
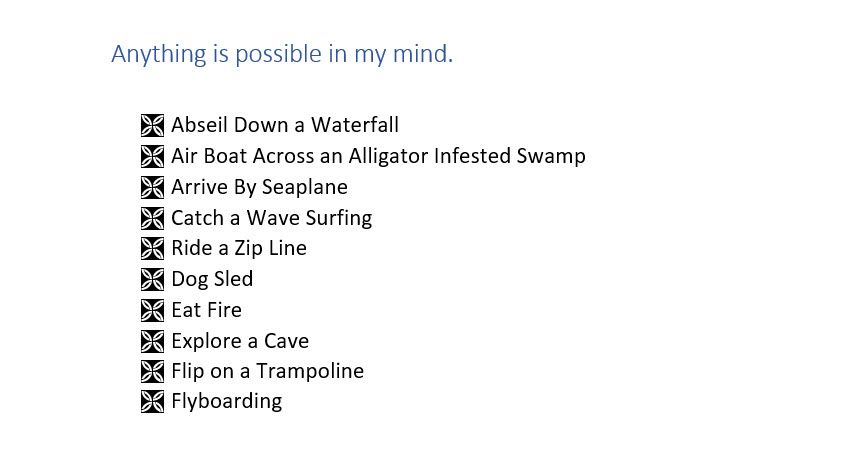
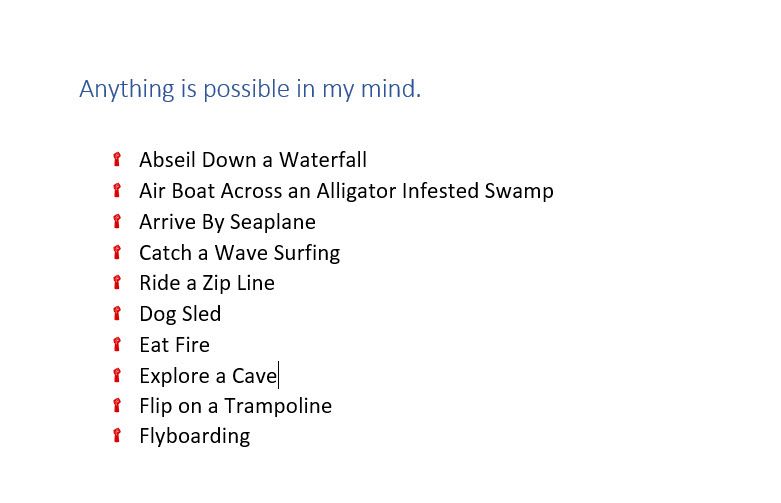
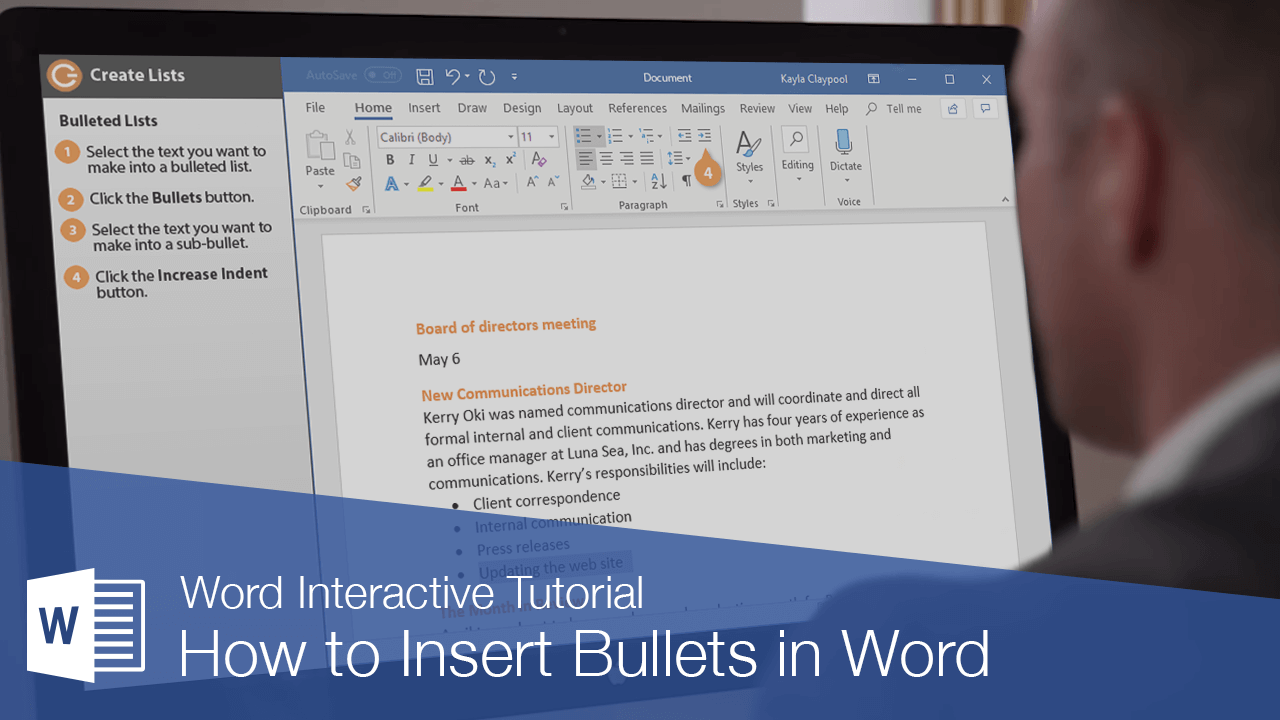
Create a bulleted or numbered list

Create a list
To start a numbered list, type 1, a period (.), a space, and some text. Word will automatically start a numbered list for you.
Type* and a space before your text, and Word will make a bulleted list.
To complete your list, press Enter until the bullets or numbering switch off.
Create a list from existing text
-
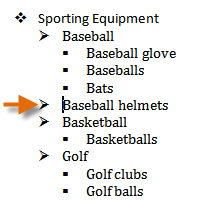
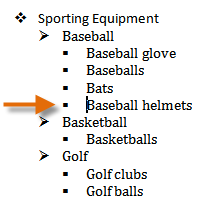
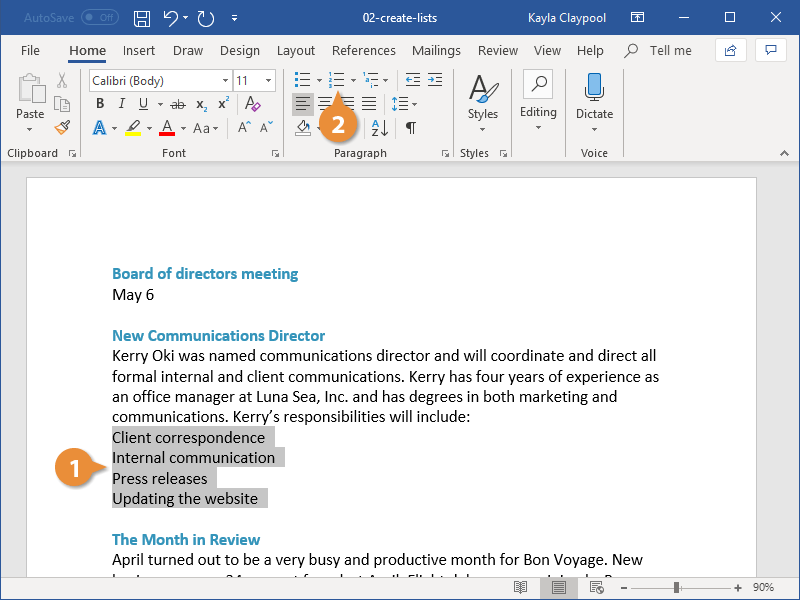
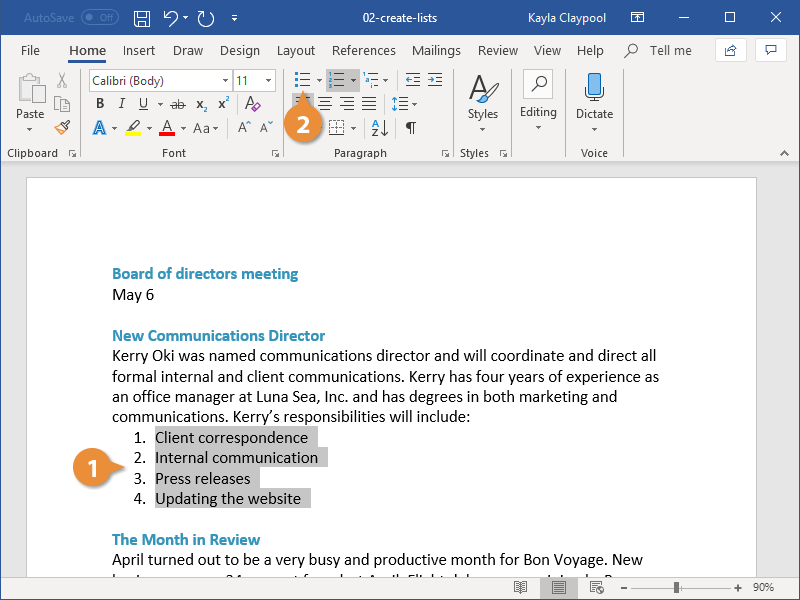
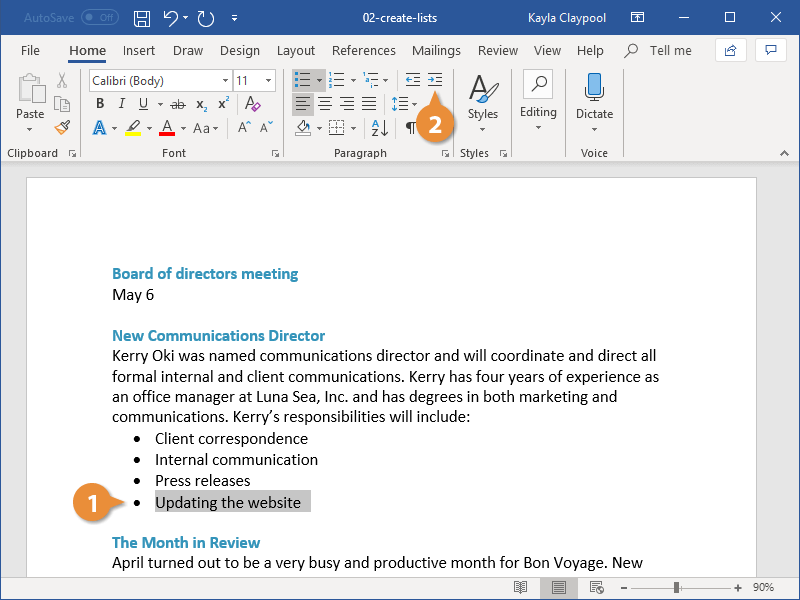
Select the text you want to change into a list.
-
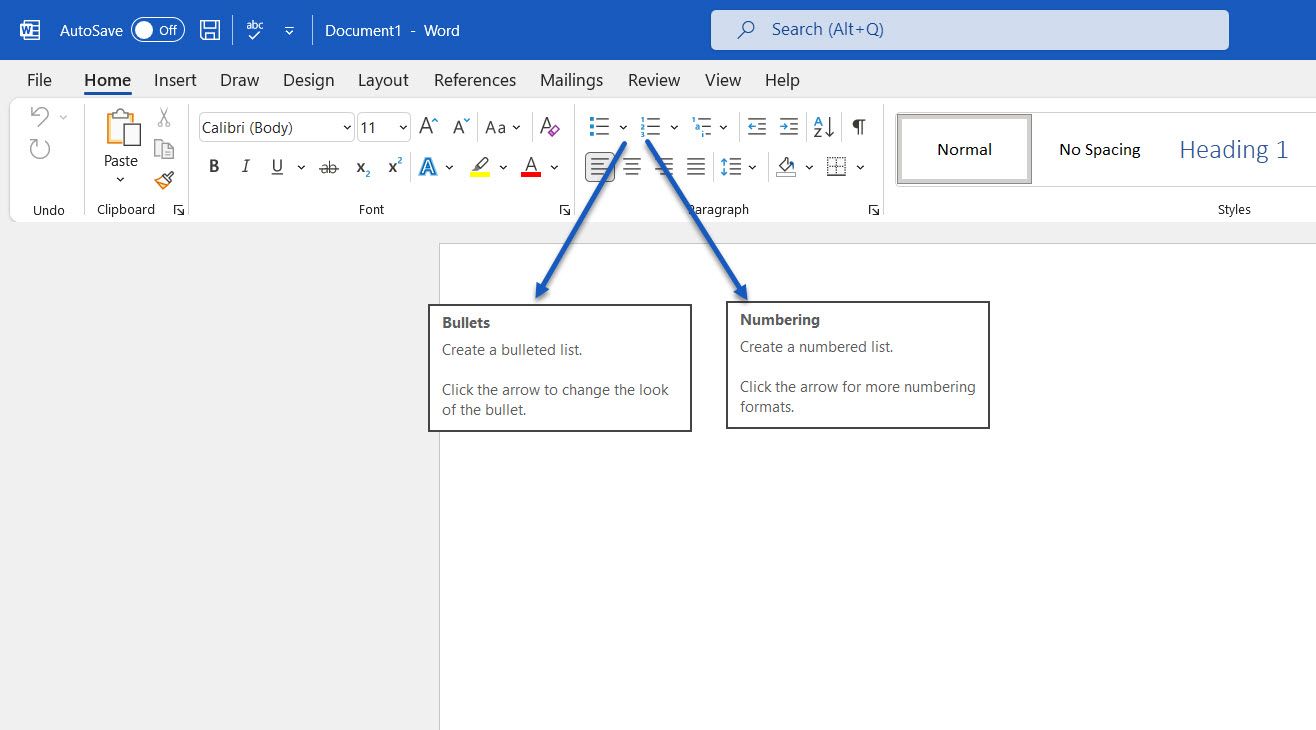
Go to Home> Bullets or Home> Numbering.

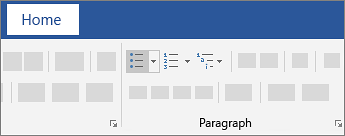
Note: Find different bullet styles and numbering formats by clicking the down arrow next to Bullets or Numbering.
See Also
Add and format text
Change the line spacing in Word
Apply styles
Apply themes
Need more help?
But this is a program that over time has not stopped evolving and growing. Thus, it has been receiving new updates and functions in order to meet the expectations and needs of its millions of users. Therefore and due to all this, at the moment we can find a multitude of functions, more or less useful or extended, but which try to cover all environments. At the same time we must bear in mind that here we are not only going to work with texts , but also that the application supports all kinds of additional elements. Here we find graphics, tables, images , videos, etc; many of them from the Insert menu.

To all that we have mentioned so far, another very interesting element as well as useful that we can add, are those called lists. In fact, in these we are going to focus on these same lines , a type of object as used and versatile as lists.
Surely, over the years, many of you have used these elements to add a plus to your documents. Well, that is why here we are going to focus on showing you in detail what these objects can offer us. We will also see the types of lists that we can use in Word , as well as the utility that they will offer us separately.
What is a Word list and what is it for?
First of all and as its own name lets us glimpse, the Word lists function allows us to carry out an accumulation of similar elements, and ordered properly. Thus, what we achieve is to generate our own personal lists that in the end will come in handy to show a set of elements, but in a structured way.
Of course, we must bear in mind that the advanced program of the Redmond , presents us with several ways, both to create those lists, and formats for them. For example, initially we have the possibility of accessing this type of elements directly from the Start menu option of Word itself. Thus, at the top of the section called Paragraph, we see the formats of the same that we can access and use below.

As we mentioned, a program of the potential of this Microsoft , presents us with several alternatives to choose from when dealing with its additional elements. Here come into play, as it could not be otherwise, the lists that concern us in these lines. That is why below we are going to talk about each of the types of lists that we are going to find here and that we can use. Each will be best suited for a type of use, or work environment.
Numbered lists
It is evident that the numbered lists are perhaps one of the most common ones that are often used when the time comes to make use of these elements. They could be considered as the most basic of the exposed formats, but perhaps they are also the most useful. These are represented, in the section discussed above, by a button with a series of numbers vertically. Therefore, to see what this format offers us, we will only have to click on it.
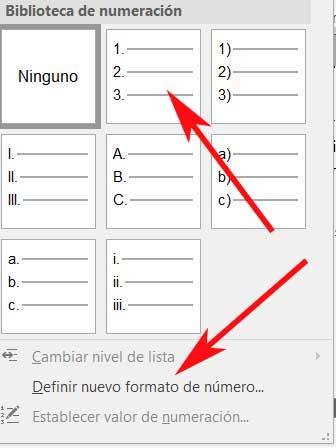
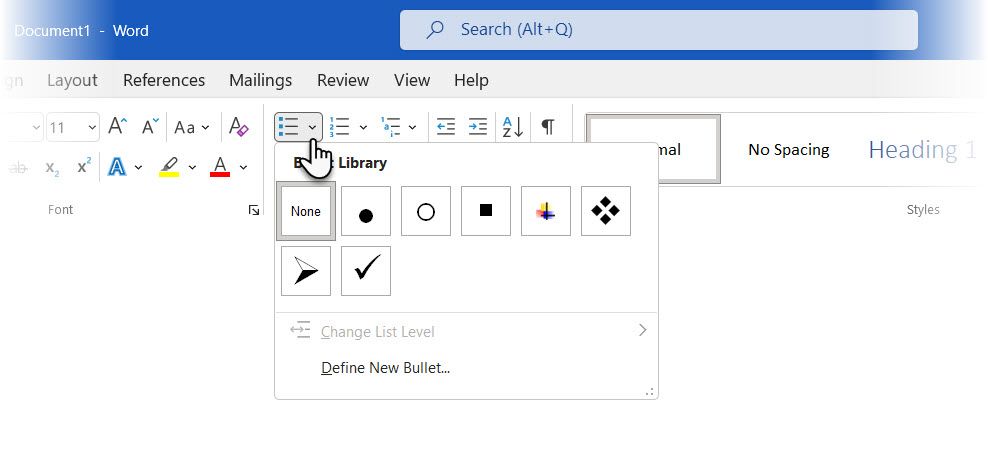
It is worth mentioning that despite being called Numbering Lists, here we can use other elements in the form of separators for the elements of the same. We will see these on the screen by clicking on the drop-down list to the right of the mentioned button. In this way, we can opt to use simple numbers , upper or lower case letters, numbers with a separator, etc. Say that when you click on the button directly, the list will begin to be classified by simple numbers.
But that’s not all, but at the same time we can specify our own custom classifier, all through the link Define new number format.
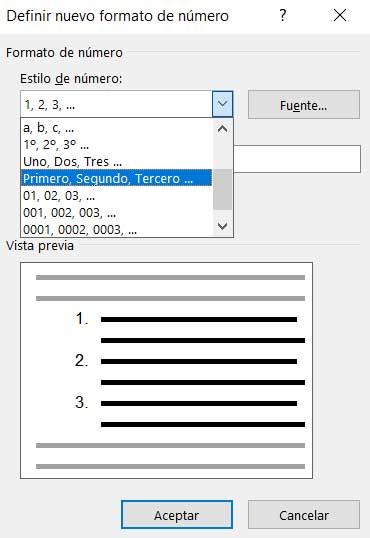
Here the program itself proposes a wide range of formats that will serve as classification elements for the list that we will create. Similarly, we will have the possibility to create a custom one by adding characters to the Number format field. Say that in this same window we have a preview to visualize how the numerical list that we are going to create will look like. As you can imagine, this function opens up a wide range of possibilities when creating basic and original lists in Word.
Before we finish this type, we will tell you that a shortcut to creating numerical lists here is, for example, writing a 1 followed by a -. Thus, when pressing the space bar, Word will directly create a list of this type for us to fill in and customize.
Bullet lists
On the other hand, a little more original than those previously reviewed, we find the Bullet lists. These we will find in the same section of the main interface of the program that we discussed earlier. But in this case, if we choose to use this specific format, say that it is represented by a button with a series of small squares. As in the previous case, when you click on the small arrow on the right of it, the corresponding drop-down list appears.
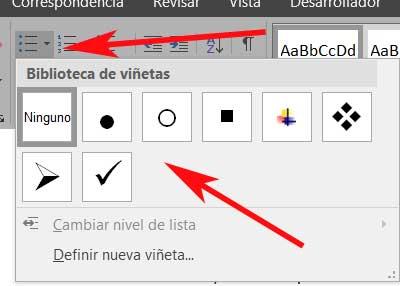
Here, as before, we are going to find a series of slightly more graphic elements or objects that will serve as cataloguers or separators for this new list. In this section, what we are going to find are a series of elements in the form of symbols that can act as separators for the elements of the new list. Thus, we find circles, squares, arrows, etc. But of course, as in the previous case, we can also define new ones. For this we click on Define new bullet from the mentioned drop-down list.
The most interesting thing about this is that here we can specify that we want to use some of the multiple symbols that we usually use throughout the operating system. But that is not all, we will also have the possibility to select an image that we have stored in the disk drives . Of course, we should be a little cautious, since this image will be repeated over and over again for each item on the list.
As in the previous case, we also have the possibility to shorten the process of creating a custom list. For this, it is enough that we write an asterisk on a new line, so that the bullet list starts automatically by pressing the space bar .
Multilevel lists
So far we have been able to see the main objective and how we can create both numerical and bulleted lists. Each format can serve us in an environment or type of independent use, we can also create both lists made up of generic classifiers, as well as more personalized and therefore original.
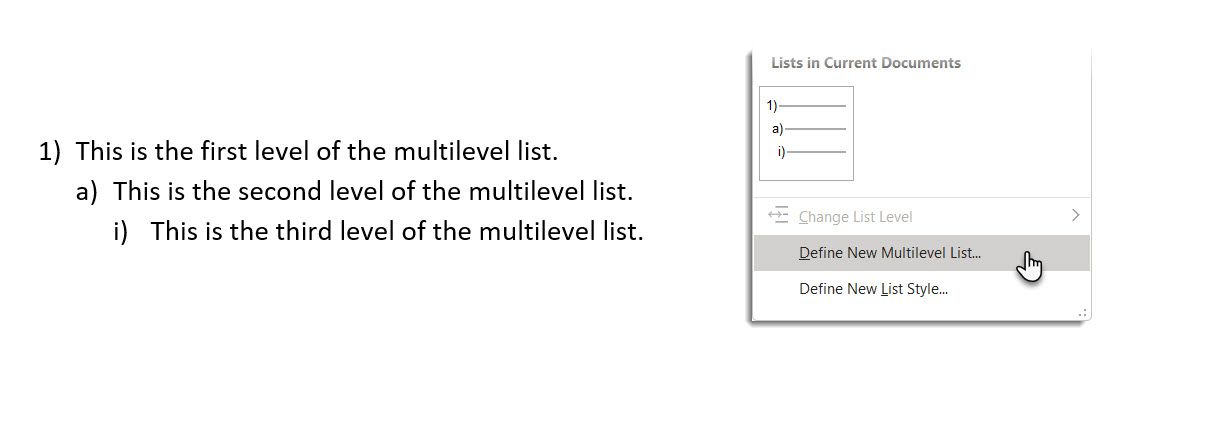
However, it is also worth taking a look at the so-called Multilevel lists. We will find these in the same section of the Word interface of the previous two. Of course, in this case they are represented by the levels of which they will be composed, in miniature. So, to start we will tell you these Multilevel are elements of this same type that we have seen, but they allow you to create a list within another. It is evident that for this the container must already exist, so within the primary list, we can create others. Say that these will keep the indentations that we added initially, as well as the numbering indicated in their design.

That is why it could be said that the use of these elements is like taking the use of the simple lists previously reviewed, one step further. In fact, if we deploy the corresponding drop-down menu on its button , we find designs similar to those we saw in the previous formats, but in this case, nested. In the same way we can create the design of our new multilevel list from the link Define new list style.
At the same time, we find another link in the same window that allows us to define a new, multilevel, personalized list. Here we will have the opportunity to specify various parameters of this nested list element. Among these we find the possibility of customizing the types of separators of the different lists, including the level number, the alignment of the elements, the distance of the indentation , etc.
How to sort a Word list
First, it must be clear that in order to sort the components of a Word list, we must first create an element of this type. For this we can use any of the types that we talked about previously, to later mark the list in its entirety.
Well, once we have marked it with the mouse, we return to look at the Paragraph section, but in this case we opted for the button called Order. This is represented by the letters A and Z with an arrow, where we can directly click. There are no drop-down lists here, as before. But of course, by clicking on the mentioned button that we discussed, we find a new window that will give us the opportunity to customize the order to use in the marked list, depending on the needs of each case.
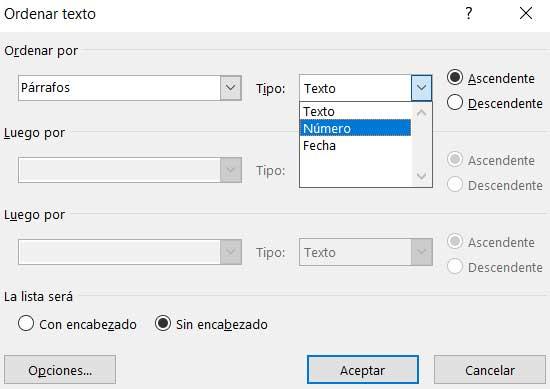
In this way, the program offers us the possibility of sorting the lists marked by paragraphs or titles on the one hand. When it comes to placing the elements that are part of it, Word offers us to order them by alphabetical, numerical order, or by date. Thus, if we are a little tricky and create the source lists in a structured way, this function will allow us to order their elements in a few seconds. And it is that the correct use of these elements will help to better understand our created documents.
Lesson 10: Working with Lists
/en/word2010/line-and-paragraph-spacing/content/
Introduction
Bulleted and numbered lists can be used in your documents to format, arrange, and emphasize text. In this lesson, you will learn how to modify existing bullets, insert new bulleted and numbered lists, select symbols as bullets, and format multilevel lists.
Using bulleted and numbered lists
When you want to organize lists in Word, you can format them as either bulleted or numbered lists. Word offers a variety of bullet options that allow you to customize your lists to suit your needs.
Optional: You can download this example for extra practice.
To create a list:
- Select the text you want to format as a list.
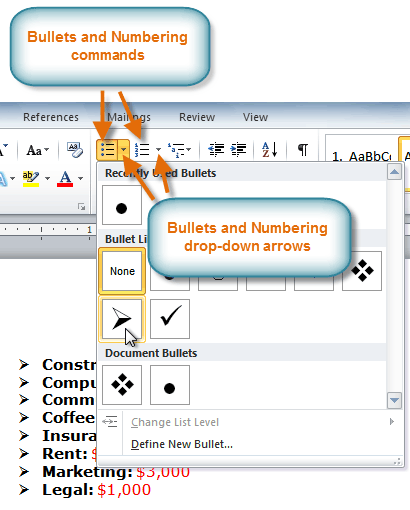
- Click the Bullets or Numbering drop-down arrow on the Home tab.
The Bullets and Numbering commands and drop-down arrows
- Select the bullet or numbering style you want to use, and it will appear in the document.
- To remove numbers or bullets from a list, select the list, then click the Bullets or Numbering commands.
When you’re editing a list, you can press Enter to start a new line, and the new line will automatically have a bullet or number. When you’ve reached the end of your list, press Enter twice to return to normal formatting.
Bullet options
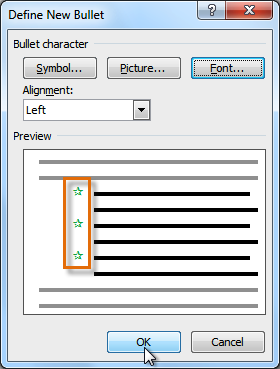
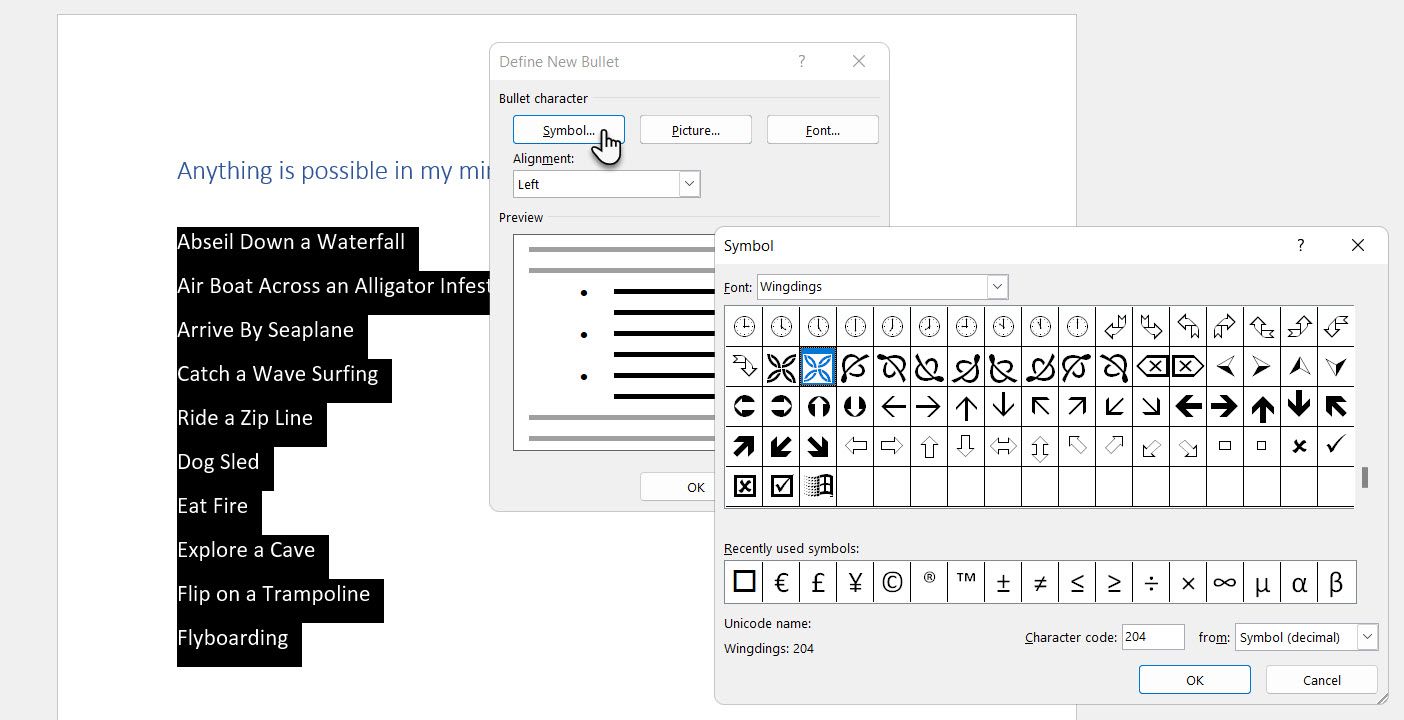
To use a symbol as a bullet:
- Select an existing list.
- Click the Bullets drop-down arrow.
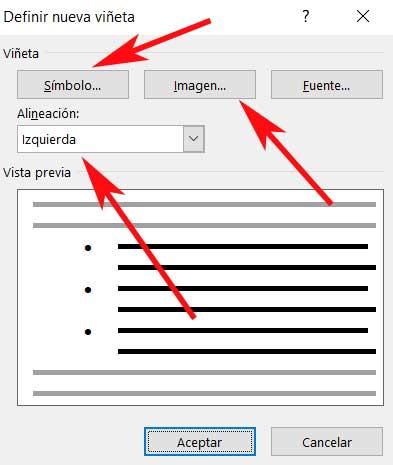
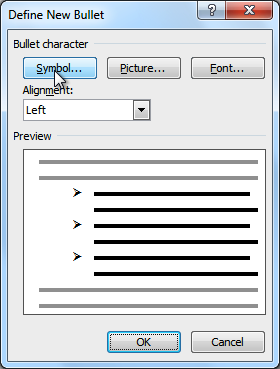
- Select Define New Bullet from the drop-down menu. The Define New Bullet dialog box appears.
The Define New Bullet dialog box
- Click the Symbol button. The Symbol dialog box appears.
- Click the Font drop-down box, and select a font. The Wingdings and Symbol fonts are good choices because they have a large number of useful symbols.
Choosing a symbol
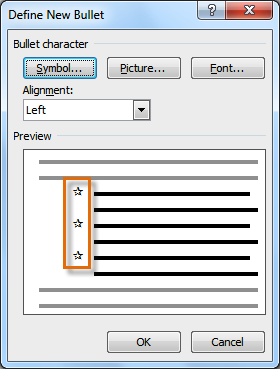
- Select the desired symbol.
- Click OK. The symbol will now appear in the Preview section of the Define New Bullet dialog box.
Preview of the new bullets
- Click OK to apply the symbol to the list in the document.

You can use a picture as a bullet. Click the Picture button in the Define New Bullet dialog box, then locate the image file on your computer.
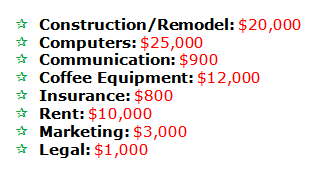
To change the bullet color:
- Select an existing list.
- Click the Bullets drop-down arrow.
- Select Define New Bullet from the list. The Define New Bullet dialog box appears.
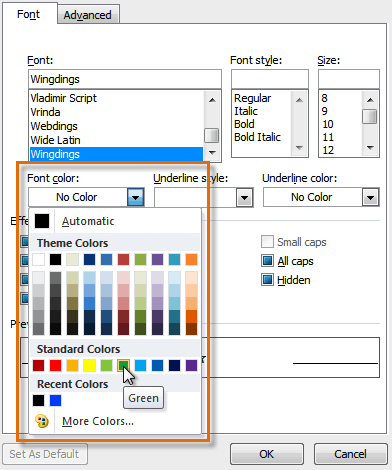
- Click the Font button. The Font dialog box appears.
- Click the Font Color drop-down box.
Choosing a bullet color
- Click the desired color to select it.
- Click OK. The bullet color will now appear in the Preview section of the Define New Bullet dialog box.
Preview of the new bullet color
- Click OK to apply the bullet color to the list in the document.
The finished bullets
Multilevel lists
Multilevel lists allow you to create an outline with multiple levels. In fact, you can turn any bulleted or numbered list into a multilevel list by placing the insertion point at the beginning of a line and pressing the Tab key to change the level for that line. You can then use the Multilevel List command to choose the types of bullets or numbering that are used.
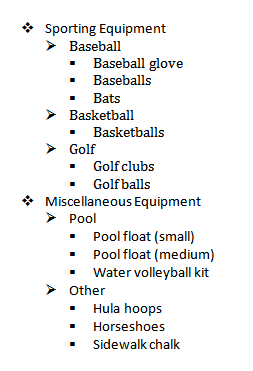 A multilevel list
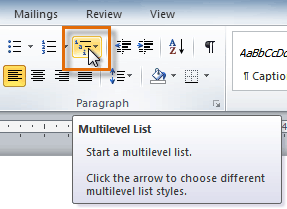
To create a multilevel list:
- Select the text you want to format as a multilevel list.
- Click the Multilevel List command on the Home tab.
The Multilevel List command
- Click the bullet or numbering style you want to use. It will appear in the document.
- Position your cursor at the end of a list item, then press the Enter key to add an item to the list.
To remove numbers or bullets from a list, select the list, then click the Bullets or Numbering commands.
To change the level of a line:
- Place the insertion point at the beginning of the line.
Placing the insertion point at the beginning of a line
- Press the Tab key to increase the level.
Pressing the Tab key to increase the level of a line
- Hold Shift and press Tab to decrease the level.
Challenge!
- Open an existing Word document. If you want, you can use this example.
- Format some text as a bulleted or numbered list. If you’re using the example, use the list of New Clients on page 2.
- Insert a new numbered list into the document.
- Modify the color of a bullet.
- Use the Tab key to change the levels of some of the lines.
/en/word2010/adding-breaks/content/

Microsoft Word lets you easily create and format multilevel lists in your documents. You can choose from a variety of formatting options, including bulleted, numbered, or alphabetized lists. Let’s take a look.
Creating a multilevel list in Word is dead simple. Start by typing out one or more lines of your list, with each item of your list on a different line. Then, select those lines.

On the “Home” tab of the Ribbon, click the “Multilevel Lists” button, and then click one of the built-in lists types shown on the dropdown menu.
Your list will now be formatted in the style you chose.
And yes, right now, it’s a single-level list. The truth is that technically, single- and multi-level lists are not much different in Word. It’s not until you start promoting and demoting list items that it turns into a multilevel list.
Demoting and Promoting Lines On Your Multilevel List
Demoting a line in your list indents the line and bumps it to a lower list level. Promoting a line does just the opposite.
Demote or Promote a List Item By Pressing Tab or Shift-Tab
Start by placing your cursor at the beginning of the line you want to demote or promote.
To demote that line to a lower list level, just hit your Tab key.
You can also demote a line more than once by just pressing Tab however many times you need. Here, we’ve demoted the third line in our list twice.
Repeat these steps if you would like to add four, five, or even more levels to your multilevel list.
You can also promote a line (move it back a level) by placing your cursor at the beginning of the line…
And then hitting Shift+Tab.
You can also demote or promote multiple lines at a time by selecting them…
and then hitting the Tab or Shift+Tab keys.
Pick a Specific List Level for a Line
While just using the Tab and Shift+Tab key combos is probably the easiest way to promote or demote lines on your list, Word does have a menu option for choosing a specific level.
Place your cursor anywhere in the line you want to change (or select multiple lines if you want to change more than one).
Click the “Multilevel List” button on the Home tab of the Ribbon, point to the “Change List Level” option on the dropdown, and then select the level you want.
And the line (or lines) you selected get changed to that level.
How to Quickly Change the Type of Your Multilevel List
Sometimes, you may decide that you want to change the basic type of multilevel list you’re using. Perhaps you originally went with numbers, but now want to use bullet points. Or maybe you just want a different numbering scheme. Whatever the case, you can easily make that change.
Place your cursor anywhere on any line of your list. It really doesn’t matter where, because this is going to change the whole list.
Open that “Multilevel Lists” dropdown menu again, and this time, just click any of the other default list types on the menu.
Your whole list changes to that new type.
How to Customize Your Multilevel List
So, what if you want to change something about your list like the way just one line level is numbered or how the levels are aligned. Well, you can do that, too. Multilevel lists in Word are pretty customizable, letting you make changes to just about every aspect.
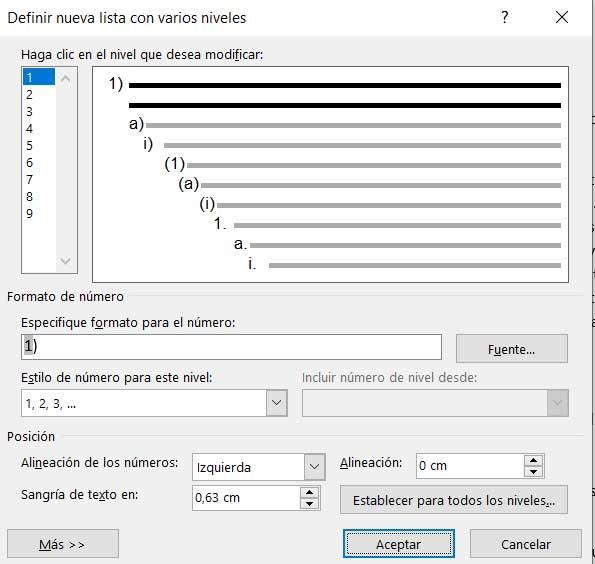
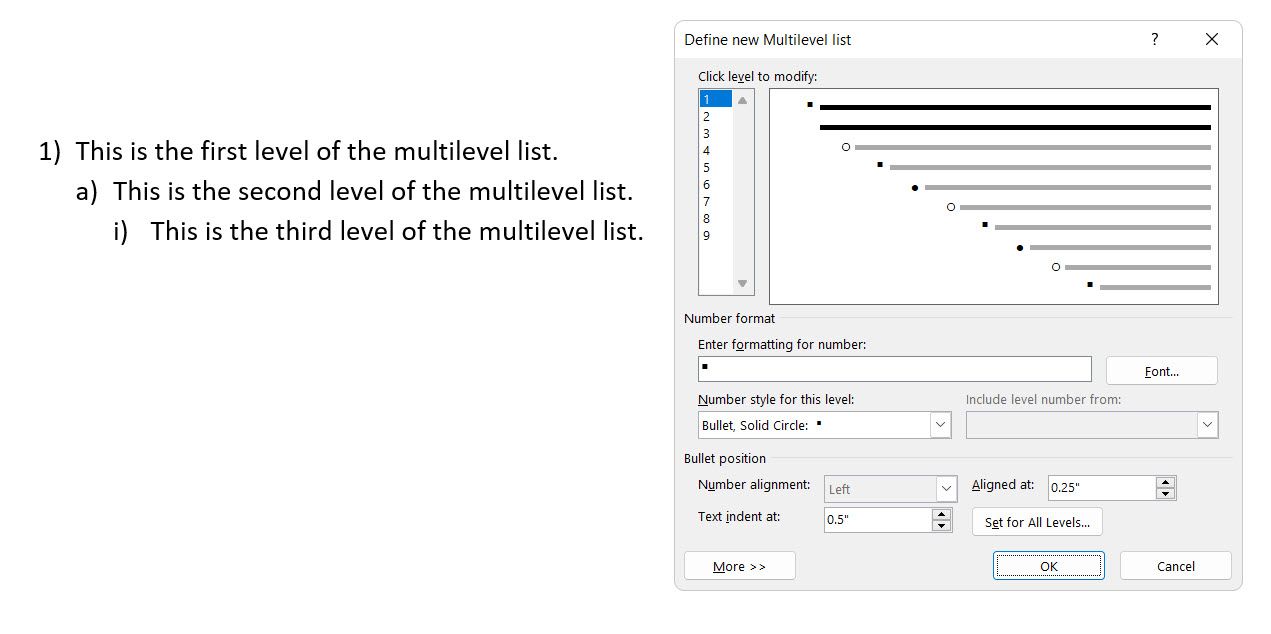
Start by placing your cursor anywhere on any line of your list. Open the “Multilevel List” dropdown, and then choose the “Define New Multilevel List” command.
The Define New Multilevel List window pops up, showing you a number of basic options for customizing how the lines in your list appear. However, there’s more here than meets the eye, so go ahead and click that “More” button down in the bottom left corner.
Now, your window should look like this, with a bunch of extra options off to the right.
So, here’s the rundown. First, select the level of the list that you want to modify. You can click either in the simple numbered list to the left, or on a line in the center window that shows how the list actually looks.
Below that, you’ll find a bunch of options for changing the number format and positioning for the selected level appears.
Here’s what you can do there (and note that this list includes the extra stuff revealed by that “More” button):
- Enter formatting for number: You can type the text for the line number as you want it to appear in this box. Click the “Font” button to its right to change the font used for the level.
- Number style for this level: Use this dropdown to change the style of the selected number level. You can change it to pretty much any number or bullet style you want. You can even mix bullet points into a numbered list this way (or vice versa).
- Include level number from: Use this dropdown to include the number from a previous level. This lets you create line numbers like 1.1; 1.1.1; and so on.
- Start at: Choose the number or letter where you want to start the numbering.
- Restart list after: Have the list restart after it reaches a certain number or letter.
- Position: Use the controls in the “Position” section to change how the selected number level is aligned and indented. You can also click the “Set For All Levels” button to control alignment and indents for your whole list. You can also choose whether the line number is followed by a tab character (the default), a space, or no character at all.
And at the top right of the window, you’ll find a few extra options, including:
- Apply changes to: Choose whether you want to apply changes to the whole list, from the point where your cursor is placed in the list, or only levels you’ve selected.
- Link level to style: You can use this dropdown to link your selected level to a style, whether a built-in Word style or one you’ve created. This can be particularly handy for linking levels to heading styles.
- Level to show in gallery: This dropdown lets you choose the level of the list that’s shown in the gallery on Word’s Home tab. Honestly, its not a very useful option, and it’s usually best to leave it set to its default—Level 1.
- ListNum field list name: Use this field to associate the level with a name that you can then use along with Word’s LISTNUM function. This is useful if you’re creating functions to generate lists.
After making changes to a particular level, you’ll need to repeat the process for each additional level of the list you want to modify. So, select a level, make your changes, select the next level, make those changes, and so on.
When you have finished changing all the levels you want, click the “OK” button, and your multilevel list will now show your changes.
How to Turn Your Multilevel List into a New Style
After customizing you multilevel list just the way you want it, you may find yourself wanting to use that same formatting for other lists—even lists in other documents. You can do this by turning the list into a style.
Place your cursor anywhere on any line of your list, open the “Multilevel List” dropdown menu again, and this time, choose the “Define New List Style” option.
In the Define New List Style window, start by giving your new style a name.
Now, there are a number of formatting options available in this window. You can change the font, character formatting, type (number or bullet), and several other things that you were also able to change when customizing your list.
While these options can be useful if you want to create a quick new multilist style from scratch (i.e., when you have not already created and customized a list you want to turn into a style), we highly recommend that you don’t bother with them. Instead, it’s much more effective to create your list, customize using the more powerful tools we talked about in the previous section, and then creating your style. The new style will include all those customizations you’ve already made to the list.
One option you will want to pay attention to is whether you want the style to be available only in the current document, or in new documents based on the template attached to the document. You’ll want to choose the latter if you need to access the style when you create other documents.
Choose what you want, and then click “OK” to save your new style.
Now, you’ll be able to choose that style (or any other list styles you’ve created) from the “Multilevel List” dropdown menu any time you want to create another multilevel list.
And now you know more than you ever wanted to know about creating multilevel lists in Word.
READ NEXT
- › How to Edit, Restart, or Continue a Numbered List in Google Docs
- › How to Alphabetize Lists and Tables in Microsoft Word
- › How to Make a PowerPoint Presentation From an Outline
- › Universal Audio Volt 2 Review: A Workhorse Audio Interface With Vintage Charm
- › Why the Right-Click Menu in Windows 11 Is Actually Good
- › Why One Ultrawide Is Better Than Two Monitors
- › The Best DNS Servers for Secure Browsing
- › Get to Your Windows 11 Desktop: 7 Fastest Methods
Checklists and lists have become the staple of everything from grocery shopping to NASA launches. But they are boring.
Still, lists and checklists are also the simplest tools to reduce the complexity of information that assaults us every day. They are also the perfect antidote against forgetfulness. So, even as we swear to make perfect lists for productivity, let’s also get down to the basics with Microsoft Word and check off one daily office function—how to make those visually appealing lists and manage them.
1. Create Your First List
Most of the list-making tricks and tips lie within the Ribbon’s Paragraph group on the Home tab.
Select the text to which you want to add the numbered list and click the down arrows next to the Bullet Lists icon or the Numbered List icon to access the libraries for both. Preview each list format by hovering over the selections available.
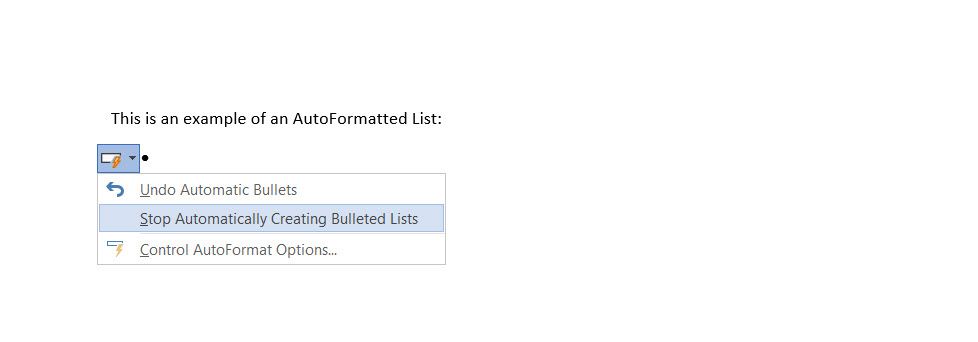
Microsoft Word also automatically creates a list for you when you start a paragraph with an asterisk or a number 1, period, and space followed by a press on the Enter key. With an asterisk, Word creates a bulleted list. Word senses that you are trying to create a numbered list with a number.
If you don’t want your text turned into a list, you can click the AutoCorrect options button image that appears. To disable or enable this option, go to File > Options > Proofing > AutoCorrect Options > AutoFormat As You Type.
To quickly change the style of a bulleted or numbered list, just click the style you want in the list that appears when you click the arrow next to Bullets or Numbering.
General Tip: You can change the format of just one or some of the bullet or number styles in a list. Place the cursor at the start of the line that you want to change before opening the Bullets and Numbering dialog box. Your changes will apply only to the selected lines.
2. Use Just the Keyboard to Create a List
Use a handy Microsoft Word shortcut to create numbered lists quickly with the keyboard alone.
The keyboard shortcut for a bulleted list: Press Ctrl + Shift + L to apply the default bullets to a list. Press Ctrl + Shift + N to remove the bullets.
To customize a keyboard shortcut for a numbered list, right-click anywhere on the Ribbon and select Customize the Ribbon from the popup menu. You can also open Word Options from File > Options > Customize Ribbon.

Click on the Customize button for Keyboard shortcuts.
Select All Commands in the Categories list. Scroll down the list on the left, and select FormatNumberDefault.
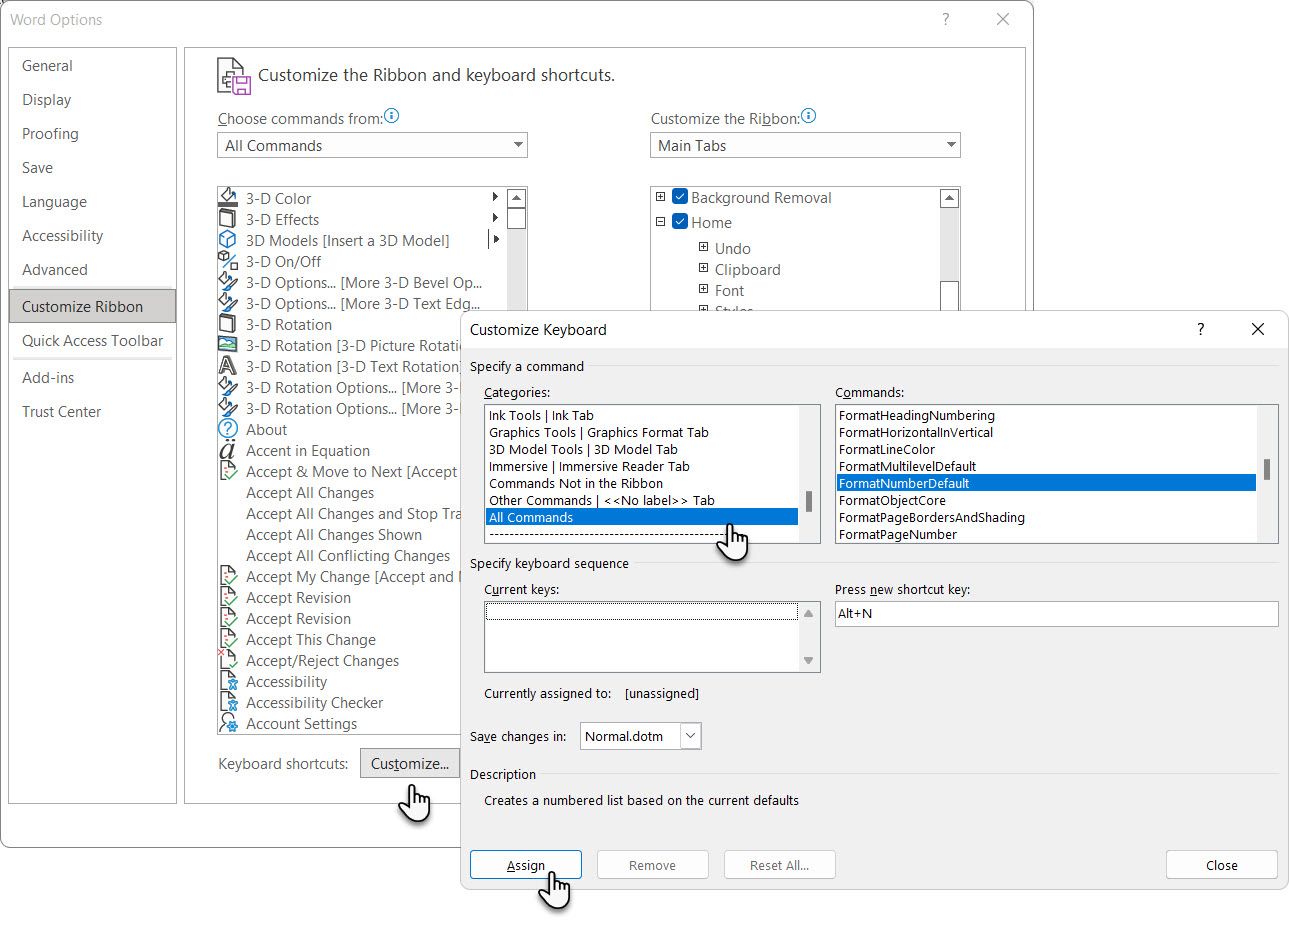
Place the cursor in the Press new shortcut key box and press the shortcut key combination you want to use to create a numbered list. For example, you could use Alt + N because it’s not assigned to anything else in Word. Click Assign.
The new keyboard shortcut is added to the Current keys list.
Click OK to exit the dialog box and test the new shortcut. Pressing «Alt + N» creates a numbered list. Pressing it again reverts it back to paragraph text.
General Tip: Do you want to skip numbering for a list item and convert it into a paragraph in the middle of a list? Select the specific list item and use the Alt + N shortcut to turn off the numbering.
3. Change the Default Numbered List Format
You can change, edit, or create a new numbered list. You have four Numbered List formats to choose from. But what if you want to use your own format other than the letters or Roman numerals, and it’s not available?
Go to Home > Paragraph group > Numbering. Click the down arrow. Choose Define New Number Format.
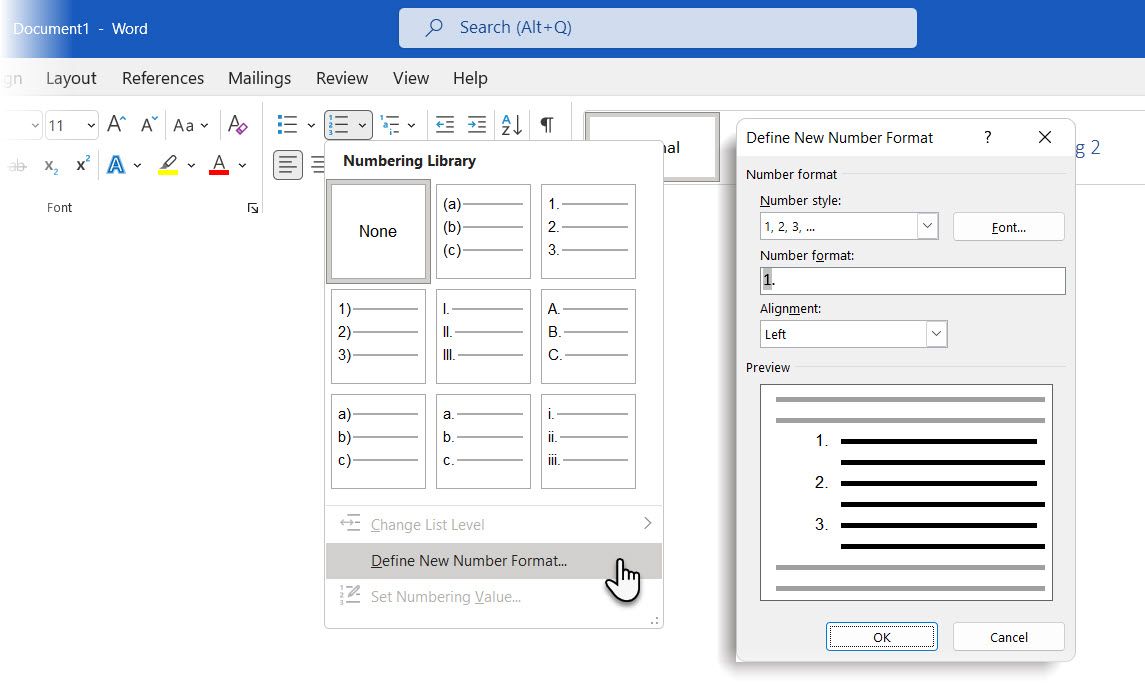
Choose any chronological format. To change the font size, style, and color, click Font and choose a setting on the Font or Advanced tab.
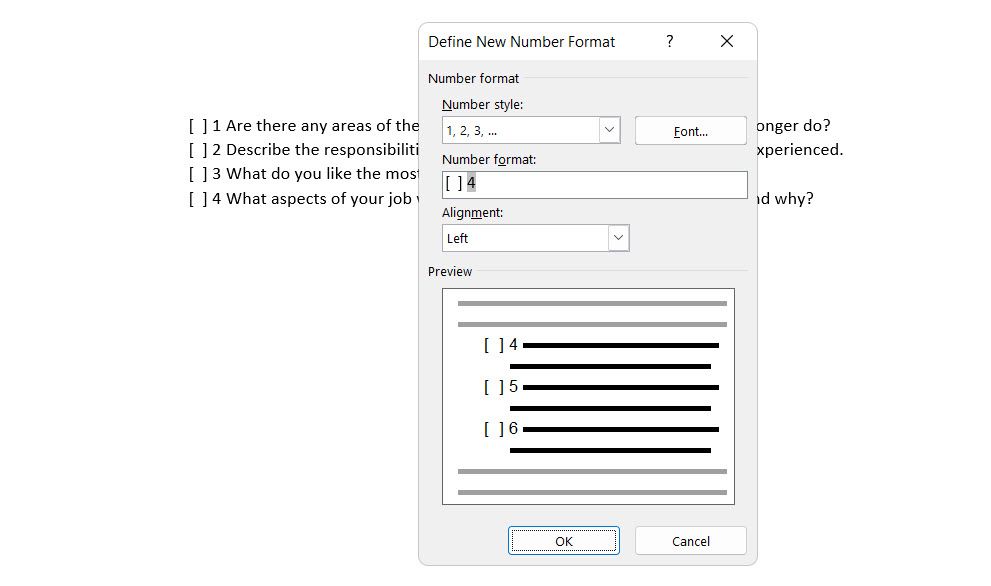
When you want to add a dash, parentheses, or another value like a pound sign to the number, enter it in the Number format field. The little preview displays the changes. You can see the square brackets for a list you can tick off in the screenshot below.
Choose Left, Centered, or Right under Alignment to change the number alignment. The default is Left-Aligned.
Click OK.
The new number format is applied to any selected text on your document.
General Tip: You can even prefix the numbered lists with descriptive text, e.g., Attendee 1, Attendee 2, Attendee 3…and so on.
4. Change the Default Bullet List Format
Just like the numbered list, you can also change the default look of any bulleted list. Again, visually appealing bullets (other than the boring black solid dots) help your documents stand out from the mundane.
Select the text you want the bulleted list for and follow these steps.
Go to Home > Paragraph group. Click the arrow next to Bullets.
When the bullet you want isn’t in the library, click Define New Bullet.
The Define New Bullet dialog box opens. Under Bullet Character, choose Symbol.
Another dialog opens, which lets you choose appropriate symbols from your installed fonts.
The Wingdings fonts have the best variety that makes for stylized bullet lists. Like any other font, you can change the color, size, style, and other characteristics of your chosen bullet font. Click the Font button in the Bullet character section to enter the Font dialog box.
General Tip: Use an open box (Open box) or a three-dimensional box (3D box) from the Wingdings character palette to create a Word document with neat checkboxes.
5. Use a Picture Instead of a Bullet
Sometimes all the mystic symbols in Webdings might not be enough. You can also use your own reusable graphics for bullet points. Though picture and SmartArt bullets look better on a PowerPoint slide, they work just as well in Word.
Select the bulleted list for which you want to change the bullets to pictures. Next, go to the Home tab > Paragraph group, click on the Bullets button, and select Define New Bullet from the dropdown menu. On the Define New Bullet dialog box, click Picture.
The Insert Pictures dialog box is displayed with different choices for your source file. You can insert a picture From a file on your PC or local network, from a Bing Image Search, or your OneDrive account.
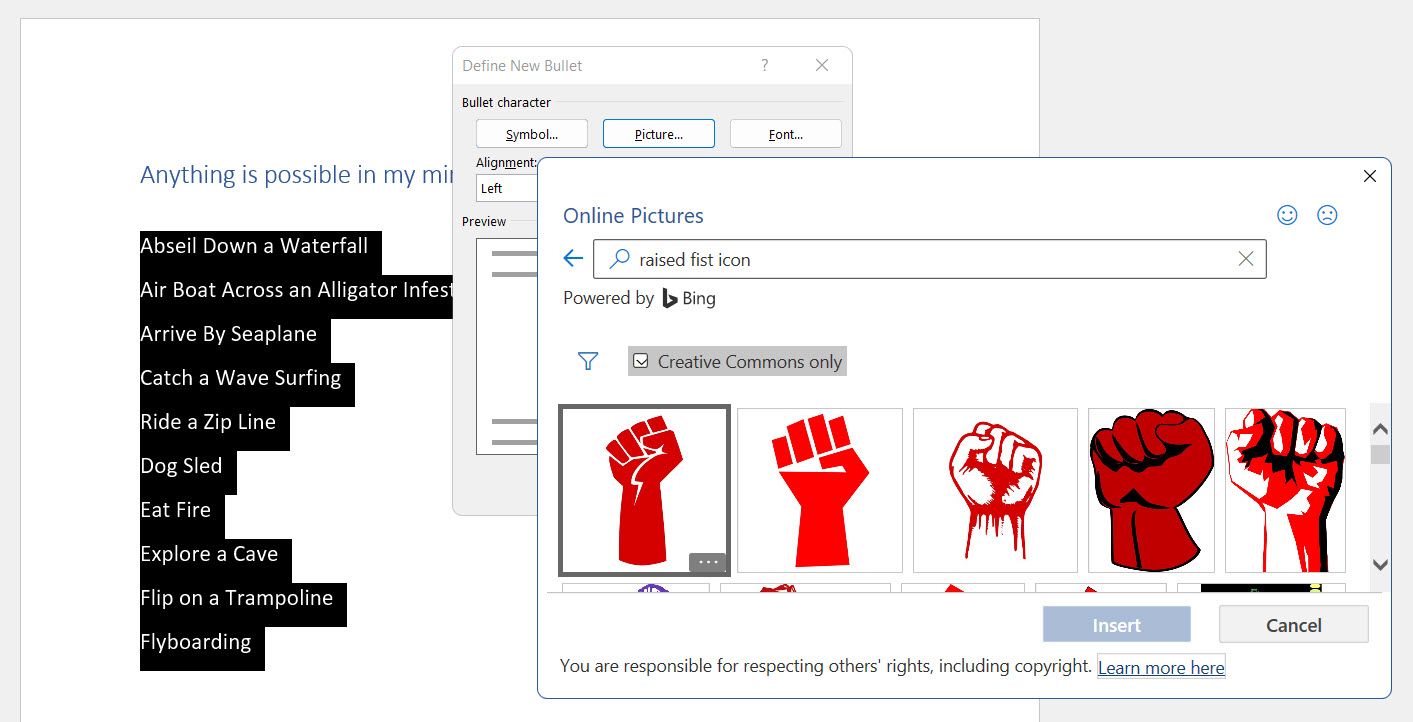
Navigate to the location of your source file and click on Insert. The Preview window shows the selection.
General Tip: You can choose a graphic that matches the «theme» of your list. For instance, display a banana as a picture bullet for a list of fruits. Make sure images are transparent and have a good background. In my experience, simple graphics work best.
6. Line Up the Numbers in a List
Sometimes, the smallest of tweaks can make a big visual difference. For example, note the screenshot below, which shows a numbered list with Word’s default Left alignment. As soon as the list reaches double digits, the default left alignment seems skewed as the decimal points do not line up neatly. Microsoft Word allows you to control this alignment and flush the double-digit numbers to the right.

Create your numbered list. Select the list items. Word can also control the alignment of a few selected items.
Go to Home > Paragraph. Then, click the dropdown arrow on Numbered list button.
Click on Define New Number Format. Choose Right alignment from the dropdown. Click OK.
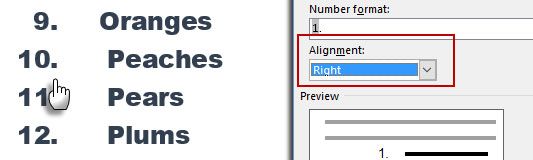
General Tip: Even if there is no decimal, it is preferable to have them aligned on the right edge of the number. Try it with brackets.
7. Adjust Microsoft Word’s Automatic List Indent
Every Word list comes with an automatic indent. Depending on the visual look you want, you may want to adjust the space.
Double-click any number in the list to select all of the numbers in the list.
Right-click the selection and choose Adjust List Indents from the context menu.
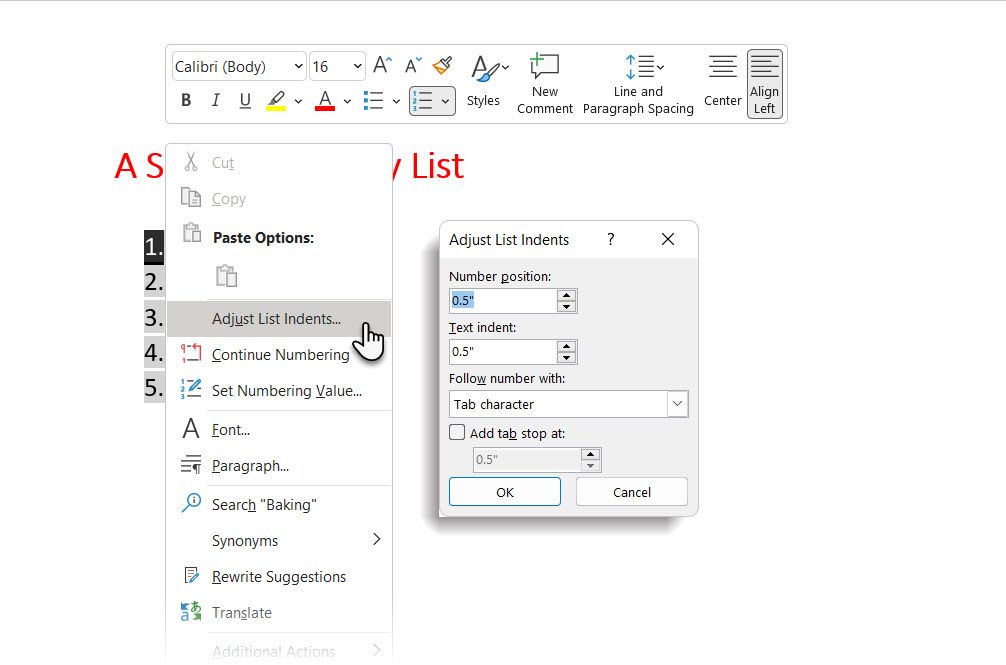
Change the distance of the bullet indent from the margin with the Number position box. Change the distance between the bullet and the text with the Text indent box.
Click OK.
8. Apply Formatting to a Single Number or Bullet on a List
You may want to format (changing the bullet style, color, or the size) a single bullet or number on a list without affecting any text on the list or any other succeeding bullets or numbers. Here’s an easy way.
Show formatting marks by clicking Home > Show/Hide.
Select just the paragraph marker (pilcrow) at the end for the list item whose bullet or number you want to change. Apply any formatting. The formatting affects only the bullet or number; the text in the list item retains its original format.
New bulleted or numbered items on the list coming after this will reflect this too. The text in the new list item will have the same font characteristics as the previous text, and the new bullet/number will have the same font characteristics as the previous bullet/number.
9. Create a Multilevel Numbered List
A multilevel list can be a mix of numbers, alphabets, and bullets arranged on different levels, as shown below. You can use multilevel lists to break down a list into its hierarchies or sub-points. Such an alignment is also used to create outlines. Word 2016 gives us a dedicated button on the Ribbon to create a multilevel list.
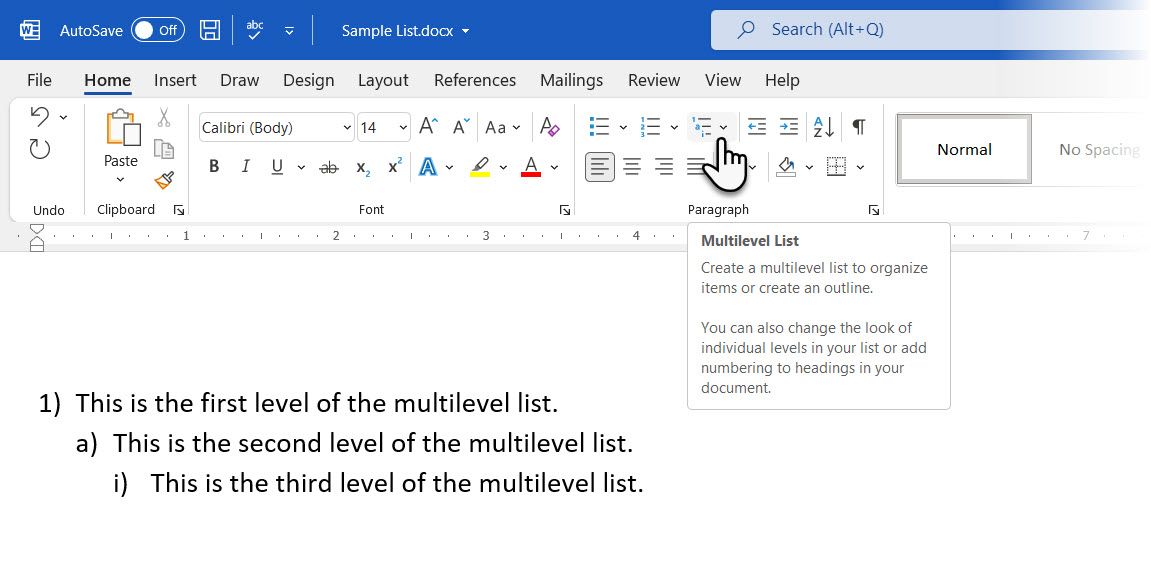
Click the Multilevel List button and type the list.
Press the Tab key to indent and create a sublevel. Press Shift + Tab to unindent and promote an item to a higher level.
General Tip: You can also write the entire list in advance. Select it, and click the Multilevel List button to align it using the Tab and Shift + Tab keys to organize the topics. You can also use the Increase or Decrease Indent commands on the Ribbon.
10. Create Reusable Styles for Multilevel Lists
You can change the bullets, letters, or numbers’ style, color, and alignment like any other list type. Save these changes as a new style and use it again and again.
Go to Ribbon > Home > click the arrow next to Multilevel List > Define New Multilevel List.
Click on More to expand the options.
For customizing any of the levels, click the level number you want to modify. 1 is the default.
Use the options provided to change the appearance of the list. For example:
- In Number style for this level, type (1) if you want to style the numbers with parentheses or (A) to style the letters with parentheses.
- In Start at, choose the number, letter, or bullet where you want to start the list.
When you’ve finished the customizations, give the list a name under the ListNum field list name. This name will appear wherever you see the ListNum field.
Choose a style under Link level to style. This lets you use an existing style in Word for each level in the list.
Choose where you would like to apply your changes by clicking on Apply changes to and selecting from Selected text, Whole list, or This point forward.
11. Convert a List to a Table
First, select the list. Next, go to Home > Insert. Click the Table option in the Tables group.
Choose Convert Text to Table from the dropdown list.
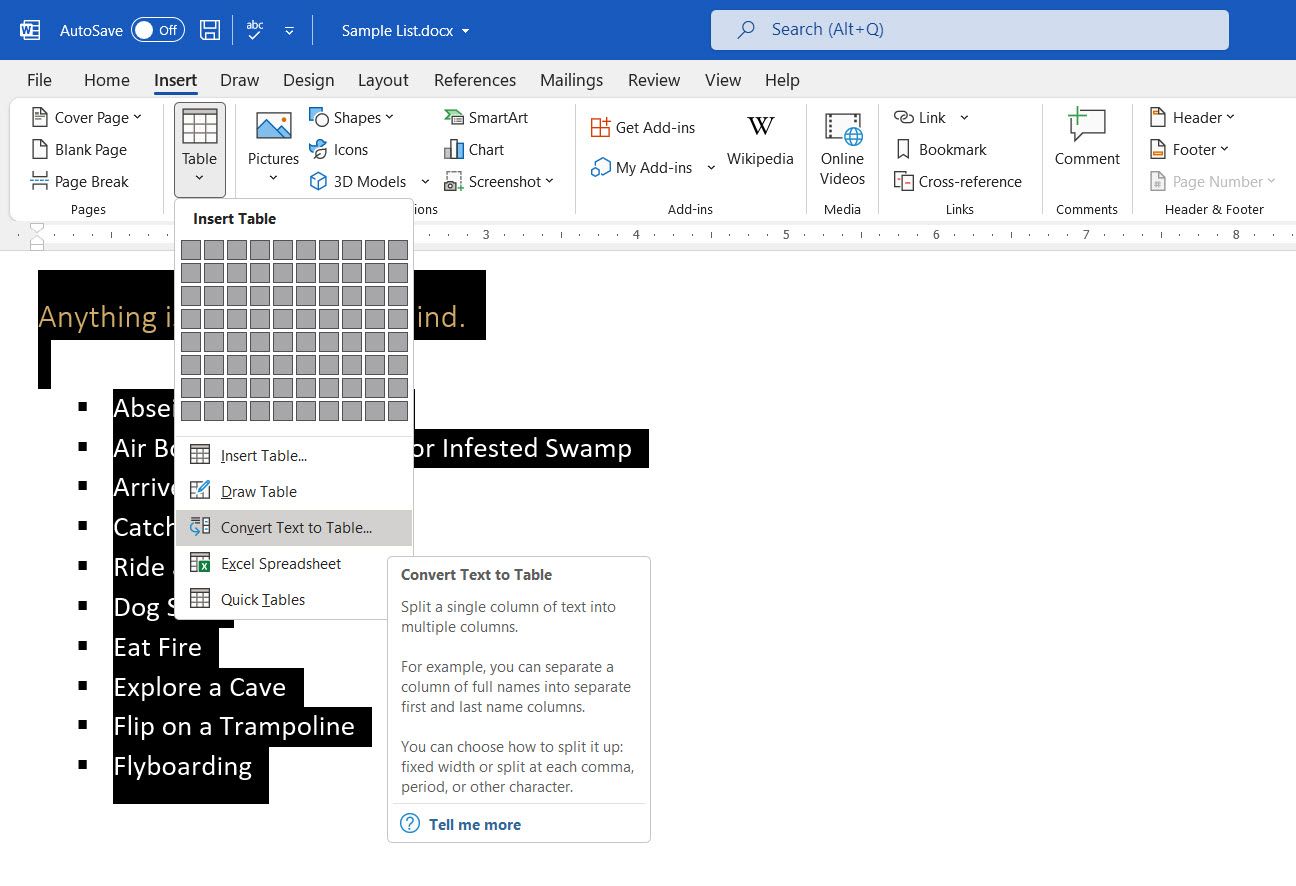
Microsoft Word estimates the table structure based on the list’s contents. Word creates the columns based on the separators between the items on the list.
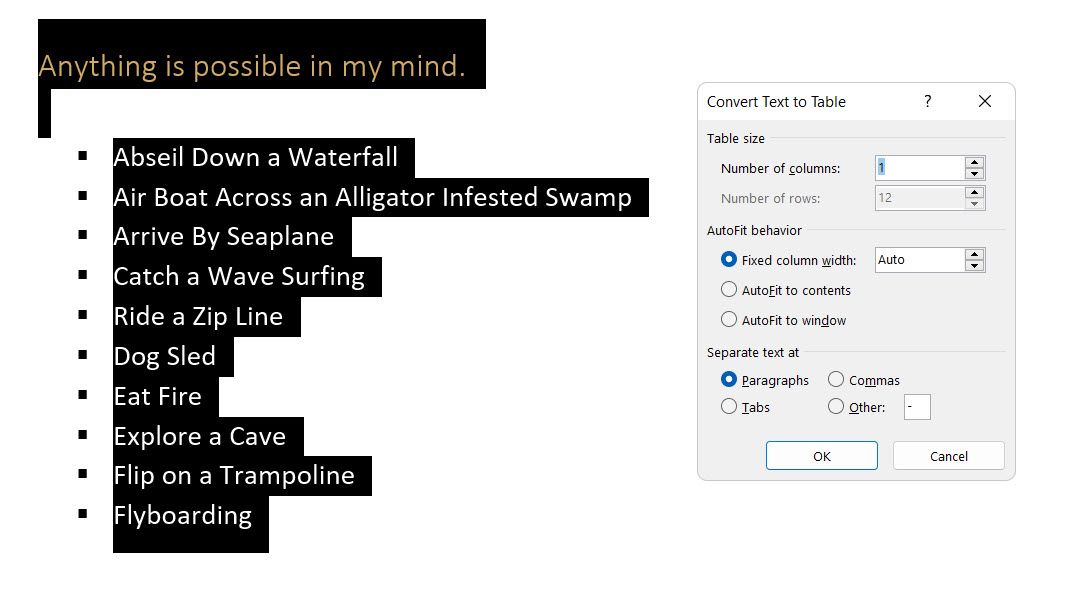
When Word doesn’t get it right, you have to modify the settings and make it easier for Word to convert the list. Once the table has been created, you can use the Table design tools to format the appearance.
General Tip: In most cases, the results aren’t perfect. The best way is to remove the numbering or the bullets and then create the table from the list of items. The serial numbers can easily be added to the table later.
12. Continue Your Numbering When a Paragraph Cuts It Short
Sometimes, a paragraph of text needs to interrupt the sequence of the list. Follow these steps to continue the list after the paragraph with the same number format.
Enter the rest of your numbered list after the paragraph and format it. The list begins with 1 again. Right-click on the list that comes after the paragraph. Choose Continue Numbering from the Context menu. The list is modified instantly.
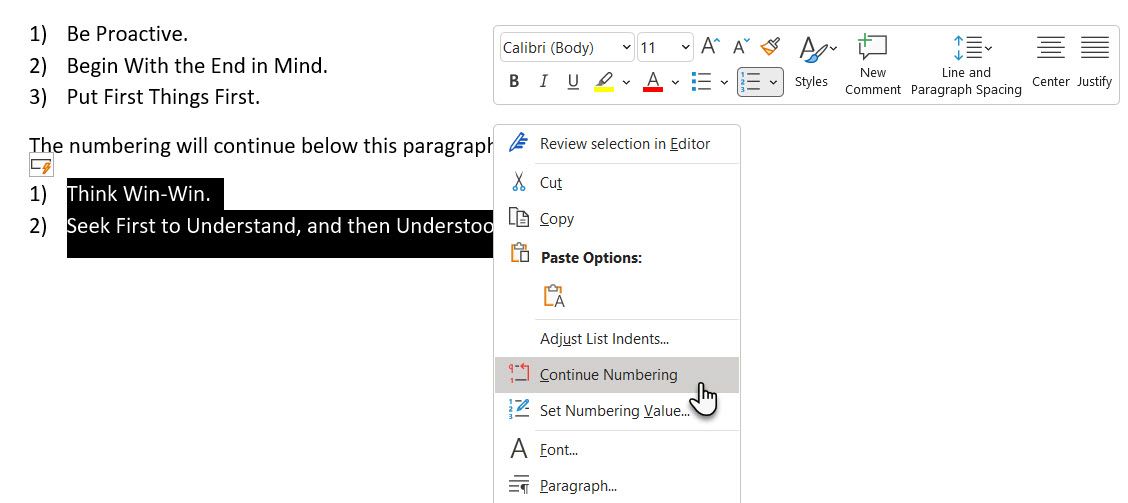
The list numbering continues from where the paragraph broke it off.
The Importance of Lists as Timesavers
Lists are time savers when a document has to be an exercise in economy. They instantly become a little less boring than blocks of text. Use them as the organizational backbone of a document and see your document better organized.

This tutorial shows two ways to create bulleted lists in Microsoft Word. We will also look at how to change list levels and how to change the size and color of bullets.
Quick Links:
- How to Create Bulleted Lists — Basic Method 1
- How to Create Bulleted Lists — Basic Method 2
- How to Change Bulleted List Levels
- How to Change the Size and Color of Bullets
Do you want to customize your bullets by using different symbols or your own images? See “How to Create Custom Bullets in Microsoft Word.”
This tutorial is available as a YouTube video showing all the steps in real time.
Watch more than 200 other writing-related software tutorials on my YouTube channel.
The images below are from Word for Microsoft 365. These steps will also work in Word 2021, Word 2019, Word 2016, Word 2013, and Word 2010. However, your interface may look slightly different in those older versions of the software.
This is the basic method of creating a bulleted list in Word. This method requires you to type each item as you create the list. If you have already typed your list items, see the other basic method shown below.
- Place your cursor where you want to start your bulleted list.
- Select the Home tab in the ribbon.

- Select the menu arrow next to the Bullets button.
![]()
- Choose a bullet style from the Bullet Library.

The first bullet will appear in your document.

- Type your first list item after the bullet and press the Enter key on your keyboard. The next bullet will appear.

- Continue typing your list items and pressing the Enter key until your list is complete.
- After typing the final item, press the Enter key twice to remove your cursor from the list.
How to Create Bulleted Lists in Microsoft Word — Basic Method 2
This method is for existing text formatted as a list.
- Select and right-click the text.
- Select the menu arrow next to the Bullets button in the Mini toolbar. (Alternately, you can select the menu arrow next to the Bullets button in the Home tab, as shown in figure 2.)
![]()
- Choose a bullet style from the Bullet Library (see figure 3).
Your selected items should become a bulleted list.

How to Change Bulleted List Levels in Microsoft Word
Word lets you create bulleted lists with up to nine nested levels. Here are two ways to change the level of list items:
How to Change Bulleted List Levels — Method 1
Important note: This method will not work for the first item in your list.
- Select one or more list items.

- Press the Tab key on your keyboard. Each time you press the Tab key, the bullet will move to the right one level (in this case, from level one to level two).

How to Change Bulleted List Levels — Method 2
This method will work for any item in your list, including the first item.
- Select one or more list items (see figure 8).
- Select the Home tab in the ribbon (see figure 1).
- Select the menu arrow next to the Bullets button (see figure 2).
- Select Change List Level from the drop-down menu.

- Select a list level from the submenu.

Your list item(s) should move to the next level.
How to Change the Size and Color of Bullets in Microsoft Word
By default, the size and color of your bullets will be the same as your text. However, you can manually change the size and color of bullets by selecting them separately from the text.
- Select one bullet. All bullets on that level will also be selected.

- Select the Home tab in the ribbon (see figure 1).
- Select a new font size, font color, or both from the Font group.

Your bullets should change to the new formatting. Repeat these steps for each level in your list, as necessary.

As always, remember to save your file to save your changes.
Related Resources
How to Create and Modify Numbered Lists in Microsoft Word
How to Write Vertical Lists (Ordered and Unordered)
Parallel Structure—The Secret to Beautiful Bullet Points
How to Insert Playing Card Symbols in Microsoft Word
Updated January 11, 2023
Содержание
- Создание нового маркированного списка
- Преобразование готового текста в список
- Изменение уровня списка
- Создание многоуровневого списка
- Изменение стиля маркированного списка
- Удаление списка
- Вопросы и ответы
Создать список в Microsoft Word можно довольно просто, достаточно сделать всего несколько кликов. Кроме того, программа позволяет не только создавать маркированный или нумерованный список по ходу набора текста, но и преобразовать в список текст, который уже был набран.
В этой статье мы детально рассмотрим то, как сделать список в Ворде.
Урок: Как в MS Word отформатировать текст
Создание нового маркированного списка
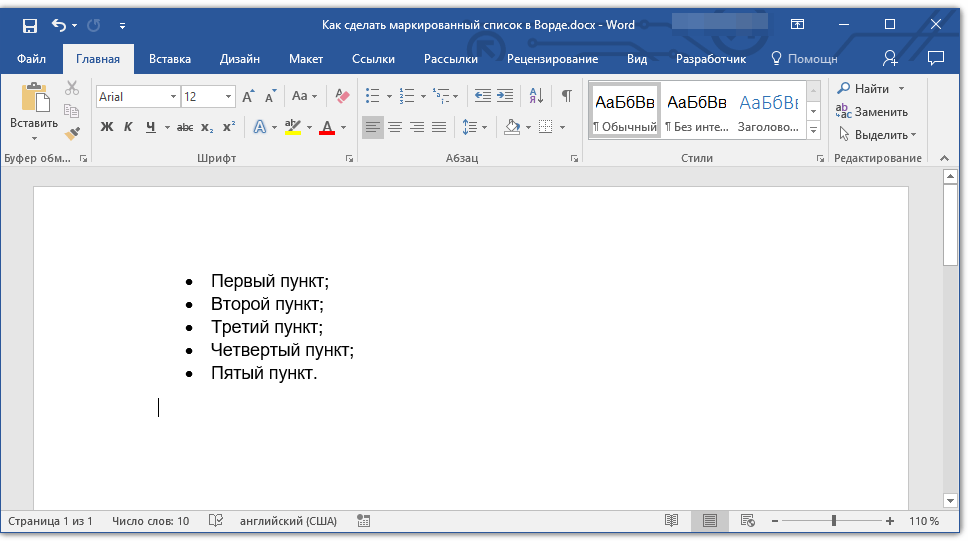
Если вы только планируете печатать текст, который должен быть оформлен в виде маркированного списка, выполните следующие действия:
1. Установите курсор в начале строки, в которой должен находиться первый пункт списка.

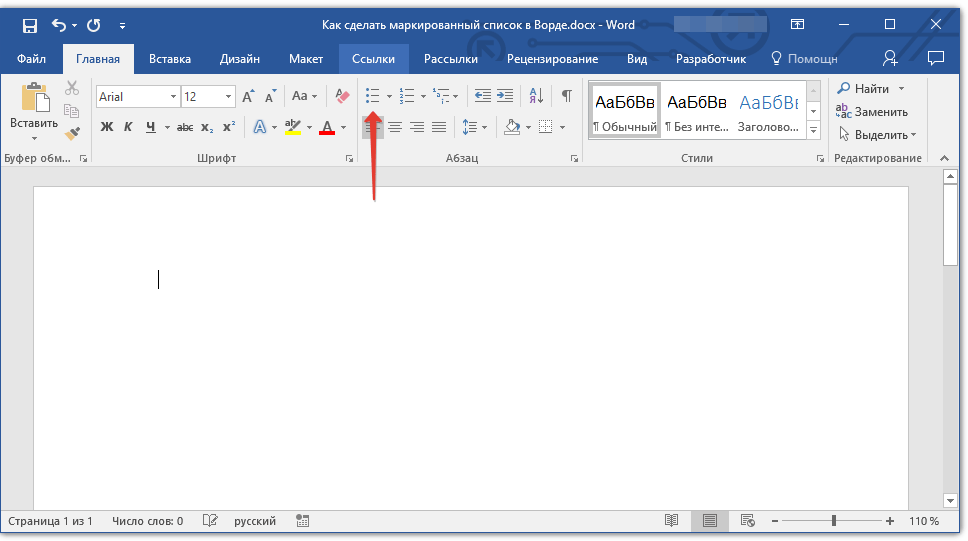
2. В группе “Абзац”, которая расположена во вкладке “Главная”, нажмите кнопку “Маркированный список”.
3. Введите первый пункт нового списка, нажмите “ENTER”.

4. Введите все последующие пункты маркированного списка, нажимая в конце каждого из них “ENTER” (после точки или точки с запятой). Когда закончите вводить последний пункт, дважды нажмите “ENTER” или нажмите “ENTER”, а затем “BackSpace”, чтобы выйти из режима создания маркированного списка и продолжить обычный набор текста.
Урок: Как в Ворде упорядочить список по алфавиту
Преобразование готового текста в список
Очевидно, что каждый пункт будущего списка должен находиться в отдельной строке. Если ваш текст еще не разделен на строки, сделайте это:

1. Установите курсор в конце слова, фразы или предложения, которое должно быть первым пунктом в будущем списке.

2. Нажмите “ENTER”.
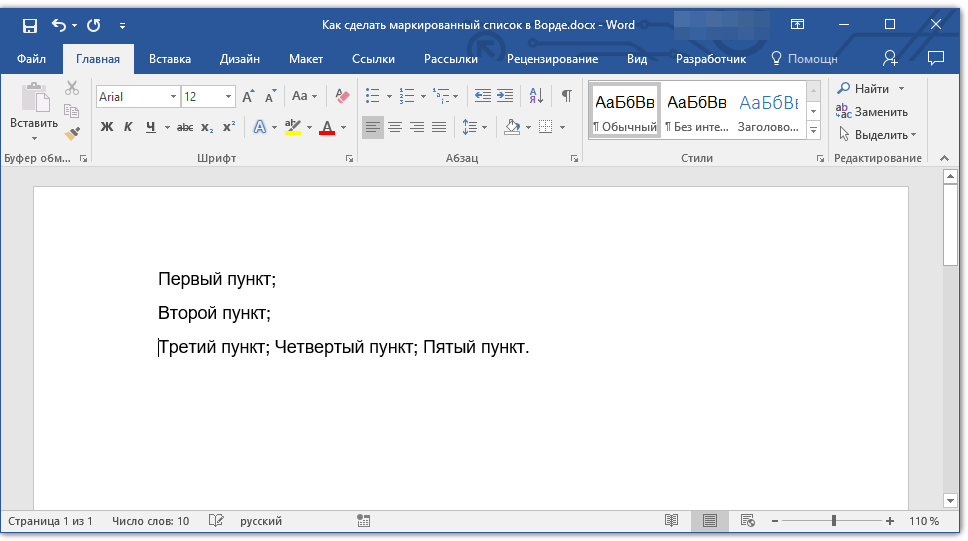
3. Повторите это же действие для всех следующих пунктов.

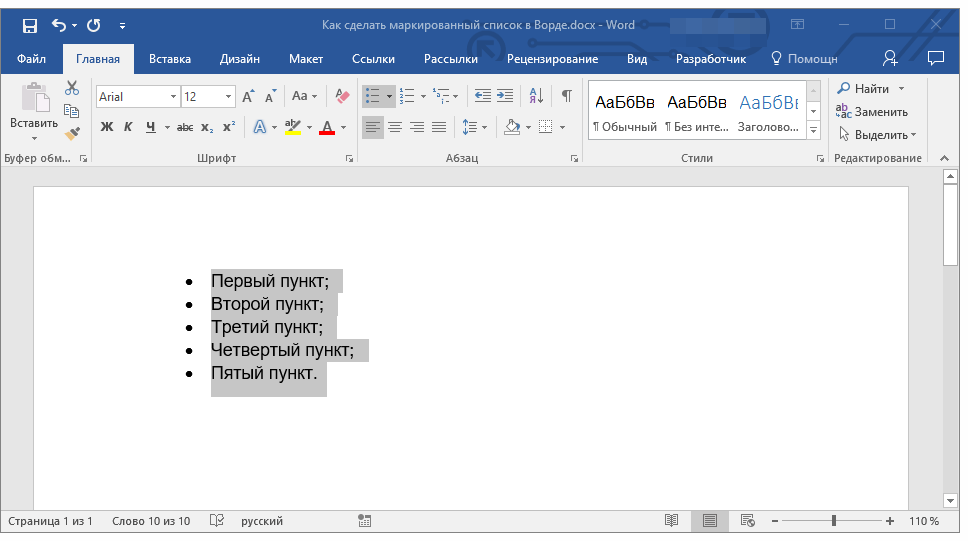
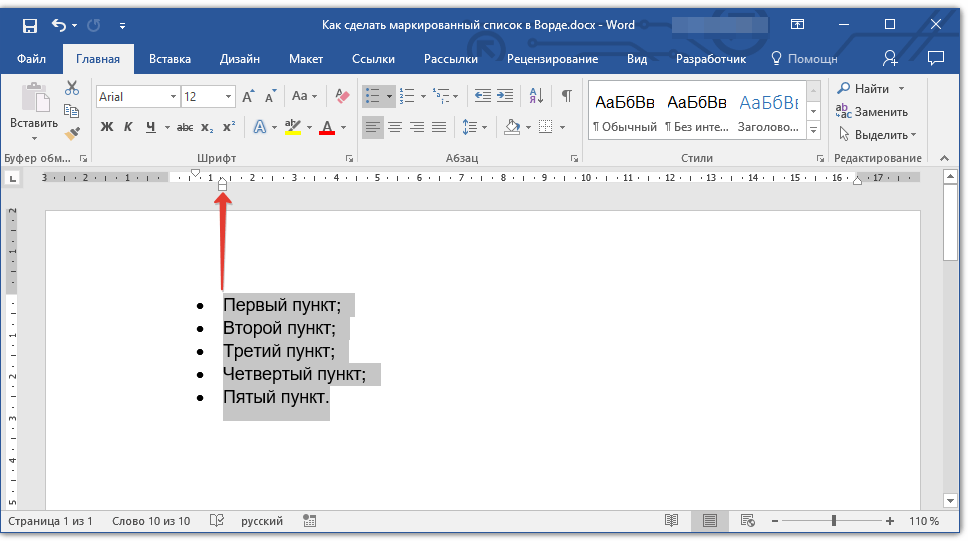
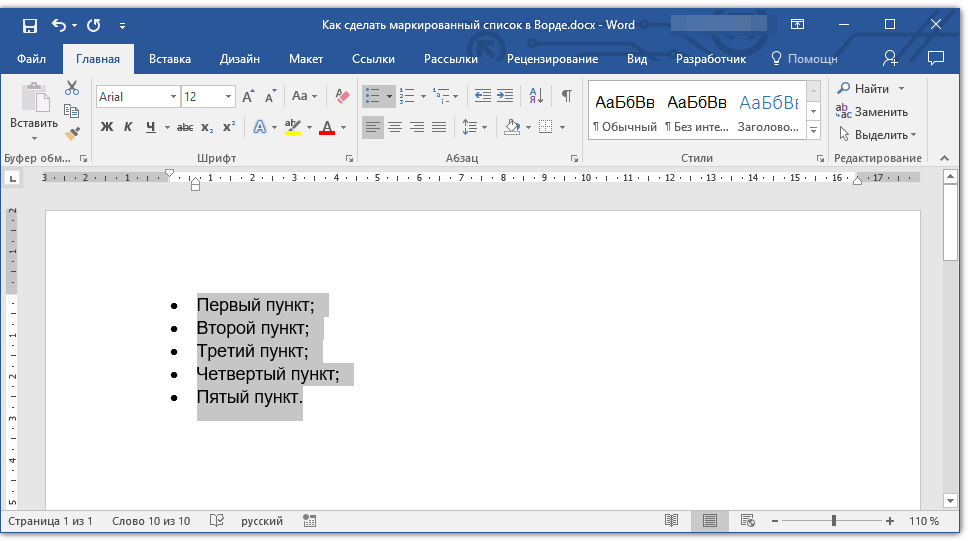
4. Выделите фрагмент текста, который должен стать списком.
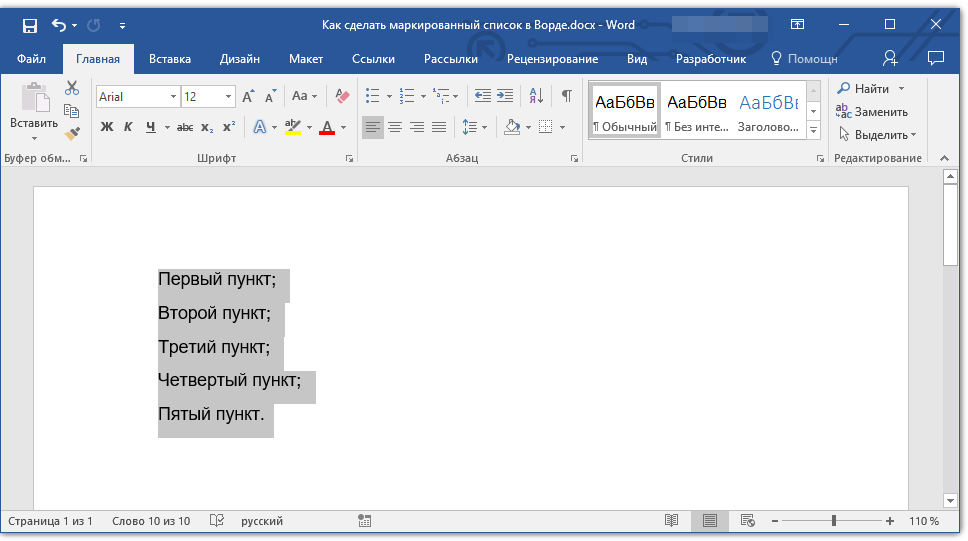
5. На панели быстрого доступа во вкладке “Главная” нажмите кнопку “Маркированный список” (группа “Абзац”).
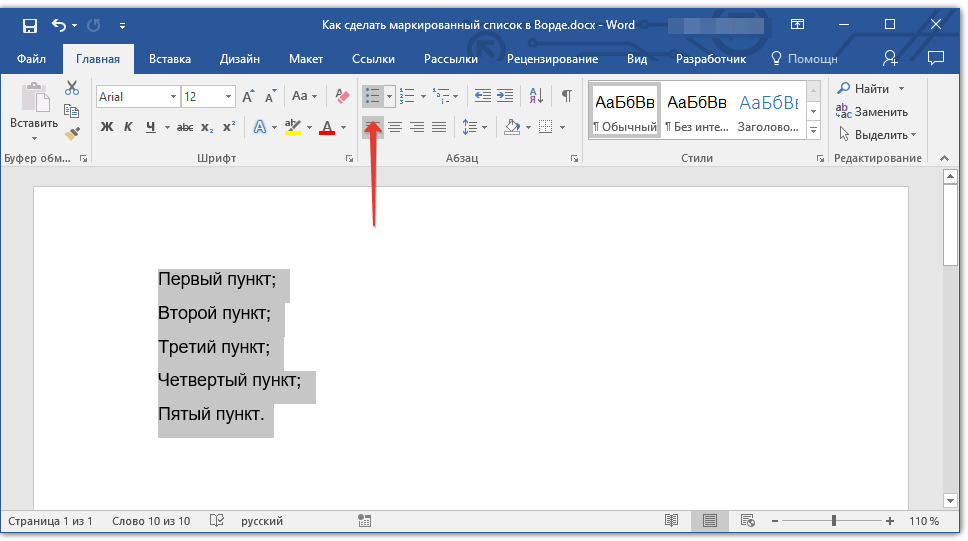
- Совет: Если после созданного вами маркированного списка еще нет текста, дважды нажмите “ENTER” в конце последнего пункта или нажмите “ENTER”, а затем “BackSpace”, чтобы выйти из режима создания списка. Продолжите обычный набор текста.

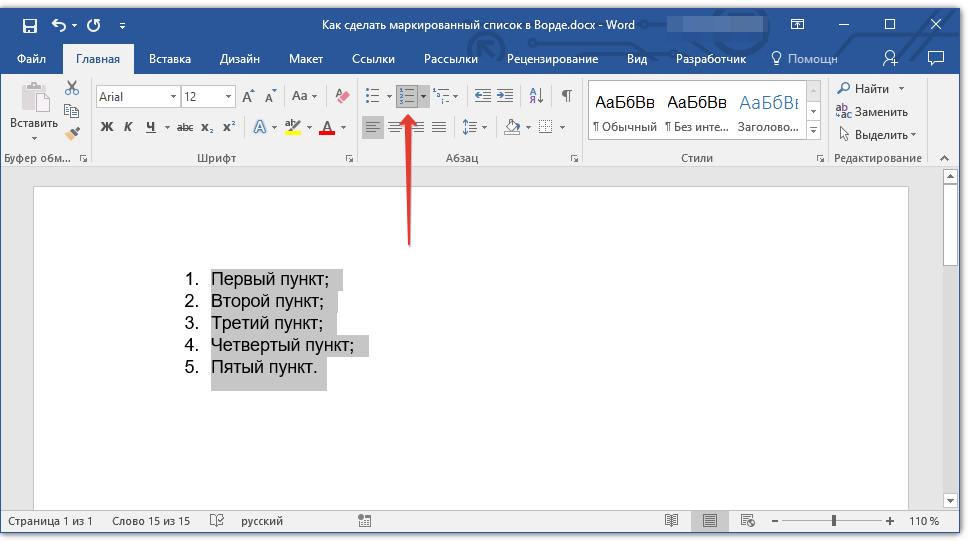
Если вам необходимо создать нумерованный список, а не маркированный, нажмите кнопку “Нумерованный список”, расположенную в группе “Абзац” во вкладке “Главная”.
Изменение уровня списка
Созданный нумерованный список можно сместить влево или вправо, изменив таким образом его “глубину” (уровень).
1. Выделите созданный вами маркированный список.
2. Нажмите на стрелку, расположенную справа от кнопки “Маркированный список”.
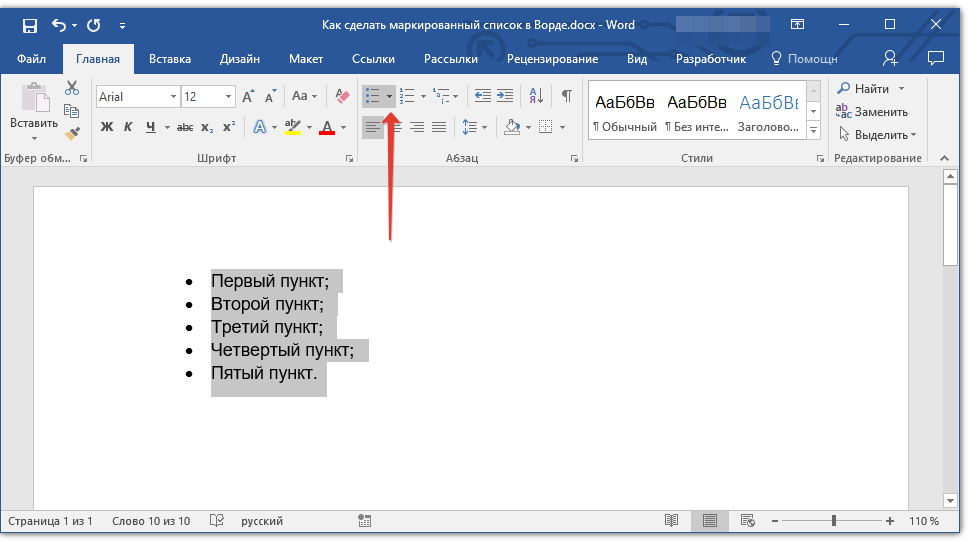
3. В выпадающем меню выберите пункт “Изменить уровень списка”.
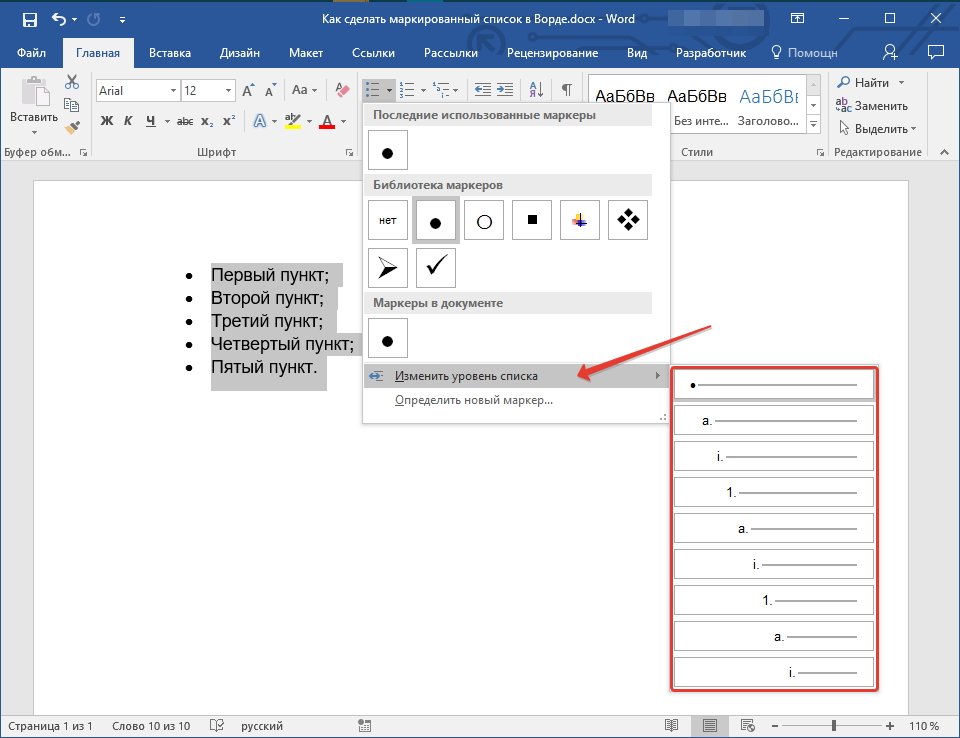
4. Выберите уровень, который вы хотите задать для созданного вами маркированного списка.
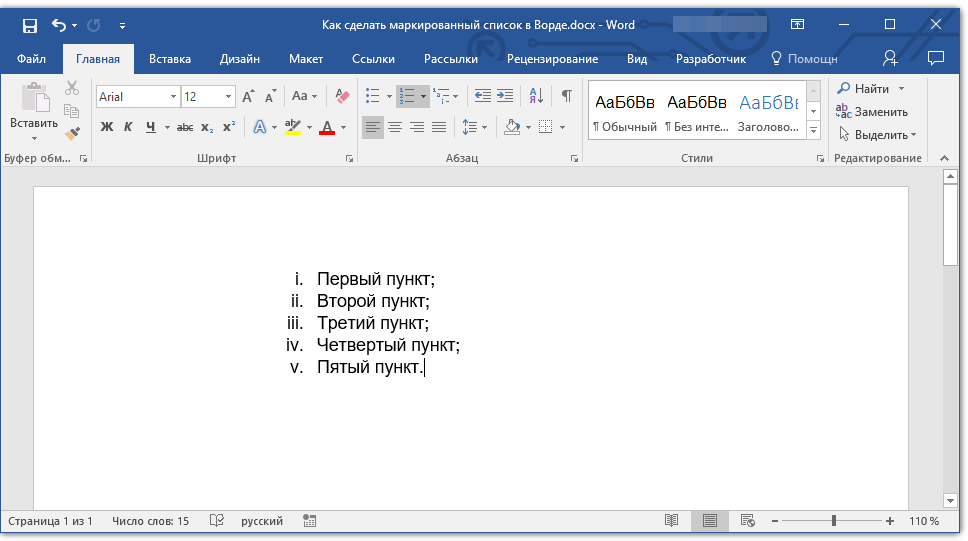
Примечание: С изменением уровня изменится и маркировка в списке. О том, как изменить стиль маркированного списка (вид маркеров, в первую очередь), мы расскажем ниже.
Аналогичное действие можно выполнить и с помощью клавиш, причем, вид маркеров в таком случае изменен не будет.
Примечание: Красной стрелкой на скриншоте показана начальная позиция табуляции для маркированного списка.

Выделите список, уровень которого нужно изменить, выполните одно из следующих действий:
- Нажмите клавишу “TAB”, чтобы сделать уровень списка более глубоким (сместить его вправо на одну позицию табуляции);
- Нажмите “SHIFT+TAB”, если вы хотите уменьшить уровень списка, то есть, сместить его на “шаг” влево.
Примечание: Одно нажатие клавиши (или клавиш) смещает список на одну позицию табуляции. Комбинация “SHIFT+TAB” будет работать только в том случае, если список находится на расстоянии хотя бы в одну позицию табуляции от левого поля страницы.
Урок: Табуляция в Word
Создание многоуровневого списка
При необходимости вы можете создать многоуровневый маркированный список. Более детально о том, как это сделать, вы можете узнать из нашей статьи.
Урок: Как в Ворд создать многоуровневый список
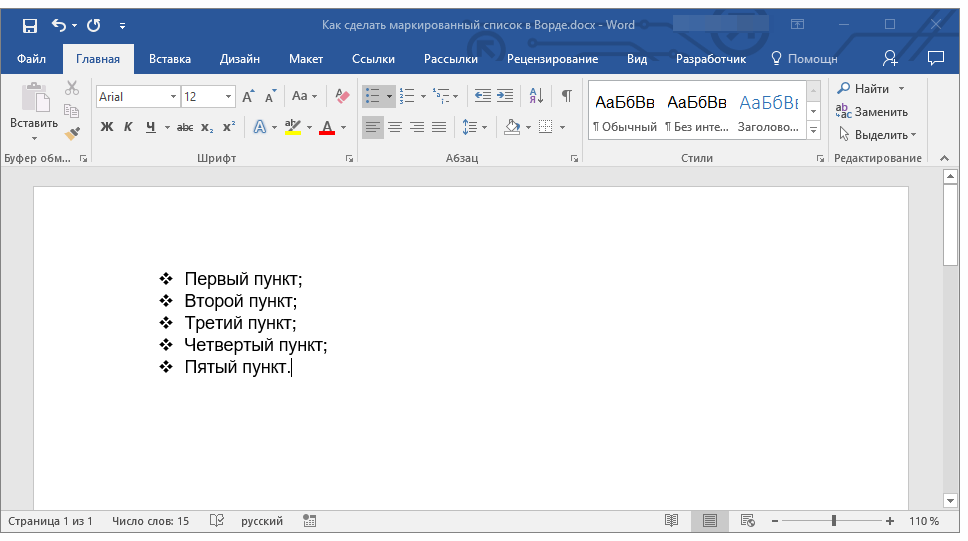
Изменение стиля маркированного списка
Помимо стандартного маркера, устанавливаемого в начале каждого пункта списка, для его маркировки вы можете использовать и другие знаки, доступные в MS Word.
1. Выделите маркированный список, сnиль которого необходимо изменить.

2. Нажмите на стрелку, расположенную справа от кнопки “Маркированный список”.

3. Из выпадающего меню выберите подходящий стиль маркера.

4. Маркеры в списке будут изменены.
Если по каким-то причинам вас не устраивают стили маркеров, доступные по умолчанию, вы можете использовать для маркировки любой из присутствующих в программе символов или рисунок, который можно добавить с компьютера или загрузить из интернета.
Урок: Вставка символов в Ворде
1. Выделите маркированный список и нажмите на стрелку справа от кнопки “Маркированный список”.
2. В выпадающем меню выберите “Определить новый маркер”.
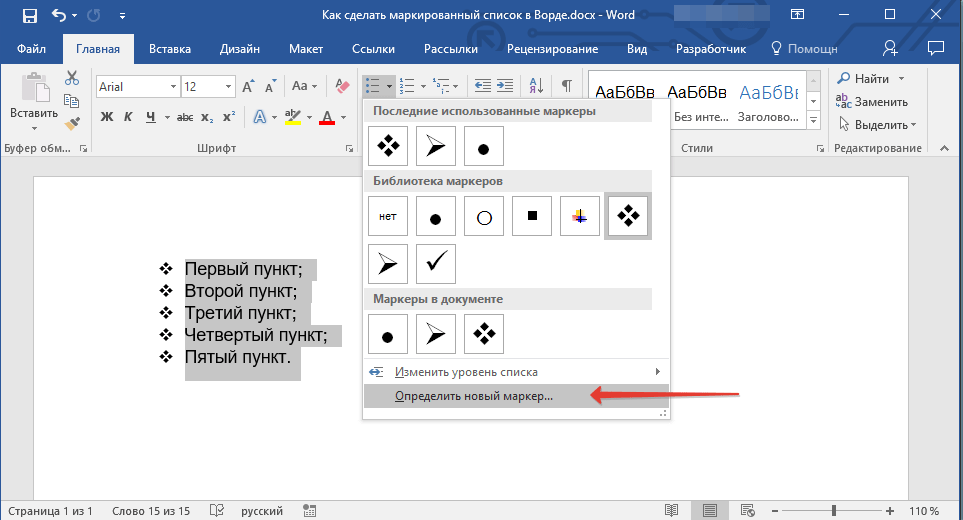
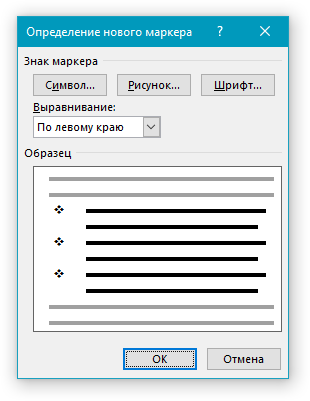
3. В открывшемся окне выполните необходимые действия:

Уроки:
Вставка изображений в Word
Изменение шрифта в документе
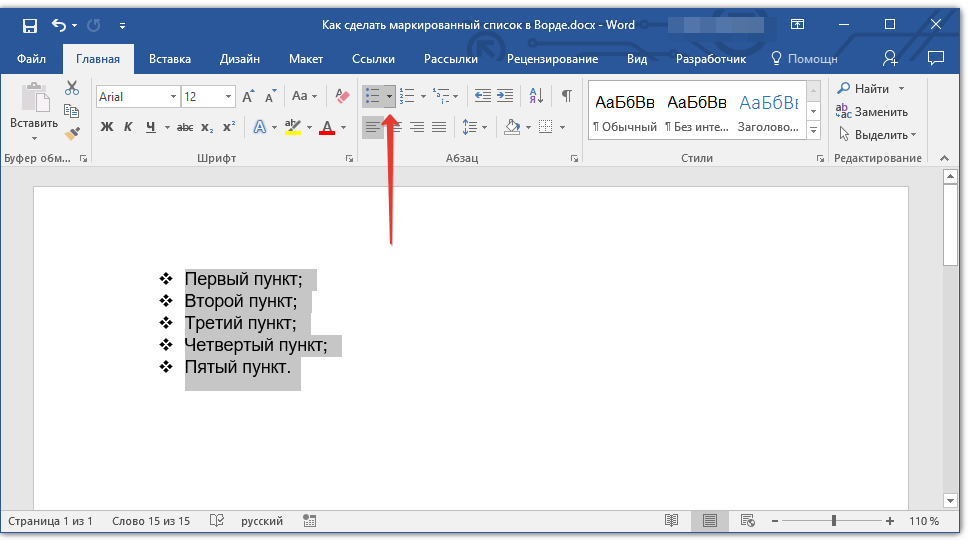
Удаление списка
Если вам необходимо убрать список, оставив при этом сам текст, который содержится в его пунктах, выполните следующие действия.
1. Выделите весь текст, входящий в список.
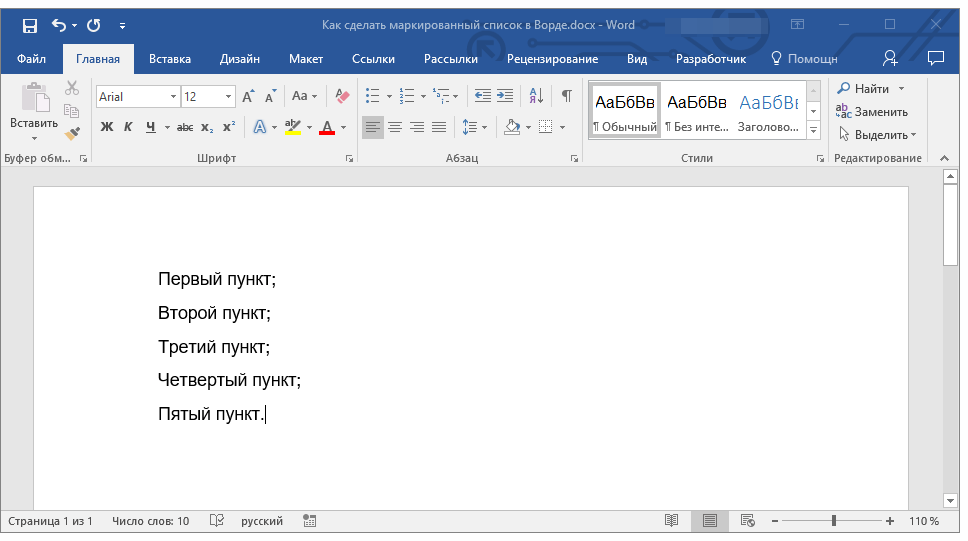
2. Нажмите на кнопку “Маркированный список” (группа “Абзац”, вкладка “Главная”).

3. Маркировка пунктов исчезнет, текст, который входил в состав списка, останется.
Примечание: Все те манипуляции, которые можно выполнить с маркированным списком, применимы и для нумерованного списка.
Вот, собственно, и все, теперь вы знаете, как в Ворде создать маркированный список и, если это необходимо, изменить его уровень и стиль.
Simple bullet lists are easy to create. The standard black round bullets work well, but your document really comes to life when you create some custom bullets using different symbols and colour.
Likewise, single-level numbering is easy to set up.
Then there is multi-level numbering and that’s a whole different animal. It’s too big to cover here so I have created a separate post that shows you how to set up multilevel numbering properly.
Clickable Table of Contents
1. What is a numbered list?
Numbered lists are used to show the steps of a process or sequence. The order is important.

2. What is a bullet list (a.k.a. dot points)?
Bullet lists are used to show two or more points or items. The order is not important.

3. When to use numbered lists vs bullet lists
Think of a recipe.
First, you need a list of ingredients. The order in which you list the ingredients is irrelevant so bullet points, also called dot points are perfect.
However, when you are following the recipe, the order is important, so you would use a numbered list to show each step of the recipe.
4. One-click bullets
# Create a new bullet list
1. Select the items to which you want to add bullets.

2. Select the HOME tab.
3. Click the bullet icon in the Paragraph group.
![]()
Standard black round bullet symbols are added to each item.

# Delete a bullet item
If you delete a line (a bullet item), the rest of the list closes to fill the gap.

# Add a bullet item
If you place your cursor at the end of a bullet item and press ENTER, a new bullet item is added on the next line.

# End a bullet list
If you place your cursor at the end of the last bullet item and press ENTER twice, the bullet list is ended.

5. One-click numbers
To create a numbered list:
1. Select the items that you want to number.

2. Select the HOME tab.
3. Click the Numbering icon in the Paragraph group.
![]()
The items are now numbered sequentially.
# Delete a bullet item
If you delete a line (a numbered item), the numbering for the remaining list adapts so the numbering is always sequential.

# Add a bullet item
If you place your cursor at the end of a numbered item, then press Enter, a new blank numbered item is added to the next line (with the correct number), ready to be populated. The numbers in the rest of the list adapt so the numbers remain sequential

# End a bullet list
If you place your cursor at the end of the last numbered item and press ENTER twice, the numbered list is ended.

6. Custom symbol bullets
# Choose a different bullet symbol
1. Select your list of items
2. Select the HOME tab.
3. Click the drop-down arrow next to the bullet icon in the Paragraph group.
A gallery of default or previously-used bullet styles is displayed.
4. Click on any bullet style to use it.

# Define a new symbol bullet
1. Click Define New Bullet.
2. Click the Symbol button to display the symbol gallery.

3. Choose a font from the drop-down list at the top.
Good symbol fonts are Wingdings, Wingdings2, Wingdings3 and Webdings
4. Select a symbol from the gallery.
5. Click OK

# Define a new picture bullet
1. Select your list of items
2. Select the Home tab.
3. Click the drop-down arrow next to the bullet icon in the Paragraph group.
4. Click Define New Bullet.
5. Click the Picture button to display the symbol gallery
You can use a picture from three different places

To select a picture that is already stored on your computer
1. Click FROM A FILE.
2. Locate the picture and select it.

To search for an image online:
1. Click BING IMAGE SEARCH.
2. Type a keyword or phrase that describes the kind of bullet picture you want.
3. Select one from the gallery.
4. Click Insert
You are responsible for respecting creators rights including copyright.

To use an image store on your OneDrive (cloud):
1. Click ONEDRIVE.
2. Sign in if necessary.
3. Locate and select the image file.
7. Adding symbols anywhere in your document
You may insert all kinds of symbols into your document such as copyright symbols, tick/check marks, crosses or phone/mobile/cell.
To insert a symbol anywhere in your document:
1. Select the INSERT tab.
2. Click Symbol (on the right-hand side)
3. Choose MORE SYMBOLS to display the symbol gallery.
4. Even standard fonts like Arial and Calibri contain many more characters that you can find on the keyboard. For example, ©, », and ¼.
5. There are lots of fonts and symbols to explore, but if you start experimenting with different fonts from the drop-down list, you’ll discover another whole world.
6. Select a symbol from the gallery.
7. Click Insert

8. Summary
- Single-level bullets or numbers can be applied to a list by clicking the bullet icon or the number icon in the Paragraph group on the Home tab.
- Bullet lists are used where the order is irrelevant (like a list of ingredients).
- Custom bullets can be created by selecting a symbol from the symbol library, an icon from the icon library or by selecting an image from your computer or a fresh Bing image search.
- Numbered lists are used where the order is important (like the instructions for a recipe).
I hope you found plenty of value in this post. I’d love to hear your biggest takeaway in the comments below together with any questions you may have.
Have a fantastic day.


About the author
Jason Morrell
Jason loves to simplify the hard stuff, cut the fluff and share what actually works. Things that make a difference. Things that slash hours from your daily work tasks. He runs a software training business in Queensland, Australia, lives on the Gold Coast with his wife and 4 kids and often talks about himself in the third person!
SHARE
Numbered lists are similar to bulleted lists, except that instead of bullets, Word places
sequential numbers in the front of the first line. This feature is handy because if you add a paragraph in the middle of a
numbered list or rearrange the order of the paragraphs in a list, Word automatically renumbers the
paragraphs so that they retain their sequence.
To create numbered lists, follow these steps:
1. Type your list, and then select it.
2. Do one of the following:
- On the Home tab, in the Paragraph group, click Bullets or Numbering.

- You can find different bullet styles and numbering formats by clicking the arrow next to
Bullets or Numbering on the Home tab, in the Paragraph group.
- You can move an entire list to the left or the right. Click a bullet or number in the list,
and drag it to a new location. The entire list moves as you drag. The numbering levels do
not change.
- You can find different bullet styles and numbering formats by clicking the arrow next to
- Click the Numbering on the popup menu:

- Type 1. to create a numbered list or * to create a bulleted list.
Then press Spacebar or Tab. Word automatically formats the entry as a list item and
displays the AutoCorrect Options button (for more details see Create lists with
AutoFormat or turn it off) so that you can undo or stop automatic numbering.

3. To add additional numbered items to your list, move the insertion
point to the end of a line formatted with a number and press Enter.
4. Move the insertion point to the end of the last numbered item in your
list. Press Enter and then Del, or press Enter and click the Numbering
button on the Home tab, in the Paragraph group, to turn off the number formatting.
Note: more details are available
in the Numbered lists section
in the Work with bulleted, numbered and multi-level lists lesson
of the Create basic documents free course.
See also Customizing numbered lists.
See also this tip in French:
Comment créer des listes numérotées ou listes à puces.
Please, disable AdBlock and reload the page to continue
Today, 30% of our visitors use Ad-Block to block ads.We understand your pain with ads, but without ads, we won’t be able to provide you with free content soon. If you need our content for work or study, please support our efforts and disable AdBlock for our site. As you will see, we have a lot of helpful information to share.
When you have a list of items to include in a document, you can format it as either a bulleted list or a numbered list. Adding a new item to a list will automatically insert a bullet, or a sequential number, in front of the item.
Numbered List
A numbered list will automatically number each line of the list in sequence. This is helpful for a list of steps that must be done in order.
- Select the text you want to use to make a numbered list.
- Click the Numbering button.

The selected items are turned into a numbered list.
You can remove the list formatting by clicking the Numbering button again.
Bulleted List
Use bulleted lists when the order of items in a list doesn’t matter, such as listing items you need to buy.
- Select the text you want to use to make a numbered list.
- Click the Bullets button.
The selected items are formatted as a bulleted list.
Like with a numbered list, clicking the Bullets button again will turn off the list formatting.
Multilevel List
Both numbered and bulleted lists can have multiple levels, letting you put together an outline of topics and subtopics. Any list can be turned into a multilevel list by demoting list items.
- Select the list item you want to demote.
- Click the Increase Indent button.
The list item is indented, and depending on the list style, the bullet or number may change.
You can indent a list item multiple times to create additional levels.
To promote a list item back to a higher level, just click the Decrease Indent button.
Change the List Style
While both bulleted and numbered lists have a default style, you can change the bullet style or numbering style for your lists.
- Select the list you want to change.
- Click the Bullets button list arrow or the Numbering button list arrow.
- Select a new list style.
You could also select just a single list item to change only that list item’s style.
Depending on which style of list you’re using, you can choose a new symbol for the bullets or a different numbering style, such as roman numerals.
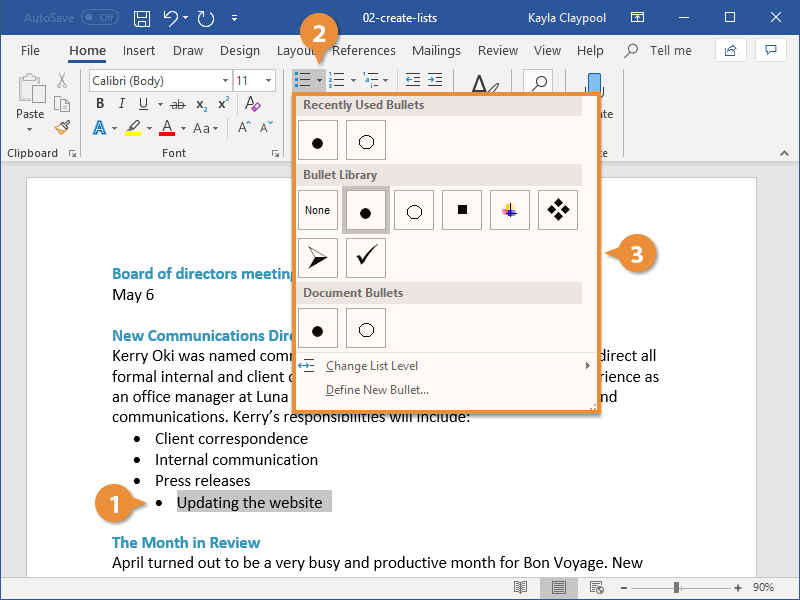
The list style is updated.
Custom Numbering
Numbered lists automatically number each list item in order, but you can change it if you need to.
- Right-click a list number.
- Select Set Numbering Value.
- Make your adjustments.
- Start new list: This is the default, and it starts your list at “1.”
- Continue from previous list: Start numbering where the numbered list prior to it left off. If you check Advance value, you can skip numbers.
- Set value to: Allows you to manually enter a number other than “1” to start your list.
- Click OK when you’re done.
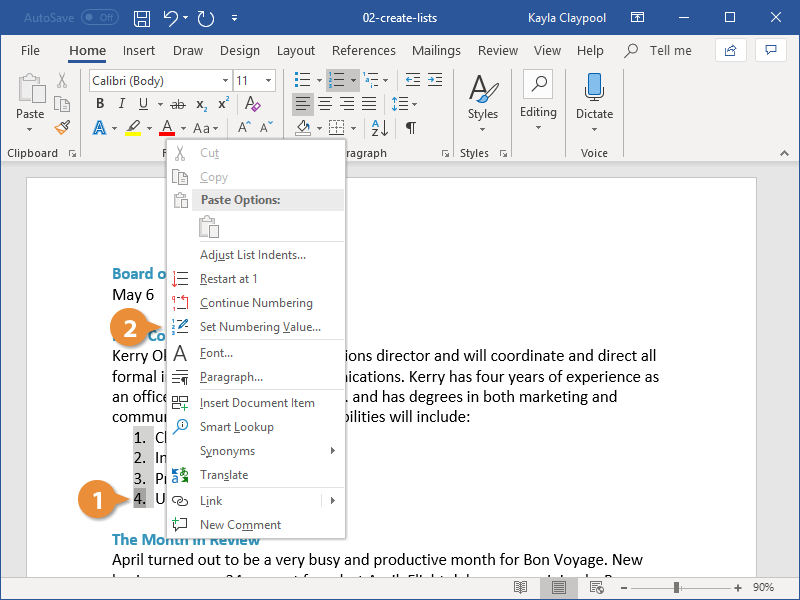
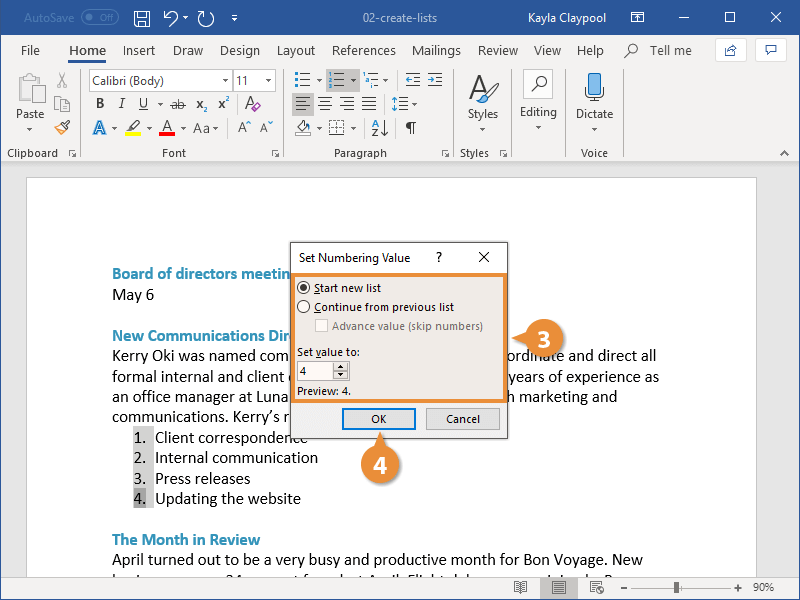
The list numbering is updated.

FREE Quick Reference
Click to Download
Free to distribute with our compliments; we hope you will consider our paid training.