
Insert footnotes and endnotes

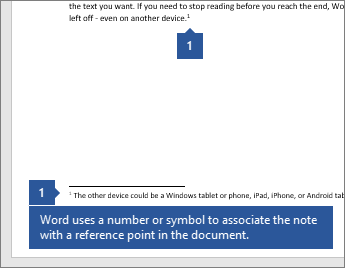
Footnotes appear at the bottom of the page and endnotes come at the end of the document. A number or symbol on the footnote or endnote matches up with a reference mark in the document.
-
Click where you want to reference to the footnote or endnote.
-
On the References tab, select Insert Footnote or Insert Endnote.

-
Enter what you want in the footnote or endnote.
-
Return to your place in the document by double-clicking the number or symbol at the beginning of the note.
Need more help?
Use footnotes and endnotes to explain, comment on, or provide references to something in a document. Usually, footnotes appear at the bottom of the page, while endnotes come at the end of the document or section.
If you’re in Reading View, switch to Editing View by clicking Edit Document > Edit in Word for the web.

Add a footnote
-
Click where you want to add the footnote.
-
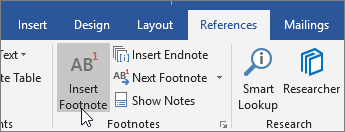
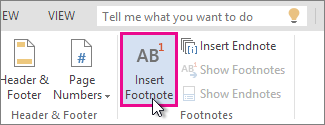
Click Insert > Insert Footnote.
Word inserts a reference mark in the text and adds the footnote mark at the bottom of the page.
-
Type the footnote text.
Add an endnote
-
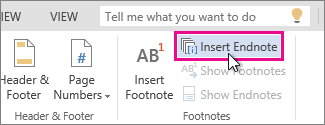
Click where you want to add the endnote.
-
Click Insert > Insert Endnote.
Word inserts a reference mark in the text and adds the endnote mark at the end of the document.
-
Type the endnote text.
Customize your footnotes and endnotes
To customize a footnote or endnote:
-
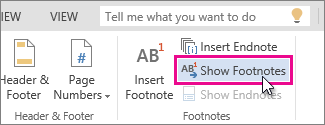
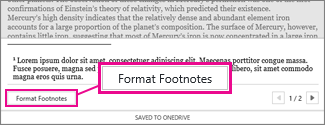
Click the reference number or mark in the body of the text or click Insert > Show Footnotes(for endnotes, click Insert > Show Endnotes).
-
In the footnote/endnote view, click Format Footnotes or Format Endnotes to display the Format Options dialog, where you can change the size, font, and indentation of one or all of your footnotes or endnotes.

Note: If you want to convert footnotes to endnotes or the other way around, use the Open in Word command and convert them there. When you save the doc in Word, it’s saved where you opened it in Word for the web.
Need more help?
Want more options?
Explore subscription benefits, browse training courses, learn how to secure your device, and more.
Communities help you ask and answer questions, give feedback, and hear from experts with rich knowledge.
![]()
Download Article
Multiple easy-to-follow ways to add footnotes in Word
![]()
Download Article
Footnotes allow you to cite sources or explain a concept in detail without sidetracking the main text. Word makes managing footnotes easy, as new footnotes are numbered automatically, and the footnotes area expands and shrinks dynamically based on the amount of text. Give your document a professional feel by strategically using footnotes to clarify information and credit your sources.
-
1
Click the «References» tab. This is located at the top of the window, typically between «Page Layout» and «Mailings». This tab lets you insert various reference tools, such as a table of contents, footnotes and endnotes, citations, captions and more.
-
2
Place your cursor where you want the footnote to appear. By default, footnotes will be designated by increasing superscript numbers. Place the cursor where you want the number to appear.
Advertisement
-
3
Click the «Insert Footnote» button. This is located in the «Footnotes» section of the «References» tab. The footnote number will be inserted, and a separator bar will be added to the bottom of the page. Your cursor will automatically be taken to the footnote at the bottom of the page so that you can fill it out.
- An endnote is like a footnote except the reference occurs at the end of the document. By default, endnotes are numbered with Roman numerals (i, ii, iii, etc.).
- Alternatively, you can press Ctrl + Alt + F to create a footnote, or Ctrl + Alt + D to create an endnote.
-
4
Change when your footnotes numbering resets. By default, your footnotes will increase in number throughout your whole document. You can change this so that the numbers restart every page or at section breaks in the document.[1]
- Click the Menu button in the bottom-right corner of the «Footnotes» section. This will open the «Footnote and Endnote» window. In the «Format» section, use the «Numbering» drop-down menu to select when you want the footnote numbers to restart.
- You can insert section breaks into your document by clicking the «Page Layout» tab, clicking the «Breaks» button in the «Page Setup» section, and then selecting the type of break you’d like to insert. Besides changing the way footnotes are numbered, section breaks are great for making layout changing to specific portions of a document.
-
5
Change your footnote formatting. If you’d rather have symbols instead of numbers, want the footnotes to appear below the text instead of at the bottom of the page, or want the numbering to start at a different number, you can change this from the «Footnote and Endnote» window. Click the Menu button in the bottom right-corner of the «Footnotes» section to open it.
- Click Symbol… to choose a symbol from the Symbol menu. You can choose any character from any font, though the «Symbols» font will open by default.


Advertisement
-
1
Switch to Print Layout view. Click View and select Print Layout.
-
2
Place your cursor where you want the footnote to appear. Your footnote will appear at the cursor, so place the cursor at the end of the text that you want to create a footnote reference for.
-
3
Insert the footnote. Click the «Document Elements» tab, and then click the «Footnote» button in the «Citations» section. A footnote will be inserted at your cursor and you will be taken to the footnote text section to enter the contents of the footnote. The footnote text will be at the bottom of the same page as the footnote, separated by a line.
- Alternatively, you can press Command + Option + F to create a footnote, or Command + Option + E to create an endnote.
-
4
Change your footnote formatting. If you’d rather have symbols instead of numbers, want the footnotes to appear below the text instead of at the bottom of the page, or want the numbering to start at a different number, you can change this from the «Footnote and Endnote» window. Click Insert and select Footnote.
- Click Symbol… to choose a symbol from the Symbol menu. You can choose any character from any font, though the «Symbols» font will open by default.
- By default, your footnotes will increase in number throughout your whole document. You can change this so that the numbers restart every page or at section breaks in the document. In the «Format» section, use the «Numbering» drop-down menu to select when you want the footnote numbers to restart.
- You can apply your formatting changes to just your selected text, the current section, or your entire document.
- Click Symbol… to choose a symbol from the Symbol menu. You can choose any character from any font, though the «Symbols» font will open by default.


Advertisement
-
1
Switch to Print Layout view. Click View and select Print Layout.
-
2
Place your cursor where you want the footnote to appear. Your footnote will appear at the cursor, so place the cursor at the end of the text that you want to create a footnote reference for.
-
3
Insert the footnote. Click Insert → Reference → Footnote… to open the «Footnote and Endnote» window. Select «Footnote», and then choose your numbering option. You can have Word number your footnotes automatically, or you can choose a custom symbol to insert.
- In Word 2004/2008, click Insert → Footnote….
- Alternatively, you can press Ctrl + Alt + F to create a footnote, or Ctrl + Alt + D to create an endnote in Windows. On a Mac, press Command + Option + F to create a footnote, or Command + Option + E to create an endnote.
-
4
Enter your footnote text. Your footnote will be created and you will be taken to the footnote text section at the bottom of the page. You can enter the text you want for the footnote, and then click back in your document when you are finished.


Advertisement
Add New Question
-
Question
Why is my first footnote printing on the next page?

A header or footnote is applied to all pages when put in a document. Unless it is a page number generated by the document (which you select). Otherwise, the header and footnote follows you through all of your pages.
-
Question
How do I insert more information into a footnote that already exists?
You can double click on an existing footnote to edit it.
-
Question
When I create a footnote for a word, does it appear each time I use the word?
No, it doesn’t. Footnotes are bound to locations in the document, not to words. This means that, even if you change the word or the text around the footnote, the footnote remains where it is.
Ask a Question
200 characters left
Include your email address to get a message when this question is answered.
Submit
Advertisement
Video
Thanks for submitting a tip for review!
About This Article
Article SummaryX
1. Click References.
2. Click the desired location.
3. Click Insert Footnote.
4. Select a number format.
5. Select a symbol.
6. Click Insert.
Did this summary help you?
Thanks to all authors for creating a page that has been read 808,644 times.
Is this article up to date?
Во время подготовки документа есть много причин, по которым пользователю нужно добавить сноски в Ворде. При работе с большими документами (дипломами, рефератами, курсовыми, научными публикациями и тому подобными материалами) часто возникает необходимость в пояснительных сносках к тексту (терминах, литературе и так далее).
В научных кругах сноски часто используются для цитирования источников. В других случаях сноска в Word выполняет функцию добавления информации, не отвлекая внимание от основного текста. Вы наверняка встречали сноски при чтении книг научной, технической или даже художественной направленности.
Содержание:
- Как вставить сноску в Ворде
- Как добавить концевую сноску
- Просмотр сносок в основном тексте документа
- Как изменить сноски в Ворде
- Как настроить сноски в Ворде
- Настройка разделителя сносок
- Выводы статьи
Во многих ситуациях сноска — необходимый элемент оформления документа, добавляющей дополнительную информацию. В связи с этим у пользователя возникает вопрос о том, как добавить сноску в Word.
Редактор Microsoft Word имеет встроенную поддержку вставки сносок в редактируемый документ. Поэтому в случае необходимости вы можете создать сноску в Word в любом открытом файле.
Существует два вида сносок:
- обычные — постраничные сноски в Ворде, помещенные внизу страницы;
- концевые сноски в Ворде — размещенные в конце раздела или всего документа.
В одном документе допустимо использовать оба вида сносок: постраничные и концевые. В первом случае сноски помещаются в специальной области внизу страницы, на которой они были созданы. Во втором варианте сноски размещены в виде отдельного списка в конце документа.
Сноска состоит из цифры или символа, которым отмечается нужное слово непосредственно в тексте, и текстовой информации, поясняющей выбранное слово, которая размещается либо внизу страницы, либо в конце документа в общем списке сносок.
В этом руководстве мы расскажем, как сделать сноску в Ворде несколькими способами, которые вы можете использовать на практике. Из инструкций вы узнаете о том, как в Ворде сделать сноску внизу страницы, или как добавить в документ концевую сноску. Эти инструкции работать в любой современной версии программы Word.
Как вставить сноску в Ворде
Сначала мы рассмотрим, как сделать постраничные сноски в Ворде, размещенные в нижней части страницы документа.
Чтобы добавить в документ обычные сноски, выполните следующие действия:
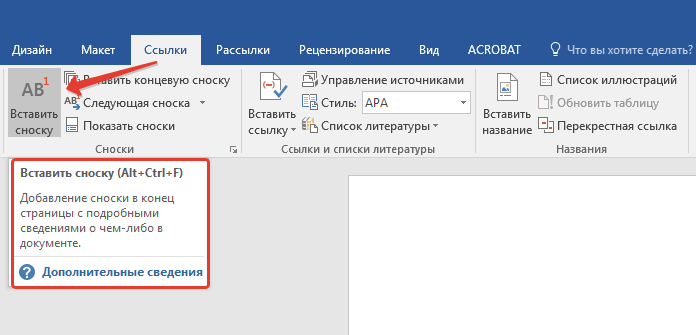
- Откройте документ Word и поместите мигающий курсор мыши в то место, где вы хотите вставить сноску.
- Войдите во вкладку «Ссылки» на ленте панели инструментов, а в группе «Сноски» выберите «Вставить сноску».

- В результате, у вас появится сноска в тексте Word. Программа добавит надстрочный номер сноски (по умолчанию это цифра) в основной текст документа и в раздел сноски в нижней части страницы, где будут размещаться сноски.
Область сноски отделена от текста страницы горизонтальной линией. Нумерация сносок в Ворде проводится последовательно по всему документу.
На этом изображении вы можете увидеть, что после выполнения необходимых действий появилась сноска внизу страницы документа в Ворде.

- Наберите текст, поясняющий сноску, или вставьте туда скопированную информацию.
- Для возвращения к работе с основным текстом щелкните в нужном месте на странице документа.
Повторите описанные выше шаги, чтобы добавить в документ несколько сносок. Сноски в Ворде всегда будут отображаться внизу на каждой страницы, на которой они используются.
Если вы добавите новую сноску в середину документа перед одной или несколькими существующими сносками, MS Word соответствующим образом изменит нумерацию сносок.
Как добавить концевую сноску
Концевая сноска в Word, как понятно из ее названия, размещается в самом конце документа или раздела. В этом случае список сносок в Ворде находится в одном месте.
1 способ:
- В окне открытого документа Word войдите во вкладку «Ссылки».
- Поставьте курсор ввода текста в то место текста, где должна располагаться концевая сноска.
- В группе «Ссылки» щелкните по кнопке «Вставить концевую сноску».

- Возле выбранного слова появится знак сноски (цифра — по умолчанию), а курсор мыши автоматически переместится в область сноски, расположенную в самом конце документа в особом списке сносок.
- Введите текст для этой сноски или скопируйте туда информацию из другого источника.
Чтобы быстро вернуться к работе с основным текстом к месту ввода последней сноски, щелкните по номеру сноски.
2 способ:
- Откройте документ Word.
- Установите указатель мыши в то место, где должна располагаться концевая сноска.
- Нажмите на сочетание клавиш «Alt» + «Ctrl» + «D», после чего произойдет вставка сноски в Word.
Просмотр сносок в основном тексте документа
После того как вы добавили сноску в Word, вы можете навести указатель мыши на номер ссылки сноски в верхнем регистре в основном тексте документа, чтобы быстро просмотреть всплывающее окно этой сноски. Это упрощает чтение сноски без прокрутки страницы вниз до области сносок.

Если вам необходимо посмотреть сноски на странице в Ворде, вы можете использовать два варианта действий.
1 способ:
Листайте страницы документа и просматривайте обозначение сносок в тексте и соответствующие списки внизу страницы. Этот способ трудоемкий и неэффективный.
2 способ:
- В окне открытого документа Word переходим к вкладке «Ссылки».
- В группе «Сноска» щелкаем по стрелке у кнопки «Следующая сноска».
- В выпадающем меню выберите один из вариантов в списке:
- Следующая сноска — для перехода к следующей по ходу сноске документа.
- Предыдущая сноска — для перехода к предыдущей по ходу сноске документа.
- Следующая концевая сноска — для перехода к следующей по ходу концевой сноске документа.
- Предыдущая концевая сноска — для перехода к предыдущей по ходу концевой сноске документа.

Как изменить сноски в Ворде
В случае необходимости, вы можете быстро внести коррективы в текст сноски. Текст сноски форматируется и редактируется так же, как и обычный текст документа.
1 способ:
- В окне Word дважды щелкните по значку нужной сноски в тексте документа.
- Курсор мыши автоматически переместится в поле выбранной сноски.
- Внесите коррективы в текст сноски.
2 способ:
- В окне открытого документа щелкните по самому тексту сноски внизу страницы.
- Измените текст сноски.
Как настроить сноски в Ворде
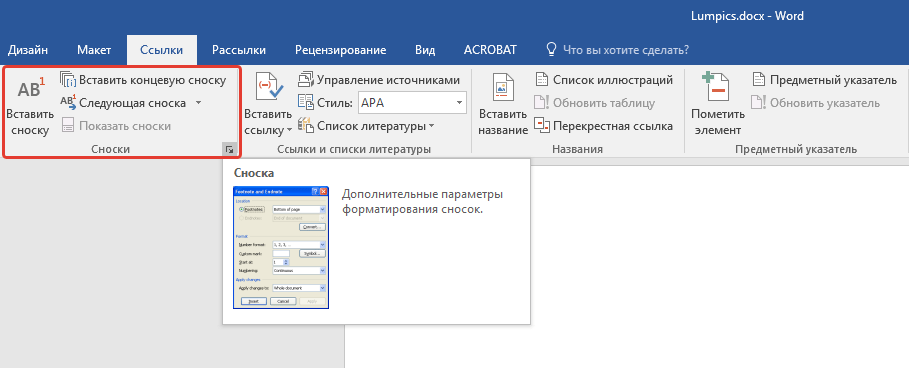
Вы можете настроить формат и другие параметры сносок, используемых в документе. Для этого потребуется войти в дополнительные параметры форматирования сносок.
Выполните следующее:
- Войдите во вкладку «Ссылки», а в группе «Сноски» нажмите на стрелку.

- В окне «Сноски» вы можете настроить параметры отображения элементов.

Здесь вы можете сделать следующие настройки:
В группе «Положение» выберите отображение обычных сносок — «Внизу страницы» или «Внизу текста». Если вы хотите, чтобы раздел сносок был привязан к нижней части страницы, выберите параметр «Внизу страницы». Если вам нужно, чтобы раздел сносок отображался непосредственно под текстом документа, выберите «Внизу текста».

Концевые сноски можно настроить так, чтобы они отображались «В конце документа» или «В конце раздела».

Здесь вы также можете преобразовывать обычные сноски в концевые и наоборот. Нажмите на кнопку «Заменить…». В окне «Преобразование сносок» вы можете преобразовать сноски между обычными и концевыми или поменять их местами.

В группе «Расположение сносок» можно выбрать количество столбцов для сносок. В поле «Столбцы:» выберите подходящий вариант:
- В соответствии с макетом раздела.
- Одна колонка.
- Две колонки.
- Три колонки.
- Четыре колонки.

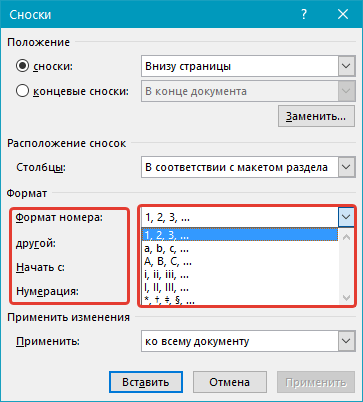
В группе «Формат» вы можете изменить числовой формат на другой тип нумерации, включая пользовательскую метку или символ.

Сноски не обязательно должны быть пронумерованы. Чтобы использовать нестандартный значок для обозначения сносок, нажмите на кнопку «Символ…». Подберите подходящий символ, а затем нажмите на кнопку «ОК».

Вы также можете выбрать между непрерывной нумерацией и повторной нумерацией в каждом разделе или на странице. В пункте «Начать с» задайте начальную цифру, по умолчанию используется значение «1».
При необходимости иметь отдельную нумерацию сносок на каждой странице или в каждом разделе, в опции «Нумерация:» выберите подходящий вариант из выпадающего списка:
- Продолжить — в документе будет использоваться сплошная непрерывная нумерация сносок.
- В каждом разделе — используется отдельная для каждого раздела нумерация сносок.
- На каждой странице — применяется отдельная нумерация сносок для каждой страницы документа.
В группе «Применить изменения» вы можете указать Word применить параметры, которые вы только что настроили, ко всему документу или к разделу, в котором вы находитесь (если вы создали разделы).
После завершения настройки всех параметров нажмите кнопку «Применить».
Настройка разделителя сносок
После того, как вы узнали о том, как делать сноски в Ворде, у вас может возникнуть вопрос о разделителе области сносок. Если вы используете настольную версию Word, вы можете настроить отображение линии, которая отделяет раздел сносок от остального текста на каждой странице, содержащей сноски.
Проделайте следующее:
- Войдите во вкладку «Вид», в группе «Режимы» нажмите на кнопку «Черновик».

- Щелкните два раза по обычной или концевой сноске.
- В нижней части окне документа появится область, в которой в раскрывающемся списке «Сноски» выберите «Разделитель сноски».

Теперь вы можете редактировать или удалить линию — разделитель сносок. Сначала выделите линию, а затем выполните необходимые действия: удалите или измените разделитель. Вы можете изменить толщину линии (просто отрегулируйте размер шрифта) или ввести другие символы, которые будут использоваться вместо линии, изменить цвет или положение.

Вернитесь во вкладку «Вид», в группе «Режимы» нажмите на кнопку «Разметка страницы», чтобы посмотреть, как ваш документ будет выглядеть после применения изменений.

Выводы статьи
Во время редактирования вам может понадобиться добавить поясняющую информацию (сноску) в текст документа Word. Поэтому пользователю необходимо получить ответ на вопрос о том, как сделать сноску в Word. Текстовый редактор имеет встроенную поддержку вставки сносок. В материалах этой статьи рассказано, как сделать сноску на странице в Ворде, или как разместить сноску в самом конце раздела или за всем текстом документа.
Похожие публикации:
- Как сделать вертикальный текст в Word — 5 способов
- Как сделать колонки в Word: полное руководство
- Как объединить документы Ворд в один файл
- Режим чтения Word: как включить или как убрать
- Как убрать красные подчеркивания в Word — 3 способа
Содержание
- Добавление обычных и концевых сносок
- Как изменить начальное значение сносок?
- Как создать уведомление о продолжение сноски?
- Как изменить или удалить разделитель сноски?
- Как удалить сноску?
- Вопросы и ответы

Сноски в Майкросотф Ворд — это что-то вроде комментариев или примечаний, которые можно размещать в текстовом документе, как на любых его страницах (обычные сноски), так и в самом конце (концевые сноски). Зачем это нужно? В первую очередь, для совместной работы и/или проверки заданий либо же при написании книги, когда автору или редактору нужно внести пояснение того или иного слова, термина, фразы.
Представьте, кто-то вам сбросил текстовый документ MS Word, который вы должны просмотреть, проверить и, при необходимости что-то изменить. Но как быть, если вы хотите, чтобы это «что-то» изменил автор документа или какой-нибудь другой человек? Как быть в случаях, когда нужно просто оставить какое-то примечание или пояснение, к примеру, в научной работе или книге, не захламляя при этом содержимое всего документа? Именно для этого и нужны сноски, и в этой статье мы расскажем о том, как вставлять сноски в Ворде 2010 — 2016, а также в более ранних версиях продукта.
Примечание: Инструкция в данной статье будет показана на примере Microsoft Word 2016, но она применима и к предыдущим версиям программы. Некоторые пункты могут отличаться визуально, у них может быть немного другое название, но смысл и содержание каждого шага практически идентичны.
Добавление обычных и концевых сносок
Используя сноски в Ворде, можно не только предоставлять разъяснения и оставлять комментарии, но и добавлять ссылки для текста в печатном документе (зачастую, для ссылок используются концевые сноски).
Примечание: Желая добавить к текстовому документу список литературы, воспользуйтесь командами для создания источников и ссылок. Найти их можно во вкладке «Ссылки» на панели инструментов, группа «Ссылки и списки литературы».
Обычные и концевые сноски в MS Word нумеруются автоматически. Для всего документа можно использовать общую схему нумерации либо же можно создавать разные схемы для каждого отдельного раздела.
Команды, необходимые для добавления обычных и концевых сносок, а также для их редактирования, расположены во вкладке «Ссылки», группа «Сноски».
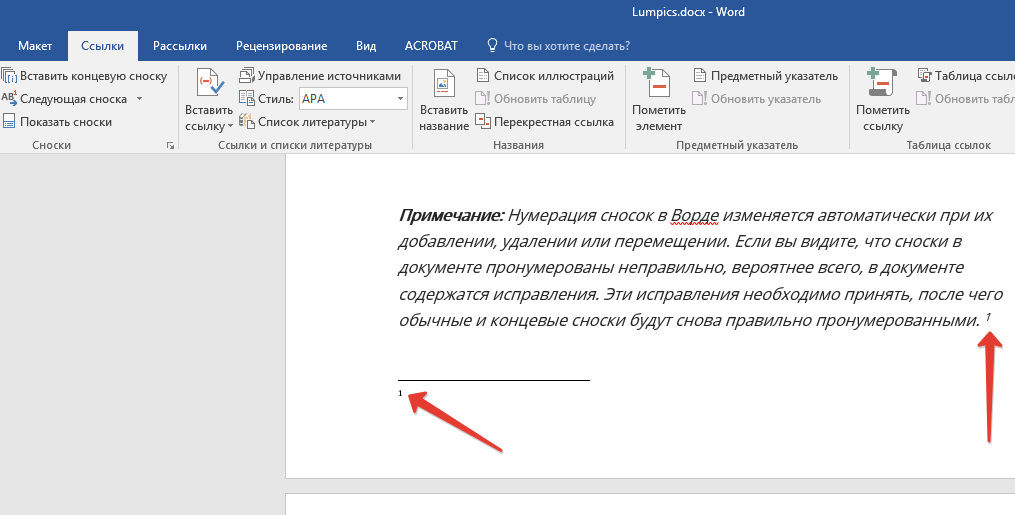
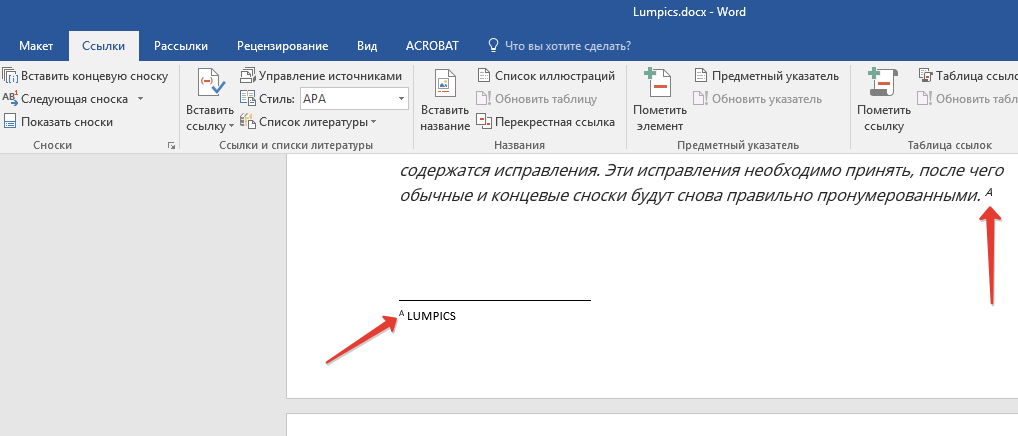
Примечание: Нумерация сносок в Ворде изменяется автоматически при их добавлении, удалении или перемещении. Если вы видите, что сноски в документе пронумерованы неправильно, вероятнее всего, в документе содержатся исправления. Эти исправления необходимо принять, после чего обычные и концевые сноски будут снова правильно пронумерованными.
1. Кликните левой кнопкой мышки в том месте, куда вы желаете добавить сноску.
2. Перейдите во вкладку «Ссылки», группа «Сноски» и добавьте обычную или концевую сноску, нажав на соответствующий пункт. Знак сноски будет расположен в необходимом месте. Сама же сноска будет находиться внизу страницы, если она обычная. Концевая сноска будет расположена в конце документа.
Для большего удобства используйте сочетания клавиш: «Ctrl+Alt+F» — добавление обычной сноски , «Ctrl+Alt+D» — добавление концевой.

3. Введите необходимый текст сноски.
4. Кликните дважды по значку сноски (обычной или концевой), чтобы вернуться к ее знаку в тексте.
5. Если вы хотите изменить расположение сноски или ее формат, откройте диалоговое окно «Сноски» на панели управления MS Word и выполните необходимое действие:
- Для преобразования обычных сносок в концевые, как и наоборот, в группе «Положение» выберите необходимый тип: «Сноски» или «Концевые сноски», после чего нажмите кнопку «Заменить». Нажмите «ОК» для подтверждения.
- Для изменения формата нумерации выберите необходимое форматирование: «Формат номера» — «Применить».
- Чтобы изменить стандартную нумерацию и установить вместо нее собственный знак для сноски, нажмите на «Символ», и выберите то, что вам необходимо. Существующие знаки сносок при этом останутся неизменными, а новый знак будет применяться исключительно к новым сноскам.
Как изменить начальное значение сносок?
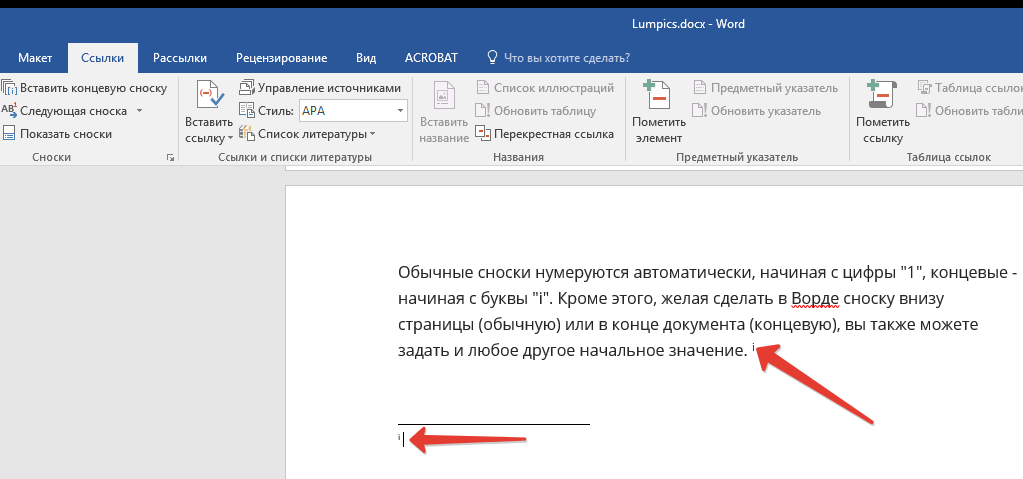
Обычные сноски нумеруются автоматически, начиная с цифры «1», концевые — начиная с буквы «i», за которой следует «ii», затем «iii» и так далее. Кроме этого, желая сделать в Ворде сноску внизу страницы (обычную) или в конце документа (концевую), вы также можете задать и любое другое начальное значение, то есть, установить другую цифру или букву.
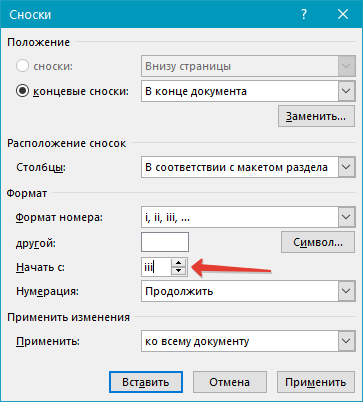
1. Вызовите диалоговое окно во вкладке «Ссылки», группа «Сноски».
2. Выберите необходимое начальное значение в поле «Начать с».
3. Примените изменения.
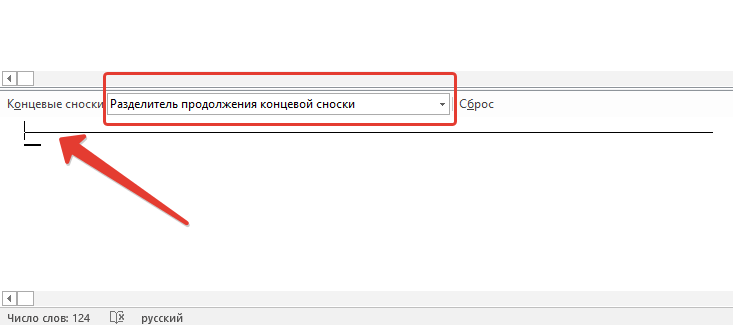
Как создать уведомление о продолжение сноски?
Иногда бывает так, что сноска не помещается на странице, в таком случае можно и нужно добавить уведомление о ее продолжение, чтобы человек, который будет читать документ, был в курсе того, что сноска не закончена.

1. Во вкладке «Вид» включите режим «Черновик».

2. Перейдите во вкладку «Ссылки» и в группе «Сноски» выберите «Показать сноски», а затем укажите тип сносок (обычные или концевые), которые вы хотите показать.
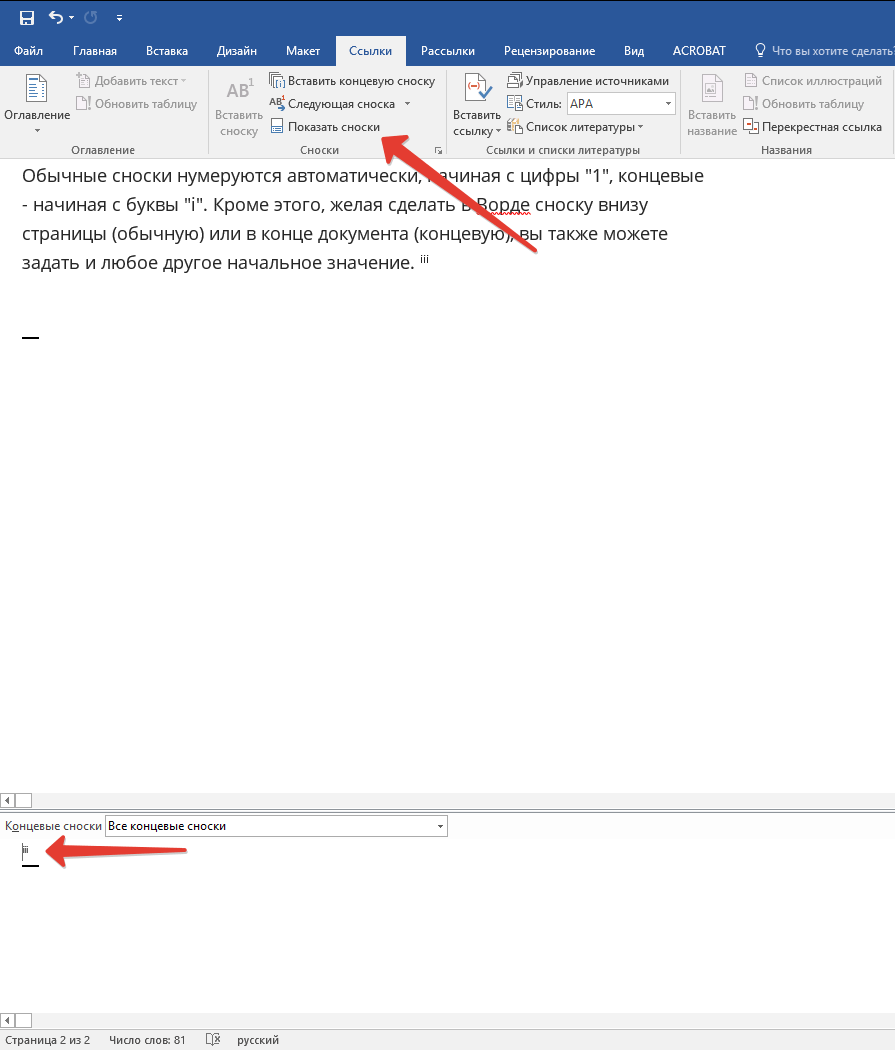
3. В появившемся списке области сносок кликните «Уведомление о продолжении сноски» («Уведомление о продолжении концевой сноски»).

4. Введите в области сносок текст, необходимый для уведомления о продолжение.
Как изменить или удалить разделитель сноски?
Текстовое содержимое документа отделяется от сносок, как обычных, так и концевых, горизонтальной линией (разделитель сносок). В случае, когда сноски переходят на другую страницу, линия становится более длинной (разделитель продолжения сноски). В Microsoft Word можно настраивать эти разделители, добавляя к ним рисунки или текст.
1. Включите режим черновика.

2. Вернитесь во вкладку «Ссылки» и нажмите «Показать сноски».
3. Выберите тип разделителя, который вы хотите изменить.
4. Выберите необходимый разделитель и внесите соответствующие изменения.
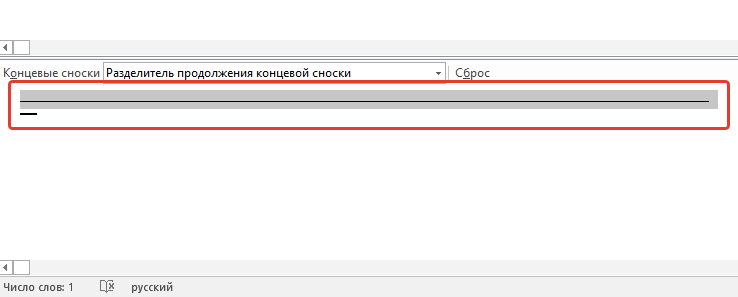
- Для удаления разделителя просто нажмите «DELETE».
- Для изменения разделителя выберите подходящую линию из коллекции картинок или просто введите желаемый текст.
- Для восстановления разделителя по умолчанию нажмите «Сброс».
Как удалить сноску?
Если сноска вам больше не нужна и вы хотите ее удалить, помните, что удалять нужно не текст сноски, а ее символ. После того, как знак сноски, а вместе с ним и сама сноска со всем содержимым будут удалены, автоматическая нумерация измениться, сместившись на отсутствующий пункт, то есть, станет корректной.
На этом все, теперь вы знаете, как вставить сноску в Ворде 2003, 2007, 2012 или 2016, а также в любой другой версии. Надеемся, эта статья для вас была полезной и поможет заметно упростить взаимодействие с документами в продукте от Microsoft, будь то работа, учеба или творчество.
You have read an academic article or paper and noticed superscripts at the end of specific sentences or even words at the bottom of a page in an article under a line.
These are what are referred to as footnotes because they appear at the footer of the page. They contain extra information for a reader who would like to do further reading, and they at times include citations.
Footnotes are essential because sometimes not everyone requires this extra information, so stuffing it into the main text would make it wordy and stray from the topic or concentrate on the wrong theme.
However, it would help if you were careful to place them logically and when the need arises.
Footnotes will have corresponding superscripted numbers in the main text and at the foot of the page, as seen below.
Easy to follow steps on how to add footnotes in Microsoft Word
1. Open Microsoft word
Open the word document where you would like to add the footnote(s)
Put the clicker on the part of the text where you would like to add the footnote at the end of a sentence or a paragraph.
2. Go to the ‘references’ at the top of the screen
There are several tabs at the top of the screen. Click on references. Several options will appear. Click on the large ‘insert footnote’ option in the second column.

When you do this, two superscript numbers will appear, one besides the text area where you want to note your source and a corresponding one at the bottom of the page. This number will guide the reader on which footnote belongs to which text.
3. Add the footnote
At the bottom of the text, you can start typing out your footnote.
There you have it! Your first footnote.
You can add as many footnotes as you want to your document.
Be sure to keep them relevant. You do not want your reader to get confused or irritated because of too much supplementary information.
Note:
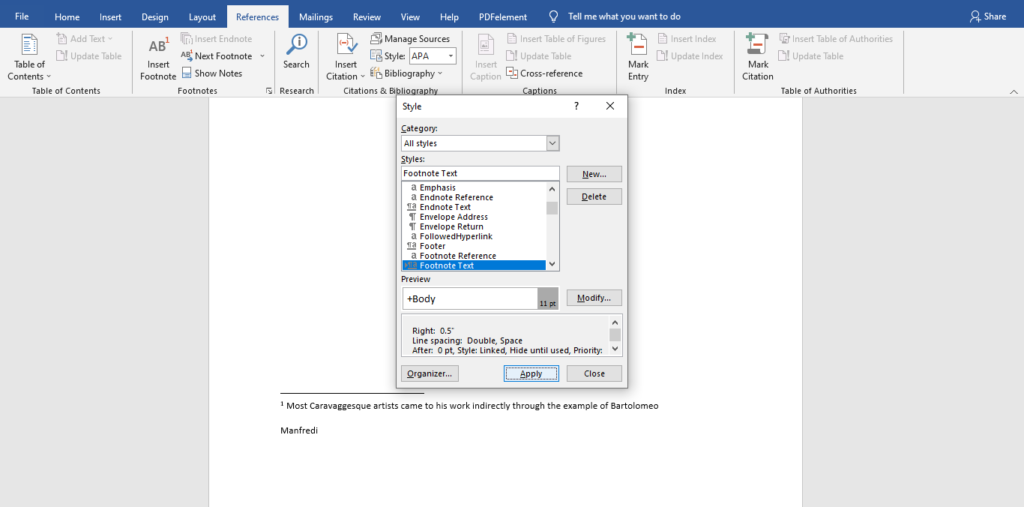
Footnotes are usually already in a specific style. However, you can modify it to a different one to automatically appear that way each time you use the footnote.
Let us use MLA format- Modern Language Association (you can use a format of your choosing or the one specified for your work)
Modern Language Association
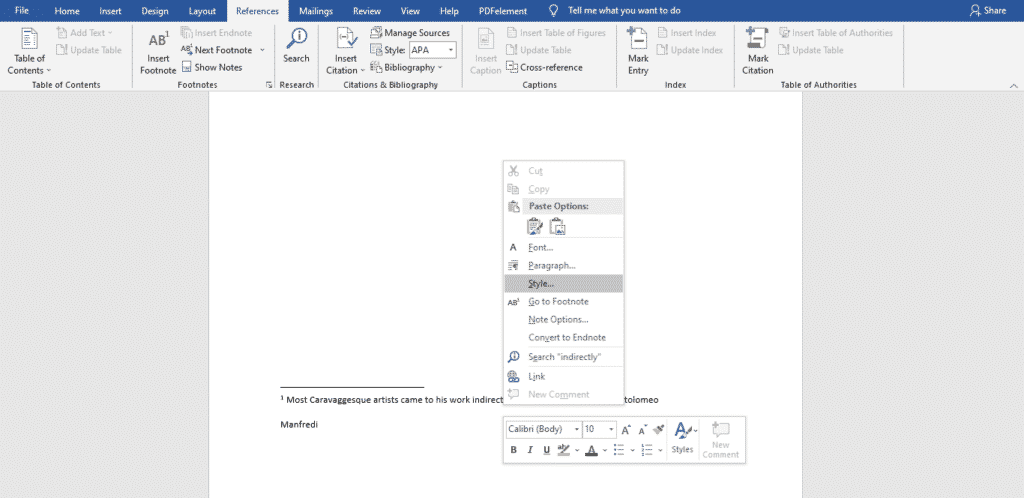
After typing out the footnote, instead of selecting the entire footnote and highlighting it to make changes, right-click anywhere in the footnote area, and go right up to the style you want in the list that shows up and click it.
You will notice that a style dialogue box shows up that says ‘style for footnote text.’ Click modify
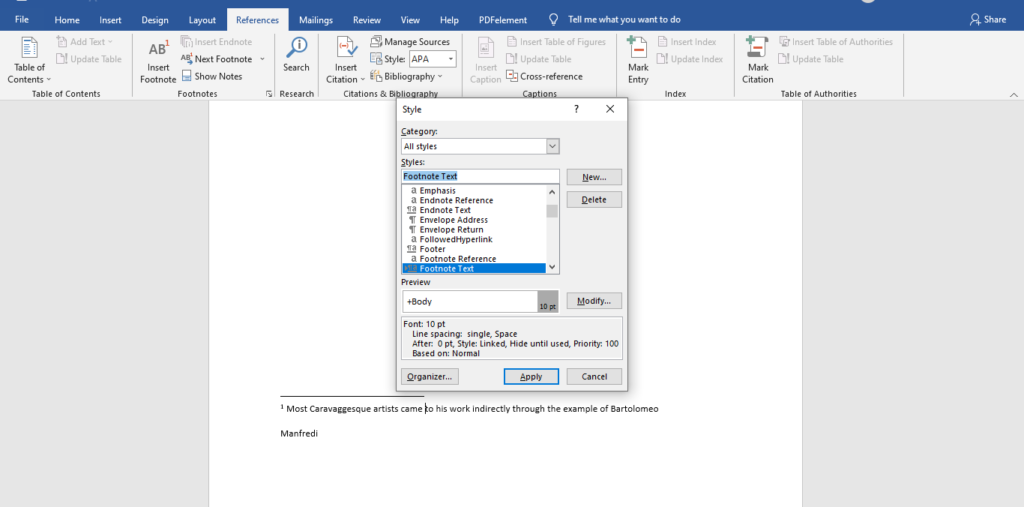
Here you will select the font size, say 11
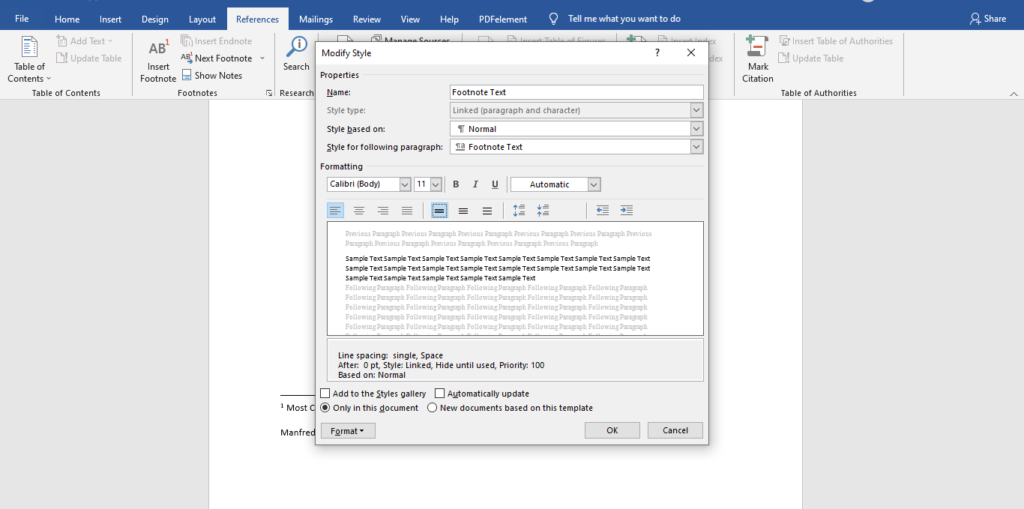
At the bottom left of that dialogue box, click on ‘format.’
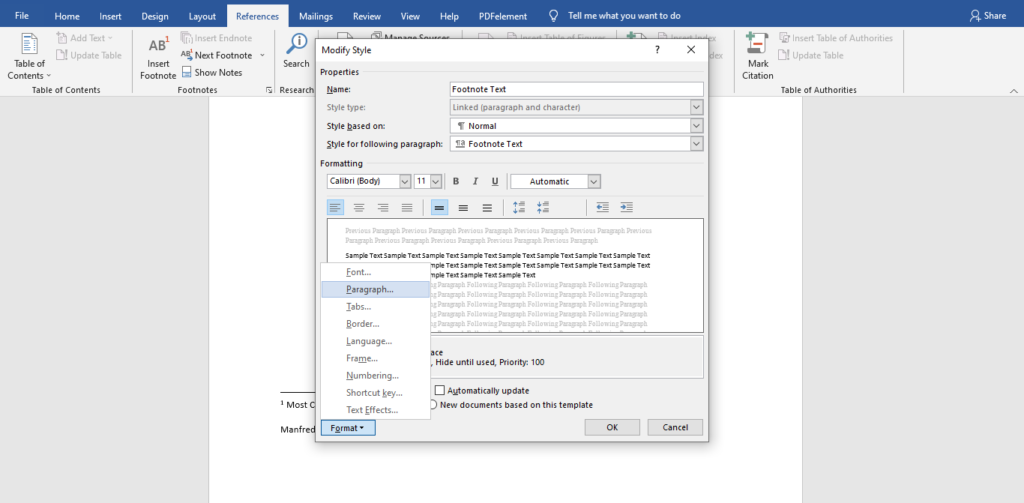
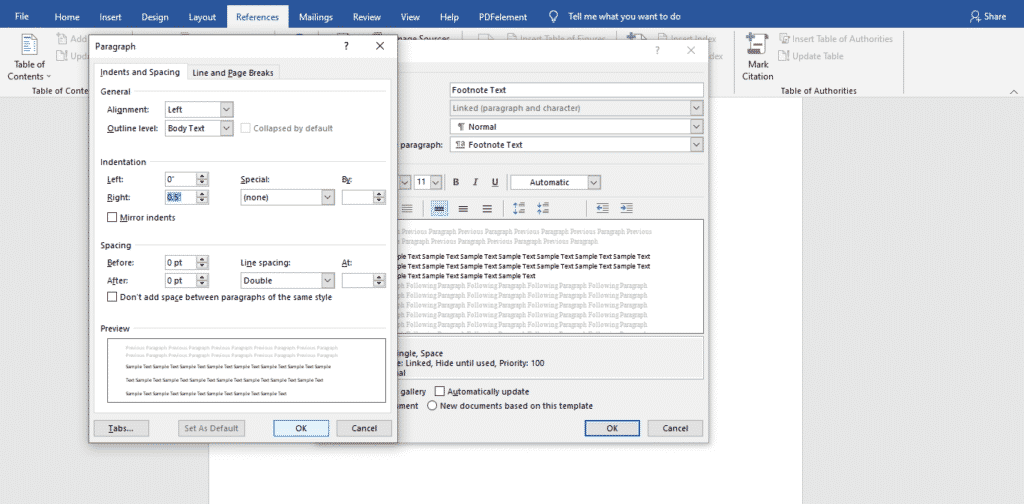
Go to paragraph
This will bring up the Paragraph dialogue box. You can also change the indentation to the first line of half an inch and double spacing inside it.
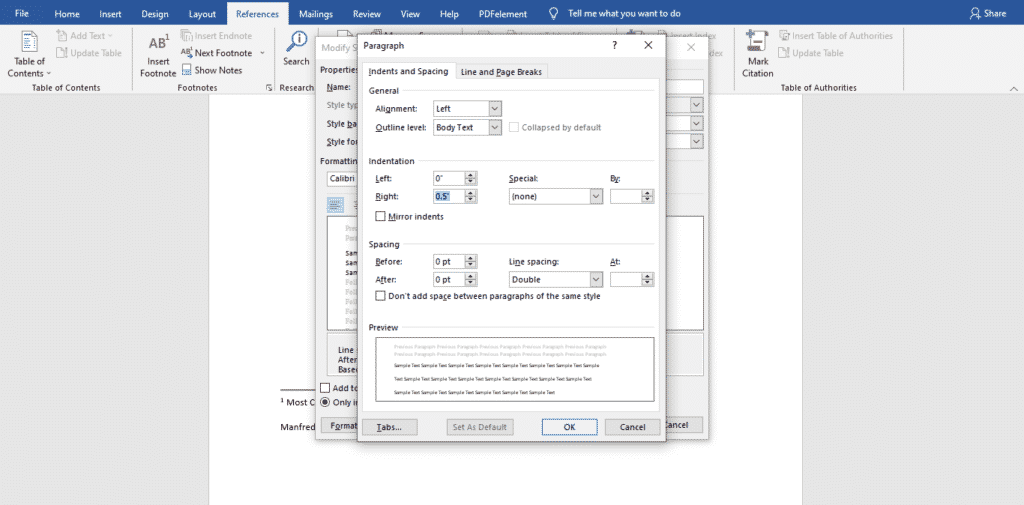
Click okay on both pop-up boxes separately.
Click apply.
Anytime you put a new footnote in the document, it will have the updated style.
Do you and a colleague or classmate ever get assigned a group project, and you do not know how to go about it?
With Simul Docs (simuldocs.com), all this is possible from all your different locations.
All you have to do is write the first sample in Microsoft word and upload it to Simul.
Simul will automatically make this the first version.
Your other colleague can now open this version and make their changes, creating another version of the same document, and so on.
There is no need to worry; after everyone has made their submissions and changes, you can merge the edited versions to create one complete document.
This document shows tracked changes in word so everyone can see where edits were made and if they should be rejected or approved.
Additionally, you can make these changes simultaneously; this is not a one-login at a time situation.
Even if another colleague wants to make changes but does not have Simul, the document can still be downloaded, emailed, or even uploaded to any cloud storage software like One Drive. Once they are done with their edits, they can email it back to you, and you can add it to Simul once again, which will create a different version.
Centralizing your edits is essential in preventing the loss of edits and original formats.
Visit simuldocs.com and simplify group edits today.

Whether you use Microsoft Word for personal or professional writing, sometimes you may want to add supplemental notes to sections of your work. Maybe you want to make a side comment on one of your arguments, or you need to cite another author’s work without distracting from the main text. Luckily, Word has useful tools for adding footnotes and endnotes to your writing.
Note: We’re using Microsoft Word 2016, but Word has supported footnotes and endnotes since at least Word 2007. Depending on the version of Word you’re using, the menus we walk through in this guide may look a little different. But don’t worry—the features and functions are the same.
What Are Footnotes and Endnotes?
Footnotes and endnotes are both ways of adding extra bits of information to your writing outside of the main text. Think of them like verbal asides, only in writing. You can use footnotes and endnotes to add side comments to your work or to cite other publications like books, articles, or websites. The only difference between footnotes and endnotes is where they appear in your document.
As the name suggests, footnotes are attached to the bottom of the page containing the sentence they correspond to. Endnotes, on the other hand, are added to the end of a section or document. Which one you should use in your writing depends on your personal preference or—if you’re writing for school or work—your organization’s publication standards.
Fire up Microsoft Word, and then open the document to which you’d like to add footnotes (or create a new document if you’re just getting started). Switch to the “References” tab on Word’s Ribbon.

Here, you’ll find a bunch of useful features for annotating your text, including tools for inserting a table of contents, adding citations, and generating a bibliography. The second group on this tab contains the footnote and endnote features we want.
To add a footnote, place your insertion point in your text where you want the footnote to appear, and then click the “Insert Footnote” button.
Word adds a small superscript number where you placed the insertion point.
And then immediately shifts focus to the footnote pane and places the insertion point at your new footnote, so you can start typing it right away.
Footnotes appear at the bottom of the page beneath a short horizontal line. Each time you add a footnote on this page, another number will be added to the list.
Once you’ve added your footnotes, you can hover your cursor over each sentence’s reference marker to see a preview of the footnote within the text.
You can also quickly tab between footnotes in both the main text and the footnote list at the bottom of the page by clicking the “Next Footnote” button in the navigation bar.
Or, click the dropdown menu arrow on the “Next Footnote” button to select a different navigation option. You can choose to go to the previous footnote or navigate to the next or previous endnote.
The steps for inserting endnotes are essentially the same. Place your insertion point where you’d to annotate, and then click the “Insert Endnote” button on the “References” tab of Word’s Ribbon.
Just like with footnotes, Word attaches a superscript number containing an endnote. But this time, the list of notes it generates appears at the end of the current section or the end of the document (you can customize where they appear, and we’ll talk more about that in a bit).
How to Configure Footnotes and Endnotes in Word 2016
Word has basic default settings for footnotes and endnotes, but you can adjust these settings at any time from the menu on the References tab.
Click the arrow in the lower right corner of the “Footnotes” menu.
This brings up a Footnote and Endnote window where you can customize the location, appearance, and format of all your footnotes and endnotes.
Change the Location of Footnotes and Endnotes
By default, Word puts footnotes at the bottom of the page and endnotes at the end of the document, but you can change where these notes appear.
Under “Location” in the Footnote and Endnote menu, find the “Footnotes” option (it should be selected by default when you first open the menu). Open the dropdown menu to the right of that option and you can change your footnote location to either the bottom of the page or below the text. If you choose the latter option, Word places your footnotes immediately after the main body of text instead of at the bottom of the page.
To change the default location of endnotes, select the “Endnotes” option, and then open the dropdown menu to its right. There, you can change endnote placement to the end of the current section or the end of the document.
Convert Footnotes to Endnotes (and Vice Versa)
Another option is to convert all of your footnotes to endnotes or vice versa. Instead of changing each one individually, this option lets you change them all at once. If you’re working on a document with a lot of notes, this option can come in handy.
Under the “Location” section of the Footnote and Endnote menu, click the “Convert” button.
The Convert Notes dialog box pops up, giving you three options: 1) Convert All Footnotes to Endnotes, 2) Convert All Endnotes to Footnotes, and 3) Swap Footnotes and Endnotes. Select the option you want, and then click the “OK” button.
Change the Layout of Footnotes and Endnotes
By default, Word creates footnote and endnote lists with the same layout as the page on which they appear. However, you can adjust this from the Footnote and Endnote window by clicking the “Columns” dropdown menu and selecting the number of columns you’d like to use.
You can set your footnotes and endnotes to display in up to four different columns on the page.
Customize the Format of Footnotes and Endnotes
Word also lets you choose from several options for formatting how your footnotes and endnotes are numbered. It’s generally a good idea to choose a different numbering system for each note type, especially if you’re using a combination of footnotes and endnotes in the same document. This helps you and your reader quickly distinguish between the two at a glance.
In the Format section, click the dropdown arrow to the right of the “Number Format” option. Select your desired number format.
You can also label your notes with a custom symbol instead of a standard numbering system. Next to the Custom Mark option, click the “Symbol” button.
The Symbol menu will open. Select the symbol you’d like to use to label your notes, and then click the “OK” button.
Your selected icon should appear in the “Custom Mark” box, and Word will now use this symbol to label your notes.
By default, Word numbers footnotes and endnotes in individual series starting at “1” (or a, i, I, etc.) and continuing throughout the document. However, you can customize both the starting point and continuity of your notes.
If you want your footnotes or endnotes to start somewhere other than the first number in the series (for example, 2 instead of 1), click the arrows in the “Start At” dropdown box to increase or decrease the beginning value. One example of where this might be useful is if you’re writing a book that contains endnotes and you’re saving each chapter as a separate Word document. You could configure each chapter’s document to start numbering endnotes where the last chapter left off.
To change the continuity of your numbering series, click the dropdown menu arrow next to the “Numbering” option.
You’ll see three options for numbering your footnotes and endnotes: Continuous, Restart Each Section, and Restart Each Page. If you want your footnotes and endnotes to be numbered continuously from the beginning of your document to the end, select the “Continuous” option. If you’d prefer to have your notes numbered by chapter or section, select the “Restart Each Section” option. Or select “Restart Each Page” to number your notes by page.
Apply Your Changes to the Document
After configuring the above options, you’ll need to select how you want your changes applied to your document. At the bottom of the menu, click the dropdown menu arrow next to the “Apply Changes To” option.
If you want your changes to apply to every page and section of your document, select the “Whole Document” option. Or select “This Section” to apply changes only to the section of the document you’re currently in. (Note that this option will not appear if you have no section breaks in your document.)
Once you’re satisfied with your settings, click the “Apply” button in the bottom right of the menu.
You can also insert a new footnote using your selected settings by clicking the “Insert” button in the lower left corner of the menu.
How to Cross-Reference Footnotes and Endnotes in Word 2016
If you want to use the same footnote or endnote more than once throughout your text, there’s an easy way to do it without having to insert the same thing over and over again.
Place your insertion point where you want a reference inserted into the text. On the References tab, click the “Cross-Reference” button.
In the Cross-Reference window, choose either “Footnote” or “Endnote” from the “Reference Type” dropdown menu.
Next, click the “Insert Reference To” dropdown menu.
The “Footnote Number” option inserts the number of the footnote in regular text, while the “Footnote Number (Formatted)” option inserts the number of the footnote in superscript. The “Page Number” option inserts the number of the referenced page instead of the footnote number. The “Above/Below” option inserts either the word “Above” or “Below” depending on where the original footnote appears in relation to the cross-reference. Select your desired option.
Word lets you create hyperlinks between cross-references so you can easily find the same footnote everywhere it appears in your document. The “Insert as Hyperlink” option is checked by default, so you can click any cross-reference and automatically be taken to the part of the document containing the original footnote. We recommend leaving this option checked, but you can uncheck it if you prefer.
Under the “For Which Footnote” option, select the footnote you’d like to cross-reference, and then click the “Insert” button at the bottom of the menu.
READ NEXT
- › How to Add Footnotes in Google Docs
- › How to Cross-Reference in Microsoft Word
- › Learn These Microsoft Word Features to Make College Easier
- › How to Create Your Own Bibliography Template in Microsoft Word
- › Mozilla Wants Your Feature Suggestions for Thunderbird
- › How to Adjust and Change Discord Fonts
- › BLUETTI Slashed Hundreds off Its Best Power Stations for Easter Sale
- › Expand Your Tech Career Skills With Courses From Udemy
Footnotes are short notes at the bottom of the page that provide explanations, additional comments, or an understanding of a particular word or phrase in the document content. Endnotes are the same as footnotes but appear at the end of an entire section or document.

Footnotes or endnotes in the document must be formatted according to the requirements accepted by your college, university, company, established on the project, etc.
The number or symbol inserted in the document content to refer to a footnote or endnote is called a reference mark. Footnotes appear on the same page as their reference marks, and endnotes appear at the end of the document or section (see more about their customization below). In most views, footnotes or endnotes are separated from the body text by a note separator line (see how to change a note separator line).
The numbering is always correct if you insert footnotes or endnotes using the Word’s Footnote and Endnote functionality. Even after changes are made to the document, Word automatically moves the footnotes to the correct page and renumbers them accordingly.
Note: You can use footnotes and endnotes in the same document.
Insert a Footnote or Endnote
Word offers several useful features to insert footnotes and endnotes. You can:
- Insert the Footnote with the default format using the Insert Footnote button
- Insert the Endnote with the default format using the Insert Endnote button
- Insert the Footnote and Endnote using shortcut keys
- Insert the Footnote and Endnote using the custom format
Note: To reference a single footnote or endnote multiple times in the document text with the automatic numbering, you can use cross-references.
Insert the Footnote using the Insert Footnote button
To insert the Footnote with the format used by default (Word’s default format or last saved format for the footnotes in the document), do the following:
1. Place the cursor where you want to insert the reference to the footnote.
2. On the References tab, in the Footnotes group, click the Insert Footnote button:

Word inserts the footnote at the bottom of the current page with the format used by default (superscript number of the 1, 2, 3, … numbered list). The cursor is positioned next to the inserted footnote. E.g.:
3. Enter what you need in the footnote. You can modify text style, size, color as you want using the same features as for the regular text:

Note: See how to format footnotes and endnotes for more details.
4. Double-click the number or symbol at the beginning of the footnote to return to the place in the document where you inserted a reference mark.
Insert the Endnote using the Insert Endnote button
To insert the Endnote with the format used by default (Word’s default format or last saved format for the endnotes in the document), do the following:
1. Place the cursor where you want to insert the reference to the endnote.
2. On the References tab, in the Footnotes group, click the Insert Endnote button:

Word inserts the endnote at the end of the document with the format used by default (superscript number of the i, ii, iii, … numbered list). The cursor is positioned next to the inserted endnote. E.g.:

3. Enter what you need in the endnote.
Note: See how to format footnotes and endnotes for more details.
4. Double-click the number or symbol at the beginning of the endnote to return to the place in the document where you inserted a reference mark.
Insert the Footnote and Endnote using shortcut keys
You can use the following keyboard shortcuts to insert footnotes and endnotes in a Microsoft Word document:
- Press Alt+Ctrl+F to insert a footnote.
- Press Alt+Ctrl+D to insert an endnote.
Insert the Footnote and Endnote with custom format
To insert the Footnote and Endnote in the document with the custom format, do the following:
1. Place the cursor where you want to insert the reference to the footnote or endnote.
2. On the References tab, in the Footnotes group, click the dialog box launcher:

3. In the Footnote and Endnote dialog box:

- In the Location section:
- Select Footnotes and the location:
- Bottom of page (used by default)
- Below text – if there is a space between text and a bottom margin on the page, it can be placed right after text. For example:

- Select Endnotes and the location:
- End of section
- End of document (used by default)
To insert endnotes at the end of each chapter or other parts in the document, add a section break (see how to work with breaks in Word) for each chapter or part and select the End of section option.
- Click the Convert… button to convert all footnotes to endnotes, or vice versa (see converting footnotes and endnotes below).
- Select Footnotes and the location:
- In the Footnote layout section (available only if the Footnote is selected in the Location section), select the layout from the Columns dropdown list.
As for the regular text, Word offers to create columns for the footnotes and endnotes.
- Match section layout – use the same number of columns as the document text
- 1 column
- 2 column
- 3 column
- 4 column
For example:
- Match section layout:

- 1 column:
- In the Format section:
- Choose the format you need from the Number format dropdown list:

- 1, 2, 3, … (used by default for footnotes)
- a, b, c, …
- A, B, C, …
- i, ii, iii, … (used by default for endnotes)
- I, II, III, …
- *, †, ‡, §, …
- Type the Custom mark or select it by clicking the Symbol… button to open the Symbol dialog box:

Select the symbol you need in the Symbol dialog box and click the OK button.
In English, a footnote or endnote is usually indicated by a superscript number immediately following the text or phrase to which the note refers. For some requirements, a superscript number should be placed between parentheses, for example: [1].
Note: We strongly recommend checking the requirements you need to follow. For example:
- The Chicago style allows using symbols, such as the asterisk (*) or the dagger (†), instead of numbers if there are a few footnotes in the document (see how to add different reference marks for more details).
- The American Psychological Association (APA) style and Modern Language Association (MLA) style don’t recommend using symbols as footnote identifiers.
- Optionally, select the number you need to start numbering in the Start at field.
For example, if you have several documents containing different chapters or parts of the voluminous project, you can start footnotes from a specific number in the current document.
- From the Numbering dropdown list, select one of the options:
- Continuous (used by default)
- Restart each section
- Restart each page
- Choose the format you need from the Number format dropdown list:
- In the Apply changes section, from the Apply changes to dropdown list, select one of the options:
- This section
- Whole document


4. Enter the text you need in the footnote or endnote:
5. Double-click the number or symbol at the beginning of the note to return to the document content.
Converting Footnotes and Endnotes
Word can convert footnotes to endnotes, and vice versa:
- To convert one footnote to an endnote, right-click the footnote, then click Convert to Endnote in the popup menu:

- To convert one endnote to a footnote, right-click the endnote, then click Convert to Footnote in the popup menu.
- To convert all footnotes to endnotes or convert all endnotes to footnotes, do the following:
1) Right-click any of the footnotes or endnotes, then select Note Options… in the popup menu:
2) In the Footnotes and Endnotes dialog box, click the Convert… button:

3) In the Convert Notes dialog box, choose the option you need:

- Convert all footnotes to endnotes (is active if there is at least one footnote in the document)
- Convert all endnotes to footnotes (is active if there is at least one endnote in the document)
- Swap footnotes and endnotes (is active if there are at least one footnote and one endnote in the document)


Select all footnotes in the document
To select all footnotes in the document, click inside any footnote, then press Ctrl+A.
To select all endnotes in the document, click inside any endnote, then press Ctrl+A:

Edit and move footnotes and endnotes
To edit a footnote or endnote, click inside the note and make corrections.
To move a footnote or endnote from one location in the document to another, do the following:
1. Select the reference mark in the document.
2. Do one of the following to cut the selection:
- On the Home tab, in the Clipboard group, click the Cut button:

- Right-click the selection and choose Cut in the popup menu.
- Press Ctrl+X.

3. Place the cursor in the new location.
4. Do one of the following to paste selection:
- On the Home tab, in the Clipboard group, click the Paste button.
- Right-click and choose Paste in the popup menu.
- Press Ctrl+V.
Word moves the reference mark and the note to the correct place; also, it renumbers footnotes and endnotes.
Move among footnotes and endnotes
To move among footnotes and endnotes, on the References tab, in the Footnotes group, click the Next Footnote button, then select one of the options:

- Next Footnote,
- Previous Footnote,
- Next Endnote,
- Previous Endnote.
Notes:
- To move to the next footnote, you can just click the Next Footnote button in the Footnotes group on the Reference tab.
- See more about navigating in the document.
Display footnotes or endnotes
To display the note’s content in the Word document, do one of the following:
- On the References tab, in the Footnotes group, click the Show Notes button to display the list of footnotes or endnotes:

If there are footnotes and endnotes in the document, Word asks which type of notes you want to see:

- Double-click a reference mark in the document’s body to display its corresponding footnote or endnote.


Note: If you hover the mouse over a reference mark in the document text, a tooltip appears with a full footnote or endnote text, so you don’t need to scroll up and down to check footnotes and endnotes as you read or write:

Remove the Footnote and Endnote
To delete the footnote or endnote in the Word document, select its reference mark (number or symbol that refers to the footnote or endnote), and press the Delete key.
Note: If you delete the text and the number from the footnote or endnote pane, it does not delete the number in the document text itself. Word still thinks the deleted footnote or endnote is still active. You need to delete the original reference mark in the document.
After removing any note, Microsoft Word automatically renumbers the footnotes and endnotes.
Footnotes are notes placed at the bottom area of a page. It allows you to cite references or comment on a concept without overstuffing the main text.
Inserting and managing footnotes in Microsoft Word is very simple. If you add more than one footnotes in a document, it’ll number them automatically for you. And clicking on a footnote in Word will jump to it, or place your mouse on the footnote mark to read the note as a tooltip.

To footnote in MS Word, select the text you want the footnote to reference and press Ctrl+ Alt+F (shortcut) to open the footnote section, then type the footnote text.
For detailed steps on how to add footnotes in Word, follow the instructions below.
- Select the text you want the footnote to
reference.

- Go to Reference > Footnotes > Insert Footnote.
- Alternatively, press Ctrl+ Alt+F on the keyboard.

As soon as you click on the Insert Footnote command, MS Word will superscript a number by the selected text. The insertion pointer then moves to the bottom area of the page, waiting for you to type your footnote text. There’s also a horizontal line that separates the main text from the footnote text. This line can be removed though – I’ll show you how in a moment.

- Type the footnote text

- Click back into your document main text area and continue editing.
Changing the Footnote number format
The Microsoft Word’s footnote has a habit of numbering your
footnotes as you add them into your document. You can change the number format
of the footnote so that it can use either roman numerals or other numbering
options.
To change the number format of your document’s footnote:
- Click on the more options command for Footnotes
under the Reference tab.

- The Footnote and Endnote dialog appears. Under the Format category, click to select the numbering format of your choice, then click Apply to save the settings.
