
This article will show you how to easily add/attach file like PDF, Word or any other to Excel spreadsheet.
Applies to: Excel, Excel 2013, Excel 2016, Excel 2019, Excel 365, Office 365
-
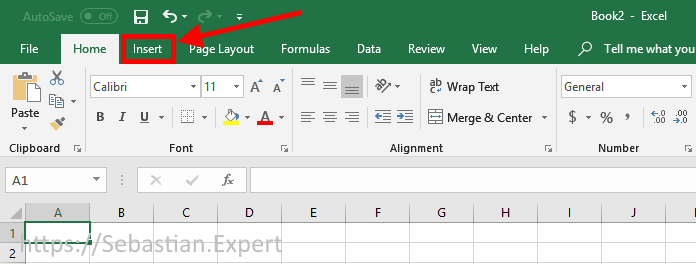
Go to Insert tab

Excel 2016/2019/365 — Home tab
-
Click Object button placed in Text group.
Narrow window

Insert Object button — narrow window
Medium width window

Insert Object button — medium width window
Maximum width window
Insert Object button — max width window
-
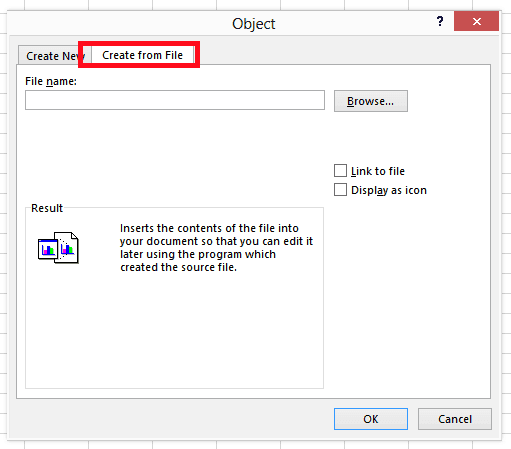
Click Create from file and browse for the file.

Click to enlarge


![]()
Download Article
![]()
Download Article
Do you need to create a spreadsheet in Microsoft Excel but have no idea where to begin? You’ve come to the right place! While Excel can be intimidating at first, creating a basic spreadsheet is as simple as entering data into numbered rows and lettered columns. Whether you need to make a spreadsheet for school, work, or just to keep track of your expenses, this wikiHow article will teach you everything you know about editing your first spreadsheet in Microsoft Excel.
-

1
Open Microsoft Excel. You’ll find it in the Start menu (Windows) or in the Applications folder (macOS). The app will open to a screen that allows you to create or select a document.
- If you don’t have a paid version of Microsoft Office, you can use the free online version at https://www.office.com to create a basic spreadsheet. You’ll just need to sign in with your Microsoft account and click Excel in the row of icons.
-
2
Click Blank workbook to create a new workbook. A workbook is the name of the document that contains your spreadsheet(s). This creates a blank spreadsheet called Sheet1, which you’ll see on the tab at the bottom of the sheet.
- When you make more complex spreadsheets, you can add another sheet by clicking + next to the first sheet. Use the bottom tabs to switch between spreadsheets.
Advertisement
-
3
Familiarize yourself with the spreadsheet’s layout. The first thing you’ll notice is that the spreadsheet contains hundreds of rectangular cells organized into vertical columns and horizontal rows. Some important things to note about this layout:
- All rows are labeled with numbers along the side of the spreadsheet, while the columns are labeled with letters along the top.
- Each cell has an address consisting of the column letter followed by the row number. For example, the address of the cell in the first column (A), first row (1) is A1. The address of the cell in column B row 3 is B3.
-
4
Enter some data. Click any cell one time and start typing immediately. When you’re finished with that cell, press the Tab ↹ key to move to the next cell in the row, or the ↵ Enter key to the next cell in the column.
- Notice that as you type into the cell, the content also appears in the bar that runs across the top of the spreadsheet. This bar is called the Formula Bar and is useful for when entering long strings of data and/or formulas.[1]
- To edit a cell that already has data, double-click it to bring back the cursor. Alternatively, you can click the cell once and make your changes in the formula bar.
- To delete the data from one cell, click the cell once, and then press Del. This returns the cell to a blank one without messing up the data in other rows or columns. To delete multiple cell values at once, press Ctrl (PC) or ⌘ Cmd (Mac) as you click each cell you want to delete, and then press Del.
- To add a new blank column between existing columns, right-click the letter above the column after where you’d like the new one to appear, and then click Insert on the context menu.
- To add a new blank row between existing rows, right-click the row number for the row after the desired location, and then click Insert on the menu.
- Notice that as you type into the cell, the content also appears in the bar that runs across the top of the spreadsheet. This bar is called the Formula Bar and is useful for when entering long strings of data and/or formulas.[1]
-
5
Check out the functions available for advanced uses. One of the most useful features of Excel is its ability to look up data and perform calculations based on mathematical formulas. Each formula you create contains an Excel function, which is the «action» you’re performing. Formulas always begin with an equal (=) sign followed by the function name (e.g., =SUM, =LOOKUP, =SIN). After that, the parameters should be entered between a set of parentheses (). Follow these steps to get an idea of the type of functions you can use in Excel:
- Click the Formulas tab at the top of the screen. You’ll notice several icons in the toolbar at the top of the application in the panel labeled «Function Library.» Once you know how the different functions work, you can easily browse the library using those icons.
- Click the Insert Function icon, which also displays an fx. It should be the first icon on the bar. This opens the Insert Function panel, which allows you to search for what you want to do or browse by category.
- Select a category from the «Or select a category» menu. The default category is «Most Recently Used.» For example, to see the math functions, you might select Math & Trig.
- Click any function in the «Select a function» panel to view its syntax, as well as a description of what the function does. For more info on a function, click the Help on this function.
- Click Cancel when you’re done browsing.
- To learn more about entering formulas, see How to Type Formulas in Microsoft Excel.
-
6
Save your file when you’re finished editing. To save the file, click the File menu at the top-left corner, and then select Save As. Depending on your version of Excel, you’ll usually have the option to save the file to your computer or OneDrive.
- Now that you’ve gotten the hang of the basics, check out the «Creating a Home Inventory from Scratch» method to see this information put into practice.


Advertisement
-
1
Open Microsoft Excel. You’ll find it in the Start menu (Windows) or in the Applications folder (macOS). The app will open to a screen that allows you to create or open a workbook.
-
2
Name your columns. Let’s say we’re making a list of items in our home. In addition to listing what the item is, we might want to record which room it’s in and its make/model. We’ll reserve row 1 for column headers so our data is clearly labeled. [2]
.- Click cell A1 and type Item. We’ll list each item in this column.
- Click cell B1 and type Location. This is where we’ll enter which room the item is in.
- Click cell C1 and type Make/Model. We’ll list the item’s model and manufacturer in this column.
-
3
Enter your items on each row. Now that our columns are labeled, entering our data into the rows should be simple. Each item should get its own row, and each bit of information should get its own cell.
- For example, if you’re listening the Apple HD monitor in your office, you may type HD monitor into A2 (in the Item column), Office into B2 (in the Location column), and Apple Cinema 30-inch M9179LL into B3 (the Make/Model column).
- List additional items on the rows below. If you need to delete a cell, just click it once and press Del.
- To remove an entire row or column, right-click the letter or number and select Delete.
- You’ve probably noticed that if you type too much text in a cell it’ll overlap into the next column. You can fix this by resizing the columns to fit the text. Position the cursor on the line between the column letters (above row 1) so the cursor turns into two arrows, and then double-click that line.
-
4
Turn the column headers into drop-down menus. Let’s say you’ve listed hundreds of items throughout your home but only want to view those stored in your office. Click the 1 at the beginning of row 1 to select the whole row, and then do the following:
- Click the Data tab at the top of Excel.
- Click Filter (the funnel icon) in the toolbar. Small arrows now appear on each column header.
- Click the Location drop-down menu (in B1) to open the filter menu.
- Since we just want to see items in the office, check the box next to «Office» and remove the other checkmarks.
- Click OK. Now you’ll only see items the selected room. You can do this with any column and any data type.
- To restore all items, click the menu again and check «Select All» and then OK to restore all items.
-
5
Click the Page Layout tab to customize the spreadsheet. Now that you’ve entered your data, you may want to customize the colors, fonts, and lines. Here are some ideas for doing so:
- Select the cells you want to format. You can select an entire row by clicking its number, or an whole column by clicking its letter. Hold Ctrl (PC) or Cmd (Mac) to select more than one column or row at a time.
- Click Colors in the «Themes» area of the toolbar to view and select color theme.
- Click the Fonts menu to browse for and select a font.
-
6
Save your document. When you’ve reached a good stopping point, you can save the spreadsheet by clicking the File menu at the top-left corner and selecting Save As.


Advertisement
-
1
Open Microsoft Excel. You’ll find it in the Start menu (Windows) or in the Applications folder (macOS). The app will open to a screen that allows you to create or open a workbook.
- This method covers using a built-in Excel template to create a list of your expenses. There are hundreds of templates available for different types of spreadsheets. To see a list of all official templates, visit https://templates.office.com/en-us/templates-for-excel.
-
2
Search for the «Simple Monthly Budget» template. This is a free official Microsoft template that makes it easy to calculate your budget for the month. You can find it by typing Simple Monthly Budget into the search bar at the top and pressing ↵ Enter in most versions.
-
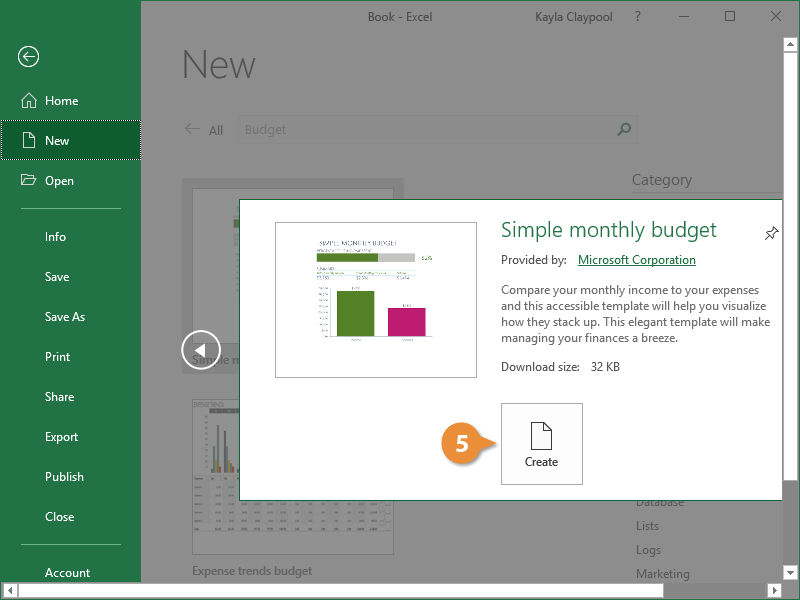
3
Select the Simple Monthly Budget template and click Create. This creates a new spreadsheet from a pre-formatted template.
- You may have to click Download instead.
-
4
Click the Monthly Income tab to enter your income(s). You’ll notice there are three tabs (Summary, Monthly Income, and Monthly Expenses) at the bottom of the workbook. You’ll be clicking the second tab. Let’s say you get income from two companies called wikiHow and Acme:
- Double-click the Income 1 cell to bring up the cursor. Erase the content of the cell and type wikiHow.
- Double-click the Income 2 cell, erase the contents, and type Acme.
- Enter your monthly income from wikiHow into the first cell under the «Amount» header (the one that says «2500» by default). Do the same with your monthly income from «Acme» in the cell just below.
- If you don’t have any other income, you can click the other cells (for «Other» and «$250») and press Del to clear them.
- You can also add more income sources and amounts in the rows below those that already exist.
-
5
Click the Monthly Expenses tab to enter your expenses. It’s the third tab at the bottom of the workbook. Those there are expenses and amounts already filled in, you can double-click any cell to change its value.
- For example, let’s say your rent is $795/month. Double-click the pre-filled amount of «$800,» erase it, and then type 795.
- Let’s say you don’t have any student loan payments to make. You can just click the amount next to «Student Loans» in the «Amount» column ($50) and press Del on your keyboard to clear it. Do the same for all other expenses.
- You can delete an entire row by right-clicking the row number and selecting Delete.
- To insert a new row, right-click the row number below where you want it to appear, and then select Insert.
- Make sure there are no extra amounts that you don’t actually have to pay in the «Amounts» column, as they’ll be automatically factored into your budget.
-
6
Click the Summary tab to visualize your budget. Once you’ve entered your data, the chart on this tab will automatically update to reflect your income vs. your expenses.
- If the info doesn’t calculate automatically, press F9 on the keyboard.
- Any changes you make to the Monthly Income and Monthly Expenses tabs will affect what you see in your Summary.
-
7
Save your document. When you’ve reached a good stopping point, you can save the spreadsheet by clicking the File menu at the top-left corner and selecting Save As.


Advertisement
Add New Question
-
Question
How do I name a spreadsheet?

When you click «Save As,» at the bottom of the page there should be a file name box. Whatever you type into that box will be your spreadsheet’s name.
-
Question
Can I rename the columns, instead of A, B, C, etc.?
You cannot change those labels. Typically, the name of the column is simply written in the first row.
-
Question
How do I make more space to type in the boxes?
As you’re typing, select the cell where you want the text to be and select «Wrap Text» at the top of the page. This will contain all of the text to the same cell, which will grow as you type.
See more answers
Ask a Question
200 characters left
Include your email address to get a message when this question is answered.
Submit
Advertisement
Thanks for submitting a tip for review!
About This Article
Article SummaryX
1. Open Excel.
2. Click New Blank Workbook.
3. Enter column headers into row 1.
4. Enter data on individual rows.
5. Click the Page Layout tab to format the data.
6. Click File > Save As to save the document.
Did this summary help you?
Thanks to all authors for creating a page that has been read 2,886,243 times.
Is this article up to date?
Creating a new workbook is one of the most basic commands you need to know in Excel. You can create a new, blank workbook or create a new workbook based on a variety of pre-designed templates.
Create a Blank Workbook
Most of the time you’ll want to create a blank workbook.
- Click the File tab.

- Click New.
- Select Blank workbook.

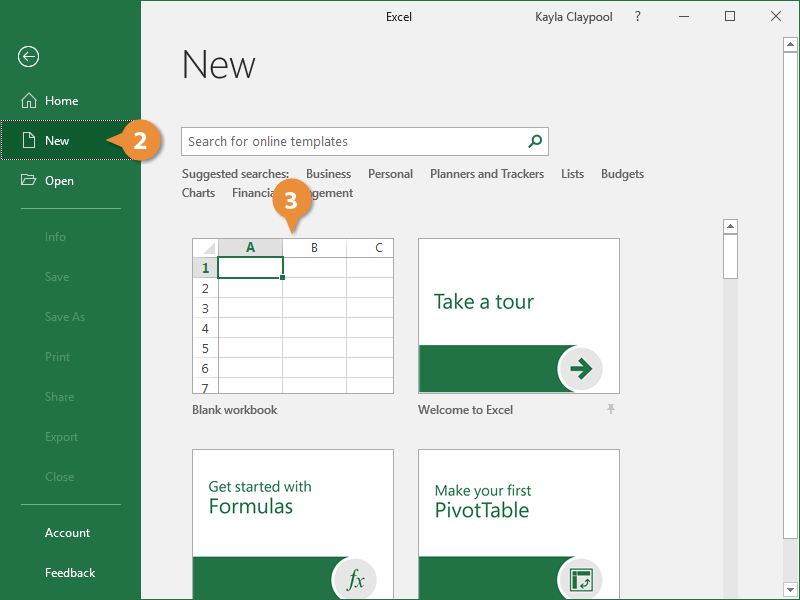
Press Ctrl + N to quickly create a new blank workbook.
A new, blank workbook is created, and you can start entering data.
Create a Workbook from a Template
If you need help getting started with a common document, such as an invoice, expense report, or calendar, you can use one of Excel’s templates instead of starting from scratch.
- Click the File tab.
- Click New.
- Find the template you want by:
- Searching for the type of template you want, using keywords that describe it, such as “calendar” or “invoice”.
- Clicking a suggested search, located below the search field.
- Selecting the template you want, if it already appears on the page.
- Select a template style.
- Click Create.

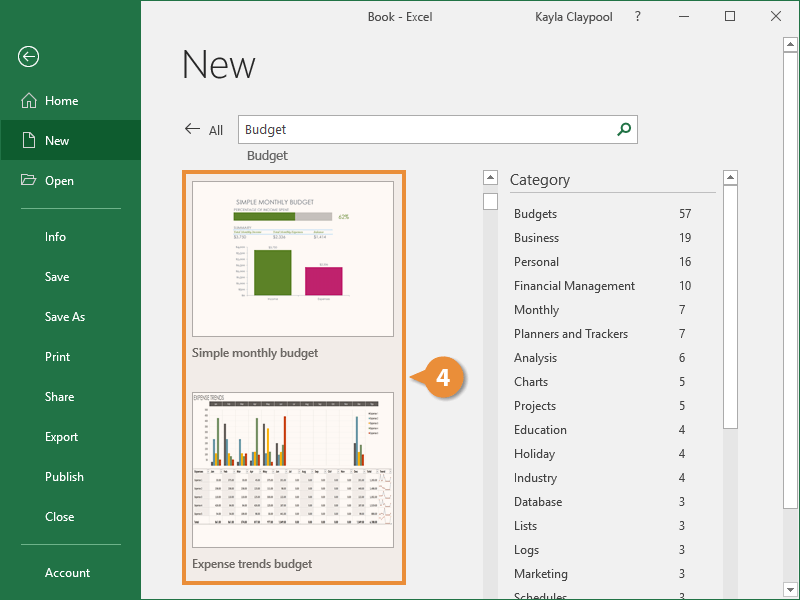
Excel will create a new workbook, based on the template you select.
A new workbook is created from the template, and you can start populating it with your own data.

FREE Quick Reference
Click to Download
Free to distribute with our compliments; we hope you will consider our paid training.
Create a new workbook
A workbook is a file that contains one or more worksheets to help you organize data. You can create a new workbook from a blank workbook or a template.

Create a workbook
-
Open Excel.
-
Select Blank workbook or press Ctrl+N.
-
Start typing.
Create a workbook from a template
-
Select File > New.
-
Double-click a template.
-
Click and start typing.
Open a new, blank workbook
-
Click the File tab.
-
Click New.
-
Under Available Templates, double-click Blank Workbook.
Keyboard shortcut To quickly create a new, blank workbook, you can also press CTRL+N.
Tips:
-
By default, a new workbook contains three worksheets, but you can change the number of worksheets that you want a new workbook to contain.
For more information, see Change the number of worksheets in a new workbook.
-
You can also add and remove worksheets as needed.
For more information about how to add or remove worksheets, see Insert or delete a worksheet.
Base a new workbook on an existing workbook
-
Click the File tab.
-
Click New.
-
Under Templates, click New from existing.
-
In the New from Existing Workbook dialog box, browse to the drive, folder, or Internet location that contains the workbook that you want to open.
-
Click the workbook, and then click Create New.
Base a new workbook on a template
-
Click the File tab.
-
Click New.
-
Do one of the following:
-
To use one of the sample templates that come with Excel, under Available Templates, click Sample Templates and then double-click the template that you want.
-
To use a recently used template, click Recent Templates, and then double-click the template that you want.
-
To use your own template, on the My Templates, and then on the Personal Templates tab in the New dialog box, double-click the template that you want.
Note: The Personal Templates tab lists the templates that you have created. If you do not see the template that you want to use, make sure that it is located in the correct folder. Custom templates are typically stored in the Templates folder, which is usually C:Usersuser_nameAppDataLocalMicrosoftTemplates in Windows Vista, and C:Documents and Settingsuser_nameApplication DataMicrosoftTemplates in Microsoft Windows XP.
-
Tip: To obtain more workbook templates, you can download them from Microsoft Office.com. In Available Templates, under Office.com Templates, click a specific template category, and then double-click the template that you want to download.
Need more help?
You can always ask an expert in the Excel Tech Community or get support in the Answers community.
See Also
Insert or delete a worksheet
Need more help?
Updated: 02/01/2021 by

CSV is a simple file format used to store tabular data, such as a spreadsheet or database. Files in the CSV format can be imported to and exported from programs that store data in tables, such as Microsoft Excel or OpenOffice Calc.
CSV stands for «comma-separated values». Its data fields are often separated, or delimited, by a comma.
Example spreadsheet data
For example, let’s say you had a spreadsheet containing the following data.
| Name | Class | Dorm | Room | GPA |
|---|---|---|---|---|
| Sally Whittaker | 2018 | McCarren House | 312 | 3.75 |
| Belinda Jameson | 2017 | Cushing House | 148 | 3.52 |
| Jeff Smith | 2018 | Prescott House | 17-D | 3.20 |
| Sandy Allen | 2019 | Oliver House | 108 | 3.48 |
The above data could be represented in a CSV-formatted file as follows:
Sally Whittaker,2018,McCarren House,312,3.75
Belinda Jameson,2017,Cushing House,148,3.52
Jeff Smith,2018,Prescott House,17-D,3.20
Sandy Allen,2019,Oliver House,108,3.48
Here, the fields of data in each row are delimited with a comma and individual rows are separated by a newline.
Creating a CSV file
A CSV is a text file, so it can be created and edited using any text editor. More frequently, however, a CSV file is created by exporting (File > Export) a spreadsheet or database in the program that created it. Click a link below for the steps to create a CSV file in Notepad, Microsoft Excel, OpenOffice Calc, and Google Docs.
- Notepad (or any text editor)
- Microsoft Excel
- OpenOffice Calc
- Google Docs
Notepad (or any text editor)
To create a CSV file with a text editor, first choose your favorite text editor, such as Notepad or vim, and open a new file. Then enter the text data you want the file to contain, separating each value with a comma and each row with a new line.
Title1,Title2,Title3
one,two,three
example1,example2,example3
Save this file with the extension .csv. You can then open the file using Microsoft Excel or another spreadsheet program. It would create a table of data similar to the following:
| Title1 | Title2 | Title3 |
| one | two | three |
| example1 | example2 | example3 |
In the CSV file you created, individual fields of data were separated by commas. But what if the data itself has commas in it?
If the fields of data in your CSV file contain commas, you can protect them by enclosing those data fields in double quotes («). The commas that are part of your data are kept separate from the commas which delimit the fields themselves.
For example, let’s say that one of our text fields is a user-created description that allows commas in the description. If our data looked like this:
| Lead | Title | Phone | Notes |
| Jim Grayson | Senior Manager | (555)761-2385 | Spoke Tuesday, he’s interested |
| Prescilla Winston | Development Director | (555)218-3981 | said to call again next week |
| Melissa Potter | Head of Accounts | (555)791-3471 | Not interested, gave referral |
To retain the commas in our «Notes» column, we can enclose those fields in quotation marks. For instance:
Lead,Title,Phone,Notes
Jim Grayson,Senior Manager,(555)761-2385,"Spoke Tuesday, he's interested"
Prescilla Winston,Development Director,(555)218-3981,said to call again next week
Melissa Potter,Head of Accounts,(555)791-3471,"Not interested, gave referral"
As you can see, only the fields that contain commas are enclosed in quotes.
The same goes for newlines which may be part of your field data. Any fields containing a newline as part of its data need to be enclosed in double quotes.
If your fields contain double quotes as part of their data, the internal quotation marks need to be doubled so they can be interpreted correctly. For instance, given the following data:
| Player | Position | Nicknames | Years Active |
|---|---|---|---|
| Skippy Peterson | First Base | «Blue Dog», «The Magician» | 1908-1913 |
| Bud Grimsby | Center Field | «The Reaper», «Longneck» | 1910-1917 |
| Vic Crumb | Shortstop | «Fat Vic», «Icy Hot» | 1911-1912 |
We can represent it in a CSV file as follows:
Player Name,Position,Nicknames,Years Active
Skippy Peterson,First Base,"""Blue Dog"", ""The Magician""",1908-1913
Bud Grimsby,Center Field,"""The Reaper"", ""Longneck""",1910-1917
Vic Crumb,Shortstop,"""Fat Vic"", ""Icy Hot""",1911-1912
Here, the entire data field is enclosed in quotes, and internal quotation marks are preceded (escaped by) an additional double quote.
Here are the rules of how data should be formatted in a CSV file, from the IETF’s document, RFC 4180. In these examples, «CRLF» represents a carriage return and a linefeed (which together constitute a newline).
- Each record (row of data) is to be on a separate line, delimited by a line break. For example:
aaa,bbb,ccc CRLF
- The last record in the file may or may not have an ending line break. For example:
aaa,bbb,ccc CRLF zzz,yyy,xxx
- There may be an optional header line appearing as the first line of the file with the same format as normal record lines. The header contains names corresponding to the fields in the file. Also, it should contain the same number of fields as the records in the rest of the file. For example:
field_name,field_name,field_name CRLF aaa,bbb,ccc CRLF zzz,yyy,xxx CRLF
- In the header and each record, there may be one or more fields, separated by commas. Each line should contain the same number of fields throughout the file. Spaces are considered part of a field and should not be ignored. The last field in the record must not be followed by a comma. For example:
aaa,bbb,ccc
- Each field may or may not be enclosed in double quotes. If fields are not enclosed with double quotes, then double quotes may not appear inside the fields. For example:
"aaa","bbb","ccc" CRLF zzz,yyy,xxx
- Fields containing line breaks (CRLF), double quotes, and commas should be enclosed in double quotes. For example:
"aaa","b CRLF bb","ccc" CRLF zzz,yyy,xxx
- If double quotes enclose fields, then a double quote appearing inside a field must be escaped by preceding it with another double quote. For example:
"aaa","b""bb","ccc"
Microsoft Excel
To create a CSV file using Microsoft Excel, launch Excel and then open the file you want to save in CSV format. For example, below is the data contained in our example Excel worksheet:
| Item | Cost | Sold | Profit |
|---|---|---|---|
| Keyboard | $10.00 | $16.00 | $6.00 |
| Monitor | $80.00 | $120.00 | $40.00 |
| Mouse | $5.00 | $7.00 | $2.00 |
| Total | $48.00 |
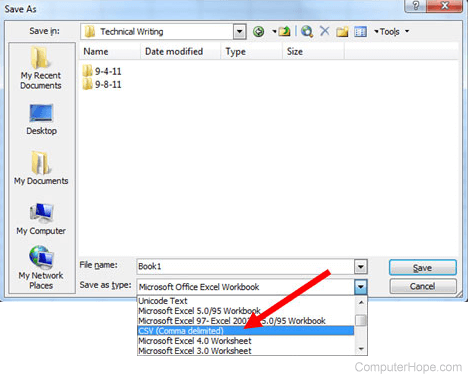
Once open, click File and choose Save As. Under Save as type, select CSV (Comma delimited) or CSV (Comma delimited) (*.csv), depending on your version of Microsoft Excel.
After you save the file, you are free to open it up in a text editor to view it or edit it manually. Its contents resemble the following:
Item,Cost,Sold,Profit
Keyboard,$10.00,$16.00,$6.00
Monitor,$80.00,$120.00,$40.00
Mouse,$5.00,$7.00,$2.00
,,Total,$48.00
Note
The last row begins with two commas because the first two fields of that row were empty in our spreadsheet. Don’t delete them — the two commas are required so that the fields correspond from row to row. They cannot be omitted.
OpenOffice Calc
To create a CSV file using OpenOffice Calc, launch Calc and open the file you want to save as a CSV file. For example, below is the data contained in our example Calc worksheet.
| Item | Cost | Sold | Profit |
|---|---|---|---|
| Keyboard | $10.00 | $16.00 | $6.00 |
| Monitor | $80.00 | $120.00 | $40.00 |
| Mouse | $5.00 | $7.00 | $2.00 |
| Total | $48.00 |
Once open, click File, choose the Save As option, and for the Save as type option, select Text CSV (.csv) (*.csv).
If you were to open the CSV file in a text editor, such as Notepad, it would resemble the example below.
Item,Cost,Sold,Profit
Keyboard,$10.00,$16.00,$6.00
Monitor,$80.00,$120.00,$40.00
Mouse,$5.00,$7.00,$2.00
,,Total,$48.00
As in our Excel example, the two commas at the beginning of the last line make sure the fields correspond from row to row. Do not remove them!
Google Docs
Open Google Docs and open the spreadsheet file you want to save as a CSV file. Click File, Download as, and then select CSV (current sheet).
Skip to content
How to Insert Attachments in Excel?

Do you ever need to insert files into Excel, so you can share more comprehensive information with your colleagues? Either to insert PDF into Excel or to insert word documents into Excel, it’s just as simple as clicking on Insert, Text, Object, choosing your file, and voila!
Then, what happens after? Your file will float around your spreadsheet and not into a single cell. Yet, to be able to sort or move it with the rest of the content, what you really need is to put it into a single cell. How can you do this?
In this brief article, we will see how Excel can better handle your attachments, then we will look into an alternative that integrates with Excel: RowShare, an online table that offers a collaboration solution.
Insert Files into Excel Sheet
There are several ways to insert files into Excel sheet. You can either create from files, create new or add link to files. We will explore how to do it one by one.
If you want to create from an existing file, follow these steps:
- Select the cell into which you want to insert your file
- Click on the “Insert” tab
- Click on “Object” under the “Text” group
- Select “Create from File”
- Browse your file
- Select the “Display as icon” check box to if you want to insert an icon linking to the files
- Click on “OK”
Another possibility is to create a new file. You can do that by selecting “Create New” instead, and choose the type of object you want to attach. A new window will then pop up and you can create a new file you want to insert.
If you only want to add a link to the file instead of embedding the file, select the “Link to File” check box. The file should be stored in a location accessible to those with whom you want to share it. If the link to your file redirects to your computer, you will be the only one able to open it. Other than that, the location of the file should remain the same, if you move it to different location, the link won’t work anymore.
Attach Files in Excel, Within Excel Cells

Once you have made it to insert word documents into Excel or attach PDF to Excel, you probably realize that what you need is to insert your file into a single cell. To do this, follow these steps:
- Resize your file or cell until they fit each other
- Right click on your file and select “Format Object”
- Click on the “Properties” tab
- Select “Move and size with cells”
Since your Excel file size will be the size of the sheet itself plus the size of each other files attached, your Excel size will then be so huge. Also, as you can see here, there is no direct way to insert your file to an Excel cell automatically.
So, crunch time: Should I follow all these long endless steps or should I stick to the traditional way and exchange my files using email instead?
Attach Files Easily with RowShare
It’s time to say goodbye to complicated spreadsheet and endless email exchange. RowShare, an online table focusing in sharing and collaboration, offers a simpler solution. You can insert attachments within a click of a mouse! Start by creating a table from RowShare’s templates or from scratch.
Attach your files by following these super simple steps:
- Add a column of type “File” to your table
- Click on the cell, browse your file and attach it to your RowShare table
You can also control your table and files the way you want it, from sorting, filtering, setting columns as read only, you name it. It couldn’t be any simpler, here is a quick video if you need help:
When it comes to collecting, centralizing and sharing data with your coworkers, partners, suppliers, clients, RowShare is a real time-saver !
Discover all the things you could do :
Tip: If you already have your table in Excel, import it to RowShare and change the appropriate column type to File. Then, click on the cell and upload the file.
Once you have finished adjusting your table in RowShare, you can then synchronize it with Excel to access the best features of both tools. When synchronizing with Excel, instead of having the file itself, you will have the link of the file in your Excel sheet.
Happy RowSharing!


Collaborative, simple and reliable.
Rowshare is the first spreadsheet designed especially for managing projects and organizing administrative tasks.
Page load link
REJECT ALLACCEPT AND CONTINUE
Privacy Overview
Go to Top
Different applications generate data in different forms.
A SaaS application might generate a report in the form of a PDF, while another application might generate data in the form of a TXT or CSV file.
The challenge lies in consolidating the data into a single application that can work with all the data to produce the required results.
Microsoft Excel is one application that is frequently used for this, owing to its versatility in importing data from files with a wide variety of extensions.
For example, if you have a list of items saved in a Text file (or in Notepad), Excel allows you to import this list so that you can process it further.
In this tutorial we will show you two ways to convert a text file to Excel:
- By using the Text Import Wizard
- By opening the file directly in Excel
What is a Text File?
A Text file is one that contains text with no special formatting (as in bold, italic, images, etc.).
These files are identified with the ‘.txt’ extension and can be opened in any text editor, like Notepad or word processor, like Microsoft Word.
But in many cases, you can have data in a text file that you need to open in Excel and analyze there.
Thankfully, you can easily open text files in Microsoft Excel and then further work on it.
Let’s see how to do that!
Let us look at two ways in which we can convert a Text file (.txt) to Excel.
Method 1: Using the Text Import Wizard to Convert a Text File to Excel
If you have a spreadsheet open in Excel and want to import the contents of a Text file at a specific area of your spreadsheet, the Text Import Wizard might be the best way to go.
This wizard scans your text file and ensures that the data in the file is imported the way you want.
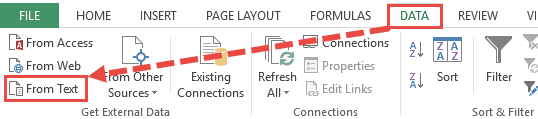
To use the Text Import Wizard, select the Data tab, followed by ‘From Text’ (which you will find under the ‘Get External Data’ group.
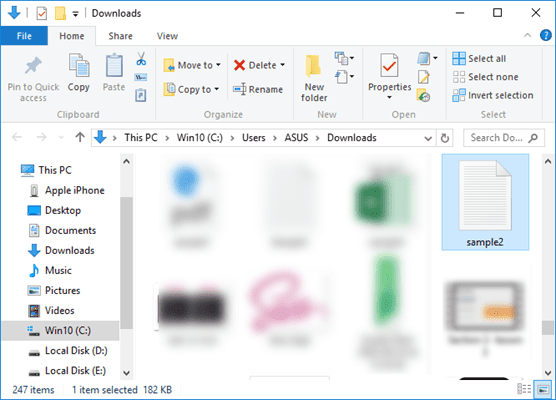
After this, select the text file that you want to import.
Your Text Import Wizard should now open automatically.
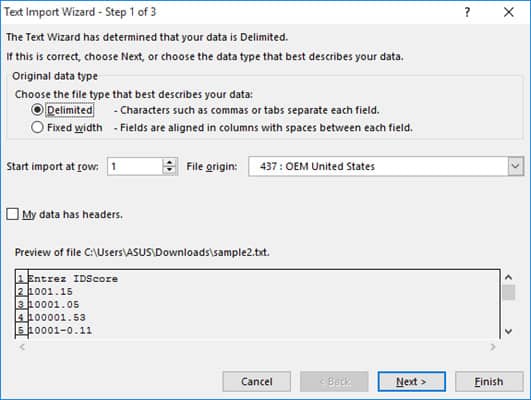
The Text Import Wizard guides you in providing the best settings to import your text file data through 3 steps:
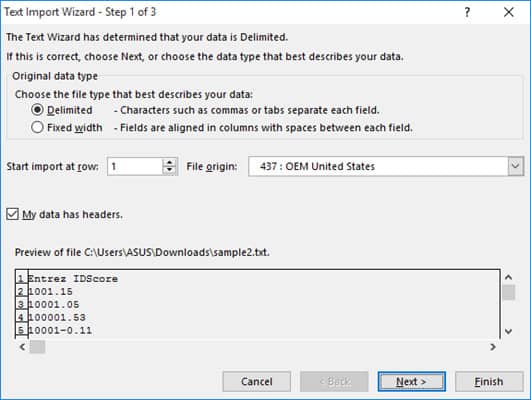
Step 1 of 3
In this step you can provide the settings for the following:
- Original Data Type: Here you can choose how you want your data to be separated into columns. You have two options:
- Delimited: Select this if your text file data is separated by tabs, colons, semicolons or other characters.
- Fixed width: Select this if all items in each column of your data are the same width.
- Start import at row: Type or select the first row of your data from where you want to start importing.
- File origin: Select the character set that your text file uses, for example 437 (for the OEM United States character set). Usually, it’s fine to leave this at the default setting.
- My data has headers: Keep this field checked if your Text file’s dataset contains headers.
Step 2 of 3
If you had selected the ‘Delimited’ radio button in Step 1, then this step lets you specify the delimiters that your data contains (for example tabs, commas, semicolons, etc.) You can also specify if you want consecutive delimiters to be counted as one.
Moreover, if your text values are enclosed in a special set of characters (for example in single or double quotes), then you can specify the character in this step.
These characters are known as ‘Text qualifiers’ and help specify if you want a set of values to be imported as one.
For example, “Scott, Steve” is imported as a single value, even though the words are separated by a comma delimiter.
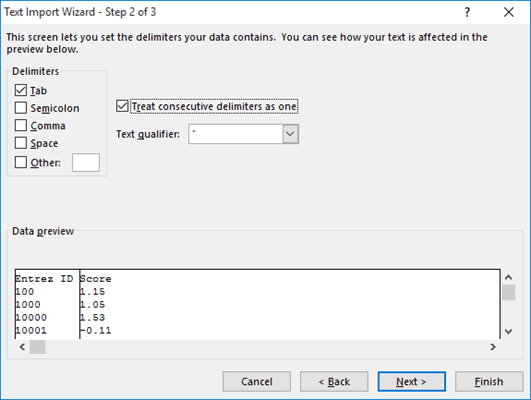
At the bottom of the screen, you can see a preview of how your data will get affected in the spreadsheet after conversion.
If you had selected the ‘Fixed Width’ radio button in Step 1, on the other hand, then Step 2 lets you specify widths for each column.
You can introduce a new column break in the preview window by simply clicking at the appropriate point on the scale.
A line with an arrow should appear to represent the column break.
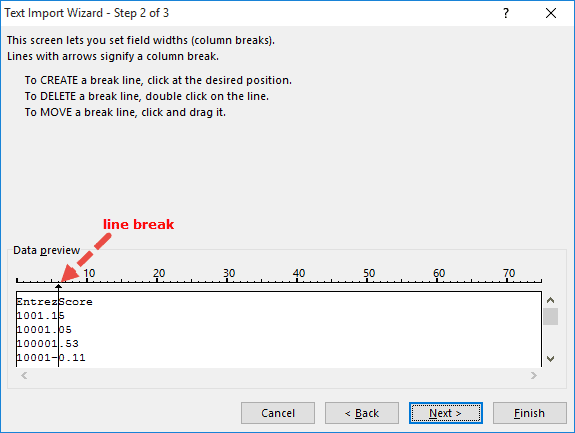
Place line breaks wherever you need to in the preview window.
If you want to move a line break, simply drag it across. If you want to remove a line, simply double-click on it.
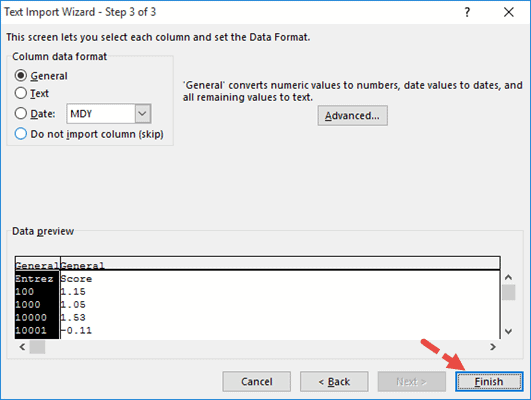
Step 3 of 3
This lets you specify the data format for each column.
You can specify if you want a column to remain in the default format set by the Text Import Wizard or if you want to set the format to be General, Text, or Date.
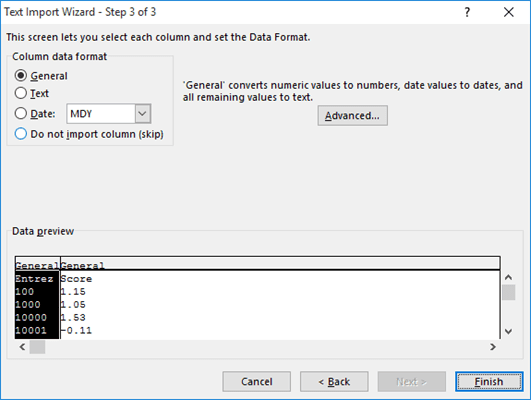
Simply select a column from the preview window and select the format you want.
If you want to remove a selected column, select the last radio button option (which says ‘Do not import column‘).
The Advanced button in this step opens the Advanced Text Import Settings dialog box.
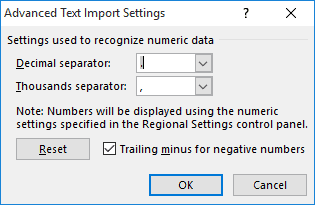
This dialog box lets you specify advanced formatting options.
For example, you can use the Advanced Text Import Settings to specify what decimal or thousands separators have been used in the text file, so that they can be made to match your computer’s regional settings.
Once you’re done providing all the settings for your imported text data, click on the Finish button.
This will open the Import Data dialog box.
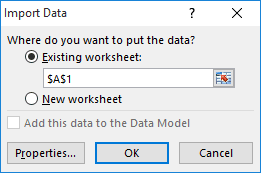
In this box, you can select where you want your text file’s data imported.
If you want to import it into the existing worksheet, you can select or type in a reference to the cell where you want Excel to start displaying the imported data.
If you want to open it in a new worksheet, however, then select the radio button next to ‘New Worksheet’.
Click OK.
Your text file should now get imported to your selected location in Excel, with the format settings that you had specified in the Text Import Wizard.

Also read: How to Open XML Files in Excel?
Method 2: Opening a Text File Directly in Excel
You can also choose to simply open the text file directly in Excel.
While opening, Excel recognizes a text file and automatically converts it into a format that can be displayed in a spreadsheet.
All you need to do is click on the File tab, select Open and then browse and select the text file that you want to open.
One issue that you are likely to face when trying to open a text file directly in Excel is trying to locate the file in the folder.
This is because Excel’s ‘Open File’ dialog box, by default, filters, and displays only Excel files like those with extensions ‘.xls’, ‘.xlsx’, etc.
It also displays CSV files, if your computer is set up to use Excel as the default application to open CSV files.
So if you don’t see your required text file in the folder when trying to open it in Excel, simply select ‘All Files’ from the ‘File Types’ drop-down, as shown below:
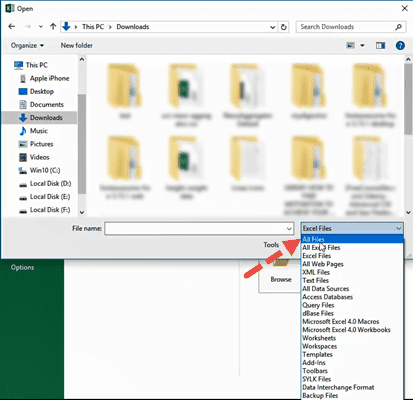
This will display the Text Import Wizard from where you can set up how you want your Text file’s data to be displayed in Excel (as shown in method 1).

You should now see your text file converted and displayed in Excel.
Once the file opens, if you still find some of the columns (or individual cells) not converted to your required format, you can convert them manually.
While this method to open the Text file directly in Excel works well, the benefit of using the first method (using Text Import Wizard) allows you to make some adjustments even before getting the data in Excel.
In this tutorial, we showed you two ways to convert and open a Text file in Excel.
A third method could be by using online tools like Online2pdf, but we did not dwell too much on this because Excel’s Text Import Wizard provides much more flexibility, allowing you to adjust your data, and format them exactly how you want them.
We hope this tutorial was helpful for you.
Other Excel tutorials you may also like:
- How to Convert a CSV File to Excel?
- How to Open VCF File in Excel?
- How to Open Excel File [xls, xlsx] Online (for FREE)
- Why does Excel Open on Startup (and How to Stop it)
- How to Make Excel File Read Only
- How to Insert an Excel file into MS Word
- How to Save Selection in Excel as PDF (3 Easy Methods)
- How to Merge Two Excel Files?
- How to Convert PDF to Excel without Software?
- How to Open DAT Files in Excel?