
Insert or delete a comment

Attaching your comments to specific parts of a document makes your feedback more clear. If someone else is commenting on the document, replying to their comments lets you have a discussion, even when you’re not all in the document at the same time.
-
Select the content you want to comment on.
-
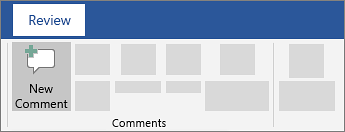
Go to Review > New Comment.
-
Type your comment. If you want to make changes to any of your comments, just go back and edit them.
-
To reply to a comment, go to the comment, and select Reply.
Note: Keep in mind that it’s possible for others to edit your comments. Comments in an Office document are stored in the file, so anyone with edit access to your file can edit your comment.
Delete comments
Right-click the comment, and choose Delete Comment.
To delete all the comments in the document, go to the Review tab, click the down-arrow on Delete, and choose Delete All Comments in Document.
-
Select the content you want to comment on.
-
Select Review > New Comment.

-
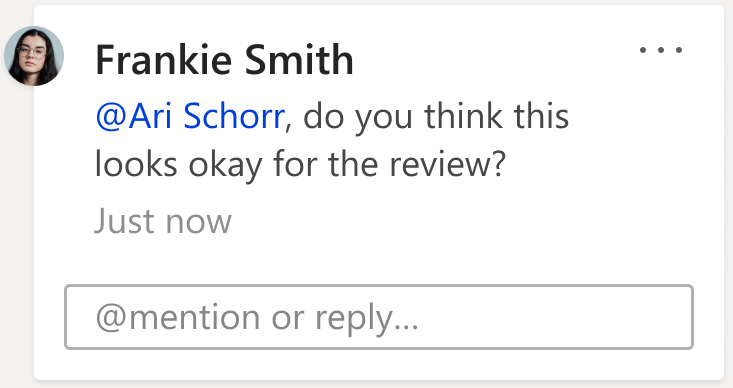
Type your comment, and select Post.
-
To reply to a comment thread, go to the comment, and select @mention or reply.


Bubbles  in the margin indicate where someone has left a comment.
Practice with comments and other collaboration features in Word by downloading this Collaborate in Word learning guide.
Edit comments
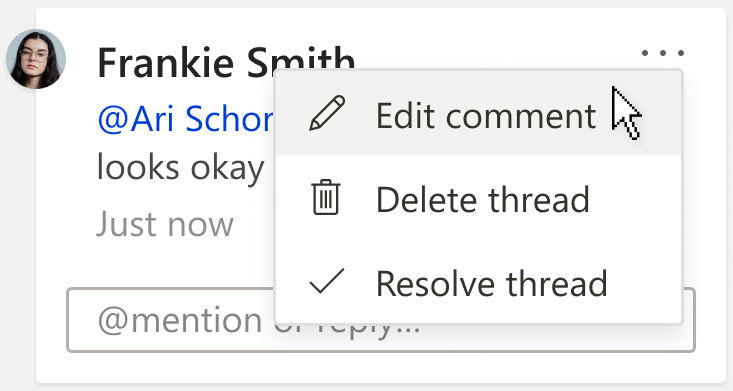
You can edit a comment by selecting Edit comment under the More thread actions drop down menu, which can be found in the top right hand corner of the comment.
Note: In Word for the Web we have restricted the Edit comment option to be available only on comments that you have authored. However, keep in mind that it may still be possible for others to edit your comments by modifying your Office file directly.
Delete comments
You can delete a comment by selecting Delete thread under the More thread actions drop down menu, which can be found in the top right hand corner of the comment.

Need more help?
-
1
Double-click a Word document you wish to change. Doing so will open the document in Microsoft Word.
-
2
Click and drag your cursor across some text. This will highlight the text. You’ll want to highlight everything on which you wish to leave a comment (e.g., an entire sentence or paragraph).
Advertisement
-
3
Right-click or two-finger click the selected text. Doing this will prompt a drop-down menu.
-
4
Click New Comment. It’s at the bottom of the right-click menu.
-
5
Type your comment. It will appear on the right side of the Microsoft Word window.
-
6
Click anywhere on the document. Doing so will cement your comment, allowing you to move on to the next section of text that needs commenting.
- Be sure to save your document before closing, or your comments won’t be saved.


Advertisement
-
1
Double-click a Word document you wish to change. Doing so will open the document in Microsoft Word.
-
2
Click the Review tab. It’s in the blue section at the top of the document’s page. Doing so will open a new set of options related to editing your document.
-
3
Click Track Changes. This option is at the top of the Word page, near the middle of the screen. Clicking it will enable Microsoft Word’s «Track Changes» feature.
-
4
Click the drop-down box next to Track Changes. Doing so will present you with the following editing options:
- Simple Markup — Draws a vertical red line on the far left side of any added or deleted text, but shows no other edits.
- All Markup — Displays all changes you make to your document in red text and comment boxes on the left side of the page.
- No Markup — Displays your changes in addition to the original document, but no red text or comment boxes appear.
- Original — Displays the original document without your changes.
-
5
Click All Markup. This option allows you to leave comments for other users to review if need be.
-
6
Click and drag your cursor across some text. This will highlight the text. You’ll want to highlight everything on which you wish to leave a comment (e.g., an entire sentence or paragraph).
-
7
Click the New Comment button. It’s near the center of the «Review» row of tools at the top of the Word window.
-
8
Type in your comment. It will appear on the right side of the Microsoft Word window.
-
9
Click anywhere on the document. Doing so will cement your comment, allowing you to move on to the next section of text that needs commenting.
- Be sure to save your document before closing to make sure that your comments are preserved.


Advertisement
-
1
Double-click a Word document you wish to change. Doing so will open the document in Microsoft Word.
-
2
Click the Review tab. It’s in the blue section at the top of the document’s page. Doing so will open a new set of options related to editing your document.
-
3
Click Track Changes. This option is at the top of the Word page, near the middle of the screen. Clicking it will enable Microsoft Word’s «Track Changes» feature.
-
4
Click the drop-down box next to Track Changes. Doing so will present you with the following editing options:
- Simple Markup — Draws a vertical red line on the far left side of any added or deleted text, but shows no other edits.
- All Markup — Displays all changes you make to your document in red text and comment boxes on the left side of the page.
- No Markup — Displays your changes in addition to the original document, but no red text or comment boxes appear.
- Original — Displays the original document without your changes.
-
5
Click All Markup. This option allows you to leave comments for other users to review if need be.
-
6
Click Ink Comment. It’s in the top-right corner of the «Comments» section of the toolbar at the top of the page.
-
7
Write your comment. You’ll do so in the pane on the right side of the page.
- If your computer doesn’t have a touchscreen, you can click and drag the mouse to draw.
- The horizontal lines in the pane will disappear when you submit your comment.
-
8
Click or tap anywhere on the document. Doing so will cement your comment, allowing you to move on to the next section of text that needs commenting.
- Be sure to save your document before closing to make sure that your comments are preserved.


Advertisement
-
1
Double-click an edited Word document. Doing so will open the document in Microsoft Word.
-
2
Hover the cursor over a comment. You’ll see a couple of options appear below the comment.
-
3
Click Reply. It’s the leftmost option below your selected comment.
-
4
Type in your reply. It will appear indented below the original comment.
-
5
Click anywhere on the document. Doing so will cement your reply to the comment.


Advertisement
Ask a Question
200 characters left
Include your email address to get a message when this question is answered.
Submit
Advertisement
-
You can click Resolve below a comment to remove it from the right-hand editing pane.
Thanks for submitting a tip for review!
Advertisement
About This Article
Article SummaryX
1. Open a Word document.
2. Highlight text on which you wish to comment.
3. Right-click the highlighted text.
4. Click New Comment.
5. Type in your comment.
6. Click anywhere in the document.
Did this summary help you?
Thanks to all authors for creating a page that has been read 510,153 times.
Is this article up to date?
Can’t figure out how to add a comment into your Microsoft Word Document?
In this post, we’ll take you through six quick and easy steps to add a comment to a Word Documents like a pro.
How to insert a comment in Microsoft Word
To insert a comment into a Word document, follow these fool-proof steps:
- Open the Word document.
- Check the document is an editable file type.
- Select the text you would like to comment on.
- Pro-tip, be sure to highlight the specific words or sentence you would like to comment on.
- In the toolbar, click Review.
- Find and click Comments.
- Click New Comment.
- Type you comment
- Click the ESC button or in the document’s text.
If you are trying to add multiple comments to your word document, repeat these steps for each individual comment.
Deleting a comment in Microsoft Word
- Click on the Comment you are trying to delete.
- In the toolbar, click Review.
- Find and click Comments.
- Click Delete Comment.
Or right-click on your comment and press ‘Delete Comment’.
Looking for an easier way to collaborate on Word Documents?
You’ve created a word document and need to collaborate on it with others. You add comments, make edits and end up saving multiple versions. After emailing the document back and forward between your colleagues so many times, you have no idea which version is the most recent and if ‘Proposal_final_V6_FINAL2’ really is the final document.
Luckily there are dedicated tools, such as Simul Docs that make version control simple.
Using Simul Docs you can easily upload, share and collaborate on Microsoft Word Documents.
Heres how:
- Get started at simuldocs.com
- Upload your Word document to Simul.
- Simul will automatically assign Version 0.0.1 to your document
- Invite your colleagues to collaborate on the document.
- Your colleague opens the doc and makes his changes.
- Simul automatically creates Version 0.0.2 and shows you the changes made, even if Track Changes wasn’t turned on.
- Finalise and publish the final version.
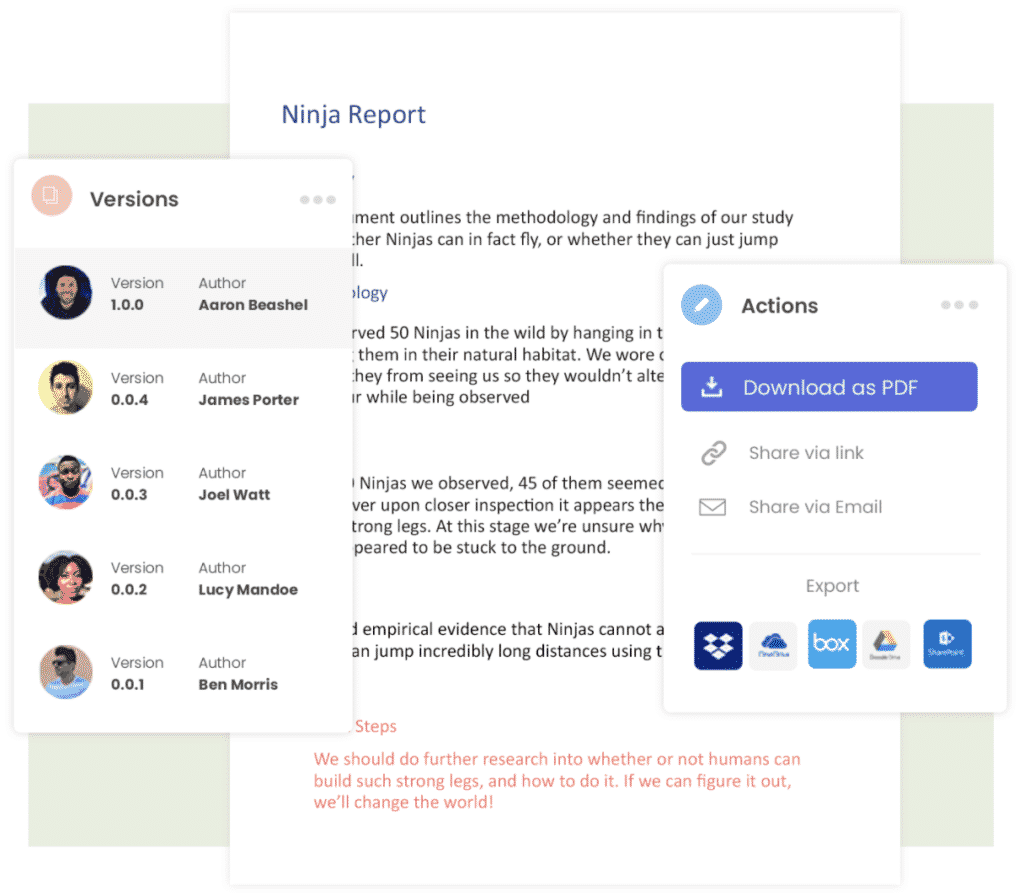
The coolest part about Simul is you won’t lose any old versions or edits along the way. Simul saves each version in an easy to navigate toolbar so you can refer back to an old version or changes with ease.
Insert a comment Select the text you want to comment on, or click at the end of the text. On the Review tab, click New Comment. Type your comment. Word shows your comment in a balloon in the document’s margin.
Contents
- 1 Why can’t I make comments in Word?
- 2 How do I add comments in Word with track changes?
- 3 How do you insert a comment in Microsoft Word 2010?
- 4 How do I insert a comment in Word without name?
- 5 How can we add comments to the changes made?
- 6 What is comment in MS Word?
- 7 How do I reply to comments in Word 2010?
- 8 What is the keyboard shortcut for adding a comment?
- 9 How do you anonymize comments in Word?
- 10 How do I show comments on the right side in Word?
- 11 How do I manage comments in Word?
- 12 How do you reply to a comment?
- 13 How do you insert a comment in Word for Mac?
- 14 What is a shortcut key for Select All comment?
- 15 How do you anonymize comments on a PDF?
- 16 How do you change the name on comments in Word Mac?
- 17 How do you display comments?
- 18 How do I show comments as bubbles in Word?
Word won’t allow you to add comments to text within a text box, as you can to regular text in your document.The first is to work around it by just adding hidden text in the text box. You can make the hidden text visible or invisible, as the need arises.
Display changes by type of edit or by reviewer
- On the Review tab, go to Tracking and select Show Markup.
- Do one of the following: Select the type of change that you want to display. For example, select Comments, Insertions and Deletions, or Formatting. The check mark next to the item indicates that the item is selected.
How to Add a Comment in Word 2010
- Open your document in Microsoft Word 2010.
- Select the text to which you wish to add a comment, or click in the location of the document where you wish to add the comment.
- Click the Review tab at the top of the window.
- Click the New Comment button.
- Type your comment into the field.
2 Methods to Change Author Names for Comments
- First and foremost, click “Review” tab.
- Then click “Track Change” in “Tracking” group.
- Next, click “Change User Name”.
- Now the “Word Options” dialog box will pop up. Make sure the “General” tab is displayed. Then change the user name and initials.
- Finally, click “OK”.
2. How can we add comments to the changes made?
- Select the text or item that you want to comment on, or click to insert the cursor near the text that you want to comment on.
- On the Review tab, under Comments, click New.
- Type the comment text in the comment balloon.
Comments can be added to a document that do not change the document. You can insert a comment inside balloons that will appear in the document margins. They can also be hidden until you want to edit your paper.
You cannot directly respond to a comment in Word 2010 as available in Word 2013. However, you can click/highlight the comment you want to reply to > click Review tab > click New Comment and start replying.
It’s Ctrl+Alt+M (that’s intuitive… Not!) If you go looking for it yourself in the keyboard shortcuts list, you’ll find it under InsertAnnotation in the list of Review tab commands.
Making Sure Changes and Comments are Anonymous
- Click the Office button.
- At the left side of the screen choose Prepare | Inspect Document.
- Make sure all the available check boxes are selected.
- Click Inspect.
- Use the controls in the dialog box to get rid of any identifying information.
- Click the Close button when done.
You can show and hide comments using the Review tab in the Ribbon in Microsoft Word. If you add comments in a Word document, they will appear in a markup area on the right side of pages by default. If you want to show or hide comments, you’ll need to control the display of markup.
How to edit a comment in Microsoft Word documents
- Open the Word document.
- Make all comments visible.
- Click in the comment.
- Edit the text for that comment.
- Click out of the comment to save changes.
5 Rules for Responding to Comments
- Be genuinely happy to receive comments. Thanking the person for taking the time to comment is a no-brainer—yet it’s often overlooked.
- Size matters.
- Respond ASAP.
- Don’t link in comments.
- Spellcheck, spellcheck, spellcheck.
Insert a comment
- Select the text you want to comment on, or click at the end of the text.
- On the Review tab, click New Comment.
- Type your comment. Word shows your comment in a balloon in the document’s margin.
Hotkey: Ctrl + “/” Using the same key combinations again will “toggle” commenting or uncommenting the selection.
Right-click (Windows) or control-click (Mac OS) the comment or edit and select Properties. c. Under General delete the author name. Type in “Reviewer” or “Anonymous” or leave the author field blank.
2 Methods to Change Author Names for Comments
- First and foremost, click “Review” tab.
- Then click “Track Change” in “Tracking” group.
- Next, click “Change User Name”.
- Now the “Word Options” dialog box will pop up. Make sure the “General” tab is displayed. Then change the user name and initials.
- Finally, click “OK”.
Find the “Review” tab, select the “Tracking” group, and click on “Show Markup”. Rest your pointer on Balloons, and then select “Show All Revisions inline” to display comments inline and deletions with strikethroughs. Rest your pointer on a comment inside the document. The comment will appear in a ScreenTip.
Click the Review tab on the Ribbon, then click the Balloons command. In the drop down list, click on Show Revisions in Balloons or Show Only Comments and Formatting in Balloons.
How comments in Word work
Learn how to add comments in Word, how to remove comments in Word, print without comments, change font size of comments, etc.
In Word, you can use comments to add notes to the document content. Comments are saved with the document and travel with the document if you share it with others. Comments are especially useful in the editing and reviewing process of a Word document. Different people can add comments and reply to other people’s comments. When finished, all comments can easily be deleted.
Word has a number of built-in tools dedicated to comments. In this article, you will learn how comments in Word work and how to use the comment tools. The basic information about comments applies to both the built-in comment functionality and the functionality of the DocTools CommentManager add-in.
The information in this article applies to Word 2013, Word 2016, Word 2019, Word 2021, and Word for Microsoft 365 on PC/Windows. Part of the information in this article also applies to Word 2010 and earlier versions but the comment tools and the ways to access them differ. In case of Word for Microsoft 365, see the notes below about Modern Comments.
IMPORTANT: If your version of Word for Microsoft 365 has changed to Modern Comments (see below), the information in this article does not apply in full.
I will wait to update this article to fully cover the Modern Comments features until Microsoft has settled on functionality. So far, the functionality is changing too often.
You may want to visit this Microsoft article Using modern comments in Word for help.
About Microsoft’s change to Modern Comments in Microsoft 365
If you have been using comment in Word for years, and if you are using Word for Microsoft 365, you may have experienced that the comment features in Word have changed. Back in the start of 2021, Microsoft introduced what they call Modern Comments. Modern Comments work quite differently than comments in Word have been working for years. Microsoft now refers to the old comments as Classic Comments.
As of July 2022, Microsoft may still not have rolled out Modern Comments to all users. The rollout has been quite slow. Mid 2021, I had to install the Insider Beta version of Office on a computer to get access to Modern Comments so I could test it. I did not see Modern Comments in my version of Microsoft 365, Current Channel, until in the spring 2022.
The switch to Modern Comments has frustrated many users and made many users angry. I agree with those users. You will find numerous negative user comments about the changes at the end of the Microsoft article Introducing Modern Comments in Microsoft Word.
Microsoft has listened and some improvements have been made. However, I still find Modern Comments extremely inefficient to work with compared to Classic Comments. Also, Modern Comments still have lack of functionality compared to Classic Comments.
How to get the old comment features back
Many users have requested a way to revert to the old comment features, Classic Comments. Microsoft has introduced a temporary option in Word that lets you turn off Modern Comments and revert to Classic Comments. Unfortunately, we must expect that the option will disappear some day.
To get the old comment features back:
- Select File > Options > General > turn OFF the Enable modern comments check box. Click OK.
This will revert to the old comment features. The change of the setting does not take effect until you have restarted Word.
About the DocTools CommentManager add-in and Modern Comments
In this article, I link to my DocTools CommentManager add-in in relation to specific features. Unfortunately, I experienced that many features in the add-in didn’t work with Modern Comments. As of 20-Jun-2021, I released version 3.0 of DocTools CommentManager that works with both classic comments and Modern Comments.
The DocTools CommentManager add-in makes it faster and easier to manage comments in Word. In addition, the add-in lets you review comments in Word from one place, rank comments by importance, extract all comments to either Word or Excel, create inline comments for instructions and help, etc. DocTools CommentManager add-in is completely compatible with Word’s own comment features.
Where to find the comment tools in Word
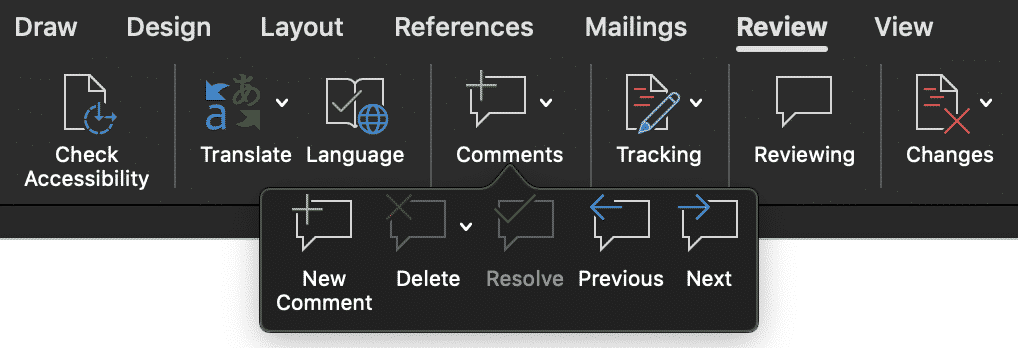
You will find the dedicated comment tools on the Review tab in the Ribbon.
- The Comments group on the Review tab includes tools that are dedicated to comments.
- The Tracking group on the Review tab includes tools that are used both in relation to comments and tracked changed. In this group, you will find tools to use for changing how comments are displayed.

Figure 1. The built-in comment tools in Word are found on the Review tab.
Word lets you add two levels of comments. First-level comments and replies to first-level comments.
You can add first-level comments in Word either via commands in the Ribbon or by using a keyboard shortcut. To can add a reply to a comment directly from the comment. Read on below.
How to insert a comment in Word
Word lets you view documents in a number of ways. In relation to comments, Print Layout view gives you the best overview. You can, for example, switch view from View tab in the Ribbon > Views group. You can also press Alt+Ctrl+P to switch to Print Layout view.
The built-in functionality in Word lets you add/insert comments from two different places. To insert a comment in Word:
- Select the text you want to comment.
The selected text will be marked as the comment scope. If no text is selected, Word will mark the preceding word, if any, as the comment scope.
To make it as easy for other users to understand your comment, make sure to select precisely the text that the comment refers to instead of, for example, selecting entire paragraphs.
- Follow step 2a, 2b, or 2c:
a. Select the Review tab in the Ribbon > Comments group > New Comment
OR
b. Select the Insert tab in the Ribbon > Comments group > Comment
OR
c. Press the keyboard shortcut Alt+Ctrl+M.The inserted comment appears in the markup area (or balloon area) in the margin or in the Reviewing Pane depending on your settings for display of comments. See How to show comments in Word below. See Figure 2 below.
- In the inserted comment, type the comment text.
- When finished, press the Esc key to return to the document text or click in the document.
Note that pressing Esc will select the text you marked in step 1 above. If you have DocTools CommentManager, pressing Esc will position the insertion point after the scope you selected, ready for you to continue typing without first deselecting the comment scope.
If you are using the DocTools CommentManager add-in, you can insert comments via DocTools tab > CommentManager group > Insert Comment.
NOTE: Comments in Word are stored in the documents. A comment can be edited by anyone who has access to edit the document and not only by the original author who inserted the comment.
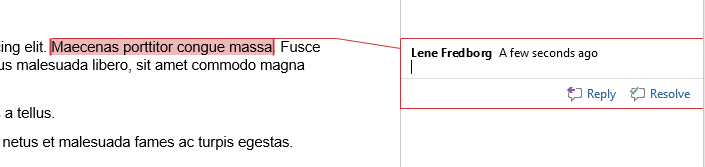
Figure 2. A new comment has just been added, ready for typing comment text. Note that if Simple Markup is selected in the Tracking group on the Review tab, the commented text (comment scope) will only be marked by a color when you have selected the comment in the markup area. If your document is in Draft view instead of Print Layout view, the comment will appear in the Reviewing Pane.
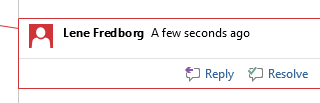
Figure 3. By default, Word shows pictures by comments. You can turn off the pictures.
NOTE: By default, Word shows pictures by comments in the balloon area. You can toggle off/on the pictures by right-clicking in a comment and selecting Hide Pictures by Comments (will change the label to Show Pictures by Comments).
Pictures are turned off in all the following illustrations in this article. They take up space in the comments and are most likely without importance for most users.
How to add a comment as a reply to another comment
Word lets you add two levels of comments. First-level comments and replies to first-level comments.
To add a reply to an existing comment:
- Click in the comment text of the comment you are going to reply to.
- Click the Reply icon below the comment text (See Figure 5 below).
OR
Right-click in the comment and select Reply to Comment. - In the inserted comment reply, type the comment text.
- When finished, press the Esc key to return to the document text or click in the document.
Replies to comments are indented below the comment to which they belong. You can add more replies to the same comment. All replies will appear on the same level – they will all be shown as replies to the first-level comment even if a reply is actually written as a reply to another reply.
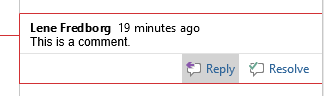
Figure 5A. Click the Reply icon to add a reply to an existing comment.
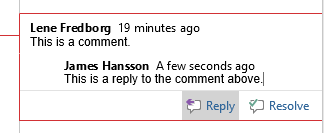
Figure 5B. A new comment has been added as a reply to an existing comment.
If a page has too many comments for Word to have room for all the comment text, the comments will be collapsed. A comment will expand when you click the comment.
Note that Word 2013 and later versions do not number comments when shown in the balloon area/Comments pane. Only if you view comments and revisions inline or in the Reviewing pane, or if you switch to Draft view or Outline view, numbers are shown together with the author initials. Syntax for comments numbers shown inline: NN#, where NN are the initials and # the index number of the comment, counted from the start of the document. Example: LF5. You will not be able to see on the number whether a comment is a first-level comment or a reply to another comment.
The DocTools CommentManager add-in shows the actual comment number and total number of comments in the Status Bar when you use the Previous Comment or Next Comment commands.
How to edit a comment in Word
To edit an existing comment in Word:
- Make sure the comment is shown. See How to show comments in Word.
- Click in the comment and add, delete, or modify the comment text.
How to resolve a comment in Word
Word lets you mark a comment as resolved. This will change the font color(s) of the comments to a pale look. Marking comments as resolved may help you keep track of which comments still need attention.
To mark a comment as resolved:
- Click in the comment text of the comment you are going to mark as resolved.
- Click the Resolve icon below the comment text (see Figure 5 above).
OR
Right-click in the comment and select Resolve Comment.
The Resolve icon changes to Reopen. If needed, you can turn off the resolved status again by clicking Reopen or by right-clicking in the comment and selecting Reopen Comment.
Why can’t I resolve comments in Word?
You may experience that the Resolve icon and the Resolve Comment command are grayed out, indicating that the commands are disabled and cannot be used. To find out why this happens and how to solve it, read on below.
What to do if the Resolve icon is grayed out – and what causes the problem?
The Resolve feature was introduced in Word 2013. The Resolve feature is grayed out under the following conditions:
- The document was created in or last saved in Word 2010 or an earlier version.
- The document is in compatibility mode.
If the document is in compatibility mode, newer Word features cannot be used. You will see the text (Compatibility Mode) after the file name in the Title bar of the Word window.
How to solve the problem
You can convert the document to allow all features in you Word version to be available. Use one of the following methods to update the document to your version of Word. This will enable the Resolve feature:
- METHOD 1: Select File > Info > click Convert. Save the document.
- METHOD 2: Select Save As (F12). In the Save As dialog box, turn off the option Maintain compatibility with previous versions of Word. Click Save. See the illustration below.
IMPORTANT: Conversion of a document may result in changes to the formatting of the document, depending how it was set up. For examples, the widths of tables created in Word 2010 and earlier may change when converted to Word 2013 format or later (due to changes of how cell margins are handled).

Bottom-left part of Save As dialog box — turn off Maintain compatibility with previous versions of Word to convert the document to your version of Word. This allows newer features to be used.
How to remove resolved comments in Word
Word does not have a built-in feature for removing all resolved comments in one operation. You need to go through all the resolved comments and delete them one by one.
Note that the DocTools CommentManager add-in lets you delete all resolved comments with the click of a button. For details, see How to delete resolved comments in Word.
Where does the name in an inserted Word comment come from?
The author name shown in an inserted comment is the name currently specified for the user in File > Options > General > User Name. See Figure 4B below.
If you have selected to show comments and revisions inline in the document, Word shows initials in the comment reference. The initials are the ones currently specified for the user in File > Options > General > Initials. See Figure 4B below.
You can also get access to the user name and initials via the Track Changes Options dialog box. To open that dialog box, click the small arrow (dialog box launcher) in the bottom-right corner of Review tab > Tracking group.

Figure 4A. You can get access to the user name and initials settings via the Change User Name button in the Track Changes Options dialog box. See the illustration below.
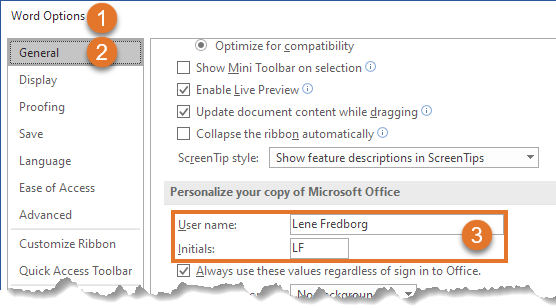
Figure 4B. The User Name and Initials settings in Word Options > General.
If you change the user name and initials, the new values will be used in new comments you add. It will not change the name and initials in existing comments.
The currently defined user name and initials are also used in insertions, deletions, and formatting changes made while track changes is turned on.
How to remove name from comments in word
Word’s comment functionality does not include functionality for changing the author name of existing comments. However, Word lets you remove personal information which will set the author name of all comments to «Author». See How to remove personal information from comments. See also the macro solution later in this article.
Note that the DocTools CommentManager add-in lets you easily change the user name and initials, also in existing comments. The command Change Author Names in Existing Comments lets you change all names or only a specific name of your choice. For example, this feature can be used to change author names to the company name before sharing a document with external people or to correct a misspelled or otherwise wrong user name. If you want to remove the name from comments, you can use the command to set the name to e.g. a non-breaking space (Ctrl+Shift+Spacebar), a hyphen or an En dash. See also the information below about a feature in the DocTools ExtractChanges Pro add-in that lets you do even more and that handles both tracked changes and comments.
The DocTools ExtractChanges Pro add-in (from version 6.0) includes a command, Change Author & Date, that lets you change the name in existing tracked changes and comments. In addition, the command lets you remove or change the date of the tracked changes and comments. You can select whether the name and/or date changes are to be applied to all tracked changes and comments or only tracked changes and comments added by a specific author. The changes are made in copy of the document so that the original document remains unchanged.
TIP: If you want to remove the name from tracked changes and comments, you can type e.g. a non-breaking space (Ctrl+Shift+Spacebar), a hyphen or an En dash as both the author name and initials in the Change Author & Date dialog box in DocTools ExtractChanges Pro.
How do dates in Word comments work?
Word shows date and time information on a comment in the following situations:
- When a comment is selected in the balloon area
- When you hover the mouse over a comment in the balloon area
- When you hover the mouse over a comment mark on a page if no balloons are shown
- Above each comment in the Reviewing Pane
The date and time tell when the comment was added.
Is it possible to change the date of a comment in Word?
The date assigned to a comment in Word cannot be changed. Also, you cannot change the way that date and time information is shown. See below for details.
Language of date and time information in comments
The language used for date and time information in balloons is determined by the current language of the user interface in Word, i.e. the language used in Ribbon, dialog boxes, etc. This also means that weekdays and month names are written in the language of the user interface. If you change that language, the date and time information will automatically change too.
The date format shown in balloons seems to always follow English (US) syntax no matter the language and even if it is not a normal date syntax in the actual language:
- [month name] [day], [year]
Example: March 21, 2018
About comment date and time information shown in the balloon area
The date and time information for comments in the balloons is not always given as date and time – you will see text descriptions instead. As time goes, the date and time information for a comment in the balloon area will change. The information shown follows the order described below – text shown as you will see it in English versions of Word:
First 24 hours
A few seconds ago
2 minutes ago
3 minutes ago
…
59 minutes ago
60 minutes ago
1 hour ago
2 hours ago
…
23 hours ago
24 hours ago
Next six days
Yesterday
The next days, until 1 week after adding the comment: the actual weekday, e.g. Wednesday, Thursday. Weekday names seem to be shown in the language set in the regional settings in Windows.
After a week
After a week, the information will change to showing date and time in the following format:
[month name] [day], [year] hh:mm:ss
where:
hh = hours
mm = minutes
ss = seconds
You may see time given with AM/PM values.
As explained above, the month name will be in the language of the user interface and the syntax follows English (US) rules even if not in English:
Examples:
- English user interface: March 21, 2019 14:55:35
- German user interface: März 21, 2019 14:55:35
- Danish user interface: marts 21, 2019 14:55:35
The CommentManager add-in makes it fast and easy to get an overview of all comments in a Word document, using the Review Comments command. This also includes date and time information.
How to show comments in Word
Comments in Word can be displayed in different ways:
- In balloons (see OPTION 1 below)
- In the Reviewing Pane (see OPTION 2 below)
- In screen tips only (see OPTION 3 below)
OPTION 1 – How to show comments in balloons
The document must be in Print Layout view (Alt+Ctrl+P) to show comments in balloons.
- Select the Review tab in the Ribbon.
- In the Tracking group, click Show Markup > Balloons and select Show Revisions in Balloons or Show Only Comments and Formatting in Balloons as desired. See Figure 6 below.
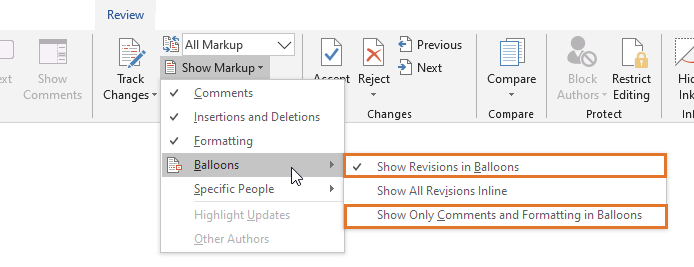
Figure 6. How to show comments in balloons in Word. Select one of the options marked by colored frame.
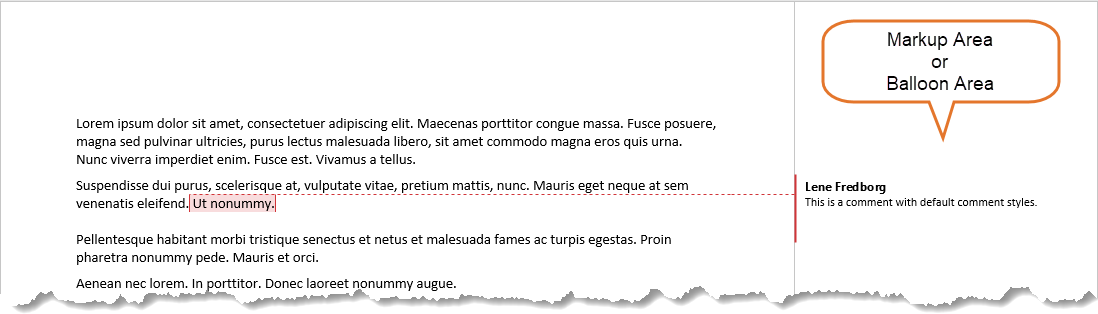
Figure 7. The Markup Area or Balloon Area is shown in the left or right margin depending on your settings. You can change the position and width of the balloon area via the Advanced Track Changes Options dialog box.
OPTION 2 – How to show comments in the Reviewing Pane
You can show the Reviewing Pane in any view except Read Mode.
- Select the Review tab in the Ribbon.
- In the Tracking group, click Reviewing Pane.
- From the menu, select Reviewing Pane Vertical or Reviewing Pane Horizontal depending on how you want the pane to be shown.
You can close the Reviewing Pane again by clicking the X in top-right corner of the pane.
OPTION 3 – How to show comments in screen tips
To use this method, all revisions must be shown inline. This means that the following option must be selected: Review tab > Tracking group > Show Markup > Balloons > Show All Revisions Inline. See the second option in Figure 6 above.
- Hover the mouse over a comment reference, i.e. the initials and number shown where a comment has been inserted.
- A screen tip will appear, showing the comment text. See Figure 8 below.
NOTE: If no screen tip appears when you hover the mouse over the comment reference, try to move the mouse a bit. If the screen tip does not appear, the problem is most likely that display of screen tips is turned off. To turn it on, select File > Options > Display > turn on Show document tooltips on hover.
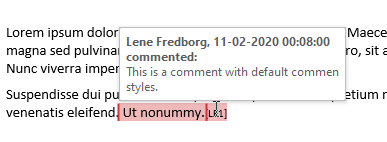
Figure 8. Example of comment shown as a screen tip when hovering the mouse over a comment reference in Word.
The DocTools CommentManager add-in includes special tools that make it faster to work with comments. For example, the Review Comments command opens a dialog box that works as a control center from where you can view, edit, delete, search comments and more.
How to show only specific comments in Word
Show comments by a specific author only
In Word documents with many comments, it may sometimes be helpful to see only a subset of the comments. Word lets you show/hide comments by author.
To show only comments added by a specific author:
- Select Review tab > Tracking group > Show Markup > Specific People: Deselect all authors except the author(s) whose comments you want to see.
This does not remove any comments – it only hides some comments temporarily.
How to hide resolved comments in Word
When you use Word’s Resolve feature in a comment, the comment is marked as resolved and shown dimmed. However, the comment remains in the document until you delete it.
You may be interested in keeping the resolved comments in the document until all comments have been handled. However, you may want to hide the resolved comments, so they do not distract you while resolving the rest of the comments.
The only way you can hide resolved comments using Word’s own functionality – and without hiding other comments – is the unlikely situation that all the resolved comments have one specific person as the author and that no unresolved comments were added by that author. In that situation, you could deselect that author in Review > Tracking group: Show Markup > Specific People. Except from that, you are out of luck.
If you are using Word for Microsoft 365 and if your version has switched to «modern comments» functionality instead of «classic comments», resolved comments will not appear in the margin but they are still shown in the Comments pane.
Note that the DocTools CommentManager add-in provides methods to quickly hide all resolved comments. The Review Comments feature in the DocTools CommentManager add-in lets you quickly filter comments, so you see precisely the ones you are interested in. This way, you can quickly hide all resolved comments. In addition, the add-in lets you export all comments to Excel where they will be listed with all metadata and with filter applied to every column, making it easy to filter so you see only unresolved comments.
What to do if you cannot see the comments
Comments can be set to not be displayed. The same is true for revisions made using track changes. If you know the document contains comments but you can’t see them, follow CHECK 1, CHECK 2, and CHECK 3 below.
CHECK 1 – Check that markup is selected to be shown
- Select the Review tab in the Ribbon.
- In the Tracking group, make sure that Display for Review has been set to All Markup or Simple Markup. See the illustration below.
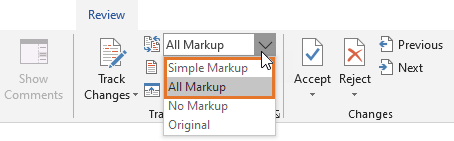
Figure 9. To see comments, make sure that All Markup or Simple Markup is selected.
CHECK 2 – Check that comments are selected to be shown
If comments are not shown after you followed CHECK 1:
- Select the Review tab in the Ribbon.
- In the Tracking group, make sure that Comments is checked in the Show Markup menu. See Figure 10 below.
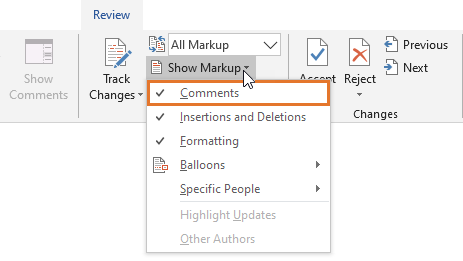
Figure 10. To see comments, make sure that Comments is checked in the Show Markup menu.
CHECK 3 – What to do if you only see comment icons in the balloon area – or how the Show Comments command works
Read on if you have followed CHECK 1 and CHECK 2 above and still can’t see comments, or if you only see small comment icons in the balloon area instead of the comment content.
You may have noticed that the Comments group in the Review tab includes a command named Show Comments. You may also have noticed that the command is not always enabled so you can use it – in some situations, the Show Comments is grayed out/disabled. Here is the reason why:
- The Show Comments command is only enabled when Simple Markup is selected. Also, Comments must be checked in the Show Markup menu. See Figures 11A and 11B below.
- If Display for Review is set to show Simple Markup, the Show Comments command toggles between two states:
State 1: Comment icons are shown in the margin (see Figure 12 below)
State 2: Full comments are shown in the balloon area
NOTE: If comments are not shown beforehand, the first click on Show Comments will switch to state 1, i.e. showing comment icons.
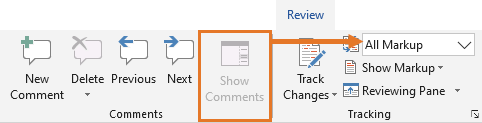
Figure 11A. The Show Comments command grayed out. To enable it, you must select Simple Markup instead of any other Display for Review option.
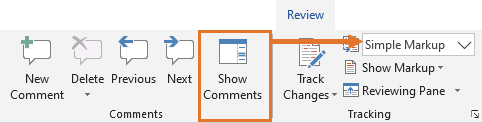
Figure 11B. The Show Comments command is only enabled when Simple Markup is selected.
![]()
Figure 12. Comment icons are shown in the margin if Simple Markup is selected.
![]()
Figure 13. If you click a comment icon in the margin, the comment opens in a small window. You can drag the comment window to the position you want. You can also resize the window by dragging an edge or corner. To close it, click the X or simply click anywhere outside the comment window.
TIP: If comment icons are shown as illustrated in Figure 12 above, the commented text in the document is not marked in any way. This means that you cannot see precisely what the comment refers to. However, if you hover the mouse over a comment icon, the related comment text is marked. If you happen to hover the mouse over commented text, that text will be colored and a screen tip with comment information is shown in the same way as illustrated in Figure 8 above.
A comment plus all replies to the comment, if any, will appear as only one comment icon in the margin. When you click a comment icon, the first-level comment and all replies to it, if any, will appear in the small comment window that opens.
What happens if you copy and paste content that contains comments?
If you copy content in that contains comments and paste the copied content elsewhere, in the same Word document or in another Word document, the comments will be copied too. The pasted comments will not be linked to the original comments – they keep the author names, time stamps and content from the original comments but they are independent comments.
If you paste the copied content as plain text, without formatting, the comments will not be included.
How to remove comments in Word
You can remove individual comments, one at a time, or remove all comments from a Word document in one operation. In Word, the term «delete» is used instead of «remove». Therefore, I have used «delete» in the following.
If you delete a comment that has replies, all replies to the comment will be deleted too.
If you delete a reply to a comment, only that reply will be deleted.
How to delete a single comment
- Make sure the comment is displayed. Click in the comment text of the comment to be deleted.
- On the Review tab in the Ribbon, in the Comments group, click Delete > Delete.
Note that the command is disabled if only comment icons are shown. - Repeat steps 1-2 to delete more comments, if relevant.
How to delete all comments from the document
- On the Review tab in the Ribbon, in the Comments group, click Delete > Delete all Comments in Document.
How to delete all comments that are currently visible
Via the Review tab > Tracking group > Show Markup > Specific People, you can turn off the display of comments and revisions made by specific people. Thereby, only comments and revisions made by the people checked in the list will be shown in the document.
To delete all comments added by the people currently checked in the Specific People list:
- On the Review tab in the Ribbon, in the Comments group, click Delete > Delete all Comments Shown.
When you delete comments in Word, the commented text (comment scope) is preserved. Only the comment(s) are removed. This means that the text in the document that the comment(s) referred to, i.e. the text that was selected when the comment(s) were inserted, is still in the document.
Note that the DocTools CommentManager add-in lets you move a comment, i.e. change which text the comment is related to. DocTools CommentManager also lets you select text in the document and convert it to a comment. This will remove the selection from the document and insert it in a new comment instead. This is practical in a number of situations. The feature is practical if some comments were originally written as part of the document text. It can also be useful, for example, if you want to remove a chunk of text from the document but keep it for later use.
How to delete resolved comments
As mentioned previously, Word doesn’t have a tool specifically for deleting resolved comments. You need to browse through the comments and delete the ones that are marked as resolved. Make sure comments are shown in balloons. You can use the Next or Previous commands on the Review tab to browse through the comments and delete individual comments as needed.
How to delete all resolved comments in Word
As opposed to Word’s own functionality, the DocTools CommentManager add-in lets you delete all resolved comments with the click of a button. You will find a command, Delete All Resolved Comments, for getting rid of all comments that have been marked as resolved.
If you want to review the resolved comments before deleting them, DocTools CommentManager offers another practical feature. You can use the filter feature in the Review Comments dialog box to show only resolved comments (type » yes » in the filter field). You can then quickly step through the resolved comments and use the Delete Comment button to remove the ones you want to get rid of.
How to hide comments in Word
There may be situations where you want comments to remain in a Word document but to be temporarily hidden. To hide comments (without deleting them), follow one of the methods below.
METHOD 1 – Hide comments only but keep any changes marked as tracked changes visible
- Select the Review tab in the Ribbon.
- In the Tracking group, remove the check mark from Show Markup > Comments.
METHOD 2 – Hide comments and any tracked changes
- Select the Review tab in the Ribbon.
- In the Tracking group, select Display for Review > No Markup.
This will show the document as if all comments have been deleted and all revisions accepted.
The comments and revisions are still in the document but hidden.
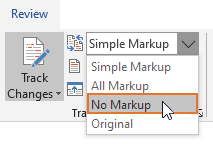
Figure 14. Select No Markup to show the document without comments and tracked changes.
Note that in relation to comments, you may select Original instead of No Markup since this will also hide comments. However, in relation to tracked changes, there is a big difference between the two options: No Markup will show the document as if all tracked changes have been accepted whereas Original will show the document as if all tracked changes have been rejected.
Note that hiding comments and tracked changes only determines how your document is shown right now. The display settings are not stored in the document. If you send the document to another user, it is that user’s settings that apply.
How to print without comments in Word
If you are going to print a document that has comments, you may want to leave out the comments in the print. To obtain this, you can follow METHOD 1 or METHOD 2 below.
METHOD 1
- Select the Review tab in the Ribbon.
- In the Tracking group > Show Markup, turn off
Comments.If the document also includes tracked changes and if you want to avoid printing those changes, turn off Insertions and Deletions and Formatting too.
- Select the desired printer and click Print.
- If you want, turn on Review tab > Tracking group > Show Markup > Comments again.
METHOD 2
- Select File > Print.
- Under Settings, click on the arrow next to Print All Pages (see (1) in Figure 15 below).
- Turn off Print Markup (see (2) in Figure 15 below).
- Click the Print button.
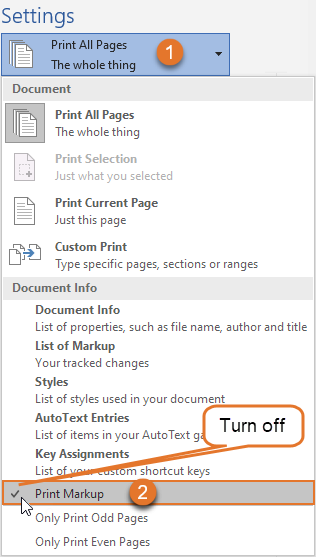
Figure 15. Part of the Print dialog box. To print without comments and other markup, turn off Print Markup.
How to print only the comments in Word
If you want to print comments only, without the content of the document, follow these steps:
- Select the Review tab in the Ribbon.
- In the Tracking group > Show Markup menu, turn on Comments.
If the document includes tracked changes, turn off Insertions and Deletions and Formatting unless you want to also print those changes. - Select File > Print.
- Under Settings, click the topmost menu (shows Print All Pages by default), select List of Markup.
- Select the desired printer and click Print.
Note that the DocTools CommentManager add-in lets you extract comments to either Word or Excel. A printout of an extract document will give you a far better overview of the comments.
How to browse comments in Word
You can step through the comments in a Word document.
- Select the Review tab in the Ribbon.
- To go to the next comment, click Next in the Comments group
To go to the previous comment, click Previous in the Comments group.
Alternative methods for browsing comments
- You can browse comments from the Navigation Pane (View tab > Navigation Pane > click the search icon > select Comments).
- You can browse comments using the Go To tab in the Find and Replace dialog box. Press Ctrl+G to open the dialog box. In the Go to what list, select Comment. Then use the buttons in the dialog box to browse comments.
How to get an overview of all comments in a Word document
Word does not include a tool that gives you a good overview of all comments. You can browse comments but you cannot see all comments at a time.
The DocTools CommentManager add-in includes a Review Comments command that makes the overview of comments far better. The command opens a dialog box from where you can manage all comments in the document. The dialog box also lets you rank comments by importance.
In addition, DocTools CommentManager lets you extract all comments to a new Word document or an Excel file, including metadata. You will also find tools to quickly find a specific comment in the original source document.
How to change the formatting of comments in Word?
In Word, styles are used to manage the formatting of text. A style in Word is a set of formatting characteristics that determine font and font size, color, alignment, spacing, etc. In relation to comments, Word uses a set of styles dedicated to comments. You can modify the comment styles to change the formatting of comments. Read on below to learn about the comment styles and how they work.
Comment styles in Word
When it comes to comments, Word uses a set of special styles to format different parts of comments. Word has four built-in styles related to comments:
- Comment Text
- Comment Reference
- Comment Subject
- Balloon Text
See how to find the comment styles names in your version of Word if it is not English.
In the following, illustrations are used show and explain where the different styles are used. Note that there are some oddities in relation to the comment styles – as you will see, not everything works as expected if modifying the comment styles.
Where are the different comment styles used?
Used for the comment text typed by users. The style is used both for comments shown in balloons and comments shown in the Reviewing Pane. See Figure 16 and Figure 17 below (red text).
Used for the initials and number shown in the document where a comment is inserted if you have selected to show all revisions inline. See Figure 16 and Figure 18 below (green text).
This style can be used for a heading in comments and may be intended for that. Note that the style is not automatically applied by Word anywhere.
Used for e.g. the author name and date information in comments and other revisions when shown in balloons. The style is also used for showing text like Deleted and Formatted + formatting info in relation to tracked changes.
This style is only used in balloons and not in the Revision Pane. See Figure 16 and Figure 17 below (red text).
How to find the names of comment styles in non-English versions of Word
The names of comment styles and other built-in styles in Word are language-specific. The styles are named in the language of the user-interface of your version of Word.
For help on finding the comment style names in the language of your version of Word, see my articles:
- Create List of Local Built-in Style Names
- Word Style Names in English, Danish, German, French
Below, you will find the four comment styles listed with names in English, Danish, German, and French.
|
English |
Danish |
German |
French |
|
Comment Text |
Kommentartekst |
Kommentartext |
Commentaire |
|
Comment Reference |
Kommentarhenvisning |
Kommentarzeichen |
Marque de commentaire |
|
Comment Subject |
Kommentaremne |
Kommentarthema |
Object du commentaire |
|
Balloon Text |
Markeringsbobletekst |
Sprechblasentext |
Texte de bulles |
To make it easy to see where the different comment styles are used by Word, I have modified the comment styles as follows before making the illustrations below:

Figure 16. Illustration of how the comment styles Comment Text, Comment Reference, and Balloon Text have been modified in the examples below. The style Comment Subject is not used by Word and therefore not included in the illustrations.
In Figure 17 below, comments and revisions have been added and re shown in the balloon area:

Figure 17. Balloon area with examples of comment and revisions. Note that the style Balloon Text is used for name, date/time info, and revision info. If you compare with Figure 16, you can see that name and revision info is bold even it the style Balloon Text is not defined as bold.
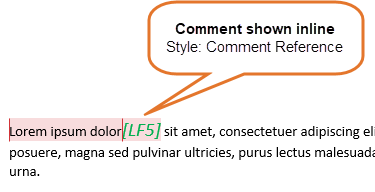
Figure 18. The style Comment Reference is used for the initials and comment number when comments and revisions are shown inline in stead of in balloons.
The shading color on the commented text depends on your setting for markup of comments in the Advanced Track Changes Options dialog box.
Learn more about the Advanced Track Changes Options dialog box.
Oddities in relation to comment styles in Word
Normally, you can modify styles in Word to make them look precisely as you want. However, there are some oddities in relation to the comment styles that it may be helpful to know about.
You may experience that some types of modifications you make to a comment style don’t have any effect when comments are shown in balloons. This is most likely a result of what Microsoft refers to as “by design”. The behavior isn’t always logical.
If you examine Figures 17-18 above and compare them with Figure 16, you will see that:
- If you apply another font or font color to the comment styles, the changes will take effect in comments (i.e. normal style behavior).
- The name and revision information (blue text in Figures 16-18 above) seem to always be bold even if the style Balloon Text is not defined as bold. On the other hand, time information and formatting information appear with the Balloon Text style in the way it is defined (see style information in Figure 16 above).
- As opposed to the Balloon Text style, adding bold to the Comment Text style works «normally», i.e. it the comment text appears bold or not bold according to the style definition.
- Adding italic or underline to the style definitions of Balloon Text and Comment Text also works «normally», i.e. it makes the corresponding text appear italic/not italic and underlined/not underlined.
- The comment text (red in Figures 16-18 above) appear with the font and color defined in the Comment Text style. However, the font size of the comment text is determined by the font size defined for the Balloon Text style. Changing the font size of the Comment Text style has no effect. You can see that the comment text in Figure 17 is larger than in Figure 16 – the font size is inherited from the Balloon Text style. This means that you must modify the style Balloon Text instead of the style Comment Text if you want to make the comment text larger or smaller.
- If you click in the comment text of a comment and check which font size is shown, e.g. in the Font group of the Home tab in the Ribbon, you will see that it shows the font size defined in the Comment Text style and not the actual font size.
- Most of the settings you can apply to styles via the Paragraph dialog box have no effect on the Balloon Text and Comment Text styles. Word does not prevent you from applying indentation, space before, space after, etc. However, it does not change the way the comments look. Note, however, that some paragraph settings applied to the style Comment Text will take effect if comments are shown in the Reviewing Pane and not in balloons.
- Adding bold, italic or underline to the style definition of Balloon Text and Comment Text does change the way the comments look.
How to change the font size of comments in Word by modifying the Balloon Text style
As already mentioned above, the steps to change the font size of comments in Word are not logical. Since it may be one of the changes most users want to make in relation to the display of comments, I have included the steps with some extra tips here.
As explained above, the style Comment Text is used for comment text entered by users. Normally, you can change the font size of text by modifying the font size of the style in use. However, this does not work for the Comment Text style.
- To change the font size of comments in Word via styles, you must change the font size in the style Balloon Text! Changing the font size of the style Comment Text has no effect.
I suggest the following steps as an easy way to get access to modify the Balloon Text style:
- Press Ctrl+Shift+S to open the Apply Styles window.
- In the Style Name field, type «Balloon Text» (without the quotation marks).
IMPORTANT: In case of a non-English version of Word, you must type the localized style name used in your version of Word instead of «Balloon Text». See the help above.
- Click Modify to open the Modify Style dialog box, showing the current definition of the Balloon Text style,
- Change the font size and make other modifications as desired. Click OK when finished.
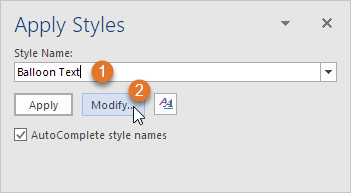
Figure 19. Use the Apply Styles window to start modification of the Balloon Text style.
The DocTools CommentManager add-in gives you easy access to modify any of the comment styles. DocTools CommentManager lets you do everything you can using Word’s own comment features plus a lot more.
How are the comment styles defined by default?

Figure 20. Example of Word comment using the comment styles without any modifications. For details about the default comment style settings, see below.
Style: Comment Text
Style type:
Style based on:
Font:
Font size:
Alignment:
Indentation:
Spacing:
Line Spacing:
Linked (paragraph and character)
Normal
Calibri
10 pt
Left
Left 0, Right 0
Before 0 pt, After 8 pt (NOTE: the spading has no effect)
Single
Style: Comment Reference
Style type:
Font:
Font size:
Character
Default Paragraph Font, i.e. the font in use where the reference is inserted
8 pt
Style: Comment Subject
Style type:
Style based on:
Font:
Font size:
Alignment:
Indentation:
Spacing:
Line Spacing:
Linked (paragraph and character)
Comment Text
Calibri, Bold
10 pt
Left
Left 0, Right 0
Before 0 pt, After 0 pt
Single
Style: Balloon Text
Style type:
Style based on:
Font:
Font size:
Alignment:
Indentation:
Spacing:
Line Spacing:
Linked (paragraph and character)
Normal
Segoe UI – the font used by default in the user interface of Word
9 pt
Left
Left 0, Right 0
Before 0 pt, After 0 pt
Single
How to remove personal information from comments
There may be situations where you want to remove personal information like author name(s) from comments in a Word document. For example, this may be the case if the Word document is to be shared with external people. Below, you will find two methods.
METHOD 1 – How to remove personal information using the Document Inspector
Word has a built-in feature you may use. However, the method may remove more information than you like. See the warning below before you use this method.
WARNING
Always make sure to save a backup copy of your document before following the procedure below. The procedure may remove data that cannot be restored.
The method removes all custom document properties and empties the built-in properties (Title, Author, Company, etc.). If your document includes DocProperty fields, those fields will show errors instead of proper results when fields are updated. However, if you lock or unlink the DocProperty fields beforehand, you can preserve the field results.
If you have the DocTools DocPropertyManager add-in, you can export custom document properties before removing personal information. You can re-import the properties again afterwards, if needed. You can also import the custom document properties directly from your backup copy of the original document. Learn more about DocTools DocPropertyManager.
To remove personal information from a document:
- Select File > Info.
- Click Check for Issues > Inspect Document. See Figure 21 below.
- In the Document Inspector dialog box, turn off all options except Document Properties and Personal Information. See Figure 22 below.
- Click Inspect.
- In the next dialog box that opens, click Remove All. See Figure 23 below.
- Click Close.
- Save the document.
Once the document has been saved, the author name in all comments will be changed to «Author» and the initials to «A» if comments are shown inline.
If you insert new comments, you will first see the actual user name but as soon as you save the document, it will be replaced by «Author». On the other hand, new property values or custom document properties you add will remain in the document unless you repeat the steps above.
Note that the terms used for author and initials are language-specific and will match the language of your Word. For example, «Forfatter» and «F» will be used in case of Danish.
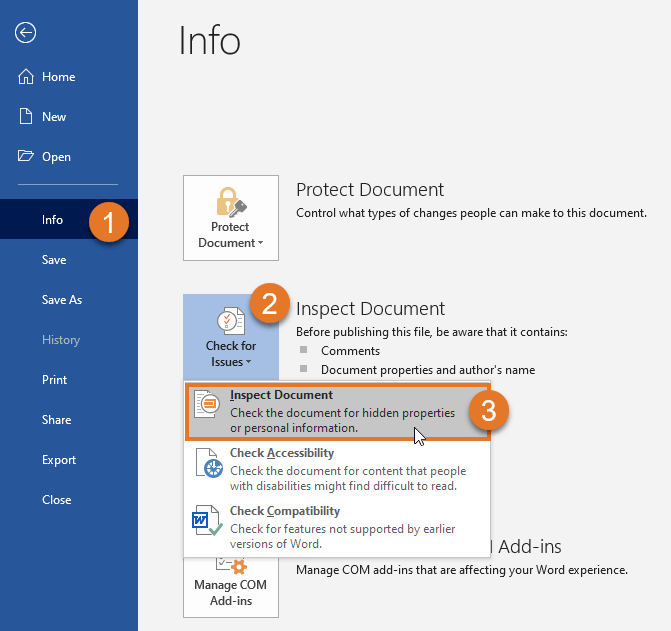
Figure 21. Select File > Info > Check for Issues > Select File > Info > Check for Issues > Inspect Document to open the Document Inspector dialog box.
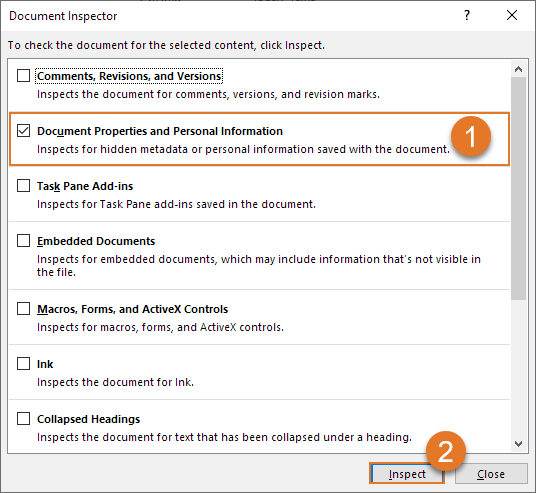
Figure 22. The Document Inspector dialog box. Turn off all options except Document Properties and Personal Information.
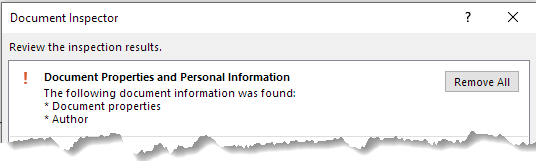
Figure 23. Click Remove All in the Document Inspector dialog box to remove the information. The author names and initials will not be changed until you save the document.
METHOD 2 – How to remove personal information from comments using a macro (VBA)
You can use a macro (VBA) to change the author name(s) and initials in comments to other values. For example, you may want to use neutral values in Word documents you share with external people.
The macro below will handle all comments in the active document. The macro:
- changes the author name in all comments to «Neutral Name»
- changes the initials in all comments to «NN»
Change the values in the macro as desired before running the macro.
If you add new comments, you will have to run the macro again to change them too.
Always make sure to save a backup copy of your document before you change the author names.
Sub WordComments_ChangeAuthorNames_AllComments()
    Dim oComment As Comment

    'Iterate through comments
    'Replace author name and initials with "Neutral Name" and "NN"
    '=========================
    'NOTE: Replace the names below with relevant values
    '=========================

    For Each oComment In ActiveDocument.Comments
        With oComment
            .Author = "Neutral Name"
            .Initial = "NN"
        End With
    Next oComment

    'Show message
    MsgBox "Finished changing author name and initials in " & _
        ActiveDocument.Comments.Count & " comments.", _
        vbOKOnly, "Change Author Names in All Comments"
End Sub
The DocTools CommentManager add-in lets you easily change author names and initials in all comments or in only comment by a specific author. For example, you can quickly change all author names to the company name if you are going to share a document with external people.
How to stop Word from changing the author of comments to «Author»
You may experience that the author name of comments in a specific document automatically changes to «Author».
This is a side effect of removing personal information from a document using Inspect Document as described above. Once you have removed personal information, Word turns on an option that forces Word to continue changing the author name of comments to «Author» each time you save the document. To stop Word from changing the author name to «Author», please refer to the detailed description about this issue in my article «Track Changes in Word – how it works».
Numbering of comments in Word
In Word 2010 and earlier versions, comments shown in the balloon area are numbered sequentially. It is practical to be able to refer to comment numbers, especially in documents with many comments.
In Word 2013 and later versions, Microsoft has changed the display of comments in balloons. The comments are no longer numbered when shown in balloons. As explained above, the style Comment Text is automatically applied to the comment text you enter. As a workaround, you may modify the style Comment Text to be numbered (for help on setting up numbering, see Shauna Kelly’s article). However, if you add numbers to the Comment Text and write comments with more than one paragraph, each paragraph will be numbered and thereby result is misleading numbering.
You can have sequential comment numbers displayed in the comment references if to display revisions inline in the document. Apply the following settings:
- Review tab > Tracking group > Display for Review: All Markup
- Review tab > Tracking group > Show Markup > Balloons > Show All Revisions Inline
More options for managing the display in balloons
In the Advanced Track Changes Options dialog box, you can make further settings for balloons. The dialog box has options for both comments and revisions, i.e. insertions, deletions and formatting changes marked as tracked changes.
How to open the Advanced Track Changes Options dialog box
To open the Advanced Track Changes Options dialog box:
- Select the Review tab in the Ribbon.
- Click the dialog box launcher in the Tracking group. See Figure 24 below.
This opens the Track Changes Options dialog box. - Click the Advanced Options button to open the Advanced
Track Changes Options dialog box. See Figure 25 below.
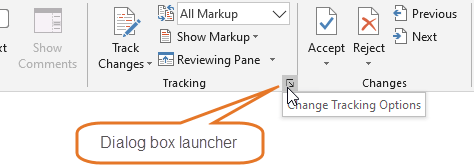
Figure 24. On the Review tab, click the dialog box launcher in the Tracking group to open the Track Changes Options dialog box.
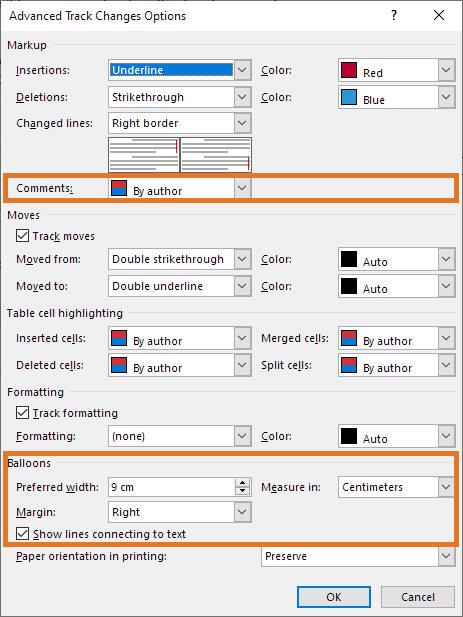
Figure 25. The Advanced Track Changes Options dialog box. The colored frames mark the options related to comments. See the descriptions below for details about how the options work.
The DocTools CommentManager add-in lets you opens the Advanced Track Changes Options more easily. In general, you can do everything in relation to comments faster and easier with DocTools CommentManager than you can using Word’s own comment tools. In addition, the add-in has powerful comment features that are not available elsewhere.
Comments and colors in balloons
See Figure 25 above, first colored frame.
In the Markup group, the Comments drop-down list lets you select the color to use for comments. Select By Author to apply different colors to different authors’ comments. The colors will be selected by Word and cannot be defined by you. Up to 20 different colors can be in use. Note that the same author may not always be applied the same color. Select a specific color to use that color for all comments regardless of the author.
Balloon area location and width
See Figure 25 above, second colored frame.
In the Balloons group, you can define the width of the balloon area in the Preferred width field and associated Measure in field. The width seems to be measured from the position of the vertical bars that are added and to the edge of the page. The vertical bars are shown in the left or right side of the page, next to lines that contain tracked changes.
The Margin option lets you position the balloons in the left or right side of pages.
The Show lines connecting to text check box lets you turn on/off lines that go from a comment to the commented text (comment scope) in the document. Comment lines are dotted but if the selection is in a comment, the related comment connection line will be a fully drawn line.
Related information
My Word add-in DocTools CommentManager provides a lot of tools that can help you work more efficiently with comments in Word.
This article has explained how add comments in Word, how to remove comments in Word, print without comments, change font size of comments and a lot more. I hope this article helps you in your future work with comments in Word.
When collaborating in Microsoft Word, it helps to understand the features that come with Microsoft Word. That includes how to use Microsoft Word comments.


You can collaborate easier and even protect your document if needed by using Microsoft Word comments. They also make editing and revising a document easier.
This article covers all of these collaboration features. Plus, we’ll also look at five premium Microsoft word templates.
Microsoft Word comments and tracking changes is another great feature that’s helpful in collaboration.
The tutorial was written using a macOS with Microsoft Word version 16.64. If you’ve got a different operating system or a different version of Word, your steps may be slightly different.
Throughout this tutorial, we use the Letterhead Microsoft Word template from Envato. Download it to follow along or use your own Word document.


This versatile stationery template can easily be adapted for longer documents. Let’s get started with our tutorial:
1. How to Track Changes


To track changes, start by clicking on the Review tab. After you’ve clicked on the Review tab, click on the Track Changes button. This feature tracks changes that are made to the document. The changes appear in red and also appear on the side of your document.
2. Review Changes


After changes have been made, you can either accept or reject changes. To accept the changes made, click on the Review tab. After you’ve looked at the changes, click on the Accept button in the toolbar to accept them.
When you click on the accept button, it gives you a chance to accept the changes one by one. To change this, click on the arrow next to the Accept button. After clicking on the button, a menu appears. These are the options in the menu:
- Accept and Move to Next
- Accept This Change
- Accept All Changes Shown
- Accept All Changes
- Accept All Changes and Stop Tracking


To reject the changes, start by clicking on the Review tab. In the toolbar, there’s a Reject button. Click on this button to reject changes one by one.
For more options, click on the arrow next to the Reject button. When you click on the arrow, a menu drops down. Here are the menu options:
- Reject and Move to Next
- Reject This Change
- Reject All Changes Shown
- Reject All Changes
- Reject All Changes and Stop Tracking
Remember when using the Accept and Reject buttons that the Accept button makes changes permanent, and the Reject button removes the changes.
To look at the changes without accepting or rejecting the changes, then use the Previous Change and Next Change buttons. These buttons are in the toolbar of the Review tab next to the Accept and Reject buttons.


Adding comments to a Word document is easy. Start by clicking on the Review tab. Next, click on the New Comment button in the comments section of the toolbar. This allows you to add comments to Word documents.
To add a comment to a specific area, highlight the text, then press the New Comment button.
You can’t add a comment to text that’s in a textbox or a footer.


When adding comments to your Word document, you can use two views to see the comments. They are:
- Contextual. These Microsoft Word comments are next to the document’s content.
- List. These Microsoft Word comments only show up in the Comments pane, not necessarily next to the content in the document.
To change the view of your comments, click on the Review tab. Next, click on the Show Comments button. When you click on this button, a menu appears. Choose the option that’s right for you.
During editing, it can be helpful to add comments to Word documents. If you don’t want to have the comments in your finished document, then delete them.
There are two methods you can use to delete Microsoft Word comments:
1. One at a Time


Deleting Microsoft Word comments as you work can be helpful. To delete one comment at a time, start by clicking on the Review tab. Select a comment. Next, click on the Delete Comment button in the Comment section of the toolbar. By pressing this button, you can delete comments in the document one at a time.
2. All at Once


If you’re reading the added comments to a Word document, it can be helpful to quickly delete them all at once. The first step is to click on the Review tab. Next, click on the arrow next to the Delete Comment button in the comment section of the toolbar.
When you click on the arrow, a menu appears. From the menu, click on the Delete All Comments in Document option.
How to Compare Two Microsoft Word Documents and Combine Them
In Microsoft Word, comparing and merging two documents are similar. Here’s how to compare and merge two Microsoft Word documents:
1. Select Two Documents


To compare documents, you need two documents. First, you need to know the file name of both documents. Start by clicking on the Review tab. Next, click on the Compare button in the toolbar.
When you click on this button, a menu appears. Click on the Compare Documents… option. When you click on this option, a Compare Documents window appears. In the window, there are two fields for the document name.


Next to these fields is a Browse for Original button next to the Original Document: field. Click on this button and find your original document. Then click on the Browse for Revised next to the Revised Document: field. After you’ve found both documents click on the OK button.
2. Compare Both Documents


When you’ve clicked on the OK button, you’ll see the changes you’ve made appear in a new document. These changes appear as a comment that you can accept or reject.
What It Means to Lock Your Document
If you’re writing something you don’t want others to see or working on sensitive information, it can help to know how to lock your Microsoft Word document. When you lock your document, you’ve got several options. They are:
- Always Open Read-Only. If this feature is turned on, the person reading the document can only read the document and can’t make any changes to it.
- Encrypt with Password. This feature password protects the documents.
- Restrict Editing. This feature allows you to choose what changes readers can make, such as tracked changes, comments, filling in forms, and reading only.
- Add a Digital Signature. This feature shows the reader that you’re the only person who signed the document. You were the last person who signed and made changes to the document.
- Mark as Final. When this feature is turned on, the reader sees a message at the top of the screen informing the reader of the document’s status. But the reader can click on an edit anyway button that allows them to edit and make changes to the document.
How to Lock Your Document
When using a Mac, you’ve got three options for locking documents:
- block authors
- protect documents
- always open read-only.
Now that we know what some of the options are and their benefits, let’s look into how to protect your document:
1. Protect


Start by clicking on the Review tab above the toolbar. Next, in the toolbar, click on the Protect button. When you click on this button, you’ll be presented with a menu. Choose the option you want. In this tutorial, we’ll choose the Protect Document option.
2. Protect Document Window- Security


In the Password Protect window, you can create a password to open the document. Plus, you can create a separate password to modify the document. If you want a password to open the document, use the first field. The Password: field in the Set a password to open this document: field is where you set your password. So, type a password to have a password-protected document.
Next, you’ll see a Set a password to modify this document: with a Password: field. To set a password for any changes made to the document, use that field.
3. Protect Document Window- Protection & Privacy
If you want a password for specific changes, this is where you add it. Start by clicking the box in front of Protect document for:. Next, click the circle in front of what you want to password-protect. At the bottom of the protection section, you’ll see a Password (optional): field type the password you want to use in it.
The Best Source for Microsoft Word Templates
Now that you’ve learned all about how to add comments to Word documents as well as how to protect your Word document, you may be looking for a Word template to create your next document.
Envato Elements is the top source for digital assets. These digital elements include:
- premium Microsoft Word templates
- images
- fonts
- audio
- and so on
Explore Word Templates


To get unlimited access to these templates, you must pay a low monthly fee to become a subscriber. After you’ve become a subscriber, download as many premium templates and digital elements as you need. Here are some advantages of using professional premium templates:
- Professionals make every premium template look professional and impressive. So, you’ll stand out among your peers who created a document themselves.
- Using a premium template also saves you time because after you download the template, just add your information.
- If you’re creative and are worried about customization, don’t worry. A good premium template is easily customizable.
Top 5 Microsoft Word Templates
You can still use a template if you want to add comments to Word documents. Here are some top Microsoft Word templates to choose from:
1. Enne Professional CV Resume Set


This resume is great if you work in a creative field or are applying to a modern and fun company. The colors add some fun elements to the resume. The template comes with a matching Portfolio page and with a QR code where you can link to your work. It also comes with a matching cover letter page along with the resume page.
2. Corporate Flyer


The Corporate Flyer has a modern design that comes with three color variations. Edit the template in Microsoft Word, Adobe InDesign, and Adobe Photoshop. Plus, this template comes with infographics and a contact information section.
3. Invoice Template for Microsoft Word


This is a great option if you’re looking for an invoice Word template. The color is used to highlight important information. This template looks professional and neat.
4. Certificate Award Template


This Microsoft Word certificate has a modern design that can be used for any purpose. It features a signature section where the certificate giver and receiver can add their signature or name. This template comes with both a horizontal and vertical version.
5. Business Card Word Template


The Business Card Word Template has a pretty design on the front and on the back is the information. It’s a vertical business card template. You can easily use this business card template for any field you’re in.
Collaborate in Microsoft Word Today!
Microsoft Word has many helpful features that help make collaborating easier. Save time creating a Word document from scratch and use the premium Microsoft Word template. Download a template and use the features covered in this article in your next project.
Did you find this post useful?

Freelance Writer, Dallas Area, USA
Since 2019 Sarah Joy has been a freelance instructor at Envato Tuts+. She has published over 50 informative business tutorials. Sarah has a Communications degree from SNHU. She is also certified in Microsoft Word, Excel, PowerPoint, and Access through Collin College. In addition, Sarah writes about a wide variety of popular business tools and other business topics.
In this article, you’ll learn how to add comments in Word, as well as two ways to quickly navigate your comments.

Adding comments in Word is a fantastic way to mark up your documents without having to directly edit the contents of your document. It’s like adding sticky note reminders for yourself (or your colleagues) without messing up your content.
If you frequently work with lots of comments in Word, I recommend adding the Comments Group to your Quick Access Toolbar, as pictured below. That way you can quickly get at the commenting commands, without having to dig through your Ribbon, which I will show you how to do below.
Once you are done adding comments, you can learn how to remove all comments in Word here.
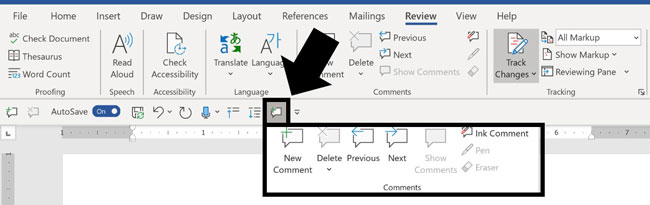
[Update] How to turn off modern comments in Word
Microsoft has introduced a new comment system in Word, giving you two options to choose from:
- Classic Comments (as described in this blog post)
- Modern Comments
To follow along with this blog post, you will first need to disable the modern comments system using the Word options dialog box, as I only cover the classic comments system here.
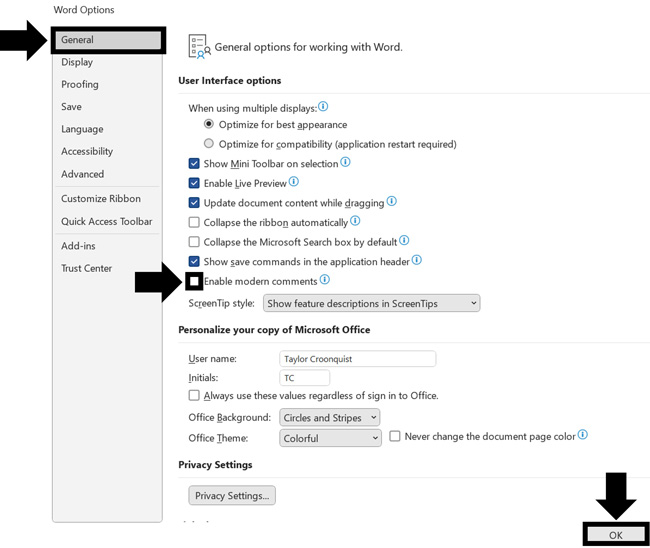
To disable modern comments in Word, simply:
- Click the File tab in Word
- Select Options (at the bottom left of your screen)
- In the Word options dialog box, find the General tab
- Unselect Enable modern comments
- Click OK
Alternatively, if you want to use the modern comment system, you can follow the same steps listed above to enable (instead of disabling) modern comments.
Please double-check that you have disabled the modern comment system before following the steps described below.
[Watch] Adding Comments in Word
1. Microsoft Ribbon (Adding Comments)
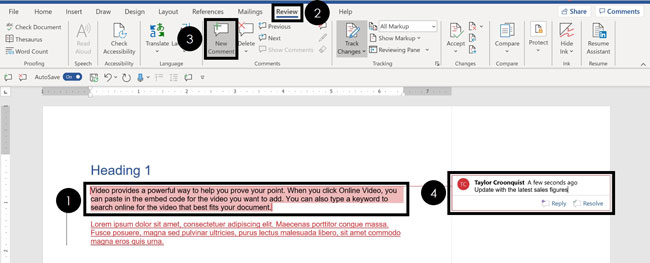
To add a comment to something in Word, simply:
- Select the text (or object) you want to comment on
- Navigate to the Review tab
- Click New Comment
- Write your comment
You can add comments to anything in Word, including text, images, charts, tables, etc. Simply place your cursor next to (or highlight) what you want to comment on and click on New Comment.
Comment Writing Tip: Make sure that the comments you add to Word are actionable and constructive.
There’s nothing worse than trying to update a document based on vague comments that don’t make much sense.
2. Right-Click Menu (Adding Comments)
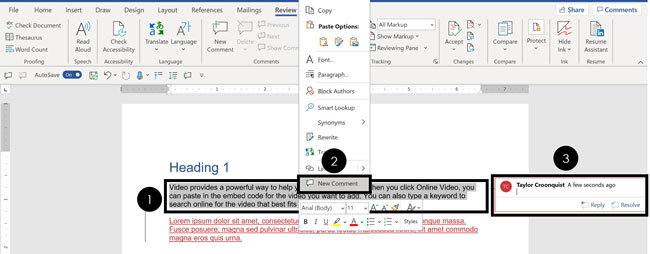
To add a comment using the right-click menu, simply:
- Select and Right-Click what you want to comment on
- Select New Comment
- Write your comment
This is the fastest way to add comments in Word, as you don’t have to continually navigate back and forth between the contents of your document and the Review tab.
Delete Comment shortcut: You can also right-click any comment within your document and use a shortcut to quickly delete them. To learn how to do that (and a variety of other ways to remove comments in Word), read our guide here.
3. Quick Access Toolbar (Adding Comments)
If you want add, remove and navigate between lots of comments in Microsoft Word, I recommend adding the Comments group to your Quick Access Toolbar (which is super easy to do)
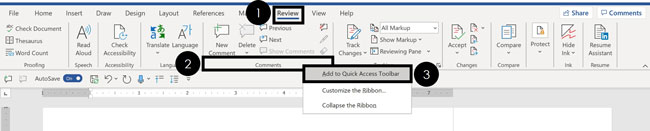
To add the Comments group to your Quick Access Toolbar, simply:
- Navigate to the Review tab
- Right-click the Comments group (anywhere along the bottom)
- Select Add to Quick Access Toolbar
With the Comments group added to your Quick Access Toolbar, you can now get at all the comment commands (add, next, previous, etc.) by simply clicking it with your mouse, as pictured below.
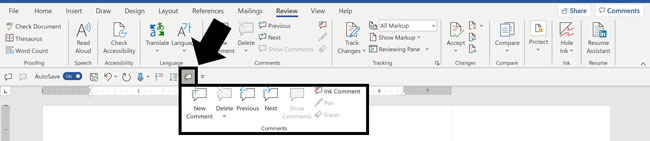
If you later want to remove the Comments group from your Quick Access Toolbar, simply right-click the command and select Remove from Quick Access Toolbar, as pictured below.
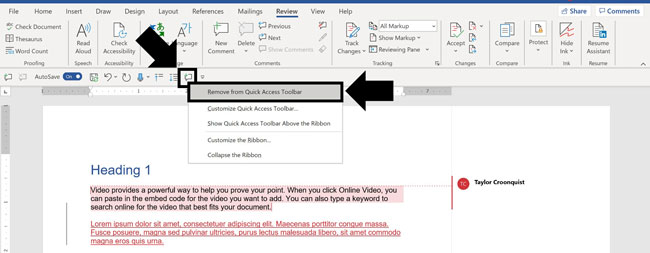
Note: If your Quick Access Toolbar is above your Ribbon, I recommend moving it below your Ribbon.
To do that, simply click the Customize Quick Access Toolbar command and select Show below the Ribbon.
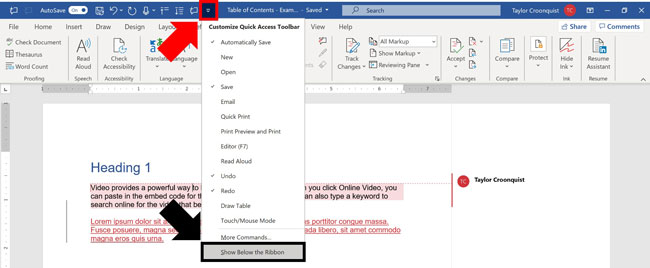
4. Microsoft Ribbon (Navigating Comments)

To use the Previous and Next comment commands, simply:
- Navigate to the Review tab
- Click Previous or Next
Previous takes to you the preceding comment from where you are currently active in your Word document.
Next takes you to the next comment from where you are currently active in your document.
If you have a lot of comments to review, you can also navigate your comments using the Reviewing Pane, discussed below.
Hidden Comments: The cool thing about the Previous and Next commands is that they work even if your comments are hidden. To learn how to hide comments in Word, read our guide here.
5. Reviewing Pane (Navigating Comments)

To open the Reviewing Pane in Word to review and navigate your comments, simply:
- Navigate to the Review tab
- Open the Reviewing Pane dropdown menu (click the downward facing arrow at the end)
- Choose either Reviewing Pane Vertical or Reviewing Pane Horizontal
Inside of the Reviewing Pane you can see and click through comments and other tracked revisions, as shown below.
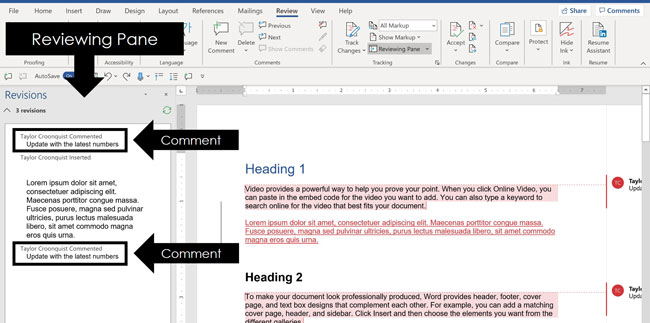
Conclusion
So those are the basics of adding comments in Word, and two separate ways you can navigate them within your document.
Adding comments is a fantastic way to mark up your documents without editing the underlying content. In this way you can quickly scan through your document and easily remember what you need to change in the future.
If you enjoyed this tutorial and want to learn more ways to improve your Microsoft Office skills, visit us here.
The comment function in Microsoft Word is a very useful tool. You can use it to leave comments for a proofreader before getting it checked, and you might receive feedback in comments if you are having your work edited. You can also use it to make notes while redrafting a document.

In all of these cases, though, you need to know how it works! Let us start with the basics…
How to Add a Comment
To add a comment in Microsoft Word, you first need to select the text you’re commenting on with the cursor. Once you’ve done that, you have three options available:
- Go to the Review tab on the main ribbon and click New Comment

Comment options. - Right-click the text and click New Comment from the menu

The contextual menu. - Use the shortcut Ctrl + Alt + M (Windows) or Cmd + Alt + A (Mac)
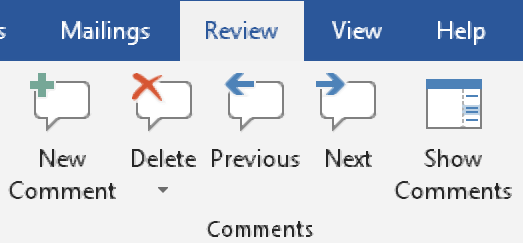
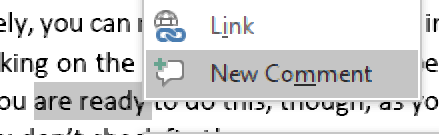
Any of these will add a new comment in the place selected (it will appear in the right-hand margin). You can then click the comment and write whatever you need to say.
Reviewing Comments
Microsoft Word also provides a few ways to interact with comments. These include the display options, the navigation buttons, and the Reply and Resolve buttons.
The most important display option is the Show Comments button in the Comments section of the Review tab. This controls whether comments are displayed in full or as small speech bubbles that you need to click to open, which can be less intrusive while you’re working.
Find this useful?
Subscribe to our newsletter and get writing tips from our editors straight to your inbox.
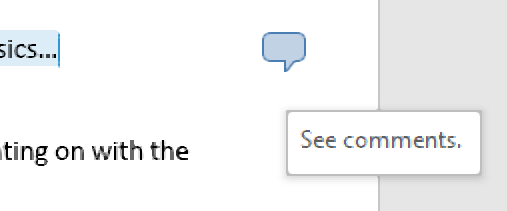
In addition, you can turn off comments completely by deselecting them in the Show Markup menu.
The navigation buttons, meanwhile, let you cycle through each comment in your document quickly. To use these, go to Review > Comments and click Previous or Next.
Finally, we have the review buttons in the bottom right of each comment. Your two options here are:
- Reply – Allows you to respond to a comment by adding a nested comment underneath
- Resolve – Marks a comment as resolved when you have read and addressed it
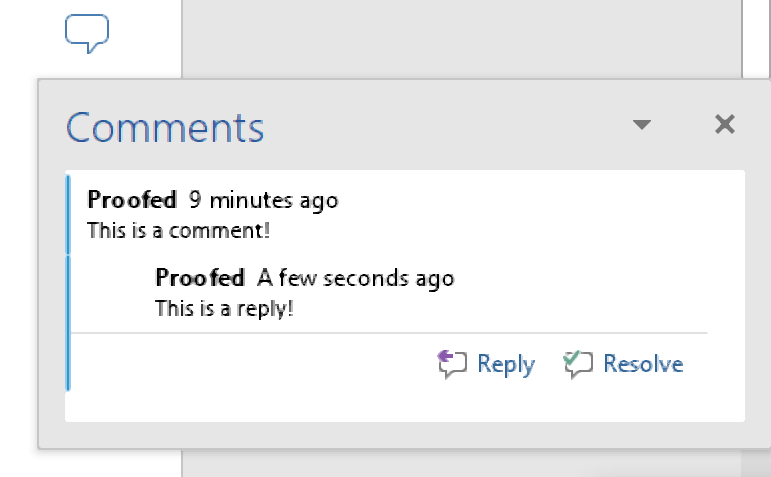
These last options are especially useful if you are working collaboratively on a document with others.
How to Delete a Comment
To remove a comment from a document, first select it and then either:
- Go to Review > Comments and click Delete
- Right-click the comment and select Delete Comment from the menu
And hey presto! The comment is gone. Alternatively, you can remove every comment in the document at once by going to Review > Comments and clicking on the little down arrow to open a new menu, then selecting Delete All Comments. Make sure you are ready to do this, though, as you might end up deleting an important comment by accident if you don’t check first!
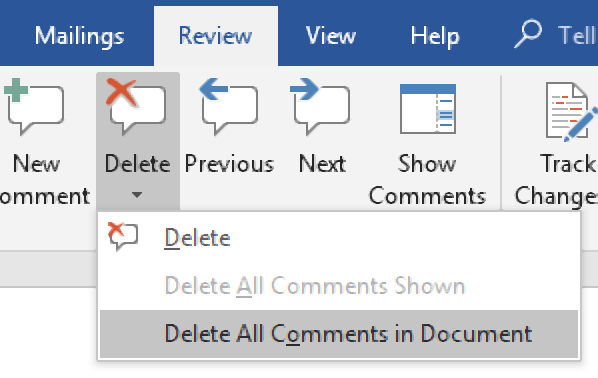
Во время совместной работы с документом Word пользователи могут добавлять примечания в Ворде, чтобы высказать свое мнение, замечание, предложение или отзыв — комментарий к текстовому содержимому. С помощью этого метода группового комментирования, вы получаете обратную связь от других пользователей или сами высказываете пожелания своим коллегам.
Если вы хотите привлечь внимание к определенной части документа, вы можете выделить некоторые части текста. Вы также можете добавить комментарий к какому-либо тексту, если вам есть, что сказать по этому поводу.
Содержание:
- Как сделать примечание в Ворде — 1 способ
- Как вставить примечание в Ворде — 2 способ
- Как создать примечание в Ворде — 3 способ
- Добавление кнопки вставки примечания на панель быстрого доступа
- Как изменить примечание в Ворде
- Как ответить на комментарий в Word
- Как посмотреть примечания в Ворде
- Как отобразить скрытые примечания в документе
- Как изменить шрифт примечания в Ворде
- Как распечатать Ворд с примечаниями
- Выводы статьи
- Как сделать примечание в Word (видео)
Комментарии в Ворде — это удобный способ пометить ваши документы без необходимости непосредственного редактирования содержимого документа Word. Это своего рода добавление напоминания для себя или своих коллег в виде заметок, не внося изменения в сам документ.
В этом случае сам текст документа не подвергается правке, потому что в Ворд примечания добавляются на полях документа без исправления основного текста. После добавления примечания, вы увидите в Ворде справа подсказку с комментарием.
Вы можете добавлять свои комментарии к чему угодно в Word, включая текст, изображения, диаграммы, таблицы и так далее.
Из этого руководства вы узнаете, как добавлять комментарии в Word. Инструкции этой статьи подходят к разным версиям программы: Word 2021, Word 2019, Word 2016, Word 2013, Word 2010, Word 2007.
Как сделать примечание в Ворде — 1 способ
Вы можете добавить примечание в Ворде несколькими способами. Сначала мы рассмотрим вариант с использованием вкладки «Рецензирование».
Выполните следующие действия:
- В окне открытого документа Word перейдите во вкладку «Рецензирование».
- Поставьте курсор мыши в нужном месте документа для прикрепления примечания.
Чтобы добавить примечание к отдельному слову, поставьте курсор мыши перед, на или после слова. Если вам потребовалось вставить комментарий к фрагменту документа, то тогда вам нужно предварительно выделить этот фрагмент в тексте документа.
- На ленте в группе «Примечания» щелкните по кнопке «Создать примечание».

- Слово или фрагмент текста, к которому добавлено примечание, будет автоматически выделено красной заливкой.
В Word 2010 и Word 2007 заливка полностью исчезнет только при удалении примечания.
В версиях Word 2013, Word 2016, Word 2019, Word 2021 в обычном состоянии заливка не отображается, она появляется после наведения указателя мыши или щелчка по области выноски примечания.
- В правой части страницы документа откроется дополнительная область примечаний, на которой в красном прямоугольнике-выноске вводится непосредственно текст комментария. Рядом с примечанием от отображается ваше имя в программе.

Если в документ Microsoft Word добавляют комментарии несколько человек, то значки имен пользователей отображаются разными цветами, чтобы вы могли видеть, кто написал какой комментарий. Каждое примечание также имеет отметку времени, указывающую, когда оно было вставлено.
- По мере ввода текста в красное поле примечания, его границы будут автоматически расширятся.

- Для возвращения к работе с основным текстом документа щелкните курсором мыши в нужном месте документа.
Все примечания останутся в документе MS Word после его сохранения на компьютере.
Как вставить примечание в Ворде — 2 способ
Ознакомьтесь с другим методом, как сделать примечание в Ворде справа, используя вкладку «Вставка».
Пройдите шаги:
- Откройте документ Word на компьютере.
- Щелкните по тексту (фрагмент текста нужно предварительно выделить) или объекту, который вы хотите прокомментировать.
- Перейдите на вкладку «Вставка».
- В группе «Примечание» нажмите на значок «Примечание», чтобы вставить свой комментарий к этой части документа.

- Напишите свой комментарий.
Как создать примечание в Ворде — 3 способ
Сейчас мы рассмотрим еще один метод добавления комментария: вы узнаете, как в Ворде вставить примечание на полях из контекстного меню программы. Это самый быстрый способ добавления примечаний в Word, поскольку вам не нужно перемещаться между содержимым документа и вкладками «Рецензирование» или «Вставка».
Проделайте следующее:
- Выберите (выделите), а затем щелкните правой кнопкой мыши по тому, что вы хотите прокомментировать.
- Нажмите на пункт контекстного меню «Создать примечание», или нажмите на значок «Создать примечание» на появившейся горизонтальной панели.

- Напишите свое примечание.
Добавление кнопки вставки примечания на панель быстрого доступа
Если вам часто приходится добавлять комментарии в Microsoft Word, то вы можете добавить кнопку «Вставить примечание» на панель быстрого доступа.
Выполните следующее:
- Откройте вкладку «Вставка».
- В группе «Примечание» щелкните правой кнопкой мыши, а в контекстном меню выберите «Добавить на панель быстрого доступа».

- Установите курсор мыши в определенном месте документа Word, а затем щелкните по кнопке «Вставить примечание».

Как изменить примечание в Ворде
Вы можете изменить свой комментарий, если возникла необходимость дополнить текст примечания или откорректировать его.
Вам необходимо сделать следующее:
- В окне открытого документа щелкните в области примечания в красном прямоугольнике выноски в нужном месте текста примечания.
- Внесите любые изменения и дополнения в текст, который форматируется обычным способом.
- Щелкните указателем мыши за пределами поля примечания, чтобы вернуться к работе с основным текстом документа.
Обратите внимание на то, что любой пользователь, у которого есть доступ к этому файлу Word, может редактировать ваш комментарий, если документ не защищен от редактирования.
Как ответить на комментарий в Word
Помимо создания новых комментариев, вы можете вести беседу, отвечая на комментарии, оставленные другими пользователями. Используйте следующие методы, чтобы ответить на комментарий.
1 способ:
- В красном прямоугольнике выноски примечания нажмите на кнопку «Ответить».
- Напишите свой ответ.

2 способ:
- Кликните по примечанию правой кнопкой мыши.
- В открывшемся контекстном меню нажмите на пункт «Ответить на комментарий».

- Добавьте свое замечание.
Как посмотреть примечания в Ворде
Если необходимо просмотреть и отредактировать примечания, расположенные в различных местах документа, можно использовать предложенный алгоритм действий для навигации по комментариям.
Сделайте следующее:
- В окне открытого документа переходим к вкладке «Рецензирование».
- В группе «Примечание» щелкаем по кнопке «Предыдущее» или «Следующее» и передвигаемся по документу от примечания к примечанию.

Как отобразить скрытые примечания в документе
Примечания, добавленные в документ Word, могут быть скрыты, поэтому пользователь может их не увидеть.
Чтобы отобразить скрытые примечания в Word, сделайте следующее:
- В окне документа перейдите во вкладку «Рецензирование».
- Щелкните по кнопке «Показать исправления».
- В списке команд включите позицию «Примечания».

- Область примечания откроется вместе со всеми существующими примечаниями.
Как изменить шрифт примечания в Ворде
По умолчанию в примечаниях используется стандартный текст маленького размера, поэтому часто необходимо увеличить шрифт в примечании Word. Форматирование текста изменяется обычным способом: вы можете сделать полужирное начертание, курсив, подчеркивание, изменить цвет шрифта и так далее.
Выбор шрифта и размер шрифта в примечаниях настраивается иначе.
Пройдите несколько шагов:
- Выделите текст примечания.
- Во вкладке «Главная» нажмите на стрелку в нижнем правом углу группы «Стили».
- В открывшемся меню щелкните по кнопке «Управление стилями».

- В окне «Управление стилями», во вкладке «Изменение» в разделе «Выберите стиль для изменения» найдите и выделите «Текст выноски (Скрыть до использования)», а затем нажмите на кнопку «Изменить…».

- В окне «Изменение стиля» в разделе «Форматирование» выберите подходящий шрифт и размер шрифта.
Можете поставить флажок в пункте «Добавить в коллекцию стилей», чтобы использовать этот стиль в дальнейшем. По умолчанию активирована настройка «Только в этом документе». Можно выбрать параметр «В новых документах, использующих этот шаблон».

- Нажмите на кнопки «ОК» в этом и предыдущем окнах.
- В результате, шрифт и размер шрифта примечания изменятся.

Как распечатать Ворд с примечаниями
В некоторых случаях вам может понадобится печать примечаний в Word вместе с основным содержимым документа.
Печать примечаний в Ворде проходит в следующей последовательности:
- Зайдите во вкладку «Рецензирование».
- В группе «Запись исправлений» щелкните по «Показать исправления».
- В выпадающем меню убедитесь, что отмечен флажком пункт «Примечания».

Если нажать на пункт «Конкретные пользователи», то можно выбрать всех рецензентов или конкретных пользователей.
- Войдите в меню «Файл», нажмите «Печать».
- В разделе «Параметры» нажмите на кнопку «Напечатать все страницы. Все сразу».
- В открытом меню посмотрите, чтобы стояла галка в пункте «Напечатать исправления».

- Нажмите на кнопку «Печать».

Выводы статьи
Некоторым пользователям необходимо знать о том, как поставить примечание в Ворд, когда они совместно работают над одним документом. Добавление комментариев помогает получить от коллег мнения и замечания без редактирования основного содержимого документа. Благодаря примечаниям вы можете увидеть то, с чем вам необходимо поработать или что вам нужно изменить в будущем.
Как сделать примечание в Word (видео)
Похожие публикации:
- Как поставить ударение над буквой в Ворде — 3 способа
- Как написать дробь в Ворде
- Как удалить ссылки из текста Word
- Как удалить сноски в Word: все способы
- Как выделить текст в Word: разные способы