
Word 2013
You can format your document in a newspaper-style column layout by adding columns. On the Page Layout tab, click Columns, then click the layout you want.
-
To apply columns to only part of your document, with your cursor, select the text that you want to format.
-
On the Page Layout tab, click Columns, then click More Columns.
-
Click Selected text from the Apply to box.
Word 2016
You can format your document in a newspaper-style column layout by adding columns. On the Layout tab, click Columns, then click the layout you want.
-
To apply columns to only part of your document, with your cursor, select the text that you want to format.
-
On the Layout tab, click Columns, then click More Columns.
-
Click Selected text from the Apply to box.
Need more help?
![]()
Download Article
A user-friendly guide to create two separate text columns on Microsoft Word
![]()
Download Article
- Using a Computer
- Using the Mobile App
- Q&A
- Tips
|
|
|
Do you want to split text into multiple columns in Microsoft Word? With the «Columns» feature, you can easily do so in a few simple steps. With the desktop version of Word, you’ll be able to create columns with selected text. On mobile, you’ll need to change the whole document layout. This wikiHow will show you how to make two or more columns in your Microsoft Word document using your Windows, Mac, iPhone, or Android device.
Things You Should Know
- On desktop, highlight the text you want to split. Click «Layout» → «Columns» → «Two.»
- On mobile, tap ••• → «Home» → «Layout» → «Columns» → «Two».
- You can only split selected text on desktop. Creating columns on mobile will change the entire document layout.
-

1
Open the Microsoft Word document you want to edit. Find the Word document you want to edit on your computer, and double-click on its icon to open it.[1]
- If you don’t have Microsoft Word on your Windows or Mac computer, you can download it or use the free web version at https://www.office.com.
- You can also add images to your document if you’re planning to create a «news column» type document.
-
2
Select all the text you want to split into columns. Click the beginning of the text you want to edit, and drag your mouse until the end of it. Selected parts will be highlighted.
- If you want to select the whole document, you can use a keyboard shortcut.
- On Mac, press Command + A.
- On Windows, press CTRL + A.
Advertisement
- If you want to select the whole document, you can use a keyboard shortcut.
-
3
Click the Layout tab at the top. This button is located above the toolbar at the top of your document.
- Depending on your version of Word, this button may also be labeled Page Layout.
-
4
Click the Columns button on the Layout toolbar. This looks like a rectangle with horizontal lines divided in two sets.
- A drop-down menu will open.
-
5
Select Two on the drop-down menu. This will split the selected text into two columns.
- Alternatively, you can select another option here, and create even more columns. You can select: One (default), Two, Three, Left, Right, or More Columns.
-
6
Change the size of your columns (optional). You can click and drag the edges of the ruler at the top of your document to change the size of your columns.
- If you don’t see the ruler, click the View tab, then click the box next to Ruler in the Show section.
- Make sure you still have your column text selected when you adjust the size.
- This is an optional adjustment. If you prefer not to change the column sizes, your columns will be equal in size by default.
- Be sure to save your Word document when you’re finished.


Advertisement
-
1
Open a document in the Microsoft Word app. This looks like a blue notebook next to a W. Microsoft Word is available for iOS in the App Store and for Android in the Google Play Store.
- Tap Blank document to open a new document or tap a file to open an existing document.
- You can’t put specific text into two columns on the mobile app. This method will adjust the entire document’s layout without needing to select text.
-
2
Tap ••• . This can be found above the keyboard, to the right.
- If you don’t see your keyboard, tap the document to bring it up.
- A new menu will open.
-
3
Tap Home. This will be to the left of the formatting window.
- A drop-down menu will open.
-
4
Tap Layout. You’ll see a list of options you can make to your page layout.
-
5
Tap Columns. This will be next to the icon of horizontal lines divided in two sets.
-
6
Tap Two. This will split the selected text into two columns.
- Alternatively, you can select another option here, and split your text into more columns. You can select: One (default), Two, Three, Left, or Right.
- Your page layout will now have two columns. When you enter text, it will fill the left column first, then continue onto the right column.


Advertisement
Add New Question
-
Question
My layout key does not have the option for columns. How do I add that?

You are probably using the web version. It doesn’t have a lot of special options. The best solution is just to get the Word app and try again.
-
Question
How to create a two columns with separate texts?
This is very simple. When typing in each column, type different things. If it tries to connect them, just start a new paragraph.
-
Question
I want to change back to a full document after the columns. Then change back to columns and so forth (Recipe title and serving size, then columns for actual recipe; then another recipe on same page.)
At the bottom of the advanced column settings, there is a dropdown box labeled «Apply to:». Set the column number and click this to select the section you want to update. The easiest option is to highlight a section and select the «selected text» option.
See more answers
Ask a Question
200 characters left
Include your email address to get a message when this question is answered.
Submit
Advertisement
Thanks for submitting a tip for review!
Advertisement
About This Article
Thanks to all authors for creating a page that has been read 384,000 times.
Is this article up to date?
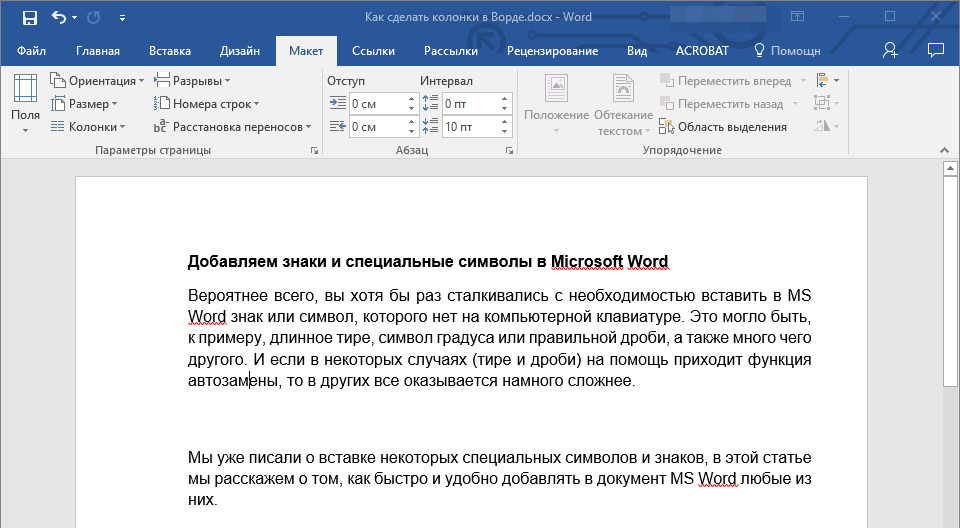
Typically, Word documents like books, reports, and letters have paragraphs that occupy the whole page width. In articles, newsletters, flyers, and brochures, all or only parts of the text may be arranged in two or more columns:

You don’t need to create tables to structure text into columns. Tables are useful for displaying translated versions of the legal document side-by-side, but table cells break the text flow and are not recommended for multi-column layouts. It is more convenient to use columns for text formatting in most other cases. Word also allows you to adjust your columns by adding column breaks.
Format text in columns
To format a text into columns, do the following:
1. Do one of the following:
- To use the same number of columns for an entire document, click anywhere in the document (empty or with content).
If you choose to format text in columns, Word fills the first column with text on the page and then moves to the beginning of the next column. When all columns on one page are filled, the text moves to the next page.
- To format only a part of the document, select the paragraphs that you want to wrap in columns.
If you select a part of the text and wrap it in columns, Word inserts section breaks at the beginning and end of the selected text to delineate the area where the column layout is applied:

See more about breaks and how to display them.

To manually specify where the text in each column should end, you can use a column break.
2. On the Layout tab, in the Page Setup group, click the Columns button:

3. In the Columns dropdown list, select one of the options:

- One (used by default),
- Two, Three to create two or three columns of equal width,
- Left, Right to create two columns of unequal width,
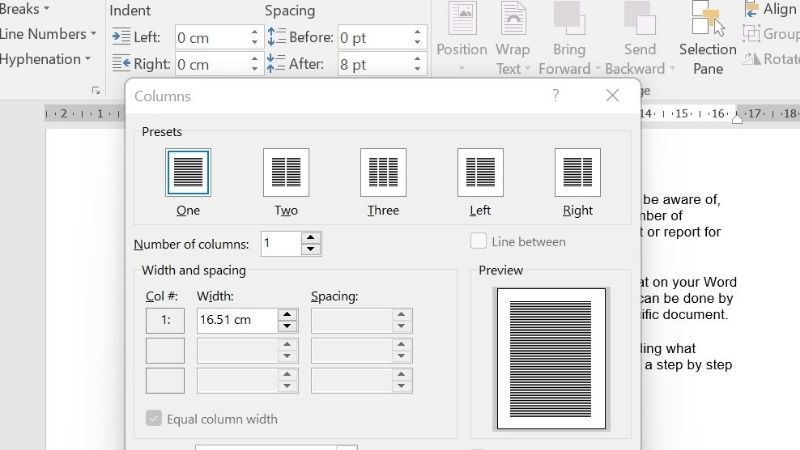
- More Columns… to specify more options in the Columns dialog box:

- In the Presets section, you can choose the same options as in the Columns dropdown list – One, Two, Three, Left, or Right.
- If you need more columns, type or select the number of columns you need in the Number of columns field. The maximum number of columns may vary depending on the font, font size, margins, etc. E.g., 13.
- The Line between checkbox inserts a vertical line between columns. This line clearly defines column borders, especially if you want to fit as much content on the page as possible (very handy for cheat sheets).
See more options below.

Format columns
I. It is recommended to justify the paragraphs in columns to give the page a clean and organized appearance. To justify the column text, select it and do one of the following:
- On the Home tab, in the Paragraph group, click the Justify button:

- Press Ctrl+J.

II. To change the width of columns or the space between them, do the following:
1. Click anywhere in the columnar text.
2. Do one of the following:
- On the Layout tab, in the Page Layout group, click the Columns button, then choose More Columns…
In the Columns dialog box, in the Width and spacing section:
In the Width box for any columns, enter or select a new width.
The Width measurements for the other columns change to match, and the width of all the columns changes.
See how the columns will be displayed in the Preview section.
- On the horizontal ruler, drag the margins to change the width of the columns:


III. To reduce white space on text lines, you can set up Word to hyphenate the text and break long words into syllables. See how to hyphenate automatically and manually for more details.
Remove columns
To remove column layout for the selected text or entire document, do the following:
1. Click anywhere in the columnar text.
2. On the Layout tab, in the Page Layout group, click the Columns button, then choose One.
Insert a column break
In the Word document, you can manually break columns. When you break a column, the text after the break moves to the top of the next column:

You can display column breaks as regular nonprintable symbols. Word displays them as ![]() .
.
To insert a column break, position the cursor at the beginning of the line you want to start in the new column, and then do any of the following:
- On the Layout tab, in the Page Setup group, click the Breaks button, and then click Column to insert a column break:

- Press Ctrl+Shift+Enter.

The column break is inserted, and the cursor moves to the beginning of the next column.
Remove a column break
To remove a column break, click at the left end of the break or select the break and press the Delete key.
Содержание
- Создание колонок в документе Ворд
- Создание колонок в документе
- Примеры использования колонок
- Отмена разбиения на колонки
- Заключение
- Вопросы и ответы

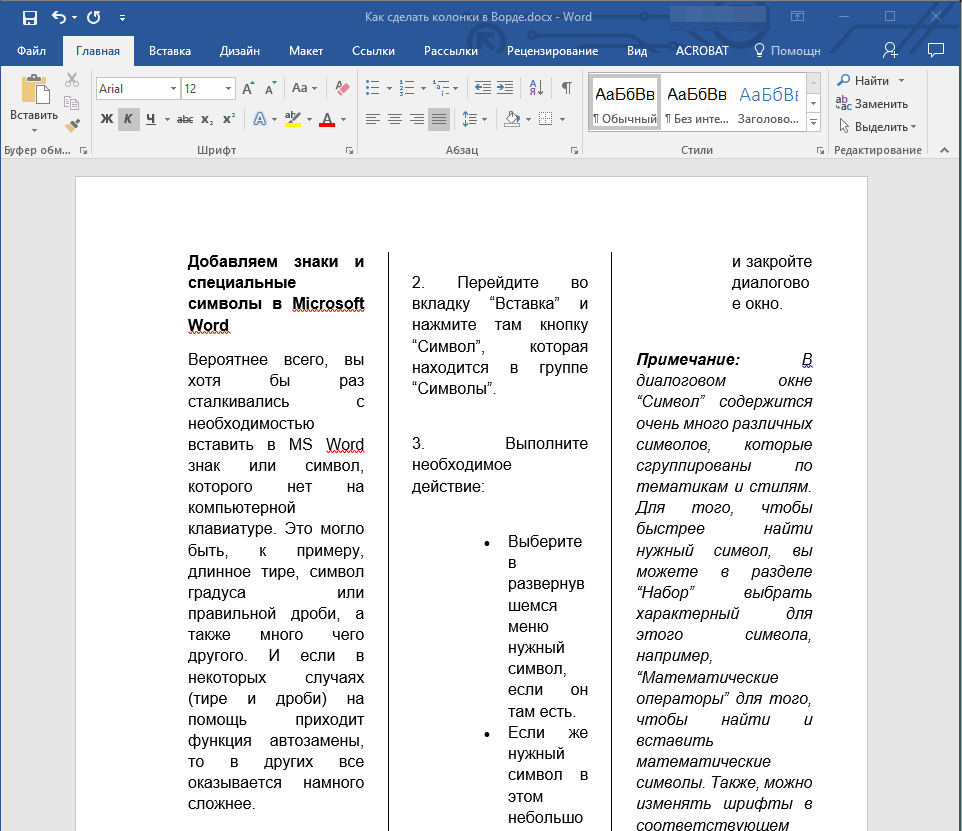
Одной из задач, с которой можно столкнуться при работе в редакторе Microsoft Word, является необходимость разбиения страницы на колонки (столбцы), с видимой границей или нет – это уже не столь важно. В рамках настоящей статьи расскажем, как это сделать.
Создание колонок в документе Ворд
Существует всего один способ создания столбцов в Word, при этом их количество, ориентация относительно полей страницы, ширина и отступы могут отличаться. Сначала мы рассмотрим то, как их создать, а затем кратко пройдемся по возможным вариантами применения данного навыка.
Создание колонок в документе
Для того чтобы разбить страницы текстового документа на два и более столбцов, необходимо выполнить следующие действия:
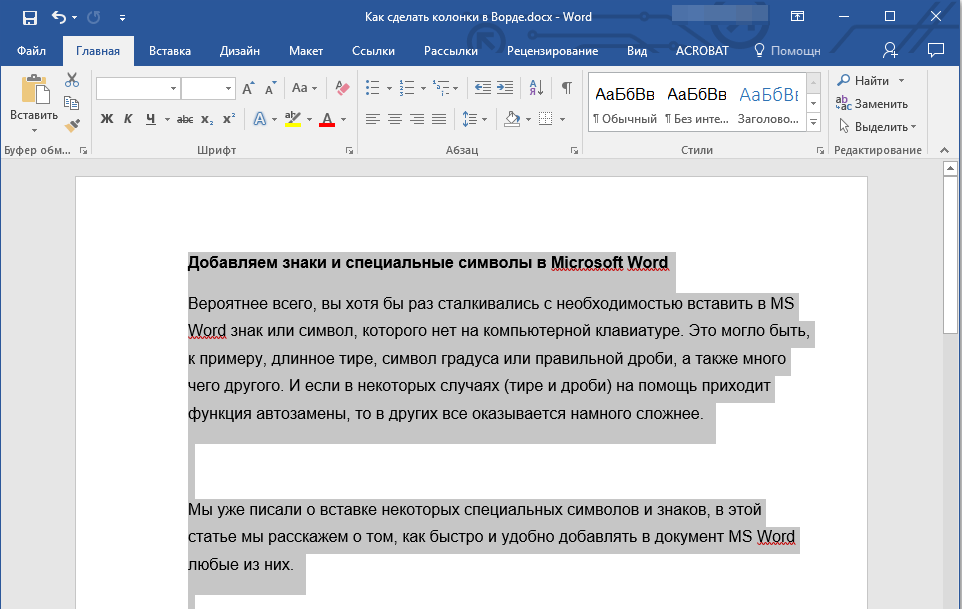
- Выделите с помощью мышки фрагмент текста или страницу, которую требуется разбить на колонки, или нажмите «CTRL+A» для выделения всего документа.

Читайте также: Как выделить страницу / весь текст в Ворде
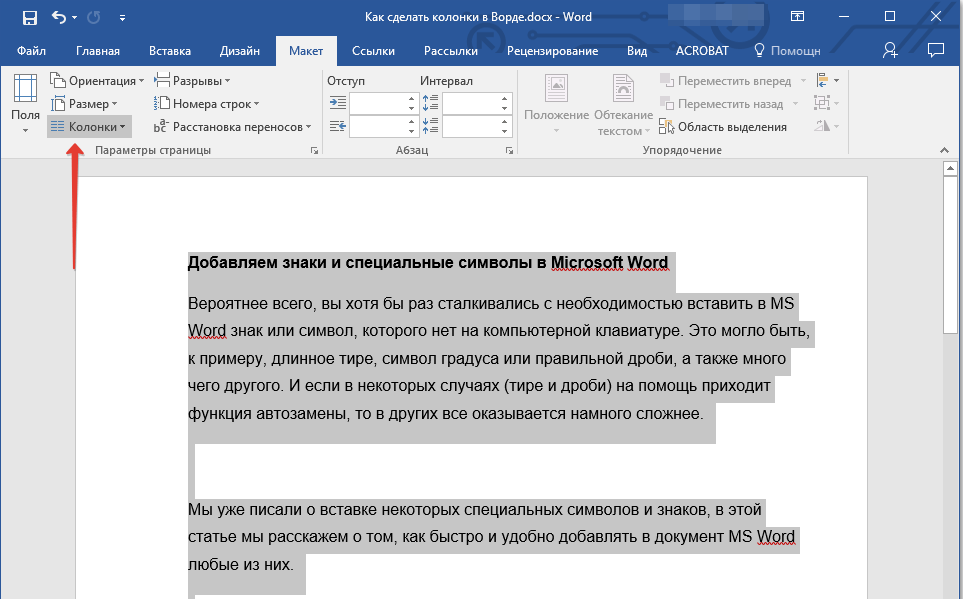
- Перейдите ко вкладке «Макет» и разверните там меню кнопки «Колонки», которая расположена в группе «Параметры страницы», нажав на нее.

Примечание: В версиях Ворд до 2012 года необходимые для решения поставленной задачи инструменты находятся во вкладке «Разметка страницы».
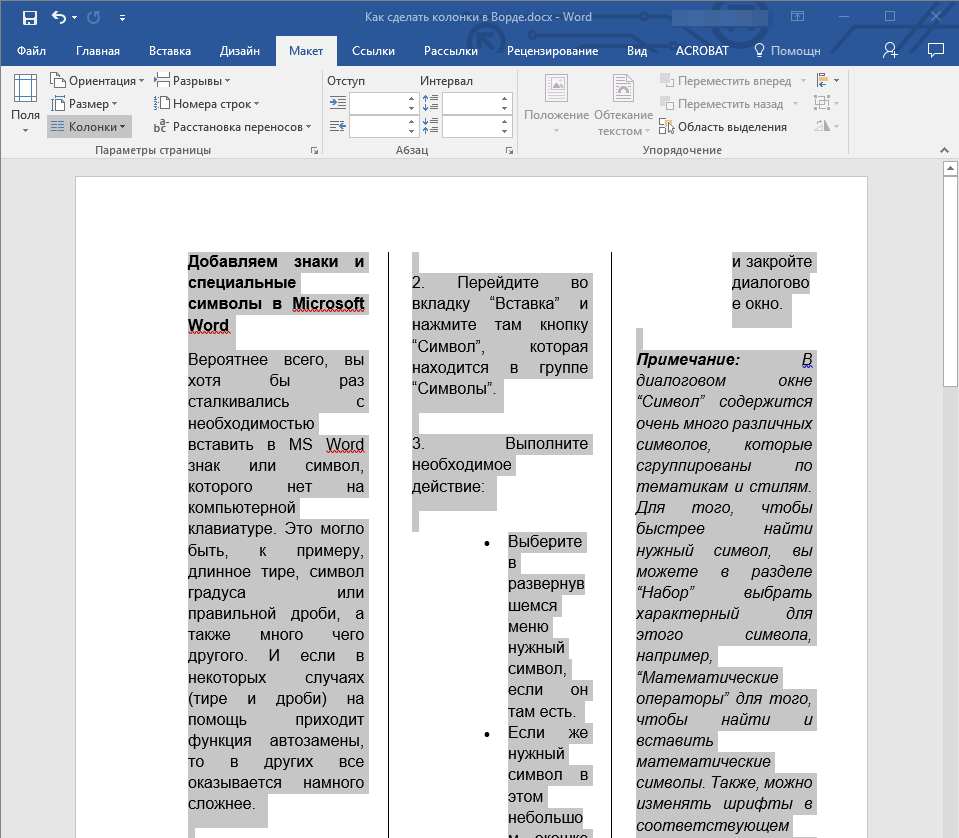
- Выберите в развернувшемся меню желаемое количество колонок. Если указанные по умолчанию значения вас не устраивают, кликните по пункту «Другие столбцы» (или «Другие колонки», в зависимости от используемой версии Microsoft Word).
- Определите необходимое количество столбцов, выбрав его в блоке «Тип», или введите вручную в строке «Чисто столбцов». В разделе «Применить» выберите один из двух доступных пунктов: «К выделенному тексту» или «До конца документа», если вы хотите разделить на заданное число столбцов текстовый фрагмент или весь документ соответственно.

Примечание: Если вам необходимо создать две колонки, размер одной из которых будет меньше другой, а ее расположение «привязано» к одному из полей, выберите соответствующее значение в блоке опций «Тип», ориентируясь на два последних макета («Слева» и «Справа»). Ниже, в блоке «Ширина и промежуток», можно задать подходящие размеры (непосредственно ширину текста и отступ между ним) для каждого из столбцов. Эти же значения можно редактировать и для большего числа колонок.
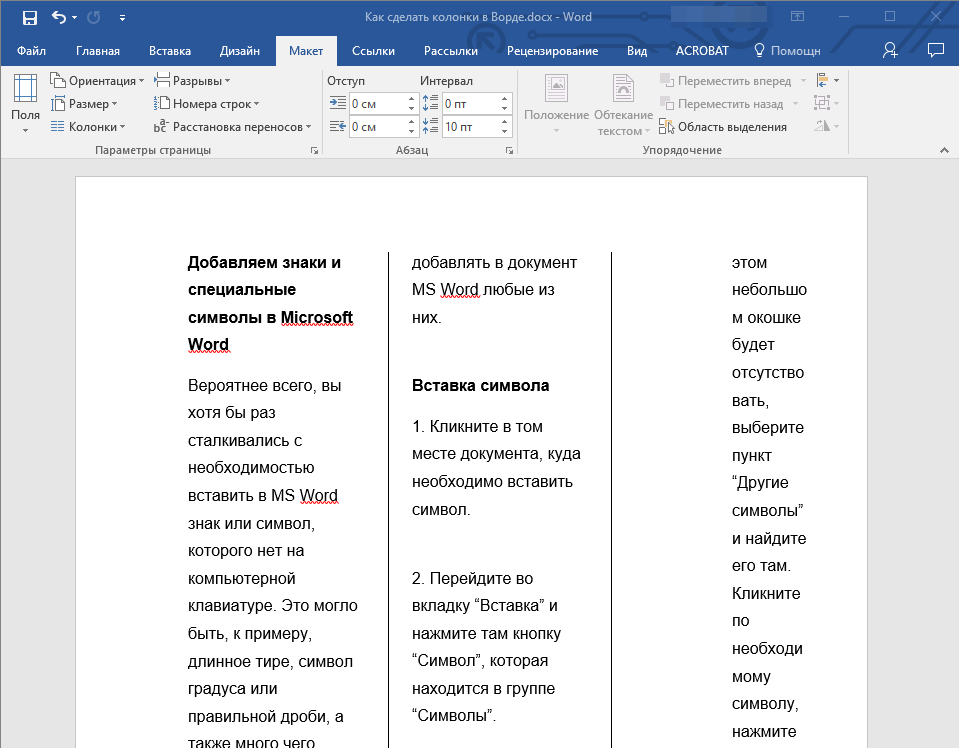
- Сразу после нажатия в диалоговом окне кнопки «ОК» выделенный фрагмент текста, страница или страницы будут разбиты на заданное количество колонок, после чего вы сможете писать текст в столбик.

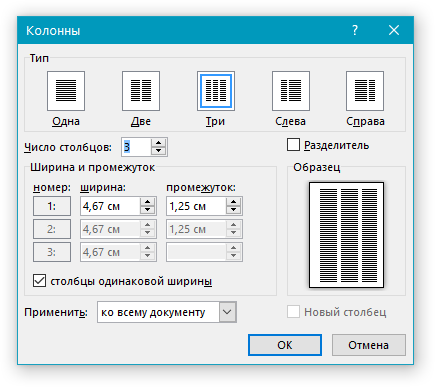

Для того чтобы добавить вертикальную границу, наглядно разделяющую столбцы (например, показав таким образом линию сгиба), снова кликните по кнопке «Колонки» и выберите пункт «Другие столбцы», после чего установите галочку напротив пункта «Разделитель». В этом же окне выполняются необходимые настройки ширины текста в столбцах и расстояния между ними, о чем мы упомянули в примечании выше.

Для подтверждения внесенных изменений нажмите «ОК».

Если вы хотите изменить разметку в следующих частях (разделах) документа, с которым работаете, выделите необходимый фрагмент текста или страницы, а затем повторите вышеописанные действия. Таким образом вы можете, к примеру, сделать на одной странице в Ворде две колонки, на следующей — три, а затем снова перейти к двум.
Совет: Если это необходимо, вы всегда можете изменить ориентацию страницы в документе Word с традиционной книжной на альбомную. О том, как это делается, мы ранее писали в отдельной статье.
Читайте также: Как в Ворде сделать альбомную ориентацию страницы
Примеры использования колонок
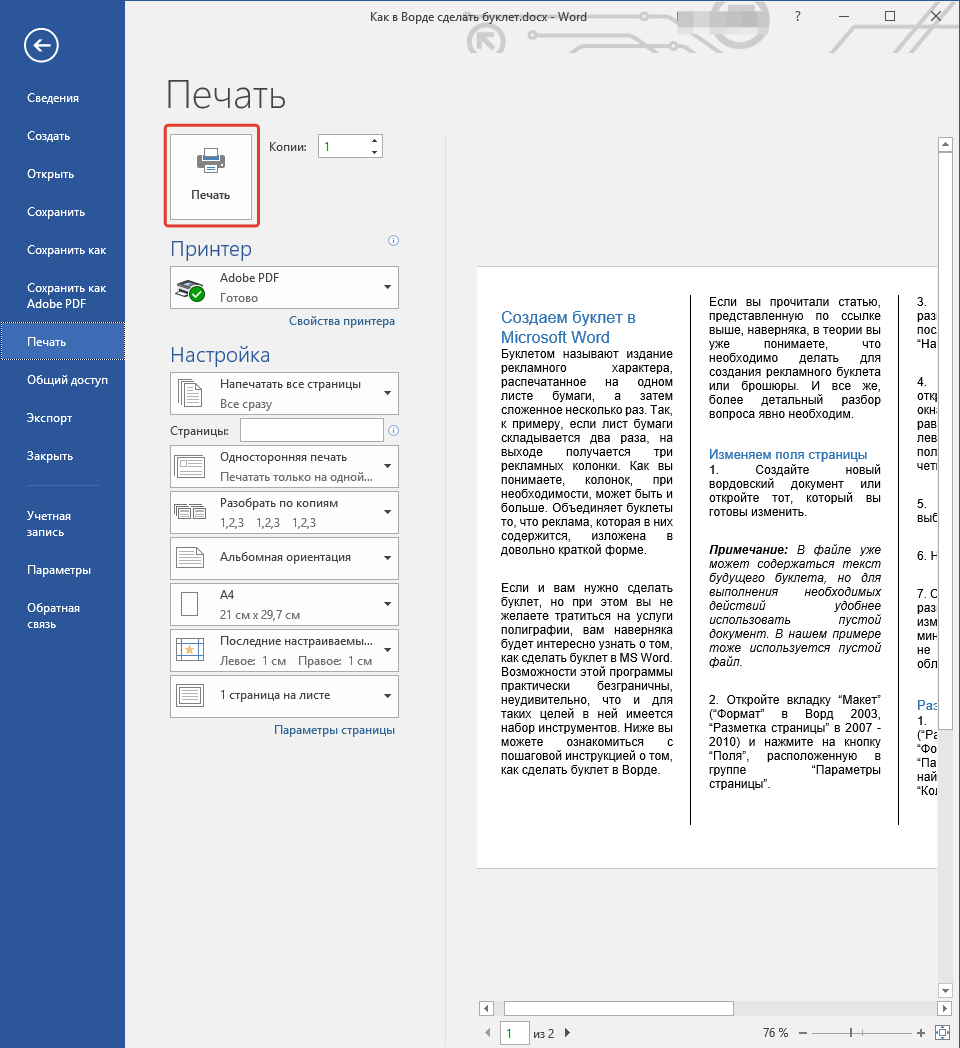
Очевидно, что добавление столбцов в Microsoft Word может потребоваться при создании документов, формат которых отличается от стандартных. К числу таковых можно отнести брошюры, буклеты и книги, которые зачастую не только разрабатываются в текстовом редакторе, но и затем распечатываются на принтере. Еще одна оригинальная задача, которую позволяет решить осваиваемая нами сегодня функция текстового редактора, — это создание шпаргалок. На нашем сайте есть отдельные статьи о работе с нетипичными документами, при которой без умения создавать и изменять колонки не обойтись – рекомендуем с ними ознакомиться.
Подробнее:
Как в Ворде сделать буклет / книгу / шпаргалку
Печать документов в Microsoft Word
Отмена разбиения на колонки
В случае если необходимость в применении столбцов к текстовому содержимому документа отпадет, для ее отмены выполните следующее:
- Повторите действия из пункта №1-2 первой части данной статьи.
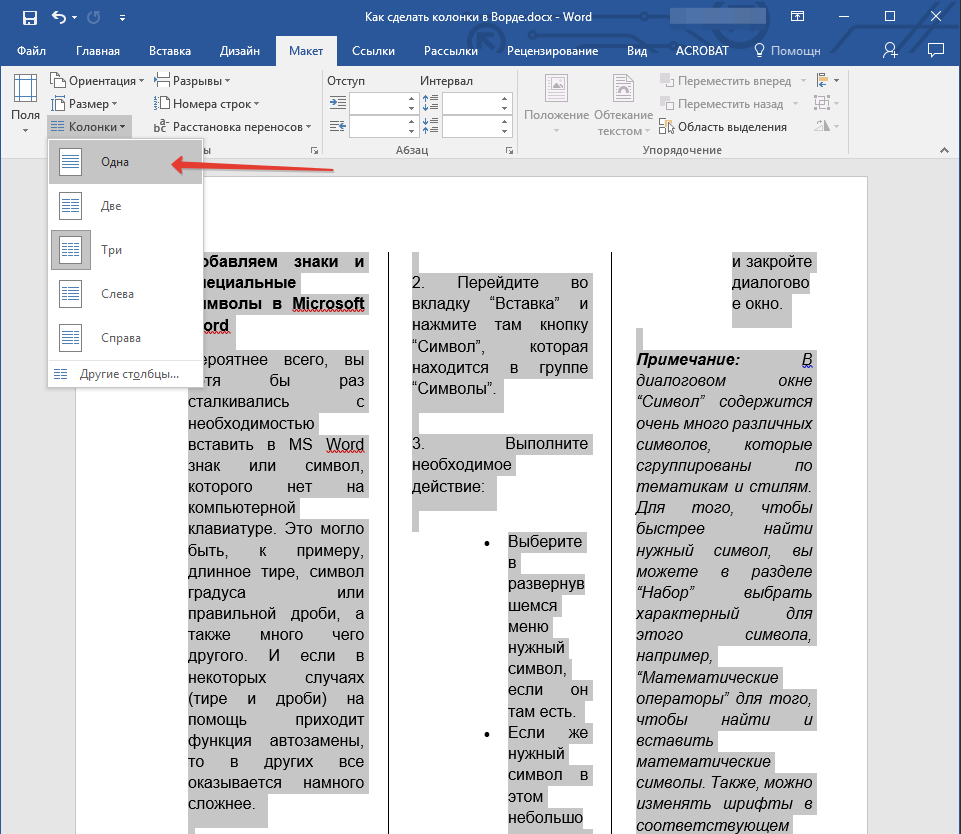
- Кликнув по кнопке «Колонки», выберите первый пункт в списке доступных — «Одна».
- Разбиение на колонки исчезнет, а документ обретет привычный вид.
Читайте также: Как отменить действие в Ворде
Заключение
Теперь вы знаете не только о том, как сделать колонки в Microsoft Word, но и в документах какого типа их применение особенно актуально.
Еще статьи по данной теме:
Помогла ли Вам статья?
Most books present their content as a single column on their pages. You read one page and move on to the other. Many magazines and newspapers present their content in columns. Here, you read one column to the bottom of the page, then proceed to the top of the neighboring column on the same page.
Another use of pages with columnar text is when presenting a translation. One column represents the original language, while the neighboring column carries the translation.
The difference is after reading the first column, you proceed to the first column on the next page. Likewise, the second column on one page connects to the second column on the next page.
Sometimes, it is necessary to leave a part of the page blank for others to add notes or place comments. A page with two columns helps.
Word allows making two or more columns on a page in a document. You can use three different methods for making columns in a Word document. They satisfy all the requirements above. We will show you how to make the columns by 3 mehods.
- Inserting a table
- Inserting linked text boxes
- Inserting columns
Let us start.
Method #1: Make two columns by inserting a table.
Step #1: Open a new document
Open a new Word document.
Click on the Insert tab on the top menu bar to change the ribbon.

Step #2: Insert a table
In the Tables section, click on the Table icon to open the Insert Table dialog.

Hover the mouse cursor over the second square in the Table dialog.
A table with two cells will appear on the page.
Click the second square to fix the 2×1 table on the page.

Step #3: Change table properties
Hover the mouse pointer near the top to the left side of the table.
Click on the cross icon that appears. This will select the entire table.
Right click to open a menu. Click on Table Properties.

This opens the Table Properties dialog.

In Table Properties, click on Row. This opens the Row dialog.
Under Size, click on Specify height to ensure there is no tick-mark inside the square next to it.
Under Options, click on Allow row to break across pages to ensure a tick-mark appears within the square next to it.
Click on Ok to apply the choices you made.
Step #4: Adjust column width
Hover the mouse pointer over the divider between the two columns in the table.
The cursor changes into a double arrow.
Hold the left mouse button down and drag the divider to the approximate center of the table.

Step #5: Fix the column width
Select the table. Right click to open a menu.

Click on Auto Fit. This will open three choices. Click on Fixed Column Width.
You can now enter text in the two columns.

Method #2: Make two columns by inserting linked text boxes.
Step #1: Open a new document
Open a new Word document.
Click on the Insert tab on the top menu bar to change the ribbon.

In the Pages section, click on Blank Page to insert a new page.
Return to the first page.
Step #2: Draw a text box
Under Insert, and in the Text section, click on the Text Box icon.

This will open the Built-in selection for various types of text boxes.

Click on Draw Text Box.
The cursor will change to a large cross.
Place the cross on the top left side of the page.
Keep the left mouse button pressed down and drag the cross diagonally to the middle of the page.
Word will draw a box on the page.

Step #3: Draw the second text box
Repeat Step #2 and draw a second text box next to the first.

Step #4: Insert a new page
Follow Step #1 to insert another new page. Now we have three pages with the first one containing two text boxes. This step allows you to enter new pages without cutting the link between text boxes.
Step #5: Draw two boxes on page #2
Follow Step #2 and Step #3 to draw two additional text boxes on page #2. Now we have three pages with two empty text boxes each in page #1 and in page #2.
For reference, we will name the two text boxes on page #1 as A1 and A2, and the two text boxes on page #2 as B1 and B2.

Step #6: Create link between boxes on the left side
Select text box A1 on page #1.
Click on the Format tab on the top menu bar to change the ribbon.

In the section Text, Click on Create Link. The cursor changes to resemble a coffee mug.
Place the coffee mug cursor inside text box B1 on page #2 and click. This will link text box A1 to B1.
Step #7: Create link between boxes on the right side
Follow Step #6 to create link between text boxes A2 and B2.
Now, you can enter text into the text boxes. Once A1 fills up, text will overflow into B1. Likewise, overflowing text from A2 will appear in B2.

Step #8: Remove outline from text boxes (optional)
Select a text box from which you want to remove the outline.
Right click to open some choices.

Click on Outline to open some more choices.

Click on No Outline. Click anywhere outside the text box to remove the outline.

Repeat Step #8 to remove outline from other text boxes of your choice.
Method #3: Make two columns by inserting columns
Step #1: Open a new document
Open a new Word document.
Click on the Layout tab on the top menu bar to change the ribbon.
Step #2: Create Columns
In the Page Setup section, click on Columns.

This will open the Columns selection.

Click on Two to create two columns. The horizontal scale splits to accommodate the two columns.

Now, whatever you type in the page will first fill the left column and then fill the second column. Then the text will overflow to the next page, following the same two column patterns in the previous page.
Note: Method #3 applies to existing Word documents also for changing it to columnar text.

Conclusion
Change your document to a columnar layout. Follow our step-by-step approach to make columns in your Word document.
Learn how to create two columns in Google Docs.
You may find yourself needing to separate your document, or at least part of it, into parallel columns, the good thing is Word makes it easy to do so. When separating the text into columns, it flows from one column and continues to the other one next to it. You can also separate just a part of your text. This is useful for writing a newsletter, a scientific paper, or just separating your content and making it easier to read.
So, in this guide, you will learn how to create columns in Word using different methods.
How to make two columns in Microsoft Word
With this method, you will be able to split your Word document into two separate columns.
- First, we have to open the document we want to edit. It can be a blank document but it needs to have some text first to separate it into columns.
- Select the text that you want to separate into columns.

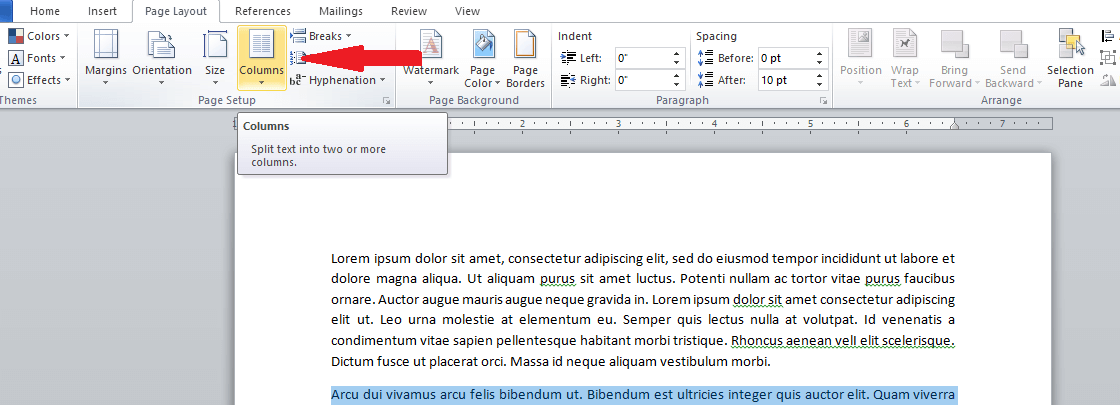
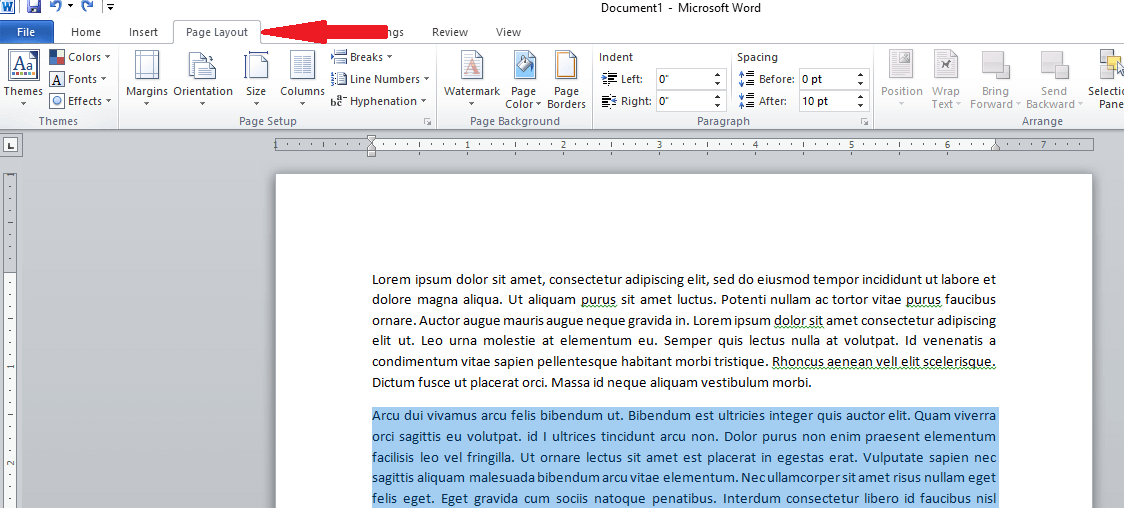
- Click on the Layout tab (Formerly Page Layout for Word 2007 and 2010)
- Click the Columns button on the Page Setup section

- This opens up a list that lets you select the number of columns you want to separate your text. We will choose two columns.

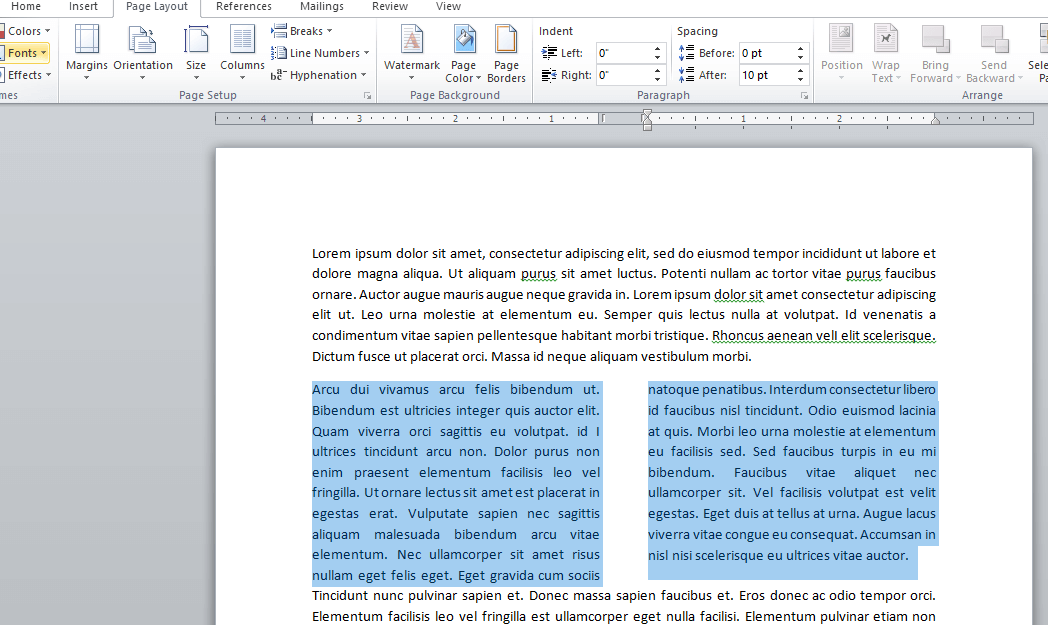
- Once you have selected two columns, Word will separate your text into two columns.
- The text you write in will go from the left column to the right.


How to make three columns or more in Microsoft Word
Sometimes you are in the need of separating your text into more than two columns. The amazing thing about Word is that it lets you separate it into three or more columns. Here are the steps for doing so:
- Open up the document you want to edit
- Select the text you want to separate into columns
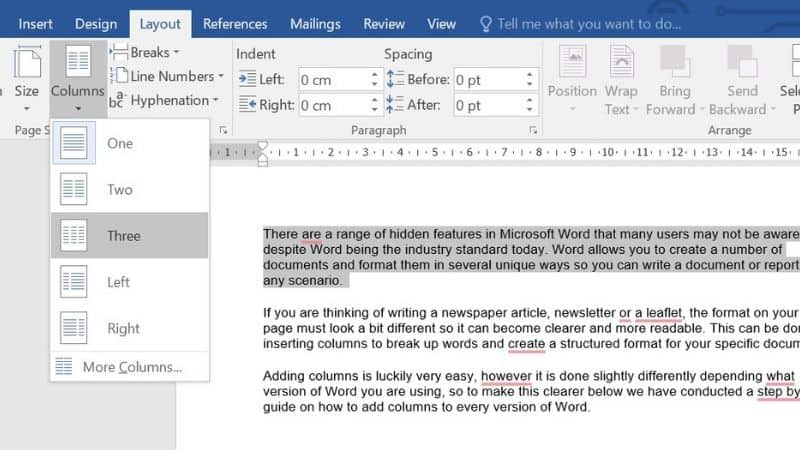
- Click on the Layout tab (Formerly Page Layout for Word 2007 and 2010)

- Click the Columns button on the Page Setup section
- If you need to separate the text into three columns, click on Three, and the text will be separated into 3 columns.

- If you need to have more than 3 columns, click on More columns
- There you will be able to manually enter the number of columns you want.

Pro tip: In this section, you can also specify the Width and Spacing of the columns - You can select if you want to apply the columns to the selected text only, the whole document, or from a specific point forward.


Now you may be asking, “how do I control where the column ends?”. Well, Microsoft Word has a function that lets you do that, and it’s called Break. Let’s break it down
How to make a column break on Microsoft Word
If you are using columns and want the text you have to start atop the next column, you can use a column break. Here are the steps
- Click on the beginning of the text you want to start the next column

- Click the Layout tab (formerly known as Page Layout for Word 2007 and Word 2010)

- In the Page Setup section, you will find the Break button. This will show you the different options for Page breaks and section breaks. In the Page break portion, click on Column

- Now the column will start at the point you have selected


And that’s it! You are now a pro at creating columns in Microsoft Word. You can repeat these steps anytime you need them.
If you are still craving more tips on how to use Word or other Office apps, why don’t you subscribe to our newsletter by entering your email below? You can also check the SoftwareKeep Blog to help you boost your productivity!
Last Updated on September 15, 2022
There is a range of hidden features in Microsoft Word that many users may not be aware of, despite Word being the go-to word processor for the majority of the globe.
Word allows you to create a number of documents and format them in several unique ways so you can write a document or report for any scenario.
If you are thinking of writing a newspaper article, newsletter or leaflet, the format on your Word page must look a bit different so it can become clearer and more readable. This can be done by inserting columns to break up words and creating a structured format for your specific document.
Adding columns is luckily very easy. However, it is done slightly differently depending on what version of Word you are using, so to make this clearer below we have conducted a step-by-step guide on how to add columns to every version of Word.
Word 2013
If you have not updated to Word 2016 or are resisting doing so because you prefer the layout of the earlier version, then luckily you can still add columns to your work:
Open Word
First you will need Word open along with your written piece that you want to edit.
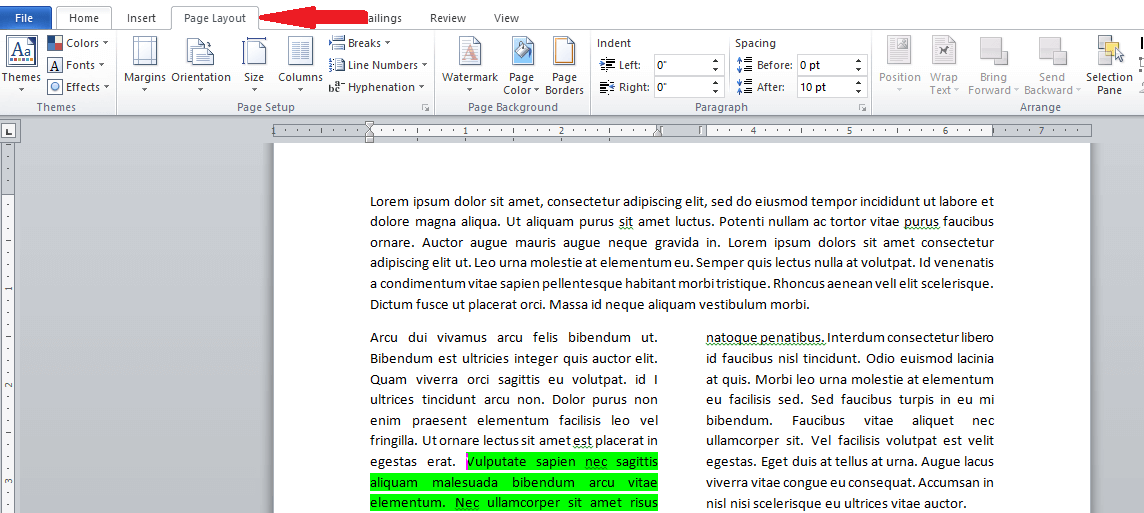
Page Layout Tab
At the top of the screen there will be a menu with some options you can pick from including referencing and mailing. Click on the ‘Page Layout’ option near the middle.
Click Columns
Once you have clicked this there are a few formatting options you can choose from including the size and orientations of the page.
‘Columns’ will be to the right, click on this.
Choose How Many Columns
You will now be asked to pick how many columns you want to insert. Simply click the amount or if you want a few more, click the ‘More Columns’ option at the bottom of the drop down menu.
Apply
Click the selected text you want to apply the column to and it will appear after a second or two delay.
Word 2016
Word 2016 is an updated version of Word with a bit of a different layout and some extra features, however you can still use the column feature and here is how:
Highlight Text
Start by opening your document of choice and highlighting all the words you want to format into a column.
Layout Tab
At the top, instead of the page layout option there will simply be ‘Layout’ in the menu, click on this to open a drop down menu of options.
Select Columns
‘Columns’ will be one of the options you can choose from, click on this and you will similarly be asked how many you want to put in your work.
Choose How Many Columns
Click on the amount of columns you want to insert or if you don’t see the option you’re looking for, click the ‘More Columns’ option.
Apply
Click ‘Apply’ and the columns will be inserted around the highlighted text after a few seconds. This can sometimes take up to 10 seconds so if it does not happen straight away, it may just be in the middle of processing the columns.
Conclusion
Columns are a great way to format your work and are a must if you are planning to write a newspaper or newsletter.
It is therefore always worth knowing where the column option is just in case you ever need it to tidy up future documents, or if you are ever asked to write a document that requires columns to be formatted correctly.
Sometimes, you need more space on a single page. In Word documents, the best way to do that is to learn how to make columns in Microsoft Word. These give you more space and improve readability.


There are many options for creating columns in Word. Maybe you want two, three, or even more column Word options. In this tutorial, you’ll learn how to create a column in Word and explore all the options.
Why You Should Add Columns in Microsoft Word
Microsoft Word columns are a popular and stylish way to format text. You’ll often see them in printed form, and they’re very easy to create for yourself. I like to add columns in Word to help lay out my documents in an elegant way.
In this tutorial, you’ll learn how to create columns in Word. Like I said, it’s a fast and easy process. Once you learn how, you’ll be creating columns in Word often.
But before we get started, it pays to ask: why learn how to make columns in Microsoft Word? The advantages are many, so let’s explore them.


By adding column Word designs, you can fit more content onto a page. With columns, you can visually define different sections of your document. Learning how to create columns in Word gives you new options for positioning your content.
Imagine for a moment the front page of your favorite newspaper. Think of how many different topics — in the form of sections and articles — can fit on a single page! Yet, these layouts accomplish this without appearing messy or cluttered. At a glance, you can distinguish unique sections.
This isn’t the only benefit. When you’re creating columns in Word, you’ll also enjoy:
- More readable designs. Vast sections of text clustered in paragraphs aren’t visually inviting. With columns, your document layouts are cleaner and easier to read.
- Foldable layouts. With text in columns, you can fold pages once you print them, to create sleek newsletters and more.
- Paper savings. By packing more content onto each page, you’ll create shorter documents. This is especially valuable if you’re planning to print copies.
As you can see, the benefits of Microsoft Word columns are many. And in moments, you’ll know how to make them for yourself.
The best way to start is with a premium Microsoft Word template from Envato Elements. These expertly-built designs help you build stylish documents in seconds.


In this tutorial, we’ll be working with the Newsletter | MS Word & InDesign template from Envato Elements. Download it today to follow along.
Now, let’s get started!
The tips in this section were written using macOS and Office 365. If you’ve got a different operating system or a different version of Microsoft Word, your steps may be slightly different.
How to Add Multiple Columns in Word
With the Newsletter template downloaded and open in Microsoft Word, let’s get to work. It’s time to learn how to create columns in Word. We’ll get started by working on a blank page inside the template. Think of this page as a clean slate. On it, you want to feature text in a column layout.
We’ll start by constructing a basic two-column layout in MS Word. Place your cursor on the blank page. This tells Word that you’re ready to edit and add style elements to the selected page.
Now, you’ll want to find the Layout tab in Word. This sits on the ribbon. If you’re unfamiliar, the ribbon is the row of menus that sits on the upper left side of your Word screen. Find it by looking for the buttons labeled Home, Insert, Draw and more.
Here, click on Layout. The Layout tab is really the hub for your Word document’s visual format. It controls how and where text and content fits onto the page.
With the Layout tab open, you’ll see an array of options available to you. In this case, Columns is the button that you need. Click on it, and a popup menu appears.


On this menu, you’ll have several choices for multi-column layouts in Word. Remember, here we want to add a simple two-column layout. Click on Two. Word instantly adds two columns to the selected page and all subsequent pages in your Word doc.
Keep in mind, on a blank page you won’t see anything happen. But once you start typing, you’ll see that Word splits the text you type into a two-column layout.


As you imagine how to use Microsoft Word columns, remember that you’re not limited to only two columns. In fact, Word offers you wide flexibility as you create your own column layouts.
The best way to explore these features is to again start by working with a blank page in your Word document. Return to the Layout > Columns button and click on it. But this time, choose More Columns from the list of options displayed to you.
When you click, Word opens the Columns menu. On it, you’ve got a full suite of customization options.
At the top, you’ll see Presets. These are defined layouts that you can apply with a single click. There are options for one, two, and three columns per page.


Also, you can add left and right columns. As shown in the previews, these are two-column layouts with unique widths. The Left option adds a narrow left column and a wide right column. Choosing Right delivers the opposite result.
Below, in the Manual group, you’ll find that Word gives you full control over column layouts. Here, it’s possible to set a custom number of columns to display on each page. For example, you can type 4 into the box, and Word adds four columns. The Line Between checkbox helps you add a visual delineation between each of the new columns.
Here are other settings that help you harness complete control of creating columns in Word:
- The Width and Spacing section controls the dimensions of each individual column.
- At first, this section is grayed out, as Equal Column Width is automatically checked. To work with this group, uncheck the Equal Column Width box.
- With the section active, you can adjust the dimensions and proportions of each column.
- The Width boxes control the specific columns. The Spacing boxes control how far apart columns are from each other.
- Finally, you’ve got the option to choose where to apply your column settings. Choose between the Whole Document and This Point Forward. The latter applies settings to your file only after the point where your cursor is placed.
Once you’ve made your selections, click OK to apply the settings that you’ve chosen. Now, you’re ready to start working with Microsoft Word columns.
From here, you can add text and other content just like you normally do in Microsoft Word. Start by typing in your own words. As words flow, you’ll see that Word drops them neatly into place using the column layout that you’ve chosen.
Similarly, other content that you add fits into the columns. For example, let’s add an image. Place your cursor in a column spot where you want to place a photo. Find the Insert tab, and then click Pictures > Picture From File. Select a photo on your computer, and then click Insert.


Word inserts the photo, perfectly placed into your column. The width adjusts to fit neatly into the space that you’ve specified. This also works for charts, graphics, and more. When you design a column layout, Word’s features place and scale content in the columns.
As you can see, it’s easy to learn how to create a column in Word. With a few clicks, you can split the text into two or more columns on any page. From there, you can easily add text, photos, graphics, and more.
Word helps you size and scale all of your content into column format. This creates an attractive, engaging document for readers to enjoy.
How to Add Columns from Existing Text in Word
We’ve learned how to create columns in Word. But as you saw in the above examples, we practiced using blank pages. What happens if you already have text on a page, and then decide that you want to put it in column format?
Fortunately, Word has you covered. You can create column Word designs with text that you already have in place. There’s no need to delete or retype anything! Let’s learn how.
Imagine for a moment that you’ve got a page in your premium template with text on it. Now, you want to display the text in columns, rather than the single, full-page paragraphs that it’s in now.
To place this text in Microsoft Word columns, you’ll first need to select the text. To do so, click and drag your cursor over the text that you want to move into columns. You’ll see Word select it, signified by pale blue shading.


Then, repeat the steps that we followed earlier to add columns. With the text still selected, find the Layout tab, and open the Columns drop-down. Choose the number of columns you want (or use the More Columns option, if you need to customize the design).


Word adds the columns that you select. Your selected text will re-format, appearing in one or more of the new columns, depending on length. From here, you can make the same adjustments to column width and more, using the More Columns feature in MS Word.
The Best Microsoft Word Templates for Column Designs (With Unlimited Downloads)
You’ve learned how to create columns in Word. And you know that premium templates are the best way to get started. The best source for these is Envato Elements.
Elements is a creative powerhouse with a winning offer: unlimited downloads. For a low, flat rate, you can download as many stunning premium MS Word templates as you want. With your membership, you also have access to fonts, stock photos, and so much more.
Explore Microsoft Word Templates


When you choose a premium MS Word template from Envato Elements, you’ll enjoy these key benefits:
- Studio-quality layouts. Designs are built by creative experts. That means you’ll gain the advantage of styles that you can’t build by yourself.
- Time savings. With layouts already built, you’re filling in the blanks. You get more time to focus on refining your written message.
- Inspired designs. Pre-built layouts help guide your creative process. You’ll find plenty of inspiration on every page.
- Full creative control. When we learned how to make columns in Microsoft Word, we added our own designs to a premium template. You benefit from the styles already built but can still add your own design flourishes.
The value is impossible to match. Sign up for Elements today!
Now You Know How to Make Columns in Microsoft Word
Just like that, you’ve learned how to create a column in Word. It’s a powerful stylistic tool that you can use in seconds! You can create more space for your content now that you know how to create a column in Word to do just that.
With multiple columns, you’ve got a new design dimension in Word documents. Try it out now to create a compelling, readable document.
Did you find this post useful?

I believe that life is too short to do just one thing. In college, I studied Accounting and Finance but continue to scratch my creative itch with my work for Envato Tuts+ and other clients. By day, I enjoy my career in corporate finance, using data and analysis to make decisions.
I cover a variety of topics for Tuts+, including photo editing software like Adobe Lightroom, PowerPoint, Keynote, and more. What I enjoy most is teaching people to use software to solve everyday problems, excel in their career, and complete work efficiently. Feel free to reach out to me on my website.