
111
111 people found this article helpful
Use a template to make printable flash cards
Updated on September 24, 2022
What to Know
- In Word, open a new blank document. Choose the Layout tab. Select Layout > Orientation > Landscape.
- In Layout > Size, choose 4″ x 6″. Type what you want the card to say. Press Ctrl+Enter to generate a new card.
- Go to the Design tab to add a theme, color, or effects to the flashcard.
This article explains how to make flashcards using Microsoft Word by changing the size of the document. It also contains information on making index cards using the envelope and label print settings. The instructions in this article apply to Microsoft Word 2019, Microsoft 365, and Word 2016.
How to Make Your Own Flashcards in Word
Flashcards are a wonderful learning tool both for children and adults, but writing each one by hand can be time consuming. With Microsoft Word you can make your own flashcards and print them out ready to use.
While older versions of Microsoft Word had simple flashcard or index card templates, it seems those templates were no longer available as of Word 2016. No need to fret because making flashcards on Word is still easy to do, and you can save your flashcards as a template as well.
-
Open Microsoft Word and select a new blank document.
-
Click Layout Tab, this is going to allow you to resize the page into a more proper flashcard size.
-
Under Layout > Orientation, select Landscape.
-
In Layout > Size, select 4”x 6” size. This will give you the perfect size for printable flashcards.
-
Type out what you want the card to say and press Ctrl+Enter to create a new card. This is where you write the response for the first card if necessary or create a new card.
-
Also, remember you can go to the Design tab and add a theme, colors, and effects to the flashcards if you need them to stand out a bit or make them colorful.
This is also a great tool for teachers to create flashcards for their students without having to spend their already limited amount of time and resources making them.
How to Make Index Cards from the Envelopes & Labels Printing Settings
Another easy way to make index cards is by using the envelopes and labels printing settings in Microsoft Word 2016. Here’s what you need to do:
-
Start with a blank document in Word and go to the Mailings tab.
-
Select the Labels option in the top left of the Mailings tab.
-
A window will open up, click the Labels tab, and select the Options button.
-
Now select Index Cards from the menu. To the right of the selection, you will see the measurements for the index card.
Printer Settings for Flashcards on Word
Now that you are done creating the cards, it’s time to have them all printed out. If you have the style of flashcards where you need one side with a question or statement and the opposite side to have the answer, then you will want to turn on double-sided printing. If you just need to have the information or image printed on one side of the card, then make sure you have double-sided printing turned off.
Go to File > Print. Now just choose the size you selected for the cards: 3.5 x 5 or 4×6. You might want to select Narrow Margins for the flash cards.
Save the Flashcards as a Microsoft Word Template
Even though the steps to create flashcards are simple to follow, it will make life easier if you just save this file as a template. This way, you can always jump right into the formatted document and just insert the new information you need for the new index cards.
FAQ
-
How do you insert a signature in Microsoft Word?
To insert a signature in Word, scan and insert a signature image into a new Word document and type your information beneath it. Select the signature block and go to Insert > Quick Parts > Save Selection to Quick Part Gallery. Name the signature. Select AutoText > OK.
-
How do you delete a page in Microsoft Word?
To delete a page in Microsoft Word, select View, then go to the Show menu and select Navigation Pane. In the left pane, choose the page you want to delete and press the delete/backspace key.
-
How do you check the word count in Microsoft Word?
To check the word count in Microsoft Word, look at what’s displayed in the Status Bar at the bottom of the screen. If you don’t see the number of words, right-click the Status Bar and choose Word Count.
Thanks for letting us know!
Get the Latest Tech News Delivered Every Day
Subscribe
![]()
Download Article
Step-by-step guide to making your own business cards in Word
![]()
Download Article
- Using a Template
- Creating from Scratch
- Video
- Expert Q&A
|
|
|
If you need to make business cards in a hurry and you don’t have fancy design software, Microsoft Word has the tools you need to make and print business cards. You can use templates to make the process easy but still maintain an individual feel, or you can create the cards completely from scratch. If you are creating cards from scratch, you can use the Table tool to help keep your cards at the proper size. This wikiHow guide will show you how to make business cards in Microsoft Word.
Things You Should Know
- Use a template by going to File > New and searching for «business cards.»
- Create your own card from scratch by going to File > New > Blank document.
- Use a table to organize copies of your business card on a single page.
-
1
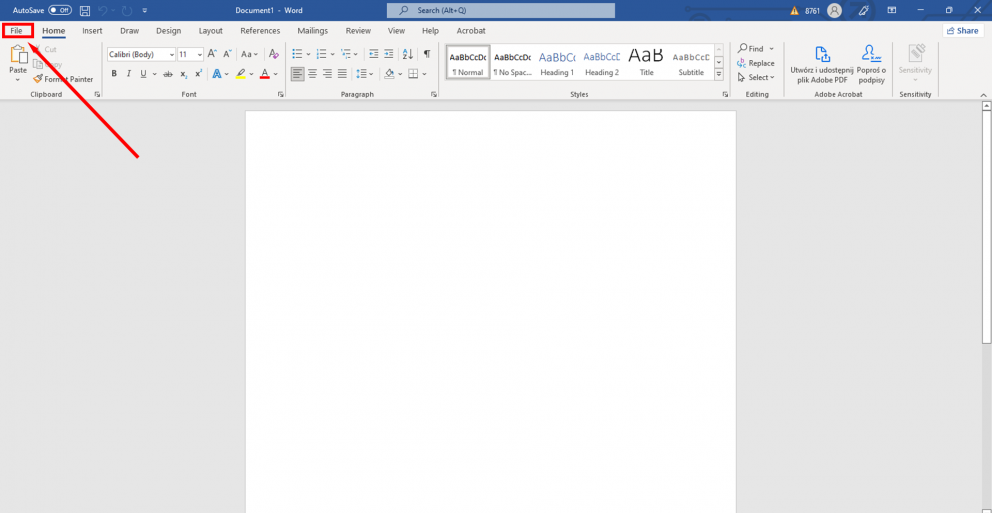
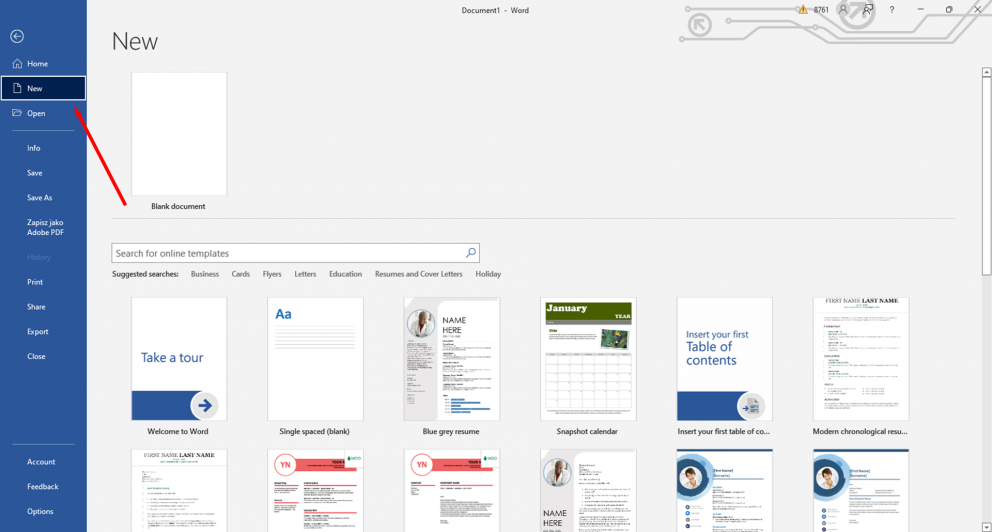
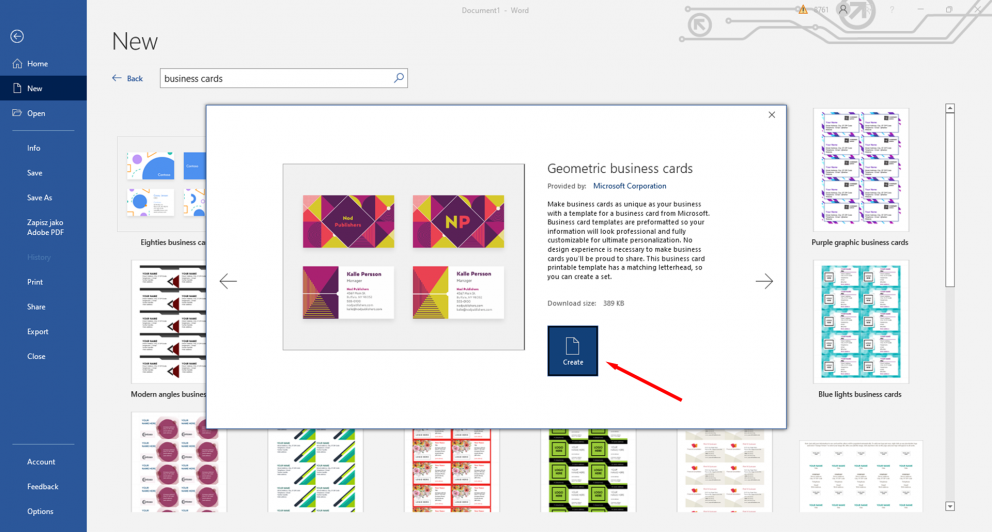
Click the File tab and select New. You’ll be creating a new document from a business card template. If you just opened Microsoft Word, you can click New in the left menu.
Tip: Using a template will allow you to quickly make a lot of professional-looking cards at once.
-
2
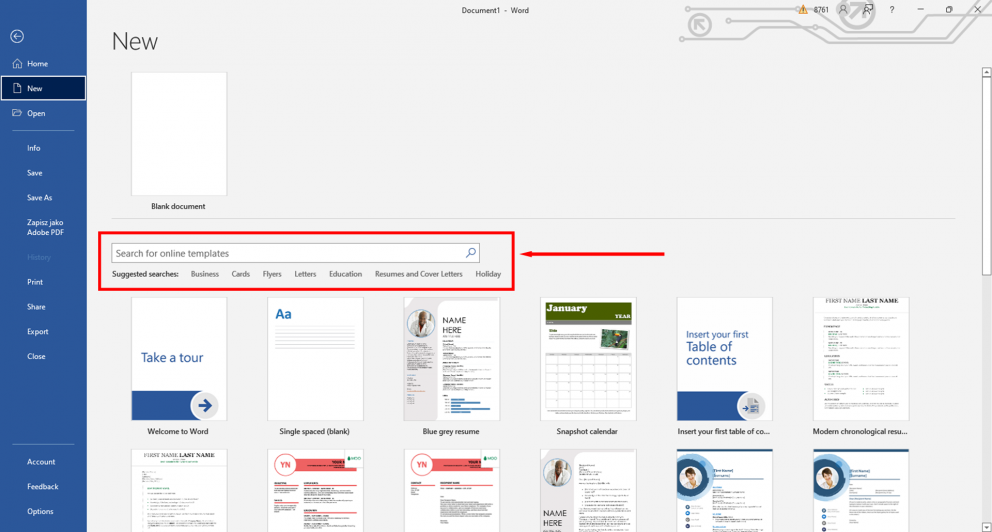
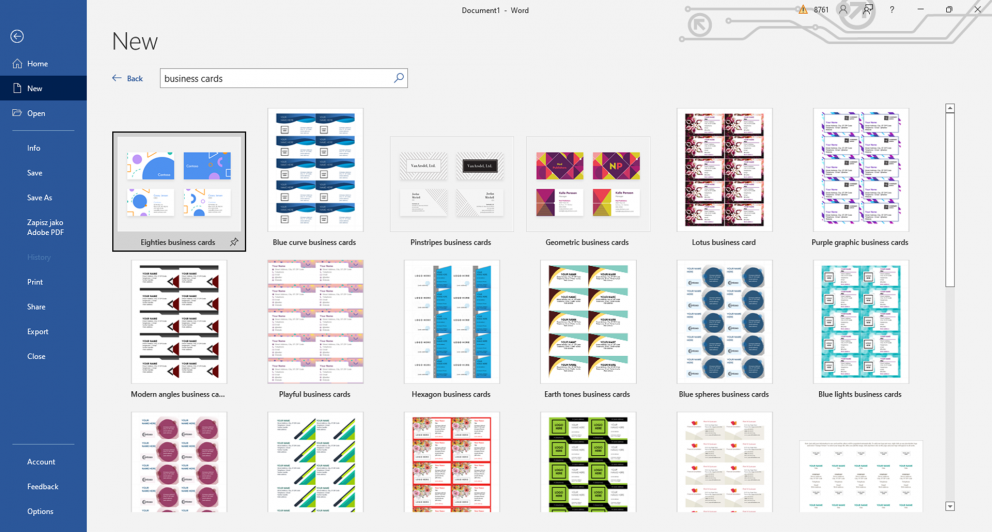
Search for business card templates. Use the search field in the new document creation window to search for «business card». This will bring up a variety of free templates that you can use for business cards. There are templates for horizontal and vertical cards.
Advertisement
-

3
Click a template that you want to use. You’ll be able to change any element of the template you’d like, including colors, images, font, and layout. Pick the template that most closely matches the vision of your business card in your head.[1]
- Clicking a template will open a window with more information about the template.
-
4
Click the Create button to open the template in Word. This is under the description of the template. This will create a new file with the document template for you to use.
-
5
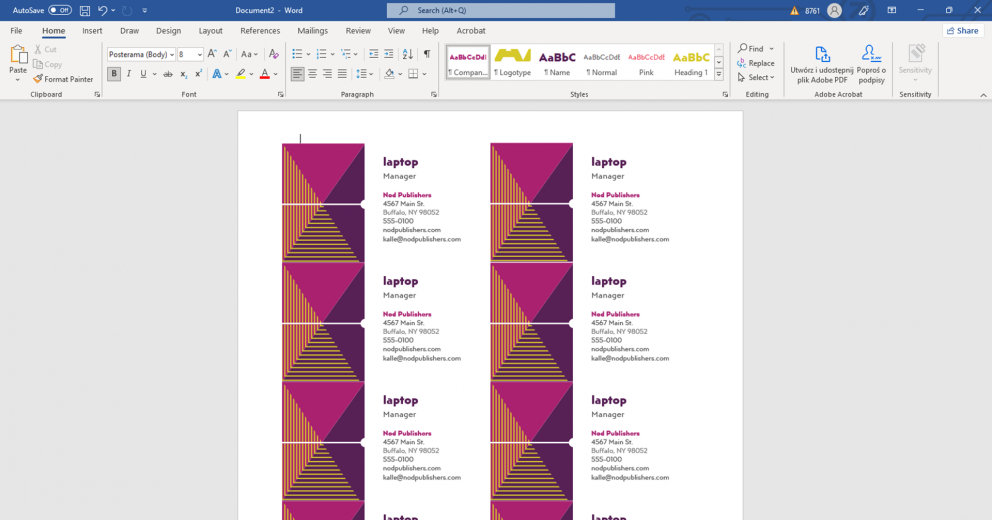
Fill out the information fields in the first card. If you’re using Office 2010 or newer (and the template was designed for 2010 or newer), you’ll see your text appear in all of the business cards on the page. You’ll only have to fill out information for one card this way. If the template is not designed to automatically fill out successive cards, you’ll need to enter the data for each one manually.
-
6
Change the format of any elements. You can select any of the text on the business card and change the format. You can switch fonts, change colors and size, and more, just like you would regular text.
- Since this is a business card, make sure that the font you choose is easy to read.
-
7
Replace the logo (if necessary). If the business card template has a placeholder logo, you can click it to replace it with your own. Make sure that you resize your logo so that it fits, and that it doesn’t look bad when the size has been changed.
-
8
Proofread the cards. Make absolutely sure that your business cards do not have any typos or other mistakes. Your business card is one of the first impressions people will have of you, so you don’t want to start off on the wrong foot.
- You can have a family member or friend review your cards before printing to make sure they’re free of errors.
-
9
Print the cards on stock, or send the file to a printer. If you’re going to be printing the cards at home, you’ll need high quality stock paper. Stick to white or off-white, and pick your finish. Most business cards don’t have a finish, but some people prefer a glossier card. Many print shops will be able to open your saved business card template and print them for you as well.
- When purchasing paper, make sure that your printer at home can handle it. Check your printer’s documentation or support site for details on the type of paper that it supports.
-
10
Use a precision cutting tool to finish the cards. Once the cards are printed, you’ll need to cut the sheet up. Each sheet will typically have ten cards on it. Don’t use scissors or other methods of cutting that rely on you keeping a straight line. Instead, use a paper guillotine or precision paper cutter. Many print shops have these tools available for customers, or can do the cutting for you.
- Note that the standard business card size varies by country. Here are a few other standards:
- The standard business card size is also 3.5 inches (8.9 cm) x 2 inches (5.1 cm) in Canada.
- In the United Kingdom, the standard size is 8.5 centimetres (3.3 in) x 5.5 centimetres (2.2 in).
- For Australia, the standard size is 9.1 centimetres (3.6 in) x 5.5 centimetres (2.2 in).
Tip: The standard US business card size is 3.5 inches (8.9 cm) x 2 inches (5.1 cm) (or 2 inches (5.1 cm) x 3.5 inches (8.9 cm) for vertical cards).
- Note that the standard business card size varies by country. Here are a few other standards:


Advertisement
-
1
Click New to create a new blank document. If you’d prefer to create your business card yourself, you can use the Table tool to make it easier.
- You can also use photo editing software like Photoshop to make a custom business card.
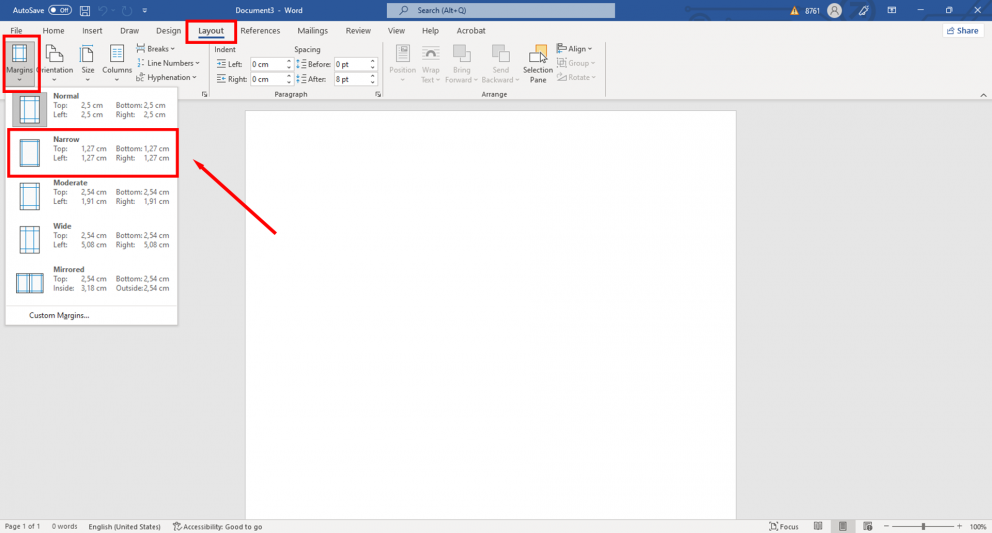
-
2
Click the Layout tab and click Margins. Select «Narrow» to make the margins a little smaller than the default setting. This will allow you to fit the business cards on the page.
-
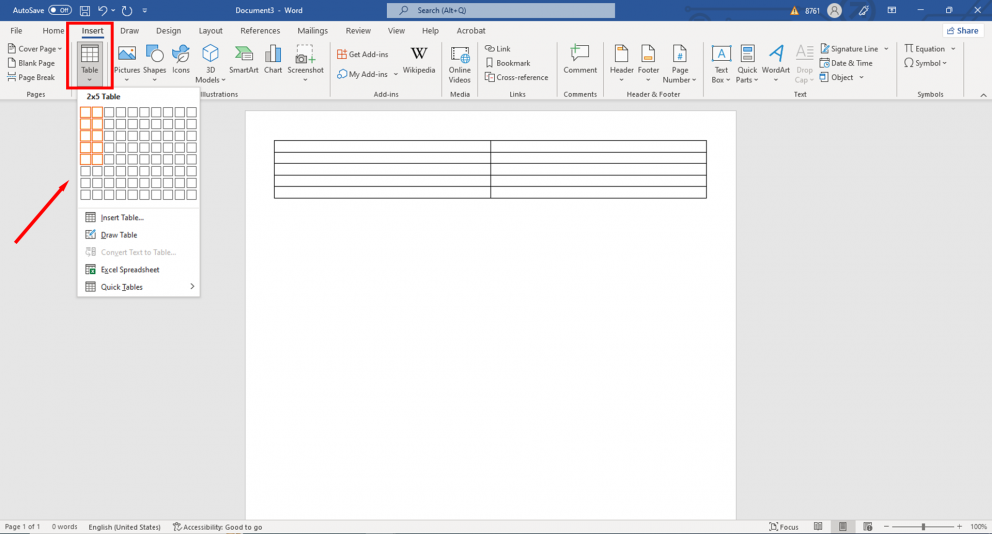
3
Click the Insert tab and then click Table. A grid will appear beneath the Table button.
-
4
Create a 2 x 5 table. Use the grid to insert a table that is two cells wide and five cells high.
-
5
Right-click on the table’s selection crosshair and select «Table Properties». This will open the Table Properties window. The selection crosshair appear in the upper-left corner of the table when you hover over it.
-
6
Set the alignment of the table to Center. This will make it easier to make the cards even. This setting is in the Table tab of the «Table Properties» window.
-
7
Click the «Row» tab and check the «Specify height» box. Enter 2" and change the drop-down menu to «Exactly».
- Note that the standard business card size varies by country. The standard US business card size is 3.5 inches (8.9 cm) x 2 inches (5.1 cm). Here are a few other standards:
- The standard business card size is also 3.5 inches (8.9 cm) x 2 inches (5.1 cm) in Canada.
- In the United Kingdom, the standard size is 8.5 centimetres (3.3 in) x 5.5 centimetres (2.2 in).
- For Australia, the standard size is 9.1 centimetres (3.6 in) x 5.5 centimetres (2.2 in).
- Note that the standard business card size varies by country. The standard US business card size is 3.5 inches (8.9 cm) x 2 inches (5.1 cm). Here are a few other standards:
-
8
Click the «Column» tab and check the «Specify width» box. Enter 3.5" and change the drop-down menu to your preferred measurement such as «Inches».
-
9
Examine your table. You should now have a table on your page that is separated into ten identical business card-sized cells. If the table doesn’t fit, you may have to extend your bottom margin by a tenth of an inch.
-
10
Right-click the crosshair again and select AutoFit. Choose «Fixed column width». This will prevent the table from changing shape as you add information to the first cell.
- For double-sided business cards, copy and paste the table onto a second page in the Word document. The second page will be the back of the business card.
-
11
Add your information to the first cell. You can use all of your regular Word formatting tools while typing in the cell. You can insert text boxes and images, change fonts, add color, or perform any other formatting that you’d like.
- Adding pictures to your business card can give it a personal touch and build your brand. You can crop and rotate the images as needed.
- Check out our guide to formatting in Word for more tips!
- If you’re creating a double-sided card, add your additional information to the first cell in the second page table.
-
12
Proofread the card. Before copying the information into each of the other cells, take the time to review it now for any errors or typos. If you proofread later, you’ll have to change each cell instead of just changing the first before copying it.
- You can have a family member or friend review your cards before printing to make sure they’re free of errors.
-
13
Select the entire first cell when you’re satisfied. To do so:
- Move your cursor to the bottom-left corner of the cell until it turns into a diagonal arrow.
- Click and the cell’s contents will be selected.
- Press Ctrl+C (Windows) or ⌘ Cmd+C (Mac) to copy the contents of the cell to the clipboard.
-
14
Click in the next cell and paste the copied information. You can click «Paste» in the Home tab, or you can press Ctrl+V (Windows) or ⌘ Cmd+V (Mac). Your copied information will appear in the cell in the right locations. Repeat this for each of the cells on the page.
- Make sure that your business card organization is minimalistic. You can’t realistically fit everything about your company into a single card—instead, focus on the most important info like your company logo, name, email address, physical address, website, and role in the company.[2]
- Make sure that your business card organization is minimalistic. You can’t realistically fit everything about your company into a single card—instead, focus on the most important info like your company logo, name, email address, physical address, website, and role in the company.[2]
-
15
Right-click the crosshair again and select «Table Properties». Click the «Borders and Shading» button and select «None» for the border. This will ensure that parts of the cell borders don’t appear when the cards are cut.
- Make sure to save your Word document in case you want to edit it later!
-
16
Find good paper for the cards. You’ll want a nice card stock paper to print your new business cards on. Make sure that your printer supports the type of paper that you get. You can also send your completed file off to a printer to have the cards professionally printed.
- To print double-sided cards, make sure to select Print on both sides in the print menu. This will print the second page (the back of the business card) on the back side of the paper.
- Print one test sheet first to make sure everything looks good and that the back side is aligned properly with the front.
-
17
Use a precision cutting tool. Avoid using scissors or other cutting tools that require you to maintain a straight line. Use professional paper cutting tools to make sure your cuts are even and properly measured.


Advertisement
Add New Question
-
Question
How do I print different business cards on the same page?

Kyle Smith is a wikiHow Technology Writer, learning and sharing information about the latest technology. He has presented his research at multiple engineering conferences and is the writer and editor of hundreds of online electronics repair guides. Kyle received a BS in Industrial Engineering from Cal Poly, San Luis Obispo.
wikiHow Technology Writer
Expert Answer
If you’re using a template, you’ll need to choose a template that doesn’t automatically update the rest of the cards. If you’re creating a card from scratch using a table, you can make each cell a different card.
-
Question
How do I put an online photo on my business cards in Microsoft Word?
Kyle Smith is a wikiHow Technology Writer, learning and sharing information about the latest technology. He has presented his research at multiple engineering conferences and is the writer and editor of hundreds of online electronics repair guides. Kyle received a BS in Industrial Engineering from Cal Poly, San Luis Obispo.
wikiHow Technology Writer
Expert Answer
You’ll need to copy or download the online photo. Then, in Microsoft Word, go to Insert > Picture to add a photo to the business card.
-
Question
make one card on a sheet
Kyle Smith is a wikiHow Technology Writer, learning and sharing information about the latest technology. He has presented his research at multiple engineering conferences and is the writer and editor of hundreds of online electronics repair guides. Kyle received a BS in Industrial Engineering from Cal Poly, San Luis Obispo.
wikiHow Technology Writer
Expert Answer
You can make a single card by following the table method above and only filling in one cell. Make sure the table is formatted with the standard business card measurement.

See more answers
Ask a Question
200 characters left
Include your email address to get a message when this question is answered.
Submit
Advertisement
Sample Business Cards
Video
About This Article
Article SummaryX
1. Click the File menu and select New.
2. Search for business card templates.
3. Select a template.
4. Fill out the fields in the first card.
5. Edit format, fonts, and colors.
6. Replace the logo (optional).
7. Proofread the cards.
8. Print the cards to cardstock.
9. Cut the cards.
Did this summary help you?
Thanks to all authors for creating a page that has been read 827,656 times.
Is this article up to date?
How to Create a Greeting Card with Microsoft Word
- Open a Blank Document. Open Microsoft Word and select a blank document.
- Set Up Orientation and Layout.
- Balance Everything with Gridlines.
- Divide Your Page for the Fold.
- Start Adding Your Graphics.
- Choose Beautiful Fonts.
- Preview and Print.
Contents
- 1 Can you make a card on Microsoft Word?
- 2 How do I make a card template in Word?
- 3 How can I make a greeting card on my laptop?
- 4 How do you make a 5×7 card on Microsoft Word?
- 5 How do you design a card?
- 6 How do you make a birthday card on Microsoft Word?
- 7 How do you make a visiting card on Microsoft Word 2007?
- 8 How do I make business cards in Word without a template?
- 9 How do you make a birthday card on Microsoft Word 2013?
- 10 How do you make a birthday card on Microsoft Paint?
- 11 Can you print on cardstock with an inkjet printer?
- 12 How do you make a card on Microsoft Word 2016?
- 13 How do you make a card on the computer and print it?
- 14 How can I make a digital card for free?
- 15 How do I make a virtual card for someone?
Can you make a card on Microsoft Word?
Microsoft Word has the ability to produce single or multi-fold cards. You can build a completely custom design or work off an existing template. While Word is highly effective, you have more design flexibility in a program like Microsoft Publisher.
How do I make a card template in Word?
How to Create a Card Template in Microsoft Word
- Launch the Microsoft Word application and create a new document.
- Click inside the opened document and create or edit the content as you prefer.
- Add images to your card template.
- Click “Save As” when you are ready to save your page as a template.
How can I make a greeting card on my laptop?
How to Make a Greeting Card
- Use Appropriate Software.
- Set up the Document.
- Choose Graphics.
- Modify the Images.
- Select a Font.
- Arrange Text and Graphics.
- Create a Consistent Look.
- Add a Credit Line.
How do you make a 5×7 card on Microsoft Word?
Open a new blank Word document. Select Page Layout > Size > More Paper Sizes. 3. Select the Custom paper size from the Page Setup Screen or just enter the height and width of your custom card (in this case, 10.5 inches wide x 7 inches tall), then click OK.
How do you design a card?
Just follow the 8 steps below to determine which business card design would work best for you.
- Choose your shape.
- Choose your size.
- Add your logo and other graphics.
- Add necessary text.
- Choose your typography.
- Consider special finishes.
- Pick a designer.
- Finalize your design.
How do you make a birthday card on Microsoft Word?
Step 1 – Open a new document in Microsoft Word. From the “File List”, click on “New.” Then choose the “Greeting Cards” option under “Microsoft Office Online Templates.” Step 2 – Select “Occasions and Events” from the “Greeting Cards” menu. Choose a template to use on your birthday card.
How do you make a visiting card on Microsoft Word 2007?
- Open Word 2007 and click the Microsoft Office button.
- Click “New” to view document templates and options.
- Click “Business Cards” and click the “Print Business Cards” folder.
- Browse the list of business card templates and double-click the one you want to use.
How do I make business cards in Word without a template?
If you didn’t find a template you like, you could create your own design through a mix of creating a table, adding images, and formatting text. Open a blank Word doc, head over to the “Insert” tab, and then click “Table.” A drop-down menu will appear.
How do you make a birthday card on Microsoft Word 2013?
How to use Word 2013 for creating greeting cards
- Launch Word 2013.
- Open any Word document.
- Click on File.
- Click on New. You can see different templates which also includes some greeting templates.
- Select any desired template from the search results.
How do you make a birthday card on Microsoft Paint?
Click on the font button, move your cursor to the blank canvas, and draw a text box. A cursor will appear within the text box. Type “Happy Birthday!” Highlight the text. Change the look of the text by selecting a different font type or size from the drop down boxes on the screen.
Can you print on cardstock with an inkjet printer?
Not only can you print on cardstock with an inkjet printer, but you can achieve really great results. Many inkjet printers can print on thick card as are versatile enough to print photo lab quality photos and graphics.
How do you make a card on Microsoft Word 2016?
Printing Your Own Greeting Cards in Word 2016
- Choose Insert→Text Box→Draw Text Box and draw the text box where you want it on the page.
- Type the text in the text box.
- Rotate the text box 180 degrees, the same way as with a graphic: use the Home→Rotate Objects→Rotate Right 90 command twice.
How do you make a card on the computer and print it?
How to Create a Greeting Card with Microsoft Word
- Open a Blank Document. Open Microsoft Word and select a blank document.
- Set Up Orientation and Layout.
- Balance Everything with Gridlines.
- Divide Your Page for the Fold.
- Start Adding Your Graphics.
- Choose Beautiful Fonts.
- Preview and Print.
How can I make a digital card for free?
How to make a card
- Open Canva. Open Canva and search for “Cards” to start your design.
- Choose a template. Choose one of Canva’s professionally-designed card templates.
- Personalize your card fully. Send a card that’s truly personalized and from the heart.
- Tweak your design with more elements.
- Order your prints.
How do I make a virtual card for someone?
How to make an eCard
- Open Canva. Launch Canva and search for “eCard.” Then, open a fresh page to get started.
- Find the right template. Browse templates for every eCard style theme.
- Experiment with features.
- Personalize your card.
- Save and share.
How do you make a card on Microsoft Word?
How to Create a Greeting Card with Microsoft Word Open a Blank Document. Open Microsoft Word and select a blank document. Set Up Orientation and Layout. Balance Everything with Gridlines. Divide Your Page for the Fold. Start Adding Your Graphics. Choose Beautiful Fonts. Preview and Print.
How do you make playing cards on the computer?
This is how easy it is to create your deck of cards: Choose the card size that you want to customize. Select your card stock, number of cards and finishing. Choose a packaging such as tuck box or rigid game box. Enter our online card maker. Design your card fronts and backs by dragging and dropping uploaded image files.
How do you make a double sided card on word?
Hit “CTRL” and “P” to bring up the print screen in Word. Click “Manual Duplex” in the upper right corner of the window. Print the first side of the flash card. Flip the printed card around to the other side, and put back into the printer. Print the other side of the flash card. Things You’ll Need. Microsoft Word.
Does Word have a card template?
Using Microsoft’s Word application, you can create customized card documents and save them as templates so that you can reuse the design again without having to do the initial setup work. With this word processing program, you can use the various tools to easily customize and save your own card templates.
How do I make a greeting card in open office?
Open a text box in the right bottom section you earlier identified as the front of the card. Write the greeting you want to use for your card’s front. Change the text font, size, alignment and color as desired using the formatting toolbar directly above the page you have opened.
Are MPC cards good?
In my experience, MPC decks don’t handle nearly as smoothly or well, and this is immediately noticeable when performing fans, spreads, and shuffling. On the other hand the quality isn’t terrible either. The colours usually look good, the print registration is fine, and the card stock feels quite durable.
How do you type the club symbol?
Hold Alt and type the number below using the numeric pad on your keyboard to insert mathematics symbols. When you release the Alt key, the symbol will appear.1. Method 1 of 3: Using Windows. Symbol Name Code ♦ Diamond 4 ♣ Club 5 ♠ Spade 6 ♂ Male 11.
What is Spade in playing cards?
form one of the four suits of playing cards in the standard French deck. It is a black heart turned upside down with a stalk at its base and symbolises the pike or halberd, two medieval weapons. In Bridge, Spades rank as the highest suit. In Skat and similar games, it is the second-highest suit.
How do you make a diamond on word?
First, press the option button+shift button+V. If you do this, your diamond symbol will appear on your document. If you don’t want to use the keyboard shortcut sequence, there are other means to insert the diamond symbol in your document.
Can you make postcards on Microsoft Word?
Microsoft Word allows you to make your own custom postcards quickly and easily. There are many different methods for making postcards in Word, but the two most straightforward options are by making them as “Labels” or through starting from a premade “Template.”.
How do you make a 5×7 card on Microsoft Word?
Open a new blank Word document. Select Page Layout > Size > More Paper Sizes. 3. Select the Custom paper size from the Page Setup Screen or just enter the height and width of your custom card (in this case, 10.5 inches wide x 7 inches tall), then click OK.
How do you make a birthday card on Microsoft Word?
How To Make A Birthday Card On Microsoft Word? Step 1 – Open a new document in Microsoft Word. Step 2 – Select “Occasions and Events” from the “Greeting Cards” menu. Step 3 – Customize the birthday card by changing the text. Step 4 – Adjust the layout of your birthday card.
What can you put on playing cards to keep them from sticking?
After a bridge game, with everyone eating, how do you clean playing cards? You can quick-clean most household playing cards by putting them into a paper bag and adding several tablespoons of flour, talcum powder or cornstarch. Shake well.
Are bicycle cards good?
Standard Bicycle Playing Cards are an affordable, high-quality deck of cards that can be found almost anywhere. They’re going to last you through countless card tricks, card flourishes and card games and are well worth the slightly higher price than cheap corner store decks.
How do you make a custom card game?
Steps to create your own board game cards Choose a game card size such as standard TCG, bridge, mini, large, hex, square amongst many. Choose a template design as your card base. Choose a card stock type. Select the number of cards you need. Select a gloss or matte finish. Add an optional plain or custom box.
What type of paper are playing cards printed on?
The most popular paper for playing cards is 400gsm card stock.
How long do playing cards take?
A. Your personalized item sent via standard shipping method should arrive in 8-10 business days (3 business days’ process + 5-7 business days in transit).
What size are magic cards?
Magic: The Gathering cards are produced in much the same way as normal playing cards. Each Magic card, approximately 63 × 88 mm in size (2.5 by 3.5 inches), has a face which displays the card’s name and rules text as well as an illustration appropriate to the card’s concept.
Where is Makeplayingcards located?
We’re headquartered in Hong Kong and have been serving our customers across the globe for over 35 years providing them with unmatched superior quality playing cards made only possible through our years of experience in this industry, non-stop research and development for continuous improvement and heavy investments in.
Is there an emoji for playing cards?
Unicode details for Playing Card Black Joker (????) emoji.???? Joker. Character ???? Description The joker in a deck of cards, usually… read more Presentation Emoji Modifiers — Shortcodes :black_joker:, :black_joker:, :joker:.
How do you make symbols on a laptop?
Release the ALT key and the symbol will appear. Create a symbol with a number pad. If your keyboard has a number pad on it, this is a much simpler process. Ensure Num Lock is enabled, then just hold alt, enter the code on the number pad, and receive your symbol.
How do you make symbols on a laptop keyboard?
To insert an ASCII character, press and hold down ALT while typing the character code. For example, to insert the degree (º) symbol, press and hold down ALT while typing 0176 on the numeric keypad. You must use the numeric keypad to type the numbers, and not the keyboard.

If you want to design business cards or a digital brochure quickly and don’t have access to expensive design software such as Adobe Photoshop, you don’t have to worry! The popular Microsoft Word program includes the tools you need to create and print professional business cards.
You can use business card templates to speed up the whole process, or you can create your own business cards from scratch. There are many tools at your disposal in the program – in this article, we will discuss how to create and design cards in Word and other similar programs.
How to make a business card in Microsoft Word in 5 steps?
1) When you open Microsoft Word, navigate to the “File” tab and then select “New” from the left panel.
2) In the template search bar in the gallery in the middle of the window, search for “Business Cards”.
3) Now the business card templates will be displayed. Browse through the entire library of business card templates and select the one you like best. Once selected, a window with a preview and description of the template will appear on your computer screen. Click on the button that says “Create”.
4) Word will download the file from the Office gallery. Now your business cards will appear in a new Word document. You can often choose the appropriate colors in the design, but most users will probably just want to type in their information into the template. Replace the example content with your own contact data.
5) In some templates, editing the contents of one business card will not change the others. To do this, you should use the Find and Replace function – press Ctrl+H in Windows or apple key+H in MacOS. You can replace, for example, “Your name” with your first and last name in the business card template.
Creating business cards in Word without a template
If you want to create your own business cards, start by creating a new blank document. You can easily use the Table tool to make your own business cards in a matter of minutes.
Click the “Margins” button on the “Page Layout” tab. To make the margins slightly smaller than the default setting, select the “Narrow margin” option. This will allow the two columns of your business card to fit on the page.
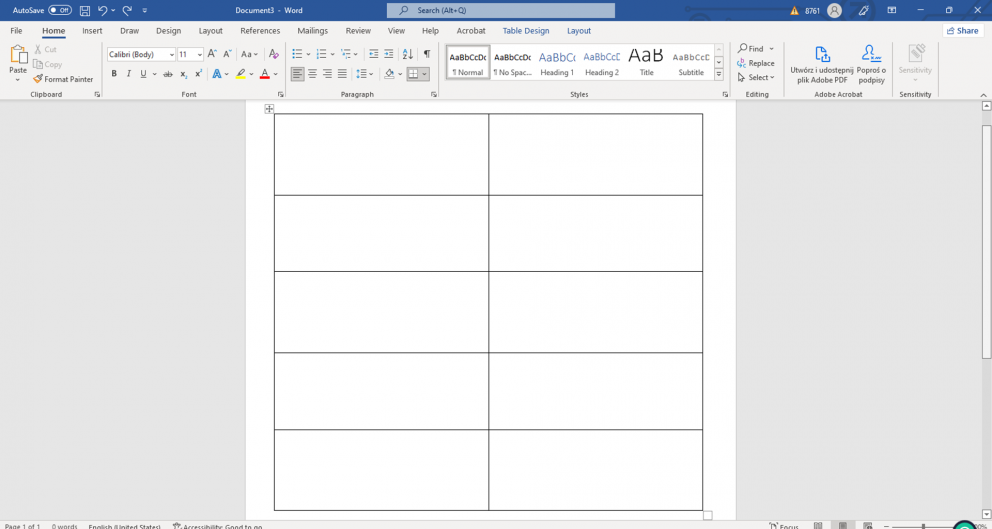
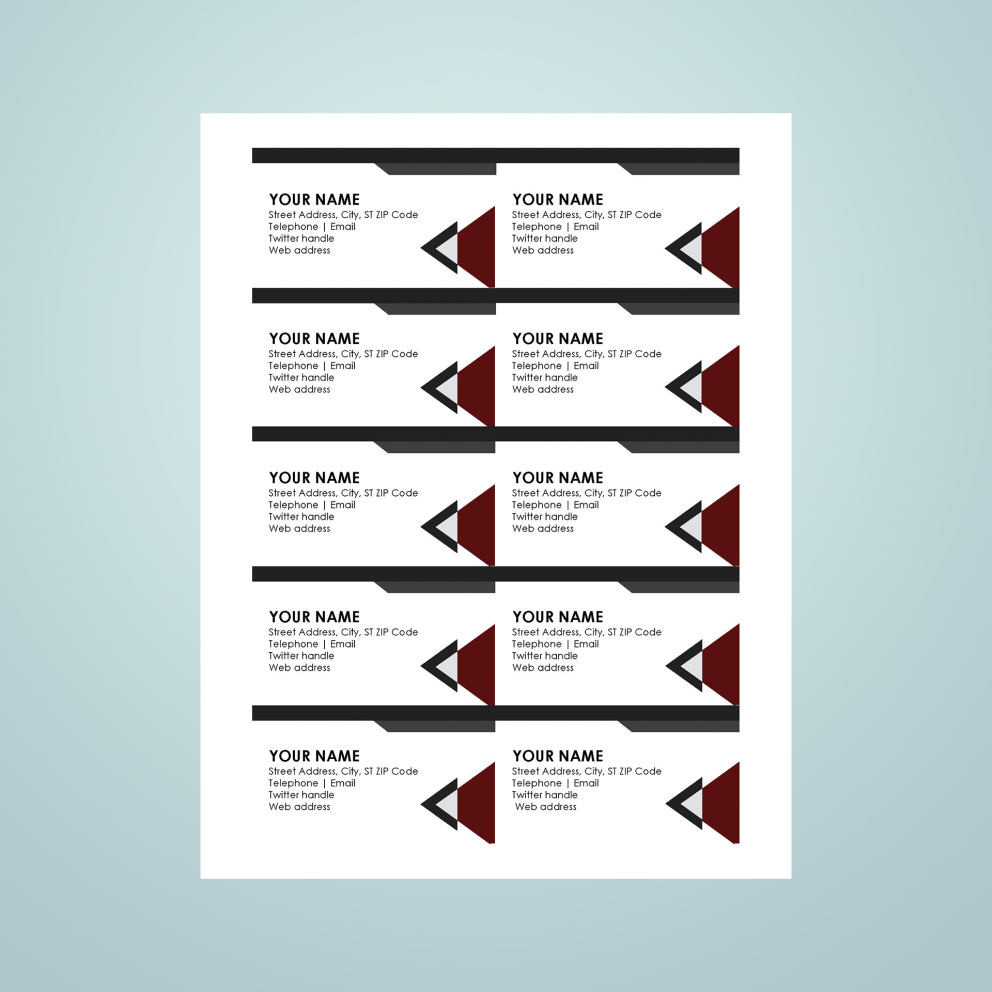
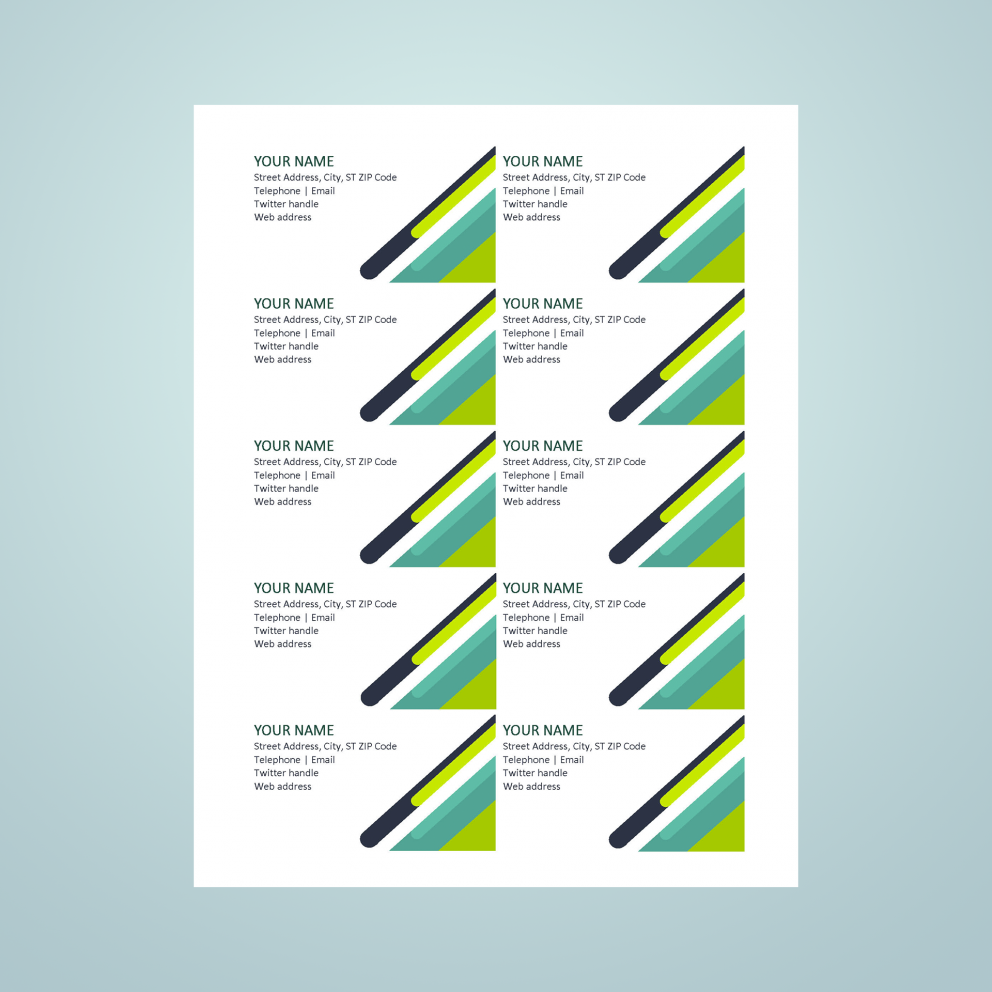
From the Insert tab, select “Insert Table”. A grid will appear in a drop-down menu below the Table button. To fit ten cards on a single sheet, choose a table with dimensions of two columns by five rows.
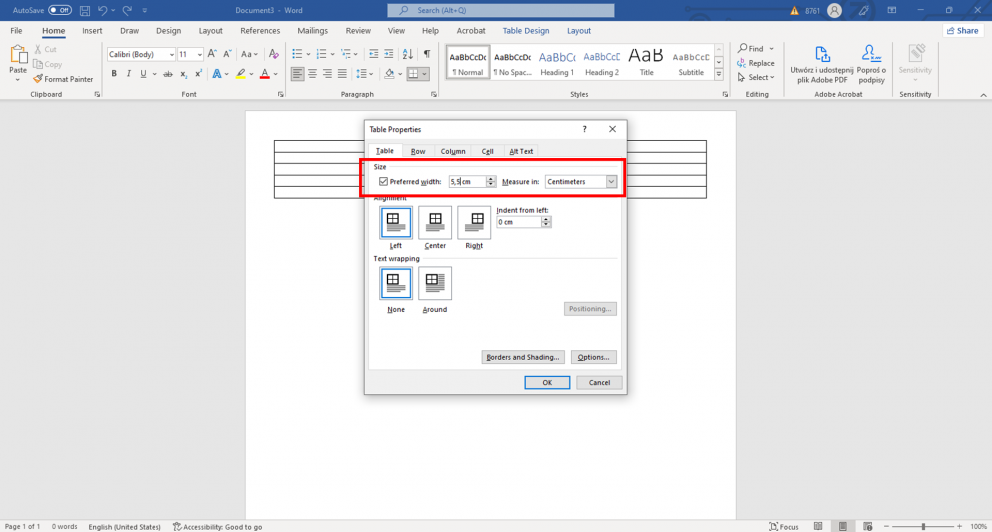
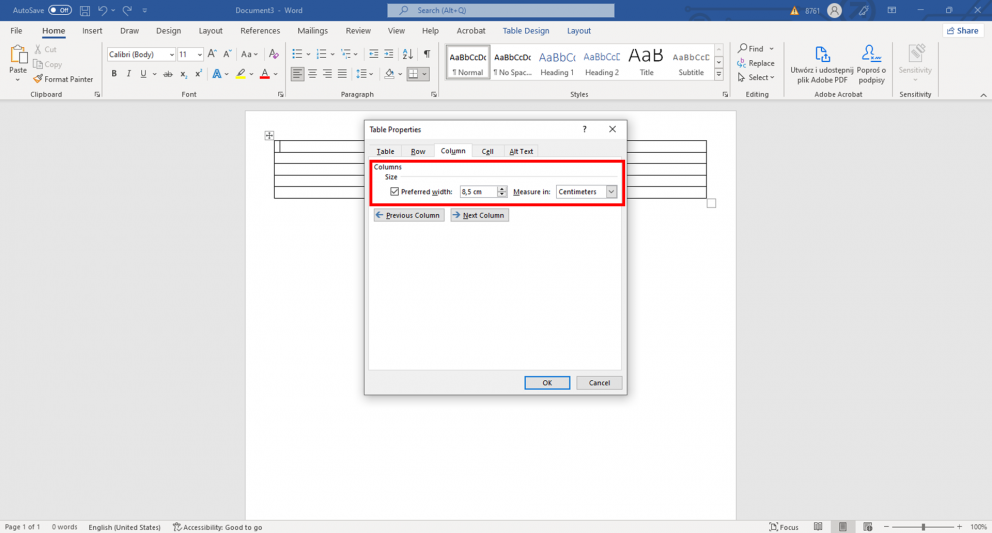
Click on the table, select the “Table Properties” menu, and then on the “Table” tab, select “Preferred Width” – choose 2 inches or 5.5 centimeters, depending on your country. Similarly, click on “Preferred Width” in the “Column” tab. Set the width to 3.5 inches or 8.5 centimeters in the table properties window. These are the dimensions of a standard business card. If you want to stick to the exact standard business card size, it’s exactly 85.60 mm × 53.98 mm.
You should now have a table divided into ten identical cells the size of a standard professional business card on your blank new document page. If the table does not fit, the margin can be reduced.
In America, business cards are mostly printed on Letter paper, while in European countries they are printed on A4 paper. As a result, you need to match the dimensions that are commonly used in your country when you experiment with business card design in Microsoft Office. Select the page size from the drop-down menu on the appropriate page.
Select AutoFit by checking Fixed column width. This will ensure that the table does not change shape as you fill the first cell with data.
Now you can fill the first cell with your personal information. Decorate it aesthetically, change the font color, use nice fonts and WordArt options. You can add shapes if you select format shape to match it to the font color and the cell. You can add graphic elements or your corporate logo image to underline the professional brand.

When you are done, select the entire first cell. To do this quickly, move your cursor to the bottom left corner of the cell until it turns into an arrow. The contents of the cell will be selected when you click. Copy the contents – whether by pressing Ctrl-C or selecting the “Copy” option in the menu.
Now you can paste the contents into the next cell. Select multiple cells at once to paste the content into them. You might want to hide the table borders – to do it, choose the hide lines option in the “table properties” menu.
When you’re happy with your project, save it as a PDF, DOCX, or print it on nice card stock paper!
A foldable card in Word – how to make it?
You can easily convert a business card to a foldable one. To do it, follow the test above, but design the cards using double-sided printing.
Remember to use formatting tools to place your table in the middle of the paper, so that you can use double-sided printing to print on both sides of the card.
How to print multiple business cards on one sheet in Word?
Before you print out and design your business cards, check how your printer works with double-sided printing. If it has a native function test it out.
Then, you can start out designing business cards in Microsoft Word. When using double-sided printing, first design the covers of the foldable business card (pages 4 and 1), and on the next page the inner pages (3 and 2). Print a test page of a word document, to create a business card that resembles a booklet.
Business card templates in Word – a gallery
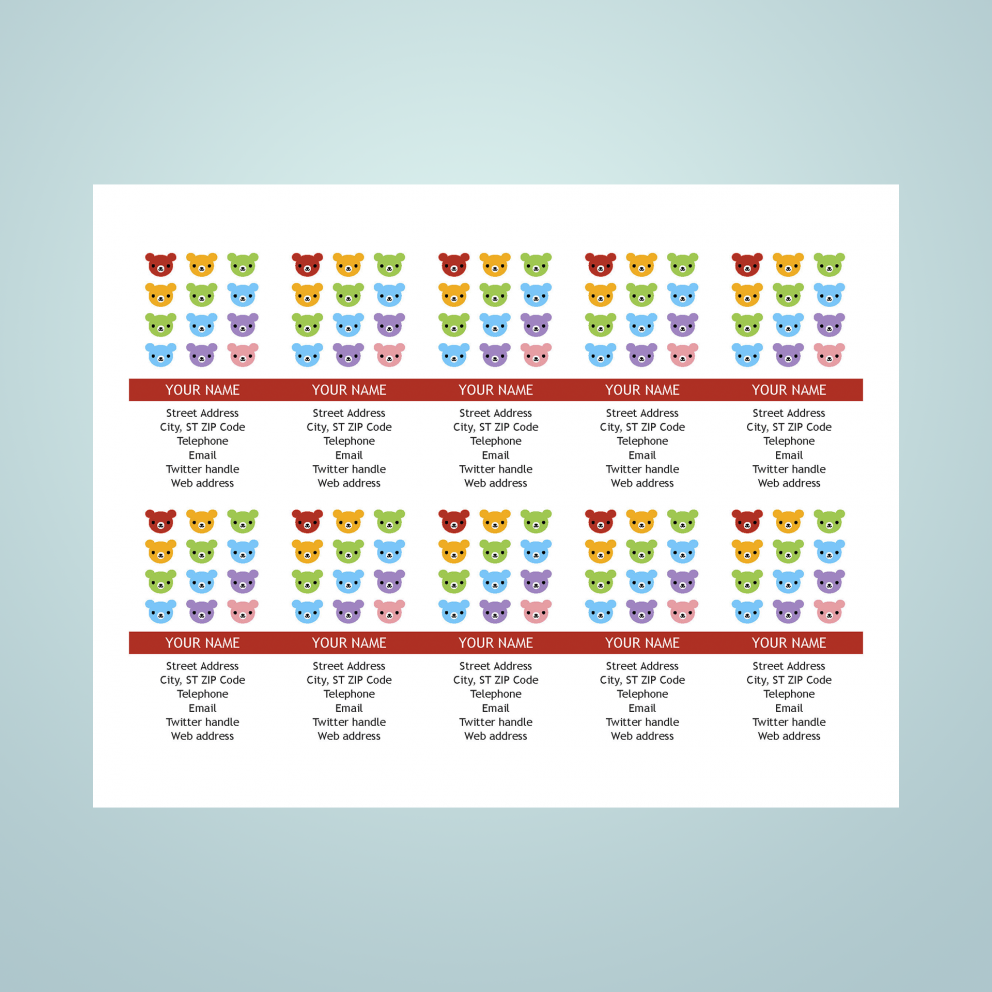
This business card template is very user-friendly thanks to the cute pattern of logos on each card and the great use of colors.

This 80s-style business card template can be used to create effective and stylish cards in MS Word.
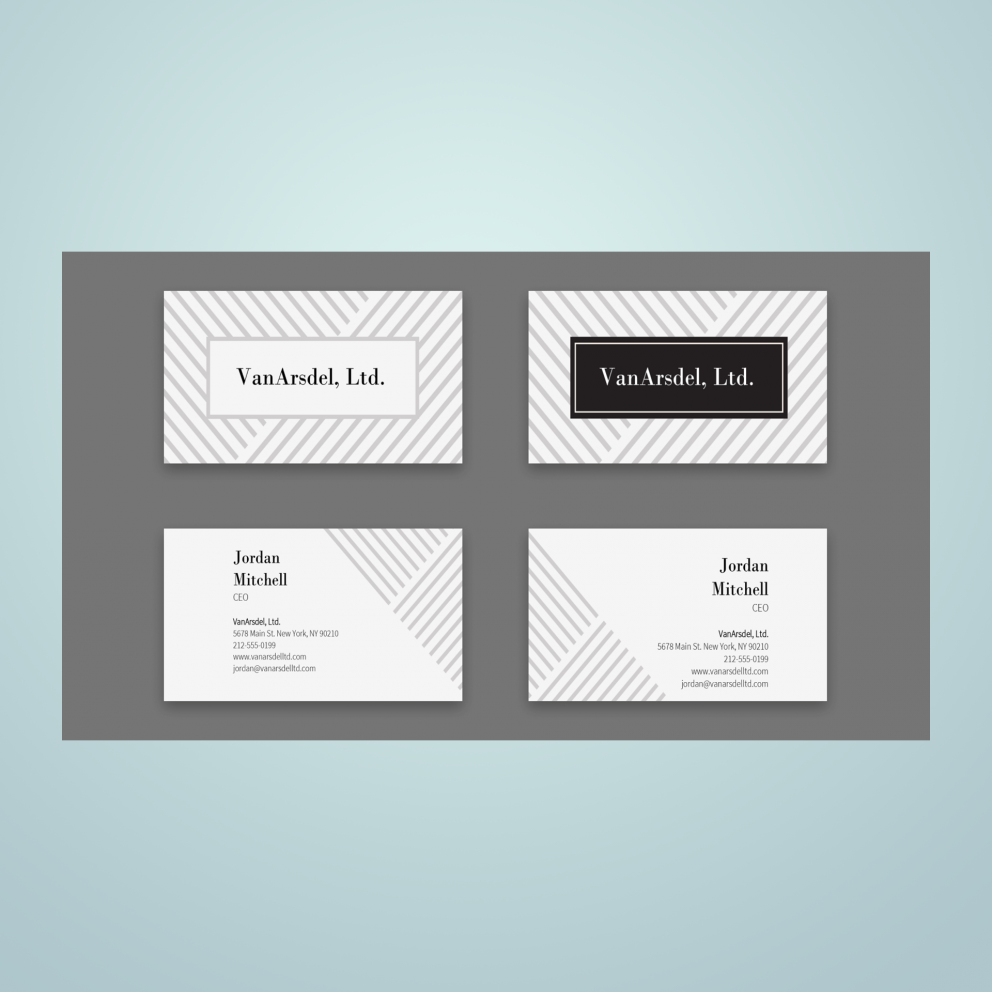
Using this business card template can make your cards look very official, especially thanks to the business-style lines.

The blue spheres of these business cards can make your designs stand out from the crowd.

The soft theme of ladybugs and cards can work for a less official business card.
The elegant triangle theme makes these templates look very dynamic.
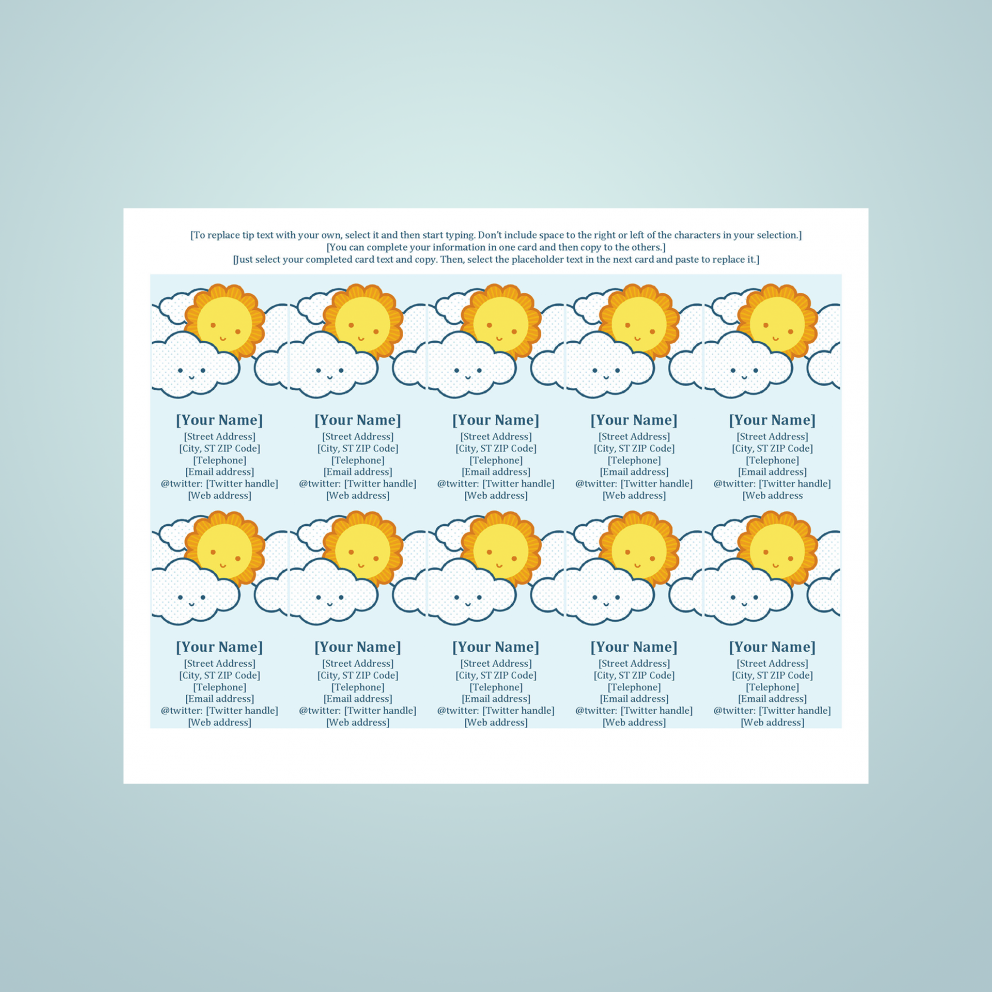
This colorful business card can look very cute, but in the right business, these templates might be very persuasive.
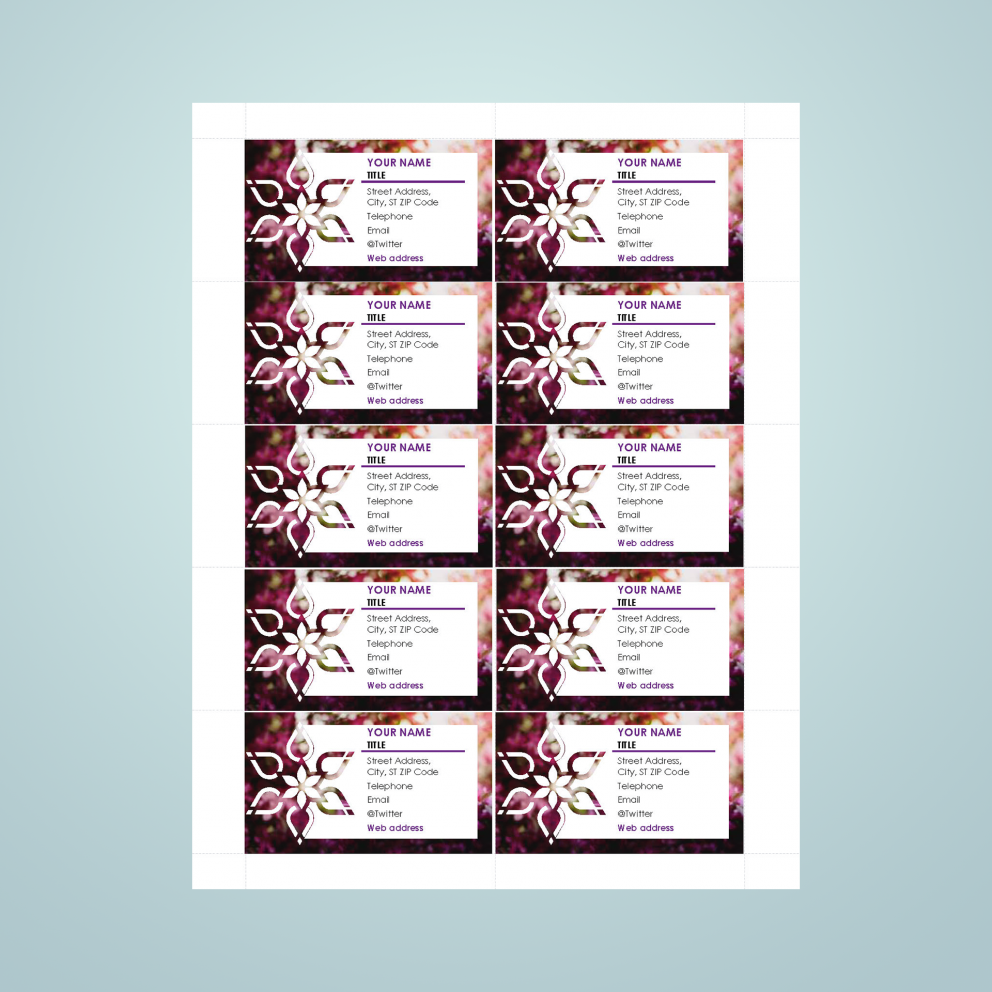
You can match this business card template to your corporate strategy if you replace the lotus theme with your logo image.
You can use this template to design business cards with a consistent pattern for your needs.
![]()
This simple design allows you to customize the business cards with your own corporate logo.
Conclusion
Using MS Office, you have a number of business card templates available, allowing you to quickly create a professional-looking business card. You can find free templates for download on the web, but you can also prepare them yourself.
With Publuu, you can publish your brochures and business cards online as beautiful PDF documents that can be opened on any device. You can place a QR code on your business card that redirects to your online brochure, ebook, or catalog.
Printing your own business cards on your own computer using a business card template in Microsoft Word or PowerPoint will save you time and money while you gain creative freedom.
You may be also interested in:
How to Make a Brochure in InDesign – A Short Guide
Postcard Design – A Comprehensive Guide for Beginners
PDF Design – The Best Software to Create a Professional PDF
Introduction: How to Make Birthday Cards With Microsoft Word
It is advisable to involve your kids in creating the home made birthday cards. This will save you money and also entertain your kids. Your relatives and friends will always be excited to receive birthday cards that have been made by your kids. In this article we have set down some tips on how to create the perfect birthday card using Microsoft Word.
Step 1: Make Up Your Mind on the Content of Your Card.
It is very important that before you start making your card, you should have in mind the type of things you would like to put down in the birthday card. You should sketch the details down on a piece of paper so as not to forget.
Step 2: Open the Microsoft Office 2010 or Any New Version on Your Computer.
This is pretty basic and you cannot miss it.
Step 3: Lay Out a Template
After opening the Microsoft Word app in your computer, head to the file section > New > Blank document. After that, go to the page layout section and select orientation and then select landscape. Finally, go to the column section and select the number of columns you would like( we recommend two columns ). Using two columns, you can now include images , any text you would like, and any type of decorations you would like to use on the column that is on the right side ( hand ) — this is what will make up the front of your birthday card. The fact that you are using columns means that even if you fold it after printing it, the birthday card will be nicely lined up.
Step 4: You Ought to Change the Color of Your Background.
Click on the page layout section then click on the page color. The page color consists of many different types of colors that you can choose from. When choosing the right color, always consider the receiver’s favorite color and not the color you prefer. You want the card to be perfect so as to make the receiver extremely happy. If you are not sure of the right color, then you necessarily do not have to put a background color. The background color will sometimes use up a lot of your ink, therefore it is not really a must.
Step 5: Add a Border.
At this step, you should go the page layout section and click on page border. Choose any style that is fun and appeals to you ( these styles are available at the bottom in the Art box and it consists of several patterns, different kinds of balloons, stars and even hearts ). You should also choose the type of color.
Step 6: Add the Appropriate Text.
Head to Home and select Word Art section- here you can choose the type of text that you would like to use. You can decide on the text color or text size at this step.
Step 7: Add the Clip Art.
If you are using new version like Office 360, 2013 or 16 then unfortunately Microsoft Office no longer provide clip arts. But if you are using 2010 or earlier version then go to Insert and click on Clip Art. Microsoft Word 2010 consists of many kinds of images you can pick and use. Click on the search section and type the word ‘birthday’.
Step 8: Insert Your Own Pictures.
Go to insert and select pictures. You should have the pictures saved somewhere in a folder in your computer. Click on the folder which has the picture and select the one you are planning to use. You can decide to crop your picture or not. After you are satisfied, save the file.
Step 9: Edit Your Card.
You should go through your card just to make sure everything is in order.
Step 10: Print and Save Your Card.
Printing is done just like the way you print a normal power point file and the save it in your computer.
Step 11: Some Tips on How to Make Adorable Cards:
- The message should be handwritten on the inside of the card. It gives an intimate touch if you have written the person’s name and whom it is from by hand instead of using your computer.
- If you decide on using your computer and printing the birthday cards, it is recommended to utilize quality paper or even the thin cards.
- The front of your birthday card should consist of your own photos. This is advisable even if you decide to use either your hand or your computer.
- Make the card’s outline using the computer and then let your kids do the rest of the decorating work.
- If you are not very familiar with designing a card then use a template so all you will need to do is fill and print it.
Be the First to Share
Recommendations
Это также отличный инструмент для учителей для создания карточек для своих учеников без необходимости тратить их и без того ограниченное количество времени и ресурсов на их изготовление.
Откройте Microsoft Word и выберите новый пустой документ .
Нажмите вкладку Layout , это позволит вам изменить размер страницы до более подходящего размера карточки.
На вкладке макета вам нужно будет выбрать страницу размером 4 x 6 дюймов и выбрать альбомную или портретную компоновку — в зависимости от того, что вам больше подходит. Это даст вам идеальный размер для печати карточек.
Введите то, что вы хотите сказать, и нажмите Ctrl + Enter, чтобы создать новую карту. Здесь вы пишете ответ для первой карты, если это необходимо, или создаете новую карту.
Кроме того, помните, что вы можете перейти на вкладку «Дизайн» и добавить тему, цвета и эффекты на карточки, если вам нужно, чтобы они немного выделялись или делали их яркими.