
Add a border to a page
-
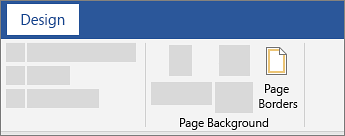
Go to Design > Page Borders.

-
Make selections for how you want the border to look.
-
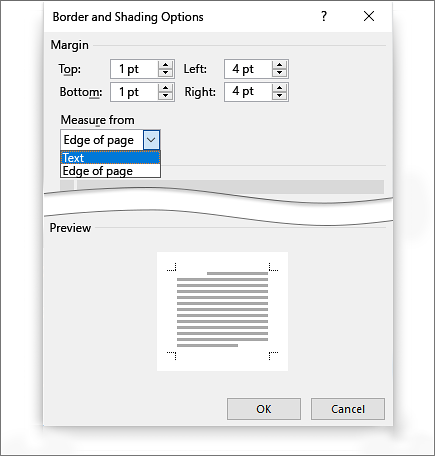
To adjust the distance between the border and the edge of the page, select Options. Make your changes and select OK.
-
Select OK.

If the page you want to add a border to is in the middle of your document, you must first add section breaks.
-
Go to Design > Page Borders.
-
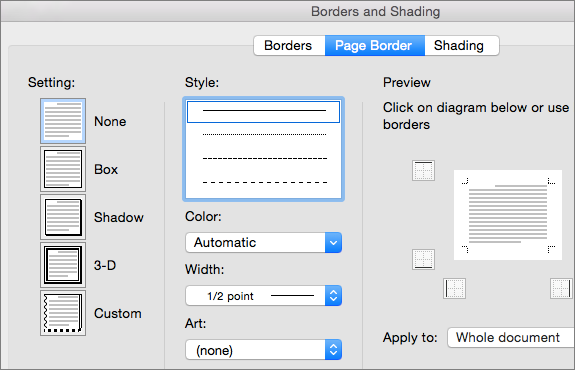
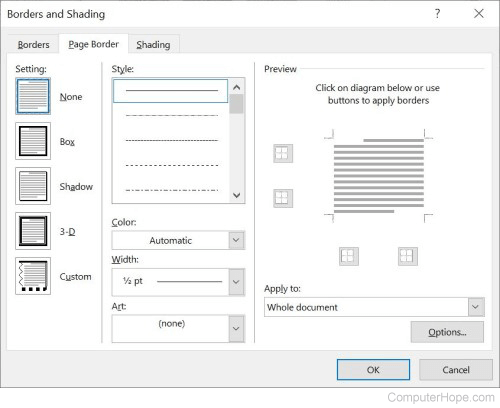
In the Borders and Shading box, design your border:
-
Under Setting on the left, choose the border style you want.
If you want to remove a border, select None.
-
Under Style, select the line style you want.
-
Select the arrow under Color and choose a border color.
-
Select the arrow under Width and choose the width you want.
Tip: If you want a clip-art border instead, select the arrow under Art and choose a border graphic.
-
-
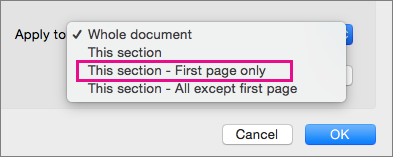
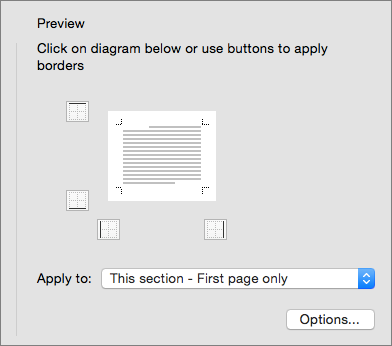
Next, select the arrow to the right of Apply to and choose This section — First page only.
This setting also works if you’re adding the border to the first page in your document.
-
The Preview box confirms your border styles. To remove the border from one side, select that line in the Preview box.
Tip: To change where the border appears on the page, select Options and adjust the margin settings.
When finished, Select OK.

Word for the web does not let you edit, delete, or add new borders to text.
If you’ve added borders around text in a document you created with the Word desktop app, Word for the web will preserve them.
A potential workaround is to insert a table that contains only one cell, then paste or type your text into that cell.
Need more help?
![]()
Download Article
Learn how to insert a lined or art border in Microsoft Word documents on desktop
![]()
Download Article
- Adding a Page Border (Windows)
- Adding a Page Border (Mac)
- Adding a Text Border
- Q&A
|
|
|
Do you want to make an outside border in your Microsoft Word documents? You can easily add a solid or dotted border to an entire page or selected content. You can also use Microsoft Word’s included designs to create an artistic border for themed event flyers. This wikiHow will show you how to create a border around text, images, or pages in Microsoft Word using your Windows or Mac computer.
Things You Should Know
- To add a page border, click «Design» → «Page Borders». Select a border setting, style, and page application. Click «OK».
- To add a border around text or images, select the content. Click the «Home» tab and click the arrow next to the border icon. Click «Borders and Shading…»
- Select a border setting, style, and page application. Click «OK».
-
1
Open a project in Microsoft Word. This looks like a W on top of a blue square. Microsoft Word is available to install for Windows.[1]
- You must have a subscription to use Office 365.
- Use this method to add a lined border around a Microsoft Word document. This is different from changing the margins.
-
2
Click Design. This will be in the top toolbar, between Draw and Layout.
Advertisement
-
3
Click Page Borders. You can find this at the left side of the Design section, next to Page Color. It will have an icon of a page with a yellow border.
- A new window will open.
-
4
Click Page Border. This is the middle tab on the Borders and Shading window. You may already be on this tab.
-
5
Select a border setting. In the left-most column, click the border option that you want to use. Select from: None, Box, Shadow, 3-D, and Custom.
- If you want a simple border to go all the way around your page, select Box.
- To add a border with fun images, click the Art drop-down menu and select from Word’s art gallery. This border can be used for themed flyers for holidays and events.
-
6
Select a border style. In the «Style» column, scroll down until you find the border style you want to use, then click the style. Select from the various solid and dotted line styles.
- If needed, you can also change the border’s color and width from the Color and Width drop-down menus, respectively.
-
7
Select pages to use. If you created a new section earlier in this method, click the «Apply to» drop-down box, then click the section to which you want to apply the border in the resulting drop-down menu.
- To apply the border to the first page of your section, click This section — first page only in the drop-down menu.
-
8
Click OK. It’s at the bottom of the page. This will apply the border to your document’s specified page(s).

Advertisement
-
1
Open a project in Microsoft Word. This looks like a W on top of a blue square. Microsoft Word is available to install for Mac.[2]
- You must have a subscription to use Office 365.
-
2
Click Design. This will be in the top toolbar, between Draw and Layout.
-
3
Click Page Borders. You can find this at the left side of the Design section, next to Page Color. It will have an icon of a page with a yellow border.
- The Borders and Shading window will open, set to the Page Border tab. If it isn’t already on the Page Border tab, click it now.
-
4
Select a border setting. In the left-most column, click the border option that you want to use. Select from: None, Box, Shadow, 3-D, and Custom.
- If you want a simple border to go all the way around your page, select Box.
- To add a border with fun images, click the Art drop-down menu and select from Word’s art gallery. This border can be used for themed flyers for holidays and events.
-
5
Select a border style. In the «Style» column, scroll down until you find the border style you want to use, then click the style. Select from the various solid and dotted line styles.
- If needed, you can also change the border’s color and width from the Color and Width drop-down menus, respectively.
-
6
Select pages to use. If you created a new section earlier in this method, click the «Apply to» drop-down box, then click the section to which you want to apply the border in the resulting drop-down menu.
- To apply the border to the first page of your section, click This section — first page only in the drop-down menu.
-
7
Click OK. This is the blue button. This will apply the border to your document’s specified page(s).
Advertisement
-
1
Open a project in Microsoft Word. This looks like a W on top of a blue square.
-
2
Click Home. This is in the top toolbar, between File and Insert.
-
3
Select content. Click and drag your mouse across the text or image(s) around which you want to place a border.
- This method will place a border around an entire selection of images and text together.
- If you want to place a border around a single image, double-click the image. Select a preset style from the Picture Styles section, or click Picture Border to set the color, weight, and design of the border.[3]
-
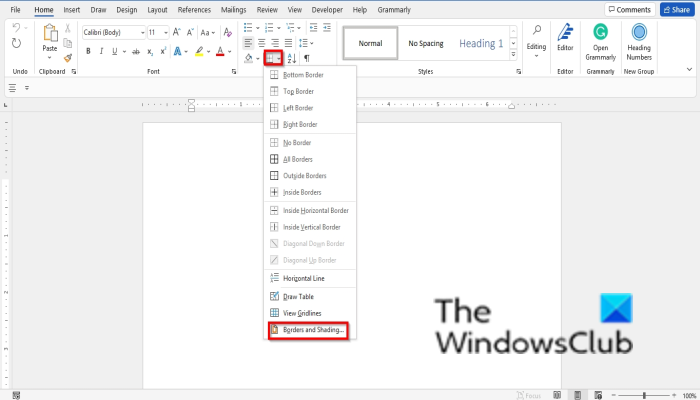
4
Click
next to the «Borders» button. The Borders button resembles a square divided into four smaller squares; you’ll find it in the «Paragraph» section of options in the toolbar, just right of the paint bucket icon. A drop-down menu will open.
- On a Mac, click the Format menu item at the top of the screen instead.
-
5
Click Borders and Shading…. It’s at the bottom of the drop-down menu. A new window will open.
- On a Mac, you’ll find this option in the middle of the Format drop-down menu.
-
6
Select a border setting. In the left-most column, click the border option that you want to use. Select from: None, Box, Shadow, 3-D, and Custom.
- If you want a simple border to go all the way around your text, select Box.
-
7
Select a border style. In the «Style» column, scroll down until you find the border style you want to use, then click the style. Select from the various solid and dotted line styles.
- If needed, you can also change the border’s color and width from the Color and Width drop-down menus, respectively.
- To add a border with images, click the Art drop-down menu and select a design.
-
8
Select pages to use. If you created a new section earlier in this method, click the «Apply to» drop-down box, then click the section to which you want to apply the border in the resulting drop-down menu.
- To apply the border to the first page of your section, click This section — first page only in the drop-down menu.
-
9
Click OK. This will apply the border to your document’s specified page(s).
- Be sure to save your document when you’re finished.
- You can also use Microsoft Word to create a booklet or another handout flyer.


Advertisement
Add New Question
-
Question
How can I place a border around a picture I’ve inserted into a document?

You do what is shown above, but instead, you click on the picture before you go through the steps.
-
Question
How do I put a border around a table in Microsoft Word?
Go into Format —> Borders and Shading. There you’ll find options for borders you can apply to the table.
-
Question
What three options can I set regarding a picture border?
The three option you can set are: small, medium and large.
Ask a Question
200 characters left
Include your email address to get a message when this question is answered.
Submit
Advertisement
Thanks for submitting a tip for review!
About This Article
Thanks to all authors for creating a page that has been read 971,313 times.
Is this article up to date?
Updated: 05/16/2020 by
Microsoft Word gives you hundreds of page border options, allowing you to surround a page with a clean or fancy border, like a frame for a picture. You can also set a border to provide a shadow or 3D effect.
Add a border
- Open Microsoft Word.
- Click the Page Layout tab. In Word 2013 and 2016, click the Design tab instead.
- In the Page Background group, click the Page Borders option.
- In the Borders and Shading window (shown below), if not already selected, click the Page Border tab.
- Select Box if you want a square border around your page.
- Select the Style of border you want on the page, which can be solid, dotted, or dashed. Select the Color and Width of the border. If you want to select artwork to use as the border, click the down arrow for the Art drop-down menu. In the example below, we’re using the hearts art as a border.

Tip
By default, the borders are applied to the whole document, which means every page has the same border. Clicking the down arrow on Apply to gives you the option to select the first page only, selected page, all pages but the first page, and other options.
- Once you’ve selected all the border options you want to use in your document, click the OK button to apply the border.
Modify a border
- Open Microsoft Word.
- Click the Page Layout tab. In Word 2013 and 2016, click the Design tab instead.
- In the Page Background group, click the Page Borders option.
- In the Borders and Shading window (shown below), if not already selected, click the Page Border tab.
- Make the desired changes to the border that is currently set for the document or page. You can change the type of border in the Settings section, choosing from Box, Shadow, 3-D, or Custom. You can also change the style, color, and width of the order, and add or change art used in the border.
- When you have finished making the desired changes to the border, click the OK button to apply the changes.
Remove a border
- Open Microsoft Word.
- Click the Page Layout tab. In Word 2013 and 2016, click the Design tab instead.
- In the Page Background group, click the Page Borders option.
- In the Borders and Shading window (shown below), if not already selected, click the Page Border tab.
- Select None to remove any border on the page.
- Click the OK button to remove the border.

Adding a page border to your document can be a subtle way to make your Microsoft Word documents stand out. You can customize the style, thickness, and number of pages for a border to apply to your Word document.
Creating a page border in Microsoft Word will depend on your version of Microsoft Office. For Office 365 and Office 2019, open a Word document and click the “Design” tab in the ribbon.
If you have an older version of Office, click the “Layout” or “Page Layout” tab instead.
From here, click the “Page Borders” button, in the “Page Background” section of the ribbon.

By default, the “Borders and Shading” box that opens should default to the “Page Border” tab. If it doesn’t, click on that tab to enter your border settings.
Click “Box” to add a typical box border to your document. You can use the default style, color, and border width, or change these settings from the various drop-down menus.
Click “OK” to apply the page border to your Word document.
By default, this border style is ten applied to every page.
Your document editing view will update to show the new border applied.
Alternative Page Border Styles and Formatting
The box page format is the default style, but alternative border styles and formatting options are available for you to use instead.
The box border is the most basic, adding a solid line with no shadow to your page. Even that can be customized with different types of lines, widths, and colors.
Custom Page Border Settings and Styles
Other than the box border, you can also apply a border with a shadow, a “3D” style border, and a custom border with mix-and-match options for each side.
To do that, select one of the options from the “Setting” section in the “Page Border” tab of the “Borders and Shading” dialog box. Your chosen style will appear for you to review in the “Preview” section before you apply it to your document.
Applying or Removing Individual Border Lines
If you want to apply or remove individual border lines from your document (for instance, removing the border from the bottom of a page), you can do this from the “Preview” section.
If a border is applied, click on the border line to remove it. To apply it again, click on the line to make it re-appear.
Applying Custom Border Lines
Clicking on individual border lines in the “Preview” section is also how you can apply different styles to different lines when the “Custom” border setting is selected.
To do this, click the “Custom” button in the “Setting” column, select a line style from the “Style” drop-down menu, and then click on one of the border lines in the “Preview” box.
Changing Border Width and Color
You can make your border stand out with different colors and border widths. A wider border width will make your border stand out more in your document.
Border widths start from 1/4 pts and go up to 6 pts. A preview of your chosen border width appears in the “Preview” section. You can select any color you choose, either from the predefined options or by using the RGB color chart.
To change the border width or color, select your chosen options from the “Color” and “Width” drop-down menus. If you have the “Custom” border setting applied, you’ll need to click on each border line in the “Preview” section to apply your chosen settings to those lines.
Adding a Border to a Single Page
Microsoft Word will usually apply border styles to each page, but you can apply a page border to an individual page or exclude certain pages like your front page.
To do this, enter the “Page Border” settings menu (Layout/Design/Page Layout > Page Borders) and click the “Apply To” drop-down menu.
If you want to apply a border to an individual page, make sure you’re active on that page in the Word document before entering the menu.
From the “Apply To” drop-down menu, select “This Section” to apply it to the page you’re currently on. To apply your border to the first page only, select “This Section – First Page Only” or, to apply it to all pages except the first page, select “This Section – All Except First Page” instead.
Click “OK” to save when you’re ready. This will then apply your page border to the pages you’ve specified, rather than to the entire document.
READ NEXT
- › How to Put a Border Around Text in Microsoft Word
- › How to Remove Borders in Microsoft Word
- › How to Insert a Vertical Line in Microsoft Word: 5 Methods
- › How to Adjust and Change Discord Fonts
- › Google Chrome Is Getting Faster
- › The New NVIDIA GeForce RTX 4070 Is Like an RTX 3080 for $599
- › BLUETTI Slashed Hundreds off Its Best Power Stations for Easter Sale
- › Expand Your Tech Career Skills With Courses From Udemy
Download PC Repair Tool to quickly find & fix Windows errors automatically
Borders are lines that people can use to put around the text, paragraphs, and even around your page. In Microsoft Word, you can customize the borders’ style, width, and colors and apply borders to a paragraph or a text. There is a section in the borders settings where you can create the custom border that you can put around your Word document.
You can create and add a custom border in Word around a picture, document, text box or any other object. Follow the steps below to create a custom border in Microsoft Word:
- On the Home tab, click the Border button.
- Click Borders and Shadings.
- Click the Page Border tab.
- On the left, click Box.
- In the Art section, choose an art style from the list.
- Change the width and color.
- Choose an option from the Apply to list box, then click OK.
On the Home tab in the Paragraph group, click the Borders button and select the Borders and Shadings option from the menu.
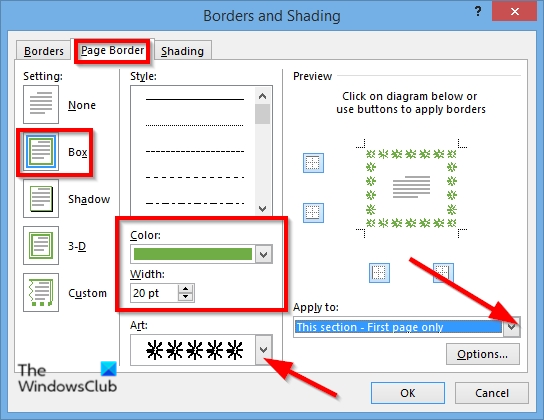
A Border and Shading dialog box will open.
Click the Page Border tab.
On the left, click Box.
In the Art section, choose an art style from the list.
You can change the art style, color, and width.
Click the Color list box and choose a color.
Click the Width list box and choose a width.
On the right, you will see a preview of your custom border.
In the Apply to list box, you can select where you want to place the border. You can choose options such as Whole Document, This Section, This Section: Frist Page Only, and This Section: All Except First Page.
Choose any of the options above and click OK.

The border is around the page.
Now read: How to use Hide Ink feature in Word
What is the difference between border and shading?
The difference between Border and shading is that the border goes around an object, while the shading feature in Word is to color the object. The Shading feature allows you to add shading Pattern styles to the object and change the pattern color.
What is a bottom border in Word?
The bottom border is a single border when selected will be below a paragraph or bottom of the page. In Microsoft Word, you can insert Top Borders, Right Borders, Left Borders, All Border, Outside Border, Inside Border, Inside Horizontal Border, Inside Vertical Border, Diagonal Down Border, and Diagonal Up Border.
If you have questions about the tutorial, let us know in the comments.
Shantel has studied Data Operations, Records Management, and Computer Information Systems. She is quite proficient in using Office software. Her goal is to become a Database Administrator or a System Administrator.