
Table of Contents
- How to make on order form?
- What should be on an order form?
- How do I create an order form in Word?
- How do you make an order form?
- How do I create a purchase order?
- How do I create a purchase order in Excel?
Create an order grid by clicking on “Insert” in the top toolbar and then clicking on “Table.”. This opens a small window that asks how many columns you want and how many rows. Select “4” columns. The number of rows you designate is based on the volume of products you have to sell.
How to make on order form?
What should be on an order form?
A space for agreed-upon pricing, quantities and specific order details. The body of the purchase order should provide enough space to include a description, pricing, quantity and specific shipping requirements, such as refrigeration, for each item being ordered on the purchase order form.
How to make an order
- Step 1 – Choose the right category. First thing you need to do is to choose the right category of products.
- Step 2 – Specify the group of products.
- Step 3 – Choose the exact product.
- Step 4 – Add product to your shopping cart.
- Step 5 – Another products or finish shopping.
- Step 6 – Confirm order and pay.
- Open a new Word document and then click “File,” “Options” and then click the “Customize Ribbon” tab.
- Check the “Developer” box and then select “OK.” The Developer tab displays on Word’s ribbon interface.
- Enter the headings that you want to include on your order form as regular text.
How do you make an order form?
Type the heading “Order Form” in cell B2
How do I create a purchase order?
Creating the Purchase Order. Purchase Orders are created by clicking on the PO List button on the icon toolbar. Click the Add button on the PO List toolbar and select Purchase Order. Select the Vendor you will be ordering your items from.
How do I create a purchase order in Excel?
Open Excel, enter “Purchase order” in the “Search for online templates” box, and then press “Enter.”. 2. Click or tap on the preferred purchase order template to preview, and then click “Create” to open the template as an Excel worksheet. 3. Update the purchase order and remove any sample entries.
Forms
An order form is what one uses in the event that he or she would like to have a certain product or service provided. With the help of this form, one is able to specify details such as the type of product or service, where it should be provided, the name of the person who made the order, and much more.

This type of form can also be used internally within companies in the event that certain authoritative figures would need something like ordering specific products or have certain services done that would benefit the business. So once you’ve either obtained or made an order form, all you have to do is place all the required information to ensure that you get what you want and need.
Steps for Creating an Order Form with Microsoft Word
These instructions can help you create an order form with the use of Microsoft Word 2007. So here are the steps as follows:
- Firstly, open up the Microsoft Word program. You must then use the Windows’ Start button and select the “All Programs” option. Then select “Microsoft Word” from the “Microsoft Office” folder.
- Next you must click the Microsoft Office button that should be located on the upper left corner. Select the “New” option and it should launch a separate “New Document” pop-up menu on your screen.
- At the top of the new document window you must type in “order form” in the search field and click on the “search” arrow. Thumbnails will then be generated in the search results that should show you pre-formatted order forms. You can then get a larger view any of these by clicking on them and seeing a preview on the pane to the right of the screen.
- Under the form preview, you can see the “Download” option should you finalize which order form you would like to use. The order form template will then appear as a new document within Word.
- This is the part where you may then edit the order form to suit whatever you need. In order for you to edit the text, all you have to do is highlight and then type over it. Once you are satisfied with everything that you need to place in the order form, click on the Office button and select “Save As.” Then type the name of the document in the “File Name” field. Click on the down arrow to the right of the “Save as Type” field so that you may select the type of document you want.
- In the event that you would like to save this template so that you can use it in the future, you can select the “Template” option. If you would like to use the original version of this template again, then you don’t need to worry as there’s already a copy that’s automatically saved in the “My Templates” Folder where you can choose to use it again at any point in time.
The Different Types of Order Forms
If you’re going to start creating an order form, you must know that there are many different types of them that you can make as well as each of them having their own specific purpose. By knowing how they’re supposed to be utilized, you can choose the right order form template that best suits your needs. So here are a few examples of the different types of order forms that you can create:
- Job Order Form. This is the type of form that’s made use by just about every person who’s in need of some sort of service done. With a job order form, it specifies what kind of job needs to be done, where it should be done, how it should be done, and more. This kind of form can also be used internally by just about any kind of business when certain problems arise or when there’s an important need for specific type of job done that could enhance operations.
- Purchase Order Form. A purchase order form is what’s issued by a buyer to a seller. What the buyer can specify in this form is the type of product or service that seller should provide, the quantity, and the agreed price for whatever product or service the buyer would want. This kind of form is mostly used by companies for when they have to control the purchasing of products and services from any external suppliers.
- Event Order Form. With help of an event order form, those who organize events may outline the details of the kind of event that they would like to have. This can act as a sort of guideline for those who are required to provide whatever is necessary for any kind of event. So things such as the amount of tables and chairs needed, the decorations, and the location of the event are all specified within this form.
- Product Order Form. This is a form that’s specifically used by anyone who wishes to purchase certain products from a business that can supply them. A product order form allows one to specify what kind of product he or she needs along with its quantity. This is similar to purchase order forms, but this kind of document can only be used to purchase or request products and nothing else. Businesses can also use this in the event that they would like to have their suppliers provide them with what they need in order to continue their operations.
- Repair Order Form. This is a form that one utilizes in the event that he or she has certain maintenance problems that need to be looked into as soon as possible. The repair order form allows people to specify the type of repair that they would like done, giving the repair service provider an idea as to what type of materials to use, the amount of time it would take, as well as the payment that the buyer will have to compensate for everything. Much like job order forms, those with authority within the business can make use of this type of form to order their maintenance department in the event that certain equipment or facilities need to be fixed.
More in Forms
Microsoft Word’s Developer toolbar allows you to use Word for more than simple document creation. The Developer toolbar features a series of form controls, enabling you to create a simple order form which you can put on a website or distribute via email. Customers can then fill out this form and send it back to you to place their order. However, it is important to make sure that you protect the document so that only the form’s input boxes can be edited, as users may otherwise edit the labels on the form itself.
-
Open a new Word document and then click “File,” “Options” and then click the “Customize Ribbon” tab.
-
Check the “Developer” box and then select “OK.” The Developer tab displays on Word’s ribbon interface.
-
Enter the headings that you want to include on your order form as regular text. For example, you might include headings for name, address, product code and quantity.
-
Click the “Controls” section of the Developer tab and then select “Design Mode” to display Word’s form control buttons.
-
Use the control buttons to add controls to your form. Controls are methods of adding data to the form, such as text fields and check boxes. Which controls you use depends on the headings on your form. For example, you might use a text field to let users enter their names, and a date picker to let users select their preferred date of delivery for an item.
-
Click “File” and then select “Info.” Click the “Protect Document” button and then select “Restrict Editing” from the drop-down menu.
-
Check the “Allow Only This Type Of Editing In The Document” box and then select “Filling In Forms» from the drop-down menu.
-
Save the document to finish creating your form.
Word for Microsoft 365 Word for Microsoft 365 for Mac Word 2021 Word 2021 for Mac Word 2019 Word 2019 for Mac Word 2016 Word 2016 for Mac Word 2013 Word 2010 Word for Mac 2011 More…Less
To create a form in Word that others can fill out, start with a template or document and add content controls. Content controls include things like check boxes, text boxes, date pickers, and drop-down lists. If you’re familiar with databases, these content controls can even be linked to data.
Show the Developer tab
If the developer tab isn’t displayed in the ribbon, see Show the Developer tab.
Open a template or a blank document on which to base the form
To save time, start with a form template or start from scratch with a blank template.
-
Go to File > New.
-
In Search online templates, type Forms or the type of form you want and press ENTER.
-
Choose a form template, and then select Create or Download.
-
Go to File > New.
-
Select Blank document.
Add content to the form
Go to Developer, and then choose the controls that you want to add to the document or form. To remove a content control, select the control and press Delete. You can set properties on controls once inserted.
Note: You can print a form that was created using content controls, but the boxes around the content controls will not print.
In a rich text content control, users can format text as bold or italic, and they can type multiple paragraphs. If you want to limit what users add, insert the plain text content control.
-
Click or tap where you want to insert the control.
-
Select Developer > Rich Text Content Control
 or Plain Text Content Control .
 or Plain Text Content Control
  .
.To set specific properties on the control, see Set or change properties for content controls.
A picture control is often used for templates, but you can also add a picture control to a form.
-
Click or tap where you want to insert the control.
-
Select Developer > Picture Content Control
.
 .
.To set specific properties on the control, see Set or change properties for content controls.
Use building block controls when you want people to choose a specific block of text. For example, building block controls are helpful when you need to add different boilerplate text depending on the contract’s specific requirements. You can create rich text content controls for each version of the boilerplate text, and then you can use a building block control as the container for the rich text content controls.
-
Click or tap where you want to insert the control.
-
Go to DeveloperBuilding Block Gallery Content Control
(or Building Block Content Control). -
Select Developer and content controls for the building block.
 (or Building Block Content Control).
-
Click or tap where you want to insert the control.
To set specific properties on the control, see Set or change properties for content controls.
In a combo box, users can select from a list of choices that you provide or they can type in their own information. In a drop-down list, users can only select from the list of choices.
-
Go to Developer > Combo Box Content Control
or Drop-Down List Content Control . -
Select the content control, and then select Properties.
-
To create a list of choices, select Add under Drop-Down List Properties.
-
Type a choice in Display Name, such as Yes, No, or Maybe.
Repeat this step until all of the choices are in the drop-down list.
-
Fill in any other properties that you want.
Note: If you select the Contents cannot be edited check box, users won’t be able to click a choice.
 or Drop-Down List Content Control
  .
.-
Click or tap where you want to insert the date picker control.
-
Select Developer > Date Picker Content Control
.
 .
.To set specific properties on the control, see Set or change properties for content controls.
-
Click or tap where you want to insert the check box control.
-
Select Developer > Check Box Content Control
.
 .
.To set specific properties on the control, see Set or change properties for content controls.
Legacy form controls are for compatibility with older versions of Word and consist of legacy form and Active X controls.
-
Click or tap where you want to insert a legacy control.
-
Go to Developer > Legacy Forms
drop-down. -
Select the Legacy Form control or Active X Control that you want to include.
 drop-down.
Set or change properties for content controls
Each content control has properties that you can set or change. For example, the Date Picker control offers options for the format you want to use to display the date.
-
Select the content control that you want to change.
-
Go to Developer > Properties.
-
Change the properties that you want.

Add protection to a form
If you want to limit how much others can edit or format a form, use the Restrict Editing command:
-
Open the form that you want to lock or protect.
-
Select Developer > Restrict Editing.
-
After selecting restrictions, select Yes, Start Enforcing Protection.


Advanced Tip:
If you want to protect only parts of the document, separate the document into sections and only protect the sections you want.
To do this, choose Select Sections in the Restrict Editing panel. For more info on sections, see Insert a section break.

Show the Developer tab
If the developer tab isn’t displayed in the ribbon, see Show the Developer tab.
Open a template or use a blank document
To create a form in Word that others can fill out, start with a template or document and add content controls. Content controls include things like check boxes, text boxes, and drop-down lists. If you’re familiar with databases, these content controls can even be linked to data.
-
Go to File > New from Template.
-
In Search, type form.
-
Double-click the template you want to use.
-
Select File > Save As, and pick a location to save the form.
-
In Save As, type a file name and then select Save.

-
Go to File > New Document.
-
Go to File > Save As.
-
In Save As, type a file name and then select Save.

Add content to the form
Go to Developer, and then choose the controls that you want to add to the document or form. To remove a content control, select the control and press Delete. You can set Options on controls once inserted. From Options, you can add entry and exit macros to run when users interact with the controls, as well as list items for combo boxes, .
-
In the document, click or tap where you want to add a content control.
-
On Developer, select Text Box, Check Box, or Combo Box.
-
To set specific properties for the control, select Options, and set .
-
Repeat steps 1 through 3 for each control that you want to add.

Options let you set common settings, as well as control specific settings. Select a control and then select Options to set up or make changes.
-
Set common properties.
-
Select Macro to Run on lets you choose a recorded or custom macro to run on Entry or Exit from the field.
-
Bookmark Set a unique name or bookmark for each control.
-
Calculate on exit This forces Word to run or refresh any calculations, such as total price when the user exits the field.
-
Add Help Text Give hints or instructions for each field.
-
OK Saves settings and exits the panel.
-
Cancel Forgets changes and exits the panel.
-
-
Set specific properties for a Text box
-
Type Select form Regular text, Number, Date, Current Date, Current Time, or Calculation.
-
Default text sets optional instructional text that’s displayed in the text box before the user types in the field. Set Text box enabled to allow the user to enter text into the field.
-
Maximum length sets the length of text that a user can enter. The default is Unlimited.
-
Text format can set whether text automatically formats to Uppercase, Lowercase, First capital, or Title case.
-
Text box enabled Lets the user enter text into a field. If there is default text, user text replaces it.
-
-
Set specific properties for a Check box.
-
Default Value Choose between Not checked or checked as default.
-
Checkbox size Set a size Exactly or Auto to change size as needed.
-
Check box enabled Lets the user check or clear the text box.
-
-
Set specific properties for a Combo box
-
Drop-down item Type in strings for the list box items. Press + or Enter to add an item to the list.
-
Items in drop-down list Shows your current list. Select an item and use the up or down arrows to change the order, Press — to remove a selected item.
-
Drop-down enabled Lets the user open the combo box and make selections.
-
-
Go to Developer > Protect Form.
Note: To unprotect the form and continue editing, select Protect Form again.
-
Save and close the form.

If you want, you can test the form before you distribute it.
-
Protect the form.
-
Reopen the form, fill it out as the user would, and then save a copy.
Show the Developer tab
-
On the right side of the ribbon, select
, and then select Ribbon Preferences. -
Under Customize, select Developer .
 , and then select Ribbon Preferences.
Open a template or a document on which to base the form
You can start with a blank document and create your own form. Or, to save time, you can start with a form template.
-
Go to File > New from Template.
-
In the left pane, expand Online Templates, and then select Forms.
-
Double-click the form template that you want to use.
Add content controls to the form
-
In the document, click where you want to add the control.
-
On the Developer tab, under Form Controls, select Text Box, Check Box, or Combo Box.
-
To set specific properties for the control, select Options, and then configure the properties that you want.
Note: To create a list of drop-down items in a combo box, select the combo box placeholder, click Options, and then add the items that you want to appear in the drop-down list.
-
Repeat steps 1 through 3 for each control that you want to add.
Add instructional text (optional)
Instructional text (for example, «Type First Name») in a text box can make your form easier to use. By default, no text appears in a text box, but you can add it.
-
Select the text box control that you want to add instructional text to.
-
On the Developer tab, under Form Controls, select Options.
-
In Default Text, type the instructional text.
-
Make sure that Fill-in enabled is selected, and then select OK.
Protect the form
-
On the Developer tab, under Form Controls, select Protect Form.
Note: To unprotect the form and continue editing, click Protect Form again.
-
Save and close the form.
Test the form (optional)
If you want, you can test the form before you distribute it.
-
Protect the form.
-
Reopen the form, fill it out as the user would, and then save a copy.
Creating fillable forms isn’t available in Word for the web.
You can create the form with the desktop version of Word with the instructions in Create a fillable form.
When you save the document and reopen it in Word for the web, you’ll see the changes you made.
Need more help?
February 14, 2014 11:53 am
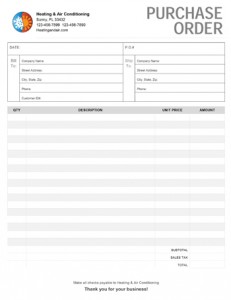 For companies looking to create their own business forms, Microsoft Office is an invaluable resource. The Microsoft library offers a variety of pre-made forms that can be used as a base to create invoices that fit your business. These tweaks are easy to do and this tutorial will offer tips on how to quickly make edits to Microsoft’s Purchase Order Invoices.
1. Open Microsoft Word
Under New Document, type in “Purchase Order”.
You will see many templates pop up. Scroll through and find one that has a layout that is functional and applies to your business. If there isn’t a perfect fit, choose one with the most useful layout. I’m going to pick this work order form because it gives me the most room for lines.
To select a template, double click on the icon. Word will open a new document with a ready-to-edit template.

2. Page Size
Click on the PAGE LAYOUT tab at the top. Click the Size icon and make sure your page is the desired size. This template is a full page.
Next click the Margins icon and select the .25 margins. If your Microsoft does not have this option then click Custom Margins at the bottom. Put .25 for Top, Left, Bottom and Right and click OK. This gives us more space to play with.
3. Gridlines
I know when I opened this template, I could not see the layout tables that all of the information is sitting in. The layout tables are not printable and aren’t shown when someone is filling out the form. If yours are visible, that’s fine. They’re helpful when trying to find where things are at. If they aren’t and you would like to see them, click on the DESIGN tab at the top. At the far right, there is an icon that says Borders. Under that, you will find View Gridlines. When that is selected, you will be able to see the form layout.

3. Place Your Logo
To place your company logo, click the “Your logo here” box and go to Insert>Picture. Find your logo on your computer and click Insert. Word will replace the text box with your company image. If your image is too large, use the transform tools to make it bigger or smaller (the transform tools are the little circles on the frame around your image when you have it selected). You can also drag the logo to any position you want inside the cell.
![]()
4. Slogan
This template gives us the option of entering a company slogan. You can choose to do so now or remove the words all together. Since I do not have a company slogan, I’m going to remove the text. To do that, simply click the text and hit the delete key on your keyboard.
5. Form Title
I needed a purchase order form and this one says work order. I’m going to highlight the word “work” and type in “purchase”. Word has now bumped the title to two lines. To get it to one line, change the font size by selecting the text. A pop up menu will appear and you can quickly select the font and size. Or while in the HOME tab, the font tool bar will be at the top left of the screen.
I’m going to leave it this way because I like the way it looks and I think I will move my company name and information up next to my logo since I chose not to type in a slogan.
6. Company Information
I’m going to go ahead and type in a company name and information that I’ve made up. To do this, I’m just going to click the line I want to edit and then begin typing.
Optional: I’m going to move this up next to the logo. Highlight the information and copy it to your clip board (ctrl+c) then delete the information. Put your selector into the cell next to your logo and paste the company information in (ctrl+v).
The company information ends up at the top of the cell. To fix that, right click in the cell and choose Table Properties. Choose your desired alignment and hit OK.

OPTIONAL: If you chose to leave out a slogan and if you’re keeping your company information where the template has it but you would like to have the Purchase Order on one line you can do that by selecting both of the cells:

Right click and choose Merge Cells. Your form should now look like this:

7. Fixing the Date and WO#
Since I moved the company address up next to the logo, I’ve freed up some pace on my form. Since the Date and WO# looks a little squished and will make writing difficult, I’m going to move them around.
Select the Date and delete, moving the WO# to the first line. I changed WO# to PO# and moved it away from the right margin so that I can later write in a number beside it. Then place your cursor in the other cell and type in “Date:“. These boxes are a little bigger than I need now so I’m going to click on the line dividing the upper cell from the lower and drag it upward.

The DATE and the PO# are in different fonts. To quickly fix this, highlight the P.O# and from the HOME tab choose Format Painter on the top left. With that, select the “Date:” and Word will automatically change the text formatting to match that of the “P.O.#”
8. Bill to and Ship to
Change “To” and “Job” to “Bill to” and “Ship to“. They’ll probably end up on two lines unless you make the font smaller or make the cell bigger. I dont mind the way they look on two lines so I’m going to leave them.
The customer information has already been supplied but if I’m having these forms printed, I wont be able to write in these boxes like they are. So I’m going to delete all of the text out of that cell.
Right click in the cell and select Split Cells. Choose 5 rows and click OK.
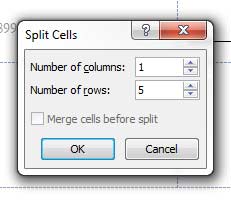
Do the same for “Ship to“.
The “Ship to” section is a tad too small so readjust those cells by clicking on the vertical lines and dragging them toward the “Bill to” section.

Now the lines we see here wont stay so in order to have lines to write on, we’re going to have to paint them in. Right click on the table and choose Border Styles. Select the first option. Your cursor will change to a little paint brush. Now you can paint along the dotted lines.

Start in the upper left hand corner and drag your cursor all the way to the right. This will turn a dotted line into a solid one. Continue to paint along the dotted lines that you want to fill in.
9. Font Size, Color and Style
Garamond really isn’t the best choice for printed forms. San-serif fonts tend to print clearer and are easier to read. Also, this form is using light gray text that is hard on the eyes. I’m going to select some of my text now and change some text formatting. Again, this can be done from the little pop up or up at the toolbar at the top.

10. Terms and Conditions
At the bottom where it says “Make all checks payable …” is where you can insert your own terms and conditions. We jumped around a little but it is best to get your terms written in so you can determine how much room you have left over.
11. Products
Now lets jump back to our table.
The “QTY” column doesn’t need to be that big so in order to make more room for “Description“, I’m going to drag that vertical line to the left. Word keeps the column titles in the center which is convenient and easy. Change any of the text at the top by selecting the word and typing in what you need. I’m going to change “Line Total” to “Amount.”
The reason I chose this template in the first place was because it looked like the simplest theme that would give me lots of room for more product lines. Since I do have room to spare, I’m going to add a few more lines to this table.
Right click on any row and go to Insert-Row Above (or below, doesn’t matter). Repeat until the terms and conditions reach the bottom of the page. I squeezed in four more product lines but depending on your terms and conditions, you may have less room.
My new lines are all white opposed to the gray-white-gray pattern above. To fix this, I’m going to select the row using my cursor. The font formatting box should pop up. Inside the box is a little paint can. That’s the shading tool. Click on the Shading Tool and choose the lightest gray. This little icon can also be found at the top of the page under the HOME tab.

Now that we’ve added more rows, our columns are too short. I’m not sure what style the template used but that’s OK because Word gives us an eyedropper that makes formatting easy. Right click and choose Border Styles again but this time select the Border Sampler option. Click on one of the column lines. Word has copied the formatting you want to use. Now just fill in the columns where you see dotted lines (like you did above) and along the new rows.
12. Save as
The form is finished. To save your Purchase Order into a printable format, choose FILE from the tabs at the top. On the right hand side, choose Save As Adobe PDF.
Now that you have created your very own business form using Microsoft Word, you can print the purchase order yourself to use or you can have Printit4Less.com do the printing for you! We offer custom form printing that allows you to upload your own design for us to print into 2, 3 or 4 part sets.
Tags: business purchase order, custom purchase order, designing a purchase order, Microsoft Word, Purchase Order, purchase order form, purchase order template, Tutorial
Categorised in: Tutorials
This post was written by Progressive Printing Team
Back to blog