You can use Microsoft Word is a tool that you can use to create a website without using a special code. You can customize and format your document and turn it into an HTML page. If needed, you can link to many other web pages within your Microsoft Word webpage. Creating one in Microsoft Word is an excellent option to create a quick and simple site.
This article covers how to make a webpage with Microsoft Word. Also, we’ll look at some common Microsoft Word questions and answers.
How to Make a Web Page in Microsoft Word
Are you ready to start learning how to create a Word website with the Microsoft Word HTML editor. Let’s get started:
In this tutorial, I’ll be using Microsoft Word Version 16.68 on macOS.
1. Download a Template


The first step is downloading a template you want to change into a Word website.
Creating your own Web page can be very useful, for a number of reasons. One creative use for making a website in Word is to post your resume online. That’s why I chose a CV template for this tutorial.
The template used in this tutorial is CV MS Word & InDesign. This template is compatible with Microsoft Word 2010 and higher and with Adobe InDesign CS4 and higher. It’s got a free font in the file guide folder with the template.
Everything in the template is editable. The CV MS Word & InDesign template comes in A4 size (8.27″ x 11.69″).
Once you’ve downloaded your template, it may open in a Protected View. If this happens, click the Enable Editing button.
2. Save as HTML


The first step in how to create a webpage using HTML is to save your document as a web page. Once you’ve downloaded your template, open the template in Word.
It’s also a good idea to rename the file at this point so that you can return to the original template if you need to.
The next step is to save your template as HTML. First, click on the File menu at the top of your screen. Then, from the menu that drops down, click on the Save As… option.


A window appears when you click on the Save As… option. In this window, you’ll see a File Format: field. Next, click on the arrow in that field. Next, click on the Web Page (.htm) option from the menu that appears.
3. Create a Hyperlink


When learning how to make a webpage with Microsoft Word, it can be helpful to know how to add a hyperlink to your document.
If you want to link to another webpage, you can. Start by highlighting the text that you want to change into the hyperlink.
Next, click on the Insert tab above the toolbar. Then in the toolbar, click on the Link icon. A menu appears. From that menu, click on the Link icon.


When you click on the Link icon, a window appears. In the Address: field, insert the link you want to add. To save the link, click on the OK button at the bottom of the window.
4. Customize Your Template


You should customize the template that you’re using as a Word website. The first step in your customization is to add your own text to your template. First, highlight the text that you want to change. After the text is highlighted, press Delete on your keyboard.


If there isn’t a text box, add one by clicking on the Insert tab above the toolbar. In the toolbar, there’s a Text Box button. Click on it. Choose the right option for you from the menu that drops down, depending on the kind of text box you want.
5. Change the Background


The last step in how to create a webpage using HTML is to finish adding customizations. Try changing your Word website’s background color if you want to make your template stand out.
First, click on the Design tab above the toolbar. In the toolbar, click on the Page Color button. When you click on this button, a color menu appears. Choose the color you’d like.
6. Post Your Webpage Online
Once you’ve finished creating a website in Word, you can post it online.
5 Easy-to-Use Website Builders
Word is not the best tool for making a professional web page. Instead, there are easy-to-use website builders that allow you to create a fuller website than you can make with MS Word.
So, if you don’t want to learn how to make a webpage with Microsoft Word but want to make a website quickly and easily, here are five options for you:
1. GoDaddy


GoDaddy website builder makes creating a mobile-friendly website for your business easy. In their website builder, you can customize your website, design content, and manage everything from reviews to orders to social through the dashboard. Their website builder uses a drag-and-drop editor, making setting up your website easy.
Plus, GoDaddy has built-in themes that you can use, so you don’t have to worry about designing a website from scratch. They start as a free website builder. But there’s a premium option. You can have a custom domain, set up appointments, and get SEO in the premium option.
2. Wix


Wix is another easy-to-use website builder. They also feature a drag and drop templates that you can use to create your website. You can also access free stock images, web hosting, and mobile design.
Built into Wix are tools for email marketing, SEO, and client management. Wix website builder is free, but they offer premium options too. These premium options give you more storage, video streaming hours, and events for the calendar app.
3. WordPress


WordPress is a popular website builder that’s been around for years. It uses a cloud-based website builder where you can drag and drop dozens of themes.
This website builder is great for bloggers, magazines, news sites, and other publications. WordPress makes it easy to add links to other websites. WordPress has a free option, and they’ve got premium options that give you a chance to use:
- your own domain
- live chat support
- Google Analytics integration
- advanced SEO tools
4. Weebly


Weebly is a popular choice for e-commerce because of its many e-commerce tools for selling products. It gives you the option for customers to purchase a product online and purchase in-store.
Weebly is another website builder that uses drag and drop, so it’s easy to create the website you need. Weebly has themes that are ready to launch and completely customizable.
Weebly has a free version and premium versions. In the premium versions, you gain access to features such as:
- unlimited storage
- a custom domain
- advanced site statistics
- password protection
5. Webflow


Webflow website builder is intuitive and easy to use. It comes with an editor that’s similar to a word processor. On Webflow, you can create an e-commerce site that allows you to create members-only content through passwords and gated content. You can also add animations to your website to make it more immersive.
Webflow has both free and premium plans. The premium plan features more storage, more items you can add to the CMS, and content editors.
Your Top Source for Premium Word Templates (With Unlimited Use)
Envato Elements is a great place to find Premium Word templates. It’s a premium subscription service where you pay a low monthly fee to gain access to digital assets. When you become a subscriber, the digital assets you receive access to are premium Word templates, photos, fonts, and more.
Using a premium template saves time by starting with a well-done base. In addition, a good template has labeled sections, so you have less chance of forgetting a critical section.
Professionals make every template look stylish and impressive. Just add your text and images. If you want to add a personal touch to your documents, you can. A good template is entirely editable.
Explore Envato Elements


Microsoft Word Frequently Asked Questions (FAQ)
Want to learn more about Microsoft Word? Here are some frequently asked Microsoft Word questions and answers:
1. Can You Check the Word Count on Microsoft Word?
Yes, you can! There’s a status bar at the bottom of your window where you can check the word count. If you want a more advanced word count, there’s a keyboard shortcut that you can use.
Control+Shift+G causes a window to appear where you can check and see an advanced word count. For more methods to check the word count in Microsoft Word, read this article:
2. Can I Make a Greeting Card in Word?
Not only can you create a greeting card in Word, but Envato Elements makes it easy. All you need to do is choose a graphic from the thousands of premium graphics offered on Envato Elements.
Read this tutorial for information on how to create a greeting card in Microsoft Word:
3. How Do I Change the Margins in Word?
Changing the margins in Word can change the layout of your document. It controls how far text and numbers sit from the edge of each page. For more information on how to change your margins in Microsoft Word, read this article:
4. How Do I Quickly Print Documents?
The keyboard shortcut to quickly print a document is to press the Command+P buttons on your keyboard. You can also use the Print button above the tabs.
For more tips on how to quickly print documents in Word, read this article:
5. How Do I Make Checklists in Microsoft Word?
Checklists can be helpful when you have a lot to do and want to keep track of it. You can insert a checkbox in your word document so that you can check off each task that’s done.
For a tutorial on how to make a checklist in Microsoft Word, read this article:
Download a Microsoft Word Premium Template Today!
Microsoft Word is a great word processor but can be used for much more. The software has a lot of helpful features in it that make it easy to create multiple different types of documents.
In addition, you save time when you use a premium Word template from Microsoft Word. Since you aren’t designing your document from scratch, you’ll have more time to complete other tasks. Not only will you save time, but you’ll end up with a professional-looking document. To use premium templates and sign up for Envato Elements today!
Did you find this post useful?

Freelance Writer, Dallas Area, USA
Since 2019 Sarah Joy has been a freelance instructor at Envato Tuts+. She has published over 50 informative business tutorials. Sarah has a Communications degree from SNHU. She is also certified in Microsoft Word, Excel, PowerPoint, and Access through Collin College. In addition, Sarah writes about a wide variety of popular business tools and other business topics.
Microsoft Word is a word processing software tool that provides an option to create websites without needing to use special code. It allows for customization and easy formating that translate well into an html or xml page. Users can create as many pages as needed and link to those pages within the website. Special features, such as Java and Flash are not available when creating a page through Word, but it is a good option for anyone who needs to create a quick, simple site.
Step 1
Open Microsoft Word by clicking on the desktop shortcut or selecting it from the programs list under the start menu. Choose a template if one is desired.
Step 2
Design your page as a word document. Format headings, paragraphs and graphics as you want them to appear on your website.
Step 3
Preview the document and fix any formatting that is wrong. Change the margins if necessary to fit text into a single line.
Step 4
Click on the home button at the top of the document. Choose «save file as». Choose the type of webpage that you would like to save. There may be multiple options depending on the version of Word that you are using.
Step 5
Create additional webpages that are linked to your main site. Change any hyperlinks to reflect the correct page that they should open.
Step 6
Save all of your pages in the same web directory. Check with your school or workplace about using hosted directories before uploading live pages.
References
Tips
- Look for templates that may save you time with formatting.
Warnings
- Do not use Word for homework assignments that require html coding. Websites created with Word have many code errors that professionals can easily detect.
Writer Bio
Risa Edwards is a librarian who works for a small private university. She has a degree in geology and library science, but is interested in topics from across many disciplines. Edwards enjoys using her research skills to help others as well as continuing to broaden her own knowledge.

WordPress is a popular and user-friendly platform for creating websites, perfect for beginners looking to establish their online presence. With its vast array of themes and plugins, WordPress offers immense customization possibilities. In this guide, we’ll walk you through the steps to create a WordPress website from scratch, even if you’re an absolute beginner.
Step 1: Choose a Domain Name and Hosting Provider
Your domain name is your website’s address on the internet (e.g., yourwebsite.com). Select a memorable and relevant name that represents your brand or the purpose of your website. Once you’ve chosen a domain name, you’ll need to sign up for a hosting plan with a reliable hosting provider. Web hosting is a service that stores your website’s files and makes it accessible to visitors.
Step 2: Install WordPress
Most hosting providers offer a one-click WordPress installation, making it simple to set up your website. Log in to your hosting account and locate the WordPress installer or Softaculous app installer. Follow the on-screen instructions to complete the installation process.
Step 3: Configure Basic Settings
After installing WordPress, you’ll be directed to your WordPress dashboard. Here, you can manage your website’s content and settings. Start by configuring some basic settings:
- Site title and tagline: Give your website a title and a brief description that represents its purpose.
- Permalink structure: Set a URL structure for your website that is SEO-friendly.
- Timezone, date format, and language: Customize these settings based on your preferences.
Step 4: Select a Theme
Themes control the visual appearance of your website. WordPress offers thousands of free and premium themes. To choose a theme, navigate to “Appearance” > “Themes” in your dashboard, and click “Add New.” Browse through the available themes, preview them, and install the one that suits your needs.
Step 5: Customize Your Theme
Once your theme is installed, click “Customize” to personalize your website’s appearance. Here, you can modify colors, fonts, layouts, and more, depending on your theme’s features.
Step 6: Install Essential Plugins
Plugins extend the functionality of your WordPress website. Some essential plugins to consider installing are:
- Yoast SEO: Helps optimize your website for search engines.
- Akismet: Protects your site from spam comments.
- WP Super Cache: Speeds up your site by caching pages.
- Contact Form 7: Creates simple contact forms for your website.
To install a plugin, go to “Plugins” > “Add New” in your dashboard, search for the desired plugin, and click “Install Now.”
Step 7: Create Pages and Posts
Now it’s time to add content to your website. Start by creating essential pages like Home, About, Services, and Contact. To create a new page, go to “Pages” > “Add New” in your dashboard. Similarly, to create a blog post, navigate to “Posts” > “Add New.”
Step 8: Set up Navigation Menus
Once you have your pages and posts, create a navigation menu to help visitors explore your site. Go to “Appearance” > “Menus” in your dashboard. Name your menu, add items (pages, posts, categories, or custom links), and assign the menu to a location, such as the header or footer.
Step 9: Configure Widgets
Widgets are content blocks that can be added to various sections of your website, such as sidebars and footers. Add and customize widgets by going to “Appearance” > “Widgets” in your dashboard.
Building a WordPress website is a straightforward process, even for beginners. By following this step-by-step guide, you'll have a fully functional and visually appealing website up and running in no time. Remember to update your site regularly with fresh content, and don't hesitate to explore additional plugins and themes to enhance your website further. As you gain experience, you'll discover new ways to optimize your site for both user experience and search engine visibility. With persistence and dedication, your WordPress website will flourish and help you achieve your online goals.
While Microsoft Word isn’t usually thought of as webpage software, you can use the venerable word processor to create webpages and post them online. The three ways to do this are to save your Word document as an HTML file, export it to a blog, or use Word as a makeshift code editor.
Saving Word Docs as HTML Files
Whenever you save a document, Microsoft Word gives you the option to save it in HTML format. Simply select «Save As» from the File menu options, choose a folder and then select «Web Page» from the «Save As Type» menu. By default, Word 2016, as well as Word 365, saves the page with a «.htm» file extension, but you can change this to «.html» if you prefer. Both extensions work as HTML files. If you plan to upload the page to a website, remove any blank spaces in the file name. You can use hyphens or underscore characters to replace any spaces, such as «my_webpage.html» or «my-webpage.html.»
In addition to the HTML file, Word creates a folder with support files including several XML files, which are used to help render the webpage you saved. If you have images in the document, copies of the images are placed in the folder that has the same name as the document you saved. If you move the webpage file or upload it to a web server, the supporting folder must go to the same location.
To examine the code inside the webpage, right-click it while viewing it in a web browser and select «View Source Code.» In addition to what you wrote in Word, you will likely find thousands of lines of code. While much of the additional code is grayed out, these extra lines and Word’s unique way of rendering webpages makes it less than ideal if you want a fast-loading webpage.
Note: You can use the web layout view in Word to see an approximation of how your document content will appear on the web, but is not an exact match. The web layout view does not contain HTML coding.
Exporting a Document as a Blog Post
Word contains a feature that exports documents as blog posts for sites that include WordPress and TypePad. From the File menu, select «Share» and then click the «Post to Blog» icon. The first time you go through the process, Word prompts you for your account name and password to allow access to your blog. Your document is automatically transformed to the blog template.
Make sure you add your blog post title to the Title section at the top of the first page. Enter the content you want as you normally would using Word including hyperlinks, pictures, fonts and font colors, and select the alignment you prefer. To add a category to your post, click the «Insert Category» icon at the top of the screen.
Using Word to Code Webpages
While Microsoft Word offers no advantages over other text-editing apps, you can use it to type HTML webpages from scratch or other files like JavaScript or Cascading Style Sheets – provided you save the files carefully. To do this, select «Save As» from the File menu and select «Plain Text» from the «Save As Type» menu. When the File Conversion window opens, select «Unicode.» After the file is saved, locate it in File Explorer and change the file extension from «.txt» to «.html,» «.jss,» or whatever is appropriate for the code you wrote. Note that if you accidentally save the file in any format other than Unicode, Word will most likely add additional code to what you wrote, thus corrupting it. To verify that the file was saved correctly, open it with any web browser to view the content.
Any free coding app like Notepad++ or even the Notepad app that comes with Windows is a better option than Word for coding webpages.
The thought of creating your own website may seem overwhelming.
You might even think this task is impossible for anyone but a developer or a person with a background in web design.
Well, I have good news for you — there’s a software out there that’s so easy to use, virtually anyone can successfully create a unique and professional-looking website for their business, blog, or portfolio. It’s called WordPress.
![Download Now: How to Launch a WordPress Website [Free Guide + Checklist]](https://no-cache.hubspot.com/cta/default/53/b5ae83fa-3a09-487e-a43a-4833bf87ab87.png)
What Is WordPress?
WordPress is a content management system (CMS) that allows you to host and build websites. WordPress contains plugin architecture and a template system, so you can customize any website to fit your business, blog, portfolio, or online store.
But how?
This ultimate guide will cover a basic step-by-step process of creating your own WordPress website as well as a list of tips and tricks to remember while working with WordPress.
-
How to Build a WordPress Website
-
WordPress Hosting
-
Install WordPress
-
Choose Your Theme
-
Install Plugins
-
Tips and Tricks
But first, let’s answer the question most people have when they begin thinking about their new WordPress website: What is the difference between WordPress.org and WordPress.com?
WordPress.org vs. WordPress.com
The difference between WordPress.org and WordPress.com has to do with who is actually hosting your website.
You host your own website or blog on WordPress.org, through a third-party hosting provider. You also have to download your WordPress software, buy a domain name on a third-party site, and manage your server. It’s a much more hands-on experience than with WordPress.com.
WordPress.com offers to host your website for you. You also don’t need to download any software or manage a server. If you choose WordPress.com, your website’s URL will look like this: www.mywebsite.wordpress.com. However, you have the option to also upgrade your WordPress.com account and buy a custom domain from a third-party provider (meaning your URL will look like this: www.mywebsite.com).
How to Choose Between WordPress.org or WordPress.com
You may be wondering whether WordPress.org or WordPress.com would be a better fit. Let’s review a few more of the pros and cons that come with both options, so you can make an informed decision.
WordPress.org is ideal if you want full power over customizing and controlling your website. However, there is a lot more responsibility that comes with managing a WordPress.org website. You have to purchase and set up your own domain name, upload and install plugins and a theme, edit your website’s code, and manage your website’s security. WordPress.org is free to use, but you have to pay for everything else that goes into having a website.
WordPress.com is preferable if you’re looking for an all-in-one option that has most of the hard work done for you. You’ll never need to manage your server, pay for your hosting, or buy a domain. There are also a number of customization options that come with a WordPress.com plan to help you make your website look the way you want it to.
WordPress.com has a free and paid version. If you stick with the free version, you can’t upload any custom themes or plugins, and you will have a WordPress subdomain. However, there is always the option to pay for premium upgrades and other plans that provide you with even more features and control, as well as the option to buy a custom domain through a third-party site.
WordPress for Beginners: How to Use WordPress
There are a number of ways for you to create your dream website with WordPress. Users generally find the software easy to use, but getting started can be understandably intimidating if you’re completely new to the process. That’s why we have built this “WordPress for Beginners” guide. Want a quick introduction before you dive deep? Check out this helpful video:
For even more resources, we’ve also compiled some of the best websites for learning about WordPress — these can be incredibly valuable sources of information as you start you journey.
Below, we will take a closer look at how to start creating your website.
How to Build a WordPress Website
- Select a WordPress plan (WordPress.com only).
- Set up your domain name and hosting provider.
- Install WordPress.
- Choose your theme.
- Add posts and pages to your website.
- Customize your website.
- Install plugins.
- Optimize your website to increase page speed.
- Get inspired from WordPress website examples.
WordPress is by far the most popular CMS today. Its ease of use and versatility enable the majority of users and business owners to create a website that works for their needs. Here’s how you can do the same.
1. Select a WordPress plan (WordPress.com only).
To begin creating your website, select a WordPress plan. As stated earlier, with WordPress.org you only have one (free) plan option — but it requires you to buy your domain, hosting provider, plugins, themes, and everything else related to your WordPress site.
With WordPress.com, you’ll have to choose between the five plans they offer.
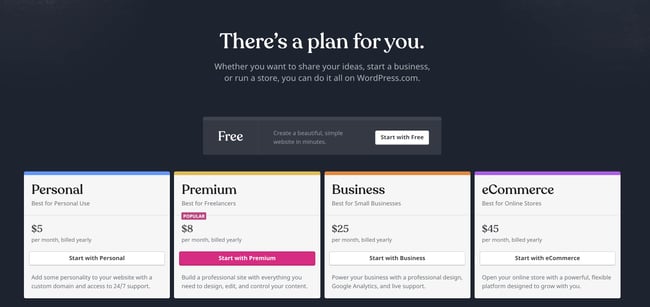
The main differences between these plans are the monthly fee, types of site customization, and the access you get to marketing tools.
2. Set up your domain name and hosting provider.
Setting up your domain name and choosing your hosting provider for WordPress typically happen around the same time in the website creation process.
Before we talk about how to complete those tasks, let’s discuss the difference between your domain name and hosting provider.
Think about your domain name as your home address — it’s how your visitors are able to locate your website on the Internet. You domain name will look something like this: www.example.com.
Your hosting provider is like your house — it’s where your website files are actually stored. Without a hosting provider, your site wouldn’t have space on a server to “live.” Some of the best WordPressing hosting providers include WP Engine, Bluehost, and Kinsta.

Image Source
How to pick domain and hosting providers
Again, WordPress.org requires you to create your own domain and find a third-party hosting provider for your website. WordPress.com allows you to decide whether or not you want a custom domain depending on the plan you choose, but it takes care of the hosting for you.
Your hosting provider is important because it impacts your website’s speed, security, and reliability. There are hundreds of providers to choose from, which is why we put together a list of 22 of the best WordPress hosting providers to help you decide what will work best for you. All of these providers meet WordPress’ three hosting requirements:
- PHP version 7.4 or greater
- MySQL version 5.6 or greater OR MariaDB version 10.1 or greater.
- HTTPS support
When considering hosting providers for your WordPress site, make sure they meet all of the above criteria.
For domain names, getting one is as easy as searching and purchasing one through your domain registrar of choice. If you are new to WordPress.com but have already purchased and created a domain name elsewhere, no problem — you’ll have the option to transfer or map it to your WordPress website.
For the sake of this guide, let’s assume you do not yet have a domain or hosting provider. Here’s how to start creating your website with the popular hosting service Bluehost.
First, head to Bluehost’s website and click Get Started.
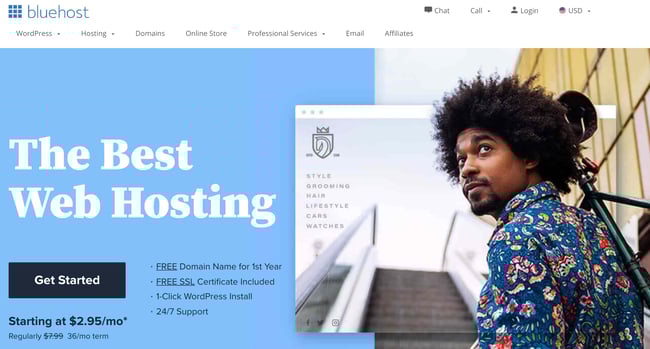
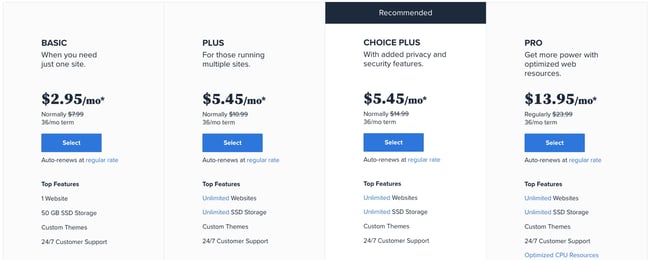
From here, you’ll be taken to Bluehost’s pricing page to choose from four plans.
Once you choose your plan and click Select, you’ll be taken to another page to sign up with a domain name.
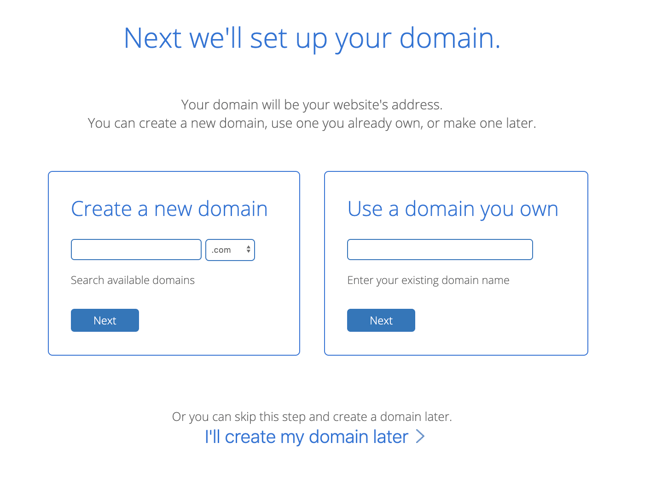
Image Source
Once you select your domain name, you’ll be brought to a page to complete your account and billing information for your purchase.
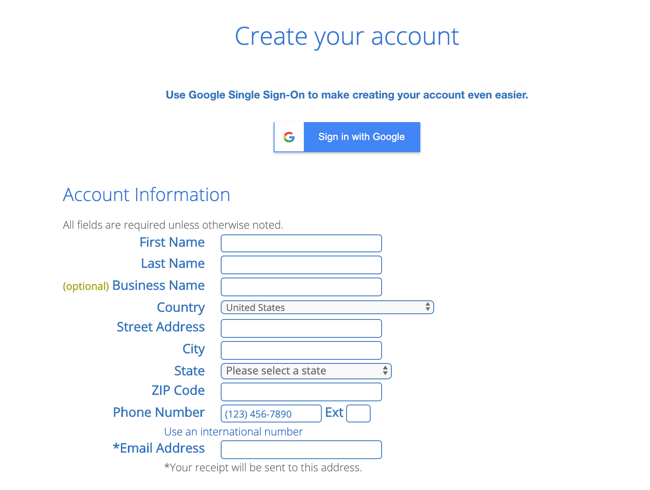
After confirming your account and purchasing your domain, you will gain access to your hosting dashboard where you’ll be able to install the WordPress CMS.
3. Install WordPress.
If you are using a hosting provider outside of WordPress, you’ll need to install the CMS to connect your new domain to your website.
This time, let’s use GoDaddy as an example. (Don’t worry, no matter the hosting provider you choose, this process looks similar.)
Note: If you choose to use a managed WordPress hosting service like WP Engine or Kinsta, you won’t need to go through this process, as those services were built specifically for WordPress and will have WordPress installed for you.
To start, log into your GoDaddy account, click Web Hosting, and then Manage. You will be brought to a screen with your account details.
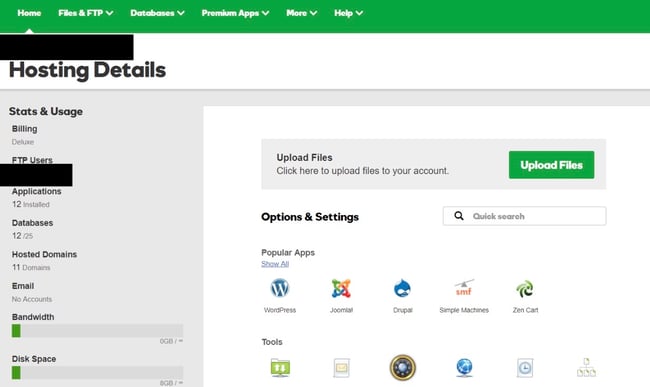
Image Source
Scroll down and under Options & Settings, you will see an area titled Popular Apps. Click on the WordPress app to begin the installation.
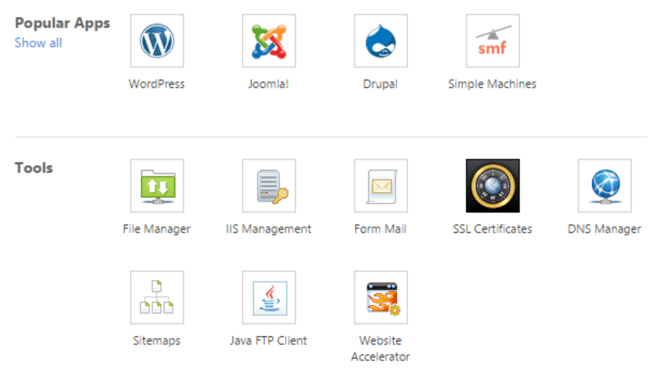
Image Source
After installing WordPress, you’ll need to answer a few questions about the domain you want to use, the directory where you want to install WordPress, and your admin information.
After about 24 hours, your website will be installed to your hosting account, and GoDaddy will send you an email confirmation.
Now that you have your domain set up and WordPress installed, you’ll next need to set up your “Primary Domain” within WordPress, so your visitors see your website when they search your domain.
In WordPress, go to My Site and click Domains. Select the custom domain you want to make your primary domain.
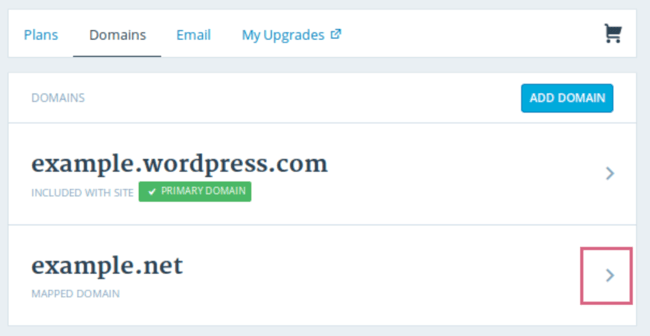
Image Source
Then, click Make Primary.
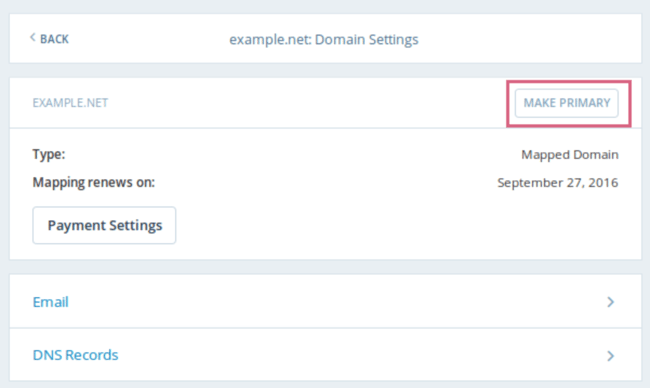
Image Source
Confirm you meant to make this change by clicking Update Primary Domain.
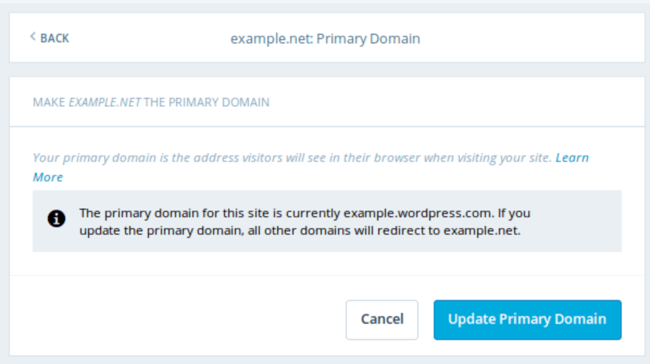
Image Source
Verify the update was successful by looking for a green box with a checkmark that says Primary Domain.
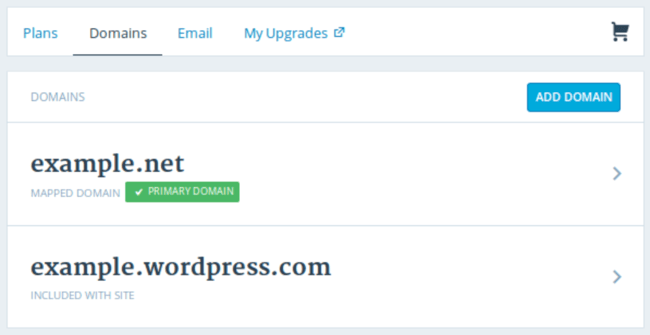
Image Source
Now, on to step four: making your website look nice.
4. Choose your theme.
You can customize your WordPress website using WordPress’ many themes and templates, each of which contains a multitude of layouts, formatting styles, colors, fonts, and other visual options.
WordPress automatically applies a default theme that looks rather plain. You can keep it, but your website visitors may not be so impressed. A custom WordPress theme, whether it’s paid or free, will make your website look appealing and professional to your buyer personas.
Similar to the wide range of hosting providers available, there are also hundreds of themes and templates to choose from. To help you out, we’ve put together a guide to 20 of our favorite themes and templates and categorized them by purpose. Whether you’re looking for a theme versatile enough for multiple different business types, or one suitable for your ecommerce site, portfolio, blog, or business, there’s a theme that will work for your specific needs. On top of your theme, you can further customize your pages with a builder tool like Elementor.
To find a theme that works best for you in WordPress.org, head to your admin dashboard. Click Appearance, then Themes. You’ll be brought to another screen where you can browse available themes or search for a specific one you have in mind.
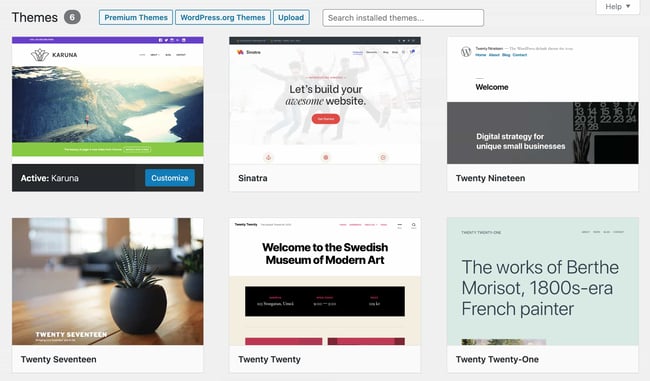
Once you find the perfect theme, simply install it to begin customizing. Each theme has different steps required during the customization process, so be sure to follow them closely. If a theme has a website (often accessible through the WordPress theme and template library), check for documentation as you work through the customization process.
5. Add posts and pages to your website.
When you add content to your WordPress website, it’s usually displayed in the form of posts and pages.
Posts (or “dynamic pages”) are typically used for blogs and portfolios because they automatically place your newest website content at the top of your featured content. Pages are static, which is why they appeal more to business owners — the added content stays in the same place.
Posts and pages are the main post types in WordPress. Additionally, there are other native post types, as well as custom post types. For now, we can just stick to pages and posts.
Start by deciding whether you want a post or page to serve as the homepage (or any page) of your website. To add a post to your website, go to the admin dashboard, click Posts and then Add New.
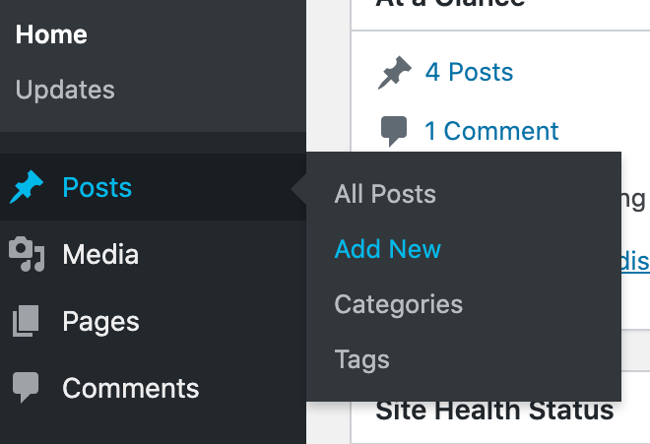
You can add a title for your post, place photos, change the format, and insert page elements via blocks and shortcodes. Click Save Draft to save your changes as a draft, or click Publish to immediately take the post live.
Adding a page to your website is a similar process. In your admin area, click Pages, then Add New.
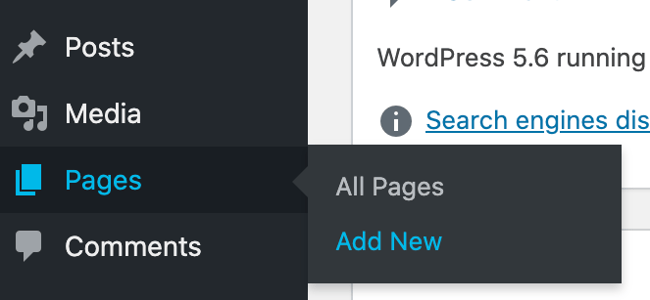
First, add a title to your page. Next, you can insert photos, embed videos, and add content. Follow the same steps to create multiple pages for your website. When finished, click Save Draft or Publish.
6. Customize your website.
Beyond the theme you choose, there are a number of ways to further customize your website. Let’s review a few options.
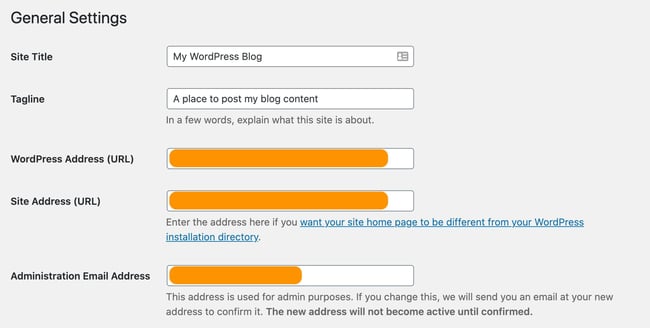
First, let’s customize your site title. From your admin dashboard, select Settings > General. Here, add your website title and tagline. You can also toggle other basic site information like you URL, email, time zone, and more.
Next, let’s customize your reading sections. Under Settings > Reading, you can change your home page to a static page.
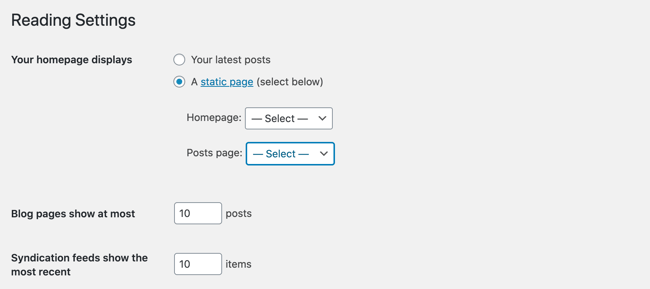
Consider this if you’re a business owner who prefers having content remain in one place on your website. Consider using a dynamic page if you’re a blogger who prefers having your newest content appear at the top of your pages. This way, your visitors can easily find your latest posts.
The navigation bar is customizable, too. This enables your visitors to easily find information on your website.
Add a navigation bar by going to your admin dashboard, clicking Appearance and then Menus.
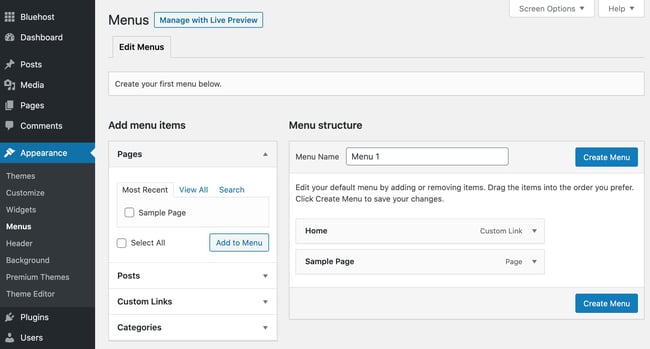
From here, you can determine how you want your bar to look, how many pages you want to include, what you want to title those pages, and what order you want them to be listed in.
Of course, this is just a fraction of what you can do in the dashboard — click here for more information on your WordPress site settings and customization options.
7. Install plugins.
Plugins are pieces of software that add functionality to your WordPress website and enhance the user experience. With over 55,000 available plugins, there are options for most every type of website and user. Some of the most popular plugins available include:
- HubSpot WordPress Plugin: Easily add pop-ups, forms, and live chat to your WordPress website. And as an added bonus, pair this plugin, or other CRM plugins, with your HubSpot CRM.
- All in One SEO: A top-rated SEO plugin that’s used by businesses to improve their rankings and uncover new SEO growth opportunities.
- The Events Calendar: An effortless events calendar that makes scheduling events from your site easy.
- Yoast SEO: The go-to plugin to help you with on-page SEO. This app makes sure you’re following best practices before you push your site live.
- TablePress: Need a table on your site? Look no further.
- The SEO Framework: Another plugin that can help you master SEO on your site.
- Weglot: A top translation plugin for translating WordPress and WooCommerce websites.
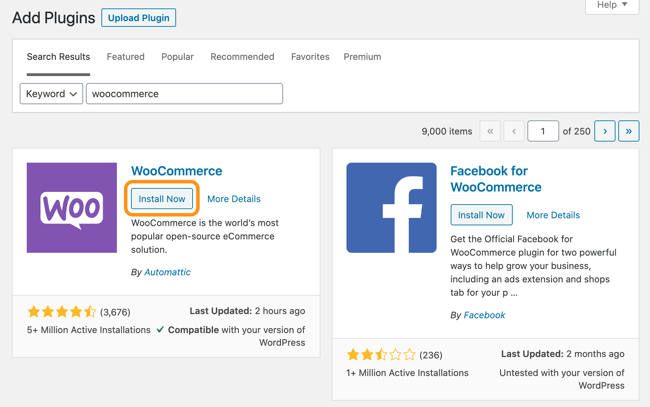
To begin installation, head to the Plugins section in your admin dashboard. This shows you all the plugins currently installed on your site. Depending on your host, you might have several plugins installed already. Note that for a plugin to work you must activate it after installing.
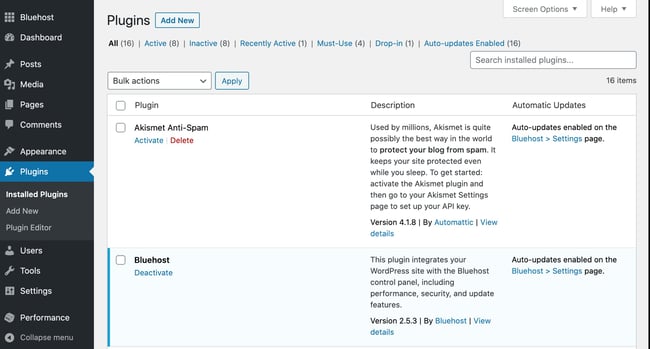
To add a new plugin, click Add New. Search for your desired plugin and then click Install Now, wait a few seconds, then click Activate.
Get the WordPress CRM plugin that helps you organize, track, and nurture your leads.
8. Optimize your website to increase page speed.
Website performance is a critical part of the user experience. If a page takes too long to load, your visitors will move quickly to another site. You don’t want to frustrate visitors with slow speeds.
You can improve your website’s performance by enabling browser caching. Browser caching is the process of temporarily storing your website’s data on your visitors’ browsers. That way, your content doesn’t need to be sent from the web server for it to appear in the browser, which increases the website speed.
To enable caching for your website, install and activate a caching plugin with the process described above.
For instance, WP Rocket is a WordPress caching plugin that will make your site faster in a few clicks. Thanks to powerful options such as Remove Unused CSS and Delay JS Execution, you’ll save time and effort while improving your Core Web Vitals grades, the PageSpeed Insights score, and the overall loading time.
9. Get inspired from WordPress website examples.
As you begin to customize your website, you may feel overwhelmed by all the options you have. Instead of starting completely from scratch, it helps to grab some inspiration from other exemplary WordPress websites. Here are some of our favorites:
99% Invisible is a popular podcast that focuses on design and architecture. Their website is sleek, modern, and offers easy navigation for visitors to quickly access each podcast episode.

Image Source
The Houston Zoo’s website displays its main attraction on the homepage. The magnifying glass icon on the top menu bar makes searching the site effortless.
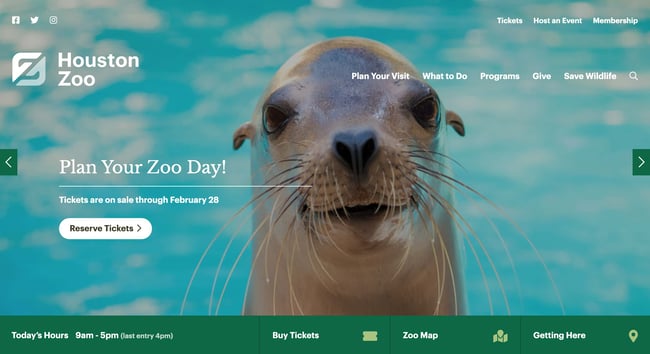
Image Source
Awesome Motive, the creators behind several WordPress projects, engages their visitors with a polished, yet simple website. It features subtle animation to grab people’s attention.

Image Source
WordPress Website Tips and Tricks
There are a number of WordPress tips and tricks to make your website as impactful and user-friendly as possible — we’ve listed 20 of them below to help you do just that.
1. Focus on the basics and create a great user experience with a WordPress theme that complements your business and website content.
2. Use dashes and not underscores when naming your files in WordPress. Google looks as underscores as joiners, meaning your file will look like one big word. That won’t help you with your SEO. Use dashes to make it obvious there are separate words. (For example, use www.example.com/this-is-an-example, not www.example.com/this_is_an_example).
3. Use WordPress’ online support for any questions or concerns you may have while creating or using your website. There are a number of forums and ways to reach out to WordPress experts listed on their website.
4. Use Image Alt Text to your advantage. Image Alt Text can be used to improve your SEO and Google rankings.
5. Keep your sidebar as organized as possible. Stick to the essentials and think about what your website visitors and buyer personas really need quick and easy access to.
6. Back up your website regularly, so if you ever lose access or have technological difficulties, you have everything you need to completely restore your content. There are a number of plugins, such as Snapshot Pro, made specifically for backing up your WordPress content.
7. Learn and understand SEO basics to ensure your website is completely optimized so you can boost your conversions.
8. Create a custom homepage. As mentioned earlier, WordPress will provide you with a default homepage. Take the time to create your own with a theme that works for your business — remember, this is your visitor’s first impression of your business, blog, or portfolio.
9. Keep an eye on your website’s performance and know what is and isn’t working for your visitors. There are a number of useful WordPress plugins, as well as Google Analytics software, to help with this performance.
10. Include an “About Us” page on your website to show your visitors you’re a trustworthy person and/or business. “About Us” pages are known to be the second most-visited pages on websites (after homepages) — so introducing yourself is important.
11. Make sure your site is secure to ensure there are no hackers gaining entry. Again, there are plenty of plugins such as WP Defender to help you with security.
12. Create custom permalinks. Permalinks are the permanent URLs that you plan to keep static for the foreseeable future. They’re important because they improve user experience and enhance your WordPress website SEO.
13. Create a custom navigation bar (as we reviewed earlier) to make your site easy to use for your visitors.
14. Include excerpts on your blog posts so people don’t land on your blog page and see your entire piece at once. By only including excerpts on your blog page, you make room to list all of your blogs in one location. Visitors can then read the excerpts and click-through to read the posts they are most interested in.
15. Structure your website in a way that makes sense for your business, visitors, and buyer personas. For example, use posts if you’re a blogger and use pages if you’re a business owner.
16. Remove “Comment” and “Share” buttons from specific pages of your website. You don’t need (or want) a “Comment” or “Share” button on your “About Us” page, or any of your service pages for that matter.
17. Consider what your website looks like on mobile. It’s no secret people are searching the Internet while on their phones, tablets, and other mobile devices these days. Consider using a plugin to help you achieve a responsive, mobile WordPress design.
18. Use visuals and video content when possible to break up the text on your website pages.
19. Update your WordPress site and plugins regularly. WordPress will tell you when updates are released. This will keep your website looking fresh and working efficiently.
20. Use social proof to show your new website visitors how many other people have already viewed your site and content. There are plugins to help you do this in a matter of minutes.
21. Pick a CRM that works with your WordPress site. A CRM can help you keep track of the way users are interacting with your website and company. Here’s a list of some of the best WordPress CRM options.
Build a Website With WordPress
Having a great website matters. It’s how you connect with your visitors and leads, create a positive first impression with new users, and boost conversions. The good news is creating your own website doesn’t have to be a daunting process…at least not with WordPress.
The easy-to-use CMS offers completely customizable plans suitable for all needs. With no prior knowledge necessary, you can start building your own site for your business, blog, portfolio, or online store immediately.