
Its undeniable that creating a flowchart in Lucidchart and then inserting it into your Microsoft Office applications using the Add-Ins is the most efficient way to incorporate flowcharts into your Word documents. However, its still possible to make a flowchart in Word directly and this helpful guide will show you how.
1. Open a blank document in Word
2. Add shapes
To begin adding shapes to your flowchart in Word, you have two options. Begin by going to the Insert tab within the Ribbon and choose SmartArt or Shapes. SmartArt graphics are pre-made collections of shapes within a gallery. The Shapes tool provides a basic selection of shaped objects that can be inserted and edited onto the document.
Adding symbols via SmartArt in Word
A gallery box will pop up when you select SmartArt from the Insert tab. We recommend clicking Process for flowchart-specific options from the left panel in the dialog box, but keep in mind that you are by no means limited to this option and are free to use whatever SmartArt graphic is best for your specific needs. You will then click the SmartArt selection you want to use and a preview of that flowchart graphic will appear in the right panel, along with an explanation of its logic. Click OK to insert the selected graphic into your document.

To replace your graphic with SmartArt at any time, select it and press Delete. You can then click the SmartArt Graphics (Insert > SmartArt) and choose a different chart type. If you prefer to change the layout of a SmartArt graphic, select the shape(s) and select a new style from the Design tab within the Ribbon menu. Rest assured that you can edit the SmartArt chart layout at any time without losing any text.
From the Design tab, you can then continue to add flowchart shapes and connect them with lines until your flowchart is ready. If you find yourself lacking in shape options, you will need to manually add a shape from within the Design tab. To do this, select the shape (or entire chart in some cases) nearest to where you want to add a new shape. Then select Add a Shape.
Adding symbols via Shapes in Word
From the Insert tab within the Ribbon, select a flowchart shape from the dropdown gallery. You can then click and drag it to the size you want on the page to place it. Continue to add shapes and lines to complete your flowchart.
3. Add text
Add text to a SmartArt graphic by clicking the filler text and begin typing. Depending on how much text you add, the shape and font will automatically resize to fit.
For a Shape, add text by double-clicking the object and begin typing. To customize the font, use the toolbox that pops up when a desired shape is selected.
4. Add lines
To draw lines between shapes, click Insert > Shapes and select a line style. Then click and drag on the page to add a line.
5. Format shapes and lines
To really make this flowchart stand out in Word, youll want to do some final formatting. You wont have as many options as you would in Lucidchart, but theres still some significant room for customization when making a flowchart in Word.
For some of the simplest editing options, a menu will appear with basic editing options when you right-click on an object.
To edit text layout click the Layout Options icon that appears when you right-click a text box and pick your preferred layout. You can also view the rest of the option when you click See More.
Move a shape or lines anywhere on the Word document by simply clicking and dragging. If youre trying to resize the image, just click and drag from a corner or edge and use the handle icon to rotate the shape.
If you select a SmartArt graphic:
Change the design of your shapes by selecting your objects and choosing an option from the two new tabs in the Ribbon, Format and Design.
If you select a shape:
When changing the design of an object that was placed using Shapes, the Format tab will appear when you select the flowchart shape to begin your modifications.
Contents
- 1 Does Word have a funeral program template?
- 2 What is the format of a funeral?
- 3 Does Google Docs have a funeral program template?
- 4 What is a funeral pamphlet?
- 5 What app can I use to make a funeral program?
- 6 How do you make a program show on Google Docs?
- 7 How do you make a funeral order of service?
- 8 How do you start a funeral speech?
- 9 How do you write an obituary program?
- 10 What is cremated?
- 11 What type of paper is used for obituaries?
- 12 What do you write on a funeral pamphlet?
- 13 What goes in a eulogy?
- 14 How do you make a memorial program?
- 15 How do I create a program?
- 16 How do I make a booklet in docs?
- 17 Who Organises a funeral order of service?
- 18 What do you say at the end of a funeral speech?
- 19 How do you say a few words at a funeral?
- 20 What should you not say at a funeral?
Does Word have a funeral program template?
If you have Microsoft Word, you already have access to numerous templates that can work for a funeral program. All you need to do is open Word, click “File,” and then click “New.” In the screen that comes up, you’ll see a bunch of template options down towards the bottom.
What is the format of a funeral?
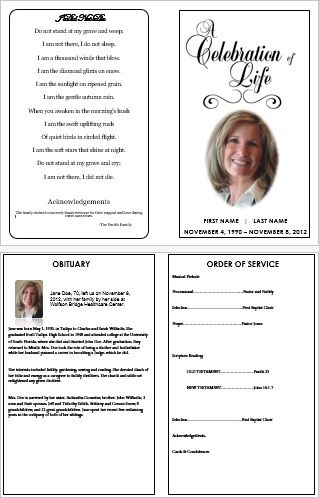
This order of service contains tradition elements of a funeral service such as musical prelude, scriptures, prayers, an obituary reading, musical selections, acknowledgements and a eulogy.
Does Google Docs have a funeral program template?
Edits in Word, Author, Apple Pages and Google Docs! This is an optimal choice for those that wish to make your very own funeral service sales brochure and print it on your own or locally. There are predefined picture boxes are movable or detachable.Funeral Program Templates don’t always have to be a trifold layout.
What is a funeral pamphlet?
Sometimes called an order of service, the funeral program is a simple brochure or pamphlet that you hand out to guests. This document outlines the process of the service (what will happen) and sometimes includes a brief overview of the life milestones and achievements of the deceased.
What app can I use to make a funeral program?
IWorks Pages is a robust, but easy to use Word Processing/Desktop Publishing program that can be used to design your funeral or memorial program or booklet. You can also use Microsoft Word for MAC. You can use Adobe products such as Photoshop Elements or InDesign as well.
How do you make a program show on Google Docs?
Check out the guide below to create your own program in Google Docs.
- STEP 1: CREATE A NEW GOOGLE DOCUMENT.
- STEP 2: PAGE SET UP.
- STEP 3: CREATE YOUR TABLE TO ACT AS COLUMNS.
- STEP 4: PLAN YOUR CONTENT.
- STEP 5: ZIG-ZAG FORMAT.
- STEP 6: INSERT TEXT AND IMAGES.
- STEP 7: PREPARE TO PRINT.
How do you make a funeral order of service?
These are:
- The full name of the person who has died (and maybe their nickname, if it was used a lot). Celebrating the life of Thomas ‘Rozzer’ Rockwell.
- Their photo.
- The day they were born, and the day they died.
- A quote or short line in memory of them.
- The date, time and location of the funeral service.
How do you start a funeral speech?
- Talk with the Family Members. We know what to expect at a funeral.
- Start with an Introduction. One of the most appropriate ways to start a eulogy is to introduce yourself.
- Offer Condolences.
- Start with a Quote.
- Establish a Theme.
- Start with a Funny Story.
- Start with a Reading of the Obituary.
How do you write an obituary program?
- Step 1: Start with the Name and Age.
- Step 2: Include the Birth Date, Death Date, and Cause of Death.
- Step 3: Include the Name of the Deceased’s Parents.
- Step 4: Include Details About the Early Life of the Deceased.
- Step 5: Write About the Deceased’s Professional Life.
- Step 6: Include Community Engagement Information.
What is cremated?
Cremation is a method of final disposition of a dead body through burning. Cremation may serve as a funeral or post-funeral rite and as an alternative to burial.In modern times, cremation is commonly carried out with a closed furnace (cremator), at a crematorium.
What type of paper is used for obituaries?
Try using 22 or 24-pound paper instead of ordinary copier paper. Meanwhile, 28 to 32-pound paper may be a better choice for you – it is crisp and professional and will look as classy as it will be touching. Prayer cards and bookmarks, by contrast, will call for much heavier paper stock.
What do you write on a funeral pamphlet?
Since the booklet will become a keepsake for many who attend the funeral, several items should be included:
- Full legal name of the deceased person.
- Dates of birth and death.
- Time, date and place of funeral.
- Name of the priest, minister or other dignitary officiating the service.
- Place of interment.
- Full names of pallbearers.
What goes in a eulogy?
What to Include in a Eulogy? A eulogy can include anecdotes, accomplishments, favorite quotes — any details that help paint a picture of the personality of the deceased.
How do you make a memorial program?
Tips for Creating a Memorial Service Program
- Order of service. A funeral or memorial service program will include an ordered schedule of planned events.
- Cover it up.
- Choose appropriate fonts.
- Set the right tone.
- Organize personal information.
- Get a second opinion.
- Get them professionally printed.
How do I create a program?
The general steps for writing a program include the following:
- Understand the problem you are trying to solve.
- Design a solution.
- Draw a flow chart.
- Write pseudo-code.
- Write code.
- Test and debug.
- Test with real-world users.
- Release program.
How do I make a booklet in docs?
How to Make a Booklet in Google Docs
- Log in to Google Docs with your normal Google account and create a new doc by clicking on a blank document.
- Go to File > Page Setup.
- Set your size and orientation.
- Add 3mm Margins to your document as a safety zone to work within.
Who Organises a funeral order of service?
A funeral is a ceremony, and like many other ceremonial services – weddings, religious celebrations and rites of passage – there will be an order of service. The close friends and family of the departed will plan the order of the service with the help of the funeral planners and the person conducting the ceremony.
What do you say at the end of a funeral speech?
How to End a Eulogy. The ending of your eulogy should be simple. Addressing the person who has died with a phrase such as, “We will miss you” or “Rest well on your journey, my friend” can be a good way to wrap up. You can also end with an inspirational quote if that feels better to you.
How do you say a few words at a funeral?
Words to Say at a Funeral
- I am sorry about your loss.
- I wish I had the right words to say, just know that I care for you.
- I’ll always remember your loved one for…
- If there’s anything you need, I am here for you. Please don’t hesitate to call.
- I’ll miss their kind words and sweet smile.
What should you not say at a funeral?
Seven Things You Should Never Say at Funerals
- “He/She Deserved to Die”
- “It Could be Worse”
- “It was Destiny”
- “Everything Happens for a Reason”
- “At Least…”
- “You’re Still Young”
- “It’s Better…”

monkeybusinessimages/iStock/Getty Images
When you’re planning your wedding, the costs can really add up. One way to save a little money on design fees is to create your own wedding program using Microsoft Word. The program offers a number of templates that can take the hassle out of creating an effective program for your big day.
Make notes of what you’re going to include on the program before you begin to design it. Couples often choose to include their names, the wedding date and location on the front of the program. Inside, there’s typically a section that details the events of the day, another section that lists the names of the wedding party, and then another section for thanking family members or acknowledging those who helped you.
Launch Microsoft Word from your system tray. That should launch the Templates window, but if you don’t see it, click «File,» and then «New from Template Chooser» to launch the Templates window.
Click on «Brochures» from the menu on the left side of the Templates window.
Scroll through the brochures that appear in the main Templates window. Some brochures feature a «tri fold,» meaning they’ll have three sections on each side of the program. Others have just two sections, so choose a style that works best for you. Don’t worry about the colors and fonts or the exact arrangement of the template images just yet — you can change all that later.
Click on a brochure to display it in the right Template window. Click the «Select a color scheme» drop-down menu to see the color options available for the brochure. To see how a particular color scheme will look with your chosen brochure, click on the color scheme. It might take a few seconds for the colors to appear in the dummy template in the right window.
Click the «Font scheme» drop-down menu to choose fonts for your brochure.
Click «Choose» when you’re satisfied with your colors and fonts.
Click on a section of text to highlight it, keeping in mind that the pointer tool needs to be selected to do this. The pointer tool is visible near the top of the page and looks like a diagonal arrow. With text highlighted, type in the actual text that you want to replace the dummy text. If you need a section of text to be slightly larger to accommodate more text, click on one of the small boxes at the top or bottom center of the text box and drag the box to make it bigger.
Right-click on any generic photos in the brochure that you want to replace with photos of the couple. After you right click, click «Change Picture,» and then select the appropriate photo from the files and photos on your computer. If there are too many photo sections or text sections, simply click on them to highlight them, and then click «Delete.» If you have a logo or other graphic you’re using for the wedding, you can also use that to replace any generic photos or graphics in the template.
Review each section carefully to ensure you haven’t left any dummy text in the document.
Click «File» and then «Save As» to save the file as a Word document on your computer.
Creating a funeral programme template is not easy not because it is complicated to do but because you are currently grieving while creating it. Thankfully, there are programs that will enable you to make a funeral leaflet easily. This will alleviate some of the burden that you are feeling, which will enable you to organize a funeral service that will truly show how much you appreciate the life of your deceased loved one.
Making a Funeral Program Card
MS Word or Microsoft Word is one of simplest word processors or editors that you can use to create funeral brochures. There are multiple templates readily available on MS Word that you can use as a guide in creating these brochures. This will enable you to save time and energy in making the brochures, which will enable you to have them printed and delivered to their respective recipients well before the scheduled funeral service.
- Use a Template
The easiest way to create a funeral programme is by using a template. You can use the templates readily available on MS Word. You just have to open MS Word, click on ‘File’ then hit the ‘New’ option or icon. The icon looks like a blank sheet of paper with a slight fold on the upper right corner of the paper.
A pop-up window will appear. This contains the templates. You only have to choose one. You can choose from the different categories, which are listed at the left side of the pop-up window. You can either choose ‘Brochures’, ‘Flyers’ or ‘Cards’. Then, choose the kind of template that you like.
Input the needed details and photo by clicking on the form or space provided for the content and adjust the content according to your liking. Save the files and print them on your own printer or have it printed on a nearby printing shop.
- Download Templates
FuneralPamphlets.com
If you want something specific, you can also choose downloadable funeral program templates online at websites such as FuneralPamphlets.com. You just need to make sure that the files that you will download are compatible with MS Word. This will enable you to edit these printable templates without any problems.
Although there are editable funeral programme templates online that are also compatible with other editors, it would be best to choose downloadable funeral program templates that are compatible with MS Word. Because this is one of the easiest programs to use, this is the most preferred one. you will have minimal or no problems when you use this program as this is very easy to use and printing the templates will never be a problem since it is quite compatible with any kind of printer used in homes and offices.
When looking for printable funeral program templates, make sure that you check out the free ones. This will save you more money. But if you want to have more choices, feel free to check out the premium ones. This will enable you to choose the one that you think best fits your deceased loved one’s personality.
Related Blogs:
DIY Funeral Program Templates
Things to Avoid Putting on Memorial Cards
How to Print Death Memorial Templates
If you have Microsoft Word, even the basic one, this article will show you how to format it so you can write your screenplays.
A side note: If you’re writing screenplays and making a living from them, I highly recommend Final Draft (Amazon, B&H).![]() The program gets out of the way and allows you to focus completely on your craft. Also, it’s the industry standard.
The program gets out of the way and allows you to focus completely on your craft. Also, it’s the industry standard.
For a free software that works great, take a look at Fade In. You will have to pay to remove the watermark and publish your pages, but at least you can get your script written.
Exclusive Bonus: Download your FREE Blueprint: How to make a movie. A complete visual representation of the filmmaking process from beginning to end.
I have used MS Word for six years without any problems.
The only two ‘must-haves’ for a serious screenplay writer are a great keyboard and a great chair. If you’re writing on a tablet, get a bluetooth keyboard and pound away.
I’m assuming you know what the correct format is. If not, please start by reading this article:
How is A4 different from US Letter for screenplays?
You might be wondering if there are any practical ramifications of using A4 over the standard US Letter format. If you’re sending a web PDF document, then consider where it will be printed. If it is going to the US, then it will be printed on US Letter.
The screenplay format is designed for US letter, and not for A4. I’ve been using it for A4, since that’s the only kind of paper I can buy in India.
Courier 12-point should give you 4.23mm (0.166″) per line. For A4 paper, this means 55-64 lines , and for US Letter paper, this means a maximum of 51-60 lines. How many characters does that make?
- A4 – Between 3,135 to 3,648 per page.
- Letter – Between 3,060 to 3,600 per page.
That’s an approximate difference of 2% between the two. If one page equals one minute (60 seconds) in US Letter, it would mean 61 seconds on A4. For a 100 page script, it would approximate 100 minutes in US Letter, and 102 minutes in A4. There is no difference. Also, don’t forget to take note that you are allowed to use double or even triple spaces between lines, or break up your page breaks for better readability. This by itself is a 10% difference per page!
To recap, don’t worry about the paper size. Stick to the margins, and keep your font fixed at Courier 12-point 10-pitch.
The font for a screenplay
The font is Courier 12-point 10-pitch.
Where do you find Courier 12 pt 10-pitch?
The easiest way is to download a demo version of Final Draft. Then copy the font to your font directory before the trial version expires. Then you’ll have it available for Microsoft Word or another word processing application.
Before you use fonts for any commercial activity, make sure there are no licensing fees involved. Some fonts are not usable for any purpose, commercial or personal. When in doubt, use the default Courier font on your word processor. Nothing bad will happen.
How to format MS Word for the page layout
I’m going to be using Microsoft Word, but you can do the same with any word processor.
Open a new blank document. Go to Layout and choose the paper size – stick to US Letter or A4.
Go to Margins and select Custom Margins…:
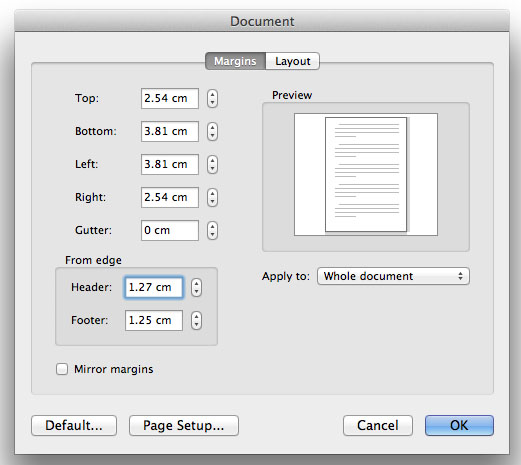
Click OK. Go to Insert > Page Numbers and select Top and Right. Page numbers should be displayed from the first page. Note: Some people shift the page numbers a bit to the right but it doesn’t matter. Start the numbering from 2 (1 is reserved for the title page).
Finally, select the Courier 12pt font.
That’s it, your main document is ready. Save it on your hard drive before proceeding. We’ll come back to it after the next section.
How to create the title page for your screenplay
Create your title page only after you’ve finished writing your script. Otherwise you might spend months with just the name of your movie!
Open a new Word document and select the same paper size as your preferred screenplay format. Choose your font.
The title is centered somewhere just above the middle (doesn’t matter). On the next line (or you could leave a couple of lines) you write ‘by’. On the next line write your full name (only first letter is capitalized).
No jazzy stuff, bold fonts or styles or colors. The page number shouldn’t be visible on the title page.
On the bottom right (align to the right), write down your address, phone number and/or email address (Many competitions forbid you to include this information). Nobody’s going to study your title page and gush at your layout skills. It shouldn’t draw attention to itself. If your script is good, then the reader will want to meet you.
Save this as a title template and you’re done.
Next let’s look at the elements that form a screenplay, and how you can ensure the smoothest writing experience with Microsoft Word.
Now let’s create the elements of a screenplay.
How to get elements into Microsoft Word
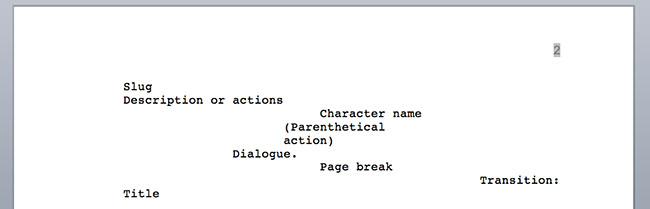
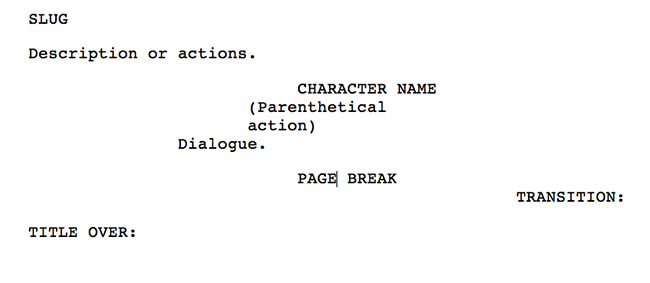
Word has a crazy system of adding spacing to the margin, so you need to get rid of that first. Type these to the script template:
Slug
Description or actions
Character name
Parenthetical action
Dialogue
Transition
Page break
Title
Select them and right click. Select Paragraph…. Make sure the Alignment is ‘Left’ and Indentation is ‘0 cm or inches’. Hit OK.
Character name
Place the curser at the beginning of ‘Character name’. Right click and select Paragraph…. You have two choices:
- Change the left indentation to 6.86 cm (2.7″). Use this if you’re using the 4.2″ formatting.
- Change the alignment to ‘Centered’. Use this if you’re just centering the character name.
Parenthetical action
Place the cursor on Parenthetical action. Repeat the steps above to get to the Paragraph popup. Because the paranthetical action position is related to the character name, you have two choices:
- If you have opted for the 4.2″ system, set the left indentation at 5.59 cm (2.2″).
- If you have opted for the centered system, set the alignment to ‘Centered’. Then set the left indentation at -1.27 cm (0.5″).
Dialogue
Place the cursor on Dialogue. Repeat the steps above to get to the Paragraph popup. Because the position of the dialogue is relative to the character name, you have two choices:
- If you have opted for the 4.2″ system, set the left indentation at 3.84 cm (1.5″). Set the right indentation at 2.54 cm (1″).
- If you have opted for the centered system, set the alignment to ‘Centered’. Then set the left indentation at -3.81 cm (1.5″). Set the right indentation at -4.44 cm (1.75″). This will center the text and give you a width of 3″.
Centered looks better for online reading but the 4.2″ system is better for MS Word formatting. The ‘centering system’ is harder to implement in Word, don’t worry.
Transition
Same steps. Align to the Right.
Page break
Same as Character name.
For Slug, Title and Description, don’t make any changes yet. If you’ve done everything okay, this is what your template should look like:
Changing the fonts and line spacing
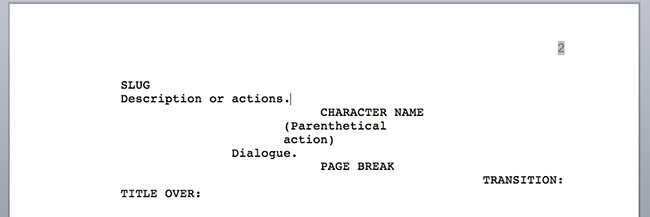
The next step is to make sure the fonts that are always in upper case be assigned that style.
Fonts
Choose Slug, Character name, Page break, Transitions and Title one by one, right click and select Font…. Check ‘All caps’. This is what it will look like:
Finally, we manipulate the line spacing so each element behaves the way it is supposed to.
Line Spacing
This part could have been done alongside indentation and alignment, but this way it is more foolproof for first timers. First, let’s understand how line spacing works in a screenplay:
Double spacing follows these elements, always:
- Slug
- Each paragraph of a description or action.
- Diagloue.
- Transition.
Why not add them in automatically? We can do that.
Select each of these elements one by one, right click and select Paragraph…. Change the Spacing, After to 12 pt. This is what it will look like:
There shouldn’t be a double spacing before the Page break. However, this only applies rarely to a screenplay, so you can just hit backspace when you need it. There are some writers who like to have two spaces prior to every slug. You can use the same method to change things up.
With this system, you don’t have to worry about line spaces before any element because it will follow automatically after another element.
Add Actions to your template
What are actions? Simply put, there are some rules that always hold true in a screenplay format:
- A slug or scene heading is always followed by action/description.
- The end of a transition is always a slug or scene heading.
- Dialogue is assumed after each character’s name, unless a parenthetical action is necessary. After every parenthetical there is always a dialogue.
- More likely than not a dialogue will be followed by another character’s name.
Software like Final Draft makes it easy to write because as soon as you finish one line of the above and hit ENTER the next line assumes the next logical step – saving you many keystrokes. To get the same benefits in Microsoft Word, you must try to create actions (term borrowed from Photoshop) that make it as easy as possible.
Let’s go in this order:
Description or action
Select/Highlight Description or actions in your template. Go to Format > Style > New…:
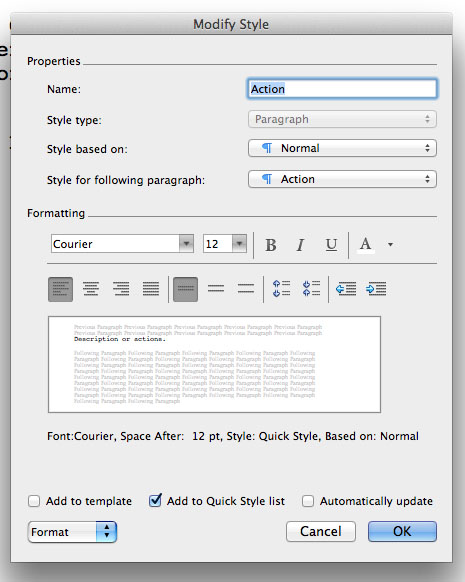
Name the style as ‘Action’. Click OK. Word will automatically assign the ‘Style for following paragraph’ to ‘Action’. To create a shortcut, click on the ‘Format’ drop down on the lower left:
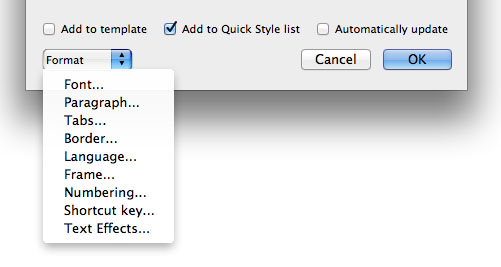
Select Shortcut key…. You’ll get this box:
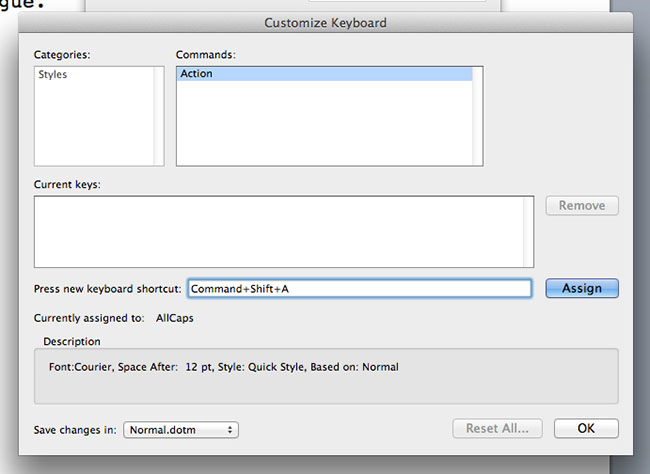
Alt is assigned to the menu and Shift is assigned to upper case letters. I recommend using CTRL+SHIFT+Number. E.g., for Action you could have CTRL+SHIFT+2. Click on Assign and then OK.
Slug
Highlight ‘Slug’ and repeat the above steps. In the New Style popup, name it ‘Slug’ and assign the ‘Style for following paragraph’ to ‘Action’. Click OK.
Set the shortcut as CTRL+SHIFT+1.
Transition
Same as above. In the New Style popup, name it ‘Transition’ and assign the ‘Style for following paragraph’ to ‘Slug’. Click OK.
Set the shortcut as CTRL+SHIFT+6.
Character name
Same as above. In the New Style popup, name it ‘CharacterName’. Click OK.
Set the shortcut as CTRL+SHIFT+3.
Dialogue
Same as above. In the New Style popup, name it ‘Dialogue’ and assign the ‘Style for following paragraph’ to ‘CharacterName’. Click OK.
Go back to the CharacterName style and assign the ‘Style for following paragraph’ to ‘Dialogue’. Click OK.
Set the shortcut as CTRL+SHIFT+5.
Parenthetical action
Same as above. In the New Style popup, name it ‘Paranthetical’ and assign the ‘Style for following paragraph’ to ‘Dialogue’. Click OK.
Set the shortcut as CTRL+SHIFT+4.
Title
Same as above. In the New Style popup, name it ‘TitleOver’ and assign the ‘Style for following paragraph’ to ‘Dialogue’. Click OK.
Set the shortcut as CTRL+SHIFT+7.
Now we have our styles. Page break has the exact same style as CharacterName so you can use that instead. Try playing around with the styles. It works!
Don’t forget to save your template!
If you’re having trouble with my shortcuts, feel free to choose your own. Keep it simple and repeatable so you only have to learn one set of movements and you’ll be doing it fast in no time.
Microsoft Word tells you whether your preferred shortcut is already in use for an important function or not. You can also save your shortcuts and styles to apply to all documents created in Word (but that isn’t a good idea if you’re using Word for other stuff as well).
There you have it, how to set up Microsoft Word to write a screenplay. Happy writing!