
Headings make text stand out and help people scan your document.
The simplest way to add headings is with heading styles. Using heading styles means you can also quickly build a table of contents, reorganize your document, and reformat its design without having to manually change each heading’s text.
-
Select the text you want to use as a heading.
-
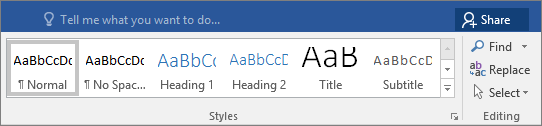
On the Home tab, move the pointer over different headings in the Styles gallery. Notice as you pause over each style, your text will change so you can see how it will look in your document. Click the heading style you want to use.

If you don’t see the style that you want, click the More button
to expand the gallery.
 to expand the gallery.
Tip: You can change the font and formatting of a heading style. Just select the heading text you want to customize, modify its styles the way you want, and then on the Home tab, in the Styles group, right-click the heading style that you customized and click Update Heading to Match Selection. Every time you apply that heading style in your document, the heading style will include your customizations.
Styles can do a lot more, including a table of contents. Here’s a short video on why to write first and format later using Styles.

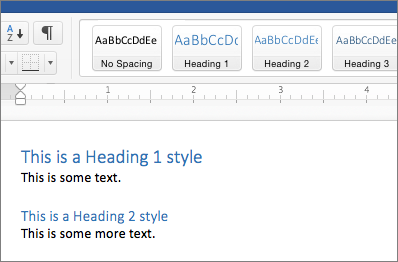
Headings can make text stand out and help people scan your document. The simplest way to add headings is to use heading styles.
-
Select the text you want to use as a heading.
-
On the Home tab, click the heading style you want to use.
If you don’t see the style you want, click a left, right, or down arrow to see more available styles.
This tutorial shows how to create headings in Microsoft Word. First, we’ll look at how to create headings using Word’s built-in styles. Then, we’ll look at how to customize Word’s built-in heading styles to your preferred font, font size, alignment, and color.
Table of Contents
- How to Create Headings Using Word’s Built-In Heading Styles
- How to Customize Word’s Built-In Heading Styles
Before jumping to the tutorial, let’s discuss the importance of using Word’s heading styles.
Why Are Heading Styles Important?
You can make any text in Word look like a heading by using a large font size. However, you won’t have access to several important features if you use a large font size rather than Word’s official heading styles. For example, Word’s heading styles help you perform the following tasks:
- Create an automatic or custom table of contents
- Create bookmarks in a PDF using Adobe Acrobat
- Use Word’s outline feature
- Use Word’s Navigation pane
Most importantly, screen reading software can identify your heading hierarchy based on Word’s styles. If you only use a large font size for headings, people who use screen readers will have less information about how your document is organized.*
This tutorial’s companion video shows all the steps in real time.
Watch more than 200 other writing-related software tutorials on my YouTube channel.
The images below are from Word for Microsoft 365. The steps are the same in Word for Microsoft 365 for Mac (a.k.a., Word for Mac), Word 2021, Word 2019, and Word 2016, and similar in Word 2013 (PC only).
How to Create Headings Using Word’s Built-In Heading Styles
The following steps show how to create headings using Word’s built-in styles.
- Select the text you want to turn into a heading. (Or, move your cursor to a blank line where you want to type your new heading during the next step.)

- Select the Home tab in the ribbon.

- Select the appropriate heading level in the Styles group. (If you didn’t select existing text during step 2, type your new heading text after making your selection.)

Pro Tip: Word includes nine heading levels, although only a few will appear in your Styles group when you open a new document. Additional heading levels will appear after you use higher-level headings. For example, Heading 3 will appear after you use Heading 2.
The selected text will be formatted with the new heading style immediately.

- Deselect the heading and then press Enter (PC) or Return (Mac) on your keyboard to move your cursor to the next line. The heading formatting will automatically turn off.
5. Save your file to save your new heading.
How to Customize Word’s Built-In Heading Styles
The following steps show how to customize the built-in heading styles in an individual Word document.
There are many ways to change styles in Word. For this tutorial, we’ll stick with the basics: font, font size, emphasis (i.e., bold, italic, or underlined), color, alignment, spacing, and indentation.
- Select the Home tab in the ribbon (see figure 1).
- Right-click (PC) or Control-click (Mac) the heading level in the Styles group, and then select Modify from the shortcut menu.

- Make all necessary formatting changes in the Modify Style dialog box. Here are the eight basic modifications:
A. Font
B. Font size
C. Emphasis
D. Font color
E. Alignment
F. Line spacing
G. Spacing before and after
H. Indentation

- (PC Users) Select Only in this document to ensure that your customized style is limited to your current document.

- (Mac Users) Ensure that Add to template is not selected to limit your customized style to your current document.

- Ensure that Automatically Update is not selected. (If Automatically Update is selected, you won’t be able to edit the styles of individual same-level headings.)

- Select the OK button.

Your changes will be applied to all existing text using the heading style you just customized.
- Save your file to save your changes.
Related Resources
How to Create Run-In Headings in Microsoft Word (Indented & Left-Aligned)
What Is Headline-Style Capitalization?
How to Capitalize Hyphenated Words in Titles and Headings
*Visit “Make Your Word Documents Accessible to People with Disabilities” from the Microsoft Office Support website for an in-depth list of ways to make your document accessible to the widest audience.
Updated March 18, 2023
Apply and Customize Headings in Word Documents
by Avantix Learning Team | Updated April 19, 2022
Applies to: Microsoft® Word® 2010, 2013, 2016, 2019, 2021 or 365 (Windows)
You can create headings in Microsoft Word documents by applying Word’s built-in heading styles (such as Heading 1 or Heading 2). After you have applied styles, you can modify them and change the font, size, color, and other formatting attributes so the entire document will update. Once you have applied heading styles, you’ll be able to navigate to the headings using the Navigation Pane and create a table of contents.
Recommended article: How to Hide Comments in Word (or Display Them)
Do you want to learn more about Microsoft Word? Check out our virtual classroom or in-person classroom Word courses >
Heading styles are very important because they create structure in your documents and are readable by screen readers or assistive technology programs used by people with vision impairments. They can also save you a lot of time formatting and reformatting documents.
In addition to creating structure, heading styles are also used to:
- Generate a table of contents
- Reformat a document using Style Sets
- Navigate using the Navigation Pane (select Navigation Pane on the View tab in the Ribbon)
- Rearrange a document using the Outline View
- Create a structured PDF (portable document format) file with heading tags
Note: Screenshots in this article are from Word 365 but are very similar in previous versions of Word.
Creating headings by applying Word heading styles
To create or designate headings, you will need to apply the built-in heading styles in order (Heading 1, Heading 2, Heading 3, and so) to paragraphs. There are 9 levels of headings available in Word.
Heading styles are technically available as paragraph and character styles, but it’s important to apply them as paragraph styles to entire paragraphs. A paragraph in Word is anything with a hard return after it (you have pressed Return or Enter).
Heading styles are affected by your theme choices (overall theme, color theme, and font theme). You can change theme options using the Design tab in the Ribbon.
To create headings by applying heading styles:
- Click in the paragraph (title or subheading) you want to designate or format as a heading.
- Click the Home tab in the Ribbon.
- Click the heading style you want in the Styles Gallery (such as Heading 1) in the Style group. You may need to click the More arrow on the bottom right of the Styles Gallery to view more styles and then click the style you want to use.
All available heading styles do not appear initially in the Styles Gallery. When you apply a heading level (such as Heading 3), an additional heading level should appear in the Gallery (such as Heading 4).
The Styles Gallery appears on the Home tab in the Ribbon and typically displays top level headings:

If you click the More arrow on the bottom right of the Styles Gallery, an expanded gallery appears:

Modifying or customizing heading styles using the Styles task pane
If you modify heading styles, every instance of the modified style will change in your document. Not only will this save time, but it will also ensure consistency. There are many ways to customize heading styles in Word. In this article, we will modify heading styles using the Styles task pane.
The Styles task pane appears with styles in the document (you can change this display by clicking Options at the bottom of the task pane):

To modify or customize a heading style:
- Click the Home tab in the Ribbon.
- Click the dialog box launcher (diagonal arrow) on the bottom right in the Styles group. You can also press Ctrl + Alt + Shift + S. The Styles task pane will appear. If the task pane is floating, double-click the title bar.
- Click in a paragraph using the style you want to modify.
- Click the arrow to the right of the heading you want to modify in the Styles task pane and then select Modify from the drop-down menu. You can also right-click the heading style in the task pane and select Modify. A dialog box appears.
- In the Modify Style dialog box, select the desired options such as font, font size, font color, alignment, and line spacing. Buttons in this dialog box are comparable to those in the Ribbon.
- If you want to change some other formatting options (such as paragraph formats), select Format at the bottom of the dialog box and select other options from the drop-down menu.
- Select Only in this document so that the style is modified in the current document only.
- Do not select Automatically Update unless you want the document styles to update when a user changes heading formatting in the document. It’s typically best to leave this option unchecked.
- Click OK or press Enter. The entire document will change unless a heading has been manually formatted (which overrides the style). You can simply reapply the style if this occurs.
The Modify Styles dialog box displays the style name, the type of style and options for modifying the style:

When you save the document, the modified styles are also saved.
Styles are the most important formatting feature in Word to automate formatting in longer documents. Heading styles also have the added benefit of creating structured documents and are integrated with several other Word features such as generated tables of contents.
This article was first published on May 15, 2021 and has been updated for clarity and content.
Subscribe to get more articles like this one
Did you find this article helpful? If you would like to receive new articles, join our email list.
More resources
How to Create a Table of Contents in Word
14+ Word Selection Shortcuts to Quickly Select Text
How to Copy Styles Between Microsoft Word Documents Using the Organizer
How to Insert Reusable Text Snippets in Word with Quick Parts (Great Timesaver)
How to Convert a PDF to Word in Microsoft Word (for Free – No Third Party Programs Needed)
Related courses
Microsoft Word: Intermediate / Advanced
Microsoft Excel: Intermediate / Advanced
Microsoft PowerPoint: Intermediate / Advanced
Microsoft Word: Long Documents Master Class
Microsoft Word: Styles, Templates and Tables of Contents
Microsoft Word: Designing Dynamic Word Documents Using Fields
VIEW MORE COURSES >
To request this page in an alternate format, contact us.
Our instructor-led courses are delivered in virtual classroom format or at our downtown Toronto location at 18 King Street East, Suite 1400, Toronto, Ontario, Canada (some in-person classroom courses may also be delivered at an alternate downtown Toronto location). Contact us at info@avantixlearning.ca if you’d like to arrange custom instructor-led virtual classroom or onsite training on a date that’s convenient for you.
Copyright 2023 Avantix® Learning
Microsoft, the Microsoft logo, Microsoft Office and related Microsoft applications and logos are registered trademarks of Microsoft Corporation in Canada, US and other countries. All other trademarks are the property of the registered owners.
Avantix Learning |18 King Street East, Suite 1400, Toronto, Ontario, Canada M5C 1C4 | Contact us at info@avantixlearning.ca
Type the text you want into a Word document. Select a sentence that you want to add a header to. Select Home > Styles (or press Alt+H, then L), and then select the heading you want, such as the Heading 1 button.
Contents
- 1 How do I create a heading in Word?
- 2 How do I add a level heading in Word?
- 3 How do I fix headings in Word?
- 4 How do I add a level heading?
- 5 How do I insert a heading 1.1 in Word?
- 6 How do you make a heading 2 Follow heading 1?
- 7 How do I insert a 2.1 in Word?
- 8 What is the difference between Heading 1 and Heading 2 in Word?
- 9 How do you change headings to normal text in Word?
- 10 How do you set up a heading 2?
- 11 How do I link two headings in Word?
How do I create a heading in Word?
How to Create Headings Using Word’s Built-In Heading Styles
- Select the Home tab in the ribbon. Figure 1.
- Select the text you want to turn into a heading.
- Select the appropriate heading level in the Styles group.
- Press Enter on your keyboard to move your cursor to the next line.
- Save your file to save your new heading.
How do I add a level heading in Word?
The simplest way to add headings is to use heading styles. Select the text you want to use as a heading. On the Home tab, click the heading style you want to use. If you don’t see the style you want, click a left, right, or down arrow to see more available styles.
How do I fix headings in Word?
Windows Key commands: Alt+H,F,Y,F6. Then right click on the desired Heading style you wish that text to resemble and select “Update Heading to Match Selection.” This will modify all the headings for this document.
How do I add a level heading?
Highlight a header in the text, then open the Paragraph dialog box (right click the paragraph and choose Paragraph from menu). In the Indents and Spacing tab, change Outline level to proper number.
How do I insert a heading 1.1 in Word?
Number your headings
- Open your document that uses built-in heading styles, and select the first Heading 1.
- On the Home tab, in the Paragraph group, choose Multilevel List.
- Under List Library, choose the numbering style you would like to use in your document.
How do you make a heading 2 Follow heading 1?
Click on the More >> button at the bottom left of the dialog box.
- Make sure level 1 is selected at the top left of the box.
- Click on the Link level to style box and choose Heading 1.
- Select level 2, link this to the Heading 2 style.
- Select level 3, link this to the Heading 3 style.
How do I insert a 2.1 in Word?
If you just need the chapter number included in captions, on the On the Home Ribbon, in the Paragraph Group, click the Multilevel List icon and select the one with the words Chapter 1 in it from the List Library section. If you need subsections numbered (for example, 2.1, 2.2, 2.12, etc.)
What is the difference between Heading 1 and Heading 2 in Word?
Usually, the topic heading at the top of your page will be Heading 1. The headings of sections within the document will have Heading 2 styles.Next, give each section of the document a meaningful heading. Assign each of these a Heading 2 style.
How do you change headings to normal text in Word?
Using the mouse, drag the body text indicator (the small plus sign to the left of the heading) to the right. Drag it far enough that you pass through all nine heading levels, which is necessary before the paragraph is changed to body text.
How do you set up a heading 2?
For the Heading 2, In the Define new Multilevel list dialog:
- Click 2 in the left bar under Click level to modify,
- Select Heading 2 from the Link level to style drop down list,
- Select Level 1 from the Level to show in gallery drop down list. See screenshot:
How do I link two headings in Word?
Add the link
- Select the text or object you want to use as a hyperlink.
- Right-click and then click Hyperlink .
- Under Link to, click Place in This Document.
- In the list, select the heading or bookmark that you want to link to.
Not many people know there’s a quite useful feature in Microsoft Word that would help you organize long documents. It’s called heading — which basically makes the text stand out, especially for a title or specific section of your document.
It comes in a variety of styles which you can choose as you want. Not only that, the heading is also important to help people scan your document and reorder pages faster.
In some cases, headings could make your work easier. In fact, many companies are using headings on their documents because it’s more convenient to read and manage.
In this guide, I will assume you already have the text (line) that will be converted into a heading. Although the tutorial is based on Microsoft Word 365, the heading feature is available on all other versions.
1. Select the text you want to add as a heading.

2. Go to the Home menu.

3. Choose either Heading 1, Heading 2, or Heading 3.

4. Now, the text was converted into a heading.

5. You can also change the font type, color, background color, and other styles.

If you go to View > Navigation Pane, you will see a new pane on the left showing all headings inside the document. You can jump into a certain section just by clicking the heading. Even better, you can drag & drop the heading and the section below it will automatically follow.

Creating a new style for a heading
The default heading style might not fit to your current document’s style. Luckily, you can create a new style and then use it when adding a heading in the future.
1. On the heading section, click the flipped triangle to expand options.

2. Select Create a Style

3. Give a name to your style, then click Modify…

4. Adjust the settings based on your needs. Click OK to confirm.

The new style will appear in the heading section. It’s just one click away to use it.
Headings are definitely useful for a document with tons of pages. Make sure you did not forget to add headings to your document.