
![]()
Download Article
![]()
Download Article
There’s no need to drop hundreds of dollars for script writing software when you already own the most powerful program out there: Microsoft Word! Producing a professional screenplay with MS Word can be done in a number of ways. Whether you use macros (small programs which record your keystrokes and automate repetitive tasks later) or just create some custom style and formatting options for yourself, your script will be ready for TV, film, or theatre in no time.
-

1
Open a new document. With MS Word running, select File from the menu bar in the top left corner of the screen. Then, choose New. This will give you a choice as to which style and layout you want the document to be created in.
-
2
Locate a screenplay template. In the search bar, type the word “screenplay.” Currently, Microsoft offers one premade screenplay template for MS Word 2013/2016. Double click on it after the search is completed. This will launch the screenplay-formatted document.
- In MS Word 2010, the steps are essentially the same. Open a new document, then select templates, and search Microsoft Office Online. Choose one of the two available, then download it.
Advertisement
-
3
Adjust the screenplay template as desired. There are no hard and fast rules governing the style in which screenplays are produced, though there are general guidelines, vocabulary, and common features. Check with the specific studio you’re writing for to find out how to customize your specific document. Think about how to adjust margins, font size, fonts, and line spacing.
-
4
Create your own template. If you’ve already written or have a screenplay saved on your hard drive, open it in MS Word. In Word 2013/2016, click File > Save As > Computer. Type a name for your template in the file name box. Then, in the drop-down “save as type” menu just below the file name box, select Word Template. If the document contains macros, select Word Macro-Enable Template. Click save.[1]
- If you want to change the location where your template will be saved, click File > Options > Save and type the folder path you want to use in the default personal templates location box.


Advertisement
-
1
Consider using style and formatting patterns to format a screenplay. If you’re unhappy with the template layout provided by Word, you can modify the style and formatting of your document in order to create new formatting patterns. These patterns could be used again if you save them, or you can create a new template based on a document which uses these style and formatting rules. You could think of formatting as creating your own template.
-
2
Select a line of text. The text might be a character name, a piece of dialogue, or some stage directions. Select the line of text by clicking the left button on your mouse with your cursor at the left edge of the line of text.[2]
- Alternately, you could highlight the text by clicking the left button of your mouse to the right or left of the line of text you want to adjust.
- Finally, you could highlight text by bringing up a blinking cursor within the text you’ve written and holding down the shift key and an arrow key to highlight the text you want to format. To highlight text to the left of the place your cursor is, hold the shift key and the left directional button. To highlight text to the right of the place your cursor is, hold the shift key and the right directional arrow.
- If you have multiple lines of text, you can select them at one time and apply the formatting changes you desire to all highlighted lines.
-
3
Open the Styles and Formatting pane. With your text highlighted, click on the word “Format” on the menu bar. The drop down menu will display several options. Click on the words “Styles and Formatting.” This will open the Styles and Formatting pane.
- Alternately, you can open the Styles and Formatting pane by clicking the Styles and Formatting button on the toolbar. Just click the Styles and Formatting button located next to the script character drop-down menu to open the pane. The button is found at the far left edge of the toolbar. It contains two letter “A”s, each of a different color, with one positioned above and to the left of the other.
-
4
Select text with similar formatting. Right click on the still-highlighted text you selected initially. A drop-down menu will open with a number of options. The bottom-most option reads “Select Text with Similar Formatting.” Click on this option with the left button of your mouse. All text with formatting similar to that which you highlighted originally will become highlighted.
- So, for instance, if you have all character names in a certain font and size centered exactly above a line of text, you can highlight a single instance of any character’s name, then use the “Select text with similar formatting” option to adjust all character names in your screenplay at once.
-
5
Select the format you want. After you’ve highlighted all the text you want to assign a given style, choose a style from the pane on the right. The Styles and Formatting pane should still be open on the right of the screen. Choose the style format you want to change the highlighted text to by left-clicking on it.
-
6
Create a new style. If your highlighted text does not conform to an extant style, you can assign the formatting and style within the highlighted text a name by clicking the button near the top of the pane which reads “New Style.” You can then assign a name, align the text to left or right, choose your font, and make other adjustments as you see fit.


Advertisement
-
1
Think about why you want to set up a scene. Typically in a screenplay, the master scene heading (also known as a slug line) is the series of words which broadly identify the content which follows. For instance, scene headings might read “INT. OFFICE — DAY” (interior office during the day). This helps orient the screenplay’s reader to the scene.[3]
- Scene headings should, as in the aforementioned example, be in all caps, two lines down from the last line of dialogue or description in the previous scene.
-
2
Prepare to record the macro. A macro is a sequence of saved commands which can be executed immediately by assigning them to a single keystroke. To prepare your macro, set your margins. Format page margins by clicking on the Layout tab, then Margins, then Custom Margins. The top, bottom and right margins should be set at 1″. The left margin should be set to 1.5″. Set font to Courier New, 12 point. These choices are standard in screenplays. If you’d like to work with a different layout, set your margins accordingly.
- In Word 2007, prepare to record the macro by setting your margins. Format page margins by clicking on the Page Layout tab, then set the margins and font to the designations listed above. Then open the Developer tab. Display the Developer tab by opening the office button (the top left button), Word Options (at the bottom), under Popular check Show Developer tab in the Ribbon.[4]
- In Word 2007, prepare to record the macro by setting your margins. Format page margins by clicking on the Page Layout tab, then set the margins and font to the designations listed above. Then open the Developer tab. Display the Developer tab by opening the office button (the top left button), Word Options (at the bottom), under Popular check Show Developer tab in the Ribbon.[4]
-
3
Click View > Macros > Record Macro. Type a name for the macro. Since this macro is for setting up scenes, assigning the name “Scene heading” to this macro is a logical choice. Ensure you’ve selected “All documents” at the bottom of the drop-down menu reading “Store macro in.”
- In Word 2007, click Record Macro. This button is located on the left side of the developer tab.[5]
Store the macro in Document 1 (instead of Normal, so that you can save it as a distinct screenplay template). Name the macro ‘Scene’ or ‘Heading’. Click the keyboard icon to assign the macro to a keyboard shortcut. You can then press the keyboard button you wish to assign to the macro. For example, perhaps you want to bind F2 to your macro. In the “Press New Shortcut Key” box, press F2 to bind it. Click Assign, then Close.
- In Word 2007, click Record Macro. This button is located on the left side of the developer tab.[5]
-
4
Click the keyboard icon. Then assign the macro to F2 (or whatever button you want to assign it to) using the “Press New Shortcut Key” clickable box. Click “Assign” or press Enter, then click “Close.”
-
5
Look for a tape recorder icon next to your mouse. Press Enter on your keyboard twice to skip two lines. Go back into Page Layout tab (Layout tab in Word 2007)and change both indentations back to 0. Open the Home tab. Click on the bottom right corner of the Font section to open the dialog box. Then in the Effects section, check All Caps and click OK.
-
6
Finish the macro. Click the View tab again. Click Macros > Stop Recording. F2 (your shortcut key) will now skip two lines down the page and capitalize text, preparing you to enter a scene heading.
- In Word 2007, go back to the Developer tab. Click Stop Recording. F2 (your shortcut key) will now skip two lines down and capitalize the text.


Advertisement
-
1
Think about why you want to create a macro for description. Description in a screenplay offers more info than does the simple scene heading. It might offer details about the type of lighting, weather conditions, or other descriptions of the physical location of the scene and its characters.[6]
Description is located two lines below the scene heading in a standard sentence format, with the first letter capitalized and a period at the end. For instance, below a scene heading like “INT. OFFICE — DAY” we might read descriptive info such as “The window is open and the lights are flickering on and off.” -
2
Open the Layout tab (Page Layout tab in Word 2007) and set your margins. In the bottom right corner of the Paragraph section, click the little icon that opens the dialog box. Set 1’’ indents before text and 1.5’’ after text under the Indentation section.
- In Word 2007, display the Developer tab. Click the Office button at the top left, then go to Word Options (at the bottom), then under Popular, check “Show Developer tab in the Ribbon.”[7]
- In Word 2007, display the Developer tab. Click the Office button at the top left, then go to Word Options (at the bottom), then under Popular, check “Show Developer tab in the Ribbon.”[7]
-
3
Click View > Macros > Record Macro. Type a name for the macro. Since this macro is for description, assigning the name “Description” to this macro is a logical choice. Ensure you’ve selected “All documents” at the bottom of the drop-down menu reading “Store macro in.”
-
4
Click the keyboard icon and assign the macro to F3 (or whatever button you want to assign it to) using the “Press New Shortcut Key” clickable box. Click “Assign” or press Enter, then click “Close.”
- In Word 2007, click Record Macro on the left side of the ribbon. Store the macro in the same place you stored the other macro you created, and name it “Description.” Click the keyboard icon and assign the macro to F3.
-
5
Look for a tape recorder icon next to your mouse. Hit Enter twice on your keyboard to skip a couple lines, then go to the Layout tab (Page Layout tab in Word 2007) and move both indentations to 0. Next, click on the Home tab. In the bottom right corner of the Font section, select the little icon which opens the dialog box to open it. Look under the Effects section, then deselect All Caps. Click OK.
- In word 2007, after deselecting All Caps, return to the Developer tab and press Stop Recording before continuing with the rest of the above directions.
-
6
Click the View tab again. Click Macros > Stop Recording. F3 will now skip two lines down the page and be lowercase. If you do not bind the macro to the F3 key, F3 will not be useful as a hotkey to setup descriptive passages in your screenplay.
- In Word 2007, return to the Developer tab and press Stop Recording instead of clicking Macros > Stop Recording.


Advertisement
-
1
Create a macro for character names. Characters and their dialogue or actions typically follow the introduction and descriptive info which sets a scene. They should be centered in all caps on the page with dialogue following on the line below.
- To create a macro which will prepare you to input character names after writing scene description, repeat the same steps used to create a macro for description in MS Word 2013/2016, but:
- a) after changing the indentation back to 0 during recording, press the space bar 22 times, then select the All Caps and
- b) name the macro ‘Character’ and assign it to F4. Be sure that the first thing done during recording is to skip down two lines.
- After pressing Stop Recording, F4 will skip two lines down the page (thus bringing the cursor to the correct character name position) and capitalize.
- To create a dialogue macro for Word 2007, follow the directions for the description macro in Word 2007 but input the parameters outlined in the sub-steps above.
- To create a macro which will prepare you to input character names after writing scene description, repeat the same steps used to create a macro for description in MS Word 2013/2016, but:
-
2
Open the Layout tab (Page Layout tab in Word 2007) to set your margins. In the bottom right corner of the Paragraph section, there’s a little icon. Click it and a dialog box will open. Set 1’’ indents before text and 1.5’’ after text under the Indentation section.
- In Word 2007, display the Developer tab. At the top left of the Word window, there’s a multicolored button known as the Office button. Click it and go to Word Options (at the bottom). Under Popular, check “Show Developer tab in the Ribbon.”[8]
- In Word 2007, display the Developer tab. At the top left of the Word window, there’s a multicolored button known as the Office button. Click it and go to Word Options (at the bottom). Under Popular, check “Show Developer tab in the Ribbon.”[8]
-
3
Click View > Macros > Record Macro. Type a name for the macro. Since this macro is for dialogue, assigning the name “Dialogue” to this macro is a logical choice. Ensure you’ve selected “All documents” at the bottom of the drop-down menu reading “Store macro in.”
- Click the keyboard icon and assign the macro to F5. Click “Assign” or press Enter, then click “Close.”
- In Word 2007, click Record Macro. The button to record the macro is on the left side of the ribbon. Store the Macro in the same place you stored the other macro you created, and name it “Description.” Click the keyboard icon and assign the macro a button of your choice. For example, maybe you want to use F5. Click within the “Press New Shortcut Key” and then press the F5 button to assign this macro to F5.
-
4
Look for a tape recorder icon next to your mouse. Hit Enter once on your keyboard to skip a line, then go into the Page Layout tab and move both indentations to 0. Next, click on the Home tab. In the bottom right corner of the Font section, select the little icon which opens the dialog box to open it. Look under the Effects section, then select All Caps. Click OK.
- Click the View tab again. Click Macros > Stop Recording. F5 will now skip one line, utilize lowercase text, and prepare you to enter dialogue.
- In Word 2007, instead of clicking Macros > Stop Recording, press Stop Recording in the Developer tab.


Advertisement
Add New Question
-
Question
If each page is supposed to equal one minute of screen time, what do I do with a page that only has one paragraph of the action end that equals one minute?

Just imagine that the action is happening or mime through it.
Ask a Question
200 characters left
Include your email address to get a message when this question is answered.
Submit
Advertisement
Video
-
Check your spelling and grammar. MS Word comes with a built-in spellchecker function.[9]
It also provides limited grammatical correction. -
Screenwriting devices which are used less frequently can be punched in manually (such as FADE IN:).
-
Page numbers can be inserted by selecting the Insert tab, then Page numbers, then Top of Page, and Plain Number 3. In the Design tab that pops up, make sure the Header from top is .5″. Deselect Different First Page, and then delete #1 because the first page should not include a page number.
Show More Tips
Thanks for submitting a tip for review!
Advertisement
-
Before recording the macro, all the settings that you want it to accomplish should be reversed or off.
-
Disable the auto-correct function during the writing process in Word.
Advertisement
References
About This Article
Article SummaryX
To write screenplays using Microsoft Word, use a template to create a polished script. Start by selecting “File” from the menu bar and choosing “New.” In the search bar, type “screenplay” to access the premade template. If you’re writing for a specific studio, check the guidelines for the margins, font size, font, and line spacing, which you can customize for your specific document. Alternatively, if you’ve already written a script or have a screenplay saved on your hard drive, open it in MS Word, click “File,” then “Save As” and type the name of your template in the file name box. Finally, in the drop-down menu, select “Word Template.” To learn how to use style and formatting patterns to format a screenplay, keep reading!
Did this summary help you?
Thanks to all authors for creating a page that has been read 387,708 times.
Did this article help you?
Please wait.
We are checking your browser. ficbook.net
Why do I have to complete a CAPTCHA?
Completing the CAPTCHA proves you are a human and gives you temporary access to the web property.
What can I do to prevent this in the future?
If you are on a personal connection, like at home, you can run an anti-virus scan on your device to make sure it is not infected with malware.
If you are at an office or shared network, you can ask the network administrator to run a scan across the network looking for misconfigured or infected devices.
Another way to prevent getting this page in the future is to use Privacy Pass. You may need to download version 2.0 now from the Chrome Web Store.
Cloudflare Ray ID: 661a952de9cc3a59 • Your IP : 88.135.219.175 • Performance & security by Cloudflare
Как оформить диалог в тексте
Соавтор(ы): Diya Chaudhuri, PhD. Дия Чаудхури имеет ученую степень PhD по писательскому мастерству (со специализацией на поэзии), полученную в Университете штата Джорджия. Имеет более пяти лет опыта в качестве преподавателя писательского мастерства во Флоридском университете и Университете штата Джорджия.
Количество источников, использованных в этой статье: 13. Вы найдете их список внизу страницы.
Количество просмотров этой статьи: 49 718.
В каком бы жанре вы ни писали – фантастика, публицистика, сатира, драма, или в любом другом виде прозы – очень важно правильно оформлять диалоги между персонажами. В большинстве случаев реплики героев выделяются кавычками. Вот несколько общепринятых правил оформления диалогов в тексте.
Основные правила написания диалогов

Помимо всего прочего, весьма полезно для пишущей братии грамотно писать. Известный сатирик-пародист А.А. Иванов изрёк фразу: «Велик могучий русский языка!» Спору нет, очень велик и могуч, да вот беда — ещё и сложный неимоверно по грамотности изложения. Сам, увы, грешу не редко, особенно бросаюсь в крайности при написании и редактировании диалогов. Сегодня, к великой моей радости, наткнулся в инете на удачную подборку основных правил их написания, чем с удовольствием поделюсь с Вами, полагаю, что для каждого из нас они (эти правила) не будут излишними.
Большинство авторов в своих произведениях используют диалоги, которые от прямой речи отличаются отсутствием кавычек и тем, что в диалогах каждая реплика начинается с нового абзаца. Реплику в кавычках обычно используют для отображения мыслей героя. Существуют довольно строгие правила написания и того, и другого. Я потратила целый вечер, чтобы собрать всё, что в сети есть по этой теме, и кратко, максимально доходчиво изложить тут. Надеюсь, кому-то будет полезно.
Начну с пунктуации, то есть с того, какие знаки препинания следует использовать. Пару слов о терминах:
Реплика – фраза, которую произносят вслух или про себя персонажи.
Слова автора – фраза, содержащая атрибутивный глагол (сказал, ответил, спросил и т. д.) или заменяющее его словосочетание.
Если в разговоре участвуют 2 человека, зачастую можно обойтись и без слов автора. Тогда перед репликой ставят тире (ниже я расскажу, где его взять, так как на клавиатуре такого значка нет, и многие обходятся дефисом, что не очень красит текст), затем пробел. В конце ставится точка, вопросительный или восклицательный знак, или же многоточие.
— Простите, это что?
— Модная стрижка…
— Этот кошмар вы называете модной стрижкой?!
Тут ситуация сложнее. Точка меняется на запятую, остальные знаки остаются неизменными. Далее идет пробел, затем тире, потом снова пробел и слова автора ВСЕГДА пишутся с маленькой буквы.
— Простите, это что? — спросила я.
— Модная стрижка, — уверенно ответила парикмахерша.
— Этот кошмар вы называете модной стрижкой?! — возмущенно возразила я.
В этом случае после слов автора, которые в начале диалога обычно не выделяют абзацем, ставится двоеточие, затем с новой строки идет реплика. Фраза, относящаяся к следующей реплике, также должна начинаться с новой строки.
Я взглянула в зеркало и спросила:
— Простите, это что?
Парикмахерша уверенно ответила:
— Модная стрижка.
Это самое сложное. Именно тут делается большинство ошибок, потому что мы имеем больше вариантов. Основных вариантов два: слова автора разрывают предложение или слова автора находятся между предложениями. В обоих случаях реплика начинается так же, как и в примере «реплика – слова автора», то есть: тире, пробел, реплика, затем ставится запятая, пробел, тире, пробел и слова автора с маленькой буквы. А вот дальше есть небольшие различия.
В этом случае после слов автора ставится запятая и реплика, перед которой ставится тире, продолжается с маленькой буквы.
– Бог с тобой, – сказал мечник, – но смотри, если хоть веточку сделаешь не так, пожалеешь.
Здесь слова автора заканчиваются точкой, а реплика (после тире, конечно) начинается с большой буквы.
– Я зайду завтра вечером, – пообещала она. – Принесу тебе книгу.
Следующий вариант встречается редко, слова автора в этом случае чаще всего включают два атрибутивных глагола, и представляет собой сочетание вариантов «реплика – слова автора» и «слова автора – реплика», соединенных в одну структуру. В таких случаях перед второй частью прямой речи ставится двоеточие и тире. Пишутся одной отдельной строкой.
— Идём, холодно, — сказал Макаров и угрюмо спросил: — Что молчишь?
— Здравствуй, Михаил Прославович! – скороговоркой выпалил он, бросаясь к воину. И тут же добавил: – Пойдем, не хочу книгам учиться, хочу на мечах биться!
В литературе встречаются и другие, еще более сложные конструкции, но нам они, я думаю, ни к чему.
Прямая речь, которую мы используем, как правило, для передачи мысли персонажа, оформляется так же, только реплика выделяется кавычками, а тире перед ней не ставится. Если вы решили облечь в такую форму диалог, что допустимо, начинать каждую реплику с нового абзаца не нужно, весь разговор можно оформить в одном абзаце.
Рассмотрим несколько вариантов на примерах: так короче и нагляднее.
«Хоть бы эта пытка уже закончилась», — вздохнул про себя мальчик.
«Когда эта пытка уже закончится?» — вздохнул про себя мальчик.
Мальчик вздохнул про себя: «Хоть бы эта пытка уже закончилась».
Мальчик вздохнул про себя: «Когда эта пытка уже закончится?»
Мальчик выпрямился и подумал: «Когда эта пытка уже закончится?» — как вдруг всё стихло.
Обратите внимание, запятая и точка ставятся ЗА кавычками, а вопросительный (и восклицательный тоже) знак – ПЕРЕД кавычками.
Вот, пожалуй, и все, что нужно знать о пунктуационном оформлении. Обычно приводят схемы наподобие — П! — а. или А: «П», — а. Но я сама в них путаюсь, поэтому не стала этого делать. На примерах проще понять, мне кажется. Если надо, сами найдите в сети, но они, в основном, к прямой речи относятся.
Теперь по поводу самих диалогов. Опытные писатели советуют минимизировать слова автора, а также сами реплики. Убирать ненужные описания, удалять лишние неинформативные реплики, ненужные «украшательства» (это касается не только диалогов). Но это, конечно, дело автора. Лишь бы чувство меры не отказало.
Непрерывный диалог не должен быть слишком длинным, это замедляет развитие сюжета. Разговор героев подразумевает реальное течение времени, в целом же сюжет должен развиваться гораздо быстрее. Если продолжительный диалог так уж необходим, то его следует немного разбавить описаниями действий, эмоций героя и так далее.
Важно не засорять диалог фразами, которые не несут полезной для развития сюжета информации. Диалог должен звучать максимально естественно, нельзя использовать длинные многоэтажные предложения или выражения, не употребляемые в разговорной речи. Конечно, если этого не требует замысел автора. Самый простой способ контроля естественности – чтение вслух. Вычурные слова и длинноты будут резать слух, а глазом их можно и не заметить (это тоже касается не только диалогов).
Еще одна ошибка – излишнее или однообразное употребление атрибутивных глаголов. По возможности убирайте авторские комментарии в диалогах: «сказал он», «произнесла она» и так далее. Если и так понятно, кто что говорит, убираем, не раздумывая!
Не стоит повторять одинаковые атрибутивные глаголы (он сказал, она сказала, он спросил, она ответила), можно вместо атрибутивного глагола найти фразу, которая будет описывать действие героя, а потом — его реплику. Синонимов к слову «сказал», несущих различные эмоциональные оттенки, существует великое множество. О том, где их брать, я писала в теме «Стилистика».
Нужно отличать атрибуцию от основного текста. Если атрибутивного глагола или заменяющего его слова нет, это просто текст, и оформляется он отдельной от реплики строкой.
– Ну я пошел, – мальчик отвернулся и побрел прочь.
Это неправильно, так как фраза, стоящая после реплики НЕ является атрибутивной. Правильно сделать так:
– Ну я пошел.
Мальчик отвернулся и побрел прочь.
А теперь о том, откуда же брать красивенькие длинненькие тире, которых нет на клавиатуре.
Я как-то проводила опрос на эту тему; из 16 человек, которые добросовестно используют в своих работах тире, 11 просто копируют его из какого-либо текста и вставляют в нужное место. Я тоже так делала, это быстрее, чем использовать схему буква-пробел-дефис-пробел-буква-пробел, при которой в Ворде автоматически дефис преобразуется в тире. Но теперь у меня есть компьютерная клава с цифровым блоком. На нем обычное тире получается сочетанием Ctrl и минуса в верхнем правом углу, а длинное, именно его мы применяем в прямой речи – сочетанием Ctrl-Alt-минус. Есть и другие способы, но они сложнее, на мой взгляд.
Updated: March 29, 2019
There’s no need to drop hundreds of dollars for script writing software when you already own the most powerful program out there: Microsoft Word! Producing a professional screenplay with MS Word can be done in a number of ways. Whether you use macros (small programs which record your keystrokes and automate repetitive tasks later) or just create some custom style and formatting options for yourself, your script will be ready for TV, film, or theatre in no time.
Create a Screenplay With a Template
-
Open a new document. With MS Word running, select File from the menu bar in the top left corner of the screen. Then, choose New. This will give you a choice as to which style and layout you want the document to be created in.
-
Locate a screenplay template. In the search bar, type the word “screenplay.” Currently, Microsoft offers one premade screenplay template for MS Word 2013/2016. Double click on it after the search is completed. This will launch the screenplay-formatted document.
- In MS Word 2010, the steps are essentially the same. Open a new document, then select templates, and search Microsoft Office Online. Choose one of the two available, then download it.
-
Adjust the screenplay template as desired. There are no hard and fast rules governing the style in which screenplays are produced, though there are general guidelines, vocabulary, and common features. Check with the specific studio you’re writing for to find out how to customize your specific document. Think about how to adjust margins, font size, fonts, and line spacing.
-
Create your own template. If you’ve already written or have a screenplay saved on your hard drive, open it in MS Word. In Word 2013/2016, click File > Save As > Computer. Type a name for your template in the file name box. Then, in the drop-down “save as type” menu just below the file name box, select Word Template. If the document contains macros, select Word Macro-Enable Template. Click save.
- If you want to change the location where your template will be saved, click File > Options > Save and type the folder path you want to use in the default personal templates location box.


Using Style and Formatting
-
Consider using style and formatting patterns to format a screenplay. If you’re unhappy with the template layout provided by Word, you can modify the style and formatting of your document in order to create new formatting patterns. These patterns could be used again if you save them, or you can create a new template based on a document which uses these style and formatting rules. You could think of formatting as creating your own template.
-
Select a line of text. The text might be a character name, a piece of dialogue, or some stage directions. Select the line of text by clicking the left button on your mouse with your cursor at the left edge of the line of text.
- Alternately, you could highlight the text by clicking the left button of your mouse to the right or left of the line of text you want to adjust.
- Finally, you could highlight text by bringing up a blinking cursor within the text you’ve written and holding down the shift key and an arrow key to highlight the text you want to format. To highlight text to the left of the place your cursor is, hold the shift key and the left directional button. To highlight text to the right of the place your cursor is, hold the shift key and the right directional arrow.
- If you have multiple lines of text, you can select them at one time and apply the formatting changes you desire to all highlighted lines.
-
Open the Styles and Formatting pane. With your text highlighted, click on the word “Format” on the menu bar. The drop down menu will display several options. Click on the words “Styles and Formatting.” This will open the Styles and Formatting pane.
- Alternately, you can open the Styles and Formatting pane by clicking the Styles and Formatting button on the toolbar. Just click the Styles and Formatting button located next to the script character drop-down menu to open the pane. The button is found at the far left edge of the toolbar. It contains two letter “A”s, each of a different color, with one positioned above and to the left of the other.
-
Select text with similar formatting. Right click on the still-highlighted text you selected initially. A drop-down menu will open with a number of options. The bottom-most option reads “Select Text with Similar Formatting.” Click on this option with the left button of your mouse. All text with formatting similar to that which you highlighted originally will become highlighted.
- So, for instance, if you have all character names in a certain font and size centered exactly above a line of text, you can highlight a single instance of any character’s name, then use the “Select text with similar formatting” option to adjust all character names in your screenplay at once.
-
Select the format you want. After you’ve highlighted all the text you want to assign a given style, choose a style from the pane on the right. The Styles and Formatting pane should still be open on the right of the screen. Choose the style format you want to change the highlighted text to by left-clicking on it.
-
Create a new style. If your highlighted text does not conform to an extant style, you can assign the formatting and style within the highlighted text a name by clicking the button near the top of the pane which reads “New Style.” You can then assign a name, align the text to left or right, choose your font, and make other adjustments as you see fit.


Creating a Macro for Setting Up Scenes (Word 2013/2016)
-
Think about why you want to set up a scene. Typically in a screenplay, the master scene heading (also known as a slug line) is the series of words which broadly identify the content which follows. For instance, scene headings might read “INT. OFFICE — DAY” (interior office during the day). This helps orient the screenplay’s reader to the scene.
- Scene headings should, as in the aforementioned example, be in all caps, two lines down from the last line of dialogue or description in the previous scene.
-
Prepare to record the macro. A macro is a sequence of saved commands which can be executed immediately by assigning them to a single keystroke. To prepare your macro, set your margins. Format page margins by clicking on the Layout tab, then Margins, then Custom Margins. The top, bottom and right margins should be set at 1″. The left margin should be set to 1.5″. Set font to Courier New, 12 point. These choices are standard in screenplays. If you’d like to work with a different layout, set your margins accordingly.
- In Word 2007, prepare to record the macro by setting your margins. Format page margins by clicking on the Page Layout tab, then set the margins and font to the designations listed above. Then open the Developer tab. Display the Developer tab by opening the office button (the top left button), Word Options (at the bottom), under Popular check Show Developer tab in the Ribbon.
-
Click View > Macros > Record Macro. Type a name for the macro. Since this macro is for setting up scenes, assigning the name “Scene heading” to this macro is a logical choice. Ensure you’ve selected “All documents” at the bottom of the drop-down menu reading “Store macro in.”
- In Word 2007, click Record Macro. This button is located on the left side of the developer tab. Store the macro in Document 1 (instead of Normal, so that you can save it as a distinct screenplay template). Name the macro ‘Scene’ or ‘Heading’. Click the keyboard icon to assign the macro to a keyboard shortcut. You can then press the keyboard button you wish to assign to the macro. For example, perhaps you want to bind F2 to your macro. In the “Press New Shortcut Key” box, press F2 to bind it. Click Assign, then Close.
-
Click the keyboard icon. Then assign the macro to F2 (or whatever button you want to assign it to) using the “Press New Shortcut Key” clickable box. Click “Assign” or press Enter, then click “Close.”
-
Look for a tape recorder icon next to your mouse. Press Enter on your keyboard twice to skip two lines. Go back into Page Layout tab (Layout tab in Word 2007)and change both indentations back to 0. Open the Home tab. Click on the bottom right corner of the Font section to open the dialog box. Then in the Effects section, check All Caps and click OK.
-
Finish the macro. Click the View tab again. Click Macros > Stop Recording. F2 (your shortcut key) will now skip two lines down the page and capitalize text, preparing you to enter a scene heading.
- In Word 2007, go back to the Developer tab. Click Stop Recording. F2 (your shortcut key) will now skip two lines down and capitalize the text.


Create a Macro for Description (Word 2013/2016)
-
Think about why you want to create a macro for description. Description in a screenplay offers more info than does the simple scene heading. It might offer details about the type of lighting, weather conditions, or other descriptions of the physical location of the scene and its characters. Description is located two lines below the scene heading in a standard sentence format, with the first letter capitalized and a period at the end. For instance, below a scene heading like “INT. OFFICE — DAY” we might read descriptive info such as “The window is open and the lights are flickering on and off.”
-
Open the Layout tab (Page Layout tab in Word 2007) and set your margins. In the bottom right corner of the Paragraph section, click the little icon that opens the dialog box. Set 1’’ indents before text and 1.5’’ after text under the Indentation section.
- In Word 2007, display the Developer tab. Click the Office button at the top left, then go to Word Options (at the bottom), then under Popular, check “Show Developer tab in the Ribbon.”
-
Click View > Macros > Record Macro. Type a name for the macro. Since this macro is for description, assigning the name “Description” to this macro is a logical choice. Ensure you’ve selected “All documents” at the bottom of the drop-down menu reading “Store macro in.”
-
Click the keyboard icon and assign the macro to F3 (or whatever button you want to assign it to) using the “Press New Shortcut Key” clickable box. Click “Assign” or press Enter, then click “Close.”
- In Word 2007, click Record Macro on the left side of the ribbon. Store the macro in the same place you stored the other macro you created, and name it “Description.” Click the keyboard icon and assign the macro to F3.
-
Look for a tape recorder icon next to your mouse. Hit Enter twice on your keyboard to skip a couple lines, then go to the Layout tab (Page Layout tab in Word 2007) and move both indentations to 0. Next, click on the Home tab. In the bottom right corner of the Font section, select the little icon which opens the dialog box to open it. Look under the Effects section, then deselect All Caps. Click OK.
- In word 2007, after deselecting All Caps, return to the Developer tab and press Stop Recording before continuing with the rest of the above directions.
-
Click the View tab again. Click Macros > Stop Recording. F3 will now skip two lines down the page and be lowercase. If you do not bind the macro to the F3 key, F3 will not be useful as a hotkey to setup descriptive passages in your screenplay.
- In Word 2007, return to the Developer tab and press Stop Recording instead of clicking Macros > Stop Recording.


Create a Macro for Dialogue (Word 2013/2016)
-
Create a macro for character names. Characters and their dialogue or actions typically follow the introduction and descriptive info which sets a scene. They should be centered in all caps on the page with dialogue following on the line below.
- To create a macro which will prepare you to input character names after writing scene description, repeat the same steps used to create a macro for description in MS Word 2013/2016, but:
- a) after changing the indentation back to 0 during recording, press the space bar 22 times, then select the All Caps and
- b) name the macro ‘Character’ and assign it to F4. Be sure that the first thing done during recording is to skip down two lines.
- After pressing Stop Recording, F4 will skip two lines down the page (thus bringing the cursor to the correct character name position) and capitalize.
- To create a dialogue macro for Word 2007, follow the directions for the description macro in Word 2007 but input the parameters outlined in the sub-steps above.
- To create a macro which will prepare you to input character names after writing scene description, repeat the same steps used to create a macro for description in MS Word 2013/2016, but:
-
Open the Layout tab (Page Layout tab in Word 2007) to set your margins. In the bottom right corner of the Paragraph section, there’s a little icon. Click it and a dialog box will open. Set 1’’ indents before text and 1.5’’ after text under the Indentation section.
- In Word 2007, display the Developer tab. At the top left of the Word window, there’s a multicolored button known as the Office button. Click it and go to Word Options (at the bottom). Under Popular, check “Show Developer tab in the Ribbon.”
-
Click View > Macros > Record Macro. Type a name for the macro. Since this macro is for dialogue, assigning the name “Dialogue” to this macro is a logical choice. Ensure you’ve selected “All documents” at the bottom of the drop-down menu reading “Store macro in.”
- Click the keyboard icon and assign the macro to F5. Click “Assign” or press Enter, then click “Close.”
- In Word 2007, click Record Macro. The button to record the macro is on the left side of the ribbon. Store the Macro in the same place you stored the other macro you created, and name it “Description.” Click the keyboard icon and assign the macro a button of your choice. For example, maybe you want to use F5. Click within the “Press New Shortcut Key” and then press the F5 button to assign this macro to F5.
-
Look for a tape recorder icon next to your mouse. Hit Enter once on your keyboard to skip a line, then go into the Page Layout tab and move both indentations to 0. Next, click on the Home tab. In the bottom right corner of the Font section, select the little icon which opens the dialog box to open it. Look under the Effects section, then select All Caps. Click OK.
- Click the View tab again. Click Macros > Stop Recording. F5 will now skip one line, utilize lowercase text, and prepare you to enter dialogue.
- In Word 2007, instead of clicking Macros > Stop Recording, press Stop Recording in the Developer tab.


Tips
- Screenwriting devices which are used less frequently can be punched in manually (such as FADE IN:).
- Page numbers can be inserted by selecting the Insert tab, then Page numbers, then Top of Page, and Plain Number 3. In the Design tab that pops up, make sure the Header from top is .5″. Deselect Different First Page, and then delete #1 because the first page should not include a page number.
- Ensure you have enough lines per page. In Word, select Format, then Paragraph, Liner Spacing, and finally, select Exactly and 12 point. You’ll now have 12 points per line, the Hollywood standard for screenplays. This will enable you to fit the correct number of lines on each page.
- Check your spelling and grammar. MS Word comes with a built-in spellchecker function. It also provides limited grammatical correction.
- Remember, there are no absolute rules regarding the formatting of a screenplay. Follow the conventions requested by the studio or theatre company you’re writing for.
Warnings
- Before recording the macro, all the settings that you want it to accomplish should be reversed or off.
- Disable the auto-correct function during the writing process in Word.
If you have Microsoft Word, even the basic one, this article will show you how to format it so you can write your screenplays.
A side note: If you’re writing screenplays and making a living from them, I highly recommend Final Draft (Amazon, B&H).![]() The program gets out of the way and allows you to focus completely on your craft. Also, it’s the industry standard.
The program gets out of the way and allows you to focus completely on your craft. Also, it’s the industry standard.
For a free software that works great, take a look at Fade In. You will have to pay to remove the watermark and publish your pages, but at least you can get your script written.
Exclusive Bonus: Download your FREE Blueprint: How to make a movie. A complete visual representation of the filmmaking process from beginning to end.
I have used MS Word for six years without any problems.
The only two ‘must-haves’ for a serious screenplay writer are a great keyboard and a great chair. If you’re writing on a tablet, get a bluetooth keyboard and pound away.
I’m assuming you know what the correct format is. If not, please start by reading this article:
What is the Format of a Screenplay?
How is A4 different from US Letter for screenplays?
You might be wondering if there are any practical ramifications of using A4 over the standard US Letter format. If you’re sending a web PDF document, then consider where it will be printed. If it is going to the US, then it will be printed on US Letter.
The screenplay format is designed for US letter, and not for A4. I’ve been using it for A4, since that’s the only kind of paper I can buy in India.
Courier 12-point should give you 4.23mm (0.166″) per line. For A4 paper, this means 55-64 lines , and for US Letter paper, this means a maximum of 51-60 lines. How many characters does that make?
- A4 – Between 3,135 to 3,648 per page.
- Letter – Between 3,060 to 3,600 per page.
That’s an approximate difference of 2% between the two. If one page equals one minute (60 seconds) in US Letter, it would mean 61 seconds on A4. For a 100 page script, it would approximate 100 minutes in US Letter, and 102 minutes in A4. There is no difference. Also, don’t forget to take note that you are allowed to use double or even triple spaces between lines, or break up your page breaks for better readability. This by itself is a 10% difference per page!
To recap, don’t worry about the paper size. Stick to the margins, and keep your font fixed at Courier 12-point 10-pitch.
The font for a screenplay
The font is Courier 12-point 10-pitch.
Where do you find Courier 12 pt 10-pitch?
The easiest way is to download a demo version of Final Draft. Then copy the font to your font directory before the trial version expires. Then you’ll have it available for Microsoft Word or another word processing application.
Before you use fonts for any commercial activity, make sure there are no licensing fees involved. Some fonts are not usable for any purpose, commercial or personal. When in doubt, use the default Courier font on your word processor. Nothing bad will happen.
How to format MS Word for the page layout
I’m going to be using Microsoft Word, but you can do the same with any word processor.
Open a new blank document. Go to Layout and choose the paper size – stick to US Letter or A4.
Go to Margins and select Custom Margins…:
Click OK. Go to Insert > Page Numbers and select Top and Right. Page numbers should be displayed from the first page. Note: Some people shift the page numbers a bit to the right but it doesn’t matter. Start the numbering from 2 (1 is reserved for the title page).
Finally, select the Courier 12pt font.
That’s it, your main document is ready. Save it on your hard drive before proceeding. We’ll come back to it after the next section.
How to create the title page for your screenplay
Create your title page only after you’ve finished writing your script. Otherwise you might spend months with just the name of your movie!
Open a new Word document and select the same paper size as your preferred screenplay format. Choose your font.
The title is centered somewhere just above the middle (doesn’t matter). On the next line (or you could leave a couple of lines) you write ‘by’. On the next line write your full name (only first letter is capitalized).
No jazzy stuff, bold fonts or styles or colors. The page number shouldn’t be visible on the title page.
On the bottom right (align to the right), write down your address, phone number and/or email address (Many competitions forbid you to include this information). Nobody’s going to study your title page and gush at your layout skills. It shouldn’t draw attention to itself. If your script is good, then the reader will want to meet you.
Save this as a title template and you’re done.
Next let’s look at the elements that form a screenplay, and how you can ensure the smoothest writing experience with Microsoft Word.
Now let’s create the elements of a screenplay.
How to get elements into Microsoft Word
Word has a crazy system of adding spacing to the margin, so you need to get rid of that first. Type these to the script template:
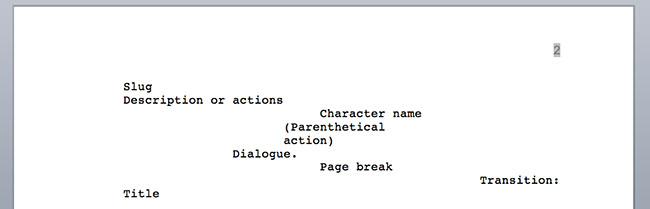
Slug
Description or actions
Character name
Parenthetical action
Dialogue
Transition
Page break
Title
Select them and right click. Select Paragraph…. Make sure the Alignment is ‘Left’ and Indentation is ‘0 cm or inches’. Hit OK.
Character name
Place the curser at the beginning of ‘Character name’. Right click and select Paragraph…. You have two choices:
- Change the left indentation to 6.86 cm (2.7″). Use this if you’re using the 4.2″ formatting.
- Change the alignment to ‘Centered’. Use this if you’re just centering the character name.
Parenthetical action
Place the cursor on Parenthetical action. Repeat the steps above to get to the Paragraph popup. Because the paranthetical action position is related to the character name, you have two choices:
- If you have opted for the 4.2″ system, set the left indentation at 5.59 cm (2.2″).
- If you have opted for the centered system, set the alignment to ‘Centered’. Then set the left indentation at -1.27 cm (0.5″).
Dialogue
Place the cursor on Dialogue. Repeat the steps above to get to the Paragraph popup. Because the position of the dialogue is relative to the character name, you have two choices:
- If you have opted for the 4.2″ system, set the left indentation at 3.84 cm (1.5″). Set the right indentation at 2.54 cm (1″).
- If you have opted for the centered system, set the alignment to ‘Centered’. Then set the left indentation at -3.81 cm (1.5″). Set the right indentation at -4.44 cm (1.75″). This will center the text and give you a width of 3″.
Centered looks better for online reading but the 4.2″ system is better for MS Word formatting. The ‘centering system’ is harder to implement in Word, don’t worry.
Transition
Same steps. Align to the Right.
Page break
Same as Character name.
For Slug, Title and Description, don’t make any changes yet. If you’ve done everything okay, this is what your template should look like:
Changing the fonts and line spacing
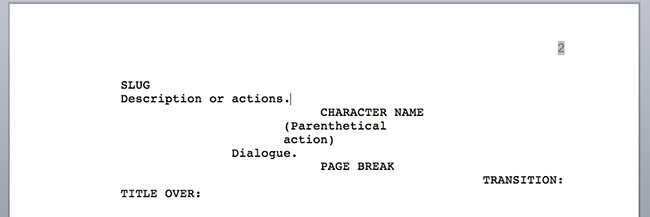
The next step is to make sure the fonts that are always in upper case be assigned that style.
Fonts
Choose Slug, Character name, Page break, Transitions and Title one by one, right click and select Font…. Check ‘All caps’. This is what it will look like:
Finally, we manipulate the line spacing so each element behaves the way it is supposed to.
Line Spacing
This part could have been done alongside indentation and alignment, but this way it is more foolproof for first timers. First, let’s understand how line spacing works in a screenplay:
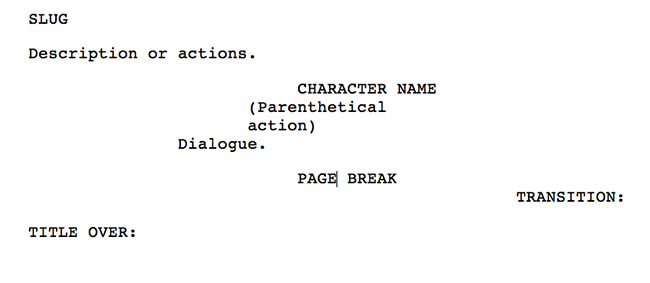
Double spacing follows these elements, always:
- Slug
- Each paragraph of a description or action.
- Diagloue.
- Transition.
Why not add them in automatically? We can do that.
Select each of these elements one by one, right click and select Paragraph…. Change the Spacing, After to 12 pt. This is what it will look like:
There shouldn’t be a double spacing before the Page break. However, this only applies rarely to a screenplay, so you can just hit backspace when you need it. There are some writers who like to have two spaces prior to every slug. You can use the same method to change things up.
With this system, you don’t have to worry about line spaces before any element because it will follow automatically after another element.
Add Actions to your template
What are actions? Simply put, there are some rules that always hold true in a screenplay format:
- A slug or scene heading is always followed by action/description.
- The end of a transition is always a slug or scene heading.
- Dialogue is assumed after each character’s name, unless a parenthetical action is necessary. After every parenthetical there is always a dialogue.
- More likely than not a dialogue will be followed by another character’s name.
Software like Final Draft makes it easy to write because as soon as you finish one line of the above and hit ENTER the next line assumes the next logical step – saving you many keystrokes. To get the same benefits in Microsoft Word, you must try to create actions (term borrowed from Photoshop) that make it as easy as possible.
Let’s go in this order:
Description or action
Select/Highlight Description or actions in your template. Go to Format > Style > New…:
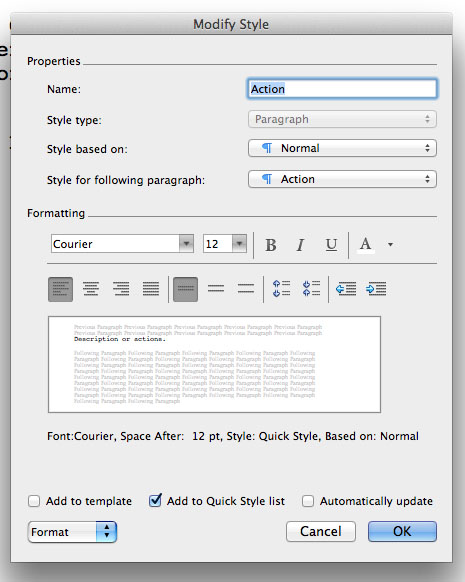
Name the style as ‘Action’. Click OK. Word will automatically assign the ‘Style for following paragraph’ to ‘Action’. To create a shortcut, click on the ‘Format’ drop down on the lower left:
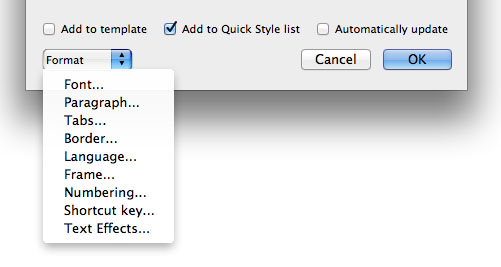
Select Shortcut key…. You’ll get this box:
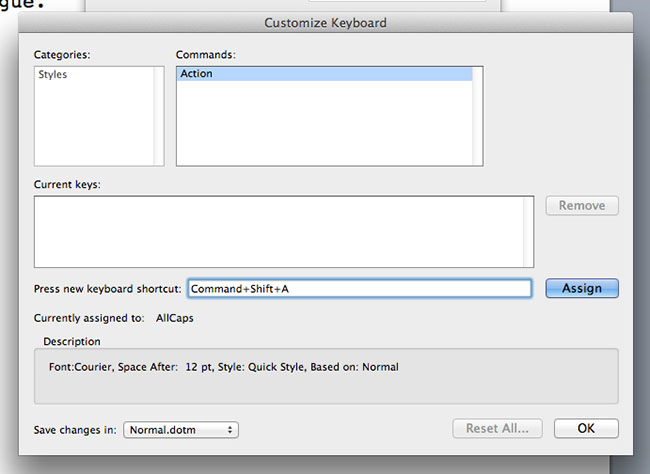
Alt is assigned to the menu and Shift is assigned to upper case letters. I recommend using CTRL+SHIFT+Number. E.g., for Action you could have CTRL+SHIFT+2. Click on Assign and then OK.
Slug
Highlight ‘Slug’ and repeat the above steps. In the New Style popup, name it ‘Slug’ and assign the ‘Style for following paragraph’ to ‘Action’. Click OK.
Set the shortcut as CTRL+SHIFT+1.
Transition
Same as above. In the New Style popup, name it ‘Transition’ and assign the ‘Style for following paragraph’ to ‘Slug’. Click OK.
Set the shortcut as CTRL+SHIFT+6.
Character name
Same as above. In the New Style popup, name it ‘CharacterName’. Click OK.
Set the shortcut as CTRL+SHIFT+3.
Dialogue
Same as above. In the New Style popup, name it ‘Dialogue’ and assign the ‘Style for following paragraph’ to ‘CharacterName’. Click OK.
Go back to the CharacterName style and assign the ‘Style for following paragraph’ to ‘Dialogue’. Click OK.
Set the shortcut as CTRL+SHIFT+5.
Parenthetical action
Same as above. In the New Style popup, name it ‘Paranthetical’ and assign the ‘Style for following paragraph’ to ‘Dialogue’. Click OK.
Set the shortcut as CTRL+SHIFT+4.
Title
Same as above. In the New Style popup, name it ‘TitleOver’ and assign the ‘Style for following paragraph’ to ‘Dialogue’. Click OK.
Set the shortcut as CTRL+SHIFT+7.
Now we have our styles. Page break has the exact same style as CharacterName so you can use that instead. Try playing around with the styles. It works!
Don’t forget to save your template!
If you’re having trouble with my shortcuts, feel free to choose your own. Keep it simple and repeatable so you only have to learn one set of movements and you’ll be doing it fast in no time.
Microsoft Word tells you whether your preferred shortcut is already in use for an important function or not. You can also save your shortcuts and styles to apply to all documents created in Word (but that isn’t a good idea if you’re using Word for other stuff as well).
There you have it, how to set up Microsoft Word to write a screenplay. Happy writing!
Can you format a screenplay in Microsoft Word? And if so, how? We will be answering both of these questions as well as outlining the necessary steps to take, and detailing a couple of tricks that will save you time in the long run. Accurate formatting is crucial in getting your screenplay taken seriously by industry professionals. Read on to find out if industry-standard formatting is possible in Microsoft Word.
Writing Screenplays in Word
Reasons to NOT use Microsoft Word
Microsoft Word can only approximate the functionality of specialized screenwriting software so closely. Using a professional screenwriting program, such as StudioBinder’s screenwriting software, is the only way to achieve 100% accurate script formatting in a smooth and efficient manner.
Improper formatting can kill the chances of a screenplay ever getting made, regardless of how great the content of the writing may be. There are both technical and professional concerns with a screenplay that fails to adhere to the standard screenplay conventions. Be sure to have a strong grasp of screenplay formatting before you begin writing.
How to format a screenplay • Subscribe on YouTube
If the high price tag of professional screenwriting programs like Final Draft is the prohibitive reason behind your decision to use Microsoft Word as an alternative. You may be pleased to learn that StudioBinder’s software features everything you need to write a professional script — and it is free to get started.
While a script CAN be written in Microsoft Word, there are a number of drawbacks. Formatting is extremely important and particular in screenwriting and getting close enough to industry-standard formatting in Microsoft Word can be time-consuming and cumbersome.
A pro screenwriting program will be much easier to use for scriptwriting purposes, not least of all because it will automate many of the steps.
Step 1: Set up your document
Microsoft Word might not be made for screenwriting but the program can be heavily customized to approximate screenplay format. If you aren’t already comfortable using Microsoft Word, then refer to the video below for a helpful beginner’s guide to the features and functions of the program.
Beginner’s guide to MS Word • Script format word doc
The first thing you need to do is either create a new, blank document or start from a template such as the official “screenplay” template offered on the Microsoft website. When starting from a blank document, the most important change to make will be setting the margins to the correct sizes for a screenplay.
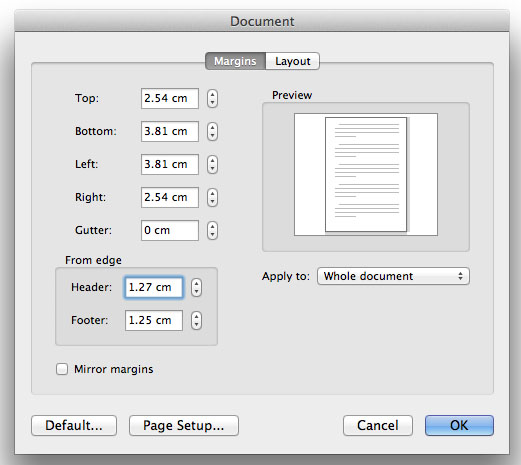
Set your top, bottom, and right margin to one inch and set your left margin to one-and-a-half inches. Be sure to read our guide to screenplay margins for more information, including why script margins are set the way they are.
In Microsoft Word, margins can be set by simply dragging along the ruler on the top and side of the window. If you do not see the rulers, click on “View” and make sure there is a checkmark beside “Ruler.” An alternative way to set margins is to click on “Format” → “Document.” A second window will pop up allowing you to manually type in your desired margin measurements.

Set your margins in MS Word • Script format word
Also during this step, set your font to Courier or Courier New and make sure that your font size is set to 12. For a script, you will need page numbers in the top right corner for all pages except the first one. To do this, click on “Insert” → “Page Numbers.”

Set your page numbers in MS Word • How to make a script in word
A window will pop up allowing you to customize your page numbers. Set the “Position” field to “Top of page (Header)” and set the “Alignment” to “Right.” Make sure that the box beside “Show number on first page” is NOT checked. Then, simply click “OK.”
How to Format a Screenplay in Word
Step 2: Create styles for each line type
This step is a little more complex but also the most important for achieving an accurately formatted screenplay using Microsoft Word. Screenplays make use of seven specialized line types that are each used for different purposes and are formatted differently. The seven line types are:
- Scene Heading/Slugline — Left aligned, all caps.
- Action — Left aligned
- Character — Centered, all caps
- Parenthetical — Goes below a character line inside parentheses, not exactly centered.
- Dialogue — block formatted below character (and parenthetical if present), not centered
- Shot — Left aligned, all caps. Smaller buffer room than scene heading lines
- Transition — Right aligned, all caps.
Transition lines should be used sparingly and shot lines should hardly be used at all in a spec script, but the remaining line types will find frequent use when formatting a screenplay. In a professional screenwriting program, these line types are formatted automatically, but when writing in Microsoft Word, a degree of extra leg-work is required.
The best way to replicate each of these line types in Microsoft Word is to use the software’s built-in “Styles” function. Each of these seven line types can be assigned to its own style, which you can then select for each appropriate line of your script. The video below details how to set up the measurements for each line type in Microsoft Word.
Setting the measurements for specialized lines • How to write a screenplay in Microsoft Word
For additional help using the “Styles” pane in Microsoft Word, refer to the video below.
A guide to using styles in MS Word • Script format Word doc
Setting up all of these styles in advance will save you a lot of time in the long run, but will still take longer to establish and switch between than it would if using a professional screenwriting program that automates the process.
How to Write a Movie Script on Microsoft Word
Step 3: Make a template
Once you have set up your document and established a style for each line type, you are all set to begin writing. But, before you do, it is a good idea to save your empty document as a template first. The video below will show you how to save a document as a template for future use.
How to design and save a template • Writing screenplays in Word
Saving your margin measurements, font choice, page numbers, and styles as a personalized screenwriting template will save you a great deal of time when setting up your next script in Microsoft Word. Now, all that is left to do now is to start writing!
Up Next
How to Write Great Sluglines
You are now all set up to begin writing a screenplay in Microsoft Word. Before you jump into the story, however, it’s always a good idea to review the fundamentals to ensure that your script is technically sound. Writing better sluglines can be an upgrade to any good screenplay. Learn the formatting conventions for sluglines and take a look at some creative examples, up next.