Download Article
Download Article
Whether you’re teaching a classroom full of kids or you just want to hand out a crossword puzzle to your friends, using Microsoft Word is an easy way to create your own. In this article, we’ve detailed how to format your crossword puzzle and make it look professional. We’ve also provided some tips and tricks that you can use while writing your crossword puzzle to make it the best it can be.
-
1
Create a table with 2 columns and 10 to 12 rows. Open up Microsoft Word and click “Insert” at the top of the toolbar. Then, hit “Table,” and select one with 2 columns and 10 to 12 rows (depending on how many hints you’re going to create). Toggle the left row until it’s super small—the left row of the table only needs to fit a single number, while the right row is going to hold all of your hints.[1]
- Keep this table in landscape mode so you can read and write your hints easily.
-
2
Add your hints to the right columns. Make your hints specific, and don’t forget to keep track of which answers they go with! If you want to, you can add the answers in with the hints for now, since you’ll be editing them later. Type your hints into the right row of the table, but leave the left one blank for now.[2]
- If you wrote your hints out ahead of time, you can simply copy and paste them into this new table.
Advertisement
-
3
Insert a 10 x 10 table into the document. Scroll down to a new page and click “Insert” again, then select “Table.” This time, pick a table with 10 rows and 10 columns. When you can see the table in your document, toggle the grid so that the height and the width are exactly the same.[3]
- In standard crossword puzzles, the height and width are the same, which is why it’s important to do this step now.
-
4
Add your answers to the 10 x 10 table. Now it’s time to create your crossword! Take a look at your hints again and strategically place your answers into the grid. You can add them both horizontal and vertical, and don’t be afraid to cross some over each other! This could take a little while, since you’re creating the puzzle part of your crossword puzzle.[4]
- Answers can cross over each other if they both contain the same letter. For instance, if the word “banana” is going across and “apple” is going down, you could make the “a” in “apple” the same as one of the a’s in “banana.”
-
5
Assign each answer a number, then match the number to the hints. In your answer grid, add a number to the first letter of each answer so you know where it starts. Then, write the number that correlates with each answer next to each of your hints. That way, you’ll keep track of which answer goes where in your puzzle.[5]
- You can make the numbers smaller by highlighting the number and then hitting “Ctrl,” “Shift,” “Plus” at the same time.
-
6
Divide your hints into 2 separate text boxes. In your toolbar, click “Insert,” then “Textbox.” Add 2 text boxes right next to each other, and label one “Down” and one “Across.” Then, divide your hints into the separate boxes based on which way their answers go.[6]
-
7
Delete the unnecessary cells in the answer table. Highlight the entire 10 x 10 table, then select “No border.” Highlight one of the letters in the answers, then click Select > Select text with similar formatting. Click the borders option again in the toolbar, then select “All borders.” This will create a grid that perfectly fits your crossword puzzle without any unnecessary boxes.[7]
- Unfortunately, on Microsoft Word, you can’t create a traditional look with black boxes surrounding the answers.
-
8
Delete your answers and drag the hint text boxes up to the grid. Blank your crossword puzzle out by deleting each letter in the grid. Drag your text boxes up so everything fits on one page, and arrange them however you’d like to. Once you’ve done that, your crossword puzzle is ready to print![8]
- To print your crossword puzzle, hit “Ctrl” and “P” at the same time.
Advertisement
-
1
Download a free template to skip the formatting. There are tons of different Microsoft Word templates you can use for crossword puzzles for free. EclipseCrossword and Crossword Labs are 2 of the most popular ones, and you can add them to your Microsoft Office in no time. Hit “download” and wait for them to load onto your computer before you start making your puzzle.[9]
- You can also search for templates in Microsoft Word. If you don’t have any templates already downloaded, you can find ones that you want right in Word. Open up a new document, then click “File,” and “new.” Then, type crossword into the search bar.
-
2
Enter your list of words and hints. Crossword makers do most of the work for you, but you still have to write them out. Once you come up with a list of hints and words you’d like to use, go ahead and type them into the relevant spaces. Then, your crossword will be formatted for you, and all you have to do is print it out![10]
-
3
Scroll through different puzzle formats to pick your favorite. If you don’t like the format that your crossword maker spit out at first, feel free to change it up. You can pick a traditional-looking crossword with black squares instead of blanks, or you can go for a more modern version with colorful spots in the middle.[11]
- You might also be able to decorate your crossword puzzle with fun stickers or logos.
Advertisement
-
1
Pick an exciting theme. It’s much easier to come up with answers and hints if your crossword puzzle has a general theme that you can stick to. Before you start creating, sit down and think of a fun, relevant theme that you can model your crossword after. Make it relevant to your audience, and pick something broad that you can create a lot of hints for.[12]
- Some fun themes include toys and games, 90’s nostalgia, fruits and vegetables, pop culture, insects, plants, or sports.
-
2
Create fun hints that make you think. When it’s time to think of the hints, feel free to get creative. You don’t want your hints to be too easy (unless you’re making a crossword puzzle for young kids), but you also don’t want your audience to be stumped. As you write out your hints, try to read them on their own and think about whether or not you’d be able to guess the answer based on your hints alone.[13]
- For instance, if your answer was “banana,” you might write, “A fruit, yellow and curved.”
- If the answer was “lunch,” your hint might be, “The thing you eat after breakfast.”
- If your answer was “cold,” you might write, “The inside of your freezer.”
-
3
Consider the age of your audience. A crossword puzzle for 8 year olds will be much different than a crossword puzzle for older adults. Younger children don’t have the life experience that older adults do, so they may need easier hints and simpler words. You should also keep in mind the specific audience you’re handing out your crossword puzzle to: a group of biologists might enjoy a crossword puzzle full of scientific terms, while a group of writers might love a puzzle full of obscure words.[14]
-
4
Check out a daily crossword puzzle for inspiration. If you subscribe to a newspaper or do crossword puzzles online, you can get some inspiration from people who write crossword puzzles for a living. Check out how they write each hint and how long all their answers are. You should also take note of how tough the hints are and how long it takes you to solve the puzzle. The more crosswords you write, the better you’ll get![15]
- The New York Times has a fairly famous daily crossword puzzle that you can play online.
Advertisement
Add New Question
-
Question
How can I retrieve a Word document that wasn’t saved?
Spike Baron
Network Engineer & Desktop Support
Spike Baron is the Owner of Spike’s Computer Repair based in Los Angeles, California. With over 25 years of working experience in the tech industry, Spike specializes in PC and Mac computer repair, used computer sales, virus removal, data recovery, and hardware and software upgrades. He has his CompTIA A+ certification for computer service technicians and is a Microsoft Certified Solutions Expert.
Network Engineer & Desktop Support
Expert Answer
If you’re in a corporate environment, a back-up copy of your document is saved to the Exchange Server of recent files, where you can recover it. Unfortunately, that option isn’t usually available for home users. In that case, you’ll need to use software like Recuva.
Ask a Question
200 characters left
Include your email address to get a message when this question is answered.
Submit
Advertisement
-
If you’re ever stumped on writing a hint for a word, try looking it up in the dictionary for inspiration.
Thanks for submitting a tip for review!
Advertisement
References
About This Article
Thanks to all authors for creating a page that has been read 22,715 times.
Is this article up to date?
Содержание
- Создание таблицы подходящих размеров
- Заполнение таблицы для кроссворда
- Как сделать нумерацию ячеек таблицы как в настоящих кроссвордах?
- Финальный этап
- Вопросы и ответы
Желаете самостоятельно создать кроссворд (конечно же, на компьютере, а не только на листе бумаги), но не знаете, как это сделать? Не отчаивайтесь, многофункциональная офисная программа Microsoft Word поможет вам это сделать. Да, стандартных средств для подобной работы здесь не предусмотрено, но на помощь в этом нелегком деле нам придут таблицы.
Урок: Как в Ворде сделать таблицу
Мы уже писали о том, как создавать таблицы в этом продвинутом текстовом редакторе, как с ними работать и как их изменять. Все это вы можете прочесть в статье, представленной по ссылке выше. К слову именно изменение и редактирование таблиц это и есть, что особенно необходимо в случае, если вы хотите составить кроссворд в Word. О том, как это сделать, и пойдет речь ниже.
Создание таблицы подходящих размеров
Вероятнее всего, у вас в голове уже есть представление того, каким должен быть ваш кроссворд. Возможно, у вас уже даже есть его набросок, а то и готовый вариант, но только на бумаге. Следовательно, размеры (хотя бы приблизительные) вам точно известны, ведь именно в соответствие с ними и нужно создавать таблицу.
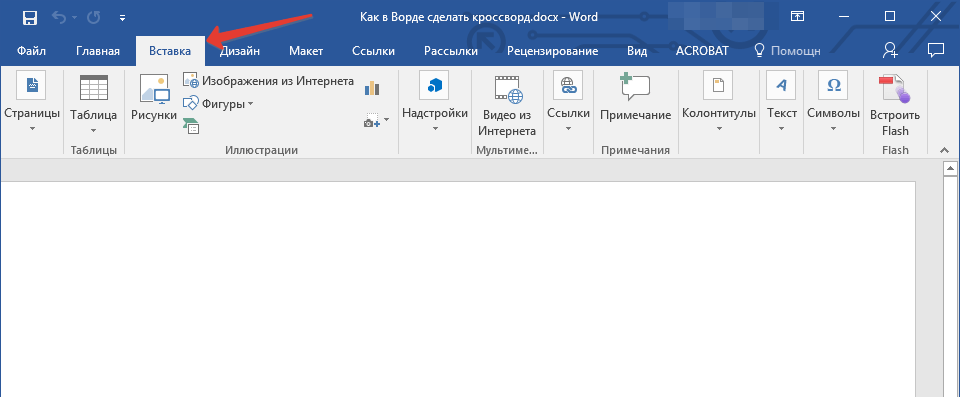
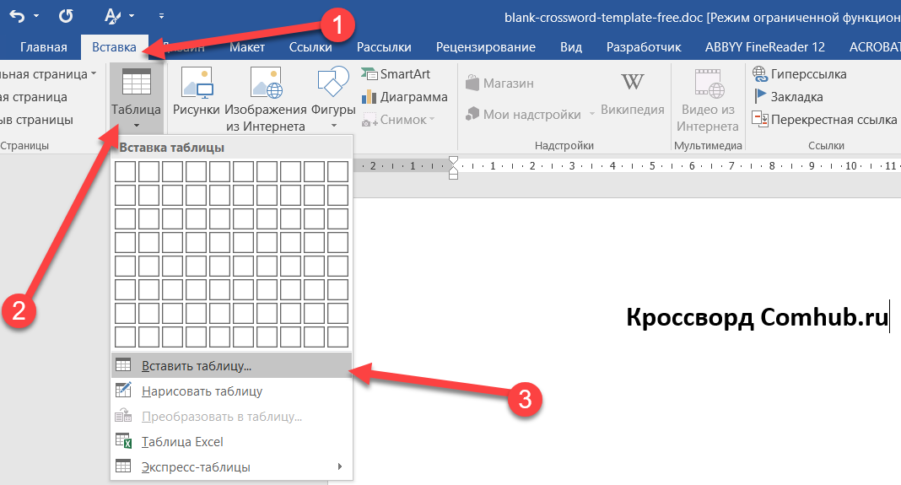
1. Запустите Ворд и перейдите из вкладки “Главная”, открытой по умолчанию, во вкладку “Вставка”.
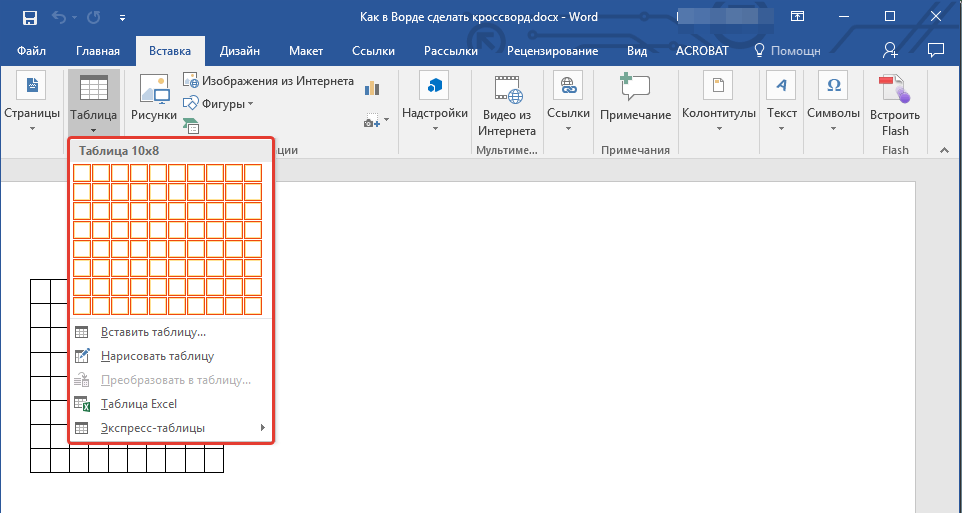
2. Нажмите на кнопку “Таблицы”, расположенную в одноименной группе.
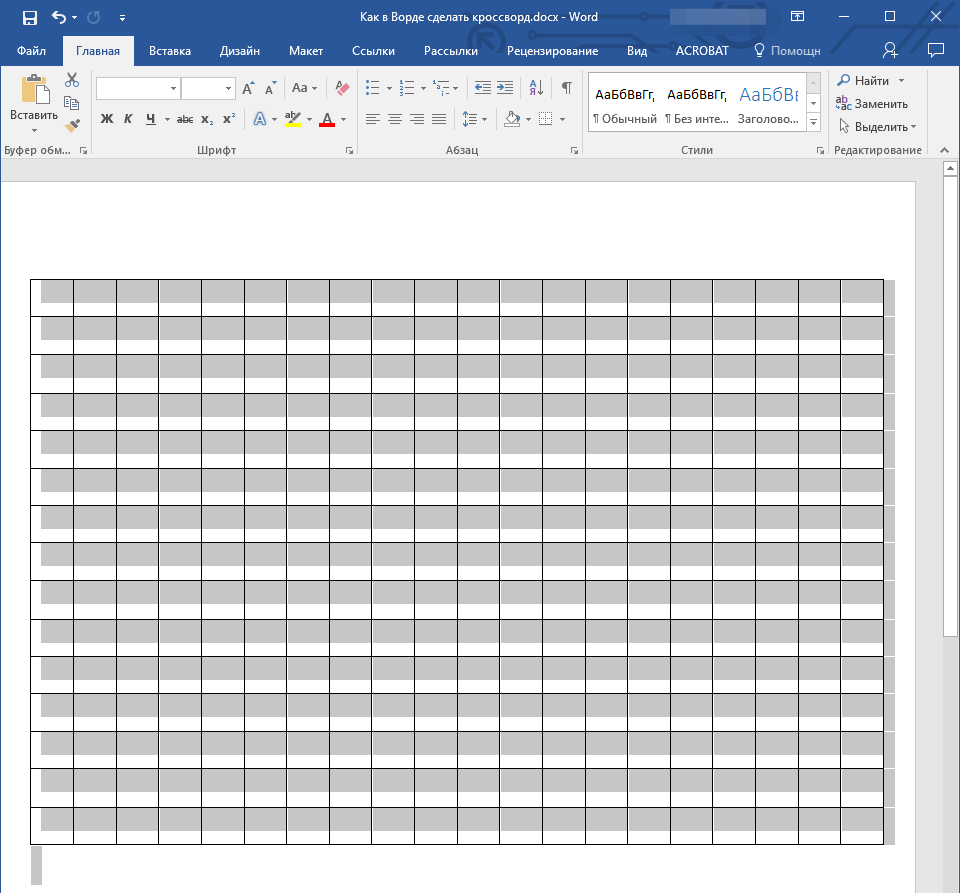
3. В развернутом меню можно добавить таблицу, предварительно указав ее размер. Вот только значение по умолчанию вас вряд ли устроит (конечно, если в вашем кроссворде не 5-10 вопросов), поэтому нужно вручную задавать необходимое количество строк и столбцов.
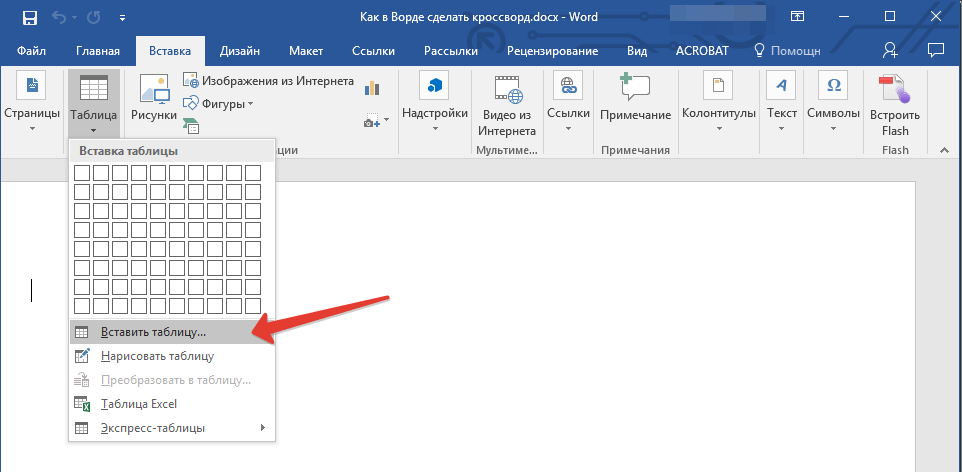
4. Для этого в развернувшемся меню выберите пункт “Вставить таблицу”.
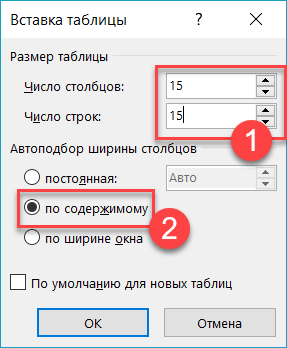
5. В появившемся диалоговом окне укажите желаемое число строк и столбцов.
6. Указав требуемые значения, нажмите “ОК”. Таблица появится на листе.
7. Чтобы изменить размер таблицы, кликните на нее мышкой и потяните за угол в направление к краю листа.
8. Визуально ячейки таблицы кажутся одинаковыми, но как только вы захотите вписывать текст, размер будет изменяться. Чтобы сделать его фиксированным, необходимо выполнить следующие действия:
Выделите всю таблицу, нажав “Ctrl+A”.
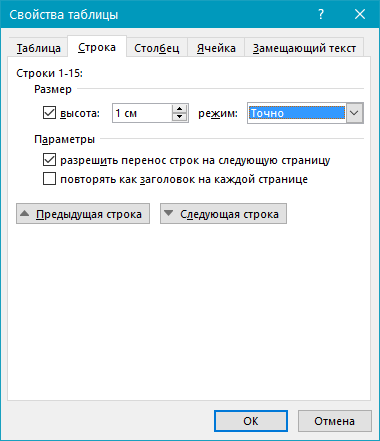
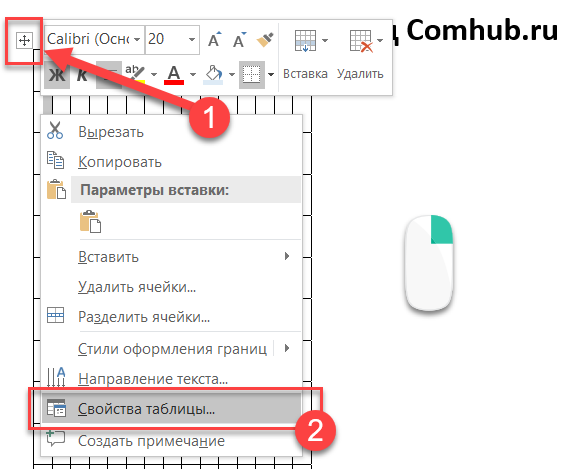
- Кликните по ней правой кнопкой мышки и в появившемся контекстном меню выберите пункт “Свойства таблицы”.
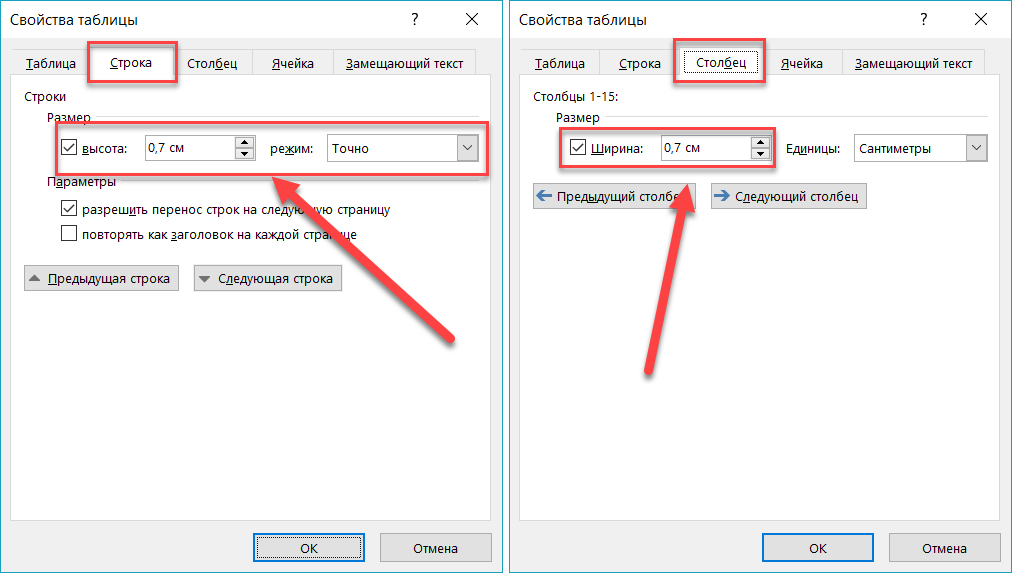
- В появившемся окне сначала перейдите во вкладку “Строка”, где необходимо установить галочку напротив пункта “высота”, указать значение в 1 см и выбрать режим “точно”.
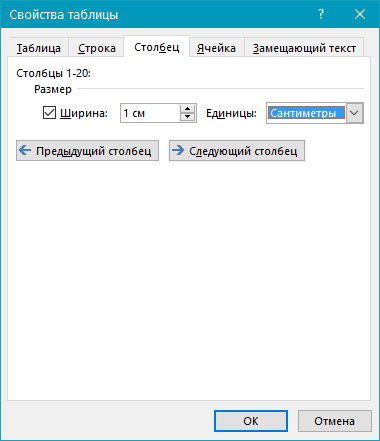
- Перейдите во вкладку “Столбец”, поставьте галочку “Ширина”, также укажите 1 см, значение единиц выберите “сантиметры”.
- Повторите эти же действия и во вкладке “Ячейка”.
- Нажмите “ОК”, чтобы закрыть диалоговое окно и применить внесенные изменения.
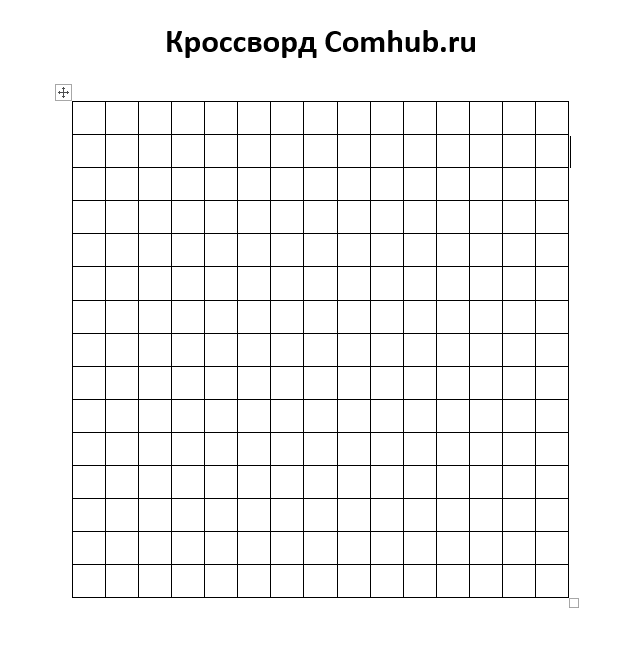
- Теперь таблица точно выглядит симметричной.
Заполнение таблицы для кроссворда
Итак, если вы хотите сделать кроссворд в Word, не имея при этом его наброска на бумаге или в какой-либо другой программе, предлагаем вам сначала создать его макет. Дело в том, что не имея перед глазами пронумерованных вопросов, а вместе с тем и ответов на них (а значит, зная количество букв в каждом конкретном слове), выполнять дальнейшие действия не имеет смысла. Именно поэтому мы изначально предполагаем, что кроссворд у вас уже есть, пусть пока что и не в Ворде.
Имея готовый, но пока еще пустой каркас, нам необходимо пронумеровать ячейки, в которых будут начинаться ответы на вопросы, а также закрасить те ячейки, которые в кроссворде использоваться не будут.
Как сделать нумерацию ячеек таблицы как в настоящих кроссвордах?
В большинстве кроссвордов цифры, обозначающие начальное место для введения ответа на конкретный вопрос, расположены в верхнем левом углу ячейки, размер этих цифр относительно небольшой. Нам предстоит сделать то же самое.
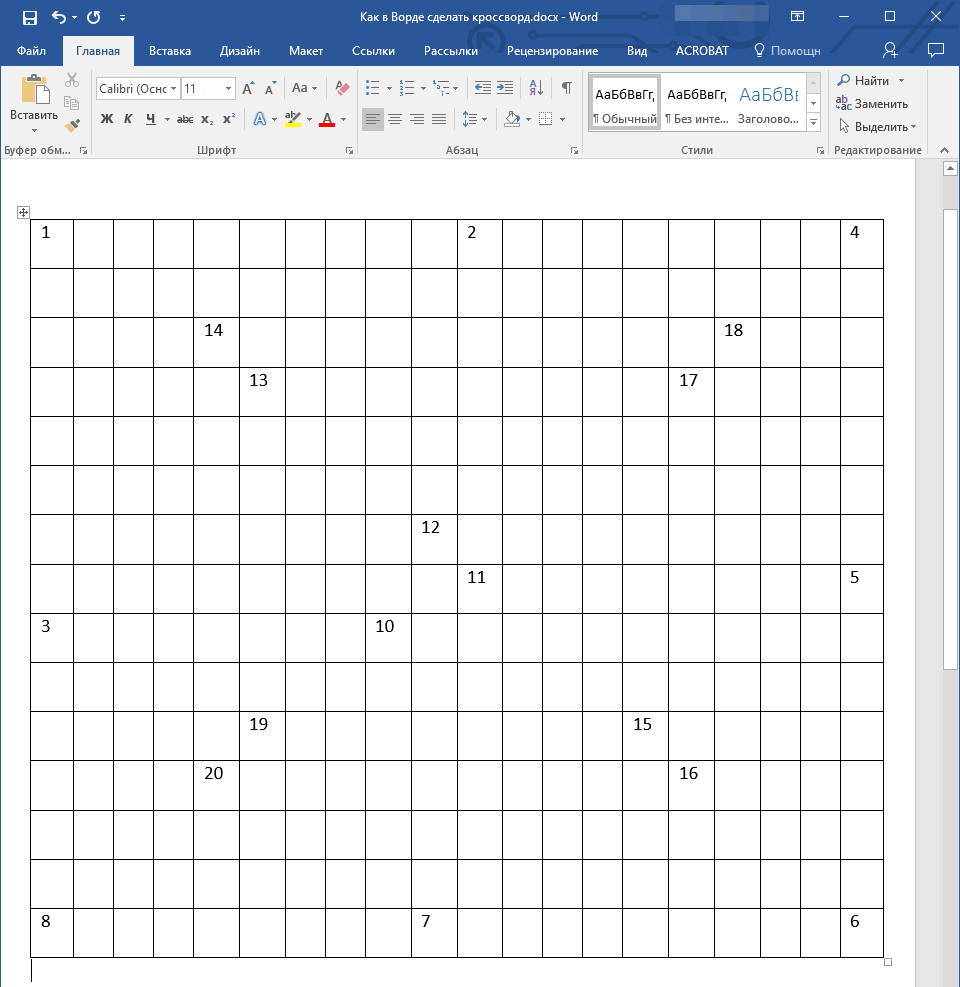
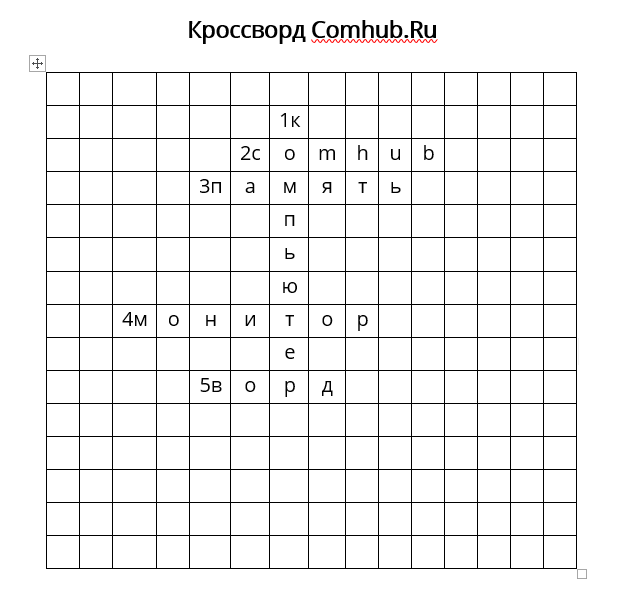
1. Для начала просто пронумеруйте клетки так, как это сделано на вашем макете или наброске. На скриншоте показан лишь минималистичный пример того, как это может выглядеть.
2. Чтобы разместить цифры в левом верхнем углу ячеек, выделите содержимое таблицы, нажав “Ctrl+A”.
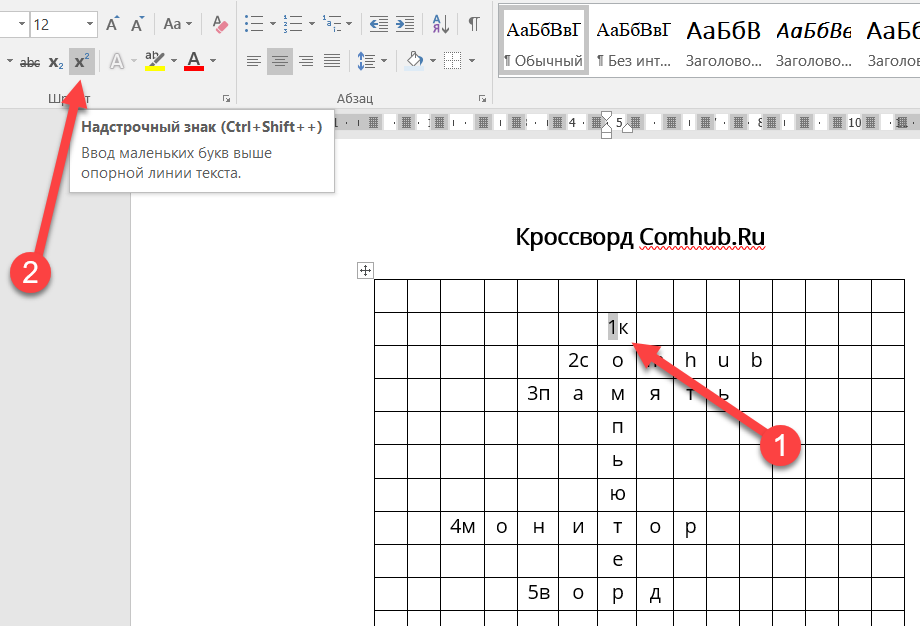
3. Во вкладке “Главная” в группе “Шрифт” найдите символ “Надстрочный знак” и нажмите на его (можно использовать и горячую комбинацию клавиш, как показано на скриншоте. Цифры станут меньше и будут расположены немного выше относительно центра ячейки
4. Если текст все еще недостаточно смещен влево, выровняйте его по левому краю, нажав на соответствующую кнопку в группе “Абзац” во вкладке “Главная”.
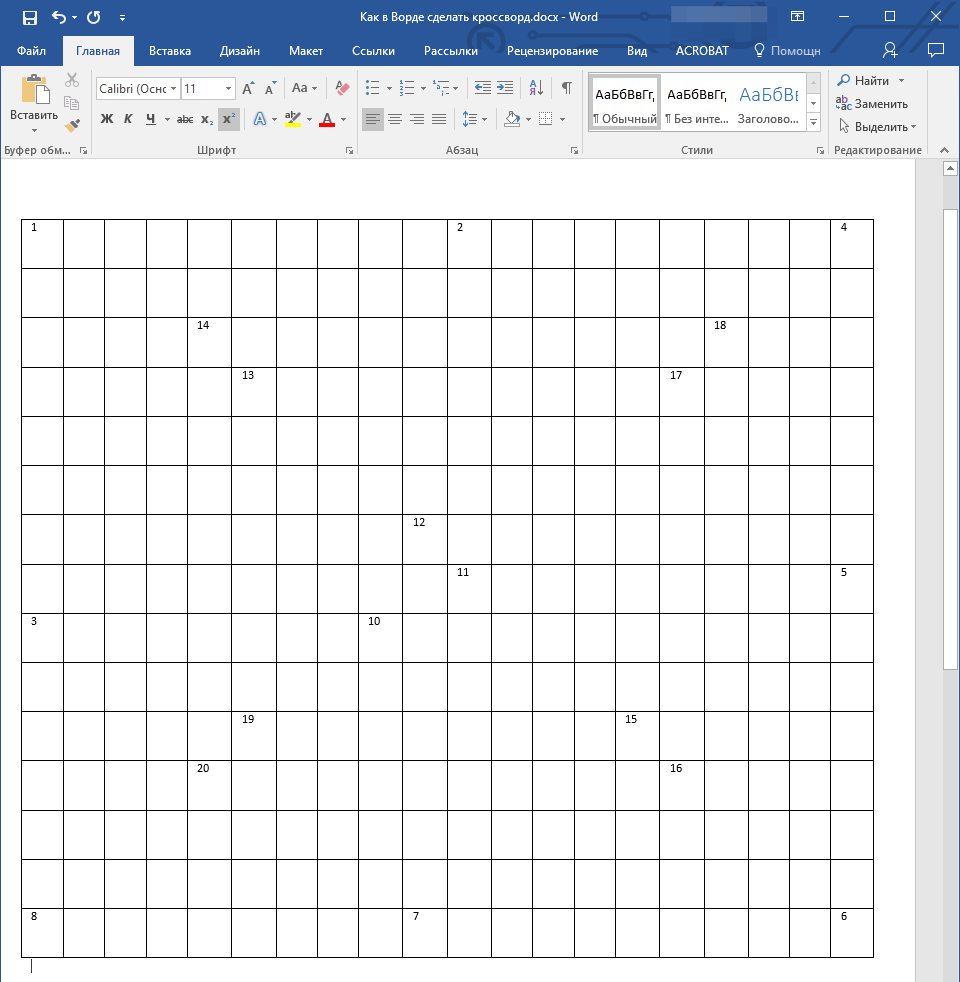
5. В результате пронумерованные ячейки будут выглядеть примерно так:
Выполнив нумерацию, необходимо закрасить ненужные ячейки, то есть те, в которые не будут вписываться буквы. Для этого необходимо выполнить следующие действия:
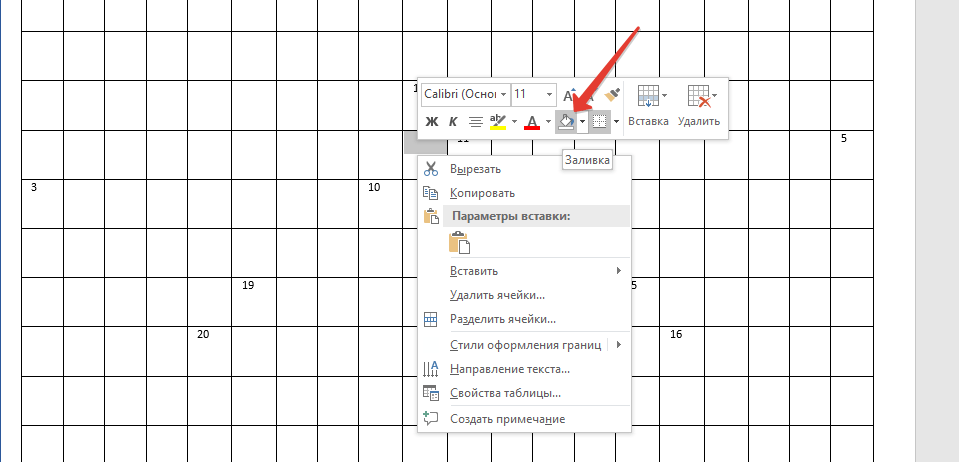
1. Выделите пустую ячейку и кликните в ней правой кнопкой мышки.
2. В появившемся меню, расположенном над контекстным меню, найдите инструмент “Заливка” и нажмите на него.
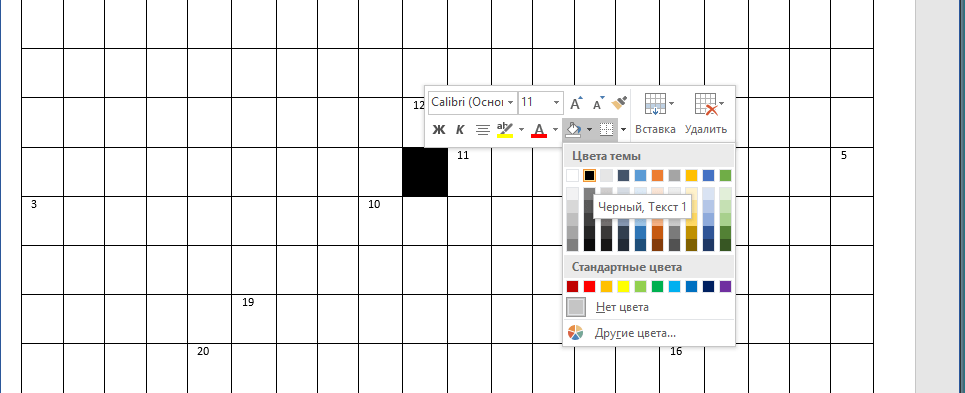
3. Выберите подходящий цвет для заливки пустой ячейки и нажмите на него.
4. Ячейка будет закрашена. Чтобы закрасить все остальные ячейки, которые не будут задействованы в кроссворде для введения ответа, повторите для каждой из них действие с 1 по 3.
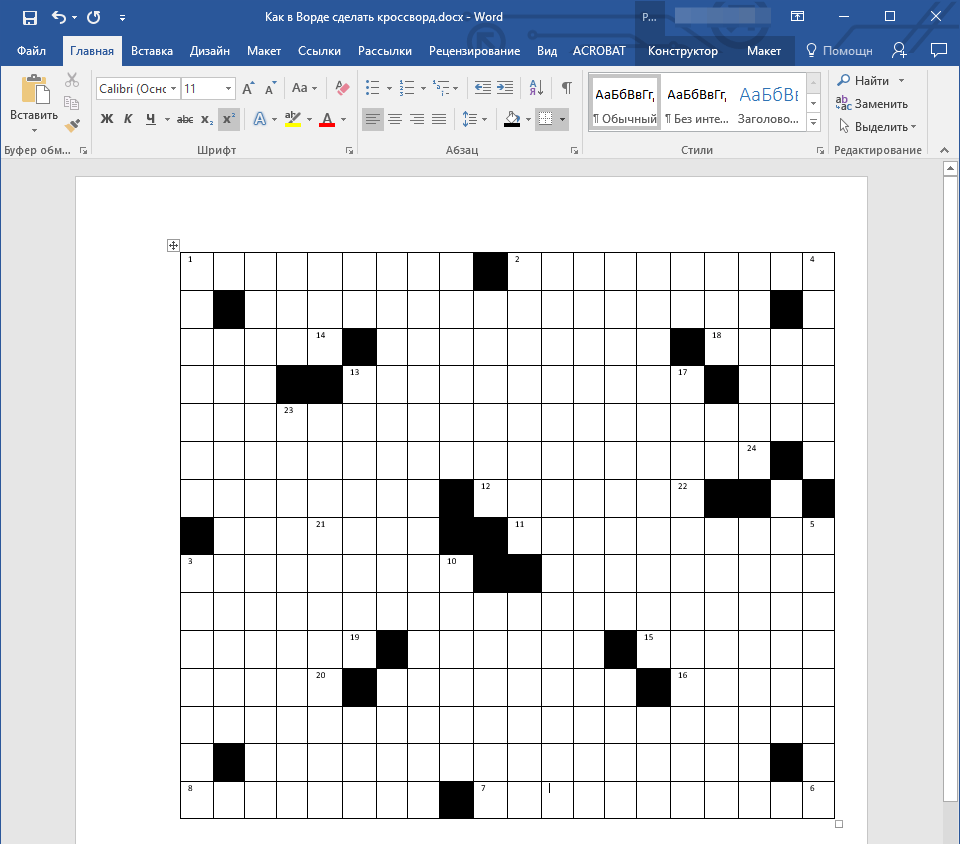
На нашем простом примере это выглядит так, у вас, конечно же, будет выглядеть иначе.
Финальный этап
Все, что нам с вами осталось сделать, чтобы создать кроссворд в Ворде именно в том виде, в котором мы его привыкли видеть на бумаге, это написать под ним список вопросов по вертикали и горизонтали.
После того, как вы все это сделаете, ваш кроссворд будет выглядеть приблизительно так:
Теперь его можно распечатать, показать друзьям, знакомым, близким и попросить их не только оценить то, как хорошо у вас получилось в Ворде нарисовать кроссворд, но и разгадать его.
На этом мы вполне можем закончить, ведь теперь вы знаете, как создать кроссворд в программе Word. Желаем вам успехов в работе и обучение. Экспериментируйте, творите и развивайтесь, не останавливаясь на достигнутом.
Word is a word processing tool known worldwide and recommended by everyone. Although there is a small detail and is that this program is very extensive in functions and creative possibilities.
But not everyone knows how to use it and realize the full potential that this wonderful tool offers us, that’s why when doing tasks such as crosswords or other puzzles, they prefer to pay for someone do the work.
In this step-by-step guide, we are going to teach you how to do a crossword puzzle in Word simply and quickly with a professional finish. We will also name some other programs for your computer that could facilitate this task in less time.
Steps to make a crossword puzzle in Microsoft Word quickly and easily
There are few activities to gain brain agility and dexterity, as is a crossword puzzle. Solving it is an activity that greatly encourages learning and information retention in both children and adults.
That’s why is encouraged to resolve it in a booklet perhaps after an exhibition for children or other activities. So if you need to create one quickly, let’s now see the steps to carry it out in Word:
Settings before starting
To be able to carry out the creation of a crossword puzzle in Word, the first thing we will have to have at least is the theme of the words that will be in it.
- Once the above and the words have been selected, we must make a small sketch on paper to get an idea of what we want for everything to fit together.
- Then when we are in a new document in Word, what we should start doing is adjust the margin of the page.
- To do this in the top menu we enter “Layout” and then “Margins”, we recommend the “Strait” since it is a graphic representation and not a common text.
- If the crossword we are going to make has a massive didactic purpose perhaps for 40 or 50 people, it may be convenient to configure the number of columns on the page.
- From the same section of «Layout» in the icon of the columns we can choose between two or three, depending on the size and how many we are going to print per page.
With these parameters adjusted to our needs we can start creating the crossword puzzle.
Create the grid
- In the “Insert” section you will find the option that facilitates the creation of the grid for the crossword puzzle.
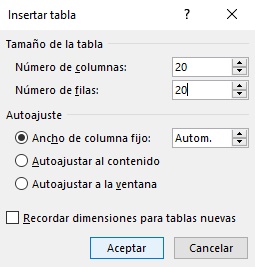
- We click on “Table” and then on “Insert table” in order to create a chord with the size needed.
- In this case we have chosen 20 by 20, we leave everything as is and we give it in acceptedAuthorly.
Once this is done, we will have our grid, which we can adjust in height and width if necessary from the lower right corner, then it will be ready to enter the words.
Enter the words in the grid
In the newly created grid we will introduce the selected words, one letter in each box and with a capital letter of preference.
- It is important that before we start writing we select the size and type of font we will use.
- The words of course must cross each other vertically and horizontally, so that our work takes hold.
Once you finish placing all the words and everything fits perfectly, we can start polishing the crossword puzzle.
Draw the word box
- If we place the mouse in the upper left corner of the grid we will get an option that will allow us to select it all.
- With the entire grid selected, click on the “Start”, section and on the “Paragraph” section we will remove the edges of the grid with the “Borderless” option.
- With this we will be able to visualize only the words of the crossword puzzle.
- Then we must with the «CTRL» key pressed and with the click Use the mouse to select each of the boxes containing the letters of the crossword puzzle.
- Then in «Start» and in «Paragraph» we will restore the borders again, but only from the frames we have selected.
- After doing this step we can already see that the crossword is taking shape and only a few tweaks are missing.
Place the reference numbers
If we are doing a crossword puzzle it would be obvious that the people who receive it should solve it, so we need to eliminate the solutions.
To do this we will select the entire grid again in the upper left corner and then press the importantSUPR occurs.
We will get something similar to this:
The next thing we will do will be to place the numbers that they indicate along with the legend on which site the answers should be written and in what sense they should be placed. Since each number will be placed right where you start typing the word to indicate to the player that from there you should start writing.
Although this is more important only in more complex crosswords that include words upside down or from the bottom up. For this we can do it in two ways, put the numbers outside each box or put them inside, in this example we will put it inside.
To give it a bit of style and that the numbers remain as the number 1 we have to make some small modifications in the margin of the cells , the alignment and size of the letter.
For that we select everything as in the image above and then go to the “Layout” tab that is located in the upper right menu, and in alignment we give it the option «Top left.
Once this is done we go to the margin of the left cell and reduce it from 0.19 cm to a considerable amount, and then we reduce the font size.
We will get something similar to this:
We customize our crossword puzzle
After the previous step and the creation of a legend with crossword questions, we should customize it a bit to our liking.
We can play with the colors and assign each cell a different color, or adjust the size, and other things to give the final touch to the work. Although we leave that to your discretion. To do this you have to select the cells you want to modify and then in the top menu, in «Start» you can choose what things to modify and to leave as is.
List of the best tools to make crosswords quick and easy
Below we will show you some of the creators and more accessible crossword generators other than Word. These will undoubtedly speed up more the work we showed earlier:
Crossword generator
This first program to generate crosswords is hosted on The Teachers Corner website with the following link . Just as you can see in the image, you just have to give the crossword name, set the instructions and add as many words as you want and then give it in « Generate » and that’s it.
Crossword Puzle Games
This is another crossword puzzle and puzzle generator that we can use by entering its official page . It works very simply and similar to the previous one, only that it does not allow more than 20 words per crossword puzzle. Its advantage is that it is free.
Crossword Compiler 10
The next tool for crossword creation is paid, but it is absolutely certain that the effort is worth it, since offers learning functions and puzzles like no other program would. Also offers a very useful free version.
Download Crossword Compiler 10 Demo
Eclipse Crossword
It is the first free program that can be downloaded to the computer, it is very simple to work and with which you can create fantastic crosswords. You have the option to print it or export it to different formats.
Как сделать кроссворд в Microsoft Word
Просмотров 59.3к. Опубликовано 18 марта, 2019 Обновлено 18 марта, 2019
В этой пошаговой инструкции, вы узнаете как создать кроссворд в MS Word (2016, 2013, 2010, 2007, 2003).
- В Ворде перейдите во вкладку «Вставка» >»Таблица» > «Вставить таблицу…»
- Указываемым количество строк и столбцов. Автоподбор ширины столбцов, переключаем на «По содержимому».
- В созданной таблице нажмите на любую ячейку, чтобы в левом верхнем углу появился Квадратик, нажмите по нему правой кнопкой мыши, в открывшемся меню, выберите Свойства таблицы.
- Во вкладках «Строка» и «Столбец», установите галочки и установите одинаковые размеры, в режиме «точно».
- Нажмите «ОК»
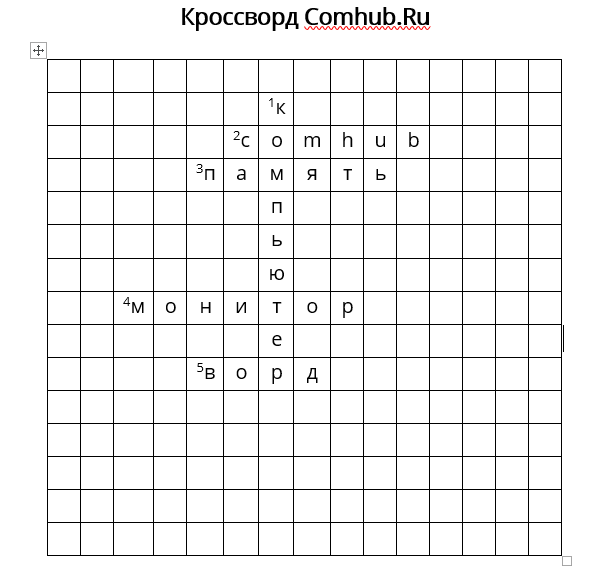
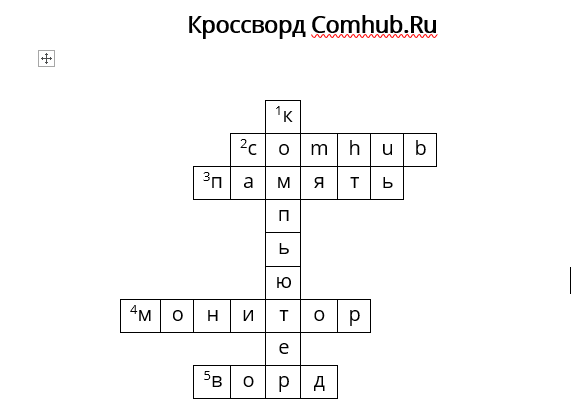
Получилась вот такая таблица. - Добавьте Ответы, перед словом укажите номер вопроса.
- Выделите цифры, и на вкладке «Главная», нажмите «Надстрочные буквы», или нажмите сочетание клавиш CTRL + Shift + «+».
- Должно получиться вот так.
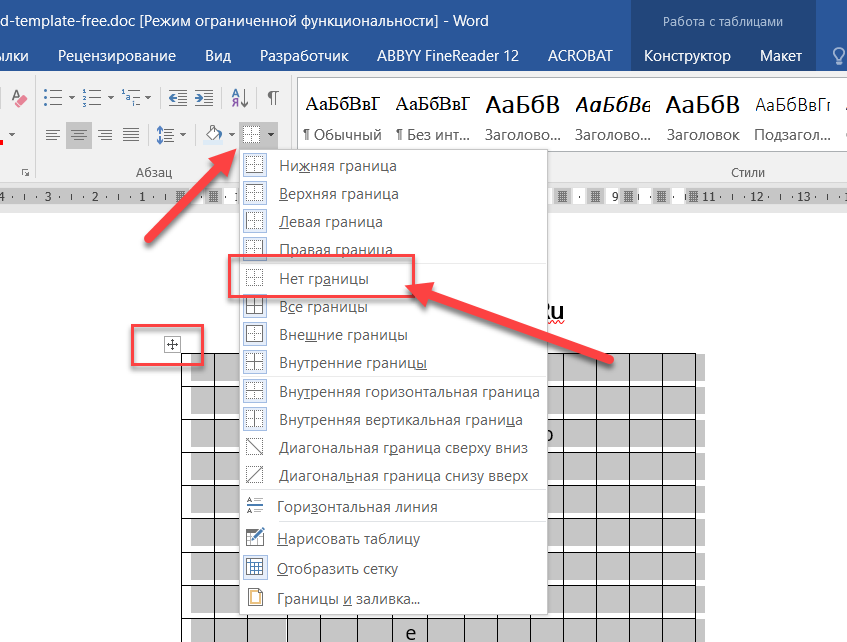
- Выделите всю таблицу, вы можете это сделать с помощью зажатой мыши, либо нажав левой кнопкой мыши на квадратик в левом верхнем углу, который появляется при нажатии на таблицу. Теперь нужно убрать все границы таблицы.
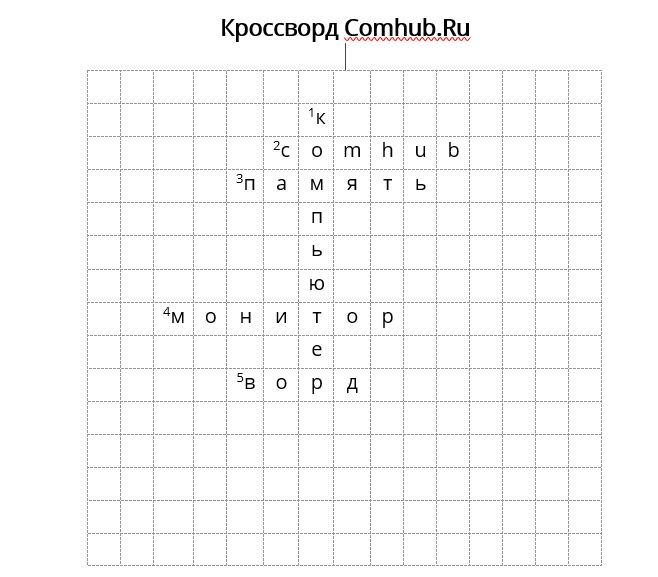
- Получилось вот так. У меня стоит режим сетка, у вас может не быть пунктирных линий.
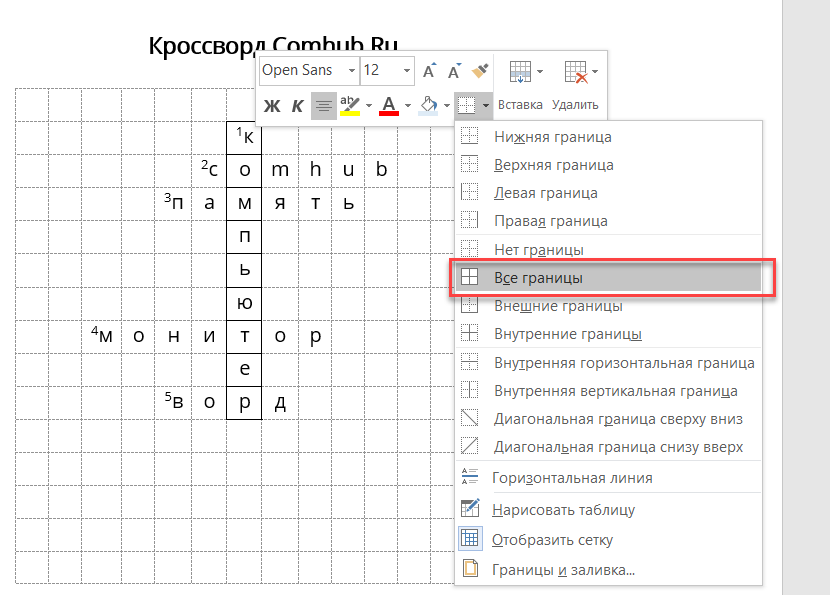
- На следующем шаге, выделите заполоненные ячейки и установите для них границы. Можно зажать CTRL + SHIFT, чтобы выделить несколько строк или столбцов.
- Получилось вот так.
Можно будет стереть слова, останутся только цифры, можно распечатать.
В Microsoft Word нет функционала для автоматического создания кроссвордов. Поэтому для начала нужно самостоятельно придумать слова и собрать его из них, например, на листе бумаги. После этого с помощью популярного текстового редактора можно красиво оформить его с помощью самой обычной таблицы. В этой статье подробно описано, как сделать кроссворд в Ворде на компьютере.
Для начала создаем таблицу необходимого размера
Шаг 1. Запустите Microsoft Word и создайте новый документ или откройте тот, в который необходимо добавить кроссворд.
Шаг 2. Перейдите в раздел «Вставка» в верхнем ленточном меню приложения, нажмите на кнопку «Таблица» и выберите возможность «Вставить таблицу».
Шаг 3. Определите число столбцов и строк в соответствующих ячейках на основании придуманного кроссворда.
Вот результат:
Далее делаем все ячейки в ней квадратными
Шаг 1. Наведите курсор на таблицу, нажмите на кнопку в виде крестика в ее левом верхнем углу правой кнопкой мыши и выберите пункт «Свойства таблицы».
Шаг 2. Перейдите в раздел «Строка» и выберите высоту ячейки с помощью поля «Высота».
Шаг 3. Перейдите в раздел «Ячейка» и выберите ширину ячейки с помощью соответствующего поля, а потом подтвердите изменение свойств таблицы с помощью кнопки «ОК».
Вот результат:
Удаляем ненужные линии с помощью ластика
Шаг 1. Нажмите на таблицу, перейдите в раздел «Макет» в верхнем ленточном меню приложения и выберите возможность «Ластик».
Шаг 2. Сотрите лишние границы ячеек, чтобы воссоздать задуманный кроссворд.
Вот результат:
Проставляем цифры согласно заданному плану
По задумке, которая используется в примере, нужно получить ключевое слово по горизонтали под номером «0», вписав в кроссворд все слова по вертикали под цифрами «1», «2», «3», «4», «5» и «6» согласно заданиям.
Вот рузультат:
Устанавливаем необходимые параметры выравнивания
Если в этом есть необходимость, выделите таблицу и перейдите в раздел «Макет» в верхнем ленточном меню приложения, а потом установите необходимое выравнивание — обычно используется вариант «Выровнять сверху по левому краю».
Вот результат:
Занимаемся дополнительными украшательствами
На финальном этапе можно заняться наведением красоты: можно, к примеру, выделить рамку ключевого слова с помощью инструмента «Стили границ» в разделе «Конструктор таблиц», а также залить его фон с помощью инструмента «Заливка» здесь же.
Вот итоговый результат:
Нет разницы, насколько сложный кроссворд вы придумали, — для его оформления без проблем подойдет алгоритм, описанный в данной инструкции.
⚠️ Если инструкция перестала работать или у вас возникли проблемы на каком-то шаге — пожалуйста, сообщите об этом в комментариях. Мы обязательно изучим проблему и обновим статью.


