Excel Programming (Table of Contents)
- Introduction to Programming in Excel
- How to Program in Excel?
Introduction to Programming in Excel
Have you ever been tired of doing a task in Excel which you feel can be automated and save your time? Most of the time, you must have encountered such tasks. However, in order to automate any task, you first need to have programming skills for that particular language. In Excel, you can do programming with the help of Visual Basic for Application (VBA) which is Excel’s own programming language that can help you to automate the tasks. In this article, we will see how we can do programming in Excel VBA. VBA can be used to write a program that can automate the task for you. The piece of lines we write under VBA is called Macro, which is written in such a way that they instruct the Excel system about what to be done.
How to Program in Excel?
Let’s understand how to Program in excel with few illustrations.
Enabling Developer Tab
The first thing that comes is enabling the developer tab that helps you to record and store a macro (VBA Code). Let us see how we can get that enabled.
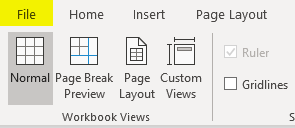
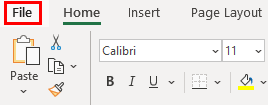
- Navigate to the File menu in your excel file and click on it.
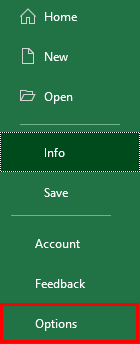
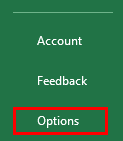
- Within the File menu, click on Options, and it will load a new window with all excel options available.
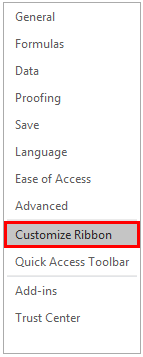
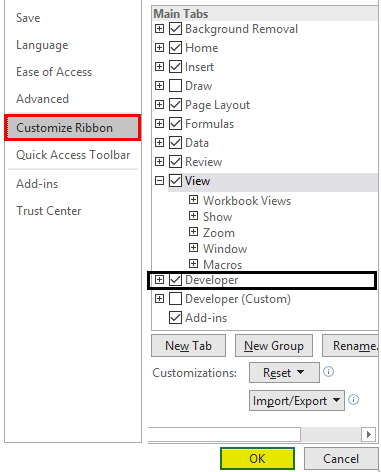
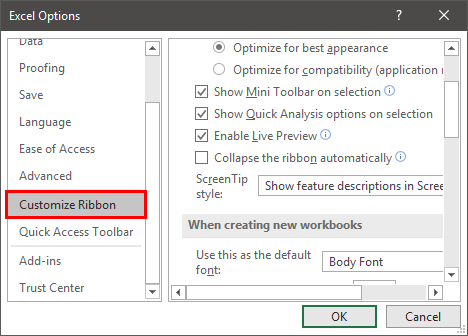
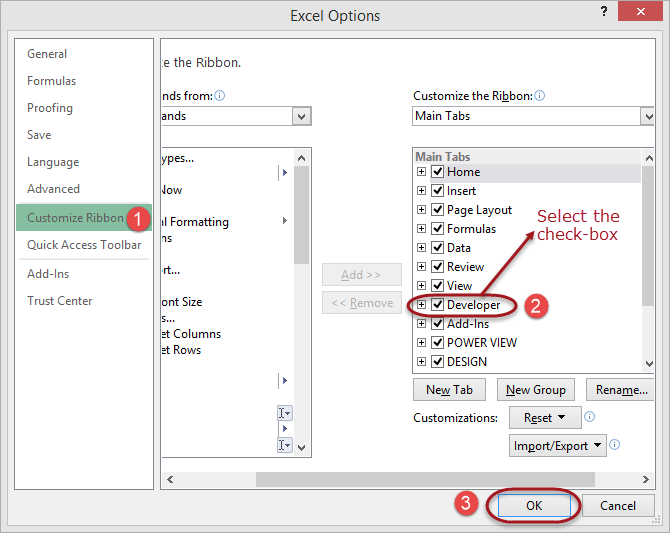
- In the new window that popped up named Excel Options, click on the Customize Ribbon tab. You can see all the customization options you can use for Excel Ribbon, which appears at the top of your Excel file.
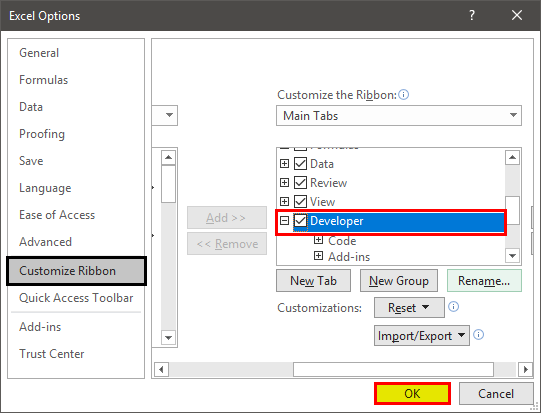
- Enable Developer option under Main Tabs dropdown within Customize the Ribbon: section. You can check (tick-mark) the Developer tab to enable it. Click the OK button placed at the bottom right of the Excel Options tab, and that’s it.
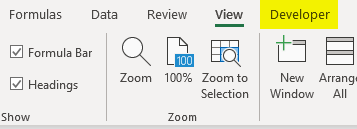
- You have successfully enabled the Developer option within your excel. If you check the Excel Ribbon in your file now, you’ll be able to see a new tab added there with the name Developer on it.
This is the first step you need to follow before you start writing macros in Excel. Because the Developer tab is needed to record and run the macro, this option tab is not by default enabled, which is why we tried enabling it here first.
Recording a Macro
- Open the Excel file. Navigate towards the Developer tab you just enabled and then click on the Record Macro button, categorized and can be seen under the Code section.
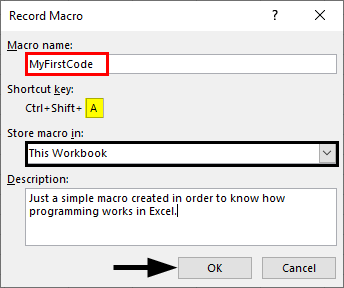
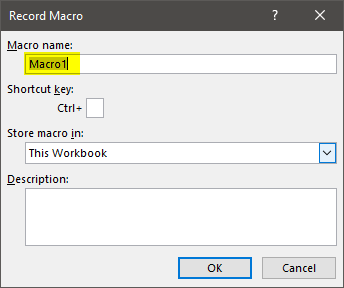
- As soon as you click on the Record Macro button, you’ll see a window popping up; in that window, you must have to assign a name to the macro; you can also assign a shortcut key for this macro to run. Can you add the description, if any, for this macro you are creating? Once you are done with all this, you can click on the OK button placed at the right bottom of the window. See the screenshot below for your reference.
As soon as you click OK, the system starts recording the macro and all the tasks you perform will be recorded and converted to Excel Program in the backend.
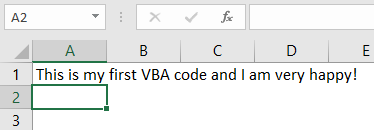
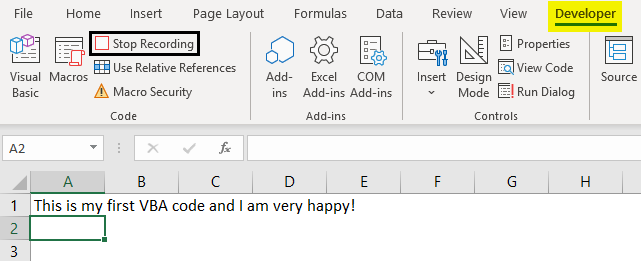
- Try typing the sentence “This is my first VBA code, and I am very happy!” in cell A1 within the Excel sheet and press Enter key. These steps will be recorded in the backend of the macro.
- Under the Code section, you might have observed that the Record Macro button has changed to Stop Recording. This is like Play and Stop. Record Macro Works as Play button and Stop Recording work as Stop button. Click on the Stop Recording button to stop the recording.
The magic behind all this is, Excel has recorded my steps here and converted those into pieces of code so that this task can be automated. It means, every single step, selecting cell A1, inputting the text as “This is my first VBA code, and I am happy!”, clicking Enter to go to the next cell. All these steps are converted into a VBA code. Let’s check the code now.
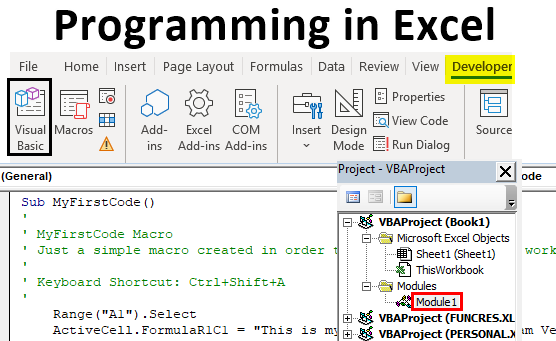
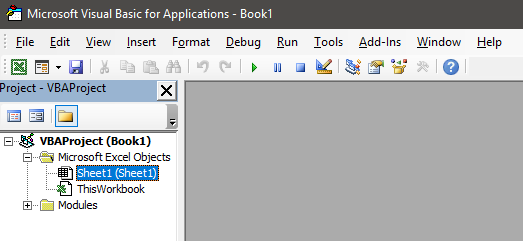
- In order to go to Visual Basic Editor, you can click on the Visual Basic option under the Code category in the Developer tab, or you can use Alt + F11 as a shortcut for the same.
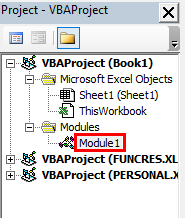
- Navigate towards the Modules section under VBAProject and click on the plus button under it to see the list of active modules in VBA.
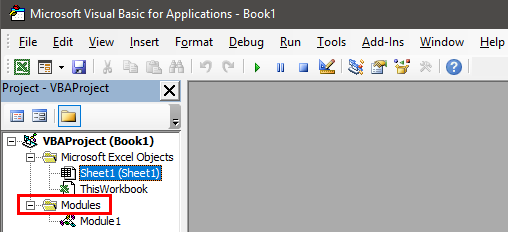
- Inside the Modules folder, you can see Module1 as soon as you click on the plus sign. You can double click on Module1; it is where your code for the task we performed in previous steps (Step 3 and 4) are recorded. Save this code, and you can run it every time to get the same output. See the screenshot below:
Conclusion
- We can record a macro in Excel to automate day to day small tasks, which are simpler for the system to manipulate programmatically.
- The cool thing about it is you don’t need to dig your head deep for the logic behind each step you perform. Excel VBA does it for you.
- For some complex tasks, such as the one which involves looping and conditional statements, you need to write code manually under VBA.
Things to Remember About Programming in Excel
- The Developers tab is not by default enabled and visible to you in Excel Ribbon. You need to enable it through Excel Options.
- Recording a macro works on simple tasks that are repeating, and you need those to be automated. However, for complex tasks which involve looping or Conditional Inputs and Outputs are still need to be coded manually under VBA.
- You need to save the file as an Excel-Macro Enable file format in order to be able to read and run the code again on your excel.
Recommended Articles
This is a guide to Programming in Excel. Here we discuss how to Program in Excel along with practical examples and a downloadable excel template. You can also go through our other suggested articles –
- Ribbon in Excel
- TRIM Formula in Excel
- Project Management Template in Excel
- COUNTIFS in Excel
What is Programming in Excel?
Programming refers to writing a set of instructions that tell Excel to perform one or more tasks. These instructions are written in the Visual Basic for Applications (VBA) as this is the language understandable to Excel. To write an instruction, one can either write a code in VBA or record a macro in Excel. A macro is recorded to automate repetitive tasks. When a macro is recorded, VBA generates a code in the background.
For example, to submit an Excel report, a table needs to undergo the same set of tasks each time. These tasks include applying a pre-defined border, color, alignment, and font. To program in Excel, a macro can be recorded for performing all these tasks.
The purpose of programming in Excel is to save the user from performing the same tasks again and again. Moreover, it helps accomplish multiple tasks at a great speed that would have taken a lot of time, had they been performed manually.
Table of contents
- What is Programming in Excel?
- Stages of Programming in Excel VBA
- Stage 1–Enable the Developer Tab in Excel
- Stage 2–Record a Macro in Excel
- Stage 3–View and Examine the VBA Code Generated by the Recorded Macro
- Stage 4–Test the VBA Code of the Recorded Macro
- Stage 5–Save the Recorded Macro (or the VBA Code)
- Frequently Asked Questions
- Recommended Articles
- Stages of Programming in Excel VBA
Stages of Programming in Excel VBA
Programming in Excel VBA is carried out in the following stages:
- Enable the Developer tab in Excel
- Record a macro in Excel
- View and examine the VBA code generated by the recorded macro
- Test the VBA code of the recorded macro
- Save the recorded macro (or the VBA code)
Further in this article, every stage of programming ine xcel has been discussed one by one. The steps to be performed in each stage are also listed.
Stage 1–Enable the Developer Tab in Excel
Let us understand how to enable the Developer tabEnabling the developer tab in excel can help the user perform various functions for VBA, Macros and Add-ins like importing and exporting XML, designing forms, etc. This tab is disabled by default on excel; thus, the user needs to enable it first from the options menu.read more in Excel. This tab is enabled to record a macro and access VBA. When the Developer tab is enabled, it appears on the Excel ribbonRibbons in Excel 2016 are designed to help you easily locate the command you want to use. Ribbons are organized into logical groups called Tabs, each of which has its own set of functions.read more. However, by default, Excel does not display the Developer tab.
Note: To know an alternate method to record a macro and access VBA, refer to the “alternative to step 1” in stages 2 and 3.
The steps to enable the Developer tab in Excel are listed as follows:
Step 1: Go to the File tab displayed on the Excel ribbon.
Step 2: Select “options” shown in the following image.
Step 3: The “Excel options” window opens, as shown in the following image. Select “customize ribbon” displayed on the left side of this window.
Step 4: Under “choose commands from” (on the left side of the window), ensure that “popular commands” is selected. Under “customize the ribbon” (on the right side of the window), choose “main tabs” from the drop-down list.
Next, select the checkbox of “developer” and click “Ok.” This checkbox is shown in the following image.
Step 5: The Developer tab appears on the Excel ribbon, as shown in the following image.
Stage 2–Record a Macro in Excel
Let us learn how to record a macroRecording macros is a method whereby excel stores the tasks performed by the user. Every time a macro is run, these exact actions are performed automatically. Macros are created in either the View tab (under the “macros” drop-down) or the Developer tab of Excel.
read more in Excel. When a macro is recorded, all tasks performed by the user (within the workbook) are stored in the Macro Recorder until the “stop recording” option is clicked. Apart from Microsoft Excel, a macro can be recorded for all Office applications that support VBA.
The steps to record a macro in Excel are listed as follows:
Step 1: From the Developer tab, click “record macro” from the “code” group.
Alternative to step 1: One can also click “record macro” from the “macros” group of the View tab of Excel.
Step 2: The “record macro” window opens, as shown in the following image. In this window, one can name the macro before recording it. The default macro name given by Excel is “macro1.”
The rules governing a macro name are stated as follows:
- It should not contain any space ( ), period (.) or exclamation point (!).
- It cannot contain any special characters (like $, @, ^, #, *, &) except the underscore (_).
- It should not begin with a numerical value. Rather, it must start with a letter.
- It cannot exceed 255 characters in length.
Note: It is recommended to use short and meaningful names for macros. Further, one must assign a unique name to each macro. In VBA, two macros within the same code module cannot have the same names.
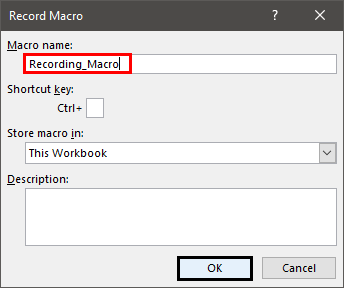
Step 3: In the “macro name” box, we have entered the name “recording_macro.”
Notice that an underscore has been used as a separator between the two strings (recording and macro) of the name. No spaces, periods or special characters have been used in this name.
Step 4: Click “Ok” to start recording the macro. Once “Ok” is clicked in the preceding window, the “record macro” button (in the Developer tab or the View tab) changes to the “stop recording” button.
Next, carry out the tasks to be recorded in the macro “recording_macro.”
Note: Since the Macro Recorder records every action performed by the user, ensure that the actions are executed in the right sequence. If the recorded sequence is correct, Excel will perform the tasks efficiently each time the macro is run.
However, if a sequencing error occurs, one must either re-record the actions or edit the VBA codeVBA code refers to a set of instructions written by the user in the Visual Basic Applications programming language on a Visual Basic Editor (VBE) to perform a specific task.read more manually. If one is recording the macro for the first time, it is recommended to keep a copy of the workbook to prevent any undesired changes to the stored data.
In the following steps (step 4a to step 4c), the tasks to be recorded have been performed.
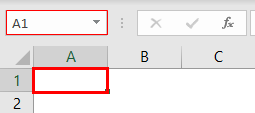
Step 4a: Select cell A1 of the worksheet. This is the first task that is recorded. The selection is shown in the following image.
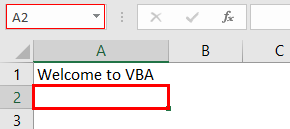
Step 4b: Type “welcome to VBA” in cell A1. This is the second task that is recorded. Exclude the beginning and ending double quotation marks while typing.
Step 4c: Press the “Enter” key. As a result, the selection shifts from cell A1 to cell A2. This becomes the third task that is recorded.
The selection is shown in the following image.
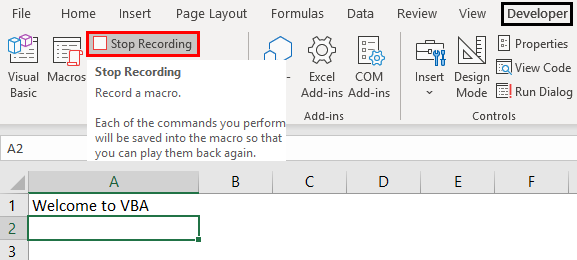
Step 5: Click “stop recording” in the “code” group of the Developer tab. By clicking this option, Excel is told to refrain from recording any further tasks.
The “stop recording” option is shown in the following image.
Stage 3–View and Examine the VBA Code Generated by the Recorded Macro
Let us observe and study the VBA code generated by the macro recorded in stage 2. Remember that one can either directly write a code in the Visual Basic Editor (VBE or VB Editor) or let a macro do the same.
The VBE is a tool or program where VBA codes are written, edited, and maintained. When a macro is recorded, a code is automatically written in a new module of VBE. Note that VBA is the programming language of Excel.
The steps to view and study the code generated by the recorded macro are listed as follows:
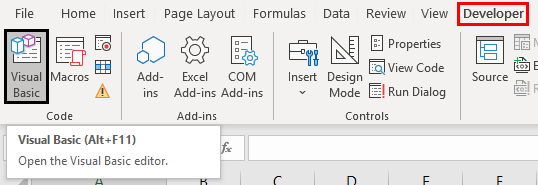
Step 1: Click “visual basic” from the “code” group of the Developer tab. This option is shown in the following image.
Alternative to step 1: As a substitute for the preceding step, press the keys “Alt+F11” together. This is the shortcutAn Excel shortcut is a technique of performing a manual task in a quicker way.read more to open the VBE window.
Note: “Alt+F11” is a toggle key which when pressed repeatedly, helps to switch between VBE and Excel.
Step 2: The Visual Basic Editor window opens, as shown in the following image.
To the left of the VBE window, the worksheet, workbook, and module are shown. This window on the left (named “Project-VBAProject”) is also known as the Project window or the Project Explorer of VBE.
Step 3: Double-click “modules” shown in the following image.
Note: “Modules” are folders shown in the Project window after recording a macro. They are not shown prior to recording a macro. “Modules” are also shown when a module is inserted manually from the Insert tab of the VBE.
Step 4: Double-click “module1” under modules. A code appears on the right side of the VBE window. This window on the right [named “Book1-Module1 (Code)”] is known as the module code window.
The code is displayed in the following image.
Note: The code generated by recording a macro can be checked in the “modules” folder (in the module code window). In a module code window, one can also write a code manually or copy-paste it from another source.
In the following steps (step 4a to step 4d), the code generated by the recorded macro has been studied.
Step 4a: The first word of the code is “Sub.” “Sub” stands for subroutine or procedure. At the start of the code, the word “Sub,” the macro name (recording_macro), and a pair of empty parentheses are displayed. This is followed by the statements to be executed by the code. These statements are:
ActiveCell.FormulaR1C1 = “Welcome to VBA”
Range (“A2”). Select
The code ends with “End Sub.”
The start or head [Sub Recording_Macro ()] and the end or tail [End Sub] of the code are shown in the following image.
Note 1: The words “macro” and “code” are often used interchangeably by several Excel users. However, some users also distinguish between these two words.
A VBA code is a command created either by writing a code directly in VBE or by recording a macro in Excel. In contrast, a macro consists of instructions that automate tasks in Excel. According to one’s choice, one can decide whether or not to differentiate between the two words.
Note 2: The “Sub” can be preceded by the words “Private,” “Public,” “Friend,” or “Static.” All these words set the scope of the subroutine. The default subroutine used in VBA is “Public Sub.” So, when “Sub” is written in a code, it implies “Public Sub.”
A “Public Sub” can be initiated by subroutines of different modules. However, a “Private Sub” cannot be initiated by subroutines of other modules.
Step 4b: The first activity we performed (in step 4a of stage 2) was to select cell A1. Accordingly, the following statement of the code tells Excel that the active cell is R1C1.
ActiveCell.FormulaR1C1
When a macro is recorded, VBA uses the R1C1 style for referring to cells. In this style, the letter R is followed by the row number and the letter C is followed by the column number. So, cell R1C1 implies that the row number is 1 and the column number is also 1. In other words, cell R1C1 is the same as cell A1 of Excel.
Step 4c: The second activity we performed (in step 4b of stage 2) was to type “welcome to VBA” in cell A1. So, the following statement of the code tells Excel that the value in cell R1C1 is “welcome to VBA.”
ActiveCell.FormulaR1C1 = “Welcome to VBA”
Step 4d: The third activity we performed (in step 4c of stage 2) was to press the “Enter” key. By pressing this key, the selection had shifted from cell A1 to cell A2. Therefore, the following statement tells Excel to select cell A2.
Range (“A2”). Select
This is the way VBA generates a code for all the activities performed under stage 2 of programming in Excel. Examining the code line-by-line makes it easier to interpret it.
Stage 4–Test the VBA Code of the Recorded Macro
Let us test the code when it is run multiple times. Note that a macro (or code) can be run as many times as one wants. Each time it runs, it performs the recorded tasks in Excel.
The steps to test the code that we examined in stage 3 are listed as follows:
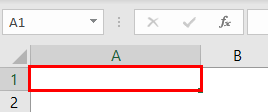
Step 1: Delete the string “welcome to VBA” from cell A1 of Excel. Let A1 remain as a blank, selected cell. The following image shows the empty cell A1.
Note: To go back from VBE to Excel, press the toggle key “Alt+F11.”
Step 2: Go to VBE again by pressing the key “Alt+F11.” Click anywhere within the code. Next, click the “Run Sub/UserForm (F5)” button. This button is shown within a blue box in the following image.
Note: Alternatively, one can press the key F5 to run the VBA code.
Step 3: The output is shown in the following image. The preceding code enters the string “welcome to VBA” in cell A1. Thereafter, the selection shifts to cell A2. The string “welcome to VBA” has been entered in cell A1 because this cell was selected (in step 1) before running the code.
Each time the code is run, the currently selected cell (or the active cell) is filled with the string “welcome to VBA.” Then, the selection shifts to cell A2. So, if cell M10 is the active cell, running the code fills this cell with the stated string and selects cell A2 at the end.
However, had cell A2 been selected, running the code would have filled this cell with the string “welcome to VBA.” Moreover, in the end, cell A2 would have remained the selected cell.
Stage 5–Save the Recorded Macro (or the VBA Code)
Let us learn how to save a workbook containing a recorded macro. If a macro is saved, its VBA code is also saved.
The steps to save a workbook containing a macro (or a VBA code) are listed as follows:
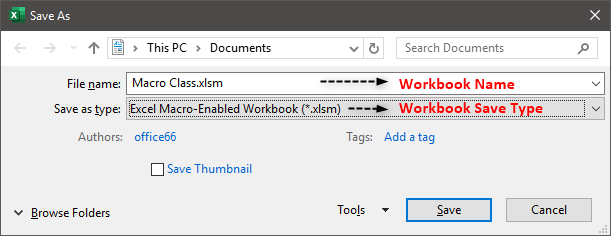
- Click “save as” from the File tab of Excel. The “save as” dialog box opens, as shown in the following image.
- Assign a name to the Excel workbook in the “file name” box. We have entered the name “macro class.”
- Save the workbook with the “.xlsm” extension. So, in the “save as type” box, choose “Excel macro-enabled workbook.”
- Click “save” to save the workbook.
A workbook containing a macro should always be saved with the “.xlsm” extension. This extension ensures that the macro is saved and can be reused the next time the workbook is opened.
Note 1: The “save as” command is used when a workbook is saved for the first time. It is also used when a new copy of the workbook is to be created and, at the same time, the original copy is to be retained as well.
Note 2: If the workbook containing a macro is saved as a regular workbook (with the “.xlsx” extension), the macro will not be saved. Further, one may lose the code of the recorded macro.
Frequently Asked Questions
1. What is programming and how is it carried out in Excel?
Programming refers to instructing Excel to perform one or more tasks. To instruct Excel, either a code can be written in the Visual Basic for Applications (VBA) or a macro can be recorded in Excel. Each time a macro is recorded, a code is generated by VBA in the background.
The steps to carry out programming in Excel are listed as follows:
a. Enable the Developer tab in Excel.
b. Record a macro in Excel. For recording, perform each activity in the sequence in which it should be recorded.
c. Save the code generated by the recorded macro and run it whenever required.
One can also carry out programming by writing a code manually and then saving and running it.
Note: To learn the details of programming in Excel, refer to the description of the different stages given in this article.
2. How to write a code for programming in Excel?
For programming in Excel, a code is written in Visual Basic Editor (VBE), which is a tool of VBA. The steps to write a code in VBE are listed as follows:
a. Open a blank Excel workbook.
b. Press the keys “Alt+F11” to open VBE.
c. Select any worksheet from “Microsoft Excel Objects” listed in the “Project-VBA Project window.”
d. Click the Insert tab and choose “module.” A folder named “modules” and an object named “module1” are created in the “Project-VBA Project window.” At the same time, a window opens on the right, which is titled “Book1-Module1 (Code).”
e. Enter the code in the “Book1-Module1 (Code)” window that has opened in the preceding step.
f. Click anywhere within the code once it has been written entirely.
g. Run the code by pressing F5 or clicking the “Run Sub/UserForm (F5)” button.
If the code has been entered correctly in step “e,” Excel will perform the tasks it has been instructed to. However, if there is an error in the code, an error message will appear.
Note: For saving a code, refer to stage 5 of programming in Excel given in this article.
3. How to learn programming in Excel?
To learn programming, one can learn how to record a macro in Excel. It is easier to learn macro recording than to create a code manually in VBE. Moreover, macro recording can be done even if one does not know VBA coding.
However, each time a macro is recorded, examine the generated code carefully. As one becomes proficient in macro recording, the codes too will become understandable. In this way, learning programming in Excel will no longer be a complicated task.
Recommended Articles
This has been a guide to Programming in Excel. Here we discuss how to record VBA macros along with practical examples and downloadable Excel templates. You can learn more from the following articles–
- Create Button Macro in ExcelA Macro is nothing but a line of code to instruct the excel to do a specific task. Once the code is assigned to a button control through VBE you can execute the same task any time in the workbook. By just clicking on the button we can execute hundreds of line, it also automates the complicated Report.read more
- What is VBA Macros?
- Excel MacroA macro in excel is a series of instructions in the form of code that helps automate manual tasks, thereby saving time. Excel executes those instructions in a step-by-step manner on the given data. For example, it can be used to automate repetitive tasks such as summation, cell formatting, information copying, etc. thereby rapidly replacing repetitious operations with a few clicks.
read more - Code in Excel VBAVBA code refers to a set of instructions written by the user in the Visual Basic Applications programming language on a Visual Basic Editor (VBE) to perform a specific task.read more
Everybody in this country should learn how to program a computer... because it teaches you how to think." -Steve Jobs
I wish to extend the wise words of Steve Jobs and say everyone in the world should learn how to program a computer. You may not necessary end up working as a programmer or writing programs at all but it will teach you how to think.
In this VBA tutorial, we are going to cover the following topics.
- What is Visual Basic for Applications (VBA)?
- Why VBA?
- Personal & Business Applications of VBA in Excel
- Introduction to Visual Basic for Applications
- Step by step example of creating a simple EMI calculator in Excel
- How to use VBA in Excel Example
Visual Basic for Applications (VBA) is an event-driven programming language implemented by Microsoft to develop Office applications. VBA helps to develop automation processes, Windows API, and user-defined functions. It also enables you to manipulate the user interface features of the host applications.
Before we go into further details, let’s look at what computer programming is in a layman’s language. Assume you have a maid. If you want the maid to clean the house and do the laundry. You tell her what to do using let’s say English and she does the work for you. As you work with a computer, you will want to perform certain tasks. Just like you told the maid to do the house chores, you can also tell the computer to do the tasks for you.
The process of telling the computer what you want it to do for you is what is known as computer programming. Just as you used English to tell the maid what to do, you can also use English like statements to tell the computer what to do. The English like statements fall in the category of high level languages. VBA is a high level language that you can use to bend excel to your all powerful will.
VBA is actually a sub set of Visual Basic 6.0 BASIC stands for Beginners All-Purpose Symbolic Instruction Code.
Why VBA?
VBA enables you to use English like statements to write instructions for creating various applications. VBA is easy to learn, and it has easy to use User Interface in which you just have to drag and drop the interface controls. It also allows you to enhance Excel functionality by making it behave the way you want.
Personal & Business Applications of VBA in Excel
For personal use, you can use it for simple macros that will automate most of your routine tasks. Read the article on Macros for more information on how you can achieve this.
For business use, you can create complete powerful programs powered by excel and VBA. The advantage of this approach is you can leverage the powerful features of excel in your own custom programs.
Introduction to Visual Basic for Applications
Before we can write any code, we need to know the basics first. The following basics will help you get started.
- Variable – in high school we learnt about algebra. Find (x + 2y) where x = 1 and y = 3. In this expression, x and y are variables. They can be assigned any numbers i.e. 1 and 3 respective as in this example. They can also be changed to say 4 and 2 respectively. Variables in short are memory locations. As you work with VBA Excel, you will be required to declare variables too just like in algebra classes
-
Rules for creating variables
- Don’t use reserved words – if you work as a student, you cannot use the title lecturer or principal. These titles are reserved for the lecturers and the school authority. Reserved words are those words that have special meaning in Excel VBA and as such, you cannot use them as variable names.
- Variable names cannot contain spaces – you cannot define a variable named first number. You can use firstNumber or first_number.
- Use descriptive names – it’s very tempting to name a variable after yourself but avoid this. Use descriptive names i.e. quantity, price, subtotal etc. this will make your Excel VBA code easy to read
-
Arithmetic operators – The rules of Brackets of Division Multiplication Addition and Subtraction (BODMAS) apply so remember to apply them when working with expressions that use multiple different arithmetic operators. Just like in excel, you can use
- + for addition
- – for subtraction
- * for multiplication
- / for division.
-
Logical operators – The concept of logical operators covered in the earlier tutorials also apply when working with VBA. These include
- If statements
- OR
- NOT
- AND
- TRUE
- FALSE
How to Enable the Developer Tab
Below is the step by step process on how to enable the developer tab in Excel:
- Create a new workbook
- Click on the ribbon start button
- Select options
- Click on customize ribbon
- Select the developer checkbox as shown in the image below
- Click OK
You will now be able to see the DEVELOPER tab in the ribbon
VBA Hello World!
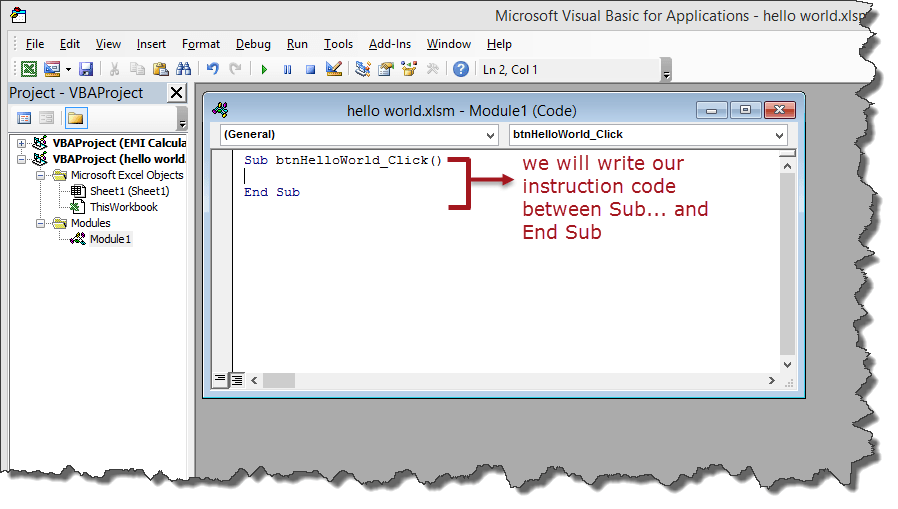
Now we will demonstrate how to program in VBA programming language. All program in VBA has to start with “Sub” and end with “End sub”. Here the name is the name you want to assign to your program. While sub stands for a subroutine which we will learn in the later part of the tutorial.
Sub name()
.
.
.
End Sub
We will create a basic VBA program that displays an input box to ask for the user’s name then display a greeting message
This tutorial assumes you have completed the tutorial on Macros in excel and have enabled the DEVELOPER tab in excel.
- Create a new work book
- Save it in an excel macro enabled worksheet format *.xlsm
- Click on the DEVELOPER tab
- Click on INSERT drop down box under controls ribbon bar
- Select a command button as shown in the image below
Draw the command button anywhere on the worksheet
You will get the following dialogue window
- Rename the macro name to btnHelloWorld_Click
- Click on new button
- You will get the following VBA code window
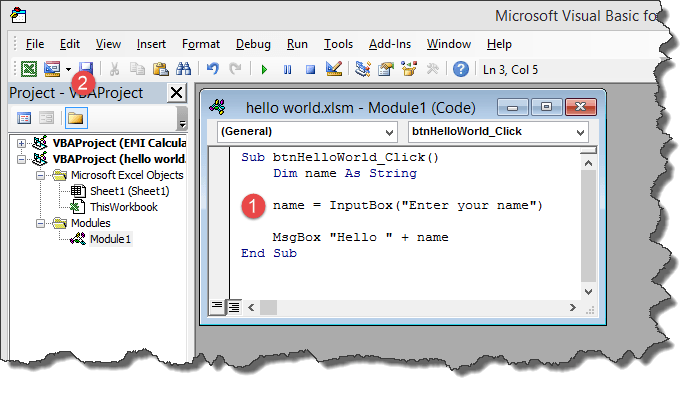
Enter the following instruction codes
Dim name As String
name = InputBox("Enter your name")
MsgBox "Hello " + name
HERE,
- “Dim name as String” creates a variable called name. The variable will accept text, numeric and other characters because we defined it as a string
- “name = InputBox(“Enter your name”)” calls the built in function InputBox that displays a window with the caption Enter your name. The entered name is then stored in the name variable.
- “MsgBox “Hello ” + name” calls the built in function MsgBox that display Hello and the entered name.
Your complete code window should now look as follows
- Close the code window
- Right click on button 1 and select edit text
- Enter Say hello
- Click on Say Hello
- You will get the following input box
- Enter your name i.e. Jordan
- You will get the following message box
Congratulations, you just created your first VBA program in excel
Step by step example of creating a simple EMI calculator in Excel
In this tutorial exercise, we are going to create a simple program that calculates the EMI. EMI is the acronym for Equated Monthly Instalment. It’s the monthly amount that you repay when you get a loan. The following image shows the formula for calculating EMI.
The above formula is complex and can be written in excel. The good news is excel already took care of the above problem. You can use the PMT function to compute the above.
The PMT function works as follows
=PMT(rate,nper,pv)
HERE,
- “rate” this is the monthly rate. It’s the interest rate divided by the number of payments per year
- “nper” it is the total number of payments. It’s the loan term multiplied by number of payments per year
- “pv” present value. It’s the actual loan amount
Create the GUI using excel cells as shown below
Add a command button between rows 7 and 8
Give the button macro name btnCalculateEMI_Click
Click on edit button
Enter the following code
Dim monthly_rate As Single, loan_amount As Double, number_of_periods As Single, emi As Double
monthly_rate = Range("B6").Value / Range("B5").Value
loan_amount = Range("B3").Value
number_of_periods = Range("B4").Value * Range("B5").Value
emi = WorksheetFunction.Pmt(monthly_rate, number_of_periods, -loan_amount)
Range("B9").Value = emi
HERE,
- “Dim monthly_rate As Single,…” Dim is the keyword that is used to define variables in VBA, monthly_rate is the variable name, Single is the data type that means the variable will accept number.
- “monthly_rate = Range(“B6”).Value / Range(“B5″).Value” Range is the function used to access excel cells from VBA, Range(“B6”).Value makes reference to the value in B6
- “WorksheetFunction.Pmt(…)” WorksheetFunction is the function used to access all the functions in excel
The following image shows the complete source code
- Click on save and close the code window
- Test your program as shown in the animated image below
How to use VBA in Excel Example
Following steps will explain how to use VBA in Excel.
Step 1) Open your VBA editor
Under Developer tab from the main menu, click on “Visual Basic” icon it will open your VBA editor.
Step 2) Select the Excel sheet & Double click on the worksheet
It will open a VBA editor, from where you can select the Excel sheet where you want to run the code. To open VBA editor double click on the worksheet.
It will open a VBA editor on the right-hand side of the folder. It will appear like a white space.
Step 3) Write anything you want to display in the MsgBox
In this step we are going to see our first VBA program. To read and display our program we need an object. In VBA that object or medium in a MsgBox.
- First, write “Sub” and then your “program name” (Guru99)
- Write anything you want to display in the MsgBox (guru99-learning is fun)
- End the program by End Sub
Step 4) Click on the green run button on top of the editor
In next step you have to run this code by clicking on the green run button on top of the editor menu.
Step 5) Select the sheet and click on “Run” button
When you run the code, another window will pops out. Here you have to select the sheet where you want to display the program and click on “Run” button
Step 6) Display the msg in MsgBox
When you click on Run button, the program will get executed. It will display the msg in MsgBox.
Download the above Excel Code
Summary
VBA Full Form : Visual Basic for Application. It’s a sub component of visual basic programming language that you can use to create applications in excel. With VBA, you can still take advantage of the powerful features of excel and use them in VBA.
Содержание
- Starting an Application from Excel
- Using the VBA Shell function
- Using the Windows ShellExecute API function
- How to start an application from Excel VBA
- How to start an application from Excel VBA
- Re: How to start an application from Excel VBA
- Re: How to start an application from Excel VBA
- Re: How to start an application from Excel VBA
- Contact US
- Come Join Us!
- Posting Guidelines
- Related Projects
- starting a separate program from Excel
- starting a separate program from Excel
- starting a separate program from Excel
- RE: starting a separate program from Excel
- RE: starting a separate program from Excel
- RE: starting a separate program from Excel
- RE: starting a separate program from Excel
- Red Flag Submitted
- Reply To This Thread
- Posting in the Eng-Tips forums is a member-only feature.
- Programming in Excel
- Introduction to Programming in Excel
- How to Program in Excel?
- Enabling Developer Tab
- Recording a Macro
- Conclusion
- Things to Remember About Programming in Excel
- Recommended Articles
Starting an Application from Excel
Starting up another application from Excel is often useful. For example, you might want to execute another Microsoft Office application or even a DOS batch file from Excel. Or, as an application developer, you might want to make it easy for a user to access the Windows Control Panel.
Using the VBA Shell function
The VBA Shell function makes launching other programs relatively easy. The StartCalc procedure that follows launches the Windows Calculator application.
You’ll probably recognize the application that this procedure launches in Figure 20-1.
The Shell function returns a task identification number for the application. You can use this number later to activate the task. The second argument for the Shell function determines how the application is displayed. ( 1 is the code for a normal- size window, with the focus.) Refer to the Help system for other values for this argument.

Displaying a Folder Window
The Shell function is also handy if you need to display a particular directory using Windows Explorer. For example, the statement that follows displays the folder of the active workbook (but only if the workbook has been saved):

If the Shell function is not successful, it generates an error. Therefore, this procedure uses an On Error statement to display a message if the executable file cannot be found or if some other error occurs.
It’s important to understand that your VBA code does not pause while the application that was started with the Shell function is running. In other words, the Shell function runs the application asynchronously. If the procedure has more instructions after the Shell function is executed, they are executed concurrently with the newly loaded program. If any instruction requires user intervention (for example, displaying a message box), Excel’s title bar flashes while the other application is active.
In some cases, you might want to launch an application with the Shell function, but you need your VBA code to pause until the application is closed. For example, the launched application might generate a file that is used later in your code. Although you can’t pause the execution of your code, you can create a loop that does nothing except monitor the application’s status. The example that follows displays a message box when the application launched by the Shell function has ended:
While the launched program is running, this procedure continually calls the GetExitCodeProcess function from within a Do-Loop structure, testing for its returned value ( lExitCode ). When the program is finished, lExitCode returns a different value, the loop ends, and the VBA code resumes executing.
Both of the preceding examples are available on the companion CD-ROM. The filename is 
Using the Windows ShellExecute API function
ShellExecute is a Windows Application Programming Interface (API) function that is useful for starting other applications. Importantly, this function can start an application only if an associated filename is known ( assuming that the file type is registered with Windows). For example, you can use ShellExecute to open a Web document by starting the default Web browser. Or you can use an e-mail address to start the default e-mail client.
The API declaration follows (this code goes at the top of a VBA module):
The following procedure demonstrates how to call the ShellExecute function. In this example, it opens a graphics file by using the graphics program that’s set up to handle GIF files. If the result returned by the function is less than 32, then an error occurred.
The next procedure opens a text file, using the default text file program:
The following example is similar, but it opens a Web URL by using the default browser.
This technique can also be used with an e-mail address. The example below opens the default e-mail client and then addresses an e-mail to the recipient.
These examples are available on the companion CD-ROM in a file named 
Источник
How to start an application from Excel VBA
LinkBack
Thread Tools
Rate This Thread
Display
How to start an application from Excel VBA
I would like to start an application from Excel VBA and pass command line
parameters to it. Once the app is started it should run completely
independently from the instance of Excel that started it.
Excel shouldn’t wait on it to to anything (including terminate).
Re: How to start an application from Excel VBA
See the Shell statement.
—
Cordially,
Chip Pearson
Microsoft MVP — Excel
Pearson Software Consulting, LLC
www.cpearson.com
wrote in message
news:7i1b32htj314cn5ghlgmquiharuloasmj9@4ax.com.
>I would like to start an application from Excel VBA and pass
>command line
> parameters to it. Once the app is started it should run
> completely
> independently from the instance of Excel that started it.
>
> Excel shouldn’t wait on it to to anything (including
> terminate).
>
> Thanks.
Re: How to start an application from Excel VBA
Thanks, I haven’t tried it yet but it looks like exactly what I needed. I
tried «Spawn», «Execute», «Start» and several others, but I didn’t think to
look up «Shell».
On Thu, 6 Apr 2006 17:15:48 -0500, «Chip Pearson»
wrote:
>See the Shell statement.
The VBA shell command is as follows:
programPath = «C:Program FilesInternet Exploreriexplore.exe» ‘ works
‘programPath = «iexplore.exe» ‘ does not work
Shell programPath + » » + fileToLaunch, vbNormalFocus
but the drawback is that the invoked program (iexplore.exe, at least in my case) needs to have the FULL PATH to where the program exists = the «C:Program FilesInternet Explorer» which may or may not work on someone elses computer. Is there a trick to find where the executing program lives? This hardcoding will not work and is not transportable.
Re: How to start an application from Excel VBA
I’m trying to get this shell function working but w/o the desired success:
Sub runSubMagic()
programPath = «D:Program FilesVideoSubMagic5-8subMagic»
fileToLaunch = «H:VIDEOMOVIESmovies 2010movieTitle» & «» & «movieTitle.en.srt»
Shell programPath + » » + fileToLaunch, vbNormalFocus
End Sub
It starts the application but does not load the file «movieTitle.en.srt». I have tried this:
programPath = «»»» & «D:Program FilesVideoSubMagic5-8subMagic» & «»»»
fileToLaunch = «»»» & «H:VIDEOMOVIESmovies 2010movieTitle» & «»»» & «» & «movieTitle.en.srt»
but it doesn’t help either. Executing the code step by step also does not create an error whatsoever.
Источник
Thanks. We have received your request and will respond promptly.
Come Join Us!
- Talk With Other Members
- Be Notified Of Responses
To Your Posts - Keyword Search
- One-Click Access To Your
Favorite Forums - Automated Signatures
On Your Posts - Best Of All, It’s Free!
Posting Guidelines
Promoting, selling, recruiting, coursework and thesis posting is forbidden.
starting a separate program from Excel
starting a separate program from Excel
starting a separate program from Excel
I would like to create a macro in excel that runs another program using the data from that excel file. It’s the running the other program that I don’t know how to do. I would be grateful for any thoughts on the matter.
Regards,
Qshake
Eng-Tips Forums:Real Solutions for Real Problems Really Quick.
RE: starting a separate program from Excel
IN VBA look at the help for shell function and ActivateMicrosoftApp Method
In Excel dig around in the ActiveX help, it looks like you might be able to do it from there.
Please see FAQ731-376 for tips on how to make the best use of Eng-Tips.
RE: starting a separate program from Excel
It’s easier if the other program is part of the MS Office suite, in which case you can do this directly. Open up your Object Browser in the VBE screen and look at the options under Application.
I did this way back in 1999, opening up Access, searching a database for matching records, then writing a line to the database and opening up Word and performing a mail merge with the data. It was my first ever macro and I managed to pull it off, so it’s not that hard!
RE: starting a separate program from Excel
RetVal = Shell(ShellPath, vbNormalFocus)
where ShellPath is the full path and program name
RE: starting a separate program from Excel
Please see FAQ731-376 for tips on how to make the best use of Eng-Tips.
Red Flag Submitted
Thank you for helping keep Eng-Tips Forums free from inappropriate posts.
The Eng-Tips staff will check this out and take appropriate action.
Reply To This Thread
Posting in the Eng-Tips forums is a member-only feature.
Click Here to join Eng-Tips and talk with other members! Already a Member? Login
Источник
Programming in Excel
Excel Programming (Table of Contents)
Introduction to Programming in Excel
Have you ever been tired of doing a task in Excel which you feel can be automated and save your time? Most of the time, you must have encountered such tasks. However, in order to automate any task, you first need to have programming skills for that particular language. In Excel, you can do programming with the help of Visual Basic for Application (VBA) which is Excel’s own programming language that can help you to automate the tasks. In this article, we will see how we can do programming in Excel VBA. VBA can be used to write a program that can automate the task for you. The piece of lines we write under VBA is called Macro, which is written in such a way that they instruct the Excel system about what to be done.
Valuation, Hadoop, Excel, Mobile Apps, Web Development & many more.
How to Program in Excel?
Let’s understand how to Program in excel with few illustrations.
Enabling Developer Tab
The first thing that comes is enabling the developer tab that helps you to record and store a macro (VBA Code). Let us see how we can get that enabled.
- Navigate to the File menu in your excel file and click on it.
- Within the File menu, click on Options, and it will load a new window with all excel options available.
- In the new window that popped up named Excel Options, click on the Customize Ribbon tab. You can see all the customization options you can use for Excel Ribbon, which appears at the top of your Excel file.
- Enable Developer option under Main Tabs dropdown within Customize the Ribbon: section. You can check (tick-mark) the Developer tab to enable it. Click the OK button placed at the bottom right of the Excel Options tab, and that’s it.
- You have successfully enabled the Developer option within your excel. If you check the Excel Ribbon in your file now, you’ll be able to see a new tab added there with the name Developer on it.
This is the first step you need to follow before you start writing macros in Excel. Because the Developer tab is needed to record and run the macro, this option tab is not by default enabled, which is why we tried enabling it here first.
Recording a Macro
- Open the Excel file. Navigate towards the Developer tab you just enabled and then click on the Record Macro button, categorized and can be seen under the Code section.
- As soon as you click on the Record Macro button, you’ll see a window popping up; in that window, you must have to assign a name to the macro; you can also assign a shortcut key for this macro to run. Can you add the description, if any, for this macro you are creating? Once you are done with all this, you can click on the OK button placed at the right bottom of the window. See the screenshot below for your reference.
As soon as you click OK, the system starts recording the macro and all the tasks you perform will be recorded and converted to Excel Program in the backend.
- Try typing the sentence “This is my first VBA code, and I am very happy!” in cell A1 within the Excel sheet and press Enter key. These steps will be recorded in the backend of the macro.
- Under the Code section, you might have observed that the Record Macro button has changed to Stop Recording. This is like Play and Stop. Record Macro Works as Play button and Stop Recording work as Stop button. Click on the Stop Recording button to stop the recording.
The magic behind all this is, Excel has recorded my steps here and converted those into pieces of code so that this task can be automated. It means, every single step, selecting cell A1, inputting the text as “This is my first VBA code, and I am happy!”, clicking Enter to go to the next cell. All these steps are converted into a VBA code. Let’s check the code now.
- In order to go to Visual Basic Editor, you can click on the Visual Basic option under the Code category in the Developer tab, or you can use Alt + F11 as a shortcut for the same.
- Navigate towards the Modules section under VBAProject and click on the plus button under it to see the list of active modules in VBA.
- Inside the Modules folder, you can see Module1 as soon as you click on the plus sign. You can double click on Module1; it is where your code for the task we performed in previous steps (Step 3 and 4) are recorded. Save this code, and you can run it every time to get the same output. See the screenshot below:
Conclusion
- We can record a macro in Excel to automate day to day small tasks, which are simpler for the system to manipulate programmatically.
- The cool thing about it is you don’t need to dig your head deep for the logic behind each step you perform. Excel VBA does it for you.
- For some complex tasks, such as the one which involves looping and conditional statements, you need to write code manually under VBA.
Things to Remember About Programming in Excel
- The Developers tab is not by default enabled and visible to you in Excel Ribbon. You need to enable it through Excel Options.
- Recording a macro works on simple tasks that are repeating, and you need those to be automated. However, for complex tasks which involve looping or Conditional Inputs and Outputs are still need to be coded manually under VBA.
- You need to save the file as an Excel-Macro Enable file format in order to be able to read and run the code again on your excel.
Recommended Articles
This is a guide to Programming in Excel. Here we discuss how to Program in Excel along with practical examples and a downloadable excel template. You can also go through our other suggested articles –
Источник
While it can be scary in trying to write your first code, it is also very fulfilling to see the result of your first code. I wrote my first code in QBASIC about 20 years ago, it was a simple PRINT HELLO, WORLD.
When the computer did as I say and go on to show «HELLO, WORLD» on the b/w screen, I remember I had a big smile on my face. I couldn’t remember what else happened but I know I was very very happy to see the result of my first code.
Here I’d like to share the joy with you on programming with Excel-VBA. If you are a total beginner, having no knowledge about programming, then this is for you! After writing your first code and understanding how it works, then I will go on and show you a few excel macro tricks that are commonly used.
First Code
You probably know that computer will do as you say, so where do we input the commands? For Excel (and other Ms Office products), it is through the VBA window which you can open it by pressing Alt+F11 in Excel. There is a more-obvious way to go to VBA window, but I always use the short-cut key anyway. By the way, VBA stands for Visual Basic for Applications, it is a light-weighted version of Visual Basic created specifically for Microsoft Office products.
And where do we write in VBA window the commands? Generally, we write in a Module. There is no module yet for a new workbook, so go ahead and right-click on the VBAProject, and add a module such as shown below
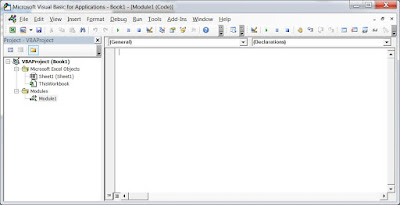
You should get to the screen shown below with the new module, namely Module1, automatically opened for you. If not, just double click on Module1 to open it.
It may looks very complicated what we have just done, especially with all the unfamiliar icons in the VBA window. But don’t worry, you will get used to it.
It has been customary for all new programmers to command the computer to say Hello, World! as their first code. There is a good reason why, because it is simple and good for initial understanding. So here’s the codes for your first mini program in Excel-VBA
Sub MyFirstProgram()
MsgBox «Hello, World!»
End Sub
Go on and type these codes into the module, or just copy and paste if you like.
Now you can execute the code by pressing the play button.
See the message?
Congratulation!
That’s it! you have written your first code!
OK Lets recap, to write a program,
- First, we go to VBA window, that is the window to give instructions to the computer.
- Then create a module, the notepad-like place where you write the commands (i.e the codes).
- Then hit play!
How simple is that!?!
Now that you have created your first program in Excel-VBA, I’ll explain some technicalities so that you fully understand how the code works. Look at you first program:
Sub MyFirstProgram()
MsgBox «Hello, World!»
End Sub
- Your program codes should be sandwiched between the Sub and the End Sub lines. These two lines let the computer know where your program starts and ends. We call this the object-oriented paradigm, that is giving everything a sense of boundary. You will see that many other codes also adopted this paradigm.
- MyFirstProgram is the title of your program and is written immediately after Sub word. Note that only alphanumeric characters and underscores are allowed, no space, and title cannot start with a number. Always give a meaningful title for a program.
- The () is for passing information between programs when you have multiple programs that run in sequence. In other words, it is where input parameters are defined. For example,
Sub PromptAMessage(MyMessage As String)MsgBox MyMessage
End Sub
That is pretty much it! Now you can go on and make your own program, be creative and be versatile.
Examples
Here are few small programs to help enrich your understanding.
How to declare a variable to store information for use later
Variables are useful for storing information to work with later on as the program runs. To declare a variable, we use Dim. There are a few data types of variable, here are 7 types you can learn as starters:
- Long — used to store whole numbers
- Double — used to store numbers with decimal places
- String — used to store text
- Boolean — used to store logical information like TRUE and FALSE
- Date — used to store date and time information. I repeat, its date and time information.
- Variant — used to store any type (all of the above) and also multi-dimensional information like a table
- Range — used to store information of cells location/addresses
Sub Example1()
‘This example shows how to store a string of text.
Dim mytext As String
mytext = «Hello, World!»
MsgBox mytext
mytext = «The time is» & Now
MsgBox mytext
End Sub
Notes: the ampersand(&) is used to concatenate two strings together. Now is the code to return the current system date and time.
Sub Example2()
‘This example shows how to store numbers.
Dim x As Decimal
Dim y As Decimal
x = 2.5
y = 6.6
MsgBox x + y
End Sub
Notes: If you store decimal numbers in a long type variable, the decimals will be truncated leaving only the whole number. So define your variables correctly!
With a variable, you can also do iteration in macro.
Sub Example3()
‘This example shows how to do iteration.
Dim x As long
x = 1
MsgBox x
x = x + 1
MsgBox x
End Sub
The first message will show 1 and the second message will show 2.
There are unending number of ways to play with variables, only time will show you the vast different methods.
How to ask for user input while your program is running
Sub Example4()
‘This example shows how to ask for user input.
Dim NameStr As String
NameStr = InputBox(«Please enter your name»)
MsgBox «Hello » & NameStr
End Sub
Notes: If you declare wrong data type, for example if you declare NameStr As Double, you will get an error if you try to store text information into it.
How to change the value of a cell in current spreadsheet
Sub Example5()
‘This example shows how to change the value of a cell
‘in current sheet.
‘There are 3 ways, but they are all the same.
Range(«B5»).Value = 55
Cells(6, 2).Value = 60 ‘This corresponds to cell B6
[B7].Value = 70
End Sub
How to change the value of a cell in specific spreadsheet
Often we have multiple sheets and we want to change the values across different sheets.
Sub Example6()
‘This example shows how to change the value of a cell
‘in specific sheet.
Worksheets(«Sheet1»).Range(«B5»).Value = 55
Worksheets(«Sheet2»).Range(«B5»).Value = 60
Worksheets(«Sheet3»).Range(«B5»).Value = 65
Worksheets(«Sheet4»).Range(«B5»).Value = 70
Worksheets(«Sheet5»).Range(«B5»).Value = 80
End Sub
Notes: Sheet1, Sheet2…. to Sheet 6 are the sheet names you used in your Excel. If you change them, then you have to change your code as well, unless you have a more dynamic way to identify the sheets.
How to loop through a few cells and change their values
We can ask the computer to do some actions repeatedly for a specified number of times (or continuously until a certain criteria is met).
Sub Example7()
‘This example shows how to repeat an action
‘for specified number of times (5 times for this example)
Dim i as long
For i = 1 to 3
MsgBox i
Next i
End Sub
Lets try to get a little creative on example 6
Sub Example8()
‘An advancement of example 6
Dim i as long
For i = 1 to 5
Worksheets(«Sheet» & i).Range(«B5»).Value = 50 + i * 5
Next i
End Sub
See how the codes shrink, imagine that if you need to do 1000 iterations!
Besides For… Next, another way is use Do… Loop. Below is an alternative looping method for example 7.
Sub Example9()
‘An alternative to example 7
Dim i as long
i = 1
Do
MsgBox i
i = i + 1
Loop While i <= 3
End Sub
Notes: Loop While i <= 3 means that the Loop will repeat while i is less than or equal to 3. When i becomes greater than 3, the loop is ended.
Besides Do… Loop While, we can also use Do… Loop Until, which is literally the same but just change the condition for exiting the loop. Applying Loop Until to example 9 will become
Sub Example10()
‘An alternative to example 7 and 9
Dim i as long
i = 1
Do
MsgBox i
i = i + 1
Loop Until i > 3
End Sub
How to get the computer to make decision
Decision making is made using the IF function. You probably been very familiar with it in excel formula. Now you just need the correct syntax for using IF in VBA.
Sub Example11()
‘Decision making example
Dim x As Long
x = 100
If x < 100 Then
MsgBox «x is less than 100»
ElseIf x = 100 Then
MsgBox «x is equal 100»
Else
MsgBox «x is more than 100»
End If
End Sub
Notes: You can put as many ElseIf as you like. This may be new concept to you from excel-formula as excel-formula don’t support ElseIf.
Another example
Sub Example12()
‘Decision making example
Dim t As Date
t = Now
If TimeValue(t) < TimeValue(«12:00:00») Then
MsgBox «Good Morning»
Else
MsgBox «Good afternoon»
End If
End Sub
Notes: TimeValue is the function to extract the time information from a given date and time input.
How to copy and paste values
Lets say you want to copy values in cells B2:B10 to cells D5:D13, we can do this in two methods,
- simulation method
- direct method
Simulation method simulates the action of human, i.e. the action of copying (Ctrl+c) and the action of pasting (Ctrl+v). This method is often slower in performance but its advantage is everything gets copied, including formatting and formulas.
In direct method, it is much faster, but only values get copied. Copying formatting and formula is also possible with direct method but more difficult compared to simulation method.
Sub Example13()
‘Copy and paste simulation method
Range(«B2:B10»).Copy Range(«D5:D13»)
End Sub
Sub Example14()
‘Copy and paste direct method
Range(«D5:D13»).Value = Range(«B2:B10»).Value
End Sub
Designing your program
A real program will consist of combinations of codes used in the above examples as well as others not written here. Line-by-line the computer will execute your program according to the order you write the lines of codes.
Before you start writing a program, you should first have an overall aim for your program. Secondly break it down into actions necessary to achieve it, write it in English or any language you like. And finally, write each action in VBA language.
The second step is sometimes unnecessary. People already familiar with programming often just write codes out of thin air after having an aim in mind. Only when things get extremely complex, then we write it to help us visualise the program (this is called writing the pseudo codes).
How to store programs you have written
Consider keeping your DIY programs for use in other days so that you don’t solve the same problem twice! There are few choice where to save your codes.
The program is used only in the current workbook
If the program can only be used for the workbook you just worked with, then write the program in the module of the workbook, then save the workbook in .xlsm extension.
The program can be used across many workbooks
If you have written a generic program which can be used repeatedly in many other workbooks, then you can store it in a different workbook, either in
- Macro-enabled workbook (.xlsm), or
- Binary workbook (.xlsb), or
- Add-in (.xlam)
The workbook that carries your generic program should be kept in an easy to find place. So it is a good idea to have a folder like My DIY Excel programs folder to basket up these workbooks.
Some examples of commonly used generic programs are:
- Highlight cells that has formula (a program we can toggle the highlight on/off)
- Convert text to number or vice versa
- Trim leading and lagging blank space off a selection of texts
- Rearrange comments besides their parent cells (comments often go hay-wire after sometime we use the worksheet. so we create a program that quickly rearrange them back!)
- Insert a barcode image from a given barcode number in a cell
- Crack a password protected sheet (Yes sometimes we need to as the previous owner left! Its no secret but do it ethically!)
Well done! You are now equipped with fundamentals of programming in VBA. You should now be able to write simple programs to do simple automation in Excel.
But…
Be sure to check back on my next post on
How to comprehend all the codes in Excel VBA
. There are thousands of thousands of codes in VBA, how do we comprehend all of them? This is an important question. When you understand how the codes are arranged in a grand hierarchy, you will be able to visualise a mind-map of the codes. If you have the mind-map, you don’t have to memorise the codes, you don’t even need to know if a particular code existed, but somehow you’ll know where to find the right code you need on the go! That is the beauty of computer programming.

