
Word for Microsoft 365 Word for Microsoft 365 for Mac Word for the web Word 2021 Word 2021 for Mac Word 2019 Word 2019 for Mac Word 2016 Word 2016 for Mac Word 2013 Word 2010 Word for Mac 2011 More…Less
You can control the vertical space between the lines of text in your document by setting the line spacing. Or, you can change the vertical space between paragraphs in your document by setting the spacing before or spacing after paragraphs. You can also choose to keep lines of text together or keep paragraphs together on a page.
Change the line spacing in an entire document
-
Go to Design > Paragraph Spacing.
-
Choose an option. To single space your document, select No Paragraph Space.
To return to the original settings later, go to Design > Paragraph Spacing and choose the option under Style Set. This may be Default or the name of style you’re currently using.
Change the line spacing in a portion of the document
-
Select one or more paragraphs to update. Press Ctrl + A to select all.
-
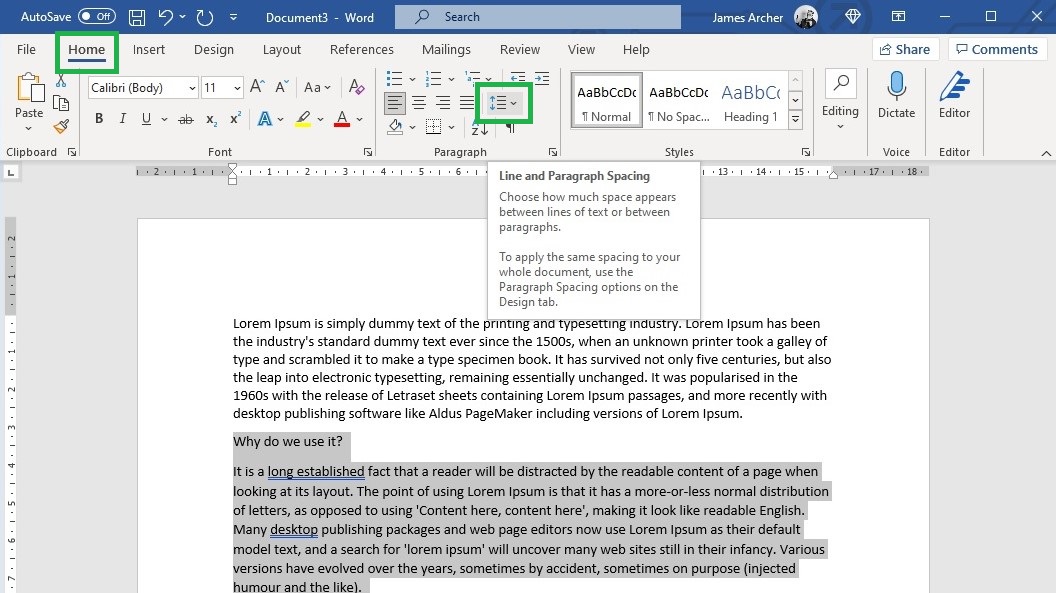
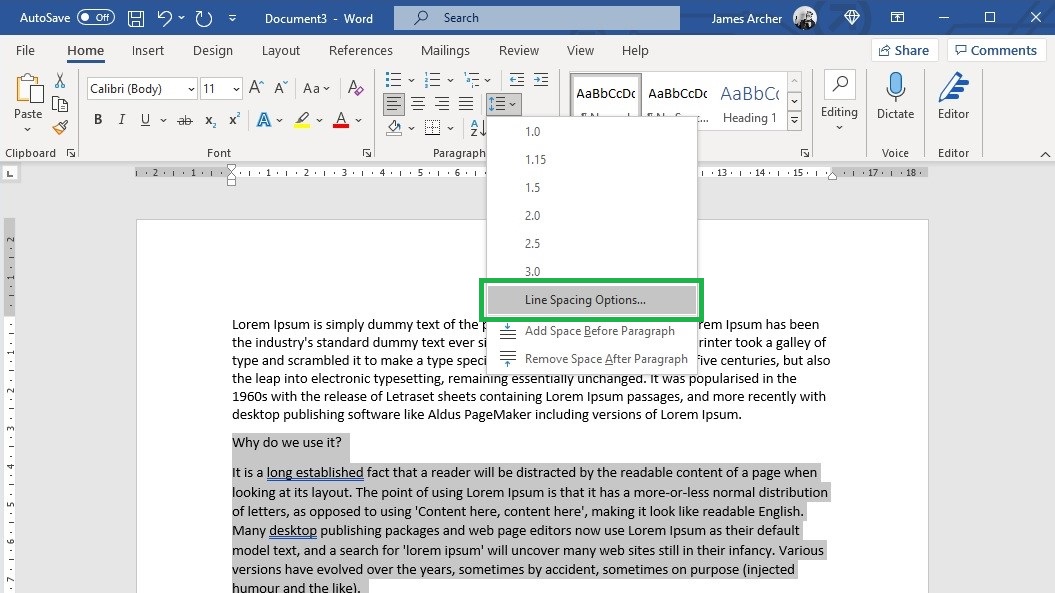
Go to Home > Line and Paragraph Spacing

-
Select Line Spacing Options and choose an option in the Line spacing box.
-
Adjust the Before and After settings to change spacing between paragraphs.
-
Select OK.

For more info, see Adjust indents and spacing.
Change the line spacing in an entire document
-
Go to Design > Paragraph Spacing.
-
Choose the option you want. If you want to single space your document, choose No Paragraph Space.

This overrides the settings of the style you’re currently using. If you decide later to return to the original settings, go to Design > Paragraph Spacing and choose the option under Style Set. The option might be Default, as shown above, or it will show the name of style you’re currently using.
Change the line spacing in a portion of the document
-
Select the paragraphs you want to change.
-
Go to Home > Line and Paragraph Spacing.
-
Choose the number of line spaces you want or select Line Spacing Options, and then select the options you want under Spacing.
-
To change the spacing before or after each of the paragraphs in the text you selected, click the arrow next to Before or After and enter the amount of space that you want.
-
Select OK.

-
Select the paragraph whose lines you want to keep together.
-
Go to Format > Paragraph >Line and Page Breaks.
-
Select Keep lines together.
-
Select the first of the two paragraphs that you want to keep together.
Tip: If you want to keep more than two paragraphs together, select all but the last paragraph.
-
Go to Format > Paragraph.
-
Go to Line and Page Breaks.
-
Select Keep with next.
-
Select OK.
-
Select the paragraphs you want to change, or press Ctrl+A to select everything.
-
Go to Home > Line Spacing.
-
Choose the number of line spaces you want, or select Line Spacing Options and then select the options you want in the Paragraph dialog box under Spacing:
Tip: If you want to change the spacing before or after the selected paragraphs, select the arrows in the Before or After boxes, or type a number directly.
Need more help?

There are several ways to adjust line spacing in Microsoft Word. Today’s tutorial explains the basic method using the ribbon and a more advanced method using the Paragraph dialog box.
See the Quick Tip at the bottom of this tutorial to learn how to single-space an entire document from the Paragraph dialog box.
This tutorial is available as a YouTube video showing all the steps in real time.
Watch more than 150 other document software tutorials on my YouTube channel.
The images below are from Word for Microsoft 365.The steps are the same in Word 2021, Word 2019, and Word 2016, and similar for Word 2013 and Word 2010. However, your interface may look slightly different in those older versions of the software.
Basic Method: Adjust Line Spacing from the Ribbon
- Select the Home tab in the ribbon.

- (Optional Step) Select the Show/Hide button in the Paragraph group to show paragraph break symbols and other formatting that may affect line spacing.

- Select the text with the line spacing that needs to be changed.

- Select the Line and Paragraph Spacing button in the Paragraph group.

- Select an option from the drop-down menu:
A. Numbers 1.0 through 3.0 add space between lines.
B. Add Space Before Paragraph adds space before paragraphs but not before the lines within them.
C. Remove Space After Paragraph removes space after paragraphs but not after the lines within them.
These three options are based on your current font size with 1.0 being the equivalent of single-spacing.

Your changes will be applied immediately.

Note that you can apply the individual line spacing (the numbers 1.0 through 3.0) and the paragraph spacing to the same text to further customize your results.
- (Optional Step) Select the Show/Hide button again to hide paragraph symbols and other formatting (see figure 2).
Now, let’s move on to an advanced method offering additional spacing options.
Advanced Method: Adjust Line Spacing from the Paragraph Dialog Box
- Select the Home tab in the ribbon (see figure 1).
- (Optional Step) Select the Show/Hide button in the Paragraph group to show paragraph break symbols and other formatting that may affect line spacing (see figure 2).
- Select the text with the line spacing that needs to be changed (see figure 3).
Pro Tip: PC users can press Ctrl + A to select the entire document if all the line spacing needs to be changed. However, this includes items you may not want to alter, including headings, tables, table titles, figure captions, tables of contents, footnotes, endnotes, and reference lists.
- Select the dialog box launcher in the Paragraph group.

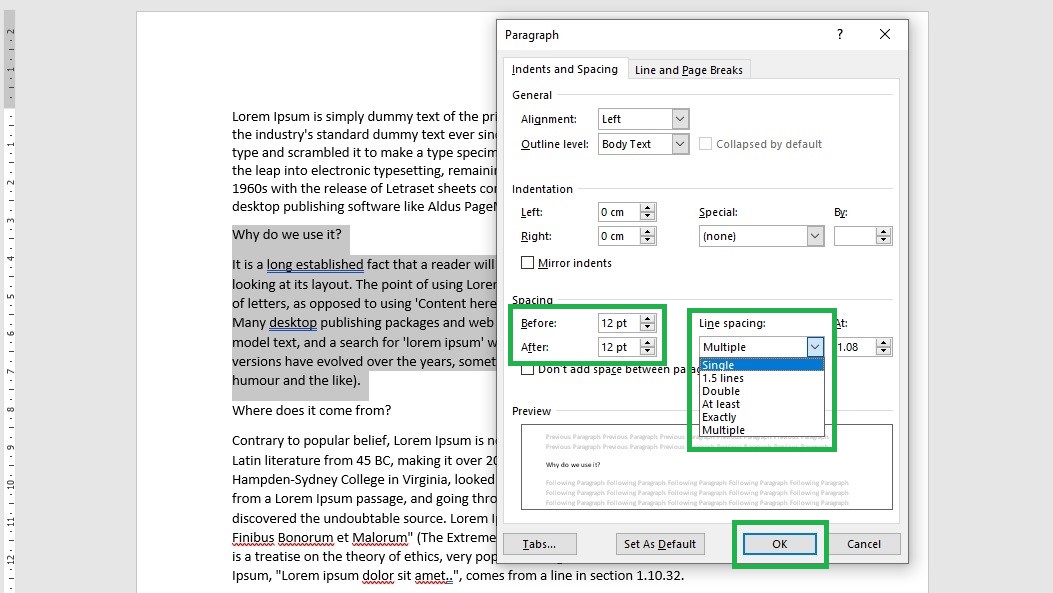
- Make changes in the Spacing section of the Paragraph dialog box:
A. The Before and After boxes represent the spaces before and after paragraphs measured in points with one point being 1/72 of an inch tall. Use the increment arrows to choose a whole number or enter a number with a decimal (e.g., 2.75) directly into the box.
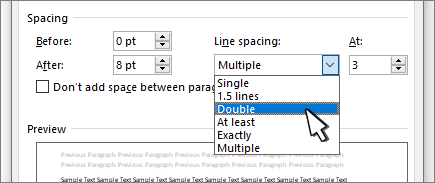
B. The Line spacing drop-down menu offers six options:
1. Single—Creates single-spacing based on your current font size.
2. 1.5 Lines—Creates a space and a half as large as your current font size.
3. Double—Creates double-spacing based on your current font size.
4. At Least—Determines the minimum amount of space between lines based on the number of points entered in the At box.
5. Exactly—Creates space between lines based on the number of points entered in the At box.
6. Multiple—Creates spacing multiplied by the number entered in the At box. For example, if you enter four in the At box, your spacing will be four times as large as your current single-spacing.
C. Don’t add space between paragraphs of the same style—For many users, this will remove spaces between all paragraphs because general documents commonly have only one paragraph style.

Note that the Preview box updates as you make adjustments in the Spacing section.
- Select the OK button to close the Paragraph dialog box.

- (Optional Step) Select the Show/Hide button again to hide paragraph symbols and other formatting (see figure 2).
Quick Tip: Single-Space an Entire Document from the Paragraph Dialog Box
- Select the Home tab in the ribbon (see figure 1).
- Select the entire document. (PC users can press Ctrl + A.)
- Select the dialog box launcher in the Paragraph group (see figure 7).
- Enter 0 in the Before box in the Paragraph dialog box (see figure 8).
- Enter 0 in the After box in the Paragraph dialog box (see figure 8).
- Select Single in the Line spacing drop-down menu (see figure 8).
- Select the OK button (see figure 9).
Related Resources
How to Adjust Letter Spacing in Microsoft Word (PC & Mac)
How to Adjust the Space between Words in Microsoft Word
How to Adjust Page Margins in Microsoft Word
Updated June 25, 2022
TheTechieSenior.com is reader supported. We may earn a commission if you buy through links on this site. As an Amazon Associate, we earn from qualifying purchases. Learn more here.
In this article we’ll give you some easy to follow hints how to set line spacing and margins in Microsoft Word. We’ll also give you some easy tips for changing your first line indent and page margins. (Note: The following instructions apply specifically to Microsoft 365 Word, but should also work in the several preceding versions of Word.)
Table of Contents
Set line spacing and margins in Microsoft Word
Microsoft Word offers its users hundreds of customization possibilities. Some of them are behind the scenes and rarely seen or adjusted by the average user. But others, such as the ability to adjust spacing and margins, stand out front in their impact on your document’s appearance. It is important to know how to set spacing and margins in Microsoft Word, whether you are a casual user or you use Word every day.
How to increase line spacing.
With normal font usage, the distance between lines of text will be set automatically, usually at “1”. There are going to be times when you will want to change the line spacing. For example, if you are typing a book manuscript and are expecting to provide a printed or emailed version to an editor, you may be asked to provide a manuscript in Courier font with double spacing. Or it may be that you want to increase the line spacing slightly for aesthetic reasons, so that your text better fills the page.
Another circumstance when larger line spacing will be necessary is when you have a line of text and somewhere along that line, you insert one or more characters in a much larger font size. As a hypothetical example, you might want a date presented in a much larger font size than the other text on the line. The larger font size that you used for the date will force that entire line’s spacing to be increased to accommodate the larger date font.
Fortunately, changing line spacing in Microsoft Word is an easy task.
Set Line Spacing via the Ribbon
Select the text you want to increase the line spacing for. If you need to change all of the text in a document, you can select all text in the document by using the key command, Control + A in Windows or Command + A on a Mac. That handy little shortcut will select all of the text in the entire document.
- Be sure you are displaying the Home ribbon at the top of MS Word.
- Look in the third section of icons from the left which deals with line spacing, ordered and unordered lists, paragraph indents, etc..
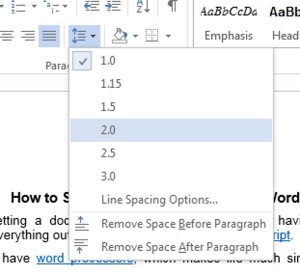
- Look for an icon with four thin horizontal lines. On the left side of it is a blue up and down arrow. That icon is the one that allows you to set your line spacing.
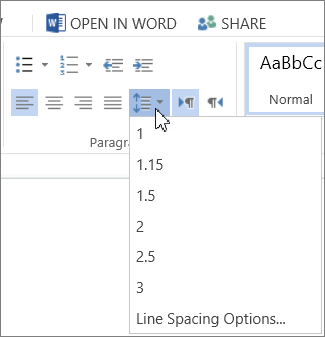
- Tap it and you can choose 1.0 (normal single spaced line), 1.15, 1.5, 2.0, 2.5, and 3.0.

There is also a line labeled “Line Spacing Options.” From there you can play with the settings in greater detail.
You may also open the Line Spacing Options box by selecting the text you wish to set line spacing for.
- Right-click the selection and choose “Paragraph….”
- The same Line Spacing Options box mentioned in the previous paragraph will open.
For more detailed information about line spacing, see our article Double Spacing in Microsoft Word – How to Start and Stop It.
How to set space between paragraphs.
There are several reasons you might wish to adjust the spacing between paragraphs in your documents. Whatever the reason is, the process is simple when you know where to look.
To change paragraph spacing:
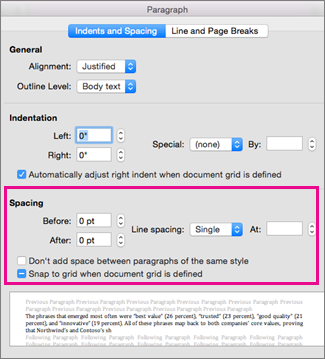
- Open the same Line Spacing Box you used in the previous instruction.
- Select your text, then right click and select “Paragraph…” from the menu. The same box you saw before will open.
- Be sure “Indents and Spacing” is chosen at the top of the box.
- Look for the Spacing section.
- In the Spacing section, the first controls you’ll see are the “Before” and “After” controls. Those controls set the spacing before or after each paragraph, accordingly.
If you select the entire document, any settings you make here will be used throughout your document.
If you select only a portion of the document, the setting you make here will apply only to the portion you selected.
How to set first line paragraph indents.
Formatting a paragraph so the first line is indented is easy in Microsoft Word, but not necessarily obvious.
For this task, you’ll need to be sure the ruler is turned on. Go to View in the top menu, then be sure there is a check next to Ruler. The check mark indicates the ruler is active. If it is not, just click on the word Ruler.
The Ruler option causes a ruler to be displayed horizontally at the top of the document and vertically on the far left.
If you want to indent the first line of all paragraphs in your document by, you can do so using Command + A on a Mac or Control + A in Windows to select the entire document.
- Near the left end of the top ruler, you will see two icons, one above the other. The top icon looks like an upside down triangle.
- With your chosen text selected, grab just that icon with your mouse or trackpad and slide it to the right. You should see the first line of your paragraphs become indented.
You may not want the first paragraph to be indented. In that case, select all of your paragraphs except the first before you slide the icon in the ruler. That should leave your first paragraph fully aligned left and your others with their first lines indented.
How to set margins in MS Word – easy method one.
If you followed the instructions above for indenting the first line of a paragraph, you’re halfway to knowing how to set margins. This method applies to the paragraph where your cursor is located if you have not selected a box of text. If you select a large block of text or your entire document, the changes will apply to the selected areas.
- In the ruler, look just below the upside down triangle icon that you used to indent the first line. You’ll see what looks like a triangle sitting on a box.
- Click and hold your mouse or trackpad on just the triangle. When you slide it, the margin will be adjusted, but leaving the first line indent wherever you set it. Slide it too far to the right and your indented first line will be negatively indented, hanging out to the left of your paragraph.
- There is a single triangle icon on the right end of the ruler. It works the same way as the left one, but adjusts only the right side margin. It does not affect the first line indent.
- Clicking and sliding the tiny box under the triangle on the left end of the ruler indents the entire paragraph or larger selection, taking with it the first line indent.
Because of their small sizes, it can be a little tricky to select just the triangle or the box.
How to set margins in MS Word – easy method two.
This method will change the margins for your entire document without the need to select any specific text.
- Click on the Layout tab to open the layout ribbon.
- The first icon in the layout ribbon is labeled “Margins.” When you click on the Margins icon you’ll be presented with a few preset options – normal, narrow, wide, and a couple others. Selecting any of these options will affect your entire document without having to select text.
- At the bottom of the list is “Custom margins…” Click that option, then be sure Margins is selected at the top of the box that opens.
- You’re given options to set top, bottom, left, right, and gutter. You’ll also see a box with drop-down options to apply the margins to the entire document or from that point forward.
Set new default margins
You can easily set new default margins which will affect all future documents that use the normal.dotm styles.
Use the same instructions as instructed in How to set margins in MS Word – easy method two, above.
In the Custom margins… box, make the adjustments you wish to use, then, at the bottom, click the Default… button (Mac) or “Set as Default…” (Windows). That will set your margins for all future documents according to the settings you made.
You’ll find more helpful hints on using Microsoft Word here.
You can also set line spacing in the Web version of Microsoft Word.
In the old days, getting a document written up neatly involved having a medieval monk painstakingly copy everything out by hand in elaborate illuminated script.
Thankfully, now we have word processors, which makes life much simpler. As well as eliminating the need to hire a scribe, programs like Microsoft Word provide a range of formatting options to make sure your work is easy to read.
In this post, for example, we take a look at how to set line spacing in Microsoft Word.
What is Line Spacing? Why Does it Matter?
Line spacing is the gap between lines of text in your document. College students are often told to use double spacing (i.e., a gap twice the height of the font) to enhance the clarity of their written work and so markers have space to leave feedback on a paper.
How to Set Line Spacing
Adjusting the spacing in a document is reassuringly easy thanks to the pre-defined settings in Microsoft Word (instructions apply to Word 2007 onwards):
- Select the text you want to adjust
- Find the “Paragraph” section on the “Home” tab
- Click on the line and paragraph spacing button to open the dropdown menu
- Select the desired line spacing (standard options range from 1.0 to 3.0)
 To double-space your document, simply click “2.0.” If you pick “Line Spacing Options” from the dropdown menu, you can also customize the spacing to suit your requirements.
Taking Shortcuts
If you find yourself regularly adjusting the spacing in your work, you could save time by using the keyboard shortcuts in Microsoft Word. For line spacing, these are:
|
Line Spacing |
PC |
Mac |
|
1.0 |
Ctrl + 1 |
Command + 1 |
|
1.5 |
Ctrl + 5 |
Command + 5 |
|
2.0 |
Ctrl + 2 |
Command + 2 |
To set the spacing in your document this way, simply select the passage(s) you want to modify and use the shortcut for the spacing desired. To select all text in the document, use “Ctrl + A” on PC or “Command + A” on Mac.
Find this useful?
Subscribe to our newsletter and get writing tips from our editors straight to your inbox.

If you’ve used Office before, you may already know how to change line spacing in Word, at least on a very basic level: the “Styles” box on the Home tab can act as a very prominent switch between standard and zero spacing. But did you know you can also adjust the space between lines to a much finer degree?
In this guide, we’ll show you how to take full control of line spacing in Word, enabling you to make your documents more easily readable with extra space — or to fit more text on each page by closing the gaps.
- Learn how to save a Word document as a PDF
- How to sign a Word document before sending it
- Discover how to track changes in Word
There are several reasons why you may want to increase the vertical spacing between lines, or alternatively, narrow or remove that space. Greater line spacing can make a document easier to read, so could be useful for writing scripts, while tighter spacing can save you printer paper by squeezing additional text onto each page.
Word’s default spacing is 1.08 lines, so the gap between each line is very slightly larger than single-spaced. In this guide we’ll show you how to quickly change line spacing throughout your document, as well as how to adjust spacing for specific paragraphs.
How to change line spacing in Word
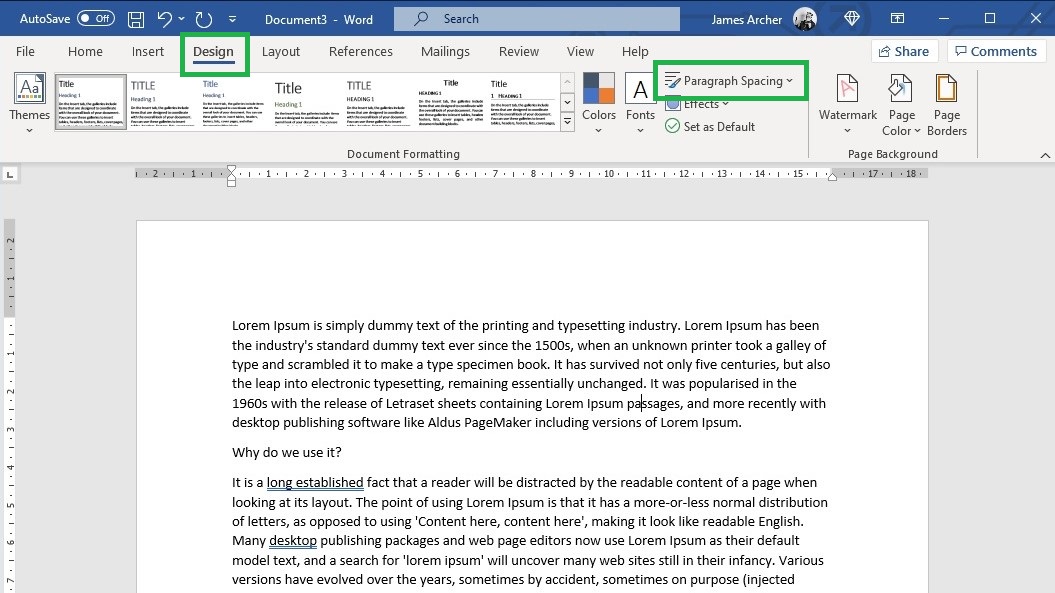
1. In Word, open the “Design” tab and click “Paragraph Spacing.”
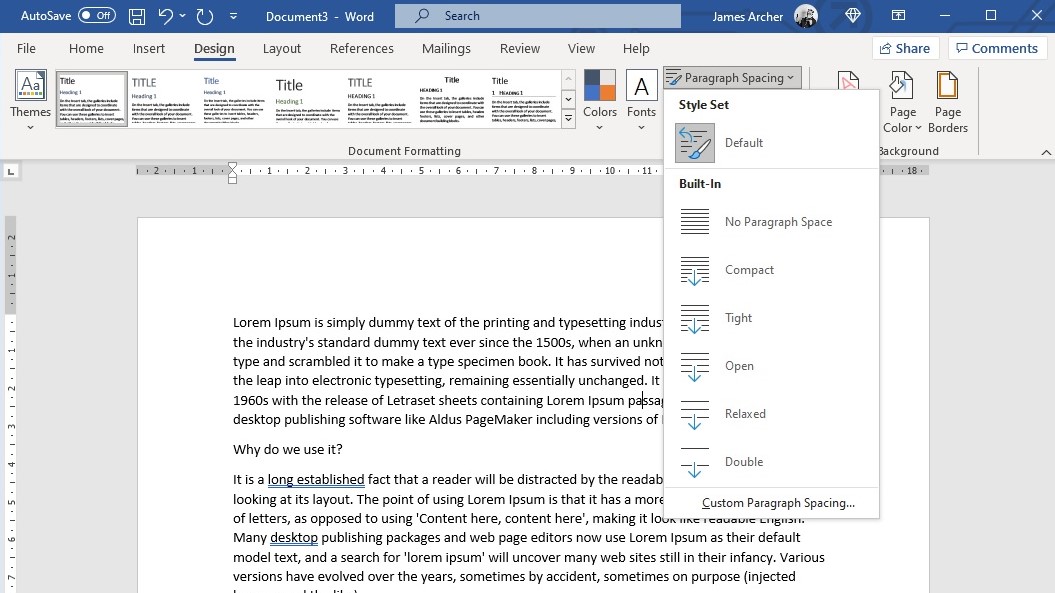
2. To quickly change the line spacing for the entire document, simply click one of the six “Built-In” spacing options.
From top to bottom, these range from zero spacing (“No Paragraph Space”) to double spacing (“Double”), with single spacing represented by the “Compact” option.
If there’s already text in the document, it will dynamically change as you hover your mouse over each option, so check which one you like best before clicking it.
3. You can also tweak spacing for individual paragraphs or sections. To do this, highlight the section you want to edit, then open the “Home” tab. Then, in the “Paragraph” section, click the “Line and Paragraph Spacing” icon.
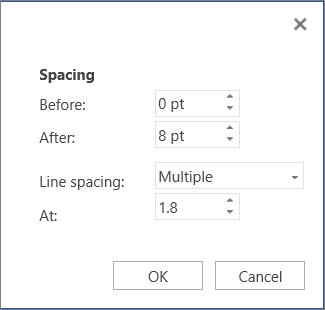
4. Click “Line Spacing Options.”
5. Under “Spacing,” adjust the “Before” value to select the size of the spacing that will go immediately before your highlighted text, and adjust the “After” value to select the size of the spacing immediately after it.
You can also use the “Line spacing” drop-down menu to adjust general line spacing for the highlighted section. This will override the selection you made in step 2. Finally, click “OK.”
Stay tuned for more tips on using Microsoft Office software; you can also check out our guides on how to convert a PDF to Excel and how to use VLOOKUP in Excel.
- More: How to delete a page in Microsoft Word
Get instant access to breaking news, the hottest reviews, great deals and helpful tips.
James is currently Hardware Editor at Rock Paper Shotgun, but before that was Audio Editor at Tom’s Guide, where he covered headphones, speakers, soundbars and anything else that intentionally makes noise. A PC enthusiast, he also wrote computing and gaming news for TG, usually relating to how hard it is to find graphics card stock.