
Insert the current date and time in a cell
Excel for Microsoft 365 Excel for Microsoft 365 for Mac Excel for the web Excel 2021 Excel 2021 for Mac Excel 2019 Excel 2019 for Mac Excel 2016 Excel 2016 for Mac Excel 2013 Excel 2010 Excel 2007 Excel for Mac 2011 More…Less
Let’s say that you want to easily enter the current date and time while making a time log of activities. Or perhaps you want to display the current date and time automatically in a cell every time formulas are recalculated. There are several ways to insert the current date and time in a cell.
Insert a static date or time into an Excel cell
A static value in a worksheet is one that doesn’t change when the worksheet is recalculated or opened. When you press a key combination such as Ctrl+; to insert the current date in a cell, Excel “takes a snapshot” of the current date and then inserts the date in the cell. Because that cell’s value doesn’t change, it’s considered static.
-
On a worksheet, select the cell into which you want to insert the current date or time.
-
Do one of the following:
-
To insert the current date, press Ctrl+; (semi-colon).
-
To insert the current time, press Ctrl+Shift+; (semi-colon).
-
To insert the current date and time, press Ctrl+; (semi-colon), then press Space, and then press Ctrl+Shift+; (semi-colon).
-
Change the date or time format
To change the date or time format, right-click on a cell, and select Format Cells. Then, on the Format Cells dialog box, in the Number tab, under Category, click Date or Time and in the Type list, select a type, and click OK.
Insert a static date or time into an Excel cell
A static value in a worksheet is one that doesn’t change when the worksheet is recalculated or opened. When you press a key combination such as Ctrl+; to insert the current date in a cell, Excel “takes a snapshot” of the current date and then inserts the date in the cell. Because that cell’s value doesn’t change, it’s considered static.
-
On a worksheet, select the cell into which you want to insert the current date or time.
-
Do one of the following:
-
To insert the current date, press Ctrl+; (semi-colon).
-
To insert the current time, press
 + ; (semi-colon).
 -
To insert the current date and time, press Ctrl+; (semi-colon), then press Space, and then press
+ ; (semi-colon).
-
 + ; (semi-colon).
Change the date or time format
To change the date or time format, right-click on a cell, and select Format Cells. Then, on the Format Cells dialog box, in the Number tab, under Category, click Date or Time and in the Type list, select a type, and click OK.
Insert a static date or time into an Excel cell
A static value in a worksheet is one that doesn’t change when the worksheet is recalculated or opened. When you press a key combination such as Ctrl+; to insert the current date in a cell, Excel “takes a snapshot” of the current date and then inserts the date in the cell. Because that cell’s value doesn’t change, it’s considered static.
-
On a worksheet, select the cell into which you want to insert the current date or time.
-
Do one of the following:
-
To insert the date, type the date (like 2/2), and then click Home > Number Format dropdown (in the Number tab) >Short Date or Long Date.
-
To insert the time, type the time, and then click Home > Number Format dropdown (in the Number tab) >Time.
-
Change the date or time format
To change the date or time format, right-click on a cell, and select Number Format. Then, on the Number Format dialog box, under Category, click Date or Time and in the Type list, select a type, and click OK.
Insert a date or time whose value is updated
A date or time that updates when the worksheet is recalculated or the workbook is opened is considered “dynamic” instead of static. In a worksheet, the most common way to return a dynamic date or time in a cell is by using a worksheet function.
To insert the current date or time so that it is updatable, use the TODAY and NOW functions, as shown in the following example. For more information about how to use these functions, see TODAY function and NOW function.
For example:
|
Formula |
Description (Result) |
|
=TODAY() |
Current date (varies) |
|
=NOW() |
Current date and time (varies) |
-
Select the text in the table shown above, and then press Ctrl+C.
-
In the blank worksheet, click once in cell A1, and then press Ctrl+V. If you are working in Excel for the web, repeat copying and pasting for each cell in the example.
Important: For the example to work properly, you must paste it into cell A1 of the worksheet.
-
To switch between viewing the results and viewing the formulas that return the results, press Ctrl+` (grave accent), or on the Formulas tab, in the Formula Auditing group, click the Show Formulas button.
After you copy the example to a blank worksheet, you can adapt it to suit your needs.
Note: The results of the TODAY and NOW functions change only when the worksheet is calculated or when a macro that contains the function is run. Cells that contain these functions are not updated continuously. The date and time that are used are taken from the computer’s system clock.
Need more help?
You can always ask an expert in the Excel Tech Community or get support in the Answers community.
Need more help?
-
1
Type the desired date into a cell. Double-click the cell in which you want to type the date, and then enter the date using any recognizable date format. You can enter the date in a variety of different formats.[1]
- Using January 3 as an example, some recognizable formats are «Jan 03,» «January 3», «1/3,» and «01-3.»
-
2
Press the ↵ Enter key. As long as Excel recognizes the date format, it will re-format the cell as a date, which is usually mm/dd/yyyy or dd/mm/yyyy, depending on your locale.
- If the text automatically aligned to the right, then Excel recognized it as a date and re-formatted it.
- If the text stayed aligned to the left, Excel is treating the input as text rather than a date. This could be because it cannot recognize your input as a date, or because that cell’s format is set to something besides a date.
Advertisement
-
3
Right-click the date cell and select Format Cells. A new window will pop up.
-
4
Click the Number tab. It’s the first tab.
-
5
Select Date in the «Category» panel. A variety of date formats will appear on the right side of the window.
-
6
Select your desired date format under «Type.» This reformats the selected cell to display in this format.
- You can also change your locale to access date formats used in your location.
-
7
Click OK. The selected cell(s) will now display dates in the selected format.


Advertisement

-
1
Click the cell in which you want today’s date to appear. This can be in an existing formula, or in a new cell.
-
2
Type an equal sign = followed by the formula TODAY(). If you wish to retrieve the current time as well, use NOW() instead of TODAY().[2]
-
3
Hit ↵ Enter. Excel will return today’s date as the cell value. This is a dynamic date, meaning it will change depending on when you are viewing the sheet.
- Use the shortcuts Ctrl + ; and Ctrl + Shift + ; instead to set a cell’s value to today’s date and time respectively as a static value. These values will not update, and act as a timestamp.


Advertisement
-
1
Click the cell in which you want to type the date.
-
2
Type an equal sign = followed by the date formula DATE(year, month, day). Year, month, and day should be numerical inputs.
-
3
Hit ↵ Enter. Excel will return the default date format, which is usually mm/dd/yyyy or dd/mm/yyyy depending on your locale.
-
4
Expand on the formula if required. You can set formulas for the year, month, and day values. Or, you can use the DATE function within other formulas.
- For instance, DATE(2010,MONTH(TODAY()),DAY(TODAY())) sets the cell’s value as today’s month and day in 2010. The formula DATE(2020,1,1)-10 sets the value to 10 days before 1/1/2020.


Advertisement
-
1
Type the desired date into a cell. Double-click the cell in which you want to type the date, and then enter the date using any recognizable date format. You can enter the date in a variety of different formats.
- Using January 3 as an example, some recognizable formats are «Jan 03,» «January 3», «1/3,» and «01-3.»
-
2
Hit ↵ Enter. Excel will re-format the cell and align the text to the right if it has recognized it as a date.
-
3
Select all the cells you wish to fill with dates. Include the cell in which you just entered the date. To select, drag your mouse over all the cells, select an entire column or row, or hold Ctrl (PC) or ⌘ Cmd (Mac) while clicking each cell.
-
4
Click Fill on the Home tab. It’s at the top of Excel in the «Editing» section and looks like a white box with a blue down arrow.
-
5
Click Series…. It is near the bottom.
-
6
Select a «Date unit.» Excel will use this to fill the blank cells based on this setting.
- For instance, if you select «Weekday,» all the blank cells will populate with the weekdays following the initial input date.
-
7
Click OK. Make sure the are dates filled in correctly.


Advertisement
Ask a Question
200 characters left
Include your email address to get a message when this question is answered.
Submit
Advertisement
-
Set a custom date format in Excel by right-clicking a cell, clicking Format Cells, and selecting «Custom» as the category in the Number tab. Review the available date options. Create your own by typing the format code using an existing code.
Advertisement
References
About This Article
Article SummaryX
1. Click on a cell.
2. Type in a date.
3. Hit Enter.
4. Review the date format. Change by right-clicking and selecting Format Cells.
Did this summary help you?
Thanks to all authors for creating a page that has been read 12,928 times.
Is this article up to date?
In Microsoft Excel, the date can be inserted in a variety of ways, including using a built-in function formula or manually entering the date, such as 22/03/2021, 22-Mar-21, 22-Mar, or March 22, 2021. These date functions are typically used for cash flows in accounting and financial analysis.
In Excel, there is a built-in function called TODAY() that will insert the exact today’s date and will give the updated date whenever the workbook is opened. The NOW() built-in function can also be used to insert the current date and time, and this function will be kept up to date if we open the workbook multiple times.
Inserting the date:
In the Formula tab, the built-in TODAY is categorized under the DATE/TIME function.
Alternate to insert the date in Excel the below keyboard shortcut can be used:
CTRL+;
It will insert the current date.
To insert the current date and time we can use the following shortcut keys:
CTRL+; <space key> CTRL+SHIFT+;
It returns the current date and time to us.
1. Inserting specific date in Excel:
We have to use DATE() to insert a specific valid date in Excel. We can notice in the above function that the DATE requests to provide Year, Month, Day values. If we provide the details, the default date will be shown as below:
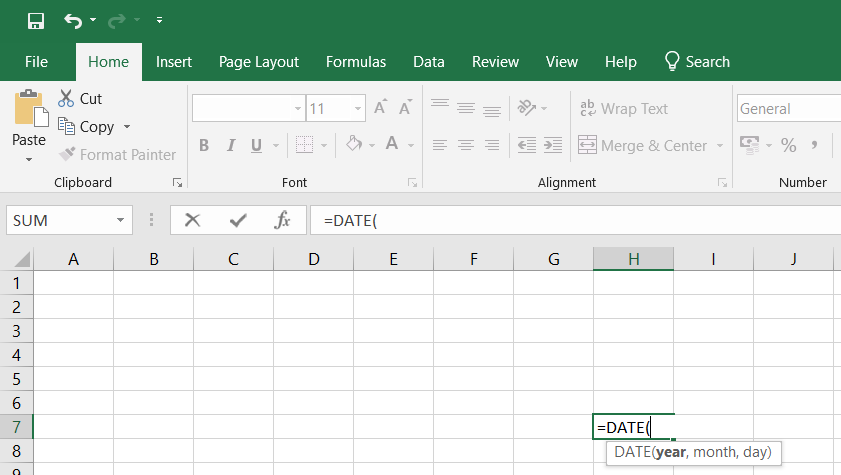
Image 1.1

Image 1.2
2. Inserting static date and time:
A static value in a sheet does not change if the sheet is recalculated or opened. To do so follow the below steps:
Step 1: Select the cell in which the current date or time will be inserted on a table.
Step 2: Do one of the next:
- Press Ctrl+;(semi-colon) to insert your current date.
- Press the Ctrl+Shift+;(semi-colon) to insert the current time.
- Press Ctrl+;(semi-column) to insert the current date and time then press Space, and press Ctrl+Shift+; (semi-colon).
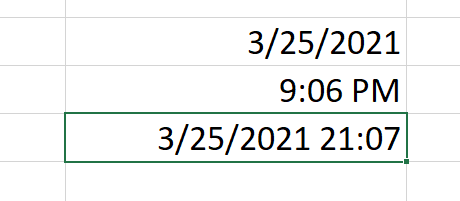
Static date and time
3. Inserting a date in Excel via a drop-down calendar:
It may be a good idea to include a down calendar in your worksheet if you set up a table for other users and want to make sure that the dates enter correctly. You can fill in the dates with a mouse click and be 100% confident that all dates are entered in a suitable format. You can use Microsoft Date Picker control when you use a 32-bit version of Excel. Microsoft Date Picker Control will not work when you are using a 64-bit Excel 2016, Excel 2013 version.
4. Inserting an automatically updatable today’s date and current time:
If you want to keep your Excel date up-to-date today, use one of the following Excel date functions:
=TODAY() -> inserts in a cell the current date.
=NOW() -> inserts in a cell the current and current date.
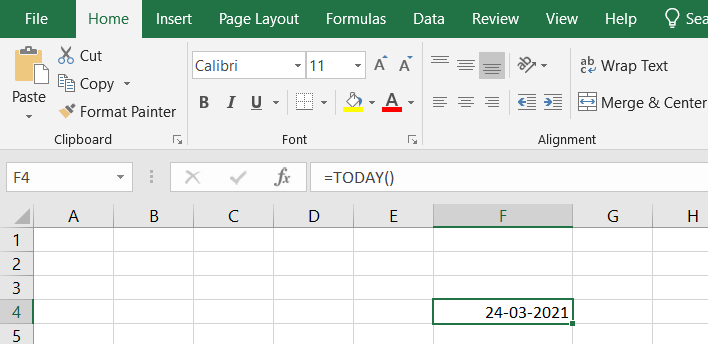
=TODAY example
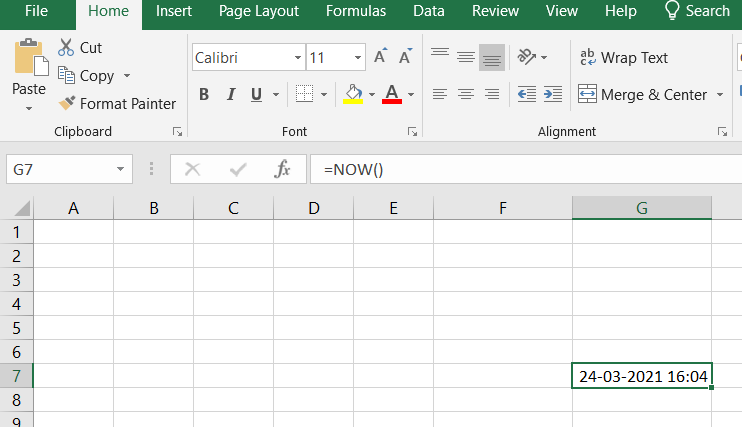
=NOW example
Please remember that when using the Excel date functions:
- The date and the time returned will not be refreshed on an ongoing basis, but only when the chain is reopened or re-calculated.
- The functions take the current system clock date and time.
5. Auto-populate dates in Excel
To autofill a series of dates in which one day is incremented, you can use the Excel AutoFill function. It is a common way to automatically fill a column or row. To do so follow the below steps:
- Enter the original date in the first cell.
- Click the first date on your cell and then drag the fill handle to or from the cells you want Excel to add dates.
Autofill weekdays, months, or years:
There are two ways of automatically adding weekdays, months, or years to the selected range of cells. To so follow the below steps:
- You can use the above-mentioned Excel AutoFill options. Click the AutoFill Options icon and choose the option you want when the range is populated by sequential dates.
- Another way to enter your first date will be to right-click the fill handle and drag and release the fill handle through the cells you automatically want to fill with dates. Excel displays a context menu and selects the appropriate option.
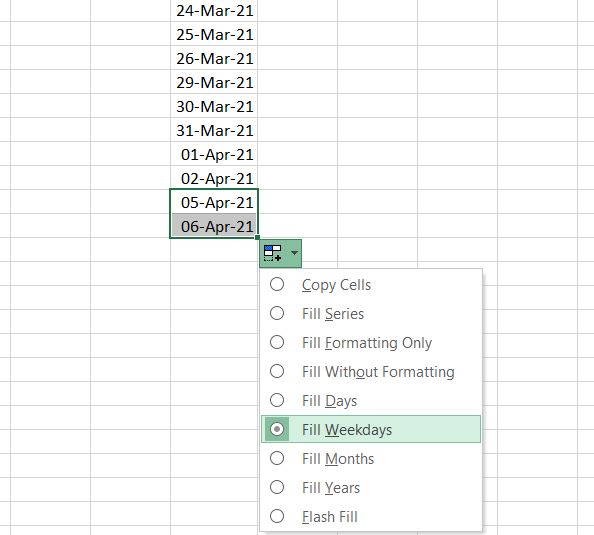
Auto-populate dates
The easiest and fastest way to enter into the cell current date or time — is to click the hotkey combination CTRL + «;» (today’s date) and CTRL + SHIFT + «;» (the current time).
To use the TODAY () function is much better. It not only states but also automatically updates the information of the cell every day without user intervention.
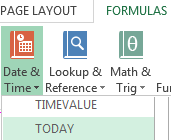
How to put the current date in Excel
To insert the current date in Excel a person should use the function TODAY (). To do this, select the tool «FORMULAS»-«Date & Time»-«TODAY». This function has no arguments, so you can just type in a cell «=TODAY()» and press ENTER.
The current date in a cell:
If it is necessary to update automatically not only the current date, but the time in the cell, you’d better use the function «=NOW()».
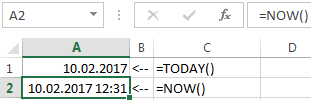
The current date and time in a cell.
The way to set the current date into the running title in Excel
Inserting the current date in Excel is implemented in several ways:
- By setting the parameters of the running title. The advantage of this method is that the current date and time are put on all the pages at once simultaneously.
- Using the function TODAY ().
- Using the hotkey combination CTRL +; — To set the current date and CTRL + SHIFT +; — To set the current time. The disadvantage in this process is that it will not be automatically updated to the current value of the cell parameters, the document is opened. But in some cases, lack of data is an advantage.
- With the help of VBA macros using the function code of the program: Date();Time();Now();.
The running title allows you to set the current date and time in the top or bottom of pages in the document to be output to the printer. In addition, the header allows us to enumerate all the pages of the document.
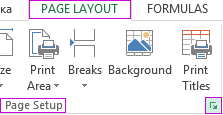
To make the current date in Excel and enumerate the pages with the help of the running page you should:
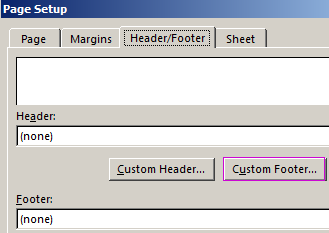
- Open the «PAGE LAYOUT»-«Page Setup» tab and select «Header/Footer».
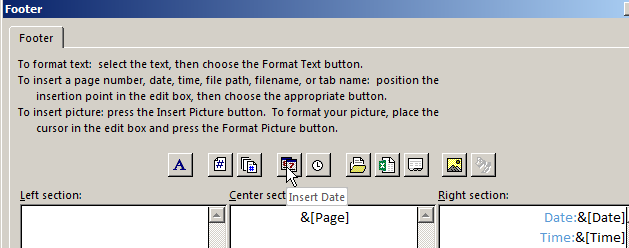
- Click on the button to create «Custom Footer».
- In the window that appears, click on the field «Center section:». On the panel, click the second button, «Insert Number of Pages». Then select the first button «Format Text» and set the format to display the page number (for example, bold and font size of 14 points).
- To set the current date and time, click on the field «Right section:» and then click «Insert Date» (if necessary, click on the «Insert Time»). Click OK in both dialog boxes. In these fields you can enter your text.
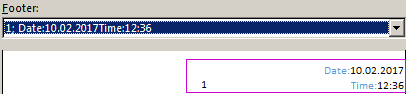
- Click OK, and look at the preliminary results display header. Below dropdown list «Footer:»
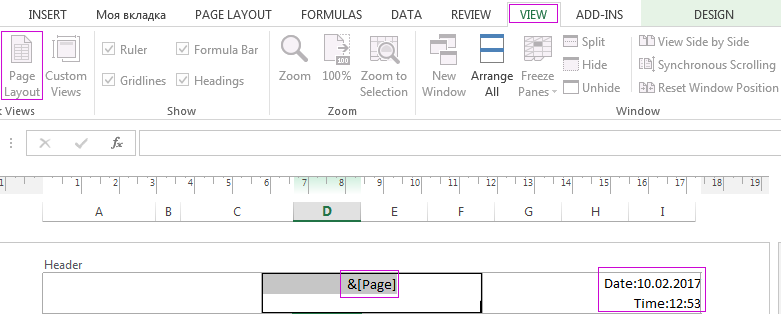
- «VIEW»-«Page Layout» menu, go to the preview of headers and footers. You can edit them there.
Running titles allow us not only to set the date and page number. You can also add a space for the signature of the responsible person for the report. For example, the edit is now the lower left part of the page in the running titles:

Thus, it is possible to create documents with a comfortable place for signatures and seals on each page automatically.