
Import or export text (.txt or .csv) files
There are two ways to import data from a text file with Excel: you can open it in Excel, or you can import it as an external data range. To export data from Excel to a text file, use the Save As command and change the file type from the drop-down menu.
There are two commonly used text file formats:
-
Delimited text files (.txt), in which the TAB character (ASCII character code 009) typically separates each field of text.
-
Comma separated values text files (.csv), in which the comma character (,) typically separates each field of text.
You can change the separator character that is used in both delimited and .csv text files. This may be necessary to make sure that the import or export operation works the way that you want it to.
Note: You can import or export up to 1,048,576 rows and 16,384 columns.
Import a text file by opening it in Excel
You can open a text file that you created in another program as an Excel workbook by using the Open command. Opening a text file in Excel does not change the format of the file — you can see this in the Excel title bar, where the name of the file retains the text file name extension (for example, .txt or .csv).
-
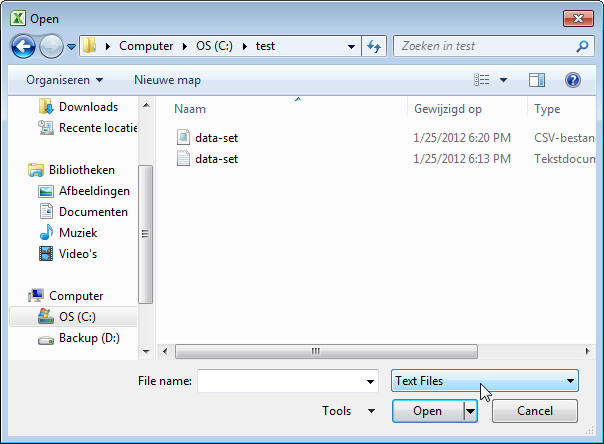
Go to File > Open and browse to the location that contains the text file.
-
Select Text Files in the file type dropdown list in the Open dialog box.
-
Locate and double-click the text file that you want to open.
-
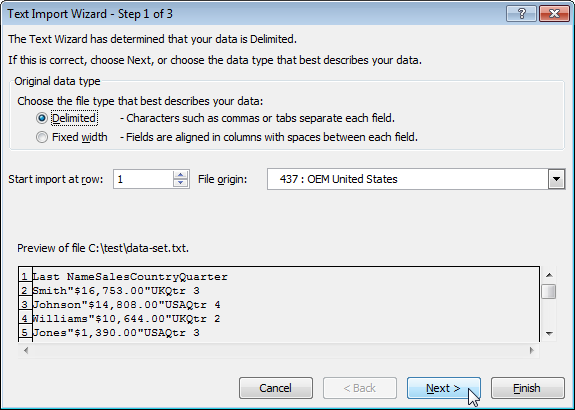
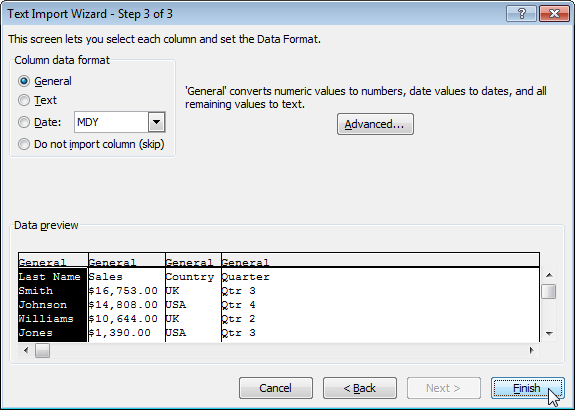
If the file is a text file (.txt), Excel starts the Import Text Wizard. When you are done with the steps, click Finish to complete the import operation. See Text Import Wizard for more information about delimiters and advanced options.
-
If the file is a .csv file, Excel automatically opens the text file and displays the data in a new workbook.
Note: When Excel opens a .csv file, it uses the current default data format settings to interpret how to import each column of data. If you want more flexibility in converting columns to different data formats, you can use the Import Text Wizard. For example, the format of a data column in the .csv file may be MDY, but Excel’s default data format is YMD, or you want to convert a column of numbers that contains leading zeros to text so you can preserve the leading zeros. To force Excel to run the Import Text Wizard, you can change the file name extension from .csv to .txt before you open it, or you can import a text file by connecting to it (for more information, see the following section).
-
Import a text file by connecting to it (Power Query)
You can import data from a text file into an existing worksheet.
-
On the Data tab, in the Get & Transform Data group, click From Text/CSV.
-
In the Import Data dialog box, locate and double-click the text file that you want to import, and click Import.
-
In the preview dialog box, you have several options:
-
Select Load if you want to load the data directly to a new worksheet.
-
Alternatively, select Load to if you want to load the data to a table, PivotTable/PivotChart, an existing/new Excel worksheet, or simply create a connection. You also have the choice of adding your data to the Data Model.
-
Select Transform Data if you want to load the data to Power Query, and edit it before bringing it to Excel.
-
If Excel doesn’t convert a particular column of data to the format that you want, then you can convert the data after you import it. For more information, see Convert numbers stored as text to numbers and Convert dates stored as text to dates.
Export data to a text file by saving it
You can convert an Excel worksheet to a text file by using the Save As command.
-
Go to File > Save As.
-
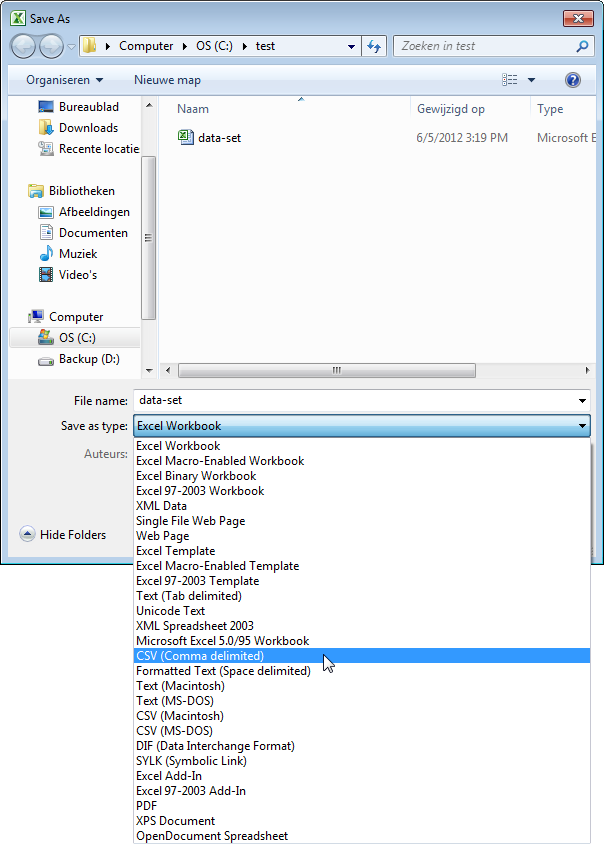
Click Browse.
-
In the Save As dialog box, under Save as type box, choose the text file format for the worksheet; for example, click Text (Tab delimited) or CSV (Comma delimited).
Note: The different formats support different feature sets. For more information about the feature sets that are supported by the different text file formats, see File formats that are supported in Excel.
-
Browse to the location where you want to save the new text file, and then click Save.
-
A dialog box appears, reminding you that only the current worksheet will be saved to the new file. If you are certain that the current worksheet is the one that you want to save as a text file, click OK. You can save other worksheets as separate text files by repeating this procedure for each worksheet.
You may also see an alert below the ribbon that some features might be lost if you save the workbook in a CSV format.
For more information about saving files in other formats, see Save a workbook in another file format.
Import a text file by connecting to it
You can import data from a text file into an existing worksheet.
-
Click the cell where you want to put the data from the text file.
-
On the Data tab, in the Get External Data group, click From Text.
-
In the Import Data dialog box, locate and double-click the text file that you want to import, and click Import.
Follow the instructions in the Text Import Wizard. Click Help
 on any page of the Text Import Wizard for more information about using the wizard. When you are done with the steps in the wizard, click Finish to complete the import operation.
 -
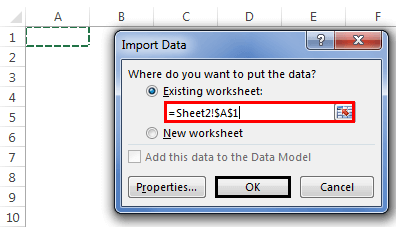
In the Import Data dialog box, do the following:
-
Under Where do you want to put the data?, do one of the following:
-
To return the data to the location that you selected, click Existing worksheet.
-
To return the data to the upper-left corner of a new worksheet, click New worksheet.
-
-
Optionally, click Properties to set refresh, formatting, and layout options for the imported data.
-
Click OK.
Excel puts the external data range in the location that you specify.
-
 on any page of the Text Import Wizard for more information about using the wizard. When you are done with the steps in the wizard, click Finish to complete the import operation.
If Excel does not convert a column of data to the format that you want, you can convert the data after you import it. For more information, see Convert numbers stored as text to numbers and Convert dates stored as text to dates.
Export data to a text file by saving it
You can convert an Excel worksheet to a text file by using the Save As command.
-
Go to File > Save As.
-
The Save As dialog box appears.
-
In the Save as type box, choose the text file format for the worksheet.
-
For example, click Text (Tab delimited) or CSV (Comma delimited).
-
Note: The different formats support different feature sets. For more information about the feature sets that are supported by the different text file formats, see File formats that are supported in Excel.
-
-
Browse to the location where you want to save the new text file, and then click Save.
-
A dialog box appears, reminding you that only the current worksheet will be saved to the new file. If you are certain that the current worksheet is the one that you want to save as a text file, click OK. You can save other worksheets as separate text files by repeating this procedure for each worksheet.
-
A second dialog box appears, reminding you that your worksheet may contain features that are not supported by text file formats. If you are interested only in saving the worksheet data into the new text file, click Yes. If you are unsure and would like to know more about which Excel features are not supported by text file formats, click Help for more information.
For more information about saving files in other formats, see Save a workbook in another file format.
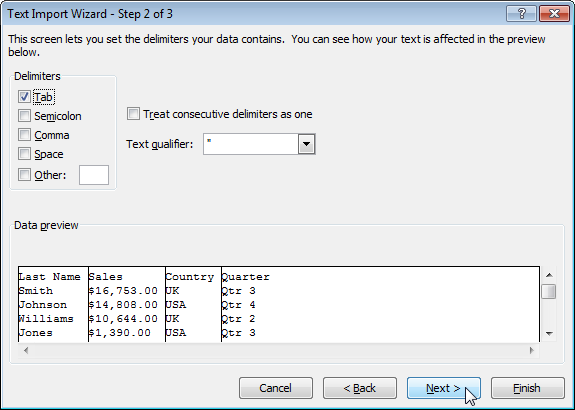
The way you change the delimiter when importing is different depending on how you import the text.
-
If you use Get & Transform Data > From Text/CSV, after you choose the text file and click Import, choose a character to use from the list under Delimiter. You can see the effect of your new choice immediately in the data preview, so you can be sure you make the choice you want before you proceed.
-
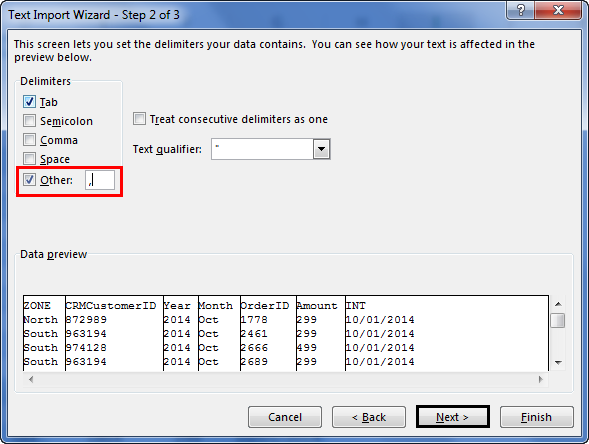
If you use the Text Import Wizard to import a text file, you can change the delimiter that is used for the import operation in Step 2 of the Text Import Wizard. In this step, you can also change the way that consecutive delimiters, such as consecutive quotation marks, are handled.
See Text Import Wizard for more information about delimiters and advanced options.
If you want to use a semi-colon as the default list separator when you Save As .csv, but need to limit the change to Excel, consider changing the default decimal separator to a comma — this forces Excel to use a semi-colon for the list separator. Obviously, this will also change the way decimal numbers are displayed, so also consider changing the Thousands separator to limit any confusion.
-
Clear Excel Options > Advanced > Editing options > Use system separators.
-
Set Decimal separator to , (a comma).
-
Set Thousands separator to . (a period).
When you save a workbook as a .csv file, the default list separator (delimiter) is a comma. You can change this to another separator character using Windows Region settings.
Caution: Changing the Windows setting will cause a global change on your computer, affecting all applications. To only change the delimiter for Excel, see Change the default list separator for saving files as text (.csv) in Excel.
-
In Microsoft Windows 10, right-click the Start button, and then click Settings.
-
Click Time & Language, and then click Region in the left panel.
-
In the main panel, under Regional settings, click Additional date, time, and regional settings.
-
Under Region, click Change date, time, or number formats.
-
In the Region dialog, on the Format tab, click Additional settings.
-
In the Customize Format dialog, on the Numbers tab, type a character to use as the new separator in the List separator box.
-
Click OK twice.
-
In Microsoft Windows, click the Start button, and then click Control Panel.
-
Under Clock, Language, and Region, click Change date, time, or number formats.
-
In the Region dialog, on the Format tab, click Additional settings.
-
In the Customize Format dialog, on the Numbers tab, type a character to use as the new separator in the List separator box.
-
Click OK twice.
Note: After you change the list separator character for your computer, all programs use the new character as a list separator. You can change the character back to the default character by following the same procedure.
Need more help?
You can always ask an expert in the Excel Tech Community or get support in the Answers community.
See Also
Import data from external data sources (Power Query)
Need more help?
Want more options?
Explore subscription benefits, browse training courses, learn how to secure your device, and more.
Communities help you ask and answer questions, give feedback, and hear from experts with rich knowledge.
Excel can import data from external data sources including other files, databases, or web pages.
- Click the Data tab on the Ribbon..
- Click the Get Data button.
- Select From File.
- Select From Text/CSV.
- Select the file you want to import.
- Click Import.
- Verify the preview looks correct.
- Click Load.
Contents
- 1 How do I import a CSV file into Excel?
- 2 How do I import a file into a workbook?
- 3 How do I import a text file into Excel?
- 4 How do I automatically open a CSV file in Excel with columns?
- 5 What type of file can be imported into Excel worksheet?
- 6 How do I automatically open a CSV file in Excel with Windows 10?
- 7 How do I copy a worksheet in Excel to another Excel file?
- 8 How can we convert Word file into Excel?
- 9 How do I open a data file in Excel?
- 10 Why can’t I open a CSV file in Excel?
- 11 Why is CSV not importing?
- 12 Can an Excel file be converted to CSV?
- 13 How do you import a table into Excel?
- 14 How do I import data into a table in Excel?
- 15 What do you need to do to import only some of the data in an Excel worksheet?
- 16 How do you open CSV in Excel without formatting?
- 17 How do I open a CSV file?
- 18 Why can’t I copy Excel worksheet to another workbook?
- 19 How can I convert PDF file into Excel?
- 20 What is the difference between a CSV and Excel file?
How do I import a CSV file into Excel?
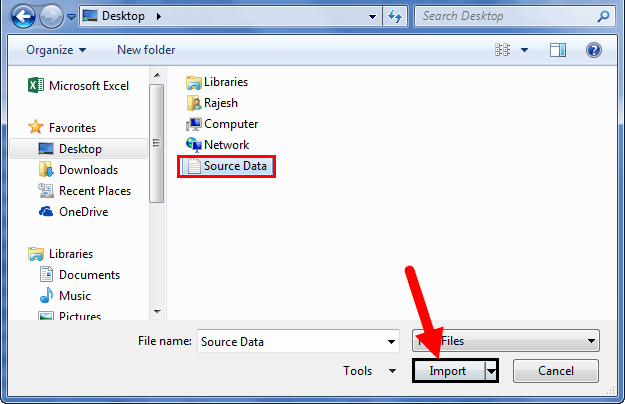
Steps to convert content from a TXT or CSV file into Excel
- Open the Excel spreadsheet where you want to save the data and click the Data tab.
- In the Get External Data group, click From Text.
- Select the TXT or CSV file you want to convert and click Import.
- Select “Delimited”.
- Click Next.
How do I import a file into a workbook?
Activate the worksheet you want to import data to, click the Data tab, and choose From Text button on the Get External Data group. 2. Choose the text file you want to import from the Import Text File window, and then click Import.
How do I import a text file into Excel?
You can import data from a text file into an existing worksheet.
- Click the cell where you want to put the data from the text file.
- On the Data tab, in the Get External Data group, click From Text.
- In the Import Data dialog box, locate and double-click the text file that you want to import, and click Import.
How do I automatically open a CSV file in Excel with columns?
To do that: Open Excel. Click on Data. Click on From Text/CSV.
- Right-click the file and select “Open with…”. The new sub-menu will show up.
- Click on the “Choose another app” option.
- From the new menu select Excel and tick the box next to “Always use this app to open . csv files” option.
What type of file can be imported into Excel worksheet?
The most common data formats used to store data in files that can be read data into Excel are:
- Existing Excel workbook or worksheet with extension .xls.
- Existing Excel workbook or worksheet with extension .xlsx.
- Comma-separated values text file with extension .csv.
- Text file, often with extension .txt or extension .asc.
How do I automatically open a CSV file in Excel with Windows 10?
Click the Microsoft Excel option under ‘Recommended Programs‘, then click the OK button. From the list of ‘Recommended Programs’, choose Excel. Any CSV file you click to open with now open in Excel automatically.
How do I copy a worksheet in Excel to another Excel file?
The common way to copy a sheet to another workbook is this:
- Right click on the tab that you want to copy, and then click Move or Copy…
- In the Move or Copy dialog box, do the following: Under To book, choose the target file. To place a copy into a new workbook, select (new book).
How can we convert Word file into Excel?
Replies (1)
- Open the Word document you want to convert to an Excel worksheet and click File or Office Button > Save As.
- Select a location you want to put and select Plain Text from the drop down list of Save as Type.
- Click Save, then click OK to close the File Conversion dialog.
- Now open Excel and select Data.
How do I open a data file in Excel?
The data file can be opened in Microsoft Excel by several methods: o double click; o right click, then choose Open or Open with Microsoft Excel; o open Microsoft Excel, in the File ribbon choose Open, then navigate to your saved file. At this point the file should be open as an Excel workbook.
Why can’t I open a CSV file in Excel?
Trouble With Opening CSV Files With Excel? The Comma and Semicolon Issue in Excel Due to Regional Settings for Europe. When opening standard CSV (Comma Separated Values) files in Excel you may find that Excel did not recognize the fields and simply displays all data in the first column.
Why is CSV not importing?
One of the most common CSV import errors is that the file is simply too large. That can be caused by too many fields or records in the file, too many columns, or too many rows. The import error can be caused by limits set by the program using the file or the amount of available memory on the system.
Can an Excel file be converted to CSV?
In your Excel workbook, switch to the File tab, and then click Save As. Alternatively, you can press F12 to open the same Save As dialog. 2. In the Save as type box, choose to save your Excel file as CSV (Comma delimited).
How do you import a table into Excel?
Click the “Insert” tab > Locate the “Tables” group. Select the “Table” icon > Choose the “Insert Table…” option. Set the “Number of columns,” “Number of rows,” and “AutoFit behavior” to your desired specifications > Click [OK]. Open the Excel file and use your mouse to select the data you wish to import.
How do I import data into a table in Excel?
Creating a Table within Excel
- Open the Excel spreadsheet.
- Use your mouse to select the cells that contain the information for the table.
- Click the “Insert” tab > Locate the “Tables” group.
- Click “Table”.
- If you have column headings, check the box “My table has headers”.
- Verify that the range is correct > Click [OK].
What do you need to do to import only some of the data in an Excel worksheet?
Locate the source file and select the worksheet that contains the data that you want to import to Access. If you want to import only a portion of a worksheet, you can define a named range that includes only the cells that you want to import. Switch to Excel and open the worksheet that has data that you want to import.
How do you open CSV in Excel without formatting?
How to open your CSV file safely:
- Open a new, blank worksheet in Excel.
- In the Data tab, select From Text.
- Select your CSV file and click Import.
- Complete Steps 1 and 2 of Excel’s Text Import Wizard.
How do I open a CSV file?
If you already have Microsoft Excel installed, just double-click a CSV file to open it in Excel. After double-clicking the file, you may see a prompt asking which program you want to open it with. Select Microsoft Excel. If you are already in Microsoft Excel, you can choose File > Open and select the CSV file.
Why can’t I copy Excel worksheet to another workbook?
The solution is to make sure that the workbooks are opened in the same instance of Excel. The easiest way to do this is to make sure that once the first workbook is open, you open the second workbook by using the Open tool on the toolbar or by choosing File | Open.
How can I convert PDF file into Excel?
Open a PDF file in Acrobat DC.
- Open a PDF file in Acrobat DC.
- Click on the “Export PDF” tool in the right pane.
- Choose “spreadsheet” as your export format, and then select “Microsoft Excel Workbook.”
- Click “Export.” If your PDF documents contain scanned text, Acrobat will run text recognition automatically.
What is the difference between a CSV and Excel file?
The difference between CSV and XLS file formats is that CSV format is a plain text format in which values are separated by commas (Comma Separated Values), while XLS file format is an Excel Sheets binary file format which holds information about all the worksheets in a file, including both content and formatting.
How to Import Data in Excel?
Importing the data from another file or another source file is often required in Excel. For example, sometimes people need data directly from very complicated servers, and sometimes we may need to import data from a text file or even from an Excel workbook.
If you are new to Excel data importing, then in this article, we will take a tour of importing data from text files, different Excel workbooks, and MS Access. Follow this article to learn the process involved in importing the data.
Table of contents
- How to Import Data in Excel?
- #1 – Import Data from Another Excel Workbook
- #2 – Import Data from MS Access to Excel
- #3 – Import Data from Text File to Excel
- Things to Remember
- Recommended Articles
#1 – Import Data from Another Excel Workbook
You can download this Import Data Excel Template here – Import Data Excel Template
Let us start.
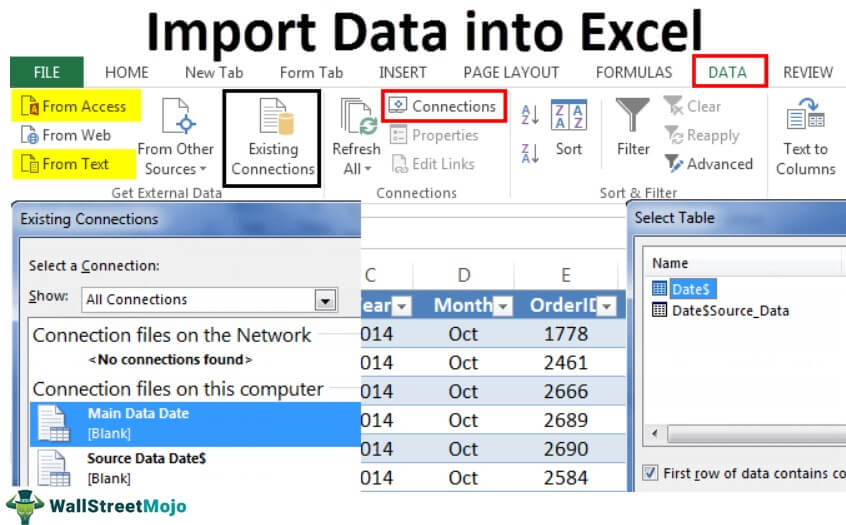
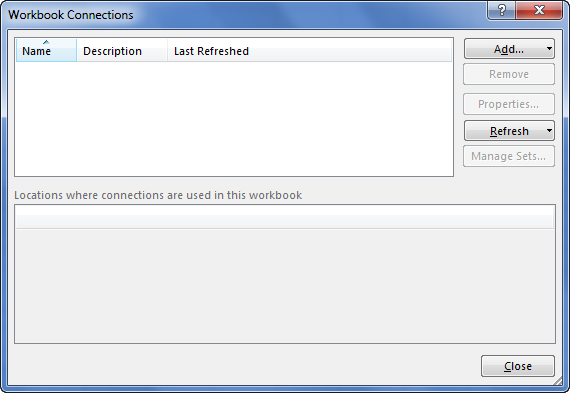
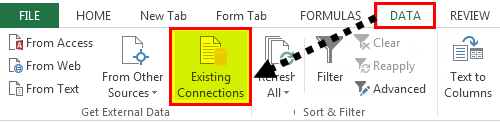
- First, we must go to the DATA tab. Then, under the DATA tab, click on Connections.

- As soon as we click on Connections, we may see the below window separately.

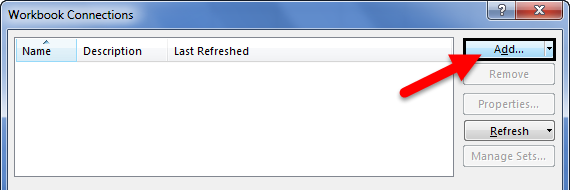
- Now, click on Add.

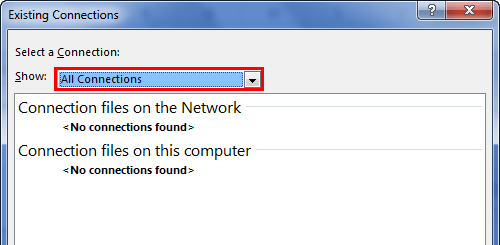
- It will open up a new window. In the below window, select All Connections.

- If there are any connections in this workbook, it will show what those connections are here.

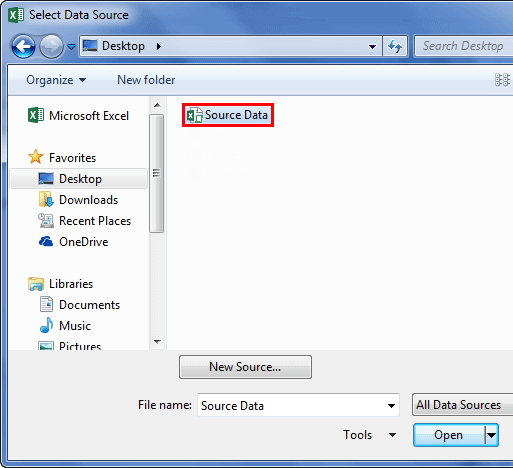
- Since we are connecting to a new workbook, click on Browse for more.

- In the below window, browse the file location. Then, click on Open.

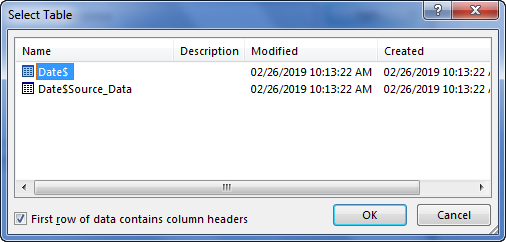
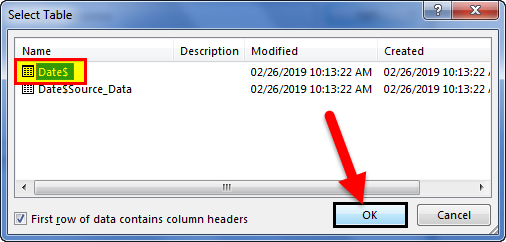
- After clicking on Open, it shows the below window.

- Here, we need to select the required table to be imported to this workbook. Select the table and click on OK.
After clicking on OK, close the Workbook Connection window.
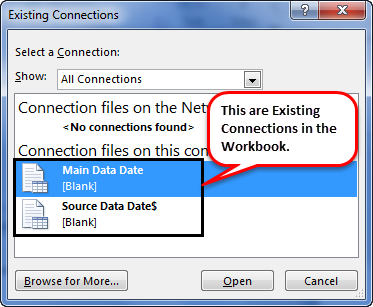
- Then, go to Existing Connections under the DATA tab.

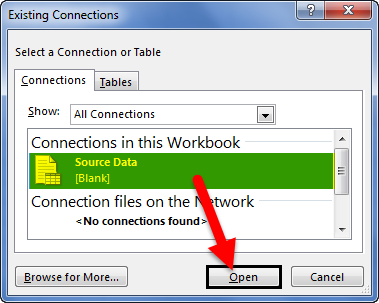
- Here, we will see all the existing connections. Select the connection we have just made and click on Open.

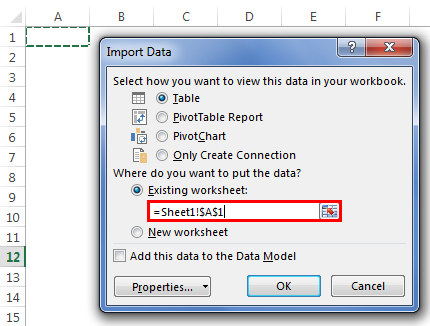
- Once we click on Open, it will ask us where to import the data. First, we need to select the cell reference here. Then, click on the OK button.

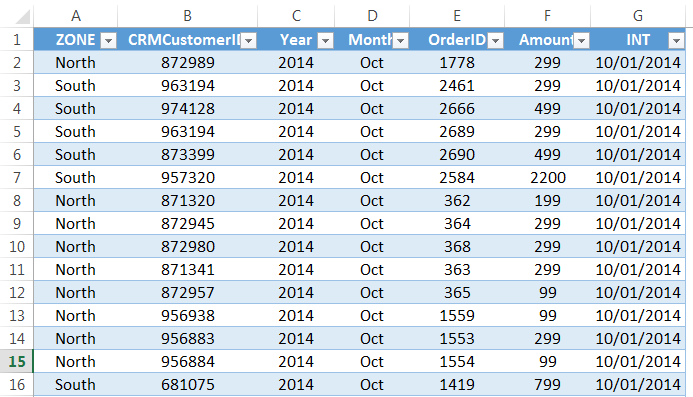
- It will import the data from the selected or connected workbook.


Like this, we can connect to the other workbook and import the data.
#2 – Import Data from MS Access to Excel
MS Access is the main platform to store the data safely. We can import the data directly from the MS Access File itself whenever the data is required.
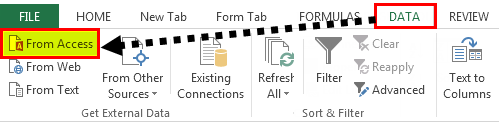
Step 1: Go to the “DATA” ribbon in excelThe ribbon is an element of the UI (User Interface) which is seen as a strip that consists of buttons or tabs; it is available at the top of the excel sheet. This option was first introduced in the Microsoft Excel 2007.read more and select “From Access.“
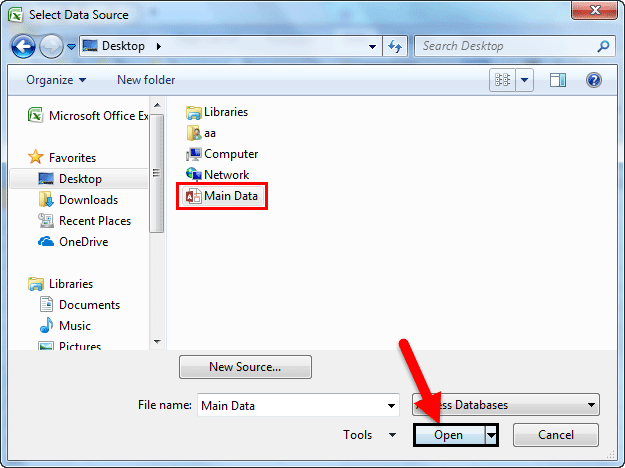
Step 2: Now, it will ask us to locate the desired file. Select the desired file path. Then, click on “Open.”
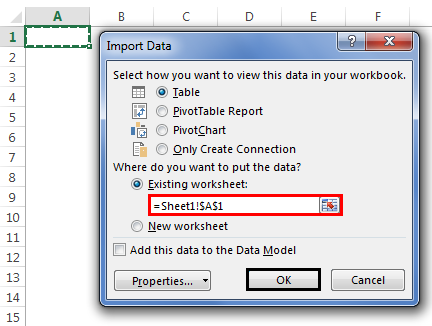
Step 3: Now, it will ask us to select the desired destination cell where we want to import the data. Then, click on “OK.”
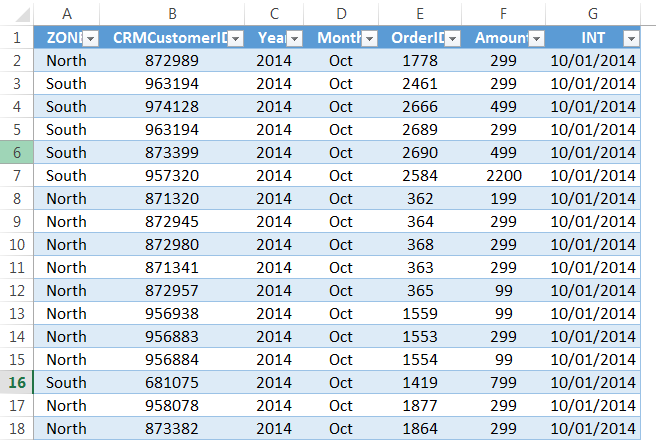
Step 4: It will import the data from access to the A1 cell in Excel.
#3 – Import Data from Text File to Excel
In almost all the corporations, whenever we ask for the data from the IT team, they will write a query and get the file in TEXT format. But unfortunately, TEXT file data is not the ready format to use in Excel; we need to make some modifications to work on it.
Step 1: Go to the “DATA” tab and click on “From Text.”

Step 2: Now, it will ask us to choose the file location on the computer or laptop. Select the targeted file, then click on “Import.”
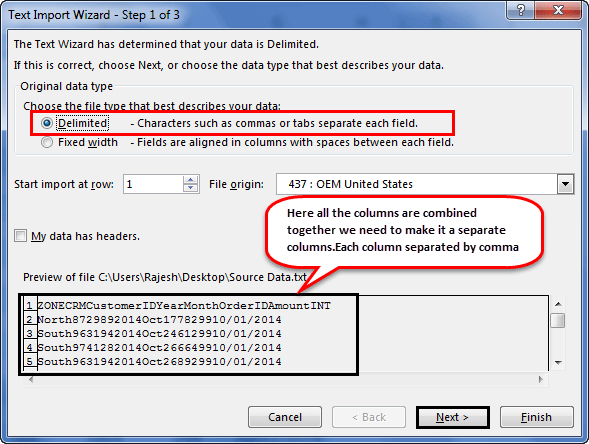
Step 3: It will open up a “Text Import Wizard.”
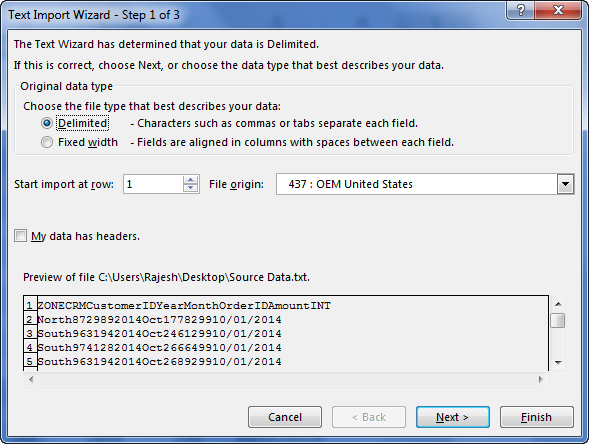
Step 4: By selecting the “Delimited,” click on “Next.”
Step 5: In the next window, select the other and mention comma (,) because, in the text file, each column is separated by a comma (,). Then click on “Next.”
Step 6: In the next window, click on “Finish.”
Step 7: Now, it will ask us to select the desired destination cell where we want to import the data. Select the cell and click on “OK.”
Step 8: It will import the data from the text file to the A1 cell in Excel.
Things to Remember
- If there are many tables, we must specify which table data we need to import.
- If we want the data in the current worksheet, we need to select the desired cell. Else, if we need data in a new worksheet, we must choose the new worksheet as the option.
- We need to separate the column in the TEXT file by identifying the common column separators.
Recommended Articles
This article is a guide to Import Data in Excel. Here, we discuss how to import data from 1) Excel Workbook, 2) MS Access, 3) Text File, practical examples, and a downloadable Excel template. You may learn more about Excel from the following articles: –
- KPI Dashboard in Excel
- Insert Image in Excel Cell
- How to Insert New Worksheet In Excel?
- Create a Dashboard in Excel
- Page Numbers in Excel
How to Import Text Files Into Excel: Step-by-Step Guide (2023)
Don’t you just wish you can magically import data that you need into a new usable format faster with nothing to do any manual work? 😩
Well, Microsoft Excel can grant your wish. Excel allows you to open other file formats such as comma-separated values (CSV) files and tab-separated (TXT) files. You can also import data from a text file by converting them into an Excel spreadsheet you can now work with.
Sounds awesome, right? 😀
Learn how to import data from a text file into Excel with our step-by-step guide.
Download this free practice workbook we’ve prepared for you to get started.
How to import a text or CSV file in Excel
Before you learn how to import a text file into Excel, you need to learn the basics of the text file formats first.
What is a text or CSV file?
Text files are formatted in a very specific way so they can be read by programs like Microsoft Excel. There are different text file formats. The commonly used ones are:
- Comma-separated values text files (.csv), in which the comma character (,) typically separates each field of text.
- Delimited text files (.txt), in which the TAB character typically separates each field of text.
Now, how does Excel reads data from a text or CSV file? 🤔
Each line of the file is a “record”. In Excel, that means it’s a row. Records are delineated by line breaks. Each line break corresponds to one row in Excel.
Delimiters such as commas, tabs, or space characters separate fields within the record. CSV files are comma delimited.
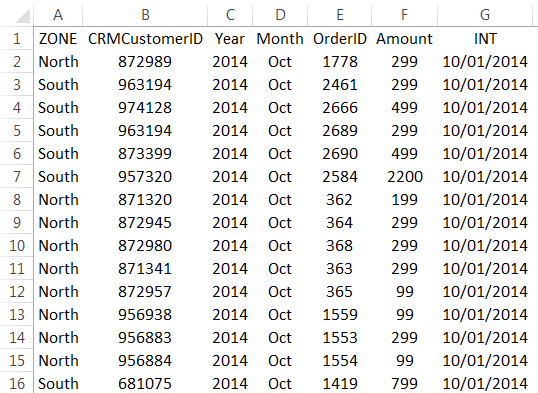
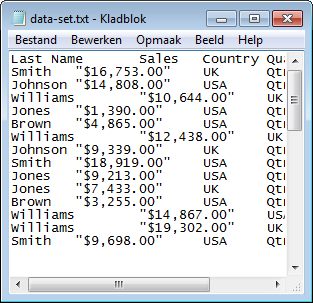
So, when Excel sees “Excel,CSV,Formatting”, it will import data in an Excel worksheet like this:

You can change the separator character that is used in CSV files or text files. This may be necessary to make sure that the import or export operation works the way that you want it to.
You can import or export up to 1,048,576 rows and 16,384 columns 👍
The only other notable thing about CSV files is that the double quote symbol indicates text fields. That’s important because text fields can contain commas and line breaks.
If they’re contained within quotes, commas, and line breaks won’t end the field or the record.
Prepare the Text File
Of course, in a real-life setting, you don’t need to prepare the text file. You may have already downloaded it in TXT or CSV file formats waiting to be imported into an Excel file.
For our tutorial, let’s open a Notepad File to create a sample text file. If you’re using Mac, open TextEdit📝
Type the following data in your notepad as shown below. Or copy this and paste it into your notepad.
Last Name,First Name,Address
Reed,James,Washington
Owens,Donovan,Texas
Hutchins,Ricky,Wisconsin

Then save this text file to be used later.
There are two ways to import data from a text file with Excel: you can open it in Excel, or you can import it as an external data range. Let’s try to do each one of them 😊
Import a text or CSV file by opening it in Excel
The first way you can import text files in Excel is rather simple.
Just open a CSV file or a text file that you created in another program as an Excel workbook by using the Open command.
Open your practice workbook and do the following steps 👇
- Go to File Tab.

- Click Open.
- Browse to the location that contains the text file.

The Open dialog box pops up.
- Locate and double-click the text file that you want to open.

If you open a CSV file, Excel automatically opens the text file and displays the data in a new workbook. If the file is a text file, Excel starts the Text Import Wizard.
Since our file is a text file, the Text Import Wizard window pops up 🧙
There are 3 steps to go through. Let’s start with Step 1 out of 3.
The Text Import Wizard has determined that our data is Delimited. But to be sure:
- Click Delimited for the Original Data Type.

- Click Next to proceed to Step 2.

- Click Comma as the delimiter.

The window will also show a Data Preview Field.
- Click Next to proceed to Step 3.

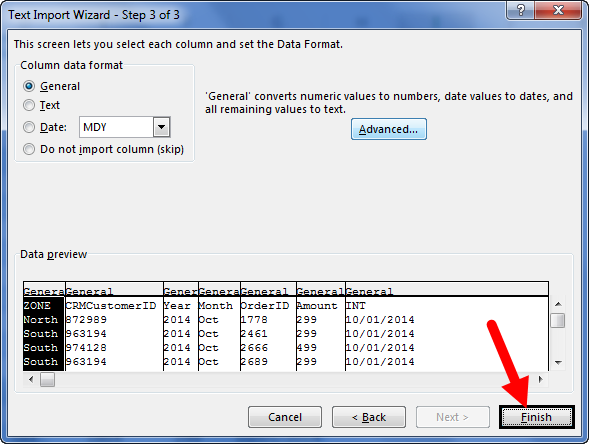
Here you can select individual columns and apply specific formatting by clicking them and choosing an option from the Column data format list.
We’ll leave it as General, which is what you’ll most often use.
- Select General.

- Finally, click Finish to get your data.

This is now the result. The imported data is now in a new blank worksheet, not in your existing worksheet 😀

Opening a text file in Excel does not change the format of the file — you can see this in the Excel title bar, where the name of the file retains the text file name extension (for example, .txt or .csv).

Simple, right? 😊
Import a text or CSV file by connecting to it (Power Query)
You can also import data from a text file into an existing worksheet.
- Go to Data Tab.
- Click the Get Data drop-down button in the Get & Transform Data group.

- Select From File.
- Select From Text/CSV.

- In the Import Data dialog box, locate and double-click the text file that you want to import, and click Import.

In the preview dialog box, you have several options:
- Select Load if you want to load the data directly to a new worksheet.
- Select Load to if you want to load the data to a table, PivotTable/PivotChart, an existing worksheet, a new Excel worksheet, or simply create a connection. You also have the choice of adding your data to the Data Model.
- Select Transform Data if you want to load the data to Power Query, and edit it before bringing it to Excel.
- Click Transform Data.

The Text Power Query Editor window will pop up. It shows the data preview as well.

The data are already separated as you can see 👀
In the case that the data are NOT separated as they should be, here’s what to do: 👇
- Click the Split column button.
- Select By delimiter from the drop-down list.

- Select Comma as the delimiter.

- Click OK.

Look at the preview to check if it’s good to go.

As you can see, it added another unnecessary column. To remove or undo any changes you’ve done, head over to the Query Setting panel on the right side of the window.
Click the ❌ symbol. This will remove or undo any applied steps.

Look at the data preview again. If everything looks good…
- Finally, click the Close & Load button.

Now, this is what it will look like. The data is imported into a new worksheet in the current Excel workbook 😊

That’s it – Now what
Clearly, Microsoft Excel helps you import data from text files with just a few clicks. This saves you from manually typing data from other file formats by converting them to a usable file format you can work on 👍
If this sounds awesome already, then you are in for a big surprise! Excel can actually help you do 50 tasks all at once with just a single click 🤯
That’s right, this is possible with Excel Mighty Macros. It’s perfect for your workflow automation. Learn how to record, and edit a macro, the basics of the VBA editor, and learn how to write your first macro from scratch. Learn it all with me!
Join my free email course to get started with macros. It’s free and perfect for beginners 😊
Kasper Langmann2023-02-02T18:55:50+00:00
Page load link
Перейти к содержанию
На чтение 2 мин Опубликовано 21.06.2015
- Импорт
- Экспорт
Эта статья описывает, как импортировать или экспортировать текстовые файлы. Текстовые файлы могут быть разделены запятыми (.csv) или знаками табуляции (.txt).
Импорт
Чтобы импортировать текстовые файлы, следуйте нашей инструкции:
- На вкладке File (Файл) кликните Open (Открыть).
- Из выпадающего списка выберите Text Files (Текстовые файлы).
- Чтобы импортировать файл …
- CSV, выберите документ с расширением .csv и нажмите кнопку Open (Открыть). Это всё.
- TXT, выберите документ с расширением .txt и кликните по Open (Открыть). Excel запустит Text Import Wizard (Мастер текстов (импорт)).
- Выберите Delimited (С разделителями) и нажмите Next (Далее).
- Уберите все галочки кроме той, что напротив Tab (Знак табуляции) и кликните Next (Далее).
- Нажмите Finish (Готово).
Результат:

Экспорт
Чтобы экспортировать книгу Excel в текстовый файл, сделайте следующее:
- Откройте документ Excel.
- На вкладке File (Файл) нажмите Save As (Сохранить как).
- Из выпадающего списка выберите Text (Tab delimited) (Текстовые файлы (с разделителями табуляции)) или CSV (Comma delimited) (CSV (разделители – запятые)).
- Нажмите Save (Сохранить).
Результат: CSV файл (разделенный запятыми) и TXT файл (разделённый знаками табуляции).

Оцените качество статьи. Нам важно ваше мнение: