
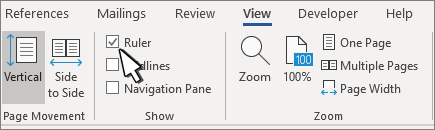
Turn on the ruler
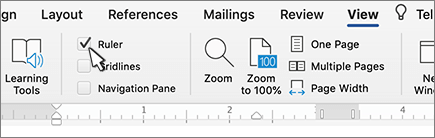
If you don’t see the ruler at the top of your document, go to View > Ruler to display it.
Set a tab stop using the ruler
-
Select Left Tab
 at the left end of the horizontal ruler to change it to the type of tab you want.
-
Choose one of the following types:
-
A Left tab stop sets the left end of the text line. As you type, the text fills toward the right.
-
A Center tab stop sets the position at the middle of the text line. As you type, the text centers on this position.
-
A Right tab stop sets the right end of the text line. As you type, the text fills toward the left.
-
A Decimal tab stop aligns numbers around a decimal point. Without regard to the number of digits, the decimal point remains in the same position. See Use decimal tabs to line up numbers with decimal points.
-
A Bar tab stop doesn’t position text. It inserts a vertical bar at the tab position. Unlike other tabs, the bar tab is added to the text as soon as you click the ruler. If you don’t clear the bar tab stop before you print your document, the vertical line is printed.
-
-
Click or tap the bottom of the horizontal ruler where you want to set the tab stop.
 at the left end of the horizontal ruler to change it to the type of tab you want.
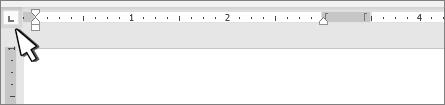
 A Center tab stop sets the position at the middle of the text line. As you type, the text centers on this position.
 A Right tab stop sets the right end of the text line. As you type, the text fills toward the left.
 A Decimal tab stop aligns numbers around a decimal point. Without regard to the number of digits, the decimal point remains in the same position. See Use decimal tabs to line up numbers with decimal points.
 A Bar tab stop doesn’t position text. It inserts a vertical bar at the tab position. Unlike other tabs, the bar tab is added to the text as soon as you click the ruler. If you don’t clear the bar tab stop before you print your document, the vertical line is printed.
Drag the tab stop down off the ruler to remove it.
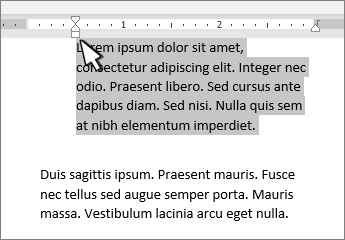
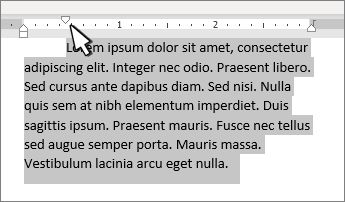
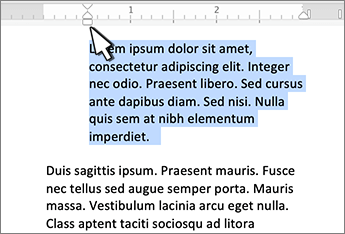
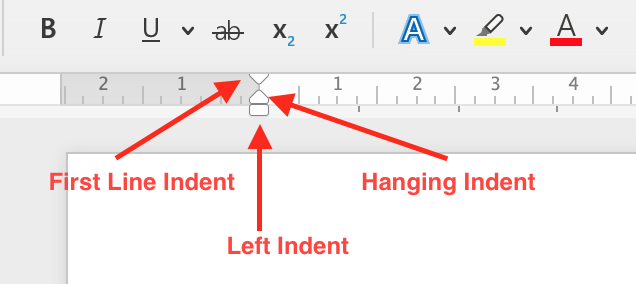
The left indent sets the position of the left side of a paragraph. When you move the left indent, your first line indent or hanging indent are moved in sync.
-
Select the text where you want set the left indent.
-
On the ruler, drag the square marker on the lower left side of the ruler to the place you want the left edge of the paragraph.
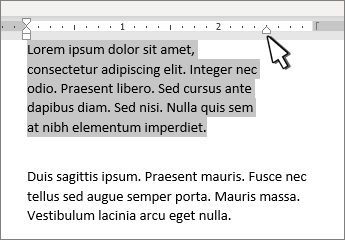
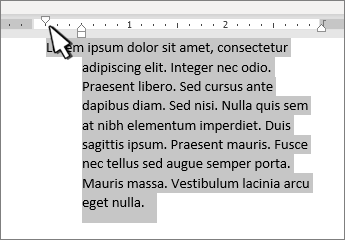
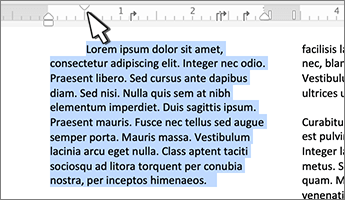
The right indent marker controls the position of the right side of a paragraph.
-
Select the text where you want set the right indent.
-
On the ruler, drag the triangular marker on the lower right side of the ruler to the place you want the right edge of the paragraph.
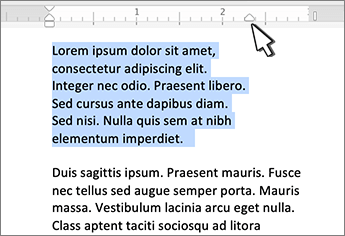
With a first line indent, the first line of a paragraph is indented and the following lines of a paragraph are not.
-
Select the text where you want to add a first line indent.
-
On the ruler, drag the triangular marker on the top left of the ruler to the place you want the indentation to start, for example to the 1″ mark.
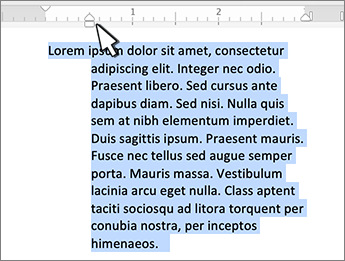
With a hanging indent, the second and all the following lines of a paragraph are indented more than the first.
-
Select the text where you want to add a hanging indent.
-
On the ruler, drag the upper triangular part of the lower marker to the place you want the indentation to start, for example to the 1″ mark.
Turn on the ruler
If you don’t see the ruler at the top of your document, go to View > Ruler to display it.
Set a tab stop using the ruler
-
Select Left Tab
at the left end of the horizontal ruler to change it to the type of tab you want.
-
Choose one of the following types:
-
A Left tab stop sets the left end of the text line. As you type, the text fills toward the right.
-
A Center tab stop sets the position at the middle of the text line. As you type, the text centers on this position.
-
A Right tab stop sets the right end of the text line. As you type, the text fills toward the left.
-
A Decimal tab stop aligns numbers around a decimal point. Without regard to the number of digits, the decimal point remains in the same position. See Use decimal tabs to line up numbers with decimal points.
-
A Bar tab stop doesn’t position text, it inserts a vertical bar at the tab position. Unlike other tabs, the bar tab is added to the text as soon as you click the ruler. If you don’t clear the bar tab stop before you print your document, the vertical line is printed.
-
-
Click or tap the bottom of the horizontal ruler where you want to set the tab stop.
 at the left end of the horizontal ruler to change it to the type of tab you want.
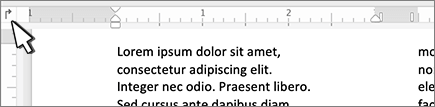
 A Center tab stop sets the position at the middle of the text line. As you type, the text centers on this position.
 A Right tab stop sets the right end of the text line. As you type, the text fills toward the left.
 A Decimal tab stop aligns numbers around a decimal point. Without regard to the number of digits, the decimal point remains in the same position. See Use decimal tabs to line up numbers with decimal points.
 A Bar tab stop doesn’t position text, it inserts a vertical bar at the tab position. Unlike other tabs, the bar tab is added to the text as soon as you click the ruler. If you don’t clear the bar tab stop before you print your document, the vertical line is printed.
Drag the tab stop down off the ruler to remove it.
The left indent sets the position of the left side of a paragraph. When you move the left indent, your first line indent or hanging indent are moved in sync.
-
Select the text where you want set the left indent.
-
On the ruler, drag the square marker on the lower left side of the ruler to the place you want the left edge of the paragraph.
The right indent marker controls the position of the right side of a paragraph.
-
Select the text where you want set the right indent.
-
On the ruler, drag the triangular marker on the lower right side of the ruler to the place you want the right edge of the paragraph.
With a first line indent, the first line of a paragraph is indented and the following lines of a paragraph are not.
-
Select the text where you want to add a first line indent.
-
On the ruler, drag the triangular marker on the top left of the ruler to the place you want the indentation to start, for example to the 1″ mark.
With a hanging indent, the second and all the following lines of a paragraph are indented more than the first.
-
Select the text where you want to add a hanging indent.
-
On the ruler, drag the upper triangular part of the lower marker to the place you want the indentation to start, for example to the 1″ mark.
19
19 people found this article helpful
How to Show the Ruler in Word
Use it to adjust margins, tabs, and more
What to Know
- In Print Layout: On the View tab, select Print Layout. Choose the Ruler check box to display the rulers.
- In Draft Layout: On the View tab, select Draft. Choose the Ruler check box to display the rulers.
- With the rulers enabled in the print or draft layout, you can change the margins and tabs.
This article explains how to display the ruler in Microsoft Word—and how to use the ruler to change margins and create tabs.
How to Show the Ruler in Word
Word has a ruler feature that enables you to do reasonably accurate layout work right within a Word document. If you want to set a tab, or see how big your text box or headline will be when you print a document, you can use the ruler to measure where on the page you want those elements to fall and see how big they will be when printed.
If you don’t see the ruler while working on a document, it’s probably turned off. Here’s how to show the ruler in Word.
-
If you want a ruler that appears horizontally and vertically, first make sure you’re working in the Print Layout view. With your document open, select Print Layout on the View tab.
-
Select the Ruler check box. In the Ribbon, it’s located at the top of the column that also contains Gridlines and Navigation Pain.
-
The ruler will appear above your document, as well as vertically on the left side in the Print Layout.
-
With the rule enabled, you can use tabs and margins, measure the size and placement of text boxes, and more in the Print Layout view.
-
To turn the ruler off, uncheck the Ruler check box.
How to Display the Microsoft Ruler in the Draft Layout in Word
If you prefer to work in the Draft layout, rather than the Print layout, the ruler works similarly in that view. While the ruler will not appear along the vertical margin of your document in the Draft layout, it will display along the top. It works much the same way as it does in the Print layout.
-
First make sure your document is open and you’re looking at it in the Draft view. To do this, Select Draft on the View tab.
-
Select the Ruler check box on the Ribbon. It’s in the same column on the ribbon as Gridlines and Navigation Pane.
How to Use the Microsoft Word Ruler
With the Ruler is enabled in either the Print Layout or in the Draft Layout, you can use it to change the margins and tabs, or to see the size and placement of graphic or type elements.
Using the Ruler to Change the Margins
-
Hover the mouse over the double tab at the left margin. Your mouse will turn to a double arrow and “Left Margin” will display as hover text. The part of the document outside the margin — the the left — is shaded grey.
-
Select and drag the left margin icon to increase your left margin.
-
On the right end of the ruler is the right margin. Hover your mouse over it until your mouse turns into a two-way arrow with «Right Margin» appearing over it.
-
Select and drag the right margin icon to see how it changes your right margin.
How to Create a Tab Using the Ruler
-
Place your cursor on the line where you want to place the tab.
-
Select the ruler in the spot where you want the tab. This will create a small corner-shaped icon representing your tab.
-
Press the Tab key to place a tab in your document, then drag along to ruler to change the tab’s placement.
Thanks for letting us know!
Get the Latest Tech News Delivered Every Day
Subscribe
In Microsoft Word, Ruler is a useful tool for typesetting. But it’s not always shown by default. It’s better to toggle it on if you want to adjust the layout more intuitively. So, how to enable the horizontal ruler and vertical ruler in Word?
It’s very easy to add horizontal ruler to your document.
1. First, Switch to View tab
2. Select Ruler in Show section .

How to Enable the Vertical Ruler
with only horizontal ruler, it may also cause inconvenience to users in typesetting. To enable vertical ruler in Word, just follow these steps:
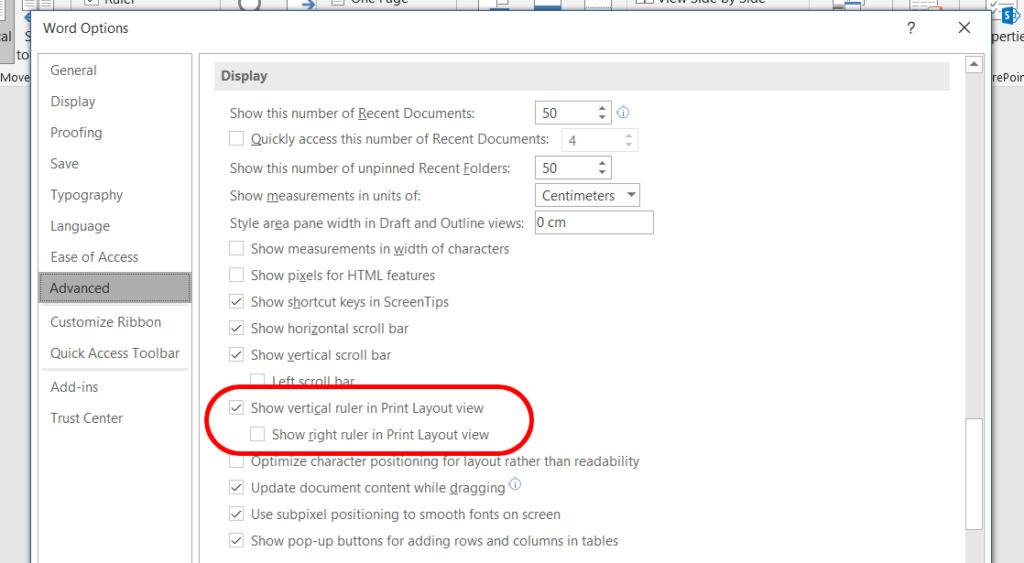
1. First, open the document, click File – Options.

2. Choose Advanced. Stroll down the page to find Display section, then check the option of Show vertical ruler in Print Layout view.

3. Check your document, the vertical ruler should have been added on the edge of the page now.

How to Hide the Ruler in Word
If you’ve done editing the layout and want a pure page without any added ruler, just go to View tab again and uncheck Ruler option in Show section.

All the rulers will disappear immediately.
Copyright Statement: Regarding all of the posts by this website, any copy or use shall get the written permission or authorization from Myofficetricks.
The ruler tool in Microsoft Word provides a simple way of making sure different parts of your document are aligned. It also lets you quickly adjust margins and indents in your work. So, how does it work? Let us explain.
How to Display the Ruler in Microsoft Word
To show the horizontal and vertical rulers in Microsoft Word, simply:
- Go to the View tab on the main ribbon.
- Click the Ruler checkbox.
This should then display the rulers on the top and left margins in the Print Layout view. You can then change the unit of measurement to suit your requirements.

How to Adjust Margins Using the Ruler
On the ruler, the gray areas represent the margins of your document. The white space between these represents the part of the page writing will appear within.
To adjust a margin in a document using the ruler tool:
- Hover the cursor at the edge of the margin you want to adjust.
- When the double-headed arrow cursor appears, click and drag to increase or decrease the margin size.
However, this way of adjusting margins can be inexact. As such, if you need to ensure precision, we suggest using the standard margin options in Word.
How to Use Indentation Tabs
You should also be able to see some white shapes on the edge of the ruler. You can use these to quickly adjust indentations in a document. All you need to do is place the cursor in text you want to indent, then drag the relevant shape on the ruler.
The trick, then, is making sure you select the correct tab! On that note:
Find this useful?
Subscribe to our newsletter and get writing tips from our editors straight to your inbox.
- To adjust the left indent (i.e., the indentation of text from the left margin), drag the rectangle shape on the ruler to move all the tabs at once. This will then adjust all the text in the paragraph where you placed the cursor.
- To add or adjust a first line indent, drag the arrow at the top of the ruler. This will indent just the first line in the paragraph where you placed the cursor.
- For a hanging indent, select and move the triangle just above the rectangle shape (this will also move the left indent tab). Doing this will indent each line in the selected paragraph after the first line.
- To adjust the right indent, simply click and drag the arrow on the righthand side of the rule. This will indent text from the right margin.
If you’re not sure which tab is which, moreover, simply hover the cursor over any of the shapes on the ruler. Its name will then pop up, helping you to pick the right one.
As with margins, though, adjusting indents via the ruler can be imprecise. To ensure consistency, you may want to check the size of indents via the paragraph menus.
Toggling the Vertical Ruler
If the vertical ruler doesn’t display with the horizontal one, you may need to turn it on via the options menu. To do this in Word for Windows:
- Go to File > Options > Advanced and scroll down to Display.
- Click the Show vertical ruler in Print Layout view checkbox (you can also select to display this ruler on the right margin here).
- Click OK to accept the change.
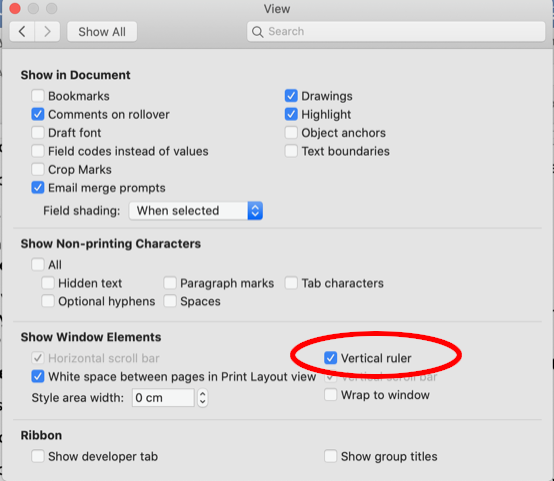
In Word for Mac, meanwhile, the process is:
- Go to Word > Preferences via the toolbar.
- Select View under Authoring and Proofing Tools.
- Check Vertical ruler under Show Window Elements.
- Close the preferences pane to save your changes.
You should now see the vertical ruler running down the left side of your document.
Expert Formatting Services
If you want to be sure your documents look perfect, our formatting services could be exactly what you need. All you need to do is add the “Formatting” option when you upload a document for proofreading, then let us know what formatting to apply!
Contents
- 1 How do I use the Ruler in Microsoft Word?
- 2 How do I align text in Word with Ruler?
- 3 How do I show vertical and horizontal rulers in Word?
- 4 What is the use of vertical ruler in MS Word?
- 5 How do I show the horizontal ruler in Word?
- 6 In which tab ruler is present?
- 7 What is the function of ruler in MS Word Mcq?
- 8 What is Draft view in MS Word?
- 9 What is the key command to turn on rulers?
- 10 How many rulers are there in Microsoft Word?
- 11 How do I show the tab bar in Word?
- 12 How do I insert a left ruler in Word?
- 13 How do I set measurements in Word?
- 14 What is the unit of ruler in Microsoft Word?
- 15 What is a ruler used for in computer?
- 16 How many ways you can save a document?
- 17 How do you magnify your document?
- 18 How do you use draft mode in Word?
- 19 What are the 5 views in Microsoft Word?
- 20 What are the three ways to view screen in Microsoft Word?
How do I use the Ruler in Microsoft Word?
Show the rulers
- Go to View and select Ruler.
- If the vertical ruler doesn’t show, make sure you’re in Print Layout view. If it still doesn’t show, you might need to turn the ruler on. Go to Word > Preferences > View (under Authoring and Proofing Tools). Then, in the View dialog box, select the Vertical ruler box.
How do I align text in Word with Ruler?
A second way to adjust text alignment is by clicking and dragging on the alignment tabs, which are found on the Ruler bar. The Ruler bar may or may not automatically display in Word. To display the Ruler bar, go to the View tab and select the Ruler checkbox.
How do I show vertical and horizontal rulers in Word?
To see both horizontal and vertical rulers, you must be in Print Layout view.
- To make sure you’re in Print Layout view, click Print Layout on the View tab.
- Select the Ruler check box.
What is the use of vertical ruler in MS Word?
The vertical ruler along the left edge of the document lets you adjust top and bottom margins and change table row heights. You can hide the rulers to get more room for your document.
How do I show the horizontal ruler in Word?
Click the View tab, then click the Ruler check box to show the horizontal and vertical ruler.
In which tab ruler is present?
On the View tab of the Ribbon, in the Show group, check the box for Ruler. This setting toggles the ruler’s display.
What is the function of ruler in MS Word Mcq?
Solution(By Examveda Team)
In Microsoft Word Ruler helps to set tabs, to change a line’s indentation, click and hold the bottom bar, then, drag it left to decrease the indentation, or right to increase it.
What is Draft view in MS Word?
Draft view can be considered a “pared down” version of the Print Layout view. It allows you to generally see how your text will appear on paper. This means you can see what each line will look like, how the text appears, and where the lines will break. You can also see where each page will break.
What is the key command to turn on rulers?
-R
Press Command-R (Mac) or Ctrl-R (Windows) to toggle the rulers on and off ( Figure 3.81 ).
How many rulers are there in Microsoft Word?
Answer: Word displays a horizontal ruler at the top of your document in most views; however, a ruler is only available only in Print Layout view.
How do I show the tab bar in Word?
You can click the button above the vertical scrollbar on the right hand side to show/hide the ruler. Or activate the View tab of the ribbon and tick the check box “Ruler” in the Show group. Do you mean the tab selector box (located to the left of the ruler). Clicking on it will activate any type of tab.
How do I insert a left ruler in Word?
Enabling the ruler in Word takes just a few clicks. Go to the View tab and check the box for Ruler in the Show area of the ribbon. You’ll then see the ruler display across the top and left side of the document.
How do I set measurements in Word?
To change the units of measurement in Microsoft Word for Windows:
- Click File tab on the ribbon and select Options.
- Go to the Advanced tab and scroll down to the Display section.
- Select an option from the Show measurements in units of menu.
- Click OK to save your selection.
What is the unit of ruler in Microsoft Word?
Changes in the measurement system will affect Word’s Ruler as well as various dialog boxes (including the Paragraph dialog where you can change paragraph indents). Unless the client or publication has a specific requirement for a type of measurement, most Microsoft Word users measure in inches or centimeters.
What is a ruler used for in computer?
Updated: 03/06/2020 by Computer Hope. The ruler is a measurement tool found with some software programs that allow the program’s user to align graphics, text, tables, or other elements on a page. When enabled, the horizontal ruler appears at the top of the document, and the vertical ruler on the left.
How many ways you can save a document?
We can save the document in Microsoft word in 3 ways:
By just pressing Ctrl + S and then browse the location where you want to save. By pressing F12 and then browse the location where you want to save.
How do you magnify your document?
To magnify text and reflow in Microsoft Word go to the view tab and choose the web layout. You can then magnify by pressing the control (ctrl) key and move the mouse wheel scroll at the same time, alternatively by selecting the zoom feature and choosing a preferred magnification level.
How do you use draft mode in Word?
In Microsoft Word, to get into Draft view, click View at the top of the window and then click the Draft icon. If you want to get out of Draft view, click any of the other available views, like Print Layout. You can also get a Draft view by clicking the Draft button in the View buttons.
What are the 5 views in Microsoft Word?
Microsoft Word gives you five different views of a document, and each has its own advantages over the others. They are Print Layout, Full Screen Reading, Web Layout, Outline and Draft and you can guess what purpose some of them serve just by their names.
What are the three ways to view screen in Microsoft Word?
In Word, you can view a document in a variety of ways:
- Print Layout view. This view displays a document on the screen the way it will look when printed.
- Full Screen Reading view.
- Web Layout view.