

Try it!
Change margins in your document to change the layout and make sure everything fits.
Apply a predefined margin setting
-
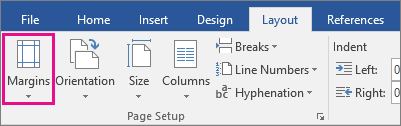
Select Layout > Margins.

-
Select the margin measurements you want.
Note: If your document contains multiple sections, the new margins apply only to the selected sections.
Create a custom margin
-
Select Layout > Margins.
-
Select Custom Margins.
-
In Margins, use the Up and Down arrows to enter the values you want.
-
Select OK when done.
Change default margins
-
Select Layout > Margins > Custom Margins.
-
Set your margins.
-
Select Set As Default.
-
Confirm your selection.
Want more?
Set page margins in Word
Discover more Word training at LinkedIn Learning
Need more help?
Want more options?
Explore subscription benefits, browse training courses, learn how to secure your device, and more.
Communities help you ask and answer questions, give feedback, and hear from experts with rich knowledge.
![]()
Download Article
A user-friendly guide to changing a Word document’s margins to wide, narrow, and more
![]()
Download Article
- Applying Preset Margins (Desktop)
- Creating Custom Margins (Desktop)
- Using the Mobile App
- Q&A
- Warnings
|
|
|
|
Are you trying to adjust your margins in Microsoft Word? The margins are the empty space between the edge of the page and the contents of the document. Depending on your needs, you can change the margins to become wider, narrower, or a mix of both. You’ll be able to select from a few preset options or customize your own. This wikiHow will show you how to fix and change the default 1-inch margins in Microsoft Word using your iPhone, Android, or Windows or Mac computer.
Things You Should Know
- On desktop, click «Layout» → «Margins» → select a margin preset.
- For custom margins, click «Custom Margins…» and enter the values for Top, Left, Bottom, and Right.
- On mobile, tap «•••» → «Home» → «Layout» → «Margins» → select a preset or «Custom Margins». Enter a new value and tap «Done».
-
1
-
2
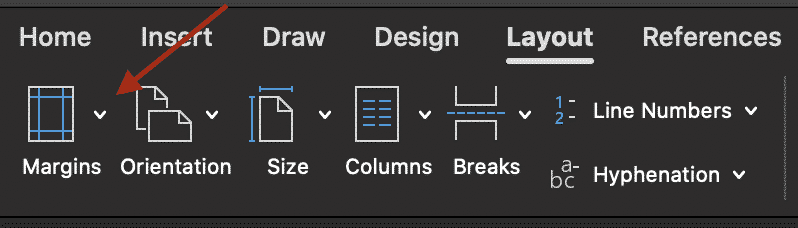
Click Layout. This will be in the top toolbar, between Design and References.
Advertisement
-
3
Click Margins. You can find this in the upper-left corner of the Layout tab. This looks like a rectangle with blue lining the margins.
- A pop-up menu will open.
-
4
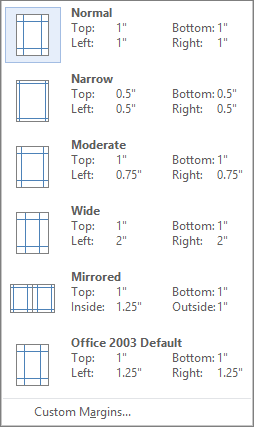
Select a margin type. You’ll see a list of preset margins: Normal, Narrow, Moderate, Wide, Mirrored, and Office 2003 Default. Click a preset margin to apply it to your document. It should be applied immediately.
- If you don’t like how it looks, you can select Normal again, or press CTRL + Z (Windows) or CMD + Z (Mac) to undo the change.
Advertisement
-
1
Click Layout. This will be in the top toolbar, between Design and References.
-
2
Click Margins. You can find this in the upper-left corner of the Layout tab. This looks like a rectangle with blue lining the margins.
- A menu will open.
-
3
Click Custom Margins…. This will be at the bottom of the drop-down menu.
- A new window will open.
-
4
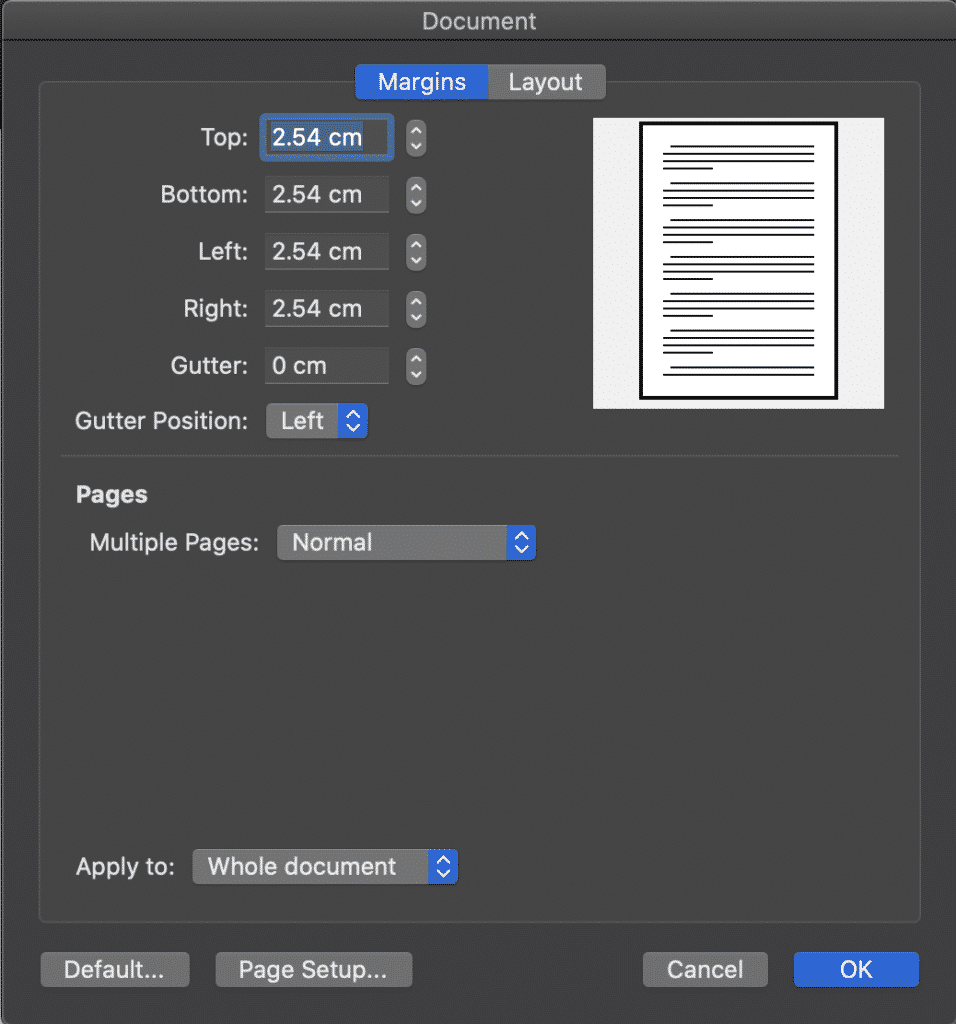
Set your new margins. On the desktop application, you’ll be able to edit the margin sizes for: Top, Left, Bottom, Right, Gutter, and Gutter Positions. On the web version, you’ll only be able to edit the margin sizes for: Top, Left, Bottom, and Right. You’ll see a preview of the document layout at the bottom of the window.
- Click the field and enter your new margin size, or use the up/down arrow to adjust the current margins.
- For Gutter Positions, select Left or Top.
- Only adjust the Gutter margin if you intend to use the document in a bound format, like a book or report, and you need space for the binding. In this case, type a number in Gutter that will allow enough room for the binding and use the drop-down to indicate whether the binding will be on the top or on the left.
- Make sure Apply to is set to Whole document, unless you only want to change the margins from This point forward.
-
5
Set new default margins (optional). If you want to use this margin for all new documents in Microsoft Word, click Set as default in the bottom-left corner. Click Yes to confirm.
- When you create a new document, the margins will reflect the change.
-
6
Click OK when finished. The changes will be applied immediately.
Advertisement
-
1
Open the Microsoft Word app. Microsoft Word is available for iOS in the App Store and for Android in the Google Play Store.
- If you aren’t already logged in to your Microsoft account, enter your email address and password to do so now.
-
2
Open a new or existing project. Tap a recent project on your homepage, or tap the + tab to create a new one.
-
3
Tap ••• . This is the «•••» located at the top of your on-screen keyboard. If you don’t see your keyboard, tap the document to open it.
- A new menu will open at the bottom.
-
4
Tap Home. This is located at the top of the new menu.
- A pop-up menu will open.
-
5
Tap Layout. You can find this between Draw and Review.
-
6
Tap Margins. This is the first listing in the Layout tab.
-
7
Select a margin type. You’ll see a list of preset margins: Normal, Narrow, Moderate, Wide, and Mirrored. Tap a preset margin to apply it to your document. It should be applied immediately.
- If you don’t like how it looks, you can select Normal again, or pick a new preset.
- Be sure to save your document when you’re finished.
-
8
Create a custom margin (optional). Tap Custom Margins at the bottom of the Margins menu. You’ll be able to edit the margin sizes for: Top, Left, Bottom, and Right.
- Tap a margin to edit it.
- Tap the backspace button to erase the existing margin.
- Enter a new margin value.
- Tap Done in the top-right corner.
- Tap Margins → Custom Margins to edit another margin.
- The changes will be applied immediately.
Advertisement
Add New Question
-
Question
I want the page ruler. What can I do?

To get the ruler, go into the View tab (Word 2010 and newer) and select the Ruler checkbox.
-
Question
Can I ever allow one more letter on a line to finish a long word rather than wrap to the next line?
No. The only thing you could possibly do would be to make all the margins wider. Making only one word go to the next line is impossible unless you do the same for all words.
Ask a Question
200 characters left
Include your email address to get a message when this question is answered.
Submit
Advertisement
Thanks for submitting a tip for review!
-
Leaving the margin under .25″ may lead to text being cut off when printed.
Advertisement
About This Article
Article SummaryX
1. Open a Microsoft Word document.
2. Click the Layout tab.
3. Click Margins.
4. Click Custom Margins….
5. Set the margins.
6. Click the Apply to drop-down.
7. Select how to apply the margins.
8. Click OK.
Did this summary help you?
Thanks to all authors for creating a page that has been read 493,209 times.
Is this article up to date?
Margins are the blank spaces that line the top, bottom, and left and right sides of a document.To change margins, click on the Margins button, found on the Page Layout tab.
Contents
- 1 How do I use margins in Word?
- 2 What is a margin in text?
- 3 What does no margin mean?
- 4 How many margins are on a page?
- 5 What is 1 margins mean?
- 6 What do you mean by margin explain with example?
- 7 Why is there a margin on paper?
- 8 What are a company’s margins?
- 9 What is margin in business?
- 10 What is a margin requirement?
- 11 How do I remove a margin line in Word?
- 12 How do you margin a paper?
- 13 Where is the margin on Microsoft Word?
- 14 Is margin same as profit?
- 15 Why do books have a margin?
- 16 What are margins for in a notebook?
- 17 What is a margin on sales?
- 18 What is margin in balance sheet?
- 19 What are margins in docs?
- 20 Is a margin account a good idea?
How do I use margins in Word?
Select Layout > Margins. Select Custom Margins. In Margins, use the Up and Down arrows to enter the values you want. Select OK when done.
Change default margins
- Select Layout > Margins > Custom Margins.
- Set your margins.
- Select Set As Default.
- Confirm your selection.
In typography, a margin is the area between the main content of a page and the page edges. The margin helps to define where a line of text begins and ends. When a page is justified the text is spread out to be flush with the left and right margins.(Any space between columns of text is a gutter.)
What does no margin mean?
Key Takeaways. Non-marginable securities are not allowed to be purchased on margin at a particular brokerage, or financial institution, and must be fully funded by the investor’s cash. Non-marginable securities are put in place to mitigate risks and control costs on stocks that are volatile.
How many margins are on a page?
Page margins should be consistent throughout the text. Required Margins: The top, bottom, and right margins are required to be 1 inch, but the left margin can either be 1 inch or 1.25 inches.
What is 1 margins mean?
The unit of measurement in those boxes is an inch so if you type 1″ in a text box, Word sets that margin to 1 inch. The Margins tab in the Page Setup window also has a “Set as Default” button. Click that when you want your margin settings to apply to all documents.
What do you mean by margin explain with example?
Margin can be defined in two main ways: It is the ratio of profit divided by revenue. This financial ratio is used to determine a company’s profitability. Money borrowed from a brokerage firm in order to leverage an investment.
Why is there a margin on paper?
Margins come in handy for notes, but at one time they had a more unique purpose. Mice and rats may not be able to read, but they love the taste of paper.So, paper manufacturers added margins as a safeguard to satisfy the rodents’ journalistic appetites while also helping to protect the written works.
What are a company’s margins?
A company’s operating margin, sometimes referred to as return on sales (ROS), is a good indicator of how well it is being managed and how efficient it is at generating profits from sales.In its essence, the operating margin is how much profit a company makes from its core business in relation to its total revenues.
What is margin in business?
Margin, or profit margin, is a percentage that’s used to measure the profitability of your business after expenses have been deducted from revenues. While revenue provides a good preliminary indicator of how well your business is performing, to determine actual business profit, you must consider your expenses as well.
What is a margin requirement?
A Margin Requirement is the percentage of marginable securities that an investor must pay for with his/her own cash.An Initial Margin Requirement refers to the percentage of equity required when an investor opens a position.
How do I remove a margin line in Word?
Go to Design > Page Borders. In the Borders and Shading box, on the Page Border tab, select the arrow next to Apply to and choose the page (or pages) you want to remove the border from. Under Setting, select None, and then select OK.
How do you margin a paper?
On the Page Layout tab, in the Page Setup group, click Margins. Click the margin type that you want. For the most common margin width, click Normal. Note: When you click the margin type that you want, your entire document automatically changes to the margin type that you have selected.
Where is the margin on Microsoft Word?
To change margins, click on the Margins button, found on the Page Layout tab. Word lists a number of pre-formatted options, but you can also make your own margins by selecting “Custom Margins,” found at the bottom of the Margins list. You can change each of the four margins in the dialog box that appears.
Is margin same as profit?
Profit Margin Measures a Company’s Profitability
Unlike profit, which gets measured in dollars and cents, profit margin gets measured as a percentage. To measure profit margin, use the company’s net income divided by the total sales generated.
Why do books have a margin?
Also known as “white space”, the margins of a book serve several important functions: 1) Enhances Aesthetics – margins help center the content on the page and make it more visually appealing.2) Improves Readability – the blank margins provide contrast to the printed words and images on the page.
What are margins for in a notebook?
Margins are around 2-inch lines presented on the top, bottom, left, and right sides of the notebook to make the writing look neat and mainly help teachers add notes and remarks for the students.
What is a margin on sales?
Sales margin is the amount of profit generated from the sale of a product or service. It is used to analyze profits at the level of an individual sale transaction, rather than for an entire business.
What is margin in balance sheet?
A margin is the difference between sales and expenses. There are a number of margins that can be calculated from the information located in the income statement, which give the user information about different aspects of an organization’s operations.
What are margins in docs?
Margins are the blank and unused spaces between the document’s content and edges. Margins don’t contain any text or image, and their prime purpose is to prevent text from colliding with document boundaries.
Is a margin account a good idea?
A margin account increases purchasing power and allows investors to use someone else’s money to increase financial leverage. Margin trading offers greater profit potential than traditional trading, but also greater risks. Purchasing stocks on margin amplifies the effects of losses.
The margins in your Microsoft Word Document determine the blank space that boarders your document, this prevents you from typing quite literally off the edge of the page.
You can change the size of your margin on any given Microsoft Word Document fairly easily.
A narrow margin may provide you with a higher word count per page, allow you to fit that one long sentence onto a single line or just suit the layout of your document.
A wide margin may make printing the Word Document easier. We’ve all been there – when you press print and Microsoft tells you the margins on your page are too wide and may not print correctly. This is when you may need to reduce the size of your margin slightly.

When you open a new word document, Microsoft will give you a default margin size of around 1 inch. This works for most documents, however, if you are looking to change the size of your margin this post will show you how.
Changing the size of your margin in Word
- Open Word
- Press Layout Tab
- Click Margins
- Select the margin you would like to insert from the pre-set options or click Custom Margins…

- Select the size of margins you would like
- Press OK
You have now successfully changes the size of the margins in your word document. These steps can be repeated as many times as required to achieve the desired look and feel for your document.
Need a better way to collaborate on a Microsoft Word Document?
How many times have you opened a Word Document that you are collaborating on with your team, forgot to press save before making your edits or you forgot to turn on tracked changes before you started editing away? Well, it happens to more of us than it should.

Resulting in the old ‘control undo’ to try and turn back time to before you pressed save and wiped out your colleague’s last version. Or Having to exit the document you started editing without tracked changes, open it again and sit there racking your brain for 5minutes about what the changes that you originally made were.
Its frustrating and it doesn’t have to be anymore.
Because so many of us (and by so many we mean probably everyone at some point in time), have faced the same issues when trying to collaborate in Word some life saving smart tech geniuses have created purpose-built tools to solve these problems for us, tools such as Simul Docs.
Remember when you last opened your shared drive and had to ask someone else on the team if Document_v8_update_Final_ACTUALFINAL_V2 is really the most recent version of the file?
Those days are over.
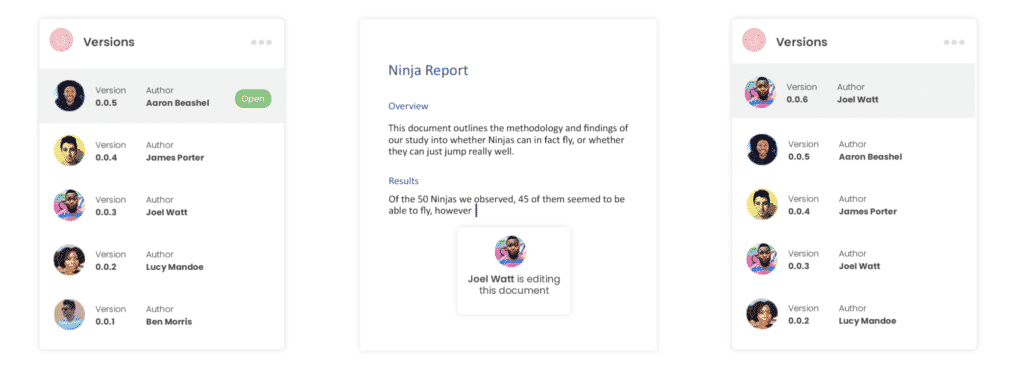
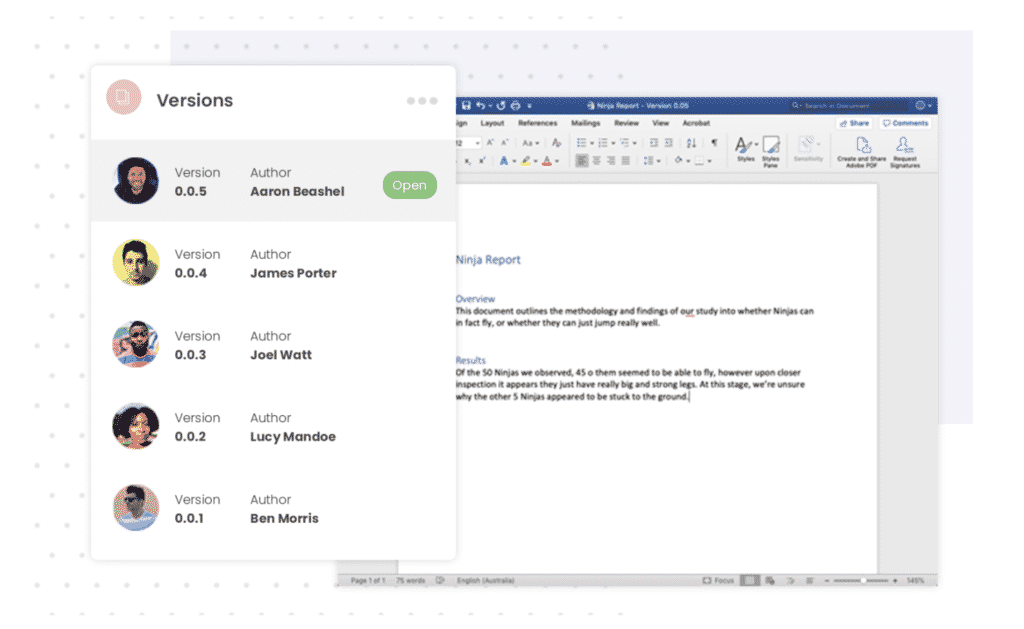
When you are using Simul Docs, by opening the shared document Simul automatically saves your file as a new version, under a neat, easy to follow numerical list. Version 1 is given the name 0.0.1, the next time it’s opened that file becomes 0.0.2 and so on. You’ll never save over a document again!
What about tracked changes?
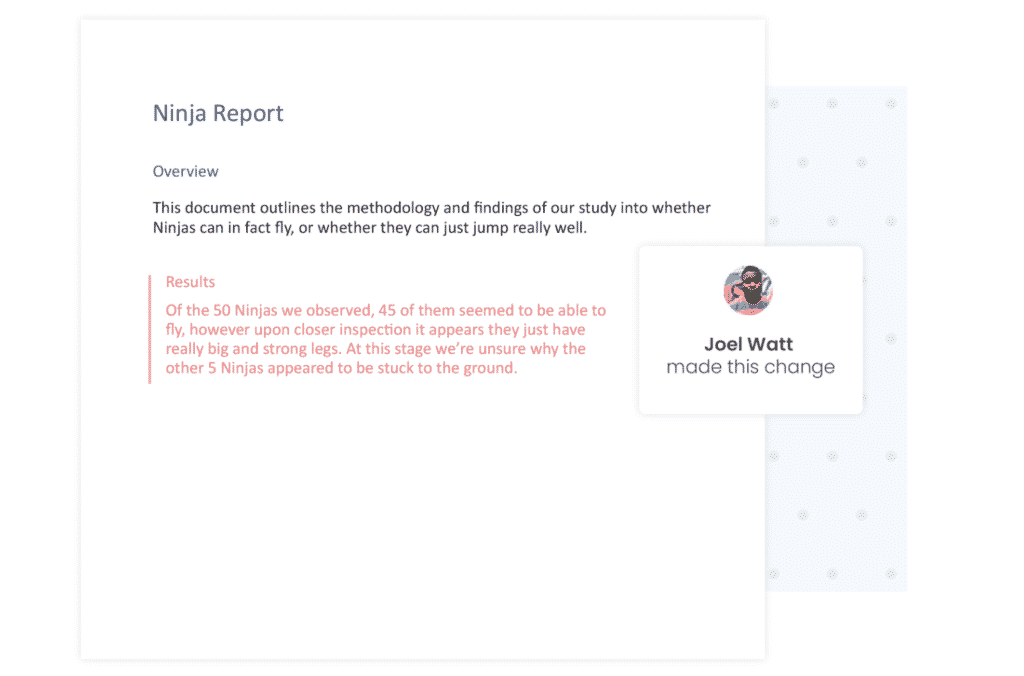
Simul knows that when you are collaborating on a Microsoft Word Document and you start to make edits you want them tracked, so tracked changes are automatically on, all the time.
Collaborating outside of your organisation?
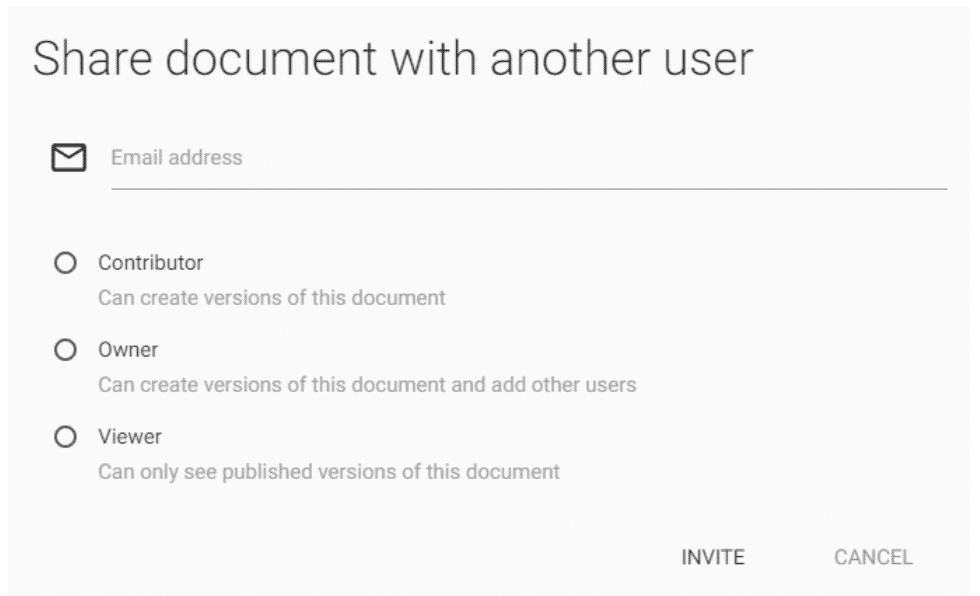
That’s ok, Simul Docs is happy for you to share your file with anyone, in or outside your dedicated organisation. The users can edit, update, change and collaborate with you as they would usually when working in Microsoft Word. Simul will track their changes, save a new version and let you know when they have finished.
Sharing the file with someone outside of your organisation is also simple. Send the document as an email attachment, direct link, share via DropBox or GoogleDrive and they can start reviewing or editing from the moment they open the file.
So, if you are tired of a messy shared drive, filled with bad version control and no way of knowing which one is the latest, you need Simul Docs.
And if you are sick of accidently saving over a document or forgetting to turn on tracked changes and having to start all over again, you need Simul Docs.
And if you just want to take the stress out of collaboration, you should try Simul Docs.
Thanks us later!

If you have requirements for a paper or document, you may be wondering how to change the margins in Word. We’ll walk you through it!
When you’re setting up a document in Microsoft Word, you may need to adjust the margins. You might be creating a document for a school that requires specific margins or one for your business where you simply prefer certain spacing.
Depending on which platform you’re using, Word not only gives you a selection of fixed margin settings but a custom option as well. Since these options differ slightly per your Word version, we’ll show you how to change the margins and where they vary in Word on Windows, Mac, the web, and in the mobile app.
Change the Margins in Word on Your Desktop or the Web
How you adjust the margins in Word is the same in the application on Windows, Mac, and the web. The differences are the preset options you can pick from and a few custom margin settings.
Fixed Margin Settings
Open your Word document and go to the Layout tab. Click the Margins drop-down arrow on the top left side of the ribbon. You’ll first see the fixed margin settings you can choose from.
You can choose Normal, Narrow, Moderate, or Wide in all three Word locations. And you can see the number of inches per margin next to each preset option.

There are two additional fixed options that vary per platform:
- Mirrored: Available in Word on Windows and Mac.
- Office 2003 Default: Available in Word on Windows and the web.

Choose the preset margin setting you want to use for your document, which will apply immediately. If you prefer to use Custom Margins, this is available on Windows, Mac, and the web as well.
Custom Margin Settings
Select Custom Margins at the bottom of the Margins drop-down list. Enter a number in inches or use the arrows to adjust the Top, Bottom, Left, and Right margins.

Custom margins in Word on the web
In Word on Windows and Mac, you can take your margin settings a step further by selecting where to apply the custom settings, whether or not to use Gutter settings, and if you prefer a different page orientation for those margins (on Mac, click Page Setup to change the orientation).

Custom margins in Word on Windows (left) and Mac (right)
You also have the option to apply these custom margins as your default setting by clicking the button on the bottom left.
If you’re working in Microsoft Word on your mobile device, you can also change the margins for a document there.
- Open your Word document and tap the three dots on the right side of the toolbar above your keyboard.
- Switch to the Layout tab.
- Select Margins.
- Tap a fixed margin setting to apply it. You can use Normal, Narrow, Moderate, Wide, or Mirrored.

Custom Margin Settings on Mobile
To use your own margins settings in the mobile app, follow the same steps as above but choose Custom Margins below the presets in Step 4.
Select each location, Top, Bottom, Left, and Right, enter the number in inches, and tap Done after each. You can then return to your document to keep working.

Prepare Your Document by Setting the Margins in Word
Changing your margins in Word takes only a couple of clicks or taps, so it’s worth the time to get your document set up before you begin. Although you can change the margins later if you discover that different settings would work better, remember that your document items may shift undesirably.
For additional help with your layout in Microsoft Word, take a look at how to work with page and section breaks or how to use outline view in Word.
![]()