
To do this, use the Shrink One Page command. Word will attempt to shrink the document by one page by reducing the size and spacing of the text. For example, it will shrink the document above to 1 page, or it might shrink a 3-page document down to 2.
Tip: Save a copy of your document before using this command. In order to shrink the document, Word decreases the font size of each font used in the document. You can undo the command by pressing Ctrl + Z. However, after you save the document and close it, there is no quick way to restore the original font size.
Shrink One Page isn’t a commonly used command, so the button isn’t shown by default. You can, however, quickly add it. The quickest way to add the button is to add it to the Quick Access Toolbar.
-
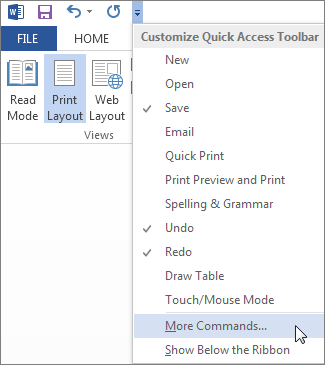
In the Quick Access toolbar at the top of the Word window, click Customize Quick Access Toolbar (the small down arrow) and choose More Commands.

-
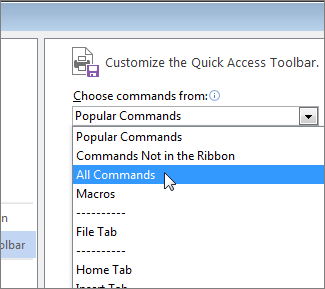
Under Choose commands from, click All Commands.
-
Scroll down through the list of commands until you find Shrink One Page.
-
Click Shrink One Page to select it, and then click the Add button.
-
Click OK.

Once the button is available, just click it to shrink the text.
-
Click Edit Document > Edit in Word for the web if you haven’t done so already.
-
Press Ctrl+A to select all the text in your document.
-
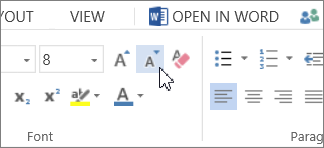
Click Home > Shrink Font one or more times.
As you click Shrink Font, Word decreases the size of every font in your document.
-
Click View > Reading View to see if you shrank the text enough.
Tip: If this doesn’t work and you have the Word desktop program, click the Open in Word button to open your document in Word and shrink text to fit there.

Have a small amount of text carrying over to create a new page in your document? Learn how to shrink it to one page in Word.
Have you ever created a single-page document where you have a tiny amount of text carry over to the next page? You squish and squeeze and try to move that text up to keep your page count at one. It can be hard to do without messing up the structure or appearance of your document.
Here, we’ll show you how to shrink text to fit on one page in Microsoft Word. The options differ if you’re using Word on your desktop or the web. So we’ll include them both, so you’re covered either way.
Shrink to One Page in Word on Your Desktop
Whether you’re using Word on Windows or Mac, you can scoot that text from the second page up to the first for a nice one-page document.
Word has a hidden command to add to your ribbon or Quick Access Toolbar called Shrink One Page.
- On Windows, click File > Options > Customize Ribbon or Quick Access Toolbar. On Mac, click Word > Preferences > Ribbon & Toolbar and select Ribbon or Toolbar at the top.
- In the drop-down box on the left, pick All Commands.
- Scroll through the commands to Shrink One Page. Select it and click the arrow to add it to the right side. You can move it up or down wherever you’d like the button to appear.
- Click OK.

Now to use the feature, click the button you just added. Below, we added it to our Quick Access Toolbar.

Word will then adjust the document to fit on one page.

The online version of Microsoft Word doesn’t currently have the Shrink One Page feature that the desktop version does. So, you’ll shrink the text in Word on the web using the Shrink Font Size feature.
Note: You can also use the below option in the desktop version of Word if you prefer not to add the Shrink One Page button described above.
- Open your document in Word on the web and select all of the text. You can use the keyboard shortcut Ctrl + A on Windows or Command + A on Mac.
- Go to the Home tab and click the Shrink Text Size button.
- You can click the button as many times as you need to shrink the text to fit one page.

It would help if you had all of the neat text on one page. And for a good way to see this, head to the View tab and select Reading View.

To return to editing, click Edit Document > Edit in the ribbon in Reading View.
Make Your Text Fit on One Page in Word
Shrinking your text to fit on one page is easy to do with Word’s features. Whether on your desktop or online, you can keep your document as a single page just like you want.
For related help with Microsoft Word, take a look at how to work with page and sections breaks or make a one-page landscape in Word.
![]()
Stretch or scale the text horizontally On the Home tab, click the Font Dialog Box Launcher, and then click the Advanced tab. Note: If you’re using Word 2007 the tab is called Character Spacing. In the Scale box, enter the percentage that you want. Percentages above 100 percent stretch the text.
Contents
- 1 How do I stretch text in Word?
- 2 How do I stretch text vertically in word art?
- 3 How do I stretch text to fill a text box?
- 4 How do I fit text to page width in word?
- 5 What is spacing in lettering?
- 6 What is font stretch?
- 7 How do I stretch text in Word for Mac?
- 8 How do I stretch text in PDF?
- 9 How do you fit to page in Pages?
- 10 Is there a fit to page option in Word?
- 11 How do you space out a letter?
- 12 How do you properly space letters?
- 13 What are the three kinds of spacing involved in lettering?
- 14 Can you make font bigger than 72 in Microsoft Word?
- 15 How do you make the word small?
- 16 Can I use font-stretch?
- 17 Why font-stretch is not working?
- 18 What is font size adjust?
- 19 How do I stretch Arabic letters in Word?
- 20 What do you call the space between words?
How do I stretch text in Word?
Stretch Text Horizontally
- Highlight the text you want to stretch.
- Select the “Home” tab, then click the small arrow in the Font section to open the Font dialog box.
- Select the “Advanced” tab.
- Increase the percentage value in the “Scale” field.
- Highlight the text you want to stretch.
How do I stretch text vertically in word art?
Changing the Height of a Font
- Select the text you want to affect.
- Enlarge the font size to 15 points. (12 times 1.25 is 15.)
- Display the Advanced tab of the Font dialog box.
- Using the Scale control, specify a scaling of 80%.
How do I stretch text to fill a text box?
Click anywhere in the text. On the Text Box Tools Format tab, in the Text group, click Text Fit, and do one of the following: To reduce the point size of text until there is no text in overflow, click Shrink Text On Overflow. To shrink or expand text to fit in the text box when you resize the box, click Best Fit.
How do I fit text to page width in word?
To fit the columns to the text (or page margins if cells are empty), click [AutoFit] > select “AutoFit Contents.” To fit the table to the text, click [AutoFit] > select “AutoFit Window.” To keep Word from automatically adjusting your column size, click [AutoFit] > select “Fixed Column Width.”
What is spacing in lettering?
Spacing refers to the amount of space left between the letters in a word, between the words themselves, and between lines. A neat lettering job can be ruined by improper spacing. There are two types of letter spacing, mechanical and optical.There is no problem in spacing between these letters.
What is font stretch?
Definition and Usage. The font-stretch property allows you to make text narrower (condensed) or wider (expanded). Note: Some fonts provide additional faces; condensed faces and expanded faces. For these fonts, you can use the font-stretch property to select a normal, condensed, or expanded font face.
How do I stretch text in Word for Mac?
Expand or condense the space evenly between all the selected characters
- Select the text that you want to change.
- On the Home tab, click the Font Dialog Box Launcher, and then click the Advanced tab.
- In the Spacing box, click Expanded or Condensed, and then specify how much space you want in the By box.
How do I stretch text in PDF?
When there is too little text…
- Select the Text tool (
- Click in the text box you want to change.
- Choose Text->Fitting…
- Tick Try to stretch to fit.
- Tick Increase Font Size to gently increase the font size in order to get the text to fit.
- Tick Increase Line Spacing to adjust the space between lines and paragraphs.
How do you fit to page in Pages?
Click Zoom, then choose Two Pages or One Page. If you’re viewing your document as a two-page spread, choose Fit Spread to fit the two-page spread vertically on your screen.
Is there a fit to page option in Word?
“Shrink to Fit” changes the font size and margins to make the document fit on one page. In Microsoft Word 2007 and 2010, go to “Print,” “Print Preview” and then “Shrink to Fit” under the “Preview” option.
How do you space out a letter?
Spacing
- Single-space your cover letter.
- Leave a space between addresses and dates in the heading.
- Leave a space between your heading (contact info) and greeting (“Dear…:”).
- Leave a space between each paragraph.
- Leave at least three spaces between your complimentary close (“Sincerely,”) and typed name.
How do you properly space letters?
The rule of thumb is that the space in between the letters in a word should be half of the letter width and the space in between words should be the width of one letter. If your letters are two inches wide, then the space between letters should be one inch and the space between words should be two inches.
What are the three kinds of spacing involved in lettering?
Tracking can similarly go in either direction, but with metal type, one could make groups of letters only farther apart (positive spacing). In the days of hot metal typesetting, letter spacing required adding horizontal space between letters of words set in metal type in increments of a minimum of a half-point.
Can you make font bigger than 72 in Microsoft Word?
Type a value larger than 72 in the Font Size control in the Font group on the Home tab of the Ribbon. This can be done in any other Font Size control (e.g., in the Format/Font dialog, the Modify Style dialog, the formatting toolbar, etc. You could click the Increase Font Size control in the same ribbon group.
How do you make the word small?
Change case
- Select the text for which you want to change the case.
- Go to Home > Change case .
- Do one of the following: To capitalize the first letter of a sentence and leave all other letters as lowercase, click Sentence case. To exclude capital letters from your text, click lowercase.
Can I use font-stretch?
If a font has multiple types of variations based on the width of characters, the font-stretch property allows the appropriate one to be selected. The property in itself does not cause the browser to stretch to a font.
Why font-stretch is not working?
According to this, here is why : In order to use font-stretch and see a result of some kind, the font being used has to have a face that matches the value given. In other words, font-stretch will not work on just any font, but only on fonts that are designed with different faces matching the defined sizes.
What is font size adjust?
The font-size-adjust CSS property sets the size of lower-case letters relative to the current font size (which defines the size of upper-case letters).
How do I stretch Arabic letters in Word?
Select the “Home” tab, then click the small arrow in the “Font” section to open the “Font” dialog box. Select the “Advanced” tab. Increase the percentage value in the “Scale” field. If you want to stretch the text to double its original width, for example, change the setting to 200 percent.
What do you call the space between words?
The space between words is simply called Word Spacing.
 Please Note:
This article is written for users of the following Microsoft Word versions: 2007, 2010, 2013, and 2016. If you are using an earlier version (Word 2003 or earlier), this tip may not work for you. For a version of this tip written specifically for earlier versions of Word, click here: Fitting Text Into Cells.
![]()
Written by Allen Wyatt (last updated May 5, 2020)
This tip applies to Word 2007, 2010, 2013, and 2016
You have worked long and hard on your page design, including a couple of tables that are just right. Then, along comes a need to add a bit more text into one of the tables. The result is that the text in a cell wraps and pushes everything else down a bit. Now your whole design is thrown off. You long for a way to automatically adjust the size of the text in a cell so you won’t have the wrapping and pushing occur.
Word provides a built-in option that may do the trick. Simply follow these steps:
- Select the cell or cells that you want to format.
- Make sure the Layout tab of the ribbon is displayed. (This tab is only visible if you first do step 1.)
- Click the Properties tool in the Table group. Word displays the Table Properties dialog box.
- Select the Cell tab. (See Figure 1.)
- Click on the Options button. Word displays the Cell Options dialog box. (See Figure 2.)
- Make sure the Fit Text check box is selected.
- Click on OK to close the Cell Options dialog box.
- Click on OK to close the Table Properties dialog box.
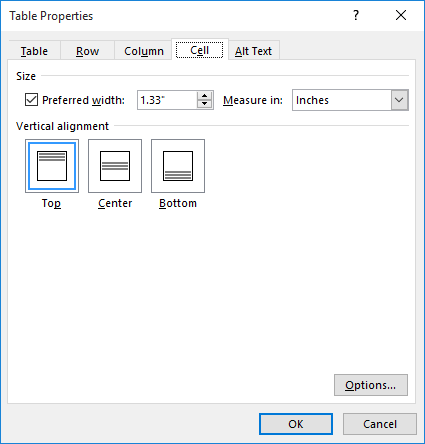
Figure 1. The Cell tab of the Table Properties dialog box.
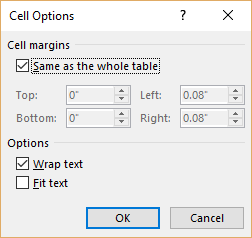
Figure 2. The Cell Options dialog box.
What Word does is to decrease the apparent size of the text so that everything fits. Word decreases the width of the text by «scrunching» (a highly technical term) the text together horizontally, without adjusting it vertically.
If you would like to know how to use the macros described on this page (or on any other page on the WordTips sites), I’ve prepared a special page that includes helpful information. Click here to open that special page in a new browser tab.
WordTips is your source for cost-effective Microsoft Word training.
(Microsoft Word is the most popular word processing software in the world.)
This tip (6081) applies to Microsoft Word 2007, 2010, 2013, and 2016. You can find a version of this tip for the older menu interface of Word here: Fitting Text Into Cells.
Author Bio
With more than 50 non-fiction books and numerous magazine articles to his credit, Allen Wyatt is an internationally recognized author. He is president of Sharon Parq Associates, a computer and publishing services company. Learn more about Allen…
MORE FROM ALLEN
Roman Numerals for Page Numbers
Yes, Excel can work with Roman numerals, and it even provides a worksheet function that converts to them. How you use …
Discover More
Retrieving Web Query Data without Interruption
If you use Excel’s Web Query tools to grab data from a website, you may run into some problems if the site isn’t …
Discover More
Quickly Moving Your Table
For those who love to use the mouse during editing, you can use the little critter to help move your tables to exactly …
Discover More
More WordTips (ribbon)
Indenting a Table
Insert a table into your document and it normally appears aligned with the left margin. Word allows you to indent the …
Discover More
Quickly Removing Table Borders
Insert a table in your document and Word assumes that you want borders around the table and its cells. Here’s a shortcut …
Discover More
Fitting Your Text In a Table Cell
Got some text you absolutely must fit on a single line in a table cell? Then you’ll appreciate this rather esoteric …
Discover More
Содержание
- Шаг 1: Выравнивание текста по ширине
- Шаг 2: Удаление лишних и больших пробелов
- Шаг 3: Уменьшение размера пробелов
- Шаг 4: Уменьшение межзнакового интервала
- Шаг 5: Уменьшение междустрочного интервала
- Вопросы и ответы

Шаг 1: Выравнивание текста по ширине
Первое, что следует сделать с целью уплотнения текста в документе Microsoft Word – это выровнять его по ширине страницы. Выделите запись с помощью мышки и кликните по отмеченной на изображении ниже кнопке, которая находится в группе инструментов «Абзац» вкладки «Главная» (вместо этого можно воспользоваться клавишами «Ctrl+J»).
Эффект от такого действия минимальный, зато удобочитаемость сохраняется в полной мере, чего нельзя сказать о большинстве предложенных далее решений.
Читайте также: Как выровнять по ширине текст в Ворде
Шаг 2: Удаление лишних и больших пробелов
Нередко бывает так, что в документах Word, созданных самостоятельно или скачанных из интернета, есть большие отступы – двойные и тройные пробелы или используемые вместо них знаки табуляции. Очевидно, что такие символы визуально растягивают текст. Следовательно, чтобы решить нашу задачу, от них нужно избавиться. О том, как это сделать, рассказывается в отдельных статьях на нашем сайте.
Подробнее: Как убрать двойные и большие пробелы в Ворде
Шаг 3: Уменьшение размера пробелов
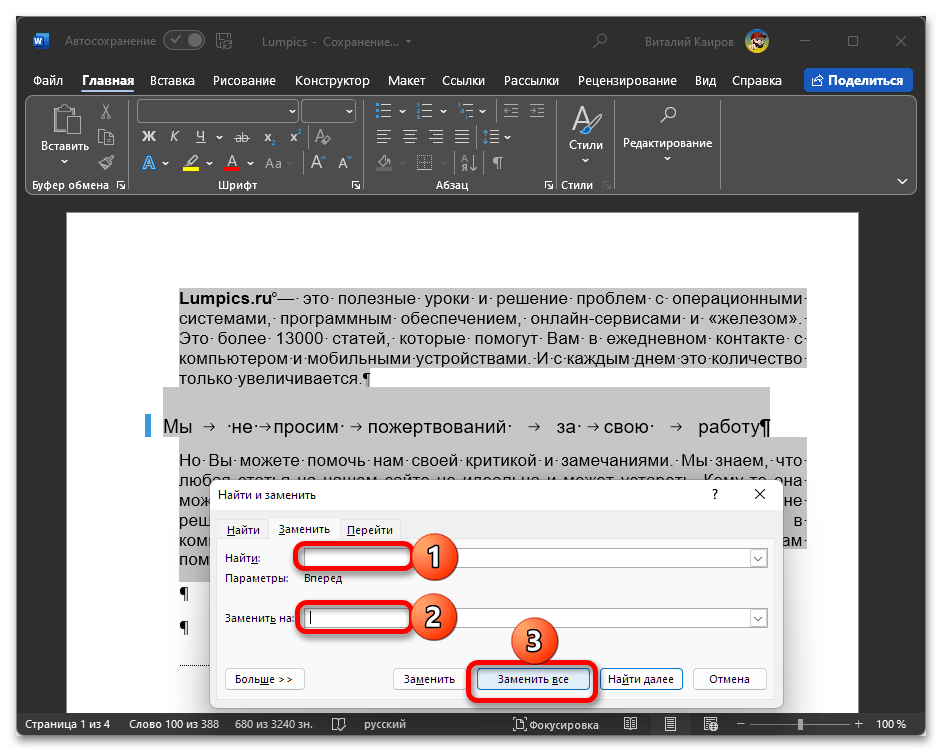
Пробелы, используемые в Word по умолчанию, являются маленькими, однако при необходимости уплотнить текст их можно немного уменьшить, применив символ ¼ пробела. Проще всего это сделать с помощью меню вставки специальных знаков и функции поиска и замены.
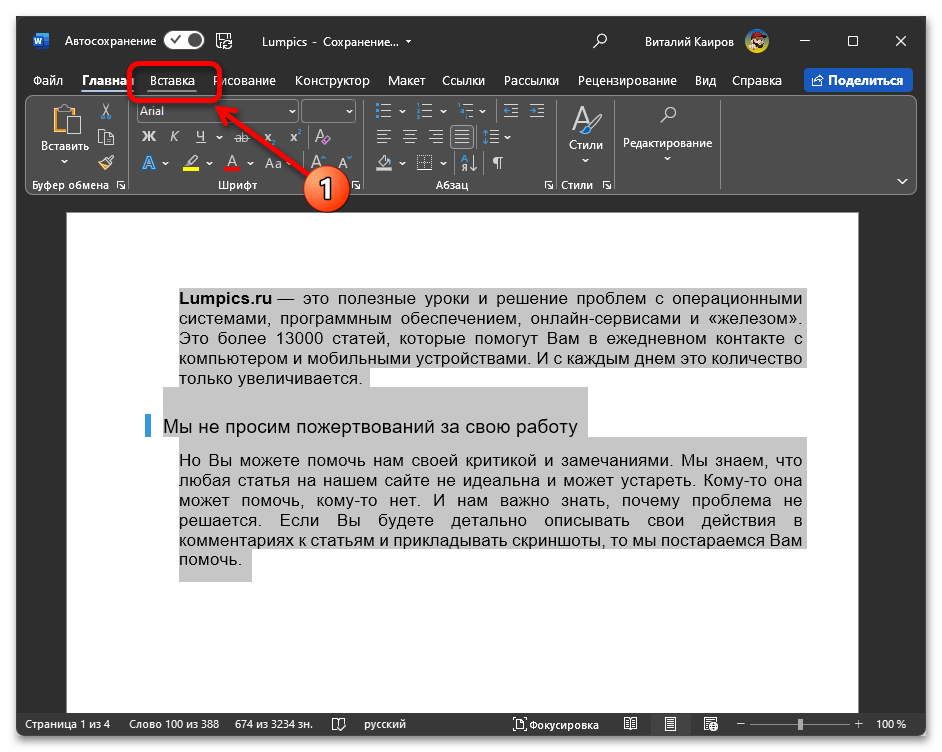
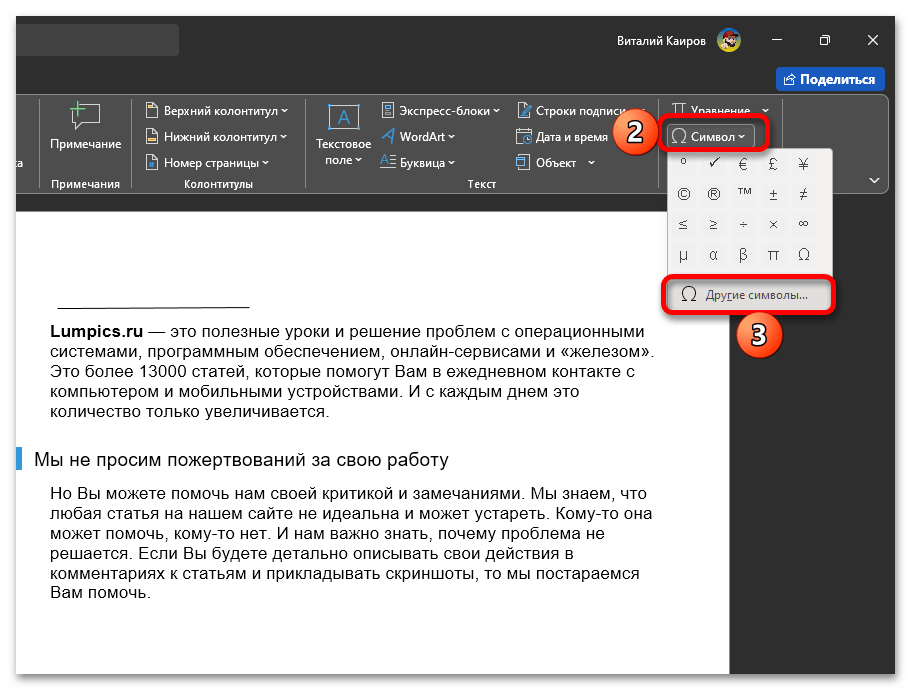
- Перейдите во вкладку «Вставка»,

разверните меню кнопки «Символ» и выберите пункт «Другие символы».
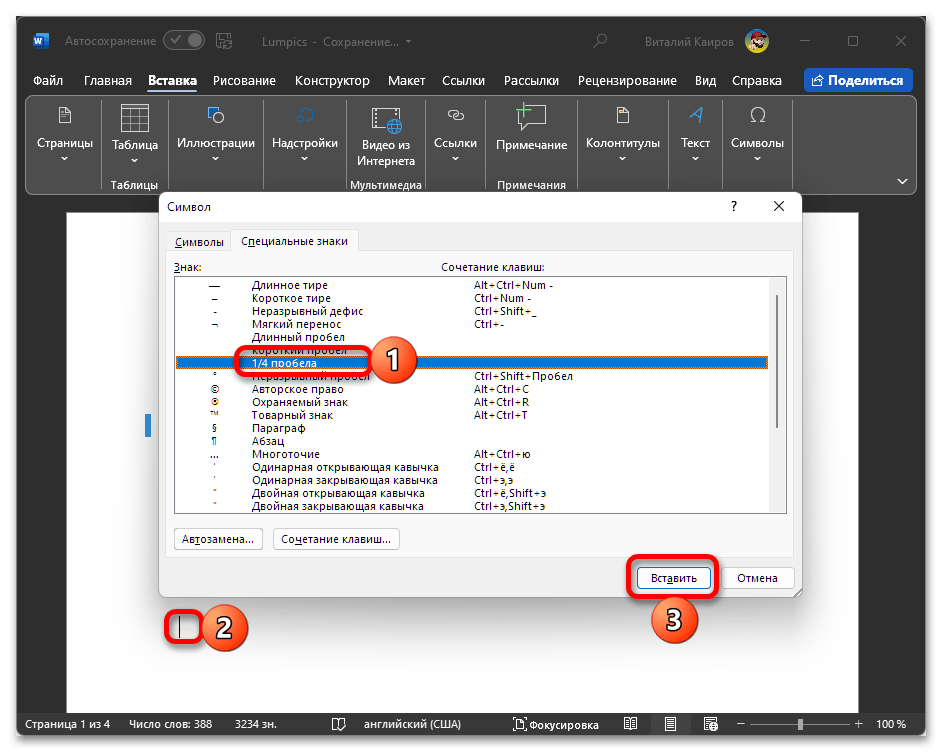
- Откройте вкладку «Специальные знаки» и выделите в представленном там списке «¼ пробела». Кликните по пустому месту текстового документа, чтобы там появился курсор, после чего нажмите на кнопку «Вставить» и закройте окно с символами.
- Активируйте отображение непечатных знаков, воспользовавшись для этого клавишами «Ctrl+*» или соответствующей кнопкой во вкладке «Главная».
- Выделите и скопируйте символ ¼ пробела, после чего кликните по пункту меню «Заменить».
- В первой строке введите с клавиатуры пробел обычный, а во вторую вставьте из буфера обмена меньший символ. По необходимости выделите текст, который требуется уплотнить, после чего нажмите на кнопку «Заменить все», а затем закройте окно.

Расстояние между словами и символами в документе немного уменьшится (правда, на глаз это крайне сложно заметить), а значит, текст уплотнится.
Читайте также: Как сделать маленькие пробелы в Ворде
Шаг 4: Уменьшение межзнакового интервала
Если уменьшения пробелов недостаточно для кажущегося вам оптимальным уплотнения текста, нелишним будет также уменьшить интервал непосредственно между символами. Для этого:
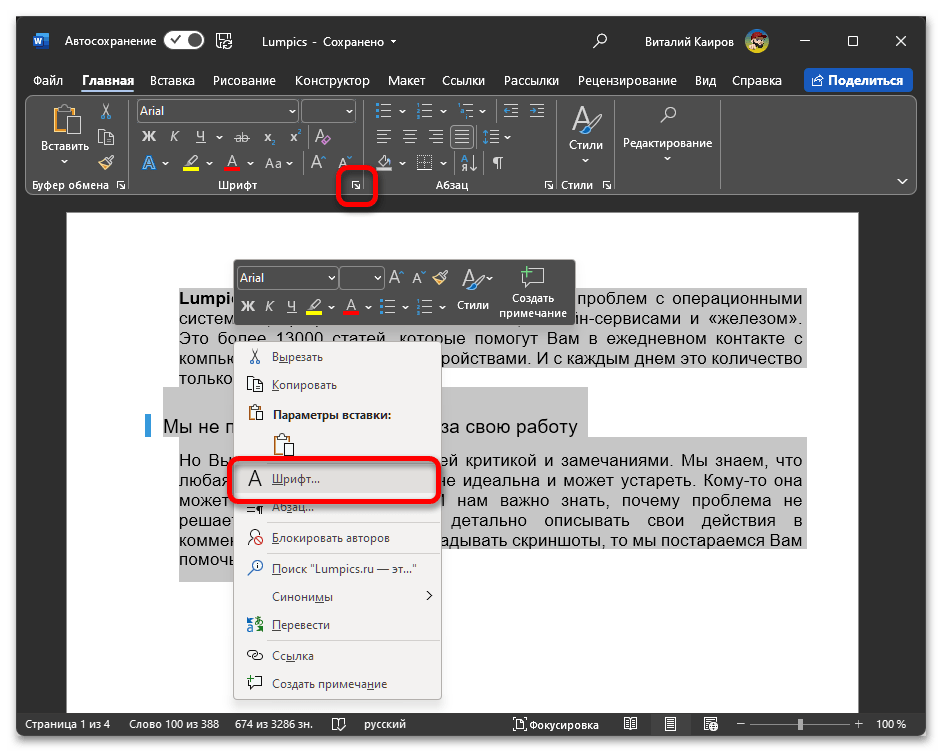
- Выделите текст и откройте меню группы инструментов «Шрифт», нажав по отмеченной на скриншоте ниже кнопке или соответствующему пункту контекстного меню.
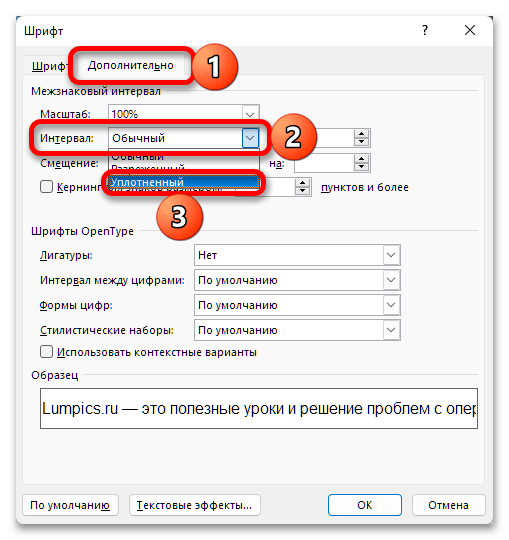
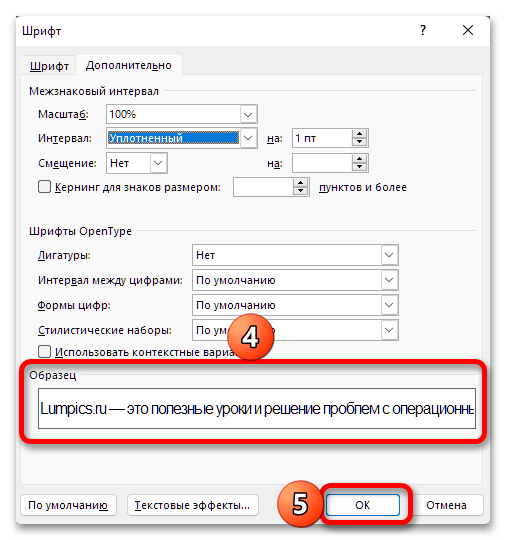
- Перейдите во вкладку «Дополнительно» открывшегося окна, разверните выпадающий список напротив пункта «Интервал» и выберите в нем «Уплотненный».

В области «Образец» будет показано то, как визуально изменится текст.
- Нажмите «ОК» для подтверждения внесенных изменений и закрытия окна «Шрифт», после чего текст в документе будет уплотнен еще больше.
Читайте также: Как уменьшить расстояние между буквами в Word
Шаг 5: Уменьшение междустрочного интервала
Все предложенные выше рекомендации позволяют уплотнить текст по горизонтали. Если же вы хотите достичь аналогичного эффекта еще и по вертикали, потребуется уменьшить интервал между строками и абзацами. Делается это следующим образом:
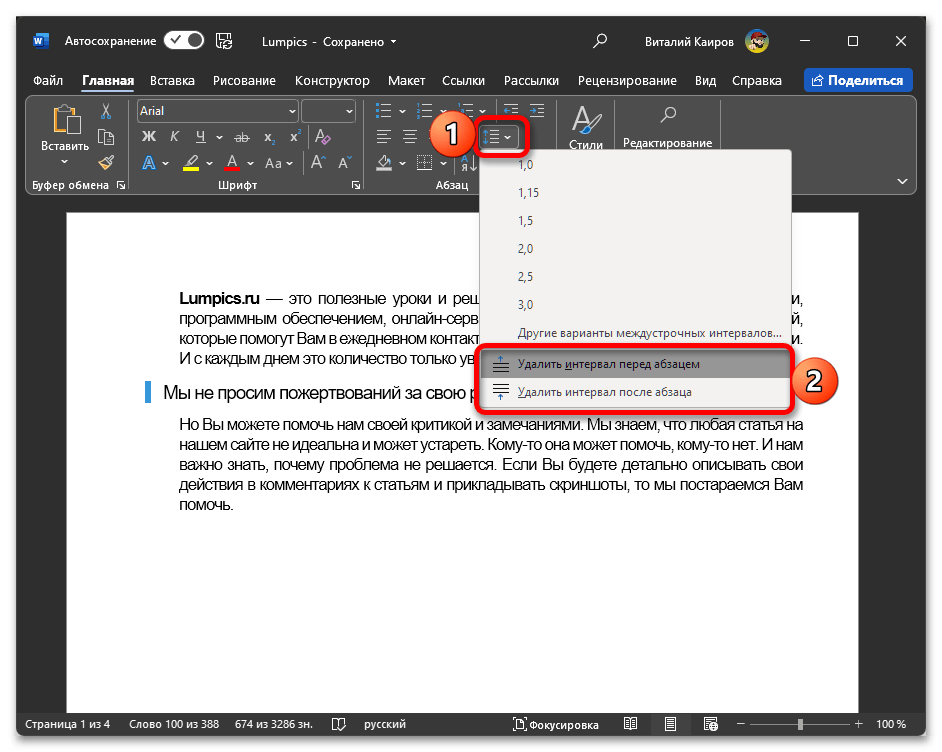
- Выделите текст, разверните меню кнопки «Интервал» и выберите в нем пункты «Удалить интервал перед абзацем» и «Удалить интервал после абзаца», если таковые будут доступны (если там будет указано «Добавить интервал…», значит, удаление уже выполнено).
- Не снимая выделения с записи, повторно вызовите это же меню и выберите в нем «1,0».
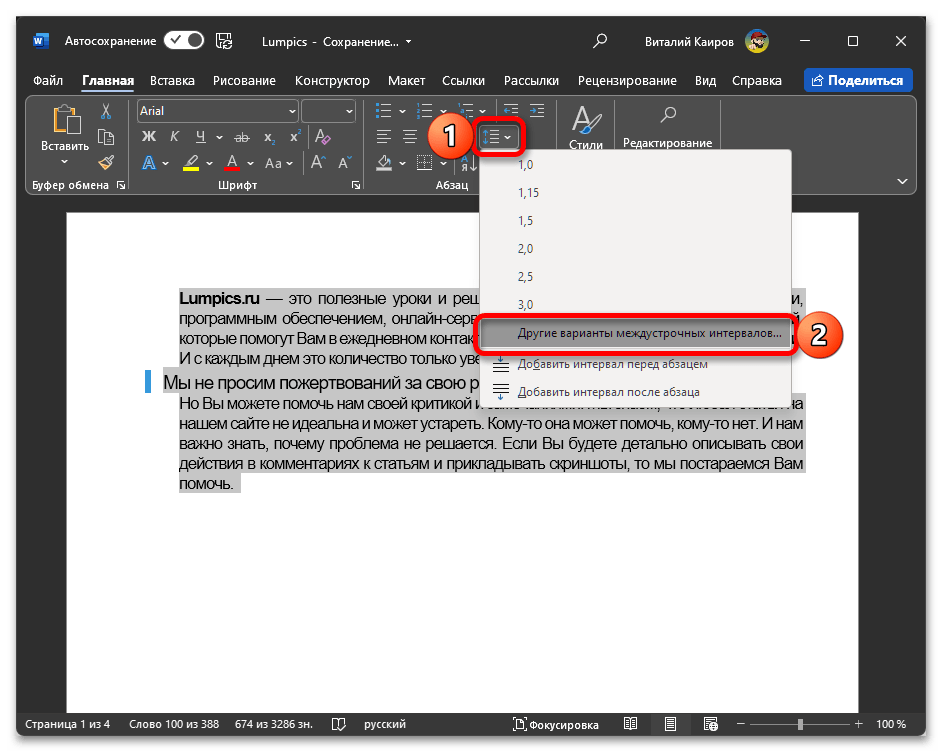
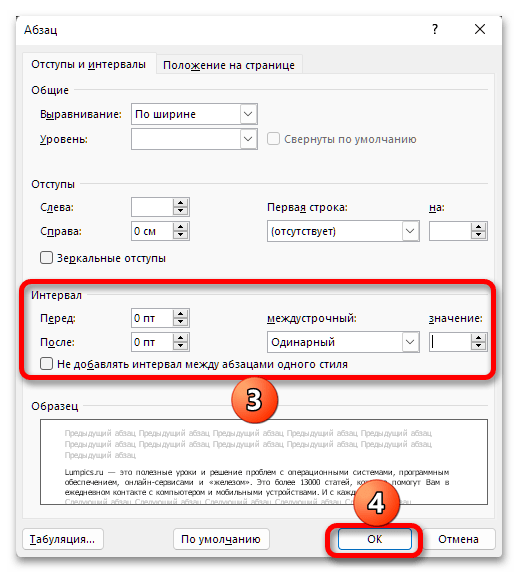
- По желанию вы можете настроить отступы между строками на свое усмотрение, выбрав в указанном меню пункт «Другие варианты междустрочных интервалов»
и изменив значения в отмеченном блоке на минимальные.

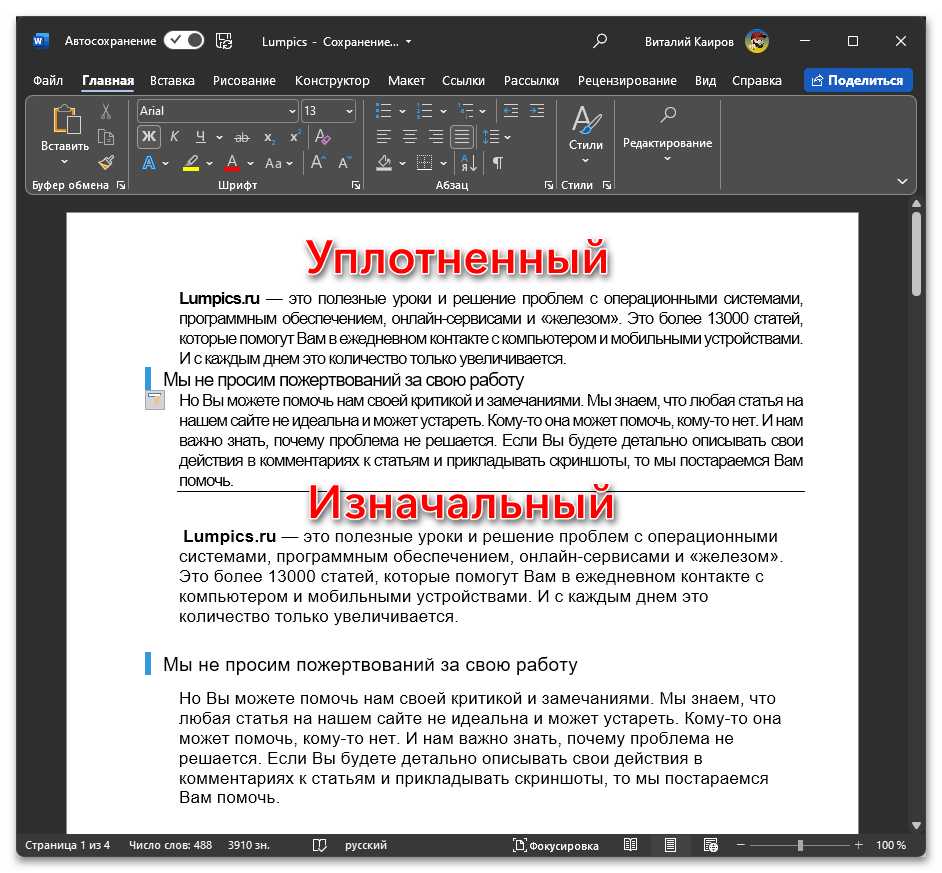
На изображении ниже можно наглядно увидеть разницу между изначальным видом текста и тем, каким он стал после уплотнения.
Читайте также: Как изменить междустрочный интервал в Ворде
Еще статьи по данной теме:
Помогла ли Вам статья?
When creating a title or heading, most people simply choose a large font size. While this is okay, you can add a touch of professionalism by STRETCHING or SPACING the text. Both OPTIONS are found in the same dialog box.
1. Select the text.
2. Select the Home tab.
3. Click the launcher in the bottom-right of the Font group.

4. In the Font dialog select the Advanced tab.
1. How to stretch text
Click the Scale drop-down arrow and choose (or type) a larger percentage.
100% is normal width, 200% is double width and so on.
2. How to compact text
Enter a smaller percentage in the Scale box.
For example, 75% will compact the width to ¾ of normal size.
3. How to add extra space between each letter (character) in the text
1. Choose Expanded from the Spacing drop-down list.
2. Enter a point size in the By box.
For example, if you are using font size 20 and you expand the spacing by 10 points, you will add half a character width between each letter.
4. How to make the letters fit tighter together:
1. Choose Condensed from the Spacing drop-down list.
2. Enter a point size in the By box.

What font / size / scale / spacing combos work for you.?
Here are some other advanced text effects you may be interested in.
I hope you found plenty of value in this post. I’d love to hear your biggest takeaway in the comments below together with any questions you may have.
Have a fantastic day.


About the author
Jason Morrell
Jason loves to simplify the hard stuff, cut the fluff and share what actually works. Things that make a difference. Things that slash hours from your daily work tasks. He runs a software training business in Queensland, Australia, lives on the Gold Coast with his wife and 4 kids and often talks about himself in the third person!
SHARE
Apply Left, Center, Right or Justify Alignment to Text in Microsoft Word
by Avantix Learning Team | Updated April 13, 2022
Applies to: Microsoft® Word® 2010, 2013, 2016, 2019, 2021 and 365 (Windows)
You can align or justify text or other content in Word in several ways including using keyboard shortcuts, selecting commands in the Ribbon, using the Paragraph dialog box or modifying a style. It’s important to note that alignment or justification is paragraph formatting so applies to entire paragraphs. You can align text or inline graphics in paragraphs that are followed by a hard return (you pressed Enter or Return).
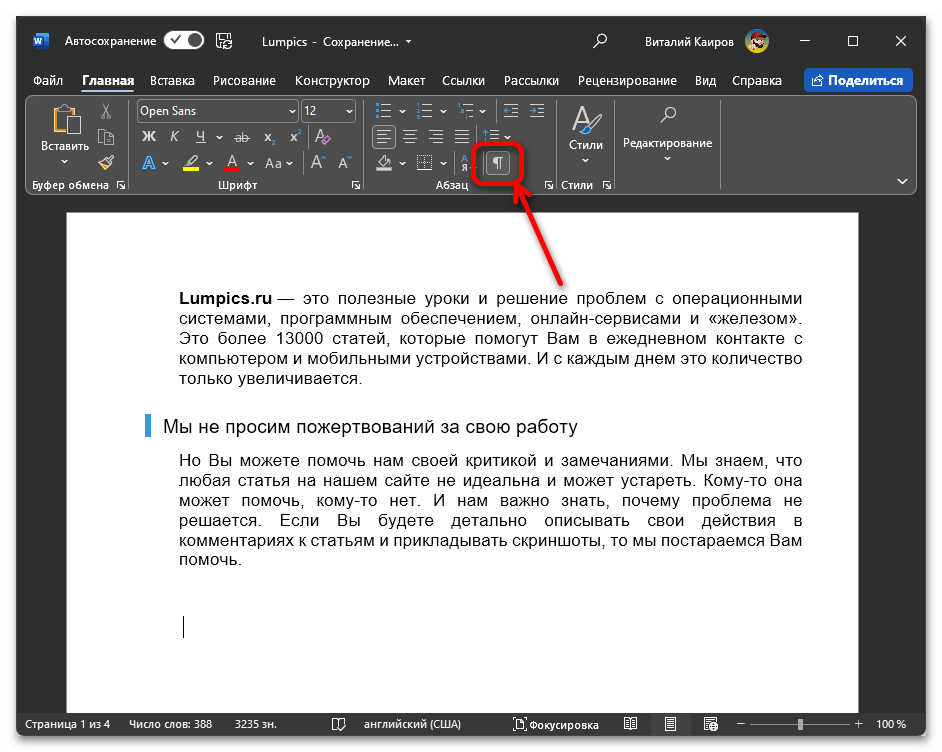
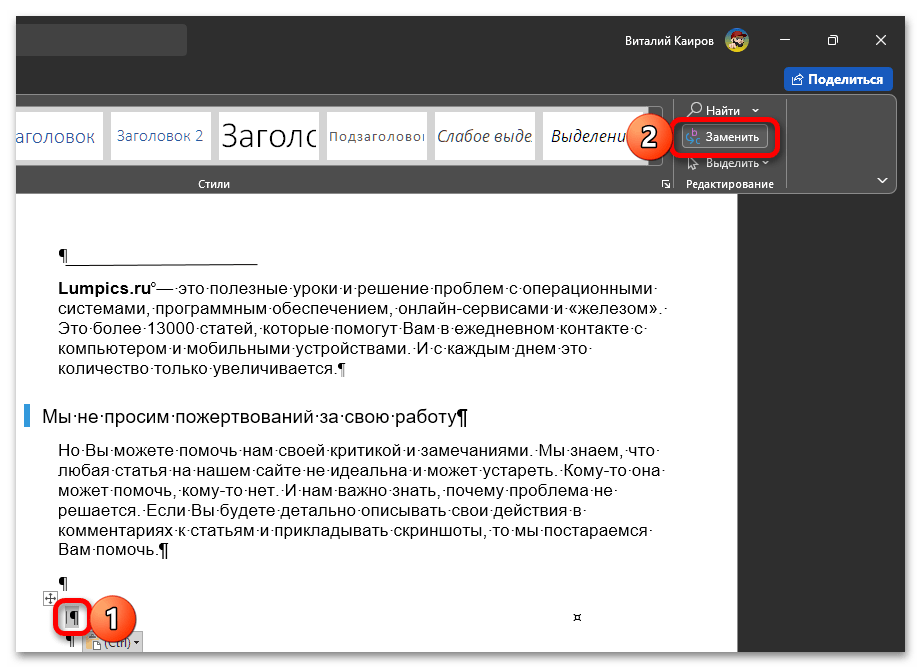
To see where paragraphs have been created in a Word document, it’s helpful to turn on Show/Hide ¶ on the Home tab in the Ribbon.
In this article, we’ll review 4 different ways to change horizontal alignment or justification in Word documents.
Recommended article: How to Insert a Line in Word (3+ Ways)
Do you want to learn more about Microsoft Word? Check out our virtual classroom or in-person Word courses >
There are 4 types of alignment that can be applied to paragraphs:
- Align left – aligns text or inline graphics with the left margin or indent
- Center – centers text or inline graphics between the left and right margins or indents
- Align right – aligns text or inline graphics with the right margin or indent
- Justify – distributes text evenly between the left and right margins or indents
A paragraph aligns within the indents (indent markers appear on the Ruler). The indents may be different from the margins. Paragraphs are also entered in cells in tables and each paragraph in a cell may have different indents and alignment settings.
1. Align or justify using keyboard shortcuts
To align or justify paragraphs using keyboard shortcuts:
- Align left – select the paragraph(s) and press Ctrl + L to align to the left.
- Align right – select the paragraph(s) and press Ctrl + R to align to the right.
- Align center – select the paragraph(s) and press Ctrl + E to align center.
- Justify – select the paragraph(s) and press Ctrl + J to justify.
2. Align or justify using the Ribbon
To align or justify paragraphs using the Word Ribbon
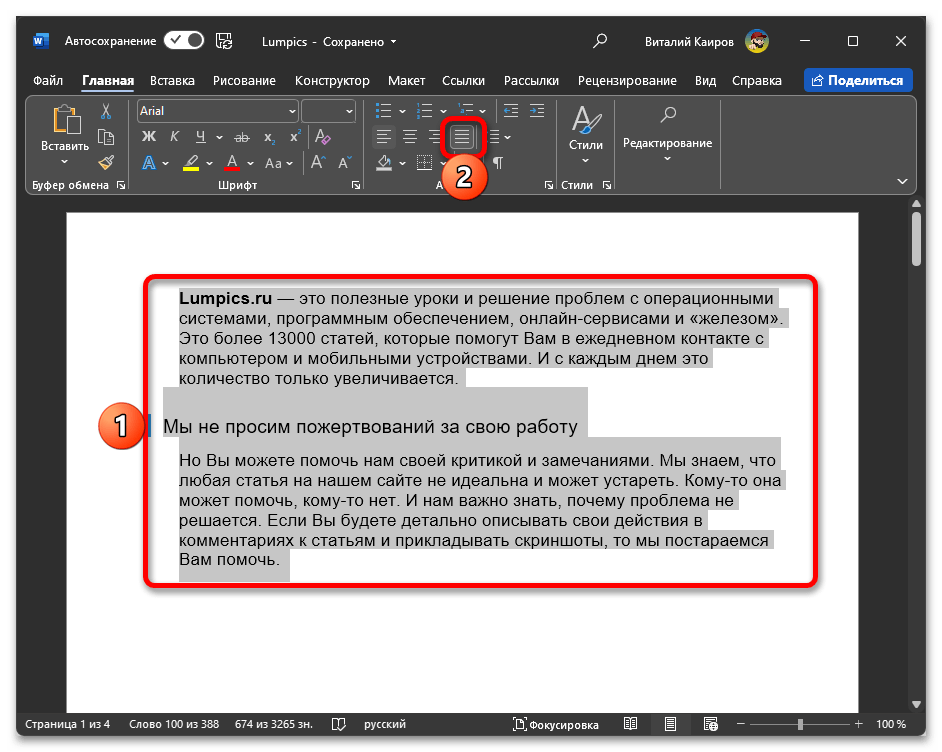
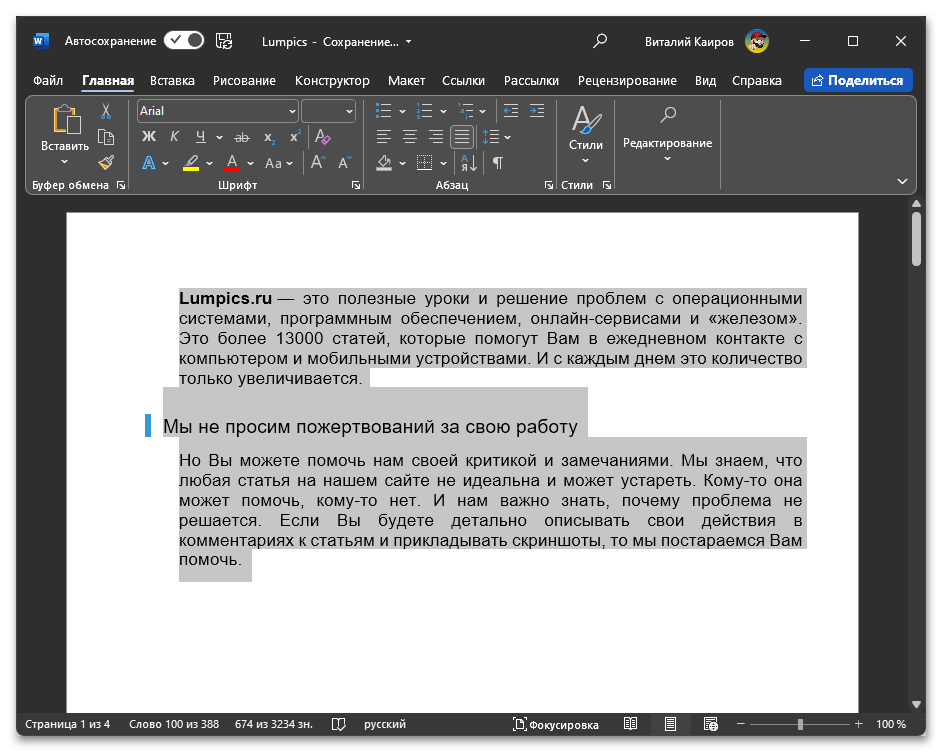
- Select the paragraph(s) to which you want to apply alignment or justification. If you would like to select all paragraphs, press Ctrl + A.
- Click the Home tab in the Ribbon and then click Align Left, Center, Align Right or Justify in the Paragraph group.
Align and Justify commands appear on the Home tab in the Ribbon in the Paragraph group:
![]()
3. Align or justify using the Paragraph dialog box
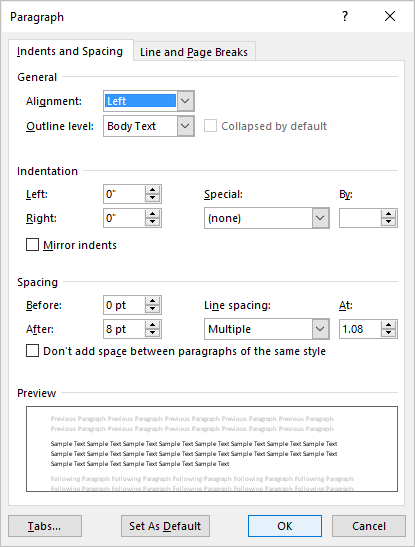
To align or justify paragraphs using the Paragraph dialog box:
- Select the paragraph(s) to which you want to apply alignment or justification. If you would like to select all paragraphs, press Ctrl + A.
- Right-click and select Paragraph. The Paragraph dialog box appears.
- From the Alignment drop-down menu, select Left, Center, Right or Justify.
- Click OK.
You can also display the Paragraph dialog box by clicking the Home tab in the Ribbon and then clicking the dialog box launcher on the bottom right of the Paragraph group.
The Paragraph dialog box includes a drop-down menu to select Alignment:
4. Align or justify by modifying a style
When you create a new blank document, it starts out using the Normal style which contains default paragraph and character formatting.
If you want to apply alignment or justification to multiple paragraphs throughout a document (such as a heading), you can modify a style (such as Heading 1).
To change the alignment for a heading style (such as Heading 1):
- Click in a paragraph using the heading style (typically applied through the Home tab in the Ribbon).
- Click the Home tab in the Ribbon.
- In the Styles group, right-click the heading style. A dialog box appears.
- Click Format. A drop-down menu appears.
- Click Paragraph. The Paragraph dialog box appears.
- From the Alignment drop-down menu, select Center or your preferred alignment.
- Click OK twice.
Below is the Modify Style dialog box with align and justify commands:
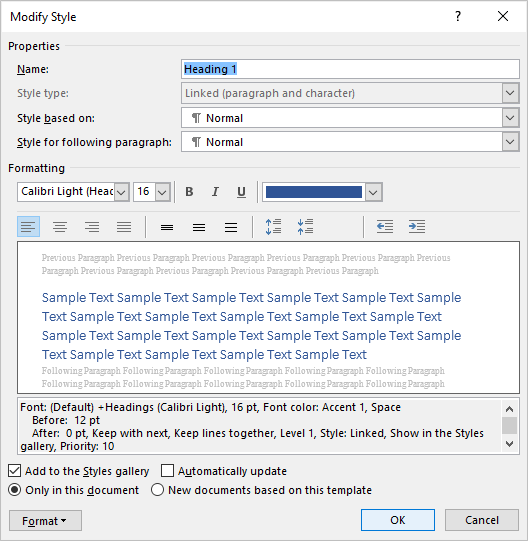
There may be issues if you modify alignment or justification in the Normal style since other styles are based on this style by default. Cells in tables would likely be affected and so would other styles that are based on the Normal style (such as Header, Footer and Heading styles). Paragraphs using these styles would then inherit the alignment or justification (unless alignment or justification has been specifically modified in these styles). If you are comfortable using styles, you could create your own style or modify a different Word style to avoid this issue.
Subscribe to get more articles like this one
Did you find this article helpful? If you would like to receive new articles, join our email list.
More resources
How to Double Space in Word (4 Ways + Shortcut)
How to Hide Comments in Word (or Display Them)
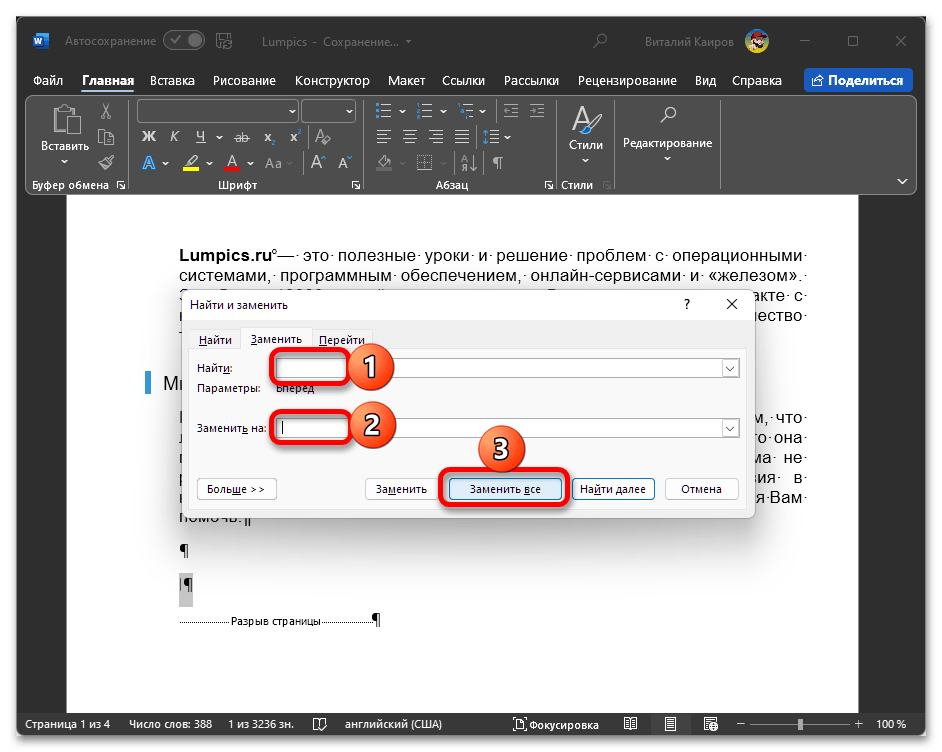
How to Find and Replace in Word (and Use Wildcards)
How to Create a Hanging or First Line Indent in Word (3 Ways)
How to Superscript or Subscript in Microsoft Word (with Shortcuts)
Related courses
Microsoft Word: Intermediate / Advanced
Microsoft Excel: Intermediate / Advanced
Microsoft PowerPoint: Intermediate / Advanced
Microsoft Word: Long Documents Master Class
Microsoft Word: Styles, Templates and Tables of Contents
Microsoft Word: Designing Dynamic Word Documents Using Fields
VIEW MORE COURSES >
Our instructor-led courses are delivered in virtual classroom format or at our downtown Toronto location at 18 King Street East, Suite 1400, Toronto, Ontario, Canada (some in-person classroom courses may also be delivered at an alternate downtown Toronto location). Contact us at info@avantixlearning.ca if you’d like to arrange custom instructor-led virtual classroom or onsite training on a date that’s convenient for you.
Copyright 2023 Avantix® Learning
Microsoft, the Microsoft logo, Microsoft Office and related Microsoft applications and logos are registered trademarks of Microsoft Corporation in Canada, US and other countries. All other trademarks are the property of the registered owners.
Avantix Learning |18 King Street East, Suite 1400, Toronto, Ontario, Canada M5C 1C4 | Contact us at info@avantixlearning.ca
When pasting something you copy from websites, sometimes you may find the texts extend past the margins of Word pages. In this article, we will introduce how to fit these texts within the edge of your Word page.
The ease of copying texts from Web pages considerably simplifies many tasks in Word, however, problem arises when you find the texts you just copied goes beyond the width of the Word pages, and sometimes even by a very large amount. This situation is quite problematic, as the texts that do not fit in the Word document will not be displayed on the page. Fortunately, there are some ways to fix this problem as we will mention in this article.
Adjust Indentation to Fit Texts within the Pages
An easy way to make texts fit within the pages of the document is to adjust the indent. For example, if the texts go beyond the right margin of your Word page, there will be a negative value for right indentation. Therefore, we can correct it by changing the value to zero.
- From the picture below, we can notice that a part of the paragraph lines is cut off at the right margin. To correct it, go to “Home” tab, and click the “Paragraph” Dialog Box Launcher.


- A dialog box comes up, under the “Indentation” tab, set the negative indentation to “0” in the “Right” box. Finally, click “OK”.


- Upon doing so, you will successfully fit the texts within the margins of the document. The adjusted page is shown as below.


Fit Texts within the Edge of Page via VBA Code
Besides adjusting ident, we can also input VBA code to fit texts across the Word pages.
- On the “View” tab, click “Macros”.


- In the pop up window, enter “AdjustIndent” in the “Macro name” box, and then click “Create”.


- Another dialogue appears, then copy the code “ActiveDocument.Content.ParagraphFormat.RightIndent = 0” into this box. Finally, click the green arrow on the toolbar to run the code. Thus, you will get the adjusted page just as we have shown above.

Take Measures to Deal with Word Corruptions
All in all, we can certainly make sure the texts in our Word document fit across the page. Although Word is widely used tool, sometimes corruptions will occur unexpectedly. In order to deal with it, it is a great idea to opt for a powerful external word recovery tool. With its advanced scanning mechanism, this tool will repair the seriously corrupted Word files with ease.
Author Introduction
Kelly Zhao is a data recovery expert in DataNumen, Inc., which is the world leader in data recovery technologies, including excel recovery and pdf repair software products. For more information visit www.datanumen.com
Skip to content
Предположим что документ получается чуть больше чем одна страница или у многостраничного документа есть небольшой хвостик, и мы хотим уместить текст так чтобы из-за этого хвостика не печатать почти пустую страницу. Для этого нужно уменьшить или подогнать текст на одну страницу.

В предыдущих версиях Word была очень удобная функция которая позволяла уменьшить текст. Для этого Предварительном просмотре была кнопка “Подгонка страниц”. В Word 2010 этой кнопки там уже нет и найти её очень не просто, потому что она теперь называется Сократить на страницу (Shrink One Page).
Так же изменился характер работы этой кнопки. По моему мнению раньше (в предварительном просмотре) было гораздо удобнее, т.к. уменьшаешь и сразу видишь как это будет при печати выглядеть. А сейчас очень не удобно, уменьшил и нужно идти в печать чтобы увидеть результат 🙁
Итак, нужно создать свою вкладку на ленте (или добавить свою группу в любую существующую вкладку) и добавил туда кнопку Сократить на страницу (Shrink One Page).
— Закладка Файл (File) — пункт Параметры (Options). Пункт Настройка ленты (Customize Ribbon).


— Кнопка Создать вкладку (New Tab). Затем с помощью кнопки Переименовать (Rename), можно переименовать вкладку и группы.

C помощью клавиш стрелочек можно изменить порядок вкладок и групп.
Теперь добавляем кнопку Сократить на страницу (Shrink One Page) в созданную вкладку.
Выбрать необходимую группу. В списке Выбрать команды (Choose commands from) выбрать Все команды (All Commands), выбрать Сократить на страницу (Shrink One Page). Нажать кнопку Добавить (Add). Нажать ОК.

В результате на панели инструментов выглядеть это будет так
