
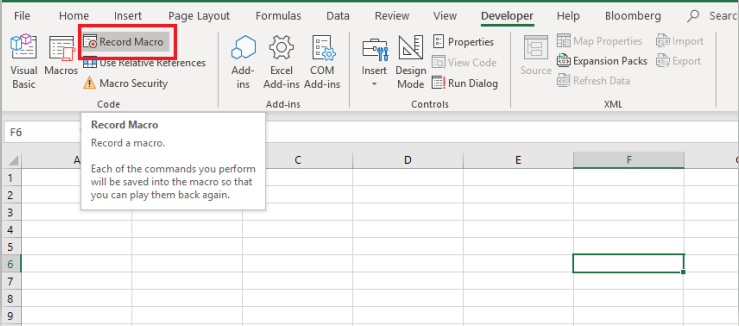
Recently taking over a new position at a company, I received the attached document today. It seems like there is either VBA or Macros attached that changes the format whenever I go to print. Is there a way to find those? The only thing that I could find were 2 modules that were meant to protect and unprotect the sheet.
![]()
YowE3K
23.8k7 gold badges26 silver badges40 bronze badges
asked Jan 15, 2018 at 21:39
![]()
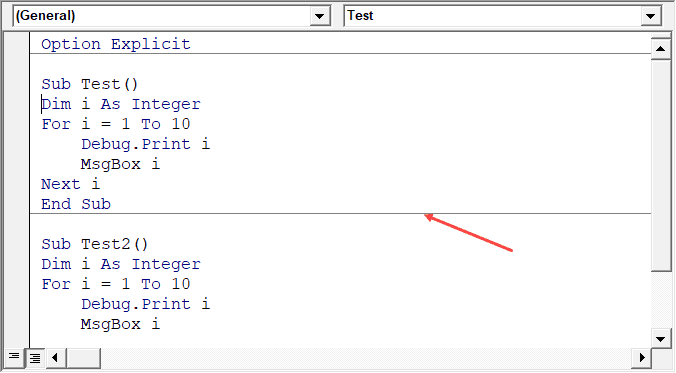
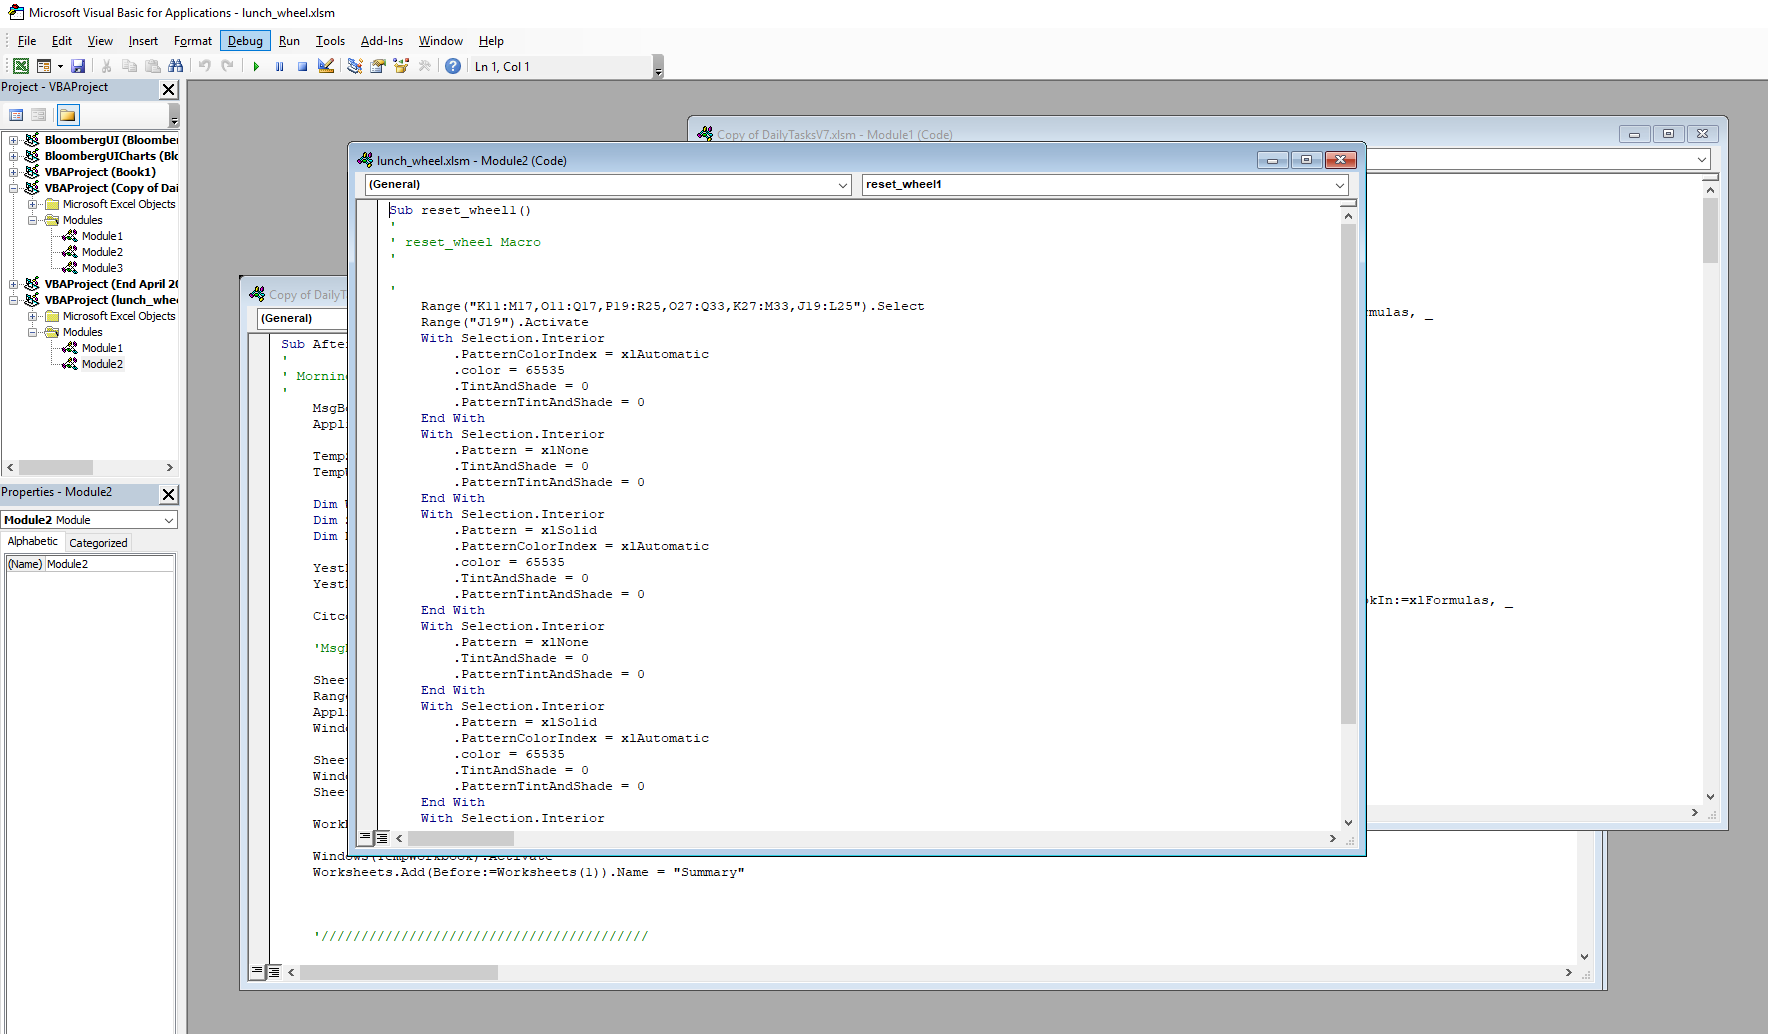
The Visual Basic Editor’s Project Explorer only displays modules, which makes it annoyingly tedious to know what’s coded where, especially in a larger project, or in a workbook with many worksheets — code can be lurking literally anywhere!
I manage the Rubberduck open-source project — we build a VBIDE add-in that enhances the VBE’s navigational tooling (and several other things) — for example the Code Explorer allows you to drill down to procedure level, and any module that contains code will have a little «expand» arrow:

Makes it much easier to see what modules contain code, at a glance.
answered Jan 15, 2018 at 22:38
![]()
Mathieu GuindonMathieu Guindon
69.4k8 gold badges109 silver badges232 bronze badges
Sounds like a workbook macro triggered by the BeforePrint event. Check the ThisWorkbook tab in the same place you found the Modules.
answered Jan 15, 2018 at 21:43
![]()
D. RadD. Rad
1251 silver badge10 bronze badges
If you do not want (or you are not allowed to) to install any third party software (MZ-Tools or Rubberduck would ease your job however), you may consider adding the following code in an additional module and adding this library — «Microsoft Visual Basic for Applications Extensibility 5.3 library»:
Option Explicit

Private strSubsInfo As String

Public Sub GetFunctionAndSubNames()

    Dim item            As Variant

    strSubsInfo = ""

    For Each item In ThisWorkbook.VBProject.VBComponents
        If ComponentTypeToString(vbext_ct_StdModule) = "Code Module" Then
            ListProcedures item.Name, False
            'Debug.Print item.CodeModule.lines(1, item.CodeModule.CountOfLines)
        End If
    Next item

    Debug.Print strSubsInfo

End Sub

Private Sub ListProcedures(strName As String, Optional blnWithParentInfo = False)

    'Microsoft Visual Basic for Applications Extensibility 5.3 library

    Dim VBProj          As VBIDE.VBProject
    Dim VBComp          As VBIDE.VBComponent
    Dim CodeMod         As VBIDE.CodeModule
    Dim LineNum         As Long
    Dim ProcName        As String
    Dim ProcKind        As VBIDE.vbext_ProcKind

    Set VBProj = ActiveWorkbook.VBProject
    Set VBComp = VBProj.VBComponents(strName)
    Set CodeMod = VBComp.CodeModule

    With CodeMod
        LineNum = .CountOfDeclarationLines + 1

        Do Until LineNum >= .CountOfLines
            ProcName = .ProcOfLine(LineNum, ProcKind)

            If blnWithParentInfo Then
                strSubsInfo = strSubsInfo & IIf(strSubsInfo = vbNullString, vbNullString, vbCrLf) & strName & "." & ProcName
            Else
                strSubsInfo = strSubsInfo & IIf(strSubsInfo = vbNullString, vbNullString, vbCrLf) & ProcName
            End If

            LineNum = .ProcStartLine(ProcName, ProcKind) + .ProcCountLines(ProcName, ProcKind) + 1
        Loop

    End With

End Sub

Function ComponentTypeToString(ComponentType As VBIDE.vbext_ComponentType) As String

    Select Case ComponentType

        Case vbext_ct_ActiveXDesigner
            ComponentTypeToString = "ActiveX Designer"

        Case vbext_ct_ClassModule
            ComponentTypeToString = "Class Module"

        Case vbext_ct_Document
            ComponentTypeToString = "Document Module"

        Case vbext_ct_MSForm
            ComponentTypeToString = "UserForm"

        Case vbext_ct_StdModule
            ComponentTypeToString = "Code Module"

        Case Else
            ComponentTypeToString = "Unknown Type: " & CStr(ComponentType)

    End Select

End Function
As a result you would all the functions and subs printed in the immediate window.
GitHub with credits to CPearson.
answered Jan 19, 2018 at 11:09
![]()
VityataVityata
42.4k8 gold badges55 silver badges98 bronze badges
Microsoft Excel VBA feature is a powerful interface tool that enables a user to automate tasks in a workbook. It is a programming language that helps excel users write their codes and even review the recorded macros they saved. In short, for a user to be a master of Excel’s VBA, they have to get used to its coding processes.
How do I open VBA? Any new beginner in Excel’s VBA Editor may find it daunting. But this should not be the case as the feature is user-friendly, and anyone can get the hang of it. This article focuses on addressing such doubts concerning VBA. Please read the article below to learn step-by-step how to open the Visual Basic Editor (VBA) in Excel.
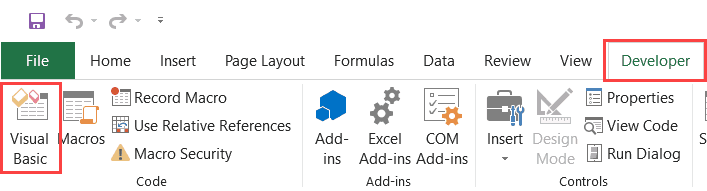
Enabling the Developer tab in Excel
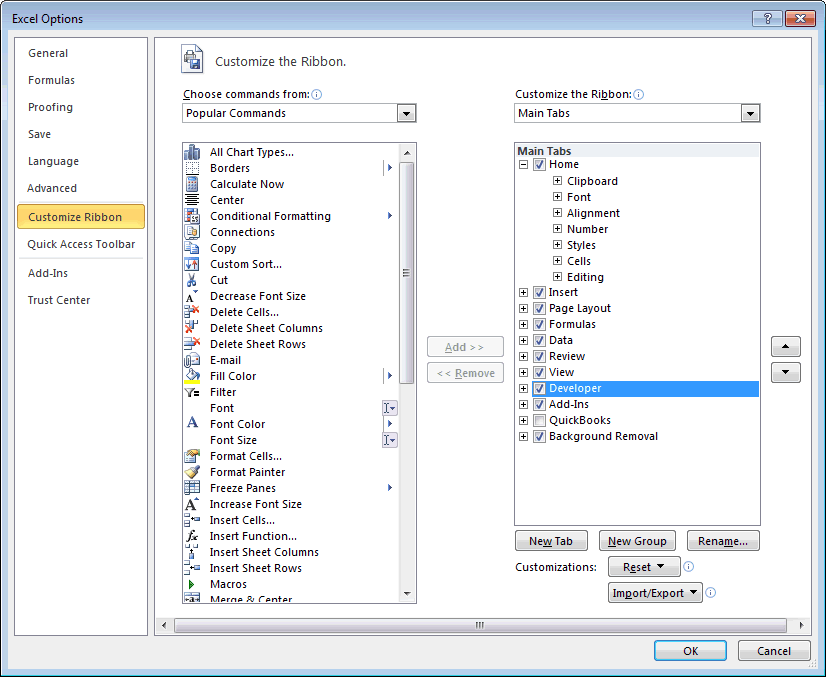
To use VBA, a user has first to enable the Developers tab in their Excel workbook. The tab has several groups and features to enhance how a user creates their worksheets. It allows one to open the VBA editor and create Form and ActiveX controls like checkboxes, buttons, and macros. Sometimes, the tab may already be available in the main menu ribbon of a worksheet. If not, here are the steps to follow to enable it;
1. In your open workbook, click on the File menu tab.

2. Click on the Excel Options button to display a dialog box.

3. On the given options on the left of the open dialog box, click on the ‘Customize Ribbon option.

4. Here, you will find two partitions, right and left.
5. Under Choose Command from on the left side of the dialog box, click on the drop-down arrow and select Popular Commands.

6. Under Customize the Ribbon on the right side of the dialog box, select Main Tabs from the drop-down list.

7. in the right panel, check the Developers checkbox if it is not already selected.

8. Click Ok to enable the tab and return to your open workbook. The main ribbon will have an additional visible tab marked as ‘Developer.’
Steps to follow to open VBA
After enabling the Developer tab, it is easy to open the VBA feature in Excel.
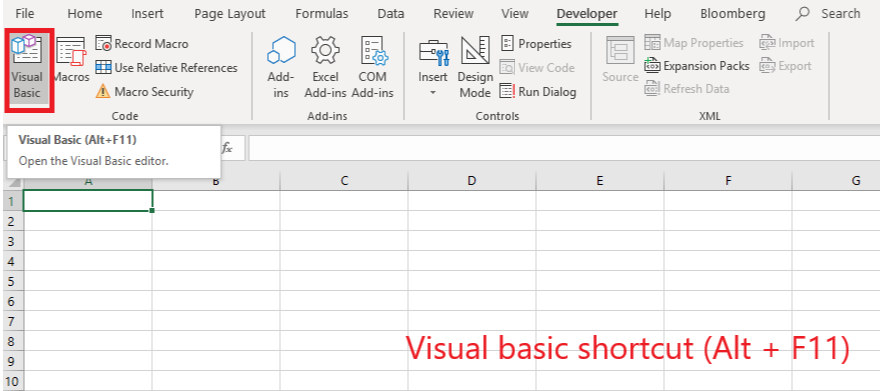
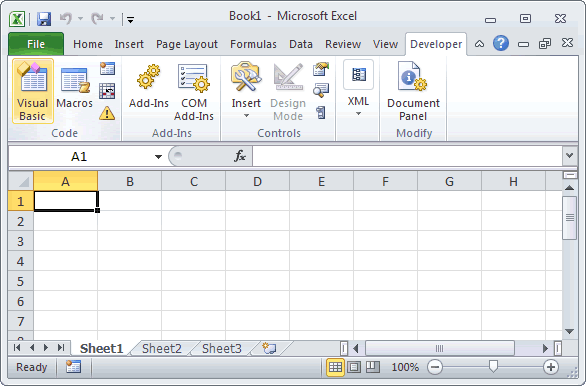
1. To open the feature, click on the Developers tab and select Visual Basic to display the’ Microsoft Visual Basic’ window.

Here is the Microsoft visual basic window

2. In cases where you want to use keyboard shortcuts to open the VBA window, press on Alt + F11 keys.
Both options above will open the Visual Basic Editor window in your Excel workbook. From here, you can create and even edit your macros, buttons, and codes.
Conclusion
Opening a VBA editor in Excel should no longer be a daunting task with the steps mentioned above. Using those steps will enable you to access the VBA editor and create your macros to allow you to complete tasks on time.
Note that;
Despite VBA being a powerful tool, it can also be harmful when used the wrong way. Any macro created should be saved in the appropriate files due to security risks. Some malicious writers may create dangerous macro codes as viruses to target an individual or a company’s data. Any macro-enabled document should be saved as an ‘Excel Macro-Enabled Workbook. Make sure to have permissions from your organization or a different person’s computer to run macros on their machines.
The first step to working with VBA in Excel is to get yourself familiarized with the Visual Basic Editor (also called the VBA Editor or VB Editor).
In this tutorial, I will cover all there is to know about the VBA Editor and some useful options that you should know when coding in Excel VBA.
What is Visual Basic Editor in Excel?
Visual Basic Editor is a separate application that is a part of Excel and opens whenever you open an Excel workbook. By default, it’s hidden and to access it, you need to activate it.
VB Editor is the place where you keep the VB code.
There are multiple ways you get the code in the VB Editor:
- When you record a macro, it automatically creates a new module in the VB Editor and inserts the code in that module.
- You can manually type VB code in the VB editor.
- You can copy a code from some other workbook or from the internet and paste it in the VB Editor.
Opening the VB Editor
There are various ways to open the Visual Basic Editor in Excel:
- Using a Keyboard Shortcut (easiest and fastest)
- Using the Developer Tab.
- Using the Worksheet Tabs.
Let’s go through each of these quickly.
Keyboard Shortcut to Open the Visual Basic Editor
The easiest way to open the Visual Basic editor is to use the keyboard shortcut – ALT + F11 (hold the ALT key and press the F11 key).

As soon as you do this, it will open a separate window for the Visual Basic editor.
This shortcut works as a toggle, so when you use it again, it will take you back to the Excel application (without closing the VB Editor).
The shortcut for the Mac version is Opt + F11 or Fn + Opt + F11
Using the Developer Tab
To open the Visual Basic Editor from the ribbon:
- Click the Developer tab (if you don’t see a developer tab, read this on how to get it).
- In the Code group, click on Visual Basic.
Using the Worksheet Tab
This is a less used method to open the Vb Editor.
Go to any of the worksheet tabs, right-click, and select ‘View Code’.
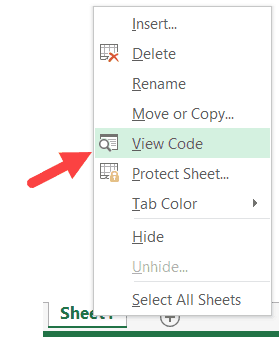
This method wouldn’t just open the VB Editor, it will also take you to the code window for that worksheet object.
This is useful when you want to write code that works only for a specific worksheet. This is usually the case with worksheet events.
Anatomy of the Visual Basic Editor in Excel
When you open the VB Editor for the first time, it may look a bit overwhelming.
There are different options and sections that may seem completely new at first.
Also, it still has an old Excel 97 days look. While Excel has improved tremendously in design and usability over the years, the VB Editor has not seen any change in the way it looks.
In this section, I will take you through the different parts of the Visual Basic Editor application.
Note: When I started using VBA years ago, I was quite overwhelmed with all these new options and windows. But as you get used to working with VBA, you would get comfortable with most of these. And most of the time, you’ll not be required to use all the options, only a hand full.
Below is an image of the different components of the VB Editor. These are then described in detail in the below sections of this tutorial.
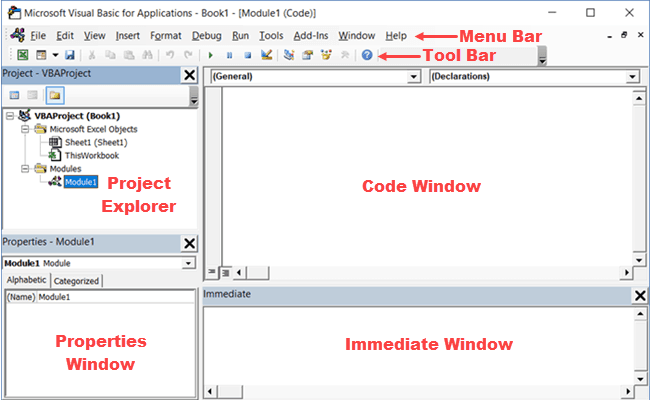
Now let’s quickly go through each of these components and understand what it does:
Menu Bar
This is where you have all the options that you can use in the VB Editor. It is similar to the Excel ribbon where you have tabs and options with each tab.
You can explore the available options by clicking on each of the menu element.
You will notice that most of the options in VB Editor have keyboard shortcuts mentioned next to it. Once you get used to a few keyboard shortcuts, working with the VB Editor becomes really easy.
Tool Bar
By default, there is a toolbar in the VB Editor which has some useful options that you’re likely to need most often. This is just like the Quick Access Toolbar in Excel. It gives you quick access to some of the useful options.
You can customize it a little by removing or adding options to it (by clicking on the small downward pointing arrow at the end of the toolbar).

In most cases, the default toolbar is all you need when working with the VB Editor.
You can move the toolbar above the menu bar by clicking on the three gray dots (at the beginning of the toolbar) and dragging it above the menu bar.
Note: There are four toolbars in the VB Editor – Standard, Debug, Edit, and User form. What you see in the image above (which is also the default) is the standard toolbar. You can access other toolbars by going to the View option and hovering the cursor on the Toolbars option. You can add one or more toolbars to the VB Editor if you want.
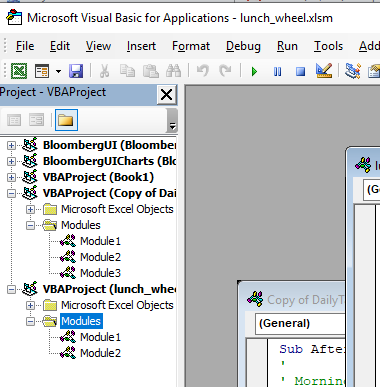
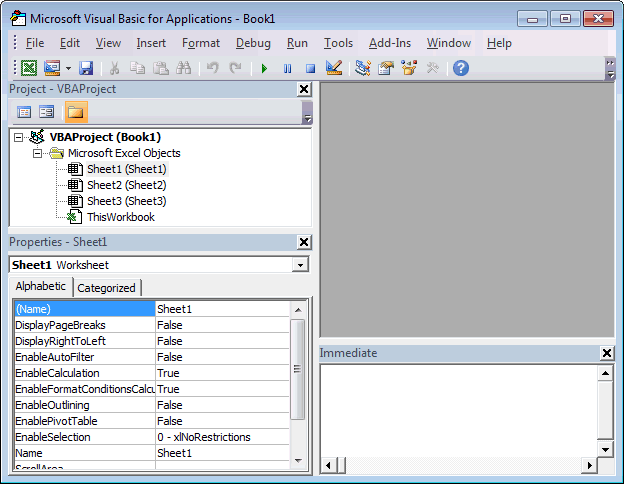
Project Explorer
Project Explorer is a window on the left that shows all the objects currently open in Excel.
When you’re working with Excel, every workbook or add-in that is open is a project. And each of these projects can have a collection of objects in it.
For example, in the below image, the Project Explorer shows the two workbooks that are open (Book1 and Book2) and the objects in each workbook (worksheets, ThisWorkbook, and Module in Book1).
There is a plus icon to the left of objects that you can use to collapse the list of objects or expand and see the complete list of objects.
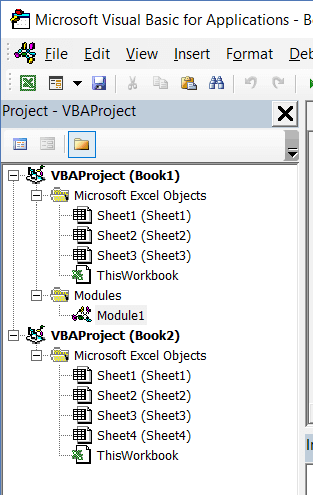
The following objects can be a part of the Project Explorer:
- All open Workbooks – within each workbook (which is also called a project), you can have the following objects:
- Worksheet object for each worksheet in the workbook
- ThisWorkbook object which represents the workbook itself
- Chartsheet object for each chart sheet (these are not as common as worksheets)
- Modules – This is where the code that is generated with a macro recorder goes. You can also write or copy-paste VBA code here.
- All open Add-ins
Consider the Project Explorer as a place that outlines all the objects open in Excel at the given time.
The keyboard shortcut to open the Project Explorer is Control + R (hold the control key and then press R). To close it, simply click the close icon at the top right of the Project Explorer window.
Note: For every object in Project Explorer, there is a code window in which you can write the code (or copy and paste it from somewhere). The code window appears when you double click on the object.
Properties Window
Properties window is where you get to see the properties of the select object. If you don’t have the Properties window already, you can get it by using the keyboard shortcut F4 (or go to the View tab and click Properties window).
Properties window is a floating window which you can dock in the VB Editor. In the below example, I have docked it just below the Project Explorer.
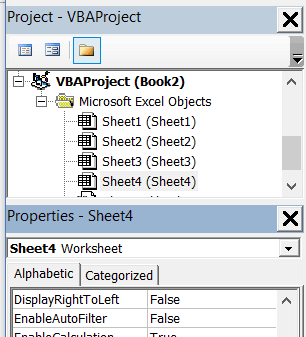
Properties window allows us to change the properties of a selected object. For example, if I want to make a worksheet hidden (or very hidden), I can do that by changing the Visible Property of the selected worksheet object.
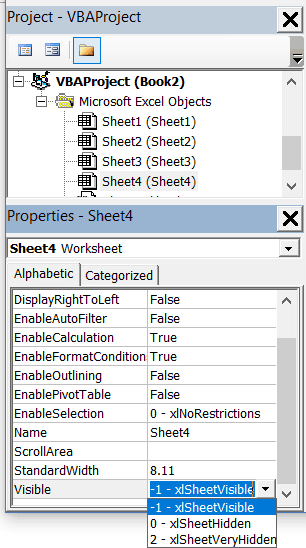
Related: Hiding a Worksheet in Excel (that can not be un-hidden easily)
Code Window
There is a code window for each object that is listed in the Project Explorer. You can open the code window for an object by double-clicking on it in the Project Explorer area.
Code window is where you’ll write your code or copy paste a code from somewhere else.
When you record a macro, the code for it goes into the code window of a module. Excel automatically inserts a module to place the code in it when recording a macro.
Related: How to Run a Macro (VBA Code) in Excel.
Immediate Window
The Immediate window is mostly used when debugging code. One way I use the Immediate window is by using a Print.Debug statement within the code and then run the code.
It helps me to debug the code and determine where my code gets stuck. If I get the result of Print.Debug in the immediate window, I know the code worked at least till that line.
If you’re new to VBA coding, it may take you some time to be able to use the immediate window for debugging.
By default, the immediate window is not visible in the VB Editor. You can get it by using the keyboard shortcut Control + G (or can go to the View tab and click on ‘Immediate Window’).
Where to Add Code in the VB Editor
I hope you now have a basic understanding of what VB Editor is and what all parts it has.
In this section of this tutorial, I will show you where to add a VBA code in the Visual Basic Editor.
There are two places where you can add the VBA code in Excel:
- The code window for an object. These objects can be a workbook, worksheet, User Form, etc.
- The code window of a module.
Module Code Window Vs Object Code Window
Let me first quickly clear the difference between adding a code in a module vs adding a code in an object code window.
When you add a code to any of the objects, it’s dependent on some action of that object that will trigger that code. For example, if you want to unhide all the worksheets in a workbook as soon as you open that workbook, then the code would go in the ThisWorkbook object (which represents the workbook).
The trigger, in this case, is opening the workbook.
Similarly, if you want to protect a worksheet as soon as some other worksheet is activated, the code for that would go in the worksheet code window.
These triggers are called events and you can associate a code to be executed when an event occurs.
Related: Learn more about Events in VBA.
On the contrary, the code in the module needs to be executed either manually (or it can be called from other subroutines as well).
When you record a macro, Excel automatically creates a module and inserts the recorded macro code in it. Now if you have to run this code, you need to manually execute the macro.
Adding VBA Code in Module
While recording a macro automatically creates a module and inserts the code in it, there are some limitations when using a macro recorder. For example, it can not use loops or If Then Else conditions.
In such cases, it’s better to either copy and paste the code manually or write the code yourself.
A module can be used to hold the following types of VBA codes:
- Declarations: You can declare variables in a module. Declaring variables allows you to specify what type of data a variable can hold. You can declare a variable for a sub-routine only or for all sub-routines in the module (or all modules)
- Subroutines (Procedures): This is the code that has the steps you want VBA to perform.
- Function Procedures: This is a code that returns a single value and you can use it to create custom functions (also called User Defined Functions or UDFs in VBA)
By default, a module is not a part of the workbook. You need to insert it first before using it.
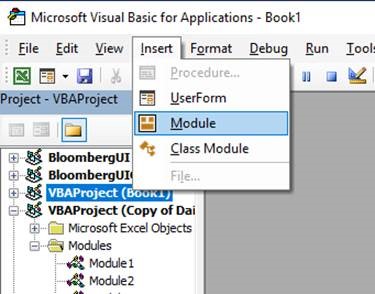
Adding a Module in the VB Editor
Below are the steps to add a module:
- Right-click on any object of the workbook (in which you want the module).

- Hover the cursor on the Insert option.
- Click on Module.


This would instantly create a folder called Module and insert an object called Module 1. If you already have a module inserted, the above steps would insert another module.
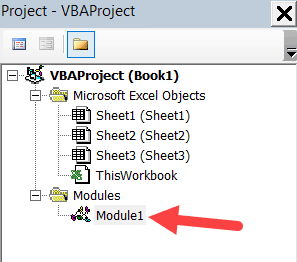
Once the module is inserted, you can double click on the module object in the Project Explorer and it will open the code window for it.
Now you can copy-paste the code or write it yourself.
Removing the Module
Below are the steps to remove a module in Excel VBA:
- Right-click on the module that you want to remove.
- Click on Remove Module option.

- In the dialog box that opens, click on No.


Note: You can export a module before removing it. It gets saved as a .bas file and you can import it in some other project. To export a module, right-click on the module and click on ‘Export file’.
Adding Code to the Object Code Window
To open the code window for an object, simply double-click on it.
When it opens, you can enter the code manually or copy-paste the code from other modules or from the internet.
Note that some of the objects allow you to choose the event for which you want to write the code.
For example, if you want to write a code for something to happen when selection is changed in the worksheet, you need to first select worksheets from the drop-down at the top left of the code window and then select the change event from the drop-down on the right.
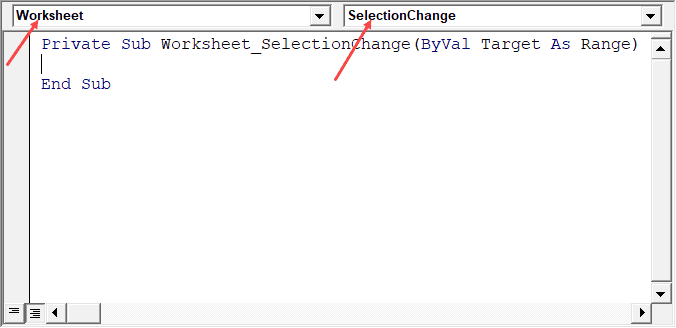
Note: These events are specific to the object. When you open the code window for a workbook, you will see the events related to the workbook object. When you open the code window for a worksheet, you will see the events related to the worksheet object.
Customizing the VB Editor
While the default settings of the Visual Basic Editor are good enough for most users, it does allow you to further customize the interface and a few functionalities.
In this section of the tutorial, I will show you all the options you have when customizing the VB Editor.
To customize the VB Editor environment, click Tools in the menu bar and then click on Options.
This would open the Options dialog box which will give you all the customization options in the VB Editor. The ‘Options’ dialog box has four tabs (as shown below) that have various customizations options for the Visual Basic Editor.
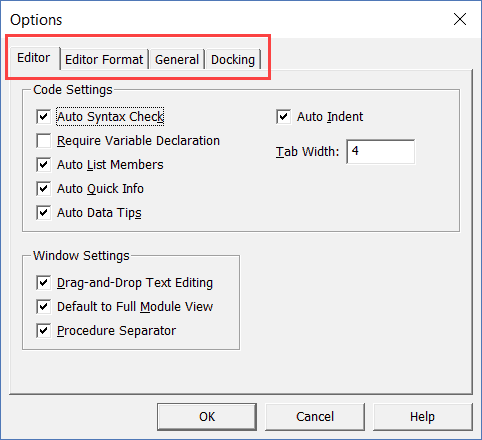
Let’s quickly go through each of these tabs and the important options in each.
Editor Tab
While the inbuilt settings work fine in most cases, let me still go through the options in this tab.
As you get more proficient working with VBA in Excel, you may want to customize the VB Editor using some of these options.
Auto Syntax Check
When working with VBA in Excel, as soon as you make a syntax error, you will be greeted by a pop-up dialog box (with some description about the error). Something as shown below:
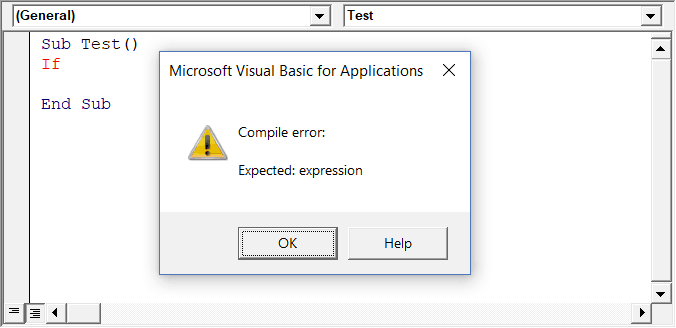
If you disable this option, this pop-up box will not appear even when you make a syntax error. However, there would be a change in color in the code text to indicate that there is an error.
If you’re a beginner, I recommend you keep this option enabled. As you get more experienced with coding, you may start finding these pop-up boxes irritating, and then you can disable this option.
Require Variable Declaration
This is one option I recommend enabling.
When you’re working with VBA, you would be using variables to hold different data types and objects.
When you enable this option, it automatically inserts the ‘Option Explicit’ statement at the top of the code window. This forces you to declare all the variables that you’re using in your code. If you don’t declare a variable and try to execute the code, it will show an error (as shown below).
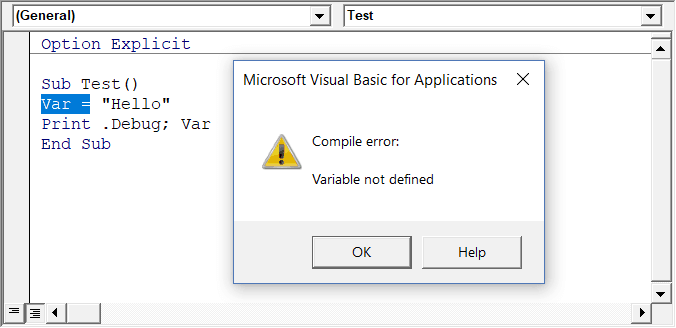
In the above case, I used the variable Var, but I didn’t declare it. So when I try to run the code, it shows an error.
This option is quite useful when you have a lot of variables. It often helps me find misspelled variables names as they are considered as undeclared and an error is shown.
Note: When you enable this option, it does not impact the existing modules.
Auto List Member
This option is quite useful as it helps you get a list of properties of methods for an object.
For example, if I want to delete a worksheet (Sheet1), I need to use the line Sheet1.Delete.
While I am typing the code, as soon as I type the dot, it will show me all the methods and properties associated with the Worksheet object (as shown below).
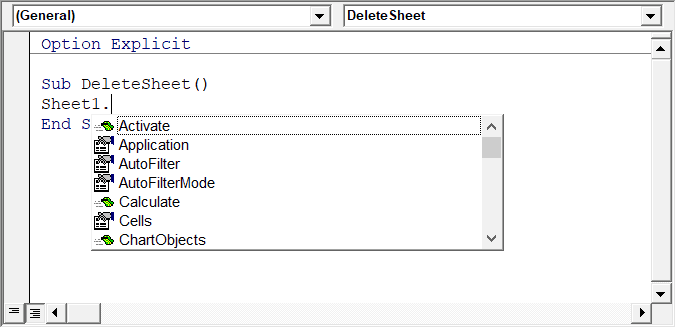
Auto list feature is great as it allows you to:
- Quickly select the property and method from the list and saves time
- Shows you all the properties and methods which you may not be aware of
- Avoid making spelling errors
This option is enabled by default and I recommend keeping it that way.
Auto Quick Info Options
When you type a function in Excel worksheet, it shows you some information about the function – such as the arguments it takes.
Similarly, when you type a function in VBA, it shows you some information (as shown below). But for that to happen, you need to make sure the Auto Quick Info option is enabled (which it is by default).
Auto Data Tips Options
When you’re going through your code line by line and place your cursor above a variable name, it will show you the value of the variable.
I find it quite useful when debugging the code or going through the code line by line which has loops in it.

In the above example, as soon as I put the cursor over the variable (var), it shows the value it holds.
This option is enabled by default and I recommend you keep it that way.
Auto Indent
Since VBA codes can get long and messy, using indentation increases the readability of the code.
When writing code, you can indent using the tab key.
This option ensures that when you are done with the indented line and hit enter, the next line doesn’t start from the very beginning, but has the same indentation as the previous line.
In the above example, after I write the Debug.Print line and hit enter, it will start right below it (with the same indentation level).
I find this option useful and turning this off would mean manually indenting each line in a block of code that I want indented.
You can change the indentation value if you want. I keep it at the default value.
Drag and Drop Text Editing
When this option is enabled, it allows you to select a block of code and drag and drop it.
It saves time as you don’t have to first cut and then paste it. You can simply select and drag it.
This option is enabled by default and I recommend you keep it that way.
Default to Full Module View
When this option is enabled, you will be able to see all the procedures in a module in one single scrollable list.
If you disable this option, you will only be able to see one module at a time. You will have to make a selection of the module you want to see from the drop-down at the top right of the code window.
This option is enabled by default and I recommend keeping it that way.
One reason you may want to disable it when you have multiple procedures that are huge and scrolling across these is taking time, or when you have a lot of procedures and you want to quickly find it instead of wasting time in scrolling.
Procedure Separator
When this option is enabled, you will see a line (a kind of divider) between two procedures.
I find this useful as it visually shows when one procedure ends and the other one starts.
It’s enabled by default and I recommend keeping it that way.
Editor Format Tab
With the options in the Editor Format tab, you can customize the way your code looks in the code window.
Personally, I keep all the default options as I am fine with it. If you want, you can tweak this based on your preference.
To make a change, you need to first select an option in the Code Colors box. Once an option is selected, you can modify the foreground, background, and indicator color for it.
The font type and font size can also be set in this tab. It’s recommended to use a fixed-width font such as Courier New, as it makes the code more readable.
Note that the font type and size setting will remain the same for all code types (i.e., all the code types shown in the code color box).
Below is an image where I have selected Breakpoint, and I can change the formatting of it.
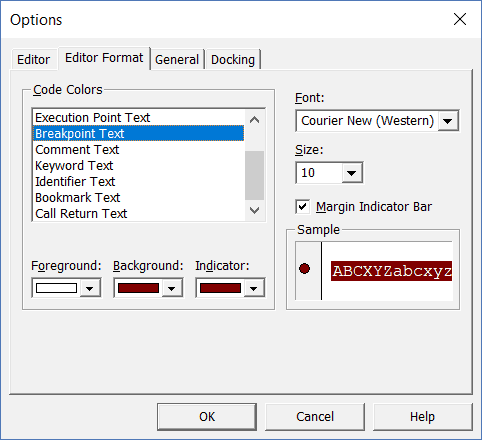
Note: The Margin Indicator Bar option when enabled shows a little margin bar to the left of the code. It’s helpful as it shows useful indicators when executing the code. In the above example, when you set a breakpoint, it will automatically show a red dot to the left of the line in the margin bar. Alternatively, to set a breakpoint, you can simply click on the margin bar on the left of the code line that you want as the breakpoint.
By default, Margin Indicator Bar is enabled and I recommend keeping it that way.
One of my VBA course students found this customization options useful and she was color blind. Using the options here, she was able to set the color and formats that made it easy for her to work with VBA.
General Tab
The General tab has many options but you don’t need to change any of it.
I recommend you keep all the options as is.
One important option to know about in this tab is Error Handling.
By default, ‘Break on Unhandled Errors’ is selected and I recommend keeping it that way.
This option means that if your code encounters an error, and you have not handled that error in your code already, then it will break and stop. But if you have addressed the error (such as by using On Error Resume Next or On Error Goto options), then it will not break (as the errors are not unhandled).
Docking Tab
In this tab, you can specify which windows you want to get docked.
Docking means that you can fix the position of a window (such as project explorer or the Properties window) so that it doesn’t float around and you can view all the different windows at the same time.
If you don’t dock, you will be able to view one window at a time in full-screen mode and will have to switch to the other one.
I recommend keeping the default settings.
Other Excel tutorials you may like:
- How to Remove Macros From an Excel Workbook
- Comments in Excel VBA (Add, Remove, Block Commenting)
- Using Active Cell in VBA in Excel (Examples)
Excel VBA is a powerful tool which enables the automation of tasks in Excel. It can be used to automate many repetitive tasks along with more complex applications. This quick tip guide shows you how to open the Excel Visual Basic Editor (aka Excel VBA Editor) and get started with VBA programming in Excel. Having access to the VBA editor lets you write your own VBA code or review recorded macros. Read on to see How to Open and Start Using the MS Excel VBA Editor
To open Excel visual basic editor,
Click the visual basic button on the developer tab.
If the Developer tab is not present, go to File -> Options -> customize ribbon and tick Developer.
You can also open VBA in Excel using Alt + F11 keyboard shortcut.
What is the VBA Editor
Great, now you’re in the editor, what is it? Microsoft Excel’s Visual basic editor can be referred to as, VBA editor, VB editor and even VBE. It is all the same thing. It’s the place where you can create macros and write scripts in Excel VBA.
The most basic sections of the editor is the Project View in which you can see modules listed down the left hand side. Think of this like a folder for your macros. Modules contain the code that is required for your macros to work. Its beyond the scope of this article to go into how to split out your code into objects but modules gives the user a powerful tool to create efficient and well organized code.
To get started writing code you will need to create a new module. Add a new module in VBA editor by clicking on VBAProject(Book1), right click, Insert Model. Delete a module by simply right clicking, Remove Module. Excel will prompt you to confirm before deleting.
Record a Macro in Excel
Recording a macro in Excel is a great way to automate tasks as well as a great tool to help learn more VBA code. A common trick is to record a macro and then review the VBA code to see how it works. Now you know how to open the VBA editor in Excel you should be able to record a macro, open the editor and view the code. You’ll see the system generated VBA can be messy but it will give you the key snippets of code needed for the desired action. These can be things as simple as formatting, copying, pasting, deleting or selecting a sell. Alternatively, you could get quite advanced and carry out entire tasks before going into the Excel visual basic editor to review the code.
The world really is your oyster when you get started recording macros in excel. Top tip is to start with small steps. You can always bulk all your small macros into one at a later stage but when it comes to reviewing each step its useful to keep it separate, at least when you are first getting started.
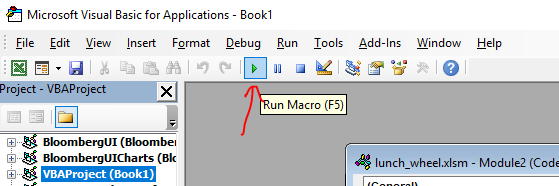
Run a Macro in Excel VBA Editor
Once you have entered the VBA editor, created a module and written some code you will want to run the code.
To run VBA code in VBA editor simply click the Run Macro button which is shaped like a small green triangle on the toolbar. You can also Run Macro in Excel VBA editor by pressing F5 shortcut.
This is a very quick introduction to show you how to open VBA in excel, create a new module and also run your macro once written. To write some actual code, as we have suggested above, a great tip is to record macros and then go back and review the code in the MS Excel VBA editor. You’ll be surprised how messy the generated VBA can get but it will give you the key snippets of VBA code you need to get started with Excel VBA programming and is a great way of learning the syntax of VBA. Alternatively, Google is your best friend when it comes to writing macros. So what are you waiting for, press Alt + F11 in Excel and get coding in VBA!
What to do next? REad our quick Introduction to VBA for MS Excel
Visual Basic for Applications, or VBA, is a Microsoft programming language that allows users to create scripts to execute certain actions or functions in a document by using Macros. It is most widely used in Excel to manage large quantities of data; however, other uses do exist. In this article we will show you how to activate VBA in Excel. These methods should work on both PC and Mac.
How to access VBA in Excel?
Access to VBA is turned off by default in Excel as a security precaution. Microsoft Office is vulnerable to Macro viruses, which can be spread to other documents if VBA is enabled. However, enabling VBA does not increase your likelihood of contracting a computer virus if you use it correctly and with caution.
To get started manipulating data, you will need to add the VBA add-in and enable access. This article will explain how to get started with VBA on your Windows computer.
How to activate the VBA add-in?
- To enable/disable the VBA tool, first, open Excel, click Options and select Add-ins. In the list that displays, find the add-in Analysis ToolPalk — VBA, and select OK:

- VBA add-in will now be active. Next, you must ensure the VBA tool is enabled.
How to enable or disable Access to VBA in Excel?
To enable/disable VBA tool, first open Excel, click Options, and find the Trust Center. Here, select the Trust Center Settings, and search for Macro Settings:

To enable access to VBA, ensure to check the option Trust access to the VBA project object model. To disable it, make sure that the box is unchecked:

Need more help with Excel? Check out our forum!

This Excel tutorial explains how to open the Visual Basic Editor in Excel 2010 (with screenshots and step-by-step instructions).
How to open the VBA environment
You can access the VBA environment in Excel 2010 by opening the Microsoft Visual Basic for Applications window.
First, be sure that the Developer tab is visible in the toolbar in Excel.
The Developer tab is the toolbar that has the buttons to open the VBA editor and create Form/ActiveX Controls like buttons, checkboxes, etc.
To display the Developer tab, click on File in the menu bar and select Options from the drop down menu.
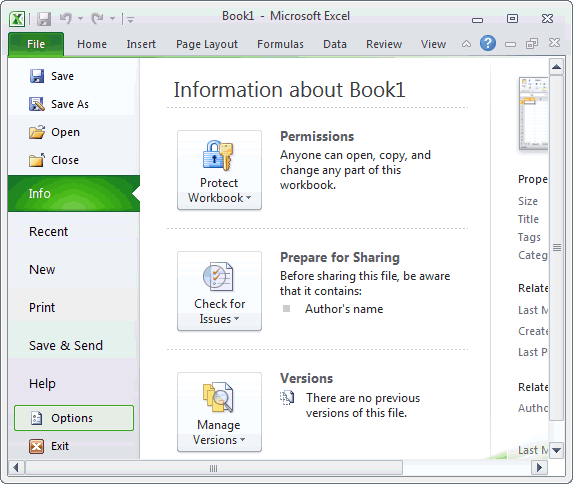
When the Excel Options window appears, click on the Customize Ribbon option on the left. Click on the Developer checkbox under the list of Main Tabs on the right. Then click on the OK button.
Select the Developer tab from the toolbar at the top of the screen. Then click on the Visual Basic option in the Code group.
Now the Microsoft Visual Basic editor should appear and you can view your VBA code.
“I know well what I am fleeing from but not what I am in search of” – Michel de Montaigne
Introduction
This post covers everything you need to know about the VBA Find function. It explains, how to use Find, in simple terms. It also has tons of code examples of Find you can use right now.
If you want to go straight to an example of Find then check out How to do a Simple Find.
If you want to search for text within a string then you are looking for the InStr and InStrRev functions.
If you want to find the last row or column with data then go to Finding the Last Cell Containing Data
Download the Source Code
What is the VBA Find Function?
The Find function is very commonly used in VBA. The three most important things to know about Find are:
- The Find function is a member of Range.
- It searches a range of cells containing a given value or format.
- It is essentially the same as using the Find Dialog on an Excel worksheet.
Introduction
Excel Find Dialog
To view the Excel Find dialog, go to the Home ribbon and click on Find & Select in the Editing section. In the menu that appears select Find(shortcut is Ctrl + F)

When you do this the following dialog will appear:

The VBA Find function uses most of the options you can see on this Dialog.
How to Use Options With Find
To use the options you pass them as parameters to the Find function. This is similar to how you use worksheet functions. For example, the Sum function has a Range as a parameter. This means you give it a range when you use it.
The VBA Find uses parameters in the same way. You must give it the item you are searching for. This is the first parameter and it is required.
The rest of the parameters are optional. If you don’t use them then Find will use the existing settings. We’ll see more about this shortly.
The table in the next section shows these parameters. The sections that follow this, give examples and details of how to use these parameters.
VBA Find Parameters
The following tables shows all the Find parameters.
| Parameter | Type | Description | Values |
|---|---|---|---|
| What | Required | The value you are searching for | Any VBA data type e.g String, Long |
| After | Optional | A single cell range that you start your search from | Range(«A5») |
| LookIn | Optional | What to search in e.g. Formulas, Values or Comments | xlValues, xlFormulas, xlComments |
| LookAt | Optional | Look at a part or the whole of the cell | xlWhole, xlPart |
| SearchOrder | Optional | The order to search | xlByRows or xlByColumns. |
| SearchDirection | Optional | The direction to search | xlNext, xlPrevious |
| MatchCase | Optional | If search is case sensitive | True or False |
| MatchByte | Optional | Used for double byte languages | True or False |
| SearchFormat | Optional | Allow searching by format. The format is set using Application.FindFormat | True or False |
Important Note about Find Parameters
Keep the following in mind as it can cause a lot of frustration when using Find.
As you can see from the table most of the VBA Find parameters are optional. As we said earlier, if you don’t set a Find parameter it uses the existing setting.
For example, if you set the LookIn parameter to xlComments, it will search for a value in comments only. The next time you run Find(either from the Dialog or from VBA) the existing LookIn setting will be Comments.
The following code shows an example of this
' Search in comments only
Range("A1:A5").Find "John", LookIn:=xlComments
' Will search comments as this is the existing setting
Range("A1:A5").Find "John"

' Search in formulas only
Range("A1:A5").Find "John", LookIn:=xlFormulas
' Will search formulas as this is the existing setting
Range("A1:A5").Find "John"
This applies to the parameters LookIn, LookAt, SearchOrder, and MatchByte.
The Find Return Value
If the search item is found then Find returns the cell with the value. That is, it returns a Range type of one cell.
If the search item is not found then Find returns an object set to Nothing.
In the following examples, you will see how to deal with the return value.
How to do a Simple Find
Let’s start with a simple example of the VBA Find. You need three things when using the Find function
- The Range to search
- The value you are searching for
- The Range to store the returned cell
Let’s take the following sample data

We are going to search for the text “Jena” in the cells A1 to A5.
The following code searches for “Jena”. When it finds “Jena”, it then places the cell in the rgFound variable.
' Find the name Jena in the range A1:A5
Dim rgFound As Range
Set rgFound = Range("A1:A5").Find("Jena")

' Print cell address to Immediate Window(Ctrl + G)
Debug.Print rgFound.Address
The above code shows the most basic search you can do. If this is your first time using the VBA Find function then I recommend you practice with a simple example like this.
If you want to try these examples you can download the workbook from the top of this post.
When the Value is not Found
When you use the VBA Find function, there will be times when you do not find a match. You need to handle this in your code or you will get the following error when you try to use the returned range

The following code will give this error if the text “John” is not found in the range A1 to A5
Set rgFound = Range("A1:A5").Find("John")

' Shows Error if John was not found
Debug.Print rgFound.Address
What we need to do is check the return value like the following code shows
Set rgFound= Range("A1:A5").Find("John")

If rgFound Is Nothing Then
    Debug.Print "Name was not found."
Else
    Debug.Print "Name found in :" & rgFound.Address
End If
Using After with Find
The After parameter is used if you want to start the search from a particular cell. When, the Excel Find Dialog is used, the active cell is considered the After cell. In other words, this cell is the starting point for the search. In VBA, if no After parameter is specified then the search starts at the top-left cell of the range.
Example 1 Without After
Let’s look at the following code.
Set cell = Range("A1:A6").Find("Rachal")
Find will return the cell A2 as this is where the first “Rachal” is found.

Example 2 Using After
In the next example, we use after. We are telling VBA to start the search for “Rachal” after cell A2
Set cell = Range("A1:A6").Find("Rachal", After:=Range("A2"))
This will return the cell A6

Example 3 Wrapping Around
If a match is not found then the search will “wrap around”. This means it will go back to the start of the range.
In the following example, we are looking for Drucilla. We start our search After cell A2. Find will search from A3 to A6 and then will move to A1.
So the following code will return A1 as there is no text “Drucilla” from A3 to A6:
Set cell = Range("A1:A6").Find("Drucilla", After:=Range("A2"))

The search order for this example was A4, A5, A6, A1.
You can try these example for yourself by downloading the workbook from the top of the post.
Using LookIn with Find
Using LookIn allows you to search in Values, Formulas or Comments.
Important Note: When a cell has text only, this text is considered a formula AND a value. See the table below for details
| Cell Contains | Result | LookIn value is |
|---|---|---|
| Apple | Apple | Value and Formula |
| =»App» & «le»‘ | Apple | Value only |
| =LEFT(«Apple»,4)’ | Appl | Formula only |
We are going to use the following sample data.
A2 Contains “Apple” as a value only
A3 Contains “Apple” as a formula only
A4 Contains “Apple” in the comment only

The code below searches for “Apple” in the different types: value, formula, threaded comment and note.
To see a working example of this code you can download the source code from the top of this post.
' Searches in value, formula, threaded comment and note.
' https://excelmacromastery.com/excel-vba-find/
Sub UseLookIn()

    ' Finds A2
    Dim rgFound As Range
    Set rgFound = shLookin.Range("A1:A5").Find("Apple", LookIn:=xlValues)
    Debug.Print "Found 'Apple' as value in: " & rgFound.Address

    ' Finds A3
    Set rgFound = shLookin.Range("A1:A5").Find("Apple", LookIn:=xlFormulas)
    Debug.Print "Found 'Apple' as formula in: " & rgFound.Address

    ' Finds A4
    Set rgFound = shLookin.Range("A1:A5").Find("Apple", LookIn:=xlCommentsThreaded)
    Debug.Print "Found 'Apple' as comment threaded in: " & rgFound.Address

    ' Finds A5
    Set rgFound = shLookin.Range("A1:A5").Find("Apple", LookIn:=xlNotes)
    Debug.Print "Found 'Apple' as note in: " & rgFound.Address

End Sub
Important note that I have used xlCommentsThreaded for the third one as threaded comments are used in Office 365. If you are using an older version that doesn’t have threaded comments then use xlComments.
Using LookAt with Find
Using the LookAt function is pretty straightforward.
- xlWhole means the search value must match the entire cell contents.
- xlPart means the search value only has to match part of the cell.
The following example has “Apple” as part of the cell contents in A2 and it is the full contents in cell A3.

The first Find in the following code finds “Apple” in A2. The second Find is looking for a full match so finds A3.
' https://excelmacromastery.com/
Sub UseLookAt()

    Dim cell As Range

    ' Finds A2
    Set cell = Range("A1:A3").Find("Apple", Lookat:=xlPart)
    Debug.Print cell.Address

    ' Finds A3
    Set cell = Range("A1:A3").Find("Apple", Lookat:=xlWhole)
    Debug.Print cell.Address

End Sub
You can try these example for yourself by downloading the workbook from the top of the post.
Using SearchOrder with Find
The SearchOrder parameter allows us to search by row or by column. In the following sample data we have two occurrences of the text “Elli”.

If we search by row we will find the “Elli” in B2 first. This is because we search in the order row 1, then row 2 etc.
If we search by column we will find the “Elli” in A5 first. This is because we search in the order column A, the Column B etc.
The following code shows an example of using the SearchOrder with this sample data
' https://excelmacromastery.com/
Sub UseSearchOrder()

    Dim cell As Range

    ' Finds B2
    Set cell = Range("A1:B6").Find("Elli", SearchOrder:=xlRows)
    Debug.Print cell.Address

    ' Finds A5
    Set cell = Range("A1:B6").Find("Elli", SearchOrder:=xlColumns)
    Debug.Print cell.Address

End Sub
Using SearchDirection with Find
SearchDirection allows you to search forward or backward. So imagine you have the range A1:A7. Searching using xlNext will go in the order
A1, A2, A3, A4, A5, A6, A7
Searching using xlPrevious will go in the order
A7, A6, A5, A4, A3, A2, A1

Using xlNext with the sample data will return A2 as this where it finds the first match. Using xlPrevious will return A6.
' NOTE: Underscore allows breaking up a line
' https://excelmacromastery.com/
Sub UseSearchDirection()

    Dim cell As Range

    ' Finds A2
    Set cell = shData.Range("A1:A7") _
        .Find("Elli", SearchDirection:=xlNext)
    Debug.Print cell.Address

    ' Finds A6
    Set cell = shData.Range("A1:A7") _
        .Find("Elli", SearchDirection:=xlPrevious)
    Debug.Print cell.Address

End Sub
Using xlPrevious with After
It you use the After parameter with xlPrevious then it will start before from the After cell. So if we set the After cell to be A6 then the search order will be
A5,A4,A3,A2,A1,A7,A6.
The following code shows an example of this
' https://excelmacromastery.com/
Sub UseSearchDirectionAfter()

    Dim cell As Range

    ' Finds A2
    Set cell = shData.Range("A1:A7").Find("Elli" _
            , After:=Range("A6"), SearchDirection:=xlPrevious)
    Debug.Print cell.Address

    ' Finds A6
    Set cell = shData.Range("A1:A7").Find("Elli" _
            , After:=Range("A7"), SearchDirection:=xlPrevious)
    Debug.Print cell.Address

End Sub
Using MatchCase with Find
The MatchCase parameter is used to determine if the case of the letters matters in the search. It can be set to True or False.
- True – the case of the letters must match
- False – the case of the letters does not matter
The following sample list has two entries for “Elli”. The second has a small letter e

The following code examples show the result of setting MatchCase to True and False
' https://excelmacromastery.com/
Sub UseMatchCase()

    Dim cell As Range

    ' Finds A2
    Set cell = Range("A1:B6").Find("elli", MatchCase:=False)
    Debug.Print cell.Address

    ' Finds A6
    Set cell = Range("A1:B6").Find("elli", MatchCase:=True)
    Debug.Print cell.Address

End Sub
Using MatchByte with Find
The MatchByte parameter is used for languages with a double-byte character set. These are languages such as Chinese/Japanese/Korean.
If you are not using them then this parameter is not relevant. They are used as follows
- True means to match only double-byte characters with double-byte characters.
- False means to double-byte characters can match with single or double-byte characters.
Using the WildCard
We can use the asterisk symbol(*) as a wild card when searching for text. The asterisk represents one or more characters.
For example
“T*” will find any word that starts with T.
“To*” will find any word that starts with To.
“*y” will find any word that ends with y.
“*ey” will find any word that ends with ey.
The code below shows examples of using the wildcard based on this data:

' Examples of using the wild card
' https://excelmacromastery.com/excel-vba-find/
Sub WildCard()

    Dim rgFound As Range

    ' Finds Tom in A2
    Set rgFound = shWildCard.Range("A1:A6").Find("T*")
    Debug.Print rgFound.Value & " was found in cell " & rgFound.Address

    ' Finds Tim in A5
    Set rgFound = shWildCard.Range("A1:A6").Find("Ti*")
    Debug.Print rgFound.Value & " was found in cell " & rgFound.Address

    ' Finds Tommy in A4
    Set rgFound = shWildCard.Range("A1:A6").Find("*my")
    Debug.Print rgFound.Value & " was found in cell " & rgFound.Address

    ' Finds Ellen in A3
    Set rgFound = shWildCard.Range("A1:A6").Find("*len*")
    Debug.Print rgFound.Value & " was found in cell " & rgFound.Address

    ' Finds Helen in A6
    Set rgFound = shWildCard.Range("A1:A6").Find("*elen*")
    Debug.Print rgFound.Value & " was found in cell " & rgFound.Address

End Sub
Using SearchFormat with Find
Search Format is a bit different than the other parameters. It allows you to search for a cell format such as font type or cell color.
You need to set the format first by using the Application.FindFormat property. Then you set SearchFormat to True to search for this format.
In the following sample data, we have two cells formatted. Cell A5 is set to Bold and Cell A6 has the fill colour set to red.

The following code searches for the bold cell:
' Find the cell which has a bold format
' https://excelmacromastery.com/excel-vba-find/
Sub UseSearchFormat()

    Dim findText As String
    findText = "Elli"

    ' Clear previous formats and set new format
    Application.FindFormat.Clear
    Application.FindFormat.Font.Bold = True

    ' Finds A2
    Dim rgFound As Range
    Set rgFound = Range("A1:A6").Find(findText, SearchFormat:=False)
    Debug.Print "Found '" & findText & "' in cell: " & rgFound.Address

    ' Finds A5
    Set rgFound = Range("A1:A6").Find(findText, SearchFormat:=True)
    Debug.Print "Found '" & findText & "' in cell: " & rgFound.Address

    Application.FindFormat.Clear

End Sub
Using Wild Card with Format
You can search for a cell based on the format only. In other words, the value in the cell is ignored in the search. You do this by placing “*” in the search string.
The following code searches for a cell that is formatted – the cell color in this example is set to red. The contents of the cell do not matter:
' Find the cell which is formatted - contents do not matter
' https://excelmacromastery.com/excel-vba-find/
Sub UseSearchFormatWild()

    ' Clear previous formats and set new format
    Application.FindFormat.Clear
    Application.FindFormat.Interior.Color = rgbRed

    ' Finds A2 as it ignores the format and finds the first cell with any contents
    Dim rgFound As Range
    Set rgFound = shSearchFormat.Range("A1:B6").Find("*", SearchFormat:=False)
    Debug.Print "Found format in cell: " & rgFound.Address

    ' Finds A5 as this is first cell with the format set to interior color as red
    Set rgFound = shSearchFormat.Range("A1:B6").Find("*", SearchFormat:=True)
    Debug.Print "Found format in cell: " & rgFound.Address

    Application.FindFormat.Clear

End Sub
Important – Clearing Format
When you set the FindFormat attributes they remain in place until you set them again. This is something to watch out for.
For example, imagine you set the format to bold and then use Find. Then you set the format to font size 12 and use Find again. The search will look for cells where the font is bold AND of size 12.
Therefore, it is a good idea to clear the format before you use it as I have done in the above examples.
Application.FindFormat.Clear
You can see we used this in the second SearchFormat example above.
Multiple Searches
In many cases you will want to search for multiple occurrences of the same value. To do this we use the Find function first. Then we use the .FindNext function to find the next item.

.FindNext searches based on the setting we used in the Find. The following code shows a simple example of finding the first and second occurrences of the text “Elli”.
' https://excelmacromastery.com/
Sub SearchNext()

    Dim cell As Range
    ' Find first - A2
    Set cell = Range("A1:A9").Find("Elli")
    Debug.Print "Found: " & cell.Address

    ' Find second - A5
    Set cell = Range("A1:A9").FindNext(cell)
    Debug.Print "Found: " & cell.Address

End Sub
Sometimes you won’t know how many occurrences there is. In this case we use a loop to keep searching until we have found all the items.
We use Find to get the first item. If we find an item we then use a Do Loop with .FindNext to find the rest of the occurrences.
FindNext will wrap around. That is, after it finds A9 it will continue the search at A1. Therefore, we store the address of the first cell we find. When FindNext returns this cell again we know we have found all the items.
The following code will find all the occurrences of Elli
' https://excelmacromastery.com/
Sub MultipleSearch()

    ' Get name to search
    Dim name As String: name = "Elli"

    ' Get search range
    Dim rgSearch As Range
    Set rgSearch = Range("A1:A9")

    Dim cell As Range
    Set cell = rgSearch.Find(name)

    ' If not found then exit
    If cell Is Nothing Then
        Debug.Print "Not found"
        Exit Sub
    End If

    ' Store first cell address
    Dim firstCellAddress As String
    firstCellAddress = cell.Address

    ' Find all cells containing Elli
    Do
        Debug.Print "Found: " & cell.Address
        Set cell = rgSearch.FindNext(cell)
    Loop While firstCellAddress <> cell.Address

End Sub
The output from this code is
Found: $A$2
Found: $A$5
Found: $A$8
Finding the Last Cell Containing Data
A very common task in VBA is finding the last cell that contains data in a row or colum. This does not use the VBA Find function. Instead, we use the following code to find the last row with data
' Find the last row with data in column A
LastRow = Cells(Rows.Count, 1).End(xlUp).Row

' Find the last row with data in column C
LastRow = Cells(Rows.Count, 3).End(xlUp).Row
To find the last column with data we use similar code
' Find the last column with data in row 1
lLastCol = Cells(1, Columns.Count).End(xlToLeft).Column

' Find the last column with data in row 3
lLastCol = Cells(3, Columns.Count).End(xlToLeft).Column
Finding Cells with Patterns
If you want to find cells with certain patterns then you have to use the Like operator rather than Find.
For example, to find the all the names starting with E you could use the following code
' Print all names starting with the letter E
' https://excelmacromastery.com/
Sub PatternMatch()

    Dim cell As Range
    ' Go through each cell in range
    For Each cell In Range("A1:A20")
        ' Check the pattern
        If cell Like "[E]*" Then
            Debug.Print cell
        End If
    Next

End Sub
To see a real-world example of using pattern matching check out Example 3: Check if a filename is valid.
An Alternative to using VBA Find
If you are expecting a large number of hits then using an array is a better option. You can read a range of cells to an array very quickly and efficiently.
The following code reads the cell values to an array and then reads through the array to count the items.
' https://excelmacromastery.com/
Sub UseArrayToCount()

    Dim arr As Variant
    ' read cell range to array
    arr = Sheet2.Range("A1:B25").Value

    Dim name As Variant, cnt As Long
    ' Go through the array
    For Each name In arr
        ' Count in the name 'Ray' is found
        If name = "Ray" Then
            cnt = cnt + 1
        End If
    Next name

    Debug.Print "The number of occurrences was: " & cnt

End Sub
Find and Replace
To do a find and Replace you can use the Replace function. It is very similar to using the Find function.
The replace function is outside the scope of this post although a lot of what you read here can be used with it. You can see the details of it at Microsoft – VBA Replace Function
What’s Next?
Free VBA Tutorial If you are new to VBA or you want to sharpen your existing VBA skills then why not try out the The Ultimate VBA Tutorial.
Related Training: Get full access to the Excel VBA training webinars and all the tutorials.
(NOTE: Planning to build or manage a VBA Application? Learn how to build 10 Excel VBA applications from scratch.)
Microsoft has written a documenation for VBA. It is sorted for objects, not for functions, but if you don’t need to type an object’s name before the function, it is likely to be a function of an object you are currently working with, like the current workbook.
This documentation can be read here.
http://msdn.microsoft.com/en-us/library/bb149081.aspx
Try looking for the function in objects like Workbook, Sheet, etc., and if it isn’t there, use the search option on the site (warning: this search used to be bad, now it seems to be a bing search, so maybe it is better now).
You won’t be able to see the source for the function, but there is a comprehensive API there.
If you cannot find the function there and think that it is not a standard Excel function, there is the question of where did Excel get it from in order to execute it. Try debugging a macro calling the function in question, and use the «step into button». If you see the source, you’ve solved your problem. If it isn’t there, it may come from an external application communicating with Excel. Go to the Button «Office», there choose Excel options, there go to Add-Ins. You can look at the addins installed and hunt down their documentation.
If all else fails and/or is too cumbersome, you can always google something like «[name of function] + Excel + VBA +Documentation]». Maybe you’ll find some online documentation.