
Find and replace text

-
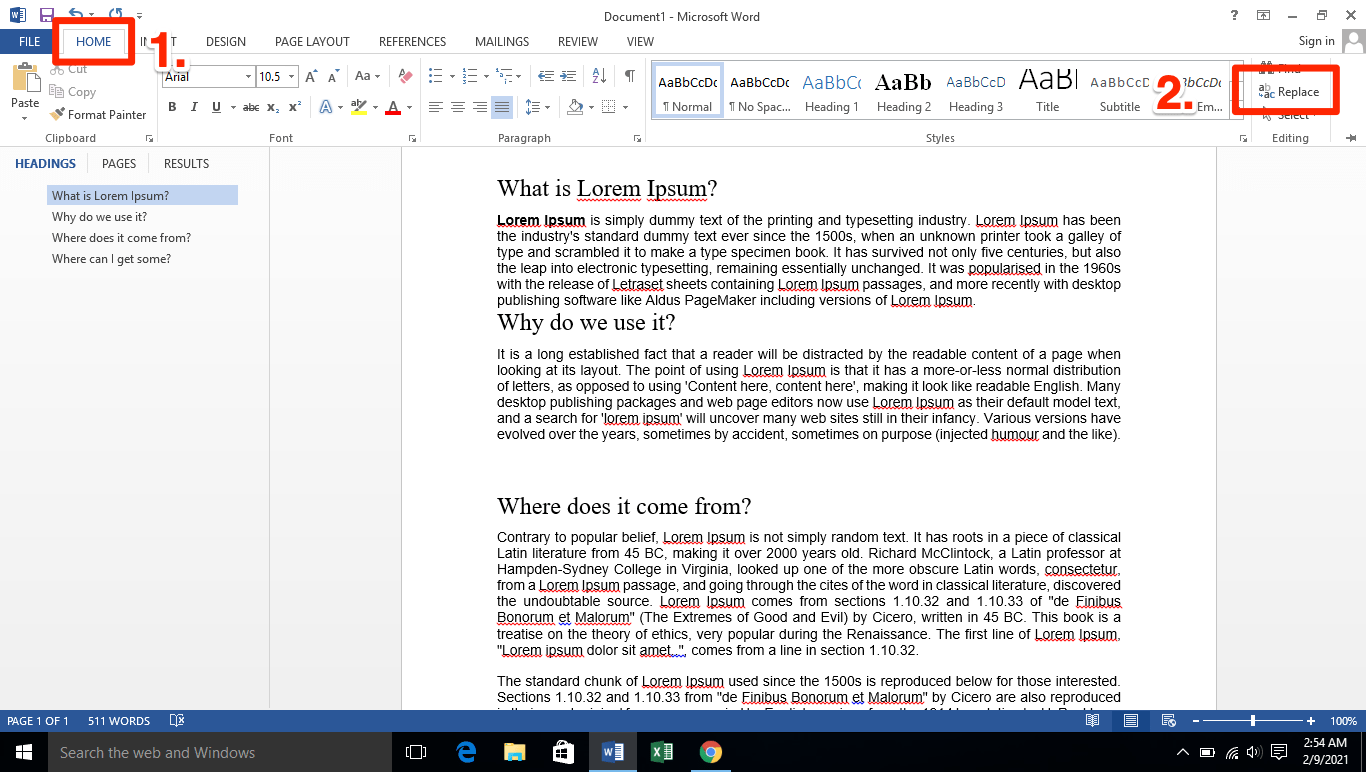
Go to Home > Replace.
-
Enter the word or phrase you want to replace in Find what.
-
Enter your new text in Replace with.
-
Choose Replace All to change all occurrences of the word or phrase. Or, select Find Next until you find the one you want to update, and then choose Replace.
-
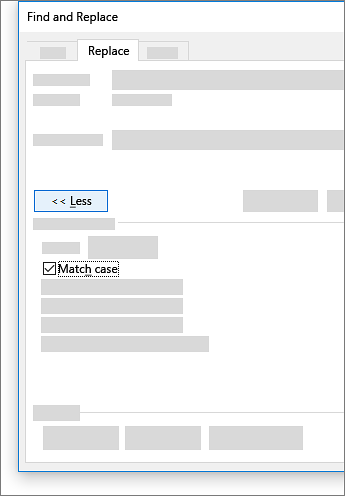
To specify only upper or lowercase in your search, select More > Match case. There are several other ways to search in this menu.
For other options, see Find and replace text
Find and replace basic text
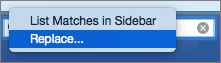
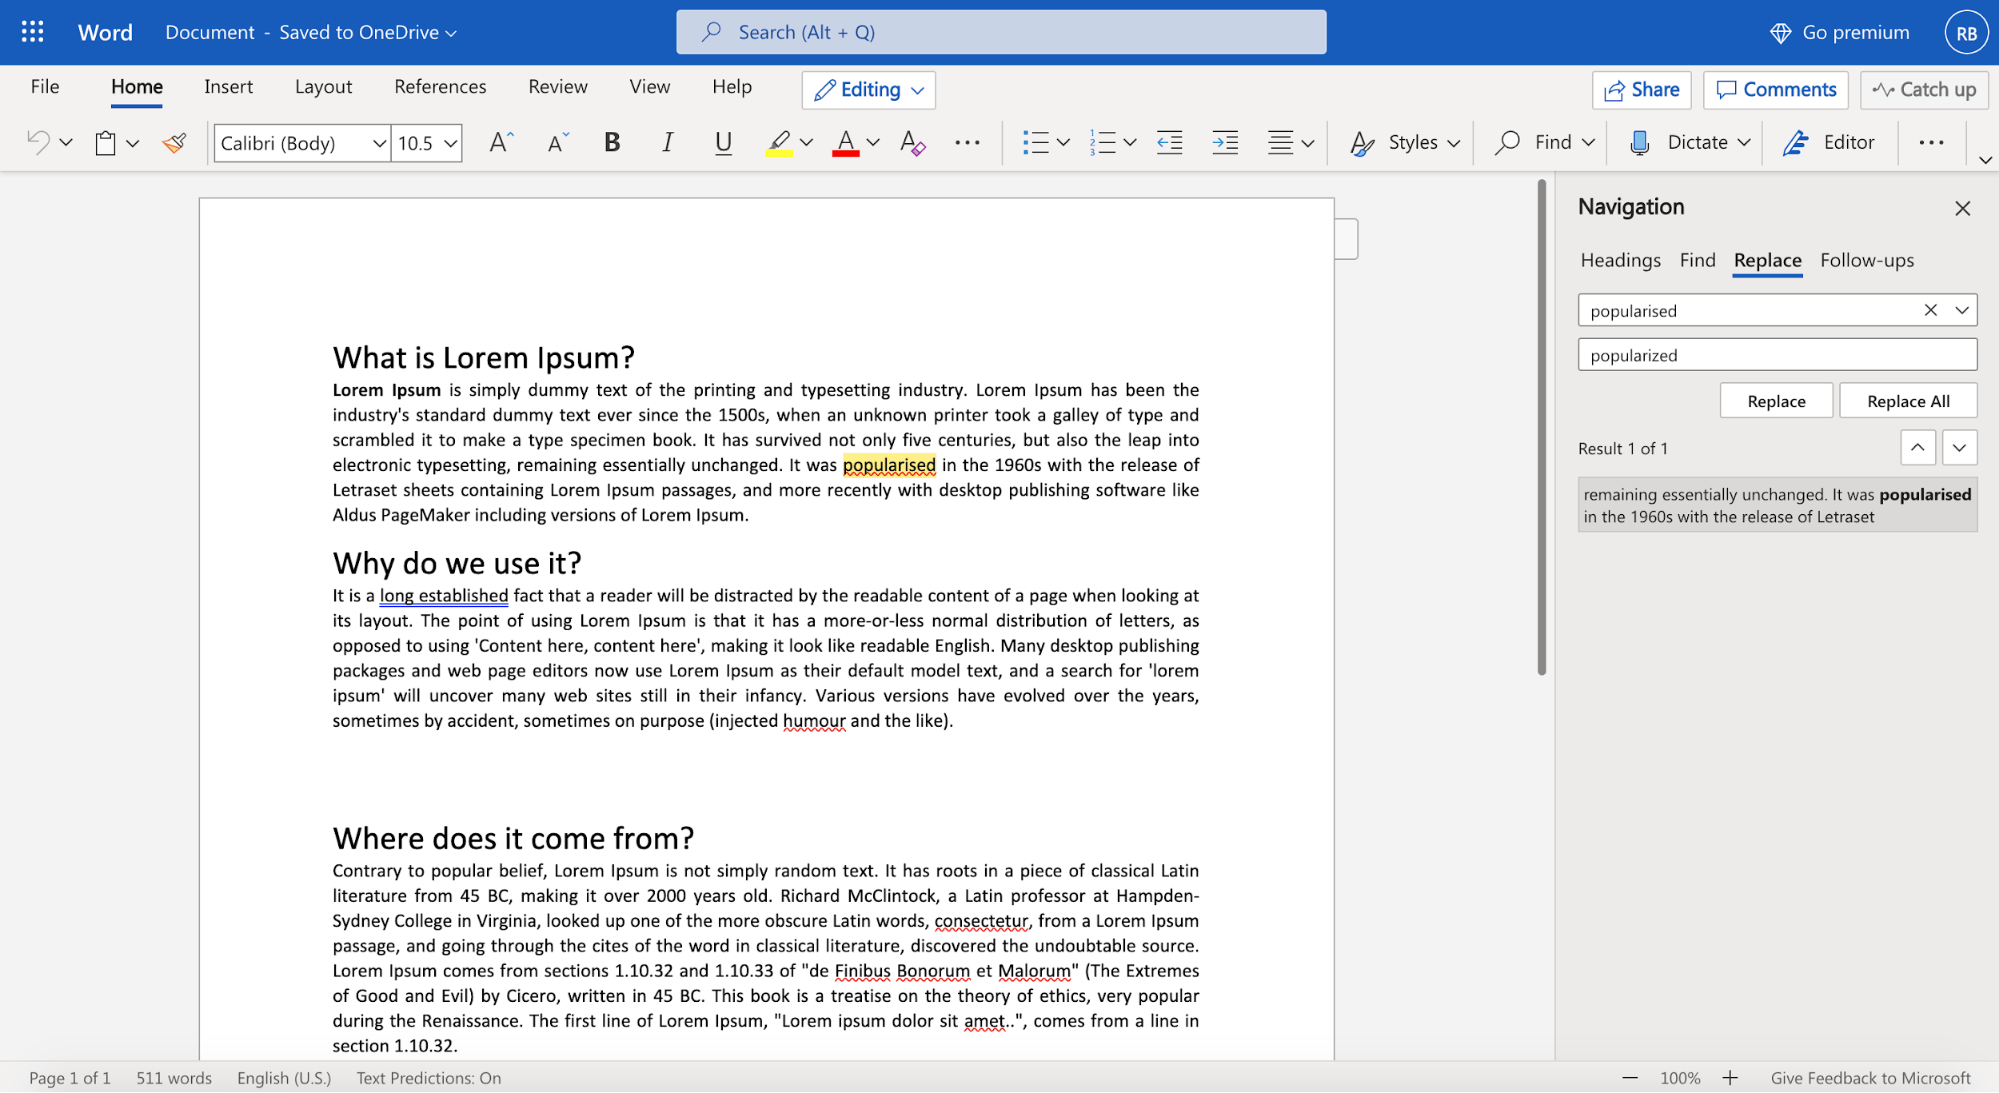
In the upper-right corner of the document, in the search box  , type the word or phrase that you want to find, and Word will highlight all instances of the word or phrase throughout the document.
To replace found text:
-
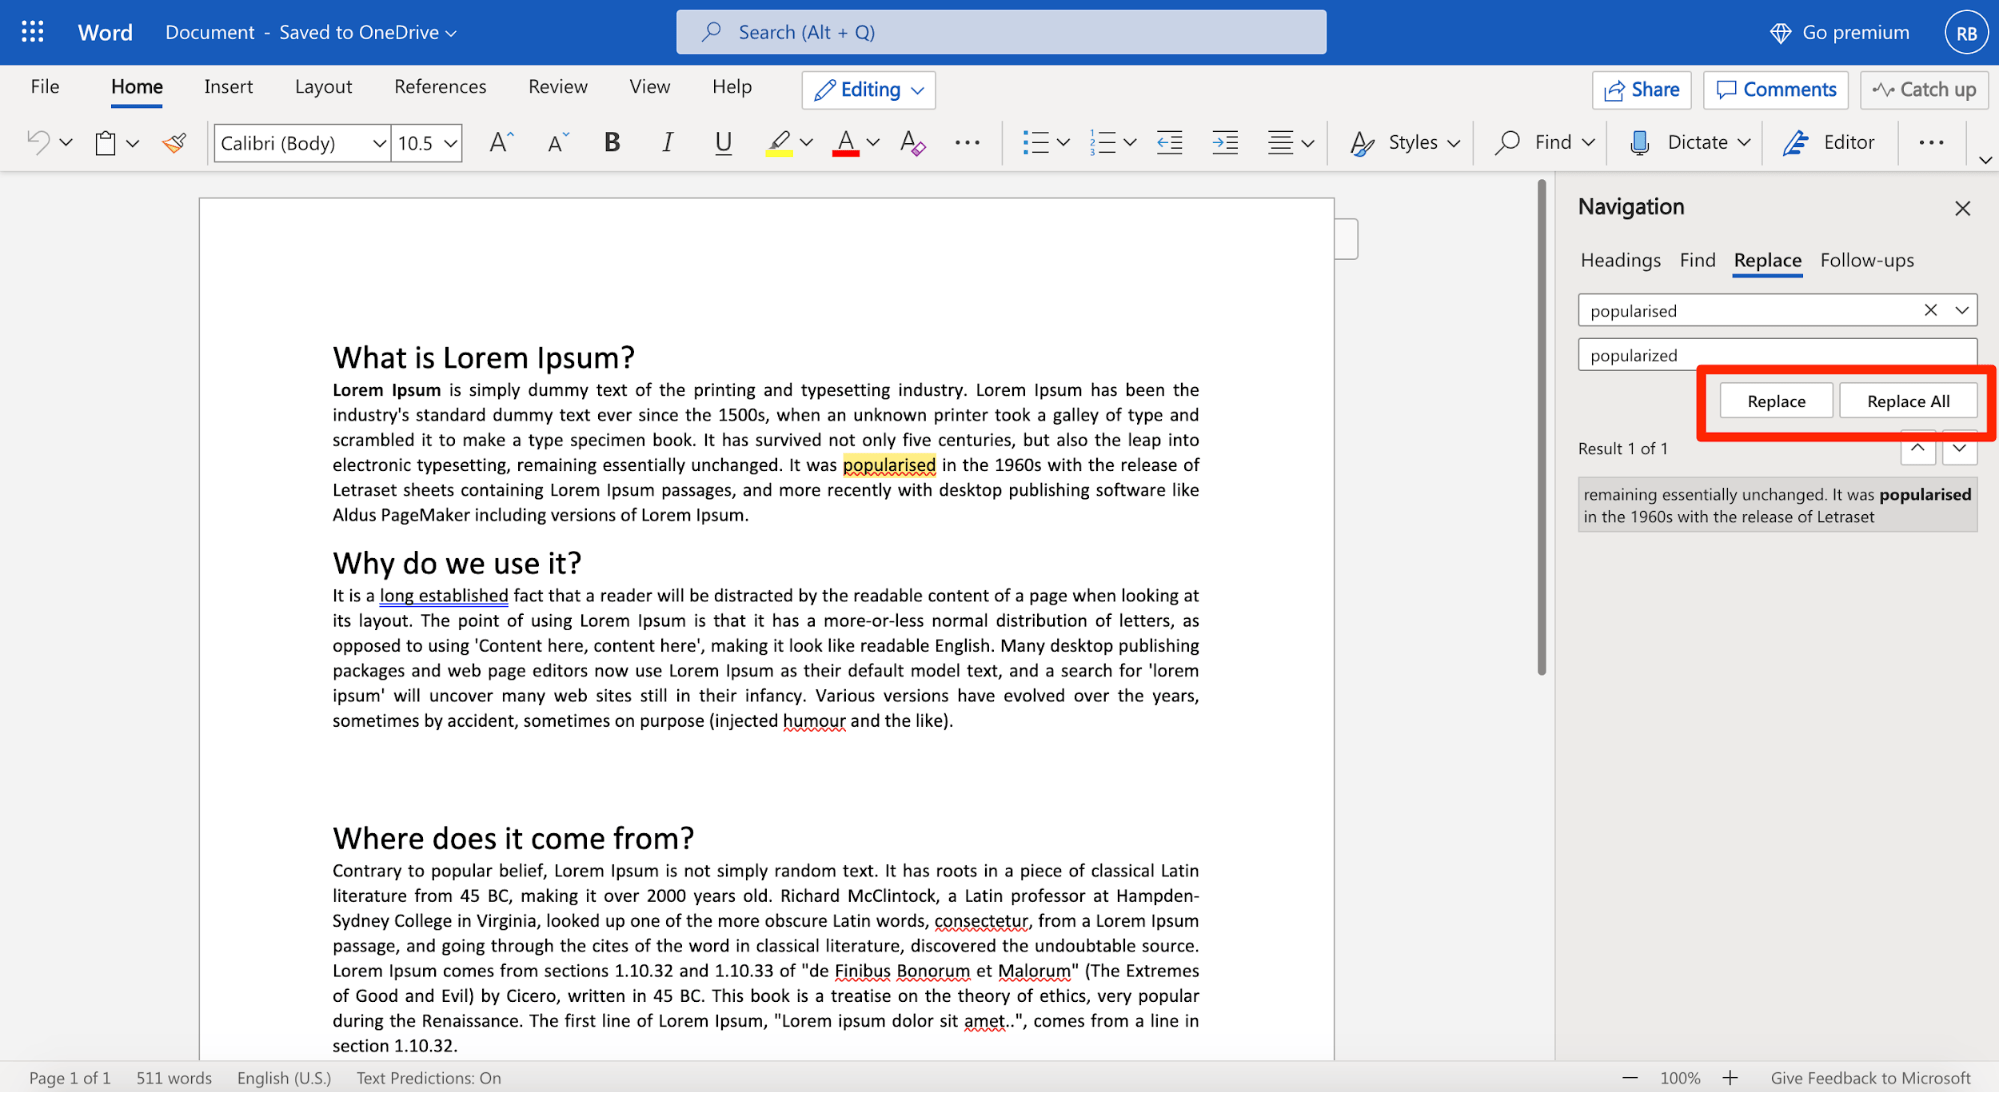
Select the magnifying glass, and then select Replace.

-
In the Replace With box, type the replacement text.
-
Select Replace All or Replace.
Tips:
-
You can also open the basic Find and Replace pane with the keyboard shortcut CONTROL + H.
-
When you replace text, it’s a good idea to select Replace instead of Replace All. That way you can review each item before replacing it.
-
You can find text with special formatting, such as bold or highlight, by using the Format menu.
-
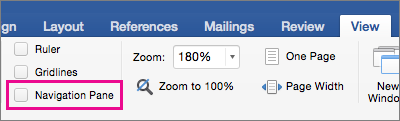
Select View > Navigation Pane.
-
In the Navigation Pane, select the magnifying glass.
-
Select Settings
, and then select Advanced Find & Replace.
Notes:
-
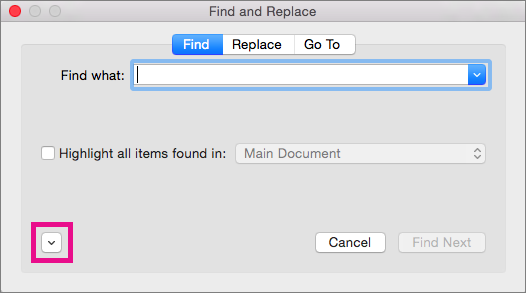
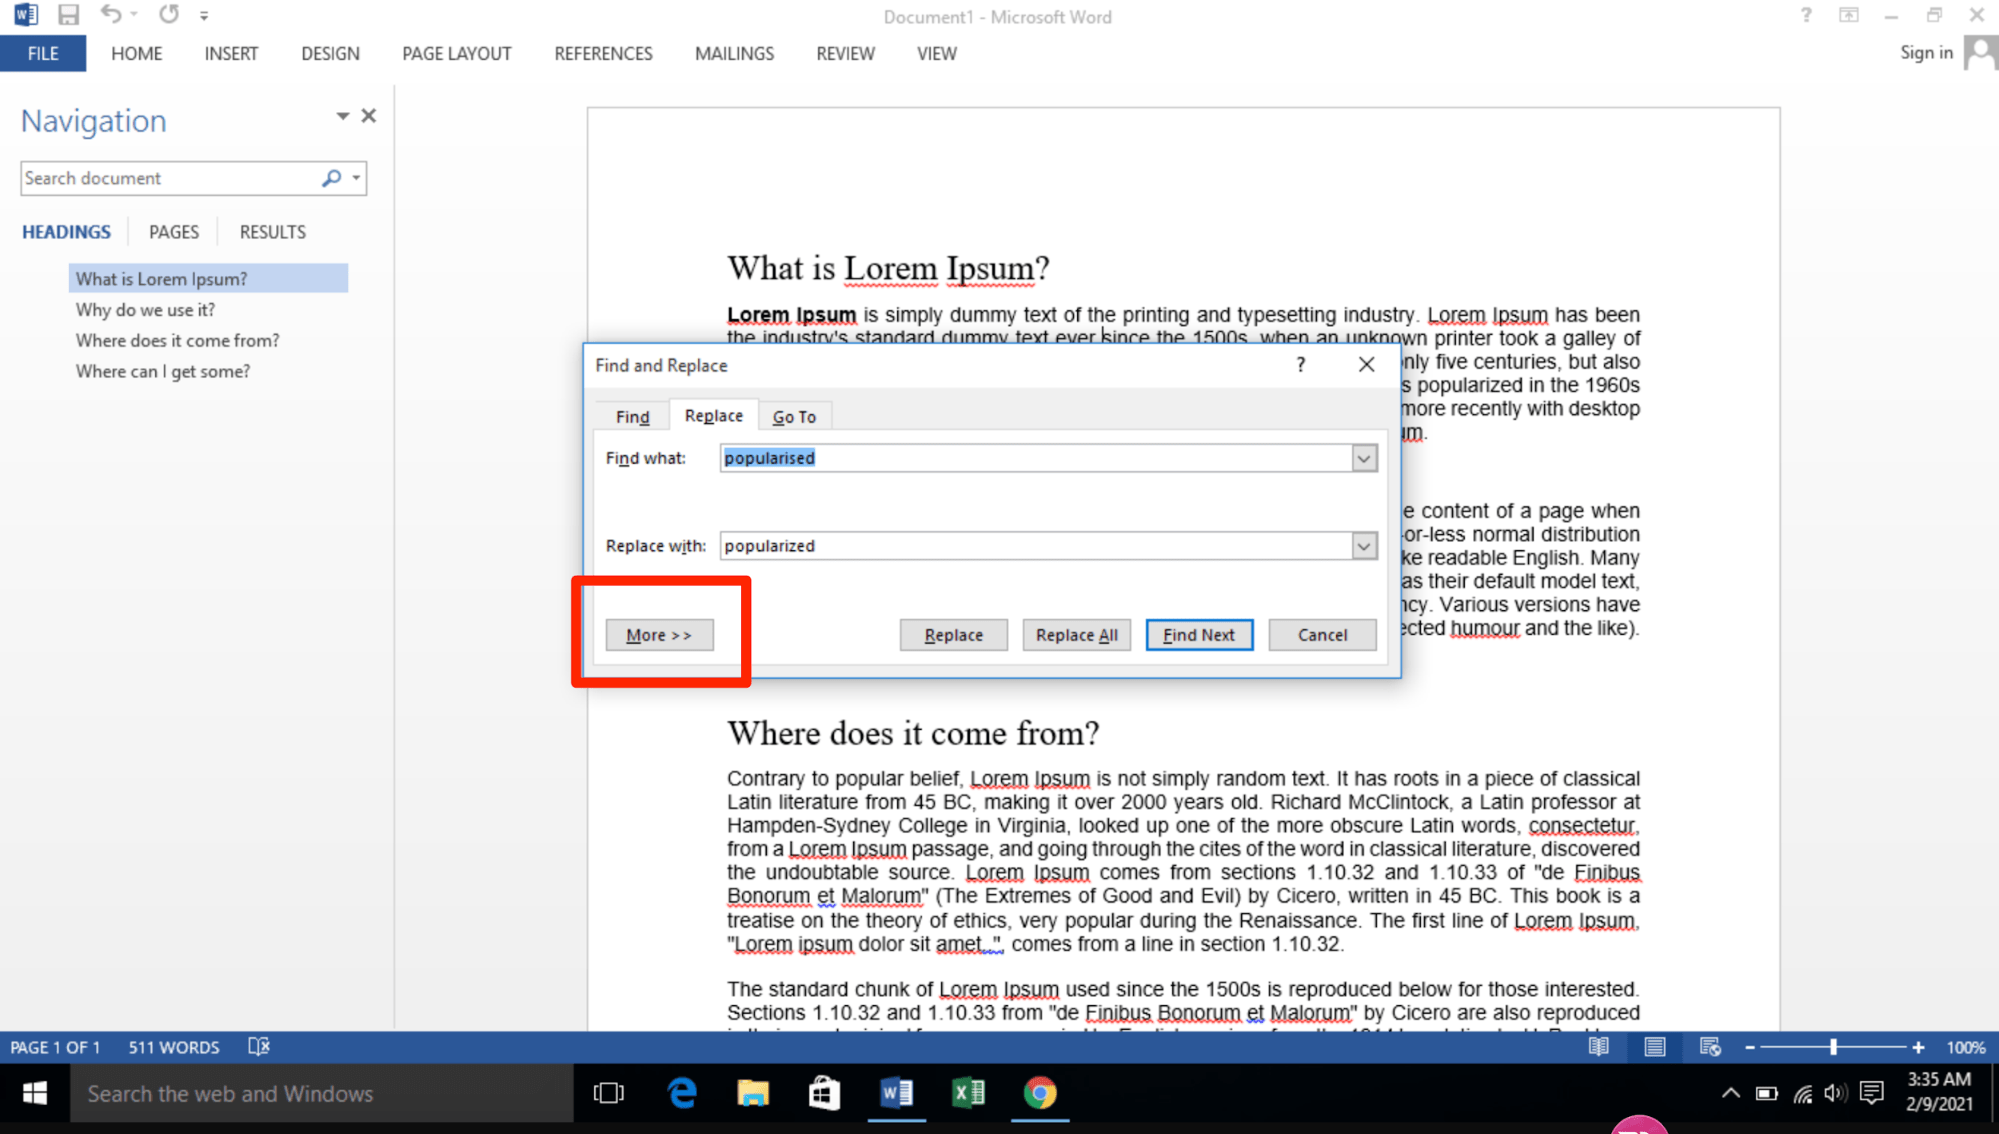
Select the arrow at the bottom of the Find and Replace dialog box to show all options.
-
-
-
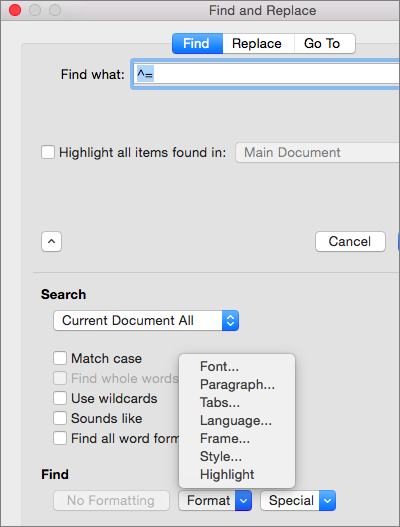
On the Format menu, select the option that you want.
If a second dialog box opens, select the options that you want, and then select OK.
-
In the Find and Replace dialog box, select Find Next or Find All.
 , and then select Advanced Find & Replace.
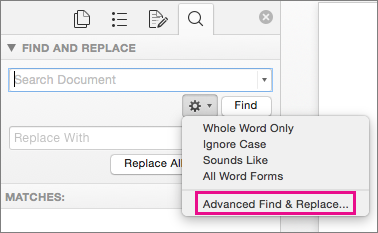
You can find and replace text with special formatting, such as bold or highlight, by using the Format menu.
-
Select View > Navigation Pane.
-
In the Navigation Pane, select the magnifying glass.
-
Select Settings
, and then select Advanced Find & Replace.
-
At the top of the dialog box, select Replace.
Notes:
-
Select the arrow at the bottom of the Find and Replace dialog box to show all options.
-
-
-
On the Find what box, type the text that you want to find.
-
On the Format menu, select the formatting that you want to find.
If a second dialog box opens, select the options that you want, and then select OK.
-
Select in the box next to Replace with.
-
On the Format menu, select the replacement formatting. If a second dialog box appears, select the formats that you want, and then select OK.
-
Select Replace, Replace All, or Find Next.
-
Select View > Navigation Pane.
-
In the Navigation Pane, select the magnifying glass.
-
Select Settings
, and then select Advanced Find & Replace.
Notes:
-
Select the arrow at the bottom of the Find and Replace dialog box to show all options.
-
-
-
On the Special menu, select the special character that you want to find.
-
Select Find Next.

-
Select View > Navigation Pane.
-
In the Navigation Pane, select the magnifying glass.
-
Select Settings
, and then select Advanced Find & Replace.
Notes:
-
Select the arrow at the bottom of the Find and Replace dialog box to show all options.
-
-
-
At the top of the Find and Replace dialog box, select Replace and then select in the Find What box, but don’t type anything there. Later, when you select a special character, Word will automatically put the character code in the box for you.
Note: Select the arrow at the bottom of the Find and Replace dialog box to show all options.
-
On the Special menu, select the special character that you want to find.
-
Select in the Replace with box.
-
On the Special menu, select the special character that you want to use as a replacement.
-
Select Replace or Find Next.
-
Select View > Navigation Pane.
-
In the Navigation Pane, select the magnifying glass.
-
Select Settings
, and then select Advanced Find & Replace.
-
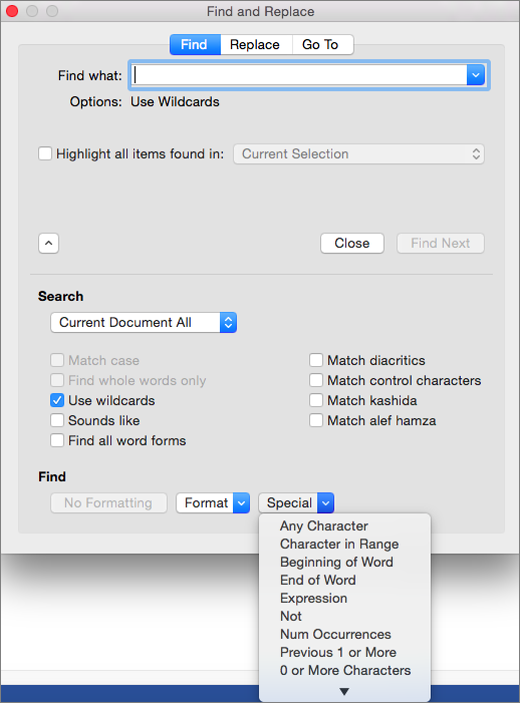
Select the Use wildcards check box.
If you don’t see the Use wildcards check box, select
. -
Select the Special menu, select a wildcard character, and then type any additional text in the Find what box.
-
Select Find Next.
Tips:
-
To cancel a search in progress, press
+ PERIOD. -
You can also enter a wildcard character directly in the Find what box instead of selecting an item from the Special pop-up menu.
-
To search for a character that’s defined as a wildcard character, type a backslash () before the character. For example, type ? to find a question mark.
-
You can use parentheses to group the wildcard characters and text and to indicate the order of evaluation. For example, search for <(pre)*(ed)> to find «presorted» and «prevented.»
-
You can search for an expression and use the n wildcard character to replace the search string with the rearranged expression. For example, type (Newman) (Belinda) in the Find what box and 2 1 in the Replace with box. Word will find «Newman Belinda» and replace it with «Belinda Newman.»
-
-
To replace found text:
-
Select the Replace tab, and then select the Replace with box.
-
Select Special, select a wildcard character, and then type any additional text in the Replace with box.
-
Select Replace All, Replace, or Find Next.
Tip: When you replace text, it’s a good idea to select Replace instead of Replace All. That way you can confirm each replacement to make sure that it’s correct.
-
 .
.
 + PERIOD.
You can refine a search by using any of the following wildcard characters.
|
To find |
Use this |
For example |
|---|---|---|
|
Any single character |
? |
s?t finds «sat» and «set.» |
|
Any string of characters |
* |
s*d finds «sad» and «started.» |
|
One of the specified characters |
[ ] |
w[io]n finds «win» and «won.» |
|
Any single character in this range |
[-] |
[r-t]ight finds «right» and «sight» and «tight.» Ranges must be in ascending order. |
|
Any single character except the characters inside the brackets |
[!] |
m[!a]st finds «mist» and «most» but not «mast.» |
|
Any single character except characters in the range inside the brackets |
[!x-z] |
t[!a-m]ck finds «tock» and «tuck» but not «tack» or «tick.» Ranges must be in ascending order. |
|
Exactly n occurrences of a character or expression |
{ n} |
fe{2}d finds «feed» but not «fed.» |
|
At least n occurrences of a character or expression |
{ n,} |
fe{1,}d finds «fed» and «feed.» |
|
A range of occurrences of a character or expression |
{ n, n} |
10{1,3} finds «10,» «100,» and «1000.» |
|
One or more occurrences of a character or expression |
@ |
lo@t finds «lot» and «loot.» |
|
The beginning of a word |
< |
<(inter) finds «interesting» and «intercept» but not «splintered.» |
|
The end of a word |
> |
(in)> finds «in» and «within,» but not «interesting.» |
Word for the web lets you find and replace basic text. You can match case or fine whole words only. For more varied options, open your document in Word for the desktop.
Need more help?
Exchange one text string for another in any version of Word
Updated on October 29, 2021
What to Know
- Open the Find and Replace tool in Word with the keyboard shortcut CTRL+H.
- Find and Replace doesn’t take capitalization into account unless you specifically tell it to.
- To replace capitalization, select More in the Find and Replace box, then Match Case > Replace or Replace All > OK.
All editions of Microsoft Word offer a feature called Find and Replace. Use this tool to search for a specific word, number, or phrase in a document and replace it with something else. You can also make several replacements at once—like changing a name or fixing something you’ve consistently misspelled. Use it, also, to replace numbers or punctuation and cap or uncap words.
If you turn on Track Changes before you begin, you can reject the replacement or deletion of any unintended word.
Find and Replace a Word
The Microsoft Word Find and Replace dialog box, in its simplest form, prompts you to type the word you’re looking for and the word you want to replace it with. Then, click Replace, and either allow Word to change every entry for you or, go through them one at a time.
To open the tool, press Ctrl+H (Cmd+H on Mac).
Change Capitalization in Microsoft Word
The Find and Replace feature doesn’t take into account anything about capitalization unless you specifically tell it to. To get to that option you’ll need to click the More option in the Find and Replace dialog box:
- Open the Find and Replace dialog box using your favorite method. We prefer Ctrl+H.
- Click More.
- Type the appropriate entry in the Find What and Replace With lines.
- Click Match Case.
- Click Replace and Replace again, or, click Replace All.
- Click OK.
Advanced Options
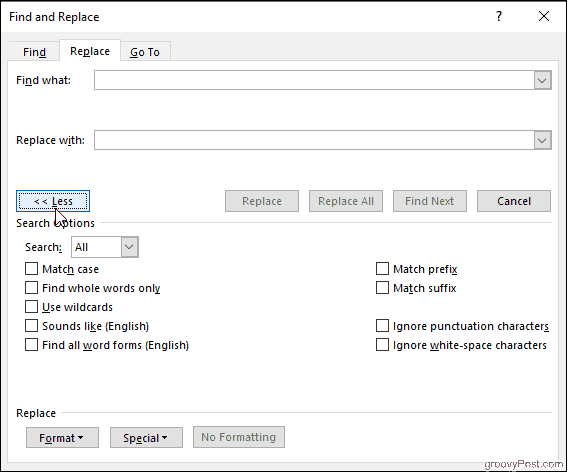
When you select the More expander in the Search and Replace dialog box, you’ll encounter several customizations. The list of items varies according to which version of Word you’re running.
Search Options
Select the check boxes to include or exclude things like punctuation, white-space characters, or substrings. Plus, apply tools like word-form matching (i.e., walked also matches walking) and Soundex matching (Karin matches Karen).
Replace Options
Word supports more advanced substitutions, too. Use special characters to substitute text markup with symbols. For example, replace a character code like & with an ampersand. This approach is useful for de-cluttering pasted HTML text that uses HTML codes to render certain symbols.
Thanks for letting us know!
Get the Latest Tech News Delivered Every Day
Subscribe
Find and Replace Text and Numbers in Word
by Avantix Learning Team | Updated March 7, 2022
Applies to: Microsoft® Word® 2013, 2016, 2019, 2021 or 365 (Windows)
You can find and replace in Word using the Find and Replace dialog box as well as the Navigation Pane. If you use the dialog box, you can find and replace text and numbers and use wildcards for more advanced find and replace tasks. Wildcards are useful when you are not able to find an exact match. You can display the Find and Replace dialog box using a keyboard shortcut or the Home tab in the Ribbon.
Recommended article: How to Quickly Remove Hard Returns in Word Documents
Do you want to learn more about Microsoft Word? Check out our virtual classroom or in-person Word courses >
Note: Screenshots in this article are from Word 365 but are similar in previous versions of Word.
The Replace command appears on the Home tab in the Ribbon in the Editing group:

Using the Find and Replace dialog box to replace words or characters (and match case)
You can perform simple find and replace tasks using the Replace dialog box in its collapsed state. To access more advanced options, you will need to click More in the Replace dialog box to expand it.
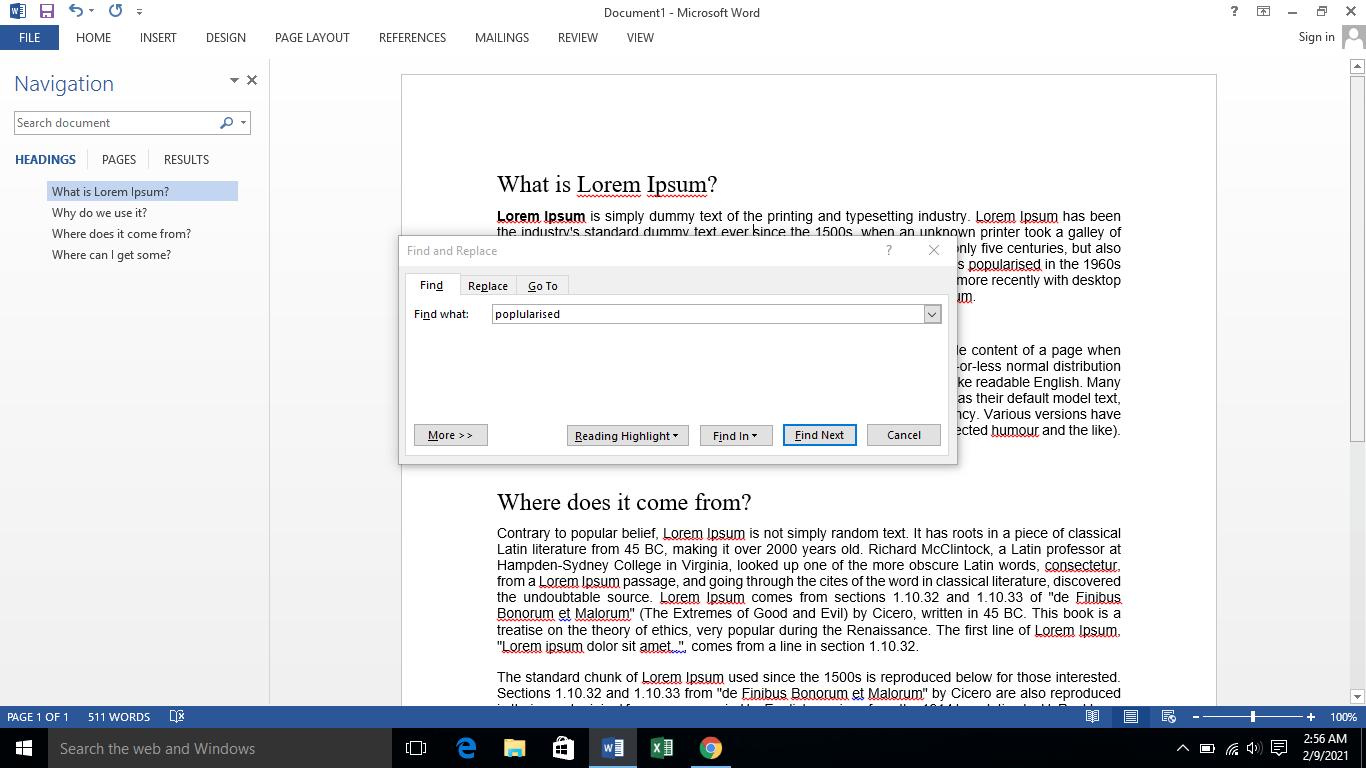
To use the Find and Replace dialog box to find and replace text in Word (words or characters) and match case if needed:
- Click the Home tab in the Ribbon.
- In the Editing group, click Replace to display the Replace dialog box. Alternatively, press Ctrl + H if you prefer to use a keyboard shortcut to open the Replace dialog box.
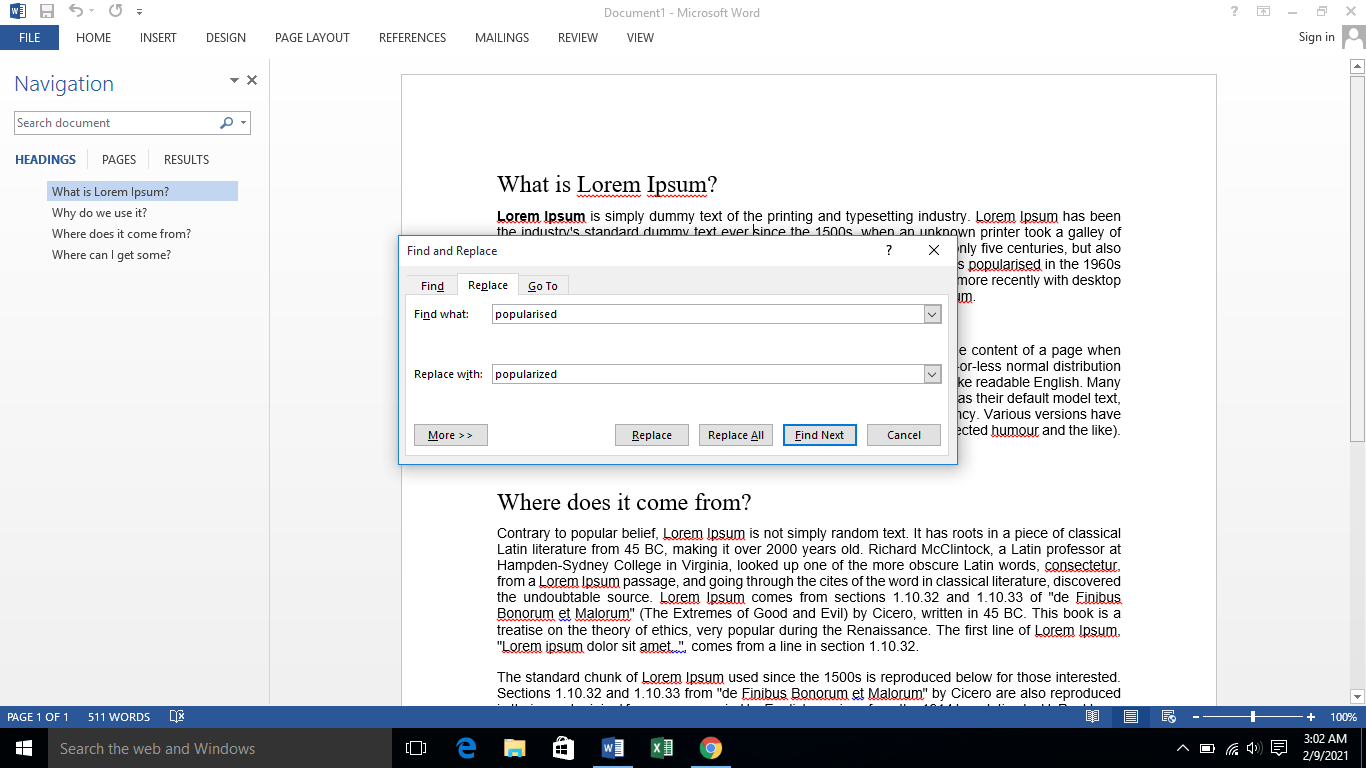
- Enter the text you want to find in the Find What box. You can specify whether Word should locate only matches with the exact capitalization by clicking More and then selecting or checking Match case.
- Enter the text you want to replace in the Replace box.
- Click Find Next and then click Replace for each occurrence or click Replace All.
- Click Close.
In the following example, the Replace dialog box has been expanded to display other options including Match case:

Finding and replacing using wildcards
To use wildcards, you will need to use the Find and Replace dialog box and expand it to display more options. You can then select the option to Use wildcards. A wildcard can replace one or more characters in a string of text or numbers. The most common wildcard is the asterisk (*).
It’s important to note that wildcard searches are case sensitive. Also, Word uses «lazy» pattern matching so it will stop matching as soon as possible. This means that you could enter part of a word and find that part without using wildcards.
To find and replace text using wildcards in Word:
- Position the cursor at the location in the document where you want to start finding and replacing. If you want to start at the beginning of the document, you can press Ctrl + Home.
- Click the Home tab in the Ribbon.
- In the Editing group, click Replace. Alternatively, press Ctrl + H. A dialog box appears.
- Select More to expand the dialog box.
- Click in the Find What box.
- Select or check the Use wildcards checkbox.
- Enter the text and wildcard(s) you want to use. For example, enter s*l to find any text starting with s and ending with l.
- Click in the Replace with box.
- Enter the text you want to use to replace the text in the Find what box.
- Click Find Next to find the first instance of the characters you want to find.
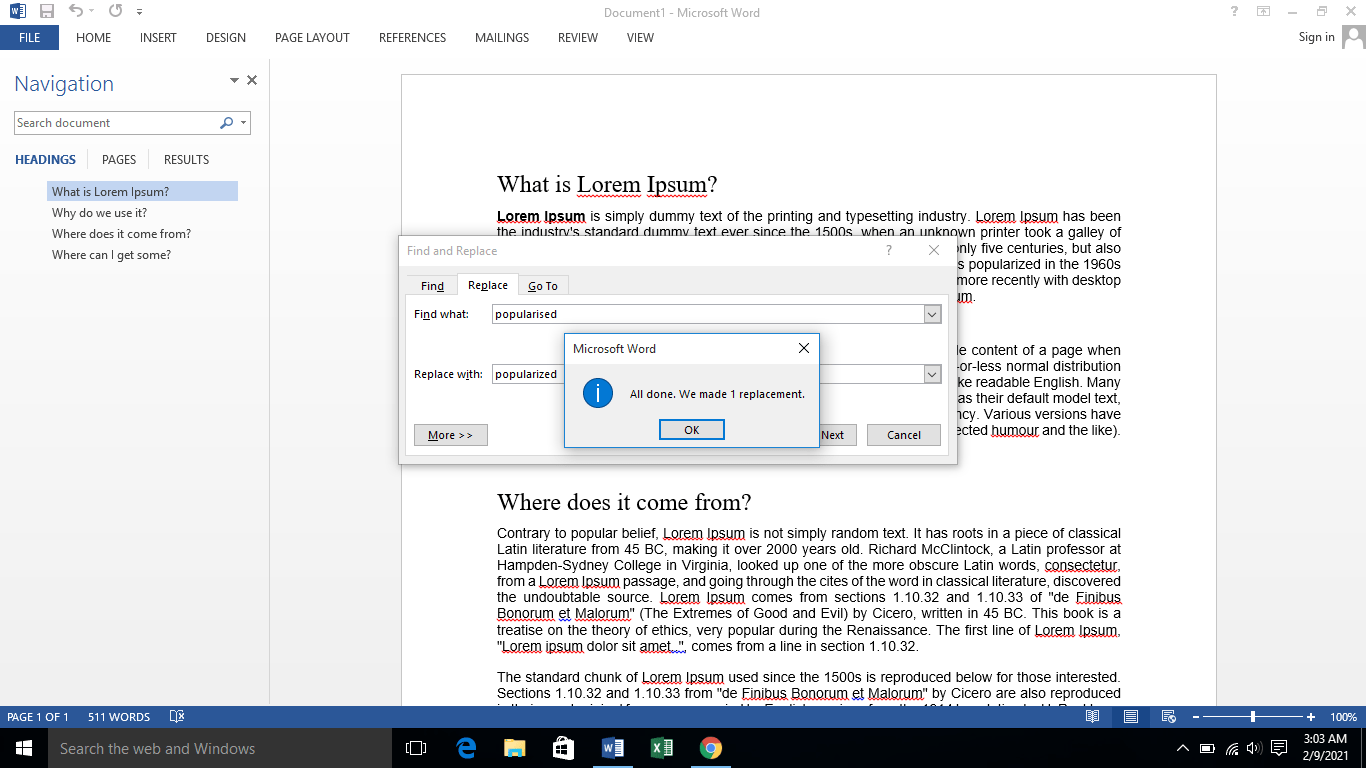
- Click Replace or Replace All. If you click Replace, Word will select the next matching characters in the Find what box. If you click Replace All, Word will display a dialog box with the number of replacements. In this case, click OK.
- If necessary, click Replace again. Repeat for each instance.
- Click Close to close the dialog box.
In the following example, b*s has been entered in the Find what box to find any word starting with starting with b and ending with s:

If you want to undo a Replace or Replace All action, close the dialog box and press Ctrl + Z.
Using common wildcards
The most common wildcards you can use in the Find and Replace dialog box are the asterisk (*) to find multiple characters and the question mark (?) to find a single character.
For example:
b*l will find ball and barrel (a character followed any characters and ending with a specific character)
h?ll will find hill and hall (a character followed by any single character and then followed by 2 characters)
Using wildcards to find one or more instances of the same character
You can also use @ as a wildcard to find one or more instances of the same character.
For example:
catchal@ will find catchal or catchall
Using wildcards for alternate characters and ranges
You can also use wildcards to find alternate characters or ranges of characters. These are entered in square brackets [ ] and may be combined with other wildcards.
[ ] can be used to find each of a set of characters
[ – ] can be used to find each of a set of characters in a range
You can use any character or series of characters in a range within the square brackets (including the space character). Characters are processed in alphanumeric order from lowest to highest.
For example:
[abc] will find any of the letters a, b, or c
[G] will find the upper case letter G
[A-Z] will find any upper case letter
[0-9] will find any single number
[13579] will find any odd number
[0-9A-z] will find any number or letter
f[ai]n will find each of the characters in square brackets such as fan or fin
[b-f]at will find each of a range of characters such as bat, cat, and fat
Using wildcards to omit characters
If you want to omit specific characters, you can use an exclamation mark (!) combined with square brackets.
For example:
[!f]ast will find last and past but not fast
Using wildcards to find the beginning or end of a word
You can use the less than symbol (<) to find the beginning of a word and the greater than symbol (>) to find the end of a word. These wildcards are combined with characters in round brackets or parentheses.
For example,
<(watch) will find watching or watchman
(all)> will find wall or stall
These wildcards can be problematic if you are using a wildcard and you want to find > or < as characters in the document. If this is the case, enter a backslash () in front of the character so that it is not treated as a wildcard.
For example,
<*> will find <h1> or <h2>
Using wildcards to find instances of a character
You can use curly brackets { } to specify the number of instances of a character. These brackets can be combined with a comma to specify the number of instances. Counting can be used with individual characters or with sets of characters.
{n} is used to find the number of instances of a character
{n,} is used to find at least n instances of a character
{n,m} is used to find between n and m instances of a character
For example:
^p{2} will find two consecutive paragraph marks or hard returns (^p is a special character for a paragraph mark in Word)
{3} will find three spaces (there is a space entered before the first curly bracket)
30{2,} will find at least 2 instances of the preceding character such as 3000 or 30000
30{3,4} will find between 3 and 4 instances of the preceding character such as 30000 or 300000 not 300
These last wildcards are particularly useful if you are finding and replacing numbers in Word.
The Find and Replace dialog box offers more functionality as well. For example, you can also Find and Replace Formatting in Word.
Subscribe to get more articles like this one
Did you find this article helpful? If you would like to receive new articles, join our email list.
More resources
How to Add Page Numbers in Word (Step by Step)
How to View Document Statistics in Microsoft Word
How to Update All Figure Numbers in Microsoft Word
How to Check Word Count in Microsoft Word (4 Ways)
How to Superscript or Subscript in Word (with Shortcuts)
Related courses
Microsoft Word: Intermediate / Advanced
Microsoft Word: Designing Dynamic Word Documents Using Fields
Microsoft Word: Long Documents Master Class
Microsoft Word: Accessible Word Documents
Microsoft Excel: Intermediate / Advanced
Microsoft PowerPoint: Intermediate / Advanced
VIEW MORE COURSES >
Our instructor-led courses are delivered in virtual classroom format or at our downtown Toronto location at 18 King Street East, Suite 1400, Toronto, Ontario, Canada (some in-person classroom courses may also be delivered at an alternate downtown Toronto location). Contact us at info@avantixlearning.ca if you’d like to arrange custom instructor-led virtual classroom or onsite training on a date that’s convenient for you.
Copyright 2023 Avantix® Learning
Microsoft, the Microsoft logo, Microsoft Office and related Microsoft applications and logos are registered trademarks of Microsoft Corporation in Canada, US and other countries. All other trademarks are the property of the registered owners.
Avantix Learning |18 King Street East, Suite 1400, Toronto, Ontario, Canada M5C 1C4 | Contact us at info@avantixlearning.ca
![]()
Download Article
![]()
Download Article
This wikiHow teaches you how to use Microsoft Word’s «Find and Replace» feature to look up words in your document, as well as how to replace instances of a word with another word.
-
1
Open a Microsoft Word document. Either double-click a Word document, or open Word and then select the document from the list of recently opened documents if applicable.
-
2
Place your cursor at the beginning of the document. Click to the left of the first word in your document to place the cursor there. «Find and Replace» will only search for words after the cursor.
- If you only want to search for words in a specific section of text (rather than the whole document), highlight that section instead.
Advertisement
-
3
Click the Home tab. It’s in the upper-left section of the Word ribbon, which is the blue strip at the top of the window.
-
4
Click Find. This option is on the far-right side of the toolbar in the «Editing» section. Doing so will open a search bar on the left side of the window.
-
5
Type in a word you wish to find and press ↵ Enter. This will highlight instances of the word you searched for in the document.
-
6
Click ▼ or ▲. These arrows are below the right side of the search bar. Clicking these arrows will jump to the next (or previous) instance of your word.
- You can also click one of the results in the middle of the sidebar.
-
7
Click
. It’s on the far-right side of the search bar. Doing so prompts a drop-down menu.
-
8
Click Replace. This option is in the drop-down menu. Doing so opens the Find and Replace window.
-
9
Type a word into the «Replace with» field. This field is near the bottom of the Find and Replace window. You should use a word you with which you intend to replace the «Find what» word.
-
10
Click Replace all. It’s at the bottom of the Find and Replace window. This will replace each instance of the word you typed into «Find what» with the word you typed into the «Replace» field.
- For example, entering «Banana» in the «Find what» field and then entering «Plantain» in the «Replace with» field and clicking Replace all would replace the word «banana» with «plantain» in your whole paper (or the selected section).
- If you would rather replace some, but not all, instances of a word, you can click Replace instead to go word-by-word. You may need to click the beginning of the paper again before doing so.


Advertisement
-
1
Open a Microsoft Word document. Either double-click a Word document, or open Word and then select the document from the list of recently opened documents if applicable.
-
2
Place your cursor at the beginning of the document. Click to the left of the first word in your document to place the cursor there. «Find and Replace» will only search for words after the cursor.
- If you only want to search for words in a specific section of text (rather than the whole document), highlight that section instead.
-
3
Click the Home tab. It’s on the far-left side of the Microsoft Word ribbon, which is the blue strip at the top of the Word window.
-
4
Click the search bar. It’s on the far-right side of the Microsoft Word ribbon.
-
5
Type in a word you wish to find and press ⏎ Return. This will highlight instances of the word you searched for in the document.
-
6
Click ► or ◄. These arrows are on the right side of the search bar. This will cycle through the different areas of your paper in which your typed word appears.
-
7
Click
. It’s to the right of the magnifying glass icon that’s on the left side of the search bar. Doing so prompts a drop-down menu.
-
8
Click Replace. This option is in the drop-down menu. Clicking Replace opens a left-hand sidebar.
-
9
Type a word into the «Replace With» field. It’s near the top of the FIND AND REPLACE sidebar. You should use a word you with which you intend to replace the searched word.
-
10
Click Replace All. It’s below the «Replace With» field. This will replace each instance of the word you searched for with the word you typed into the «Replace» field.
- For example, if your searched word was «spumoni» and you meant to write «neopolitan», typing «neopolitan» into «Replace With» and click Replace All would remove «spumoni» from the paper and replace it with «neopolitan».
- If you would rather replace some, but not all, instances of a word, you can click Replace instead to go word-by-word. You may need to click the beginning of the paper again before doing so.


Advertisement
Add New Question
-
Question
How do I clear the «Find and Replace» box when I am finished?

You can get there by pressing the «ctrl+alt» button on the keyboard. Remove the box by clicking the «x» or «close» button on the upper right corner of the box.
-
Question
What are some uses for find and replace?
Say, for example, you are writing a document and reference a character by the name of Ann, only to find out that Ann’s name is actually spelled «Anne». Now, instead of tediously going through the entire document, finding each instance of «Ann» and changing it to «Anne» (with the possibility of missing an instance, leaving you with an inconsistent document), you can simply find all instances of «Ann» and replace with «Anne» and it will delete all cases of «Ann» and insert «Anne» in its place. The find and replace also goes beyond simple characters such as above, as it can apply to miscalculated numerical values.
Ask a Question
200 characters left
Include your email address to get a message when this question is answered.
Submit
Advertisement
Video
-
In addition to text, you can use the Find and Replace dialog to search for and replace formatting and special characters.
-
You can bring up the Find and Replace section by press Ctrl+H (PC) or ⌘ Command+H (Mac).
-
If your document is lengthy, the find and replace search may take a while. You can cancel the search at any time by pressing the «ESC» key on your keyboard.
Thanks for submitting a tip for review!
Advertisement
-
Always save your work before using Find and Replace in case you accidentally mess up your document.
Advertisement
About This Article
Thanks to all authors for creating a page that has been read 296,635 times.
Is this article up to date?

Have you ever finishing typing a letter, report or presentation only to discover that you misspelled a person’s name or had the wrong company listed multiple times throughout your document? No worries—it’s an easy fix. Using Word’s Find and Replace feature, you can quickly locate and replace text. Let’s see how it works.
Switch over to the “Home” tab on Word’s Ribbon and then click the “Replace” button.

This opens Word’s Find and Replace window. In the “Find What” box, type the word or phrase you want to locate. If you only want to find text in your document, you can go ahead and click the “Find Next” button to have Word jump to the next occurrence of that word. Keep clicking it to browse through all the results.
If you want to replace the text you find with something else, type the replacement text into the “Replace With” box. You can enter up to 255 characters in the both the “Find What” and “Replace With” boxes, by the way.
In this example, let’s say we want to replace the name “Williams” with the name “Billingsly”, so we’ve typed that text into the respective boxes. Next, we’d click the “Find Next” button to have Word locate the first instance of the text in the “Find What” box.
Word jumps the document to that point and highlights the result in gray, still keeping the Find and Replace window on top for you. Click the “Replace” button to replace the currently selected result with whatever text is in the “Replace With” box.
To replace all instances at once without stopping and reviewing each one, you can click the “Replace All” button.
Be careful when using “Replace All” because it will automatically replace all instances, including those you might not want to replace. In the example below, there are three more instances of “Williams,” but we only want to replace the next two. In this case, we would only click “Replace” for the second and third instance.
If there is a particular instance where you don’t want to replace the text, click “Find Next” as many times as needed until you come to an example where you need to replace text.
To exit from Find and Replace, click the “Cancel” button.
Of course, since it is Word we’re talking about here, there are also lots of other things you can do to make your searches more sophisticated:
- Use wildcards in your searches to narrow them down to more specific results.
- Search directly within Word’s Navigation pane to have Word show you which headings have your search terms included under them.
- Replace double spaces between sentences with single spaces.
- Search for specific formatting or special characters.
The basic of searching and replacing text in Word are pretty straightforward, but there’s a lot you can do with it once you start digging.
READ NEXT
- › What Your Function Keys Do in Microsoft Word
- › How to Find and Replace Formatting in Microsoft Word
- › How to Delete a Page in Microsoft Word
- › How to Use Find and Replace in Google Docs
- › How to Replace Any Character with Newlines in Notepad++
- › How to Search in Google Docs
- › How to Search for Text in Word
- › Expand Your Tech Career Skills With Courses From Udemy
How-To Geek is where you turn when you want experts to explain technology. Since we launched in 2006, our articles have been read billions of times. Want to know more?
Back to Top
A white circle with a black border surrounding a chevron pointing up. It indicates ‘click here to go back to the top of the page.’
Back to Top
Home
Chevron icon
It indicates an expandable section or menu, or sometimes previous / next navigation options.
Tech
Ye Naiquan /EyeEm/Getty Images


- Find and Replace in Word is a tool that searches a document for a specific word or phrase.
- You can use the tool to replace a word or phrase with another.
- You can review each instance of a word before replacing it, or replace all instances at once.
Find and Replace is a helpful tool in Microsoft Word that searches your document for a specific word or phrase.
You can use the tool to replace one word with another, which can be helpful in situations where you need to go back to change the spelling of a word or check a document for instances of a repeated word to avoid redundancy. For example, if you’re deep into writing a paper and realize you’ve been misspelling someone’s name (let’s say Mark when it should have been Marc), you can use Find and Replace to easily find all instances of Mark and replace it with Marc with a few clicks.
Below, we’ve outlined how to use Find and Replace in Word on macOS and Windows.
Marissa Perino is a former editorial intern covering executive lifestyle. She previously worked at Cold Lips in London and Creative Nonfiction in Pittsburgh. She studied journalism and communications at the University of Pittsburgh, along with creative writing. Find her on Twitter: @mlperino.
Read more
Read less
Abigail Abesamis Demarest is a contributing writer for Insider based in New York. She loves a good glazed donut and nerdy deep dives into the science of food and how it’s made.
Read more
Read less
Related articles
Microsoft Word
Word
More…
Close icon
Two crossed lines that form an ‘X’. It indicates a way to close an interaction, or dismiss a notification.
You’ve just finished typing a presentation that’s due in about 15 minutes. But before you can celebrate your moment of victory, you realize that you’ve spelled your client‘s name wrong and have missed the double Rs in their company name multiple times throughout your document.
Cue: An aggravated scream.
The good news is that changing these small errors is an easy fix on Office 365. You can replace as many words as you want within seconds on Microsoft Word using its super helpful Find and Replace functionality.
This article will guide you through the necessary steps to help you find and replace text in MS Word.
Ready? Let’s begin.
How to Use Microsoft Word’s Find and Replace Feature
Microsoft is one of the leading companies in the world. It’s because it prioritizes its customers and comes up with innovations that can make their lives easier and more convenient.
The Find and Replace feature on MS Word is a shining example of this effort.
You can use this feature to find specific words in your file and then replace them in case there are some last-minute changes. This can even be useful when you make mistakes in the doc while typing or want to accommodate those last-minute client changes.
We’ll show you how to replace text in Microsoft Word, depending on the computer device you use.
How to Change and Replace Text in MS Word on Windows
It’s no wonder that all Windows devices have built-in Microsoft programs considering it’s a product developed by the Microsoft company themselves. If you find yourself using the word processor often for making notes or presentations, you’ll be especially thankful for the Find and Replace functionality.
Here’s a short step-by-step guide to using the feature in MS Word on Windows devices:
Step #1 Open Microsoft Word on your Windows device.
Step #2 Click on the Home tab on your top menu bar. A secondary menu will appear on your screen.
Step #3 Select the Replace option located on the top-right-hand side of your screen. Alternatively, you can also press Ctrl + H. The Find and Replace pop-up box will appear immediately.
Step #4 Type in the phrase or word you want to locate in your Word doc in the Find what field under the Find tab.
Step #5 Click on the Replace tab on the top menu bar. Type in the word you want to update in the Replace with field.
On clicking on the Replace button, the changes you want will be made one by one in the Word doc. However, if you want to update all fitting instances at once, you can click on Replace All instead.
Microsoft Word will give you a confirmation of the replacements made in your Word doc. It’ll look something like this:
How to Change and Replace Text in MS Word on Mac
Now that we’ve covered Windows, let’s see how you can use the Find and Replace feature on a MacBook. Here’s how to proceed in MS Word when you’re using an iOS device:
Step #1 Open the Microsoft Word document on your Mac.
Step #2 Take your cursor towards the top of your screen until you see your Mac’s top toolbar. Click on the Edit tab. A dropdown menu will appear.
Step #3 Click on Find from the displayed menu options. You’ll typically see a Replace… option on your screen.
But if you don’t, simply press Shift + Command + H on your keyboard. A side navigation bar will appear on the left-hand side of your computer screen.
Step #4 Enter the word or phrase you want to replace in the doc in the Search for… field.
Once you’ve finished typing the incorrect word or phrase, type in the right word or phrase that you want to replace the incorrect one with in the Replace with… field.
Step #5 Click on the Find tab to locate the matches. Once you’re sure the match is right and highlighting the words you want to change, select Replace. This will replace every individual match one by one.
Again, if you click on the Replace All button, all the matching words and phrases will be changed at once.
After the changes are made, you’ll see an “All Done” message just below the Replace and Replace All buttons that indicate the replacement of the intended word or phrase.
Advanced Find and Replace Features: Everything You Need to Know
You can take this whole shebang of replacing words and phrases to the next level thanks to Microsoft Word’s Advanced Find and Replace option. In other words, you can use the Advanced settings to simplify the process further and make the results even more accurate.
Follow the previously stated steps to open the Find and Replace pop-up box. On it appears on your screen, click on More.
You’ll immediately see a slew of additional options like Match case, Use wildcards, Match prefix, Match suffix, and so on. Here’s how the Advanced Find and Replace settings look like:
Each one of these has its own unique functions. Let’s discuss them in more detail below:
Find whole words only
If you check on the Find whole words only box, MS Word will treat your search term as an entire word and won’t look for your search term within other words.
Example: If you’re searching for the word “stand,“ the search feature won’t show you the word “standard.”
Use wildcards
Use wildcards is one of the more advanced search options that allows you to use question marks, brackets, asterisks, and other similar symbols to modify your search.
You see, a wildcat is a short string of characters – or a character – that represents multiple characters in a search.
Example: <(int)*(net)>
Sounds like (English)
As the name suggests, the Sounds like option finds similar-sounding words to your search term. This is best for finding homonyms and words that have varying spellings.
Example: This is common for words that have both UK and US variants. For instance, you can have both “colours” and “colors” on a document.
Find all word forms (English)
This option allows you to look for the word you searched for, along with other instances that are either plural or in a different tense.
Example: If you search for the word “be” after enabling the Find all word forms option, you’ll also find the words “are“ and “is“ highlighted as they are the different tense forms of “be.”
Match prefix and Match suffix
Checking off the Match prefix or Match suffix fields will limit your search to words that have the same beginning or the same ending, respectively.
Example: Suppose you enable Match prefix. When you search for the word “love,” Microsoft Word will find the words “love“ and “lovely.“ However, you won’t find the word “beloved“ highlighted in the search results as it’s a suffix of love.
Ignore punctuation characters and Ignore white-space characters
Again, this search option is self-explanatory. It tells Microsoft Word not to take up spaces, periods, hyphens, and similar attitudes into consideration.
Example: After clicking on the search options, when you type in “color block”, you’ll also see “color-block.”
When to Use the Find and Replace Feature of Microsoft Word
The whole point of the Find and Replace function in Microsoft Word is to allow MS Word users to search for target text – whether it’s a specific word, a type of formatting, or a string of wildcard characters – and replace them with whatever you want.
Typically, here’s why you should use this feature:
- When you want to maintain absolute consistency in your document
- When you want to speed up typing and formatting tasks
- When you realize last-minute mistakes and want to find and then replace your errors
- When you’re writing a document that includes words with varying spellings. For instance, if you typically follow US English, and are typing a doc according to the rules of UK English, the Find and Replace feature would be super helpful to identify and change spelling errors.
- Adding special characters to words
- editing partial words and phrases
- Correcting words that you may have misspelled in a hurry. For instance, if you type “h?t” instead of “hat” and enable Use wildcards, you’ll find it highlighted in your search.
- Eliminating extra spaces
- Changing the separator character in numerals
- Reversing currency symbols
Concluding Thoughts
As you may have realized, the Find and Replace feature of Microsoft is a lifesaver, to say the least.
It can help you save tons of time, which would otherwise have been wasted in looking for errors and then replacing them. Whether you are a student, an intern, or the CEO of a company, this is a functionality that we all can be very thankful for.
If you are looking for a simple approach (or shortcut) to find and replace text in Word, you’ll love this guide.
Without further ado, below is a quick guide on this task:
To find and replace text in Word, press Ctrl+H shortcut to display the Find and Replace dialog box. In the Find what: field, type the Word you want to replace. In the Replace with: field, type the replacement word. Click Replace to replace matches one after the other or Replace All to replace all at once.
For a more detailed tutorial with pictures, let’s break it down in steps.
Related Article: How to search in Word – Step by step
- Launch the Word Document where you want to find and replace text.
- Press Ctrl+H shortcut to display the Find and Replace dialog.
- In the Find what: text box, type the text or word you want to replace.
- In the Replace with: text box, type the replacement text or word.

- Click on the Replace button to replace the first found instance and find the next. Use this button if you want to replace matching instances one after the other.
- Click on Replace All to replace all matching instances. Of course, use this button if you want to replace all matching instances at once.
- Click on the Find Next button to find the first matching instance of the search term. Word will highlight the next matching instance in gray.
- If you use the Replace All button, Word will display a message box telling you that the search is complete and count the number of replacements made.
- Click on the OK button of the message box.
- After the replacements, click on the close button to dismiss the dialog.

These are the steps you may use to find and replace text in Word.
Safety tips: Save the work before you hit on the Replace All button. This way, if it turns out that clicking on the Replace All was a mistake, you can undo it by pressing Ctrl+Z shortcut.
Related: How to find and replace in Word for Mac
Find and Replace text Formatting
What makes Word’s Find and Replace feature so beautiful is its ability to find and replace fonts and text formatting.
For example, you may want to change all underlined formatting to italic. This way, the text itself will not change; it’s only the formatting that will change from underline to italic.
Using this trick is a little tricky, so you’ll need to pay attention!
Without further ado, let’s get started on how to find and replace text formatting in Word.
Our example will find all underlined formatting and replace it with italic.
- Press Ctrl+Home shortcut to position the insertion pointer at the top of the document.
- Press Ctrl+H shortcut to display the Find and Replace dialog box, with the replace tab active.
- Click on the More button to expand the dialog box.

- Click inside the Find what: text box and leave it blank.
- Click the Format button and choose Font from the drop-down list.

- The Replace Font dialog box will appear. Select the format you want to find. For our example, click the Underline style: drop-down and select single underline from the list.

- Click OK to close the Replace Font dialog box and navigate back to the Find and Replace dialog box.
- Click inside the Replace with: text box and leave it blank.
- Click the Format button again and select Font from the drop-down list.
- The Replace Font dialog box will appear. From the Font Style: list, choose Italic.
- From the Underline style: list, choose none.
What we did here will find all underline and replace them with italics.

- Click OK to close the Replace Font dialog.
- After successfully doing all the above steps, the Search and Replace dialog box should look similar to the screenshot below:

- Click on the Replace All button to search and replace the formatting throughout the document. A message box will appear to show that the task is complete and the number of replacements made. Now if you look into your Word document, all the underlined text will change to italic.
- Click the OK button to dismiss the message box.
- After successfully, replacing the formatting, click inside the Find what: text box and click on the No Formatting button. Do the same for the Replace with: text box. This step removes the formatting option for the next Find and Replace operation.

- Now close the dialog.
These are the basic and advanced ways to find and replace text in MS Word.
Have you ever heard or seen Find and Replace option in a Word document? Do you know what is the use with that feature? Do you want to use find and replace in a word document (Microsoft 365 Word and MS Word)? Before going to discuss how to use it, you need to know what is Find and Replace in word document. This article gives you detailed information about the use of find and replaces in word and how to use it.
Table of Contents
What is the use of find and replace in a word document?
“Find and Replace” helps you to locate a word and replace it in a document. Before you are using this find and replace you want to enter the word which you want to find in the “Find What” search bar and the word which you want to replace in the “Replace With” search bar.
It is very difficult to find and replace a particular word in the document. This is particularly a handy process when you go through the find and replace option.
- Read: How to insert or remove header and footer in Ms-word
- How to use LastPass for securing your passwords
1. How to use Find and Replace in Microsoft 365 Word?
Video tutorial:
For our reader’s convenience, we provided this tutorial in the form of a video. If you are interested to watch then watch this video tutorial, otherwise skip the video and continue reading.

Microsoft 365 Word is mostly used now a days than the MS Word. So let us see how to use find and replace in Microsoft 365 Word and then in MS Word.
Total Time: 2 minutes
Step 1: Open document and click on Home tab

Open the Microsoft 365 Word document in which you want to use find and replace. When you open the document you can see different options for viewing and editing that document.
Step 2: Click on Find tab

In the Home menu, you can see different options such as font styles, sizes, color for text, etc. In that screen, you can see the Find option at the right of the screen as shown in the above image. Click on that Find option.
Step 3: Enter the word which you want to find

When you click on the Find option, a screen will appear for entering the word to find as shown in the above image. Enter the word which you want to find in the search bar and then hit enter. Then the matching results for that word will be shown on the right side screen and that word will be highlighted with yellow color in the document.
Step 4: Click on Replace

Now in that right side screen, you can see two options. Those are filter and three horizontally placed dots symbol. Click on the Three dots symbol. Then you can see the Replace option. Click on that Replace option.
Step 5: Enter the word or content to replace

When you click on the Replace option on the right side, then a navigation window will appear on the left side as shown in the above image. There you can see the Find option with the word that you have entered and the Replace option with an empty box to enter the word or content.
Enter the Word or Content which you want to replace into the “Replace with…” section and then click on Replace option at the bottom if you want to replace that word one by one or click the Replace All option to replace all those words at a time.

With these steps, that particular word or content can be replaced with the word or content that you entered.
Estimated Cost: 9.99 USD
Supply:
- Microsoft 365
Tools:
- Microsoft 365
Materials: software
2. How to use find and replace in the Older version MS Word?
Note: It is not recommended to use the older versions. We recommend buying Microsoft 365 for the best feature.
Video Tutorial:
For the comfort of our readers, we provided this tutorial also in video format.
Step 1: Login into your Windows PC and open the document in MS word. You can see the “Find” option at the top right end of the taskbar.

Step 2: Select the Find option. Then the Find and Replace window is opened. In that, there is the “Find what” search bar under find which is only used to find a certain word in a document. Enter the word in the “Find what” search bar and select find the next option to find the word in the document.

Step 3: You can also highlight the selected word in the document by selecting “Highlighting All” under Reading highlighting.

If you want to remove the highlight, then simply select the “Clear Highlighting” under Reading highlight.
Step 4: If you want to replace the word with something else, Select Replace in the “Find and replace” window or from the top right end of the taskbar. Enter the text/word which you want to find in the “Find what” search bar and the replacement word in the “Replace with”.

Step 5: Select “Find Next” to locate the first instance of the word in the “Find what” search bar. Word jumps document to that point and denotes the result in blue color.

Now, tap on the “Replace” option to replace the currently selected result with the word which is in the “Replace with” box.

Step:6 If you want to replace all the instances at a time without any interrupt, then select the “Replace All” option.

Before selecting the “Replace All” option make sure that you want to replace the selected word in the entire document. if you want to replace the word at a certain point then it is better to select the “Replace” option at the place where you want to replace the existing word with new.
- Read: How to add page break in MS-Word and Microsoft 365 Word
- How to remove the page number from first page on word document
Conclusion
After reading this article, you can feel that find and replace options are the best to locate a particular word and replace it with your desired word. Without this option, it is a difficult task to find and replace a word in the document. so, this article helps you to know how to use find and replace options in a Word document.
We think with this, you got details about the find and replace in Microsoft 365 word and older version MS Word. Once again we recommend to buy Microsoft 365. Because it gives you many features.
I hope this tutorial helped you to use find and replace in word. If you like this article, please share it and follow WhatVwant on Facebook and Twitter for more tips. Subscribe whatvwant channel on YouTube for regular updates.
What is the use of find option in word?
A find option is used to find the particular word/text easily in a vast document.
Does Microsoft word have a Find and replace function?
Yes. Microsoft word has a Find and replace function.
Where is the find and replace?
The Find and replace options are at the right of the ribbon under the Home tab.

Let’s say you’ve written a long article and you’re about ready to publish it. But then one of your proof readers lets you know you’ve spelled a certain word incorrectly, or made some other mistake. And you’ve done it multiple times, all through that long article.
What do you do? Well, you certainly don’t want to scroll through looking for every instance of that error. So instead, you can use Word’s handy Find and Replace feature. Let’s see how to do that now.
How to Use Find and Replace in Word
Find and Replace is pretty easy to use. It just takes a few clicks.
Step 1: Navigate to the «Find and Replace» screen
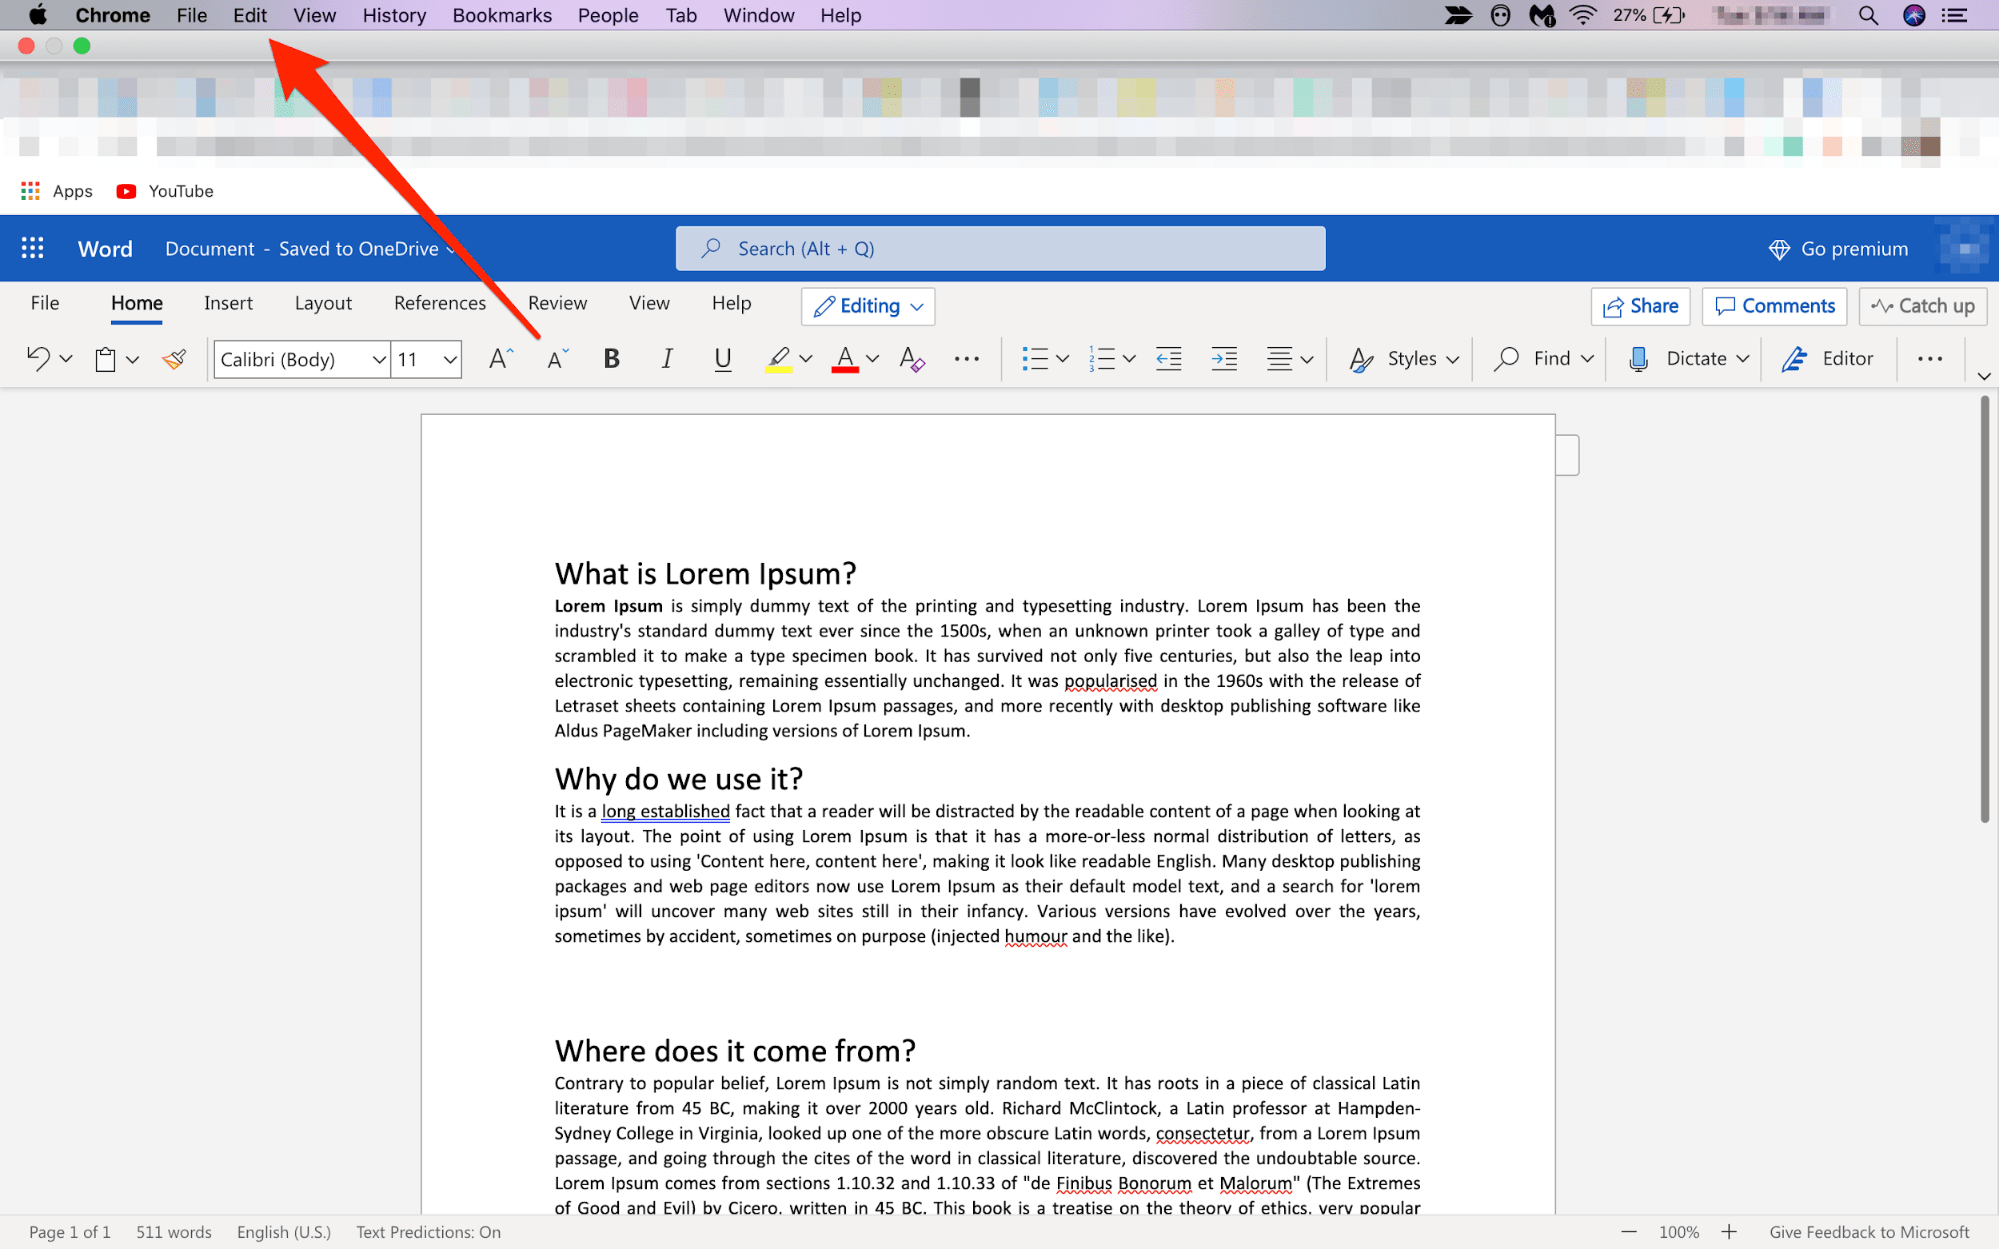
When you’re in your Word document, go to the Edit tab in the main Word menu (along the top of your screen).
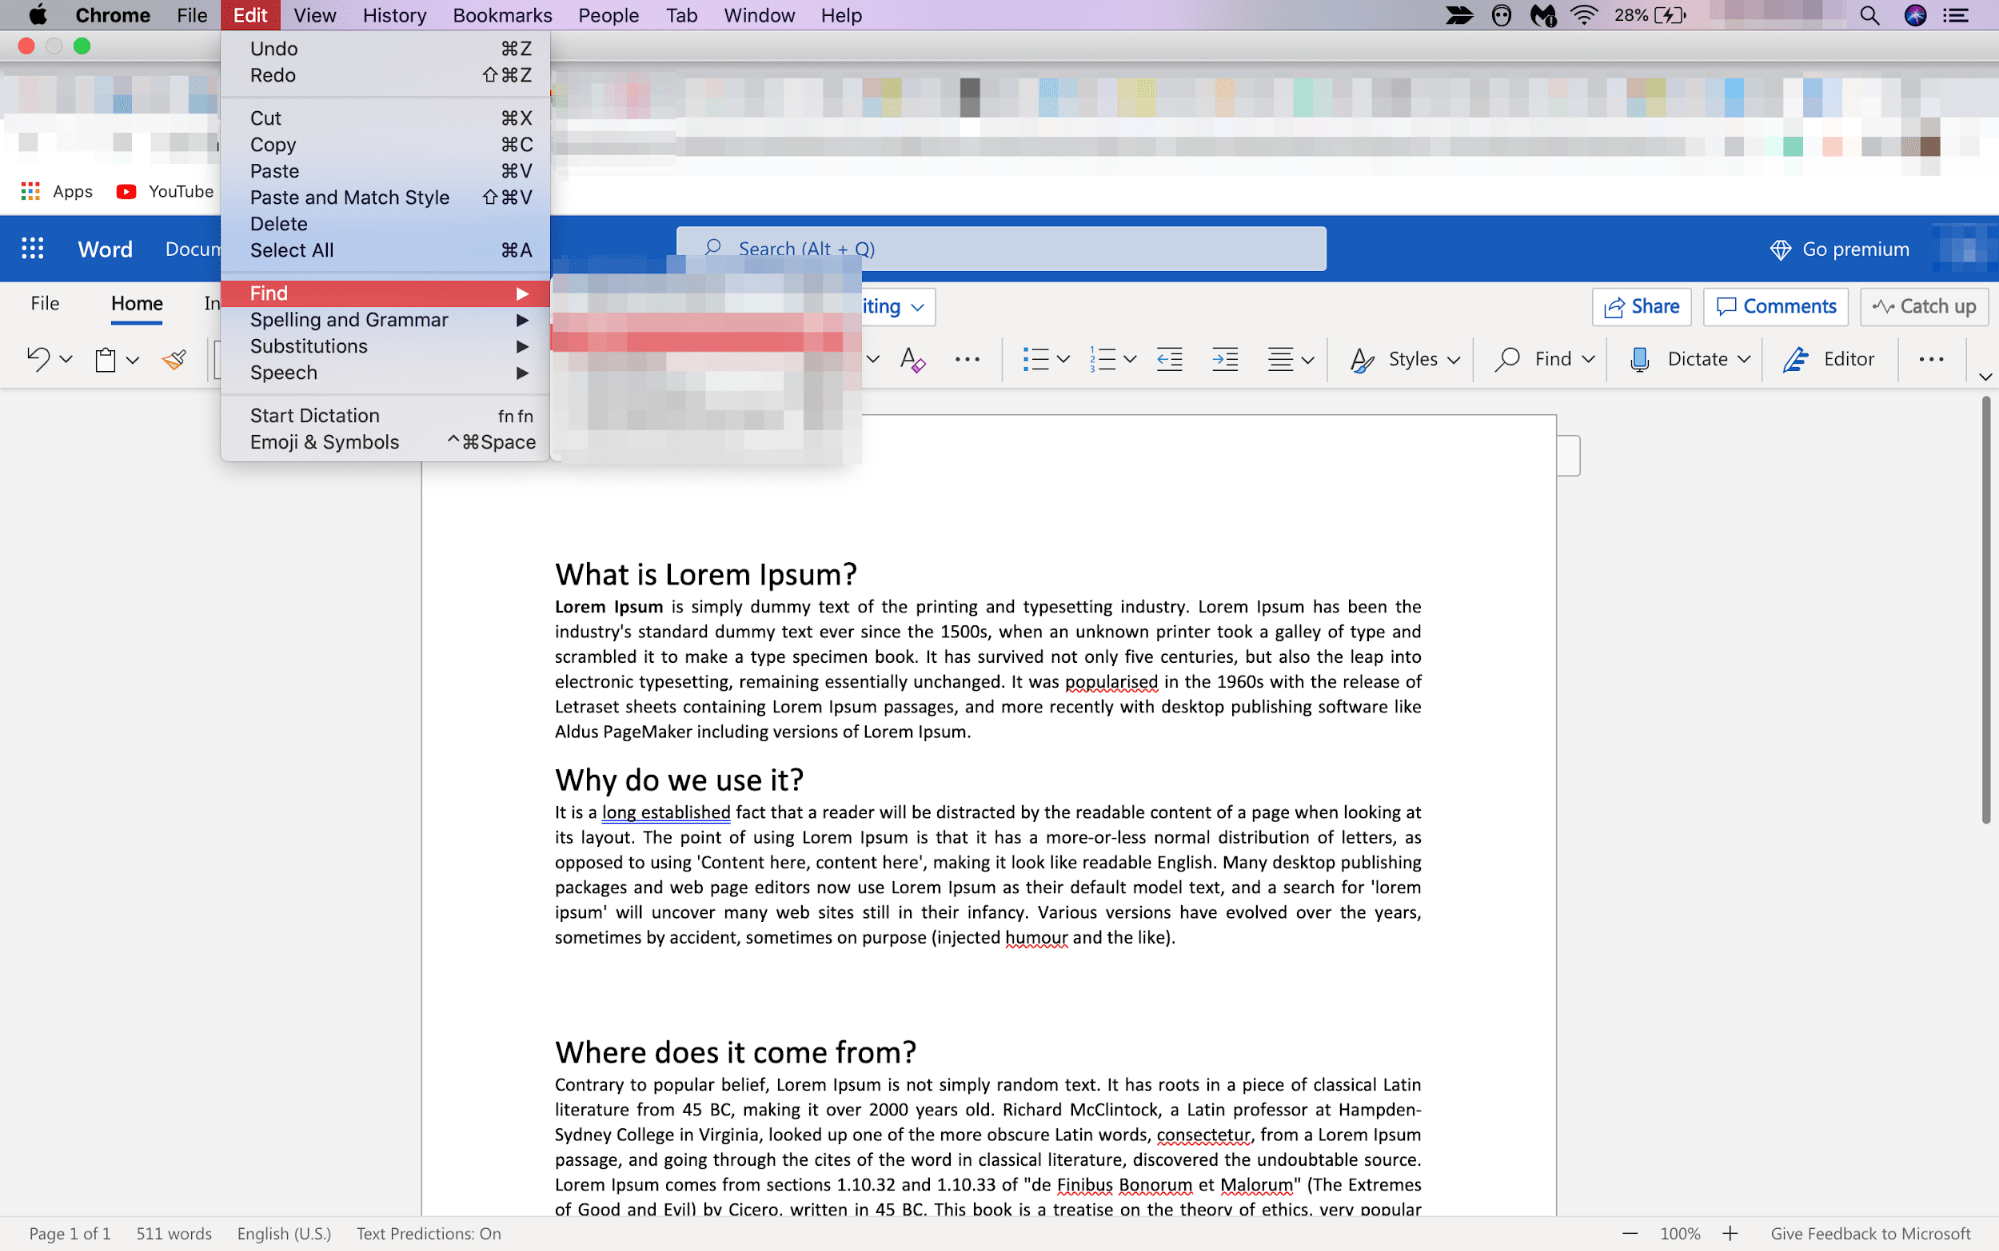
Scroll down until you see «Find», hover over it, and a side menu will pop out. At the bottom of that menu, you’ll see «Advanced Find and Replace»:
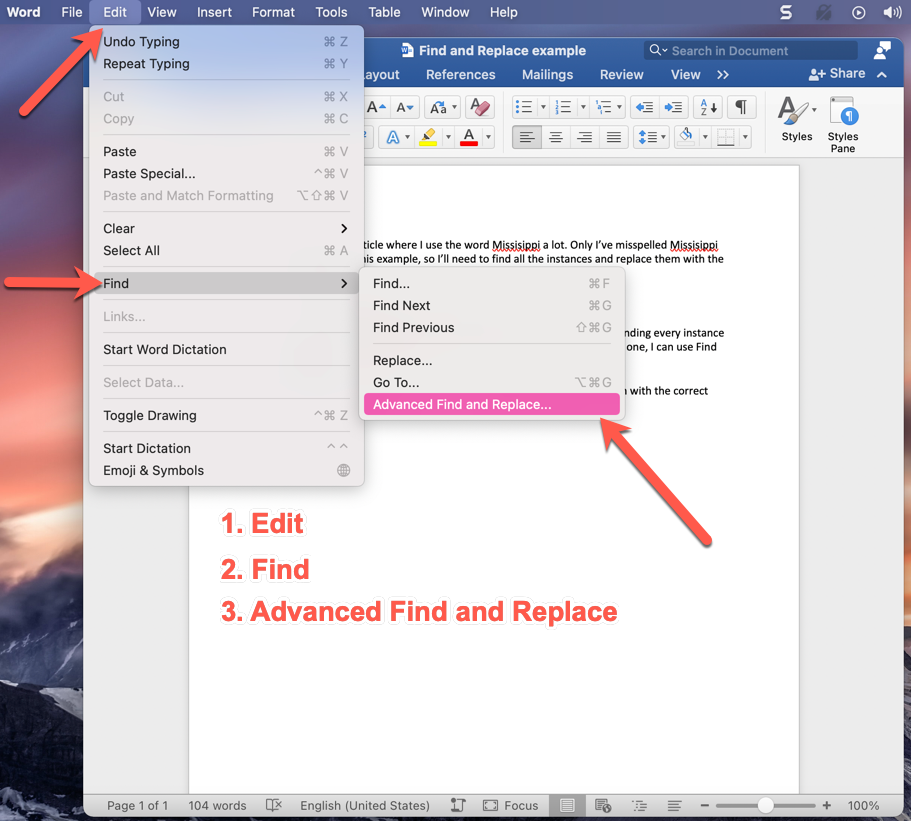
When you click on the Advanced Find and Replace tab, you’ll be brought to a screen with options to Find, Replace, and Go To.
Step 2: Find all mistakes
If you just want to find all instances of your mistake, you can select the first option, «Find». Just make sure you check the box that says to «Highlight all items found in: Main Document».
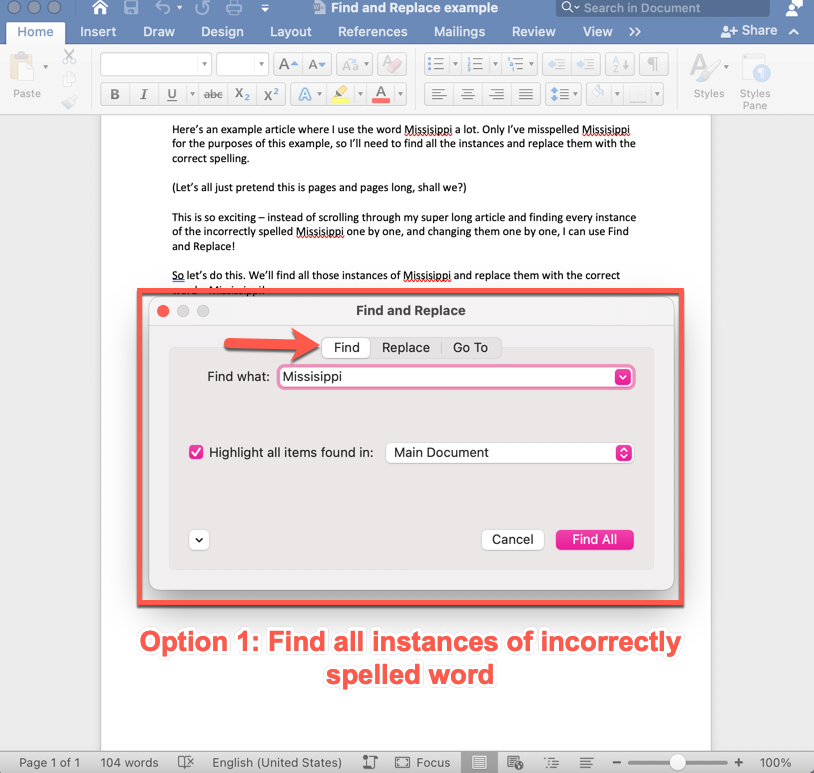
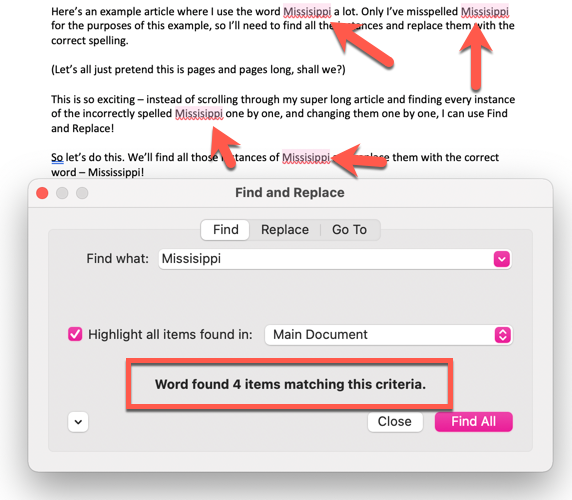
When you click the «Find All» button, Word will highlight all the times you misspelled the word (or whatever the issue is) and will tell you how many times it happened.
In the image below, you can see that there are 4 instances of the misspelled word «Missisippi»:
Now, if you don’t want to fix each misspelled word individually, you can use the Replace tool.
Step 3: Replace all instances of the mistake with the correct word
To do that, just click the «Replace» button (next to Find), and you’ll see this screen:
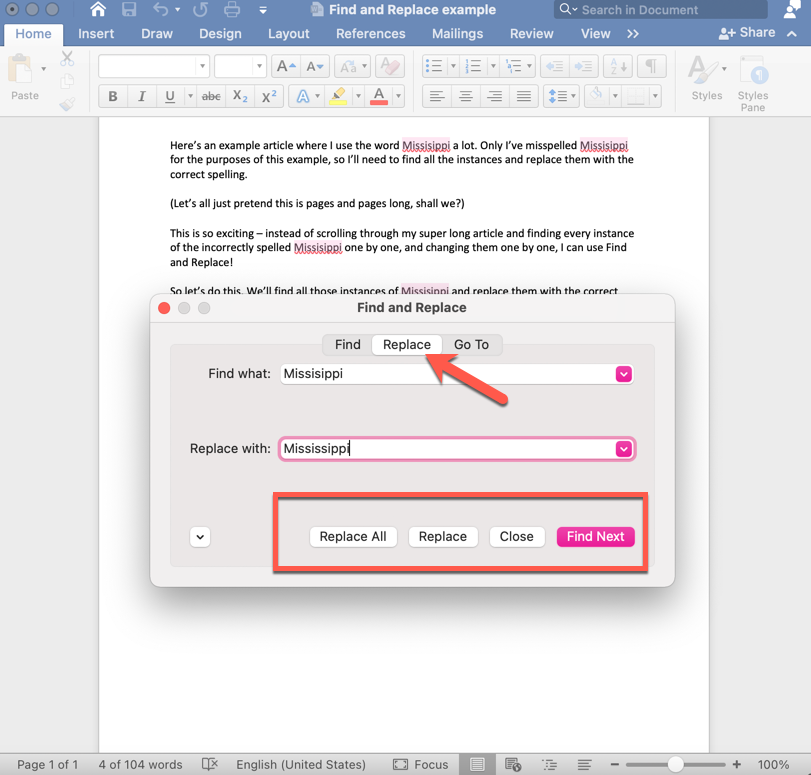
Once you’re ready to replace your misspelled words with the correct word, you have two options:
- You can replace them all at once by clicking «Replace All». If you’re sure that you want to replace every single instance of your mistake, this is the best option (takes lots less time).
- But you can also replace one instance at a time. Like, what if you wanted to leave one misspelling as an example? Then you can choose the «Replace» button, click it, then hit «Find Next», click «Replace» again…and so on.
If you click «Replace All», a little message box will pop up confirming the number of instances Word found, and asking if you want to search from the beginning:

Word does this just in case you didn’t start searching/replacing until the middle of the document. If you want to be thorough, just click «Yes» in the screen above.
What about the «Go To» button?
There’s one more option on the Find and Replace screen: Go To. Say you want to check page 15 specifically – you can just click on the Page Number option in the dropdown, and then enter the specific page.
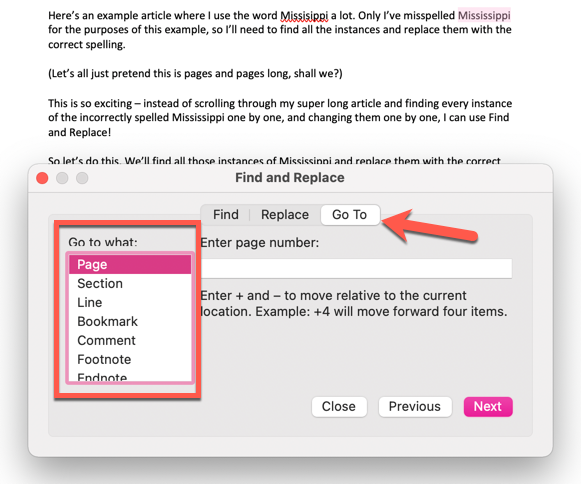
This also works with all sorts of features of your document, like line number, comments, footnotes, graphs and charts, and so on. Just scroll down in the little dropdown menu that you see above outlined in red.
And just a little Word tip…
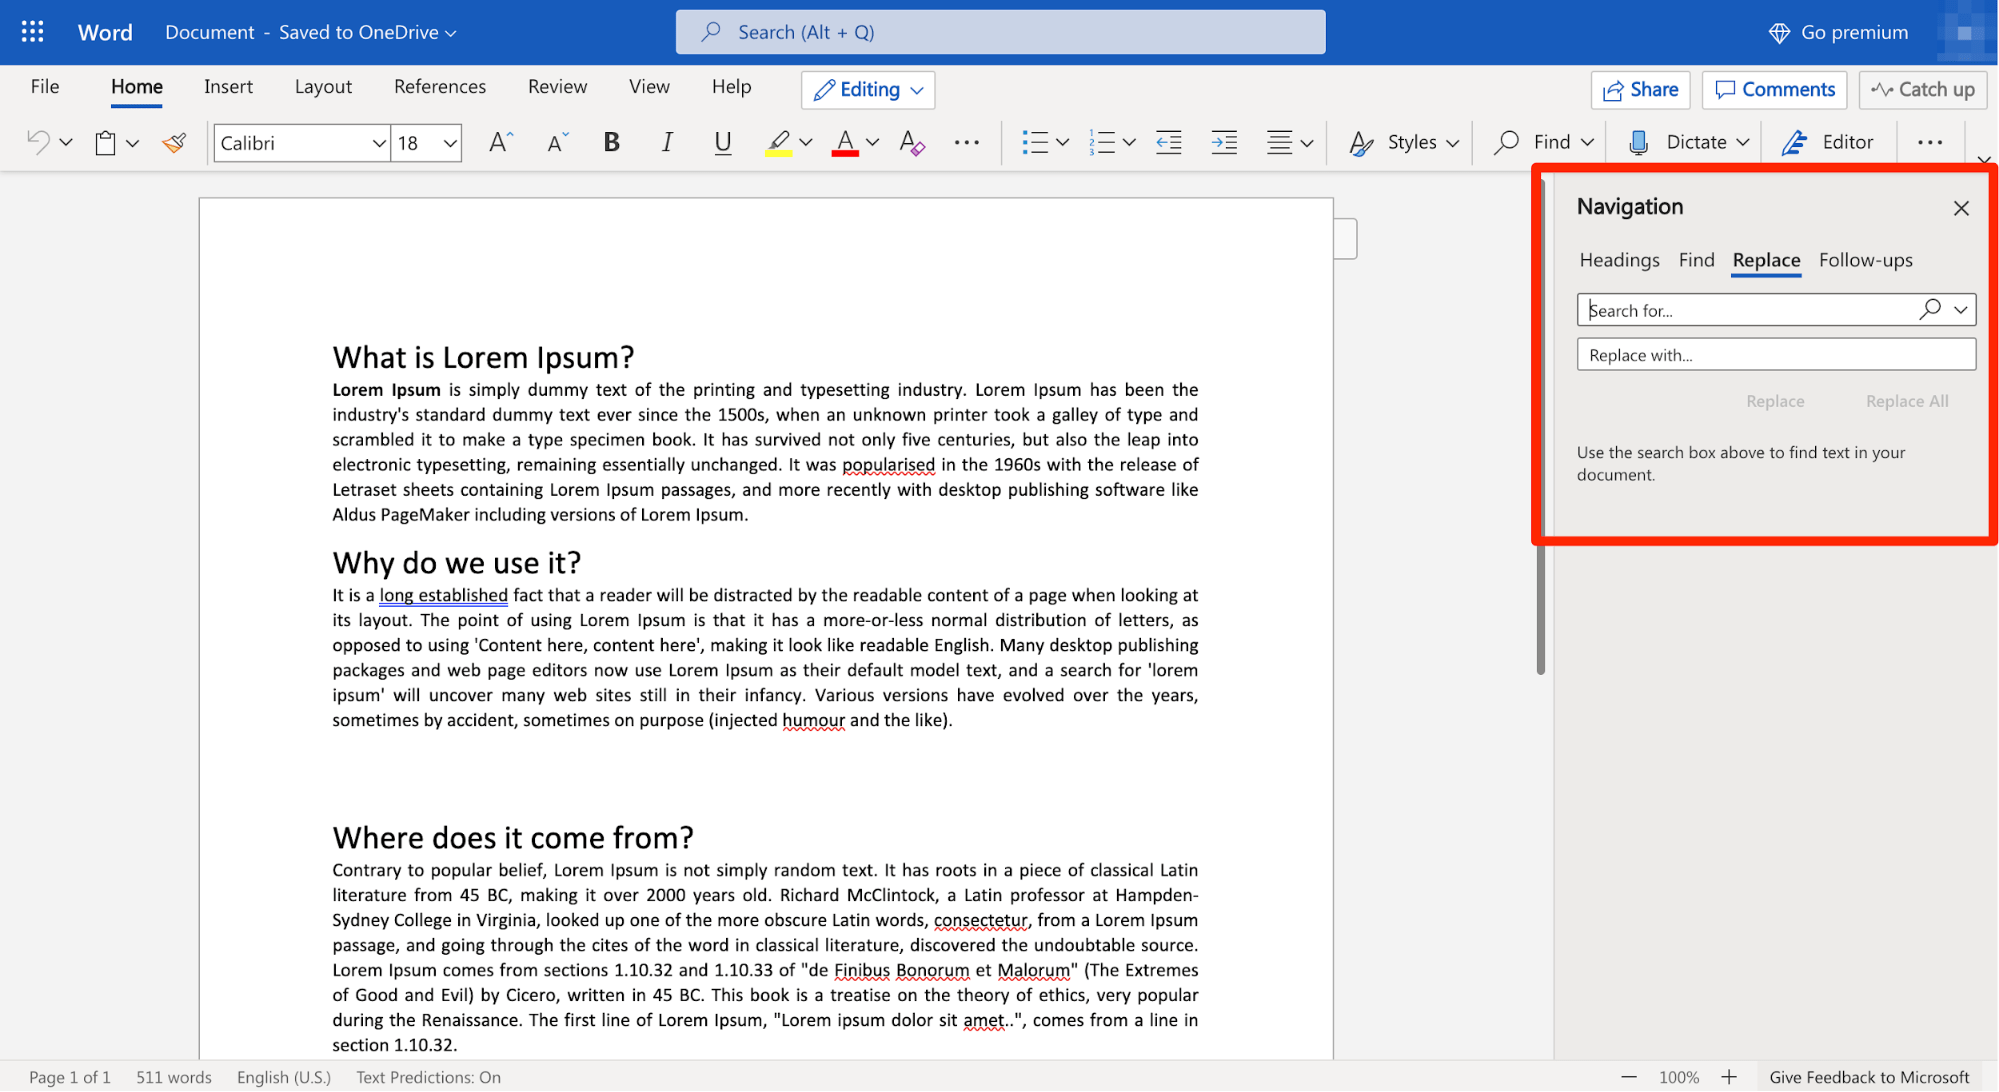
If you ever want to see how to navigate to a specific place in word, the «Help» tab is super useful.
Just click on Help, type in what you’re trying to find (like «Find and Replace») and when the answer appears, just hover over it (without clicking). You’ll see the path to what you’re searching for like this:
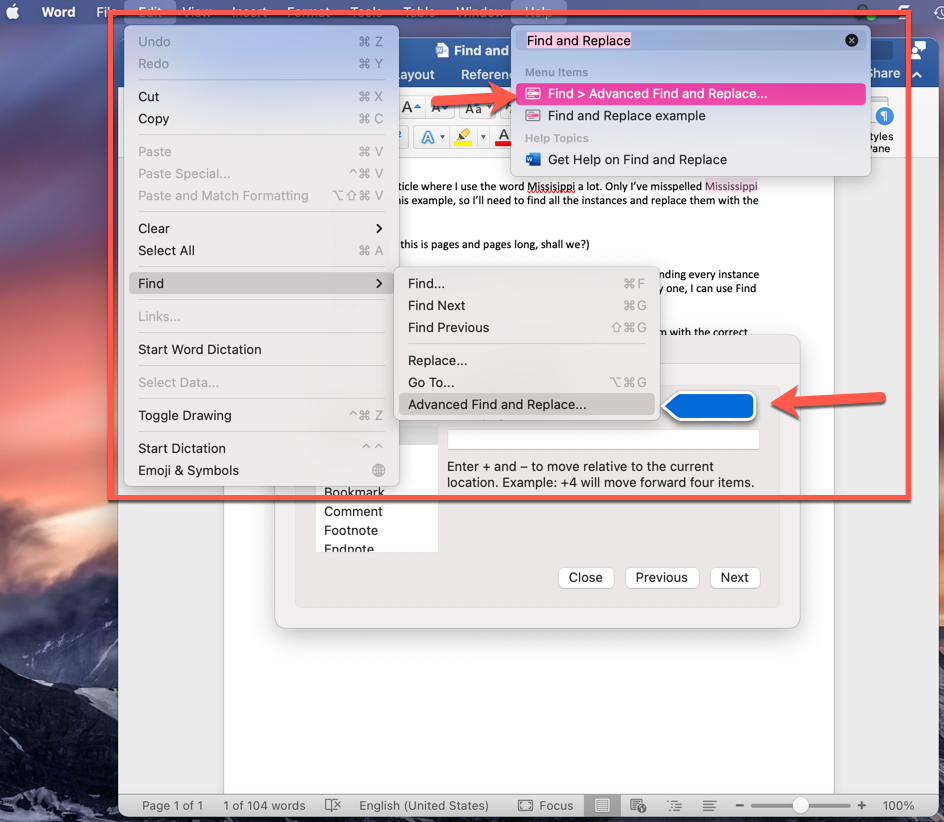
It even has a nice blue arrow that points exactly at the thing you’re trying to find. If you want to go straight there, then just actually click on that result and it’ll take you to the Find and Replace screen.
And that’s it!
Now you can find and replace anything in your Word document with ease! And you don’t even have to spend hours scrolling mind-numbingly through your long document searching for each mistake (and possibly missing some).
Learn to code for free. freeCodeCamp’s open source curriculum has helped more than 40,000 people get jobs as developers. Get started