
Use the word processor’s search function to locate text and more
Updated on December 15, 2020
What to Know
- Basic word search: Go to the Home tab. Select Find and enter the text for the search.
- Advanced search: Go to Home > Find. Choose the search drop-down arrow. Select Options and select your criteria.
This article explains how to search for text in Microsoft Word. The information applies to Word 2019, Word 2016, Word 2013, Word 2010, Word Online, and Word for Microsoft 365.
How to Do a Basic Word Search in MS Word
Microsoft Word includes a search function that makes it easy to search for different elements in a document, including text. Use the basic tool to look for instances of a specific word, or the advanced options to perform tasks such as replace all instances of a word with another one or search for equations.
To run a basic search for a specific word or phrase in Word:
-
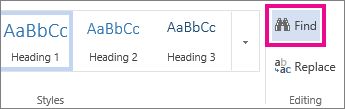
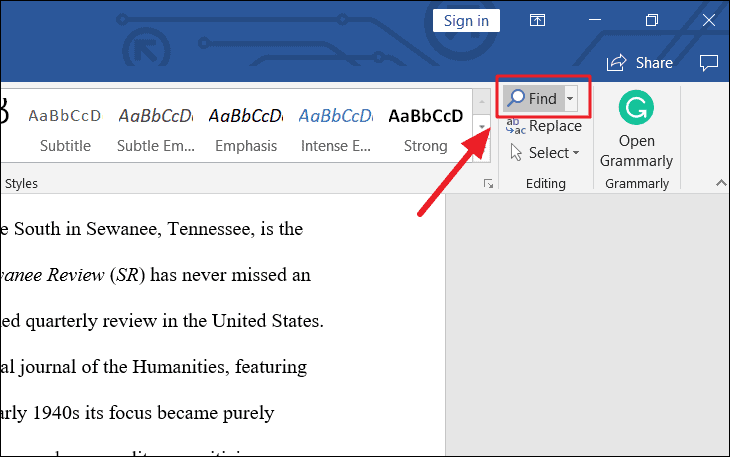
Go to the Home tab and select Find, or press Ctrl+F.
In older versions of Microsoft Word, select File > File Search.
-
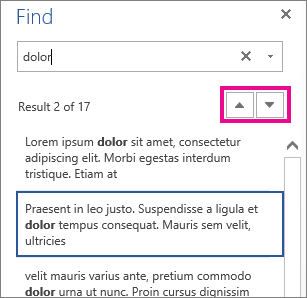
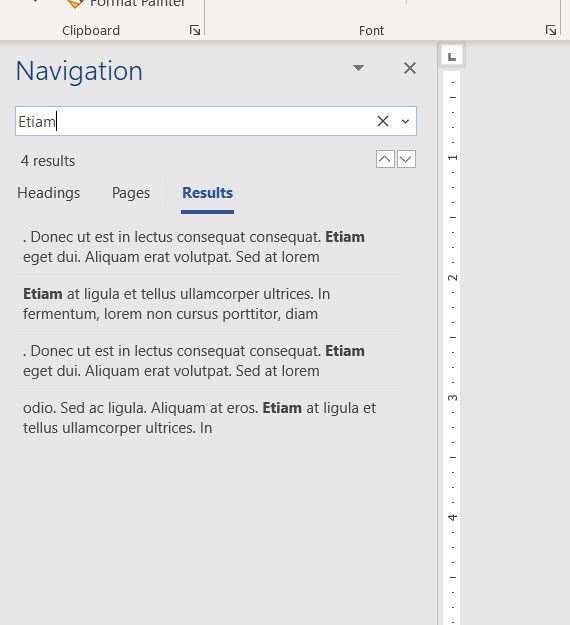
In the Navigation pane, enter the text you want to search for. A list of matching words displays in the Navigation pane and instances of the word are highlighted in the main document.
-
Cycle through the results in the Navigation pane in one of three ways:
- Press Enter to move to the next result.
- Select a result with the mouse.
- Select the Up and Down arrows to move to the previous or next result.
-
Make any changes or edits to the document as needed.
-
Select the Down arrow to move to the next instance of the word.
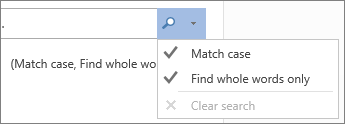
Match Case, Whole Words Only, and More
Beyond searching for every instance of a word, you can get more specific about what you want to find. For example, to find whole instances of a word and not every word that contains the letter combination or to find instances of a word that aren’t capitalized.
Here’s how to do an advanced search:
-
Select Home > Find.
-
In the Navigation pane, select the Search drop-down arrow.
-
Choose Options.
-
In the Find Options dialog box, choose the description that best fits what you’re trying to find. For example, to find instances of a word with the same capitalization, select Match case.
-
Select OK.
Use Advanced Find
Many of the choices available in the Find Options dialog box are also available in Advanced Find. Advanced Find includes the option to replace the text with something new. Based on your selection, Word replaces one instance or all instances at once. You can also replace the formatting, or change the language, paragraph, and tab settings.
Find Instances of Other Elements
Other options in the Navigation pane include searching for equations, tables, graphics, footnotes, endnotes, and comments.
Thanks for letting us know!
Get the Latest Tech News Delivered Every Day
Subscribe
Looking for text in your document? The Find pane helps you find characters, words, and phrases. If you want, you can also replace it with different text.
If you’re in Reading View, switch to Editing View by clicking Edit Document > Edit in Word Web App.

To open the Find pane from the Edit View, press Ctrl+F, or click Home > Find.
Find text by typing it in the Search the document for… box. Word Web App starts searching as soon as you start typing. To further narrow the search results, click the magnifying glass and select one or both of the search options.
Tip: If you don’t see the magnifying glass, click the X at the end of the Search the document for… box. The magnifying glass reappears.
When you type in your document or make a change, Word Web App pauses the search and clears the Find pane. To see the results again, click the Next Search Result or Previous Search Result arrow.
When you’re done searching, click the X at the end of the Search the document for… box.
Need more help?
Want more options?
Explore subscription benefits, browse training courses, learn how to secure your device, and more.
Communities help you ask and answer questions, give feedback, and hear from experts with rich knowledge.
To open the Find pane from the Edit View, press Ctrl+F, or click Home > Find. Find text by typing it in the Search the document for… box. Word Web App starts searching as soon as you start typing.
Contents
- 1 How do I search for a word in a word document 2010?
- 2 How do I search all of my documents for a specific word?
- 3 Where is the search box in word?
- 4 How do I insert a search button in word?
- 5 How do I search for a Word in a document in Windows 10?
- 6 Can you search multiple Word documents at once?
- 7 How do I find all Word documents in Windows 10?
- 8 How do I get a search box?
- 9 What we can search using find command?
- 10 What is the shortcut key for spell check in word?
- 11 Why is find command used in MS word?
- 12 How do I search for a text string in Windows 10?
- 13 How do I search for a specific file type in Windows 10?
- 14 How do I search for text in command prompt?
- 15 How do I search multiple documents?
- 16 How do I search for a word document without opening it?
- 17 What is the search box in Windows 10 called?
- 18 Why can’t I use the search bar in Windows 10?
- 19 Why is my search bar not working?
- 20 How do I search for a file?
Searching with the Word 2010 Navigation pane
You can also use the keyboard shortcut: Ctrl+F. Clicking the Find button or pressing Ctrl+F summons the Navigation pane. In the Find What text box, type the text you want to find. While you type, matching text is highlighted in the document.
How do I search all of my documents for a specific word?
How to Search for words within files on Windows 7
- Open windows explorer.
- Using the left hand file menu select the folder to search in.
- Find the search box in the top right hand corner of the explorer window.
- In the search box type content: followed by the word or phrase you are searching for.(eg content:yourword)
Where is the search box in word?
At the top of your Microsoft Office apps on Windows you’ll find the new Microsoft Search box. This powerful tool helps you quickly find what you’re looking for, from text to commands to help and more.
How do I insert a search button in word?
Click Customize the Quick Access Toolbar > More Commands. In the Choose commands from list, click Commands Not in the Ribbon. Find the command in the list, and then click Add.
How do I search for a Word in a document in Windows 10?
Click the Cortana or Search button or box on the Taskbar and type “indexing options.” Then, click on Indexing Options under Best match. On the Indexing Options dialog box, click Advanced. Click the File Types tab on the Advanced Options dialog box. By default, all the extensions are selected, and that’s what we want.
Can you search multiple Word documents at once?
The easiest and most convenient tool for searching text in multiple Word files is SeekFast. With this tool, you can quickly and efficiently search for a combination of words or phrases in your documents, and the results are sorted by relevance, similar to search on Google, Bing, and other search engines.
How do I find all Word documents in Windows 10?
Search File Explorer: Open File Explorer from the taskbar or right-click on the Start menu, and choose File Explorer, then select a location from the left pane to search or browse. For example, select This PC to look in all devices and drives on your computer, or select Documents to look only for files stored there.
How do I get a search box?
If your search bar is hidden and you want it to show on the taskbar, press and hold (or right-click) the taskbar and select Search > Show search box. If the above doesn’t work, try opening taskbar settings. Select Start > Settings > Personalization > Taskbar.
What we can search using find command?
You can use the find command to search for files and directories based on their permissions, type, date, ownership, size, and more. It can also be combined with other tools such as grep or sed .
What is the shortcut key for spell check in word?
F7
Open the document you want to check for spelling or grammar mistakes, and then press F7. You can also use the ribbon to start the check. Press Alt+R to open the Review tab, and then press C, 1 to select the Check Document option.
Why is find command used in MS word?
The Find command lets you enter a word. Each time you push the Enter/Return button on your keyboard or click the Find button, that word will be found and highlighted in the text on the Web page you are reading. This makes it very easy to find the keyword you are looking for without having to scan long passages.
How do I search for a text string in Windows 10?
If you’d like to always search within file contents for a specific folder, navigate to that folder in File Explorer and open the “Folder and Search Options.” On the “Search” tab, select the “Always search file names and contents” option.
How do I search for a specific file type in Windows 10?
Click Start and then go to File Explorer by expanding the Windows system folder. You can also simply type File Explorer in the Search bar. Click the View tab in File Explorer. Check File name extension box.
How do I search for text in command prompt?
How to Use the Find Command to Search in Windows
- Open the Command Prompt Window with Administrative Privileges.
- Switches and Parameters for the find Command.
- Search a Single Document for a Text String.
- Search Multiple Documents for the Same Text String.
- Count the Number of Lines in a File.
How do I search multiple documents?
Search inside multiple PDFs at once
- Open any PDF in Adobe Reader or Adobe Acrobat.
- Press Shift+Ctrl+F to open the Search panel.
- Select the All PDF Documents in option.
- Click the dropdown list arrow to show all drives.
- Type the word or phrase to search.
How do I search for a word document without opening it?
Open File Explorer (aka Windows Explorer). Navigate to the folder containing the documents. Click in the search box in the upper right corner, below the ribbon. Enter the word you want to search for, then press Enter.
What is the search box in Windows 10 called?
Cortana is getting separated from the Windows 10 search bar, with Microsoft’s assistant getting a separate spot in the taskbar. The new functionality was released today in Windows 10 Build 18317 (19H1), the latest version of Microsoft’s Insider Preview in the so-called Fast ring.
Why can’t I use the search bar in Windows 10?
One of the reasons why Windows 10 search isn’t working for you is because of a faulty Windows 10 update. If Microsoft hasn’t released a fix just yet, then one way of fixing search in Windows 10 is to uninstall the problematic update. To do this, return to the Settings app, then click ‘Update & Security’.
Why is my search bar not working?
Use the Windows Search and Indexing troubleshooter to try to fix any problems that may arise.In Windows Settings, select Update & Security > Troubleshoot. Under Find and fix other problems, select Search and Indexing. Run the troubleshooter, and select any problems that apply.
How do I search for a file?
Work
- Introduction.
- 1Choose Start→Computer.
- 2Double-click an item to open it.
- 3If the file or folder that you want is stored within another folder, double-click the folder or a series of folders until you locate it.
- 4When you find the file you want, double-click it.

Microsoft Word provides a feature that allows you to search for text within a document. You can also use advanced settings to make your search more specific, such as case matching or ignoring punctuation. Here’s how to use it.
Finding Text in a Word Doc
To search for text in Word, you’ll need to access the “Navigation” pane. You can do so by selecting “Find” in the “Editing” group of the “Home” tab.

An alternative method to accessing this pane is by using the Ctrl + F shortcut key on Windows or Command + F on Mac.
RELATED: How to Search for Text Inside of Any File Using Windows Search
With the “Navigation” pane open, enter the text you want to find. The number of instances that text appears throughout the document will be displayed.
You can navigate through the search results by selecting the up and down arrows located beneath the search box or by clicking directly on the result snippet in the navigation pane.
Setting Advanced Search Features
The caveat with the basic search function is that it doesn’t take into account many things such, as the case of the letters in the text. This is a problem if you’re searching a document that contains a lot of content, such as a book or thesis.
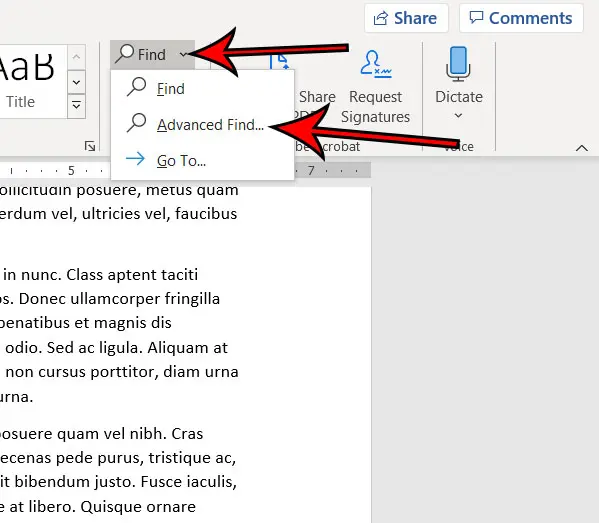
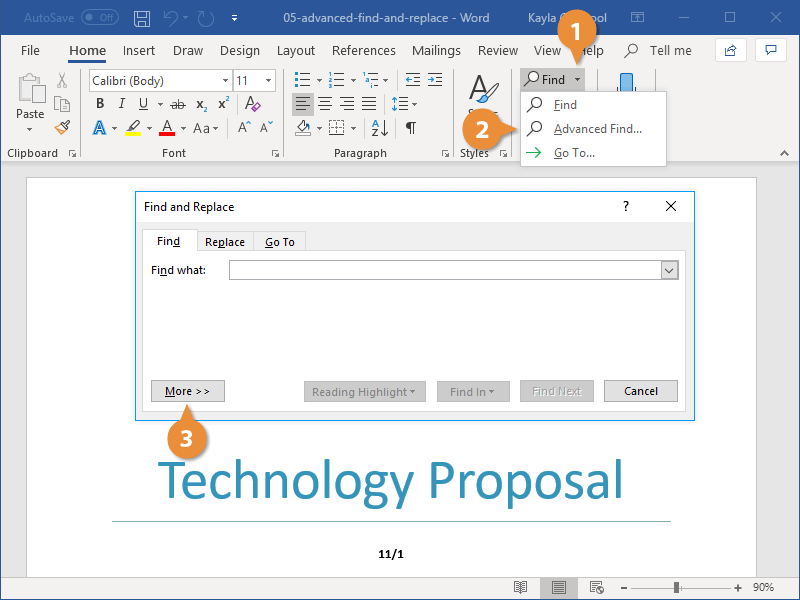
You can fine-tune these details by going to the “Editing” group of the “Home” tab, selecting the arrow next to “Find,” and selecting “Advanced Find” from the drop-down list.
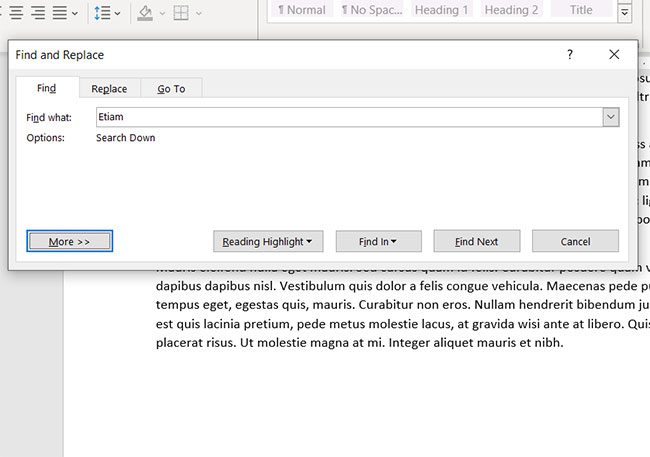
The “Find and Replace” window will appear. Select “More.”
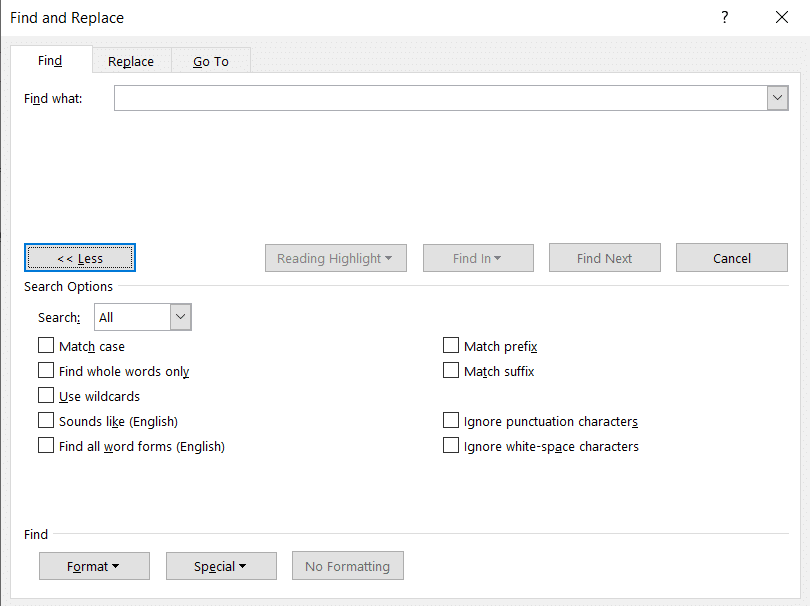
In the “Search Options” group, check the box next to the options you want to enable.
Now, the next time you search for text in Word, the search will work with the selected advanced options.
RELATED: Microsoft Word: Document Formatting Essentials
READ NEXT
- › How to Highlight Text in Microsoft Word
- › How to Search in Google Docs
- › Why One Ultrawide Is Better Than Two Monitors
- › The Best DNS Servers for Secure Browsing
- › Google+ Will Come to a Final End on July 5, 2023
- › Universal Audio Volt 2 Review: A Workhorse Audio Interface With Vintage Charm
- › Get to Your Windows 11 Desktop: 7 Fastest Methods
- › Why the Right-Click Menu in Windows 11 Is Actually Good
How-To Geek is where you turn when you want experts to explain technology. Since we launched in 2006, our articles have been read billions of times. Want to know more?
- When you learn how to search for a word in Microsoft Word, you will be learning how to use the Find tool. However, there is also an Advanced Find feature that lets you customize your search further, and there is a Find and Replace tool that lets you replace instances of words and phrases.
- Aside from the method below that we use to search for a word in a Word document, you can also use a keyboard shortcut to launch the Find tool. Simply press Ctrl + F on your keyboard to launch it.
- The Find tool lets you search for whole words, phrases, or even letters. You can use it to find what you are looking for in your document, regardless of how much or how little of the information you enter into the search field.
Microsoft Word’s search tools come in a couple of different varieties. The basic search lets you locate specific words or phrases in your document, while the Advanced Find tool lets you do things like match case, use wildcards, and generally find text in most of the ways that you might consider.
You can search for certain words in Microsoft Word by clicking the Home tab, selecting the Find button, then typing your search term into the “Search” field.
This will then highlight each instance of the word that appears in the document, and you can click each of the search results in the Navigation column to jump to the occurrence of that word in your document.
But if you are trying to figure out how to search for a word in Microsoft Word, then you might be struggling to locate the correct tool. Our guide below will show you how to use the search tool in your Word file.
How to Search a Word Document
- Open the Word document.
- Select the Home tab at the top of the window.
- Click the Find button in the Editing group of the ribbon.
- Enter your search term into the search box, then click a result to go to that point in the document.
Our guide continues below with additional information on how to find a word in a document, including pictures of these steps.
How to Search for a Word in a Microsoft Word Document (Guide with Pictures)
The steps in this article were performed in Microsoft Word for Office 365, but will also work in other versions of Word, such as Word 2016 or Word 2019.
As mentioned earlier, you can also open the search tool by pressing Ctrl+F on your keyboard.
Step 1: Open your document in Microsoft Word.
Step 2: Click the Home tab above the ribbon at the top of the window.
Step 3: Click the Find button in the Editing section of the ribbon.
Note that there are down arrows to the right of the Find button and the Select button in that section that you can use for other options. For example, there’s an Advanced Find option on the Find drop down menu that you can use for additional search options to locate a particular word or words in the document.

Step 4: Type your search term into the search box in the Navigation pane on the left side of the window.
Results containing your search term will appear in the column. You can then click a search result to be taken to its location in the document.
The up and down arrows under the search field will allow you to quickly move between the different results.
Additional Information on How to Search for a Word in a Microsoft Word Document
- Other applications, including Microsoft Excel, can also take advantage of the Ctrl + F keyboard shortcut for finding information.
- If you have used older versions of Microsoft Word, then you might be used to the dialog box that previously appeared when you tried to search for a word. The Navigation pane has replaced the basic search tool, but that dialog box will still appear if you select the Advanced Find option from the dropdown menu.
- The search function in MS Word also displays a magnifying glass at the right end of the search box. If you click that magnifying glass you will see a menu with additional ways to search for words or other items in the document.
- The Find and Replace dialog box also has a “Replace” tab at the top of the window. If you select that tab you will be able to enter the existing word that you want to replace, then enter the word that you want to use to replace it.
- Once the Find and Replace dialog box appears and you start using that to search through Word documents, it’s possible that you will find that to be a better way to search through an entire document and customize what Word replaces. Fortunately this is a similar search function that exists in other Microsoft office applications so you will be able to use it and its advanced options for searching while you look through spreadsheets and slideshows.
Find out how to remove page numbers in Microsoft Word if you have a document that contains page numbers that you either don’t want or don’t need.
Additional Sources

Matthew Burleigh has been writing tech tutorials since 2008. His writing has appeared on dozens of different websites and been read over 50 million times.
After receiving his Bachelor’s and Master’s degrees in Computer Science he spent several years working in IT management for small businesses. However, he now works full time writing content online and creating websites.
His main writing topics include iPhones, Microsoft Office, Google Apps, Android, and Photoshop, but he has also written about many other tech topics as well.
Read his full bio here.
Let’s delve even deeper into the ‘Find’ function, looking specifically at a number of options that can be accessed in the Word “Find” feature (CTRL+F) by clicking its “More” button.
In a recent issue of Office for Mere Mortals we looked at how to search within a Word document. There is a lot of hidden power accompanying the relatively simple process of finding text within a document.
Advanced Find
The clever Find features are in Advanced Find. Press Ctrl + F to open the Word navigation pane, click on the pull-down menu then Advanced Find …

It’s called Advanced Find but many long-time Word users will know it as the standard Find dialog that’s been in Word for many, many years.
Click on the More … button to see a lot of power in Word’s Find.
FIND WHOLE WORDS ONLY
‘Find whole words only’ is a selectable option in Word that can be accessed in the Find feature (Ctrl-F) by clicking the ‘More’ button to display more specific search features.
But what does it mean to find whole words only? Isn’t that what a normal search is meant to do? Well… yes and no. A ‘whole word’ is defined in Office as a group of characters surrounded on either side by one or more spaces or punctuation marks.
To demonstrate the difference between having the ‘Find whole words only’ option selected and not having it selected, I will use a very simple example. Feel free to try it for yourself in Microsoft Word.
Let’s pretend that you are searching for the word ‘ample’ out of the following short text: “This sample sentence is one way to demonstrate the ample finding flexibility of Office”.
There is only one instance of the word ‘ample’ within the text, searching without the ‘Find whole words only’ option would actually find 2 matches. The less obvious match comes as part of the tail-end of the second word of the text, which is ‘sample’.
To further demonstrate my point, the word ‘in’ does not appear within the sample sentence on its own using ‘Find whole words’, but would be found twice within the word “finding” with that choice off.
By selecting the ‘Find whole words only’ option, Office will omit matches to any search query that is found _within_ a word of the document. Such a search is less intensive for the program and will therefore be faster with large amounts of text.
Before you go setting this option, be forewarned that it will omit any plurals from your search results. Searching for the word ‘sport’ in the following text will not produce any matches: “Why are all the sports I want to watch on at the same time?”
USE WILDCARDS
A wildcard is a special character that you can use to represent one or more characters in a search string. Any character or set of characters can be represented by a wildcard character. It is really just another name for a “regular expression”.
With just a few special characters and the knowledge of what they represent, searching for strings that conform to a predefined grammar (or pattern) now becomes extremely easy.
The first step to using wildcards in your search terms is to select the ‘Use Wildcards’ option, which can be found in find dialog box after clicking the ‘More’ button. The ‘Match case’ and ‘Find whole words only’ check boxes are now unavailable (grayed out).
There are two ways to incorporate wildcards into your search query string. The first is to choose the particular wildcard character from a list. To do this, click the ‘Special’ pull-down menu and select the desired wildcard character from the resulting list. Then type any additional text into the ‘Find what’ box. The second way is to simply type in the wildcard character directly into the ‘Find what’ box!
The asterisk (*) is the most commonly used wildcard to search for a string of one or more characters. For example, just say you want to find all words that start with “a” and end with “m”. Then you could write “a*m” as your search term. Your results could be anything from “aim” to “antidisestablishmentarianism”.
The next most commonly used wildcard is the question mark (?), which can be used to substitute for any single character. For example, sat?n finds “satin” and “satan”.
SOUNDS LIKE… FO-NE-TIKS
The ‘Sounds like’ option is a type of search mechanism for words that may have been spelt phonetically. To make this point, searching for the word ‘phonetically’ with the ‘Sounds like’ option switched on, will find all of the words that would sound like the word ‘phonetically’ if you were to say them out aloud. As a test, I wrote down ‘fonetikalee’ in a document and searched for the word ‘phonetically’ with the ‘Sounds like’ option activated. The find feature was indeed able to determine that I was searching for the word ‘fonetikalee’.
This function may be of use for people who type up conversations between people in real-time. If someone uses a word you are not familiar with in such a situation, you don’t really have the time find out how to spell it properly. In such a situation, the common solution would be to simply type it phonetically (as it sounds) and then move on. Sometime after scribing the conversation, you may have a flash of enlightenment and realize what word the person actually said.
Instead of scrolling through pages of text to find it and change the potentially numerous incarnations of phonetic spelling, you can simply type in the correct word to the search facility with the ‘Sounds like’ option selected, and hope that your phonetic spelling was sufficient for the ‘Sounds like’ search algorithms to pick up.
FIND ALL WORD FORMS – PAST, PRESENT AND FUTURE TENSE
The ‘Find all word forms’ option has a simple, but powerful function. It acts by finding all possible tenses of the search word.
For example, if I searched for “run”, then both “run” and “ran” could be potential search results.
Similarly, searching for “talk” could have both “talk” and “talked” as potential search results.
Searching for “laugh” on the other hand, could have “laugh”, “laughed” and “laughing” as potential search results.
READER QUESTION: HOW DO YOU FIND A SPACE?
A question from an OfMM reader recently queried us how to find a space within a document. This is quite simply a case of typing a space into the ‘Find what’ text box and clicking the ‘Find Next’ button. This will find each and every space from the start to the end of the document. A useful application of this would be to insert two spaces in the “Find what” box in order to any occurrences of two consecutive spaces within a document, in order to ensure consistency of spacing between sentences.
Another way of doing this was mentioned in passing in the last OfMM newsletter in the section entitled “Strange Characters”. Selecting the ‘Special’ pull-down list in the Find dialog box will bring up a list of special search character types. The last option on this list is called ‘White-space’ and as the name suggests, can be used to find groups of white space within the search area. This is equivalent to typing /w into the ‘Find what’ text box.
THE ‘GO TO’ TAB
Another way of quickly accessing a certain area of a document, or even jumping through a document in regular increments, is to use the ‘Go To’ tab on the Find dialog box.
On this tab you can select between a number of document elements including: page, section, line, bookmark, comment, footnote, endnote, field, table, graphic, equation, object, and heading.
Then simply jump through the document For example, if the page option has been selected, you can type in the page you wish to ‘Go To’ in the ‘Enter page number’ text box. Then click the ‘Next’ button and you will be taken there.
An interesting function is to go to the heading in the document. If you have headings few and far between, then this is a useful tool. You have to make sure that your headings are formatted as a “Heading” within word, and aren’t simply bolded or formatted “Normal” text.
Let’s assume you’re a paralegal and you just finished typing a lengthy legal document or a contract for your client, only to discover that you misspelled your client’s name or a wrong company’s name multiple times throughout your document. And don’t have time to manually locate and replace every instance of the text. What would you do? Don’t panic – you can easily fix that with MS Word’s Find and Replace feature.
Find and Replace is one of the most useful features in Microsoft Word that can be used to find a character, a word, or phrase in a document and replace them. You can also find and replace text in a specific section of text or a whole document.
Not only can you find a particular word and replace it with another word, but you can also find text based on its formatting, using wildcards, and with matching prefix or suffix. It also allows you to find and replace text with specific formatting, non-printing characters, or special characters. In this post, you will learn how to find and replace text in MS Word.
Find Text in Microsoft Word
To start with, let’s see how to Find text in Excel using the navigational pane or the Find and Replace tool. Then we’ll explore how to use the Find and Replace tool to replace text based on different options.
Find Text
You can use the Navigation pane to search for a character, a word, or a group of words. And you can access this navigation pane from the Ribbon or by pressing a hotkey Ctrl + F.
To access, the Navigation panel (Find Command), first, open the Word in which you want to search for text. Then, go to the ‘Home’ tab, and click the ‘Find’ button from the Editing group in the Ribbon. Or you can press the shortcut keys Ctrl + F in the keyboard.
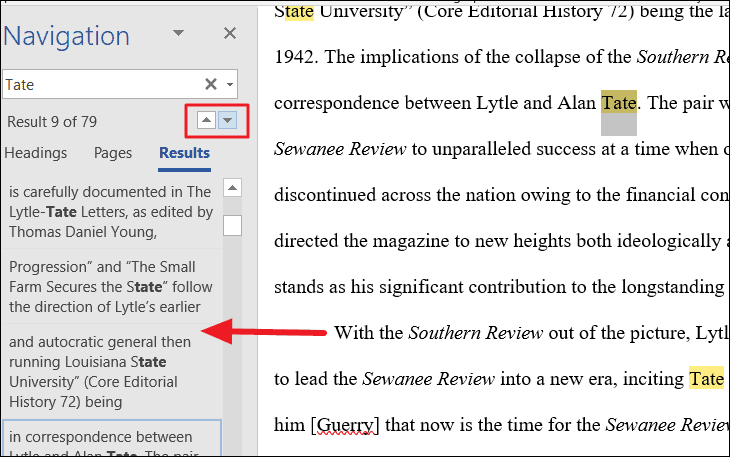
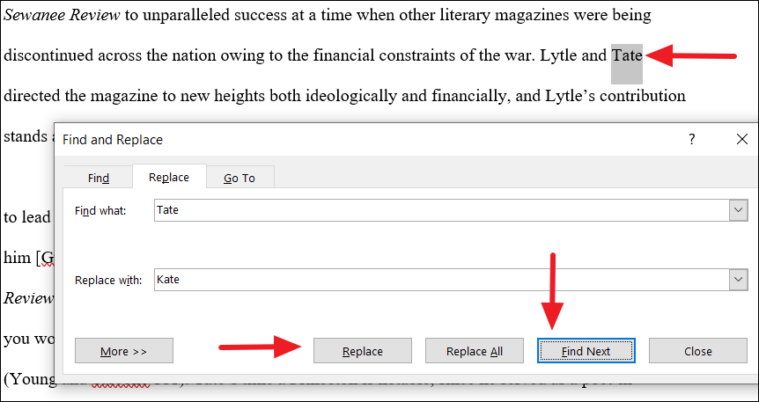
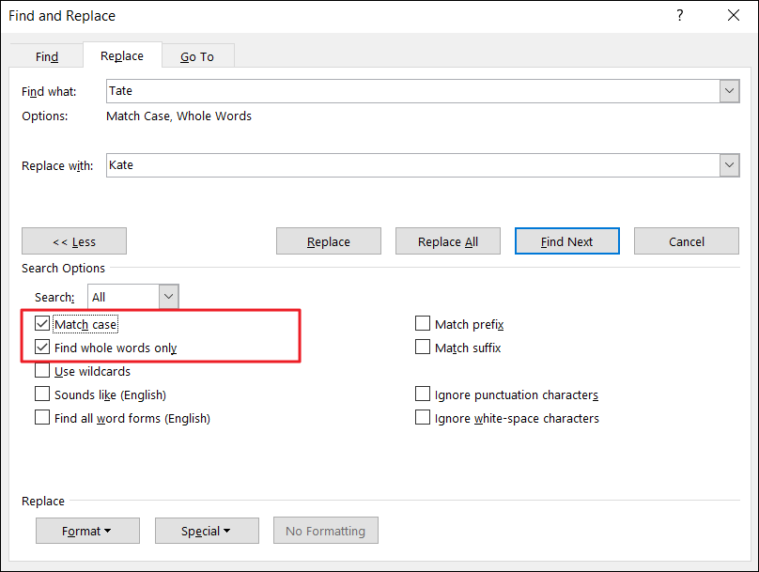
This will open up the Navigation pane on the left of the Window. Type the text or phrase you want to find in the ‘Search document’ text box in the Navigation pane and press ‘Enter’. As you type, the tool will show you all the related matches. In our example, we’ll type ‘Tate’.
The Find command searches for all the matching text in the document and highlights them in yellow. The navigation pane shows all instances of the search word (Tate) as a preview of the results
The tool not only highlights the exact words, it even highlights the partially matched words.
You can use the upward and downward arrows beside the text box to jump to the Previous or Next search result. Or you can click on one of the results below the search field to jump to it directly.
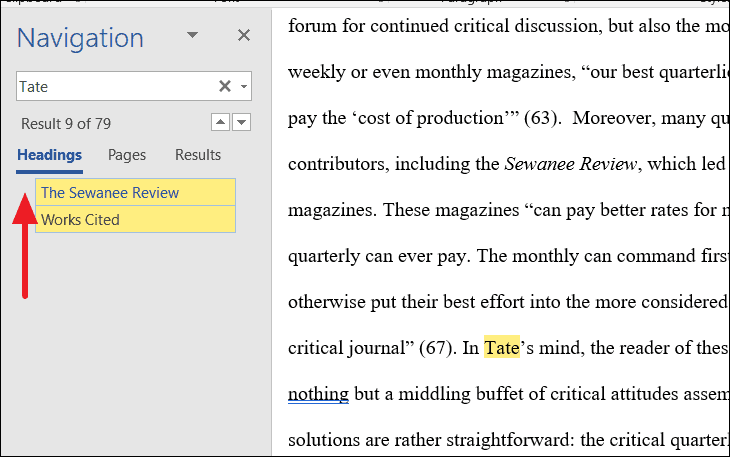
Instead of searching through an entire document for a text or phrase, you can also search a large document by headings. To do that, click the ‘Headings’ tab and select a heading in the Navigation pane to browse by headings in the document.
To search through pages in Word, click the ‘Pages’ tab in the Navigation pane and select one of the thumbnail images of all your pages that you want to see. Then, you can search for a specific text on that page.

Once you’re done editing the document, close the Navigation pane and the highlights will disappear.
Advanced Find
If you are looking for more specific words or phrases, for instance, words with a certain font or style, special characters, or only full words, you can use the Advanced Find feature to track them down. This tool lets you customize your search with various options. Here’s how:
Go to the ‘Home’ tab, click the downward arrow next to the ‘Find’ icon in the Editing group, and select ‘Advanced Find’. Or press Ctrl + H shortcut keys to open the Find and Replace tool.
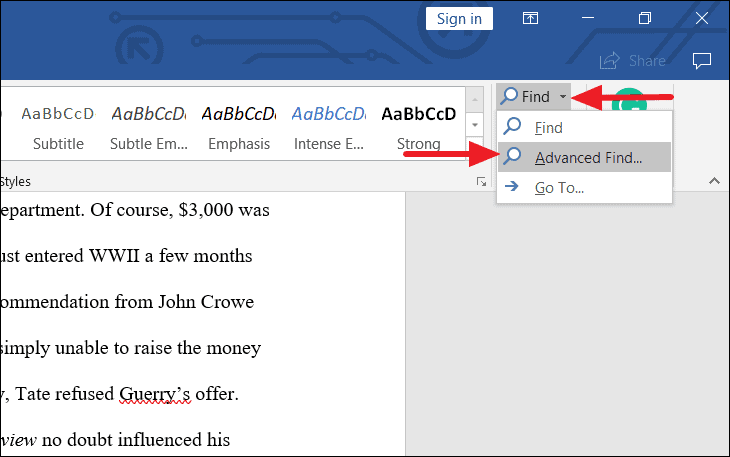
Or you can even launch the Find and Replace tool from the Navigation pane by clicking the magnifying glass icon in the Search Document text box and selecting the ‘Advanced Find’ option.

The Find and Replace dialog box will appear. Here, you can do a basic search, but if you want to customize your search with more options, Click the More >> button.

When you expand the More button, you would find more options with which you can do more advanced searches.
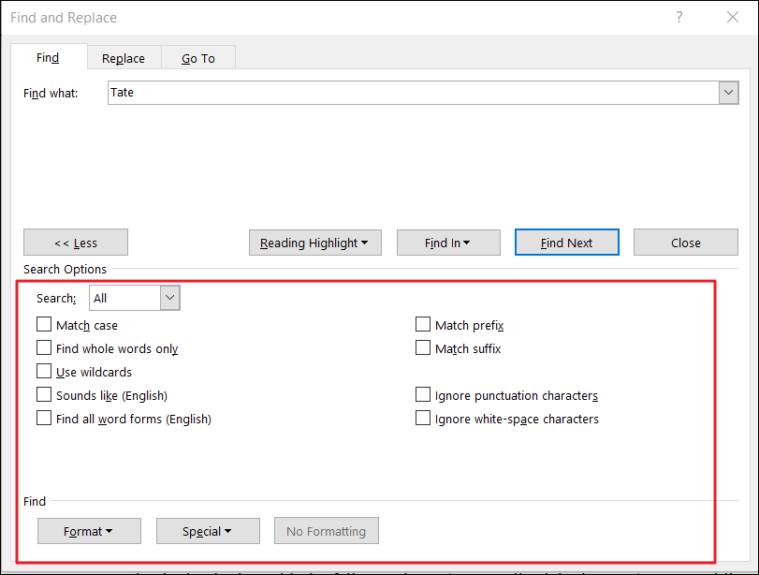
Select one or more options in the Search Options section and click ‘Find Next’ to view the result.
- Match Case: If the Match case box is checked, it searches for the text that exactly matches the uppercase and lowercase letters you type in the ‘Find what’ field.
- Find Whole Words Only: This option finds text that is not partial or part of another word, it only finds the whole words that are exactly matched.
- Use Wildcards: This option is the opposite of the ‘Find Whole Words only’ option. The wildcards you can use are single character (?) and multiple characters (*) wildcards. For example, when you are searching for “Wall*”, you’ll get Walls, Wallmart, or Wallpaper, etc.
- Sounds Like: This option finds words or phrases that sound phonetically similar such as ‘eyes’ when searching for ‘ice’ or ‘ant’ for ‘aunt’.
- Find All Word Forms: This option finds all variants of words (all verb forms). For example, when you search swim, you’ll get swim, swam, and swimming.
- Match Prefix: This searches for words with the same prefixes. For example, search for hype, and you may get hyperactive, hypersensitive, hypercritical.
- Match Suffix: This searches for words with the same suffixes. For example, search for less, and you may get endless, ageless, lawless, effortless.
- Ignore Punctuation Characters: This option lets you ignore punctuation characters in a text when searching. For instance, finding the word ‘Mrs. Jones’ when you searched for ‘Mrs Jones’.
- Ignore white-space characters: This option lets you ignore white spaces in between. For instance, finding the word ‘Days are good’ when you searched for ‘Daysaregood’.
We’ll apply few of these options and see how it works with an example.
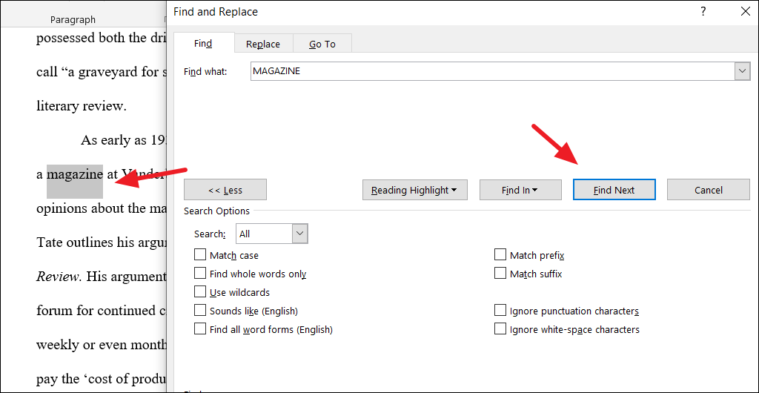
Match Case
For example, let’s say we search the word ‘MAGAZINE’ in all caps without the match case option enabled. Type the word in the ‘Find what’ field and click the ‘Find Next’ button.

In the ‘Search’ drop-down under Search Options, you choose ‘Down’ to start looking from the top to bottom of the document, choose ‘down’ to start looking from the bottom to top of the document, or ‘All’ to search all over the document.
When you click ‘Find Next’, it will highlight the first instance of the word in grey. When you click ‘Find Next’ again, it will select the next instance of the word. As you click Find Next each time, it will highlight the matching word one at a time.
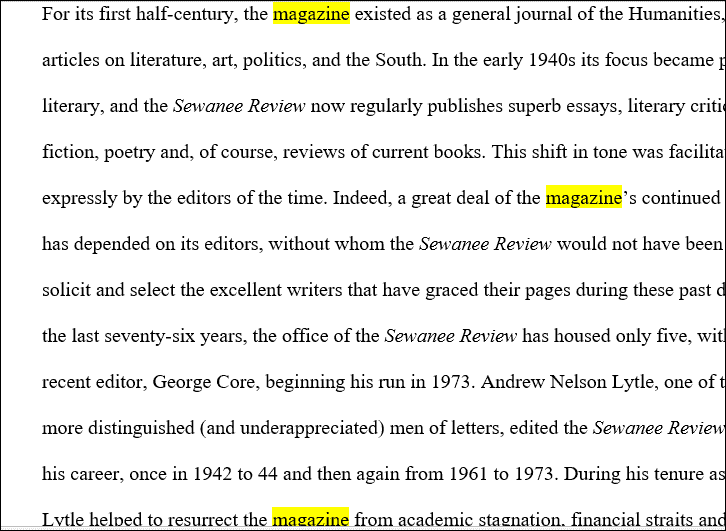
If you want to highlight all the instances of the word at once, click the ‘Reading Highlight’ button and select ‘Highlight All’.
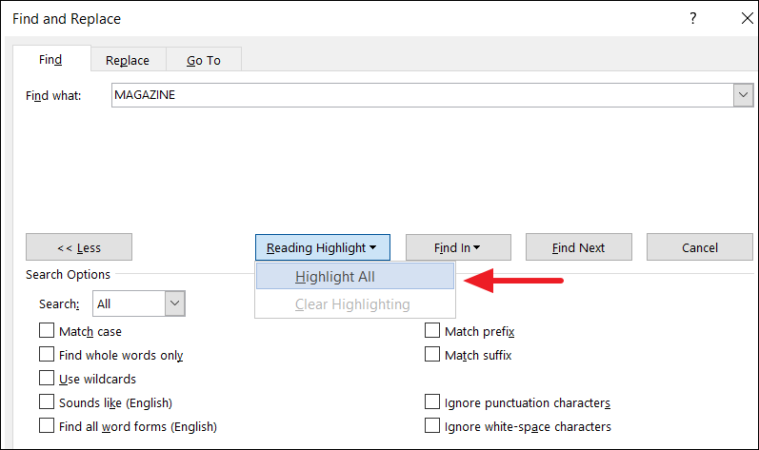
You would get several matches with the word all highlighted in yellow.
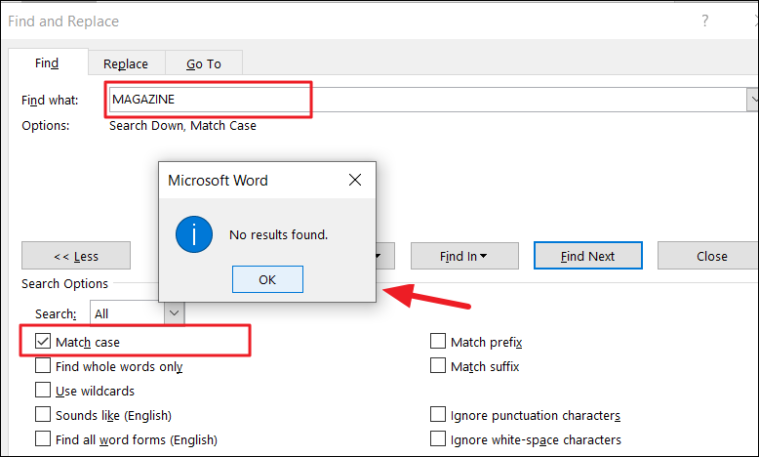
But if we searched the same word (capitalized) with match case enabled, we would get no results. Because the tool only looks for the word that exactly matches the uppercase letters we typed earlier.
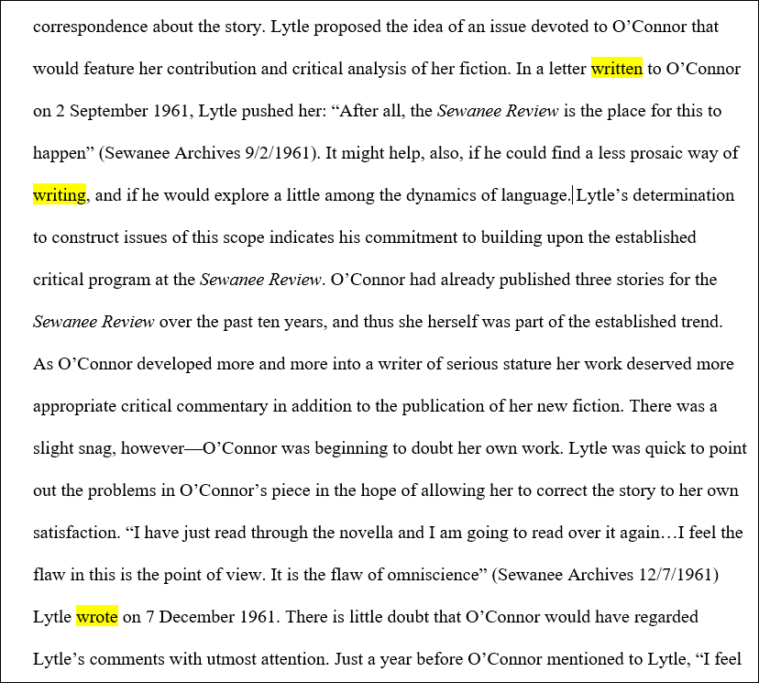
Find All Word Forms
In another example, if we searched the word ‘write’ with the ‘Find all word forms (English)’ setting enabled, we would get all variants of the word.
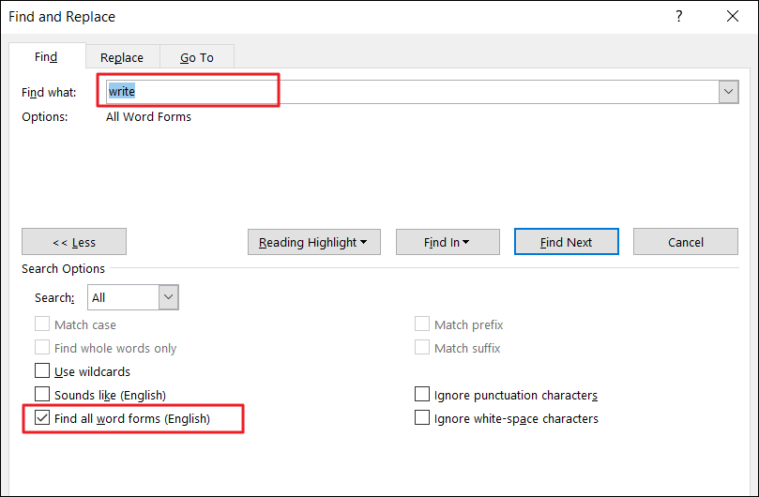
Word will find all verb forms of the word as shown below.
Advanced Find with Formatting
You can also search for certain word or phrase with specific formatting applied.
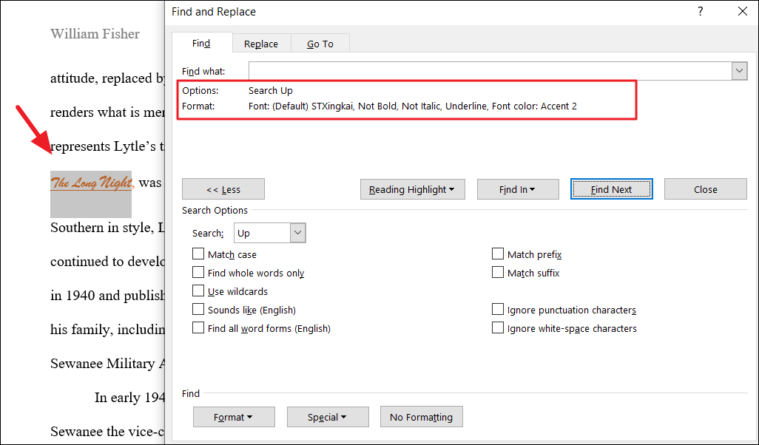
To find words with formatting, first, type the word in the ‘Find what’ box and click the ‘Format’ drop-down button at the bottom of the Find and Replace dialog box. Then choose the format in which you want to look for the word.
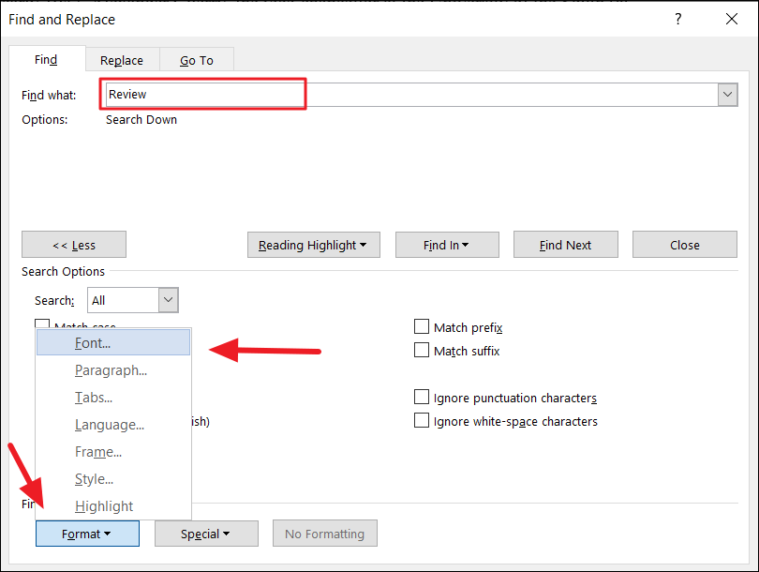
You can even find words with specific font format, paragraphs with specific alignment and format, tabs, words in a certain language, text frame, style, and highlight.
We are going to search for the word with a certain font format, so we are choosing ‘Font’. In the Find Font window, specify the format as shown below and click ‘OK’.
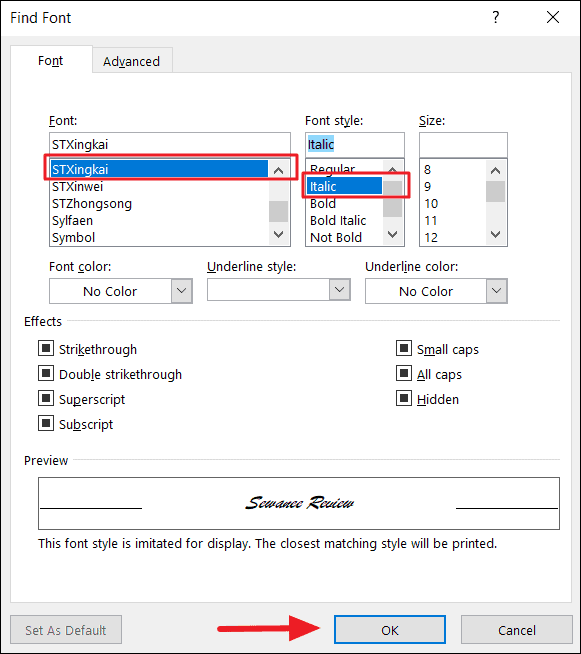
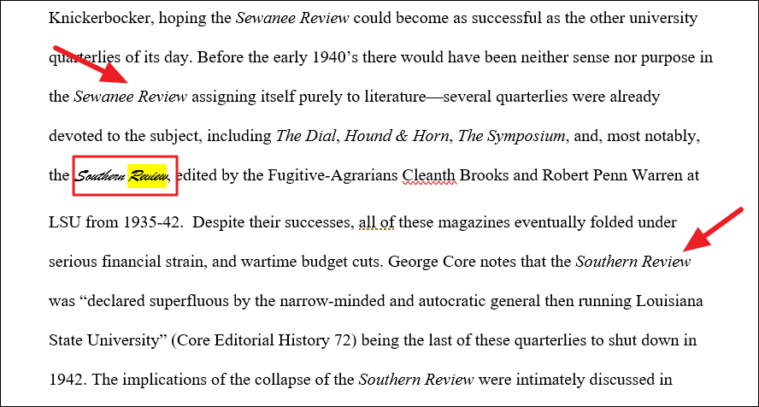
The chosen Format ‘Font: (Default) STXingkai, Italic’ will appear under the ‘Find What’ text box in the Find and Replace dialog box. Now click ‘Highlight All’ to find the matching words with that format.
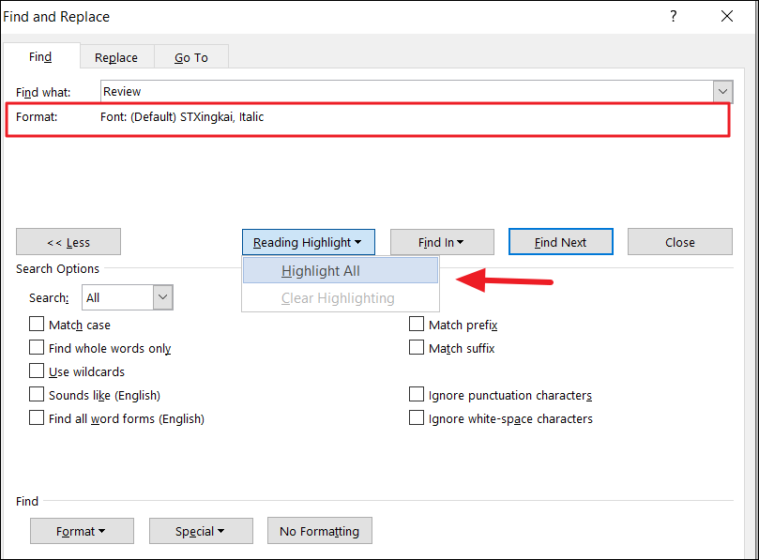
As you can see, the tool only highlights the words with that specific font format, while it doesn’t highlight the same matching word in a different font format.
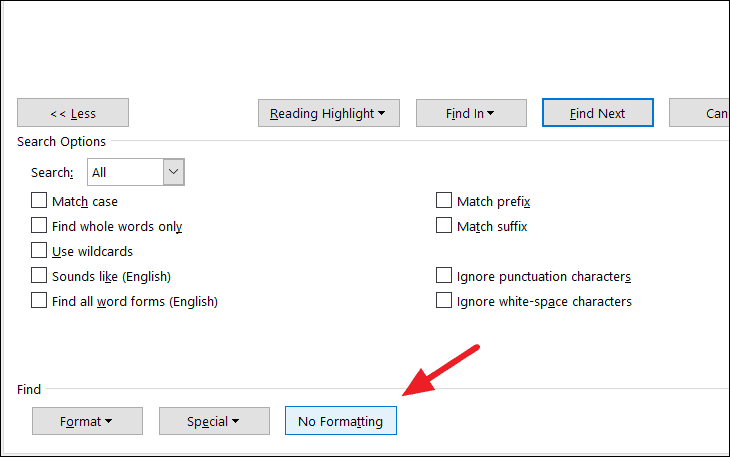
To clear the formatting for the search, click the ‘No Formatting’ button at the bottom of the Find and Replace dialog box.
Find Text with Only Formatting
You can even find texts with formatting alone. You don’t even have to type a word or phrase, you can just specify the only format of the text.
And the tool will find you all the words or phrases with the matching format.
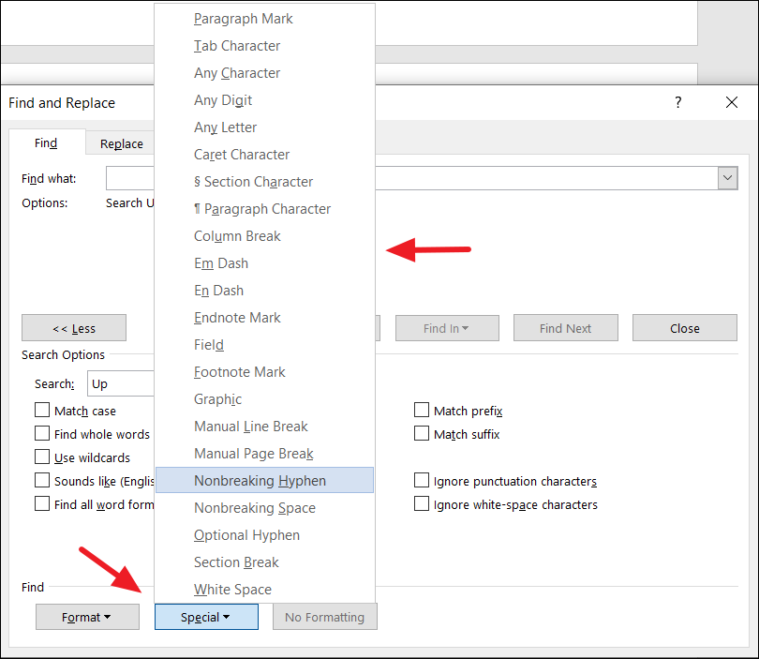
The Find and Replace tool also lets you find non-breaking characters/special characters or words with special characters by choosing the character(s) from the ‘Special’ drop-down button at the bottom of the Find and Replace dialog box.
Find and Replace Text in MS Word
So far, you have learned how to find text and how to find text with advanced options, now let us see how to replace the found text.
The Replace function allows you to find a word or a group of words and replace it with something else or find a word based on text formatting and replace it with other text, or find a specific word and replace its formatting, or find and replace characters with other special characters or words.
Find and Replace Text
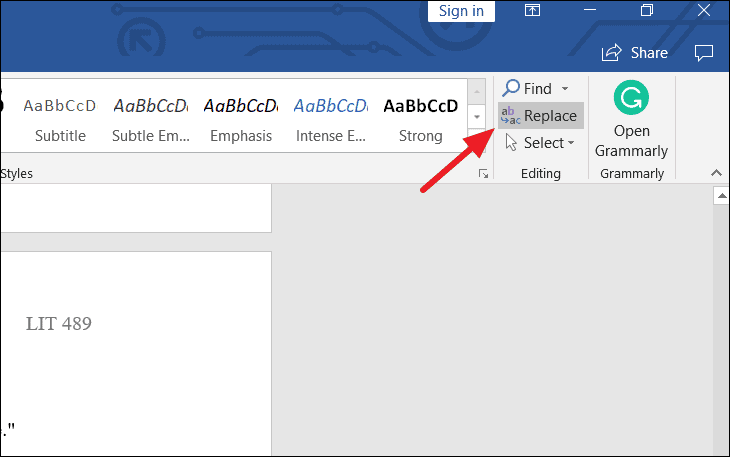
To find and replace a particular word or phrase for another, navigate to the Editing group in the ‘Home’ tab and click the ‘Replace’ command. Alternatively, you can also press the keyboard shortcut Ctrl + H.
This will open the Find and Replace dialog box. In the Find and Replace dialog box, fill out the two fields:
- Type the text you want to search for in the ‘Find what:’ field.
- Type the text you want to replace it with in the ‘Replace with:’ field.
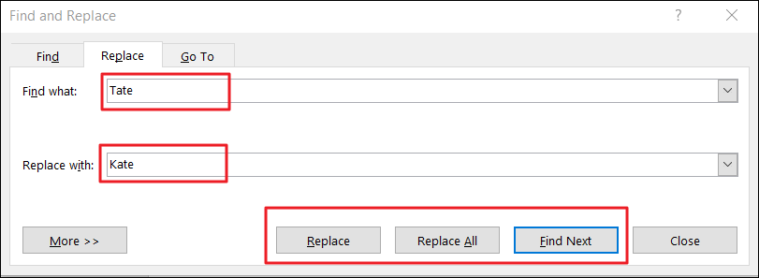
Once you enter the necessary texts, you can either click the ‘Replace’ button to replace the text one by one or ‘Replace All’ to replace all the instances of the word at once.
Replacing all the text together may cause errors in your document if you are not cautious. For example, if you are replacing all the ‘He’ words with ‘She’, it may also replace the words Head with Shead, help with Shelp, heat with Sheat, and so on. So sometimes, it’s better to replace them one at a time.
Click the ‘Find Next’ to find the first instance of the text highlighted in gray and click ‘Find Next’ again to jump to the next instance. Review each instance and click ‘Replace’ to exchange the currently highlighted text.
You can click the title bar of the Find and Replace dialog box and drag it out the way to see the results behind it.
Once you’re done, click the ‘Close’ button to close the dialog box.
Note: If you leave the ‘Replace With’ field blank, the search text in the ‘Find What’ field will be deleted from the document.
Advanced Find and Replace Text
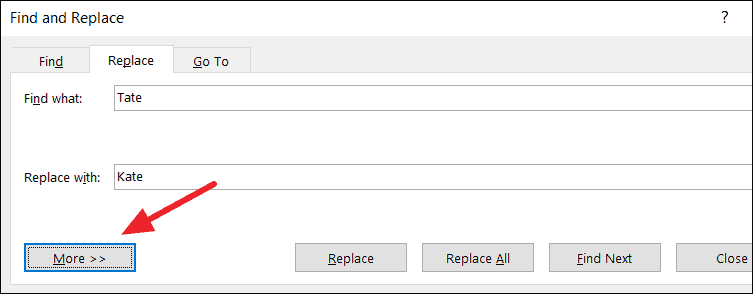
If you are looking to replace more specific words such as words with punctuation, capitalization, certain font or style, or even special characters, you can use the advanced search options of the Find and Replace tool.
To access the advanced options of Find and Replace, click the ‘More >>’ button at the bottom of the dialog.
Here, you have various search and replace options that you can use to narrow down your search.
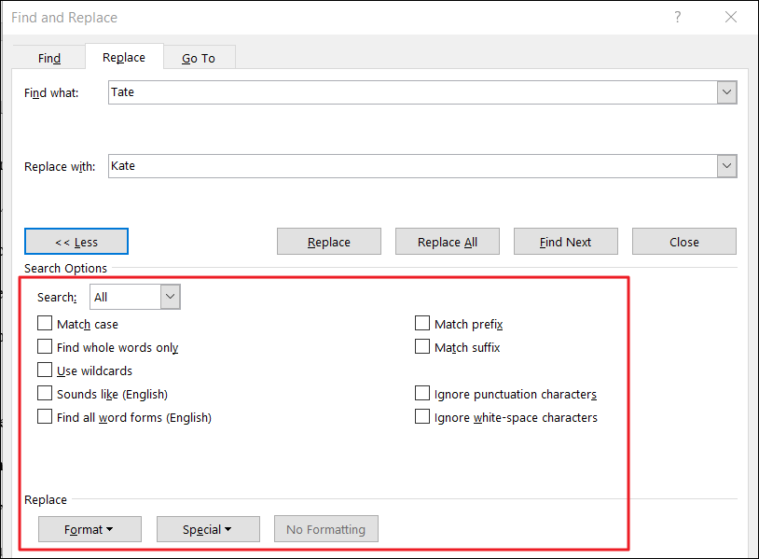
As we discussed earlier in the Advanced Find section, you already know what each option under the Search Options is used for.
Select one or more options under the Search Options and click ‘Find Next’ to find the matching words or click ‘Replace’ to replace one instance at a time or click ‘Replace All’ to exchange every instance at once.
Example:
As we mentioned before, this tool finds the combinations of characters of the given word, even as part of other words.
For example, when we search for the word ‘Tate’ in the document, it finds that combination of characters even as part of other words like ‘United States’.
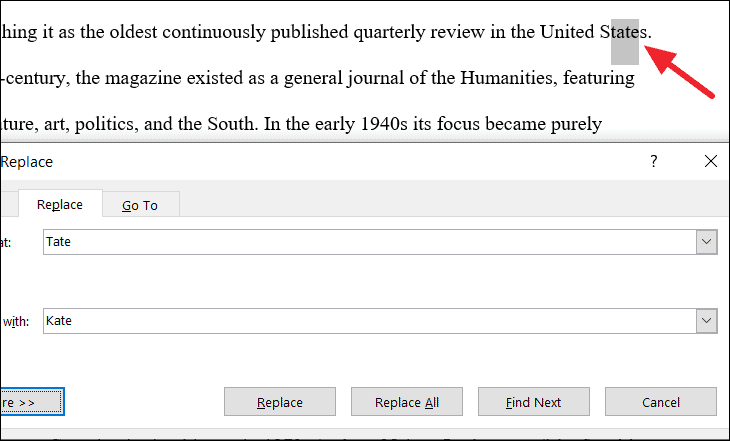
And this is not ideal when we replace these words. Also if you hundreds of matches, it would take forever to replace words one by one.
To fix this, check the ‘Find whole words only’ option, to find the words that are not partial or part of other words, it only finds whole words that are exactly matched. Here, we also checked the ‘Match case’ option to make sure it matches the exact uppercase and lowercase letters too. Then, click ‘Replace’ or ‘Replace All’ to replace the words.
You can use the rest of the above options in a similar fashion to customize your search to find specific words.
Find Text and Replace Formatting
You can also find a particular word and replace it with the same word but with specific formatting or replace it with another word with formatting.
For example, we want to find and replace the whole word ‘Lytle’ with a specific font format. To replace formatting, type the word you want to find in the ‘Find what’ field and select the ‘Find whole words only’ option to search for only that whole word. Then, click the ‘Format’ button at the bottom of the dialog box and choose ‘Font’.
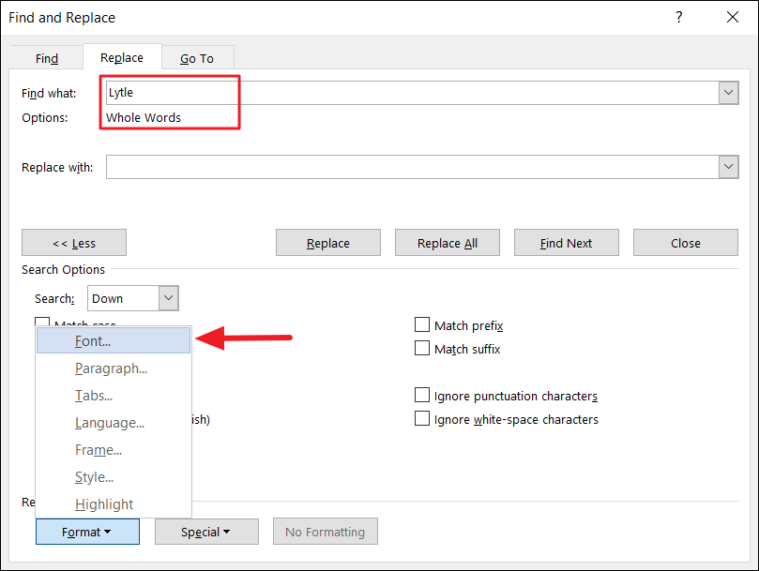
You can replace words with other formatting options such as Style, Paragraph, Frame, and so on.
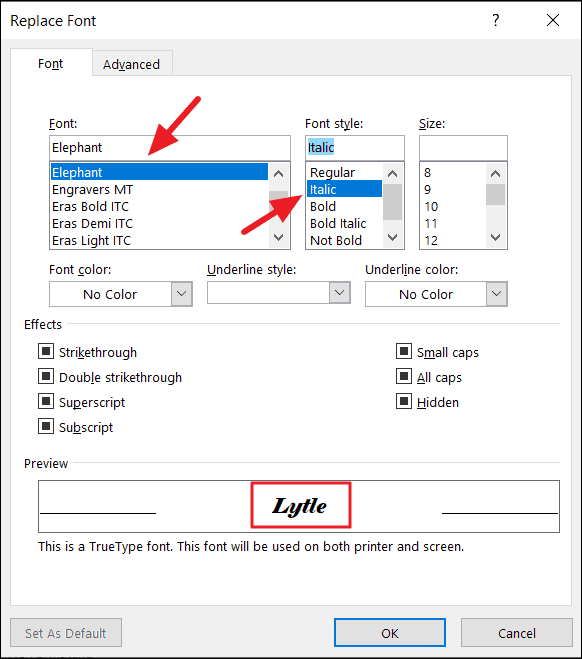
In the Replace Font dialog, choose your desired format style such as font, font style, font color, etc. In our case, we are choosing ‘Elephant’ font and ‘Italic’ style. Then, click ‘OK’ to apply.
Back in the ‘Find and Replace’ dialog box, you can see the chosen formatting is set for the ‘Replace with:’. Since we are only replacing the formatting of the word, leave the ‘Replace with:’ field blank. Then, click either the ‘Replace’ or ‘Replace All’ button to replace the formatting.
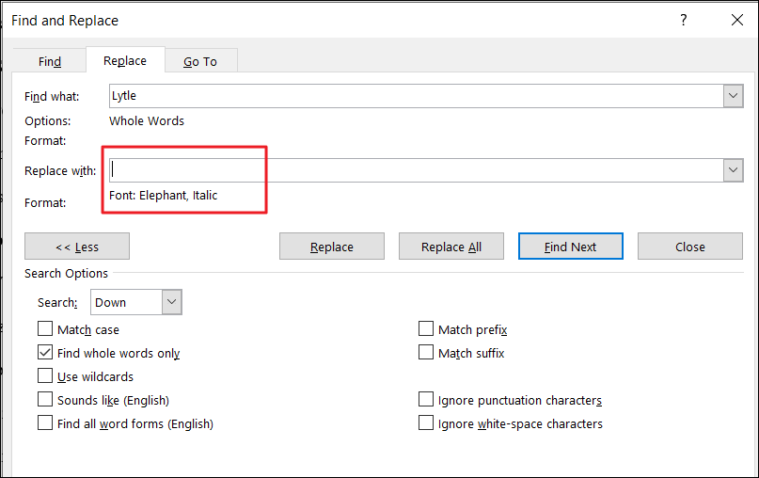
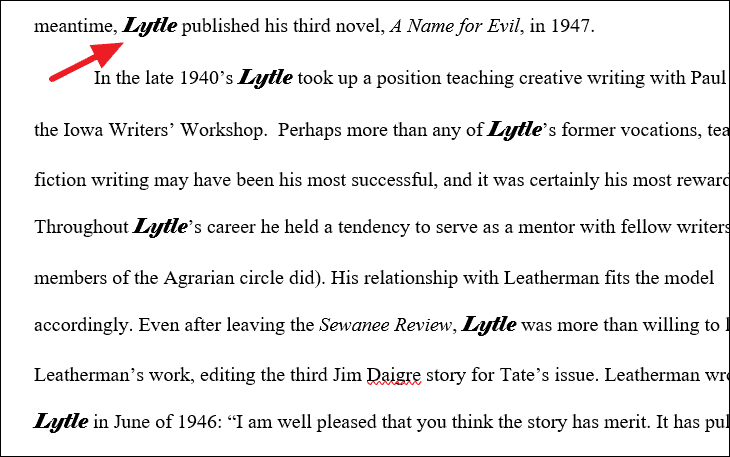
Once you click the ‘Replace All’ button a message box will appear informing you how many replacements were made (In our case, 222).
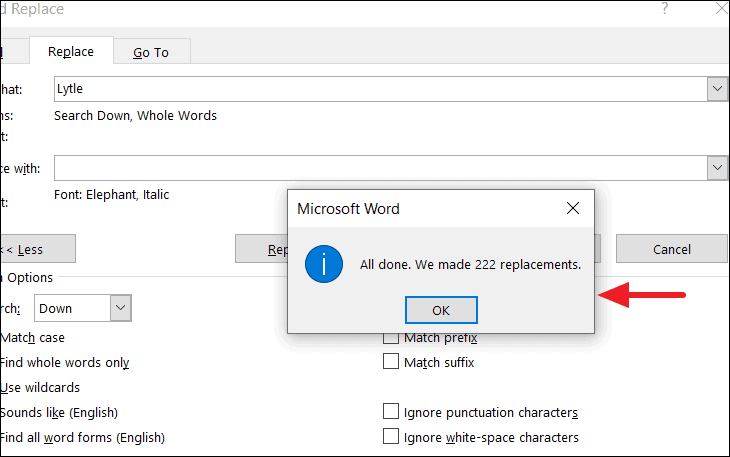
As you can see, all the instances of the word ‘Lytle’ is replaced with specified formatting.
Find Text with a Specific Formatting and Replace
If you want to find a text that has a certain formatting style and replace it with another text, without changing the formatting or with different formatting, you can do it by applying that formatting to the Find word. Here’ how you do this:
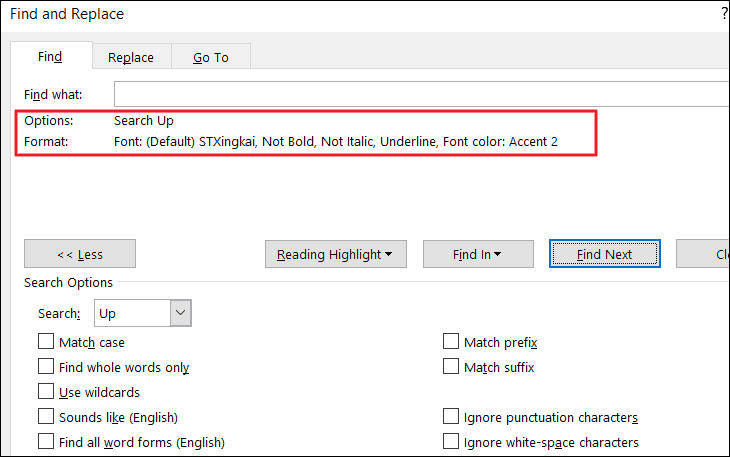
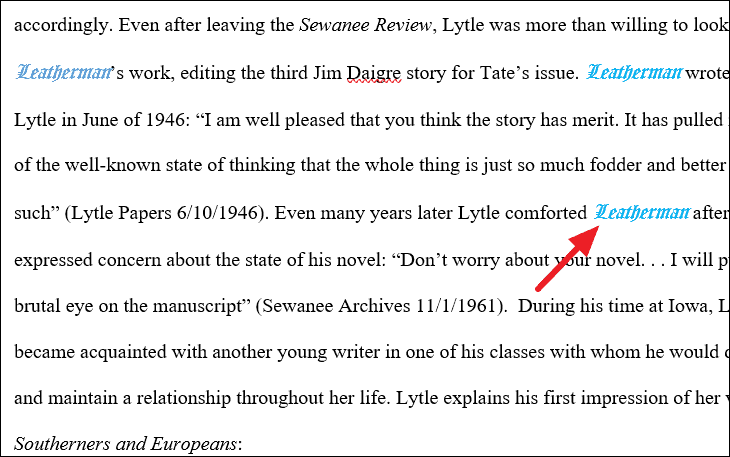
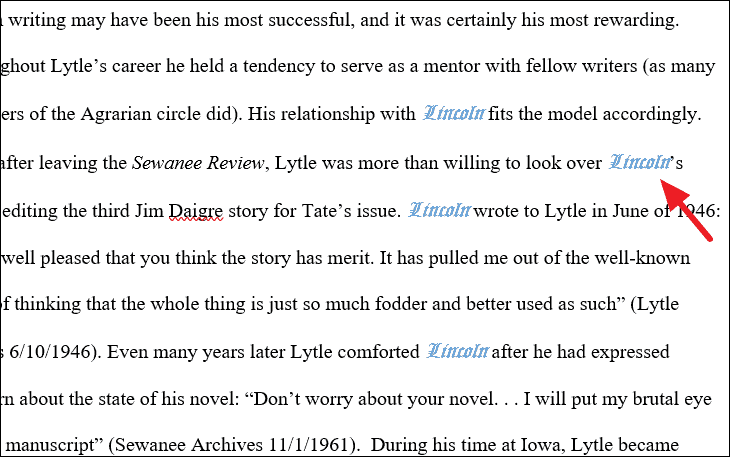
For example, we want to find and replace the text ‘Leatherman’, that has particular formatting (Font: Old English Text MT, Style: Italic, Color: Blue, Accent 5), with the text ‘Lincoln’ (without changing the formatting).
First, type the text you want to search for (in our case, Leatherman) in the ‘Find What’ field. Then, click on the ‘Format’ button and choose the options as required (Font).
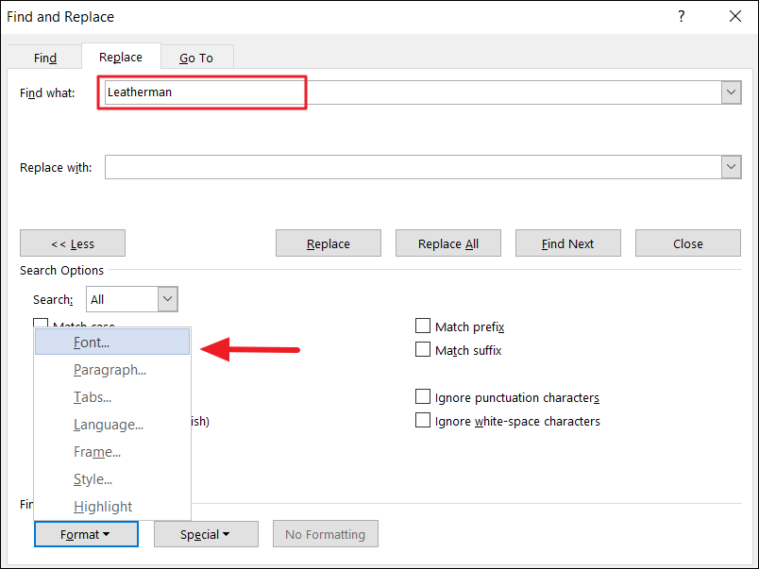
In the Find Font, dialog box, select the required formatting with which we’re going to find text. In our example, the text ‘Leatherman’ is in ‘Font: Old English Text MT, Style: Italic, and Color: Blue, Accent 5’ formatting. Once the options are selected, click ‘OK’.
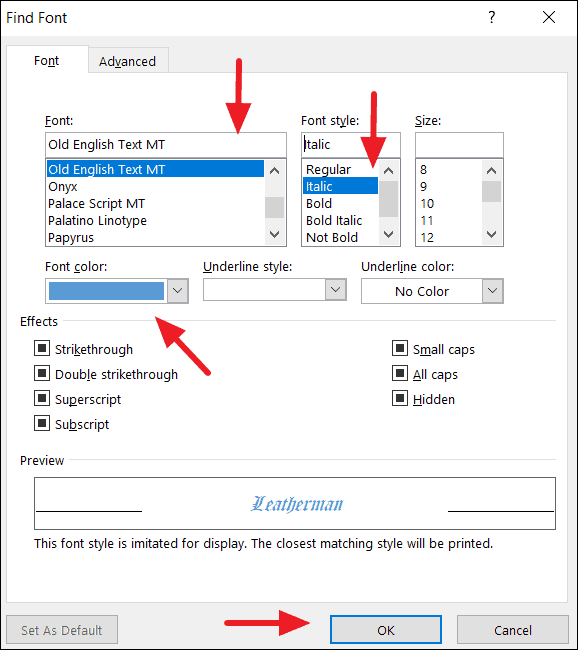
Now the selected formatting options should appear under the ‘Find What’ text field in the Find and Replace.
Next, type the text you want it to be replaced with (Lincon) in the ‘Replace with field:’ and click ‘Replace All’. You can also add formatting to the replacement text if you want.

Once you click ‘Replace All’, all of the instances will be replaced and a prompt will show you how many replacements were made.

As you can see all the instances of the ‘Leatherman’ with formatting is replaced by the ‘Lincoln’ without changing the formatting.
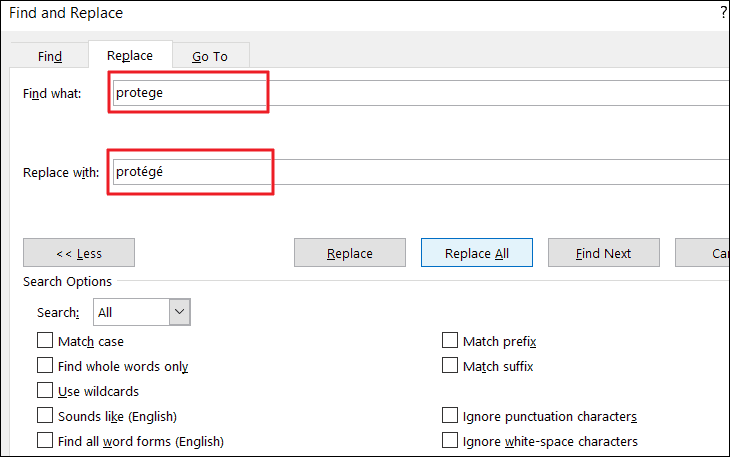
Find and Replace Special Characters/Non-Printing Characters
The find and replace feature can also help you find special character characters and replace them with other special characters such as ®, é, ä, or any other character listed in the Symbol dialog. You can also find and replace non-printing characters such as manual line breaks, tab characters, paragraph marks, etc. You can even replace special characters with text and vice versa.
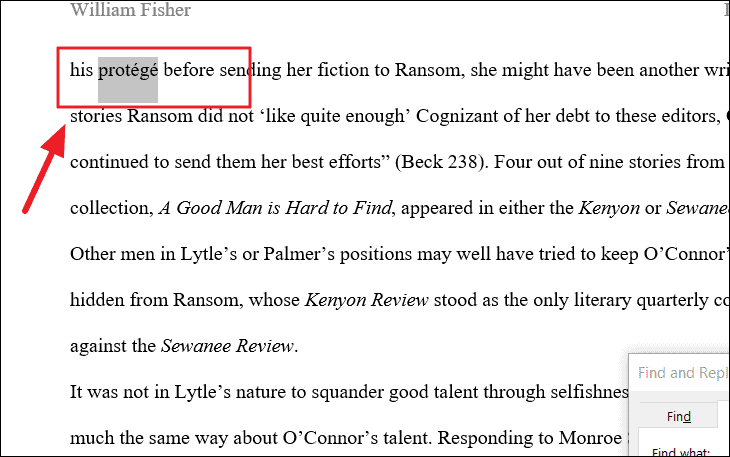
For example, if you want to find and replace the word ‘protege’ with ‘protégé’, type ‘protege’ in the Find what box and type ‘protégé’ in the ‘Replace with’ box. Then, click ‘Replace’ or ‘Replace All’ to replace them.
As you can see the found texts are replaced with replacement text with special characters.
Sometimes you want to replace manual line breaks (non-printing characters) with paragraph marks, in such cases, you need to insert respective character code in the ‘find what’ and ‘replace with’ boxes.
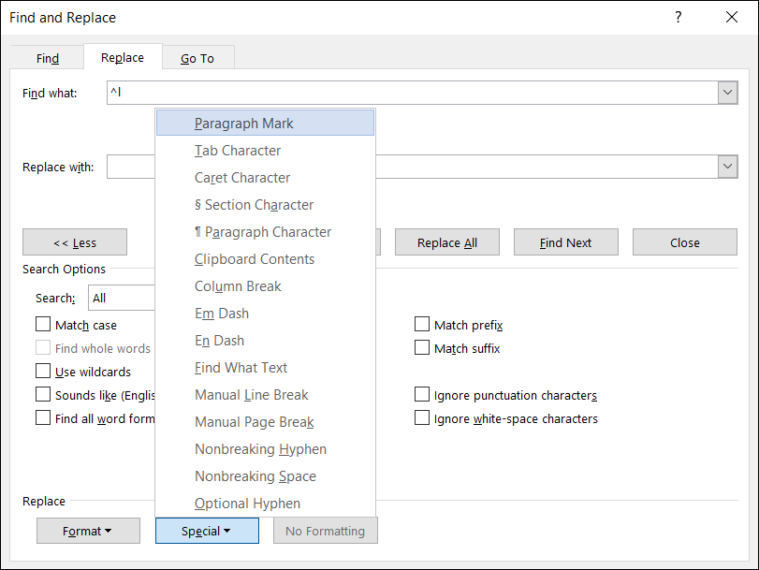
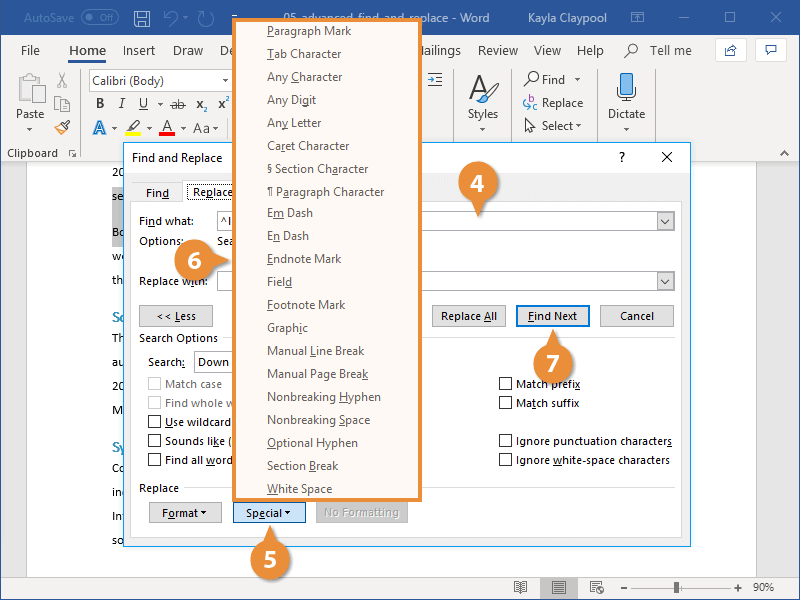
For example, we want to replace all manual line breaks in the documents with paragraph marks. The character code for a manual line break and paragraph mark is ‘^l’ and ‘^p’ respectively. You can either type the code or if you don’t know the code, use the ‘Special’ button to insert the code.
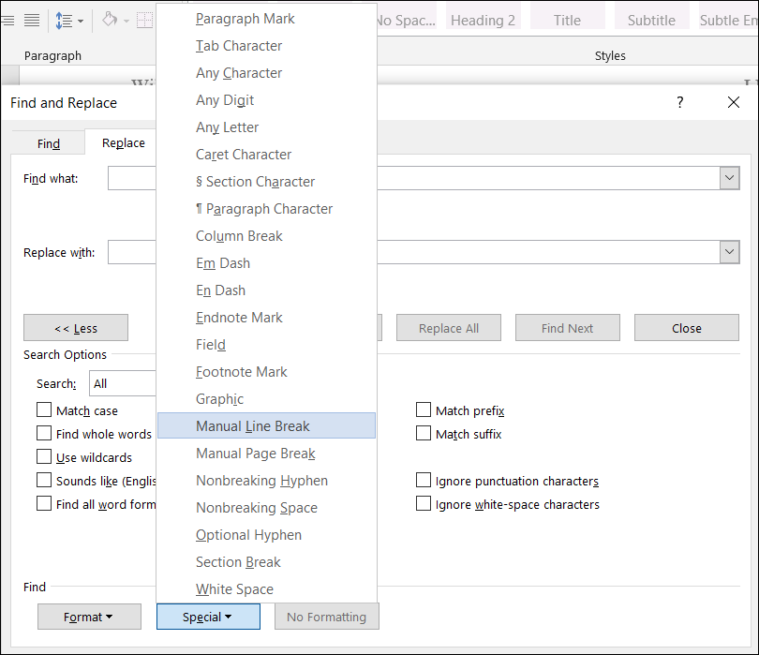
To insert non-breaking characters, first, select the text box where you want to insert. Then, click the ‘Special’ button at the bottom of the Find and Replace dialog box and select an item from the list. And the tool will automatically insert the respective character code in the text box.
In the example, we are choosing ‘Manual Line Break’ for the ‘Find what’ field.
And ‘Paragraph Mark’ for the ‘Replace with’.
Then, click ‘Find Next’ to see where the line breaks are located. Now, click ‘Replace All’ to replace all the manual line breaks in the documents.
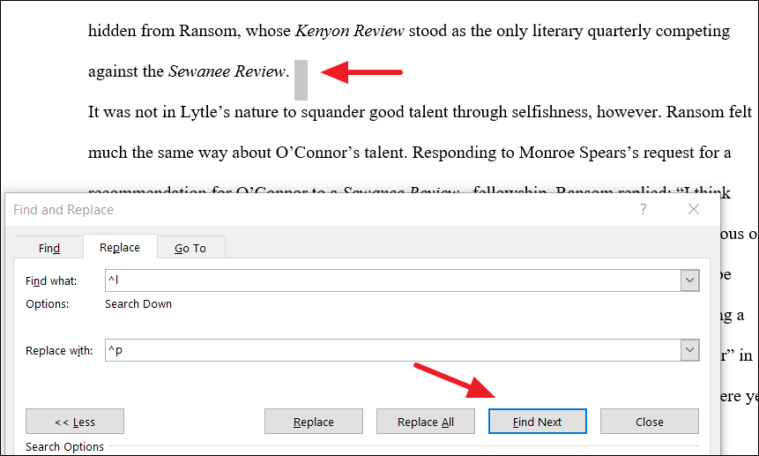
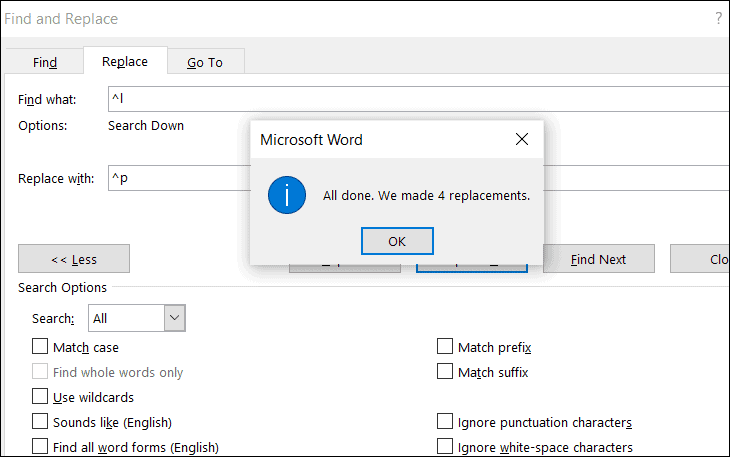
As you can see below, the manual line breaks are replaced with paragraph marks.
In the similar way, you can also replace non-breaking characters/special characters with text and vice versa.
That’s everything you need to know about finding and replacing text in Microsoft Word.
In this article, we will offer you 2 quick ways to find or delete sentences containing specific text in your Word.
It’s known to all that we can use the “Find and Replace” function in Word to easily find all occurrences of specific words. Then we will have no problem in highlighting, replacing or removing them. As you see, the target is a word or a phrase. Today, however, we are delighted to tell you the macro way to find or delete sentences containing certain text.
Method 1: Find or Delete Sentences Containing Specific Text
- To begin with, press “Alt+ F11” to trigger the VBA editor in Word.
- Next create a new module by clicking “Normal”.
- Then click “Insert” and choose “Module” to get a new one.

- And open the module with double click.
- Now paste the following codes:

Sub DeleteSentencesContainingSpecificWords()
  Dim strTexts As String
  Dim strButtonValue As String

  strTexts = InputBox("Enter texts to be found here: ")

  With Selection
    .HomeKey Unit:=wdStory

    '  Find the entered texts.
    With Selection.Find
      .ClearFormatting
      .Text = strTexts
      .Replacement.Text = ""
      .Forward = True
      .Wrap = wdFindContinue
      .Format = False
      .MatchCase = False
      .MatchWholeWord = False
      .MatchWildcards = False
      .MatchSoundsLike = False
      .MatchAllWordForms = False
      .Execute
    End With

    Do While .Find.Found = True
      '  Expand the selection to the entire sentence.
      Selection.Expand Unit:=wdSentence
      strButtonValue = MsgBox("Are you sure to delete the sentence?", vbYesNo)
      If strButtonValue = vbYes Then
        Selection.Delete
      End If
      .Collapse wdCollapseEnd
      .Find.Execute
    Loop
  End With
End Sub
- Next click “Run”.

- There will be an input box, asking you to enter text. Just type the common text that all sentences contain. Click “OK”.

- Then you shall see a sentence containing the text in selection with a message box prompting up. Click “Yes” to delete the sentence and “No” to keep it.

- After the confirmation, the next sentence with designated text is in selection. And there is the confirming box, too. Namely, the macro takes you to step through the whole document, finding target sentences and asking your confirmation every time.


Method 2: Find or Delete Sentences Containing Any Text on a List
With the macro in method 1, you can only search for one word or phrase a time. Certainly, you can run the macro repeatedly to search for find multiple instances of words or phrases. To meet the need of multiple searching, we will provide you another macro.
- First put all target texts on a new document. Make sure each piece of text occupies one paragraph with no trailing space. Close and save the document.
- Next install and run a macro with the exact steps in method 1.
- Then replace macro with this one:
Sub DeleteSentencesContainingSpecificWordsOnAList()
  Dim objListDoc As Document, objTargetDoc As Document
  Dim objParaRange As Range
  Dim objParagraph As Paragraph
  Dim strFileName As String, strButtonValue As String
  Dim dlgFile As FileDialog

  Set dlgFile = Application.FileDialog(msoFileDialogFilePicker)

  With dlgFile
    If .Show = -1 Then
      strFileName = .SelectedItems(1)
    Else
      MsgBox "No file is selected! Please select the target file."
      Exit Sub
    End If
  End With
  Set objTargetDoc = ActiveDocument
  Set objListDoc = Documents.Open(strFileName)
  objTargetDoc.Activate

  For Each objParagraph In objListDoc.Paragraphs
    Set objParaRange = objParagraph.Range
    objParaRange.End = objParaRange.End - 1

    With Selection
      .HomeKey Unit:=wdStory

      '  Find target words.
      With Selection.Find
        .ClearFormatting
        .Text = objParaRange
        .MatchWholeWord = True
        .MatchCase = False
        .Execute
      End With

      '  Expand the selection to the entire sentence.
      Do While .Find.Found
        Selection.Expand Unit:=wdSentence
        strButtonValue = MsgBox("Are you sure to delete the sentence?", vbYesNo)
        If strButtonValue = vbYes Then
          Selection.Delete
        End If
        .Collapse wdCollapseEnd
        .Find.Execute
      Loop
    End With
  Next objParagraph
End Sub
- Now the “Browse” window shall open. Choose the document just saved and click “Open”.
- The following procedure is as same as that in method 1.
Approach to Deal with Corrupt Documents
Loss of valuable data is absolutely devastating. It can even leave your business at stake. To avoid such frustration, you need get hold of a Word fix tool as soon as possible. Such a tool shall help you win the battle with document corruption.
Author Introduction:
Vera Chen is a data recovery expert in DataNumen, Inc., which is the world leader in data recovery technologies, including fix Excel and pdf repair software products. For more information visit www.datanumen.com

In addition to simply searching for a specified word or phrase, you can use Word’s advanced search features to search using wildcards or search for special characters.
Search with Wildcards
A “wildcard” is a character (or a short string of characters) that represents multiple characters in a search.
- Click the Find list arrow.
- Select Advanced Find.
- Click the More button.

- Click the Use wildcards check box.
If you’re familiar with wildcards, you can type them out as part of the search phrase. You can also insert them from a menu.
- (Optional) Click the Special menu to select a wildcard.
The wildcard syntax is shown at the top of the list. The syntax can get tricky, and wildcards can be tough to understand without examples. The table on the next page should help explain some common examples.
- Enter a search phrase in the Find what text field.
- Click Find Next.


The search is conducted. Make sure to be careful if you’re using wildcard searches to find and replace text. Keep an eye on the results in case something unexpected is found.
Some common wildcards are shown in the following table.
| Wildcard | Purpose | Example |
|---|---|---|
| ? | Any single character | h?t will find hat, hot, and h t |
| * | Any number of characters | a*d will find ad, ahead, and as compared |
| [ ] | One of these characters | t[ai]n will find tan and tin, but not ton |
| [ — ] | One of these characters in a range | [b-d]ot will find bot, cot, and dot |
| [! ] | Not the specific characters | [!d]ust will find rust and must, but not dust |
| < | The beginning of a word | <(some) will find something, someone, and somewhere |
| > | The end of a word | (one)> will find stone, cone, and provolone |
| @ | One or more instances of a character | cor@al will find coral and corral |
| {n} | Exactly n instances of a character | ^p{2} will find two consecutive paragraph breaks |
| {n,} | At least n instances of a character | 10{2,} will find 100, 1000, and 10000 |
| {n,m} | Between n and m instances of a character | 10{2,3} will find only 100 and 1000, not 10000 |
Search for Special Characters
You can also specifically search for special characters, such as line and page breaks, paragraph marks, fields, graphics, and dashes.
- Click the Find list arrow.
- Select Advanced Find.
- Click the More button to expand the dialog box, if necessary.
If you’ve expanded the Find and Replace dialog box in a recent search, without collapsing it back down, it will open in an expanded state.
- Click in the Find what text field.
- Click the Special button.
The Special menu lists the special formatting characters that can be searched for.
- Select a special character.
When you select a special character from the menu, the text code for that special character is inserted.
- Click the Find Next button.
The next instance of the selected special character is found.
You can find and replace one special character with another (to replace section breaks with page breaks, for example) on the Replace tab of the Find and Replace dialog box.

FREE Quick Reference
Click to Download
Free to distribute with our compliments; we hope you will consider our paid training.