
Find and replace text

-
Go to Home > Replace.
-
Enter the word or phrase you want to replace in Find what.
-
Enter your new text in Replace with.
-
Choose Replace All to change all occurrences of the word or phrase. Or, select Find Next until you find the one you want to update, and then choose Replace.
-
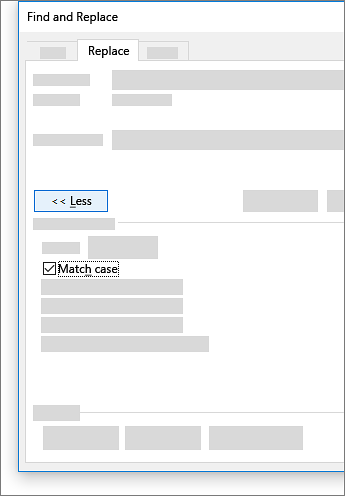
To specify only upper or lowercase in your search, select More > Match case. There are several other ways to search in this menu.
For other options, see Find and replace text
Find and replace basic text
In the upper-right corner of the document, in the search box  , type the word or phrase that you want to find, and Word will highlight all instances of the word or phrase throughout the document.
To replace found text:
-
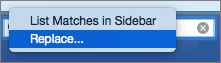
Select the magnifying glass, and then select Replace.

-
In the Replace With box, type the replacement text.
-
Select Replace All or Replace.
Tips:
-
You can also open the basic Find and Replace pane with the keyboard shortcut CONTROL + H.
-
When you replace text, it’s a good idea to select Replace instead of Replace All. That way you can review each item before replacing it.
-
You can find text with special formatting, such as bold or highlight, by using the Format menu.
-
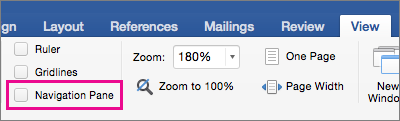
Select View > Navigation Pane.
-
In the Navigation Pane, select the magnifying glass.
-
Select Settings
, and then select Advanced Find & Replace.
Notes:
-
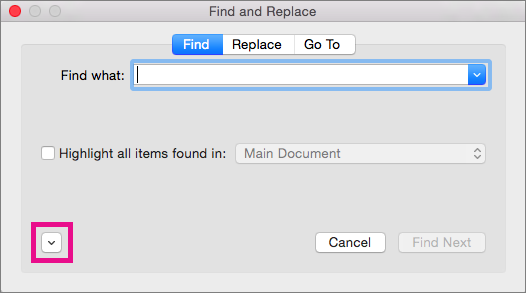
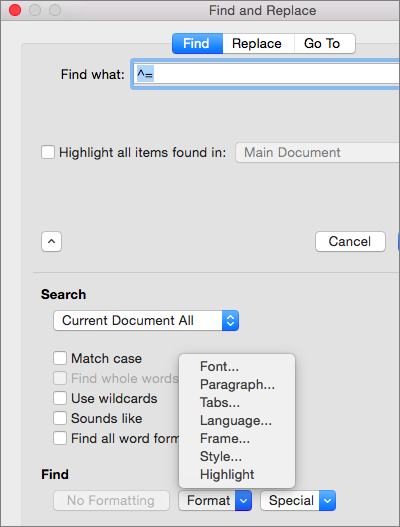
Select the arrow at the bottom of the Find and Replace dialog box to show all options.
-
-
-
On the Format menu, select the option that you want.
If a second dialog box opens, select the options that you want, and then select OK.
-
In the Find and Replace dialog box, select Find Next or Find All.
 , and then select Advanced Find & Replace.
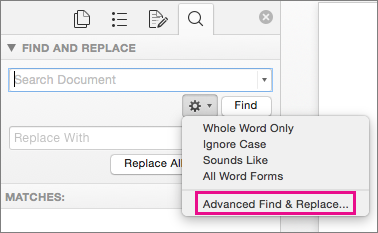
You can find and replace text with special formatting, such as bold or highlight, by using the Format menu.
-
Select View > Navigation Pane.
-
In the Navigation Pane, select the magnifying glass.
-
Select Settings
, and then select Advanced Find & Replace.
-
At the top of the dialog box, select Replace.
Notes:
-
Select the arrow at the bottom of the Find and Replace dialog box to show all options.
-
-
-
On the Find what box, type the text that you want to find.
-
On the Format menu, select the formatting that you want to find.
If a second dialog box opens, select the options that you want, and then select OK.
-
Select in the box next to Replace with.
-
On the Format menu, select the replacement formatting. If a second dialog box appears, select the formats that you want, and then select OK.
-
Select Replace, Replace All, or Find Next.
-
Select View > Navigation Pane.
-
In the Navigation Pane, select the magnifying glass.
-
Select Settings
, and then select Advanced Find & Replace.
Notes:
-
Select the arrow at the bottom of the Find and Replace dialog box to show all options.
-
-
-
On the Special menu, select the special character that you want to find.
-
Select Find Next.

-
Select View > Navigation Pane.
-
In the Navigation Pane, select the magnifying glass.
-
Select Settings
, and then select Advanced Find & Replace.
Notes:
-
Select the arrow at the bottom of the Find and Replace dialog box to show all options.
-
-
-
At the top of the Find and Replace dialog box, select Replace and then select in the Find What box, but don’t type anything there. Later, when you select a special character, Word will automatically put the character code in the box for you.
Note: Select the arrow at the bottom of the Find and Replace dialog box to show all options.
-
On the Special menu, select the special character that you want to find.
-
Select in the Replace with box.
-
On the Special menu, select the special character that you want to use as a replacement.
-
Select Replace or Find Next.
-
Select View > Navigation Pane.
-
In the Navigation Pane, select the magnifying glass.
-
Select Settings
, and then select Advanced Find & Replace.
-
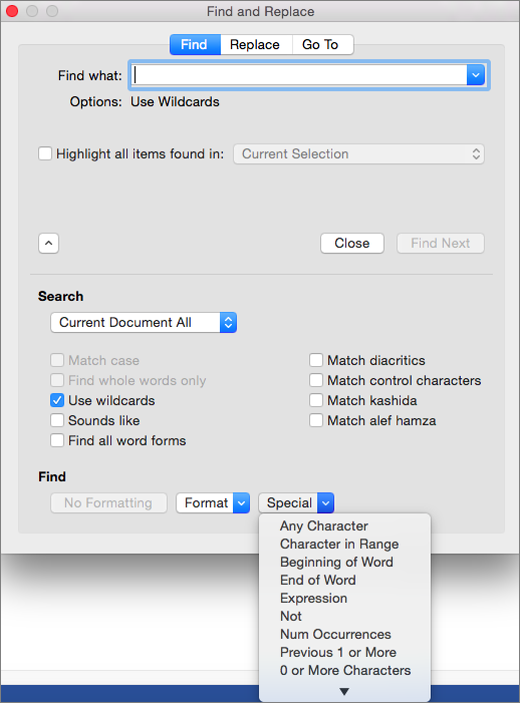
Select the Use wildcards check box.
If you don’t see the Use wildcards check box, select
. -
Select the Special menu, select a wildcard character, and then type any additional text in the Find what box.
-
Select Find Next.
Tips:
-
To cancel a search in progress, press
+ PERIOD. -
You can also enter a wildcard character directly in the Find what box instead of selecting an item from the Special pop-up menu.
-
To search for a character that’s defined as a wildcard character, type a backslash () before the character. For example, type ? to find a question mark.
-
You can use parentheses to group the wildcard characters and text and to indicate the order of evaluation. For example, search for <(pre)*(ed)> to find «presorted» and «prevented.»
-
You can search for an expression and use the n wildcard character to replace the search string with the rearranged expression. For example, type (Newman) (Belinda) in the Find what box and 2 1 in the Replace with box. Word will find «Newman Belinda» and replace it with «Belinda Newman.»
-
-
To replace found text:
-
Select the Replace tab, and then select the Replace with box.
-
Select Special, select a wildcard character, and then type any additional text in the Replace with box.
-
Select Replace All, Replace, or Find Next.
Tip: When you replace text, it’s a good idea to select Replace instead of Replace All. That way you can confirm each replacement to make sure that it’s correct.
-
 .
.
 + PERIOD.
You can refine a search by using any of the following wildcard characters.
|
To find |
Use this |
For example |
|---|---|---|
|
Any single character |
? |
s?t finds «sat» and «set.» |
|
Any string of characters |
* |
s*d finds «sad» and «started.» |
|
One of the specified characters |
[ ] |
w[io]n finds «win» and «won.» |
|
Any single character in this range |
[-] |
[r-t]ight finds «right» and «sight» and «tight.» Ranges must be in ascending order. |
|
Any single character except the characters inside the brackets |
[!] |
m[!a]st finds «mist» and «most» but not «mast.» |
|
Any single character except characters in the range inside the brackets |
[!x-z] |
t[!a-m]ck finds «tock» and «tuck» but not «tack» or «tick.» Ranges must be in ascending order. |
|
Exactly n occurrences of a character or expression |
{ n} |
fe{2}d finds «feed» but not «fed.» |
|
At least n occurrences of a character or expression |
{ n,} |
fe{1,}d finds «fed» and «feed.» |
|
A range of occurrences of a character or expression |
{ n, n} |
10{1,3} finds «10,» «100,» and «1000.» |
|
One or more occurrences of a character or expression |
@ |
lo@t finds «lot» and «loot.» |
|
The beginning of a word |
< |
<(inter) finds «interesting» and «intercept» but not «splintered.» |
|
The end of a word |
> |
(in)> finds «in» and «within,» but not «interesting.» |
Word for the web lets you find and replace basic text. You can match case or fine whole words only. For more varied options, open your document in Word for the desktop.
Need more help?
![]()
Download Article
![]()
Download Article
This wikiHow will teach you how to find and delete duplicate words in Word using a computer. Usually, the default grammar checker will underline any repeats, but you can always use the find and replace tool to locate specific words and delete them manually.
Steps
-
1
Open your project in Word. You can either click File > Open when you have Word open, or you can right-click your project file and select Open with > Word.
- If you’re using the mobile app, simply open your project in editing mode and tap the magnifying glass, then enter a word you’re looking for.
-
2
Click the Home tab (if needed). If you haven’t selected another tab, this should be selected when you open the project.
Advertisement
-
3
Click the arrow next to Find. It’s in the «Editing» group.
-
4
Click Advanced Find. This will pop up a «Find and Replace» window.
-
5
Type the word you want to search for. There should be a field for you to enter your word.
-
6
Click More. It’s at the bottom of the window.
-
7
Click to check the box next to «Find whole words only» and «Highlight All.« This sets the tool to find that word and highlight it.
- If you don’t see «Highlight All,» you may need to click Reading Highlight first.
-
8
Press ← Backspace or Delete until the word is deleted. You’ll manually need to delete the highlighted words if you want to remove duplicates.


Advertisement
Ask a Question
200 characters left
Include your email address to get a message when this question is answered.
Submit
Advertisement
Thanks for submitting a tip for review!
About This Article
Article SummaryX
1. Open your project in Word.
2. Click the Home tab (if needed).
3. Click the arrow next to Find.
4. Click Advanced Find.
5. Type the word you want to search for.
6. Click More.
7. Click to check the box next to «Find whole words only» and «Highlight All.»
Did this summary help you?
Thanks to all authors for creating a page that has been read 50,500 times.
Is this article up to date?
If you run a small business, you probably work with Microsoft Office Word documents quite often. If you have a large document listing hundreds or even thousands of items, finding duplicate words is very important. Microsoft Office Word enables you to quickly find such words and Word even highlights them for you in the document. You must use the Advanced Find feature to find full words, excluding anything that just contains the term you’re searching for.
-
Click the «Home» tab at the top of the Word window if it’s not selected already.
-
Click the small arrowhead next to Find in the Editing group at the top and select «Advanced Find» from the drop-down menu. The «Find and Replace» window pops up.
-
Type the word you want to search for in the Find What box.
-
Click the «More» button at the bottom of the window to view more options.
-
Place a check mark in front of the «Find whole words only» option.
-
Click the «Reading Highlight» button and then «Highlight All» to find all duplicate words and highlight them.
-
Click «Close» to close the Find And Replace window. The results remain highlighted.
Often when working in Microsoft Word we only need to change one or two words in the file to make it relevant to another client or project. For Example, updating a client’s name in a 30-page contract or updating the address of a company or speakers name in a briefing document.
Because scrolling through your document changing each word individually would be a tedious and time-consuming task Microsoft has built-in a hand tool called ‘Find and Replace’.
Find and Replace allows you to replace one word with another, across the entirety of your Microsoft Word Document at the click of a button.
There is no limit to how many times you can use this tool, but it does need to be done word by word, we can’t yet find and replace multiple words at once. But still, it’s a huge time saver and will guarantee you don’t miss a word that needs replacing.
In this post we will show you how to use the Find and Replace tool in Microsoft Word and leave you updating your document in seconds.
Using Microsoft Word’s Find and Replace
- Open Word
- Find and click Edit in the Home bar
- Under Edit click Find

- In the Find tab press Replace….
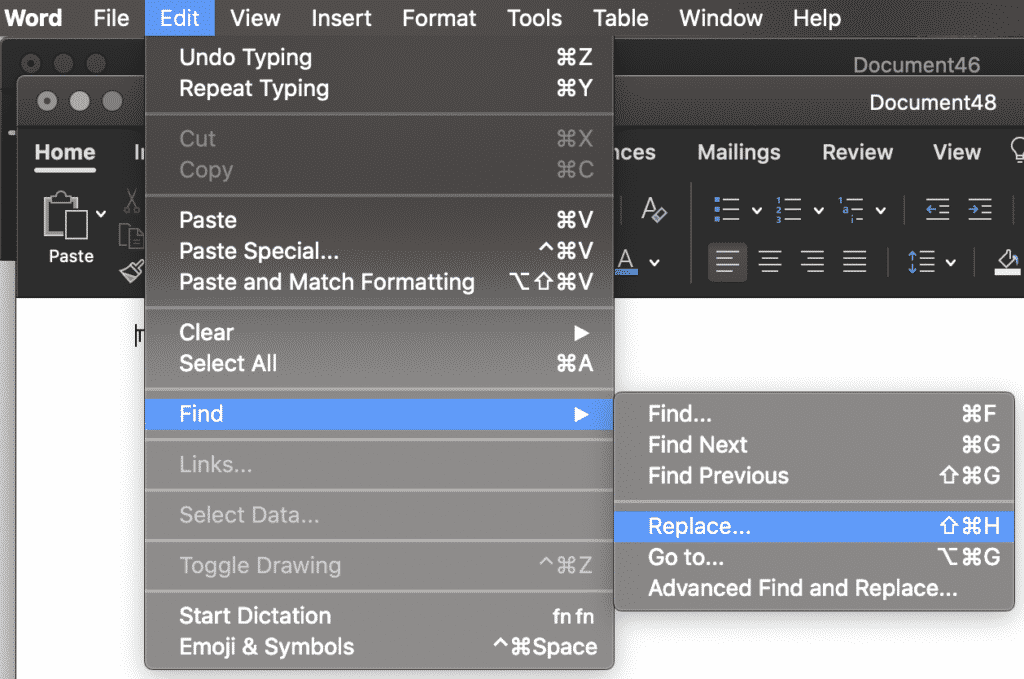
- This will open a navigation box on the left-hand side of your Word Document
- Type the word you wish to replace in the Find box
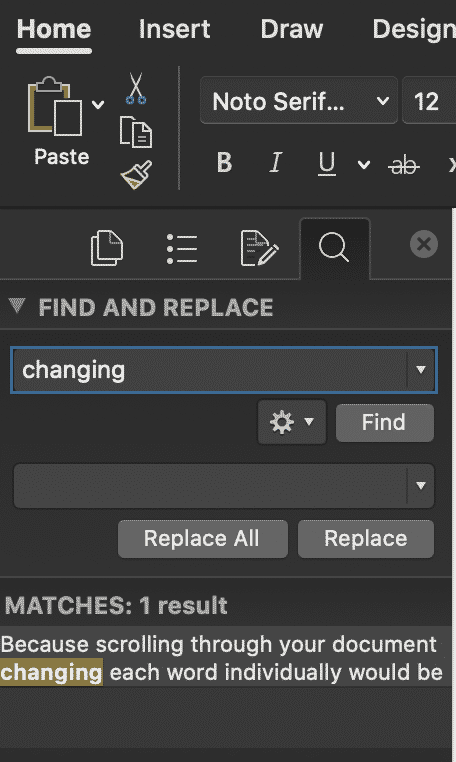
- Type the word you wish to replace this word with, in the second text box
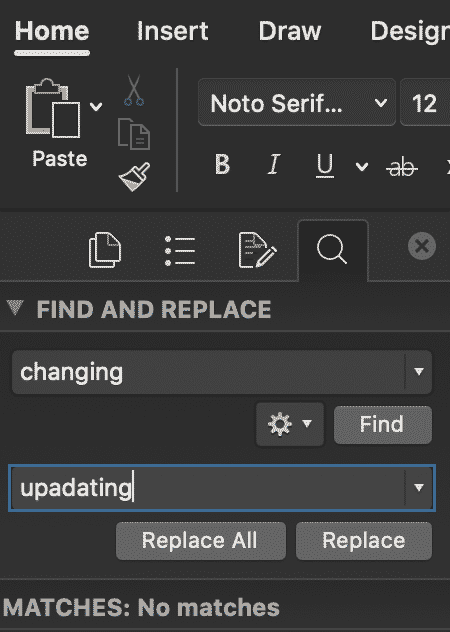
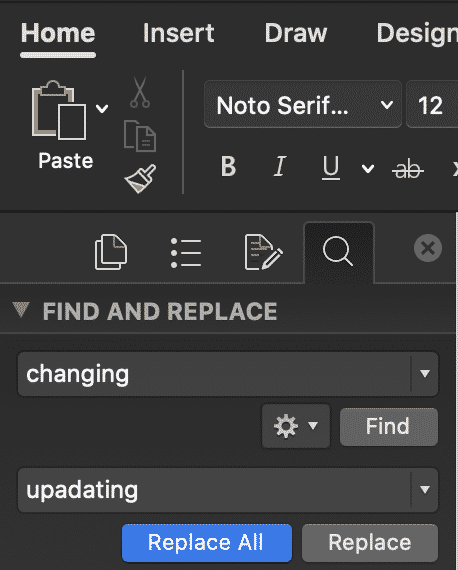
- Choose Replace. To replace all instances at the same time, select Replace All.
- Press OK.
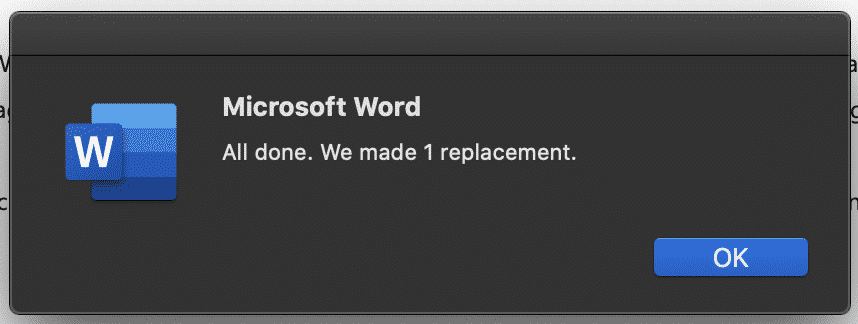
You have no successfully used Words Find and Replace feature to update your Microsoft Word Document.
Advanced Word Replacement
If your word search shows multiple options, as shown below.
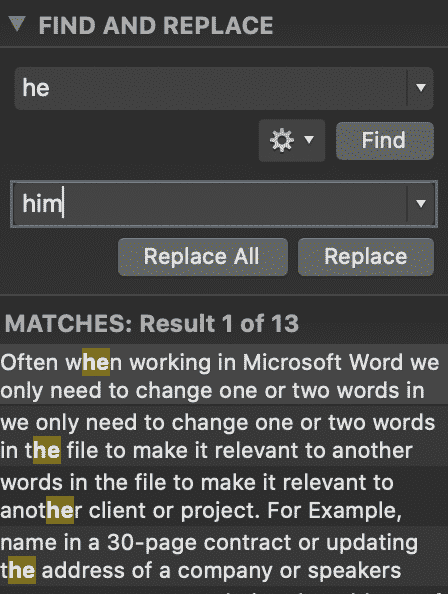
You can scroll through the highlighted words until you find the word you would like to replace. This will narrow down the word search and ensure you only replace the exact word you are looking for.

Looking for an easier solution to your collaboration frustrations?
When collaborating in Microsoft Word, your email inbox can quickly become filled with updated versions of a document being sent back and forward between colleagues.
John made an edit, sent an email ‘see updated attached’.
Then Lucy made an edit, sent an email 30minutes later ‘updated version attached’, and it goes on for days.
Sending updated versions via email is one way to know a new version is available and required your attention. But it can also clutter your inbox with internal emails, with a single line or sometimes nobody of text in the email.

The alternative is to send them via a group chat channel such as Slack or Microsoft Teams, but you should make a new channel for the document updates so that you don’t miss one, or lose it in an open channel as other conversations start happening around the document being sent.
With overflowing inboxes and your slack channel constantly telling you there are un-read messages there needs to be a solution for collaborating alone. Somewhere your updated versions can live in peace, with no other noise around them to allow you to easily review and check them at any time.
The solution is here and it comes in the form of a great new purpose-built tool called Simul Docs.
Simul was built just for Microsoft Word and for you, to help you collaborate with ease.
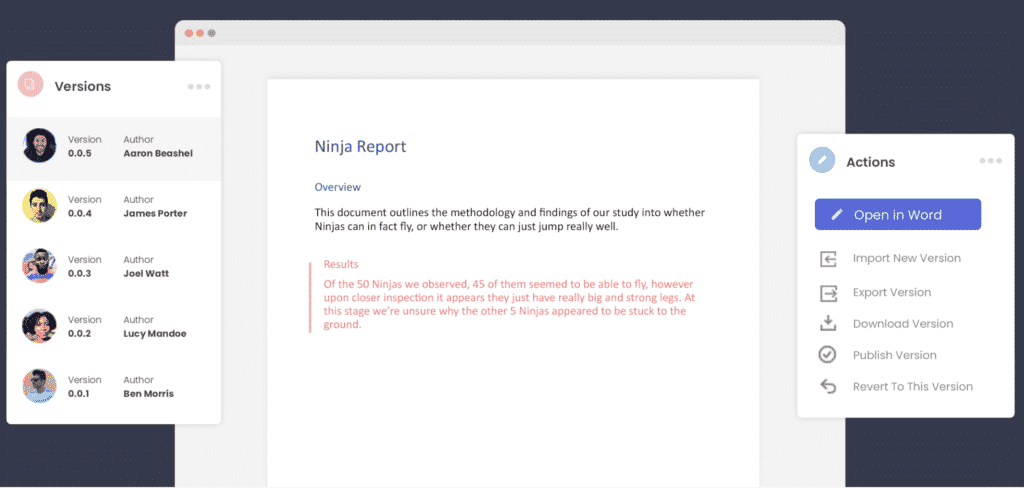
First and foremost, Simul will store and manage every version of your document in an easy to navigate toolbar that you can access from anywhere you have an internet connection (or offline if you do a quick download before losing your connection).
As a new version of your document is created, Simul will automatically save the file under a numerical version number that makes sense. The first version is named 0.0.1, the second 0.0.2, the third 0.0.3 and so on. Making it easy for you to keep track of how many versions have been made and which one is the most recent.
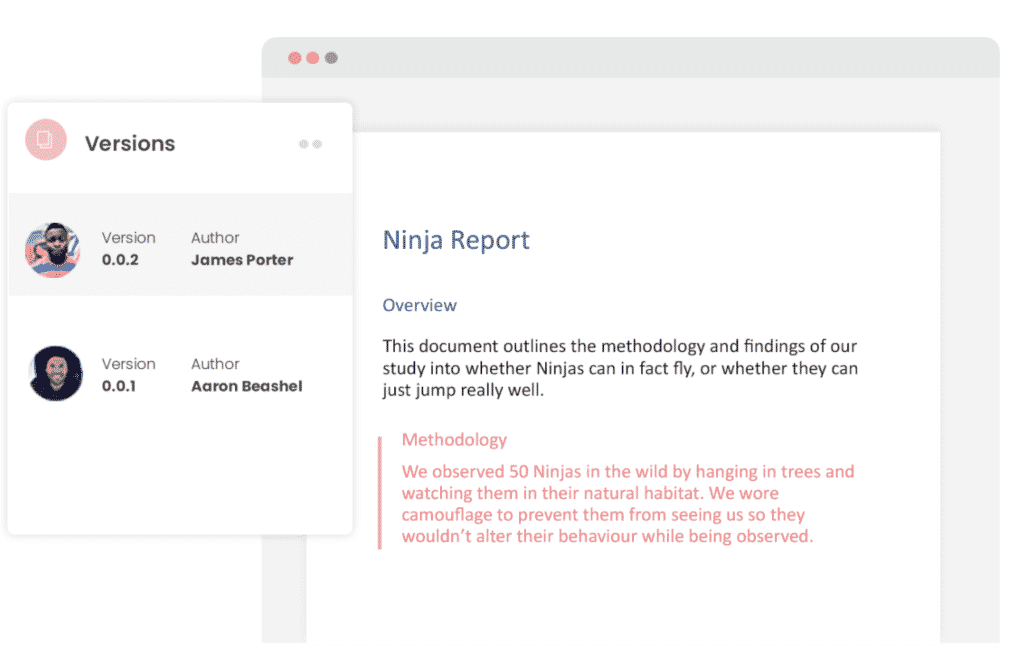
But what about any extra notes or comments the author wanted to make, ones they would usually put in the email such as ‘Tim, this is my final round of edits before we send onto client’? No worries, Simul allows you to add comments and notes to any version as well, so your team can see what is going on at all times.

Speaking of comments and notes, Simul will also track every comment, change or edit made to a version for you, without you having to remember to turn tracked changes on. That’s pretty cool, right?
So a tool that manages your version control, saves your files and stores them and tracks all of your edits and changes without you thinking about any of it, it sounds too good to be true or as though it would be difficult to use or implement. Well, don’t worry it’s not, it’s here and it is called Simul Docs and it’s so easy to use, after walking through the in-app tutorial we had it down within 3 minutes.
It’s a bit like an apple product, it just makes sense. It’s clean and simple, nothing too complicated, but with everything you need all in the one spot.
If you’re not convinced already, head over to Simul now and give their free trial a go.
Collaboration just got a whole lot easier with Simul Docs.
When writing, even the most expert makes mistakes. Both in writing and in style. On many occasions the same program corrects them, but sometimes you have to help it, as is the case of finding all the repeated words in a Word document .
When you review your document, no matter how many times you read it, you may not notice all the errors that are in it. Similarly, the automatic corrector is not always as effective as it is thought. Don’t worry, Word has the necessary tools to correct your text and leave it without a single error. You just have to learn how to use it to get the most out of it.
How to Find All Repeated Words in a Word Document
It is necessary to know how many versions of Windows 10 there are, to determine if you have the most recent and therefore the most current edition of Word.
Index( )
- What is called the repetition of words in a text
- Find all repeated words in a Word document
- Word wildcards
- How to easily check repeated words in Word
- Find repeating paragraphs in Word
- Repeated words in a Word document and wildcards
- How to underline all the same words in Word
- How to delete the same words in Word
- How to find all the repeated words in a Word document using wildcards?
What is called the repetition of words in a text
There is no specific term for this problem, but we could use ‘redundancy’ or ‘catchphrase’. Redundancy refers to the tendency to extend an argument too long and is something that should be avoided in certain cases. On the other hand, the catchphrase is the use of phrases in a repetitive way.
Although the catchphrase is seen mainly in speeches, it can also sneak into our texts, if we tend to use a word too much. Redundancy serves a purpose if you want to express a complex message in an explainable way, but you have to be careful and the catchphrase should also be avoided at all costs .
One of the most common mistakes when writing a document is that sometimes repeated words can be written. Normally, Word’s auto-checker alerts you to this error by underlining repetition in red. But this is not infallible, if you have the correction tool disabled it is still possible to detect these errors very easily. Using the program’s wildcards.
Word wildcards
Wildcards in Word are quite useful tools when navigating and correcting a document. However, many users do not know how to use them and many more do not even know that they exist. To find all the repeated words in a Word document, you can make use of these wildcards and even lock the position of an image in Word.
How to easily check repeated words in Word
Without a doubt, the easiest way to find repeated words in a Word document is by using the underline tool. With this tool you can check the integrity of your text looking for words that you think you repeated a lot. We will show you this below.
Find repeating paragraphs in Word
You may have gotten confused and copied a paragraph into large text. Fortunately, you can find repeating paragraphs if you use the underline tool below. It is enough that, instead of writing a word, you paste the text that is repeated in the document .
Repeated words in a Word document and wildcards
To get a repeated word, the first thing to do is search for a word, right? For this we will use the Word tool ” Search “. This is in the ” Start ” section of the top menu. It should be noted that to use this type of search you must select the “Use wildcard characters” box in the Search and Replace window.
If a word is a sequence of letters arranged in a specific way. So the first wildcard to use would be [a-zA-Z]. In this way the search engine will consider all the letters of the alphabet taking into account upper and lower case. Similarly, within this sequence will be the vowels with their accents and the letter “ñ”.
With that joker you can already get a letter. Now, how to find a word? Well, to do that you must use this wildcard [aaZ] {1;}. This is translated as a redundant letter one or more times, counting capital letters, accents, and the letter ñ.
The <> characters placed at the beginning and end of the wildcard will indicate the beginning and end of each word. But since you want to search for repeated words, you will modify the wildcard to the following <[a-zA-Z] {1;}). By replacing the “greater than” characters with a parenthesis, you are saying that you want to search for words followed by a space.
How to underline all the same words in Word
Underlining words is simple, for this we must use the ‘Find and replace’ tool. This option is found in the ‘Home’ section with the name of ‘Replace’, in turn, you can press Ctrl + B to display the tool.
Make sure you are in the ‘Search’ tab and type the word you want to search for. At the top you will see the option ‘Highlight reading’ , There select ‘Highlight all’. Doing the above will highlight the word in the text so you can see all the times it is there.
How to delete the same words in Word
To eliminate the repeated words, we must also use the ‘Find and replace’ tool . Remember, you access it through ‘Start’, there click on ‘Replace’. The tool menu will be displayed, you must click on the ‘Replace’ tab.
In ‘Search’ write the term you want to remove from your text and leave the ‘Replace with’ section blank. You can do the process one by one, clicking on ‘Find next’ to see the word in each section of the text, to make the modification click on ‘Replace’. If you want to remove all the words , click on ‘Replace all’.
How to find all the repeated words in a Word document using wildcards?
As an extra point, you should know that wildcards also apply to other cases, such as inserting a YouTube video in a Word document , a useful tool to finalize the file together with the elimination of repeated words.
Now, if the previous wildcard only searches for words followed by a space , how to find all the repeated words in a Word document? For that case, the wildcard explained above would be modified to the following (<[a-zA-Z] {1;}) 1>.
If you can tell, the previous wildcard is now inside parentheses. In wildcard theory it says that parentheses are used to create search references. Therefore adding parentheses created a reference.
This is followed by a space and then 1 follows. This refers to the word to search for. That is, to the first group of parentheses. If there were more sets of characters the reference would be 2, 3, or the amount of group of parentheses that are.
And finally this character> refers to the end of the word. So if you use this wildcard, it will find the redundancy “his his” but not “his dream” . Finally, after finding all the repeated words in a Word document, you will want to delete all the repeated words.
Thus, in the Word search and replace window you must put the following wildcard in the search bar (<[a-zA-Z] {1;}) 1> and in the replace window you must put 1. In this way, the repeated word will be deleted automatically.
Use the word processor’s search function to locate text and more
Updated on December 15, 2020
What to Know
- Basic word search: Go to the Home tab. Select Find and enter the text for the search.
- Advanced search: Go to Home > Find. Choose the search drop-down arrow. Select Options and select your criteria.
This article explains how to search for text in Microsoft Word. The information applies to Word 2019, Word 2016, Word 2013, Word 2010, Word Online, and Word for Microsoft 365.
How to Do a Basic Word Search in MS Word
Microsoft Word includes a search function that makes it easy to search for different elements in a document, including text. Use the basic tool to look for instances of a specific word, or the advanced options to perform tasks such as replace all instances of a word with another one or search for equations.
To run a basic search for a specific word or phrase in Word:
-
Go to the Home tab and select Find, or press Ctrl+F.
In older versions of Microsoft Word, select File > File Search.
-
In the Navigation pane, enter the text you want to search for. A list of matching words displays in the Navigation pane and instances of the word are highlighted in the main document.
-
Cycle through the results in the Navigation pane in one of three ways:
- Press Enter to move to the next result.
- Select a result with the mouse.
- Select the Up and Down arrows to move to the previous or next result.
-
Make any changes or edits to the document as needed.
-
Select the Down arrow to move to the next instance of the word.
Match Case, Whole Words Only, and More
Beyond searching for every instance of a word, you can get more specific about what you want to find. For example, to find whole instances of a word and not every word that contains the letter combination or to find instances of a word that aren’t capitalized.
Here’s how to do an advanced search:
-
Select Home > Find.
-
In the Navigation pane, select the Search drop-down arrow.
-
Choose Options.
-
In the Find Options dialog box, choose the description that best fits what you’re trying to find. For example, to find instances of a word with the same capitalization, select Match case.
-
Select OK.
Use Advanced Find
Many of the choices available in the Find Options dialog box are also available in Advanced Find. Advanced Find includes the option to replace the text with something new. Based on your selection, Word replaces one instance or all instances at once. You can also replace the formatting, or change the language, paragraph, and tab settings.
Find Instances of Other Elements
Other options in the Navigation pane include searching for equations, tables, graphics, footnotes, endnotes, and comments.
Thanks for letting us know!
Get the Latest Tech News Delivered Every Day
Subscribe
This find/replace is based on Paul Beverley’s work, so full acknowledgement to him for teaching me how to do this via his YouTube videos and his free book.
********
Some of my authors inadvertently type the same word twice (e.g. is is, the the), and it’s often hard to pick these up when editing. If you run spellcheck, you may find them, but there’s no guarantee of that. The find and replace below uses wildcards to find any instance of duplicated words, followed by a space or a common punctuation mark, and then replaces that with a single word and the trailing space or punctuation.
NOTE: This find/replace only finds words with the exact same case, so it will find ‘the the’, ‘THE THE’, and ‘The The’, but it won’t find instances where each word has the same letters but with different cases (e.g. ‘the The’, ‘The the’, ‘tHe thE’ etc.)
Steps:
- Press Ctrl+H to open the Find and Replace dialog box.
- Click More, then select the Use wildcards option.
- In the Find field, type: (<[A-Za-z]@)[ ,.;:]@1>
(Note: There’s a space in there, so I suggest you copy this Find string.) - In the Replace field, type: 1
- Click Find Next then click Replace. Repeat.
How this works — at least how I *think* it works:
- Find: Look for the start of any word (<) made up of any number (@) of letters ([A-Za-z]) followed by a space or punctuation ([ ,.;:]) then repeat that find (@1) until you can’t any more words that match the pattern (>).
- Replace: Replace the first element (the first of the duplicate words) with itself (that’s the 1 bit), which effectively deletes the rest.
[Links last checked December 2017]
Let’s assume you’re a paralegal and you just finished typing a lengthy legal document or a contract for your client, only to discover that you misspelled your client’s name or a wrong company’s name multiple times throughout your document. And don’t have time to manually locate and replace every instance of the text. What would you do? Don’t panic – you can easily fix that with MS Word’s Find and Replace feature.
Find and Replace is one of the most useful features in Microsoft Word that can be used to find a character, a word, or phrase in a document and replace them. You can also find and replace text in a specific section of text or a whole document.
Not only can you find a particular word and replace it with another word, but you can also find text based on its formatting, using wildcards, and with matching prefix or suffix. It also allows you to find and replace text with specific formatting, non-printing characters, or special characters. In this post, you will learn how to find and replace text in MS Word.
Find Text in Microsoft Word
To start with, let’s see how to Find text in Excel using the navigational pane or the Find and Replace tool. Then we’ll explore how to use the Find and Replace tool to replace text based on different options.
Find Text
You can use the Navigation pane to search for a character, a word, or a group of words. And you can access this navigation pane from the Ribbon or by pressing a hotkey Ctrl + F.
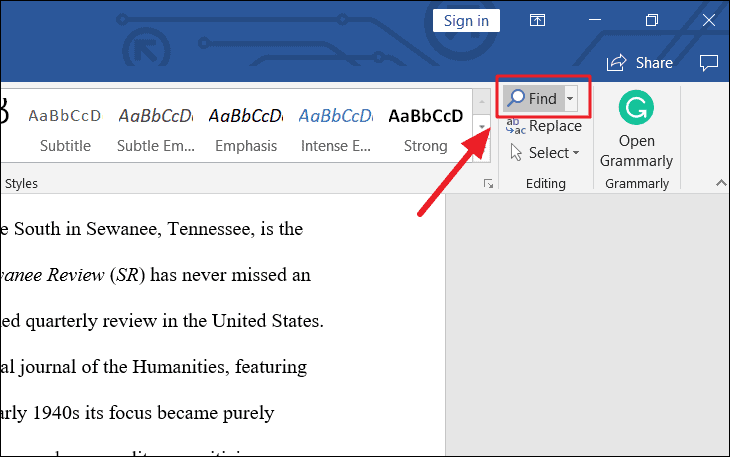
To access, the Navigation panel (Find Command), first, open the Word in which you want to search for text. Then, go to the ‘Home’ tab, and click the ‘Find’ button from the Editing group in the Ribbon. Or you can press the shortcut keys Ctrl + F in the keyboard.
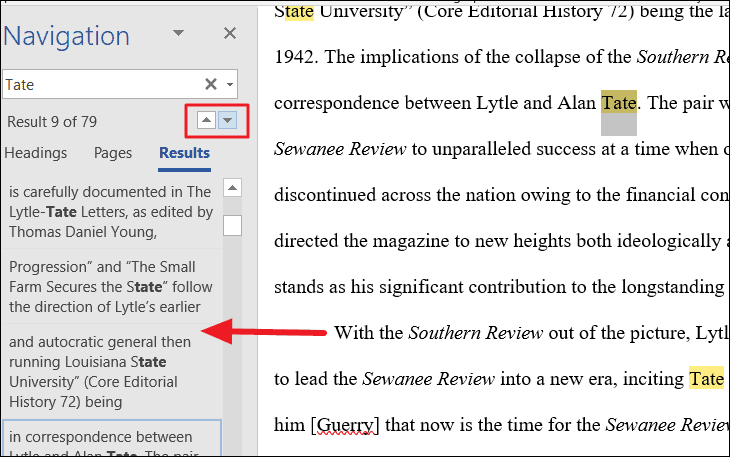
This will open up the Navigation pane on the left of the Window. Type the text or phrase you want to find in the ‘Search document’ text box in the Navigation pane and press ‘Enter’. As you type, the tool will show you all the related matches. In our example, we’ll type ‘Tate’.
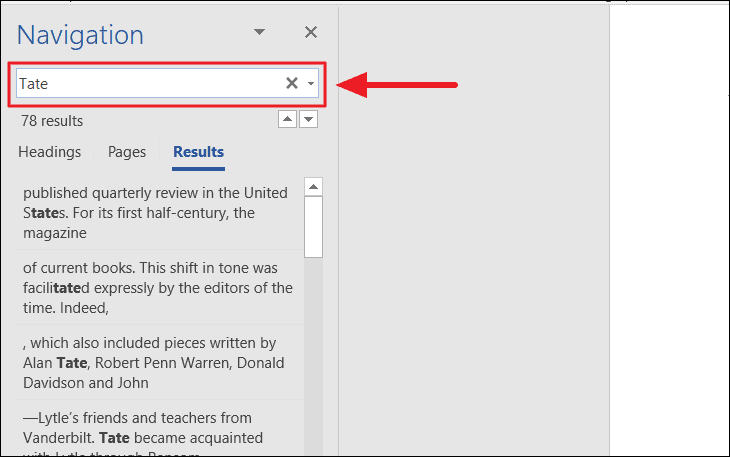
The Find command searches for all the matching text in the document and highlights them in yellow. The navigation pane shows all instances of the search word (Tate) as a preview of the results
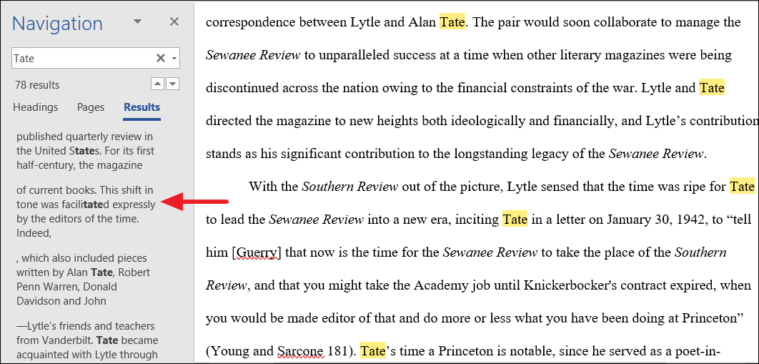
The tool not only highlights the exact words, it even highlights the partially matched words.
You can use the upward and downward arrows beside the text box to jump to the Previous or Next search result. Or you can click on one of the results below the search field to jump to it directly.
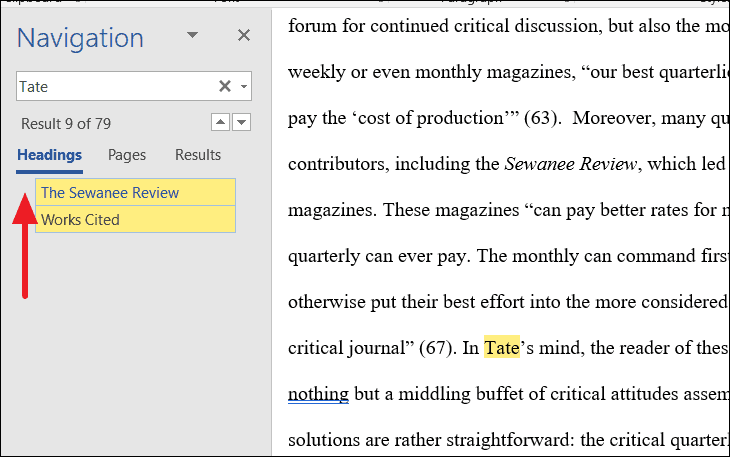
Instead of searching through an entire document for a text or phrase, you can also search a large document by headings. To do that, click the ‘Headings’ tab and select a heading in the Navigation pane to browse by headings in the document.
To search through pages in Word, click the ‘Pages’ tab in the Navigation pane and select one of the thumbnail images of all your pages that you want to see. Then, you can search for a specific text on that page.

Once you’re done editing the document, close the Navigation pane and the highlights will disappear.
Advanced Find
If you are looking for more specific words or phrases, for instance, words with a certain font or style, special characters, or only full words, you can use the Advanced Find feature to track them down. This tool lets you customize your search with various options. Here’s how:
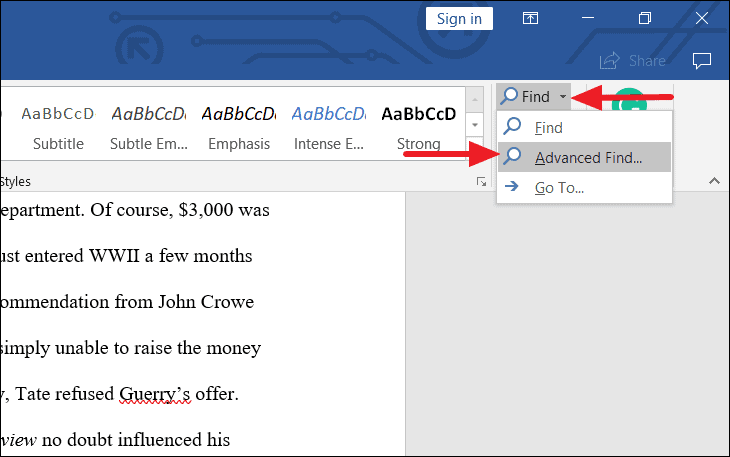
Go to the ‘Home’ tab, click the downward arrow next to the ‘Find’ icon in the Editing group, and select ‘Advanced Find’. Or press Ctrl + H shortcut keys to open the Find and Replace tool.
Or you can even launch the Find and Replace tool from the Navigation pane by clicking the magnifying glass icon in the Search Document text box and selecting the ‘Advanced Find’ option.

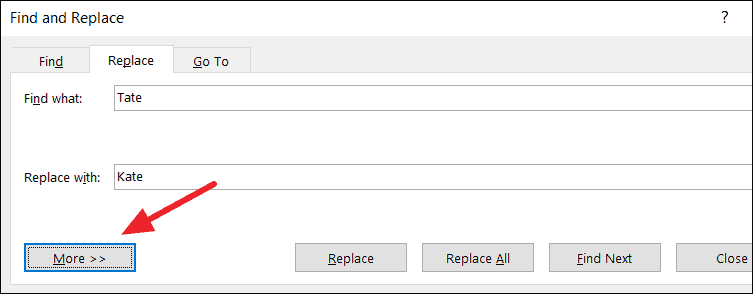
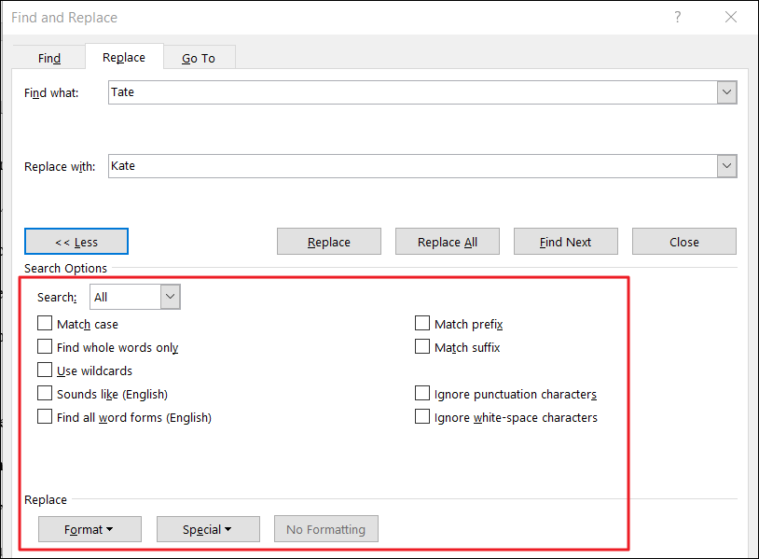
The Find and Replace dialog box will appear. Here, you can do a basic search, but if you want to customize your search with more options, Click the More >> button.

When you expand the More button, you would find more options with which you can do more advanced searches.
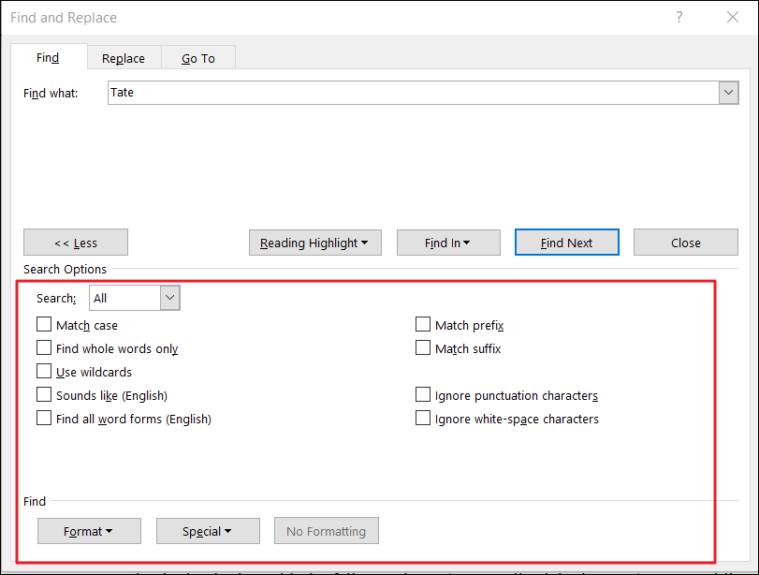
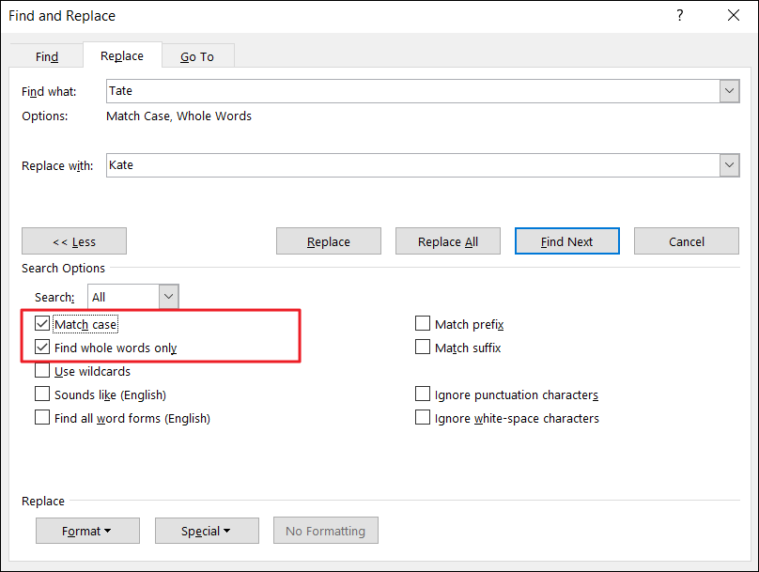
Select one or more options in the Search Options section and click ‘Find Next’ to view the result.
- Match Case: If the Match case box is checked, it searches for the text that exactly matches the uppercase and lowercase letters you type in the ‘Find what’ field.
- Find Whole Words Only: This option finds text that is not partial or part of another word, it only finds the whole words that are exactly matched.
- Use Wildcards: This option is the opposite of the ‘Find Whole Words only’ option. The wildcards you can use are single character (?) and multiple characters (*) wildcards. For example, when you are searching for “Wall*”, you’ll get Walls, Wallmart, or Wallpaper, etc.
- Sounds Like: This option finds words or phrases that sound phonetically similar such as ‘eyes’ when searching for ‘ice’ or ‘ant’ for ‘aunt’.
- Find All Word Forms: This option finds all variants of words (all verb forms). For example, when you search swim, you’ll get swim, swam, and swimming.
- Match Prefix: This searches for words with the same prefixes. For example, search for hype, and you may get hyperactive, hypersensitive, hypercritical.
- Match Suffix: This searches for words with the same suffixes. For example, search for less, and you may get endless, ageless, lawless, effortless.
- Ignore Punctuation Characters: This option lets you ignore punctuation characters in a text when searching. For instance, finding the word ‘Mrs. Jones’ when you searched for ‘Mrs Jones’.
- Ignore white-space characters: This option lets you ignore white spaces in between. For instance, finding the word ‘Days are good’ when you searched for ‘Daysaregood’.
We’ll apply few of these options and see how it works with an example.
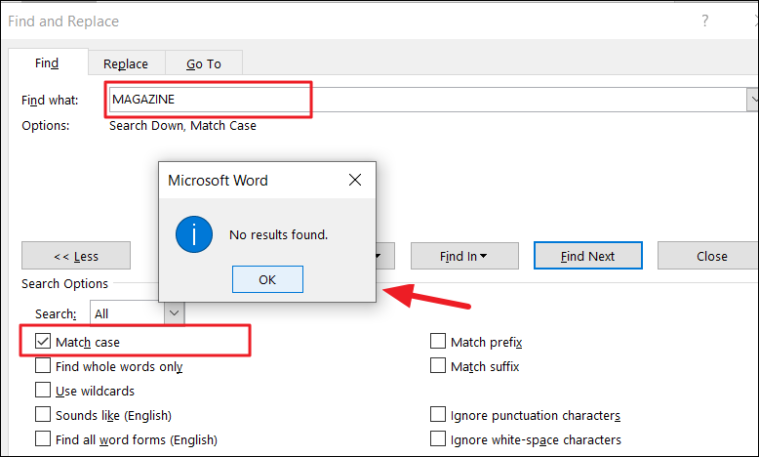
Match Case
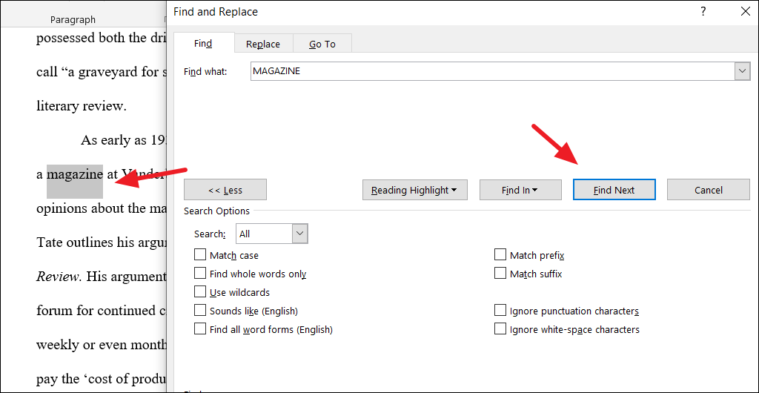
For example, let’s say we search the word ‘MAGAZINE’ in all caps without the match case option enabled. Type the word in the ‘Find what’ field and click the ‘Find Next’ button.

In the ‘Search’ drop-down under Search Options, you choose ‘Down’ to start looking from the top to bottom of the document, choose ‘down’ to start looking from the bottom to top of the document, or ‘All’ to search all over the document.
When you click ‘Find Next’, it will highlight the first instance of the word in grey. When you click ‘Find Next’ again, it will select the next instance of the word. As you click Find Next each time, it will highlight the matching word one at a time.
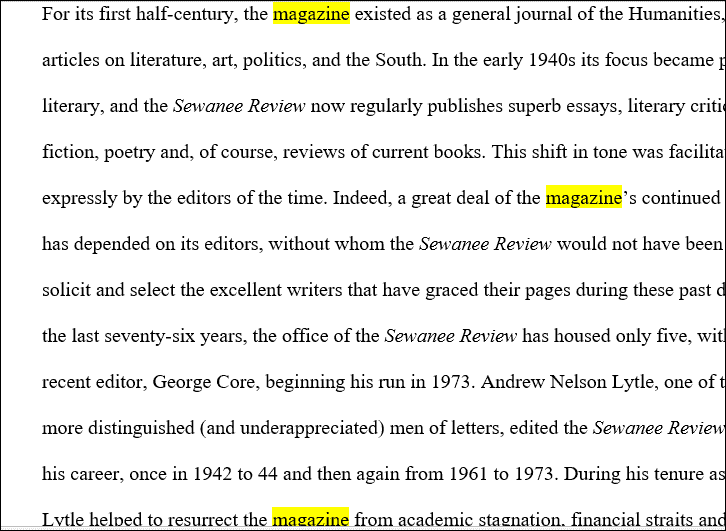
If you want to highlight all the instances of the word at once, click the ‘Reading Highlight’ button and select ‘Highlight All’.
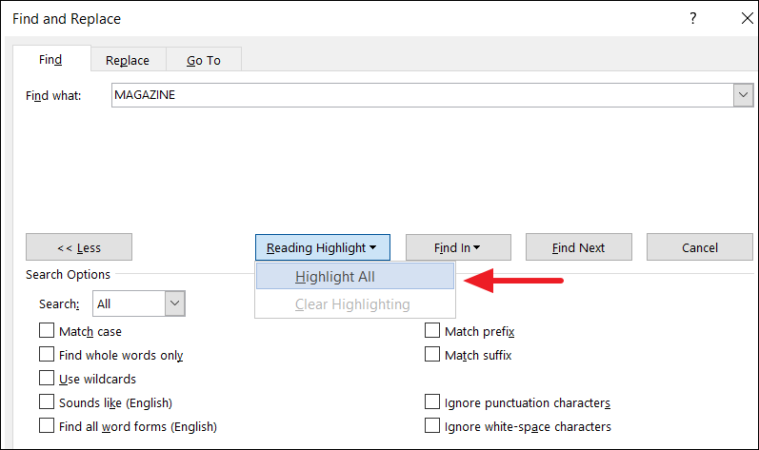
You would get several matches with the word all highlighted in yellow.
But if we searched the same word (capitalized) with match case enabled, we would get no results. Because the tool only looks for the word that exactly matches the uppercase letters we typed earlier.
Find All Word Forms
In another example, if we searched the word ‘write’ with the ‘Find all word forms (English)’ setting enabled, we would get all variants of the word.
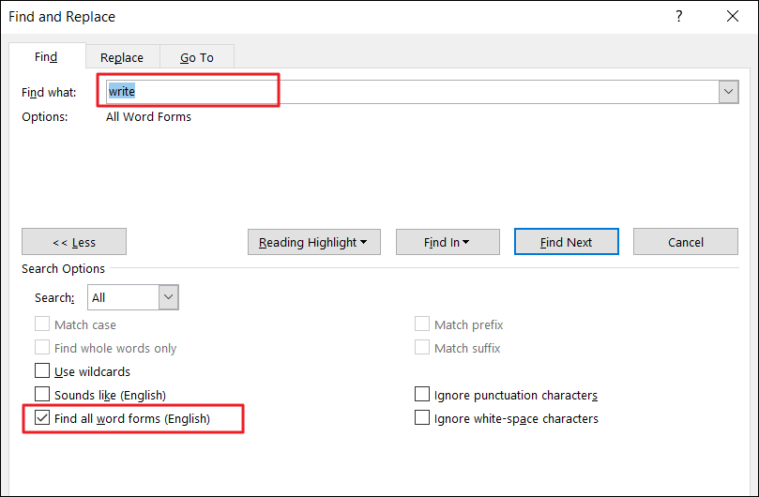
Word will find all verb forms of the word as shown below.
Advanced Find with Formatting
You can also search for certain word or phrase with specific formatting applied.
To find words with formatting, first, type the word in the ‘Find what’ box and click the ‘Format’ drop-down button at the bottom of the Find and Replace dialog box. Then choose the format in which you want to look for the word.
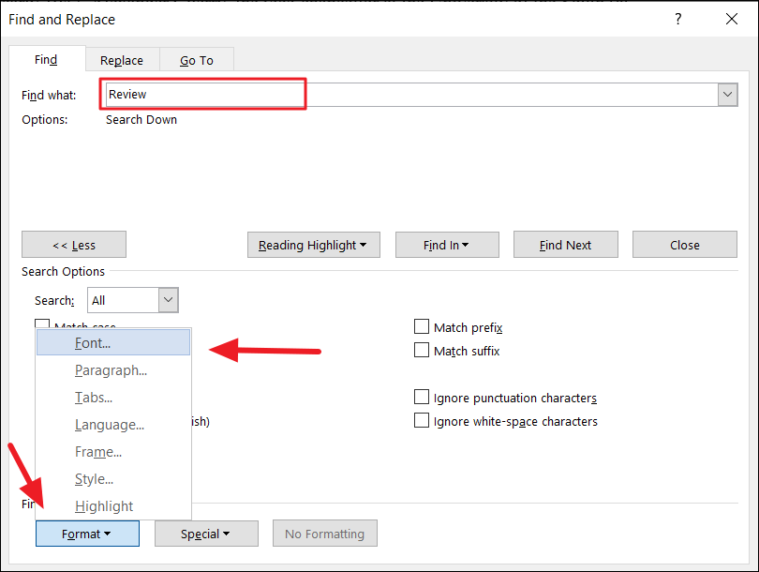
You can even find words with specific font format, paragraphs with specific alignment and format, tabs, words in a certain language, text frame, style, and highlight.
We are going to search for the word with a certain font format, so we are choosing ‘Font’. In the Find Font window, specify the format as shown below and click ‘OK’.
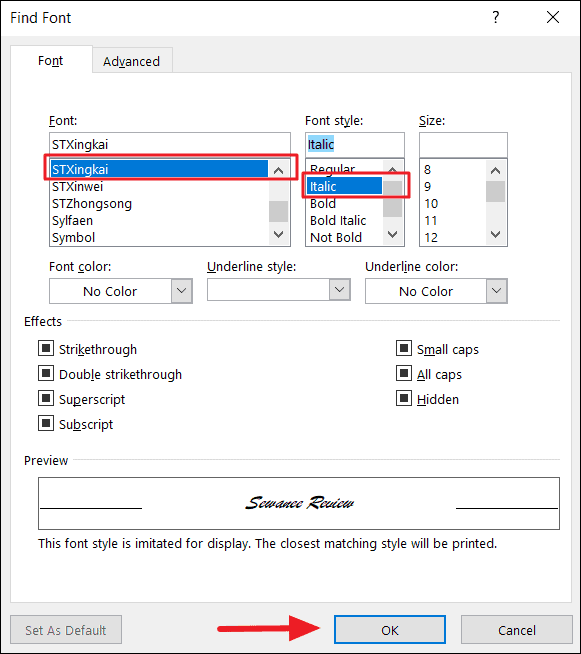
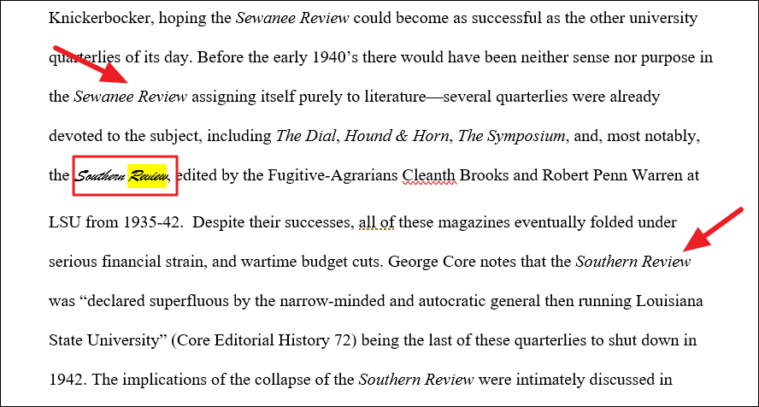
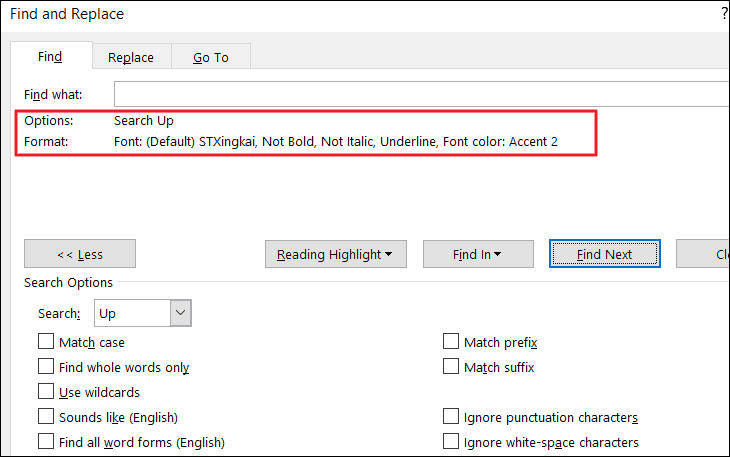
The chosen Format ‘Font: (Default) STXingkai, Italic’ will appear under the ‘Find What’ text box in the Find and Replace dialog box. Now click ‘Highlight All’ to find the matching words with that format.
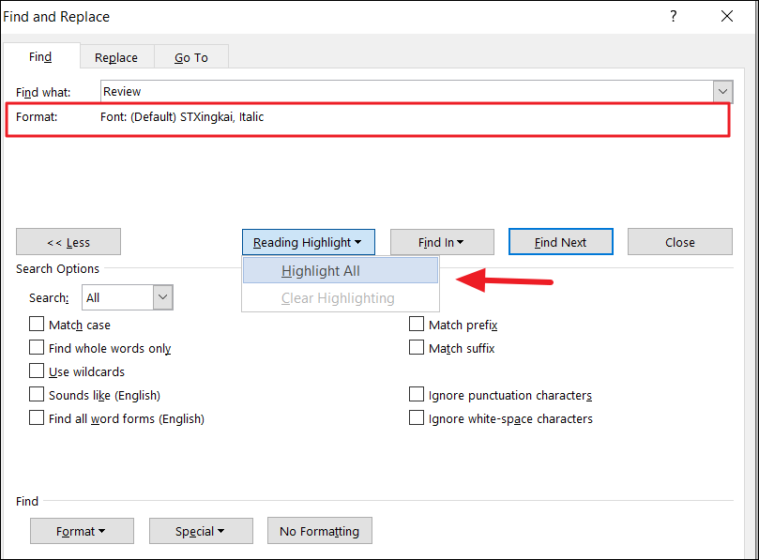
As you can see, the tool only highlights the words with that specific font format, while it doesn’t highlight the same matching word in a different font format.
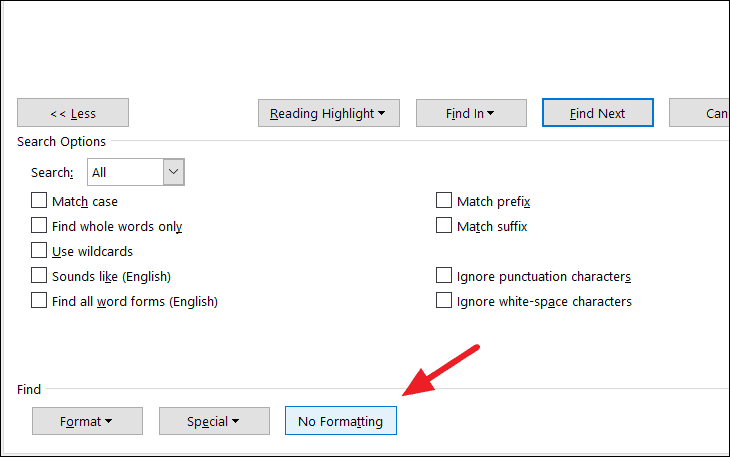
To clear the formatting for the search, click the ‘No Formatting’ button at the bottom of the Find and Replace dialog box.
Find Text with Only Formatting
You can even find texts with formatting alone. You don’t even have to type a word or phrase, you can just specify the only format of the text.
And the tool will find you all the words or phrases with the matching format.
The Find and Replace tool also lets you find non-breaking characters/special characters or words with special characters by choosing the character(s) from the ‘Special’ drop-down button at the bottom of the Find and Replace dialog box.
Find and Replace Text in MS Word
So far, you have learned how to find text and how to find text with advanced options, now let us see how to replace the found text.
The Replace function allows you to find a word or a group of words and replace it with something else or find a word based on text formatting and replace it with other text, or find a specific word and replace its formatting, or find and replace characters with other special characters or words.
Find and Replace Text
To find and replace a particular word or phrase for another, navigate to the Editing group in the ‘Home’ tab and click the ‘Replace’ command. Alternatively, you can also press the keyboard shortcut Ctrl + H.
This will open the Find and Replace dialog box. In the Find and Replace dialog box, fill out the two fields:
- Type the text you want to search for in the ‘Find what:’ field.
- Type the text you want to replace it with in the ‘Replace with:’ field.
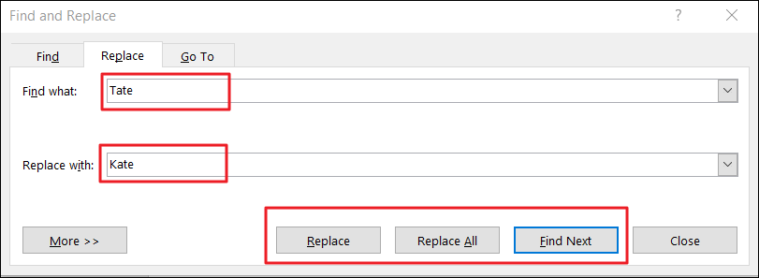
Once you enter the necessary texts, you can either click the ‘Replace’ button to replace the text one by one or ‘Replace All’ to replace all the instances of the word at once.
Replacing all the text together may cause errors in your document if you are not cautious. For example, if you are replacing all the ‘He’ words with ‘She’, it may also replace the words Head with Shead, help with Shelp, heat with Sheat, and so on. So sometimes, it’s better to replace them one at a time.
Click the ‘Find Next’ to find the first instance of the text highlighted in gray and click ‘Find Next’ again to jump to the next instance. Review each instance and click ‘Replace’ to exchange the currently highlighted text.
You can click the title bar of the Find and Replace dialog box and drag it out the way to see the results behind it.
Once you’re done, click the ‘Close’ button to close the dialog box.
Note: If you leave the ‘Replace With’ field blank, the search text in the ‘Find What’ field will be deleted from the document.
Advanced Find and Replace Text
If you are looking to replace more specific words such as words with punctuation, capitalization, certain font or style, or even special characters, you can use the advanced search options of the Find and Replace tool.
To access the advanced options of Find and Replace, click the ‘More >>’ button at the bottom of the dialog.
Here, you have various search and replace options that you can use to narrow down your search.
As we discussed earlier in the Advanced Find section, you already know what each option under the Search Options is used for.
Select one or more options under the Search Options and click ‘Find Next’ to find the matching words or click ‘Replace’ to replace one instance at a time or click ‘Replace All’ to exchange every instance at once.
Example:
As we mentioned before, this tool finds the combinations of characters of the given word, even as part of other words.
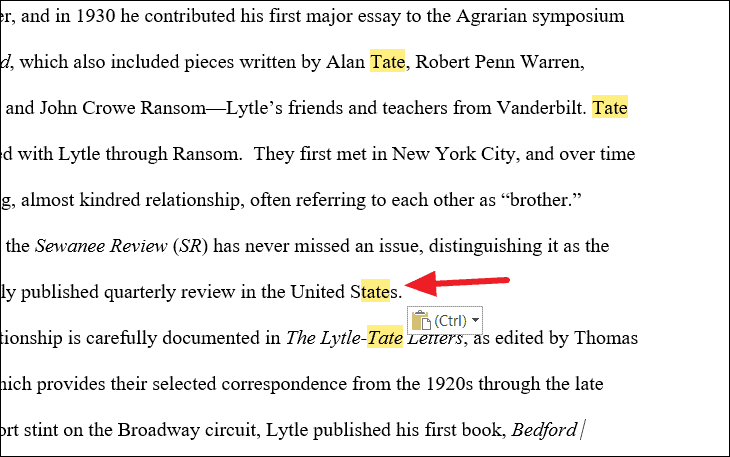
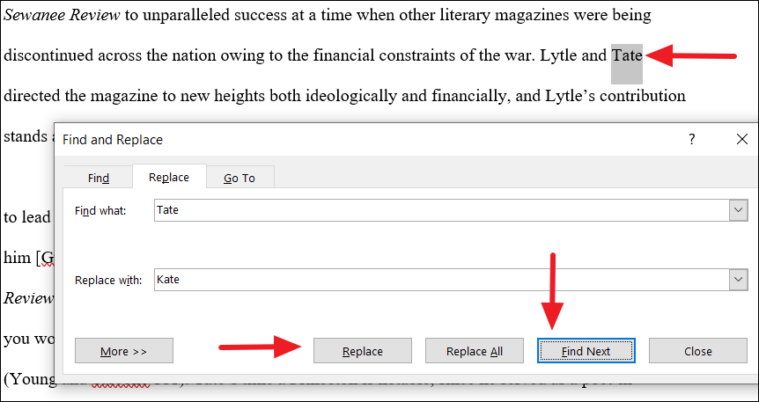
For example, when we search for the word ‘Tate’ in the document, it finds that combination of characters even as part of other words like ‘United States’.
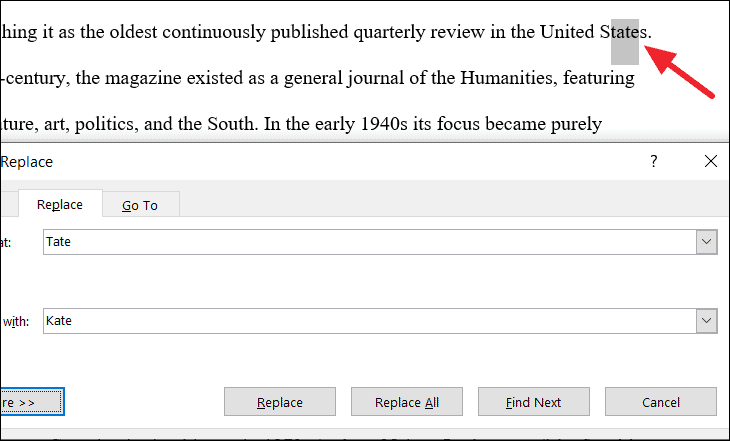
And this is not ideal when we replace these words. Also if you hundreds of matches, it would take forever to replace words one by one.
To fix this, check the ‘Find whole words only’ option, to find the words that are not partial or part of other words, it only finds whole words that are exactly matched. Here, we also checked the ‘Match case’ option to make sure it matches the exact uppercase and lowercase letters too. Then, click ‘Replace’ or ‘Replace All’ to replace the words.
You can use the rest of the above options in a similar fashion to customize your search to find specific words.
Find Text and Replace Formatting
You can also find a particular word and replace it with the same word but with specific formatting or replace it with another word with formatting.
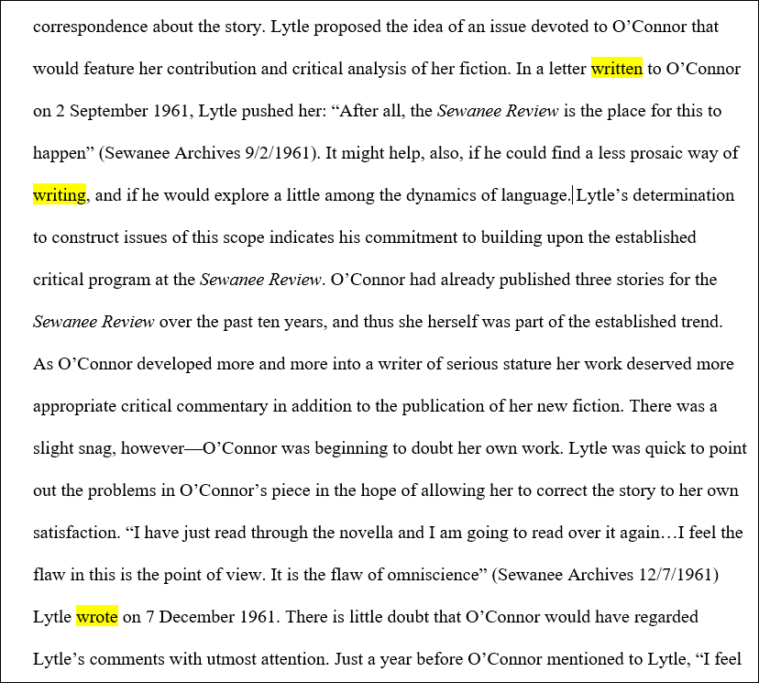
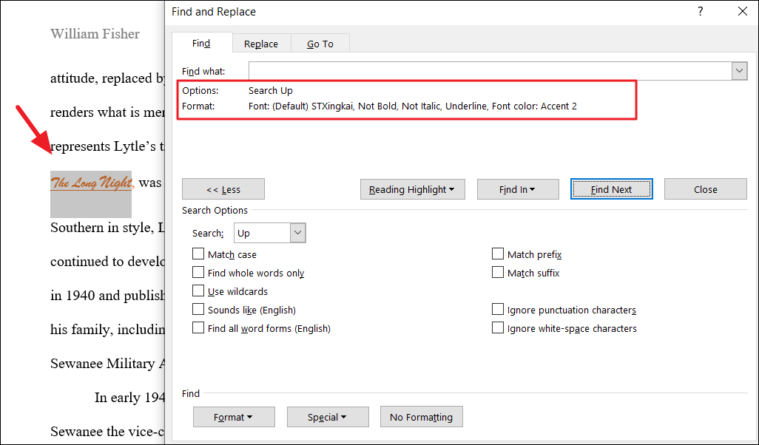
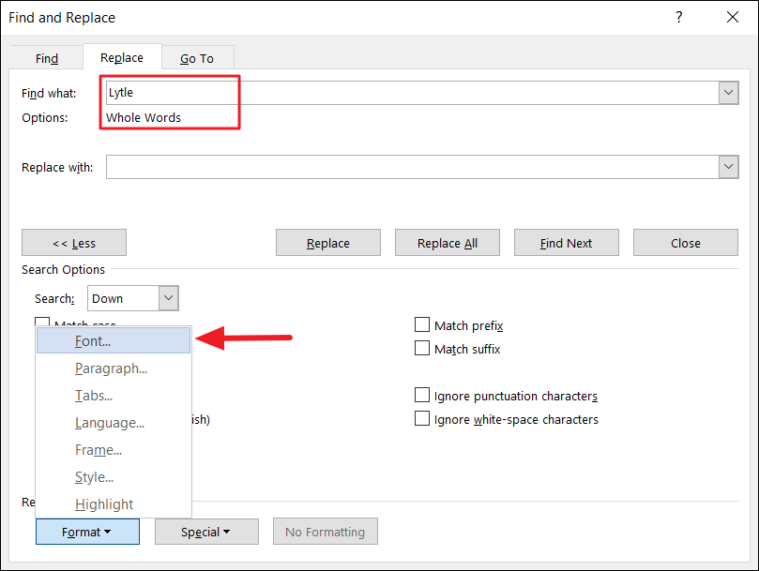
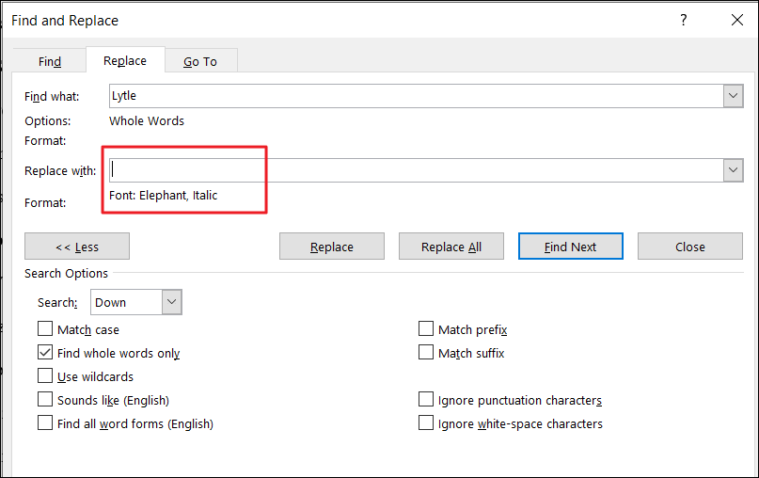
For example, we want to find and replace the whole word ‘Lytle’ with a specific font format. To replace formatting, type the word you want to find in the ‘Find what’ field and select the ‘Find whole words only’ option to search for only that whole word. Then, click the ‘Format’ button at the bottom of the dialog box and choose ‘Font’.
You can replace words with other formatting options such as Style, Paragraph, Frame, and so on.
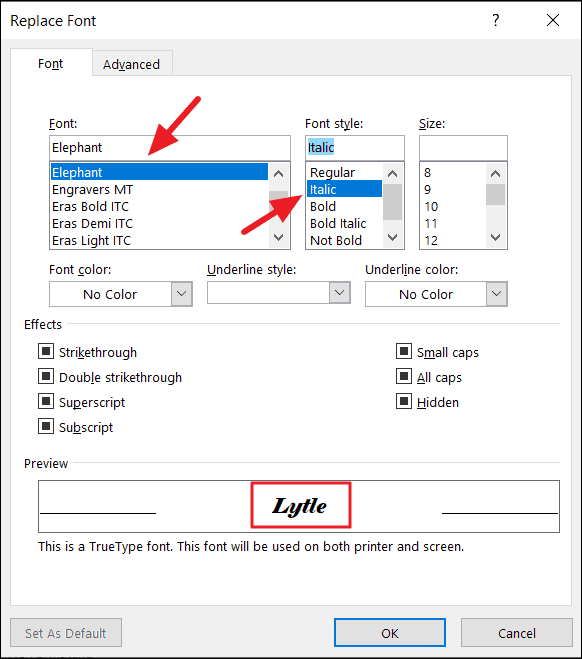
In the Replace Font dialog, choose your desired format style such as font, font style, font color, etc. In our case, we are choosing ‘Elephant’ font and ‘Italic’ style. Then, click ‘OK’ to apply.
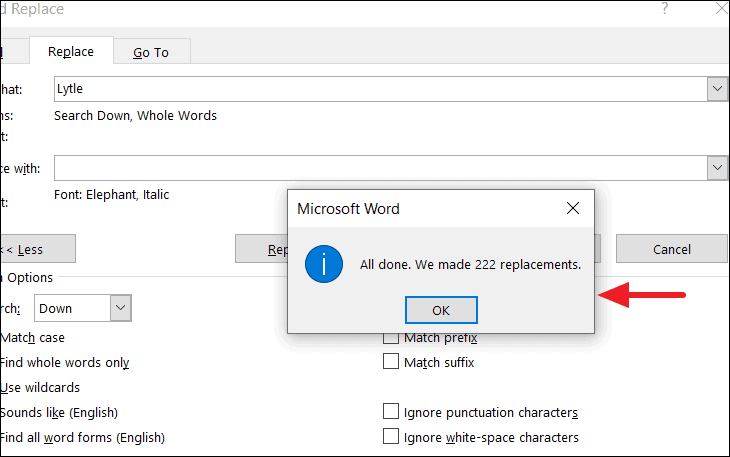
Back in the ‘Find and Replace’ dialog box, you can see the chosen formatting is set for the ‘Replace with:’. Since we are only replacing the formatting of the word, leave the ‘Replace with:’ field blank. Then, click either the ‘Replace’ or ‘Replace All’ button to replace the formatting.
Once you click the ‘Replace All’ button a message box will appear informing you how many replacements were made (In our case, 222).
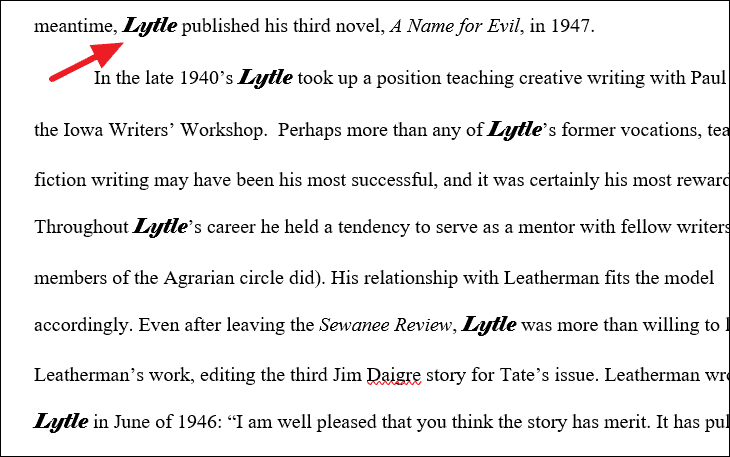
As you can see, all the instances of the word ‘Lytle’ is replaced with specified formatting.
Find Text with a Specific Formatting and Replace
If you want to find a text that has a certain formatting style and replace it with another text, without changing the formatting or with different formatting, you can do it by applying that formatting to the Find word. Here’ how you do this:
For example, we want to find and replace the text ‘Leatherman’, that has particular formatting (Font: Old English Text MT, Style: Italic, Color: Blue, Accent 5), with the text ‘Lincoln’ (without changing the formatting).
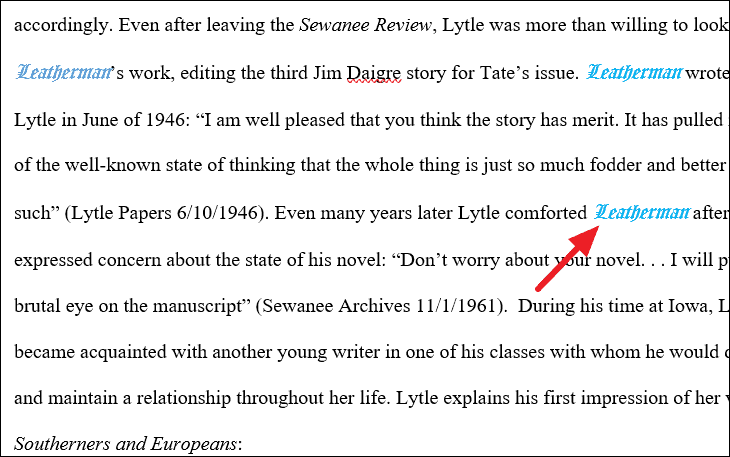
First, type the text you want to search for (in our case, Leatherman) in the ‘Find What’ field. Then, click on the ‘Format’ button and choose the options as required (Font).
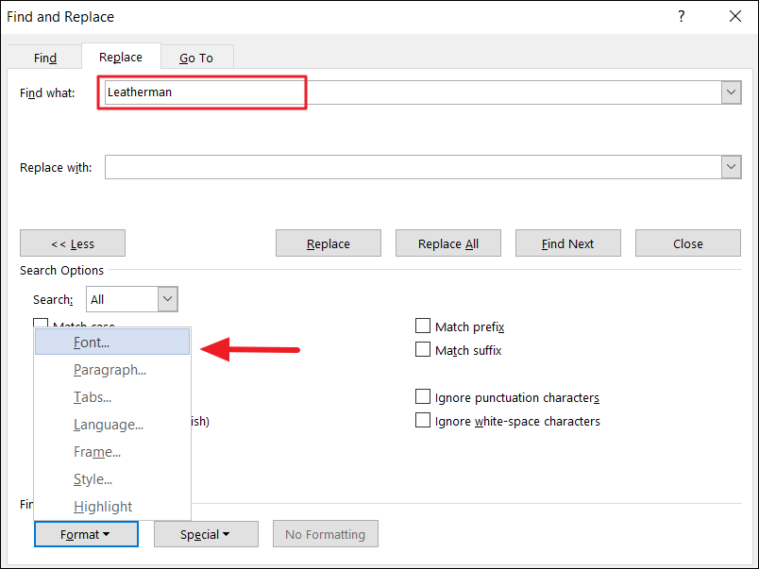
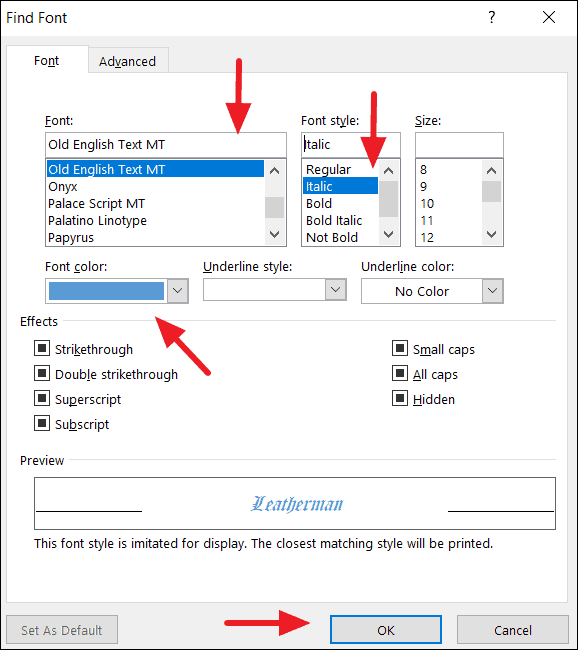
In the Find Font, dialog box, select the required formatting with which we’re going to find text. In our example, the text ‘Leatherman’ is in ‘Font: Old English Text MT, Style: Italic, and Color: Blue, Accent 5’ formatting. Once the options are selected, click ‘OK’.
Now the selected formatting options should appear under the ‘Find What’ text field in the Find and Replace.
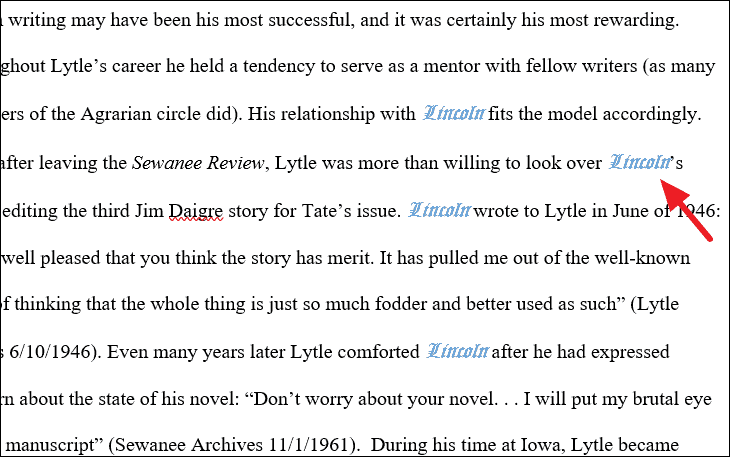
Next, type the text you want it to be replaced with (Lincon) in the ‘Replace with field:’ and click ‘Replace All’. You can also add formatting to the replacement text if you want.

Once you click ‘Replace All’, all of the instances will be replaced and a prompt will show you how many replacements were made.

As you can see all the instances of the ‘Leatherman’ with formatting is replaced by the ‘Lincoln’ without changing the formatting.
Find and Replace Special Characters/Non-Printing Characters
The find and replace feature can also help you find special character characters and replace them with other special characters such as ®, é, ä, or any other character listed in the Symbol dialog. You can also find and replace non-printing characters such as manual line breaks, tab characters, paragraph marks, etc. You can even replace special characters with text and vice versa.
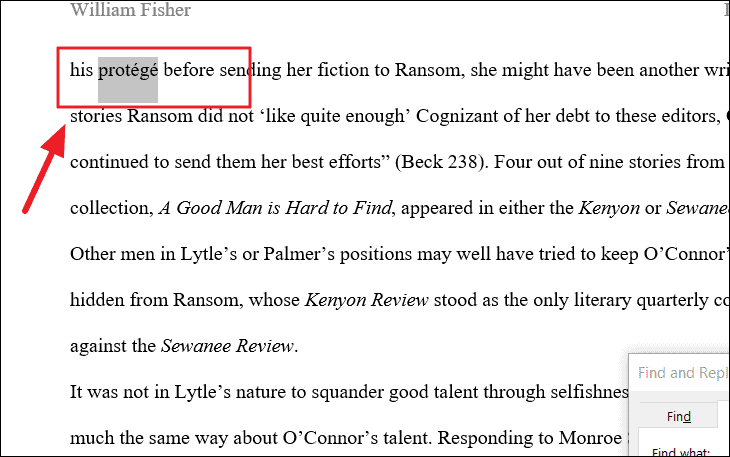
For example, if you want to find and replace the word ‘protege’ with ‘protégé’, type ‘protege’ in the Find what box and type ‘protégé’ in the ‘Replace with’ box. Then, click ‘Replace’ or ‘Replace All’ to replace them.
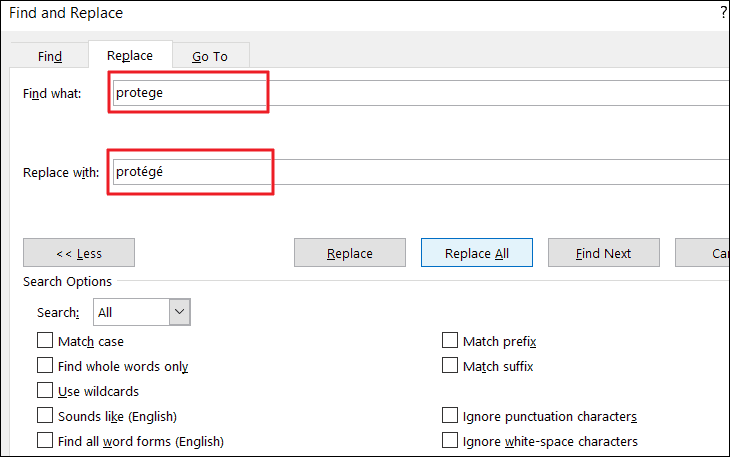
As you can see the found texts are replaced with replacement text with special characters.
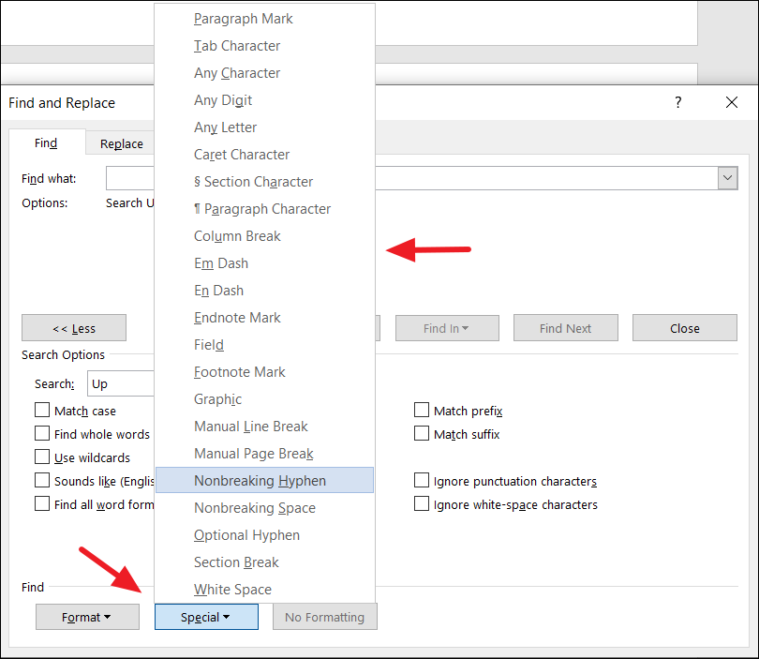
Sometimes you want to replace manual line breaks (non-printing characters) with paragraph marks, in such cases, you need to insert respective character code in the ‘find what’ and ‘replace with’ boxes.
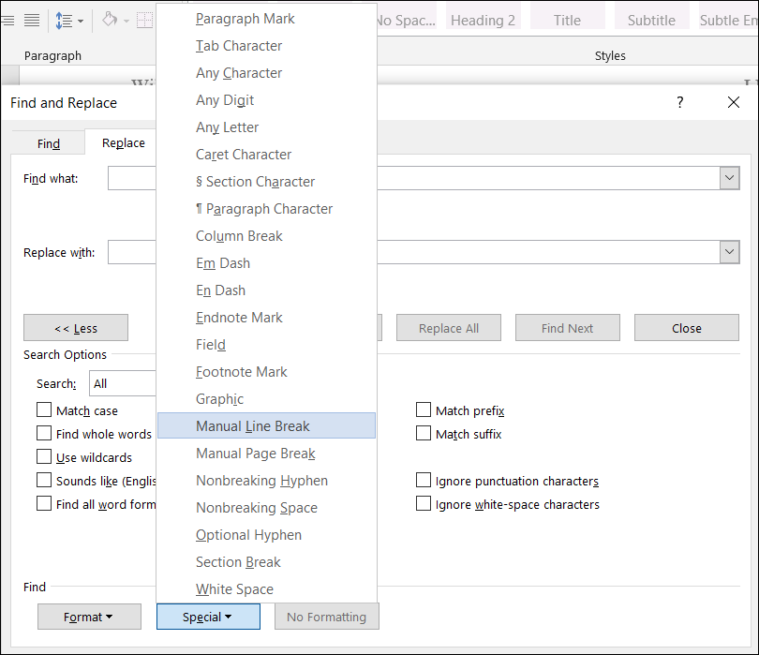
For example, we want to replace all manual line breaks in the documents with paragraph marks. The character code for a manual line break and paragraph mark is ‘^l’ and ‘^p’ respectively. You can either type the code or if you don’t know the code, use the ‘Special’ button to insert the code.
To insert non-breaking characters, first, select the text box where you want to insert. Then, click the ‘Special’ button at the bottom of the Find and Replace dialog box and select an item from the list. And the tool will automatically insert the respective character code in the text box.
In the example, we are choosing ‘Manual Line Break’ for the ‘Find what’ field.
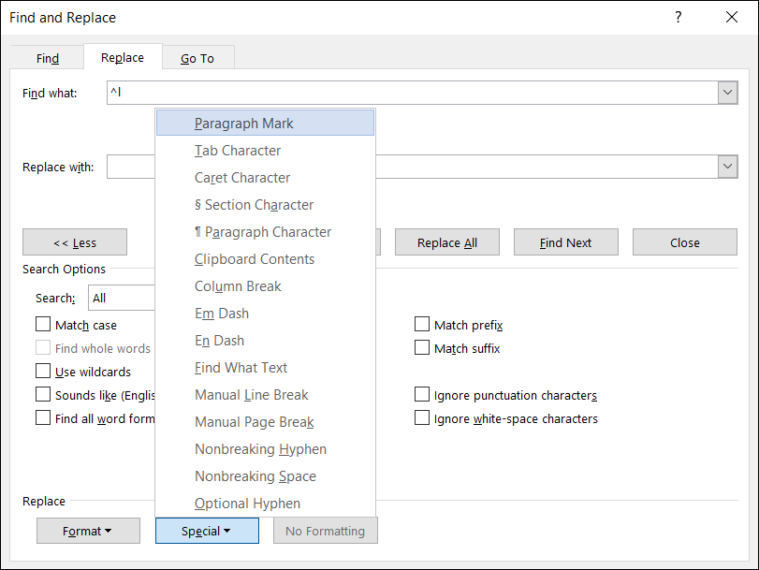
And ‘Paragraph Mark’ for the ‘Replace with’.
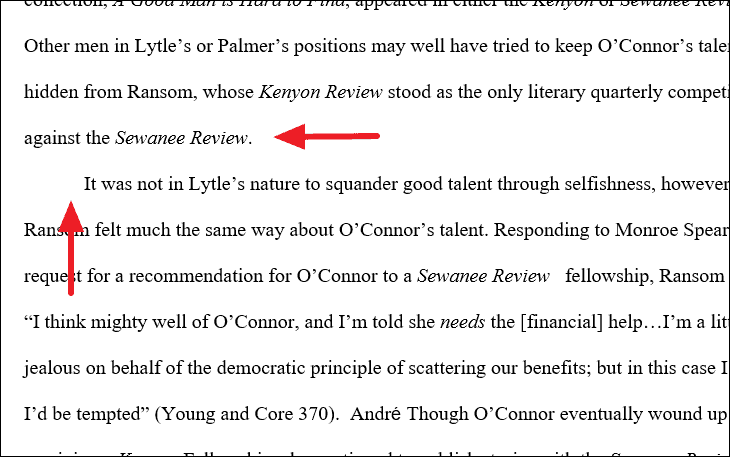
Then, click ‘Find Next’ to see where the line breaks are located. Now, click ‘Replace All’ to replace all the manual line breaks in the documents.
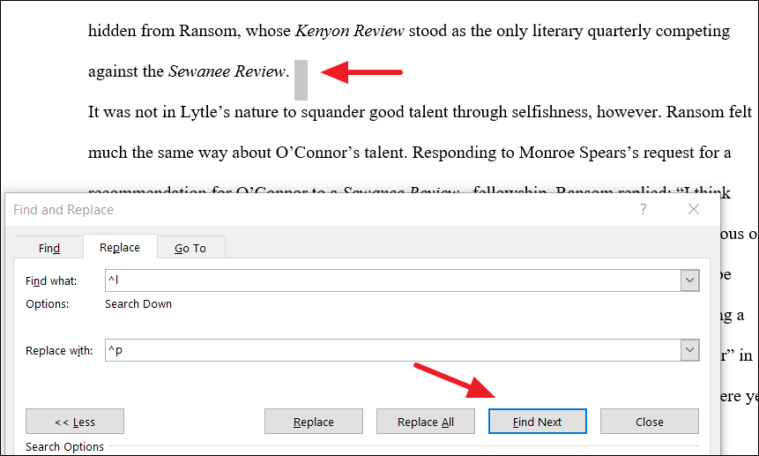
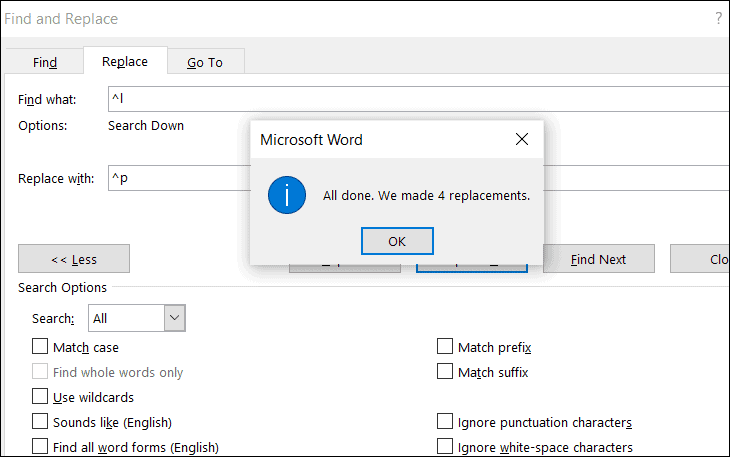
As you can see below, the manual line breaks are replaced with paragraph marks.
In the similar way, you can also replace non-breaking characters/special characters with text and vice versa.
That’s everything you need to know about finding and replacing text in Microsoft Word.
Find and Replace Text and Numbers in Word
by Avantix Learning Team | Updated March 7, 2022
Applies to: Microsoft® Word® 2013, 2016, 2019, 2021 or 365 (Windows)
You can find and replace in Word using the Find and Replace dialog box as well as the Navigation Pane. If you use the dialog box, you can find and replace text and numbers and use wildcards for more advanced find and replace tasks. Wildcards are useful when you are not able to find an exact match. You can display the Find and Replace dialog box using a keyboard shortcut or the Home tab in the Ribbon.
Recommended article: How to Quickly Remove Hard Returns in Word Documents
Do you want to learn more about Microsoft Word? Check out our virtual classroom or in-person Word courses >
Note: Screenshots in this article are from Word 365 but are similar in previous versions of Word.
The Replace command appears on the Home tab in the Ribbon in the Editing group:

Using the Find and Replace dialog box to replace words or characters (and match case)
You can perform simple find and replace tasks using the Replace dialog box in its collapsed state. To access more advanced options, you will need to click More in the Replace dialog box to expand it.
To use the Find and Replace dialog box to find and replace text in Word (words or characters) and match case if needed:
- Click the Home tab in the Ribbon.
- In the Editing group, click Replace to display the Replace dialog box. Alternatively, press Ctrl + H if you prefer to use a keyboard shortcut to open the Replace dialog box.
- Enter the text you want to find in the Find What box. You can specify whether Word should locate only matches with the exact capitalization by clicking More and then selecting or checking Match case.
- Enter the text you want to replace in the Replace box.
- Click Find Next and then click Replace for each occurrence or click Replace All.
- Click Close.
In the following example, the Replace dialog box has been expanded to display other options including Match case:

Finding and replacing using wildcards
To use wildcards, you will need to use the Find and Replace dialog box and expand it to display more options. You can then select the option to Use wildcards. A wildcard can replace one or more characters in a string of text or numbers. The most common wildcard is the asterisk (*).
It’s important to note that wildcard searches are case sensitive. Also, Word uses «lazy» pattern matching so it will stop matching as soon as possible. This means that you could enter part of a word and find that part without using wildcards.
To find and replace text using wildcards in Word:
- Position the cursor at the location in the document where you want to start finding and replacing. If you want to start at the beginning of the document, you can press Ctrl + Home.
- Click the Home tab in the Ribbon.
- In the Editing group, click Replace. Alternatively, press Ctrl + H. A dialog box appears.
- Select More to expand the dialog box.
- Click in the Find What box.
- Select or check the Use wildcards checkbox.
- Enter the text and wildcard(s) you want to use. For example, enter s*l to find any text starting with s and ending with l.
- Click in the Replace with box.
- Enter the text you want to use to replace the text in the Find what box.
- Click Find Next to find the first instance of the characters you want to find.
- Click Replace or Replace All. If you click Replace, Word will select the next matching characters in the Find what box. If you click Replace All, Word will display a dialog box with the number of replacements. In this case, click OK.
- If necessary, click Replace again. Repeat for each instance.
- Click Close to close the dialog box.
In the following example, b*s has been entered in the Find what box to find any word starting with starting with b and ending with s:

If you want to undo a Replace or Replace All action, close the dialog box and press Ctrl + Z.
Using common wildcards
The most common wildcards you can use in the Find and Replace dialog box are the asterisk (*) to find multiple characters and the question mark (?) to find a single character.
For example:
b*l will find ball and barrel (a character followed any characters and ending with a specific character)
h?ll will find hill and hall (a character followed by any single character and then followed by 2 characters)
Using wildcards to find one or more instances of the same character
You can also use @ as a wildcard to find one or more instances of the same character.
For example:
catchal@ will find catchal or catchall
Using wildcards for alternate characters and ranges
You can also use wildcards to find alternate characters or ranges of characters. These are entered in square brackets [ ] and may be combined with other wildcards.
[ ] can be used to find each of a set of characters
[ – ] can be used to find each of a set of characters in a range
You can use any character or series of characters in a range within the square brackets (including the space character). Characters are processed in alphanumeric order from lowest to highest.
For example:
[abc] will find any of the letters a, b, or c
[G] will find the upper case letter G
[A-Z] will find any upper case letter
[0-9] will find any single number
[13579] will find any odd number
[0-9A-z] will find any number or letter
f[ai]n will find each of the characters in square brackets such as fan or fin
[b-f]at will find each of a range of characters such as bat, cat, and fat
Using wildcards to omit characters
If you want to omit specific characters, you can use an exclamation mark (!) combined with square brackets.
For example:
[!f]ast will find last and past but not fast
Using wildcards to find the beginning or end of a word
You can use the less than symbol (<) to find the beginning of a word and the greater than symbol (>) to find the end of a word. These wildcards are combined with characters in round brackets or parentheses.
For example,
<(watch) will find watching or watchman
(all)> will find wall or stall
These wildcards can be problematic if you are using a wildcard and you want to find > or < as characters in the document. If this is the case, enter a backslash () in front of the character so that it is not treated as a wildcard.
For example,
<*> will find <h1> or <h2>
Using wildcards to find instances of a character
You can use curly brackets { } to specify the number of instances of a character. These brackets can be combined with a comma to specify the number of instances. Counting can be used with individual characters or with sets of characters.
{n} is used to find the number of instances of a character
{n,} is used to find at least n instances of a character
{n,m} is used to find between n and m instances of a character
For example:
^p{2} will find two consecutive paragraph marks or hard returns (^p is a special character for a paragraph mark in Word)
{3} will find three spaces (there is a space entered before the first curly bracket)
30{2,} will find at least 2 instances of the preceding character such as 3000 or 30000
30{3,4} will find between 3 and 4 instances of the preceding character such as 30000 or 300000 not 300
These last wildcards are particularly useful if you are finding and replacing numbers in Word.
The Find and Replace dialog box offers more functionality as well. For example, you can also Find and Replace Formatting in Word.
Subscribe to get more articles like this one
Did you find this article helpful? If you would like to receive new articles, join our email list.
More resources
How to Add Page Numbers in Word (Step by Step)
How to View Document Statistics in Microsoft Word
How to Update All Figure Numbers in Microsoft Word
How to Check Word Count in Microsoft Word (4 Ways)
How to Superscript or Subscript in Word (with Shortcuts)
Related courses
Microsoft Word: Intermediate / Advanced
Microsoft Word: Designing Dynamic Word Documents Using Fields
Microsoft Word: Long Documents Master Class
Microsoft Word: Accessible Word Documents
Microsoft Excel: Intermediate / Advanced
Microsoft PowerPoint: Intermediate / Advanced
VIEW MORE COURSES >
Our instructor-led courses are delivered in virtual classroom format or at our downtown Toronto location at 18 King Street East, Suite 1400, Toronto, Ontario, Canada (some in-person classroom courses may also be delivered at an alternate downtown Toronto location). Contact us at info@avantixlearning.ca if you’d like to arrange custom instructor-led virtual classroom or onsite training on a date that’s convenient for you.
Copyright 2023 Avantix® Learning
Microsoft, the Microsoft logo, Microsoft Office and related Microsoft applications and logos are registered trademarks of Microsoft Corporation in Canada, US and other countries. All other trademarks are the property of the registered owners.
Avantix Learning |18 King Street East, Suite 1400, Toronto, Ontario, Canada M5C 1C4 | Contact us at info@avantixlearning.ca