

on
May 21, 2021, 8:21 AM PDT
How to fill text with a picture in Word
Using this simple technique for filling text with an image, you can create unique textual designs in Microsoft Word. Here’s how.

Microsoft Word isn’t a desktop publishing app, but it has a lot of design features that anyone can use to create professional looking documents, flyers, brochures and more. For instance, when you have a fun message, you might try filling text with an image. Doing so lets you create unique content with an eye toward design, instead of ordinary text. In this article, I’ll show you how to use a SmartArt text shape to achieve this look—text filled with an image.
SEE: 69 Excel tips every user should master (TechRepublic)
I’m using Microsoft 365, but you can use older versions. You can create your own document or work with the demonstration downloadable .docx file. The browser version will display filled text, but you can’t create it in the browser.
1. Add SmartArt shape
When working with shapes, you can use the Fill property with just about any photo or drawing. Ordinary text doesn’t have a Fill property as shapes do.
Instead of using ordinary text, we’ll use a SmartArt text shape. You don’t need to put a lot of thought into which shape, though. We need only one shape that displays text. We will end up deleting some pieces and resizing the one that’s left. The demonstration document uses Landscape orientation, but that’s not necessary.
SEE: Windows 10: Lists of vocal commands for speech recognition and dictation (free PDF) (TechRepublic)
Now, let’s insert a SmartArt text shape as follows:
- Click the Insert tab and in the Illustrations group, click SmartArt.
- Choose the first or second List shape, as shown in Figure A. Stay away from shapes with lots of bells and whistles because that’s all stuff you’ll have to delete anyway. The resulting shape is also shown. As you can see there are five shapes that you can use to display text. We only need one.
- Select four of the shapes and delete them. The remaining shape will fill the shape (Figure B).
- At this point, you have a larger shape box and a text box. Resize so they both stretch from the left to the right border.
Figure A

Figure B

Now that we have the SmartArt text shape, let’s add and format the text. Remember, we’re working with a text shape or box, not ordinary text.
2. Add and format the text
This step gives you lots of opportunities to be as creative or subtle as you like. The document’s mood will help dictate your choices. To follow along, enter TechRepublic into the text shape. Select the text and set the font size to 110 and click Bold. You can change the font if you like, but I didn’t. As shown in Figure C, you now have formatted text, ready to fill with a picture or drawing.
Figure C

3. Fill the text
Filling text is simple. The bigger issue is choosing the right picture. The sky really is the limit, but let the picture enhance your document’s content. Now, let’s fill the text with a picture as follows:
- Select the text.
- On the contextual Format tab, click the Text Fill dropdown in the WordArt Styles group.
- In the resulting dropdown, choose Picture.
- In the resulting dialog, enter “Bubbles” as a search term.
- From the picture files, choose anything—I choose the circled graphic in Figure D.
- Click Insert.
Figure D

The picture fills the text, as you can see in Figure E, but it’s not effective because of the background. Let’s get rid of it. With the shape (not the text) selected, click the Shape Fill dropdown in the Shape Styles group (on the contextual Format tab). Choose No Fill. Figure F shows the filled text with no background.
Figure E

Figure F

I chose a colorful pattern, just for the fun of it. You’ll want to experiment a bit until you get the hang of it. The technique is easy to implement, but make sure the filled text enhances your document instead of distracting viewers.
Also See
-
How to make fewer mistakes and work more efficiently using predictive text in Microsoft 365
(TechRepublic) -
How to use the many text wrapping options in Microsoft Word
(TechRepublic) -
Microsoft 365: A cheat sheet
(TechRepublic) -
Zoom vs. Microsoft Teams, Google Meet, Cisco WebEx and Skype: Choosing the right video-conferencing apps for you (free PDF)
(TechRepublic) -
Checklist: Securing Windows 10 systems
(TechRepublic Premium) -
Everything you need to know about the Microsoft Exchange Server hack
(ZDNet) -
Must-read coverage: Windows 10
(TechRepublic on Flipboard)
-
Microsoft
-
Software
This article is for people with visual or cognitive impairments who use a screen reader program such as Microsoft’s Narrator, JAWS, or NVDA with the Microsoft 365 products. This article is part of the Microsoft 365 screen reader support content set where you can find more accessibility information on our apps. For general help, visit Microsoft Support home or Fixes or workarounds for recent office issues.
Use Word with your keyboard and a screen reader to insert a picture or image from your computer or an online source. We’ve tested it with Narrator, JAWS, and NVDA, but it might work with other screen readers as long as they follow common accessibility standards and techniques. You’ll also learn how to add alt texts to the pictures to make them more accessible.
 Need instructions on how to insert pictures to a Word document, but not using a screen reader? See Insert pictures.
Notes:
-
New Microsoft 365 features are released gradually to Microsoft 365 subscribers, so your app might not have these features yet. To learn how you can get new features faster, join the Office Insider program.
-
To learn more about screen readers, go to How screen readers work with Microsoft 365.
In this topic
-
Insert an image or picture from your computer
-
Insert an image from an online source
-
Place a picture in line with text
-
Add alt text to an image
Insert an image or picture from your computer
-
In your Word document, place the insertion point where you want to insert an image.
-
Press Alt+N, P, D. The Insert Picture dialog box opens. The focus is on the File name text field.
-
Use the Tab key and the arrow keys to navigate to the location of the picture on your computer. When you hear the name of the picture, followed by «Selected,» press Enter. The original picture is embedded into your document.
Tip: If your picture has a large file size, it can make your document too large. To reduce the size of your document, you can link to the picture instead of embedding it. In the Insert Picture dialog box, press the Tab key until you hear with Narrator and NVDA: «Insert, split button.» With JAWS, you hear: «Leaving menus, Insert button.» Press the Down arrow key until you hear «Link to file,» and then press Enter.
Insert an image from an online source
If you don’t have the perfect picture on your computer, you can search for and insert a picture from a web location straight from Word.
-
In your Word document, place the insertion point where you want to insert an image.
-
Press Alt+N, P, O. The Bing image search dialog box opens. The focus is on the search text field.
-
Type your search words to describe the picture you’re looking for, and then press Enter. The search results are listed, and the focus is on the first matching image.
Tip: To browse for more images from your OneDrive, press the Tab key until you hear «OneDrive,» and press Enter.
-
Use the arrow keys to browse the search results. Your screen reader describes each image as you move through the search results.
-
To select an image, press Spacebar.
-
To insert the selected image, press the Tab key until you hear «Insert,» and press Enter. Word downloads and inserts the image into your document.
Place a picture in line with text
To be read correctly by a screen reader, the picture has to be in line with the text. By default, Word inserts a picture in line with text, but you can check it to make sure that the screen readers can read the pictures.
-
In your Word document, move the focus to the picture you want. When the focus is on the picture, you hear the file name or number of the picture, followed by «Image.»
-
Press Shift+Right arrow key once to select the picture. Then press Shift+F10. The context menu opens.
-
Press the Up arrow key until you hear «Wrap text,» and then press the Right arrow key once. You hear: «In line with text.» Press Enter. If you don’t hear «In line with text,» press the Up arrow key until you reach the In line with text button, and press Enter.
Add alt text to an image
Add alt text to the images to make your document accessible to all audiences. For more information on alt text, refer to Everything you need to know to write effective alt text.
-
In your Word document, move the focus to the picture that you want to add alt text to. When the focus is on the image, you hear the page you’re on, the file name or the number of the image, followed by «Image.» Press Shift+Right arrow key once to select the image.
-
Press Shift+F10 to open the context menu.
-
Press the Up arrow key until you hear «Edit alt text,» and press Enter.
-
The Alt Text pane opens, and the focus is on the alt text field. Type alt text for the image.
-
When you’re ready, press Esc to return to the body of the document.
See also
Use a screen reader to insert a hyperlink in Word
Use a screen reader to align text and paragraphs in Word
Keyboard shortcuts in Word
Basic tasks using a screen reader with Word
Set up your device to work with accessibility in Microsoft 365
Use a screen reader to explore and navigate Word
What’s new in Microsoft 365: Release notes for Current Channel
Use Word for Mac with your keyboard and VoiceOver, the built-in MacOS screen reader, to insert a picture or image into a document. You’ll also learn how to add alt texts to the pictures to make them more accessible.
Need instructions on how to insert pictures to a Word document, but not using a screen reader? See Insert pictures.
Notes:
-
New Microsoft 365 features are released gradually to Microsoft 365 subscribers, so your app might not have these features yet. To learn how you can get new features faster, join the Office Insider program.
-
This topic assumes that you are using the built-in macOS screen reader, VoiceOver. To learn more about using VoiceOver, go to VoiceOver Getting Started Guide.
In this topic
-
Insert an image or picture from your computer
-
Insert an image from an online source
-
Place a picture in line with text
-
Add alt text to an image
Insert an image or picture from your computer
-
In your Word document, place the insertion point where you want to insert an image.
-
Press F6 until you hear the currently selected tab on the ribbon, for example, «Home, selected, tab.» Press Control+Option+Right or Left arrow key until you hear «Insert tab,» and press Control+Option+Spacebar.
-
Press the Tab key until you hear «Pictures, menu button,» and press Control+Option+Spacebar.
-
Press Control+Option+Right arrow key until you hear «Picture from file,» and then press Control+Option+Spacebar.
-
A dialog box opens with the focus on a recent images folder. To access the images in this folder, press Control+Option+Right arrow key. To browse to another location, use the Tab key, Shift+Tab, and the arrow keys.
-
When on the correct location, use the Up or Down arrow key to browse the files or subfolders. To open a subfolder, press the Right arrow key.
-
When you’ve located the correct image file, press Return. The picture is inserted into the document.
Insert an image from an online source
If you don’t have the perfect picture on your computer, you can search for and insert a picture from a web location straight from Word for Mac.
-
In your Word document, place the insertion point where you want to insert an image.
-
Press F6 until you hear the currently selected tab on the ribbon, for example, «Home, selected, tab.» Press Control+Option+Right or Left arrow key until you hear «Insert tab,» and press Control+Option+Spacebar.
-
Press the Tab key until you hear «Pictures, menu button,» and press Control+Option+Spacebar.
-
Press Control+Option+Right arrow key until you hear «Online pictures,» and then press Control+Option+Spacebar.
-
The Bing image search pane opens. The focus is on the search text field. Type your search words to describe the picture you’re looking for, and then press Return. The search results are listed, and the focus is on the first matching image.
-
Press Control+Option+Right or Left arrow key to browse the search results. VoiceOver describes each image as you move through the search results.
-
To select an image, press Control+Option+Spacebar.
-
To insert the selected image, press the Tab key until you hear «Insert,» and press Control+Option+Spacebar. Word downloads and inserts the image into your document.
Place a picture in line with text
To be read correctly by a screen reader, the picture has to be in line with the text.
-
In your Word document, move the cursor before the picture you want, press and hold Shift, and then press the Right arrow key once to select the picture. You hear: «Grouped object, you’re currently on a grouped object.»
-
Press F6 until you hear: «Picture format.»
-
Press the Tab key until you hear «Position button,» and then press Control+Option+Spacebar.
-
Press Control+Option+Left arrow key until you hear «In line with text,» and press Control+Option+Spacebar.
Add alt text to an image
Add alt text to the images to make your document accessible to all audiences. For more information on alt text, refer to Everything you need to know to write effective alt text.
-
In your Word document, select the picture that you want to add alt text to. To select a picture in Word, place the cursor before the image, hold down Shift, and then press the Right arrow key. You hear: «Grouped object, you’re currently on a grouped object.»
-
Press Control+Option+Shift+M. The context menu opens. Press Control+Option+Right arrow key until you hear «Edit alt text,» and press Control+Option+Spacebar.
-
The Alt Text pane opens, and the focus in on the alt text field. Type alt text for the image.
-
When you’re ready, press Shift+Tab until you hear «Close alt text button,» and press Control+Option+Spacebar. The Alt Text pane closes, and the focus moves back to your document.
See also
Use a screen reader to insert a hyperlink in Word
Use a screen reader to align text and paragraphs in Word
Keyboard shortcuts in Word
Basic tasks using a screen reader with Word
Set up your device to work with accessibility in Microsoft 365
Use a screen reader to explore and navigate Word
What’s new in Microsoft 365: Release notes for Current Channel
Use Word for iOS with VoiceOver, the built-in iOS screen reader, to insert a picture or image into a document. You’ll also learn how to add alt texts to the pictures to make them more accessible.
Notes:
-
New Microsoft 365 features are released gradually to Microsoft 365 subscribers, so your app might not have these features yet. To learn how you can get new features faster, join the Office Insider program.
-
This topic assumes that you are using the built-in iOS screen reader, VoiceOver. To learn more about using VoiceOver, visit Apple accessibility.
-
We recommend you read and edit documents in Print Layout View. VoiceOver might not work reliably in other view modes.
In this topic
-
Insert an image or picture from your phone
-
Insert a picture from the camera
-
Place a picture in line with text
-
Add alt text to an image
Insert an image or picture from your phone
-
While editing your Word document, place the insertion point where you want to insert an image.
-
Tap near the top of the screen with four fingers, swipe right until you hear «Show ribbon,» and double-tap the screen. You hear the currently selected tab, for example, «Home tab.»
-
Double-tap the screen, swipe right or left until you hear “Insert tab,” and double-tap the screen. You hear: “Insert tab.”
-
Swipe right until you hear “Insert pictures button,” and double-tap the screen. The Photos app opens.
-
Swipe right until you hear the image location you want, and then double-tap the screen to select.
-
To browse the images, swipe right or left. As you move, VoiceOver announces the images by the image types and dates.
-
When on the picture you want to insert into the document, double-tap the screen. The picture is inserted and the focus returns to your document with the image selected.
Insert a picture from the camera
You can open the device camera straight from Word for iOS, take a photo, and then insert the photo into the document.
-
While editing your Word document, place the insertion point where you want to insert a picture.
-
Tap near the top of the screen with four fingers, swipe right until you hear «Show ribbon,» and double-tap the screen. You hear the currently selected tab, for example, «Home tab.»
-
Double-tap the screen, swipe right or left until you hear “Insert tab,” and double-tap the screen. You hear: “Insert tab.”
-
Swipe right until you hear “Insert pictures button,” and double-tap the screen. The Photos app opens.
-
Swipe right until you hear “Insert picture from camera, button,” and then double-tap the screen. The Camera app opens.
Note: If you hear «Word would like to access the camera,» swipe right until you hear «OK, button,» and double-tap the screen.
-
Swipe right until you hear «Take picture, button,» point the camera in the right direction, and double-tap the screen.
-
Swipe right or left until you hear «Use photo, button,» and then double-tap the screen to insert the photo. The focus returns to your document.
Place a picture in line with text
To be read correctly by a screen reader, the picture has to be in line with the text.
-
While editing your Word document, slide one finger around the document body until you hear the image you want. When the image is in focus, VoiceOver announces the image file name, followed by «Image,» and the image layout. Double-tap the screen. You hear: «Selected.»
-
Tap near the bottom of the screen with four fingers, swipe left until you hear «Show ribbon,» and double-tap the screen. You hear: «Picture tab.»
-
Swipe right until you hear «Wrap text button,» and double-tap the screen. Swipe left until you hear «In line with text,» and double-tap the screen.
Add alt text to an image
Add alt text to the images to make your document accessible to all audiences. For more information on alt text, refer to Everything you need to know to write effective alt text.
-
While editing your Word document, to select a picture, slide one finger around the document body until you hear the image you want to add alt text to. When the image is in focus, VoiceOver announces the image file name, followed by «Image,» and the image layout. Double-tap the screen. You hear: «Selected.»
-
Tap near the bottom of the screen with four fingers, swipe left until you hear «Show ribbon,» and double-tap the screen. You hear: «Picture tab.»
-
Swipe right until you hear «Alt text button,» and double-tap the screen.
-
To add alt text, swipe right until you hear «Description, text field,» double-tap the screen, and then use the on-screen keyboard to type alt text for the image.
-
When you’re ready, tap near the top of the screen with four fingers, swipe right until you hear «Done button,» and double-tap the screen. The focus moves back to the document body.
See also
Use a screen reader to insert and change text in Word
Use a screen reader to set line spacing and indenting in Word
Basic tasks using a screen reader with Word
Set up your device to work with accessibility in Microsoft 365
Use a screen reader to explore and navigate Word
What’s new in Microsoft 365: Release notes for Current Channel
Use Word for Android with TalkBack, the built-in Android screen reader, to insert a picture or image into a document. You’ll also learn how to add alt texts to the pictures to make them more accessible.
Notes:
-
New Microsoft 365 features are released gradually to Microsoft 365 subscribers, so your app might not have these features yet. To learn how you can get new features faster, join the Office Insider program.
-
This topic assumes that you are using the built-in Android screen reader, TalkBack. To learn more about using TalkBack, go to Android accessibility.
In this topic
-
Insert an image or picture from your phone
-
Insert a picture from the camera
-
Place a picture in line with text
-
Add alt text to an image
Insert an image or picture from your phone
-
While editing your Word document, place the insertion point where you want to insert an image.
-
Swipe left until you hear «More options button,» and double-tap the screen. You hear the currently selected tab, for example, «Home tab.» Double-tap the screen, swipe right or left until you hear “Insert tab,” and double-tap the screen.
-
Swipe right until you hear “Pictures menu,” and double-tap the screen. The Pictures menu opens.
-
Swipe right until you hear “Photos button,” and double-tap the screen. The default gallery app opens.
Note: If you’re signed in and using your organization’s phone and account, you might have to switch to your personal account or select a gallery app before you can insert an image into a document.
-
Do one of the following:
-
To navigate through the pictures in the currently selected image storage location, swipe right until you hear the image you want.
-
To navigate to another storage location, for example, Downloads or Images, swipe left until you hear «Show roots button,» and then double-tap the screen. Swipe right until you hear the location you want, and then double-tap the screen. Swipe left or right until you hear the image you want.
TalkBack announces the images by their filenames, sizes, and dates.
-
-
When on the image you want to insert, double-tap the screen. The image preview opens.
-
Swipe right until you hear «Done,» and then double-tap the screen. The image is inserted and the focus returns to your document with the image selected.
Insert a picture from the camera
You can open the device camera straight from Word for Android, take a photo, and then insert the photo into the document.
-
While editing your Word document, place the insertion point where you want to insert a picture.
-
Swipe left until you hear «More options button,» and double-tap the screen. You hear the currently selected tab, for example, «Home tab.» Double-tap the screen, swipe right or left until you hear “Insert tab,” and double-tap the screen.
-
Swipe right until you hear “Pictures menu,” and then double-tap the screen. The Pictures menu opens.
-
Swipe right until you hear “Camera button,” and then double-tap the screen. The Camera app opens.
Note: If you hear «Allow Word to take pictures and record video, Allow button,» double-tap the screen.
-
To take a picture, swipe right until you hear «Capture,» point the camera to the right direction, and then double-tap the screen.
-
The image is captured, and the editing view opens. Swipe right until you hear «Confirm,» and double-tap the screen.
-
The image preview opens. Swipe right until you hear «Done,» and then double-tap the screen. The image is inserted and the focus returns to your document with the image selected.
Place a picture in line with text
To be read correctly by a screen reader, the picture has to be in line with the text.
-
While editing your Word document, slide one finger around the document body until you hear the image you want. When the focus is on the image, you hear the file name or number of the image, followed by «Image.» Double-tap and hold the screen with one finger. You hear: «Cut button.»
-
Swipe down-then-left. Then slide one finger near the lower-right corner of the screen until you hear «Not checked, More options switch,» and double-tap the screen. The focus moves to the Picture tab on the ribbon.
-
Swipe right until you hear «Wrap text menu,» and double-tap the screen.
-
Swipe right until you hear «In line with text,» and double-tap the screen.
Add alt text to an image
Add alt text to the images to make your document accessible to all audiences. For more information on alt text, refer to Everything you need to know to write effective alt text.
-
While editing your Word document, slide one finger around the document body until you hear the image you want to add alt text to. When the focus is on the image, you hear: «Selected, Image.» Double-tap the screen.
-
Slide one finger near the lower-right corner of the screen until you hear «Not checked, More options switch,» and double-tap the screen.
-
The focus moves to the Picture tab on the ribbon. Swipe right until you hear «Alt text menu,» and double-tap the screen.
-
Swipe right until you hear «Edit box, for, describe this object for someone who is blind,» and double-tap the screen. Use the on-screen keyboard to type alt text for the image. To close the on-screen keyboard, swipe down-then-left.
-
To move the focus back to the document body, swipe down-then-left.
See also
Use a screen reader to insert and change text in Word
Use a screen reader to set line spacing and indenting in Word
Basic tasks using a screen reader with Word
Set up your device to work with accessibility in Microsoft 365
Use a screen reader to explore and navigate Word
What’s new in Microsoft 365: Release notes for Current Channel
Use Word for the web with your keyboard and a screen reader to insert a picture or image into a document. We have tested it with Narrator in Microsoft Edge and JAWS and NVDA in Chrome, but it might work with other screen readers and web browsers as long as they follow common accessibility standards and techniques. You’ll also learn how to add alt texts to the pictures to make them more accessible.
Need instructions on how to insert pictures to a Word document, but not using a screen reader? See Insert pictures.
Notes:
-
If you use Narrator with the Windows 10 Fall Creators Update, you have to turn off scan mode in order to edit documents, spreadsheets, or presentations with Microsoft 365 for the web. For more information, refer to Turn off virtual or browse mode in screen readers in Windows 10 Fall Creators Update.
-
New Microsoft 365 features are released gradually to Microsoft 365 subscribers, so your app might not have these features yet. To learn how you can get new features faster, join the Office Insider program.
-
To learn more about screen readers, go to How screen readers work with Microsoft 365.
-
When you use Word for the web with a screen reader, switch to the full screen mode. Press F11 to toggle the full screen mode on and off.
-
When you use Word for the web, we recommend that you use Microsoft Edge as your web browser. Because Word for the web runs in your web browser, the keyboard shortcuts are different from those in the desktop program. For example, you’ll use Ctrl+F6 instead of F6 for jumping in and out of the commands. Also, common shortcuts like F1 (Help) and Ctrl+O (Open) apply to the web browser – not Word for the web.
In this topic
-
Insert a picture from your computer
-
Insert a picture from the web
-
Place a picture in line with text
-
Add alt text to an image
Insert a picture from your computer
-
In your Word document, place the insertion point where you want to insert the picture.
-
Press Alt+Windows logo key+N, P, P. The Windows Open dialog box opens. The focus is on the File name text field.
-
Use the Tab key and the arrow keys to navigate to the location of the picture on your computer. When you hear the name of the picture, followed by «Selected,» press Enter. The original picture is embedded into your document.
Insert a picture from the web
If you don’t have the perfect picture on your computer, you can search for and insert a picture from a web location straight from Word for the web.
Note: When using photos, images, or clip art, you’re responsible for respecting copyright. For images, the license filter in Bing can help.
-
In your Word document, place the insertion point where you want to insert the image.
-
Press Alt+Windows logo key+N, P, F.
-
The Bing image search dialog box opens. The focus is on the search text field. Type your search words to describe the picture you’re looking for, and then press Enter. The search results are listed, and the focus is on the first matching image.
-
Use the arrow keys to browse the search results. Your screen reader describes each image as you move through the search results.
-
To select an image, press Spacebar.
-
To insert the selected image, press the Tab key until you hear «Insert,» and press Enter. Word downloads and inserts the image into your document.
Place a picture in line with text
To be read correctly by a screen reader, the picture has to be in line with the text.
-
In your Word document, move the focus to the picture you want. When the picture is in focus and selected, you hear: «Image.»
-
Press Shift+F10. The context menu opens.
-
Press the Up arrow key until you hear «Wrap text,» and then press the Right arrow key once. You hear: «In line with text.» Press Enter. If you don’t hear «In line with text,» press the Up arrow key until you reach the In line with text button, and press Enter.
Add alt text to an image
Add alt text to the images to make your document accessible to all audiences. For more information on alt text, refer to Everything you need to know to write effective alt text.
-
In your Word document, move the focus to the image that you want to add alt text to. When the image is in focus and selected, you hear: «Image.»
-
Press Alt+Windows logo key+J, P, E. The Format Picture pane opens, and the focus moves to the Alternative Text section.
-
Press the Tab key until you hear «Description,» and then type alt text for the image.
-
To return the focus to document body, press Esc.
See also
Use a screen reader to insert and change text in Word
Use a screen reader to check spelling and grammar in Word
Keyboard shortcuts in Word
Basic tasks using a screen reader with Word
Use a screen reader to explore and navigate Word
What’s new in Microsoft 365: Release notes for Current Channel
Technical support for customers with disabilities
Microsoft wants to provide the best possible experience for all our customers. If you have a disability or questions related to accessibility, please contact the Microsoft Disability Answer Desk for technical assistance. The Disability Answer Desk support team is trained in using many popular assistive technologies and can offer assistance in English, Spanish, French, and American Sign Language. Please go to the Microsoft Disability Answer Desk site to find out the contact details for your region.
If you are a government, commercial, or enterprise user, please contact the enterprise Disability Answer Desk.
![]()
Download Article
![]()
Download Article
This wikiHow will show you how to use Microsoft Word to add text to an image on your computer, phone, or tablet. The Microsoft Word app is freely available for Androids, iPhones, and iPads, but you’ll need to purchase the app from Microsoft if you’re using a Windows or macOS.
Things You Should Know
- If you’re using a computer, use a text box with no fill and no outline to overlay text on an image.
- If you’re using the mobile Word app, insert a text box with no fill and no outline. Move the text box onto the image and edit the text.
- Make sure to tap the checkmark on mobile app Word documents to save your work!
-

1
Open your project in Word. You can do this by clicking Open from the File tab, or by right-clicking the file icon in your file browser and choosing Word from the «Open with…» dialog.
-
2
Click the Insert tab. You’ll find this above the document in the menu toolbar or along the top of your screen.
Advertisement
-
3
Click Text Box. You’ll find this in the Text group. A menu will dropdown.
-
4
Click Draw Text Box. You’ll see this at the bottom of the menu that drops down.
-
5
Enter your text. You’ll see your text entered into a moveable object.
- You can highlight your text and change the font size, color, and style before continuing.
-
6
Drag and drop your text box over the picture. Don’t deselect the text box yet.
-
7
Click the Format tab. You’ll find this above the document in the menu toolbar or along the top of your screen.
-
8
Format your text box in «Shape Styles.» You’ll want to make sure your text is not hidden by other elements.
- Click Shape Fill and select No fill.
- Click Shape Outline and select No outline.
-
9
Group the picture and text box. You can do this by clicking the picture to select it, then pressing and holding Ctrl (PC) or ⌘ Cmd (Mac) and clicking the text box to select it as well. Under the Format tab, click Group.[1]


Advertisement
-
1
Open your project in Word. This app icon looks like a blue page with white writing on it, and you can find this app on your home screen, in the app drawer, or by searching. To open your project in Word, you’ll need to tap Open from the File tab.[2]
-
2
Tap the pencil icon (optional). If you don’t see the pencil icon above the document, you may already be in editing mode.
-
3
Tap the upwards-pointing arrow
. You’ll see this on the right of the options menu.
-
4
Tap Home. You’ll open up a list of toolbar options.
-
5
Tap Insert. You’ll see the Insert menu options.
-
6
Tap Text Box. You might have to scroll down to see this option.
- After you tap this, you’ll see a text box with dummy text inserted on your page.
-
7
Format your text box. After you’ve inserted your text box, you’ll notice the main menu shifts to Shape. You’ll want to edit this text box from this menu.
- From Fill, choose ‘No fill.
- From Outline, choose No outline.
-
8
Tap inside the text box. A menu will pop up.
-
9
Tap Edit Text. Your cursor will appear in the text box. You’ll first need to delete what’s already in the text box.[3]
-
10
Tap the checkmark when you’re done to save your work. You’ll see this in the upper left corner of the app.


Advertisement
Ask a Question
200 characters left
Include your email address to get a message when this question is answered.
Submit
Advertisement
Thanks for submitting a tip for review!
References
About This Article
Article SummaryX
1. Open the picture in Word.
2. Insert a new text box from the Insert tab.
3. Type in your text.
4. Drag and drop the new text box over the picture.
5. Group the picture and text box.
Did this summary help you?
Thanks to all authors for creating a page that has been read 54,628 times.
Is this article up to date?

Во время работы с текстом в Word нередко приходится вставлять изображения в документ. При этом может возникнуть потребность в том, чтобы их подписать или сделать пометки, вставить замечания и так далее. Присутствующие в Word функции помогут не только поместить картинку в документ, но и дадут возможность нанести непосредственно на само изображение или подле него необходимый текст.
Написание текста на изображении в Word
Microsoft Word располагает несколькими инструментами для одновременной работы с картинками и текстом. Можно просто вписать слова в изображение, находящееся на заднем фоне, использовать буквицу или Word Art, а также создать специальное текстовое поле в документе, не говоря о добавлении подписи к рисункам или отдельной картинке. Обо всех этих методах и их особенностях пойдёт речь в данной статье.
Способ 1: Написание текста в картинке на заднем фоне
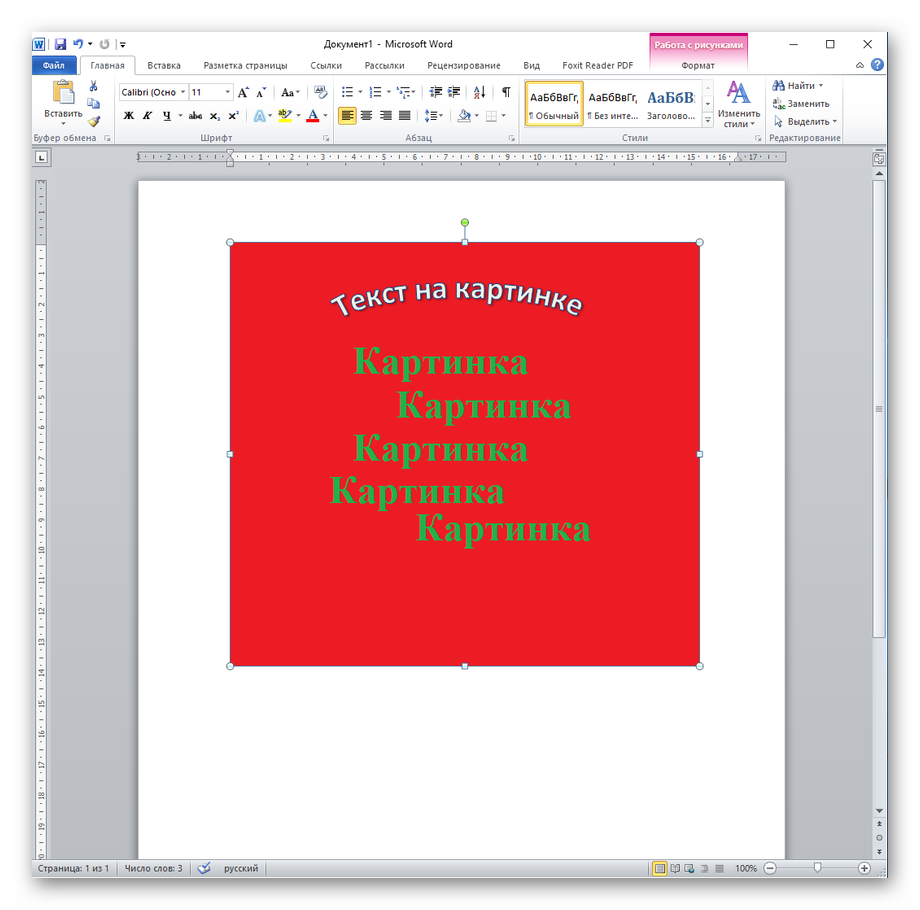
Самый простой и грубый способ написать текст на изображении в Word — это поместить картинку на задний фон документа, задав соответствующее обтекание текстом, а на переднем плане написать текст. Предположим что картинка уже содержится в документе.
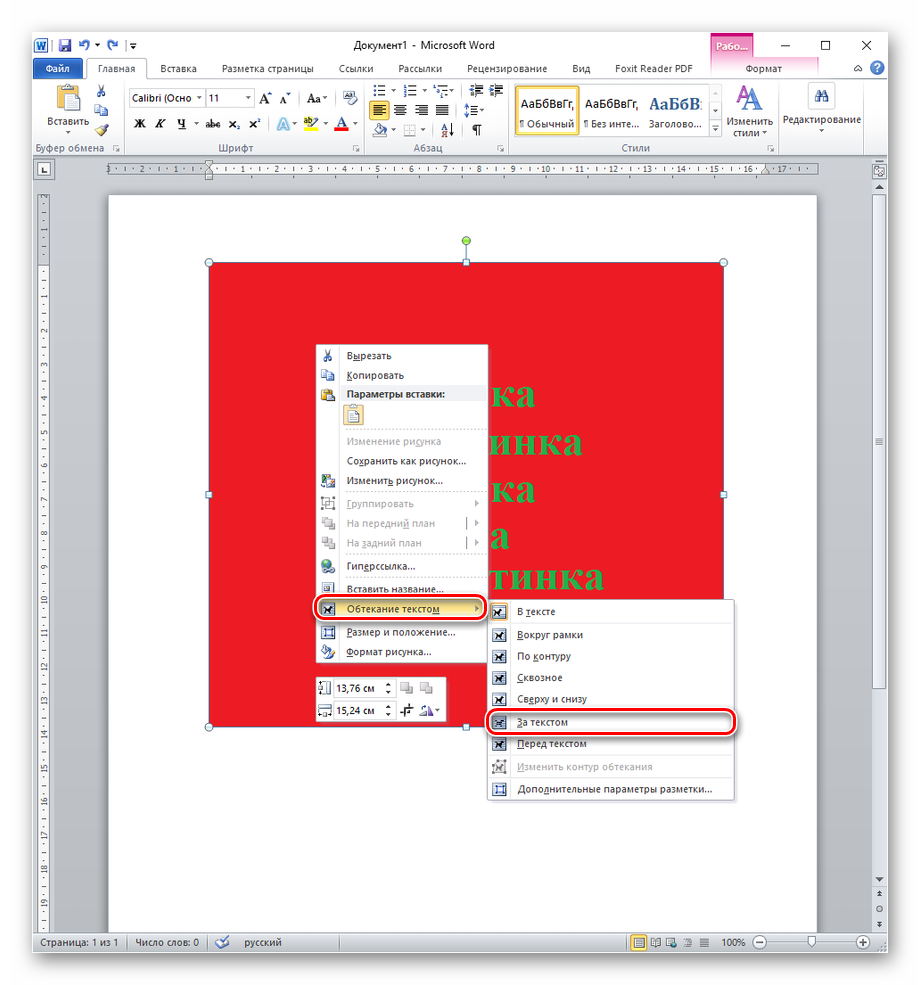
- Кликните правой кнопкой мыши по изображению, на котором следует написать текст. В выпавшем контекстном меню последовательно нажмите на «Обтекание текста», а после «За текстом».
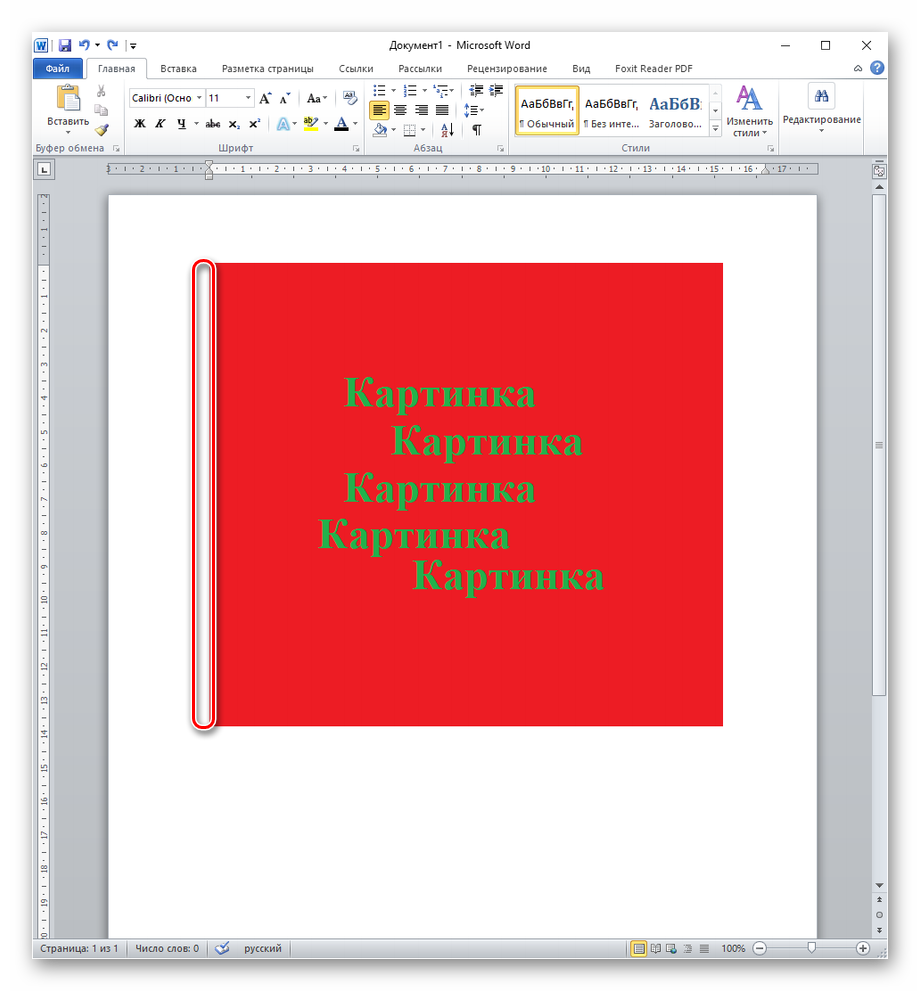
- Наведите курсор мыши на левую область и нажмите левой кнопкой мыши, для того, чтобы курсор появился на тексте, при надобности измените его положение с помощью клавиши «Enter».
- Рекомендуется не задевать большую часть области с левой стороны, для того чтобы избежать выделения всего рисунка и его удаления (замещения текстом) при начале набора.
- Начинайте вводить текст, будто печатаете его на чистом листе в Word.

Теперь можете как угодно нанести слова на изображение, при этом будут доступны все инструменты Word. Работа с помощью этого способа особо ничем не отличается от обычной деятельности в текстовом редакторе за исключением как бы подложенной под текст картинки, что является плюсом и подходит, например, для создания открыток. Минус такого подхода в том, что выделить рисунок или текст станет несколько неудобно: совершенно случайно можно захватить не то, что хотел пользователь, или же выделить текст или картинку полностью, чего по задумке не требовалось.
Способ 2: Вставка надписи
Первый профильный способ, если можно так сказать, для написания текста поверх изображения или же другого графического объекта. Отличается от обтекания тем, что для изменения текста становится доступно больше инструментов.
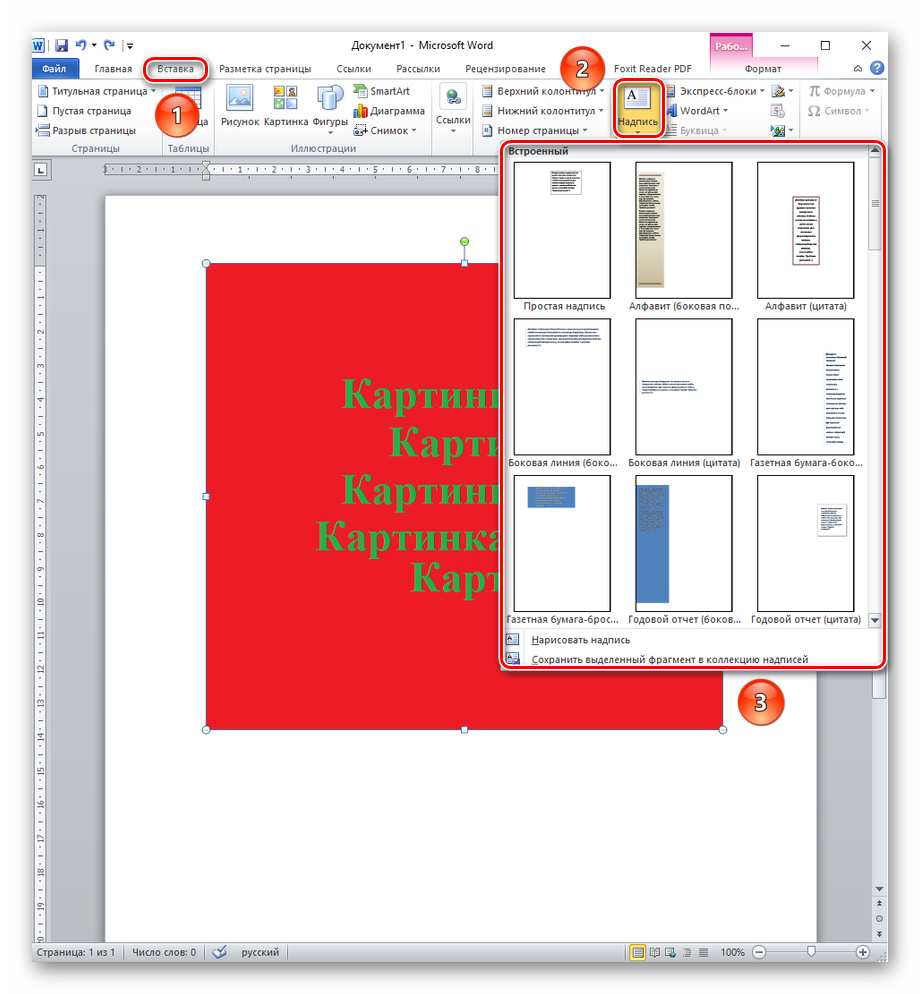
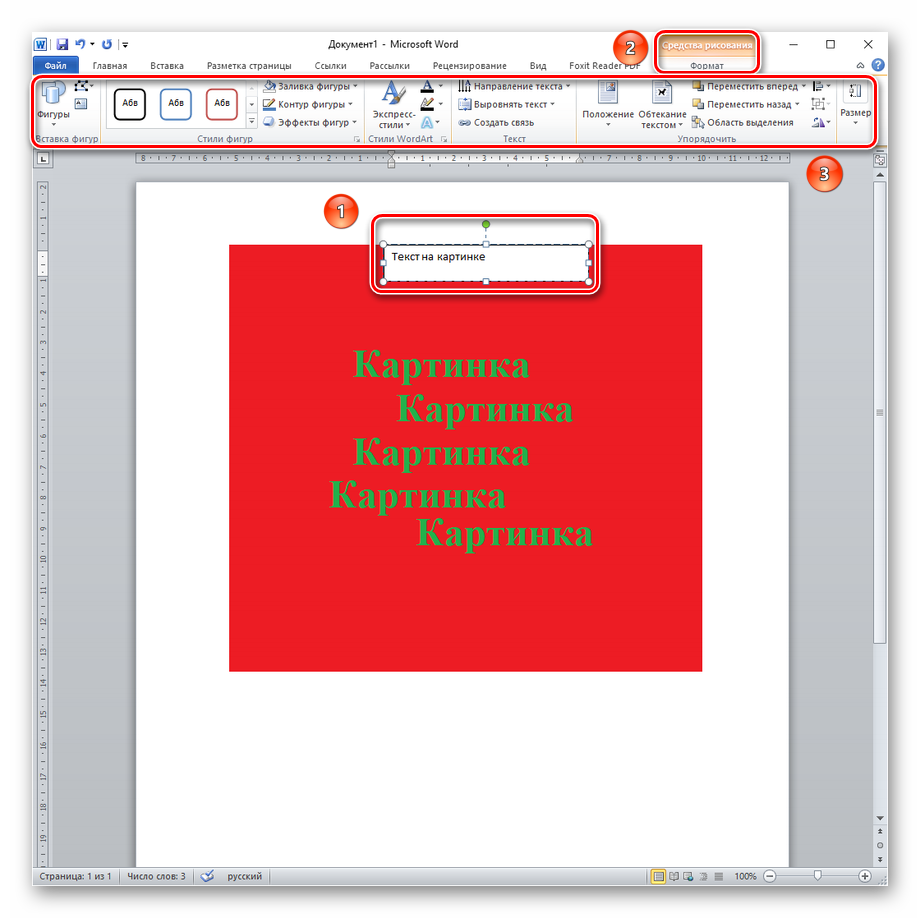
- Чтобы вставить надпись, нажмите на панель «Вставка», далее выберите раздел «Надписи» и из выпавшего меню укажите один из заданных вариантов, какой проходит вам больше. Кроме этого, можно нажать на кнопку «Нарисовать надпись» для создания своей надписи, отличной от стандартных.
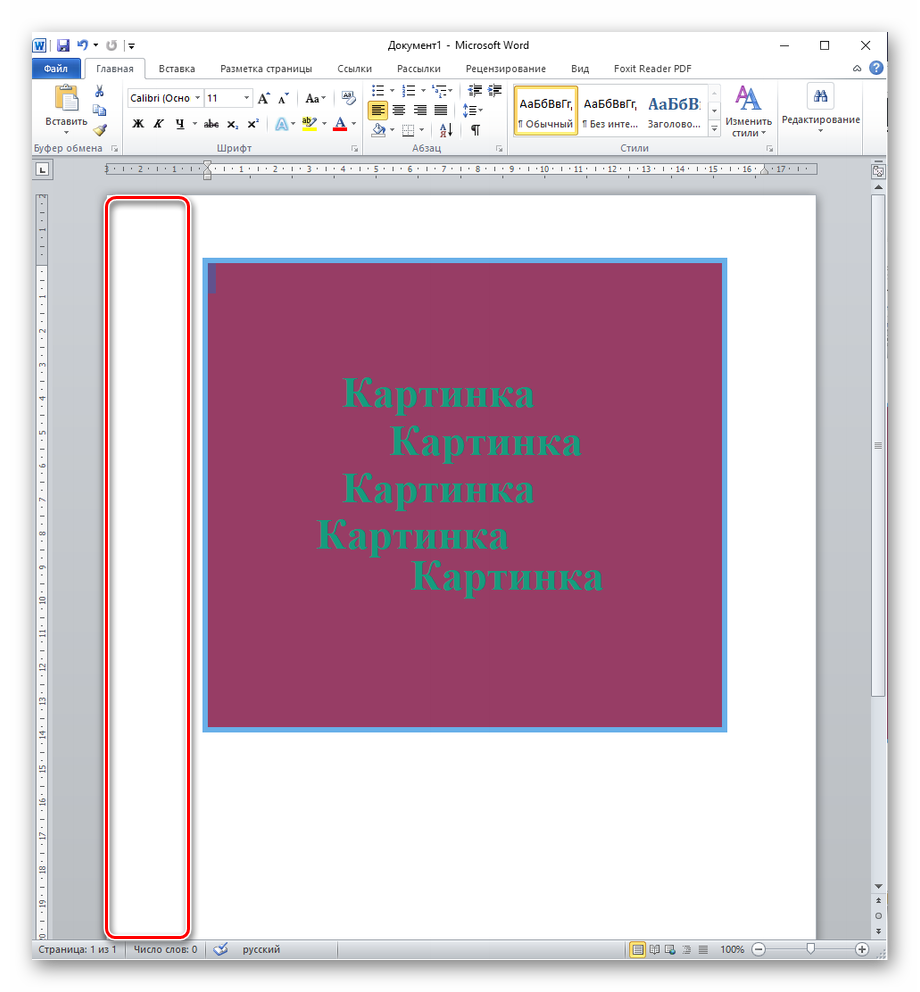
- После выбора будет предоставлена возможность изменить размер или уклон области вводимого текста. Дополнительно станут доступны «Средства рисования» на вкладке «Формат», с помощью которых можно изменить цвет рамки надписи, поменять или удалить заливку фона текста, поиграть с контуром и эффектом, добавить для написанного особый стиль или изменить его направление.
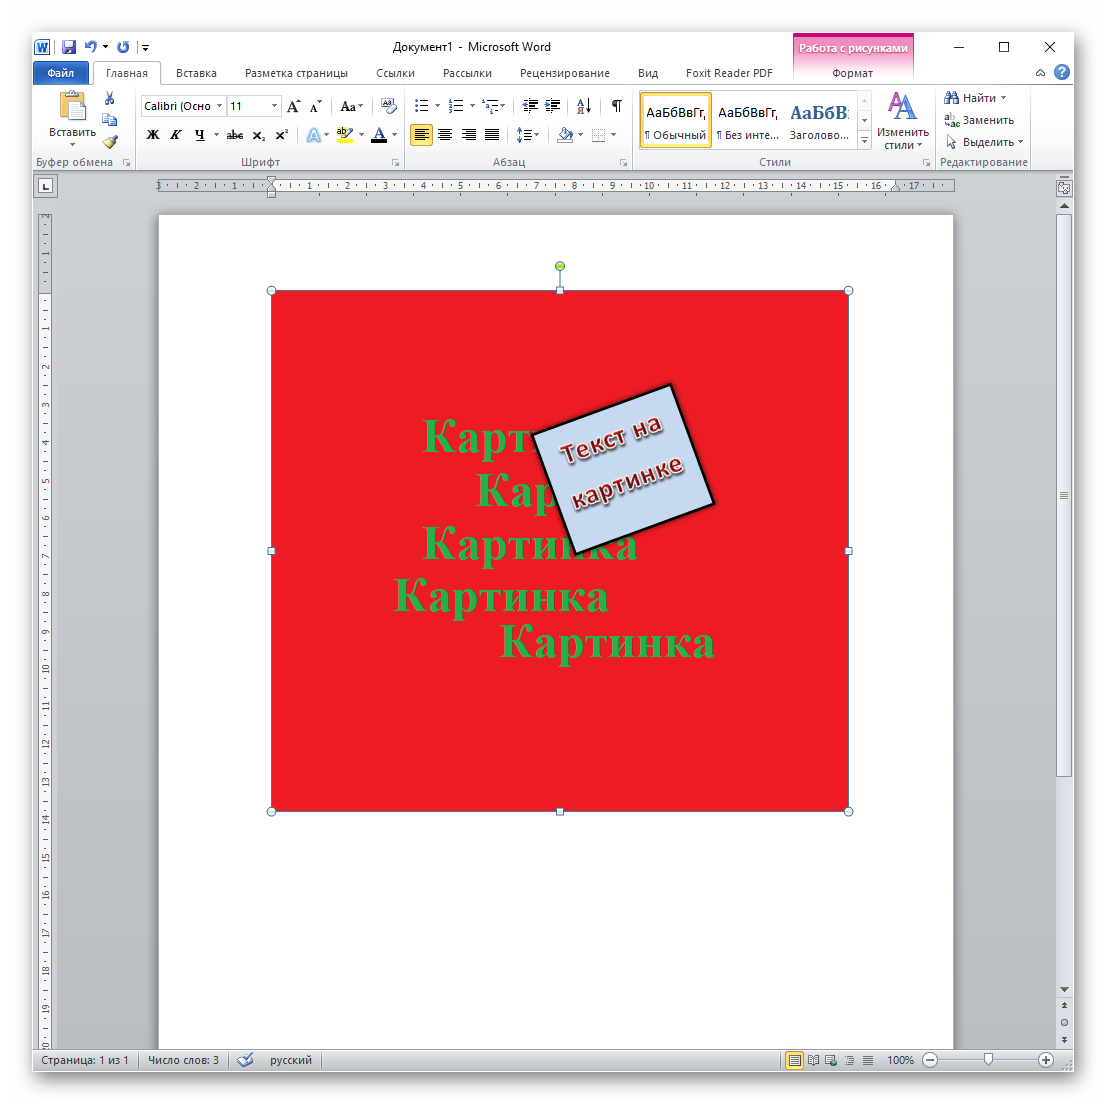
- Если вы примените все, или хотя бы несколько инструментов из предыдущего шага, ваша надпись может слегка или кардинально, но всё же заметно измениться.
Таким образом, этот вариант подходит для вставки разных примечаний, особых кусочков текста, выделения цитат и прочего, для чего может понадобиться минимальное художественное оформление. Недостаток метода состоит в том, что в таком случае работать с длинными текстами становится неудобно, так как появляется необходимость разбивать их на несколько надписей.
Способ 3: Вставка WordArt
Будучи инструментом, сходным с надписями, WordArt предназначен больше для нескольких слов, которые надо как-то вычурно оформить.
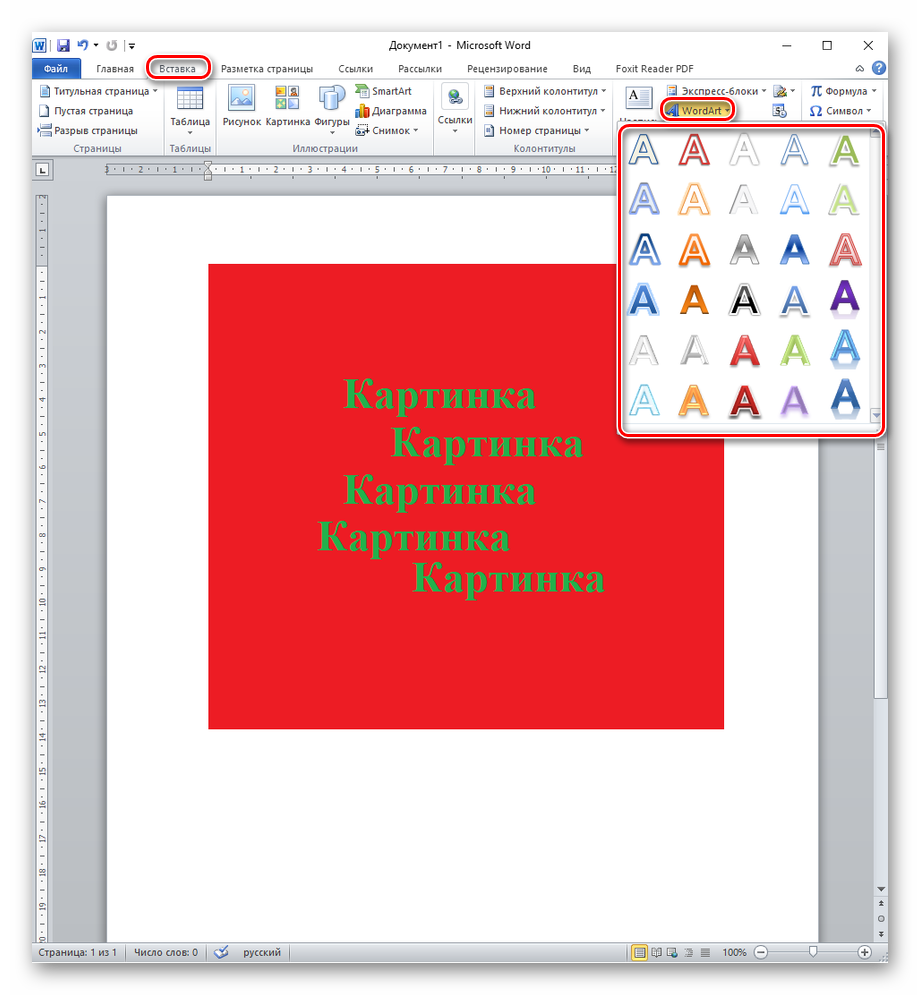
- Для вставки объекта WordArt перейдите на вкладку «Вставка», потом кликните по значку «WordArt» и выберите стиль, в котором вы хотите видеть его на картинке.
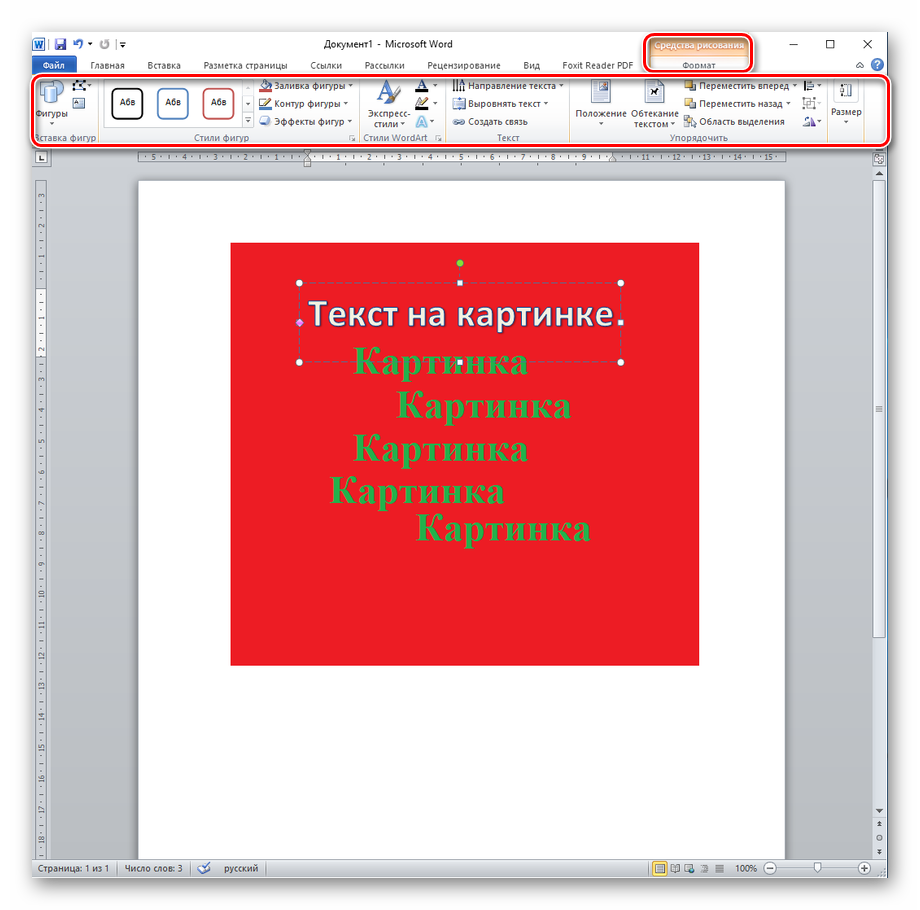
- Как можно видеть, этот способ является использованием объекта такого же типа как надписи, но с изначально заданным художественным стилем и без рамки, обладая теми же инструментами и параметрами для редактирования.
- При этом, имея направленность на пару коротких слов, WordArt больше поддаётся для манипуляций с текстом, и то, что для объёмных надписей было бы недоступно или неудобно, можно применить здесь, как, например, выгибание текста дугой.
Фундаментально не отличаясь от надписей, WordArt представляет собой инструмент быстрого создания какой-то красивой и оформленной надписи. Плюсом является то, что после клика по стилю пользователю сразу доступен какой-либо вид художественного оформления. Недостаток в том, что все инструменты редактирования такие же, как у надписей, и при должном желании WordArt можно превратить в надпись и наоборот.
Способ 4: Вставка названия
В том случае, когда пользователю необходимо не столько написать что-то в картинке, сколько дать ей описание, лучше всего использовать вставку названия.
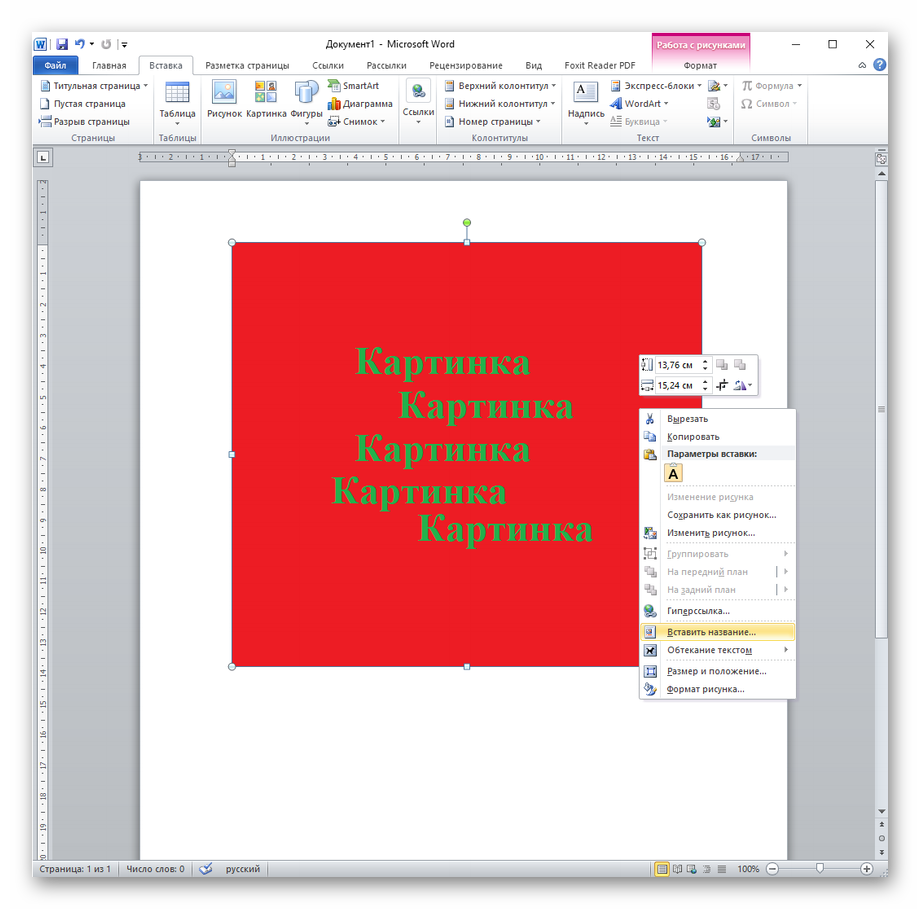
- Кликните правой кнопкой мыши по изображению, которое нужно подписать. В контекстном меню нажмите на «Вставить название…».
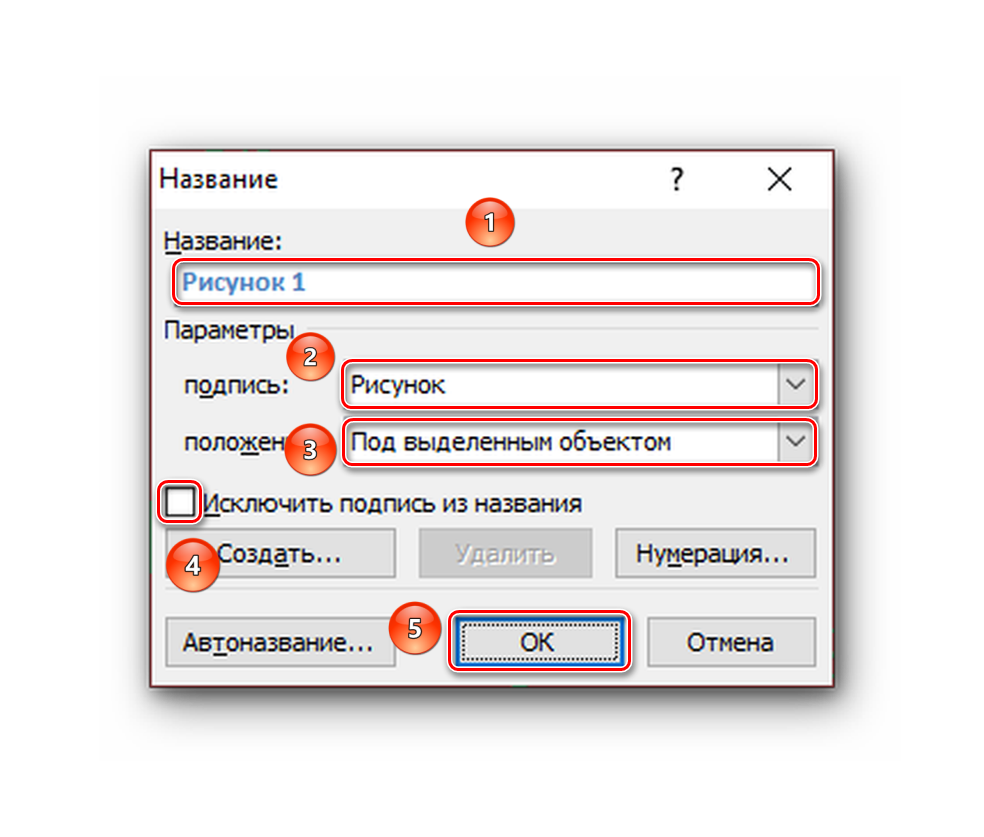
- В открывшемся окошке назовите ваше изображение, выбрав, какая подпись будет идти перед самим названием — это может быть «Рисунок», «Таблица» или «Формула». Выбор объекта подписи важен, если хотите соблюсти автоматическую нумерацию картинок в тексте. Далее определитесь с положением подписи: она может под текстом или над ним. При этом подпись можно вообще не использовать, поставив соответствующую галочку, если вы хотите видеть исключительно названия графических объектов в документе. После всего нажмите кнопку «ОК».
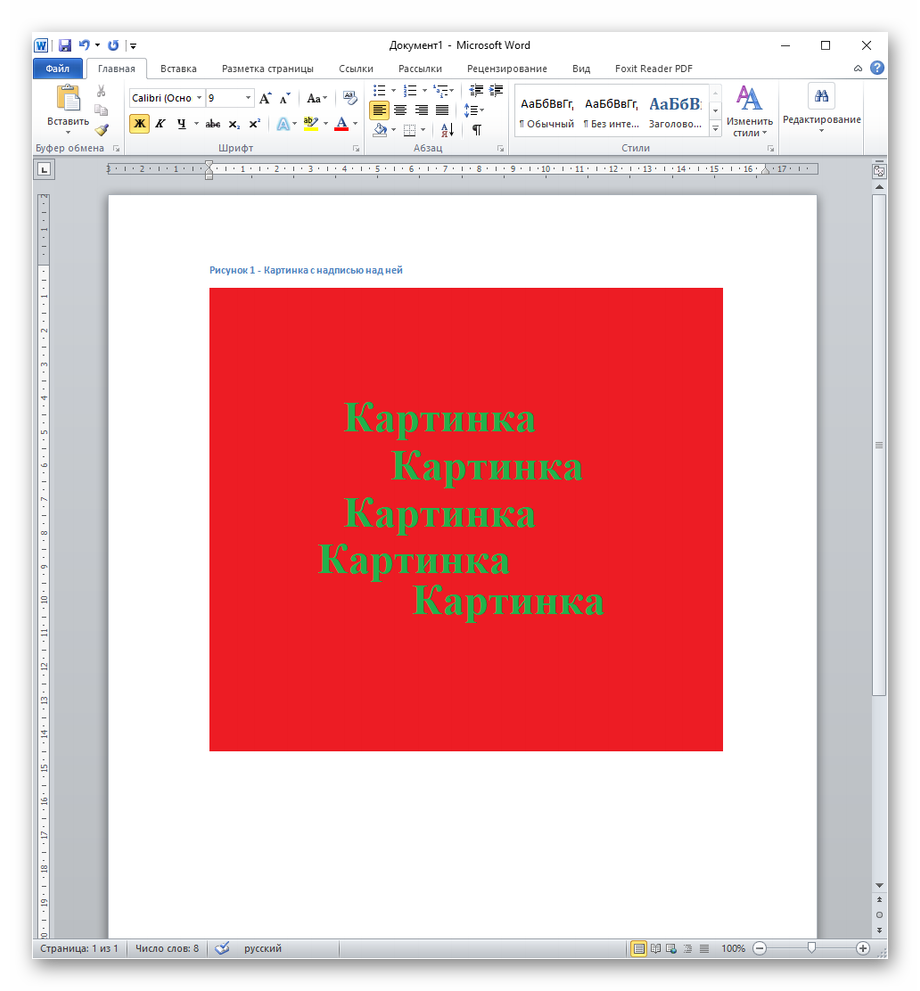
- Теперь перед вами картинка с подписью, которую в случае необходимости можно редактировать как угодно.
При желании можно создать новую подпись, кликнув на «Создать…», тогда ваше наименование будет появляться в списке предлагаемых вариантов во всех документах. В отличие от стандартных, его можно удалить позже.
Вставка названия — хороший инструмент для подписи картинок, если от текстового выделения больше ничего не требуется и сам текст не обязательно помещать на изображение.
Подходя к итогу, следует сказать, что написать текст поверх картинки в Microsoft Word не очень сложно, даже довольно удобно и порой интересно, если требуется его как-то красиво оформить. Текстовый редактор даёт для этого все инструменты, такие как обычное добавление текста поверх картинки, пользуясь ей как некой подложкой, блоковое написание для заметок или выделения одних частей документа над остальными, создание красиво оформленных художественных и технических подписей.

- Using a Text Wrapping Style
- Inserting a Text Box
- Inserting a WordArt
Method 1: Place Text Over Image Using Text Wrapping Style
If you have a long chunk of text and you just want to put a background image or a watermark on a document, then this method is best for you.
Step 1: Open up a Word document.

Step 2: Set the image as background.
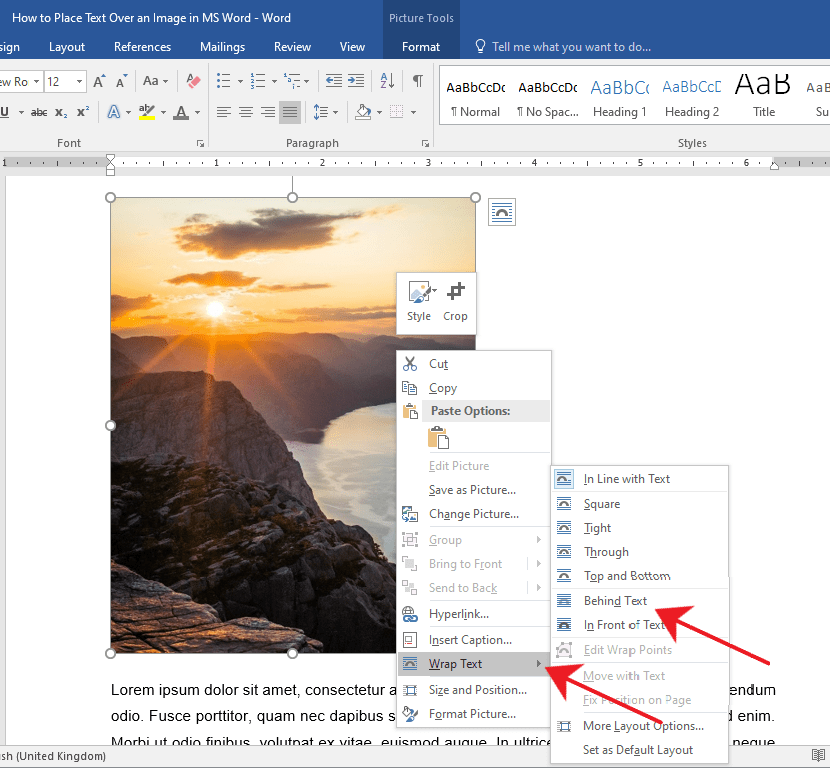
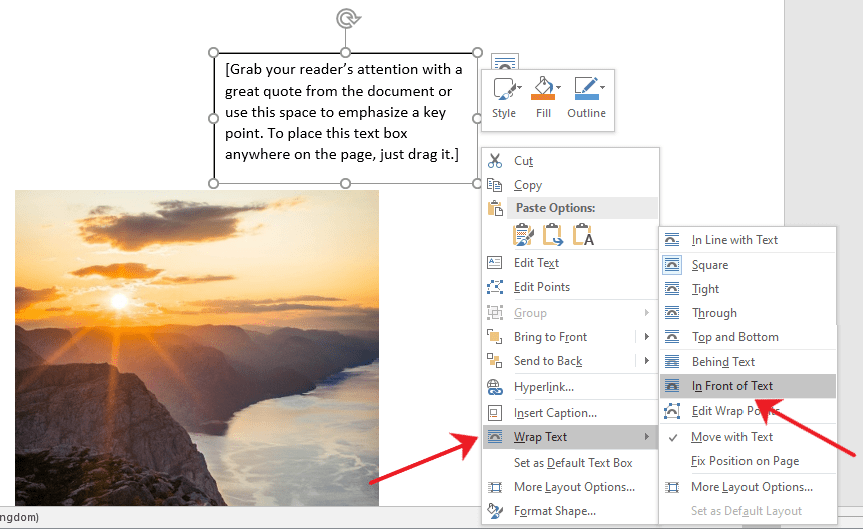
Right-click on the image and select the Wrap Text option.
This will display a horizontal drop-down menu on the right. Once you see the drop-down menu, select Behind Text.
You’ll notice the images and text will rearrange automatically as you hover over the text wrapping options.
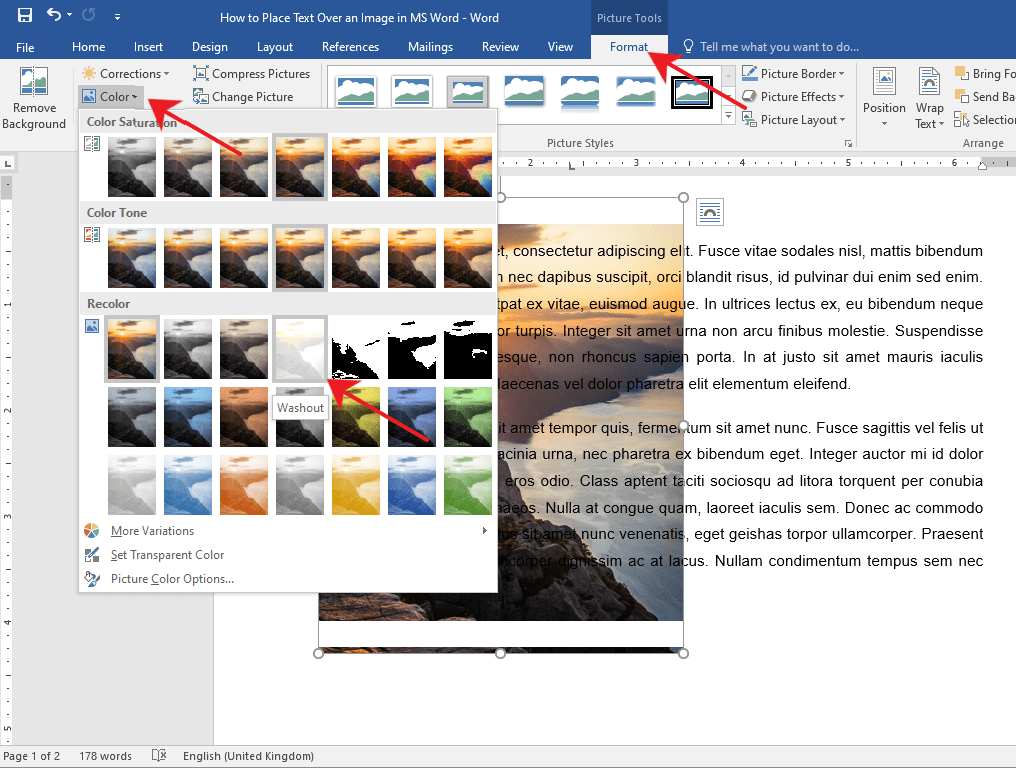
If after you’ve inserted a background image and the text becomes unreadable, you can change the image’s opacity or color.
Simply double-click on the image to activate the Format tab in the Ribbon.
After that, click on the Color drop-down menu and select Washout under the Recolor group.
You can also get creative and explore other options to suit your needs.
Method 2: Place Text Over Image Using a Text Box
Step 1: Open up a Word document.
Step 2: Insert a text box.
Go to the Insert tab on the Ribbon.
Now, navigate to the right side of the Ribbon and click on the Text Box drop-down menu.
Then, select a text box style of your preference. For this example, we’ll use the Simple Text Box.
Step 3: Type in the text.
Type in the text that you want to put on top of your image.

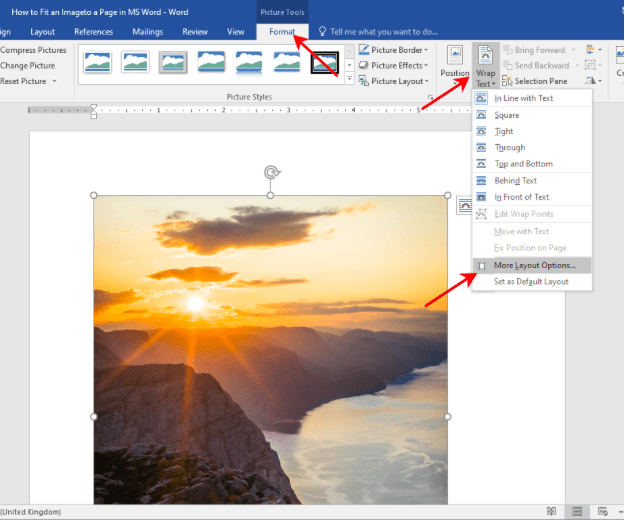
Step 4: Set the text wrapping style of the text box.
Select the text box and click the Layout button found at the upper right-hand corner of the text box.
Then, select the In Front of Text option.
Step 5: Place the text box over the image.
Click and drag the text box to place it over your image. You’ll notice that your text box has a background color by default and is covering a part of the image.

You can change your text box’s background and border color by accessing the Format tab.
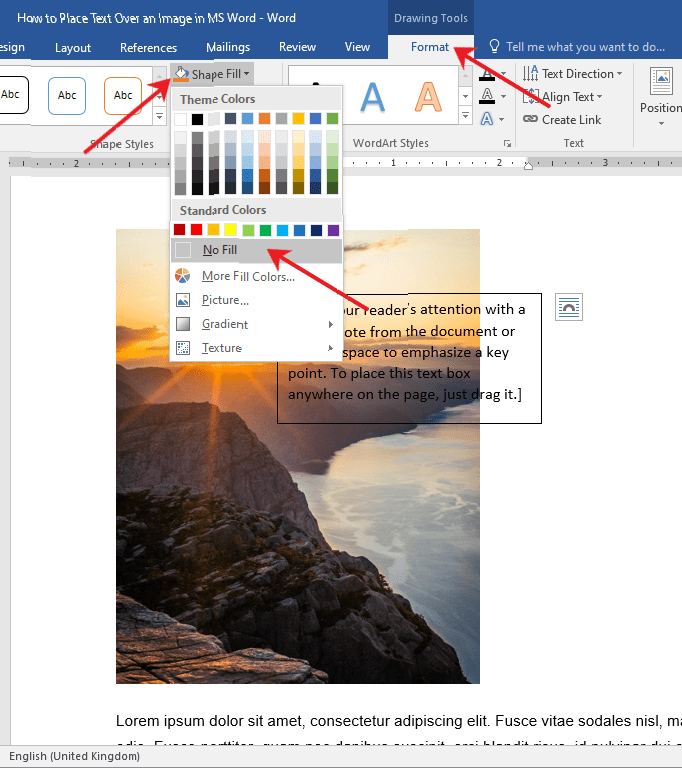
This way, only the text will be visible on top of your image. Now, Double-click the text box and go to the Format tab.
From there, click on the Shape Fill drop-down menu and choose No Fill.
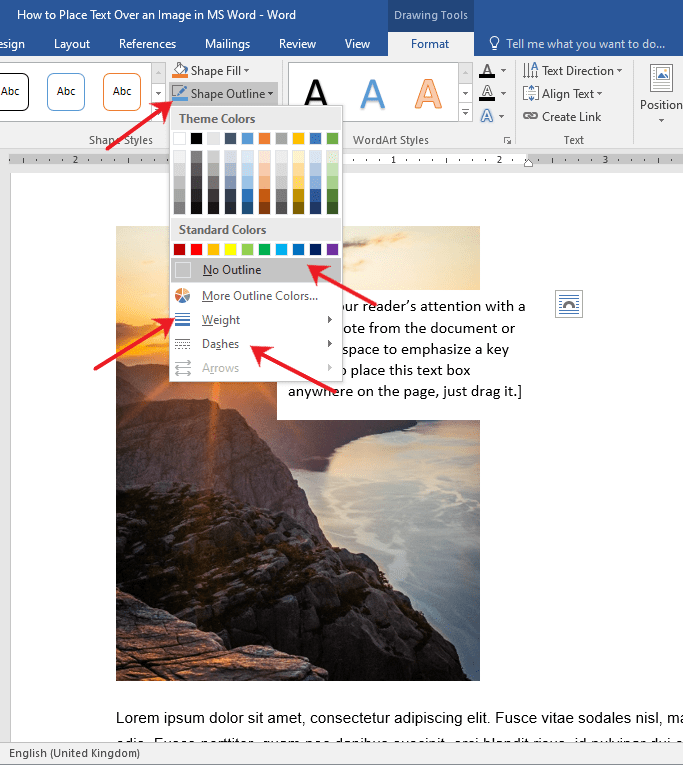
To change the border color, select the Shape Outline drop-down menu and choose No Outline.
You can also change the border’s weight and design by exploring the Dashes and Weight options.
Method 3: Place Text Over Image Using Word Art
If you find yourself needing to put a title, a name, or a couple of words over an image, then this method has got you covered.
Step 1: Open up a Word file.

Step 2: Insert the WordArt
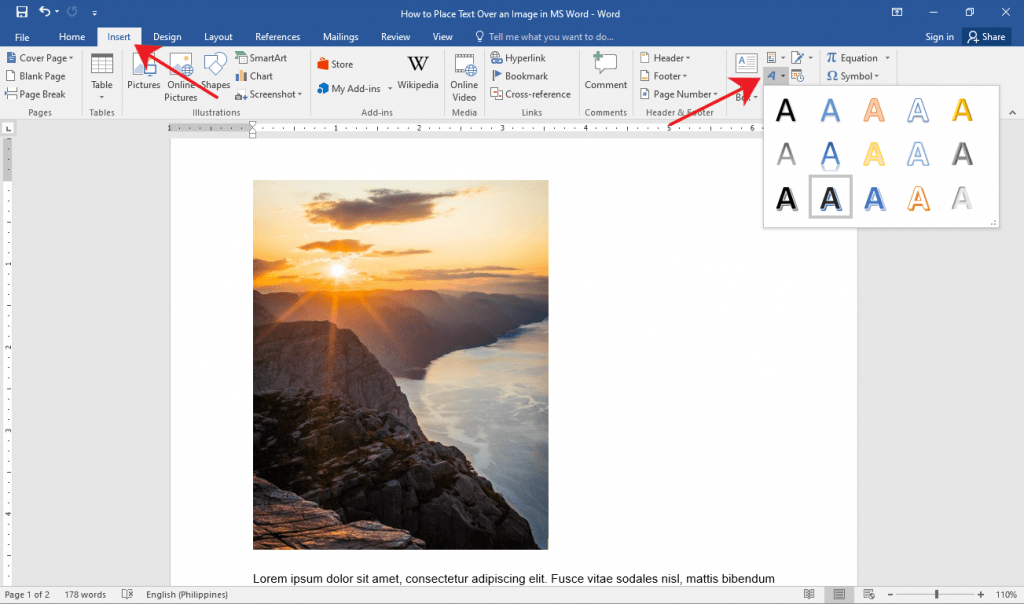
Click the Insert tab on the Ribbon.
Now, click the WordArt button found at the right side of your screen.
It’s the slanted letter A icon under the Text group. After that, choose a WordArt that suits the style of your document.
Step 3: Place the WordArt over the image.
Click on the WordArt and type in the text you want.
From there, select and drag the WordArt to easily move it around to the perfect location on your document.
You can also resize the WordArt like any other text box by grabbing either one of its corners.

Tip: If you’re using a pen or touch-enabled computer, you can directly write text over an image using the Draw option.
Editing and Deleting Text Over an Image
If you used Method 1, simply select the erroneous text and edit or delete it just as you would with any other text.
For Methods 2 and 3, click on the inside of the text box or the WordArt and start editing.
If you want to delete the entire text box or WordArt, click on any of the borders of the text box or WordArt and hit the Delete button on your keyboard.
Conclusion
That’s the rest of it. We hope you’ve found this article helpful!