
After you create a table, Microsoft Office Word 2007 offers you many ways to format that table. If you decide to use Table Styles, you can format your table all at once, and even see a preview of what your table will look like formatted in a particular style before you actually apply the style.
You can create a custom look for tables by splitting or merging cells, adding or deleting columns or rows, or adding borders. If you’re working with a long table, you can repeat the table headings on each page on which the table appears. To prevent awkward page breaks that disrupt the flow of your table, you can also specify just how and where the table should break across pages.
What do you want to do?
-
Use Table Styles to format an entire table
-
Add or remove borders
-
Display or hide gridlines
-
Add a cell, row, or column
-
Delete a cell, row, or column
-
Merge or split cells
-
Repeat a table heading on subsequent pages
-
Control where a table is divided
Use Table Styles to format an entire table
After you create a table, you can format the entire table by using Table Styles. By resting your pointer over each of the preformatted table styles, you can preview what the table will look like.
-
Click in the table that you want to format.
-
Under Table Tools, click the Design tab.
-
In the Table Styles group, rest the pointer over each table style until you find a style that you want to use.
Note: To see more styles, click the More arrow
 .
. -
Click the style to apply it to the table.
-
In the Table Style Options group, select or clear the check box next to each the table element to apply or remove the selected style.
 .
.Top of Page
Add or remove borders
You can add or remove borders to format a table the way that you want.
Add table borders
-
Under Table Tools, click the Layout tab.
-
In the Table group, click Select, and then click Select Table.
-
Under Table Tools, click the Design tab.
-
In the Table Styles group, click Borders, and then do one of
the following:-
Click one of the predefined border sets.
-
Click Borders and Shading, click the Borders tab, and then choose the options that you want.
-
Remove table borders from the whole table
-
Under Table Tools, click the Layout tab.
-
In the Table group, click Select, and then click Select Table.
-
Under Table Tools, click the Design tab.
-
In the Table Styles group, click Borders, and then click No Border.
Add table borders to specified cells only
-
On the Home tab, in the Paragraph group, click Show/Hide.
-
Select the cells that you want, including their end-of-cell marks.
-
Under Table Tools, click the Design tab.
-
In the Table Styles group, click Borders, and then click the border that you want to add.


Remove table borders from specified cells only
-
On the Home tab, in the Paragraph group, click Show/Hide.
-
Select the cells that you want, including their end-of-cell marks.
-
Under Table Tools, click the Design tab.
-
In the Table Styles group, click Borders, and then click No Border.
Top of Page
Display or hide gridlines
Gridlines show the cell boundaries of a table on the screen wherever the table doesn’t have borders applied. If you hide the gridlines in a table that has borders, you won’t see the change because the gridlines are behind the borders. To view the gridlines, remove the borders.
Unlike borders, gridlines appear only on the screen; they are never printed. If you turn off gridlines, the table is displayed as it will be printed.
Note: Gridlines are not visible when you view a document in a Web browser or in Print Preview.
Display or hide table gridlines in a document
-
Under Table Tools, on the Layout tab, in the Table group, click View Gridlines.
Top of Page
Add a cell, row, or column
Add a cell
-
Click in a cell that is located just to the right of or above where you
want to insert a cell. -
Under Table Tools, on the Layout tab, click the Rows & Columns Dialog Box Launcher.
-
Click one of the following options:
|
Click this |
To do this |
|
Shift cells right |
Insert a cell and move all other cells in that row to the right. Note: This option may result in a row that has more cells than the other rows. |
|
Shift cells down |
Insert a cell and move remaining existing cells in that column down one row each. A new row will be added at the bottom of the table to contain the last existing cell. |
|
Insert entire row |
Insert a row just above the cell that you clicked in. |
|
Insert entire column |
Insert a column just to the right of the cell that you clicked in. |
Add a row
-
Click in a cell that is located just below or above where you want to add a row.
-
Under Table Tools, click the Layout tab.
-
Do one of the following:
-
To add a row just above the cell that you clicked in, in the Rows and Columns group, click Insert Above.
-
To add a row just below the cell that you clicked in, in the Rows and Columns group, click Insert Below.
-
Add a column
-
Click in a cell that is located just to the right or left of where you want to add a column.
-
Under Table Tools, click the Layout tab.
-
Do one of the following:
-
To add a column just to the left of the cell that you clicked in, in the Rows and Columns group, click Insert Left.
-
To add a column just to the right of the cell that you clicked in, in the Rows and Columns group, click Insert Right.
-
Top of Page
Delete a cell, row, or column
-
Do one of the following:
To select
Do this
A cell
Click the left edge of the cell.
.A row
Click to the left of the row.
A column
Click the column’s top gridline or top border.
-
Under Table Tools, click the Layout tab.
-
In the Rows & Columns group, click Delete, and then click Delete Cells, Delete Rows, or Delete Columns, as appropriate.


Top of Page
Merge or split cells
Merge cells
You can combine two or more cells in the same row or column into a single cell. For example, you can merge several cells horizontally to create a table heading that spans several columns.
-
Select the cells that you want to merge by clicking the left edge of a cell and then dragging across the other cells that you want.
-
Under Table Tools, on the Layout tab, in the Merge group, click Merge Cells.
Split cells
-
Click in a cell, or select multiple cells that you want to split.
-
Under Table Tools, on the Layout tab, in the Merge group, click Split Cells.
-
Enter the number of columns or rows that you want to split the selected cells into.
Top of Page
Repeat a table heading on subsequent pages
When you work with a very long table, it will be divided wherever a page break occurs. You can make adjustments to the table so that the table headings are repeated on each page.
Repeated table headings are visible only in Print Layout view and when you print the document.
-
Select the heading row or rows. The selection must include the first row of the table.
-
Under Table Tools, on the Layout tab, in the Data group, click Repeat Header Rows.
Note: Word automatically repeats the table headings on each new page that results from an automatic page break. Word does not repeat a heading if you insert a manual page break within a table.
Top of Page
Control where a table is divided
When you work with a very long table, it must be divided wherever a page break occurs. By default, if a page break occurs within a large row, Microsoft Word allows a page break to divide the row between the two pages.
You can make adjustments to the table to make sure that the information appears as you want it to when the table spans multiple pages.
Prevent a
table row from breaking across pages
-
Click in the table.
-
Under Table Tools, click the Layout tab.
-
In the Table group, click Properties, and then click the Row tab.
-
Clear the Allow row to break across pages check box.
Force a table to break across pages at a particular row
-
Click in the row that you want to appear on the next page.
-
Press CTRL+ENTER.
Top of Page
A histogram is a type of bar chart that shows numerical data. The vertical bars of this chart use proportion to display the data details clearly. Microsoft Excel is typically the go-to application for charts of this nature, but there are times when you need or want to use Microsoft Word instead. While Word does have an «Insert Chart» option, these steps will show you how to make a comprehensible histogram using a Word table instead.
- A histogram is a type of bar chart that shows numerical data.
- While Word does have an «Insert Chart» option, these steps will show you how to make a comprehensible histogram using a Word table instead.
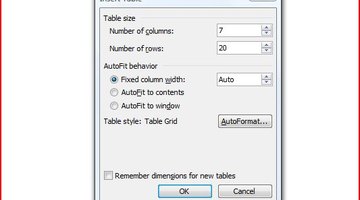
Open a blank Word document, or open the document in which you want to create a histogram. Insert a table onto the document. In Word 2007, go to the «Insert» tab, click the «Table» drop-down and select «Insert Table.» In earlier versions of Word, go to the «Table» menu, point to «Insert» and click on «Table.» Choose the number of columns you need in your chart, including a column to label the rows, and enough rows to present your data.
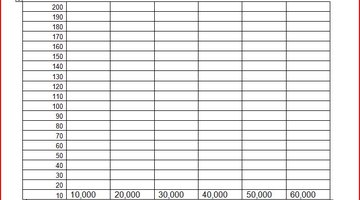
Enter the y-axis data for the histogram into the first column of the table. For example, if you are making a histogram showing how much money employees earned annually, you would put a number range for employees in each cell of the first column. Enter the x-axis data in the bottom row.
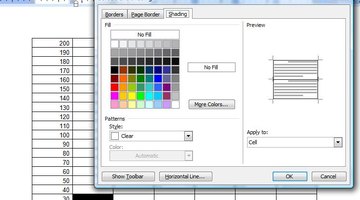
Highlight the cells in the first column to show the number of employees who earn that salary (as in the example). Right click these cells and select «Borders and Shading.» Go to the «Shading» tab.
Select a fill colour for the first column. Select the correct number of cells for the second column, right click it, select «Borders and Shading,» and choose a different fill colour for that column. Repeat with the remaining columns, filling each one with a different fill colour.
- Enter the y-axis data for the histogram into the first column of the table.
- Select the correct number of cells for the second column, right click it, select «Borders and Shading,» and choose a different fill colour for that column.
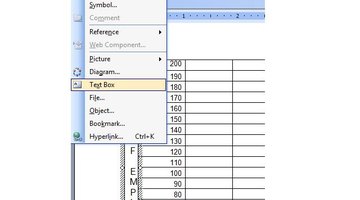
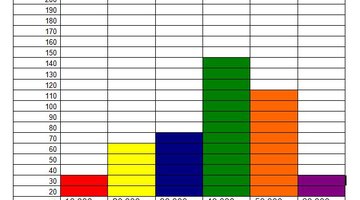
Insert a text box to the left of the table. The text box should be the same height as the column, but very narrow. To insert a text box in Word 2007, go to the «Insert» menu and click «Text Box.» In previous versions, select «Text Box» from the «Insert» menu. Type the label for the y-axis column into the text box. Type the label for the x-axis data under the table and the histogram is complete.
Create, Modify and Apply Table Styles in Word Documents
by Avantix Learning Team | Updated August 21, 2022
Applies to: Microsoft® Word® 2013, 2016, 2019, 2021 or 365 (Windows)
You can apply table styles to your Word tables to format them quickly and consistently. Word is shipped with several built-in table styles or you can create your own. You can edit table styles by modifying borders, shading, character formatting, paragraph formatting and table properties. If your document includes multiple tables, table styles can save a lot of time.
Note: Buttons and Ribbon tabs may display in a different way (with or without text) depending on your version of Word, the size of your screen and your Control Panel settings. For newer versionns of Word, Ribbon tabs may appear with different names. For example, the Table Tools Design tab may appear as Table Design.
Recommended article: How to Keep a Microsoft Word Table Together on One Page
Do you want to learn more about Microsoft Word? Check out our virtual classroom or live classroom Word courses >
Table styles and themes
Every Word document uses a document theme which includes a font theme and color theme. The colors used in table styles are based on the color theme.
You can select document themes, color themes and font themes using the Themes, Colors or Fonts drop-down menus on the Design tab in the Ribbon:

You can also create your own custom color themes so your tables can be formatted using your organization’s colors.
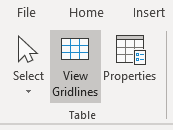
Display gridlines
When you are working with tables, it’s a good idea to turn gridlines on. Borders, which are a format, will print. Gridlines do not print.
To display gridlines:
- Click in a table.
- Click the Table Tools Layout or Table Layout tab.
- Click View Gridlines. Gridlines will stay on for all Word documents.
View Gridlines appears on the Table Tools Layout or Table Layout tab when you click in a table:
Apply a table style
If your Word document contains multiple tables that you want to format in a consistent way, it’s best to use table styles rather than applying manual or direct formatting to each table.
To apply a table style to a table:
- Click in the table.
- Click the Table Tools Design or Table Design tab in the Ribbon.
- Click the More down arrow on the bottom right in the Table Styles gallery. A drop-down menu appears.
- Hover over the various table styles. The table formatting will change as you move over different table styles in the gallery.
- Click the table style you want to apply.
Below is the Table Styles gallery (the current theme is the Office theme):
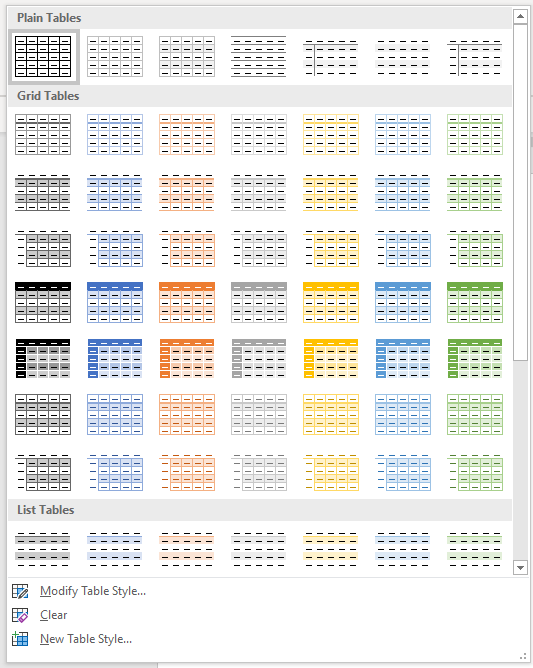
Note: Table styles do not include row height, column width or custom cell formatting for individual cells. If a user applies manual or direct formatting to a table (such as fills and borders) on the Table Tools Design or Table Design tab, this formatting will override the table style.
Apply Table Style Options
Once you have selected a table style, you can select or check different Table Style Options (which are affected by the formats in the selected table style).
The six Table Style Options that you can apply are: Header Row, Total Row, Banded Rows, First Column, Last Column and Banded Columns. If you have selected a plain table style, you may not notice any changes in the table formatting if you select different Table Style Options.
Table Style Options appear on the Table Tools Design or Table Design tab as follows when you click in a table:
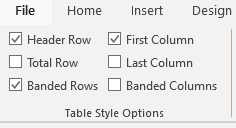
To select Table Style Options:
- Click in the table.
- Click the Table Tools Design or Table Design tab in the Ribbon.
- In Table Style Options, check or uncheck Header Row. If this option is checked, the header row will be formatted differently from the body rows.
- In Table Style Options, check or uncheck Total Row. If this option is checked, the last row will be formatted differently from the body rows.
- In Table Style Options, check or uncheck Banded Rows or Banded Columns for alternate row or column shading.
- In Table Style Options, check First Column or Last Column if you want the first or last column formatted differently from the other columns.
In the following table, Header Row and Banded Rows are checked in Table Style Options:

Modify a table style
You can modify a table style in a Word document and all tables using that table style will change.
To modify a table style:
- Click in the table.
- Click the Table Tools Design or Table Design tab in the Ribbon.
- Click the More down arrow on the bottom right in the Table Styles gallery. A drop-down menu appears.
- Click Modify Table Style. A dialog box appears. You can also right-click a table style and select Modify.
- From the Apply Formatting to drop-down menu, select the element that you want to modify (such as Header row).
- Select the desired formatting such as font, font size, font color, fill and border.
- From the Apply Formatting to drop-down menu, select the next element that you want to modify.
- Select the desired formatting such as font, font size, font color, fill and border.
- Repeat for other elements.
- Select Only in this document or New documents based on this template. If you select Only in this document, the modified style will only be available for the current document. If you select New documents based on this template, then the table style will be modified for future documents based on the current template (usually the Normal template).
- Click OK.
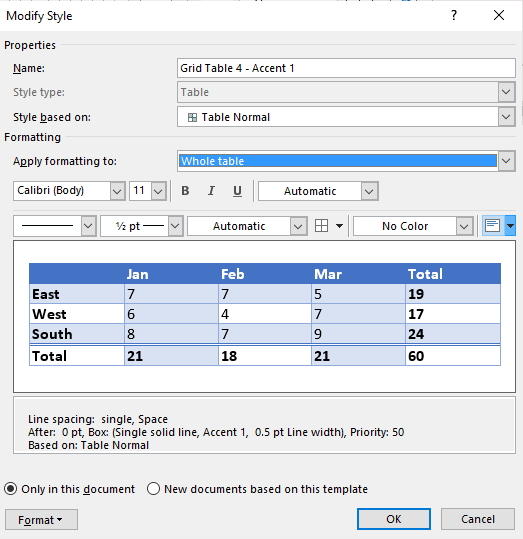
Below is the Modify Style dialog box:
You can also click Format at the bottom of the dialog box and choose other options such as Font or Paragraph.
If you modify a table style and the tables using that style do not change, it’s likely that direct or manual formatting has been applied to the table which then overrides the table style. You may need to clear formatting in the table by selecting the table and clicking Clear Formatting on the Home tab in the Font group.
You can also modify Table Properties in a table style. Table properties include table alignment, row settings and cell margins.
To modify Table Properties in a table style:
- Click in the table.
- Click the Table Tools Design or Table Design tab in the Ribbon.
- Click the More down arrow on the bottom right in the Table Styles gallery. A drop-down menu appears.
- Click Modify Table Style. A dialog box appears. You can also right-click a table style and select Modify.
- Click Format on the bottom left of the dialog box. A drop-down menu appears.
- Click Table Properties. A dialog box appears.
- Click the Table tab and select an Alignment.
- Click the Row tab and select the desired options. For example, turn off Allow row to break across pages.
- Select any other formatting options you want to apply to the entire table.
- Click OK.
- Select Only in this document or New documents based on this template.
- Click OK.
Below is the Table Properties dialog box with the Table tab selected:

Create a new table style
You can also create a new or custom table style.
To create a custom table style:
- Click in the table.
- Click the Table Tools Design or Table Design tab in the Ribbon.
- Click the More down arrow on the bottom right in the Table Styles gallery. A drop-down menu appears.
- Click a table style to apply it as a base style.
- Click the More down arrow on the bottom right in the Table Styles gallery. A drop-down menu appears.
- Click New Table Style. A dialog box appears.
- Enter a name for the new table style in the Name box.
- Select the desired formatting.
- Select Only in this document or New documents based on this template.
- Click OK.
New Table Style appears at the bottom of the Table Styles gallery:
The new table style will appear in the Table Styles gallery under Custom (at the top of the gallery). If you want to delete it, right-click it in the gallery and select Delete Table Style.
Clear a table style
To clear a table style and remove formatting:
- Click in the table.
- Click the Table Tools Design or Table Design tab in the Ribbon.
- Click the More down arrow on the bottom right in the Table Styles gallery. A drop-down menu appears.
- Click Clear.
Clear appears at the bottom of the Table Styles gallery:
Set a default table style
You can also set a default table style for new tables in the current document or all new documents.
To set a default table style:
- Click in the table.
- Click the Table Tools Design or Table Design tab in the Ribbon.
- Click the More down arrow on the bottom right in the Table Styles gallery. A drop-down menu appears.
- Right-click the table style you want to use as the default style and select Set as Default from the drop-down menu. A dialog box appears.
- Select This document only or All documents based on the Normal.dotm template (the default template in Word is the Normal template).
- Click OK.
If you are working with documents with multiple tables, formatting with table styles can ensure that your tables are formatted consistently and save a lot of time.
Subscribe to get more articles like this one
Did you find this article helpful? If you would like to receive new articles, JOIN our email list.
More resources
4 Ways to Create a Table in Word
14 Shortcuts to Quickly Select Text in Microsoft Word
How to Create Headings in Word (Using Heading Styles)
How to Quickly Remove Hard Returns in Word Documents
10 Microsoft Word Tips, Tricks and Shortcuts for Selecting in Tables
Related courses
Microsoft Word: Intermediate / Advanced
Microsoft Excel: Intermediate / Advanced
Microsoft PowerPoint: Intermediate / Advanced
Microsoft Word: Long Documents Master Class
Microsoft Word: Styles, Templates and Tables of Contents
Microsoft Word: Designing Dynamic Word Documents Using Fields
VIEW MORE COURSES >
Our instructor-led courses are delivered in virtual classroom format or at our downtown Toronto location at 18 King Street East, Suite 1400, Toronto, Ontario, Canada (some in-person classroom courses may also be delivered at an alternate downtown Toronto location). Contact us at info@avantixlearning.ca if you’d like to arrange custom instructor-led virtual classroom or onsite training on a date that’s convenient for you.
Copyright 2023 Avantix® Learning
Microsoft, the Microsoft logo, Microsoft Office and related Microsoft applications and logos are registered trademarks of Microsoft Corporation in Canada, US and other countries. All other trademarks are the property of the registered owners.
Avantix Learning |18 King Street East, Suite 1400, Toronto, Ontario, Canada M5C 1C4 | Contact us at info@avantixlearning.ca
Color fill a table to add emphasis
Updated on October 11, 2022
What to Know
- New table: Create a table, go to Table Design, and select a border style, size, and color. Select Border Painter to color cells.
- Existing table: Right-click the cells, select Borders and Shading > Shading > Fill, and choose a color. Select Apply to > Cell or Table.
- Or, go to the Design tab, select Page Borders > Shading > Fill, and choose a color. Select Apply to > Cell or Table.
This article explains how to apply a background color to an entire table or to specific portions while working on a table in Microsoft Word, adding emphasis or making a complex table easier to read. Instructions cover Microsoft Word for Microsoft 365, Word 2019, Word 2016, Word 2013, and Word 2010.
Want to Change the Display Color of a Whole Word Document? This Will Help
Add a Table With Shading
To create a new table and color it before entering data into it:
-
On the ribbon, go to the Insert tab and select the Table drop-down arrow.
-
Drag the cursor across the grid to choose how many rows and columns you want in the table.
-
On the Table Design tab, select a border style, size, and color.
-
Select the Borders drop-down arrow and choose the borders you want to apply. Or, select Border Painter to draw on the table to indicate which cells should be colored.
Add Color to a Table With Borders and Shading
To format an existing table with a background color:
-
Highlight the cells you want to tint with a background color. Use the Ctrl key to select non-contiguous cells.
-
Right-click one of the selected cells.
-
Select Borders and Shading.
-
Select the Shading tab.
-
Select the Fill drop-down arrow to open the color chart, then choose a background color.
-
Select the Style drop-down arrow, then choose a tint percentage or a pattern in the chosen color.
-
Select the Apply to drop-down arrow, then choose Cell to apply the chosen color only to the highlighted cells. Or, choose Table to fill the entire table with the background color.
-
Select OK.
Add Color With Page Borders Design Tab
To use the Design tab to add any color to a table:
-
Highlight the table cells to which you want to apply the background color.
-
Select the Design tab.
-
In the Page Background group, select Page Borders.
-
Select the Shading tab.
-
Select the Fill drop-down arrow, then choose a color from the color chart.
-
Select the Style drop-down arrow, then choose a percentage of tint or a pattern.
-
Select the Apply to drop-down arrow and choose Cell to add the background tint to the selected cells. Or, choose Table to fill the entire table with the background color.
FAQ
-
How to I change the color of a table’s lines in Word?
Select the cell, cells, or entire table you want to edit. Next, right-click to bring up the table design menu and select the Borders button (it looks like a 2×2 grid), followed by Borders and Shading > Colors. Choose the color and other style options you want, then select OK to save.
-
How do I tell a table in Word to alternate row colors?
To manually adjust the color of every other row one at a time, choose all of the cells in a given row, then right-click one of those cells and select Borders and Shading > Shading > Fill and choose the color you want. Or select the entire table, then select Home > Format as Table, then choose a style with alternating row colors.
Thanks for letting us know!
Get the Latest Tech News Delivered Every Day
Subscribe
In the article below, there are instructions enabling you to fill blank table cells with same text in batches in your word document.
Now and then if you send Word tables for others to fill, you can always get them back with some blank table cells. On one hand to leave them alone in blank will to some degree compromise your Word document look. On the other hand, you need to input same text in those blank cells sometimes.
It is therefore we here present you the detailed steps to fill blank table cells with same text in batches. Just read on to view more.
Fill Blank Table Cells with Same Text in Batches
- First thing, you should start with selecting all the blank table cells. Certainly, you can press “Ctrl” then select all blank cells one by one. This way, however, isn’t so convenient especially when the blank cells are not next to each other., such as below:


So we here can select an area where the blank cells are included. Or you can just select the entire table.
- Secondly, click “Home” tab.
- Then click “Multilevel List” option in “Paragraph” group.
- And on the list-menu, choose “Define New Multilevel List”.

- Now you will open the “Define new Multilevel list” dialog box. Click “More” button on the left-down corner of the dialog box first because you will need to choose some options.
- Then click “1” on the list box of “Click level to modify”.
- Next in “Enter formatting for number” text box, enter the text you want to display in those blank cells.
- And go to choose “Nothing” on the list box of “Follow number with”.

- Now go back to the list box of “Click level to modify” and click “2” this time.
- Repeat step 7 and step 8.
- Click “OK”.


You can see texts on all table cells you select in step 1.
Remove the Texts from Some Table Cells
As you see, if you select an area or the whole table in above step 1, you will add texts to some already filled cells which is not necessary. Thus we will show you the way to eliminate texts from these cells.
- Firstly, select all the cells which contain the texts you enter.
- Then click “Home” tab.
- Next click the upside-down triangle behind “Find” option in “Editing” group.
- On the list-menu, choose “Advanced Find”.

- In the “Find and Replace” dialog box, type “^?” in “Find what” text box.
- Next, click “Find In” button.
- And choose “Current Selection”.


Now you will see those cells which don’t need the texts are selected.
- Click “Bullets” in “Paragraph” group.
- And choose “None” in “Bullet Library”.


The next thing you see is that texts have been removed from those cells.
File Recovery Tool: Your Excellent Choice of Getting File Back
Word crash resulting in file corruption happens without any signs. So once you get damaged files, what will you do? Will you just abandon all the files and start creating new ones? Or will you turn to some IT consultants for solutions? As you see, the first one is far from realistic, and the second one can be really expensive. Given to such fact, why not take a look at the third option? To choose a File recovery tool can be your perfect option to retrieve your critical file back. With high recovery rate, Word doc fix tool enables you to purchase less money while get the maximum result.
Author Introduction:
Vera Chen is a data recovery expert in DataNumen, Inc., which is the world leader in data recovery technologies, including damaged xls file repair and pdf repair software products. For more information visit www.datanumen.com