
You can change the look of a shape or text box by changing its fill or by adding effects to it, such as shadows, glows, reflections, soft edges, bevels, and three-dimensional (3-D) rotations.
A fill is a color, pattern, texture, picture, or gradient applied to the interior of a shape. A gradient is a gradual progression of colors and shades, usually from one color to another color, or from one shade to another shade of the same color.

Changing the fill color of a shape affects only the inside or front of the shape. If you add an effect to a shape, such as a shadow, and want a different color for that effect, you must change the color of the shadow separately from the fill color.
A 3-D effect adds depth to a shape. You can add a built-in combination of 3-D effects to your shape, or you can add individual effects. You can add combinations of individual effects to your shape in these programs: Excel, Outlook, Word, and PowerPoint.
Add a fill or effect
To add a fill or effect, click your shape, click Format, click the arrow next to Shape Fill or Shape Effects, and select a color, gradient, texture, or effect.
-
Click the shape that you want to fill. To add the same fill to multiple shapes, click the first shape, and then press and hold Ctrl while you click the other shapes.
-
On the Format tab, in the Shape Styles group, click the arrow next to Shape Fill.

-
Do one of the following:
-
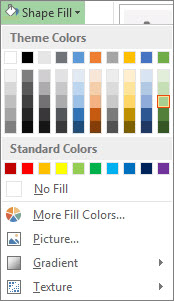
To add or change a fill color, click the color you want.
-
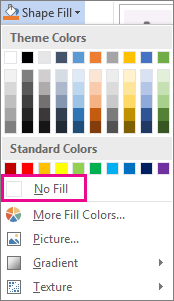
To choose no color, click No Fill.
-
To use a color that isn’t one of the theme colors, click More Fill Colors, and then either click the color that you want on the Standard tab, or mix your own color on the Custom tab. Custom colors and colors on the Standard tab do not update if you later change the document theme.
-
To adjust the transparency of the shape, click More Fill Colors. At the bottom of the Colors dialog box, move the Transparency slider, or enter a number in the box next to the slider. You can vary the percentage of transparency from 0% (fully opaque, the default setting) to 100% (fully transparent).
-
To add or change a fill picture, click Picture, locate the folder that contains the picture that you want to use, click the picture file, and then click Insert.
-
To add or change a fill gradient, point to Gradient, and then click the gradient variation that you want. To customize the gradient, click More Gradients, and then choose the options that you want.
-
To add or change a fill texture, point to Texture, and then click the texture that you want. To customize the texture, click More Textures, and then choose the options that you want.
-
Top of page
For more information about adding a fill or effect, select an item from the drop-down list:
-
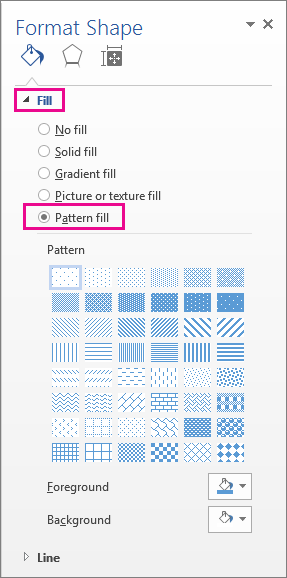
Right-click the shape that you want to add a pattern fill to and select Format Shape.
-
In the Format Shape pane, click Fill, and then click Pattern Fill.
-
Select a pattern, and if you like, click the arrows next to Foreground and Background and select a color combination.
Top of page
You can add a variety of effects to your text boxes and shapes, such as beveled edges or reflections.
-
Click the shape that you want to add an effect to. To add the same effect to multiple shapes, click the first shape, and then press and hold Ctrl while you click the other shapes.
-
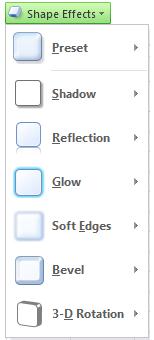
On the Format tab, in the Shape Styles group, click Shape Effects, and select an option from the list.
-
To add or change a built-in combination of effects, point to Preset, and then click the effect that you want.
To customize the built-in effect, click 3-D Options, and then choose the options that you want.
-
To add or change a shadow, point to Shadow, and then click the shadow that you want.
To customize the shadow, click Shadow Options, and then choose the options that you want.
-
To add or change a reflection, point to Reflection, and then click the reflection variation that you want.
To customize the reflection, click Reflection Options, and then choose the options that you want.
-
To add or change a glow, point to Glow, and then click the glow variation that you want.
To customize the glow, click Glow Options, and then choose the options that you want.
-
To add or change a soft edge, point to Soft Edges, and then click the size and color of the edge that you want.
To customize the soft edges, click Soft Edges Options, and then choose the options that you want.
-
To add or change an edge, point to Bevel, and then click the bevel that you want.
To customize the bevel, click 3-D Options, and then choose the options that you want.
-
To add or change a 3-D rotation, point to 3-D Rotation, and then click the rotation that you want.
To customize the rotation, click 3-D Rotation Options, and then choose the options that you want.
Notes:
-
To create a custom effect by adding multiple individual effects, repeat step two above.
-
If you add a 3-D effect, such as a bevel, to the shape and then add a soft edge, you will not see any visual change to the shape because the 3-D effect takes precedence. However, if you delete the 3-D effect, the soft edge effect will be visible.
-
-
Top of page
-
Click the shape that you want to delete a fill from. To delete the same fill from multiple shapes, click the first shape, and then press and hold Ctrl while you click the other shapes.
-
On the Format tab, in the Shape Styles group, click the arrow next to Shape Fill, and then click No Fill.
Top of page
-
Click the shape that you want to delete the effect from. To delete the same effect from multiple shapes, click the first shape, and then press and hold Ctrl while you click the other shapes.
-
On the Format tab, in the Shape Styles group, click Shape Effects, and then do one of the following.
-
To delete a built-in combination of effects from the shape, point to Preset, and then click No Presets.
Note: When you click No Presets, you do not remove any shadow effects that have been applied to your shape. To remove shadows on a shape, follow the step below.
-
To delete a shadow, point to Shadow, and then click No Shadow.
-
To delete a reflection, point to Reflection, and then click No Reflection.
-
To delete a glow, point to Glow, and then click No Glow.
-
To delete soft edges, point to Soft Edges, and then click No Soft Edges.
-
To delete an edge, point to Bevel, and then click No Bevel.
-
To delete 3-D rotation, point to 3-D Rotation, and then click No Rotation.
-
Note: If you have added multiple individual effects, repeat step two above to delete all the effects.
Top of page
See also
-
To add a shape, see Add shapes.
-
To learn about other shapes with effects, see Insert WordArt or Learn more about SmartArt graphics.
-
To change the look of a picture, see Apply an artistic effect to a picture.
-
To change the look of a text box, see Change the colors in a text box or shape.
-
To change the border around a text box or shape, see Remove or change the border on a text box or shape.
-
To create a moving effect in PowerPoint, see Animate text or objects.
Add or change a shape fill
-
Click the shape that you want to add a fill to.
To add the same fill to multiple shapes, click the first shape, and then press and hold CTRL while you click the other shapes.
-
Under Drawing Tools, on the Format tab, in the Shape Styles group, click the arrow next to Shape Fill, and then do one of the following:
If you do not see the Drawing Tools or Format tabs, make sure that you have selected the shape. You might have to double-click the shape to open the Format tab.
-
To add or change a fill color, click the color that you want, or to choose no color, click No Fill.
To change to a color that is not in the theme colors, click More Fill Colors, and then either click the color that you want on the Standard tab, or mix your own color on the Custom tab. Custom colors and colors on the Standard tab do not update if you later change the document theme.
Tip: You can also adjust the transparency of the shape by clicking More Fill Colors. At the bottom of the Colors dialog box, move the Transparency slider, or enter a number in the box next to the slider. You can vary the percentage of transparency from 0% (fully opaque, the default setting) to 100% (fully transparent).
-
To add or change a fill picture, click Picture, locate the folder that contains the picture that you want to use, click the picture file, and then click Insert.
-
To add or change a fill gradient, point to Gradient, and then click the gradient variation that you want.
To customize the gradient, click More Gradients, and then choose the options that you want.
-
To add or change a fill texture, point to Texture, and then click the texture that you want.
To customize the texture, click More Textures, and then choose the options that you want.
-

Top of page
For more information about adding a fill or effect, select an item from the drop-down list.
-
Right-click the shape that you want to add a pattern fill to and select Format Shape.
-
In the Format Shape dialog box, click the Fill tab.
-
In the Fill pane, select Pattern fill and then select a pattern, foreground color, and background color for your pattern fill.
Top of page
-
Click the shape that you want to add an effect to.
To add the same effect to multiple shapes, click the first shape, and then press and hold CTRL while you click the other shapes.
-
Under Drawing Tools, on the Format tab, in the Shape Styles group, click Shape Effects, and then do one of the following:
If you do not see the Drawing Tools or Format tabs, make sure that you have selected the shape. You might have to double-click the shape to open the Format tab.
-
To add or change a built-in combination of effects, point to Preset, and then click the effect that you want.
To customize the built-in effect, click 3-D Options, and then choose the options that you want.
-
To add or change a shadow, point to Shadow, and then click the shadow that you want.
To customize the shadow, click Shadow Options, and then choose the options that you want.
-
To add or change a reflection, point to Reflection, and then click the reflection variation that you want.
To customize the reflection, click Reflection Options, and then choose the options that you want.
-
To add or change a glow, point to Glow, and then click the glow variation that you want.
To customize the glow, click Glow Options, and then choose the options that you want.
-
To add or change a soft edge, point to Soft Edges, and then click the size and color of the edge that you want.
To customize the soft edges, click Soft Edges Options, and then choose the options that you want.
-
To add or change an edge, point to Bevel, and then click the bevel that you want.
To customize the bevel, click 3-D Options, and then choose the options that you want.
-
To add or change a 3-D rotation, point to 3-D Rotation, and then click the rotation that you want.
To customize the rotation, click 3-D Rotation Options, and then choose the options that you want.
Notes:
-
To create a custom effect by adding multiple individual effects, repeat step two above.
-
If you add a 3-D effect, such as a bevel, to the shape and then add a soft edge, you will not see any visual change to the shape because the 3-D effect takes precedence. However, if you delete the 3-D effect, the soft edge effect will be visible.
-
-
Top of page
-
Click the shape that you want to delete a fill from.
To delete the same fill from multiple shapes, click the first shape, and then press and hold CTRL while you click the other shapes.
-
Under Drawing Tools, on the Format tab, in the Shapes Styles group, click the arrow next to Shape Fill, and then click No Fill.
If you do not see the Drawing Tools or Format tabs, make sure that you have selected the shape. You might have to double-click the shape to open the Format tab.
Top of page
-
Click the shape that you want to delete the effect from.
To delete the same effect from multiple shapes, click the first shape, and then press and hold CTRL while you click the other shapes.
-
Under Drawing Tools, on the Format tab, in the Shape Styles group, click Shape Effects, and then do one of the following:
If you do not see the Drawing Tools or Format tabs, make sure that you have selected the shape. You might have to double-click the shape to open the Format tab.
-
To delete a built-in combination of effects from the shape, point to Preset, and then click No Presets.
Note: When you click No Presets, you do not remove any shadow effects that have been applied to your shape. To remove shadows on a shape, follow the step below.
-
To delete a shadow from the shape, point to Shadow, and then click No Shadow.
-
To delete a reflection from the shape, point to Reflection, and then click No Reflection.
-
To delete a glow from the shape, point to Glow, and then click No Glow.
-
To delete soft edges from the shape, point to Soft Edges, and then click No Soft Edges.
-
To delete an edge from the shape, point to Bevel, and then click No Bevel.
-
To delete 3-D rotation from the shape, point to 3-D Rotation, and then click No Rotation.
-
Note: If you have added multiple individual effects, repeat step two above to delete all the effects.
Top of page
Add or change a fill
Select a Microsoft Office application from the drop-down list.
-
Click the shape or text box that you want to add a fill to.
To add the same fill to multiple shapes or text boxes, click the first one, and then press and hold SHIFT while you click the others.
-
Under Drawing Tools, on the Format tab, in the Shape Styles group, click Shape Fill, and then do one of the following:
-
To add or change a fill color, click the color that you want, or to choose no color, click No Fill.
To change to a color that is not in the theme colors, click More Fill Colors, and then either click the color that you want on the Standard tab, or mix your own color on the Custom tab. Custom colors and colors on the Standard tab do not update if you later change the document theme.
You can also adjust the transparency of the fill by clicking More Fill Colors. At the bottom of the Colors dialog box, move the Transparency slider, or enter a number in the box next to the slider. You can vary the percentage of transparency from 0% (fully opaque, the default setting) to 100% (fully transparent).
-
To add or change a fill picture, click Picture, locate and click the picture that you want to use, and then click Insert.
-
To add or change a fill gradient, point to Gradient, and then click the gradient variation that you want.
To customize the gradient, click More Gradients, and then choose the options that you want.
-
To add or change a fill texture, point to Texture, and then click the texture that you want.
To customize the texture, click More Textures, and then choose the options that you want.
-

Top of page
-
Click the shape or text box that you want to add a fill to.
To add the same fill to multiple shapes or text boxes, click the first one, and then press and hold SHIFT while you click the others.
-
Under Drawing Tools or Text Box Tools, on the Format tab, in the Shape Styles or Text Box Styles group, click Shape Fill, and then do one of the following:
-
To add or change a fill color, click the color that you want, or to choose no color, click No Fill.
To change to a color that is not in the theme colors, click More Fill Colors, and then either click the color that you want on the Standard tab, or mix your own color on the Custom tab. Custom colors and colors on the Standard tab do not update if you later change the document theme.
You can also adjust the transparency by clicking More Fill Colors. At the bottom of the Colors dialog box, move the Transparency slider, or enter a number in the box next to the slider. You can vary the percentage of transparency from 0% (fully opaque, the default setting) to 100% (fully transparent).
-
To add or change a fill picture, click Picture, locate the folder that contains the picture that you want to use, click the picture file, and then click Insert.
-
To add or change a fill gradient, point to Gradient, and then click the gradient variation that you want.
To customize the gradient, click More Gradients, and then choose the options that you want.
-
To add or change a fill texture, point to Texture, and then click the texture that you want.
To customize the texture, click More Textures, and then choose the options that you want.
-
To add or change a pattern, click Pattern, and then click the options that you want.
-

Top of page
-
Click the shape or text box that you want to add a fill to.
To add the same fill to multiple shapes or text boxes, click the first one, and then press and hold SHIFT while you click the others.
-
Under Drawing Tools, on the Format tab, in the Shape Styles group, click Shape Fill, and then do one of the following:
-
To add or change a fill color, click the color that you want, or to choose no color, click No Fill.
To change to a color that is not in the theme colors, click More Fill Colors, and then either click the color that you want on the Standard tab, or mix your own color on the Custom tab. Custom colors and colors on the Standard tab do not update if you later change the document theme.
You can also adjust the transparency of the fill by clicking More Fill Colors. At the bottom of the Colors dialog box, move the Transparency slider, or enter a number in the box next to the slider. You can vary the percentage of transparency from 0% (fully opaque, the default setting) to 100% (fully transparent).
-
To add or change a fill picture, click Picture, locate and click the picture that you want to use, and then click Insert.
-
To add or change a fill gradient, point to Gradient, and then click the gradient variation that you want.
To customize the gradient, click More Gradients, and then choose the options that you want.
-
To add or change a fill texture, point to Texture, and then click the texture that you want.
To customize the texture, click More Textures, and then choose the options that you want.
-
Top of page
-
Click the shape or text box that you want to add a fill to.
To add the same fill to multiple shapes or text boxes, click the first one, and then press and hold SHIFT while you click the others.
-
Under Drawing Tools or Text Box Tools, on the Format tab, in the Shape Styles or Text Box Styles group, click Shape Fill, and then do one of the following:
-
To add or change a fill color, click the color that you want, or to choose no color, click No Fill.
To change to a color that is not in the theme colors, click More Fill Colors, and then either click the color that you want on the Standard tab, or mix your own color on the Custom tab. Custom colors and colors on the Standard tab do not update if you later change the document theme.
You can also adjust the transparency by clicking More Fill Colors. At the bottom of the Colors dialog box, move the Transparency slider, or enter a number in the box next to the slider. You can vary the percentage of transparency from 0% (fully opaque, the default setting) to 100% (fully transparent).
-
To add or change a fill picture, click Picture, locate the folder that contains the picture that you want to use, click the picture file, and then click Insert.
-
To add or change a fill gradient, point to Gradient, and then click the gradient variation that you want.
To customize the gradient, click More Gradients, and then choose the options that you want.
-
To add or change a fill texture, point to Texture, and then click the texture that you want.
To customize the texture, click More Textures, and then choose the options that you want.
-
To add or change a pattern, click Pattern, and then click the options that you want.
-
Top of page
Add or change an effect
Select a Microsoft Office application from the drop-down list.
-
Click the shape or text box that you want to add an effect to.
To add the same effect to multiple shapes or text boxes, click the first one, and then press and hold SHIFT while you click the others.
-
Under Drawing Tools, on the Format tab, in the Shape Styles group, click Shape Effects, and then do one of the following:
-
To add or change a built-in combination of effects, point to Preset, and then click the effect that you want.
To customize the built-in effect, click 3-D Options, and then choose the options that you want.
-
To add or change a shadow, point to Shadow, and then click the shadow that you want.
To customize the shadow, click Shadow Options, and then choose the options that you want.
-
To add or change a reflection, point to Reflection, and then click the reflection variation that you want.
-
To add or change a glow, point to Glow, and then click the glow variation that you want.
To customize the glow colors, click More Glow Colors, and then choose the color that you want. To change to a color that is not in the theme colors, click More Colors, and then either click the color that you want on the Standard tab, or mix your own color on the Custom tab. Custom colors and colors on the Standard tab do not update if you later change the document theme.
-
To add or change a soft edge, point to Soft Edges, and then click the size of the edge that you want.
-
To add or change an edge, point to Bevel, and then click the bevel that you want.
To customize the bevel, click 3-D Options, and then choose the options that you want.
-
To add or change a 3-D rotation, point to 3-D Rotation, and then click the rotation that you want.
To customize the rotation, click 3-D Rotation Options, and then choose the options that you want.
Notes:
-
To create a custom effect by adding multiple individual effects, repeat step two above.
-
If you add a 3-D effect, such as a bevel or 3-D rotation, and then add a soft edge, you will not see any change to the shape or text box because the 3-D effect takes precedence. However, if you delete the 3-D effect, the soft edge effect is visible.
-
-
Top of page
-
Click the shape or text box that you want to add an effect to.
To add the same effect to multiple shapes or text boxes, click the first one, and then press and hold SHIFT while you click the others.
-
Under Drawing Tools or Text Box Tools, on the Format tab, in the Shape Styles or Text Box Styles group, click Shape Fill, and then do one of the following:
-
To add or change a shadow, in the Shadow Effects group, click Shadow Effects, and then choose the shadow that you want.
To customize the shadow color, point to Shadow Color, and then click the color that you want.
To change to a color that is not in the theme colors, click More Shadow Colors, and then either click the color that you want on the Standard tab, or mix your own color on the Custom tab. Custom colors and colors on the Standard tab do not update if you later change the document theme.
-
To add or change a 3-D effect, in the 3-D Effects group, click 3-D Effects, and then choose the options that you want.
-
Top of page
-
Click the shape or text box that you want to add an effect to.
To add the same effect to multiple shapes or text boxes, click the first one, and then press and hold SHIFT while you click the others.
-
Under Drawing Tools, on the Format tab, in the Shape Styles group, click Shape Effects, and then do one of the following:
-
To add or change a built-in combination of effects, point to Preset, and then click the effect that you want.
To customize the built-in effect, click 3-D Options, and then choose the options that you want.
-
To add or change a shadow, point to Shadow, and then click the shadow that you want.
To customize the shadow, click Shadow Options, and then choose the options that you want.
-
To add or change a reflection, point to Reflection, and then click the reflection variation that you want.
-
To add or change a glow, point to Glow, and then click the glow variation that you want.
To customize the glow colors, click More Glow Colors, and then choose the color that you want. To change to a color that is not in the theme colors, click More Colors, and then either click the color that you want on the Standard tab, or mix your own color on the Custom tab. Custom colors and colors on the Standard tab do not update if you later change the document theme.
-
To add or change a soft edge, point to Soft Edges, and then click the size of the edge that you want.
-
To add or change an edge, point to Bevel, and then click the bevel that you want.
To customize the bevel, click 3-D Options, and then choose the options that you want.
-
To add or change a 3-D rotation, point to 3-D Rotation, and then click the rotation that you want.
To customize the rotation, click 3-D Rotation Options, and then choose the options that you want.
Notes:
-
To create a custom effect by adding multiple individual effects, repeat step two above.
-
If you add a 3-D effect, such as a bevel or 3-D rotation, and then add a soft edge, you will not see any change to the shape or text box because the 3-D effect takes precedence. However, if you delete the 3-D effect, the soft edge effect is visible.
-
-
Top of page
-
Click the shape or text box that you want to add an effect to.
To add the same effect to multiple shapes or text boxes, click the first one, and then press and hold SHIFT while you click the others.
-
Under Drawing Tools or Text Box Tools, on the Format tab, in the Shape Styles or Text Box Styles group, click Shape Fill, and then do one of the following:
-
To add or change a shadow, in the Shadow Effects group, click Shadow Effects, and then choose the shadow that you want.
To customize the shadow color, point to Shadow Color, and then click the color that you want.
To change to a color that is not in the theme colors, click More Shadow Colors, and then either click the color that you want on the Standard tab, or mix your own color on the Custom tab. Custom colors and colors on the Standard tab do not update if you later change the document theme.
-
To add or change a 3-D effect, in the 3-D Effects group, click 3-D Effects, and then choose the options that you want.
-
Top of page
Delete a fill
Select a Microsoft Office application from the drop-down list.
-
Click the shape or text box that you want to delete a fill from.
To delete the same fill from multiple shapes or text boxes, click the first one, and then press and hold SHIFT while you click the others.
-
Under Drawing Tools, on the Format tab, in the Shape Styles group, click Shape Fill, and then click No Fill.
Top of page
-
Click the shape or text box that you want to delete a fill from.
To delete the same fill from multiple shapes or text boxes, click the first one, and then press and hold SHIFT while you click the others.
-
Under Drawing Tools or Text Box Tools, on the Format tab, in the Shape Styles or Text Box Styles group, click Shape Fill, and then click No Fill.

Top of page
-
Click the shape or text box that you want to delete a fill from.
To delete the same fill from multiple shapes or text boxes, click the first one, and then press and hold SHIFT while you click the others.
-
Under Drawing Tools, on the Format tab, in the Shape Styles group, click Shape Fill, and then click No Fill.
Top of page
-
Click the shape or text box that you want to delete a fill from.
To delete the same fill from multiple shapes or text boxes, click the first one, and then press and hold SHIFT while you click the others.
-
Under Drawing Tools or Text Box Tools, on the Format tab, in the Shape Styles or Text Box Styles group, click Shape Fill, and then click No Fill.
Top of page
Delete an effect
Select a Microsoft Office application from the drop-down list.
-
Click the shape or text box that you want to delete the effect from.
To delete the same effect from multiple shapes or text boxes, click the first one, and then press and hold SHIFT while you click the others.
-
Under Drawing Tools, on the Format tab, in the Shape Styles group, click Shape Effects, and then do one of the following:
-
To delete a built-in combination of effects, point to Preset, and then click No Presets.
-
To delete a shadow, point to Shadow, and then click No Shadow.
-
To delete a reflection, point to Reflection, and then click No Reflection.
-
To delete a glow, point to Glow, and then click No Glow.
-
To delete soft edges, point to Soft Edges, and then click No Soft Edges.
-
To delete an edge, point to Bevel, and then click No Bevel.
-
To delete 3-D rotation, point to 3-D Rotation, and then click No Rotation.
-
To delete multiple individual effects, repeat step two above.
Top of page
-
Click the shape or text box that you want to delete the effect from.
To delete the same effect from multiple shapes or text boxes, click the first one, and then press and hold SHIFT while you click the others.
-
Under Drawing Tools or Text Box Tools, on the Format tab, do one of the following:
-
To delete a shadow, in the Shadow Effects group, click Shadow Effects, and then click No Shadow Effect.
-
To delete a 3-D effect, in the 3-D Effects group, click 3-D Effects, and then click No 3-D Effect.
-
Note: If you do not see the Drawing Tools, Text Box Tools, or Format tabs, make sure that you clicked the shape or text box.
Top of page
-
Click the shape or text box that you want to delete the effect from.
To delete the same effect from multiple shapes or text boxes, click the first one, and then press and hold SHIFT while you click the others.
-
Under Drawing Tools, on the Format tab, in the Shape Styles group, click Shape Effects, and then do one of the following:
-
To delete a built-in combination of effects, point to Preset, and then click No Presets.
-
To delete a shadow, point to Shadow, and then click No Shadow.
-
To delete a reflection, point to Reflection, and then click No Reflection.
-
To delete a glow, point to Glow, and then click No Glow.
-
To delete soft edges, point to Soft Edges, and then click No Soft Edges.
-
To delete an edge, point to Bevel, and then click No Bevel.
-
To delete 3-D rotation, point to 3-D Rotation, and then click No Rotation.
-
To delete multiple individual effects, repeat step two above.
Top of page
-
Click the shape or text box that you want to delete the effect from.
To delete the same effect from multiple shapes or text boxes, click the first one, and then press and hold SHIFT while you click the others.
-
Under Drawing Tools or Text Box Tools, on the Format tab, do one of the following:
-
To delete a shadow, in the Shadow Effects group, click Shadow Effects, and then click No Shadow Effect.
-
To delete a 3-D effect, in the 3-D Effects group, click 3-D Effects, and then click No 3-D Effect.
-
Note: If you do not see the Drawing Tools, Text Box Tools, or Format tabs, make sure that you clicked the shape or text box.
Top of page
Select the shape or text box. On the Drawing Tools Format tab, click Text Fill > More Fill Colors. In the Colors box, either click the color you want on the Standard tab, or mix your own color on the Custom tab.
Just so, Where is fill in Word 2016?
Besides, How do you insert a fill in field in Word 2016? Choose Insert → Field. In the Field names list, choose Fill-in. In the Field Properties Prompt box, enter the text you want to appear to prompt the user for input.
…
After inserting one or more fill-in fields, you treat the document like other Word forms.
- Save the form as a template. …
- Use the form by choosing File ?
What is text fill MS Word? Fill refers to the interior of a WordArt or character. Notes: When you change options in this dialog box, the changes are immediately applied to your WordArt or text, making it easy to see the effects of the changes in your WordArt or text without closing the dialog box.
Subsequently, How do I fill a textbox in Word? Click the shape or text box that you want to add a fill to. To add the same fill to multiple shapes or text boxes, click the first one, and then press and hold SHIFT while you click the others. To add or change a fill color, click the color that you want, or to choose no color, click No Fill.
How do you apply fill text effect in Word?
Add or remove text effects
- Select the text that you want to add an effect to.
- On the Home tab, in the Font group, click Text Effect.
- Click the effect that you want. For more choices, point to Outline, Shadow, Reflection, or Glow, and then click the effect that you want to add.
How do you insert a Text Box?
Go to Insert > Text Box, and then select Draw Text Box. Click or tap in the document, and drag to draw the text box the size that you want. To add text to a text box, select inside the text box, and then type or paste text.
How do I insert a Text Box in Word without moving text?
Click the “Insert” tab on the Ribbon and click “Text Box” on the Text panel. Choose the command “Draw Text Box” under the Text Box options.
How do I insert a fill in bubble in Word?
Position the cursor on the Word document and press and hold down the left mouse button. Drag until the word bubble is your preferred size, then release. The bubble appears on the page.
How do you engrave text in Word 2016?
To engrave text, follow these steps:
- Choose the text you want to engrave.
- Make sure the Home tab of the ribbon is displayed.
- Click the small icon at the bottom-right of the Font group. Word displays the Font dialog box. (See Figure 2.)
- Make sure the Engrave check box is selected.
- Click on OK.
Where is the text box in Word?
Insert or Draw a Text Box in Word
Go to the spot in your document where you want the text box and select the Insert tab. Click the Text Box drop-down arrow and pick a Built-In style or Draw a Text Box. If you’re using Word on Mac, go to the Insert tab, click the Text drop-down arrow, and then the Text Box arrow.
How do you insert in Word?
To insert file into Word, the following steps are required:
- First open the Word document. …
- Then click on the place within the document where you want the file to be inserted.
- Click on “Insert” tab located at the top.
- Click on the “Object” drop down.
- Then choose the file to insert. …
- Finally click “Insert”.
How do I insert a text box anywhere in Word?
To insert a text box:
- Select the Insert tab, then click the Text Box command in the Text group.
- A drop-down menu will appear. …
- Click and drag anywhere on the document to create the text box.
- The insertion point will appear inside the text box.
What is a text bubble?
A graphic element taken from comic books that is widely used to convey messages in all forms of publications, including websites. The balloon is a bubble filled with text that points to a person or human-like object. Also called “speech bubbles,” “voice bubbles,” “word balloons” and “text balloons.”
How is engraving done?
Engraving is an intaglio printmaking process in which lines are cut into a metal plate in order to hold the ink. In engraving, the plate can be made of copper or zinc. The metal plate is first polished to remove all scratches and imperfections from the surface so that only the intentional lines will be printed.
What do you put on engraving?
If you want to engrave memorial jewelry to honor your loved one, then check out these engraving ideas.
- We Were Together. I Forgot the Rest.
- Remembered With Love.
- She Walked in Beauty.
- Forever In My Heart.
- We’ll Always Remember You.
- You’ll Always Be in Our Hearts.
How do I emboss a picture in Word?
How do you text bubbles?
To open the conversation, tap the bubble. At the bottom left, tap Manage.
…
To create a bubble for a conversation:
- Swipe down from the top of the screen.
- Under “Conversations,” touch and hold the chat notification.
- Tap Bubble conversation .
How do I make bubble letters in Word?
WordArt
- Open a blank 8.5-by-11 document in Publisher.
- Click the “Insert” tab at the top of the screen. Click the “WordArt” button on the “Insert” tab’s ribbon.
- Click the third WordArt style from the left. When the “Edit WordArt Text” window pops up, type the words to convert into bubble letters into the “Text” box.
What are the typing bubbles called?
Screenshot/Tech Insider If you use Apple’s iMessage, then you know about the “typing awareness indicator” — the three dots that appear on your screen to show you when someone on the other end of your text is typing. Or so you thought.
What is an engraving example?
Examples of contemporary uses for engraving include creating text on jewellery, such as pendants or on the inside of engagement- and wedding rings to include text such as the name of the partner, or adding a winner’s name to a sports trophy. Another application of modern engraving is found in the printing industry.
Can you engrave over an engraving?
It is possible to engrave over the original to bring it back to life. If you want a completely different engraving, it depends on the type of metal and depth of the engraving. Soft metals can be polished down and re-engraved. Harder metals, like stainless steel, are not so easily fixed.
What is engraved writing?
to inscribe (a design, writing, etc) onto (a block, plate, or other surface used for printing) by carving, etching with acid, or other process. to print (designs or characters) from a printing plate so made. to fix deeply or permanently in the mind.
Can you engrave over engraving?
It is possible to engrave over the original to bring it back to life. If you want a completely different engraving, it depends on the type of metal and depth of the engraving. Soft metals can be polished down and re-engraved. Harder metals, like stainless steel, are not so easily fixed.
What do you write in an engraved gift?
Our Favorite Custom Engravings to Express LOVE
- My heart belongs to him.
- My heart belongs to her.
- My heart belongs to you.
- Forever yours.
- Yours forever.
- I Promise to Love you Forever.
- I’m blessed to have you as my first.
- I love you.
What should I engrave for my best friend?
Here are some of our favourite engraving ideas:
- You are enough.
- You have the best smile.
- You inspire me.
- Nothing can stop you.
- Double trouble.
- Lucky to have you.
- Laughter, fun & friendship.
- Blessed to have you.
- Reference 1
- Reference 2
- Reference 3
- Reference 4
- Reference 5
![]()
Download Article
![]()
Download Article
- Using Windows
- Using a Mac
|
You know when you try to fill out forms in Word on the provided lines, but the text you type makes the lines move and ruins the formatting? There is a way to get rid of that. This wikiHow will teach you how to insert fillable fields on Word on PC or Mac. You’ll need to have Word set up on your computer before you can start.
-
1
Open Word. You can find this program on your Start Menu.
-
2
Open a document. You can either open a new document, create a new document from a template, or open an old document.
Advertisement
-
3
Click Options and Customize Ribbon in the File menu. You’ll find this along the top of your program window.
-
4
Check the “Developer” box in the Customize Ribbon panel.
-
5
Click Ok.
-
6
Click the icons next to Design Mode in the Developer tab. These look like “Aa”, check boxes, and tables.
- The first “Aa” icon on the right side of the panel says “Rich Text Content Control” when you hover over it. This inserts an empty field into the document that can be filled with images, videos, text, and more.
- The second “Aa” icon says “Plain Text Content Control”. This will insert a blank fillable field into your document that the user can fill with only text.
- The “Combo Box Content Control” icon is next to the check box icon, and this will insert a drop-down menu into your document. The Properties button will open options for you to add more items to the drop-down menu.
- The “Date-Picker” icon looks like a calendar and will insert an empty box that will launch a calendar so your form user can pick a specific date. The Properties button will open options for you to choose the box format and display.
- The check box icon adds a check box to your document.
-
7
Click Restrict Editing in the Developer tab. This will pull out a panel from the right of your program window.
-
8
Check the box next to “Editing Restrictions”. This will lock the document so no one can alter the text not in text boxes.
-
9
Click Yes, Start Enforcing Protection. A box will pop up asking for a password. You can enter a password if you want to allow other people with that password to be able to edit your document.


Advertisement
-
1
Open Word. You can find this program in your Applications folder.
-
2
Open a document. You can either open a new document, create a new document from a template, or open an old document.
-
3
Click the Preferences tab under Word at the top of your screen. You’ll see this next to the Apple icon
. A new window will pop up.
-
4
Click View under the “Authoring and Proofing Tools” header.
-
5
Check the “Show developer tab” box under “Ribbon”.
-
6
Click Ok.
-
7
Click “Text Box”, “Check Box”, or “Combo Box” in the Developer tab. This will insert a blank fillable field into your document.
- The Combo Box option creates something like a drop-down menu. Click the Options icon next to the Combo Box icon to access options to turn your combo box into a drop-down menu.
- The Check Box creates checkable boxes.
- The Text box adds fillable fields that control how text appears on a form. For example, instead of a document line with Name:_______ where the user can make a mess of the lines, you can use these fillable text fields to control where the text goes and how it appears. You can click the Options icon to open an options box where you can choose the input type. For example, you have a text box, but are looking for a date, you can pick Date under the “Type” heading for this.
-
8
Click Protect Form. This will prevent you from making any edits to your fields, but will activate them so they are usable.
- If you want to password protect your document, you can go to the Review tab and click Protect Document.


Advertisement
Ask a Question
200 characters left
Include your email address to get a message when this question is answered.
Submit
Advertisement
Thanks for submitting a tip for review!
About This Article
Article SummaryX
1. Open Word.
2. Click Preferences.
3. Click View.
4. Check Show developer tab.
5. Select to add a text box, check box, or combo box.
6. Click Protect.
Did this summary help you?
Thanks to all authors for creating a page that has been read 107,940 times.
Is this article up to date?
In Microsoft Word, the user can create the text boxes in several built-in styles, predefined Textboxes offered in Word. If any of the built-in styles do not meet the user’s, interest there is a feature in Word that allows the user to draw the text box. There is an option where you can get more textboxes from Office.com and can save the selection to the text box gallery.
In this tutorial, we will explain:
- How to insert a Built-in Styles Text Box.
- How to insert text into Text Box.
- How to copy the Text Box to a new location.
- How to change the direction of text in the selected Text Box.
- How to Format the Text Box.
- How to change the default formatting for a Text Box.
- How to save a selected Text Box as a Building Block.
What is Text Box in Microsoft Word
A Text Box is a feature in Word that focuses on its content and displays essential text such as headings and quotes.
1] How to insert a Built-in Styles Text Box
![]()
Click the Insert tab on the menu bar.
On the Insert tab in the Text group, click the drop-down arrow of the Text Box button.
You will see a list of text box built-in styles you can choose from; select the one you desire.
The text box you selected will appear in the document.
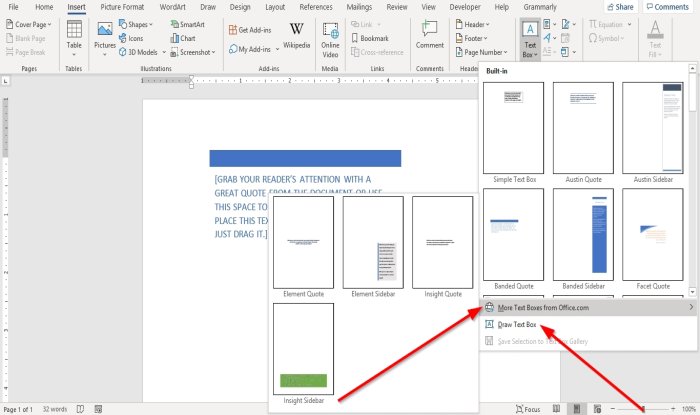
You can use More Text Boxes from Office.com to insert text boxes in the document.
In the Text Box drop-down list, you can also select Draw Text Box and draw a text box into the document.
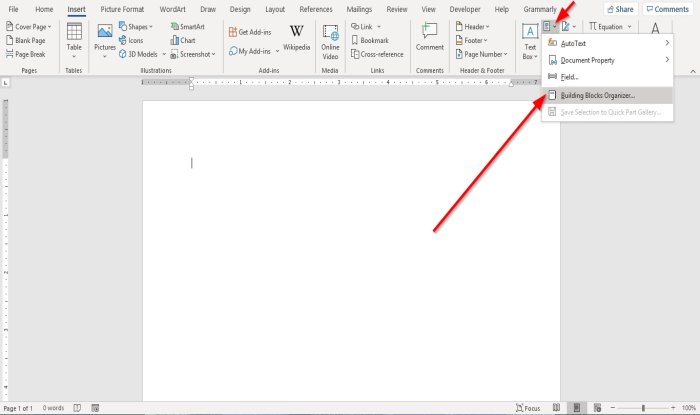
The other option to insert a Built-in Style text box is to your document is to click on the Explore Quick Parts button.
In the drop-down list, select Building Blocks Organizer.
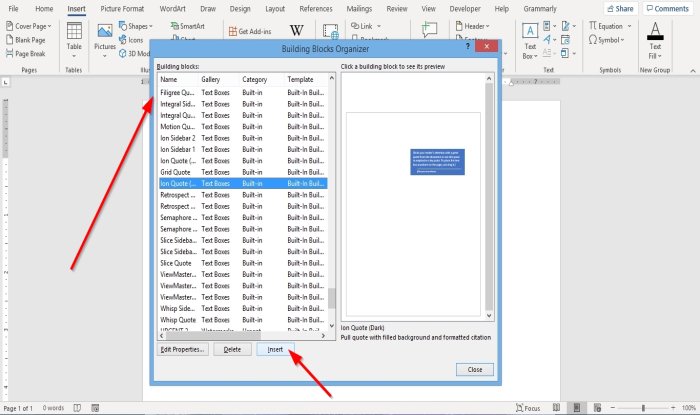
A Building Blocks Organizer dialog box will appear.
In the dialog box, scroll down until you see the text box gallery.
Click any text box of your choice and click Insert.
The text box is inserted into the document.
2] How to insert text into Text Box
For a built-in style text box, click into the text box and press the Delete Key to delete the default text inside it and type your text.
For the text box you draw, click inside the text box and enter your text.
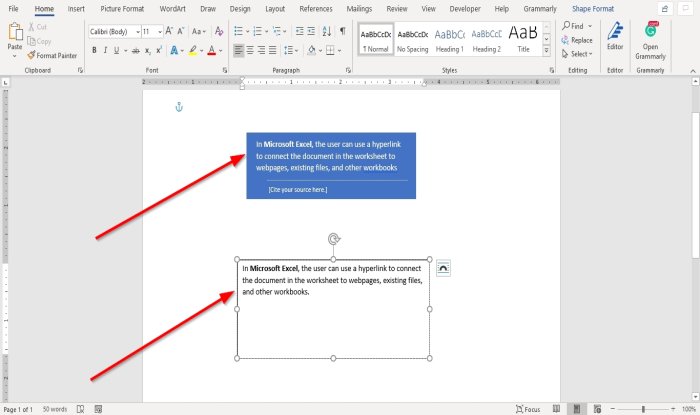
3] How to copy the Text Box to a new location
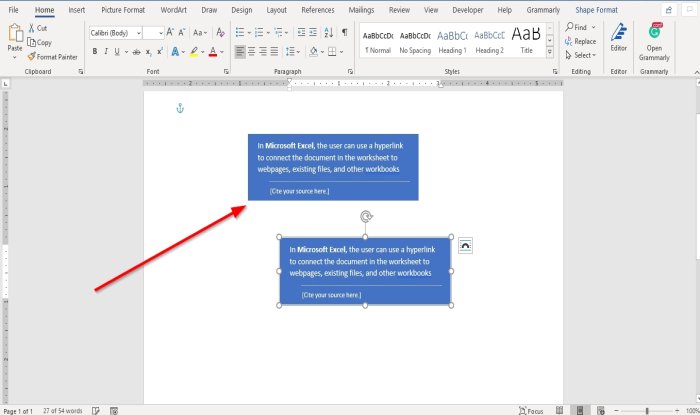
Place the cursor near the text box’s frame, hold the CTRL-key down, and drag the textbox.
You will notice that the text box is copied.
4] How to change the direction of text in the selected Text Box
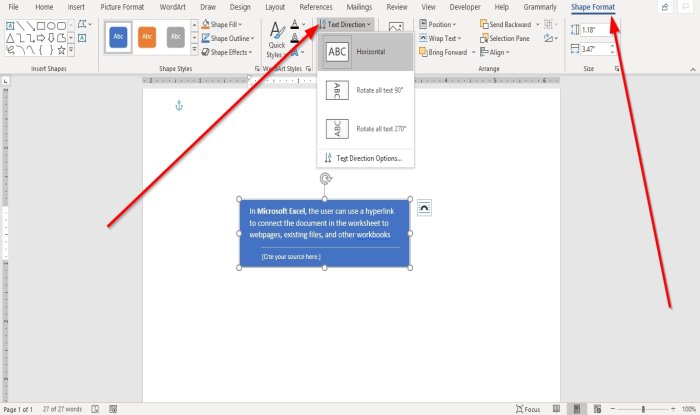
Go to the Shape Format tab.
On the Shape Format tab in the Text group, click Text Direction.
In the drop-down list, choose the direction you want the text to be in the text box.
5] How to Format the Text Box
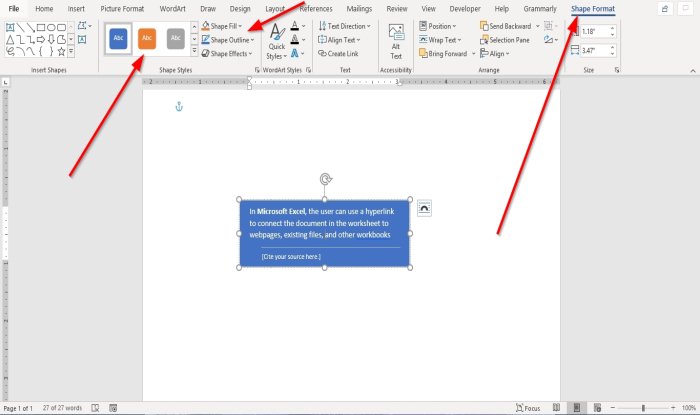
Click on the text box on the Shape Format tab in the Shape Styles group. You can choose the built-in styles you like.
You can format the text box by selecting Shape Fill, Shape Outline, and Shape Effects.
6] How to change the default formatting for a Text Box
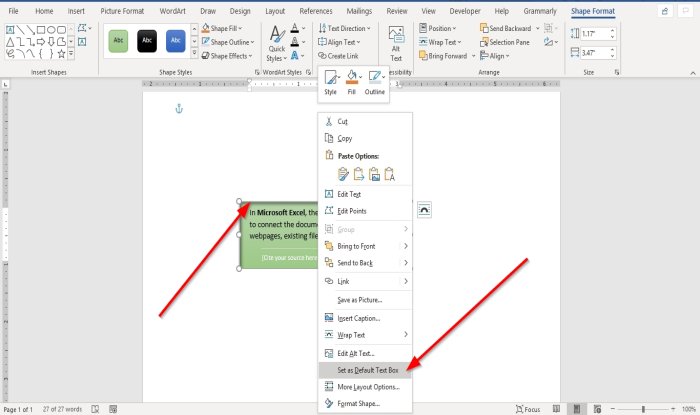
Right-click a formatted text box border and select Set as Default Text Box.
7] How to save a selected Text Box as a Building Block
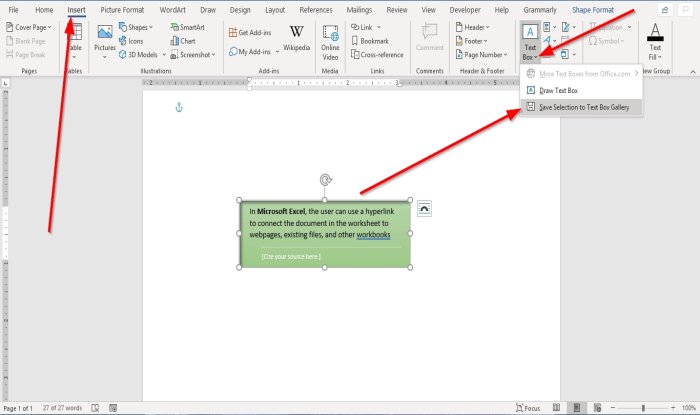
Go on the Insert tab in the Text group and select the Text Box button.
In the drop-down list, select Save Selection to Text Box Gallery.
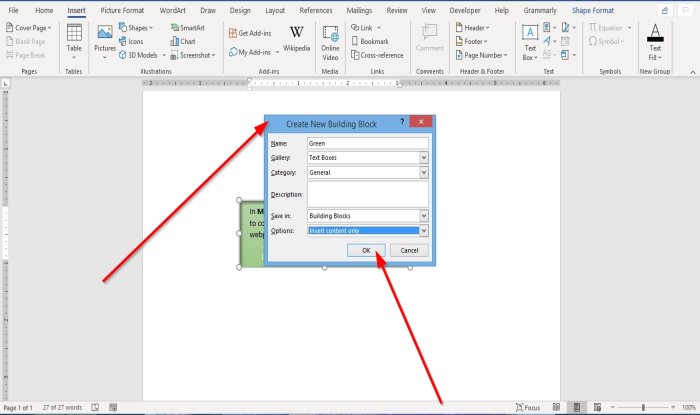
A Create New Building Block dialog box will appear, enter a name, select a category, or any changes you wish to make in the dialog box.
Click Ok.
If you want to see if the textbox you save is in the Building Block, click the Explore Quick Parts button in the Text group.
In the drop-down list, select Building Block Organizer.
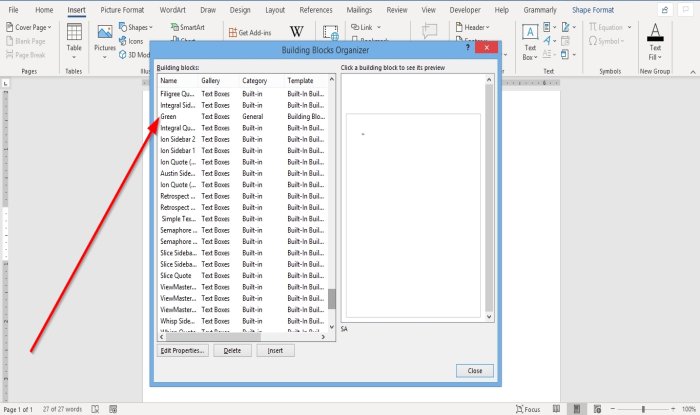
A Building Blocks Organizer dialog box will appear; Scroll down until you see the name of the text box you name.
I hope this helps; if you have questions, please comment below.
Read next: How to print hidden text in Word on Windows and Mac.
If you use forms at work, you’ll love the convenience of interactive or fillable forms in Microsoft Word. Forms that you can fill out make gathering information easy.


With a fillable form, all you’ve got to do is create a form in Word. Then you can use it over and over again. There’s nothing to print, so interactive forms are good for both your budget and the environment.
If you want a fillable form that also looks good, then begin with a template in Word. Form templates for Microsoft Word are available in Envato Elements and GraphicRiver.
In this tutorial, you’ll learn how to create a fillable form in Word, so you can reap all the benefits of an interactive form.
Find Great Form Templates on Elements
Fillable forms in Word have a variety of uses. Human resources use forms to capture employee and consultant information. Organizations use forms to register members, students, or clients. You also use forms to take orders for your products and services. Those are only a few examples of how useful fillable forms are.
Ideally, you want your Microsoft Word forms to be consistent with your branding. Well-designed forms reflect your credibility and professionalism. That’s why you want to avoid generic-looking forms. Want to know how to make a fillable form in Word that’s aligned with your visual brand?


The easiest way is by using templates for Word with pre-built tables or forms. One awesome source for Word templates is Envato Elements. Elements has an irresistible offer: for one low monthly fee, you get unlimited downloads of the millions of creative assets in its library. These include:
- Word templates
- fonts
- graphics
- photos
- and more
Whatever you need to make your forms look as good as possible, you can find in Elements.
If you need to create only one form, then a better source for Word templates is GraphicRiver. It’s got the same massive library of creative assets but on a pay-per-use basis. For the one-off project in Word, GraphicRiver is a terrific and budget-friendly option.
How to Create Fillable Forms in Word
You may be wondering, «How do I make a fillable form in Word?» Let me take you step-by-step through how to create a fillable form in Word.
Note: In the following tutorial, I’m using Microsoft Word for Mac version 16.48. If you’re using a different version, then the steps and interface may be different. But these steps should still be helpful for you.
1. Show the Developer Tab
As a first step, make sure that the Developer tab is showing up for you. This may be hidden by default. If you don’t see the Developer tab, follow these steps:
Go to Word > Preferences.


The Word Preferences menu opens. Click on the Ribbon & Toolbar button.


The Ribbon & Toolbar menu pops up. Under Main Tabs, scroll down and check Developer. Click Save.


The Developer tab should now be visible.


2. Determine the Layout and Structure of the Form
The next step is to determine the layout and structure of the fillable form. This will depend on what information you want to capture. You may want to sketch this on a sheet of paper first.
When you know what the form will look like, create a table in Word. By creating your form as a table in Word, it’ll be easier for you to keep things aligned and organized. The cells of the table are the form fields. Keep this in mind as you create your interactive form. This tutorial shows you the steps for how to make a table in Word:
Another option is to use a Word template with a pre-built table as a form. This way, the form has already been professionally designed. All you’ve got to do is to customize the form in Word according to your needs. Remember that the form template must have been built as a table so that you can make the form interactive in Word.
In the steps that follow, I’m going to create a form from scratch by first creating a table in Word:


Now, it’s time to make this a fillable form in Word.
3. Add Form Fields With Content Controls
You create a fillable form in Word by adding form fields. There are different types of form fields with content controls, depending on the types of responses you’re looking for.
Under the Developer tab, you’ll see buttons for creating a Text Box, Check Box, and Combo Box (or drop-down form field).


Let me show you how to create each type of form field:
How to Add a Word Fillable Form Text Box
Place the cursor where you would like to create a text field. Click on the Developer tab, then the Text Box button.


A text box is created. To change the text box settings, click on Options. The Text Form Field Options menu opens.


Here, choose various settings. For example, you’ve got several Text Types to choose from:
- Regular Text
- Number
- Date
- Current Date
- Current Time
- Calculation
Add a Default Text for the form field to guide respondents in filling out the form. You can also specify the Maximum Length and Text or Number Format.


When you’re happy with the settings, click OK. Repeat for each text box you want to create.


How to Add a Check Box to a Fillable Form in Word
Next, let’s make check boxes. First type the text for the check box items. Then, place your cursor in front of the first item. Go to Developer > Check Box.


A check box appears where your cursor was. Again, change the check box settings by clicking on the Options button.


The Check Box Form Field Options menu opens. Here you can determine whether the Default Value for the check box is Not Checked or Checked. Specify the Check Box Size and other options. When you’re done setting up the check box options, click OK.
Repeat these steps for the other check boxes.


How to Create a Drop-down Field in a Fillable Form in Word
Finally, let’s add a drop-down field in our form. Place the cursor where you want the drop-down menu to be, then go to Developer > Combo Box.


To add the drop-down menu items, click on the Options button. The Drop-Down Form Field Options menu opens.


Type a drop-down item, then click the + sign.


Repeat for each drop-down item you want to include in your fillable form. When you’re done, click OK.


Only the first drop-down item will appear. You’ll see the rest when you test the form.
4. Finalize the Form
Before using the fillable form in Word, it’s a good idea to first test it. To do this, click the Protect Form button on the Developer ribbon.


Now that the form is protected, fill the form fields like your respondents would. You’ll notice that the drop-down menu items appear when you click on the field or the arrow beside it.


When you’re happy with how the fillable form works, finalize the document by formatting the page. Click Protect Form again to un-protect it, so you can edit the document. Now’s the time to change fonts, colors, add logos, and format the form as you wish.
This is what my final fillable form looks like:


You may also decide to remove the shading for each form field. To do so, go to Developer > Shading.


I’m going to keep the Shading on, to make it clear to my respondents where they’re supposed to type in their answers. That’s because I deleted the borders of my table to give my form a cleaner appearance. If you keep the table borders, then it makes sense to switch off the form field Shading.
5. Use and Distribute Fillable Forms in Word
Once the fillable form in Word is completed, share it with your users or respondents. Do this by sharing the fillable form as an email attachment.
First, make sure that the form is protected. This ensures that other users won’t be able to edit the form when you share it with them.
Next, click on Share > Share a Copy.


In the menu that opens, click Email as Attachment.


This launches your default email application with the fillable form attached.


3 Top Form Templates for Word (Unlimited Downloads from Elements)
If you want a form with an impressive design, it’s best to start with a form template for Word. Templates with built-in forms are designed by professional graphic designers. This means the biggest—and hardest—design decisions have already been made for you. By customizing the colors and fonts and adding your logo, you can make the template truly your own.
Below are a few form templates for Word that look great:
1. Clean Business Registration Form Template


The Clean Business Registration Form template for Word allows you to gather basic personal information and contact details. It’s useful for registering employees, clients, members, vendors, and more. This form template comes in A4 size. You’ve got the option of customizing it with your branding colors. The template comes in Microsoft Word files, as well as files for InDesign, Adobe Illustrator, and Photoshop.
2. Order Form


Receive orders for your products or services with this Order Form for Word. This A4-sized template uses paragraph styles, making it easy to edit in Microsoft Word. It also comes in Adobe InDesign files, if you’re more comfortable editing in that application. A file guide is included to help you customize this template.
3. Client Questionnaire


Impress your clients with this Client Questionnaire template that looks anything but generic. Editable in both Microsoft Word and Adobe InDesign, this form template comes in A4 size. A 34-page guide walks you through how to edit and use the template files.
More of the Best Word Templates for Your Business or Organization
Now you know how to create a fillable Word document. But aside from fillable forms, your business or organization needs other types of documents. Using templates for MS Word helps you create professional-looking documents quickly. Premium Word templates are designed to be easy to customize, so you end up with materials that are coherent with your brand.
Here are more Word templates you can customize to easily create impressive documents for your business or organization:
Learn More About Using Microsoft Word for Your Business and Personal Needs
Whether for personal or business use, MS Word lets you create various kinds of documents. But with power comes complexity, so it can take time to learn how to use its robust features.
The best place to start is with our ultimate guide, Learn How to Use Microsoft Word (Beginner Tutorial Guide). It takes you from the basics of opening and creating Word files, to more advanced skills like comparing and merging two Word documents.
These Word tutorials will also help:
Enhance Your Workflow With Fillable Forms in Word
You’ve seen how convenient it is to use an interactive, fillable form. And now, you know how to create your own fillable form in Word.
Take it up a notch by starting with a Word template, such as those from Elements or GraphicRiver. These professionally-designed templates for Word are sure to impress your clients, employees, or members.
For unlimited downloads of Word templates, take your pick of the vast options in Envato Elements. For one small monthly subscription, you get unlimited downloads of anything you want in its massive library. These include photos, fonts, graphics, as well as sound effects, music, and stock video. If you create many marketing and communication materials, Elements gives you massive value.
For one-off projects, GraphicRiver is another massive library of Word templates and other creative elements. But with GraphicRiver, you pay only for each single use of each item. It’s an affordable way of getting the same professional results.