
Import or export text (.txt or .csv) files
There are two ways to import data from a text file with Excel: you can open it in Excel, or you can import it as an external data range. To export data from Excel to a text file, use the Save As command and change the file type from the drop-down menu.
There are two commonly used text file formats:
-
Delimited text files (.txt), in which the TAB character (ASCII character code 009) typically separates each field of text.
-
Comma separated values text files (.csv), in which the comma character (,) typically separates each field of text.
You can change the separator character that is used in both delimited and .csv text files. This may be necessary to make sure that the import or export operation works the way that you want it to.
Note: You can import or export up to 1,048,576 rows and 16,384 columns.
Import a text file by opening it in Excel
You can open a text file that you created in another program as an Excel workbook by using the Open command. Opening a text file in Excel does not change the format of the file — you can see this in the Excel title bar, where the name of the file retains the text file name extension (for example, .txt or .csv).
-
Go to File > Open and browse to the location that contains the text file.
-
Select Text Files in the file type dropdown list in the Open dialog box.
-
Locate and double-click the text file that you want to open.
-
If the file is a text file (.txt), Excel starts the Import Text Wizard. When you are done with the steps, click Finish to complete the import operation. See Text Import Wizard for more information about delimiters and advanced options.
-
If the file is a .csv file, Excel automatically opens the text file and displays the data in a new workbook.
Note: When Excel opens a .csv file, it uses the current default data format settings to interpret how to import each column of data. If you want more flexibility in converting columns to different data formats, you can use the Import Text Wizard. For example, the format of a data column in the .csv file may be MDY, but Excel’s default data format is YMD, or you want to convert a column of numbers that contains leading zeros to text so you can preserve the leading zeros. To force Excel to run the Import Text Wizard, you can change the file name extension from .csv to .txt before you open it, or you can import a text file by connecting to it (for more information, see the following section).
-
Import a text file by connecting to it (Power Query)
You can import data from a text file into an existing worksheet.
-
On the Data tab, in the Get & Transform Data group, click From Text/CSV.
-
In the Import Data dialog box, locate and double-click the text file that you want to import, and click Import.
-
In the preview dialog box, you have several options:
-
Select Load if you want to load the data directly to a new worksheet.
-
Alternatively, select Load to if you want to load the data to a table, PivotTable/PivotChart, an existing/new Excel worksheet, or simply create a connection. You also have the choice of adding your data to the Data Model.
-
Select Transform Data if you want to load the data to Power Query, and edit it before bringing it to Excel.
-
If Excel doesn’t convert a particular column of data to the format that you want, then you can convert the data after you import it. For more information, see Convert numbers stored as text to numbers and Convert dates stored as text to dates.
Export data to a text file by saving it
You can convert an Excel worksheet to a text file by using the Save As command.
-
Go to File > Save As.
-
Click Browse.
-
In the Save As dialog box, under Save as type box, choose the text file format for the worksheet; for example, click Text (Tab delimited) or CSV (Comma delimited).
Note: The different formats support different feature sets. For more information about the feature sets that are supported by the different text file formats, see File formats that are supported in Excel.
-
Browse to the location where you want to save the new text file, and then click Save.
-
A dialog box appears, reminding you that only the current worksheet will be saved to the new file. If you are certain that the current worksheet is the one that you want to save as a text file, click OK. You can save other worksheets as separate text files by repeating this procedure for each worksheet.
You may also see an alert below the ribbon that some features might be lost if you save the workbook in a CSV format.
For more information about saving files in other formats, see Save a workbook in another file format.
Import a text file by connecting to it
You can import data from a text file into an existing worksheet.
-
Click the cell where you want to put the data from the text file.
-
On the Data tab, in the Get External Data group, click From Text.
-
In the Import Data dialog box, locate and double-click the text file that you want to import, and click Import.
Follow the instructions in the Text Import Wizard. Click Help
 on any page of the Text Import Wizard for more information about using the wizard. When you are done with the steps in the wizard, click Finish to complete the import operation.
 -
In the Import Data dialog box, do the following:
-
Under Where do you want to put the data?, do one of the following:
-
To return the data to the location that you selected, click Existing worksheet.
-
To return the data to the upper-left corner of a new worksheet, click New worksheet.
-
-
Optionally, click Properties to set refresh, formatting, and layout options for the imported data.
-
Click OK.
Excel puts the external data range in the location that you specify.
-
 on any page of the Text Import Wizard for more information about using the wizard. When you are done with the steps in the wizard, click Finish to complete the import operation.
If Excel does not convert a column of data to the format that you want, you can convert the data after you import it. For more information, see Convert numbers stored as text to numbers and Convert dates stored as text to dates.
Export data to a text file by saving it
You can convert an Excel worksheet to a text file by using the Save As command.
-
Go to File > Save As.
-
The Save As dialog box appears.
-
In the Save as type box, choose the text file format for the worksheet.
-
For example, click Text (Tab delimited) or CSV (Comma delimited).
-
Note: The different formats support different feature sets. For more information about the feature sets that are supported by the different text file formats, see File formats that are supported in Excel.
-
-
Browse to the location where you want to save the new text file, and then click Save.
-
A dialog box appears, reminding you that only the current worksheet will be saved to the new file. If you are certain that the current worksheet is the one that you want to save as a text file, click OK. You can save other worksheets as separate text files by repeating this procedure for each worksheet.
-
A second dialog box appears, reminding you that your worksheet may contain features that are not supported by text file formats. If you are interested only in saving the worksheet data into the new text file, click Yes. If you are unsure and would like to know more about which Excel features are not supported by text file formats, click Help for more information.
For more information about saving files in other formats, see Save a workbook in another file format.
The way you change the delimiter when importing is different depending on how you import the text.
-
If you use Get & Transform Data > From Text/CSV, after you choose the text file and click Import, choose a character to use from the list under Delimiter. You can see the effect of your new choice immediately in the data preview, so you can be sure you make the choice you want before you proceed.
-
If you use the Text Import Wizard to import a text file, you can change the delimiter that is used for the import operation in Step 2 of the Text Import Wizard. In this step, you can also change the way that consecutive delimiters, such as consecutive quotation marks, are handled.
See Text Import Wizard for more information about delimiters and advanced options.
If you want to use a semi-colon as the default list separator when you Save As .csv, but need to limit the change to Excel, consider changing the default decimal separator to a comma — this forces Excel to use a semi-colon for the list separator. Obviously, this will also change the way decimal numbers are displayed, so also consider changing the Thousands separator to limit any confusion.
-
Clear Excel Options > Advanced > Editing options > Use system separators.
-
Set Decimal separator to , (a comma).
-
Set Thousands separator to . (a period).
When you save a workbook as a .csv file, the default list separator (delimiter) is a comma. You can change this to another separator character using Windows Region settings.
Caution: Changing the Windows setting will cause a global change on your computer, affecting all applications. To only change the delimiter for Excel, see Change the default list separator for saving files as text (.csv) in Excel.
-
In Microsoft Windows 10, right-click the Start button, and then click Settings.
-
Click Time & Language, and then click Region in the left panel.
-
In the main panel, under Regional settings, click Additional date, time, and regional settings.
-
Under Region, click Change date, time, or number formats.
-
In the Region dialog, on the Format tab, click Additional settings.
-
In the Customize Format dialog, on the Numbers tab, type a character to use as the new separator in the List separator box.
-
Click OK twice.
-
In Microsoft Windows, click the Start button, and then click Control Panel.
-
Under Clock, Language, and Region, click Change date, time, or number formats.
-
In the Region dialog, on the Format tab, click Additional settings.
-
In the Customize Format dialog, on the Numbers tab, type a character to use as the new separator in the List separator box.
-
Click OK twice.
Note: After you change the list separator character for your computer, all programs use the new character as a list separator. You can change the character back to the default character by following the same procedure.
Need more help?
You can always ask an expert in the Excel Tech Community or get support in the Answers community.
See Also
Import data from external data sources (Power Query)
Need more help?
Want more options?
Explore subscription benefits, browse training courses, learn how to secure your device, and more.
Communities help you ask and answer questions, give feedback, and hear from experts with rich knowledge.
Maintenance Alert: Saturday, April 15th, 7:00pm-9:00pm CT. During this time, the shopping cart and information requests will be unavailable.
How to Transfer Data from Excel to Word Automatically
Categories: Excel®
Tags: Export Excel Spreadsheets to Word
Excel lives up to its name when crunching numbers or organizing data. However, when you want to convey ideas beyond the table or graph, you will almost certainly turn to Word or PowerPoint. In the examples below, we are going to look at several different ways you can export, or incorporate, spreadsheets into your Word documents.
SAVE $10 AND TRAIN ON THIS TOPIC TODAY
Find out the Variety of Options to Transfer Data
To follow using our example, download ExportWorksheetsToWord.xlsx. You will need a blank Word document open. This feature applies to Excel/Word 2010 and later versions. Images were taken using Excel 2013 on Windows 7.
Solution One: Copy/Paste
The simplest way to display Excel data in a Word document is to use Copy/Paste.
- Open the destination Word document.
- In the source Excel spreadsheet, select the data you want to copy then hit CTRL-C.
- In the destination Word document, place the cursor where you want the data, then hit CTRL-V.
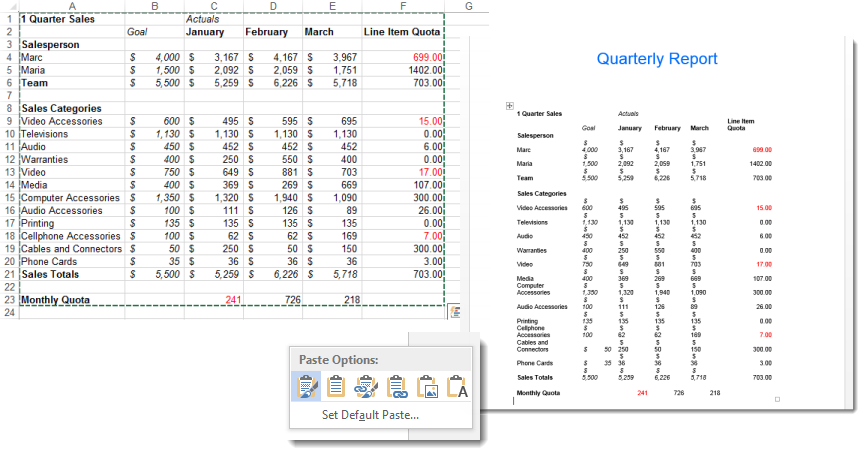
- The default paste will use the Keep Source Formatting (A) paste option. This preserves any formatting you have done in Excel and pastes the data into Word as a table using that same formatting. As you can see, you may need to clean up your table after the paste to make it look correct in the new document.
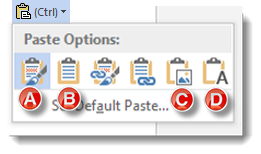
- To change the paste option, click the Ctrl dropdown option in the bottom right corner of your new table after pasting and select a new option. Other Paste options include:
Use Destination Styles (B) – This will paste the data into Word as a table and adapt the display elements into the same formatting as the Word document. Use this to make your fonts and colors consistent in the destination without having to edit in Excel beforehand. Copy as Picture (C) – This will paste the data range as a Word image object. You will be able to resize and edit the image as you would any other picture, but you will not be able to edit the data. The paste will use the original Excel formatting to generate the picture.Keep Text Only (D) – This will paste the data contained within each cell as individual lines of text in the Word document. Data in columns will be separated by a tab, rows will appear as individual paragraphs.
 Copy as Picture (C) – This will paste the data range as a Word image object. You will be able to resize and edit the image as you would any other picture, but you will not be able to edit the data. The paste will use the original Excel formatting to generate the picture.Keep Text Only (D) – This will paste the data contained within each cell as individual lines of text in the Word document. Data in columns will be separated by a tab, rows will appear as individual paragraphs.
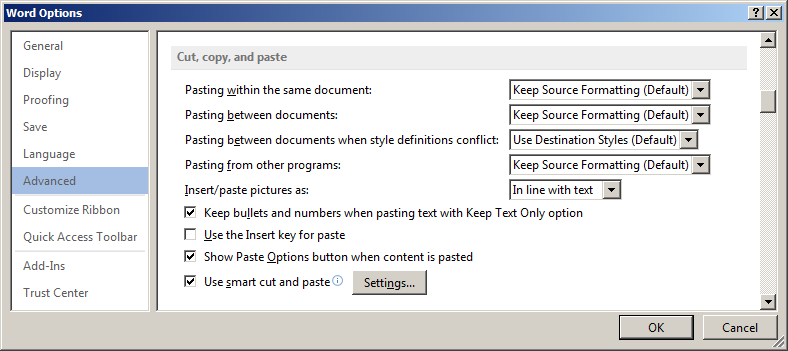
Hint! If you frequently use a paste option that is not Keep Source Formatting, you can click the Set Default Paste link and change the default settings in the Cut, copy and paste section of Word Options.
Solution Two: Insert Excel Object
Copy/Paste brings Excel tables or Worksheet data into the Word document by changing it to a Word table or text. Inserting your workbook as an Excel object embeds a mini-version of Excel itself into the middle of your Word document. This Excel object can include multiple sheets, filters and many of Excel’s features.
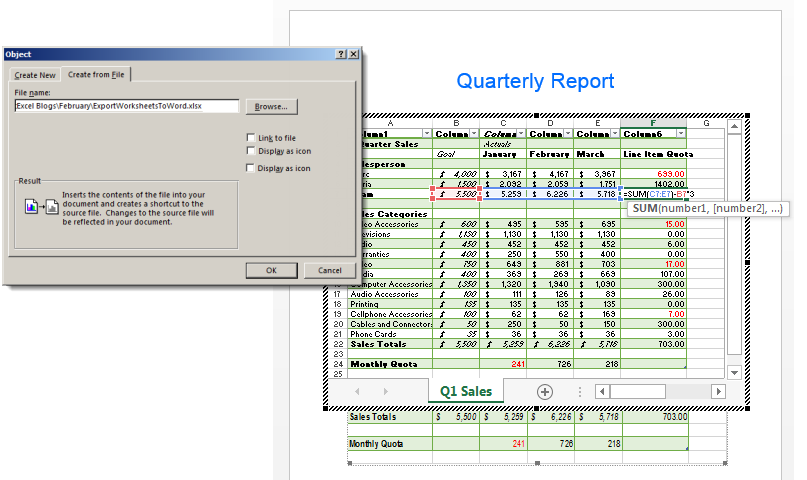
- Click the Insert tab the destination Word document, then select Object from the Insert Embedded Object dropdown button.

- Select the Create from File tab, then browse to the workbook you wish to embed.
- Choose whether you wish the object to be linked or not:
- A linked object will automatically update in the destination Word document if the source Excel spreadsheet is changed.
- An object that is not linked will not be updated automatically in the Word document if the source is changed.
- Click OK to complete the embed.
If your object is not linked, you can edit the data directly – including formulas – from within Word. Double-click on the table and make changes as you would in Excel. If the object is linked, then clicking on the table will open the Excel window.
Solution Three: Insert a Blank Excel Table
If you will be creating or entering your data table from scratch within Word, but want the functionality of an Excel spreadsheet, you can embed a blank Excel spreadsheet and work just as you would in Excel.
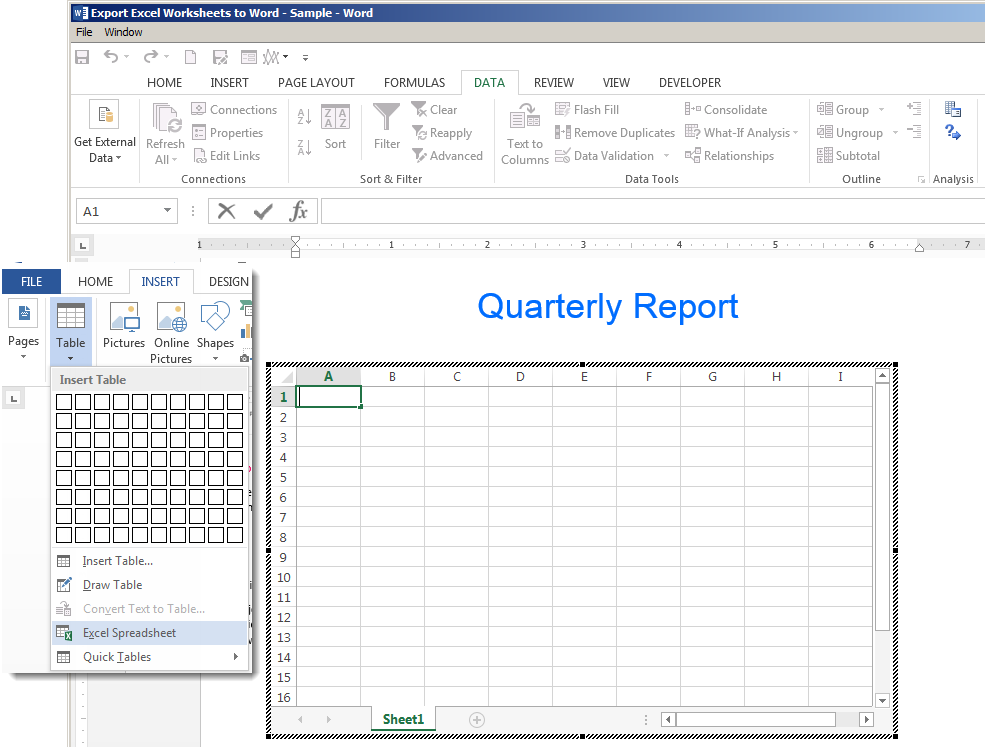
- Click the Insert tab, then select Excel Spreadsheet from the Table dropdown menu.
- Double-click on the worksheet. The Excel ribbon will appear and you will be able to add your data, insert formulas and filter and display the data as if you were working directly in Excel.
- Click outside the spreadsheet pane or hit Escape to continue editing your Word document.
Learn Excel Basics (Or Go Beyond the Basics) With Courses From Pryor Learning
Would you like to add the line “proficient in Excel” to your resume? Or perhaps you already have your dream job but would like to be more efficient and valuable to your employer. Then, consider enrolling in or downloading one of Pryor Learning’s Excel courses.
Microsoft Excel Basics
This one-day seminar is perfect for beginning or intermediate Excel users.
During this course, learn the basics of producing spreadsheets that communicate. You’ll learn to master an array of Excel formulas and functions that will put useful data at your fingertips. You’ll learn how to edit your worksheet – including how to transfer Excel table to Word. We’ll even teach you simple macros that will help you increase your productivity.
Microsoft Excel: Beyond the Basics
You may already be proficient in Excel, but you would like to learn how to use this program at a more advanced level. If so, consider enrolling in Microsoft Excel: Beyond the Basics, a one-day seminar offered live online.
Here’s the agenda for this course:
- Setup and Editing Success
- Formulas and Functions That Cut Work Down to Size
- How to Make the Most of Macros
- Data Exchange with Other Applications
- The Power of Tables, Databases, and Lists
If you’ve shopped around for technical training, you know that it often comes with a hefty price tag. However, this full-day advanced course is only $149. You won’t find any other technical school offering such affordable, high-value training.
60 Minutes of Excel Secrets
Learn hidden Excel tips and tricks from this helpful one-hour webinar. Besides learning how to transfer data from Excel to Word automatically, you’ll learn how to customize your Excel environment to increase your efficiency.
In addition, you’ll learn how to create time-saving macros and organize your spreadsheet to access the data you need. In short, this hour-long session will teach you how to better customize, organize, and format your spreadsheets.
Excel Dashboard 101
Managers, analysts, and others who spend their time looking at spreadsheet data will benefit from Excel Dashboard 101. This course is for you if you have always thought there would be a better way to view and analyze your business data.
You can download this one-hour webinar today to learn how to make your data more visually appealing and, thus – easier to understand.
You’ll learn to set up a navigational menu and move through the dashboard using only links. In addition, you’ll learn how to do the following:
- Create a key performance indicator stoplight graph
- Create a key performance indicator graph using conditional formatting
- Create a completion percentage graph
- Arrange multiple graphs on a dashboard
- And more!
Microsoft Excel Made Easy
This article has already shown you options on how to transfer Excel to Word. Imagine how more efficient you would be at creating, organizing, and analyzing spreadsheets with an hour-long course called Microsoft Excel Made Easy.
This downloadable course offered by Pryor Learning will help you discover the data analysis tools available in Excel that will make it easy to achieve your information goals. In addition, the information will be presented clearly by a professional instructor – not a frustrated IT person with very little patience dealing with someone who doesn’t have a computer science degree.
This course covers Excel 2010 – as well as previous versions. You’ll learn how to utilize old worksheets and modify new ones to be accessible to everyone.
Depend on Pryor Learning for Quality Software Training
Pryor Learning offers software training for beginning, intermediate, and advanced users. Besides providing training in Excel, Pryor Learning also has courses to help you with QuickBooks, Outlook, PowerPoint, and Word.
Are you a leader of your organization? Then, schedule in-person training for your entire staff to improve the efficiency and effectiveness of your employees. We offer a wide range of courses – including time management seminars that would be helpful to everyone.
Pryor Learning offers several different learning options. While we pioneered the one-day seminar during the 1970s, we have changed with the times. As a result, we currently provide 9,000 live and online training options in various helpful subjects – from software training to personal development training to OSHA and workplace safety training.
To become more proficient at Excel, click on one of the courses highlighted in this article. Or consider purchasing an annual pass to access all of Pryor Learning’s great content.
PRYOR+ 7-DAYS OF FREE TRAINING
Courses in Customer Service, Excel, HR, Leadership,
OSHA and more. No credit card. No commitment. Individuals and teams.
Although Excel allows you to copy and paste data, this doesn’t make sense with a large dataset or certain formats. Instead, you can import or export data much more quickly.
Here, you will learn some of the operations related to importing and exporting data in Excel as well as troubleshooting common issues. If you need problem-specific help, Excelchat is always standing by to help.

Learn how to import and export data in Excel.
Use the Excel Text Import Wizard
Excel doesn’t allow you to export directly from a text file or Word document, but the Excel text import Wizard will bring data from a text file directly into a worksheet. This isn’t instant, but instead a process that will ensure that your data is brought into Excel in the format you want.
To begin the Text Import Wizard, go to the Data tab in Excel, and click Get External Data, and then select From Text. Then you will choose the text file you want to import.
The import process involves several steps:
- You will choose Delimited if the data in your text file is separated by spaces, colons, tabs, semicolons, or other characters. Choose Fixed width if every column is the same length. Select the row for the Start import at row. You can generally leave File origin at default. Then, you can see a Preview of file.
- When you have delimited data, you’ll need to choose the character that separates your data. If you don’t see the character listed, choose Other. A text qualifier, such as a quotation mark (“) will ignore the delimiter.
- You may or may not need to use the Advanced button on the import feature. For example, you can specify that thousands or decimal separators are used in your text file or that numbers contain a trailing minus sign. You can also skip importing some data and specify certain formats such as dates and currency.
Import and Export Text Files in Excel
Excel also allows you to import and export text files in several formats. The files that you work with can be in either .txt or .csv format.
To import a file, go to the File tab and select Open. Choose Browse. Then, select the type of file you want to import from the drop-down list (.txt or .csv). Once you’ve done this, navigate to the location of the file in File Explorer and choose Open.
If you’ve chosen a .csv file, you’re done. If it is a .txt file, it will open the Text Import Wizard (see above).
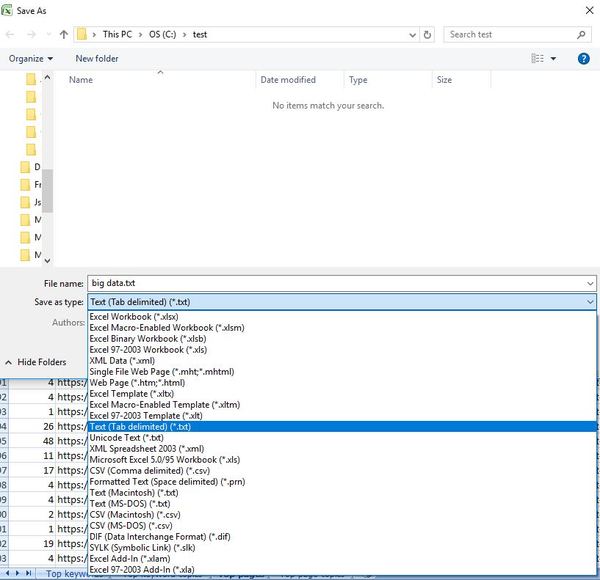
To export your Excel sheet to a text file, you’ll want to choose Save As, and then browse to where you want to save the file. Choose a new name. From the Save as type drop-down box, choose Text (tab delimited). Click Save.
Import Contacts from Excel to Outlook
If you’ve been keeping a lot of personal or business contacts in an Excel spreadsheet, you can import these straight into Outlook. The steps to do this are:
- Save your Excel sheet as a .csv file. If you have a .xls file, click File>Save As. Choose a place to save the file, and then choose OK. Now close your new .csv file.
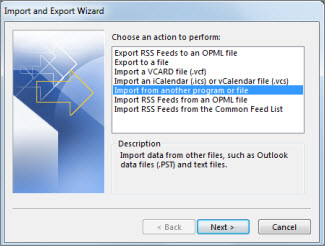
- Import your contacts to Outlook. Inside Outlook, Choose, File, Open & Export > Import. Select “Import from another program or file,” and then choose Next. Choose Comma Separated Values, and then select Next. Find the .csv file that you just created. Under Options, decided what to do about duplicates, select Next. Contacts should be the default (if not, select it), click Next. Don’t click Finish yet.
- Map your CSV columns. Select Map Customs Fields. A dialog box will appear. Match the From and To column names (some are standard). Once you have the columns correctly mapped, click Finish. Your contacts will then be imported into Outlook.
Export Access Data to Excel
You might have data in an Access database that you’d like to work with in Excel. You can export this from Access to Excel using the program’s Export Wizard. This is something that you can set up as a one-time operation, or you can even put it on a schedule to do repeatedly.
From Access, you don’t have the option of choosing Save As to get your data into Excel. Instead, you’ll want to use the Export feature. It’s also important to note that you cannot export modules or macros to Excel. You can only export a single database object with each export operation, but you can later merge multiple worksheets to produce the data you need.
- Choose your destination Excel workbook. It must be in .xls format since the newer .xlsx file format won’t work with this type of operation. This can be a new Excel workbook or an existing one. If it is an existing one, the import might overwrite data or create a new sheet.
- Make sure your destination workbook is closed before you begin.
- In the Access Navigation panel of the source database, select the object you want to export. Open the Datasheet view of the object and choose only the records you want to export.
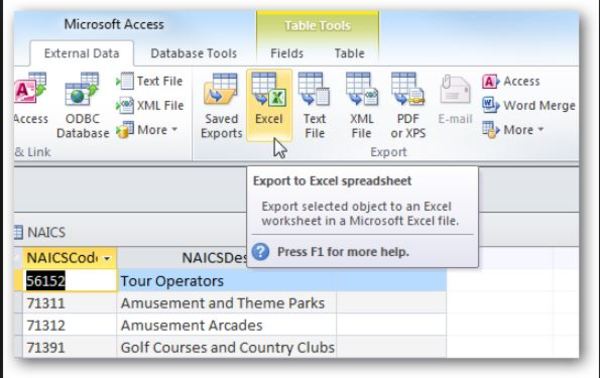
- In the Export group section of the External Data tab, choose Excel.
- An Export-Excel Spreadsheet dialog box will appear. You can change the filename if you wish. Confirm the format in the File Format box.
- Choose Export data with formatting and layout if you are exporting a query or table. This isn’t an option if you are exporting a report or form.
- Choose Open the destination file after the export operation is complete to see the final result.
- Click Ok.
If there is an error in this operation, Access will tell you what went wrong so that you can try again.
Did you find what you needed with these Excel import and export explanations? Whether you need some additional guidance or want to troubleshoot a specific issue in Excel, find out how Excelchat can help.
We have Excel experts standing by 24/7 to lend a hand. Your first session is always free.
How to Import and Export Data from Excel to SharePoint Lists and Vice Versa
Many users who use SharePoint Online like to use lists because SharePoint lists look just like Excel tables. For better integration, Microsoft allows you to export Excel tables to SharePoint lists and vice versa. Users usually ask: How do I import data from SharePoint to Excel? How do I extract data from SharePoint? How do I create a SharePoint list in Excel? This blog post can help you answer these questions and explains how to export tables from Excel to SharePoint lists and vice versa. Four methods of exporting data from Excel and one method of exporting data from SharePoint lists are covered.
Method 1 – How to Export Data from Excel to SharePoint Lists Manually
The idea of the first method is that you should create an empty list that contains the same columns as in the Excel table. The data format of columns must be the same to preserve data consistency. Then you should manually copy data from each column of the Excel table and paste this data to the appropriate column of the SharePoint list.
Open an XLS, XLSX, CSV file, or a file of another format that contains a table in Microsoft Excel that is installed on your computer. In my example, I’ve created a simple table for demonstration. You can see this table opened in Excel in the screenshot below.

Open a web browser and log into your Office 365 account (Microsoft 365 account). Open your team site in SharePoint Online, and create a new list. Let’s call our test list List02 and enter a description, for example, Import Excel into SharePoint list. You can also read this blog post about SharePoint Online to learn more about sites, lists, and libraries.

Once you have created a new SharePoint list, create the appropriate columns by clicking +Add column. The columns must have the same names and data format as the columns in the source Excel table.

In the window that opens, enter a name, description, and type, and define other needed parameters for a column. Then hit Save.

The list now contains all the needed columns but remains empty. To start copying data to a SharePoint list, you have to view the list as a table. To do this, click Edit in grid view. You are ready to copy data from Excel to SharePoint list.

Select data in a column of an Excel table, and press Ctrl+C to copy the selected data to clipboard. On the screenshot below you can see the data in the Name column selected.

You can move columns (left and right) after creating them in a SharePoint list. Select the empty cell in the needed column (the Names column in our case), and press Ctrl+V to paste data you have copied to the clipboard. The Name column now contains all the needed data in our example. Similarly copy paste data for the other columns.

Once you have transferred data to all columns of your SharePoint list, you can exit grid view. We have finished copying data from an Excel table to a SharePoint list. On the screenshot below you can see how our list looks after copying all the data.

The advantage of this method is that it’s easy to use when you don’t have that many tables or columns.
The disadvantage is that it’s time-consuming and inconvenient when you have too many columns and tables to copy.
Method 2 – How to Export Data Directly from Excel to a SharePoint List
The idea of this method is that you should export your table to a SharePoint list directly from Excel installed on your computer. Excel must be able to connect to your SharePoint site. You should provide your credentials, and your Office 365 account must have sufficient permissions to create a SharePoint list on a SharePoint site.
Open Microsoft Excel installed on your computer, and open the table you want to export to SharePoint Online. Let’s create a test table for our blog post with some equipment items and create columns with vendors who manufactured these items, users who are owners of the appropriate item, and the price for each item.
Convert a spreadsheet to a table before you start exporting. Click Insert > Table.

In the Create Table window, you can leave default values and hit OK.

Now the view of the table is a little bit different, as headers are marked with another color.
Select any column name in your table, go to the Design tab (Table Tools), and enter a table name, for example, TestTable01. There should be no spaces in the name.
Select the Design tab, click Export, then click Export Table to SharePoint List…

A pop-up window is displayed. There are two steps to complete.
Enter the address of your team site in SharePoint, which is the destination for the Excel table that you want to export. In my case, I’m using the following address: https://nakivo.sharepoint.com/sites/BlogTeamSite
Enter a name for your table, for example: Excel to SharePoint list. This name will be used as the SharePoint list name after export.
Enter a description, for example: Import Excel to SharePoint list.
Hit Next to continue.

Define the correct data types for each column of the exported table, then hit Finish.

Now Microsoft Excel connects to your SharePoint site you have selected as destination to export the Excel table into a SharePoint list. Excel needs to pass authentication in Office 365 to export a table to a SharePoint list. You should enter the username and password for your Office 365 account.

If everything is correct, the export process will be completed successfully, and you should see the message:
The table was successfully published and may be viewed on: <address>

Open the link provided in the window in a web browser.
Now you can see the exported Excel table as a list in SharePoint Online.

You can open this list manually in SharePoint Online by opening your team site and going to the Site Contents section in the navigation pane of the web interface.

The advantage of this method is that it’s convenient to export data directly from Excel to a SharePoint list. All you need is Excel and access to SharePoint Online. No third-party apps are required.
Method 3 – How to Export Data from Excel to a SharePoint List with an App
The idea of the third method is that you should use a special SharePoint App to import spreadsheets from Excel to SharePoint lists. You need the Import Spreadsheet app and a web browser that supports ActiveX controls, for example, Internet Explorer.
Open your team site in SharePoint Online, click the Settings icon, and, in the menu that opens, hit Add an app.

In the window that opens, you can see a list of different SharePoint apps. Type “import” in the search field on this page. When the Import Spreadsheet app is found, click it.

On the page that opens, you should enter a name and description of the new SharePoint list that is created after import with the app.
Name: Excel to SharePoint list
Description: Import Excel to SharePoint list
Click Browse, and select the XLSX file (or another Excel file format that is supported by the app) that you want to import to SharePoint as a list.
Hit Import.

ActiveX controls must be enabled in your web browser. If ActiveX controls is not enabled, you will see a warning message in your web browser. Refer to documentation for your web browser to learn how to enable ActiveX controls. ActiveX controls is a piece of software allowing you to interact with content you browse in the web. They can have access to your computer and may lead security issues. ActiveX controls are also known as plug-ins for Internet Explorer.
The advantage of this method is that it doesn’t take much manual intervention.
The disadvantages of the method are that you need to configure ActiveX controls that can be difficult or not supported in your web browser and that you need to use a special web app for SharePoint.
Method 4 – How to Export Data from Excel when Creating a New SharePoint List
There is one more method that allows you to import an Excel table to a SharePoint list when creating a new list in SharePoint Online. You don’t need Excel or other applications to use this method. Just open your web browser and log in to SharePoint Online with your Office 365 account (Microsoft 365) credentials.
Open you team site in SharePoint Online, click the Settings icon, and hit Site contents.

On the Site contents page that opens, click New > List.

A new page opens suggesting that you create a list. On the left side of the page, select From Excel to create a list from Excel. Enter a name for your new list, for example, SharePoint import Excel. Click Upload file, and select an Excel file (XLS, XLSX, or other supported formats) you want to import as a SharePoint list to SharePoint Online. As an alternative, you can select a file that has been already uploaded to a SharePoint site. Hit Next to continue.

A table in the file we have uploaded is recognized. Check the column types and make sure that the data format is correct to preserve consistency. Hit Create when ready to finish.

A SharePoint list has been created successfully and data has been exported from an Excel table to a SharePoint list.

The advantages of this method is that you don’t need to install Excel on your computer to export a table to SharePoint as a list and you don’t need to use a SharePoint app.
How to Export SharePoint List to Excel
You can export a SharePoint list to an Excel table with a few clicks by using a web interface of SharePoint Online.
Open your team site in SharePoint Online, then open the SharePoint list you want to export. Click Export to Excel.

A window notifies you that query.iqy must be opened in Excel. Select Excel as an application to open the downloaded query.iqy file, and hit OK. A Microsoft Excel security notice is displayed when you open a file downloaded from the internet in Microsoft Excel. The purpose of this notification message is to reduce risks of ransomware attacks and infection with other viruses. Click Enable to open the SharePoint list you are exporting to an Excel table.

Now a table opens in Excel and the export of the SharePoint list is finished. Save the table as a file in the needed format, for example, XLS or XLSX.

Refreshing data in Excel
If changes are written to your SharePoint list stored on a team site in SharePoint Online, you can refresh data in the table you have imported to Excel and update your table without the need to perform a new export/import operation. The data in Excel is not refreshed automatically right after changes are saved in a SharePoint list; you should perform one manual operation to do this. You should know how to connect Excel to SharePoint lists in this case.
Let’s add a new Switches line in the SharePoint list.

As you can see, the Excel table we have imported before is not updated automatically with the data we added to our SharePoint list (the Switches line). We need to update it by going to the Data tab and clicking Connections in Excel.

The Workbook Connections window opens. Click Refresh to refresh the data in your Excel table, then you can close this window.

Data has been updated in Excel, and the Switches line is added in the bottom of our Excel table without the need to re-export all data.

Be aware that data is refreshed only in one direction. If you change data in your Excel table and click Refresh, the SharePoint list is not updated.
If you don’t need to update data in the current Excel table, go to Data > Connections, select a query, and click Remove.

Conclusion
Microsoft provides good integration between SharePoint Online and Excel as they both are Microsoft products. There are at least four methods to export data from Excel tables to SharePoint lists. Methods covered in this blog post have advantages and disadvantages you should be aware of when selecting a method that is suitable for you. Select the right method depending on whether you want to do it manually, use Excel, or use another app. Data export from a SharePoint list to Excel is straightforward and affordable for all SharePoint Online users.
When you use SharePoint Online and Office 365 in general, don’t forget to back up your data. NAKIVO Backup & Replication supports Office 365 data backup for Exchange Online, OneDrive for Business, and SharePoint Online. Download the latest version of the product, and back up all needed data in your environment.
Download PC Repair Tool to quickly find & fix Windows errors automatically
When it comes to importing the data from Microsoft Excel to Google Sheets and vice versa, most of us do it by uploading the Excel file to Google Drive and downloading the Google Sheets in Microsoft Excel format, or simply by copying and pasting the data. It is a time-consuming process, as you have to do it every time you make any changes to either Excel file or Google Sheets. In this article, we will see how you can import data from Excel to Google Sheets and vice versa automatically. This is a two-way integration between Google Sheets and Microsoft Excel.

You can link Google Sheets with Microsoft Excel by creating a web query in Excel. But this is only one-way integration which means that the changes made to Google Sheets will automatically be updated in Excel but the changes made in Excel will not be updated in Google Sheets automatically.
If you want to establish a two-way integration between Google Sheets and Microsoft Excel, go through the following instructions.
- Download Google Drive for Windows.
- Install Google Drive for Windows on your computer.
- Create a new Excel file inside Google Drive on your File Explorer.
- Open the Excel file that you have just created and enter your data.
- Save the Excel file and close it.
- Open Google Sheets in your web browser. There you will see the spreadsheet that you have created on your computer.
- Open that spreadsheet in Google Sheets and you will see all the data that you have entered in the Excel file.
Now, let’s see all these steps in detail.
1] Download Google Drive for Windows.

2] Double-click on the installer file to install Google Drive on your Windows computer. After successful installation of Google Drive, open it and sign in by entering your Google Account credentials. After signing into Google Drive for Windows, wait till it completes synchronization. After that, you will see that a hard drive named Google Drive has automatically been created in File Explorer.
If Google Drive is not added to your File Explorer, you have to add it manually.
3] Now, double-click on Google Drive in File Explorer to open it. There, you will see a folder named My Drive. Double-click on it to open it.

4] Now, right-click in the empty space and go to “New > Microsoft Excel Worksheet.” If this option is not available, open Microsoft Excel on your computer, create a new worksheet, and save it in Google Drive on your computer.

5] Open the newly created Excel Worksheet, enter your data, and save it. After that, open Google Sheets. You will see that the Excel file you have created on your computer has automatically been added to the Google Sheets.
The two-way integration between Google Sheets and Microsoft Excel has been established. From now, all the changes you make in Google Sheets will automatically be updated in Microsoft Excel and the changes that you make in Excel will automatically be updated in Google Sheets.
Can Google Sheets retrieve data from Excel?
Google Sheets can retrieve data from Excel. For this, you have to download and install Google Drive on your computer and then create an Excel file in Google Drive on your computer. After that, Google Sheets will start retrieving data from that Excel file.
How do I auto-pull data in Excel?
You can auto-pull data in Excel from Google Sheets either by creating a web query in Excel or by installing Google Drive on your computer. The former method is the one-way integration between Excel and Google Sheets, whereas the latter method is the two-way integration between Excel and Google Sheets.
Hope this helps.
Read next: How to edit a PDF in Google Docs on the web.

Nishant is an Engineering graduate. He has worked as an automation engineer in the automation industry, where his work included PLC and SCADA programming. Helping his friends and relatives fix their PC problems is his favorite pastime.