
Do you know how to excel in your computer programming coursework? Have you ever thought about which tips you need to be followed to become the best programmer? Let us try to understand the necessity of becoming a good programmer & its growth in the IT industry.
We will discuss a very unique example using one comic character. It will help to understand the necessity of becoming a good programmer. We all know about Hulk’s comic character right? We will compare the necessity to excel in computer programming coursework with the Hulk comic character. So, let us start making the comparison.
Suppose, you are a very good learner. You have the potential to earn much in the future. so, you have a superpower like the Hulk. But, you have not committed to excel in your computer programming coursework. So, it is the key thing. It is the anger that helps to bring the power to Hulk. So, in absence of the anger, the power of Hulk is incomplete.
The same thing goes for here also. If you don’t excel in your computer programming coursework, you will surely lose the potential to become a good programmer. And last, you will lose the chance to earn much more in the future. So, everything is connected with the other.
So, we can hope that the necessity to excel in computer programming coursework is very important. We will provide you with some tips to become a good programmer in the future. But before that, let us have a look at the computer programming concept. It will help us to easily move forward with our core interests.
What Is Computer Programming?
Computer science is a very vast domain. There are several parts are present in computer science. Like, some domain relates to the hardware of the computer. Some domains represent the networking structure of the computer. But other than all of these, there are several other domains are present. computer programming is a separate domain. It can easily refer to as a complete course itself. Because there are several sup-parts present. In this domain, an individual learns about programming.
There are many programming languages are present. There C, C++, C#, Java, Python, Ruby & many more are present. Each & every programming language is used to develop some application. Java & Python programming languages are the most important programming language. Because most of the applications were developed using these two languages. If you are stuck in your programming coursework then you can use our Do my programming homework services by Codingzap. So, you can easily understand the necessity of these programming languages.
Future Salary By Excelling In Computer Programming Coursework:
If you are a person who also runs for more earnings, then you should excel in your computer programming coursework. Because nowadays it is the only gateway to easily earn more & more salary. The IT industry is a growing industry. There might be some time-to-time problems in the industry, but moreover, they will be stable in the future. A good programmer who has the best knowledge can easily earn 5 LPA INR or 6,000 USD per year. It is the minimum salary you will get. The maximum might be in million also.
So, you can see that the salary in this industry is much more than in any other industry. Also, there is another opportunity in this industry. You can switch your job more easily. Switching your job will help to a rapid increase in your salary. And this will directly affect your savings, there is no doubt about that. So, if you get some good knowledge of computer programming coursework, then your future will be settled.
Tips To Excel In Computer Programming Coursework:
We have made a list of processes that need to be followed. From your college, you need to start developing these habits for better performance in the future. so, let us go through those tips to become a good programmer.
- Clear Basic Knowledge: Whatever knowledge you are getting, is not important. The quality of the knowledge also doesn’t matter. The matter is how deeply you understand the basis of any topic. Getting knowledge about the advanced topic is not important. You need to always clear the basis of the programming languages. Then you can develop advanced knowledge of it.
- More & More Practice: To excel in your computer programming coursework, you need to practice more. Programming languages are a practical concept. There is no theory present that needs to be remembered. The more you practice, the more you get an understanding. So, you need to be focused. You can go through any online courses for practice.
- Write Down Mistakes: While practicing programming languages, you always commit some mistakes. Without making mistakes, you can’t able to learn anything in the world. And the programming languages are no different from that. When you commit any mistakes, it is advisable to note them down that. You should not take your calmly your mistakes. As it will become a big blunder in the future.
- Focus On Single Topic: In computer science, there are several topics are present. you need to focus on any one topic at a single time. If you try to get knowledge from different tracks simultaneously, then it will not help you much. Rather, you will be confused more. So, it is advisable not to run for CGPA. You should run for the knowledge.
- Don’t Run From Assignments: You often get afraid of the assignments. We request you not do this. It will push you backward. You try to do the assignments on your own. If you are stuck, then you should ask your faculty about it. At last, ZapOne is present to help you out with any of your assignment-related issues.
Conclusion:
As we saw, it is very important to excel in your computer programming coursework.
You need to always stay focused on your path. You need not start getting advanced knowledge for the very first time.
It is always advisable to start from the basic of the programming languages. It will help to easily grasp the knowledge. It will help you in the future.
Watch Now This tutorial has a related video course created by the Real Python team. Watch it together with the written tutorial to deepen your understanding: Editing Excel Spreadsheets in Python With openpyxl
Excel spreadsheets are one of those things you might have to deal with at some point. Either it’s because your boss loves them or because marketing needs them, you might have to learn how to work with spreadsheets, and that’s when knowing openpyxl comes in handy!
Spreadsheets are a very intuitive and user-friendly way to manipulate large datasets without any prior technical background. That’s why they’re still so commonly used today.
In this article, you’ll learn how to use openpyxl to:
- Manipulate Excel spreadsheets with confidence
- Extract information from spreadsheets
- Create simple or more complex spreadsheets, including adding styles, charts, and so on
This article is written for intermediate developers who have a pretty good knowledge of Python data structures, such as dicts and lists, but also feel comfortable around OOP and more intermediate level topics.
Before You Begin
If you ever get asked to extract some data from a database or log file into an Excel spreadsheet, or if you often have to convert an Excel spreadsheet into some more usable programmatic form, then this tutorial is perfect for you. Let’s jump into the openpyxl caravan!
Practical Use Cases
First things first, when would you need to use a package like openpyxl in a real-world scenario? You’ll see a few examples below, but really, there are hundreds of possible scenarios where this knowledge could come in handy.
Importing New Products Into a Database
You are responsible for tech in an online store company, and your boss doesn’t want to pay for a cool and expensive CMS system.
Every time they want to add new products to the online store, they come to you with an Excel spreadsheet with a few hundred rows and, for each of them, you have the product name, description, price, and so forth.
Now, to import the data, you’ll have to iterate over each spreadsheet row and add each product to the online store.
Exporting Database Data Into a Spreadsheet
Say you have a Database table where you record all your users’ information, including name, phone number, email address, and so forth.
Now, the Marketing team wants to contact all users to give them some discounted offer or promotion. However, they don’t have access to the Database, or they don’t know how to use SQL to extract that information easily.
What can you do to help? Well, you can make a quick script using openpyxl that iterates over every single User record and puts all the essential information into an Excel spreadsheet.
That’s gonna earn you an extra slice of cake at your company’s next birthday party!
Appending Information to an Existing Spreadsheet
You may also have to open a spreadsheet, read the information in it and, according to some business logic, append more data to it.
For example, using the online store scenario again, say you get an Excel spreadsheet with a list of users and you need to append to each row the total amount they’ve spent in your store.
This data is in the Database and, in order to do this, you have to read the spreadsheet, iterate through each row, fetch the total amount spent from the Database and then write back to the spreadsheet.
Not a problem for openpyxl!
Learning Some Basic Excel Terminology
Here’s a quick list of basic terms you’ll see when you’re working with Excel spreadsheets:
| Term | Explanation |
|---|---|
| Spreadsheet or Workbook | A Spreadsheet is the main file you are creating or working with. |
| Worksheet or Sheet | A Sheet is used to split different kinds of content within the same spreadsheet. A Spreadsheet can have one or more Sheets. |
| Column | A Column is a vertical line, and it’s represented by an uppercase letter: A. |
| Row | A Row is a horizontal line, and it’s represented by a number: 1. |
| Cell | A Cell is a combination of Column and Row, represented by both an uppercase letter and a number: A1. |
Getting Started With openpyxl
Now that you’re aware of the benefits of a tool like openpyxl, let’s get down to it and start by installing the package. For this tutorial, you should use Python 3.7 and openpyxl 2.6.2. To install the package, you can do the following:
After you install the package, you should be able to create a super simple spreadsheet with the following code:
from openpyxl import Workbook

workbook = Workbook()
sheet = workbook.active

sheet["A1"] = "hello"
sheet["B1"] = "world!"

workbook.save(filename="hello_world.xlsx")
The code above should create a file called hello_world.xlsx in the folder you are using to run the code. If you open that file with Excel you should see something like this:
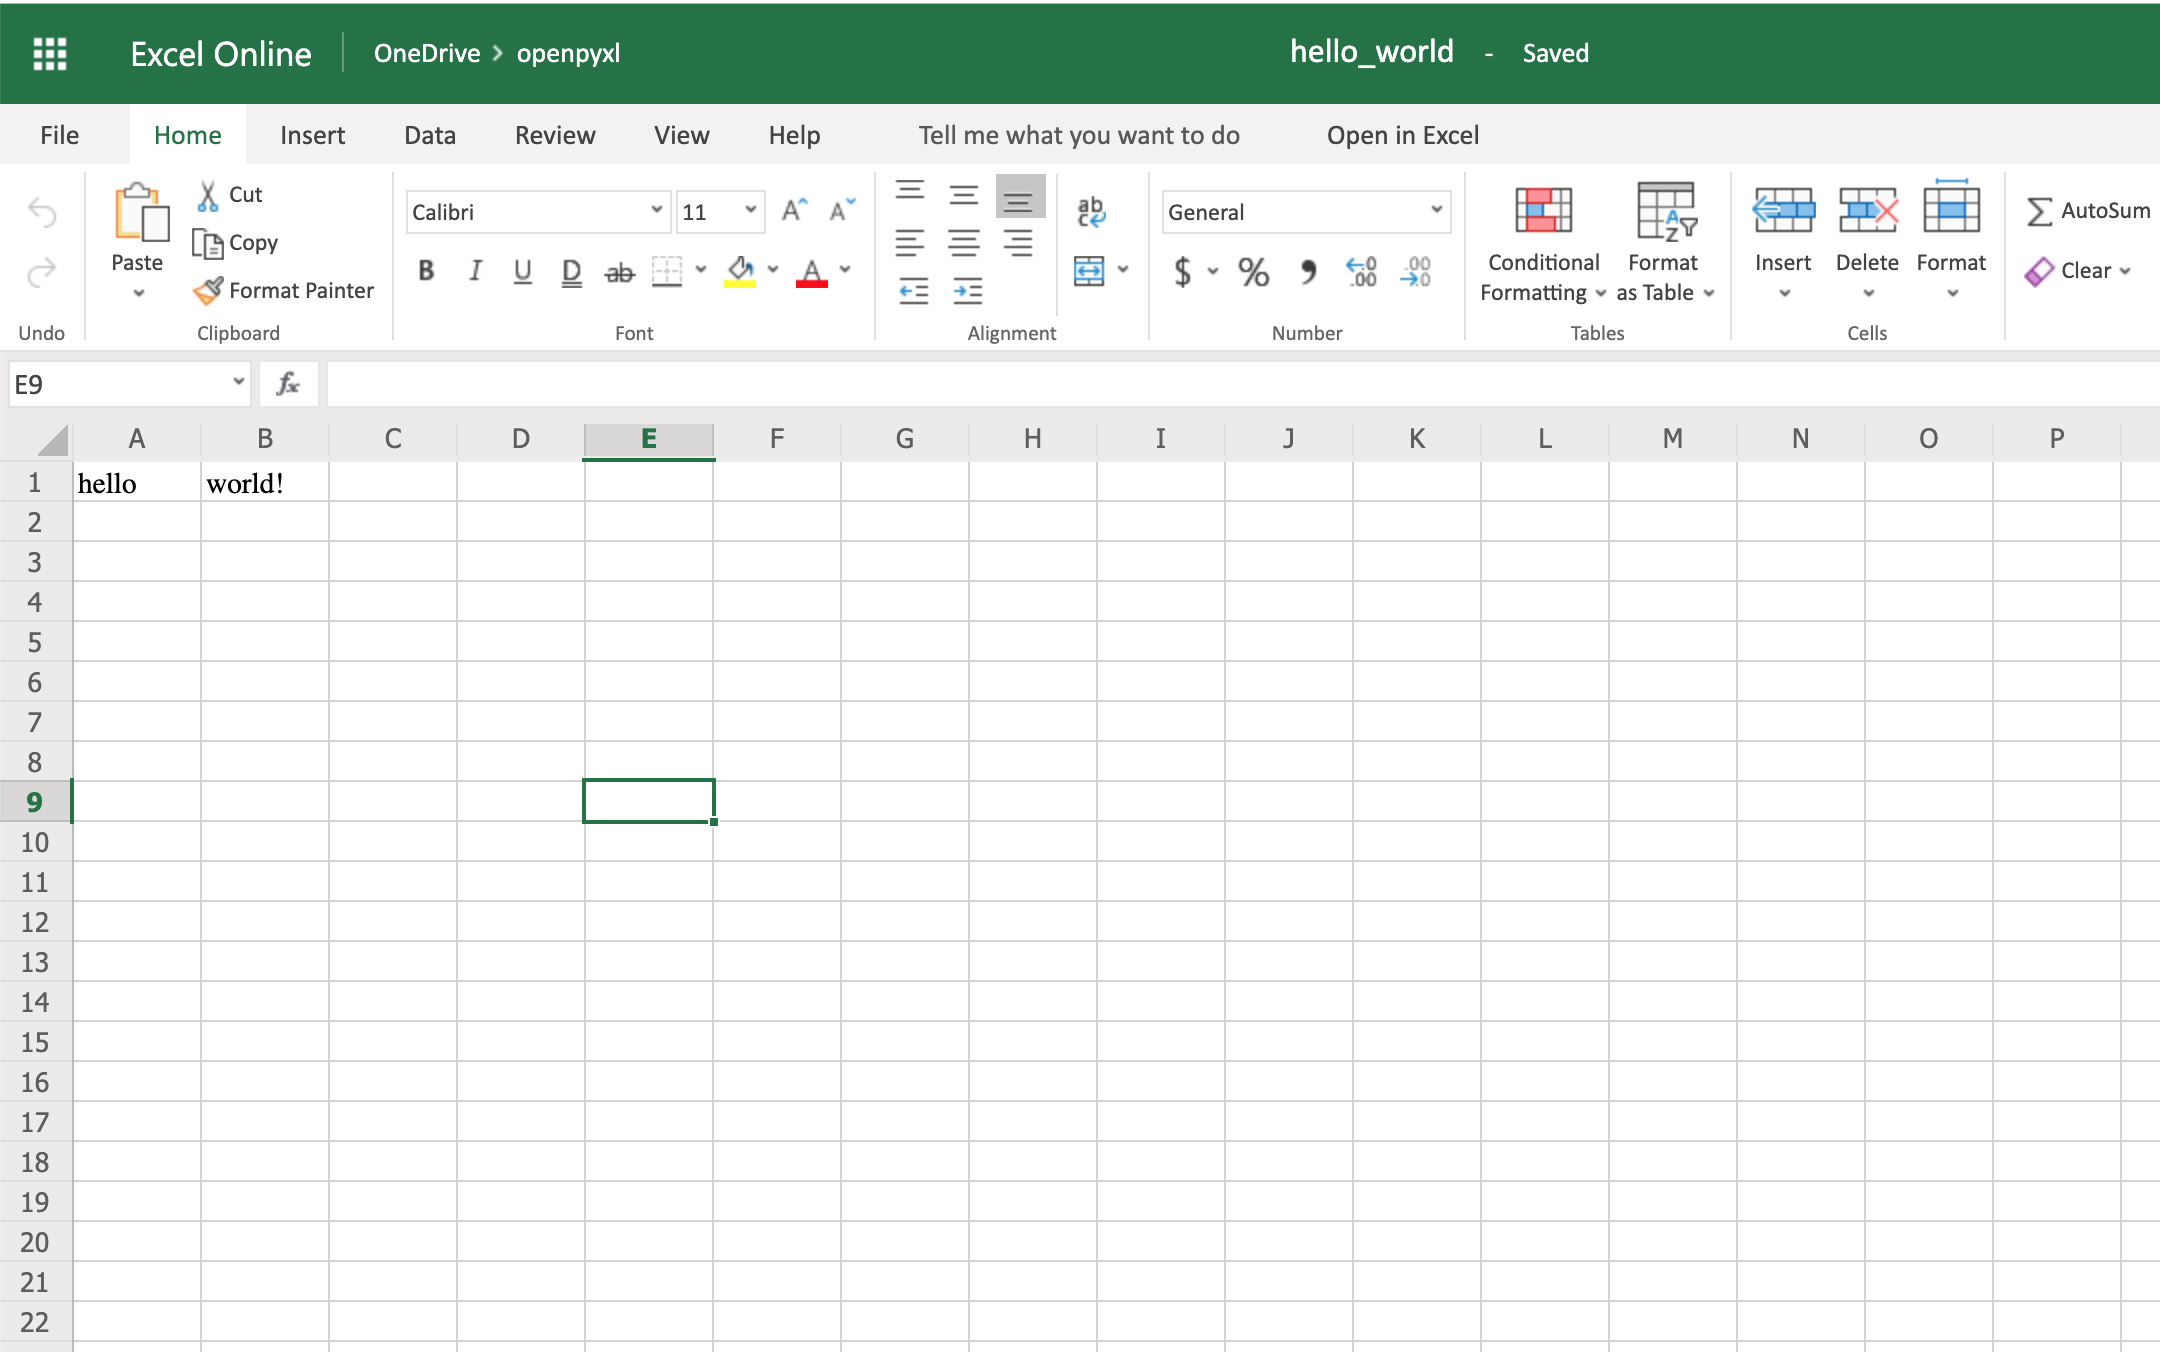
Woohoo, your first spreadsheet created!
Reading Excel Spreadsheets With openpyxl
Let’s start with the most essential thing one can do with a spreadsheet: read it.
You’ll go from a straightforward approach to reading a spreadsheet to more complex examples where you read the data and convert it into more useful Python structures.
Dataset for This Tutorial
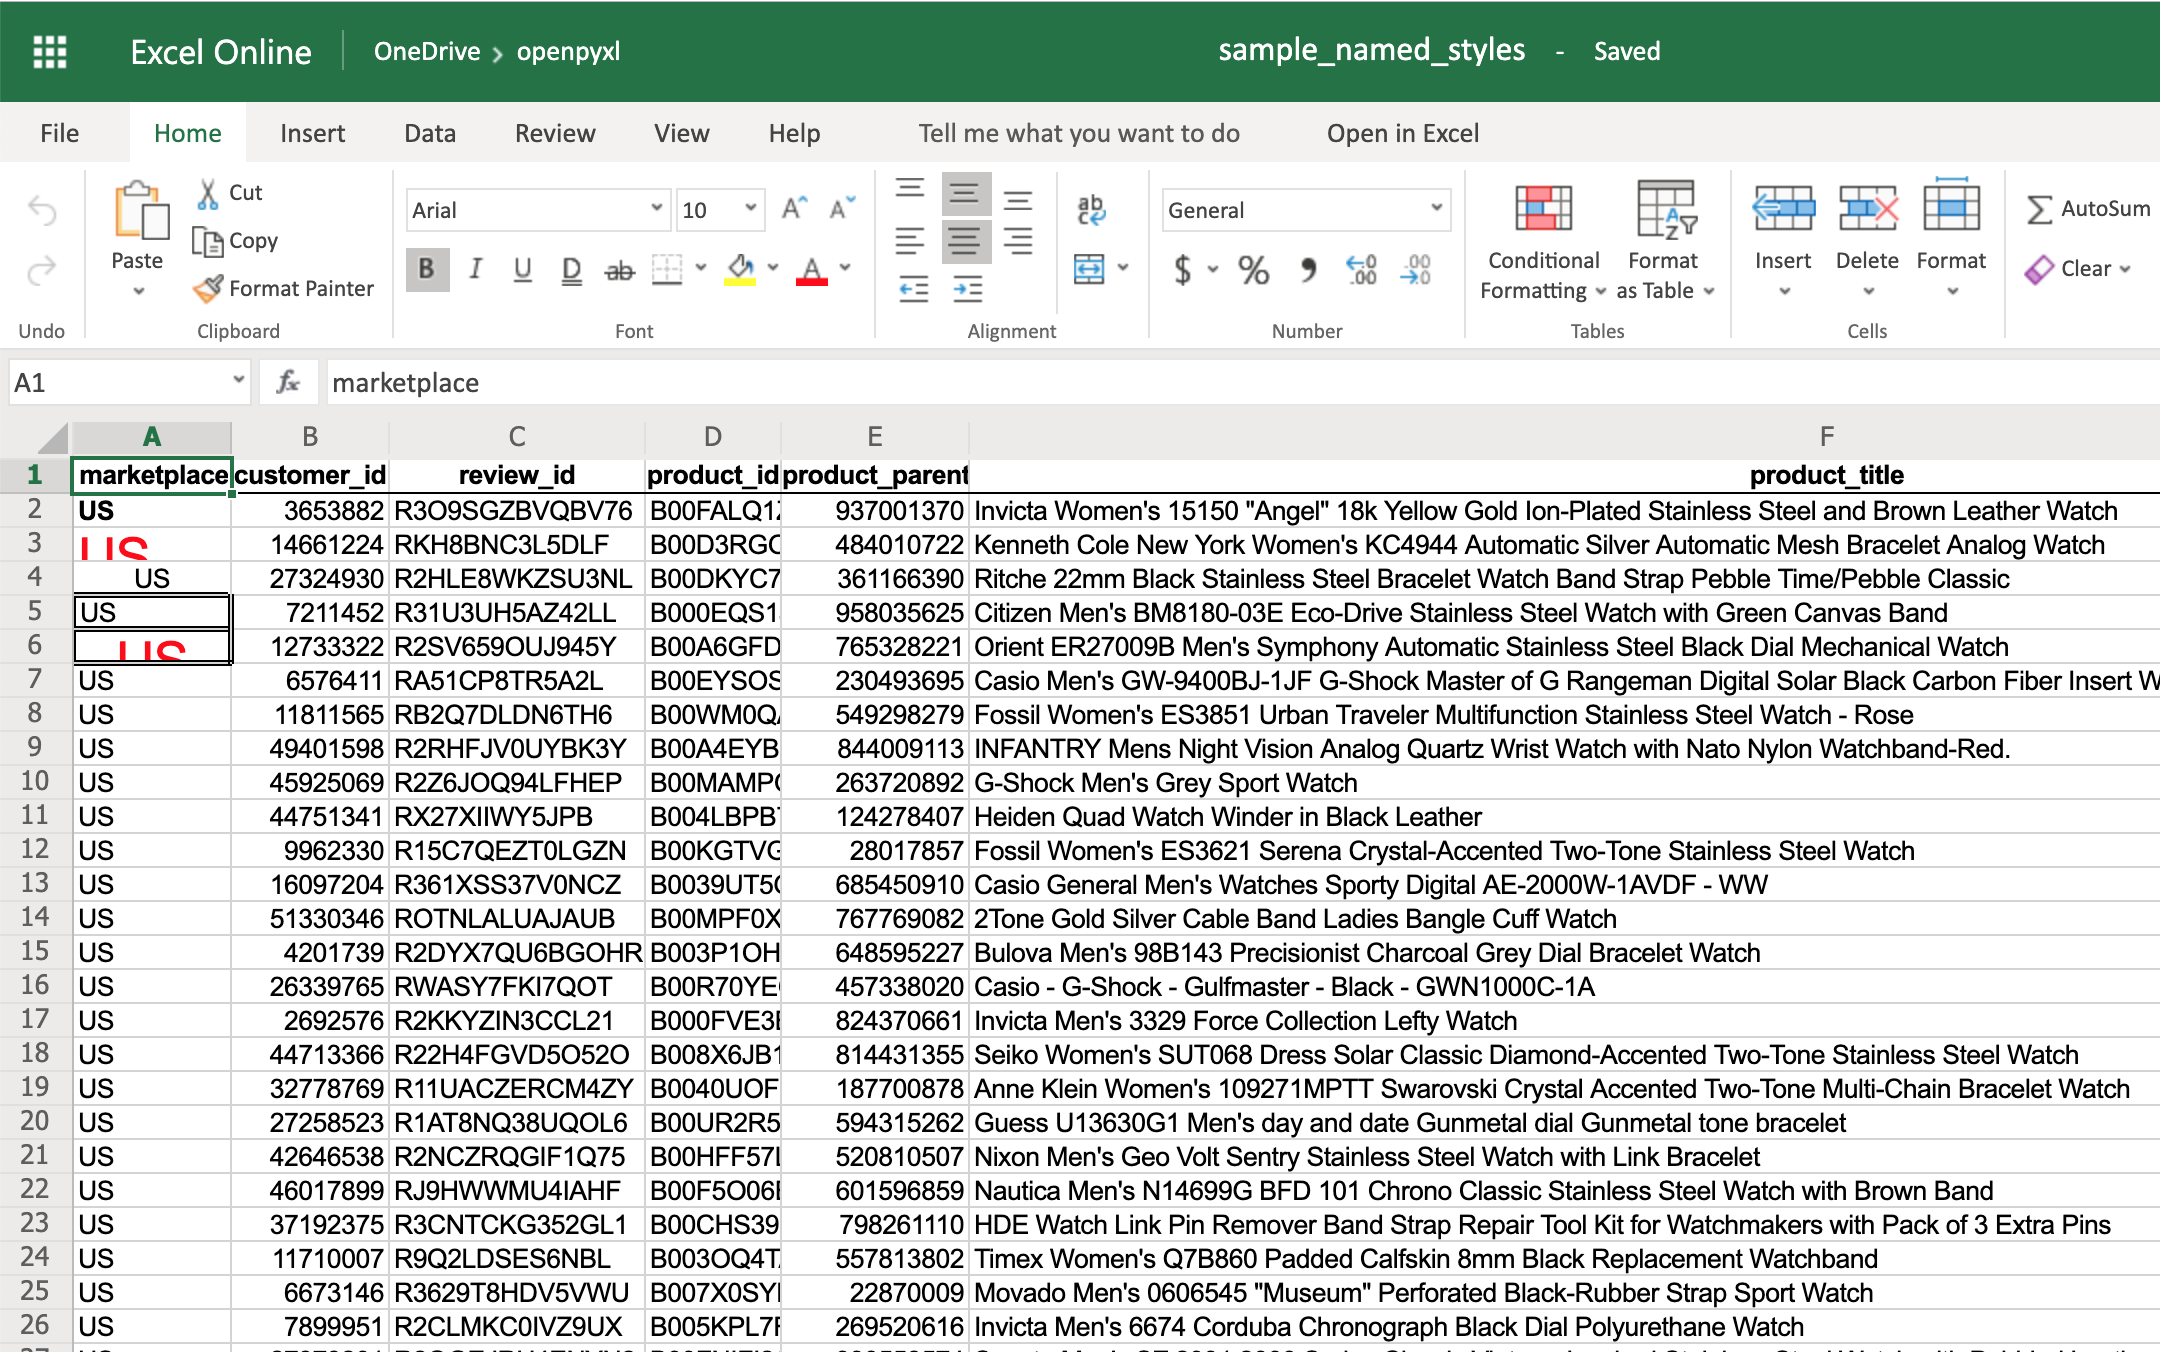
Before you dive deep into some code examples, you should download this sample dataset and store it somewhere as sample.xlsx:
This is one of the datasets you’ll be using throughout this tutorial, and it’s a spreadsheet with a sample of real data from Amazon’s online product reviews. This dataset is only a tiny fraction of what Amazon provides, but for testing purposes, it’s more than enough.
A Simple Approach to Reading an Excel Spreadsheet
Finally, let’s start reading some spreadsheets! To begin with, open our sample spreadsheet:
>>>
>>> from openpyxl import load_workbook
>>> workbook = load_workbook(filename="sample.xlsx")
>>> workbook.sheetnames
['Sheet 1']

>>> sheet = workbook.active
>>> sheet
<Worksheet "Sheet 1">

>>> sheet.title
'Sheet 1'
In the code above, you first open the spreadsheet sample.xlsx using load_workbook(), and then you can use workbook.sheetnames to see all the sheets you have available to work with. After that, workbook.active selects the first available sheet and, in this case, you can see that it selects Sheet 1 automatically. Using these methods is the default way of opening a spreadsheet, and you’ll see it many times during this tutorial.
Now, after opening a spreadsheet, you can easily retrieve data from it like this:
>>>
>>> sheet["A1"]
<Cell 'Sheet 1'.A1>

>>> sheet["A1"].value
'marketplace'

>>> sheet["F10"].value
"G-Shock Men's Grey Sport Watch"
To return the actual value of a cell, you need to do .value. Otherwise, you’ll get the main Cell object. You can also use the method .cell() to retrieve a cell using index notation. Remember to add .value to get the actual value and not a Cell object:
>>>
>>> sheet.cell(row=10, column=6)
<Cell 'Sheet 1'.F10>

>>> sheet.cell(row=10, column=6).value
"G-Shock Men's Grey Sport Watch"
You can see that the results returned are the same, no matter which way you decide to go with. However, in this tutorial, you’ll be mostly using the first approach: ["A1"].
The above shows you the quickest way to open a spreadsheet. However, you can pass additional parameters to change the way a spreadsheet is loaded.
Additional Reading Options
There are a few arguments you can pass to load_workbook() that change the way a spreadsheet is loaded. The most important ones are the following two Booleans:
- read_only loads a spreadsheet in read-only mode allowing you to open very large Excel files.
- data_only ignores loading formulas and instead loads only the resulting values.
Importing Data From a Spreadsheet
Now that you’ve learned the basics about loading a spreadsheet, it’s about time you get to the fun part: the iteration and actual usage of the values within the spreadsheet.
This section is where you’ll learn all the different ways you can iterate through the data, but also how to convert that data into something usable and, more importantly, how to do it in a Pythonic way.
Iterating Through the Data
There are a few different ways you can iterate through the data depending on your needs.
You can slice the data with a combination of columns and rows:
>>>
>>> sheet["A1:C2"]
((<Cell 'Sheet 1'.A1>, <Cell 'Sheet 1'.B1>, <Cell 'Sheet 1'.C1>),
 (<Cell 'Sheet 1'.A2>, <Cell 'Sheet 1'.B2>, <Cell 'Sheet 1'.C2>))
You can get ranges of rows or columns:
>>>
>>> # Get all cells from column A
>>> sheet["A"]
(<Cell 'Sheet 1'.A1>,
 <Cell 'Sheet 1'.A2>,
 ...
 <Cell 'Sheet 1'.A99>,
 <Cell 'Sheet 1'.A100>)

>>> # Get all cells for a range of columns
>>> sheet["A:B"]
((<Cell 'Sheet 1'.A1>,
  <Cell 'Sheet 1'.A2>,
  ...
  <Cell 'Sheet 1'.A99>,
  <Cell 'Sheet 1'.A100>),
 (<Cell 'Sheet 1'.B1>,
  <Cell 'Sheet 1'.B2>,
  ...
  <Cell 'Sheet 1'.B99>,
  <Cell 'Sheet 1'.B100>))

>>> # Get all cells from row 5
>>> sheet[5]
(<Cell 'Sheet 1'.A5>,
 <Cell 'Sheet 1'.B5>,
 ...
 <Cell 'Sheet 1'.N5>,
 <Cell 'Sheet 1'.O5>)

>>> # Get all cells for a range of rows
>>> sheet[5:6]
((<Cell 'Sheet 1'.A5>,
  <Cell 'Sheet 1'.B5>,
  ...
  <Cell 'Sheet 1'.N5>,
  <Cell 'Sheet 1'.O5>),
 (<Cell 'Sheet 1'.A6>,
  <Cell 'Sheet 1'.B6>,
  ...
  <Cell 'Sheet 1'.N6>,
  <Cell 'Sheet 1'.O6>))
You’ll notice that all of the above examples return a tuple. If you want to refresh your memory on how to handle tuples in Python, check out the article on Lists and Tuples in Python.
There are also multiple ways of using normal Python generators to go through the data. The main methods you can use to achieve this are:
.iter_rows().iter_cols()
Both methods can receive the following arguments:
min_rowmax_rowmin_colmax_col
These arguments are used to set boundaries for the iteration:
>>>
>>> for row in sheet.iter_rows(min_row=1,
...                            max_row=2,
...                            min_col=1,
...                            max_col=3):
...     print(row)
(<Cell 'Sheet 1'.A1>, <Cell 'Sheet 1'.B1>, <Cell 'Sheet 1'.C1>)
(<Cell 'Sheet 1'.A2>, <Cell 'Sheet 1'.B2>, <Cell 'Sheet 1'.C2>)


>>> for column in sheet.iter_cols(min_row=1,
...                               max_row=2,
...                               min_col=1,
...                               max_col=3):
...     print(column)
(<Cell 'Sheet 1'.A1>, <Cell 'Sheet 1'.A2>)
(<Cell 'Sheet 1'.B1>, <Cell 'Sheet 1'.B2>)
(<Cell 'Sheet 1'.C1>, <Cell 'Sheet 1'.C2>)
You’ll notice that in the first example, when iterating through the rows using .iter_rows(), you get one tuple element per row selected. While when using .iter_cols() and iterating through columns, you’ll get one tuple per column instead.
One additional argument you can pass to both methods is the Boolean values_only. When it’s set to True, the values of the cell are returned, instead of the Cell object:
>>>
>>> for value in sheet.iter_rows(min_row=1,
...                              max_row=2,
...                              min_col=1,
...                              max_col=3,
...                              values_only=True):
...     print(value)
('marketplace', 'customer_id', 'review_id')
('US', 3653882, 'R3O9SGZBVQBV76')
If you want to iterate through the whole dataset, then you can also use the attributes .rows or .columns directly, which are shortcuts to using .iter_rows() and .iter_cols() without any arguments:
>>>
>>> for row in sheet.rows:
...     print(row)
(<Cell 'Sheet 1'.A1>, <Cell 'Sheet 1'.B1>, <Cell 'Sheet 1'.C1>
...
<Cell 'Sheet 1'.M100>, <Cell 'Sheet 1'.N100>, <Cell 'Sheet 1'.O100>)
These shortcuts are very useful when you’re iterating through the whole dataset.
Manipulate Data Using Python’s Default Data Structures
Now that you know the basics of iterating through the data in a workbook, let’s look at smart ways of converting that data into Python structures.
As you saw earlier, the result from all iterations comes in the form of tuples. However, since a tuple is nothing more than an immutable list, you can easily access its data and transform it into other structures.
For example, say you want to extract product information from the sample.xlsx spreadsheet and into a dictionary where each key is a product ID.
A straightforward way to do this is to iterate over all the rows, pick the columns you know are related to product information, and then store that in a dictionary. Let’s code this out!
First of all, have a look at the headers and see what information you care most about:
>>>
>>> for value in sheet.iter_rows(min_row=1,
...                              max_row=1,
...                              values_only=True):
...     print(value)
('marketplace', 'customer_id', 'review_id', 'product_id', ...)
This code returns a list of all the column names you have in the spreadsheet. To start, grab the columns with names:
product_idproduct_parentproduct_titleproduct_category
Lucky for you, the columns you need are all next to each other so you can use the min_column and max_column to easily get the data you want:
>>>
>>> for value in sheet.iter_rows(min_row=2,
...                              min_col=4,
...                              max_col=7,
...                              values_only=True):
...     print(value)
('B00FALQ1ZC', 937001370, 'Invicta Women's 15150 "Angel" 18k Yellow...)
('B00D3RGO20', 484010722, "Kenneth Cole New York Women's KC4944...)
...
Nice! Now that you know how to get all the important product information you need, let’s put that data into a dictionary:
import json
from openpyxl import load_workbook

workbook = load_workbook(filename="sample.xlsx")
sheet = workbook.active

products = {}

# Using the values_only because you want to return the cells' values
for row in sheet.iter_rows(min_row=2,
                           min_col=4,
                           max_col=7,
                           values_only=True):
    product_id = row[0]
    product = {
        "parent": row[1],
        "title": row[2],
        "category": row[3]
    }
    products[product_id] = product

# Using json here to be able to format the output for displaying later
print(json.dumps(products))
The code above returns a JSON similar to this:
{
  "B00FALQ1ZC": {
    "parent": 937001370,
    "title": "Invicta Women's 15150 ...",
    "category": "Watches"
  },
  "B00D3RGO20": {
    "parent": 484010722,
    "title": "Kenneth Cole New York ...",
    "category": "Watches"
  }
}
Here you can see that the output is trimmed to 2 products only, but if you run the script as it is, then you should get 98 products.
Convert Data Into Python Classes
To finalize the reading section of this tutorial, let’s dive into Python classes and see how you could improve on the example above and better structure the data.
For this, you’ll be using the new Python Data Classes that are available from Python 3.7. If you’re using an older version of Python, then you can use the default Classes instead.
So, first things first, let’s look at the data you have and decide what you want to store and how you want to store it.
As you saw right at the start, this data comes from Amazon, and it’s a list of product reviews. You can check the list of all the columns and their meaning on Amazon.
There are two significant elements you can extract from the data available:
- Products
- Reviews
A Product has:
- ID
- Title
- Parent
- Category
The Review has a few more fields:
- ID
- Customer ID
- Stars
- Headline
- Body
- Date
You can ignore a few of the review fields to make things a bit simpler.
So, a straightforward implementation of these two classes could be written in a separate file classes.py:
import datetime
from dataclasses import dataclass

@dataclass
class Product:
    id: str
    parent: str
    title: str
    category: str

@dataclass
class Review:
    id: str
    customer_id: str
    stars: int
    headline: str
    body: str
    date: datetime.datetime
After defining your data classes, you need to convert the data from the spreadsheet into these new structures.
Before doing the conversion, it’s worth looking at our header again and creating a mapping between columns and the fields you need:
>>>
>>> for value in sheet.iter_rows(min_row=1,
...                              max_row=1,
...                              values_only=True):
...     print(value)
('marketplace', 'customer_id', 'review_id', 'product_id', ...)

>>> # Or an alternative
>>> for cell in sheet[1]:
...     print(cell.value)
marketplace
customer_id
review_id
product_id
product_parent
...
Let’s create a file mapping.py where you have a list of all the field names and their column location (zero-indexed) on the spreadsheet:
# Product fields
PRODUCT_ID = 3
PRODUCT_PARENT = 4
PRODUCT_TITLE = 5
PRODUCT_CATEGORY = 6

# Review fields
REVIEW_ID = 2
REVIEW_CUSTOMER = 1
REVIEW_STARS = 7
REVIEW_HEADLINE = 12
REVIEW_BODY = 13
REVIEW_DATE = 14
You don’t necessarily have to do the mapping above. It’s more for readability when parsing the row data, so you don’t end up with a lot of magic numbers lying around.
Finally, let’s look at the code needed to parse the spreadsheet data into a list of product and review objects:
from datetime import datetime
from openpyxl import load_workbook
from classes import Product, Review
from mapping import PRODUCT_ID, PRODUCT_PARENT, PRODUCT_TITLE,
    PRODUCT_CATEGORY, REVIEW_DATE, REVIEW_ID, REVIEW_CUSTOMER,
    REVIEW_STARS, REVIEW_HEADLINE, REVIEW_BODY

# Using the read_only method since you're not gonna be editing the spreadsheet
workbook = load_workbook(filename="sample.xlsx", read_only=True)
sheet = workbook.active

products = []
reviews = []

# Using the values_only because you just want to return the cell value
for row in sheet.iter_rows(min_row=2, values_only=True):
    product = Product(id=row[PRODUCT_ID],
                      parent=row[PRODUCT_PARENT],
                      title=row[PRODUCT_TITLE],
                      category=row[PRODUCT_CATEGORY])
    products.append(product)

    # You need to parse the date from the spreadsheet into a datetime format
    spread_date = row[REVIEW_DATE]
    parsed_date = datetime.strptime(spread_date, "%Y-%m-%d")

    review = Review(id=row[REVIEW_ID],
                    customer_id=row[REVIEW_CUSTOMER],
                    stars=row[REVIEW_STARS],
                    headline=row[REVIEW_HEADLINE],
                    body=row[REVIEW_BODY],
                    date=parsed_date)
    reviews.append(review)

print(products[0])
print(reviews[0])
After you run the code above, you should get some output like this:
Product(id='B00FALQ1ZC', parent=937001370, ...)
Review(id='R3O9SGZBVQBV76', customer_id=3653882, ...)
That’s it! Now you should have the data in a very simple and digestible class format, and you can start thinking of storing this in a Database or any other type of data storage you like.
Using this kind of OOP strategy to parse spreadsheets makes handling the data much simpler later on.
Appending New Data
Before you start creating very complex spreadsheets, have a quick look at an example of how to append data to an existing spreadsheet.
Go back to the first example spreadsheet you created (hello_world.xlsx) and try opening it and appending some data to it, like this:
from openpyxl import load_workbook

# Start by opening the spreadsheet and selecting the main sheet
workbook = load_workbook(filename="hello_world.xlsx")
sheet = workbook.active

# Write what you want into a specific cell
sheet["C1"] = "writing ;)"

# Save the spreadsheet
workbook.save(filename="hello_world_append.xlsx")
Et voilà, if you open the new hello_world_append.xlsx spreadsheet, you’ll see the following change:
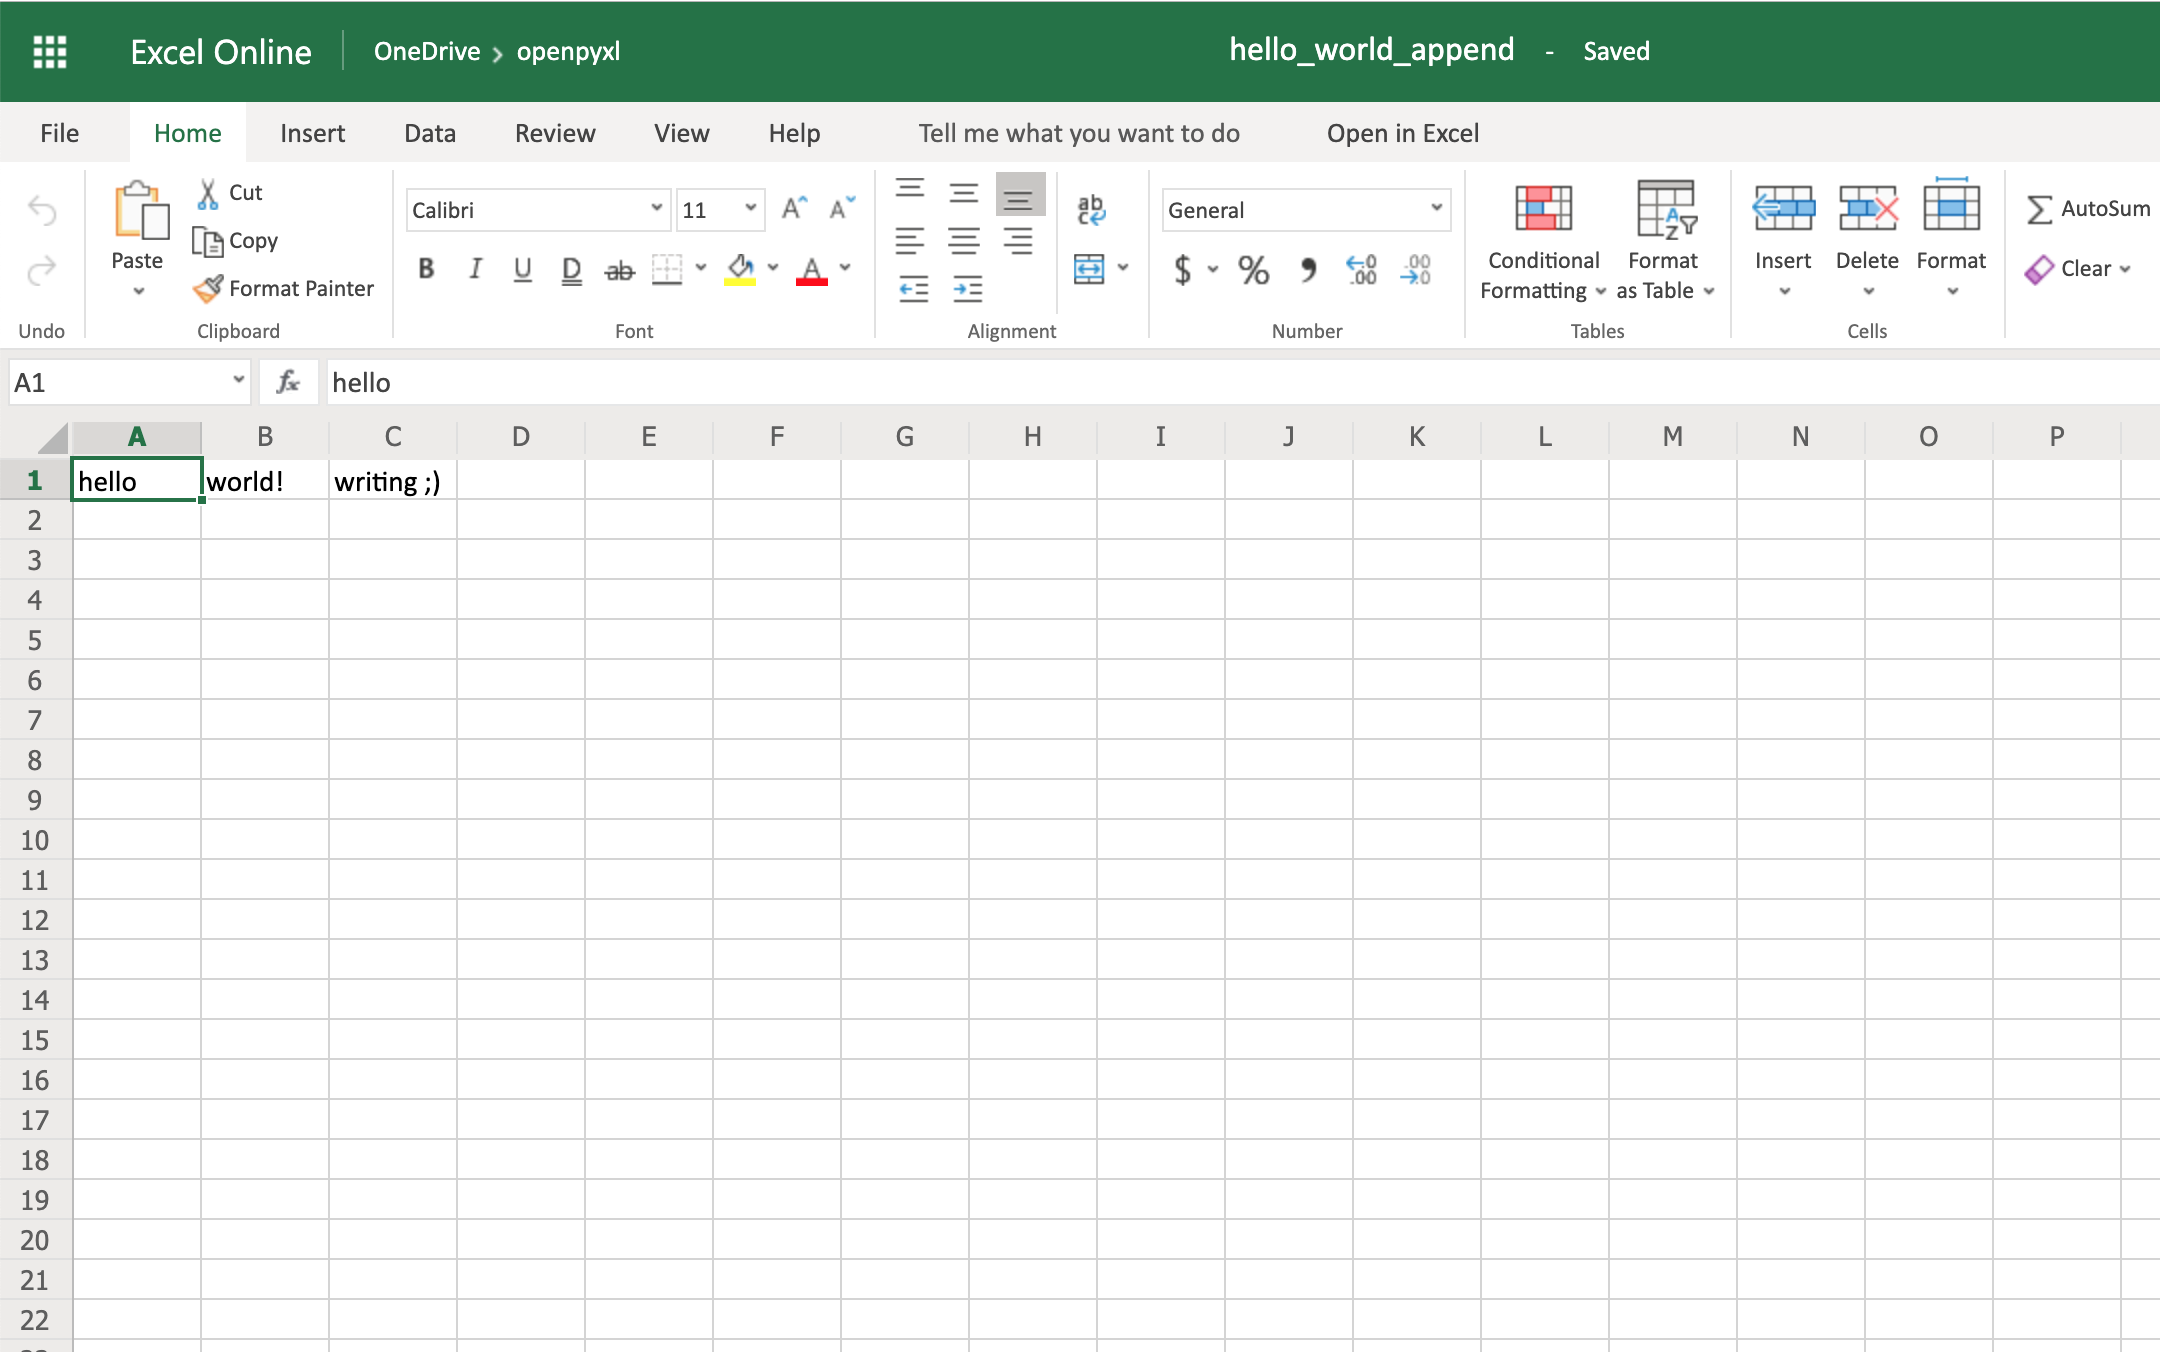
Notice the additional writing  on cell
 C1.
Writing Excel Spreadsheets With openpyxl
There are a lot of different things you can write to a spreadsheet, from simple text or number values to complex formulas, charts, or even images.
Let’s start creating some spreadsheets!
Creating a Simple Spreadsheet
Previously, you saw a very quick example of how to write “Hello world!” into a spreadsheet, so you can start with that:
 1from openpyxl import Workbook
 2
 3filename = "hello_world.xlsx"
 4
 5workbook = Workbook()
 6sheet = workbook.active
 7
 8sheet["A1"] = "hello"
 9sheet["B1"] = "world!"
10
11workbook.save(filename=filename)
The highlighted lines in the code above are the most important ones for writing. In the code, you can see that:
- Line 5 shows you how to create a new empty workbook.
- Lines 8 and 9 show you how to add data to specific cells.
- Line 11 shows you how to save the spreadsheet when you’re done.
Even though these lines above can be straightforward, it’s still good to know them well for when things get a bit more complicated.
One thing you can do to help with coming code examples is add the following method to your Python file or console:
>>>
>>> def print_rows():
...     for row in sheet.iter_rows(values_only=True):
...         print(row)
It makes it easier to print all of your spreadsheet values by just calling print_rows().
Basic Spreadsheet Operations
Before you get into the more advanced topics, it’s good for you to know how to manage the most simple elements of a spreadsheet.
Adding and Updating Cell Values
You already learned how to add values to a spreadsheet like this:
>>>
>>> sheet["A1"] = "value"
There’s another way you can do this, by first selecting a cell and then changing its value:
>>>
>>> cell = sheet["A1"]
>>> cell
<Cell 'Sheet'.A1>

>>> cell.value
'hello'

>>> cell.value = "hey"
>>> cell.value
'hey'
The new value is only stored into the spreadsheet once you call workbook.save().
The openpyxl creates a cell when adding a value, if that cell didn’t exist before:
>>>
>>> # Before, our spreadsheet has only 1 row
>>> print_rows()
('hello', 'world!')

>>> # Try adding a value to row 10
>>> sheet["B10"] = "test"
>>> print_rows()
('hello', 'world!')
(None, None)
(None, None)
(None, None)
(None, None)
(None, None)
(None, None)
(None, None)
(None, None)
(None, 'test')
As you can see, when trying to add a value to cell B10, you end up with a tuple with 10 rows, just so you can have that test value.
Managing Rows and Columns
One of the most common things you have to do when manipulating spreadsheets is adding or removing rows and columns. The openpyxl package allows you to do that in a very straightforward way by using the methods:
.insert_rows().delete_rows().insert_cols().delete_cols()
Every single one of those methods can receive two arguments:
idxamount
Using our basic hello_world.xlsx example again, let’s see how these methods work:
>>>
>>> print_rows()
('hello', 'world!')

>>> # Insert a column before the existing column 1 ("A")
>>> sheet.insert_cols(idx=1)
>>> print_rows()
(None, 'hello', 'world!')

>>> # Insert 5 columns between column 2 ("B") and 3 ("C")
>>> sheet.insert_cols(idx=3, amount=5)
>>> print_rows()
(None, 'hello', None, None, None, None, None, 'world!')

>>> # Delete the created columns
>>> sheet.delete_cols(idx=3, amount=5)
>>> sheet.delete_cols(idx=1)
>>> print_rows()
('hello', 'world!')

>>> # Insert a new row in the beginning
>>> sheet.insert_rows(idx=1)
>>> print_rows()
(None, None)
('hello', 'world!')

>>> # Insert 3 new rows in the beginning
>>> sheet.insert_rows(idx=1, amount=3)
>>> print_rows()
(None, None)
(None, None)
(None, None)
(None, None)
('hello', 'world!')

>>> # Delete the first 4 rows
>>> sheet.delete_rows(idx=1, amount=4)
>>> print_rows()
('hello', 'world!')
The only thing you need to remember is that when inserting new data (rows or columns), the insertion happens before the idx parameter.
So, if you do insert_rows(1), it inserts a new row before the existing first row.
It’s the same for columns: when you call insert_cols(2), it inserts a new column right before the already existing second column (B).
However, when deleting rows or columns, .delete_... deletes data starting from the index passed as an argument.
For example, when doing delete_rows(2) it deletes row 2, and when doing delete_cols(3) it deletes the third column (C).
Managing Sheets
Sheet management is also one of those things you might need to know, even though it might be something that you don’t use that often.
If you look back at the code examples from this tutorial, you’ll notice the following recurring piece of code:
This is the way to select the default sheet from a spreadsheet. However, if you’re opening a spreadsheet with multiple sheets, then you can always select a specific one like this:
>>>
>>> # Let's say you have two sheets: "Products" and "Company Sales"
>>> workbook.sheetnames
['Products', 'Company Sales']

>>> # You can select a sheet using its title
>>> products_sheet = workbook["Products"]
>>> sales_sheet = workbook["Company Sales"]
You can also change a sheet title very easily:
>>>
>>> workbook.sheetnames
['Products', 'Company Sales']

>>> products_sheet = workbook["Products"]
>>> products_sheet.title = "New Products"

>>> workbook.sheetnames
['New Products', 'Company Sales']
If you want to create or delete sheets, then you can also do that with .create_sheet() and .remove():
>>>
>>> workbook.sheetnames
['Products', 'Company Sales']

>>> operations_sheet = workbook.create_sheet("Operations")
>>> workbook.sheetnames
['Products', 'Company Sales', 'Operations']

>>> # You can also define the position to create the sheet at
>>> hr_sheet = workbook.create_sheet("HR", 0)
>>> workbook.sheetnames
['HR', 'Products', 'Company Sales', 'Operations']

>>> # To remove them, just pass the sheet as an argument to the .remove()
>>> workbook.remove(operations_sheet)
>>> workbook.sheetnames
['HR', 'Products', 'Company Sales']

>>> workbook.remove(hr_sheet)
>>> workbook.sheetnames
['Products', 'Company Sales']
One other thing you can do is make duplicates of a sheet using copy_worksheet():
>>>
>>> workbook.sheetnames
['Products', 'Company Sales']

>>> products_sheet = workbook["Products"]
>>> workbook.copy_worksheet(products_sheet)
<Worksheet "Products Copy">

>>> workbook.sheetnames
['Products', 'Company Sales', 'Products Copy']
If you open your spreadsheet after saving the above code, you’ll notice that the sheet Products Copy is a duplicate of the sheet Products.
Freezing Rows and Columns
Something that you might want to do when working with big spreadsheets is to freeze a few rows or columns, so they remain visible when you scroll right or down.
Freezing data allows you to keep an eye on important rows or columns, regardless of where you scroll in the spreadsheet.
Again, openpyxl also has a way to accomplish this by using the worksheet freeze_panes attribute. For this example, go back to our sample.xlsx spreadsheet and try doing the following:
>>>
>>> workbook = load_workbook(filename="sample.xlsx")
>>> sheet = workbook.active
>>> sheet.freeze_panes = "C2"
>>> workbook.save("sample_frozen.xlsx")
If you open the sample_frozen.xlsx spreadsheet in your favorite spreadsheet editor, you’ll notice that row 1 and columns A and B are frozen and are always visible no matter where you navigate within the spreadsheet.
This feature is handy, for example, to keep headers within sight, so you always know what each column represents.
Here’s how it looks in the editor:
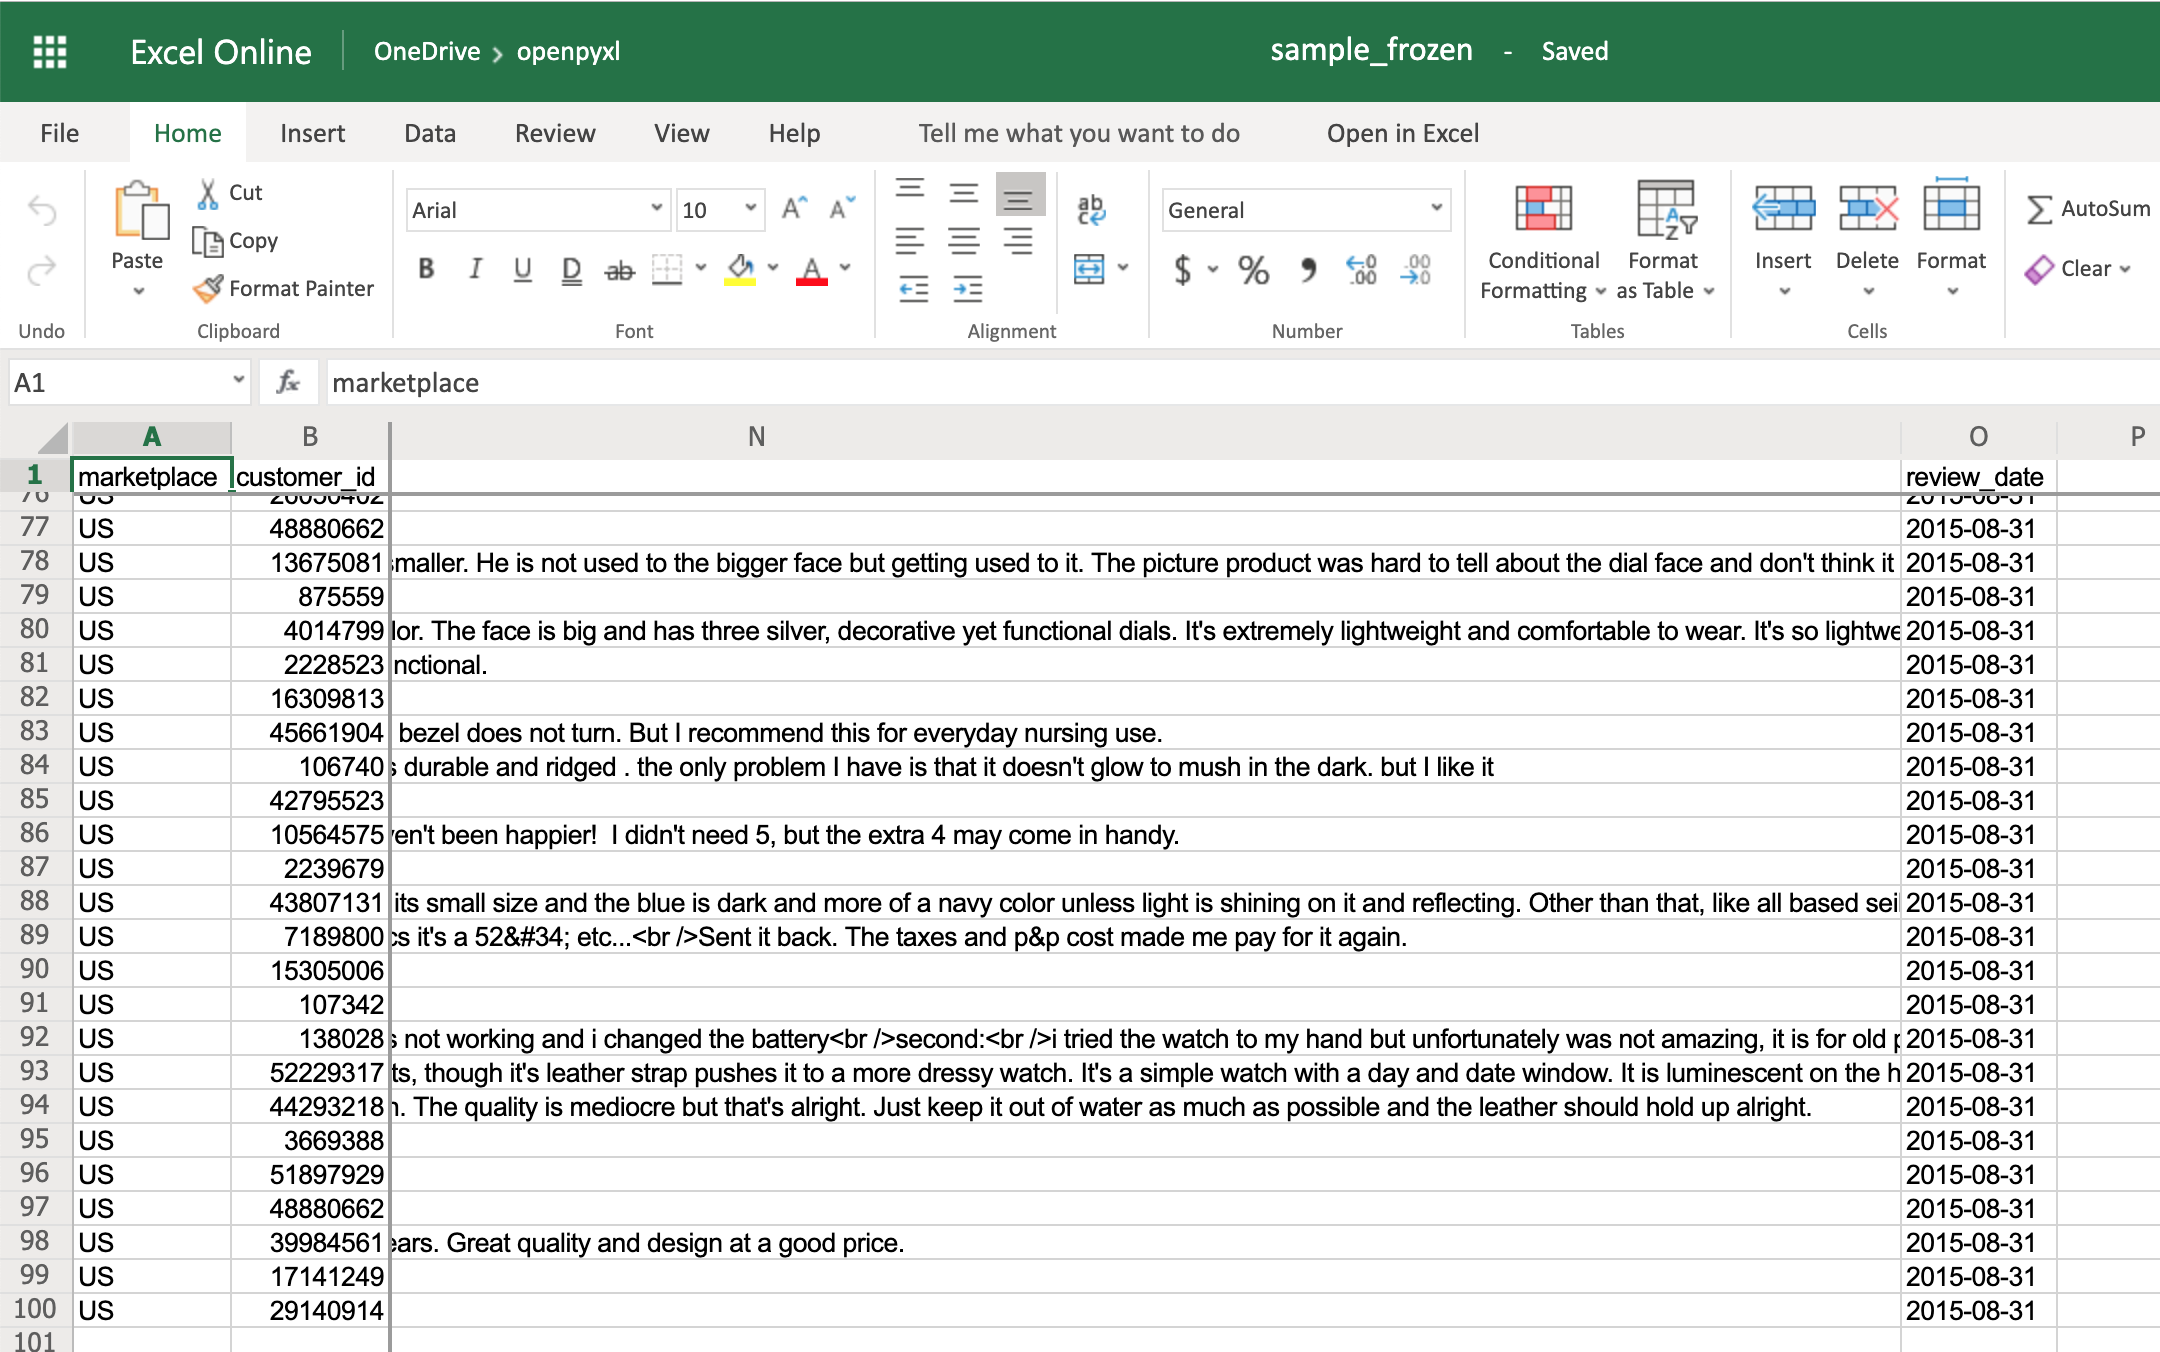
Notice how you’re at the end of the spreadsheet, and yet, you can see both row 1 and columns A and B.
Adding Filters
You can use openpyxl to add filters and sorts to your spreadsheet. However, when you open the spreadsheet, the data won’t be rearranged according to these sorts and filters.
At first, this might seem like a pretty useless feature, but when you’re programmatically creating a spreadsheet that is going to be sent and used by somebody else, it’s still nice to at least create the filters and allow people to use it afterward.
The code below is an example of how you would add some filters to our existing sample.xlsx spreadsheet:
>>>
>>> # Check the used spreadsheet space using the attribute "dimensions"
>>> sheet.dimensions
'A1:O100'
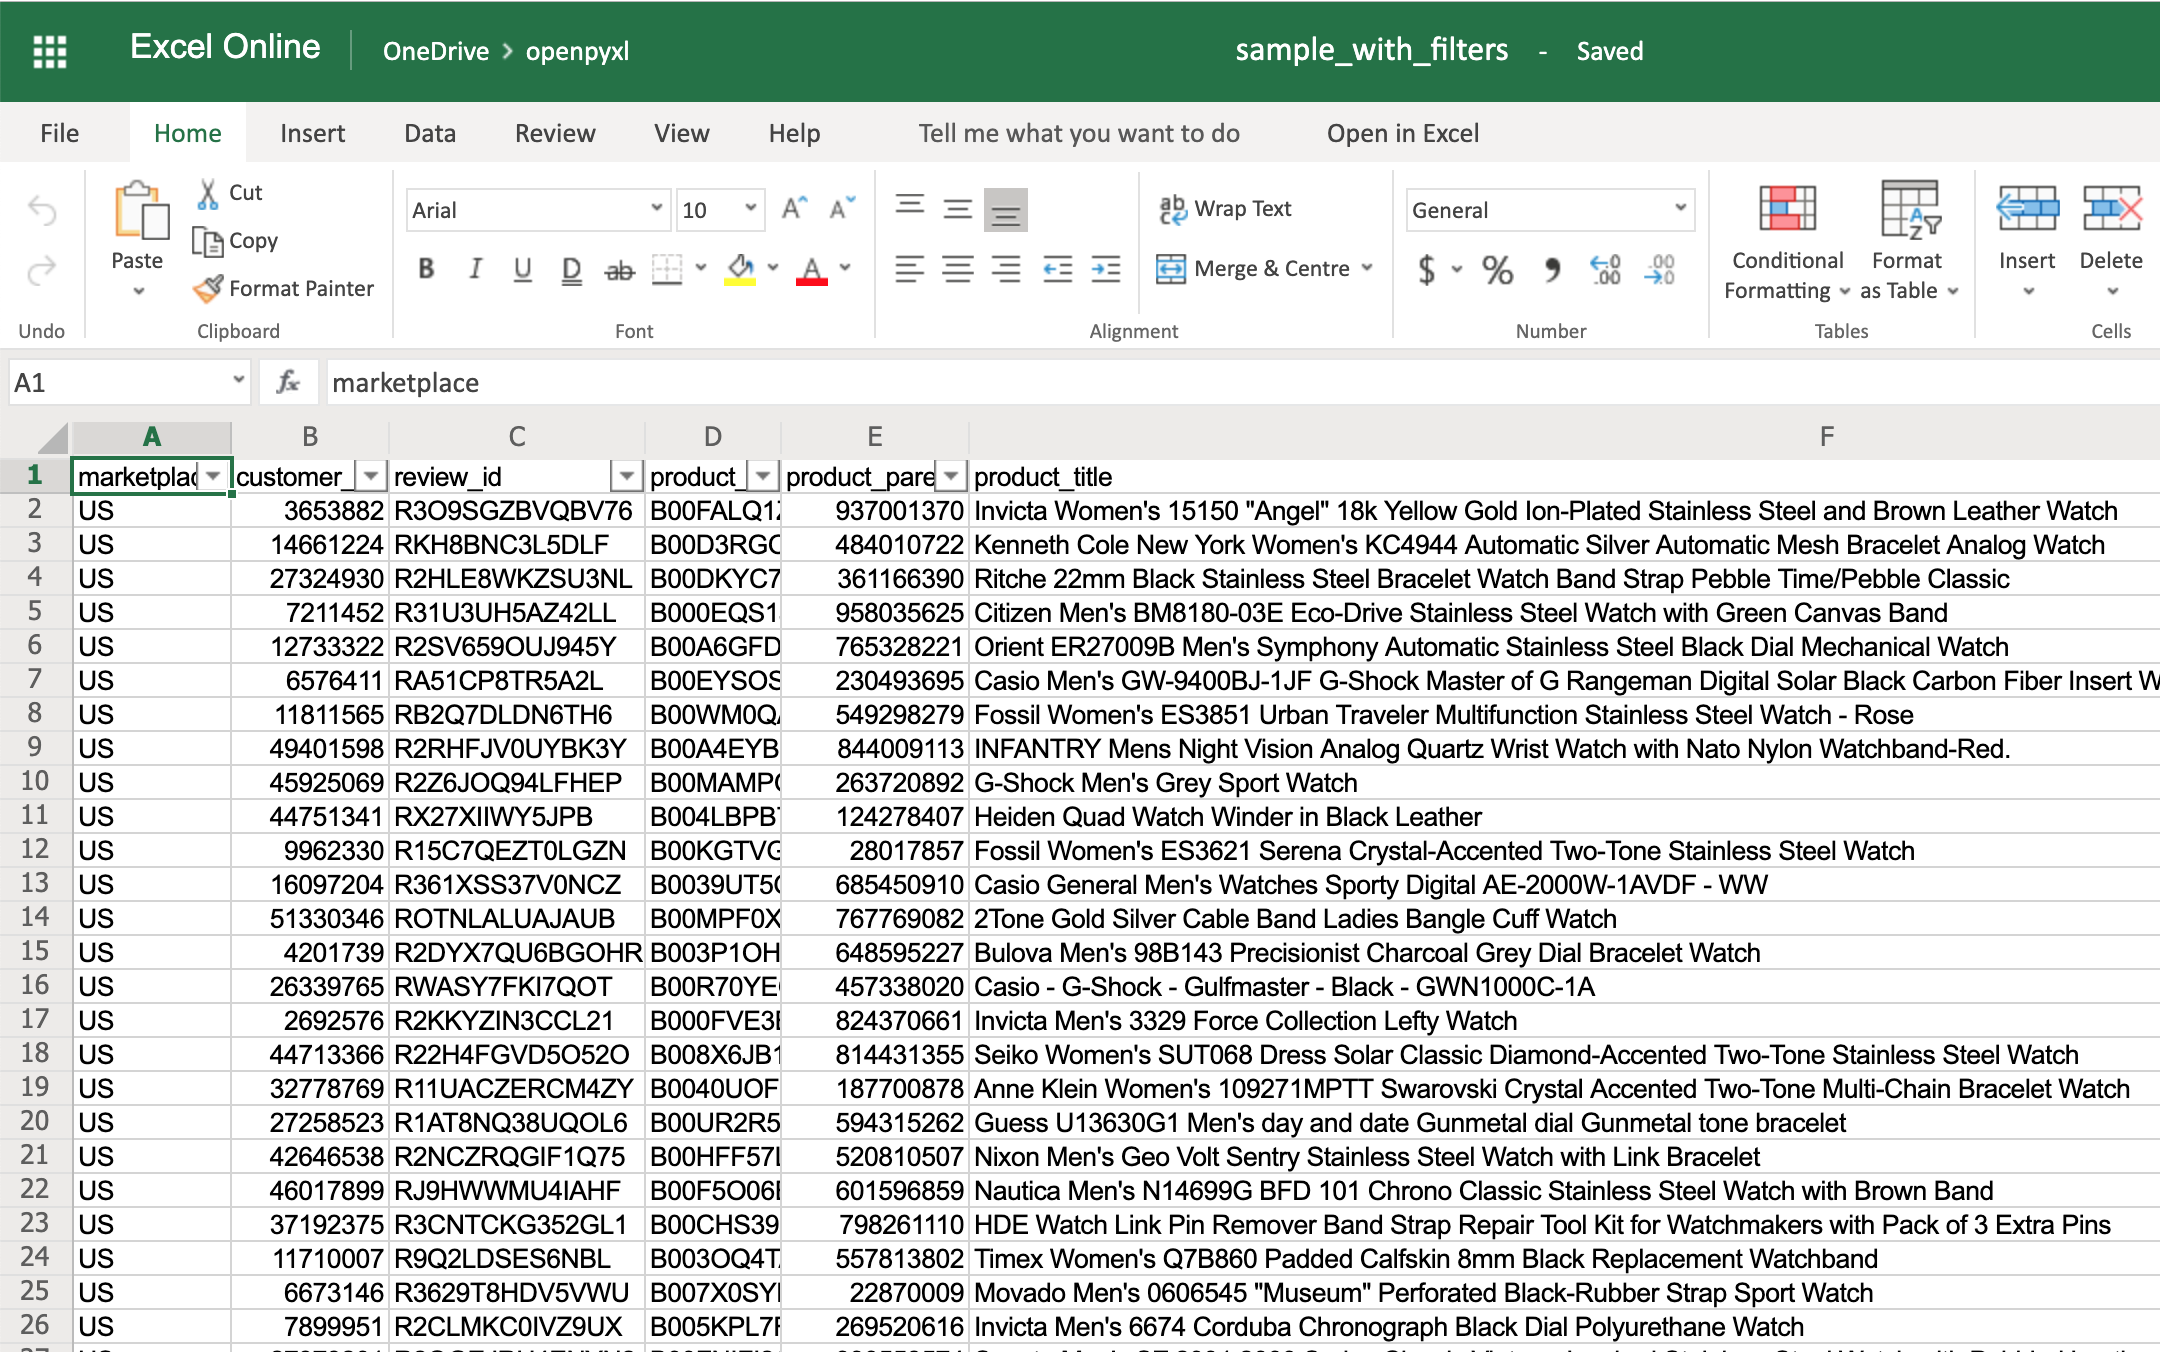
>>> sheet.auto_filter.ref = "A1:O100"
>>> workbook.save(filename="sample_with_filters.xlsx")
You should now see the filters created when opening the spreadsheet in your editor:
You don’t have to use sheet.dimensions if you know precisely which part of the spreadsheet you want to apply filters to.
Adding Formulas
Formulas (or formulae) are one of the most powerful features of spreadsheets.
They gives you the power to apply specific mathematical equations to a range of cells. Using formulas with openpyxl is as simple as editing the value of a cell.
You can see the list of formulas supported by openpyxl:
>>>
>>> from openpyxl.utils import FORMULAE
>>> FORMULAE
frozenset({'ABS',
           'ACCRINT',
           'ACCRINTM',
           'ACOS',
           'ACOSH',
           'AMORDEGRC',
           'AMORLINC',
           'AND',
           ...
           'YEARFRAC',
           'YIELD',
           'YIELDDISC',
           'YIELDMAT',
           'ZTEST'})
Let’s add some formulas to our sample.xlsx spreadsheet.
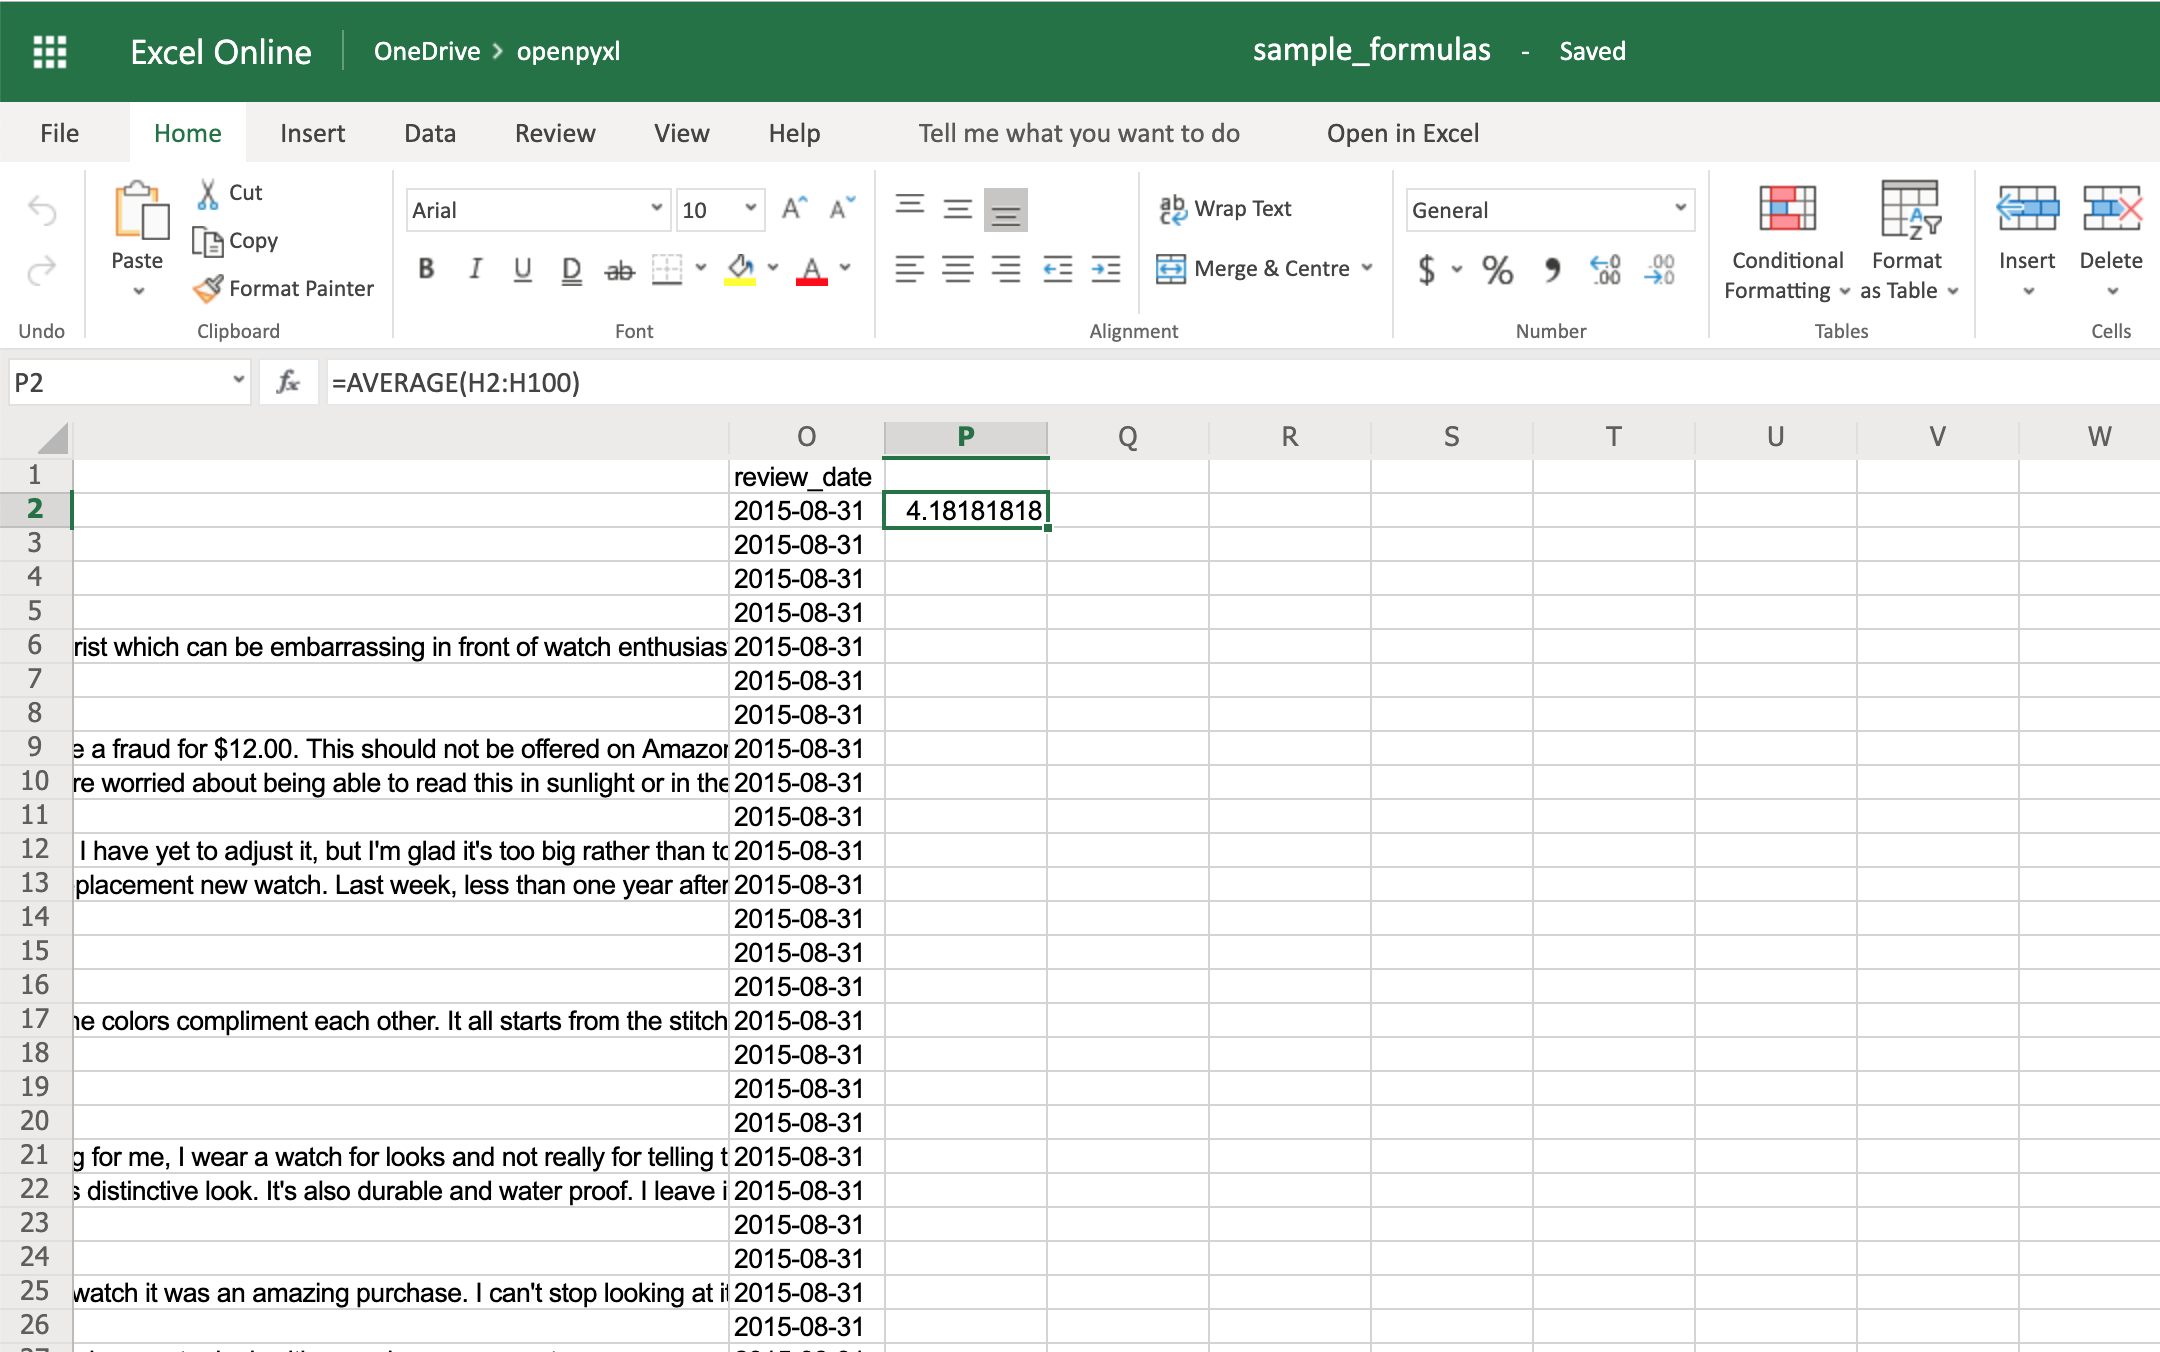
Starting with something easy, let’s check the average star rating for the 99 reviews within the spreadsheet:
>>>
>>> # Star rating is column "H"
>>> sheet["P2"] = "=AVERAGE(H2:H100)"
>>> workbook.save(filename="sample_formulas.xlsx")
If you open the spreadsheet now and go to cell P2, you should see that its value is: 4.18181818181818. Have a look in the editor:
You can use the same methodology to add any formulas to your spreadsheet. For example, let’s count the number of reviews that had helpful votes:
>>>
>>> # The helpful votes are counted on column "I"
>>> sheet["P3"] = '=COUNTIF(I2:I100, ">0")'
>>> workbook.save(filename="sample_formulas.xlsx")
You should get the number 21 on your P3 spreadsheet cell like so:
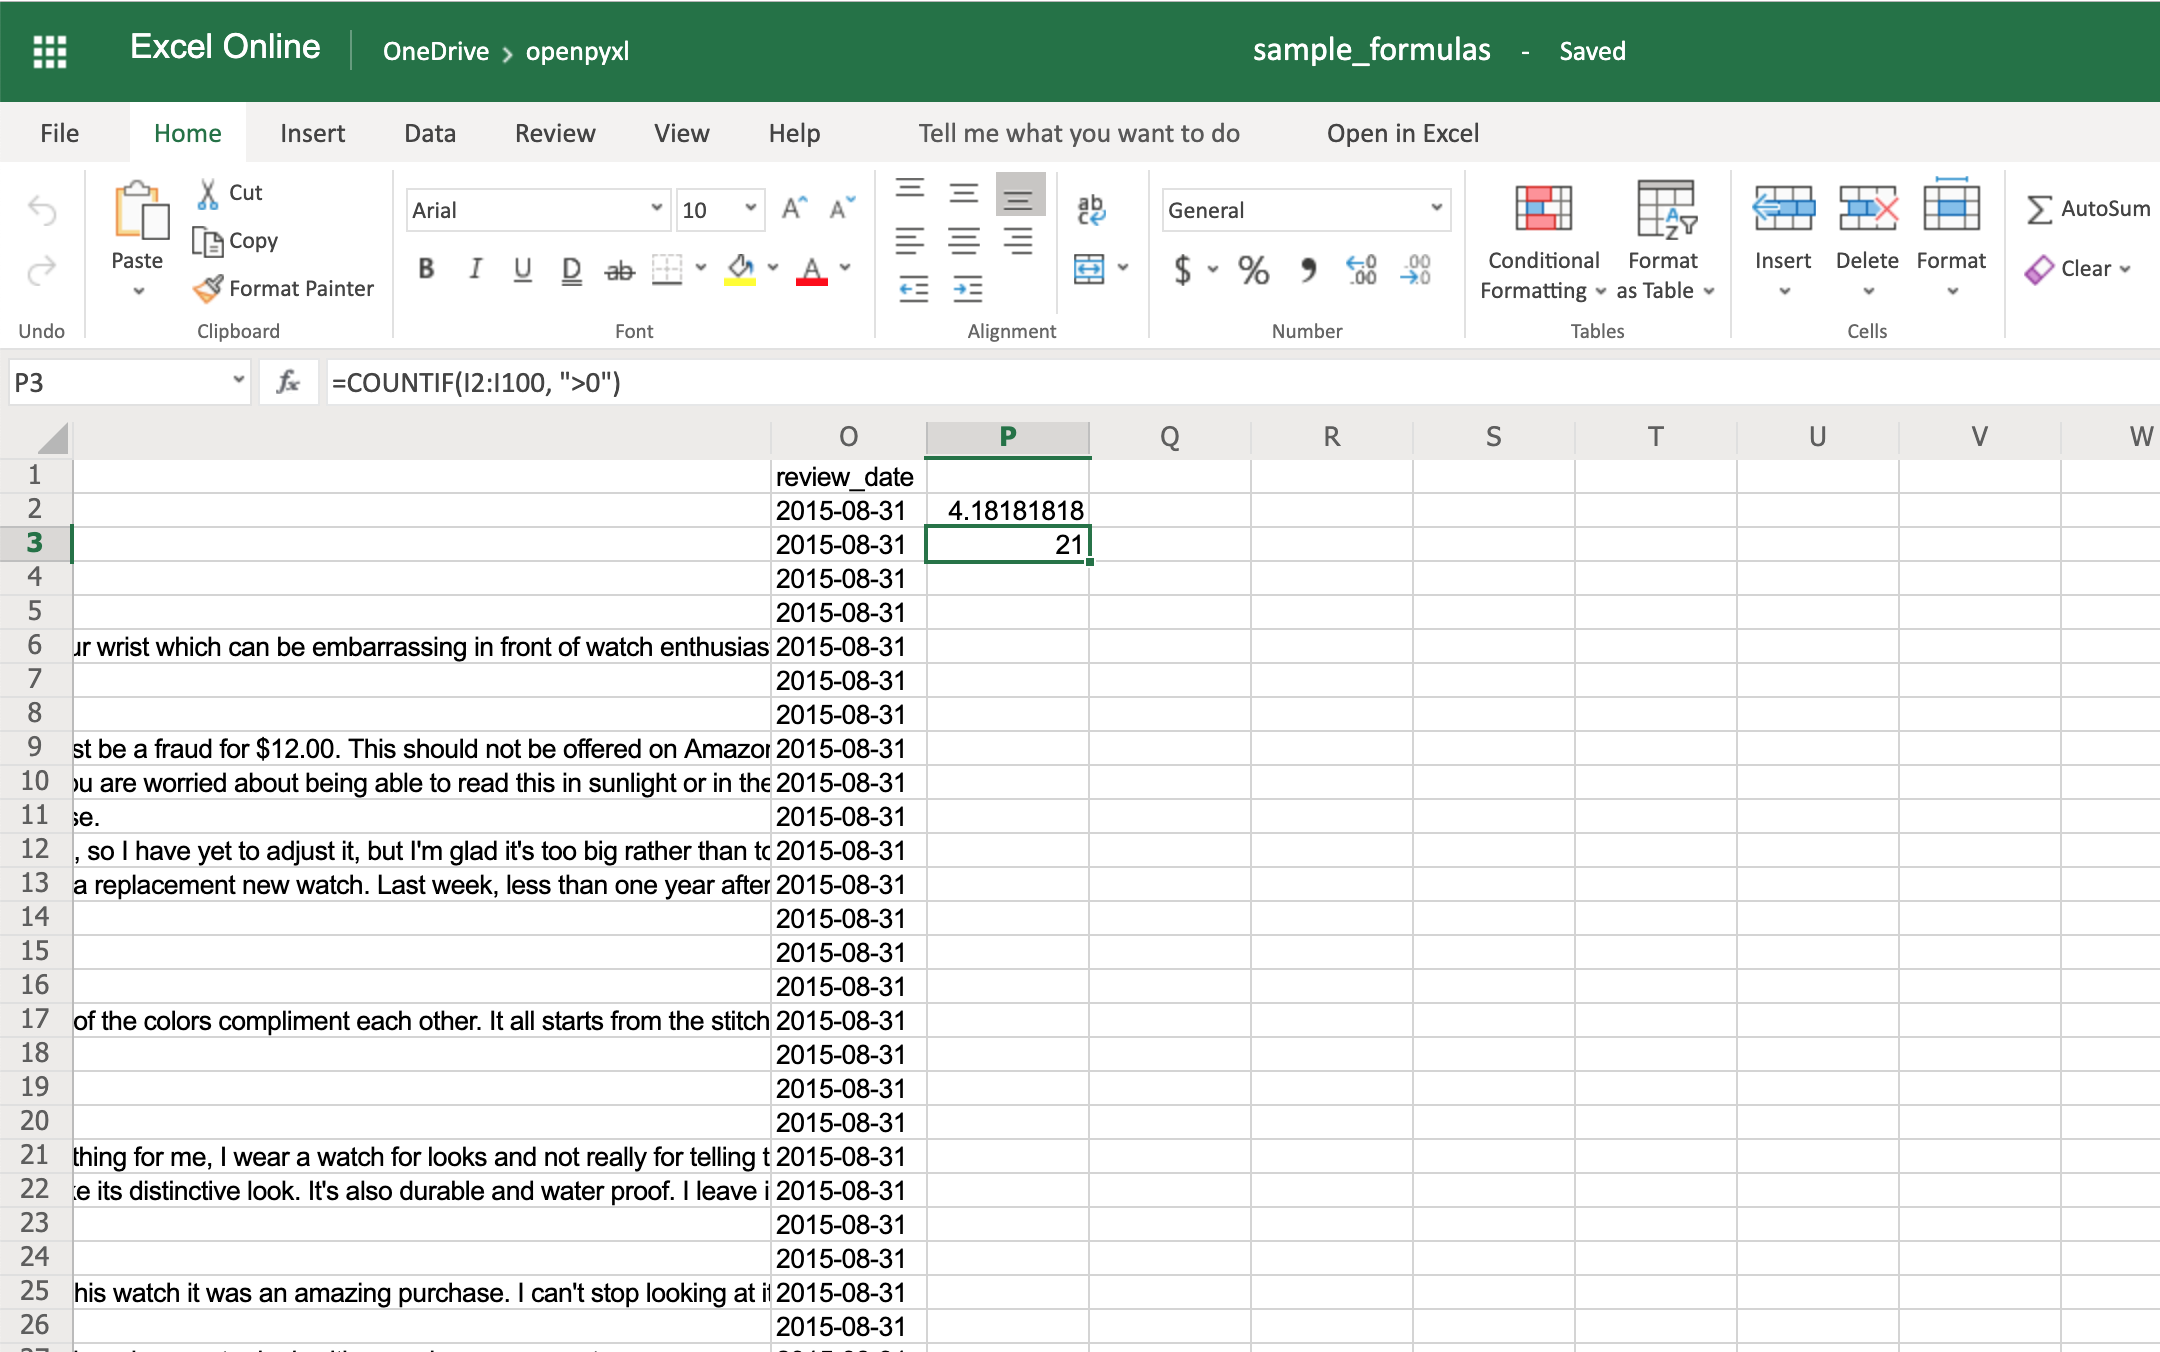
You’ll have to make sure that the strings within a formula are always in double quotes, so you either have to use single quotes around the formula like in the example above or you’ll have to escape the double quotes inside the formula: "=COUNTIF(I2:I100, ">0")".
There are a ton of other formulas you can add to your spreadsheet using the same procedure you tried above. Give it a go yourself!
Adding Styles
Even though styling a spreadsheet might not be something you would do every day, it’s still good to know how to do it.
Using openpyxl, you can apply multiple styling options to your spreadsheet, including fonts, borders, colors, and so on. Have a look at the openpyxl documentation to learn more.
You can also choose to either apply a style directly to a cell or create a template and reuse it to apply styles to multiple cells.
Let’s start by having a look at simple cell styling, using our sample.xlsx again as the base spreadsheet:
>>>
>>> # Import necessary style classes
>>> from openpyxl.styles import Font, Color, Alignment, Border, Side

>>> # Create a few styles
>>> bold_font = Font(bold=True)
>>> big_red_text = Font(color="00FF0000", size=20)
>>> center_aligned_text = Alignment(horizontal="center")
>>> double_border_side = Side(border_style="double")
>>> square_border = Border(top=double_border_side,
...                        right=double_border_side,
...                        bottom=double_border_side,
...                        left=double_border_side)

>>> # Style some cells!
>>> sheet["A2"].font = bold_font
>>> sheet["A3"].font = big_red_text
>>> sheet["A4"].alignment = center_aligned_text
>>> sheet["A5"].border = square_border
>>> workbook.save(filename="sample_styles.xlsx")
If you open your spreadsheet now, you should see quite a few different styles on the first 5 cells of column A:
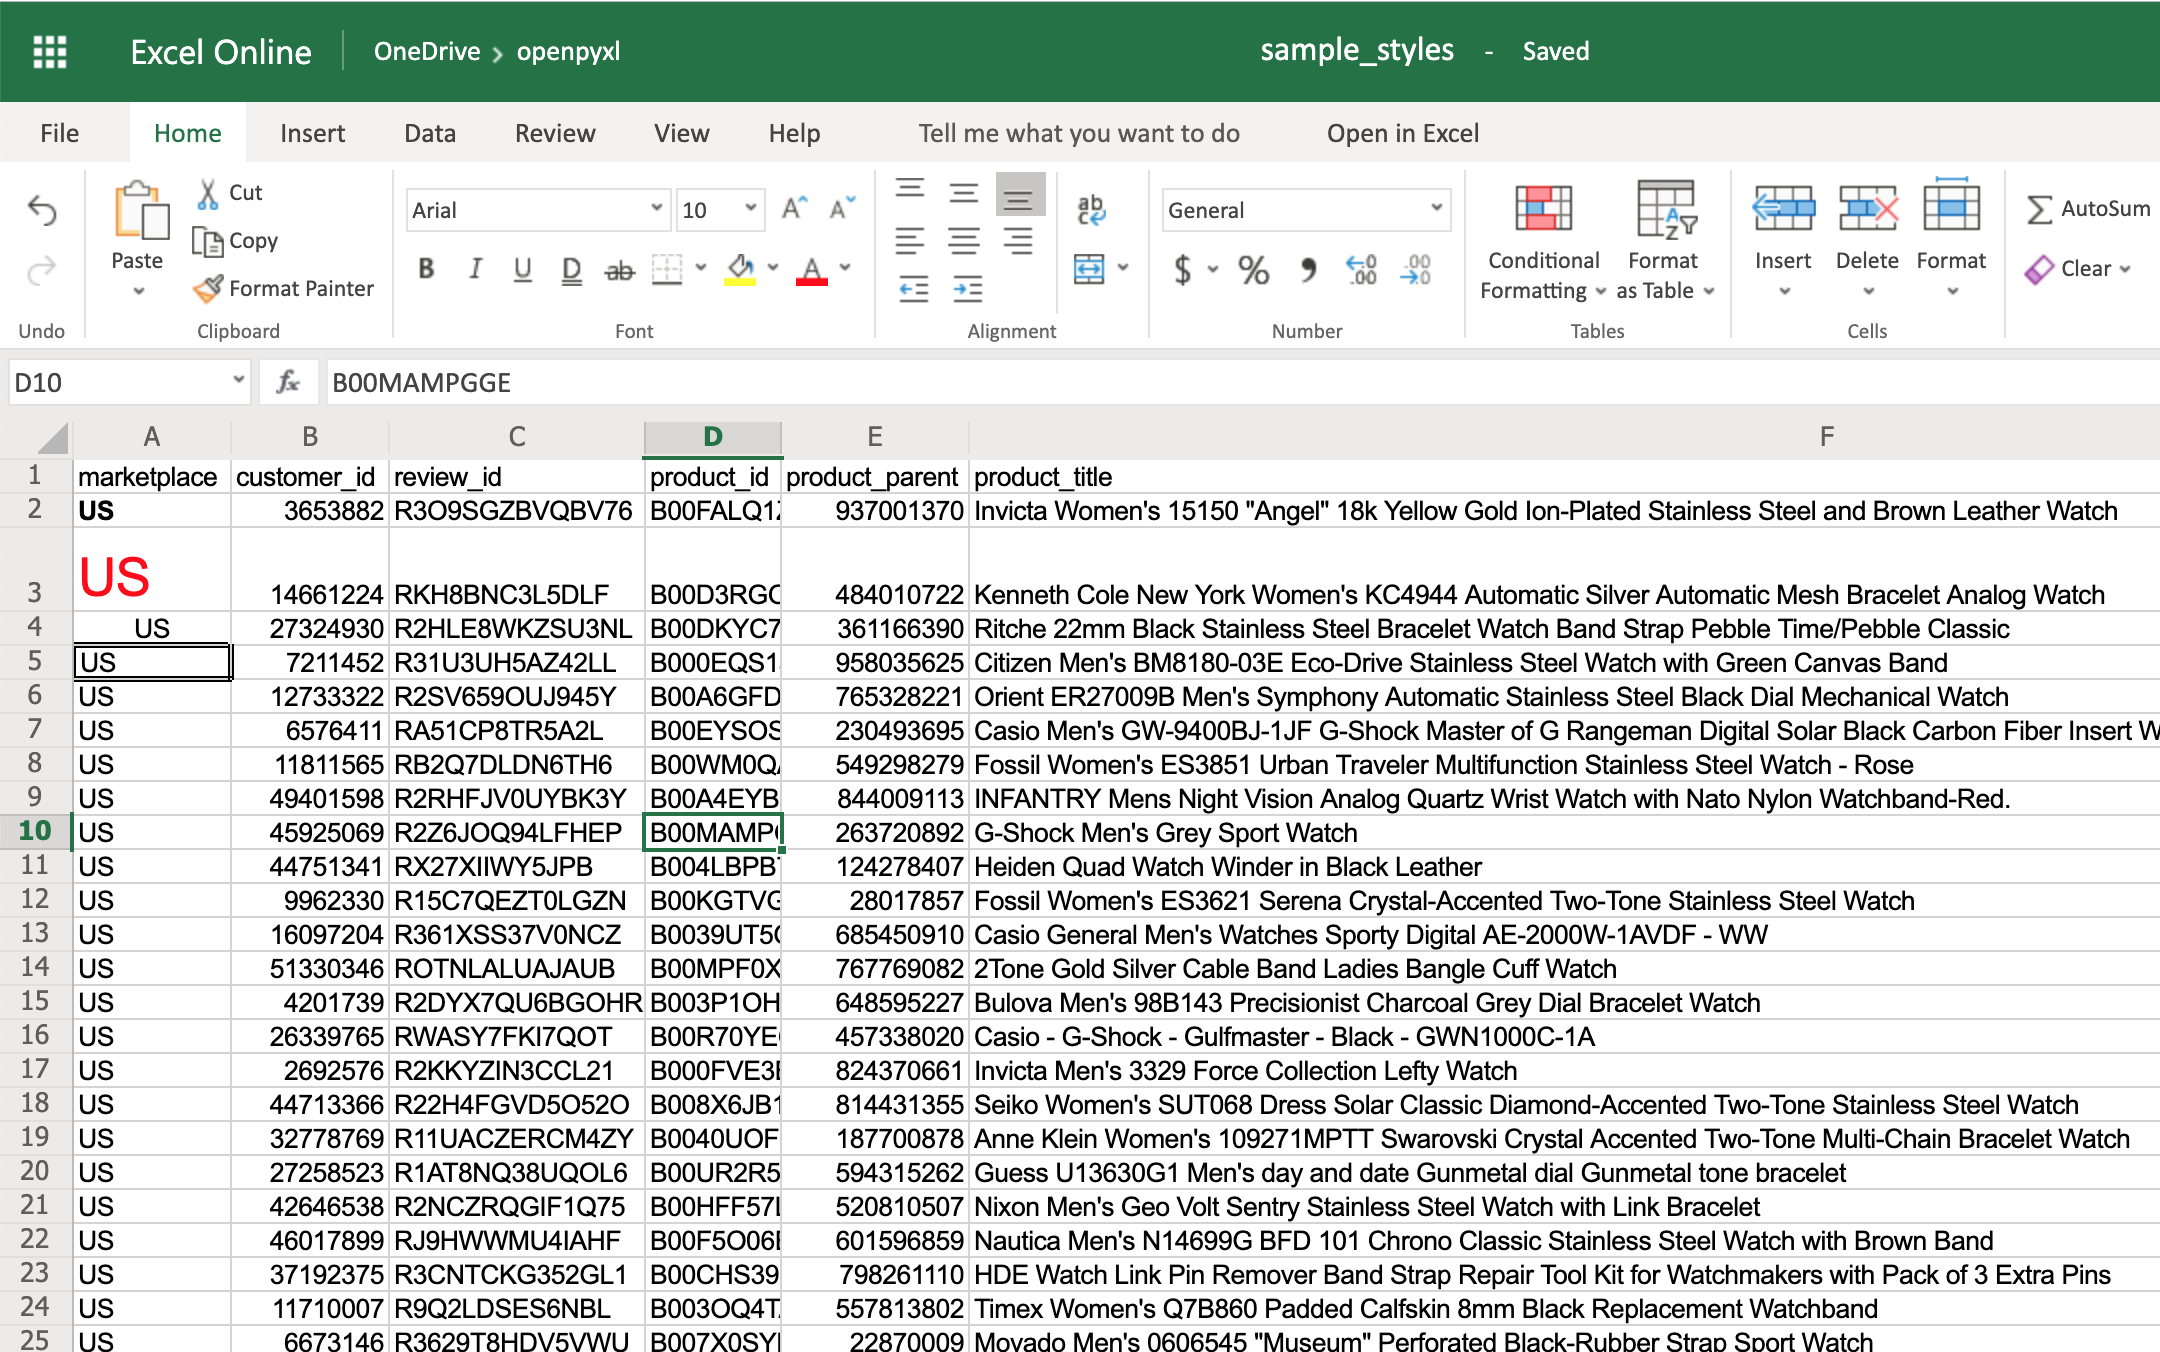
There you go. You got:
- A2 with the text in bold
- A3 with the text in red and bigger font size
- A4 with the text centered
- A5 with a square border around the text
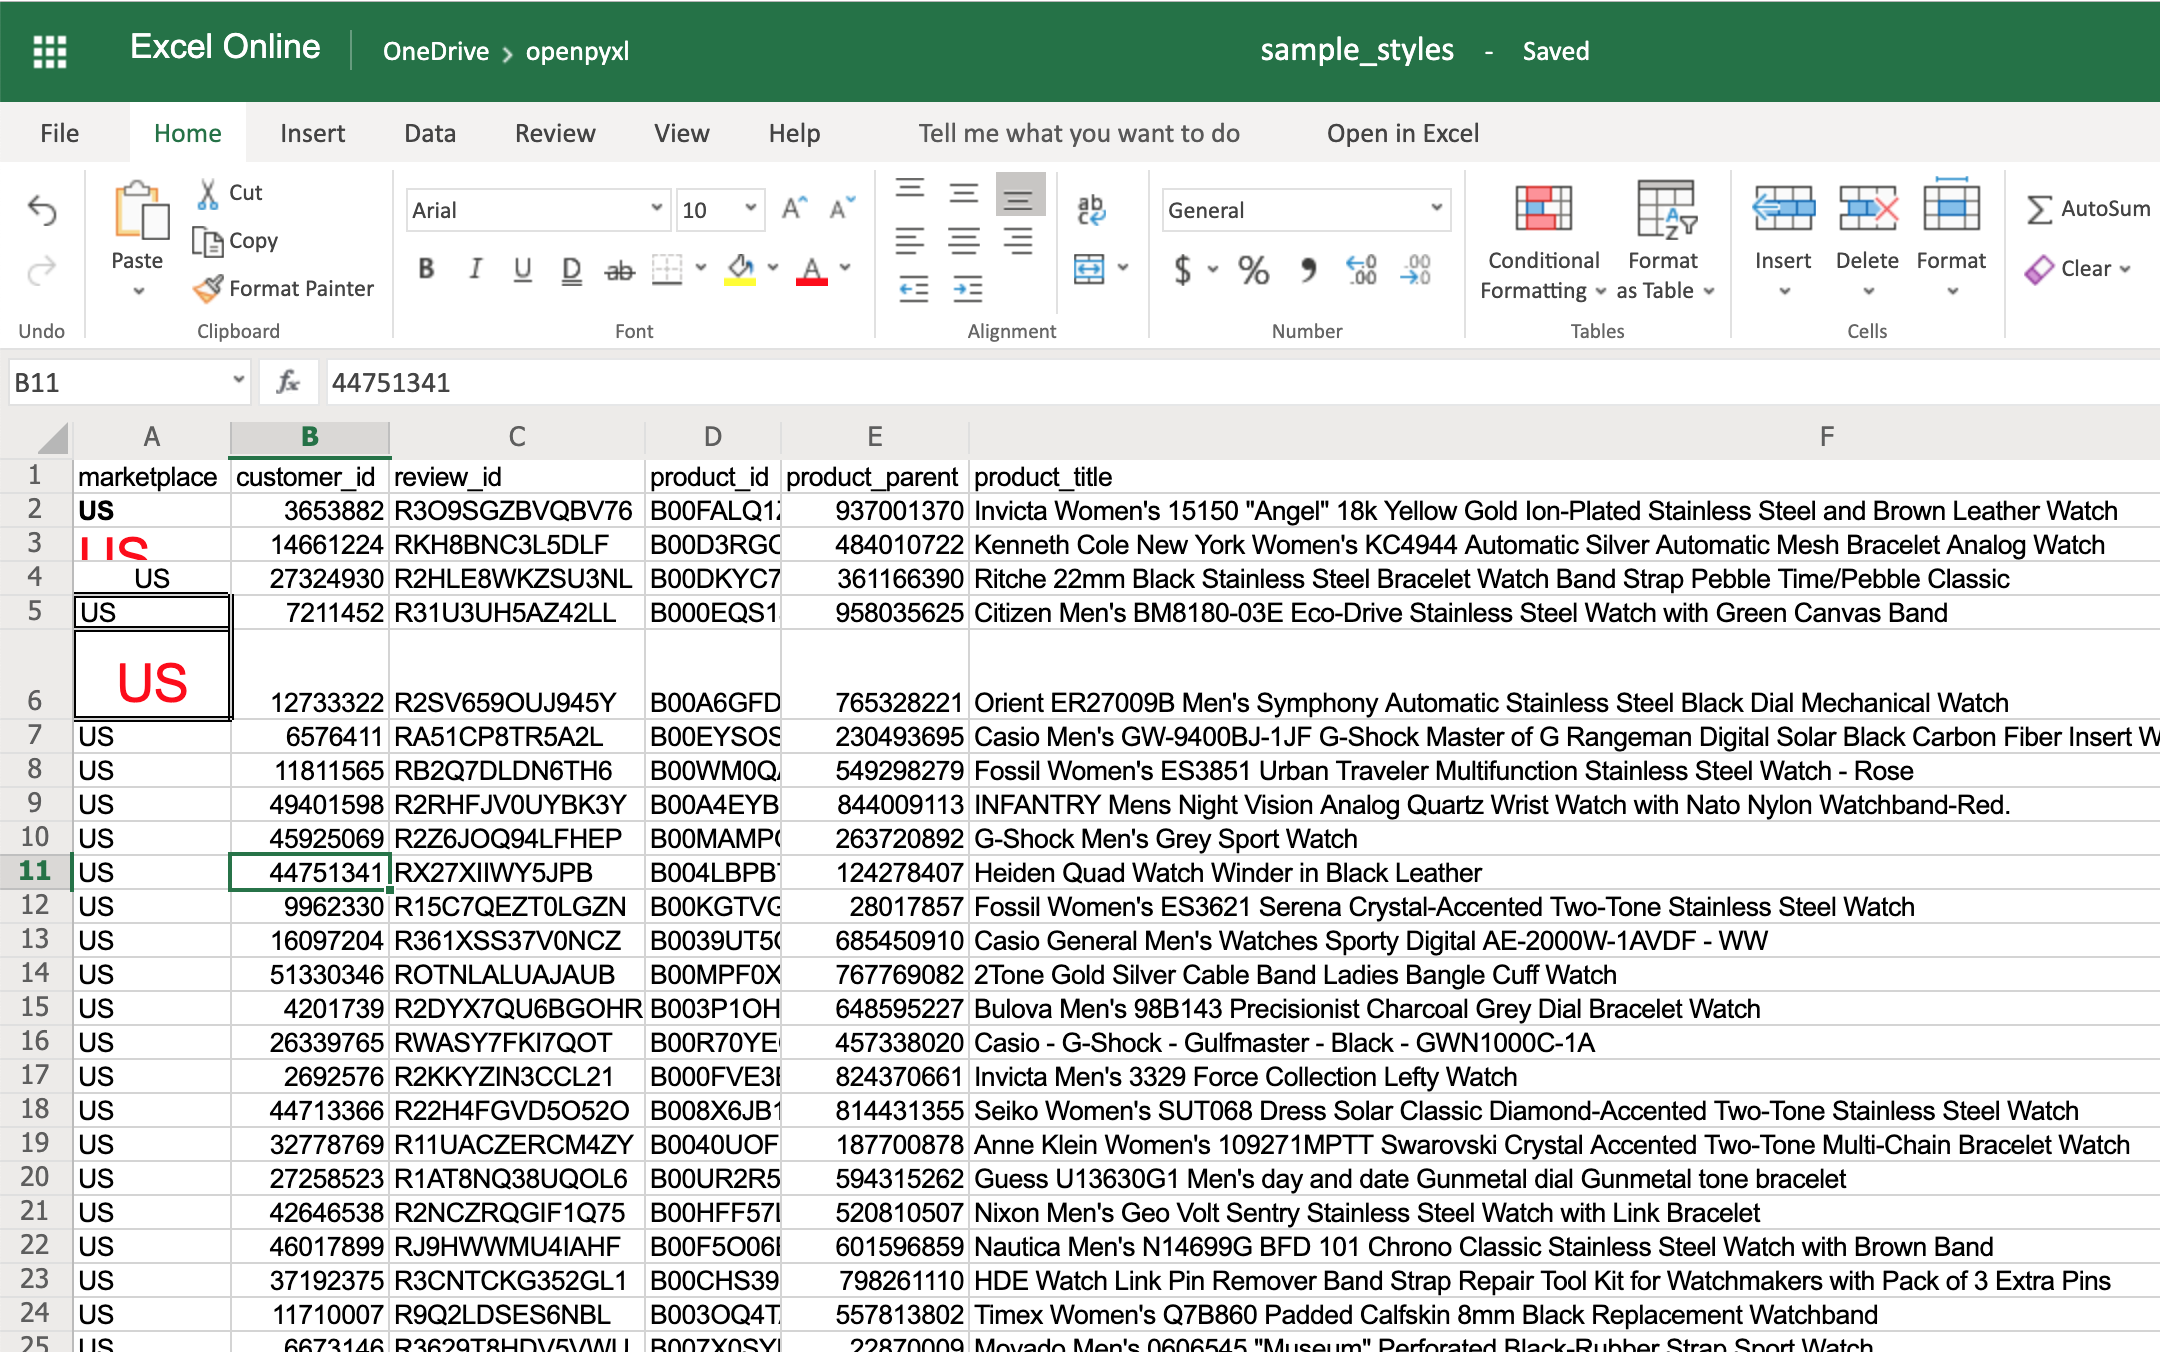
You can also combine styles by simply adding them to the cell at the same time:
>>>
>>> # Reusing the same styles from the example above
>>> sheet["A6"].alignment = center_aligned_text
>>> sheet["A6"].font = big_red_text
>>> sheet["A6"].border = square_border
>>> workbook.save(filename="sample_styles.xlsx")
Have a look at cell A6 here:
When you want to apply multiple styles to one or several cells, you can use a NamedStyle class instead, which is like a style template that you can use over and over again. Have a look at the example below:
>>>
>>> from openpyxl.styles import NamedStyle

>>> # Let's create a style template for the header row
>>> header = NamedStyle(name="header")
>>> header.font = Font(bold=True)
>>> header.border = Border(bottom=Side(border_style="thin"))
>>> header.alignment = Alignment(horizontal="center", vertical="center")

>>> # Now let's apply this to all first row (header) cells
>>> header_row = sheet[1]
>>> for cell in header_row:
...     cell.style = header

>>> workbook.save(filename="sample_styles.xlsx")
If you open the spreadsheet now, you should see that its first row is bold, the text is aligned to the center, and there’s a small bottom border! Have a look below:
As you saw above, there are many options when it comes to styling, and it depends on the use case, so feel free to check openpyxl documentation and see what other things you can do.
Conditional Formatting
This feature is one of my personal favorites when it comes to adding styles to a spreadsheet.
It’s a much more powerful approach to styling because it dynamically applies styles according to how the data in the spreadsheet changes.
In a nutshell, conditional formatting allows you to specify a list of styles to apply to a cell (or cell range) according to specific conditions.
For example, a widespread use case is to have a balance sheet where all the negative totals are in red, and the positive ones are in green. This formatting makes it much more efficient to spot good vs bad periods.
Without further ado, let’s pick our favorite spreadsheet—sample.xlsx—and add some conditional formatting.
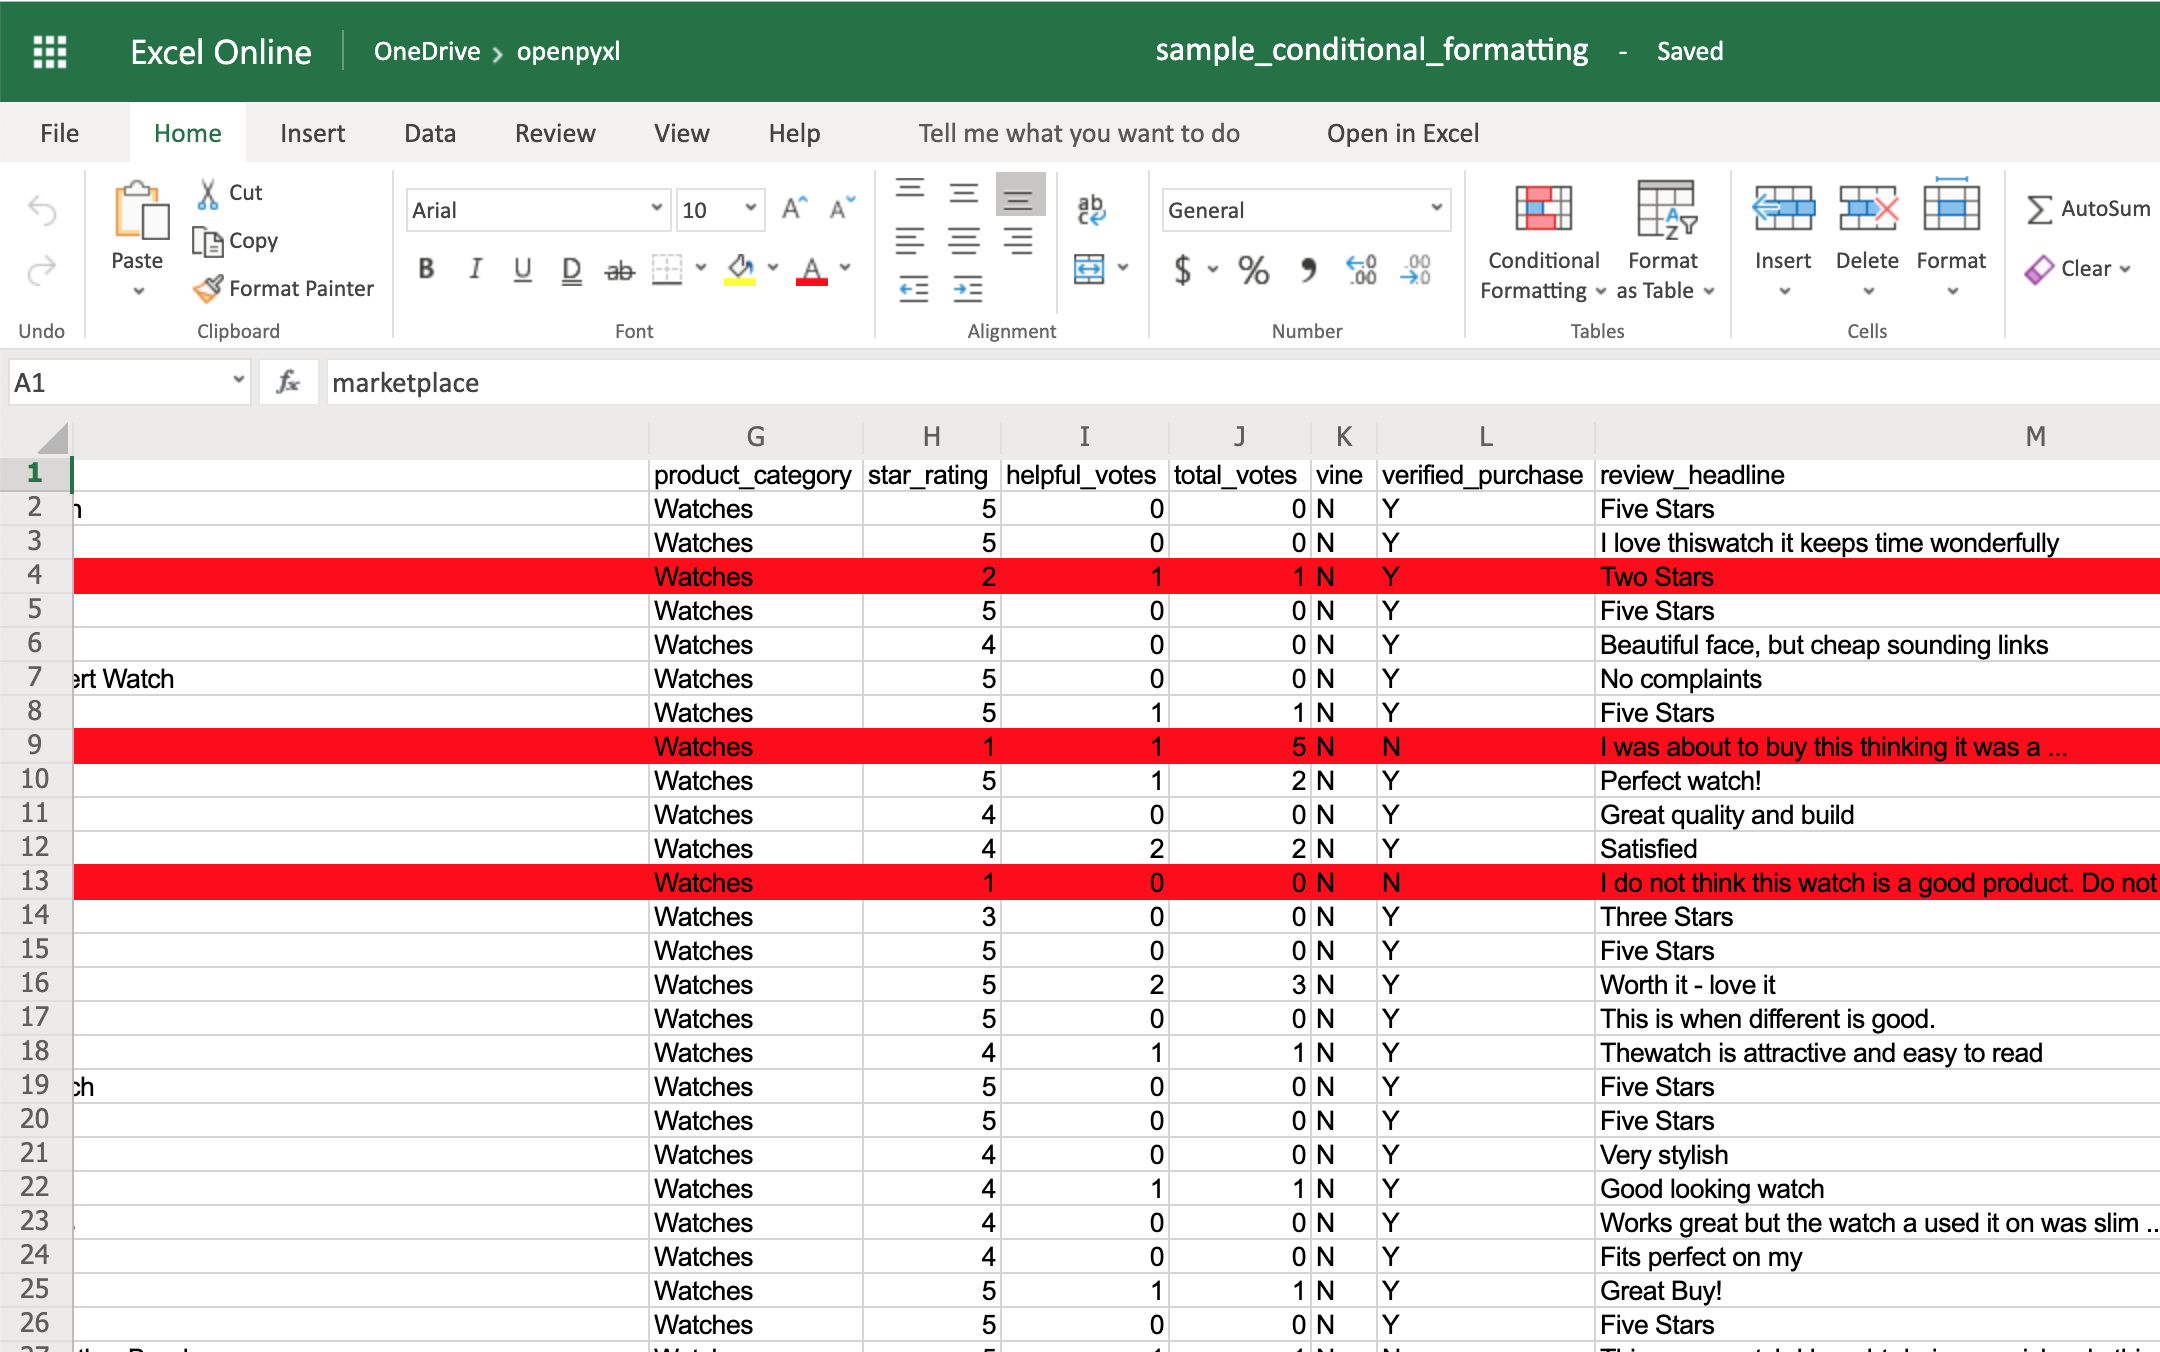
You can start by adding a simple one that adds a red background to all reviews with less than 3 stars:
>>>
>>> from openpyxl.styles import PatternFill
>>> from openpyxl.styles.differential import DifferentialStyle
>>> from openpyxl.formatting.rule import Rule

>>> red_background = PatternFill(fgColor="00FF0000")
>>> diff_style = DifferentialStyle(fill=red_background)
>>> rule = Rule(type="expression", dxf=diff_style)
>>> rule.formula = ["$H1<3"]
>>> sheet.conditional_formatting.add("A1:O100", rule)
>>> workbook.save("sample_conditional_formatting.xlsx")
Now you’ll see all the reviews with a star rating below 3 marked with a red background:
Code-wise, the only things that are new here are the objects DifferentialStyle and Rule:
DifferentialStyleis quite similar toNamedStyle, which you already saw above, and it’s used to aggregate multiple styles such as fonts, borders, alignment, and so forth.Ruleis responsible for selecting the cells and applying the styles if the cells match the rule’s logic.
Using a Rule object, you can create numerous conditional formatting scenarios.
However, for simplicity sake, the openpyxl package offers 3 built-in formats that make it easier to create a few common conditional formatting patterns. These built-ins are:
ColorScaleIconSetDataBar
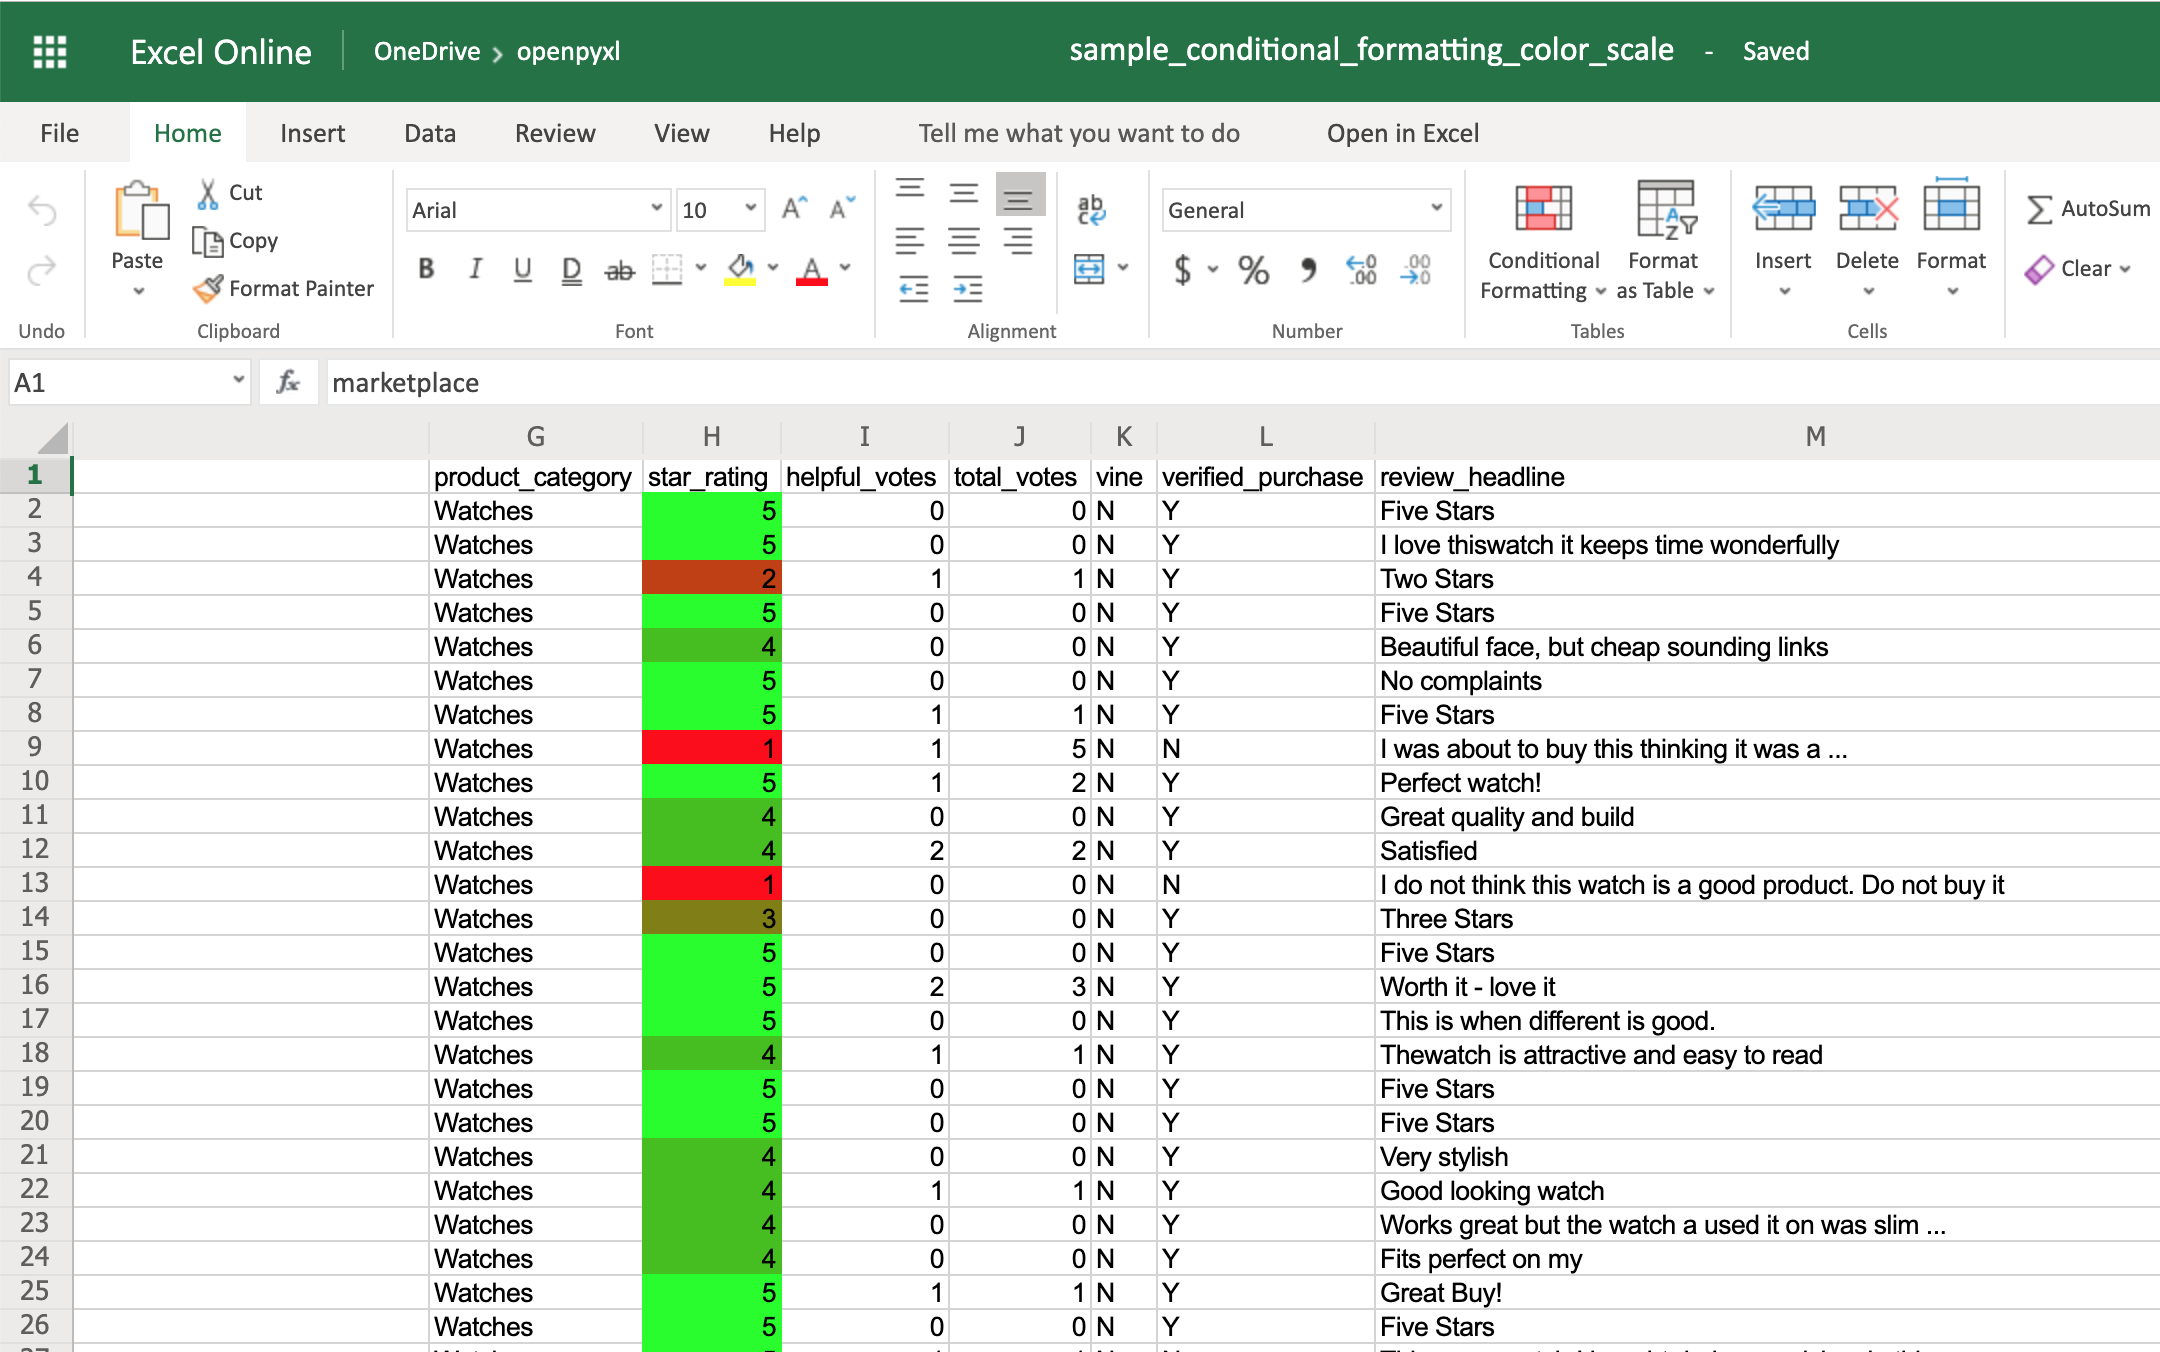
The ColorScale gives you the ability to create color gradients:
>>>
>>> from openpyxl.formatting.rule import ColorScaleRule
>>> color_scale_rule = ColorScaleRule(start_type="min",
...                                   start_color="00FF0000",  # Red
...                                   end_type="max",
...                                   end_color="0000FF00")  # Green

>>> # Again, let's add this gradient to the star ratings, column "H"
>>> sheet.conditional_formatting.add("H2:H100", color_scale_rule)
>>> workbook.save(filename="sample_conditional_formatting_color_scale.xlsx")
Now you should see a color gradient on column H, from red to green, according to the star rating:
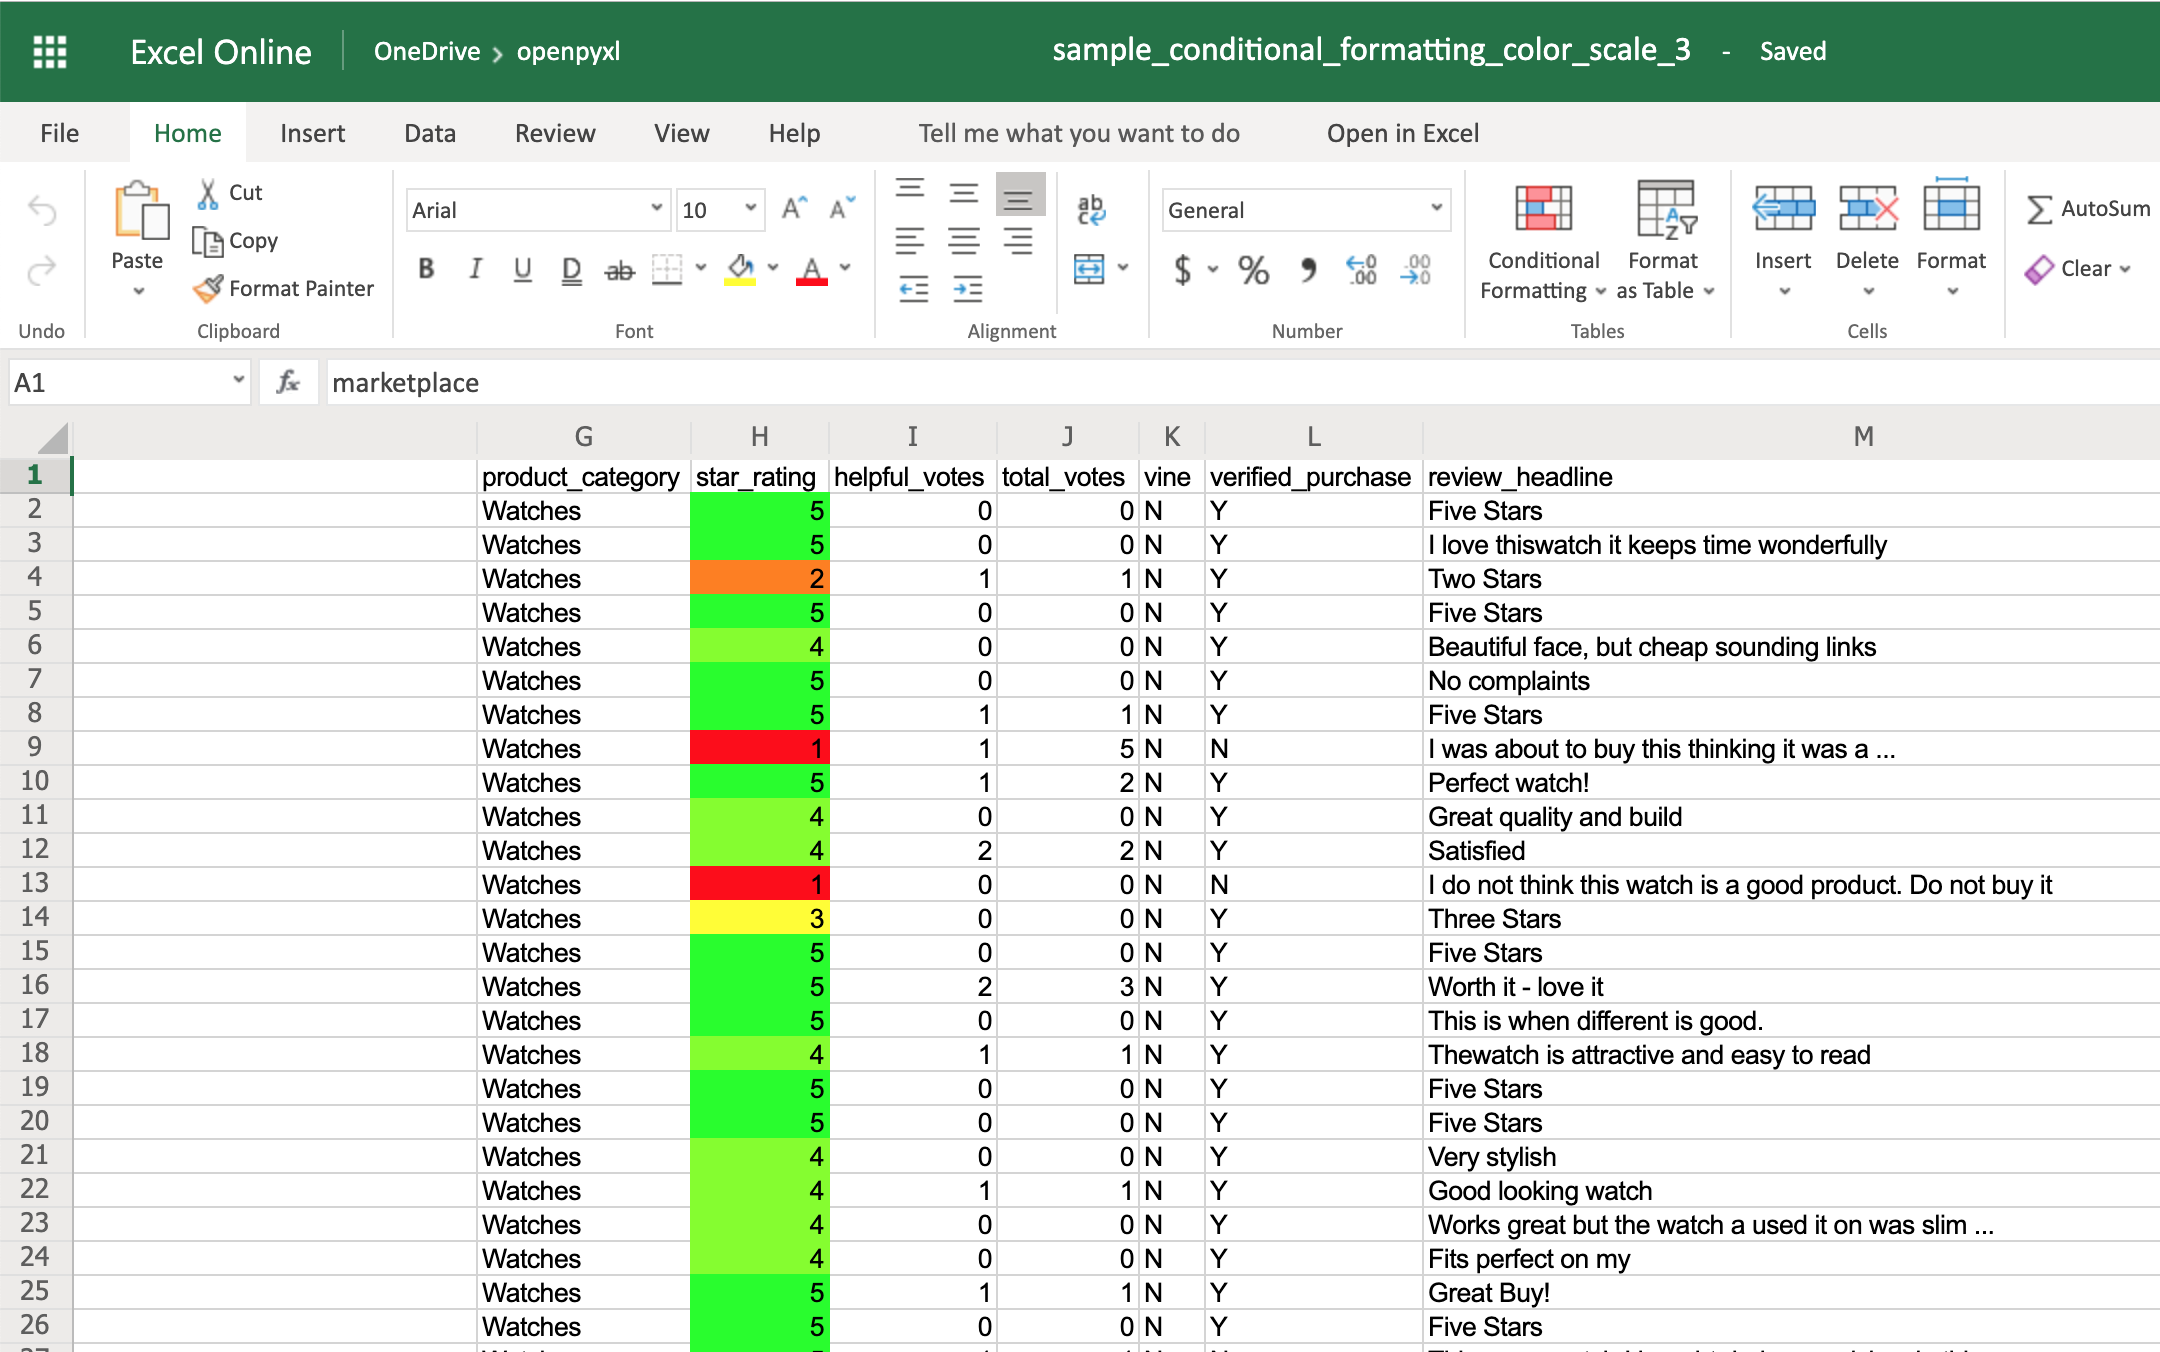
You can also add a third color and make two gradients instead:
>>>
>>> from openpyxl.formatting.rule import ColorScaleRule
>>> color_scale_rule = ColorScaleRule(start_type="num",
...                                   start_value=1,
...                                   start_color="00FF0000",  # Red
...                                   mid_type="num",
...                                   mid_value=3,
...                                   mid_color="00FFFF00",  # Yellow
...                                   end_type="num",
...                                   end_value=5,
...                                   end_color="0000FF00")  # Green

>>> # Again, let's add this gradient to the star ratings, column "H"
>>> sheet.conditional_formatting.add("H2:H100", color_scale_rule)
>>> workbook.save(filename="sample_conditional_formatting_color_scale_3.xlsx")
This time, you’ll notice that star ratings between 1 and 3 have a gradient from red to yellow, and star ratings between 3 and 5 have a gradient from yellow to green:
The IconSet allows you to add an icon to the cell according to its value:
>>>
>>> from openpyxl.formatting.rule import IconSetRule

>>> icon_set_rule = IconSetRule("5Arrows", "num", [1, 2, 3, 4, 5])
>>> sheet.conditional_formatting.add("H2:H100", icon_set_rule)
>>> workbook.save("sample_conditional_formatting_icon_set.xlsx")
You’ll see a colored arrow next to the star rating. This arrow is red and points down when the value of the cell is 1 and, as the rating gets better, the arrow starts pointing up and becomes green:
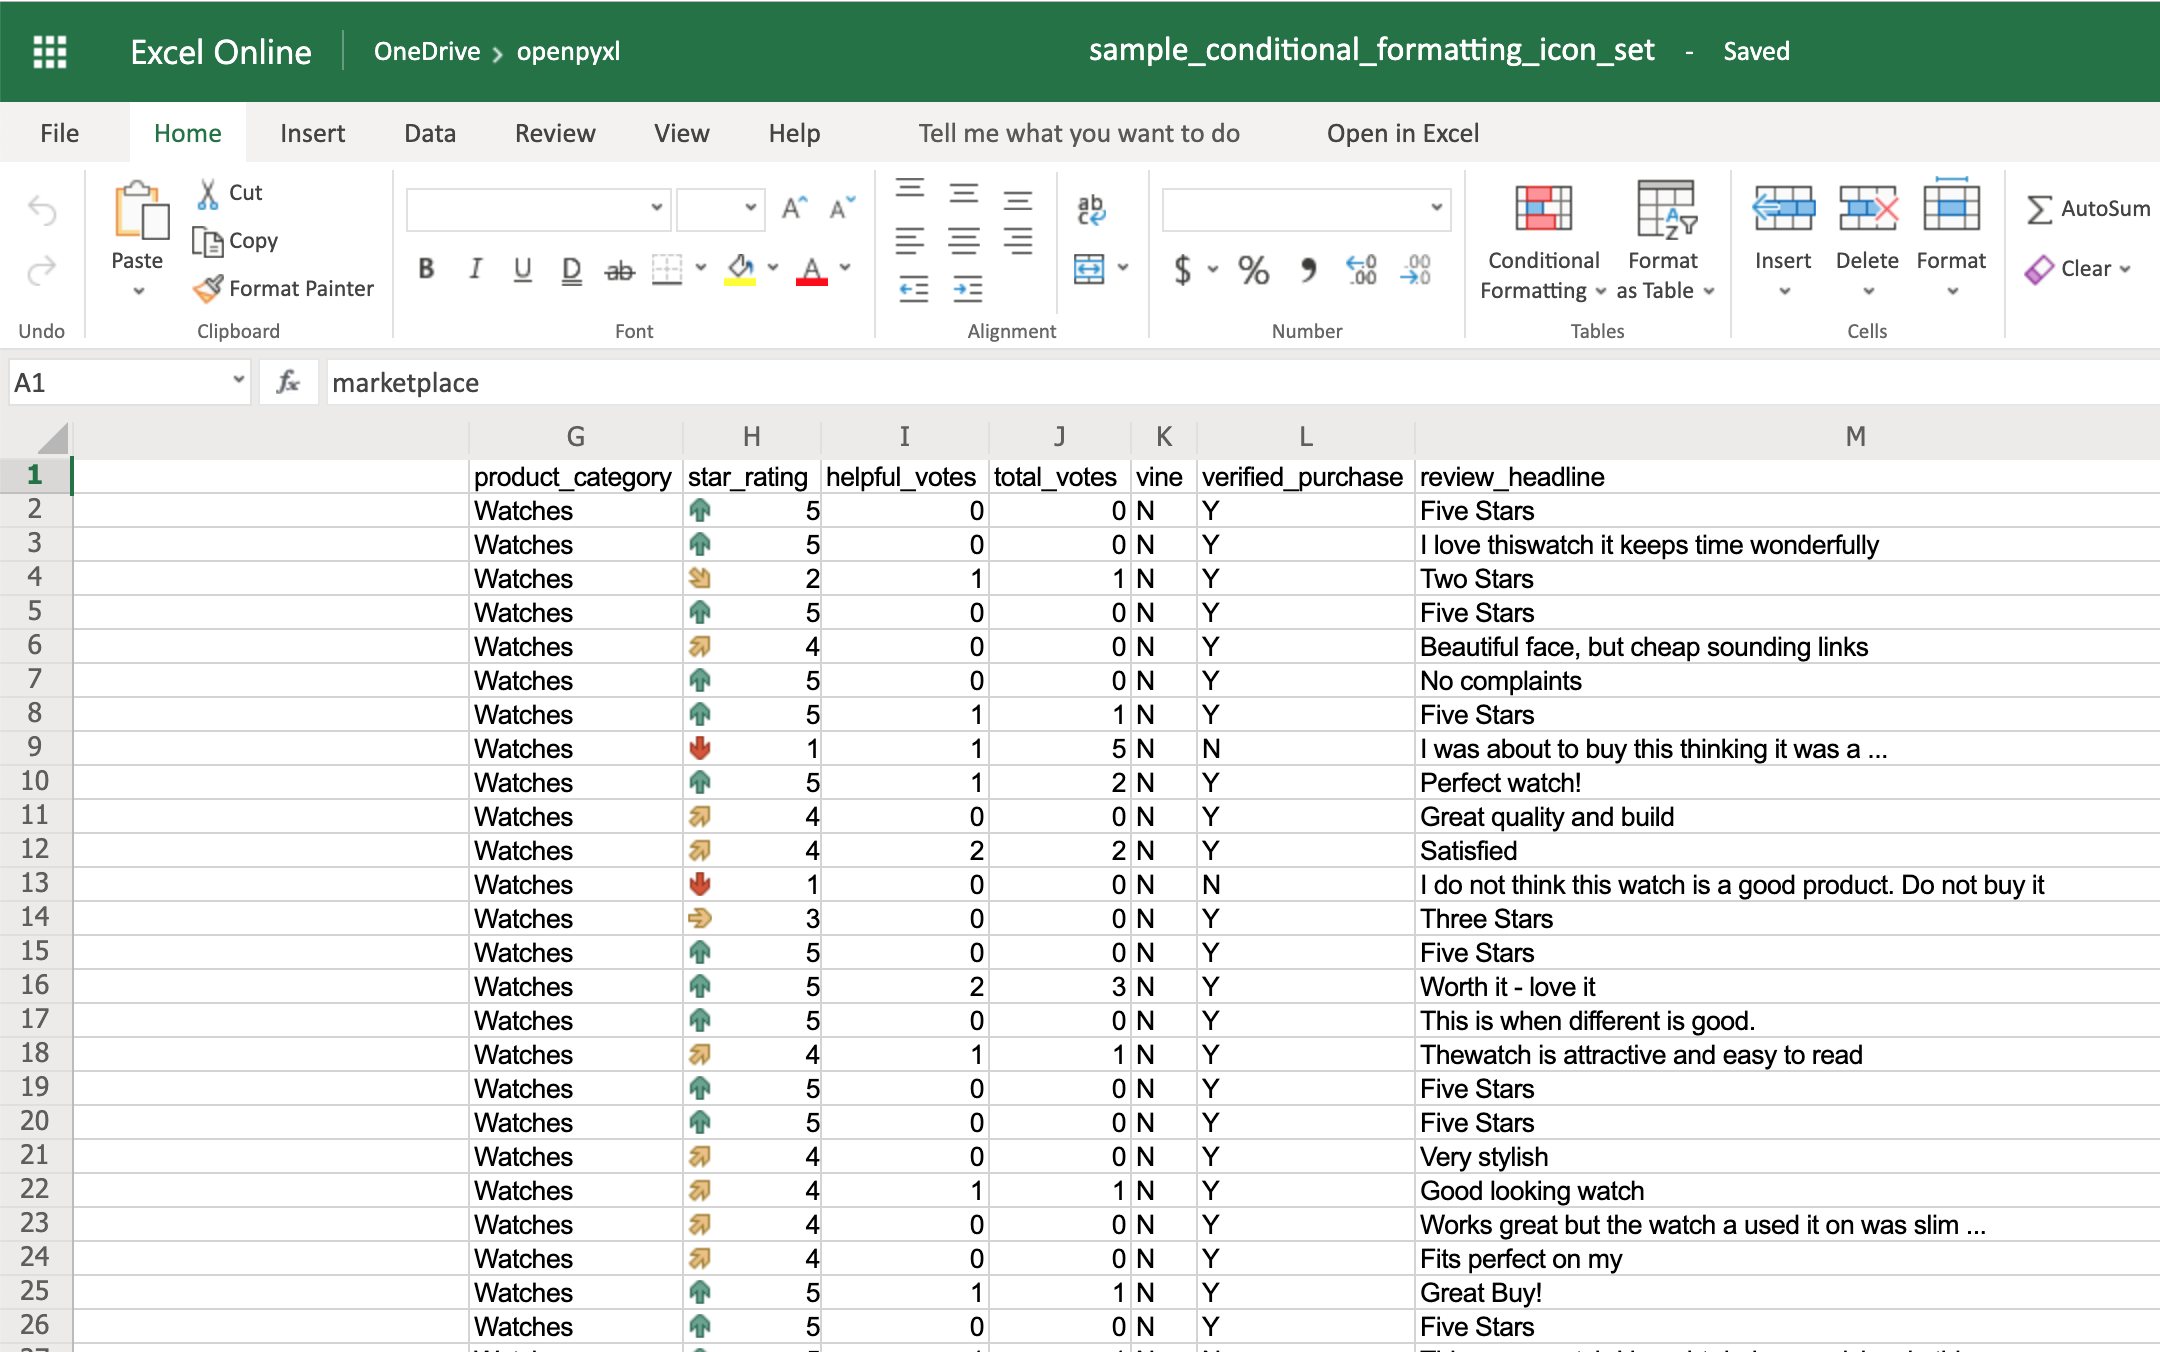
The openpyxl package has a full list of other icons you can use, besides the arrow.
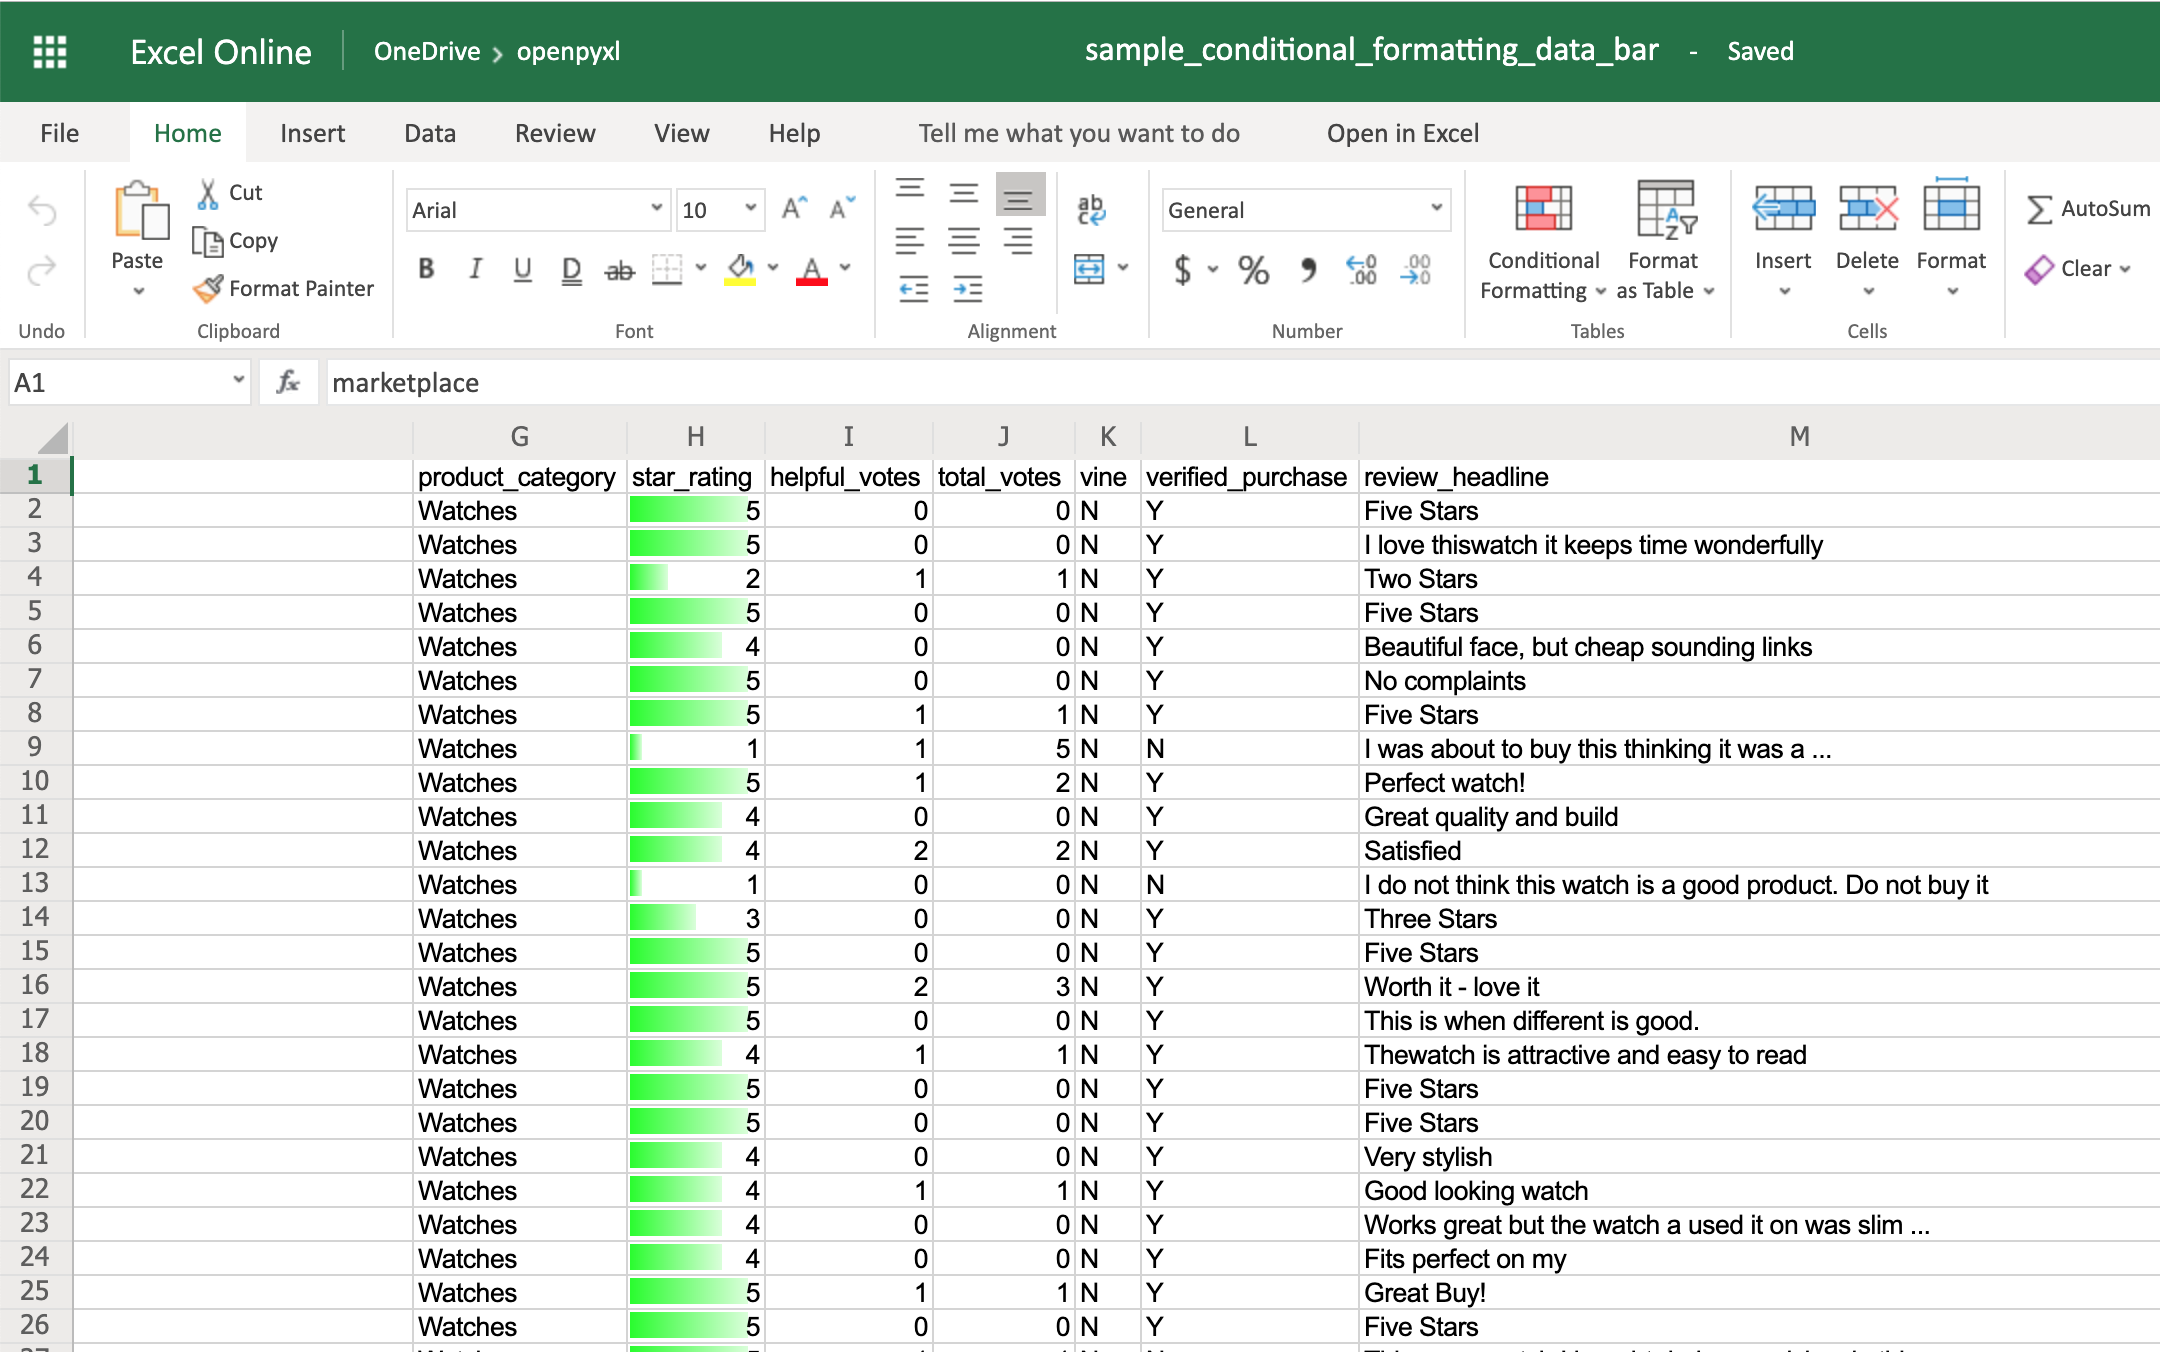
Finally, the DataBar allows you to create progress bars:
>>>
>>> from openpyxl.formatting.rule import DataBarRule

>>> data_bar_rule = DataBarRule(start_type="num",
...                             start_value=1,
...                             end_type="num",
...                             end_value="5",
...                             color="0000FF00")  # Green
>>> sheet.conditional_formatting.add("H2:H100", data_bar_rule)
>>> workbook.save("sample_conditional_formatting_data_bar.xlsx")
You’ll now see a green progress bar that gets fuller the closer the star rating is to the number 5:
As you can see, there are a lot of cool things you can do with conditional formatting.
Here, you saw only a few examples of what you can achieve with it, but check the openpyxl documentation to see a bunch of other options.
Adding Images
Even though images are not something that you’ll often see in a spreadsheet, it’s quite cool to be able to add them. Maybe you can use it for branding purposes or to make spreadsheets more personal.
To be able to load images to a spreadsheet using openpyxl, you’ll have to install Pillow:
Apart from that, you’ll also need an image. For this example, you can grab the Real Python logo below and convert it from .webp to .png using an online converter such as cloudconvert.com, save the final file as logo.png, and copy it to the root folder where you’re running your examples:
![]()
Afterward, this is the code you need to import that image into the hello_word.xlsx spreadsheet:
from openpyxl import load_workbook
from openpyxl.drawing.image import Image

# Let's use the hello_world spreadsheet since it has less data
workbook = load_workbook(filename="hello_world.xlsx")
sheet = workbook.active

logo = Image("logo.png")

# A bit of resizing to not fill the whole spreadsheet with the logo
logo.height = 150
logo.width = 150

sheet.add_image(logo, "A3")
workbook.save(filename="hello_world_logo.xlsx")
You have an image on your spreadsheet! Here it is:
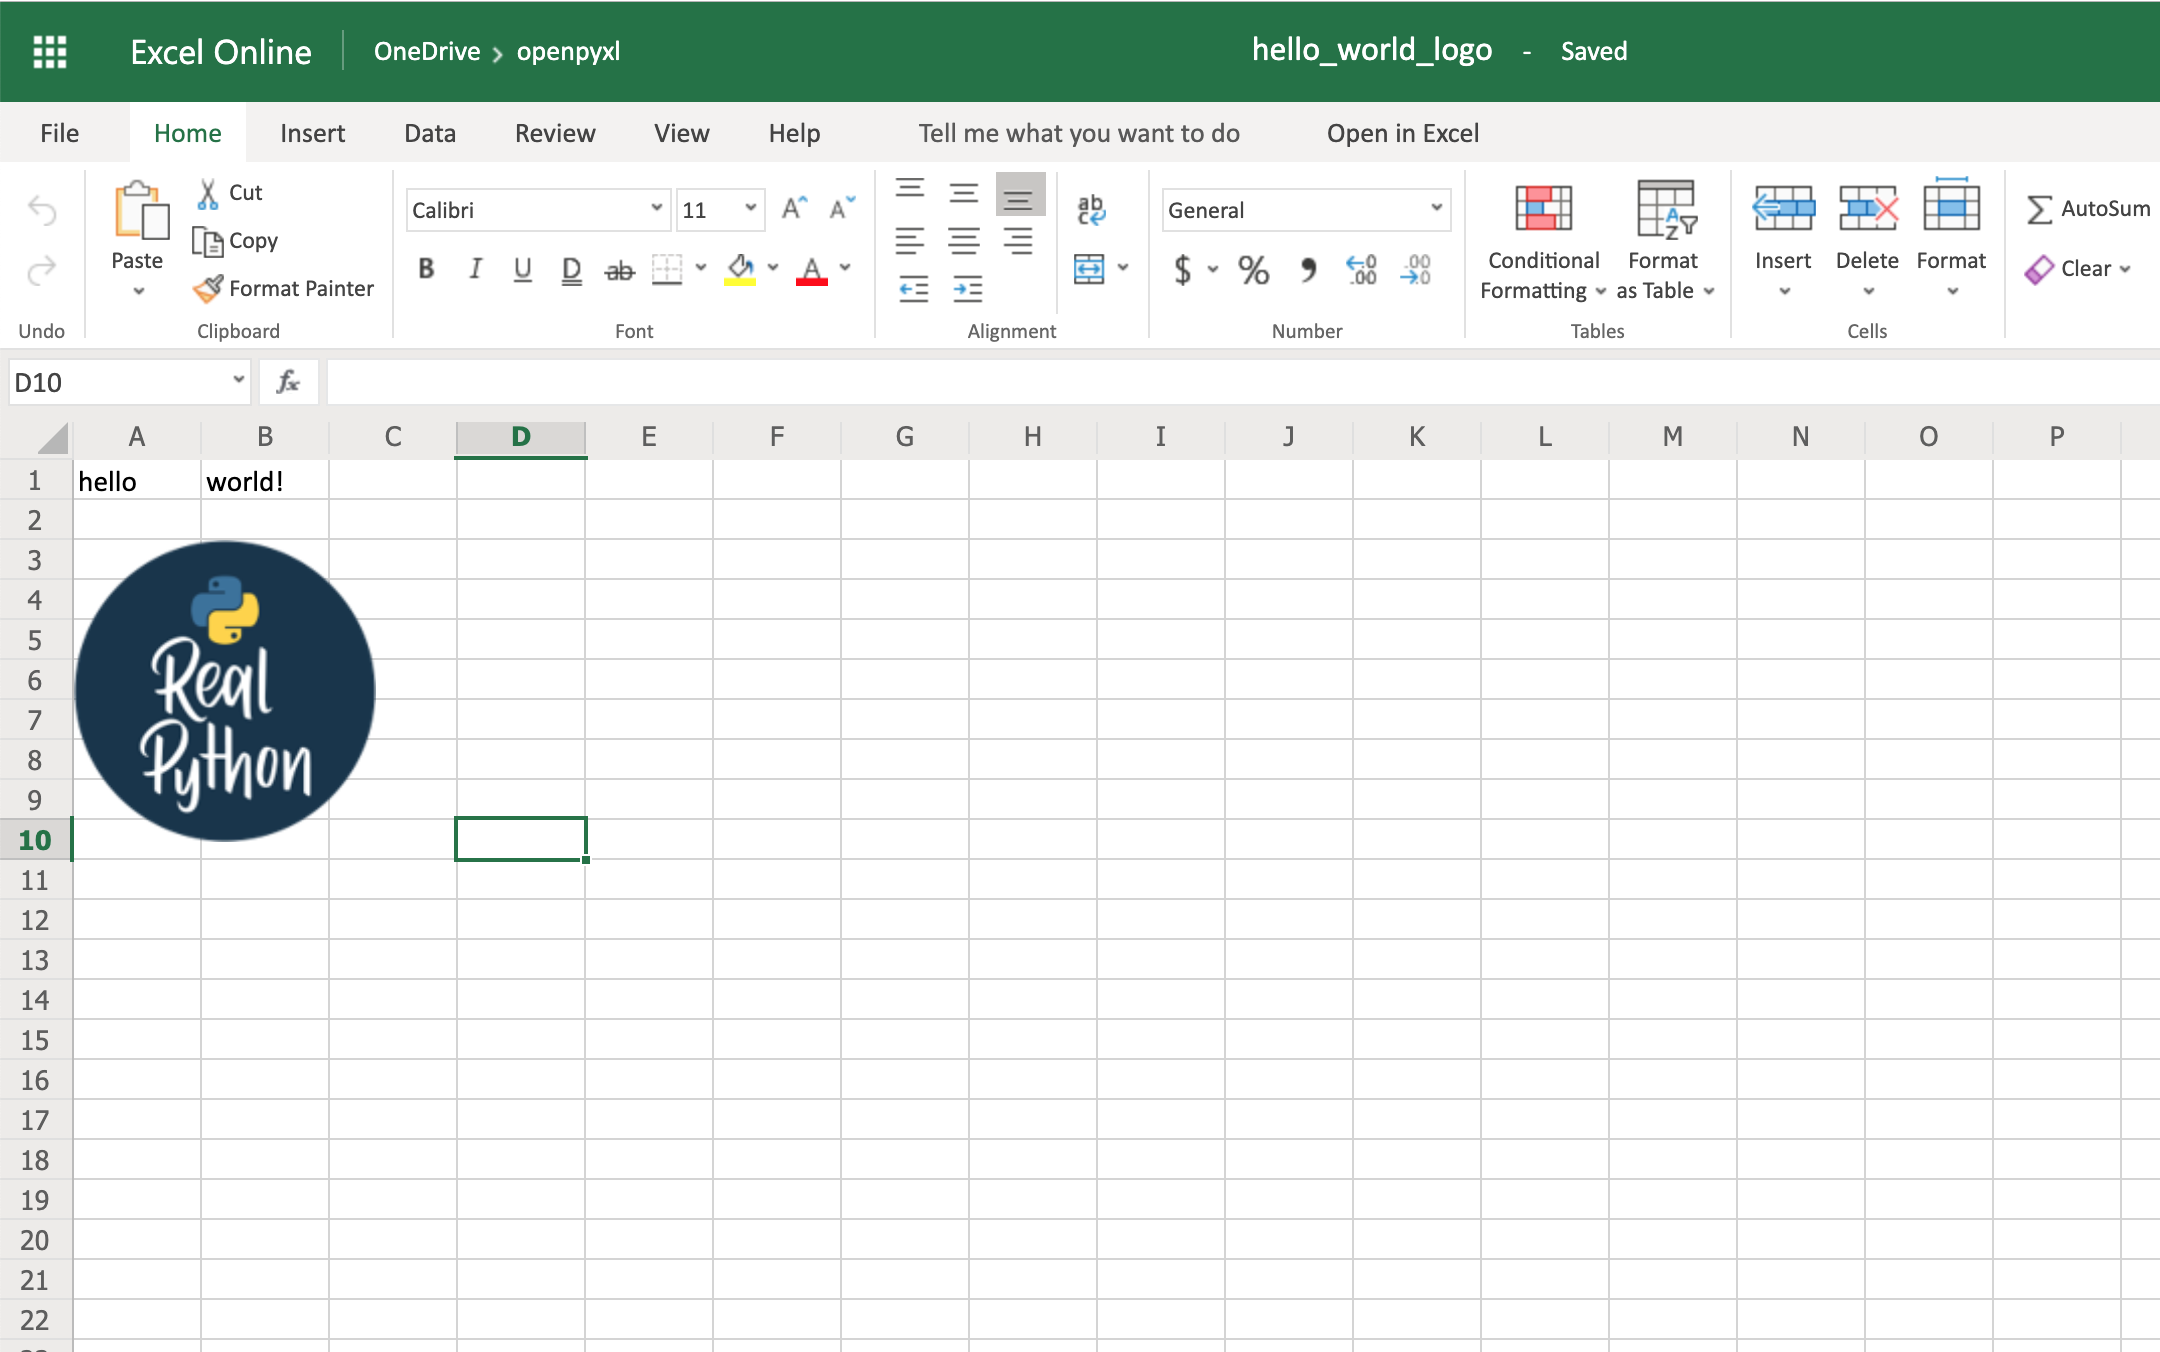
The image’s left top corner is on the cell you chose, in this case, A3.
Adding Pretty Charts
Another powerful thing you can do with spreadsheets is create an incredible variety of charts.
Charts are a great way to visualize and understand loads of data quickly. There are a lot of different chart types: bar chart, pie chart, line chart, and so on. openpyxl has support for a lot of them.
Here, you’ll see only a couple of examples of charts because the theory behind it is the same for every single chart type:
For any chart you want to build, you’ll need to define the chart type: BarChart, LineChart, and so forth, plus the data to be used for the chart, which is called Reference.
Before you can build your chart, you need to define what data you want to see represented in it. Sometimes, you can use the dataset as is, but other times you need to massage the data a bit to get additional information.
Let’s start by building a new workbook with some sample data:
 1from openpyxl import Workbook
 2from openpyxl.chart import BarChart, Reference
 3
 4workbook = Workbook()
 5sheet = workbook.active
 6
 7# Let's create some sample sales data
 8rows = [
 9    ["Product", "Online", "Store"],
10    [1, 30, 45],
11    [2, 40, 30],
12    [3, 40, 25],
13    [4, 50, 30],
14    [5, 30, 25],
15    [6, 25, 35],
16    [7, 20, 40],
17]
18
19for row in rows:
20    sheet.append(row)
Now you’re going to start by creating a bar chart that displays the total number of sales per product:
22chart = BarChart()
23data = Reference(worksheet=sheet,
24                 min_row=1,
25                 max_row=8,
26                 min_col=2,
27                 max_col=3)
28
29chart.add_data(data, titles_from_data=True)
30sheet.add_chart(chart, "E2")
31
32workbook.save("chart.xlsx")
There you have it. Below, you can see a very straightforward bar chart showing the difference between online product sales online and in-store product sales:
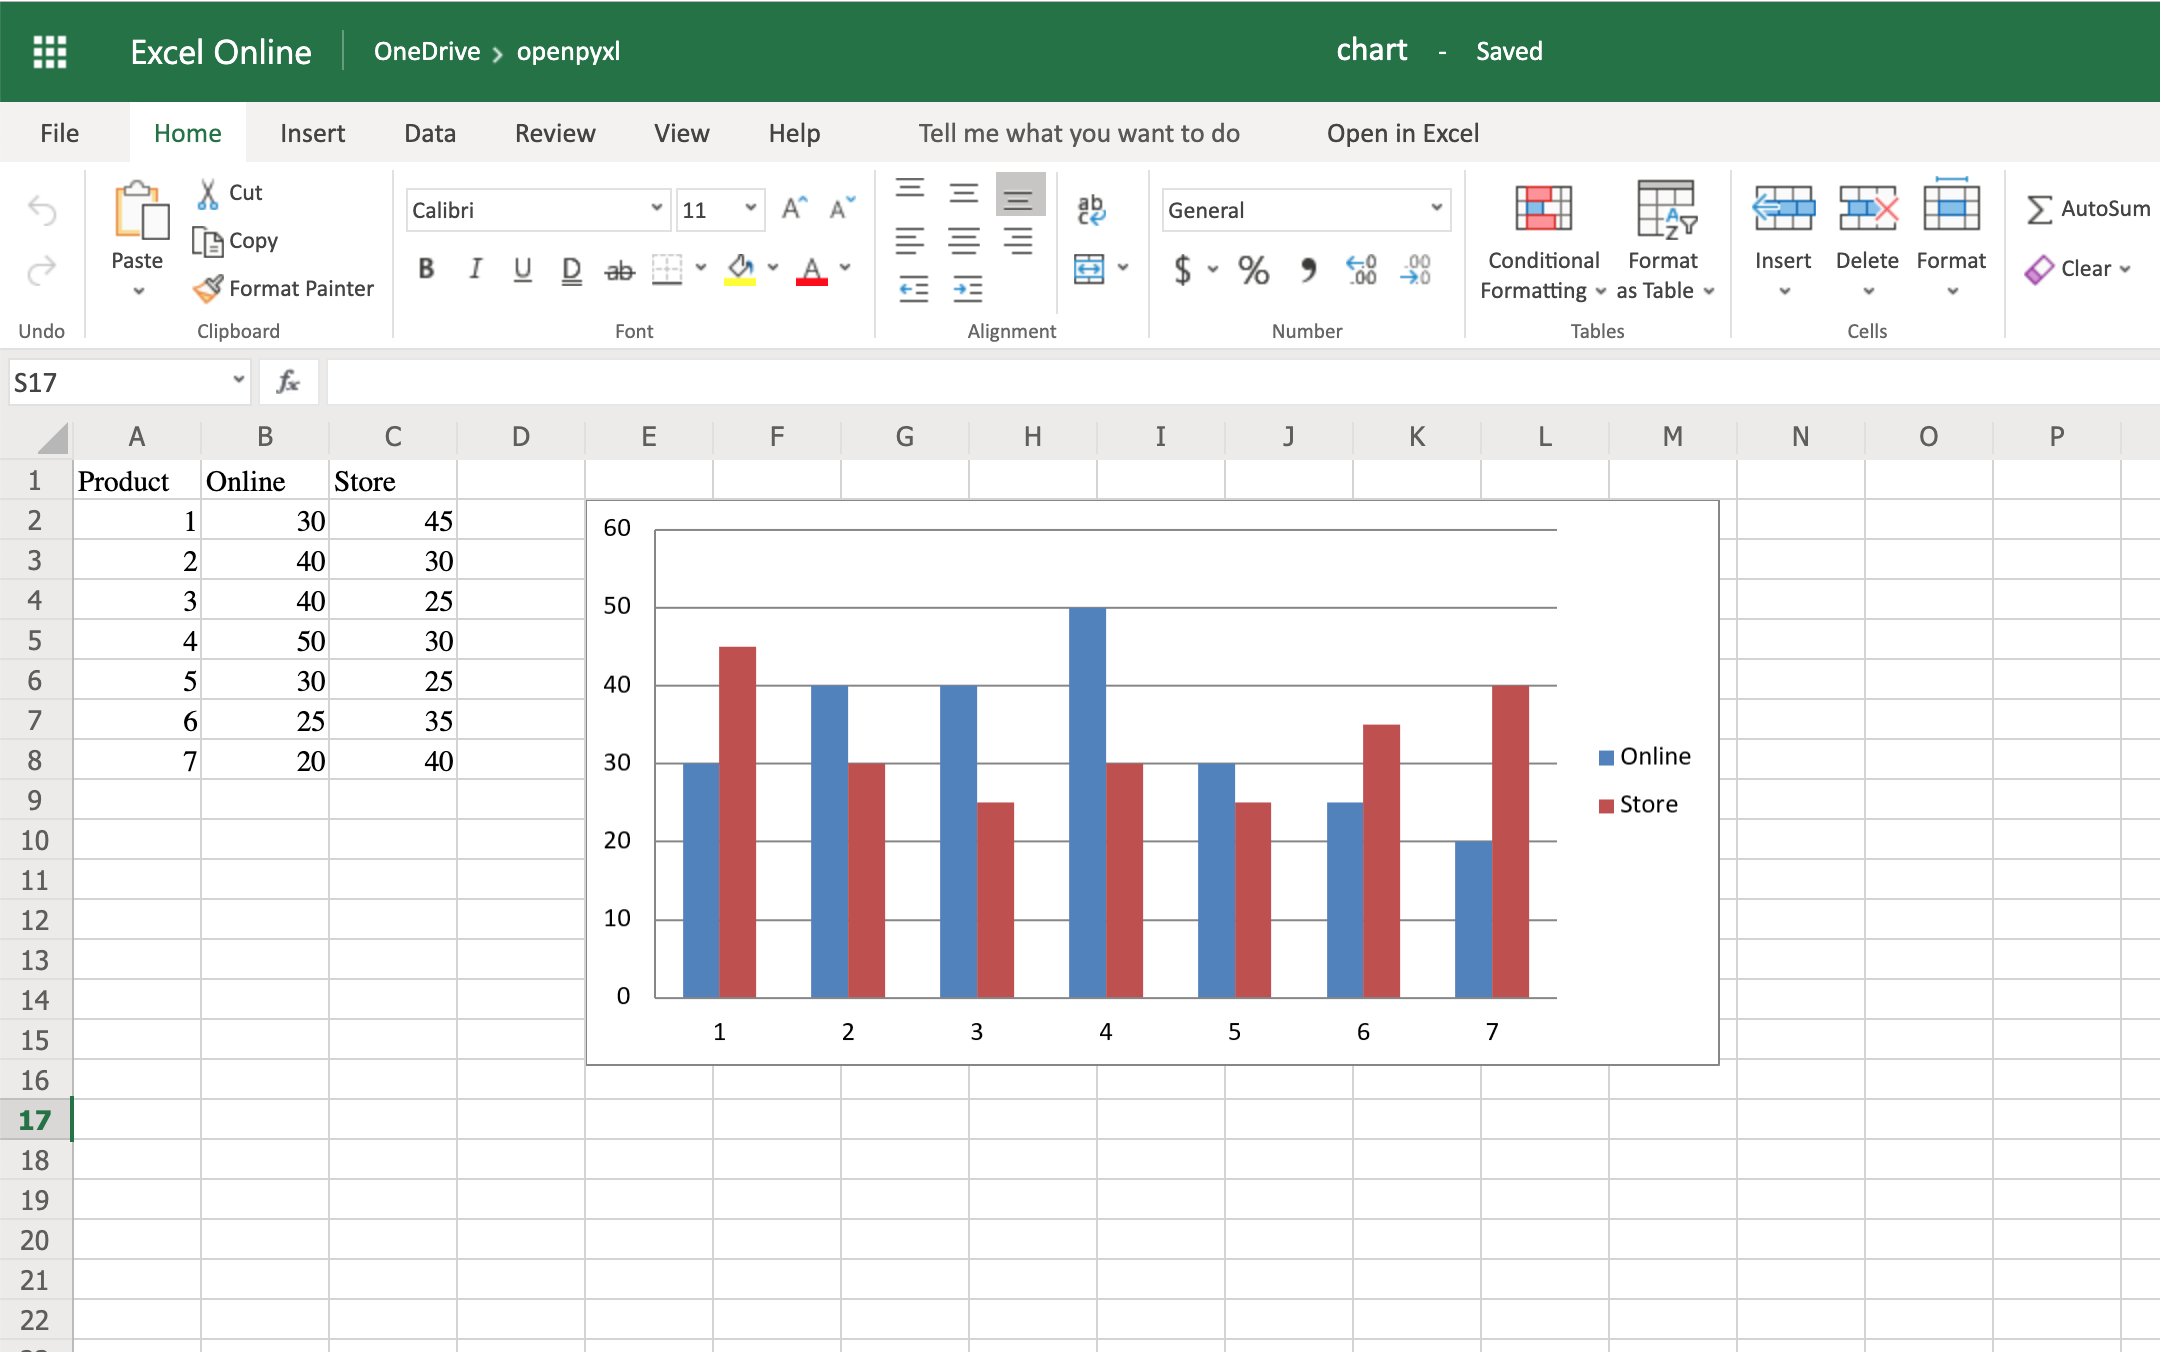
Like with images, the top left corner of the chart is on the cell you added the chart to. In your case, it was on cell E2.
Try creating a line chart instead, changing the data a bit:
 1import random
 2from openpyxl import Workbook
 3from openpyxl.chart import LineChart, Reference
 4
 5workbook = Workbook()
 6sheet = workbook.active
 7
 8# Let's create some sample sales data
 9rows = [
10    ["", "January", "February", "March", "April",
11    "May", "June", "July", "August", "September",
12     "October", "November", "December"],
13    [1, ],
14    [2, ],
15    [3, ],
16]
17
18for row in rows:
19    sheet.append(row)
20
21for row in sheet.iter_rows(min_row=2,
22                           max_row=4,
23                           min_col=2,
24                           max_col=13):
25    for cell in row:
26        cell.value = random.randrange(5, 100)
With the above code, you’ll be able to generate some random data regarding the sales of 3 different products across a whole year.
Once that’s done, you can very easily create a line chart with the following code:
28chart = LineChart()
29data = Reference(worksheet=sheet,
30                 min_row=2,
31                 max_row=4,
32                 min_col=1,
33                 max_col=13)
34
35chart.add_data(data, from_rows=True, titles_from_data=True)
36sheet.add_chart(chart, "C6")
37
38workbook.save("line_chart.xlsx")
Here’s the outcome of the above piece of code:
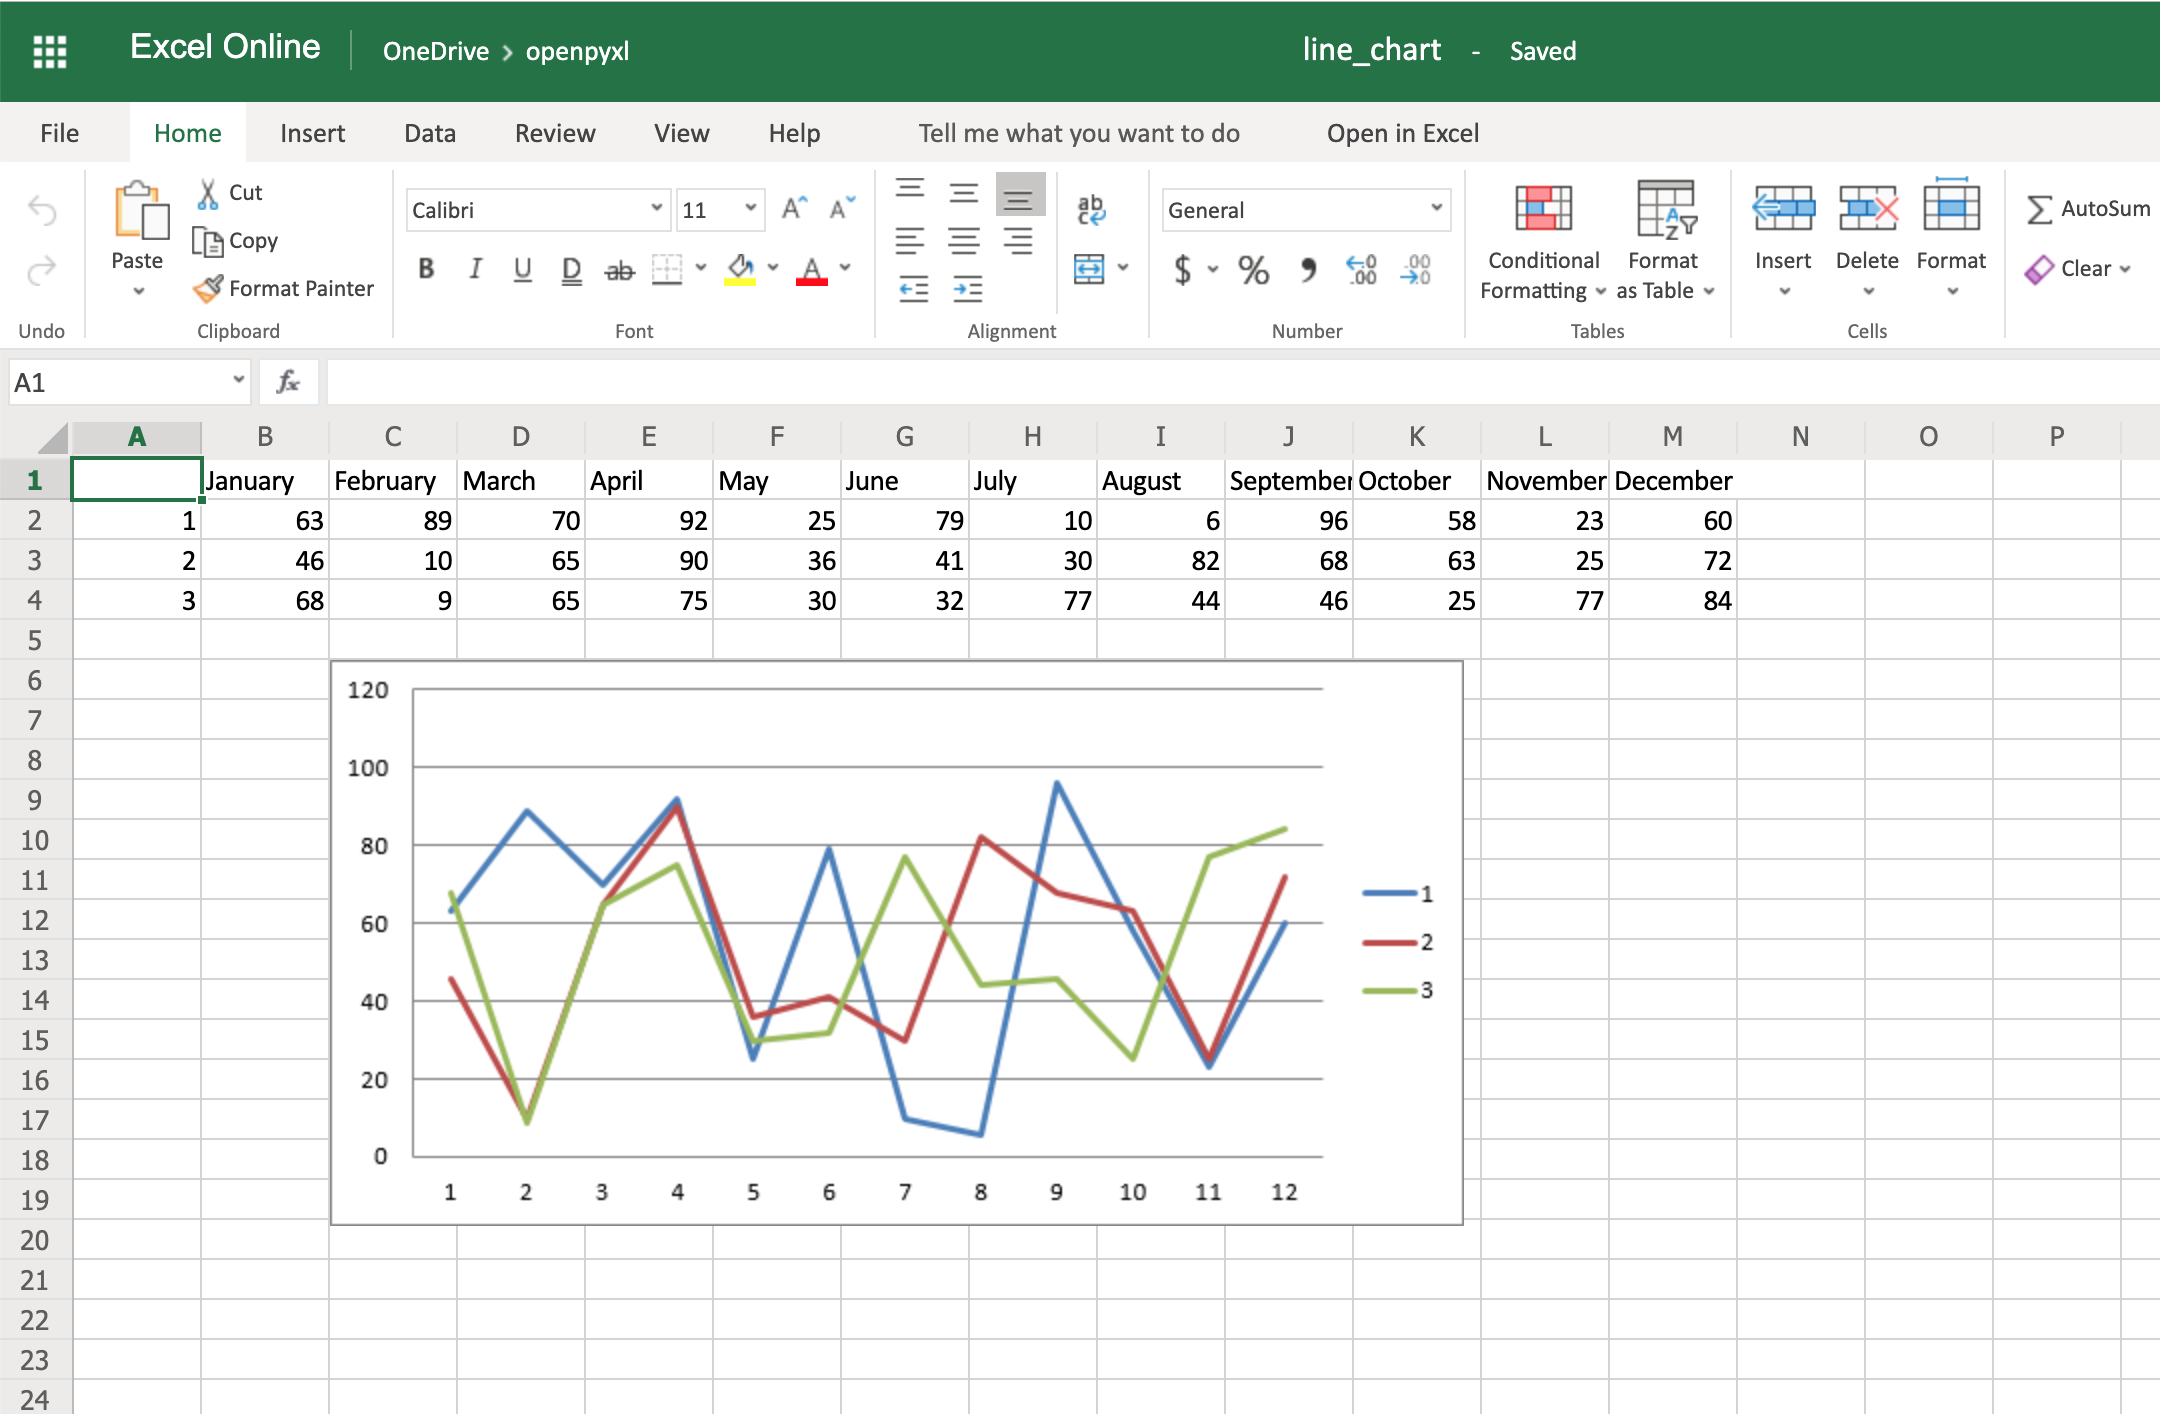
One thing to keep in mind here is the fact that you’re using from_rows=True when adding the data. This argument makes the chart plot row by row instead of column by column.
In your sample data, you see that each product has a row with 12 values (1 column per month). That’s why you use from_rows. If you don’t pass that argument, by default, the chart tries to plot by column, and you’ll get a month-by-month comparison of sales.
Another difference that has to do with the above argument change is the fact that our Reference now starts from the first column, min_col=1, instead of the second one. This change is needed because the chart now expects the first column to have the titles.
There are a couple of other things you can also change regarding the style of the chart. For example, you can add specific categories to the chart:
cats = Reference(worksheet=sheet,
                 min_row=1,
                 max_row=1,
                 min_col=2,
                 max_col=13)
chart.set_categories(cats)
Add this piece of code before saving the workbook, and you should see the month names appearing instead of numbers:
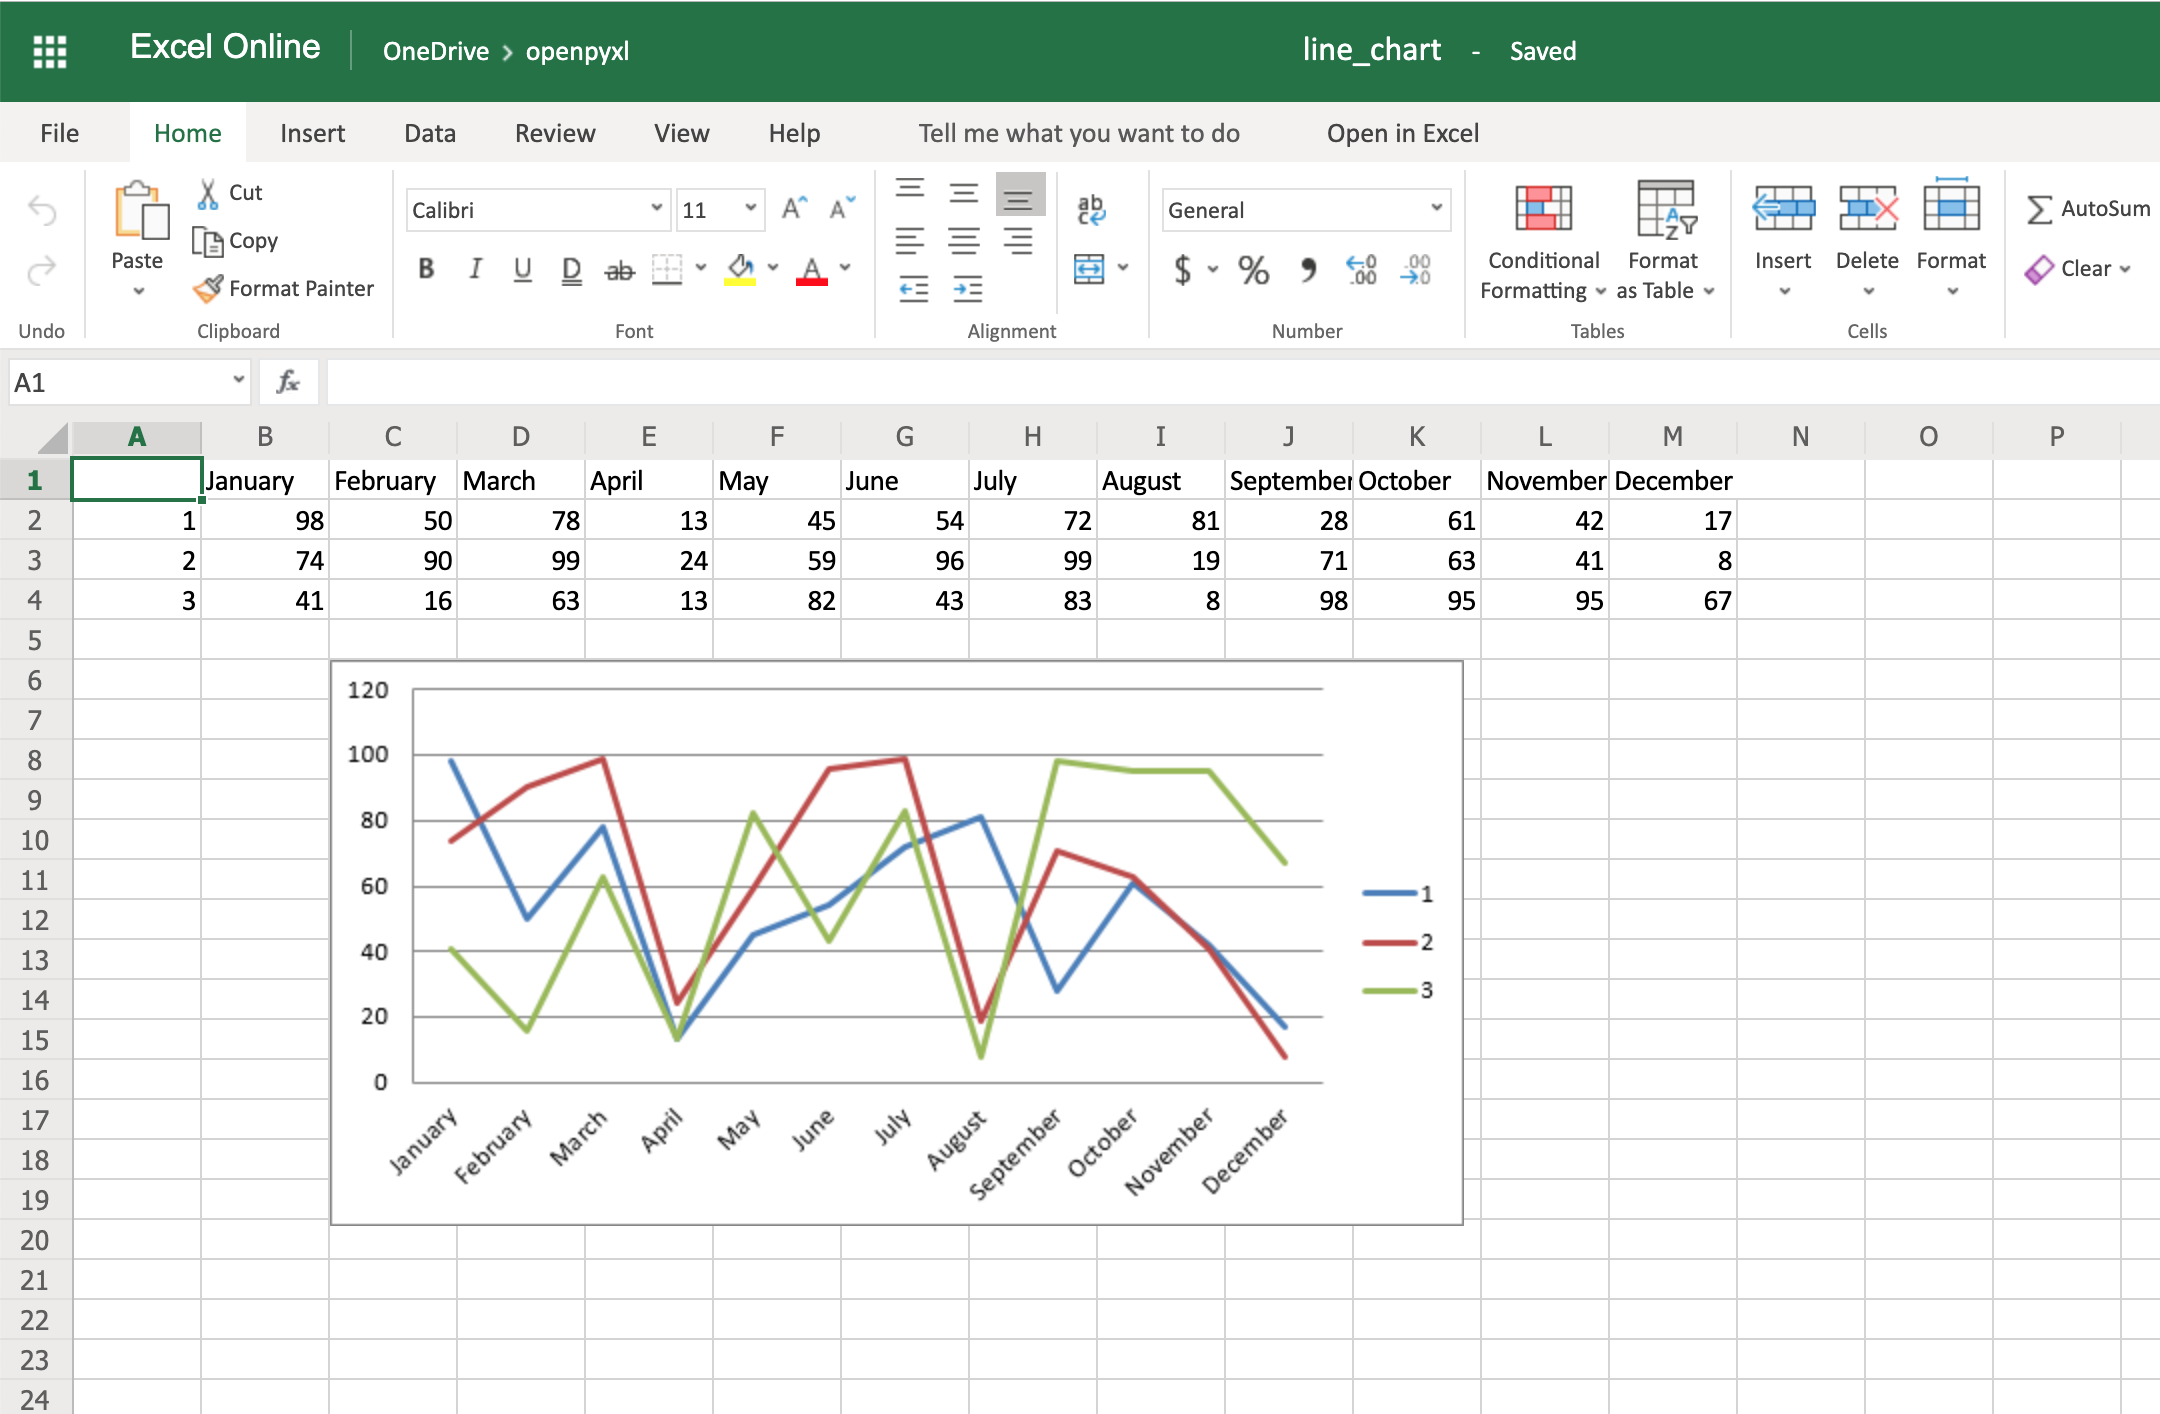
Code-wise, this is a minimal change. But in terms of the readability of the spreadsheet, this makes it much easier for someone to open the spreadsheet and understand the chart straight away.
Another thing you can do to improve the chart readability is to add an axis. You can do it using the attributes x_axis and y_axis:
chart.x_axis.title = "Months"
chart.y_axis.title = "Sales (per unit)"
This will generate a spreadsheet like the below one:
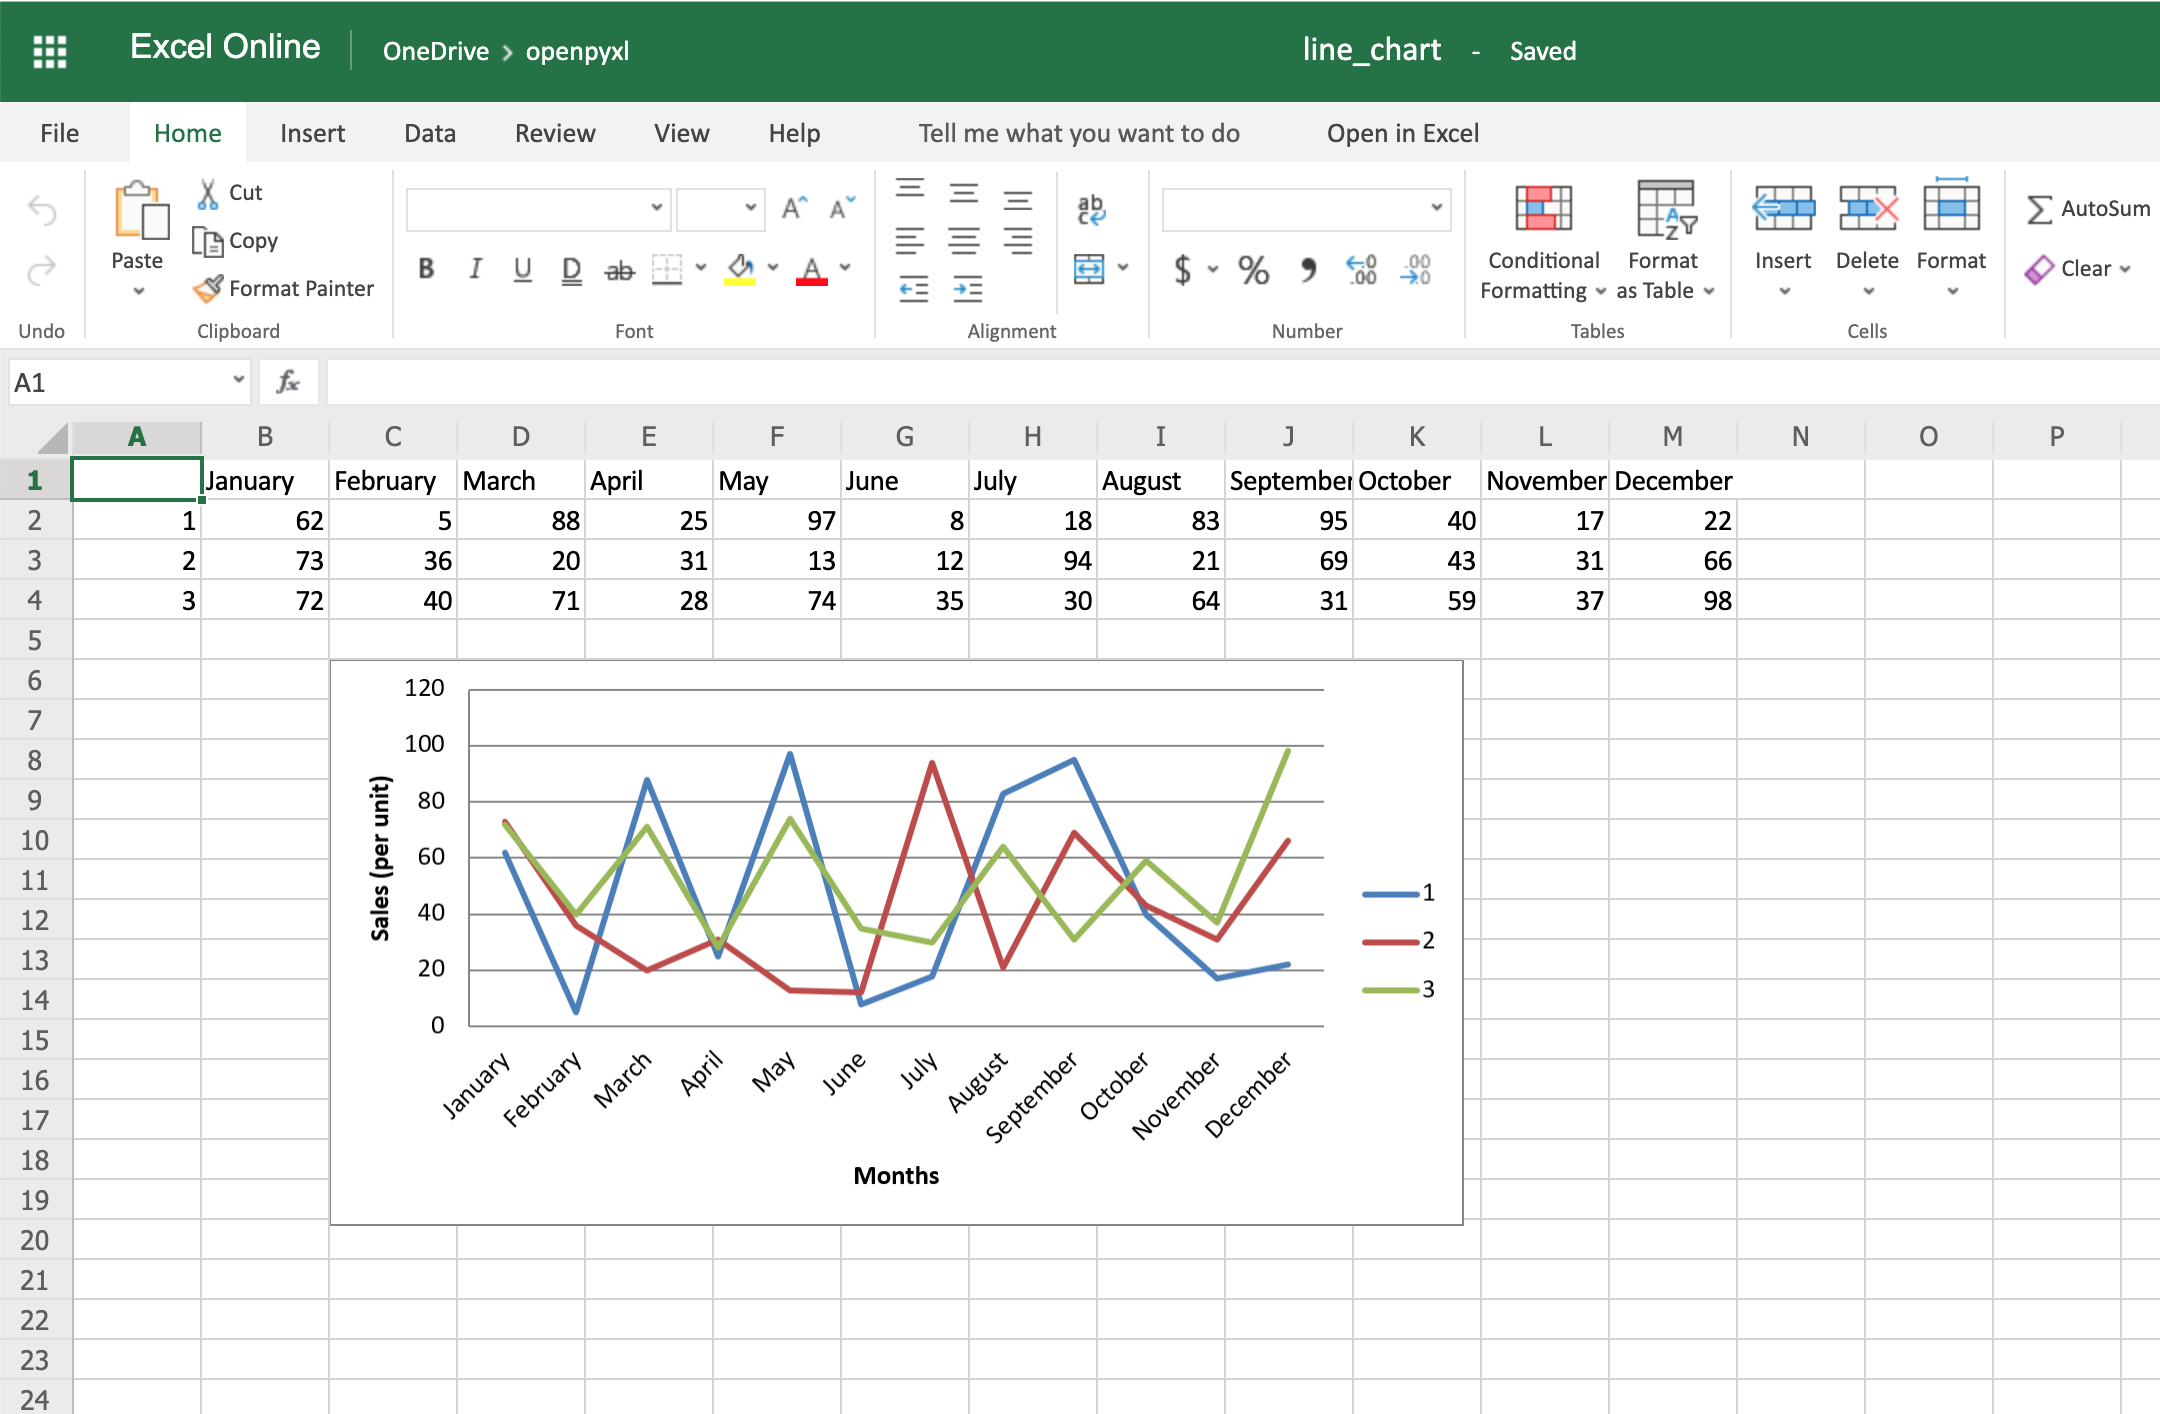
As you can see, small changes like the above make reading your chart a much easier and quicker task.
There is also a way to style your chart by using Excel’s default ChartStyle property. In this case, you have to choose a number between 1 and 48. Depending on your choice, the colors of your chart change as well:
# You can play with this by choosing any number between 1 and 48
chart.style = 24
With the style selected above, all lines have some shade of orange:
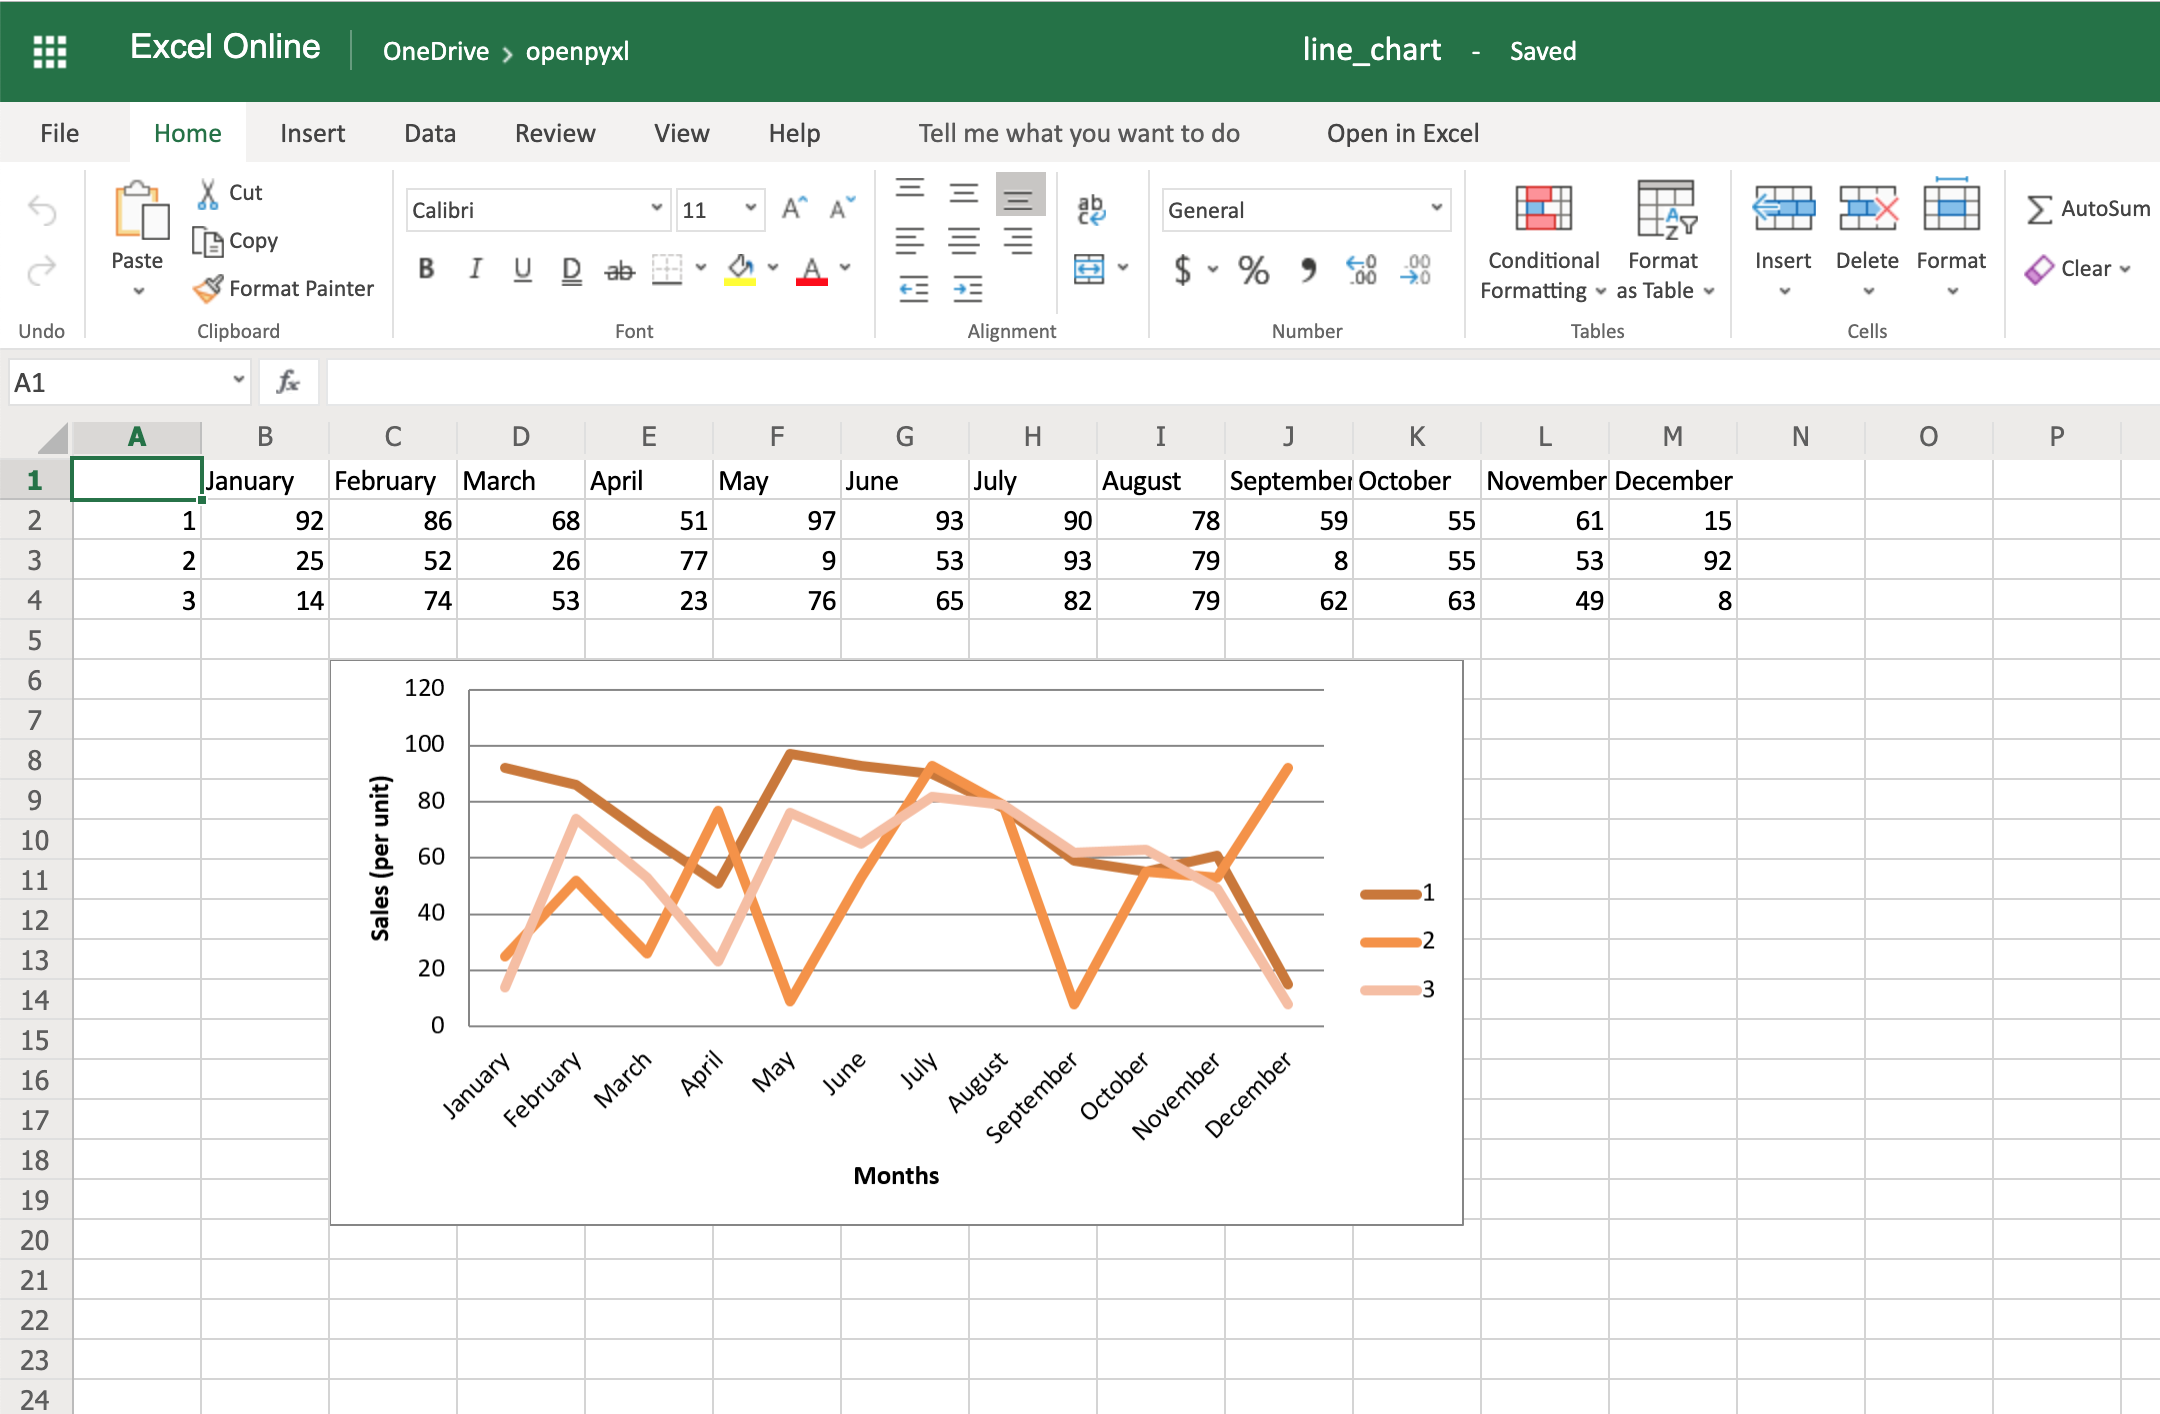
There is no clear documentation on what each style number looks like, but this spreadsheet has a few examples of the styles available.
Here’s the full code used to generate the line chart with categories, axis titles, and style:
import random
from openpyxl import Workbook
from openpyxl.chart import LineChart, Reference

workbook = Workbook()
sheet = workbook.active

# Let's create some sample sales data
rows = [
    ["", "January", "February", "March", "April",
    "May", "June", "July", "August", "September",
     "October", "November", "December"],
    [1, ],
    [2, ],
    [3, ],
]

for row in rows:
    sheet.append(row)

for row in sheet.iter_rows(min_row=2,
                           max_row=4,
                           min_col=2,
                           max_col=13):
    for cell in row:
        cell.value = random.randrange(5, 100)

# Create a LineChart and add the main data
chart = LineChart()
data = Reference(worksheet=sheet,
                           min_row=2,
                           max_row=4,
                           min_col=1,
                           max_col=13)
chart.add_data(data, titles_from_data=True, from_rows=True)

# Add categories to the chart
cats = Reference(worksheet=sheet,
                 min_row=1,
                 max_row=1,
                 min_col=2,
                 max_col=13)
chart.set_categories(cats)

# Rename the X and Y Axis
chart.x_axis.title = "Months"
chart.y_axis.title = "Sales (per unit)"

# Apply a specific Style
chart.style = 24

# Save!
sheet.add_chart(chart, "C6")
workbook.save("line_chart.xlsx")
There are a lot more chart types and customization you can apply, so be sure to check out the package documentation on this if you need some specific formatting.
Convert Python Classes to Excel Spreadsheet
You already saw how to convert an Excel spreadsheet’s data into Python classes, but now let’s do the opposite.
Let’s imagine you have a database and are using some Object-Relational Mapping (ORM) to map DB objects into Python classes. Now, you want to export those same objects into a spreadsheet.
Let’s assume the following data classes to represent the data coming from your database regarding product sales:
from dataclasses import dataclass
from typing import List

@dataclass
class Sale:
    quantity: int

@dataclass
class Product:
    id: str
    name: str
    sales: List[Sale]
Now, let’s generate some random data, assuming the above classes are stored in a db_classes.py file:
 1import random
 2
 3# Ignore these for now. You'll use them in a sec ;)
 4from openpyxl import Workbook
 5from openpyxl.chart import LineChart, Reference
 6
 7from db_classes import Product, Sale
 8
 9products = []
10
11# Let's create 5 products
12for idx in range(1, 6):
13    sales = []
14
15    # Create 5 months of sales
16    for _ in range(5):
17        sale = Sale(quantity=random.randrange(5, 100))
18        sales.append(sale)
19
20    product = Product(id=str(idx),
21                      name="Product %s" % idx,
22                      sales=sales)
23    products.append(product)
By running this piece of code, you should get 5 products with 5 months of sales with a random quantity of sales for each month.
Now, to convert this into a spreadsheet, you need to iterate over the data and append it to the spreadsheet:
25workbook = Workbook()
26sheet = workbook.active
27
28# Append column names first
29sheet.append(["Product ID", "Product Name", "Month 1",
30              "Month 2", "Month 3", "Month 4", "Month 5"])
31
32# Append the data
33for product in products:
34    data = [product.id, product.name]
35    for sale in product.sales:
36        data.append(sale.quantity)
37    sheet.append(data)
That’s it. That should allow you to create a spreadsheet with some data coming from your database.
However, why not use some of that cool knowledge you gained recently to add a chart as well to display that data more visually?
All right, then you could probably do something like this:
38chart = LineChart()
39data = Reference(worksheet=sheet,
40                 min_row=2,
41                 max_row=6,
42                 min_col=2,
43                 max_col=7)
44
45chart.add_data(data, titles_from_data=True, from_rows=True)
46sheet.add_chart(chart, "B8")
47
48cats = Reference(worksheet=sheet,
49                 min_row=1,
50                 max_row=1,
51                 min_col=3,
52                 max_col=7)
53chart.set_categories(cats)
54
55chart.x_axis.title = "Months"
56chart.y_axis.title = "Sales (per unit)"
57
58workbook.save(filename="oop_sample.xlsx")
Now we’re talking! Here’s a spreadsheet generated from database objects and with a chart and everything:
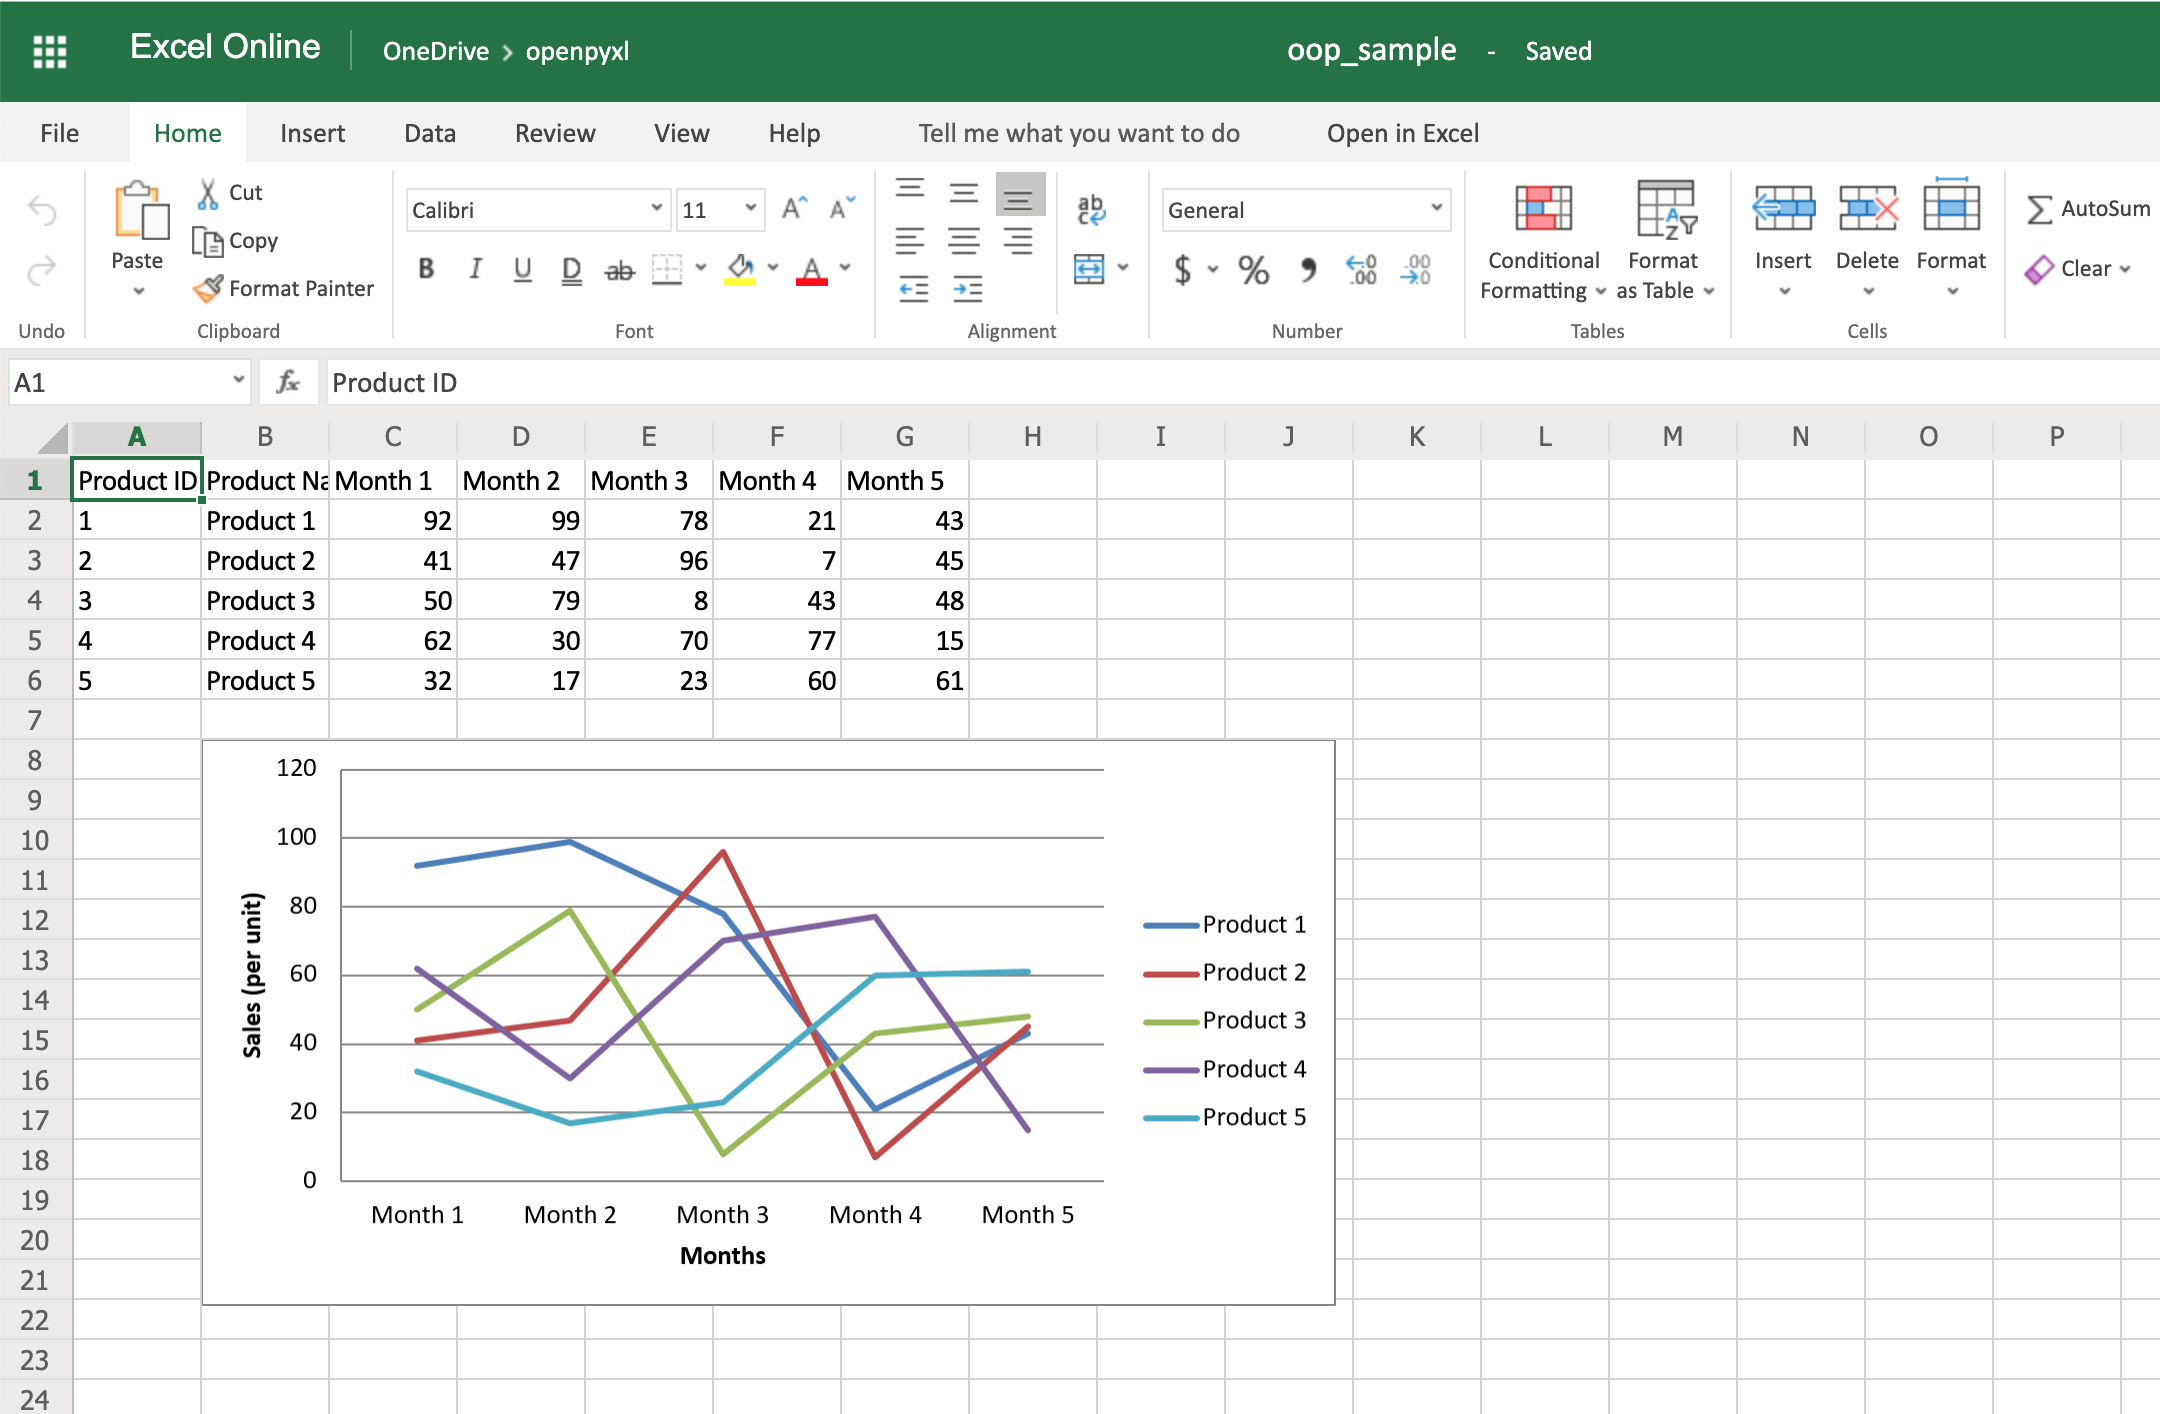
That’s a great way for you to wrap up your new knowledge of charts!
Bonus: Working With Pandas
Even though you can use Pandas to handle Excel files, there are few things that you either can’t accomplish with Pandas or that you’d be better off just using openpyxl directly.
For example, some of the advantages of using openpyxl are the ability to easily customize your spreadsheet with styles, conditional formatting, and such.
But guess what, you don’t have to worry about picking. In fact, openpyxl has support for both converting data from a Pandas DataFrame into a workbook or the opposite, converting an openpyxl workbook into a Pandas DataFrame.
First things first, remember to install the pandas package:
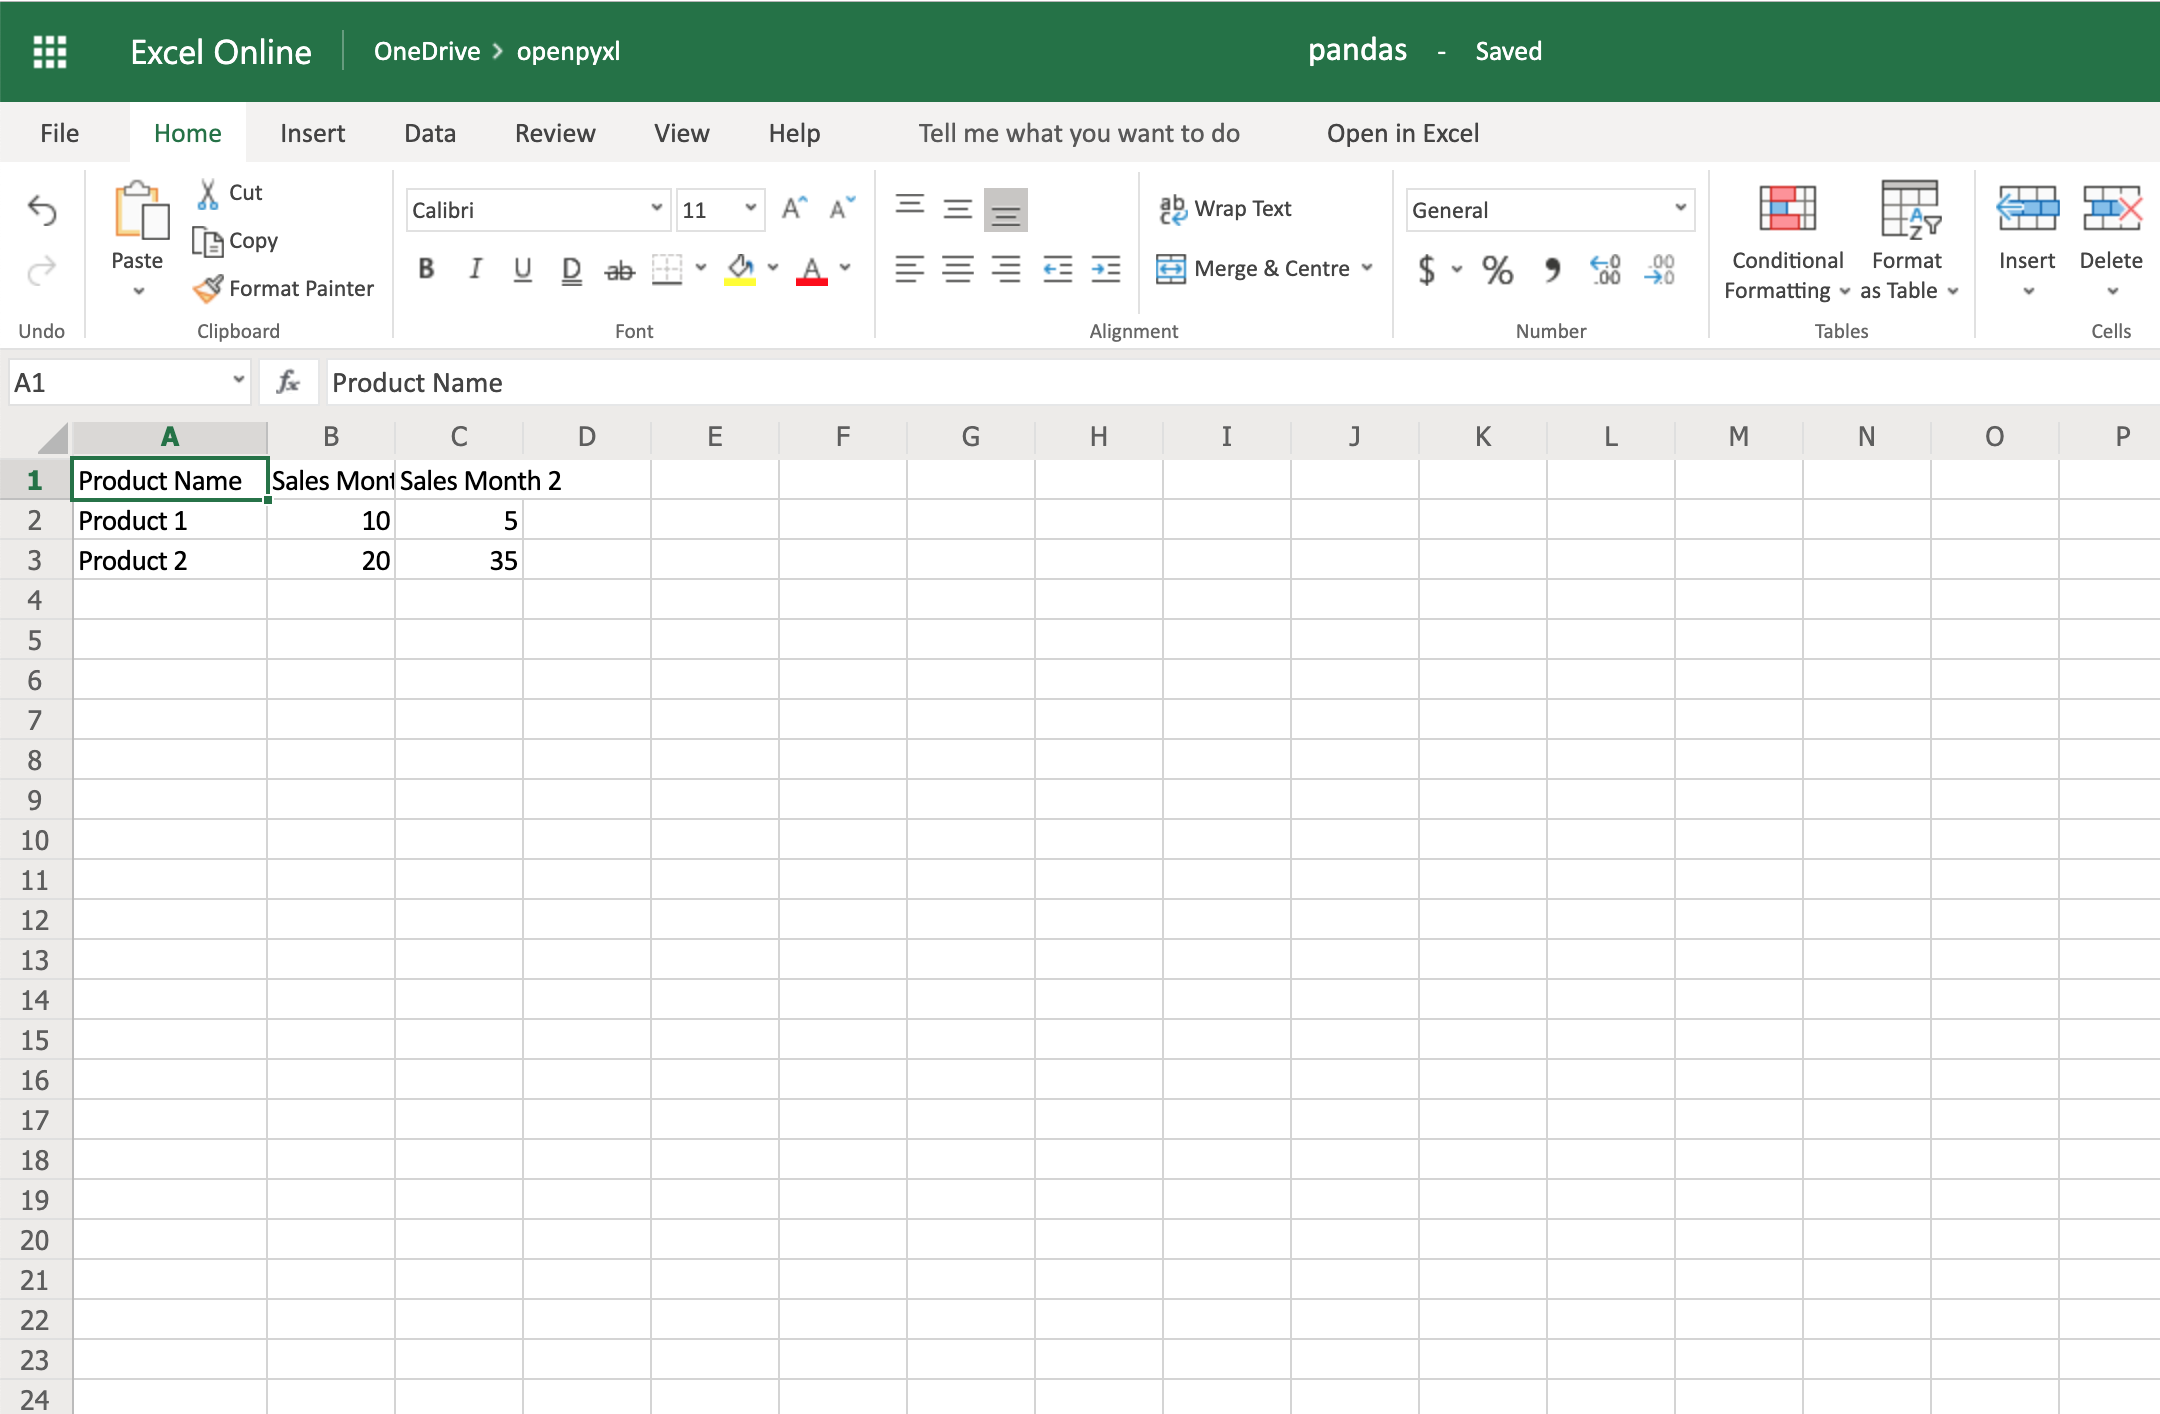
Then, let’s create a sample DataFrame:
 1import pandas as pd
 2
 3data = {
 4    "Product Name": ["Product 1", "Product 2"],
 5    "Sales Month 1": [10, 20],
 6    "Sales Month 2": [5, 35],
 7}
 8df = pd.DataFrame(data)
Now that you have some data, you can use .dataframe_to_rows() to convert it from a DataFrame into a worksheet:
10from openpyxl import Workbook
11from openpyxl.utils.dataframe import dataframe_to_rows
12
13workbook = Workbook()
14sheet = workbook.active
15
16for row in dataframe_to_rows(df, index=False, header=True):
17    sheet.append(row)
18
19workbook.save("pandas.xlsx")
You should see a spreadsheet that looks like this:
If you want to add the DataFrame’s index, you can change index=True, and it adds each row’s index into your spreadsheet.
On the other hand, if you want to convert a spreadsheet into a DataFrame, you can also do it in a very straightforward way like so:
import pandas as pd
from openpyxl import load_workbook

workbook = load_workbook(filename="sample.xlsx")
sheet = workbook.active

values = sheet.values
df = pd.DataFrame(values)
Alternatively, if you want to add the correct headers and use the review ID as the index, for example, then you can also do it like this instead:
import pandas as pd
from openpyxl import load_workbook
from mapping import REVIEW_ID

workbook = load_workbook(filename="sample.xlsx")
sheet = workbook.active

data = sheet.values

# Set the first row as the columns for the DataFrame
cols = next(data)
data = list(data)

# Set the field "review_id" as the indexes for each row
idx = [row[REVIEW_ID] for row in data]

df = pd.DataFrame(data, index=idx, columns=cols)
Using indexes and columns allows you to access data from your DataFrame easily:
>>>
>>> df.columns
Index(['marketplace', 'customer_id', 'review_id', 'product_id',
       'product_parent', 'product_title', 'product_category', 'star_rating',
       'helpful_votes', 'total_votes', 'vine', 'verified_purchase',
       'review_headline', 'review_body', 'review_date'],
      dtype='object')

>>> # Get first 10 reviews' star rating
>>> df["star_rating"][:10]
R3O9SGZBVQBV76    5
RKH8BNC3L5DLF     5
R2HLE8WKZSU3NL    2
R31U3UH5AZ42LL    5
R2SV659OUJ945Y    4
RA51CP8TR5A2L     5
RB2Q7DLDN6TH6     5
R2RHFJV0UYBK3Y    1
R2Z6JOQ94LFHEP    5
RX27XIIWY5JPB     4
Name: star_rating, dtype: int64

>>> # Grab review with id "R2EQL1V1L6E0C9", using the index
>>> df.loc["R2EQL1V1L6E0C9"]
marketplace               US
customer_id         15305006
review_id     R2EQL1V1L6E0C9
product_id        B004LURNO6
product_parent     892860326
review_headline   Five Stars
review_body          Love it
review_date       2015-08-31
Name: R2EQL1V1L6E0C9, dtype: object
There you go, whether you want to use openpyxl to prettify your Pandas dataset or use Pandas to do some hardcore algebra, you now know how to switch between both packages.
Conclusion
Phew, after that long read, you now know how to work with spreadsheets in Python! You can rely on openpyxl, your trustworthy companion, to:
- Extract valuable information from spreadsheets in a Pythonic manner
- Create your own spreadsheets, no matter the complexity level
- Add cool features such as conditional formatting or charts to your spreadsheets
There are a few other things you can do with openpyxl that might not have been covered in this tutorial, but you can always check the package’s official documentation website to learn more about it. You can even venture into checking its source code and improving the package further.
Feel free to leave any comments below if you have any questions, or if there’s any section you’d love to hear more about.
Watch Now This tutorial has a related video course created by the Real Python team. Watch it together with the written tutorial to deepen your understanding: Editing Excel Spreadsheets in Python With openpyxl
In this tutorial I will show you how to create an Excel file using the C# programming language. This tutorial consists of a step-by-step guide specially designed for beginners and intermediate developers. Experts can skip the “project creation” section and jump directly to the “code” section. I will use the IronXL Library to create Excel files.
We will cover the following topics:
- What is an Excel File?
- What is IronXL?
- A Step-by-Step Guide to Creating Excel Files
- Step 1: Create a Visual Studio Project
- Step 2: Install the NuGet Package
- Step 3: Create an Excel Workbook
- Step 4: Set a Default Worksheet
- Step 5: Save the Workbook
- Step 6: Set Cell Values
- Set Cell Values Manually
- Set Cell Values Dynamically
- Set Cell Values from the Database
- Summary
What is an Excel File?
Excel is a spreadsheet application developed and published by Microsoft. It is part of the Microsoft Office suite of productivity software.
Excel is a tool for both organizing data and making calculations with it. The software can analyze data, calculate statistics, generate pivot tables, and represent data as charts or graphs.
For example, you could create an Excel spreadsheet that calculates a monthly budget, tracks associated expenses, and interactively sorts the data by various criteria.
Unlike a word processor, such as Microsoft Word, Excel organizes data in columns and rows. Rows and columns intersect at a space called a cell. Each cell contains data, such as text, numerical values, or formulas.
What is IronXL?
IronXL is an intuitive C# & VB Excel API that allows you to read, edit and create Excel spreadsheet files in .NET with lightning-fast performance. There is no need to install MS Office or even Excel Interop. This library can also be used for manipulating Excel documents.
IronXL fully supports .NET Core, .NET Framework, Xamarin, Mobile, Linux, MacOS and Azure.

A Step-by-Step Guide to Creating Excel Files
Firstly, we have to create a new Visual Studio Project. I will use the Console Application template for the demonstration. You can use any template that best suits your requirements.
You may also use a current project that would benefit from the capacity to create Excel files.
Step1: Create a Visual Studio Project
Open Microsoft Visual Studio 2019 or any other version. However, the latest version is recommended. Click on “Create New Project”. Select the C# Console Application for the application template. Click on the “Next” button.
Assign a name to your project. I have named mine «Excel Tutorial». You can select any name you wish. Click the “Next” button, and set the target framework. I have set my target framework to «.Net 5.0», the latest and most stable version. Click the “Create” button, and a new project will be created for you.
(adsbygoogle = window.adsbygoogle || []).push({});
Step 2: Install the NuGet Package in Visual Studio
Our next step is to install the IronXL NuGet Package for our project. Click on “Tools” on the menu bar. A new drop-down menu will appear. Click on «NuGet Package Manager» and then «Manage Nuget Packages for Solution», as shown below.

Click on “Browse” and search for IronXL in the search bar.

Click on “IronXL.Excel” and press the “Installed” button. This will install IronXL in your project. Now you are free to use any of its functions in your project.
Now that the IronXL Library has been installed, let’s go to the next step.
Step 3: Create an Excel Workbook
Firstly, add the namespace of IronXL into your project.
using IronXL;
Enter fullscreen mode
Exit fullscreen mode
It could not be easier to create a new Excel Workbook using IronXL! We need just one line of code. Yes, really!
WorkBook workbook = WorkBook.Create(ExcelFileFormat.XLSX);
Enter fullscreen mode
Exit fullscreen mode
Both the XLS (older Excel file versions) and XLSX (current and newer file versions) file formats can be created with IronXL.
Step 4: Set a Default Worksheet
Let’s create an Excel spreadsheet. I have just created one. You can create as many Excel spreadsheets as you need.
var sheet = workbook.CreateWorkSheet("Result Sheet");
Enter fullscreen mode
Exit fullscreen mode
«Sheet» in the above code snippet represents the worksheet, and you can use it to set cell values and almost everything else Excel can do.
If you are confused about the difference between a Workbook and a Worksheet, let me explain: a Workbook contains Worksheets. This means that you can add as many Worksheets as you like into one Workbook. I will explain how to do this in a later article. A Worksheet contains rows and columns. The intersection of a row and a column is called a cell, and these cells are what we manipulate whilst working with Excel.
Step 5: Save the Workbook
To save the xlsx format Workbook, use the following code:
workbook.SaveAs("Budget.xlsx");
Enter fullscreen mode
Exit fullscreen mode
Run the program to see the output.
Output File
This program will create a new workbook. You can find it in your project bin folder. You can also specify the path with the “Save As” function. Open your Excel document with Microsoft Excel. Below is the Excel worksheet we have just created.

Step 6: Setting Cell Values
Now that our workbook is created and saved, let’s add some data to the cell.
Setting Cell Values Manually:
To set cell values manually, you simply indicate which cell you are working with and set its value, as in the following example:
WorkBook workbook = WorkBook.Create(ExcelFileFormat.XLSX);
            var sheet = workbook.CreateWorkSheet("Result Sheet");
// Set Cell Values Manually
            sheet["A1"].Value = "Object Oriented Programming";
            sheet["B1"].Value = "Data Structure";
            sheet["C1"].Value = "Database Management System";
            sheet["D1"].Value = "Agile Development";
            sheet["E1"].Value = "Software Design and Architecture";
            sheet["F1"].Value = "Software Requirement Engineering";
            sheet["G1"].Value = "Computer Programming";
            sheet["H1"].Value = "Software Project Management";
            sheet["I1"].Value = "Software Construction";
            sheet["J1"].Value = "Software Quality Engineering";
            sheet["K1"].Value = "Software ReEngineering";
            sheet["L1"].Value = "Advance Database Management System";
// Save Workbook
            workbook.SaveAs("Result Sheet.xlsx");
Enter fullscreen mode
Exit fullscreen mode
Here, I have populated Columns A to L, and the first row of each to the names of various courses related to software engineering.
Run the program to see the output:
Output File

Setting Cell Values Dynamically
To set values dynamically we employ instructions that are very similar to those under the previous heading. The advantage here is that you do not have to hard-code the cell location. In the next code example, you will create a new random object to create random numbers, and then make use of a loop to iterate through the range of cells you’d like to populate with values.
WorkBook workbook = WorkBook.Create(ExcelFileFormat.XLSX);
            var sheet = workbook.CreateWorkSheet("Result Sheet");
            /**
            Set Cell Value Dynamically
            **/
            Random r = new Random();
            for (int i = 2; i <= 11; i++)
            {
                sheet["A" + i].Value = r.Next(1, 100);
                sheet["B" + i].Value = r.Next(1, 100);
                sheet["C" + i].Value = r.Next(1, 100);
                sheet["D" + i].Value = r.Next(1, 100);
                sheet["E" + i].Value = r.Next(1, 100);
                sheet["F" + i].Value = r.Next(1, 100);
                sheet["G" + i].Value = r.Next(1, 100);
                sheet["H" + i].Value = r.Next(1, 100);
                sheet["I" + i].Value = r.Next(1, 100);
                sheet["J" + i].Value = r.Next(1, 100);
                sheet["K" + i].Value = r.Next(1, 100);
                sheet["L" + i].Value = r.Next(1, 100);
            }
            // Save Workbook
            workbook.SaveAs("Result Sheet.xlsx");
        }
Enter fullscreen mode
Exit fullscreen mode
Every cell from A2 to L11 contains a unique value that was randomly generated.
Let’s run the program. It will create an excel file for us. Open this with Microsoft Excel to see the output.
Output

Talking about dynamic values, how about learning how to dynamically add data into cells directly from a database? The next code snippet quickly shows how this is done, assuming you have set up your database connections correctly.
Adding Data Directly from a Database
I will get the data from the table and assign those values to the cells of my spreadsheet. Here is a snapshot of my “Marks” table:
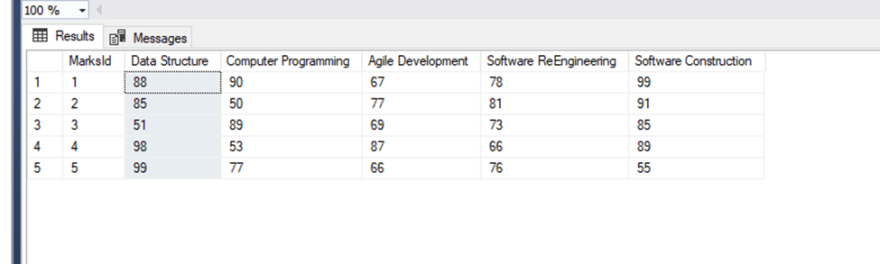
I will get the data from that tables and assign those values to the cells of my spreadsheet. Here is the snapshot of my Marks Table.
WorkBook workbook = WorkBook.Create(ExcelFileFormat.XLSX);
            var sheet = workbook.CreateWorkSheet("Result Sheet");
            //Create database objects to populate data from database
            string contring;
            string sql;
            DataSet ds = new DataSet("ResultSet");
            SqlConnection con;
            SqlDataAdapter da;
            //Set Database Connection string
            contring = @"data source = DESKTOP-FEP5MVSSQLEXPRESS; Initial Catalog = Result; Integrated Security = True; ";
            //SQL Query to obtain data
            sql = "SELECT [Data Structure],[Computer Programming] , [Agile Development] , [Software ReEngineering] , [Software Construction]  FROM Marks";
            //Open Connection & Fill DataSet
            con = new SqlConnection(contring);
            da = new SqlDataAdapter(sql, con);
            con.Open();
            da.Fill(ds);
            //Loop through Column
            foreach (DataTable table in ds.Tables)
            {
                for (int j = 0; j < table.Columns.Count; j++)
                {
                    sheet["A1"].Value = table.Columns[j].ToString();
                    sheet["B1"].Value = table.Columns[j].ToString();
                    sheet["C1"].Value = table.Columns[j].ToString();
                    sheet["D1"].Value = table.Columns[j].ToString();
                    sheet["E1"].Value = table.Columns[j].ToString();
                }
            }

            //Loop through contents of dataset
            foreach (DataTable table in ds.Tables)
            {
                for (int j = 0; j < table.Rows.Count; j++)
                {
                    sheet["A" + (j + 2)].Value = table.Rows[j]["Data Structure"].ToString();
                    sheet["B" + (j + 2)].Value = table.Rows[j]["Computer Programming"].ToString();
                    sheet["C" + (j + 2)].Value = table.Rows[j]["Agile Development"].ToString();
                    sheet["D" + (j + 2)].Value = table.Rows[j]["Software ReEngineering"].ToString();
                    sheet["E" + (j + 2)].Value = table.Rows[j]["Software Construction"].ToString();
                }
            }
            // Save Workbook
            workbook.SaveAs("Result Sheet.xlsx");
        }
Enter fullscreen mode
Exit fullscreen mode
In the above code, I first set the connection string of my database, and then I read the data from the table. Next, I assigned the column name to the Excel spreadsheet in the first loop, and values of the table in the second loop.
You simply have to set the value property of the particular cell to the field name, so that it can be entered into the cell.
Output File
Let’s run the program. It will create an Excel file for us. Open this with Microsoft Excel to see the output.

Summary
IronXL allow us to generate new Excel files in C#, create new worksheets inside them, set font sizes, use formulas and much more. There are too many functions and details to describe here. For more detailed information, please click here.
Iron software provides other libraries such as IronPdf for creating Pdf documents, Iron Barcode for generating, reading and manipulating barcode, and so forth. If you purchase the complete Iron suite, you will be eligible to receive all 5 products for the price of just two. For more details, please click here.
I hope this article was helpful and easy to read. Feel free to comment with your queries and feedback.
You can download a file project from this link.
Время на прочтение
7 мин
Количество просмотров 172K
Если Вы только начинаете свой путь знакомства с возможностями Python, ваши познания еще имеют начальный уровень — этот материал для Вас. В статье мы опишем, как можно извлекать информацию из данных, представленных в Excel файлах, работать с ними используя базовый функционал библиотек. В первой части статьи мы расскажем про установку необходимых библиотек и настройку среды. Во второй части — предоставим обзор библиотек, которые могут быть использованы для загрузки и записи таблиц в файлы с помощью Python и расскажем как работать с такими библиотеками как pandas, openpyxl, xlrd, xlutils, pyexcel.
В какой-то момент вы неизбежно столкнетесь с необходимостью работы с данными Excel, и нет гарантии, что работа с таким форматами хранения данных доставит вам удовольствие. Поэтому разработчики Python реализовали удобный способ читать, редактировать и производить иные манипуляции не только с файлами Excel, но и с файлами других типов.
Отправная точка — наличие данных
ПЕРЕВОД
Оригинал статьи — www.datacamp.com/community/tutorials/python-excel-tutorial
Автор — Karlijn Willems
Когда вы начинаете проект по анализу данных, вы часто сталкиваетесь со статистикой собранной, возможно, при помощи счетчиков, возможно, при помощи выгрузок данных из систем типа Kaggle, Quandl и т. д. Но большая часть данных все-таки находится в Google или репозиториях, которыми поделились другие пользователи. Эти данные могут быть в формате Excel или в файле с .csv расширением.
Данные есть, данных много. Анализируй — не хочу. С чего начать? Первый шаг в анализе данных — их верификация. Иными словами — необходимо убедиться в качестве входящих данных.
В случае, если данные хранятся в таблице, необходимо не только подтвердить качество данных (нужно быть уверенным, что данные таблицы ответят на поставленный для исследования вопрос), но и оценить, можно ли доверять этим данным.
Проверка качества таблицы
Чтобы проверить качество таблицы, обычно используют простой чек-лист. Отвечают ли данные в таблице следующим условиям:
- данные являются статистикой;
- различные типы данных: время, вычисления, результат;
- данные полные и консистентные: структура данных в таблице — систематическая, а присутствующие формулы — работающие.
Ответы на эти простые вопросы позволят понять, не противоречит ли ваша таблица стандарту. Конечно, приведенный чек-лист не является исчерпывающим: существует много правил, на соответствие которым вы можете проверять данные в таблице, чтобы убедиться, что таблица не является “гадким утенком”. Однако, приведенный выше чек-лист наиболее актуален, если вы хотите убедиться, что таблица содержит качественные данные.
Бест-практикс табличных данных
Читать данные таблицы при помощи Python — это хорошо. Но данные хочется еще и редактировать. Причем редактирование данных в таблице, должно соответствовать следующим условиям:
- первая строка таблицы зарезервирована для заголовка, а первый столбец используется для идентификации единицы выборки;
- избегайте имен, значений или полей с пробелами. В противном случае, каждое слово будет интерпретироваться как отдельная переменная, что приведет к ошибкам, связанным с количеством элементов в строке в наборе данных. Лучше использовать подчеркивания, регистр (первая буква каждого раздела текста — заглавная) или соединительные слова;
- отдавайте предпочтение коротким названиям;
- старайтесь избегать использования названий, которые содержат символы ?, $,%, ^, &, *, (,),-,#, ?,,,<,>, /, |, , [ ,] ,{, и };
- удаляйте любые комментарии, которые вы сделали в файле, чтобы избежать дополнительных столбцов или полей со значением NA;
- убедитесь, что любые недостающие значения в наборе данных отображаются как NA.
После внесения необходимых изменений (или когда вы внимательно просмотрите свои данные), убедитесь, что внесенные изменения сохранены. Это важно, потому что позволит еще раз взглянуть на данные, при необходимости отредактировать, дополнить или внести изменения, сохраняя формулы, которые, возможно, использовались для расчета.
Если вы работаете с Microsoft Excel, вы наверняка знаете, что есть большое количество вариантов сохранения файла помимо используемых по умолчанию расширения: .xls или .xlsx (переходим на вкладку “файл”, “сохранить как” и выбираем другое расширение (наиболее часто используемые расширения для сохранения данных с целью анализа — .CSV и.ТХТ)). В зависимости от варианта сохранения поля данных будут разделены знаками табуляции или запятыми, которые составляют поле “разделитель”. Итак, данные проверены и сохранены. Начинаем готовить рабочее пространство.
Подготовка рабочего пространства
Подготовка рабочего пространства — одна из первых вещей, которую надо сделать, чтобы быть уверенным в качественном результате анализа.
Первый шаг — проверка рабочей директории.
Когда вы работаете в терминале, вы можете сначала перейти к директории, в которой находится ваш файл, а затем запустить Python. В таком случае необходимо убедиться, что файл находится в директории, из которой вы хотите работать.
Для проверки дайте следующие команды:
# Import `os`
import os

# Retrieve current working directory (`cwd`)
cwd = os.getcwd()
cwd

# Change directory
os.chdir("/path/to/your/folder")

# List all files and directories in current directory
os.listdir('.')
Эти команды важны не только для загрузки данных, но и для дальнейшего анализа. Итак, вы прошли все проверки, вы сохранили данные и подготовили рабочее пространство. Уже можно начать чтение данных в Python?  К сожалению пока нет. Нужно сделать еще одну последнюю вещь.
Установка пакетов для чтения и записи Excel файлов
Несмотря на то, что вы еще не знаете, какие библиотеки будут нужны для импорта данных, нужно убедиться, что у все готово для установки этих библиотек. Если у вас установлен Python 2> = 2.7.9 или Python 3> = 3.4, нет повода для беспокойства — обычно, в этих версиях уже все подготовлено. Поэтому просто убедитесь, что вы обновились до последней версии
Для этого запустите в своем компьютере следующую команду:
# For Linux/OS X
pip install -U pip setuptools

# For Windows
python -m pip install -U pip setuptools
В случае, если вы еще не установили pip, запустите скрипт python get-pip.py, который вы можете найти здесь (там же есть инструкции по установке и help).
Установка Anaconda
Установка дистрибутива Anaconda Python — альтернативный вариант, если вы используете Python для анализа данных. Это простой и быстрый способ начать работу с анализом данных — ведь отдельно устанавливать пакеты, необходимые для data science не придется.
Это особенно удобно для новичков, однако даже опытные разработчики часто идут этим путем, ведь Anakonda — удобный способ быстро протестировать некоторые вещи без необходимости устанавливать каждый пакет отдельно.
Anaconda включает в себя 100 наиболее популярных библиотек Python, R и Scala для анализа данных в нескольких средах разработки с открытым исходным кодом, таких как Jupyter и Spyder. Если вы хотите начать работу с Jupyter Notebook, то вам сюда.
Чтобы установить Anaconda — вам сюда.
Загрузка файлов Excel как Pandas DataFrame
Ну что ж, мы сделали все, чтобы настроить среду! Теперь самое время начать импорт файлов.
Один из способов, которым вы будете часто пользоваться для импорта файлов с целью анализа данных — импорт с помощью библиотеки Pandas (Pandas — программная библиотека на языке Python для обработки и анализа данных). Работа Pandas с данными происходит поверх библиотеки NumPy, являющейся инструментом более низкого уровня. Pandas — мощная и гибкая библиотека и она очень часто используется для структуризации данных в целях облегчения анализа.
Если у вас уже есть Pandas в Anaconda, вы можете просто загрузить файлы в Pandas DataFrames с помощью pd.Excelfile ():
# Import pandas
import pandas as pd

# Assign spreadsheet filename to `file`
file = 'example.xlsx'

# Load spreadsheet
xl = pd.ExcelFile(file)

# Print the sheet names
print(xl.sheet_names)

# Load a sheet into a DataFrame by name: df1
df1 = xl.parse('Sheet1')
Если вы не установили Anaconda, просто запустите pip install pandas, чтобы установить пакет Pandas в вашей среде, а затем выполните команды, приведенные выше.
Для чтения .csv-файлов есть аналогичная функция загрузки данных в DataFrame: read_csv (). Вот пример того, как вы можете использовать эту функцию:
# Import pandas
import pandas as pd

# Load csv
df = pd.read_csv("example.csv")
Разделителем, который эта функция будет учитывать, является по умолчанию запятая, но вы можете, если хотите, указать альтернативный разделитель. Перейдите к документации, если хотите узнать, какие другие аргументы можно указать, чтобы произвести импорт.
Как записывать Pandas DataFrame в Excel файл
Предположим, после анализа данных вы хотите записать данные в новый файл. Существует способ записать данные Pandas DataFrames (с помощью функции to_excel ). Но, прежде чем использовать эту функцию, убедитесь, что у вас установлен XlsxWriter, если вы хотите записать свои данные на несколько листов в файле .xlsx:
# Install `XlsxWriter`
pip install XlsxWriter

# Specify a writer
writer = pd.ExcelWriter('example.xlsx', engine='xlsxwriter')

# Write your DataFrame to a file
yourData.to_excel(writer, 'Sheet1')

# Save the result
writer.save()
Обратите внимание, что в фрагменте кода используется объект ExcelWriter для вывода DataFrame. Иными словами, вы передаете переменную writer в функцию to_excel (), и указываете имя листа. Таким образом, вы добавляете лист с данными в существующую книгу. Также можно использовать ExcelWriter для сохранения нескольких разных DataFrames в одной книге.
То есть если вы просто хотите сохранить один файл DataFrame в файл, вы можете обойтись без установки библиотеки XlsxWriter. Просто не указываете аргумент, который передается функции pd.ExcelWriter (), остальные шаги остаются неизменными.
Подобно функциям, которые используются для чтения в .csv-файлах, есть также функция to_csv () для записи результатов обратно в файл с разделителями-запятыми. Он работает так же, как когда мы использовали ее для чтения в файле:
# Write the DataFrame to csv
df.to_csv("example.csv")
Если вы хотите иметь отдельный файл с вкладкой, вы можете передать a t аргументу sep. Обратите внимание, что существуют различные другие функции, которые можно использовать для вывода файлов. Их можно найти здесь.
Использование виртуальной среды
Общий совет по установке библиотек — делать установку в виртуальной среде Python без системных библиотек. Вы можете использовать virtualenv для создания изолированных сред Python: он создает папку, содержащую все необходимое для использования библиотек, которые потребуются для Python.
Чтобы начать работу с virtualenv, сначала нужно его установить. Потом перейти в директорию, где будет находится проект. Создать virtualenv в этой папке и загрузить, если нужно, в определенную версию Python. После этого активируете виртуальную среду. Теперь можно начинать загрузку других библиотек и начинать работать с ними.
Не забудьте отключить среду, когда вы закончите!
# Install virtualenv
$ pip install virtualenv

# Go to the folder of your project
$ cd my_folder

# Create a virtual environment `venv`
$ virtualenv venv

# Indicate the Python interpreter to use for `venv`
$ virtualenv -p /usr/bin/python2.7 venv

# Activate `venv`
$ source venv/bin/activate

# Deactivate `venv`
$ deactivate
Обратите внимание, что виртуальная среда может показаться сначала проблематичной, если вы делаете первые шаги в области анализа данных с помощью Python. И особенно, если у вас только один проект, вы можете не понимать, зачем вообще нужна виртуальная среда.
Но что делать, если у вас несколько проектов, работающих одновременно, и вы не хотите, чтобы они использовали одну и ту же установку Python? Или если у ваших проектов есть противоречивые требования. В таких случаях виртуальная среда — идеальное решение.
Во второй части статьи мы расскажем об основных библиотеках для анализа данных.
Продолжение следует…
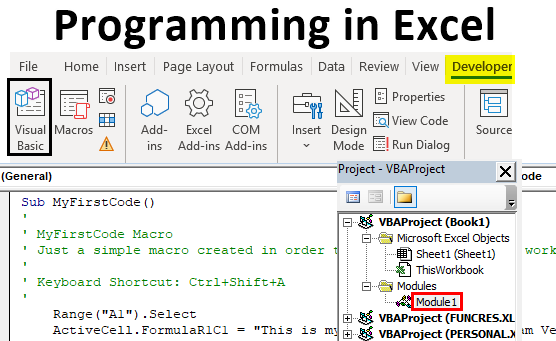
Excel Programming (Table of Contents)
- Introduction to Programming in Excel
- How to Program in Excel?
Introduction to Programming in Excel
Have you ever been tired of doing a task in Excel which you feel can be automated and save your time? Most of the time, you must have encountered such tasks. However, in order to automate any task, you first need to have programming skills for that particular language. In Excel, you can do programming with the help of Visual Basic for Application (VBA) which is Excel’s own programming language that can help you to automate the tasks. In this article, we will see how we can do programming in Excel VBA. VBA can be used to write a program that can automate the task for you. The piece of lines we write under VBA is called Macro, which is written in such a way that they instruct the Excel system about what to be done.
How to Program in Excel?
Let’s understand how to Program in excel with few illustrations.
Enabling Developer Tab
The first thing that comes is enabling the developer tab that helps you to record and store a macro (VBA Code). Let us see how we can get that enabled.
- Navigate to the File menu in your excel file and click on it.
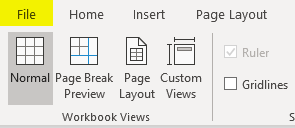
- Within the File menu, click on Options, and it will load a new window with all excel options available.
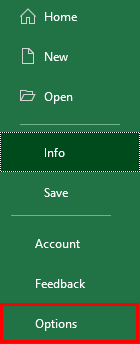
- In the new window that popped up named Excel Options, click on the Customize Ribbon tab. You can see all the customization options you can use for Excel Ribbon, which appears at the top of your Excel file.
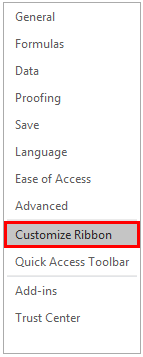
- Enable Developer option under Main Tabs dropdown within Customize the Ribbon: section. You can check (tick-mark) the Developer tab to enable it. Click the OK button placed at the bottom right of the Excel Options tab, and that’s it.
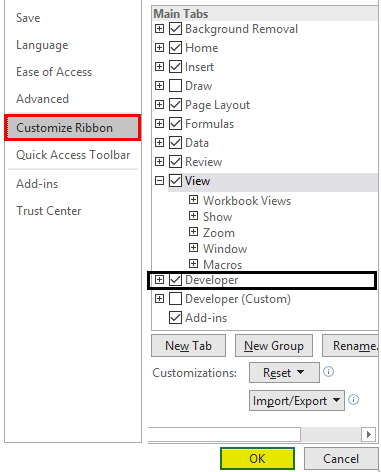
- You have successfully enabled the Developer option within your excel. If you check the Excel Ribbon in your file now, you’ll be able to see a new tab added there with the name Developer on it.
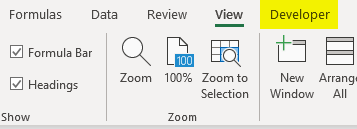
This is the first step you need to follow before you start writing macros in Excel. Because the Developer tab is needed to record and run the macro, this option tab is not by default enabled, which is why we tried enabling it here first.
Recording a Macro
- Open the Excel file. Navigate towards the Developer tab you just enabled and then click on the Record Macro button, categorized and can be seen under the Code section.
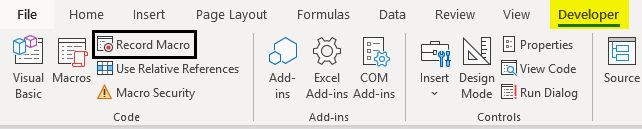
- As soon as you click on the Record Macro button, you’ll see a window popping up; in that window, you must have to assign a name to the macro; you can also assign a shortcut key for this macro to run. Can you add the description, if any, for this macro you are creating? Once you are done with all this, you can click on the OK button placed at the right bottom of the window. See the screenshot below for your reference.
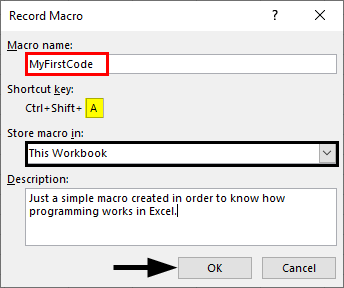
As soon as you click OK, the system starts recording the macro and all the tasks you perform will be recorded and converted to Excel Program in the backend.
- Try typing the sentence “This is my first VBA code, and I am very happy!” in cell A1 within the Excel sheet and press Enter key. These steps will be recorded in the backend of the macro.

- Under the Code section, you might have observed that the Record Macro button has changed to Stop Recording. This is like Play and Stop. Record Macro Works as Play button and Stop Recording work as Stop button. Click on the Stop Recording button to stop the recording.
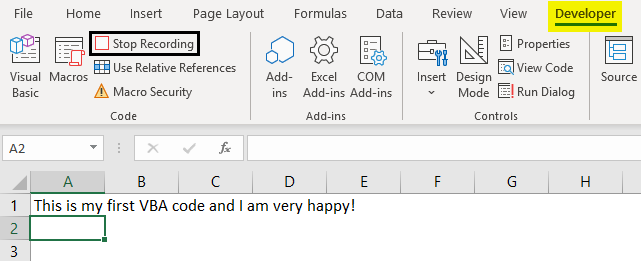
The magic behind all this is, Excel has recorded my steps here and converted those into pieces of code so that this task can be automated. It means, every single step, selecting cell A1, inputting the text as “This is my first VBA code, and I am happy!”, clicking Enter to go to the next cell. All these steps are converted into a VBA code. Let’s check the code now.
- In order to go to Visual Basic Editor, you can click on the Visual Basic option under the Code category in the Developer tab, or you can use Alt + F11 as a shortcut for the same.
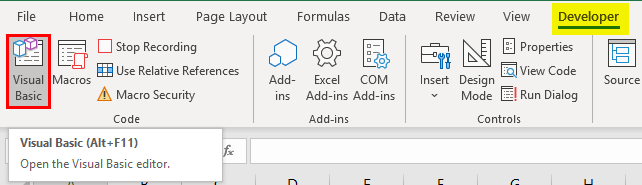
- Navigate towards the Modules section under VBAProject and click on the plus button under it to see the list of active modules in VBA.
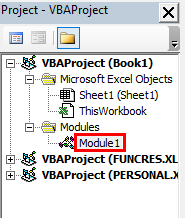
- Inside the Modules folder, you can see Module1 as soon as you click on the plus sign. You can double click on Module1; it is where your code for the task we performed in previous steps (Step 3 and 4) are recorded. Save this code, and you can run it every time to get the same output. See the screenshot below:
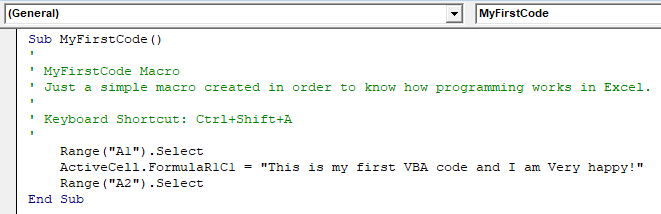
Conclusion
- We can record a macro in Excel to automate day to day small tasks, which are simpler for the system to manipulate programmatically.
- The cool thing about it is you don’t need to dig your head deep for the logic behind each step you perform. Excel VBA does it for you.
- For some complex tasks, such as the one which involves looping and conditional statements, you need to write code manually under VBA.
Things to Remember About Programming in Excel
- The Developers tab is not by default enabled and visible to you in Excel Ribbon. You need to enable it through Excel Options.
- Recording a macro works on simple tasks that are repeating, and you need those to be automated. However, for complex tasks which involve looping or Conditional Inputs and Outputs are still need to be coded manually under VBA.
- You need to save the file as an Excel-Macro Enable file format in order to be able to read and run the code again on your excel.
Recommended Articles
This is a guide to Programming in Excel. Here we discuss how to Program in Excel along with practical examples and a downloadable excel template. You can also go through our other suggested articles –
- Ribbon in Excel
- TRIM Formula in Excel
- Project Management Template in Excel
- COUNTIFS in Excel