
Enter Edit mode
- Double-click the cell that contains the data that you want to edit.
- Click the cell that contains the data that you want to edit, and then click anywhere in the formula bar.
- Click the cell that contains the data that you want to edit, and then press F2.
Contents
- 1 How do I edit rows in Excel?
- 2 Can’t edit anything in Excel?
- 3 How do I edit text in an Excel spreadsheet?
- 4 How do I make all Excel sheets editable?
- 5 How do I edit text in Excel without a mouse?
- 6 How do I edit a cell in Excel using the keyboard?
- 7 What is the shortcut to activate edit mode in Excel?
- 8 How can I edit an Excel spreadsheet without Microsoft Office?
- 9 Where is the editing tab in Excel?
- 10 How do I track changes in Excel?
- 11 What is the shortcut key for edit?
- 12 How do you edit a cell in Excel without deleting it?
- 13 What does Alt n do?
- 14 What is the use of Ctrl Z?
- 15 How do I enable editing on keyboard?
- 16 How do I edit text in multiple cells in Excel?
- 17 How do you open and edit Excel files without Office?
- 18 Is MS Excel free?
- 19 Is there a free version of Excel?
- 20 How do I edit a spreadsheet?
How do I edit rows in Excel?
To modify all rows or columns:
- Locate and click the Select All button just below the name box to select every cell in the worksheet.
- Position the mouse over a row line so the cursor becomes a double arrow.
- Click and drag the mouse to increase or decrease the row height, then release the mouse when you are satisfied.
Can’t edit anything in Excel?
a. Select File > Options > Select Advanced from the Excel menu bar. b. On Editing options, ensure that the check box Allow editing directly in cells is checked.
How do I edit text in an Excel spreadsheet?
To start working in Edit mode, do one of the following:
- Double-click the cell that contains the data that you want to edit.
- Click the cell that contains the data that you want to edit, and then click anywhere in the formula bar.
- Click the cell that contains the data that you want to edit, and then press F2.
How do I make all Excel sheets editable?
On the Tools menu, click Share Workbook, and then click the Editing tab. Click to select the Allow changes by more than one user at the same time check box, and then click OK. Save the workbook when you are prompted.
How do I edit text in Excel without a mouse?
You can press the F2 key to get into the editing mode of a cell without double clicking it. It is easy to operate, you just need to select the cell you want to edit and press the F2 key, and the cursor will be located at the end of the cell value, then you can edit the cell immediately.
How do I edit a cell in Excel using the keyboard?
Edit Cell Using Excel Shortcut Key
We can also use the keyboard shortcut keys to edit the excel cells, and the shortcut is “F2,” so by pressing the F2 key, it will take us the active cell to editing mode.
What is the shortcut to activate edit mode in Excel?
To do this, you must first press the F2 key on your desired cell to activate “Edit” mode (see our prior keyboard shortcut on the Double F2 key). Once you are in “Edit” mode, you have the flexibility to highlight any part of your formula to evaluate it, so long as it could have been evaluated as a stand-alone formula.
How can I edit an Excel spreadsheet without Microsoft Office?
Best of all, these alternatives to Excel are free.
- Google Sheets. Image: Google.
- Microsoft Office Excel Online.
- Apache OpenOffice Calc.
- LibreOffice Calc.
- WPS Office Spreadsheets.
Where is the editing tab in Excel?
you can click Menus tab to get back the classic style interface, and then you will find the Edit menu easily. Click the arrow next to the Tools; you may get the familiar functions in the drop down menu.
How do I track changes in Excel?
Enabling the Track Changes in Excel Feature
- Go to the Review tab.
- In the Changes group, click on the Track Changes option and select Highlight Changes.
- In the Highlight Changes dialog box, check the option – ‘Track changes while editing. This also shares your workbook’.
- Click OK.
What is the shortcut key for edit?
Alt+F – Open File menu. Alt+E – Open Edit menu. Alt+V – Open View menu.
How do you edit a cell in Excel without deleting it?
Press F2 (edit). Btw, pressing Enter doesn’t delete the contents of the cell it think. 🙂 It moves to the next one.
What does Alt n do?
Alt+N is a keyboard shortcut most often used to open the Insert option in a file menu or the Ribbon.
What is the use of Ctrl Z?
To reverse your last action, press CTRL+Z. You can reverse more than one action. To reverse your last Undo, press CTRL+Y. You can reverse more than one action that has been undone.
How do I enable editing on keyboard?
This list offers a quick reminder of some old standbys, along with a few shortcuts that are less well known but equally useful.
The shortcuts.
| Action | Shortcut |
|---|---|
| Enable editing within a cell | F2 |
| Fill selected cells with an entry you typed in one cell | Ctrl + Enter |
| Cancel an entry | Esc |
How do I edit text in multiple cells in Excel?
You can drag an area with your mouse, hold down SHIFT and click in two cells to select all the ones between them, or hold down CTRL and click to add individual cells. Then type in your selected text. Finally, hit CTRL+ENTER (instead of enter) and it’ll be entered into all the selected cells. How simple is that?
How do you open and edit Excel files without Office?
Open Word, Excel, PowerPoint files without Microsoft Office
- Offline solutions. Microsoft Viewer applications. OpenOffice. LibreOffice.
- Online solutions. Google Docs. ThinkFree.
Is MS Excel free?
Microsoft Office is one of the more expensive sets of productivity software most people will purchase.At the new Office.com, you can use basic versions of Word, Excel, PowerPoint, and OneNote for free in your browser. They’re the same Microsoft Office apps you’re used to, only they run online and are 100% free.
Is there a free version of Excel?
Perhaps again in response to Google, Microsoft’s Office mobile applications are completely free and available across modern mobile devices. You can download the Microsoft Excel app for Android and iOS.
How do I edit a spreadsheet?
Edit data in a cell
- Open a spreadsheet in the Google Sheets app.
- In your spreadsheet, double-tap the cell you want to edit.
- Enter your data.
- Optional: To format text, touch and hold the text, then choose an option.
- When done, tap Done .
Содержание
- Edit cell contents
- How does Excel operate differently in Edit mode?
- Enable or disable Edit mode
- Enter Edit mode
- Insert, delete, or replace cell contents
- Cancel or undo edits
- Adjust the way cell contents are displayed
- Exit Edit mode
- Excel Shortcut to Edit Cell
- Excel Edit Cell Shortcut
- Editing Cells in Excel
- Edit Cell Using Excel Shortcut Key
- Tips for Editing Cells in Excel
- Things to Remember
- Recommended Articles
- How to Create, Edit, and View Microsoft Excel Documents for Free
- In This Article
- Excel Online
- Microsoft Excel App and 365 App
- Microsoft 365 Home Trial
- Office Online Chrome Extension
- LibreOffice
- Kingsoft WPS Office
- Apache OpenOffice
- Gnumeric
- Google Sheets
Edit cell contents
You can edit the contents of a cell directly in the cell. You can also edit the contents of a cell by typing in the formula bar.
When you edit the contents of a cell, Excel is operating in Edit mode. Some Excel features work differently or are unavailable in Edit mode.
When Excel is in Edit mode, the word Edit appears in the lower-left corner of the Excel program window, as shown in the following illustration.

How does Excel operate differently in Edit mode?
In Edit mode, many commands are unavailable. For example, when Excel is in Edit mode, you cannot apply conditional formatting or change the alignment of the contents of a cell.
Also, the arrow keys behave somewhat differently when Excel is in Edit mode. Instead of moving the cursor from cell to cell, in Edit mode, the arrow keys move the cursor around in the cell.
Enable or disable Edit mode
If you try to use Edit mode and nothing happens, it might be disabled. You can enable or disable Edit mode by changing an Excel option.
Click File > Options > Advanced.
In Excel 2007 only: Click the Microsoft Office Button  , click Excel Options, and then click the Advanced category.
Under Editing options, do one of the following:
To enable Edit mode, select the Allow editing directly in cells check box.
To disable Edit mode, clear the Allow editing directly in cells check box.
Enter Edit mode
To start working in Edit mode, do one of the following:
Double-click the cell that contains the data that you want to edit.
This starts Edit mode and positions the cursor in the cell in the location that you double-clicked. The cell contents are also displayed in the formula bar.
Click the cell that contains the data that you want to edit, and then click anywhere in the formula bar.
This starts Edit mode and positions the cursor in the formula bar at the location that you clicked.
Click the cell that contains the data that you want to edit, and then press F2.
This starts Edit mode and positions the cursor at the end of the cell contents.
Insert, delete, or replace cell contents
To insert characters, click in the cell where you want to insert them, and then type the new characters.
To delete characters, click in the cell where you want to delete them, and then press BACKSPACE, or select the characters and then press DELETE.
To replace specific characters, select them and then type the new characters.
To turn on Overtype mode so that existing characters are replaced by new characters while you type, press INSERT.
Note: Overtype mode can be turned on or off only when you are in Edit mode. When Overtype mode is turned on, the character to the right of the insertion point is highlighted in the formula bar, and it will be overwritten when you type.
To start a new line of text at a specific point in a cell, click in the where you want to break the line, and then press ALT+ENTER.
Cancel or undo edits
Before you press ENTER or TAB, and before or after you press F2, you can press ESC to cancel any edits that you made to the cell contents.
After you press ENTER or TAB, you can undo your edits by pressing CTRL+Z, or by clicking Undo  on the Quick Access Toolbar.
Adjust the way cell contents are displayed
After you edit cell contents, you may want to adjust the way they are displayed.
At times, a cell might display #####. This can occur when the cell contains a number or a date and the width of its column cannot display all the characters that its format requires. For example, suppose a cell with the Date format «mm/dd/yyyy» contains 12/31/2007. However, the column is only wide enough to display six characters. The cell will display #####. To see the entire contents of the cell with its current format, you must increase the width of the column.
Change the width of a column
Click the cell for which you want to change the column width.
On the Home tab, in the Cells group, click Format.

Under Cell Size, do one of the following:
To fit all text in the cell, click AutoFit Column Width.
To specify a larger column width, click Column Width, and then type the width that you want in the Column width box.
Note: As an alternative to increasing the width of a column, you can change the format of that column or even an individual cell. For example, you could change the date format so that a date is displayed as only the month and day («mm/dd» format), such as 12/31, or represent a number in a Scientific (exponential) format, such as 4E+08.
If there are multiple lines of text in a cell, some of the text might not be displayed the way that you want. You can display multiple lines of text inside a cell by wrapping the text.
Note: When Excel is in Edit mode, you cannot change the way text wraps.
Wrap text in a cell
Click the cell in which you want to wrap the text.
On the Home tab, in the Alignment group, click Wrap Text.
Note: If the text is a single long word, the characters won’t wrap; you can widen the column or decrease the font size to see all the text. If not all text is visible in the cell after you wrap the text, you may need to adjust the height of the row.
On the Home tab, in the Cells group, click Format, and then under Cell Size click AutoFit Row.
Exit Edit mode
To stop working in Edit mode, do one of the following:
Excel exits Edit mode and selects the cell directly below the current cell.
You can also specify that pressing ENTER select a different adjacent cell.
Click File > Options > Advanced.
In Excel 2007 only: Click the Microsoft Office Button , click Excel Options, and then click the Advanced category.
Under Editing options, do one of the following:
To make the selection remain in the cell that you were editing, clear the After pressing Enter, move selection check box.
To control the direction of the selection, select the After pressing Enter, move selection check box, click the arrow next to Direction, and then select a direction from the list.
This stops Edit mode and selects the cell to the right of the current cell. Pressing SHIFT+TAB selects the cell to the left.
Click a different cell.
Excel exits Edit mode and selects the cell that you clicked.
Excel exits Edit mode and leaves the cursor where it is.
Источник
Excel Shortcut to Edit Cell


Excel Edit Cell Shortcut
Editing is common when we need to change things in any cell. So it is vital to practice the shortcut key for this particular task. Often, we may need to edit the cell’s content. Often, we may need to edit the formula or debug the formula, so the shortcut is very important. Furthermore, it is important to practice shortcut keys to cut the short time for specific tasks as a new learner. So let us start one of the keyboard shortcut keys to edit a cell in Excel. This article will show you the efficient editing techniques of the cells using shortcut keys.
Table of contents
Editing Cells in Excel
In Excel, editing is possible at the cell level at a time. However, we can edit only one cell, so we usually write formulas, edit them, and make corrections to the formulas to debug any issues.
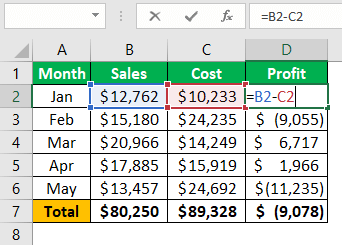
For example, let us look at the below data in Excel.

In column “D,” we have formulas. So, if we want to edit the formula, we can do it in two ways: manual and keyboard shortcut key Keyboard Shortcut Key An Excel shortcut is a technique of performing a manual task in a quicker way. read more . Both are simple and take an equal amount of time. So, let us look at them one by one in detail.
If we want to edit the cell D2 formula, we first need to select the cell for editing.


The moment we put our cursor (we can see the small blinking straight line) in the “Formula” bar. It has gone to editing mode. In the cell, we can see only the formula, not the result of the formula.
So, this is the way of editing the cells. We can edit cells and formulas by directly placing the cursor on the formula bar in Excel.
Another way of editing the cells, i.e. double-clicking on the cell. So, first, we need to select the cell that we wish to edit and then double-click on the cell. As a result, it will go to edit mode.
Since we double-clicked on the cell, it has gone to edit mode.
We can notice one more thing here: editing a blinking straight line appears itself in the cell rather than the formula cell, as in the previous example.
There is a way to identify the formula bar editing and in-cell editing, i.e.; it would be that editing mode wherever colored cell reference is highlighted.


Edit Cell Using Excel Shortcut Key
We can also use the keyboard shortcut keys to edit the Excel cells. For example, the shortcut key is “F2,” so pressing the F2 key will take us from the active cell to editing mode.

For example, suppose we want to edit cell D2. So, first, we need to press the F2 key by selecting the cell.

As we can see above, this works like in-cell editing, where a blinking straight line appears inside the cell rather than in the “Formula” bar. However, by changing default settings, we can make this change happen.
Follow the below steps to make the edit in the Excel “Formula” bar.
- We must first go to the “File” tab. Under this, go-to “Options.”

Now, click on the “Advanced” tab.

After that, uncheck the box “Allow editing directly in cells.”
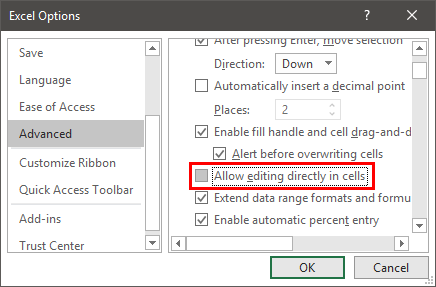
If we press the “F2” key on the keyboard as the Excel shortcut key, the blinking straight line may go to the “Formula” bar instead of in-cell itself.

Tips for Editing Cells in Excel
An “F2” shortcut key can put the cell into editing mode. But, we are the ones who need to make the changes. For example, let us look at the below content.

We have a spelling mistake, “savvve” in this example, so we must press the “F2” key to edit the cell.

Upon pressing the “F2” key, the edit gets activated at the end of the cell value. So, now we need to travel to the left side. By pressing the left arrow key, we can move one character at a time. To move one word instead of one character, we must hold the “Ctrl” key and press the left arrow. It will jump to the next word.

Like this, we can use the keyboard shortcut keys to edit the Excel cell to the full extent.
Things to Remember
- By default, we can use the “F2” shortcut key for editing in the cell. But by changing the settings, we can make this happen at the “Formula” bar.
- Edit happens at the end of the cell’s value. We may go to the middle of the cell’s value by placing the cursor anywhere.
Recommended Articles
This article has been a guide to Excel shortcuts to edit the cell. Here, we discuss the different ways of editing the cells using shortcut keys and practical examples. You may learn more about Excel from the following articles: –
Источник
How to Create, Edit, and View Microsoft Excel Documents for Free
Try any of these spreadsheeting alternatives for free
:max_bytes(150000):strip_icc()/ScottOrgera-f7aca23cc84a4ea9a3f9e2ebd93bd690.jpg)
In This Article
Jump to a Section
Microsoft Excel is used by many people to open and edit Excel files. However, the full version of Excel costs money. If you want a free alternative, these free apps can open, modify, and create Excel spreadsheets.
The majority of these apps support files with the XLS or XLSX extension, among others.
Excel Online
Microsoft offers a web-based version of the Office suite, which includes Excel. Excel Online has Excel’s basic functionality but doesn’t include the advanced features of the paid version, such as macro support.
Excel Online is accessible in most browsers. You can use it to edit existing XLS and XLSX files and create new workbooks.
:max_bytes(150000):strip_icc()/ScreenShot2019-11-14at1.30.06PM-f25e6439d31542138f7b53c1cf872f5b.jpg)
Office Online’s integration with Microsoft OneDrive means you can store your spreadsheets in the cloud and collaborate with others in real-time.
Microsoft Excel App and 365 App
The standalone Excel app is available for Android and iOS, and the features vary depending on the device. There’s also a unified Microsoft 365 iOS app that includes Excel, Word, and PowerPoint.
You can create and edit spreadsheets on an Android device with a 10.1 inch or smaller screen at no charge. If you use the app on a larger phone or tablet, you’ll need a subscription to Microsoft 365 to do more than view an Excel file.
With the Excel standalone iOS app or as part of the Microsoft 365 iOS app, you can create, edit, save, and view Excel documents for free on an iPad, iPhone, or iPod touch. Advanced features, however, will require a Microsoft 365 subscription.
Some advanced features are only accessible with a subscription, no matter which device you have.
Microsoft 365 Home Trial
Microsoft’s free offerings, such as the browser-based Office suite and the Excel app, limit the available features. If you require access to Excel’s advanced functionality but don’t want to pay for Excel, the trial version of Microsoft 365 may be a short-term solution.
Once activated, you can run the complete version of Microsoft Office Home Edition (including Excel) on a combination of five PCs and Macs. The Excel app can be installed on up to five Android or iOS phones and tablets.
You must have a valid credit card number to start the 30-day trial. After the trial, you’re charged for a 12-month subscription if you don’t manually cancel the subscription before the expiration date.
Office Online Chrome Extension
The add-on for Google Chrome opens a powerful version of Excel in a browser window. It works on all major desktop operating systems.
The Office Online extension only works with an active Microsoft 365 subscription. It functions as expected during the Microsoft 365 free trial period.
LibreOffice
LibreOffice is an open-source software suite that you can download for free. It features Calc, an Excel alternative that supports XLS and XLSX files, and the OpenDocument format.
Calc offers many of the spreadsheet features and templates that are commonly used in Excel. It contains multi-user functionality that allows for seamless collaboration. It also includes several power-user components, including DataPivot and a comparative Scenario Manager.
Kingsoft WPS Office
The personal, free-to-download version of the Kingsoft WPS Office suite contains Spreadsheets, which is compatible with XLS and XLSX files. Spreadsheets features data analysis and graphing tools along with basic spreadsheet functionality.
Spreadsheets can be installed as a standalone app on Android, iOS, and Windows operating systems.
A business version is available for a fee. It offers advanced features, cloud storage, and multi-device support.
Apache OpenOffice
Apache OpenOffice has amassed hundreds of millions of downloads since its initial release. It’s available in over three dozen languages. OpenOffice includes a spreadsheet application that’s also named Calc. It supports basic and advanced features, including extensions, macros, and Excel file formats.
Calc and the rest of OpenOffice may be shutting down due to an inactive developer community. If this happens, essential updates, including patches for security vulnerabilities, won’t be made available. At that point, we recommend that you quit using this software.
Gnumeric
Gnumeric is a standalone spreadsheet application that is also available for free. This open-source program is frequently updated. It supports all Excel file formats and is scalable to work with large spreadsheets.
Google Sheets
Google’s answer to Excel Online is Sheets. Sheets is a full-featured browser-based spreadsheet. It integrates with your Google account and your server-based Google Drive. This easy-to-use application offers high-end functionality, templates, add-ons, and real-time collaboration.
Sheets is fully compatible with Excel file formats and is entirely free to use. In addition to the web-based version for desktops and laptops, Sheets apps are available for Android and iOS devices.
Источник
![]()
Download Article
![]()
Download Article
If you’re not very familiar with Microsoft Excel, it might seem an intimidating program to use. Fortunately, it’s easy to get started. You can type in data, copy and paste it from other documents, and format it with just a few clicks. With a little practice, you’ll be able to quickly enter, edit and manage data in Microsoft Excel.
-

1
Launch Microsoft Excel. You can locate Excel by clicking the «Start» menu, selecting «All Programs,» selecting «Microsoft Office» and then choosing «Microsoft Excel.» Excel comes with the Microsoft Office suite of products generally packaged with Windows computers and notebooks.
- Mac users who have purchased Excel for Mac will find the program located in their Dock or among by opening «Finder» and then selecting «Applications.»
-
2
Open a spreadsheet. A blank «workbook» may automatically appear upon opening Excel. Otherwise, you’ll see a «Template Gallery» from which you can either select a new blank workbook or a specially formatted template.
- You may always open a new spreadsheet while working on another workbook in Excel. Simply click on «File» from the menu bar and select the «New Workbook» option.
Advertisement
-
3
Enter data into desired cells. You may type numbers, words, equations, formulas or functions in any cell after selecting and clicking on it. [1]
- When finished with a given cell, press ↵ Enter or Tab ↹ to automatically move to the next cell horizontally.
- You may also create a new line within a cell on which to add more text. Simply enter a «Line Break» by pressing Alt+↵ Enter.
-
4
Create headings for your columns. Enter text into Row 1 to create column headings for your data. For instance, enter «Name» into cell A1 and “Date” into cell B1 and allow these to serve as your column headers for tracking name and date information.
-
5
Create a sequenced data series. Excel is able to learn patterns underlying your data and then fill in data based on those pattern to save you time and energy. Begin by establishing a pattern in consecutive cells (e.g. typing «January» in one cell and «February» in the next). Then select the populated cells and click and drag the bottom right corner of your selected rectangle to expand the pattern into new cells. Excel will automatically recognize your established pattern and fill in subsequent cells with «March», «April» and so on.
- Excel can recognize many common patterns such as days of the week, evenly-spaced dates, consecutive numbers and many others.
-
6
Select a range of cells. To select a range of cells with via your mouse (in order to format or edit larger quantities of data), simply click the beginning or end of a data range and drag your cursor in your desired direction to highlight the appropriate text. There are also a number of helpful keyboard shortcuts enumerated below.[2]
- Pressing Ctrl and the spacebar extends a selection throughout the column where the original cell is located.
- Pressing ⇧ Shift and the spacebar extends a selection throughout the row where the original cell is located.
- Pressing Ctrl+⇧ Shift and the spacebar or Ctrl+A will select the entire worksheet.
-
7
Insert row(s). Begin by clicking a row number (this will select the entire row). Select the row that you’d like your new row to go above. Right-click (Control+click on Mac) and select «Insert» from the menu that appears.[3]
- This function is also available from the «Home» tab by selecting «Insert» from the «Cells» then «Insert Sheet Rows.»
- Inserting multiple rows requires you to select multiple rows above the location in which you wish to place new rows. Simply select the same number of rows that you want inserted below.
-
8
Insert columns(s). Begin by clicking a column letter (this will select the entire column). Select the column that you’d like your new column to go to the left of. Right-click (Control+click on Mac) and select «Insert» from the menu that appears.
- This function is also available from the «Home» tab by selecting «Insert» from the «Cells» then «Insert Sheet Rows.»
- Inserting multiple columns requires you to select multiple columns to the right of the location in which you wish to place new columns. Simply select the same number of columns that you want inserted to the left.


Advertisement
-
1
Copy one or more cells. After selecting the cell(s) you wish to copy, right-click and select «Copy» from the menu that appears. Alternately press Ctrl+C (or ⌘ Command+C for Mac users). This will add the selected data to your clipboard.
-
2
Cut one or more cells. After selecting the cell(s) you wish to cut, right-click and select «Cut» from the menu that appears. Alternately press Ctrl+X (or ⌘ Command+X for Mac users). This will add the selected data to your clipboard.
-
3
Paste one or more cells. After selecting the cell(s) in which you wish to paste your data, right-click and select «Paste» from the menu that appears. Alternately, press Ctrl (or ⌘ Command for Mac users). This will paste the contents of the copied or cut cell(s).
- If your cell contains a formula, «Paste» will paste the formula not calculated value of the formula. In order to «Paste» cell values, use «Paste Special»
-
4
Paste cell values instead of formulas. Begin by selecting «Edit» from the «Home» tab and clicking «Paste Special.» Select «Values» from the list of attributes to paste. [4]
- Depending on your version of Excel, other options in the «Paste Special» may include «Comments» (text comments which can be added to individual cells), «Formats» (all text formatting selections), or «All» to paste everything at once. [5]
- Depending on your version of Excel, other options in the «Paste Special» may include «Comments» (text comments which can be added to individual cells), «Formats» (all text formatting selections), or «All» to paste everything at once. [5]
-
5
Delete cell content. Simply select the cell(s) in which you wish to delete text and press Del or right-click and select «Delete» from the menu that appears.
-
6
Move cells, rows or columns. Highlight your chosen cells and activate the «move pointer» (appearing as four directional arrows for Windows users or as a hand icon for Mac users). Drag to your preferred location to replace any existing data there with the cells you’ve decided to move[6]
-
7
Use a formula. Excel uses «formulas» to make calculations within a cell and can reference other cells as part of that calculation. Click the cell in which you wish to enter the formula and then begin by typing «=». Now type a mathematical formula and click «Enter». Excel will display the results (not the formula itself).
- You can also learn more about How to Type Formulas in Microsoft Excel
-
8
Reference values from other cells. Formulas can reference other cells and their values. While typing a formula, simply click a single cell or a range of cells and Excel will automatically populate the cell’s name (e.g., B2, D5) into your formula. Now your formula references that specific cell and will draw a value from it continuously. If the value in the referenced cell changes, the results of your formula will as well.
- You can also reference values from other worksheets. Begin by selecting the cell in which you wish to reference a value, type an «=’ in the formula bar and then type your desired formula immediately after the «=.» After typing the formula, simply click on the tab for the worksheet you wish to reference and then select the desired data range that you want entered into the formula.
-
9
Track your changes. You can track changes by selecting «Tools» from the menu bar and then clicking «Track Changes.» Finally, select «Highlight Changes.»
- If this option is unavailable, you are in a Read-Only format. Under «Track Changes,» check the option next to «Track changes while editing. This also shares your workbook.» Once this option is selected, then you can make changes and view those changes by selecting this option again and checking the box next to «Highlight Changes.»
-
10
Add comments. This can be a useful way to discuss edits made on an Excel spreadsheet. Begin by selecting the cell(s) on which you wish to comment. Then select «Insert» from the menu bar and click «Insert Comment» from the menu that appears. A text box will appear in your desired location and allow you to leave a comment.
-
11
Save your changes. Select «File» from the menu bar and click «Save.» Then select the «Save In» drop-down list button and choose your preferred folder. If you attempt to exit Excel before saving your most recent changes, a dialogue box will appear and ask if you wish to save your changes. You may either click «Save» or «Don’t Save» depending on your preference.


Advertisement
-
1
View the «Format» ribbon. Be sure that the «Format» ribbon is visible so that you can easily and quickly access a variety of formatting options. Simply click the downward-pointing arrow at the right side of the «Format» ribbon to expand it. This will allow you to adjust font style and size while also making text italicized, bold or underlined. It also gives you shortcut access to several of the functions discussed in formatting steps outlined below. [7]
- A right-click on a cell or group of cells also brings up formatting options. After right-clicking the cell(s), select «Format Cells.» This will provide you a number of options with respect to Number (style), Alignment, Font, Border, Patterns and Protection.
-
2
Wrap your text. This will cause text to wrap around and remain visible within a cell rather than trailing off and becoming obscured by the next cell. Begin by highlighting the cells you wish to adjust. Then, under the «Home» tab, look at the «Alignment» group of buttons and select the «Wrap Text» option.
- You can also adjust your text to fit cells so that columns and rows automatically adjust their width or height (respectively) in order to accommodate the content within a cell. Under the «Home» tab, look at the «Cells» group of buttons and click «Format.» From the «Format» menu, select «Cell Size» and click either «AutoFit Column Width» or «AutoFit Row Height.»
-
3
Align your text. This will cause your text to be justified on the left, right or center part of the cells. Begin by highlighting the cells you wish to adjust. Then, under the «Home» tab, select the appropriate alignment. You’ll see three buttons with lines oriented so as to demonstrate the side of the cell(s) in which text will begin.
-
4
Change the numeric style of data. You’ll find several basic numbering styles on the «Format» toolbar itself. Simply select the cell(s) you wish to format and then click the appropriate numeric style located on the toolbar. To access additional styles, right-click on the selected cell(s), click «Format Cells» and then select the «Number» tab. You’ll see a variety of options listed under «Category.»
-
5
Change your text color. Select the cell(s) for which you wish to adjust the text color. Then, from the «Format» toolbar, click the downward pointing arrow next to «Font Color.» This is the option that looks like a letter «A» with a colored line underneath it. Clicking the arrow with display a menu with a variety of color options.
-
6
Change your background color. Select the cell(s) for which you wish to adjust background color. Then, from the «Format» toolbar, click the downward pointing arrow next to «Fill Color.» This is the option that looks like a letter paint can with a colored line underneath it. Clicking the arrow with display a menu with a variety of color options.


Advertisement
Add New Question
-
Question
I want to edit information in an Excel spread sheet, but I can’t alter information in the cells.

Your Excel document may be in «Read Only» mode. After opening Excel, click the «Office Orb» at the upper, lefthand side of the screen and select «Open» to access your desired document. Then click that orb again and select «Save As.» Then select the «Tools» button next to «Save» and click «General Options.» Finally, uncheck the box located next to «Read-only,» click «OK» and select «Save» for the changes to take effect.
-
Question
How do i change background colors?
First, select the cell(s) for which you wish to change the background color. Then, from the «Format» toolbar, click the downward pointing arrow next to «Fill Color.» This is the option that looks like a letter paint can with a colored line underneath it. Clicking the arrow with display a menu with a variety of color options.
-
Question
How do I create a worksheet?
A blank «workbook» may automatically appear upon opening Excel. Otherwise, you’ll see a «Template Gallery» from which you can either select a new blank workbook or a specially formatted template. You may always open a new spreadsheet while working on another workbook in Excel. Simply click on «File» from the menu bar and select the «New Workbook» option.
See more answers
Ask a Question
200 characters left
Include your email address to get a message when this question is answered.
Submit
Advertisement
-
You can also create conditional formatting for specific cells (or categories of cells). Under the «Home» tab, choose «Conditional Formatting» from the «Styles» group of buttons. [8]
-
Pressing CTRL Shift and the appropriate directional arrow extends a selection to the last populated cell in the same column or row as the original cell.
-
Pressing CTRL Shift+⇱ Home extends a selection to the very beginning of the worksheet.
Show More Tips
Thanks for submitting a tip for review!
Advertisement
About This Article
Thanks to all authors for creating a page that has been read 121,962 times.
Is this article up to date?
You can edit the contents of a cell directly in the cell. You can also edit the contents of a cell by typing in the formula bar.
When you edit the contents of a cell, Excel is operating in Edit mode. Some Excel features work differently or are unavailable in Edit mode.
When Excel is in Edit mode, the word Edit appears in the lower-left corner of the Excel program window, as shown in the following illustration.
How does Excel operate differently in Edit mode?
In Edit mode, many commands are unavailable. For example, when Excel is in Edit mode, you cannot apply conditional formatting or change the alignment of the contents of a cell.
Also, the arrow keys behave somewhat differently when Excel is in Edit mode. Instead of moving the cursor from cell to cell, in Edit mode, the arrow keys move the cursor around in the cell.
Enable or disable Edit mode
If you try to use Edit mode and nothing happens, it might be disabled. You can enable or disable Edit mode by changing an Excel option.
-
Click File > Options > Advanced.
-OR-
In Excel 2007 only: Click the Microsoft Office Button
, click Excel Options, and then click the Advanced category. -
Under Editing options, do one of the following:
-
To enable Edit mode, select the Allow editing directly in cells check box.
-
To disable Edit mode, clear the Allow editing directly in cells check box.
-
Enter Edit mode
To start working in Edit mode, do one of the following:
-
Double-click the cell that contains the data that you want to edit.
This starts Edit mode and positions the cursor in the cell in the location that you double-clicked. The cell contents are also displayed in the formula bar.
-
Click the cell that contains the data that you want to edit, and then click anywhere in the formula bar.
This starts Edit mode and positions the cursor in the formula bar at the location that you clicked.
-
Click the cell that contains the data that you want to edit, and then press F2.
This starts Edit mode and positions the cursor at the end of the cell contents.
Insert, delete, or replace cell contents
-
To insert characters, click in the cell where you want to insert them, and then type the new characters.
-
To delete characters, click in the cell where you want to delete them, and then press BACKSPACE, or select the characters and then press DELETE.
-
To replace specific characters, select them and then type the new characters.
-
To turn on Overtype mode so that existing characters are replaced by new characters while you type, press INSERT.
Note: Overtype mode can be turned on or off only when you are in Edit mode. When Overtype mode is turned on, the character to the right of the insertion point is highlighted in the formula bar, and it will be overwritten when you type.
-
To start a new line of text at a specific point in a cell, click in the where you want to break the line, and then press ALT+ENTER.
Cancel or undo edits
Before you press ENTER or TAB, and before or after you press F2, you can press ESC to cancel any edits that you made to the cell contents.
After you press ENTER or TAB, you can undo your edits by pressing CTRL+Z, or by clicking Undo on the Quick Access Toolbar.
Adjust the way cell contents are displayed
After you edit cell contents, you may want to adjust the way they are displayed.
-
At times, a cell might display #####. This can occur when the cell contains a number or a date and the width of its column cannot display all the characters that its format requires. For example, suppose a cell with the Date format «mm/dd/yyyy» contains 12/31/2007. However, the column is only wide enough to display six characters. The cell will display #####. To see the entire contents of the cell with its current format, you must increase the width of the column.
Change the width of a column
-
Click the cell for which you want to change the column width.
-
On the Home tab, in the Cells group, click Format.
-
Under Cell Size, do one of the following:
-
To fit all text in the cell, click AutoFit Column Width.
-
To specify a larger column width, click Column Width, and then type the width that you want in the Column width box.
Note: As an alternative to increasing the width of a column, you can change the format of that column or even an individual cell. For example, you could change the date format so that a date is displayed as only the month and day («mm/dd» format), such as 12/31, or represent a number in a Scientific (exponential) format, such as 4E+08.
-
-
-
If there are multiple lines of text in a cell, some of the text might not be displayed the way that you want. You can display multiple lines of text inside a cell by wrapping the text.
Note: When Excel is in Edit mode, you cannot change the way text wraps.
Wrap text in a cell
-
Click the cell in which you want to wrap the text.
-
On the Home tab, in the Alignment group, click Wrap Text.
Note: If the text is a single long word, the characters won’t wrap; you can widen the column or decrease the font size to see all the text. If not all text is visible in the cell after you wrap the text, you may need to adjust the height of the row.
On the Home tab, in the Cells group, click Format, and then under Cell Size click AutoFit Row.
-
Exit Edit mode
To stop working in Edit mode, do one of the following:
-
Press ENTER.
Excel exits Edit mode and selects the cell directly below the current cell.
You can also specify that pressing ENTER select a different adjacent cell.
-
Click File > Options > Advanced.
-OR-
In Excel 2007 only: Click the Microsoft Office Button
, click Excel Options, and then click the Advanced category. -
Under Editing options, do one of the following:
-
To make the selection remain in the cell that you were editing, clear the After pressing Enter, move selection check box.
-
To control the direction of the selection, select the After pressing Enter, move selection check box, click the arrow next to Direction, and then select a direction from the list.
-
-
-
Press TAB.
This stops Edit mode and selects the cell to the right of the current cell. Pressing SHIFT+TAB selects the cell to the left.
-
Click a different cell.
Excel exits Edit mode and selects the cell that you clicked.
-
Press F2.
Excel exits Edit mode and leaves the cursor where it is.
Open, View, Edit Excel Online for Free.
Powered by
aspose.com
&
aspose.cloud
Create a new Excel file from the template gallery:
Expand
Personal transactions list
Monthly Vehicle Payment Calculator
Calorie Fat Percentage Log
Annual Employee Turnover Calculator
Bookmark this app
Press Ctrl + D to add this page to your favorites or Esc to cancel the action.
Send the download link to
Send us your feedback
Oops! An error has occurred.
Invalid file, please ensure that uploading correct file
Error has been reported successfully.
You have successfully reported the error, You will get the notification email when error is fixed.
Click this link to visit the forums.
Immediately delete the uploaded & processed files.
Are you sure to delete the files?