
Содержание
- Drawing in Excel
- How to Use Drawing Tool in Excel?
- Benefits
- Tip and Tricks for Inserting Excel Drawing Tools
- Recommended Articles
- Excel Drawing
- Drawing in Excel
- Examples of Drawing in Excel
- Example #1
- Example #2
- Pros of Excel Drawing
- Cons of Excel Drawing
- Things to Remember
- Recommended Articles
- Animal How To Draw Sketches In Excel
- Excel Draw Create and draw DXF files inside Excel from Sketchart and Viral Category
Drawing in Excel


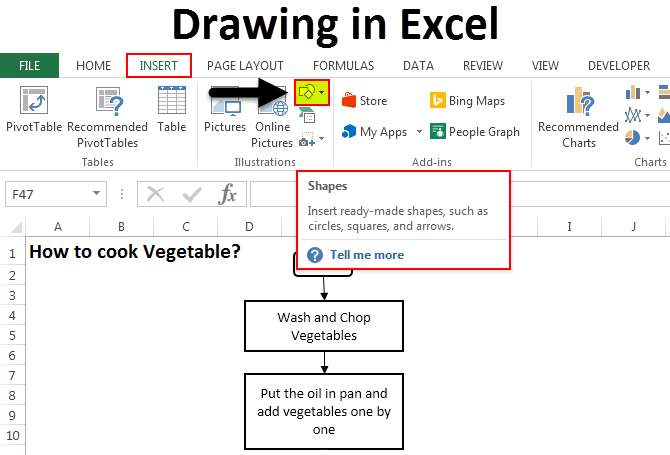
Drawing in Excel means making a shape in Excel. Now, Excel has provided us with many tools for drawing. Some of them are the predefined drawings or predefined shapes, and also, there is an option for a free form of drawing where the user can design a drawing by using a mouse. It is available in the “Shapes” in Excel’s “Insert” tab.
Table of contents
- We must first go to the “Insert” tab in the Excel toolbar.

Then, choose a drawing object which we want.
If we want to insert a shape, we must click on “Shapes.”
Draw an object which we want to draw in Excel
Next, we must click on the format to customize our drawing, e.g., color, borderline, object size, effects, etc.

Suppose we want to add a text box to any object.
If you want to add some text to any of the drawings, we must go to “Insert” and select the “Text Box”:
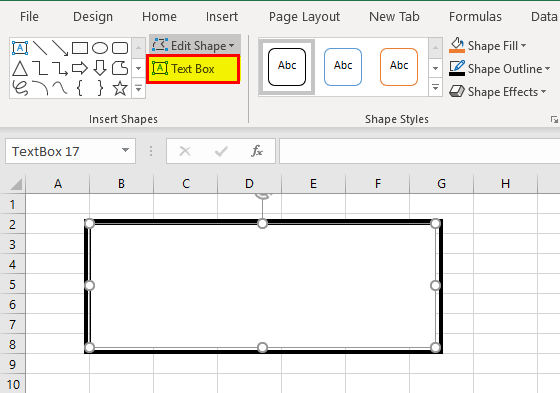
Click the “Text Box,” draw the text box horizontal or vertical, and write in that box. Finally, click the “Enter” key.
If we want to change the color of the text or customize the text box, we need to go to “Format” and click on “Shape Styles.”

As shown below, this one is the final rectangular box with customization in color.

Benefits
- We can make your data more attractive using the drawing tool in Excel.
- It is easy to insert the shapes and charts in Excel.
- It is very easy to customize the object as per the requirement.
- We can insert multiple objects as much as required, with no limit.
- We can easily rotate and flip the shapes using the rotate command in the “Arrange” group under the “Format” tab.
- It is easy to add text to a shape.
- If we want to prepare any chart, it helps us connect the shapes with the help of lines.
Tip and Tricks for Inserting Excel Drawing Tools
- We can easily add text to all the shapes we create in an Excel sheet.
- We can utilize the vast number of drawing objects accessible on the “Insert” tab of the ribbon.
- Excel does not restrain us from just numbers and content in your worksheets. We can likewise include diverse kinds of shapes.
- Excel enables us to flip drawing objects either on a level plane or vertically.
- Drawing objects can be layered over one another practically any way we want if we need to change the request in which those drawing objects are layered.
- Need to fill a drawing object with various sorts of impacts? Excel offers a few effects to make our drawing objects “pop.”
Recommended Articles
This article has been a guide to the Drawing Tool in Excel. We discuss inserting drawing objects in Excel with practical examples, tips and tricks, and a downloadable Excel template. You may learn more about Excel from the following articles: –
Источник
Excel Drawing
Drawing in Excel (Table of Contents)
Drawing in Excel
In Excel, we have different tools and functions for drawing, and all are available in the Insert menu ribbon’s illustration section. There are Shapes, Text Boxes, Smart Art Graphics, and Pictures. To draw anything in Excel, we can choose any shape or design from Shapes. If we go in Shapes, we have Lines, Rectangles, Arrows, Stars, etc. To draw anything from shapes in Excel, select any of the shapes we want to draw, hold left-click drag, draw the Shape in the size we want, and then release the key to get the final drawing.
Excel functions, formula, charts, formatting creating excel dashboard & others
Examples of Drawing in Excel
Example #1
We will see all kinds of shapes with their use and application. To select a drawing, go to the Insert menu and select the Shape option ( highlighted ), as shown in the below screenshot.
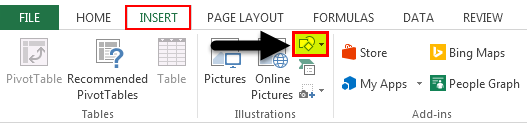
Once you click on Shape (highlighted as shown above), you will get a drop-down list with all available shapes and figures.
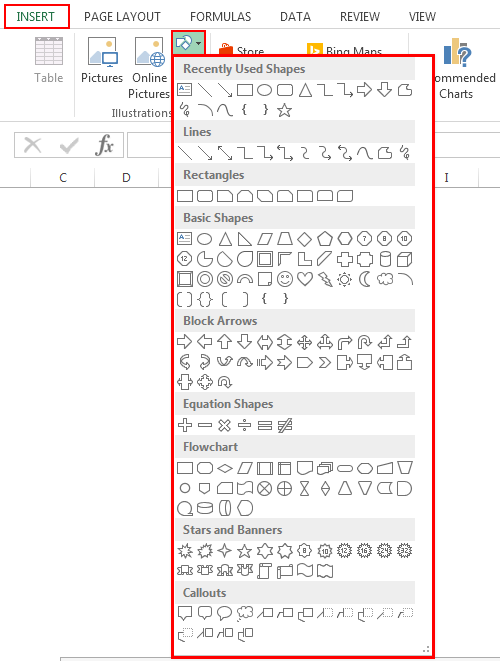
As we can see, the types of shapes mentioned are in the screenshot given above. Now, let’s take one category at a time. Select any shape from the menu by clicking on it and draw it anywhere in excel. Once drawn, you can change its orientation and size as well as per your need.
- Lines – Very first defined category of Shapes are Lines. It has Line, Arrow, and Line Arrow, Elbow connectors, Curvy Lines in different forms. Lines are used for connecting one cell or destination with the other one.

- Rectangles – A rectangle, as we know, is a shape with opposite sides equal to each other. Rectangles are mainly used for showing a process where something is happening.

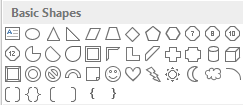
- Basic Shapes – Basic Shapes has different type of 2D and 3D shapes.
The first Shape is Text Box, which is used for entering text or headlines. This is followed by circles, Triangles, and shapes with multiple arms/sides, which can be used for decision-making mainly—followed by Cubes, Cylinders which are used for showing data storage.
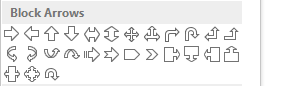
- Block Arrow – Block Arrows are used for giving direction to any process. It can be one-way or multi-way. Block Arrows can be used for direction along with entering the text.
- Flowchart – A flowchart creates a process map or flow that defines the process steps from start to end.
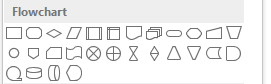
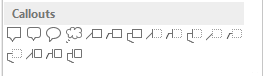
- Callouts are used to mention important notes, comments, or remarks. It calls out the value or comments important to any reference process step.
Example #2
In this example, we will draw a flow chart using some shapes. We will consider an example of cooking, where we will implement the shapes we learned in the above example.
The above-shown process flow chart is the Process Flow of Cooking Vegetables. Below are the terms and use of shapes given;
- Process Start and End box call Terminator is used to terminate or end the process.
- The rectangle represents the process; in our Flow Chart, Washing and Cutting vegetables and putting them in the pan is a process.
- The parallelogram is used to represent the data flow. Here in our Flow Chart, we are adding spices to the flow of data.
- A diamond shape box is used to represent the decision. In our Flow Chart, Tasting the cooked vegetable shows decisions with the answers YES and NO, which shows whether the vegetable is cooked or not.
- Arrows are used as connectors, connecting one process step to another.
Pros of Excel Drawing
- Excel drawing makes data professional, even if basic shapes are used.
- Using Shapes in Excel instead of MS Word is very user-friendly. So it is recommended to use Shapes for drawing in MS Excel only.
- Connecting the shapes together is also easy.
Cons of Excel Drawing
- Although it is beneficial for making data or presentations look good, using shapes consumes a lot of time in Excel. If used in Microsoft Visio, a separate tool provided by Microsoft, it is specially used to create charts with more defined shapes.
Things to Remember
- Always connect the shapes with each other by putting shapes closer so that connecting points will get activated.
- Once done using Shapes, group all the shapes together so that they will not get dispersed whenever you change the worksheet or paste it into another sheet.
Recommended Articles
This has been a guide to how to draw in Excel. Here we discuss the Drawing tool in Excel and how to use the Drawing tool, along with practical examples and a downloadable excel template. You can also go through our other suggested articles –
Источник
Animal How To Draw Sketches In Excel
By the end of the course you’ll be able to make all sorts of sketches on your own. Click shape fill and choose a new color:
How To Draw Sketches In Excel, A large flywheel, a bearing, and a shaft. Make sketches with microsoft excel. By the end of the course you’ll be able to make all sorts of sketches on your own.

Excel Draw Create and draw DXF files inside Excel From graytechnical.com
Follow the steps mention below to learn to create a pie chart in excel. Now it’s time to put the stuff in your space 🙂. As you see in the following pictures, draw the shape onto your worksheet, and select it. Now it’s time to put the stuff in your space 🙂.
Excel Draw Create and draw DXF files inside Excel from Sketchart and Viral Category
Learn how to add a linear trendline and an equation to your graph in excel. Make sketches with microsoft excel. Feel free to modify the axes and the title to make the graph more aesthetically pleasing: Measure the length and width of every table, desk, chair, storage unit, etc in your space. Excel draw can open lines, rectangles, points, circles, arcs and text. To draw anything in excel, we can choose any shape or design from shapes.
Picture and drawing tools in Excel YouTube, All other shapes created by. Click on the format to customize your drawing as required for e.g., color, borderline, size of the object, effects, etc. If you want to insert a shape, click on shapes. On the properties tab, change properties to don�t move and size with cells . In this course you can learn the fundamental drawing skills step.
How To Create CAD DXF Drawings Inside Excel Excel Draw, Along the top ribbon in excel, go to the insert tab, then the charts group. If you want to add a text box to any object. Learn how to add a linear trendline and an equation to your graph in excel. If playback doesn�t begin shortly, try restarting your device. On the size tab, change the size to 1 x.
Drawing in Microsoft Excel., As you see in the following pictures, draw the shape onto your worksheet, and select it. Click on the “insert” tab as highlighted in below image: All other shapes created by. A large flywheel, a bearing, and a shaft. Excel draw can open lines, rectangles, points, circles, arcs and text.
Excel Draw Create and draw DXF files inside Excel, For excel versions 2007 or after, click onto the insert tab, click the shapes button, and click onto the text box icon as shown. The program�s drawing tools are so easy to utilize, in fact, that this free video software tutorial can present a complete. In “shapes”, you will find a wide variety of lines from line to scribble that.
Drawing on Excel by rose154hvn on DeviantArt, In the formula bar, enter a formula such as =a1, or whichever cell whose value you want the shape to show. Then, we can click the insert tab along the top ribbon and click insert line chart to produce the following chart: Save the excel file as.csv format. Learn how to add a linear trendline and an equation to your.
How to Add the Draw Tab in MS Excel TurboFuture Technology, On the size tab, change the size to 1 x 1. Measure the length and width of every table, desk, chair, storage unit, etc in your space. Press escape on your keyboard to exit the drawing mode. Earlier versions work similarly, but you may find the placement of controls on the menu to be slightly different. Under the “insert” tab,.
How to draw doodle using excel YouTube, All other shapes created by. Using one square on the graph paper to represent one square foot, draw out the basic boundaries of the space. The draw tab is available in word, excel, and powerpoint. In “shapes”, you will find a wide variety of lines from line to scribble that we will be used according to our requirement: $29.99 this.
How to Draw a Freeform Shape in Excel YouTube, First of all, just select your data to create a bar chart. In this course you can learn the fundamental drawing skills step by step from the very basics. Measure the length and width of every table, desk, chair, storage unit, etc in your space. Draw an object which you want to draw in excel: Using the drawing toolbar, choose.
Drawing Tool in Excel How to Insert Drawing Objects, From your dashboard sheet, select the range of data for which you want to create a pie chart. Feel free to modify the axes and the title to make the graph more aesthetically pleasing: If you want to add a text box to any object. Step2:set the max and min of the chart axix as per your image complexity step3:download.
Excel Draw Create and draw DXF files inside Excel, Now it’s time to put the stuff in your space 🙂. Click scatter chart, then click scatter with straight lines and markers. In the formula bar, enter a formula such as =a1, or whichever cell whose value you want the shape to show. Measure the length and width of every table, desk, chair, storage unit, etc in your space. On.
Tom’s Tutorials For Excel Linking a Drawing Object to a, Then, we can click the insert tab along the top ribbon and click insert line chart to produce the following chart: Make sketches with microsoft excel. Upon opening dxf documents are arranged in the default xyz formation. After that, select the data bars in the chart and go to right click format data series option. Click shape fill and choose.
How to Draw Graph in Excel YouTube, Earlier versions work similarly, but you may find the placement of controls on the menu to be slightly different. Now it’s time to put the stuff in your space 🙂. Excel draw can open lines, rectangles, points, circles, arcs and text. Step2:set the max and min of the chart axix as per your image complexity step3:download any image that you.
Dibujos en excel Imagui, Click shape fill and choose a new color: Press escape on your keyboard to exit the drawing mode. To change the color of a shape, click it, then go to the drawing tools format tab. For excel versions 2007 or after, click onto the insert tab, click the shapes button, and click onto the text box icon as shown. In.
excel drawing by BBVE on DeviantArt, Measure the length and width of every table, desk, chair, storage unit, etc in your space. Click shape fill and choose a new color: Now it’s time to put the stuff in your space 🙂. Finally, draw a vertical line from the horizontal axis through the center of the curve, cutting it in half. On the properties tab, change properties.
Tom’s Tutorials For Excel Linking a Drawing Object to a, Click scatter chart, then click scatter with straight lines and markers. The draw tab is available in word, excel, and powerpoint. If you want to add a text box to any object. From here, go to “fill” section and select “picture or texture fill” option and once you do this, you’ll get an insert picture. First of all, just select.
Drawing a Line in Excel YouTube, The purpose of the esc key is to cancel the current task. Choose a drawing object which you want. To change the color of a shape, click it, then go to the drawing tools format tab. On the size tab, change the size to 1 x 1. To draw anything in excel, we can choose any shape or design from.
Drawing Sheet Template 7+ Free Printable Word, Excel, Using one square on the graph paper to represent one square foot, draw out the basic boundaries of the space. As you see in the following pictures, draw the shape onto your worksheet, and select it. Step1:open excel and select 2 column and start a scatter chart. Click on the format to customize your drawing as required for e.g., color,.
Drawing or inking in Excel Oz du Soleil, In this course you can learn the fundamental drawing skills step by step from the very basics. On the properties tab, change properties to don�t move and size with cells . Earlier versions work similarly, but you may find the placement of controls on the menu to be slightly different. In “shapes”, you will find a wide variety of lines.
How To… Draw Simple Line Charts in Excel 2010 YouTube, Along the top ribbon in excel, go to the insert tab, then the charts group. If you want to add a text box to any object. For excel versions 2007 or after, click onto the insert tab, click the shapes button, and click onto the text box icon as shown. First of all, just select your data to create a.
Excel Drawing by wingwolfWinGD on DeviantArt, In the formula bar, enter a formula such as =a1, or whichever cell whose value you want the shape to show. Excel draw can open lines, rectangles, points, circles, arcs and text. Save the excel file as.csv format. Now it’s time to put the stuff in your space 🙂. All other shapes created by.
Excel Draw Create and draw DXF files inside Excel, If you want to add a text box to any object. The draw tab is available in word, excel, and powerpoint. For excel versions 2007 or after, click onto the insert tab, click the shapes button, and click onto the text box icon as shown. Step2:set the max and min of the chart axix as per your image complexity step3:download.
Excel Draw Create and draw DXF files inside Excel, Finally, draw a vertical line from the horizontal axis through the center of the curve, cutting it in half. Whether you use a digital pen, touchscreen, or mouse, the drawing features in office can help you add notes, create shapes, edit text, and more. Excel draw can create lines, rectangles, points, circles, arcs and text. Now it’s time to put.
Excel Drawing at GetDrawings Free download, The draw tab is available in word, excel, and powerpoint. Draw an object which you want to draw in excel: If you want to insert a shape, click on shapes. Click on the format to customize your drawing as required for e.g., color, borderline, size of the object, effects, etc. Using the drawing toolbar, choose the rectangle icon and draw.
Drawing Octagon in Excel YouTube, Then, we can click the insert tab along the top ribbon and click insert line chart to produce the following chart: Learn how to add a linear trendline and an equation to your graph in excel. The draw tab is available in word, excel, and powerpoint. Click on the “insert” tab as highlighted in below image: If we go in.
Excel Drawing at GetDrawings Free download, In this course you can learn the fundamental drawing skills step by step from the very basics. Draw an object which you want to draw in excel: If you want to add a text box to any object. Then, we can click the insert tab along the top ribbon and click insert line chart to produce the following chart: A.
Источник
Drawing in Excel (Table of Contents)
- Drawing in Excel
- Examples
Drawing in Excel
In Excel, we have different tools and functions for drawing, and all are available in the Insert menu ribbon’s illustration section. There are Shapes, Text Boxes, Smart Art Graphics, and Pictures. To draw anything in Excel, we can choose any shape or design from Shapes. If we go in Shapes, we have Lines, Rectangles, Arrows, Stars, etc. To draw anything from shapes in Excel, select any of the shapes we want to draw, hold left-click drag, draw the Shape in the size we want, and then release the key to get the final drawing.
Examples of Drawing in Excel
You can download this Drawing Excel Template here – Drawing Excel Template
Example #1
We will see all kinds of shapes with their use and application. To select a drawing, go to the Insert menu and select the Shape option ( highlighted ), as shown in the below screenshot.
Once you click on Shape (highlighted as shown above), you will get a drop-down list with all available shapes and figures.
As we can see, the types of shapes mentioned are in the screenshot given above. Now, let’s take one category at a time. Select any shape from the menu by clicking on it and draw it anywhere in excel. Once drawn, you can change its orientation and size as well as per your need.
- Lines – Very first defined category of Shapes are Lines. It has Line, Arrow, and Line Arrow, Elbow connectors, Curvy Lines in different forms. Lines are used for connecting one cell or destination with the other one.
![]()
- Rectangles – A rectangle, as we know, is a shape with opposite sides equal to each other. Rectangles are mainly used for showing a process where something is happening.
![]()
- Basic Shapes – Basic Shapes has different type of 2D and 3D shapes.
The first Shape is Text Box, which is used for entering text or headlines. This is followed by circles, Triangles, and shapes with multiple arms/sides, which can be used for decision-making mainly—followed by Cubes, Cylinders which are used for showing data storage.
- Block Arrow – Block Arrows are used for giving direction to any process. It can be one-way or multi-way. Block Arrows can be used for direction along with entering the text.
- Flowchart – A flowchart creates a process map or flow that defines the process steps from start to end.
- Callouts are used to mention important notes, comments, or remarks. It calls out the value or comments important to any reference process step.
Example #2
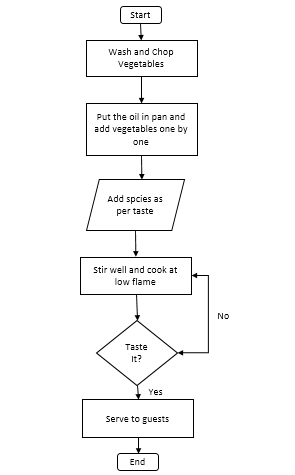
In this example, we will draw a flow chart using some shapes. We will consider an example of cooking, where we will implement the shapes we learned in the above example.
The above-shown process flow chart is the Process Flow of Cooking Vegetables. Below are the terms and use of shapes given;
- Process Start and End box call Terminator is used to terminate or end the process.
- The rectangle represents the process; in our Flow Chart, Washing and Cutting vegetables and putting them in the pan is a process.
- The parallelogram is used to represent the data flow. Here in our Flow Chart, we are adding spices to the flow of data.
- A diamond shape box is used to represent the decision. In our Flow Chart, Tasting the cooked vegetable shows decisions with the answers YES and NO, which shows whether the vegetable is cooked or not.
- Arrows are used as connectors, connecting one process step to another.
Pros of Excel Drawing
- Excel drawing makes data professional, even if basic shapes are used.
- Using Shapes in Excel instead of MS Word is very user-friendly. So it is recommended to use Shapes for drawing in MS Excel only.
- Connecting the shapes together is also easy.
Cons of Excel Drawing
- Although it is beneficial for making data or presentations look good, using shapes consumes a lot of time in Excel. If used in Microsoft Visio, a separate tool provided by Microsoft, it is specially used to create charts with more defined shapes.
Things to Remember
- Always connect the shapes with each other by putting shapes closer so that connecting points will get activated.
- Once done using Shapes, group all the shapes together so that they will not get dispersed whenever you change the worksheet or paste it into another sheet.
Recommended Articles
This has been a guide to how to draw in Excel. Here we discuss the Drawing tool in Excel and how to use the Drawing tool, along with practical examples and a downloadable excel template. You can also go through our other suggested articles –
- Excel Combo Box
- Bubble Chart in Excel
- Scrollbar in Excel
- Excel Drawing a line
To draw anything from shapes in Excel, select any of the shapes we want to draw, hold left-click drag, draw the shape in the size we want, and then release the key to get the final drawing.
Contents
- 1 Is there a drawing tool in Excel?
- 2 Can you free draw in Excel?
- 3 How do you draw a cell in Excel?
- 4 Does scribble work in Excel?
- 5 How do I write in Excel?
- 6 What is the draw tab in Excel?
- 7 How do I draw a line in an Excel column?
- 8 How do I draw a line in an Excel cell?
- 9 How do I draw a line in an Excel table?
- 10 How do you draw 3D in Visio?
- 11 Where can I find pen in Excel?
- 12 Where is the action pen in Excel?
- 13 Can I use Apple pen in Excel?
- 14 How do you type in a cell in Excel without it clicking?
- 15 How do I write text in an Excel formula?
- 16 How do I write numbers in Excel?
Is there a drawing tool in Excel?
Whether you use a digital pen, touchscreen, or mouse, the drawing features in Office can help you add notes, create shapes, edit text, and more. The Draw tab is available in Word, Excel, and PowerPoint.
Can you free draw in Excel?
Drawing in excel means making a shape in excel, now excel has provided us with many tools for drawing, some of them are the predefined drawings or predefined shapes and also there is option for free form of drawing where user can design a drawing by using mouse, this is available in the shapes in the insert tab of
How do you draw a cell in Excel?
Draw cell borders
- Click Home > the Borders arrow .
- Pick Draw Borders for outer borders or Draw Border Grid for gridlines.
- Click the Borders arrow > Line Color arrow, and then pick a color.
- Click the Borders arrow > Line Style arrow, and then pick a line style.
- Select cells you want to draw borders around.
Does scribble work in Excel?
Yes, you are right. Excel app for iOS can recognize the shapes created by scribble feature, but the scribble option itself isn’t available since Features of the app may vary depending on the device.
How do I write in Excel?
Enter text or a number in a cell
- On the worksheet, click a cell.
- Type the numbers or text that you want to enter, and then press ENTER or TAB. To enter data on a new line within a cell, enter a line break by pressing ALT+ENTER.
What is the draw tab in Excel?
The draw tab allows you to make drawing edits within a spreadsheet. This tab is found on the Excel ribbon and is not always enabled. To enable this tab for more functionality, start by clicking the file tab.
How do I draw a line in an Excel column?
To Draw a line in excel, follow these steps:
- In the Insert tab under illustrations, click on shapes.
- When the dialog box appears to go to the line section,
- Select any type of line from the various given options to draw a connection.
How do I draw a line in an Excel cell?
Answer: Select the cells that you wish to draw the border around. Right-click and then select “Format Cells” from the popup menu. When the Format Cells window appears, select the Border tab. Next select your line style and the borders that you wish to draw.
How do I draw a line in an Excel table?
Open a Spreadsheet
- Open a Spreadsheet.
- Launch Excel.
- Highlight Desired Cell.
- Position the cursor in a single cell you want to have grid lines.
- Click “Borders” Menu.
- Click the “Home” tab if it’s not enabled.
- Click “All Borders”
- Click the “All Borders” button to display grid lines on the single cell.
How do you draw 3D in Visio?
Microsoft Visio has several three-dimensional templates. To find them, on the File tab, click New, enter “3D” into the search field, and choose the template that best fits your needs: Block Diagram. Directional Map 3D.
Where can I find pen in Excel?
You define the pens you want to have, and they are then available in Word, Excel, and PowerPoint.
- On the Draw tab of the Ribbon, tap a pen to select it.
- Tap again to open the menu of Thickness and Color options for the pen.
- A Pencil texture is also available:
- On the touch screen, begin writing or drawing.
Where is the action pen in Excel?
pen toolbox
You find the Action Pen on the right end of the pen toolbox. Just select it and start editing. This replaces the old Ink Editor button that you had on the Draw tab in Word. Tip: If you have a touch-enabled device, like a Microsoft Surface, you can also tap the Action Pen and just use your finger to edit.
Can I use Apple pen in Excel?
The pencil tool allows you to draw and shade with your Apple pencil, just like drawing with an actual pencil.One aspect of this drawing feature that is so exciting is you can use it inside Microsoft Excel. The same Draw tab appears at the top in the navigation bar inside Excel.
How do you type in a cell in Excel without it clicking?
You can press the F2 key to get into the editing mode of a cell without double clicking it. It is easy to operate, you just need to select the cell you want to edit and press the F2 key, and the cursor will be located at the end of the cell value, then you can edit the cell immediately.
How do I write text in an Excel formula?
How to add text to the beginning of cells
- In the cell where you want to output the result, type the equals sign (=).
- Type the desired text inside the quotation marks.
- Type an ampersand symbol (&).
- Select the cell to which the text shall be added, and press Enter.
How do I write numbers in Excel?
Available number formats in Excel
- Press CTRL + 1 and select Number.
- Right-click the cell or cell range, select Format Cells… , and select Number.
- Select the dialog box launcher next to Number and then select Number.
Drawing inside a spreadsheet is a useful way to highlight, circle, or call attention to specific areas or data points. Here’s how to draw in Excel.
Drawing inside a spreadsheet is a useful way to highlight, circle, or call attention to specific areas or data points. Fortunately, Excel offers a series of built-in features to help you draw on your sheets. Let’s learn how to draw in Microsoft Excel.
Drawing in Excel gives you several key tools to succeed with your spreadsheet. You can circle specific points, you can highlight others, and you can easily erase and change your drawings. It’s easy to do, and it’s a unique and often forgotten way to make spreadsheets more interesting.
To draw in Excel, first find the ribbon at the top of your screen. This is the area containing options like Home, Insert, Page Layout, and more. The option you want is, predictably, labeled Draw. Go ahead and click on it, and you’ll see an array of drawing styles presented.

The first, most basic drawing feature is the simple Draw menu. Click on it, then click and hold your cursor on top of your sheets. You’ll be able to make a freehand, line-style drawing. This is especially useful if you want to circle specific content.

The pen styles group helps you change up the look and feel of the lines you’re drawing. Most notably, you can click on the yellow highlighter and use it to call out specific values or characters.
While the pen and pencil styles will obscure the content inside cells, the Highlighter feature works exactly like a real highlighter pen. It shades, rather than blocks, the values underneath it.

Want to undo a drawing? Simply click on the Eraser button, then click on any drawing once. You’ll see it disappear, and you can alter the style.
As you can see, it’s easy to draw in Microsoft Excel. This is a great way to circle, highlight, or call attention to any piece of content.
How to use Excel as a Drawing Tool
for pop, sizzle, and clearer communication with pictures and images
Search Excel Training
All Excel training
is found on 2 big web pages
- This page for Excel Drawings (see page Contents)
- and the main Excel Training page
so that you can easily
use CTRL+F to find keywords
Training
Video Help
Video: The 7 Advantages
of Excel as a drawing tool
Video: How to Use Excel
as a Drawing Tool
Part 1
Video: Part 2
How to Select Objects
Video: How to use Excel
as a Drawing Tool
Part 3
Shapes
Working with Shapes
help
Help for any Systems2win shape
RIGHT-click the shape (anywhere there is no text)
> Size and Properties > Alt Text
There in the Alt Text, you will find an explanation of what each shape is used for.
FindShapes, addShapes
Where to find shapes
Excel’s standard palette of shapes
Excel Ribbon bar > Insert tab > Shapes
Systems2win shapes
Excel Ribbon bar > Systems2win tab > Copy Shapes
Systems2win provides a standard palette of commonly used shapes that can be quickly copied and pasted into any Excel document
to make it easy for your people to give your company’s documents a consistent and professional look and feel.
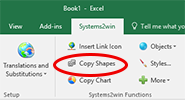

Excel Ribbon bar > Systems2win tab > Copy Shapes
Tip: The training video for the To Do List template demonstrates how to copy shapes
User-defined shapes
Scroll down to the User-Defined Shapes section
Add your own custom shapes
Your leaders can add your own shapes to the User-Defined Shapes section to make your shapes always available to every member of your team
by simply selecting Excel Ribbon bar > Systems2win tab > Copy Shapes in a way that your custom shapes will be automatically found and transferred
to your new master Shapes template every time that you upgrade.
assuming that your leaders have purchased the feature for the Personalization Upgrade Utility
![]()
Examples of icons that can be
purchased separately, and then
used with your Systems2win templates
How?
Assuming that you are person assigned the Systems2win Leadership Role to personalize your master templates…
- Open a copy of your Shapes.xlsx file
Excel Ribbon bar > Systems2win tab > Copy Shapes
- Save it to any temporary location
- Copy your shapes to the clipboard,
and then paste (CTRL+V) them to the User-Defined Shapes sectionIf you need more space, simply insert rows above the thin gold line
- Properly format your shapes
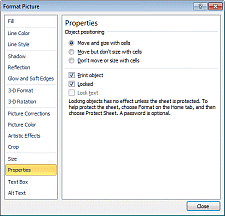
Right-click > Format Picture or Size and Properties
- Properties should be set to Move and size with cells
(this enables your shapes to be hidden and unhidden
when hiding and unhiding rows and columns) - Size > Lock Aspect Ratio should be unchecked
(this allows shapes to be easily restored to original size if they ever become distorted) - Alt Text should contain your description and/or help for each shape
If you want your icons to be perfectly sized and formatted for the Standard Work templates, then you will want them to be
no more than 36 pixels wide and 31 pixels tall (.38″ x .32″)
- Properties should be set to Move and size with cells
- When everything is perfect… overwrite your master Shapes.xlsx file in your master portal
following the same instructions that you use when you personalize any master template, overwrite the master Shapes.xlsx file located in the tTemplates folder of your master portal.
- Send the email to advise each of your users to Sync Now
following the same instructions that you use when you personalize any master template and use your Training Matrix to ensure that people actually do it (the same as always)
logo
Make your Logo always available
If you only own 1 seat, you can either:
- Purchase a second seat
Systems2win personalizes each of your templates with your logo when you own 2 seats or more
- Make your logo always instantly available
Add your logo to the User-Defined Shapes section of the master Shapes.xlsx file
which on your single-user computer is located at
C:UsersPublicDocumentsSystems2wintTemplates
And now your logo is always instantly available
to copy to any other document when you select
Excel Ribbon bar > Systems2win tab > Copy Shapes
DrawingToolbar
Where to find Drawing Tools
The Drawing Tools menu tab
appears at the very top of the window
whenever you select any drawing shape.
Click the Drawing Tools menu tab to
display the Drawing Tools ribbon.
Tip: This Drawing Tools menu only appears when a drawing shape is selected !!!

select
How to select a shape
To select a Shape, hover your mouse cursor over any part of the Shape that contains no text, until your cursor changes into a four-sided cross-arrows figure (like this ![]() )
)
Then either:
- Click the left mouse button to select the shape
- Right-click to open a pop-up window to format the Shape
- Right-click and drag to copy or move the shape
If you click in the middle of a Shape that contains text it will assume that you want to edit the text.
You need to click
an area of the shape with no text to select the entire shape.
To enter text in a blank Shape —
right-click > Edit Text.
To select a Grouped Shape
It is very important to select just the outer border
that surrounds the entire collection of grouped shapes.
If you accidentally select a shape within the group, you will move just that shape,
and it will distort the spatial relationship between the other shapes in the group.
SelectObjects
How to mass select a group of shapes
Option 1) Hold down the CTRL key as you left-mouse-click multiple objects
the same way that you select multiple objects in most other Windows applications
Option 2) Toggle the Select Objects arrow «on» and draw a box around the group of shapes
Home tab > Editing group > Find and Select > Select Objects
The Select Objects arrow
changes the way your mouse functions to make it easier to select objects.
With the Select Objects arrow toggled is on:
you can draw a box around a group of shapes,
and everything in the box will be selected
To restore normal mouse functions…
either toggle the Select Objects Arrow OFF,
or double-click any open space on your worksheet.

Because it is so frequently used…
we highly recommend adding the Select Objects arrow to your
Quick Access Toolbar.
copy
How to copy & paste shapes and connectors
- Regular copy & paste works 99% of the time
Select the object,
then CTRL+C to copy and CTRL+V to paste - If that doesn’t work…
for instance, if you use regular copy & paste
to try to copy a straight arrow connector,
it might paste as a collapsed tiny dot…then use this alternate copy method
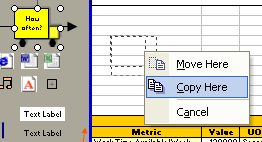
that works 100% of the time:RIGHT-click and drag the
selected object then select «copy here» from the menu that pops up
when you release your RIGHT mouse after dragging.
move
How to move shapes
Select the object, then drag.
Or use the arrow keys on your keyboard to «nudge» selected objects.
Tip: To prevent vertical or horizontal movement, hold down the Shift key while dragging.
resize
How to resize a picture or shape
Right-click the picture or shape > Size and Properties > Size tab
To keep the proportional ratio of height and width:
1) In Size tab, check Lock aspect ratio, then enter new value for either height or width.
2) To manually resize, keeping proportional ratio:
for a picture: left-click the image to select it, then left-click and drag the lower right corner of the image — keep holding down the left mouse as you drag to resize the image.
for a shape: left-click the image to select it, hold down the Shift key, then left-click and drag any corner of the image, while holding down the left mouse and Shift key as you drag to resize the image.
To make the picture or shape wider, thinner, shorter or taller:
1) In Size tab, UNCHECK Lock aspect ratio, then enter new value for either height or width, or both.
2) To manually resize, NOT keeping proportional ratio:
Left-click to select the image,
then left-click and drag one of the white circles that appear in the middle of each edge of the shape.
resetPictureSize
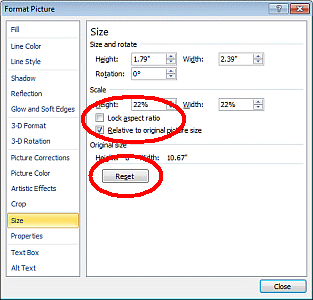
How to reset picture size
Many shapes are set to move and size with cells.
These shapes are hidden when you hide a row or column, and reappear when the row or column is again unhidden.
To reset the original size of a picture or shape…
Right-click the picture or shape > Size and Properties > Size tab then ensure that the check box for «Lock
aspect ratio» is unchecked before
you click the Reset button.
reduce
How to reduce image sizes
To reduce the total megabytes size of your Excel file,
you will want to reduce the size of large images that you paste into Excel.
This is especially useful for the Work Instructions and A3 Report templates.
Option 1) Resize the picture
If you don’t already own Photoshop or some other image editing software,
you can always use Irfanview (free image editing software)
or the Paint program that comes free with Microsoft Windows(Start > All Programs > Accessories > Paint)
How? Open your large image file in Paint.
Select Home tab > Image group > Resize.
Enter the percent (or pixel values) to which you want to shrink the image.If you want to keep both a large and small size of the image,
use File > Save As — and give your smaller image another name.You will usually want to save your files as bmp, jpg, or png.
And then in Excel, select Insert > Picture, and browse to select your (smaller) image.
Option 2) Crop the picture
In MS Paint: Select, then Crop
Although Irfanview or Paint have better cropping fearues, Excel does have its own Crop feature:
Select an image. The Picture Tools / Format tab appears above your Ribbon menu.
Click on the Picture Tools / Format menu tab and select Crop > Crop.
8 short bold lines («handles») appear along the image border (at each corner and along each side).
Carefully select any of these (cursor will change to look like handle) and drag to crop the image.At this point you also may want to compress the image to reduce file size.
Option 3) Compress the picture
In Excel…
Select an image.
The Picture Tools / Format menu appears above your Ribbon menu.
Select [Adjust group] > Compress Pictures.
Enter values in the dialog box.
Tips:
Notice that with one click of a button
you can choose to compress only selected pictures,
or All pictures in document!
Images within grouped shapes will not be compressed.

As great as Excel’s Crop and Compress features sound…
the truth is that Excel is not ideal for image editing.
Your primary strategy for reducing image file sizes should be to use image editing software to get those images down to a reasonable file size before you ever paste them into Excel.
editText
How to edit text within a shape
To edit text that already exists in an Shape simply left-click and start typing
To enter text in a blank Shape right-click > Edit Text
format
How to format a shape or picture
If you right-click…
on a Shape anywhere there is not text and select Format Shape,
or on a picture and select Format Picture
then a pop-up window will appear with many window tabs for different formatting options.
If you right-click within the text area of a Shape that contains text,
and select Format Shape
then a pop-up window will appear with only one window tab — to format text.
MatchFormat
How to format a shape
to match the formatting of another shape
Format Painter, (![]() on the Home tab can be used to apply the same formatting to match another Shape.
on the Home tab can be used to apply the same formatting to match another Shape.
Click the shape with the desired formatting,
then click the Format Painter button,
then click the shape to which you want to apply the formatting.
Or to format a new Shape…
Right-click an existing Shape that has your desired formatting, and select…
Set As Default Shape
Then copy and paste any new Shapes from Excel’s
standard palette,
and your new Shapes will be formatted to match your default shape.
ChangeToAnotherShape
How to change a shape to another shape
Drawing Tools > Insert Shapes group > Edit Shape > Change Shape
rotate
To rotate a shape
Simply use the green rotate handle.
Tip: You might need to zoom to a higher resolution for the rotate handle to appear.
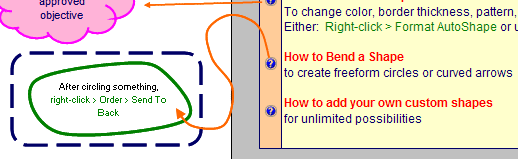
bring Forward
How to bring an object forward or backward
Some objects appear in front of other objects.
For instance, a shape might be in front of a line, or a line might be in front of a shape.
To bring an object forward or backward…
Select one or more Shapes then right-click the edge of one of the selected Shapes,
then select Order,
and choose Bring to Front or Send to Back.
group
How to group shapes
so that they are treated as a single shape
To group shapes…
Select all objects that you want to group together then right-click and select Group > Group.
To ungroup shapes…
right-click the grouped shape,
then select Group > Ungroup.
Tip: Whenever you group, ungroup, or regroup,
you need to reset Properties if you don’t want the shapes to move and size with cells.
name
How to Name a shape
Select the shape.
In the Name Box (just to the left of the Formula Bar)
type your chosen name then hit the Enter key on your keyboard.
Key Point: The name won’t stick until you hit the Enter key.

Properties
To change the Properties of a shape
to move or size with cells, or to lock or unlock the shape
Right-click > Size and Properties > Properties tab
SnapToGrid
Snap To Grid
Toggle it on or off…
Drawing Tools > Align > Snap to Grid
Snap To Grid Tips
- Many shapes have been specially designed by Systems2win to fit perfectly within the grid so that you can instantly resize all shapes in an entire column
just by dragging the column width. - When using specially-sized snap-to shapes always nudge the shape just a little to the RIGHT — rather than to the left.
- It is wise to lay out most of your snap to grid shapes first before adding connector arrows.
Connectors and attachConnectors
Working with Arrows and Connectors
How to attach connectors to shapes
so that the connectors move with the shape
In standard Excel, all lines and arrows are connectors.
The white ends turn red when connected.
![]()
Non-connectors
Because it is sometimes useful to have lines or arrows that DON’T connect…
(for example walk path arrows in a layout diagram)
some Systems2win templates include idential-looking shapes for both:
- Conector lines or arrows
- Legacy non-connector lines or arrows
If you see two identical-looking lines or connectors, play with them to see which is which.
How to:
- Copy your chosen connector from the Systems2win palette of shapes.
Tip: Straight connectors sometimes paste as a tiny dot if you use regular copy & paste.
If this happens, use our 100% method to copy.
- Drag an end of a Connector to the place where you want it to connect to the Shape.
Tip: You can connect to any of the blue dots that appear when you hover a connector line near an object.
Or use the special Systems2win Connector Diamond to create additional connectors anywhere on any shape.
- When the end of the Connector turns red and the Shape lights up for a moment the Connector is now connected to the shape.
ConnectorDiamond
Connector Diamond
Systems2win menu > Copy Shapes includes a tiny Connector Diamond
which is a tiny object that can be used as an anchor point for connecting a connector line or arrow anywhere.
![]()
Perhaps you want your connector arrow to terminate in «open space»,
or to connect to a place on an object other than the blue connectors that are part of every shape.
Tip: Consider grouping your Connector Diamond with a shape.
elbow
Change a Connector
between straight, elbow, or curved
Right-click the Connector > Connector Type > select your choice.
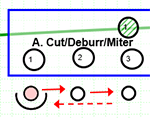
bendShapes
How to bend shapes
to create curved arrows or free form circles
The easiest way to create a curved arrow or line is to use a curved connector (instructions above) but sometimes you want a shape curved with more precision.
How?
Systems2win menu > Copy Shapes
Right-click a shape that is already formatted the way you want your new shape to be, then select…
Set As Default Line
then …
a) To create a bent arrow or line, select…
Drawing Tools > Curve
Left click to start your line, and for each corner position. Enter to finish.
b) To create a free form circle, select…
Drawing Tools > Freeform
Draw your circle
(or easier yet — just copy & paste the pre-formatted circle — and resize it — and maybe change the color)
ViewingAndPrinting
Viewing and Printing
View in Page Break Preview
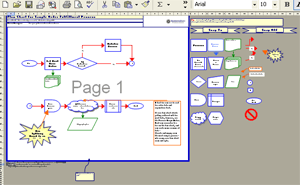
View > Page Break Preview
Tip: When viewing in Page Break Preview mode
(rather than View > Normal)
you can simply drag the thick blue lines to change the Print Area.
ChangeSizeDrawingSpace
How can I change the size of my drawing space?
Systems2win has defined your drawing canvas to automatically print on a single page,
and has defined your Shapes to scale appropriately… so you can simply hide, unhide, delete, or insert rows and columns.
a) Rather than deleting
it is usually better to
hide and unhide rows and columns.
b) To insert rows or columns, use Insert Copied Cells
(Get out of the novice bad habit of using Insert > Rows)
c) Change row height or column width
(This is rarely your best option)
To resize a drawing in Word or PowerPoint
Word: Drawing Tools > Size
Caution: Don’t just «pull the corners» of your drawing canvas, or you might be in for some rude surprises.
To resize the drawing space of an Excel Organization Chart
Refer to Org Chart training
Printing
File > Print
More printing tips
More Excel Training