
How to draw in Word Click the ‘Shapes’ button and select ‘Scribble’ Open up your Microsoft Word document. Hold down your mouse to draw. Click and hold down your mouse to draw. Release the mouse. As soon as you release your mouse, the drawing will be finished. Edit your drawing. Double-click your drawing.
How do I draw freehand on a Word document?
Draw a freeform shape Click anywhere in the document, and then drag to draw. To draw a straight segment with the Freeform tool, click one location, move your pointer to a different location, and then click again; to draw a curved segment, keep your mouse button pressed as you drag to draw.
How do you paint on Microsoft Word?
Use the Format Painter Select the text or graphic that has the formatting that you want to copy. On the Home tab, click Format Painter. Use the brush to paint over a selection of text or graphics to apply the formatting. To stop formatting, press ESC.
How do I draw a circle in a screenshot in Word?
Draw an oval or circle On the Insert tab, click Shapes. Under Basic Shapes, click Oval. Click where you want the oval to start, and drag to draw the shape. To draw a circle, press Shift while you drag.
How can I write on a picture?
Add Text to Photos on Android Using Google Photos Open a photo in Google Photos. At the bottom of the photo, tap Edit (three horizontal lines). Tap the Markup icon (squiggly line). You can also select the color of text from this screen. Tap the Text tool and enter your desired text. Select Done when you’ve finished.
How do I put an image behind text in word?
If you are working win an image you created by using the Drawing toolbar, you can follow these steps: Select the image. Choose the Order option from the Draw menu on the Drawing toolbar. Word displays a submenu. Choose Send Behind Text from the submenu. The image should move behind the text.
How do I enable the pen in Word?
Select File > Options > Advanced. In the Pen section, select the box next to Use pen to select and interact with content by default.
How do I use drawing tools in Word?
Add a drawing to a document Click in your document where you want to create the drawing. On the Insert tab, in the Illustrations group, click Shapes. When you find the shape you want to insert, double-click to insert it automatically, or click and drag to draw it in your document.
How do you turn on Draw in Word?
Right-click the Ribbon and select Customize the Ribbon. Check the box next to Draw, then click OK. The Draw tab will now be available in the Ribbon.
How do you draw in docs?
What to Know Open a document in Google Docs. Place the cursor where you want the drawing to appear. Select Insert > Drawing. Choose New to open the Drawing window. Choose a drawing type from the Actions menu. Options include word art, shapes, arrows, callouts, and equations.
How do I circle something in a picture?
After you’ve taken a photo, tap on Edit, then Draw. Then select the shape you want to use. If you’re going to circle something on a picture, select either the square or the circle shape and drag it around your focus area.
How do you draw a circle around a screenshot?
To draw a circle or any part of a circle, click the down arrow for the Ruler icon and select Protractor. Position the on-screen protractor and select your drawing tool.
How do I edit text in a picture in Word?
Click the picture to reveal the “Format” tab. Press the “Corrections” option to reveal the dropdown. This will reveal to you how to edit image text in word. Apply the required correction to complete the process in full.
How can I edit a picture in Word?
Open your collage, design, or photo in Fotor. Using the “Text” button, select and drag a text box to the desired location. Modify the text, change the font, color, size, background or transparency. Preview and save your work, choosing the size and format you wish.
How do you put captions on pictures?
Choose a Photo Caption That Fits the Platform. Use a Conversational Tone and Present Tense. Decide on the Purpose of Your Caption. Know Who Your Audience Is. Identify the Main People in Your Photo. Use a Quote or Lyrics Wisely. Add Value with Your Photo Caption. Create Involvement With Your Photo Caption.
How do you put a picture behind text?
How To Place Text Behind An Object Step 1: Open your image. Step 2: Add your text. Step 3: Duplicate the Background layer. Step 4: Drag the copy above the Type layer. Step 5: Choose the Quick Selection Tool. Step 6: Select the area that will hide the text. Step 7: Refine the selection with Select and Mask.
Where is the Drawing toolbar in Word?
Accessing the Drawing Toolbar The View menu gives the option of viewing any toolbar for your particular needs. From the View menu, select Toolbars » Drawing. The Drawing toolbar appears at the bottom of the screen.
How do you put a picture behind text on Microsoft Word 2010?
How to Put an Image Behind Text in Word 2010 Open the document. Click the Page Layout tab. Select the Watermark button. Click Custom Watermark. Choose Picture watermark and click Select Picture. Click the Scale dropdown menu and choose a size. Select Apply, then OK.
How do you insert ink in Word?
To add Ink annotations in Microsoft Office applications, select the Review menu, then select Start Inking. Note: In Microsoft Word or Excel, select the Insert tab and then click on Start Inking.
Does scribble work in Word?
Turn handwriting into text with Scribble In a document, tap Apple Pencil in the body of a word-processing document where you want to write. Or tap in a text box, shape, or in a table cell in a word-processing or page layout document. Tap the Scribble tool in the toolbar at the bottom of the screen, then start writing.
How to draw in Word
- In the ‘Insert tab,’ click the ‘Shapes’ button, and in the drop-down menu select ‘Scribble’
- Click and hold down your mouse to draw the shape you want.
- Release the mouse when you’ve finished drawing.
- Go to the ‘Shape Format’ tab to edit your shape.
Contents
- 1 How do I draw a circle in a screenshot in Word?
- 2 How do I draw freehand on a Word document?
- 3 How do you write on photos?
- 4 How do I put text and pictures side by side in Word?
- 5 How do I circle something in a picture?
- 6 How do you use pen in Word?
- 7 How do I enable the pen in Word?
- 8 Is there a drawing tool on word?
- 9 How do I edit text in a picture in Word?
- 10 How can I edit a picture in Word?
- 11 How do you put a picture in the corner of a Word document?
- 12 What app lets me draw on my pictures?
- 13 How do you make a Venn diagram on Microsoft Word?
- 14 Where is the pencil in Microsoft Word?
- 15 How do you write on screen?
- 16 Where are drawing tools in Word?
- 17 How do you draw on docs?
- 18 Where is the Drawing toolbar in Word 2013?
How do I draw a circle in a screenshot in Word?
Draw an oval or circle
On the Insert tab, click Shapes. Under Basic Shapes, click Oval. Click where you want the oval to start, and drag to draw the shape. To draw a circle, press Shift while you drag.
How do I draw freehand on a Word document?
Draw a freeform shape
Click anywhere in the document, and then drag to draw. To draw a straight segment with the Freeform tool, click one location, move your pointer to a different location, and then click again; to draw a curved segment, keep your mouse button pressed as you drag to draw.
How do you write on photos?
Add Text to Photos on Android Using Google Photos
- Open a photo in Google Photos.
- At the bottom of the photo, tap Edit (three horizontal lines).
- Tap the Markup icon (squiggly line). You can also select the color of text from this screen.
- Tap the Text tool and enter your desired text.
- Select Done when you’ve finished.
How do I put text and pictures side by side in Word?
Word – insert side by side images into document
- Click on the first of the two images that you want to align.
- Click the “Format” tab, then click “Wrap Text” in the Arrange group.
- Click the second image and repeat the process of changing the way text interacts with the image.
How do I circle something in a picture?
After you’ve taken a photo, tap on Edit, then Draw. Then select the shape you want to use. If you’re going to circle something on a picture, select either the square or the circle shape and drag it around your focus area.
How do you use pen in Word?
How to Use a Pen With MS Word
- Connect your writing tablet to your computer.
- Open the document you wish to write pen marks on.
- Click on the “Review” tab.
- Click “Start Inking” on the far right of the screen to begin using the tablet with Microsoft Word.
- Touch on the tablet to write using the pen tool.
How do I enable the pen in Word?
Select File > Options > Advanced. In the Pen section, select the box next to Use pen to select and interact with content by default.
Is there a drawing tool on word?
You can draw freely in Microsoft Word using the “Draw” feature whether you have Word for Mac or Windows. You can also insert customizable shapes into your document, or draw using the “Scribble” feature. The process of drawing in Word varies based on which version of Word and device you’re using.
How do I edit text in a picture in Word?
Click the picture to reveal the “Format” tab. Press the “Corrections” option to reveal the dropdown. This will reveal to you how to edit image text in word. Apply the required correction to complete the process in full.
How can I edit a picture in Word?
Open your collage, design, or photo in Fotor. Using the “Text” button, select and drag a text box to the desired location. Modify the text, change the font, color, size, background or transparency. Preview and save your work, choosing the size and format you wish.
How do you put a picture in the corner of a Word document?
To move an image a small amount to align it with another element in the document, select the image. Then, press and hold the Ctrl key while you press one of the arrow keys to move the picture in the direction you want it to go.
What app lets me draw on my pictures?
Annotate is a rather popular drawing and image editing tool on the Android ecosystem.Users can also upload or open images on its user interface. The application comes with custom-built filters and tools for editing and drawing on pictures.
How do you make a Venn diagram on Microsoft Word?
How to make a Venn diagram using SmartArt graphics in MS Word
- In Word, go to Insert > Illustrations > SmartArt.
- Go to Relationship > Basic Venn.
- Double-click “Text” to modify the text or use the text pane.
- Select the graphic, and click “Add Shape” to make your Venn diagram larger.
- Once finished, save the document.
Where is the pencil in Microsoft Word?
To start, press the Draw tab on the ribbon bar. This will display the pen drawing tool options for you to use. Three drawing options are available under the Tools section.
How do you write on screen?
How could I write on computer screen?
- In the Screen Draw Tools Pane, click Pen. tool.
- Drag the pointer to write on computer screen.
Where are drawing tools in Word?
Click View > Toolbars > Drawing. The Drawing toolbar is displayed or hidden. The Drawing toolbar contains a collection of icon buttons that allows the user to draw shapes and images in the document.
How do you draw on docs?
How to draw in Google Docs
- Log into Google Drive and open your Google Doc.
- In the toolbar, click “Insert.” Using your cursor, highlight “Drawing” in the sub-menu, then click “+ New” when it appears.
- A checkered window will pop up; this is, essentially, your digital sketchbook.
Where is the Drawing toolbar in Word 2013?
Click Insert. Click the Shapes button, then click the Scribble icon in the Lines section. Click and hold down the mouse button, then move the mouse cursor to draw. Click the Format tab under Drawing Tools to make any changes to your drawing.
How do you draw freehand in Word 2016?
Draw or edit a freeform shape On the Insert tab, in the Illustrations group, click Shapes. Under Lines, do one of the following: To draw a shape that has both curved and straight segments, click Freeform . Click anywhere in the document, and then drag to draw. To finish drawing the shape, do one of the following:.
Can you draw on an image in Word?
You can draw freely in Microsoft Word using the “Draw” feature whether you have Word for Mac or Windows. You can also insert customizable shapes into your document, or draw using the “Scribble” feature.
How do you draw on top of a picture in Word?
Click the drawing canvas, and then, on the Insert tab, in the Illustrations group, click Picture. Browse to and double-click the photo that you want to use, and then click outside the drawing canvas. On the Insert tab, in the Text group, click Text Box, and then at the bottom of the menu, click Draw Text Box.
Can you freehand draw on word?
While it hasn’t been designed with drawing in mind, you can still use shapes, lines, and freehand pen drawings to create simplistic images in Microsoft Word. You can use shapes to create a flow chart or diagram or use free-hand drawings to show your artistic drawing skills.
How do you type freehand in Word?
Format Shapes With the Drawing Tools in Word The Format tab gives you a variety of options to change the look, color, and style of the shapes you’ve added to your Word document. To change the color and appearance of a shape, select it, then select Format.
Where is the Drawing toolbar in Word 2016?
Click View > Toolbars > Drawing. The Drawing toolbar is displayed or hidden. The Drawing toolbar contains a collection of icon buttons that allows the user to draw shapes and images in the document.
How do you circle something on a picture in Word?
Draw an oval or circle On the Insert tab, click Shapes. Under Basic Shapes, click Oval. Click where you want the oval to start, and drag to draw the shape. To draw a circle, press Shift while you drag.
How do you use pen in Word?
How to Use a Pen With MS Word Connect your writing tablet to your computer. Open the document you wish to write pen marks on. Click on the “Review” tab. Click “Start Inking” on the far right of the screen to begin using the tablet with Microsoft Word. Touch on the tablet to write using the pen tool.
How can I write on top of a picture?
Google Photos has a similar tool for adding text to photos: Open a photo in Google Photos. At the bottom of the photo, tap Edit (three horizontal lines). Tap the Markup icon (squiggly line). Tap the Text tool and enter your desired text. Select Done when you’ve finished.
How do I put a box around a picture in Word?
To add a border to a picture: Select the picture you want to add a border to, then click the Format tab. Click the Picture Border command. A drop-down menu will appear. From here, you can select a color, weight (thickness), and whether the line is dashed. The border will appear around the image.
How do I put a red box around a picture in Word?
Place your image in the document, then set the “Wrapping” to “Behind the text”. Now draw a square over the appropriate part of the picture. Then set the Fill to “No Fill” so it becomes a box.
How do you insert a drawing canvas in Word?
Go to the Insert tab. Click the Shapes button and choose New Drawing Canvas. You can find the New Drawing Canvas command at the bottom of the Shapes drop-down list. A drawing canvas appears on your screen.
How do I draw a box in Word?
Go to Insert > Text Box, and then select Draw Text Box. Click or tap in the document, and drag to draw the text box the size that you want. To add text to a text box, select inside the text box, and then type or paste text.
How do you scribble on word?
How to draw in Word Click the ‘Shapes’ button and select ‘Scribble’ Open up your Microsoft Word document. Hold down your mouse to draw. Click and hold down your mouse to draw. Release the mouse. As soon as you release your mouse, the drawing will be finished. Edit your drawing. Double-click your drawing.
What is Picture toolbar?
The Picture toolbar contains a collection of icon buttons to allow the user to insert and manage pictures and clip art in the document.
How do I circle part of a picture?
Open your image in Photoshop. Convert your background image into an editable layer by double-clicking your Background in the Layers panel, or choose Layer › New › Layer from Background. Select the Elliptical Marquee tool and draw a perfect circle by holding the shift key and dragging your shape into place.
How do you write on screen?
How could I write on computer screen? In the Screen Draw Tools Pane, click Pen. tool. Drag the pointer to write on computer screen.
How do I edit text in a picture in Word?
Click the picture to reveal the “Format” tab. Press the “Corrections” option to reveal the dropdown. This will reveal to you how to edit image text in word. Apply the required correction to complete the process in full.
How can I edit a picture in Word?
Open your collage, design, or photo in Fotor. Using the “Text” button, select and drag a text box to the desired location. Modify the text, change the font, color, size, background or transparency. Preview and save your work, choosing the size and format you wish.
How do I add text to a picture in paint?
To add a text box in Paint, open an image with the program and locate the “A” symbol in the “Tools” group of the “Home” tab. Click the “A” and then click on the image and drag the mouse pointer to place a text box. To resize the text box, click and drag one of the small squares around the edge of the box.
Sometimes, you can’t express yourself in words and numbers alone.
Sometimes, you need to express yourself through art. Luckily, Microsoft Word recognizes this need and gives users the option to draw on a document.
If you want a new way to showcase your ideas, give drawing a try! It’s easy, adds some flair to your document and might be a more effective way to communicate your thoughts.
- In the ‘Insert tab,’ click the ‘Shapes’ button, and in the drop-down menu select ‘Scribble’
- Click and hold down your mouse to draw the shape you want
- Release the mouse when you’ve finished drawing
- Go to the ‘Shape Format’ tab to edit your shape

How to draw in Word
For all my visual learners in the house, follow along as I go through the drawing process step-by-step. I also include some formatting and editing tips and tricks to consider.
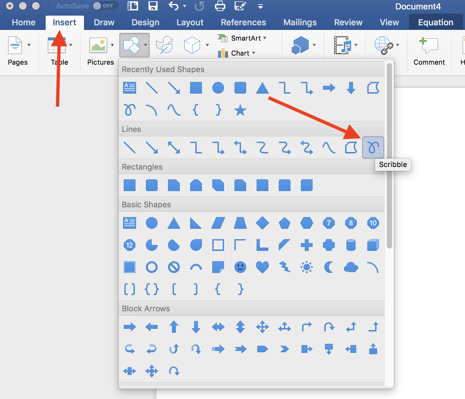
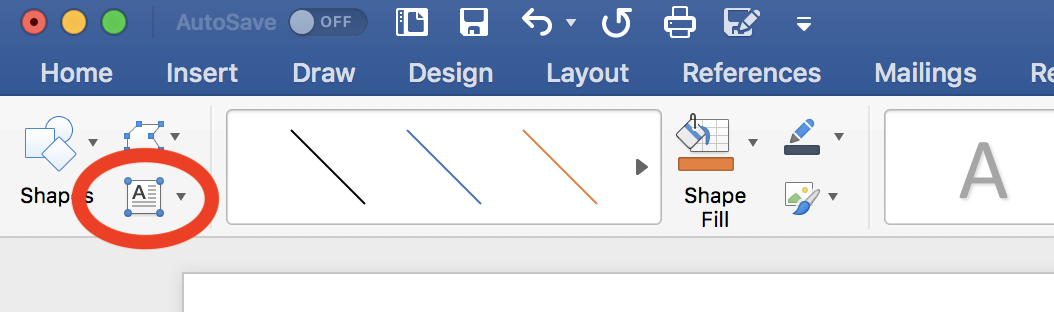
1. Click the ‘Shapes’ button and select ‘Scribble’
Open up your Microsoft Word document. It can be an empty document or it can be filled with an essay — you can draw over words if you want.
Navigate to the ‘Insert’ tab. From there, select ‘Shapes.’ A drop-down menu will appear. Under the ‘Lines’ options, select the very last button. It looks like a scribble and is aptly named ‘Scribble.’
2. Hold down your mouse to draw
Click and hold down your mouse to draw. Admittedly, this isn’t the most intuitive thing in the world and your drawings probably won’t look like they do on paper. That’s okay, you do get a chance to tweak and sculpt your drawing later — as well as adjust the line coloring, width, fill color, and more.
Here’s the strange shape I chose to draw (don’t ask me what it is):
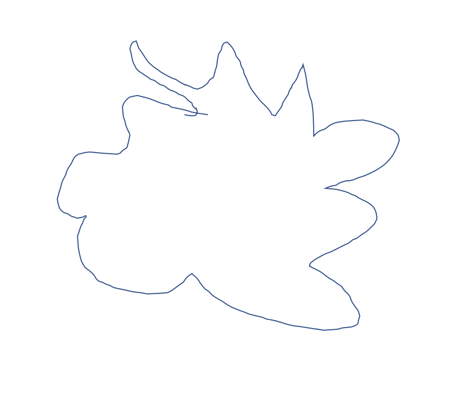
3. Release the mouse
As soon as you release your mouse, the drawing will be finished. You’ll no longer be able to continue drawing, like you would if it were pen and paper.
If you released the mouse too early, you can delete the shape and start over. If you want to add another shape to complement the one you just drew, go ahead and click the ‘Scribble’ button and go through the drawing process once more.
If you have the basic idea of the drawing done but it’s not exactly what you wanted, you can tweak the lines a bit. Double-click on the drawing. Click on the small ‘Edit Shape’ button in the top left corner. Then, select ‘Edit Points.’

A bunch of, you guessed it, points will appear on your drawing. Dragging a point out, in, or sideways effectively drags the line of the drawing with it. When you click off of the point, the drawing will be altered accordingly.
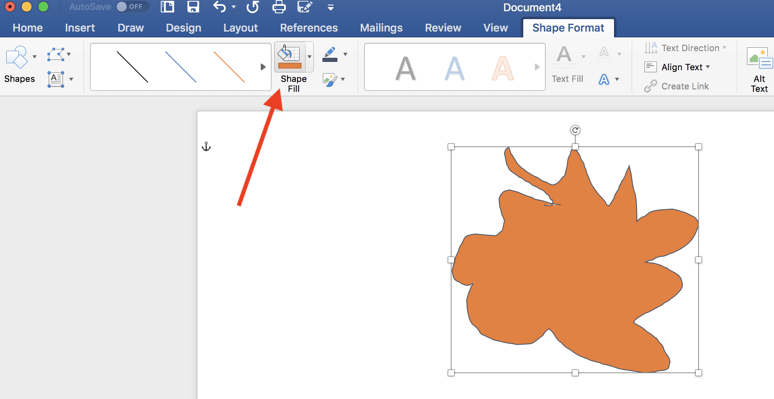
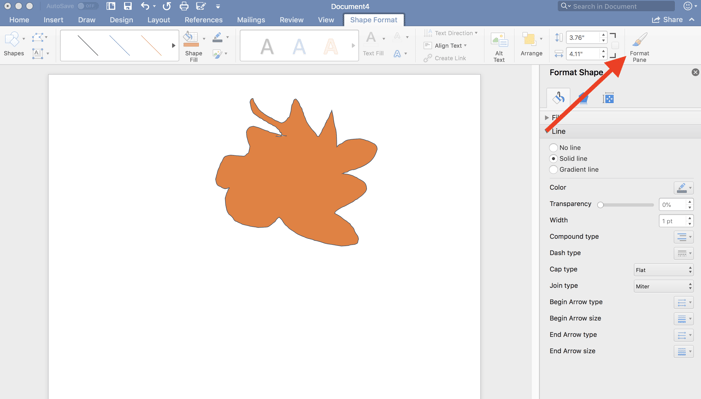
4. Edit your drawing
Double-click your drawing. A new tab will appear in the menu banner called ‘Shape Format.’ Now you can resize your shape by dragging the corners of the box around it. You can use the ‘Shape Fill’ button to add color inside your shape.
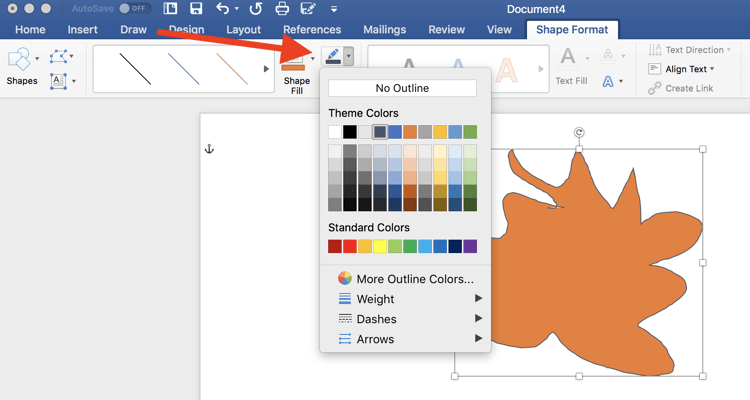
You can change the color of the outline by clicking the pencil button, located next to the ‘Shape Fill’ button. You can also choose to have ‘No Outline’ if you want.
Another way to make your drawing stand out is by adding text to it. Click on the ‘Draw a Text Box’ icon located next to the ‘Shapes’ button.
Drag your mouse over where you want the text box to live inside your shape. You can play with all the text editing options and include hanging indents, if you want.
To unlock more editing options, select the ‘Format Pane’ on the far right. This will open a sidebar where you can edit the line type of the outline, play with color effects for the fill color, and more!
Once you’ve manipulated your shape into a final product that you’re happy with, go ahead and ‘Save As.’ Now you’re ready to share your creativity with the world!

Other things to know about drawing in Word
It will be very difficult for you to draw straight lines in Word. That’s simply due to the impossibility of dragging a mouse precisely. If that’s frustrating you to no end, there are work arounds.
How to draw a line in Word
If you want to have a very straight line, maybe the ‘Scribble’ tool is not the right one for you. Go back to the ‘Shapes’ drop-down menu under the ‘Insert’ tab and go through the different line options available to you. Select what’s best for your vision and go from there!
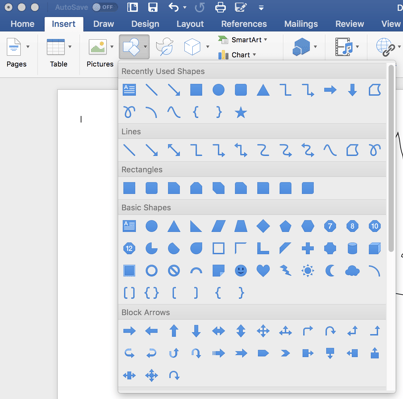
You’ll also notice that Word offers a variety of pre-made shapes to choose from. If you’re struggling to draw a star that doesn’t look like a sad blob, maybe try select the pre-made star shape. You can still play with the coloring, size, lines and more.
TIP: If you are dead-set on drawing freehand but Word isn’t working out for you, try drawing in Microsoft Paint. You can always insert that image into Word later on.
Want to put your artistry to the test in other ways? Discover how to make a brochure in Word.

Holly is the director of content marketing at G2. An avid reader and writer, Holly graduated from the University of Missouri with a dual major in Journalism and English. She firmly believes in the power of content and is constantly seeking ways to better engage and delight readers.
Word for Microsoft 365 Word 2021 Word 2019 Word 2016 Word 2013 Word 2010 Word 2007 More…Less
These are the basic types of graphics that you can use to enhance your Word documents: drawing objects, SmartArt, charts, pictures, and clip art. Drawings refer to a drawing object or a group of drawing objects.
Drawing objects include shapes, diagrams, flowcharts, curves, lines, and WordArt. These objects are part of your Word document. You can change and enhance these objects with colors, patterns, borders, and other effects.
Note: It is no longer necessary to insert a drawing canvas to work with drawing objects in Word. However, you may still use a drawing canvas as an organizational aid when working with several drawing objects, or if you want to add connectors between shapes. To insert a drawing canvas, on the Insert tab, click Shapes, and then click New Drawing Canvas.
What do you want to do?
-
Add a drawing to a document
-
Delete all or part of a drawing
Add a drawing to a document
-
Click in your document where you want to create the drawing.
-
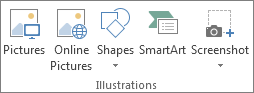
On the Insert tab, in the Illustrations group, click Shapes.

-
You can do any of the following on the Format tab, which appears after you insert a drawing shape:
-
Insert a shape. On the Format tab, in the Insert Shapes group, click a shape, and then click somewhere in the document.
-
Change a shape. Click the shape you want to change. On the Format tab, in the Insert Shapes group, click Edit Shape, point to Change Shape, and then choose a different shape.
-
Add text to a shape. Click the shape you where you want text, and then type.
-
Group selected shapes. Select several shapes at a time by pressing CTRL on your keyboard and clicking each shape you want to include in the group. On the Format tab in the Arrange group, click Group so that all of the shapes will be treated like a single object.
-
Draw in the document. On the Format tab, in the Insert Shapes group, expand the shapes options by clicking the arrow. Under Lines click Freeform or Scribble.
Tip: To stop drawing with the Freeform or Scribble lines, double-click.
-
Adjust the size of the shapes. Select the shape or shapes you want to resize. On the Format tab, in the Size group, click the arrows or type new dimensions in the Height and Width boxes.
-
Apply a style to a shape. In the Shape Styles group, rest your pointer over a style to see what your shape will look like when you apply that style. Click the style to apply it. Or, click Shape Fill or Shape Outline and select the options that you want.
Note: If you want to apply a color and gradient that aren’t available in the Shape Styles group, select the color first, and then apply the gradient.
-
Add flow charts with connectors. Before you create a flow chart, add a drawing canvas by clicking the Insert tab, clicking Shapes in the Illustrations group, and then clicking New Drawing Canvas. On the Format tab, in the Insert Shapes group, click a Flow chart shape. Under Lines, choose a connector line such as the Curved Arrow Connector.
-
Use shadow and three-dimensional (3-D) effects to add interest to the shapes in your drawing. On the Format tab, in the Shape Styles group, click Shape Effects, and choose an effect.
-
Align the objects on the canvas. To align the objects, press and hold CTRL while you select the objects that you want to align. On the Format tab, in the Arrange group, click Align to choose from an assortment of alignment commands.
-

Delete all or part of a drawing
-
Select the drawing object that you want to delete.
-
Press DELETE.
See also
Add shapes
Draw a curve or circle shape
Insert pictures
Crop a picture
Add clip art to your file
What do you want to do?
-
Add a drawing to a document
-
Delete all or part of a drawing
Add a drawing to a document
-
Click in your document where you want to create the drawing.
-
On the Insert tab, in the Illustrations group, click Shapes.
-
When you find the shape you want to insert, double-click to insert it automatically, or click and drag to draw it in your document.
You can do any of the following on the Format tab, which appears after you insert a drawing shape:
-
Insert a shape. On the Format tab, in the Insert Shapes group, click a shape, and then click somewhere in the document.
-
Change a shape. Click the shape you want to change. On the Format tab, in the Shape Styles group, click Change Shape, and then choose a different shape.
-
Add text to a shape. Right-click the shape, click Add Text, and then type.
-
Group selected shapes. Select several shapes at a time by pressing CTRL on your keyboard and clicking each shape you want to include in the group. On the Format tab in the Arrange group, click Group so that all of the shapes will be treated like a single object.
-
Draw in the document. On the Format tab, in the Insert Shapes group, expand the shapes options by clicking the arrow. Under Lines click Freeform or Scribble.
-
Adjust the size of the shapes. Select the shape or shapes you want to resize. On the Format tab, in the Size group, click the arrows or type new dimensions in the Shape Height and Shape Width boxes.
-
Apply a style to a shape. In the Shape Styles group, rest your pointer over a style to see what your shape will look like when you apply that style. Click the style to apply it. Or, click Shape Fill or Shape Outline and select the options that you want.
Note: If you want to apply a color and gradient that aren’t available in the Shape Styles group, select the color first, and then apply the gradient.
-
Add flow charts with connectors. Before you create a flow chart, add a drawing canvas by clicking the Insert tab, clicking Shapes in the Illustrations group, and then clicking New Drawing Canvas. On the Format tab, in the Insert Shapes group, click a Flow chart shape. Under Lines, choose a connector line such as the Curved Arrow Connector.
-
Use shadow and three-dimensional (3-D) effects to add interest to the shapes in your drawing. On the Format tab, choose an option in either the Shadow Effects or the 3-D Effects group.
-
Align the objects on the canvas. To align the objects, press and hold CTRL while you select the objects that you want to align. On the Format tab, in the Arrange group, click Align to choose from an assortment of alignment commands.
-

Delete all or part of a drawing
-
Select the drawing object that you want to delete.
-
Press DELETE.
See also
Draw a curve or circle shape
Insert pictures
Crop a picture
Add clip art to your file
Need more help?
Want more options?
Explore subscription benefits, browse training courses, learn how to secure your device, and more.
Communities help you ask and answer questions, give feedback, and hear from experts with rich knowledge.