PowerPoint for Microsoft 365 PowerPoint 2021 PowerPoint 2019 PowerPoint 2016 PowerPoint 2013 PowerPoint 2010 PowerPoint 2007 More…Less
You can print handouts from PowerPoint, but if you want to use the editing and formatting features of Word, you can work on and print your handouts using Word.
In the open presentation, do the following:
-
Click File > Export.
-
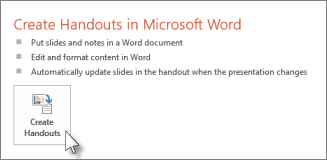
Under Export, click Create Handouts, and under Create Handouts in Microsoft Word, click Create Handouts.
-
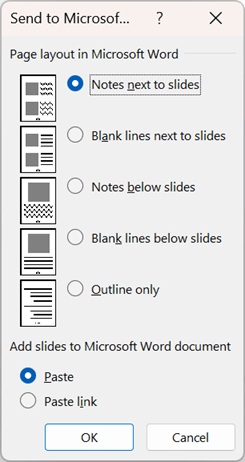
In the Send to Microsoft Word box, click the page layout that you want, and then do one of the following:
-
To paste content that you want to remain unchanged when the content in the original PowerPoint presentation is updated, click Paste, and then click OK.
-
To make sure that any updates to the original PowerPoint presentation are reflected in the Word document, click Paste link, and then click OK.
The presentation opens as a Word document in a new window. You can edit, print or save as with any Word document.
-
In the open presentation, do the following:
-
Click File > Save & Send.
-
Under File Types, click Create Handouts, then under Create Handouts in Microsoft Word, click Create Handouts.
-
In the Send to Microsoft Office Word dialog box, click the page layout that you want, and then do one of the following:
-
To paste content that you want to remain unchanged when the content in the original PowerPoint presentation is updated, click Paste, and then click OK.
-
To ensure that any updates that occur to the original PowerPoint presentation are reflected in the Word document, click Paste link, and then click OK.
The presentation opens as a Word document in a new window. You can edit, print or save as with any Word document.
-
In the open presentation, do the following:
-
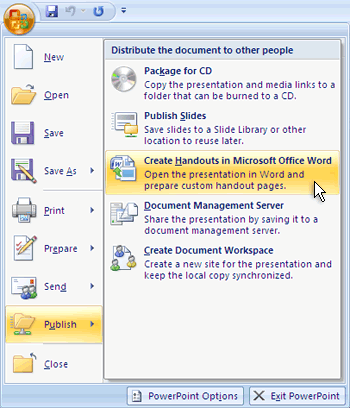
Click the Microsoft Office Button
, point to Publish, and then click Create Handouts in Microsoft Office Word.
-
In the Send to Microsoft Office Word dialog box, click the page layout that you want, and then do one of the following:
-
To paste content that you want to remain static, or unchanged, when the content in the original PowerPoint 2007 presentation is updated, click Paste, and then click OK.
-
To ensure that any updates that occur to the original PowerPoint 2007 presentation are reflected in the Office Word 2007 document, click Paste link, and then click OK.
Notes:
-
If you click Paste link, each time that you open the Word 2007 document that contains the linked presentation, you will be prompted to accept or reject any updates that were made to the linked presentation.
-
Do not move the Word 2007 handout file because, as with any linked file, the link can easily break. To eliminate linking problems, keep all files associated with your PowerPoint 2007 presentation in the same folder and then link them, so that if you decide to burn your presentation to a CD, the links will work.
-
-
-
Open Word, and then print your handouts.
Working around problems with exporting
The process of exporting a presentation to Word uses a lot of memory. The longer and larger the file, the more challenging it is for the programs and your computer to complete the process. If you get an error message that says, «PowerPoint couldn’t write to Microsoft Word,» try the process again after first restarting your computer and opening only PowerPoint. Restarting your computer will free up memory for the export process, and having other programs closed during the process will do the same.
If you have a very large file that still is not entirely exported, you can do a Save As operation on the presentation to make a second copy of it. From that copy, remove the slides that have already been exported, then run another export of the remaining slides that need to be exported. When that second export process is finished, combine the two .docx files into one.
Feedback on problems with exporting to Word
If you are unsatisfied with the reliability of this feature, let us know by providing us feedback. See How do I give feedback on Microsoft Office? for more information.
See also
Link or embed a PowerPoint slide
Need more help?
Want more options?
Explore subscription benefits, browse training courses, learn how to secure your device, and more.
Communities help you ask and answer questions, give feedback, and hear from experts with rich knowledge.
How to Do a PowerPoint Presentation on Microsoft Word
- Click the “Microsoft Office” button in PowerPoint.
- Click “Paste.”
- Click “OK.” Microsoft Word will open automatically with the PowerPoint slides inserted into a document.
Contents
- 1 How do you make a PowerPoint on Microsoft Word?
- 2 Is the a way to put PowerPoint in Word?
- 3 How do you make a PowerPoint on Microsoft Office?
- 4 How do I make a PowerPoint on Microsoft Word app?
- 5 Is PowerPoint included in Microsoft Office?
- 6 Does Microsoft Office have PowerPoint?
- 7 Is Microsoft Word and PowerPoint free?
- 8 How do I put PowerPoint on my computer?
- 9 How do I open a PowerPoint in Microsoft Office?
- 10 Do you have to pay for Microsoft PowerPoint?
- 11 Is Microsoft Word free anymore?
- 12 Which button is used to start Microsoft PowerPoint?
- 13 Why doesn’t my PowerPoint have icons?
- 14 How do I install PowerPoint in Office 365?
- 15 How do I convert PowerPoint to Microsoft Office?
Office Tip: how to create a PowerPoint presentation from a Word…
- Open a new PowerPoint presentation. Open a new PowerPoint presentation and then go to the Insert tab.
- Choose Slides from Outline.
- Select document.
- Copy & Paste.
- Save as PowerPoint.
Is the a way to put PowerPoint in Word?
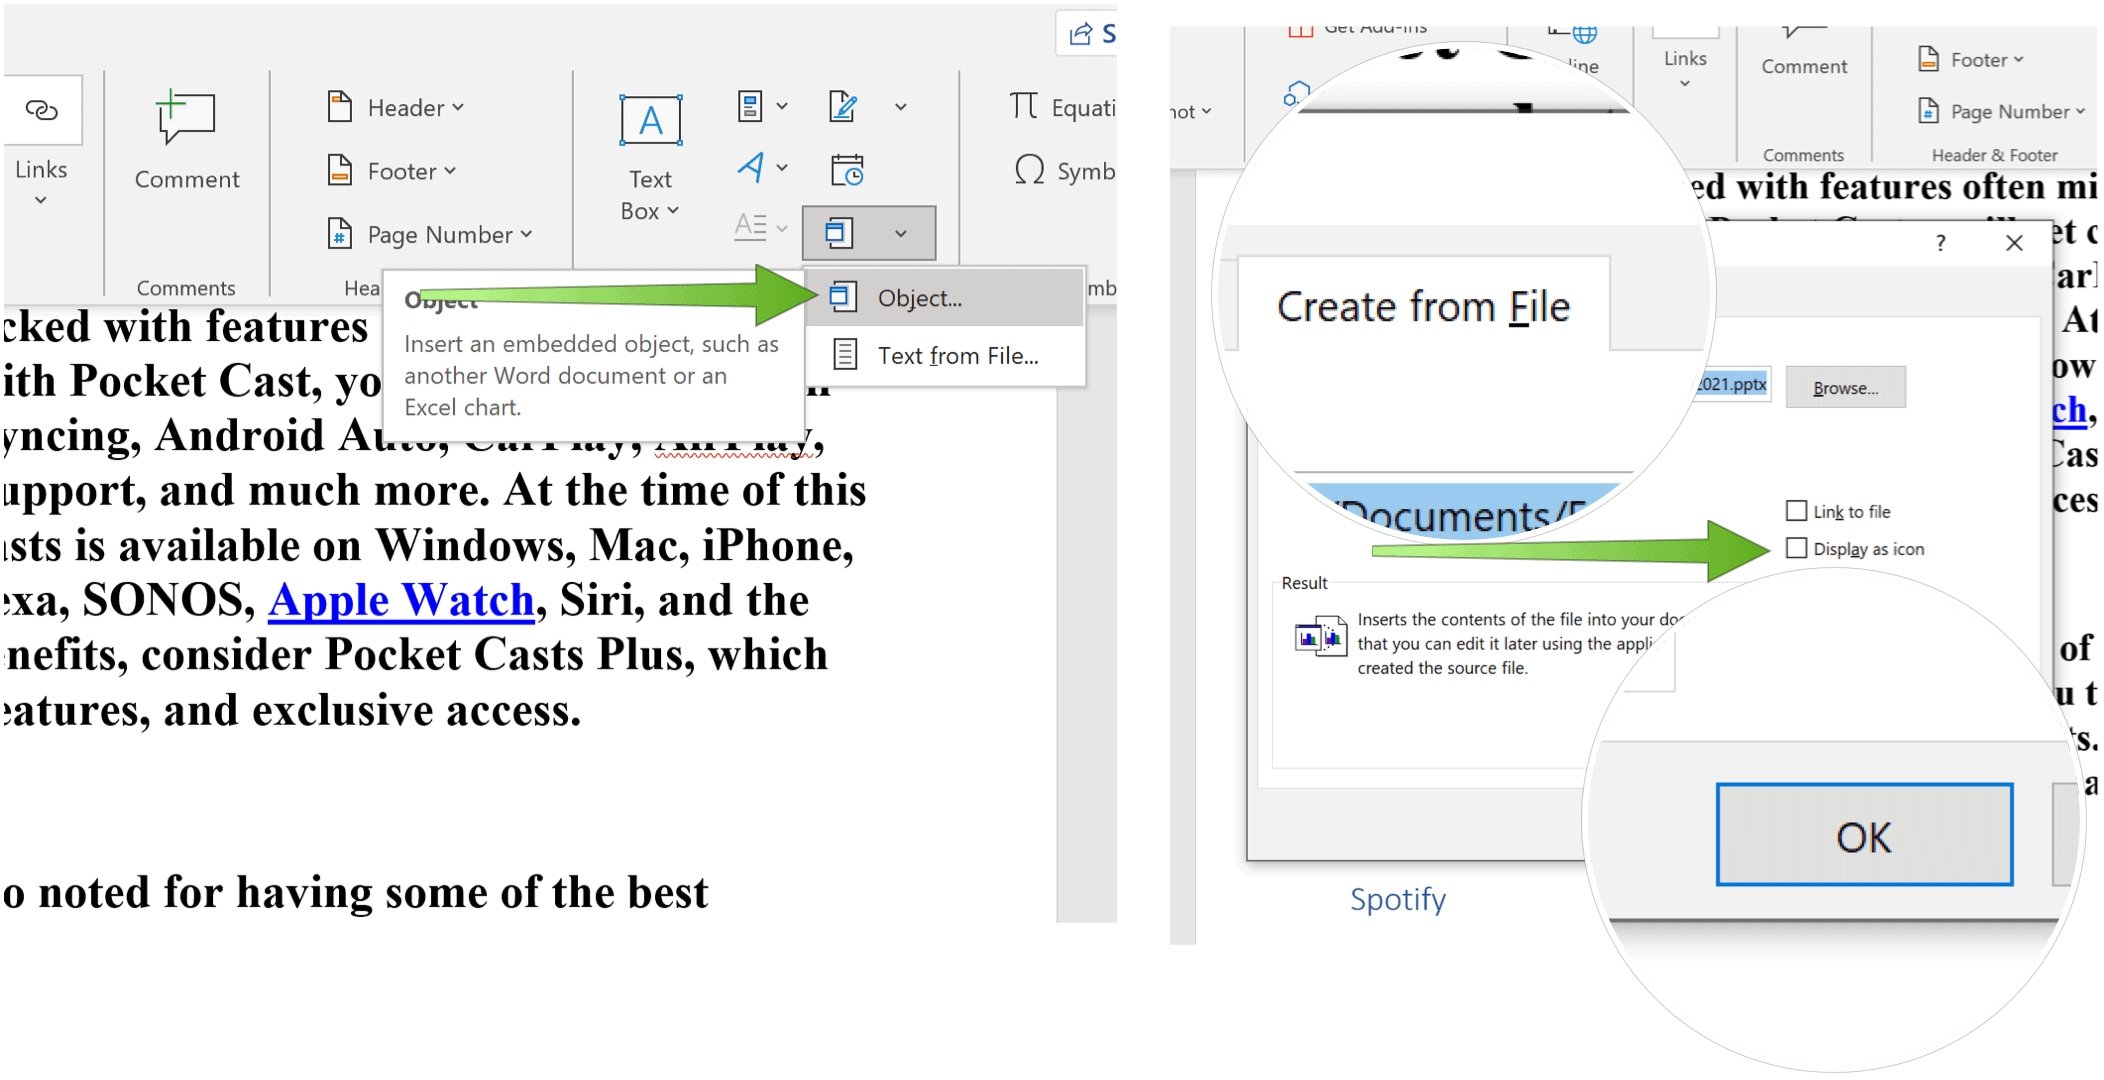
Open the word document and select Insert on the ribbon. In the Text group click the dropdown arrow for Object and Select Object. The Object dialog box will appear select Create from File. Choose Browse and select the PowerPoint file that you want to Embed.
How do you make a PowerPoint on Microsoft Office?
Create a presentation
- Open PowerPoint.
- In the left pane, select New.
- Select an option: To create a presentation from scratch, select Blank Presentation. To use a prepared design, select one of the templates. To see tips for using PowerPoint, select Take a Tour, and then select Create, .
How do I make a PowerPoint on Microsoft Word app?
In the open presentation, do the following:
- Click File > Save & Send.
- Under File Types, click Create Handouts, then under Create Handouts in Microsoft Word, click Create Handouts.
- In the Send to Microsoft Office Word dialog box, click the page layout that you want, and then do one of the following:
Is PowerPoint included in Microsoft Office?
PowerPoint became a component of the Microsoft Office suite, first offered in 1989 for Macintosh and in 1990 for Windows, which bundled several Microsoft apps.Since the late 1990s, PowerPoint’s worldwide market share of presentation software has been estimated at 95 percent.
Does Microsoft Office have PowerPoint?
Microsoft PowerPoint is a powerful slide show presentation program. It is a standard component of the company’s Microsoft Office suite software, and is bundled together with Word, Excel, and other office productivity tools.
Is Microsoft Word and PowerPoint free?
The good news is if you don’t need the full suite of Microsoft 365 tools, you can access a number of its apps online for free — including Word, Excel, PowerPoint, OneDrive, Outlook, Calendar and Skype. Here’s how to get them: 1. Go to Office.com.
How do I put PowerPoint on my computer?
Navigate to the Microsoft Office folder on your computer, double-click on the Setup file, then follow the on-screen instructions in the setup wizard to install PowerPoint on your computer.
How do I open a PowerPoint in Microsoft Office?
Click the File tab. Click Open. To only see files saved in OpenDocument format, in the File of type list, click OpenDocument Presentation. Click the file you want to open, and then click Open.
Do you have to pay for Microsoft PowerPoint?
Accessing Microsoft PowerPoint and other core Office programs is free via the web, and all you’ll need is a Microsoft account. Head over to Office.com and create an account, or log into one that you already have.When you work on a file here, it will be saved to OneDrive, Microsoft’s cloud storage service.
Is Microsoft Word free anymore?
Microsoft Office 365 is no more, but you can still get Excel, Word, and more of its apps for free.Microsoft Office 365 is no more, but you can still get Excel, Word, and more of its apps for free.
Which button is used to start Microsoft PowerPoint?
Control the slide show
| To do this | Press |
|---|---|
| Start a presentation from the beginning. | F5 |
| Start a presentation from the current slide. | Shift+F5 |
| Perform the next animation or advance to the next slide. | N Enter Page Down Right arrow key Down arrow key Spacebar |
Why doesn’t my PowerPoint have icons?
Note: If you don’t see an Icons icon on the Insert tab of the Ribbon, or you’re unable to ungroup/edit the icons, check your PowerPoint version (it’s possible that your version is older than mine). To check your PowerPoint version, click the File tab and then choose Account. Click the About PowerPoint button.
How do I install PowerPoint in Office 365?
After you’ve signed up for Microsoft 365, you and your employees can install Office apps.
- Sign in to the Microsoft 365 admin center, and choose Office software.
- Under Language, choose the language you want, and then choose Install.
- When prompted, choose Run.
How do I convert PowerPoint to Microsoft Office?
Try it!
- Select File > Export > Create a video.
- Select the quality of the video:
- Decide if you want to:
- In the Seconds spent on each slide box, select the default time you want to spend on each slide.
- Select Create Video.
- Enter a file name and then browse to the location you want to save your video.
You can insert a Microsoft PowerPoint Slide into Microsoft Word quickly and easily. It only takes a few simple steps.
We also have a helpful complement to this tutorial. Download our FREE eBook: The Complete Guide to Making Great Presentations. Grab it now before you read on.
How to Quickly Insert a PowerPoint Slide Into Word
Note: Watch this short tutorial screencast or follow the quick steps below, that complement this video.
1. Copy the Slide in PowerPoint
Let’s learn how to copy a slide from PowerPoint slide to Word. There are a few different ways to do this. The first of these is to simply start in PowerPoint and select a slide thumbnail here on the left side.
I’ll click on the slide thumbnail and then I’ll press Ctrl+C to copy it to my clipboard.
2. Paste the Slide into Word
Now let’s jump over to Word. I can go ahead and just press Ctrl+V on my keyboard to paste in a thumbnail of the slide right inside of PowerPoint.
You can work with this PowerPoint just like you would with any other image. Scale it up and down or move it around inside the document.
3. Insert a PowerPoint Into Word
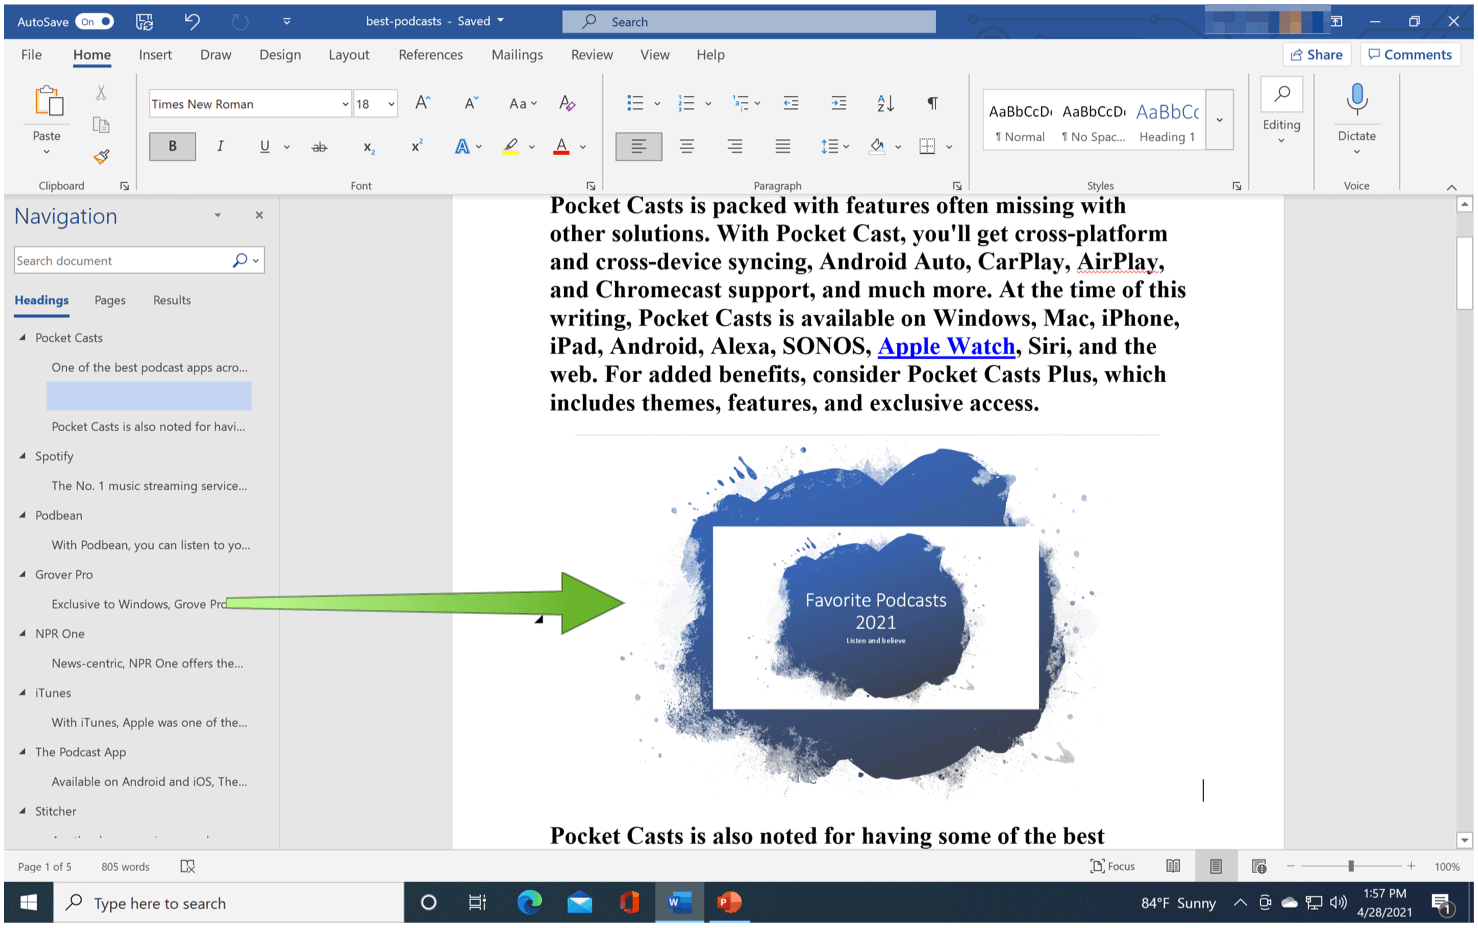
Another way to add an entire PowerPoint presentation is to come up here to the Insert tab and click on what’s called the Object option.
Let’s choose to Create from File, and then I’ll go ahead and browse to a PowerPoint presentation file and press OK. Now the entire PowerPoint presentation is inside the Word doc.
Finishing Up!
Your audience can actually double-click the slide to start the PowerPoint presentation right inside of Microsoft Word. You can easily drop PowerPoint slides in a variety of formats into Word when needed.
More Envato Tuts+ PowerPoint Presentation Tutorials
Learn more in our PowerPoint tutorials and quick video tutorials on Envato Tuts+. We have an assortment of PowerPoint material to help you work better with images in your presentations:
You can also find great PowerPoint presentation templates with premium designs on GraphicRiver or Envato Elements. Or, browse through our selection of the best Microsoft PowerPoint designs:
Grab This New eBook on Making Great Presentations (Free Download)
Learn the best presentation strategies in our new eBook: The Complete Guide to Making Great Presentations (grab it now for FREE). Get your ideas packaged into a powerful presentation that will move your audience to action.
Do you use PowerPoint Slides in your Word documents? Let us know in the comments below.
Insert PowerPoint slides as individual images
Updated on February 23, 2021
What to Know
- In Word, go to Insert > Add from Files and select the PowerPoint file. Choose Insert Slide for each slide you want to add.
- Use the Picture Format menu to adjust each inserted slide.
When you want to use PowerPoint slides in a Microsoft Word document, use the Add from Files tool to import one or more slides from a PowerPoint presentation as images to the Word file. We show you how to do it using Microsoft Word for Microsoft 365, Word 2019, Word 2016, and Word for Mac.
How to Insert PowerPoint Slides Into a Word Document
Slides from an existing PowerPoint presentation can be inserted as an image into a blank document or an existing document.
-
Open an existing or blank Word document, then position the cursor where you want to insert the PowerPoint slide.
-
Go to the Insert tab and select Add from Files.
-
Select the PowerPoint file that contains the slides you want to add to the Word document.
If the file isn’t listed, select Show More Files to browse the filesystem and choose a file.
-
In the Insert From File panel, find the slide you want to insert as an image and select Insert Slide to insert it into the document.
The slide appears as an image. It can only be edited with photo tools.
-
Use the Picture Format menu to adjust each inserted slide.
Considerations
In old versions of Microsoft Office, it sometimes made sense to export PowerPoint content into Word to mark it up with the speaker’s notes and other information. However, PowerPoint has advanced such that these workarounds no longer prove as helpful.
PowerPoint presentations can be exported in different formats including PDF, several image formats, several movie formats, and a rich-text outliner format. Use these export formats as an alternative to a multi-step Word process.
Thanks for letting us know!
Get the Latest Tech News Delivered Every Day
Subscribe
Download Article
Download Article
This wikiHow teaches you how to convert a Microsoft PowerPoint presentation into a Microsoft Word document by using the «Create Handouts» feature on PowerPoint for Windows, or by exporting an RTF (Rich Text Format) file using PowerPoint for Mac. The current version of PowerPoint for Mac does not have the «Create Handouts» feature. RTF files are not able to accurately convert the formatting of some PowerPoint features, so many images and backgrounds may not be supported.
Things You Should Know
- Open the PowerPoint that you want to convert.
- On Windows, go to File > Export… > Create Handouts. Follow the prompts and select a layout for your Word document. Finish by clicking OK.
- On Mac, go to File > Export…. Enter a file name and choose a save location. Click File Format > Rich Text Format (.rtf) > Export.
- Open the RTF file in Word and go to File > Save As… > Format > Word Document (.docx) > Save.
-
1
Open a PowerPoint presentation. To open the PowerPoint presentation file you want to convert, click File, Open… and select the file.
-
2
Click File in the menu bar at the top of the screen.
Advertisement
-
3
Click Export… in the drop-down menu.
-
4
Click Create Handouts.
-
5
Click Create Handouts in Microsoft Word.
-
6
Click Create Handouts.
-
7
Select a layout for the Word document.
- If you want the Word document to update whenever the original PowerPoint presentation is changed, click on Paste link.
- If you want the Word document to remain unchanged whenever the original PowerPoint presentation is updated, click on Paste.
-
8
Click on OK. The PowerPoint presentation will open as a Word document.
Advertisement
-
1
Open a PowerPoint presentation. To open the PowerPoint presentation file you want to convert, click File, Open… and select the file.
-
2
Click File in the menu bar, then Export….
-
3
Type a filename in the «Export As» field and a save location in the «Where» drop-down menu.
-
4
Click on the «File Format» drop-down menu and select Rich Text Format (.rtf).
-
5
Click Export. The PowerPoint presentation will be saved as a Rich Text Format (.rtf) document in the location you specified.
-
6
Open Microsoft Word. It’s the blue app that’s shaped like or contains a W.
-
7
Open the RTF file. Click File then Open… and select the RTF file you just exported from PowerPoint. This will open the RTF file in Microsoft Word.
-
8
Click File and then click Save As…. This will open the Save window which will allow you to save the document as a Word file.
-
9
Click on the «Format» drop-down menu and select Word Document (.docx).
-
10
Click Save. The PowerPoint presentation is now saved as a Microsoft Word document
- In most instances, the formatting and pagination will not match the original PowerPoint presentation and many pictures or backgrounds may not be supported by the RTF format. Be sure to go through the Word document and adjust it to your liking.
Advertisement
Ask a Question
200 characters left
Include your email address to get a message when this question is answered.
Submit
Advertisement
Thanks for submitting a tip for review!
About This Article
Article SummaryX
To convert a PowerPoint presentation into a Word document, start by opening your PowerPoint presentation and clicking “File” in the menu bar at the top of the screen. From the drop-down menu, click “Export” and “Create Handouts.” When prompted by the computer, pick “Create Handouts in Microsoft Word.” Select a layout from the options menu, like “Paste Link,” if you want it to update whenever the original PowerPoint presentation is changed. Alternatively, if you want the document to remain unchanged, click “Paste.” In order to finalize your preferences and open your PowerPoint as a Word document, click “OK.” To learn how to convert PowerPoint to Word on your Mac, keep reading!
Did this summary help you?
Thanks to all authors for creating a page that has been read 688,672 times.
Is this article up to date?
In this article, you’ll learn how to convert PowerPoint to Word so that you can edit your handouts or speaker notes directly in Microsoft Word.

The only issue you need to be aware of is the content on your slides.
Converting PPT to Word does NOT convert the content of your slides into a Microsoft Word document. Instead, the process exports your slides as thumbnails in one of five following handout layouts:

The five handout options when converting PowerPoint to Word are:
- Notes next to slides
- Blank lines next to slides
- Notes below slides
- Blank lines below slides
- Outline only
There is currently no way to convert the content of your individual slides – text boxes, shapes, SmartArt graphics, etc. – into a native Word document. For that, you will unfortunately have to copy and paste your information manually, slide by slide.
Below you’ll find a variety of methods to convert your PowerPoint slides to Word. Choose the method that works best for you.
Note: If you are just trying to convert your slides into the PDF file format, you DO NOT need to convert your PowerPoint presentation into a Word document first. Instead, you can simply save your PowerPoint presentation in the PDF file format. Read our guide here for details.
[Watch] Convert PowerPoint to Word (Speaker Notes Only)
Exporting your slides to Microsoft Word like this embeds your slides as thumbnails within a table.
While you cannot edit the individual PowerPoint slides, you can manipulate the table to format your handouts any way you like.
To see an example of how to convert PowerPoint speaker notes to Word without the thumbnail, watch the short video above. To learn more different ways you can print PowerPoint notes, read our guide here.
How to Convert PowerPoint to Word
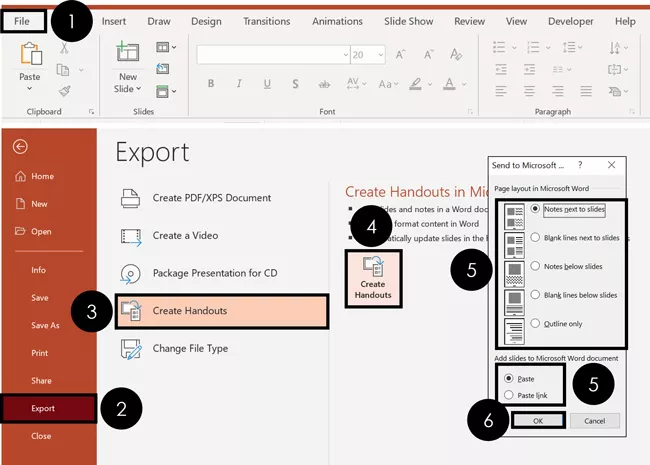
To convert your PowerPoint slides into Microsoft Word handouts, simply:
- Navigate to the File tab
- Select Export
- Click on the Create Handouts section
- Select the Create Handouts command
- Choose your Handout Type
- Select Paste or Paste Link (explained below)
- Click OK
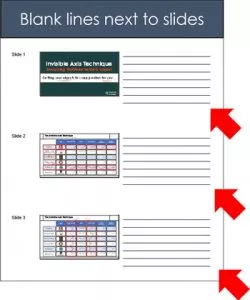
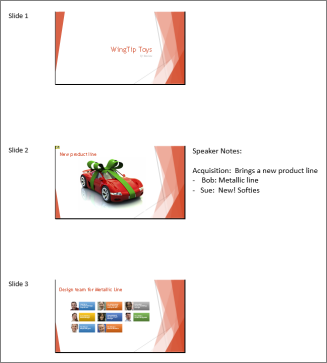
As a result, Microsoft Word opens, and your PowerPoint slides are converted into handouts based on your selection. For example, here’s how your slides look for the ‘Blank lines next to slides’ option.
Paste vs. Paste Link Options
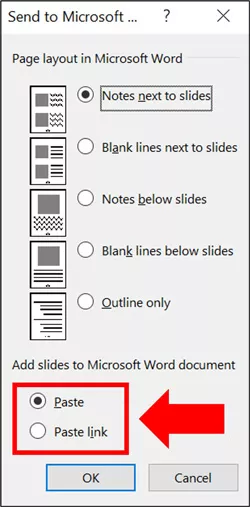
At the bottom of the Send to Microsoft Word dialog box, you are given the option to Paste or Paste link (as pictured below).
Paste: Exports your slides to Microsoft Word as a standalone file. Any updates or edits you make to your slides in PowerPoint will not be reflected in Word.
If you update your slides and want those changes reflected in Word, you will need to export your slides all over again.
Paste link: Exports your slides to Word as linked thumbnail images. Any edits you make to your slides in PowerPoint will be automatically updated within the thumbnail images inside Word.
This is all great. However, there are two caveats to the Paste link option to be aware of. Read on to see what they are.
Caveat #1: Only the PowerPoint thumbnails are linked to Word
The link created only updates the thumbnails of your slides in Word.
That means that if you export your slides to Word with your Speaker Notes beneath the slides, and you later update those speaker notes in PowerPoint, your changes will not be reflected in the Word document.
You’ll need to follow the steps above to convert PPT to Word all over again, to have your changes accurately reflected.
Caveat #2: The Word thumbnails only live in Word
Any updates and edits you make to your slides in PowerPoint will be updated in Microsoft Word.
But if you delete slide thumbnails in Word or move things around, none of those changes will be reflected in PowerPoint.
In fact, any changes like these will be overwritten as soon as PowerPoint pushes its latest updates back to Word.
How to View linked PowerPoint Slides in Microsoft Word
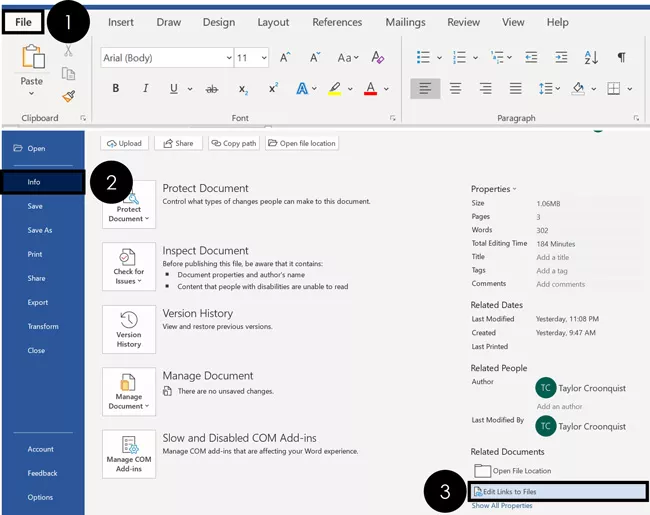
To view any linked PowerPoint slides you have in Microsoft Word, simply:
- Navigate to the File tab
- Select the Info tab
- Click Edit Links to Files
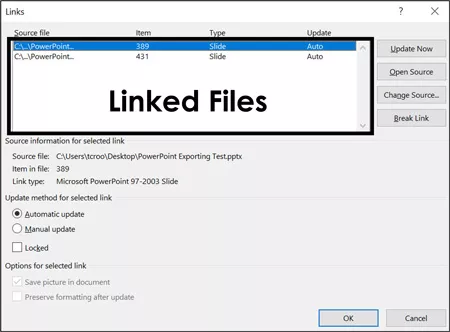
This opens the Links dialog box, which you can see below.
This is where you can update, edit, and manage any linked files to your Word document. Here is a quick rundown of what each of these options does:
Update Now: This forces Word to update based on whatever is in your PowerPoint file. This normally happens by default whenever you save your PowerPoint presentation, but you can control when it happens here.
Open Source: This will open the PowerPoint presentation from which these slides are linked. This can be faster than trying to find the original presentation you used to create your handouts.
Note: If you move your PowerPoint presentation to a different place on your computer or change its file name after you convert PowerPoint to Word, you will get the following error: “This object is corrupt or no longer available”.
To fix this, simply use the Change Source option to re-locate the file. It’s either in a different location on your computer or has a new name.
Change Source: This allows you to change which PowerPoint file you are linked to. It’s useful if you have updated the name of your PowerPoint file after you converted it to Word.
To maintain an active link between PowerPoint and Word, the PowerPoint file’s name needs to be the same.
Break Link: This allows you to break the PowerPoint to Word links for individual slides. When you break the link to a slide (as discussed further below), it will no longer update in Word as you edit it in PowerPoint.
Update method for selected link: If you don’t want your files to automatically update, you can choose to manually update them instead.
How to Update a Linked PowerPoint Slide
Now that you know how to link PowerPoint slides to Word, there are two ways that you can update the links. Both methods achieve the same goal, so just pick the one that makes the most sense (and is easiest to remember) for you.
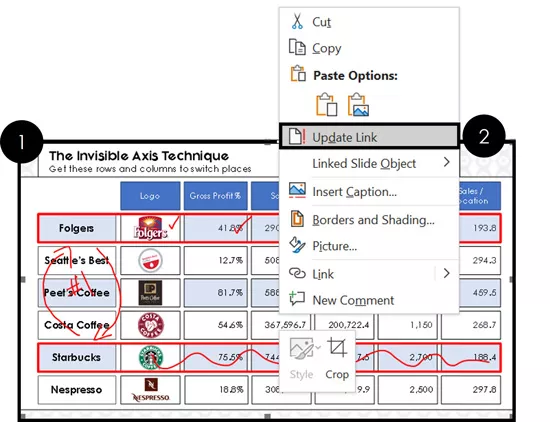
1. Right-click the slides in Word
To update an individual linked PowerPoint slide in Word, simply:
- Navigate to the slide you want to update
- Right-click the slide’s thumbnail picture in Word
- Select Update Link
Note: This only updates the converted PowerPoint slide you selected. If you want to update the rest of your slides, you’ll need to right-click them individually or use the next technique.
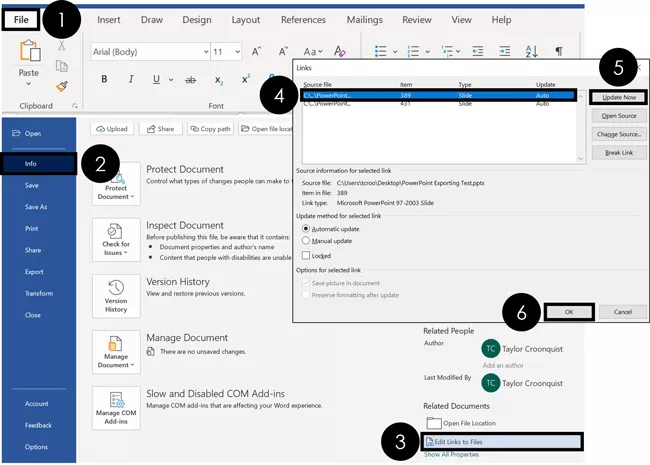
2. Use the Edit Links to Files command
To update all your linked PowerPoint slides in Microsoft Word, simply:
- Navigate to the File tab
- Click the Info tab
- Select Edit Links to Files
- Select the slide you want to update
- Click Update Now
- Click OK
If you have multiple slides you want to update, you can continue selecting slides and updating them in Word.
If your document is set to Automatic Update, you can also just close and reopen Word to have all of your links automatically update (as long as you have saved and closed your PowerPoint presentation).
How to Break Linked PowerPoint Slides in Word
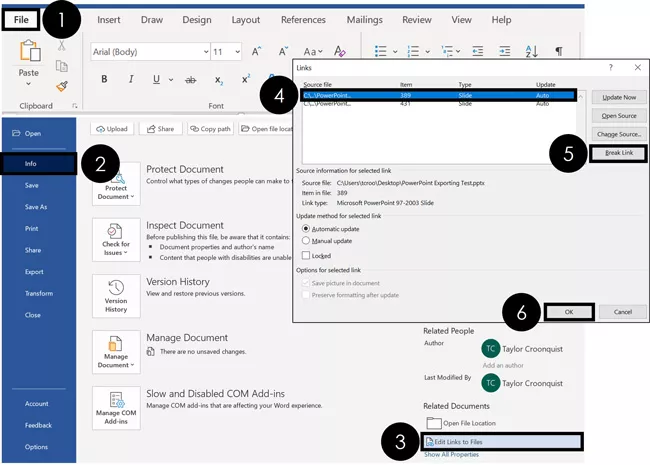
To break the links between your PowerPoint and Word files, from within Microsoft Word, simply:
- Navigate to the File tab
- Click the Info tab
- Select Edit Links to Files
- Select the linked slide you want to break
- Click Break Link
- Click OK
Because each PowerPoint slide thumbnail is considered a link, if you want to remove all the links, you will need to click on each slide and break it individually.
How to Insert PowerPoint into Word (as an embedded presentation)
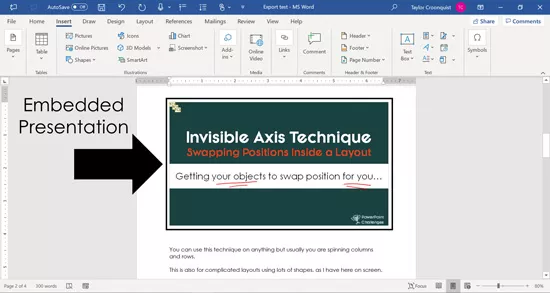
An alternative to converting PowerPoint to Word as handouts is to instead embed your presentation inside of Microsoft Word.
When you do this, instead of inserting pictures of your slides, your entire PowerPoint presentation is is embedded. You can then double-click it to launch your presentation in PowerPoint.
To embed a PowerPoint presentation inside of Word, from within Microsoft Word simply:
- Navigate to the Insert tab
- Open the Object dropdown menu
- Select Object
- Choose Create from file
- Click Browse
- Navigate to and select your PowerPoint file
- Choose Link to File (assuming you want changes to automatically update)
- Click OK
As a result, your PowerPoint presentation becomes embedded in your Word document.
Conclusion
As you can see, there are several ways to convert PowerPoint to Word depending on what you are trying to accomplish. In addition, you have several options to choose from for each method.
Is it worth your time to link the two programs together? That depends on how frequently you need to update your PowerPoint slides (and want those updates reflected in Word). If you decide to go this route, I recommend spending a few extra minutes reviewing the tips above on linking and updating links, so you know what to expect (and how to fix things if your links get broken).
If you decide not to link PowerPoint to Word, you can always easily export your PowerPoint slides to Word whenever you update them. This is my recommendation for you if you are not updating your slides frequently.
If you enjoyed this article and want to learn more about our online training courses and resources, you can visit us here.
Microsoft Word и Microsoft PowerPoint хорошо работают вместе по-разному. Оба эти приложения включены в подписку Microsoft 365. Одна вещь, которую вы можете сделать, используя оба вместе, — это добавить презентацию в документ Word как объект. Вот как встроить слайд PowerPoint в документ Word и почему это полезный инструмент.
Есть два способа добавить содержимое PowerPoint в документ Word. Вы можете вставить содержимое, нажав Ctrl + V или вставьте его как связанный или внедренный объект. В последнем случае вы все еще можете использовать объект в исходном приложении. В этом случае после вставки объекта PowerPoint в Word вы можете дважды щелкнуть слайд, чтобы использовать PowerPoint.
Как Microsoft объясняет:
Если вы вставляете слайд в документ как объект PowerPoint, Word запускает PowerPoint при двойном щелчке по слайду, и вы можете использовать команды PowerPoint для работы со слайдом.
Когда вы вставляете всю презентацию PowerPoint как объект, в документе отображается только один слайд. Чтобы отобразить разные слайды, дважды щелкните объект PowerPoint, а затем нажмите клавишу ВВОД, чтобы запустить слайд-шоу.
Как вставить связанный объект или вставить слайд PowerPoint
Когда дело доходит до PowerPoint и Word, вы можете связать или встроить один или несколько слайдов или встроить всю презентацию. Когда вы дважды щелкаете объект, Word запускает слайд-шоу PowerPoint. Однако вы не можете редактировать презентацию в документе. И объект презентации может быть только встроен, но не связан.
Примечание. Основное различие между связанными объектами и встроенными объектами заключается в том, где хранятся данные и как вы обновляете данные после их помещения в файл Word.
- Откройте свой Документ Word куда вы хотите вставить объект.
- Затем откройте Презентация PowerPoint который включает слайды, из которых вы хотите создать связанный объект или внедренный объект.
- Выберите всю презентацию или слайды, которые вы хотите в PowerPoint.
- Выбирать Ctrl + C на клавиатуре, чтобы скопировать слайды.
- Щелкните там, где вы хотите добавить свой Содержимое PowerPoint в вашем документе Word.
- На Дом вкладка в Буфер обмена группу, щелкните стрелку под Вставить, а затем щелкните Специальная вставка.
- в В виде список, выберите Объект презентации Microsoft PowerPoint или же Объект слайда Microsoft PowerPoint.
- Выбирать Вставить чтобы вставить внедренный объект, или выберите Вставить ссылку чтобы вставить ссылку на объект, а затем щелкните ОК.
В этом случае вы встроили объект. Когда объект связан, информация может быть обновлена при изменении исходного файла. Связанные данные хранятся в исходном файле. Когда вы встраиваете объект PowerPoint, информация в файле Word не изменяется, если вы изменяете исходный файл PowerPoint. Внедренные объекты становятся частью файла Word и после вставки больше не являются частью исходного файла.
Вставка ссылки
В качестве альтернативы вы можете вставить ссылку на объект, следуя приведенным ниже инструкциям:
- Щелкните там, где вы хотите вставить ссылку на свой Содержимое PowerPoint в вашем документе Word.
- Выбрать Вставить вкладку, затем щелкните стрелку рядом с объектом в группе Текст.
- Выбирать Объект.
- В поле выберите Создать из файла вкладка, затем перейдите к месту вашей презентации.
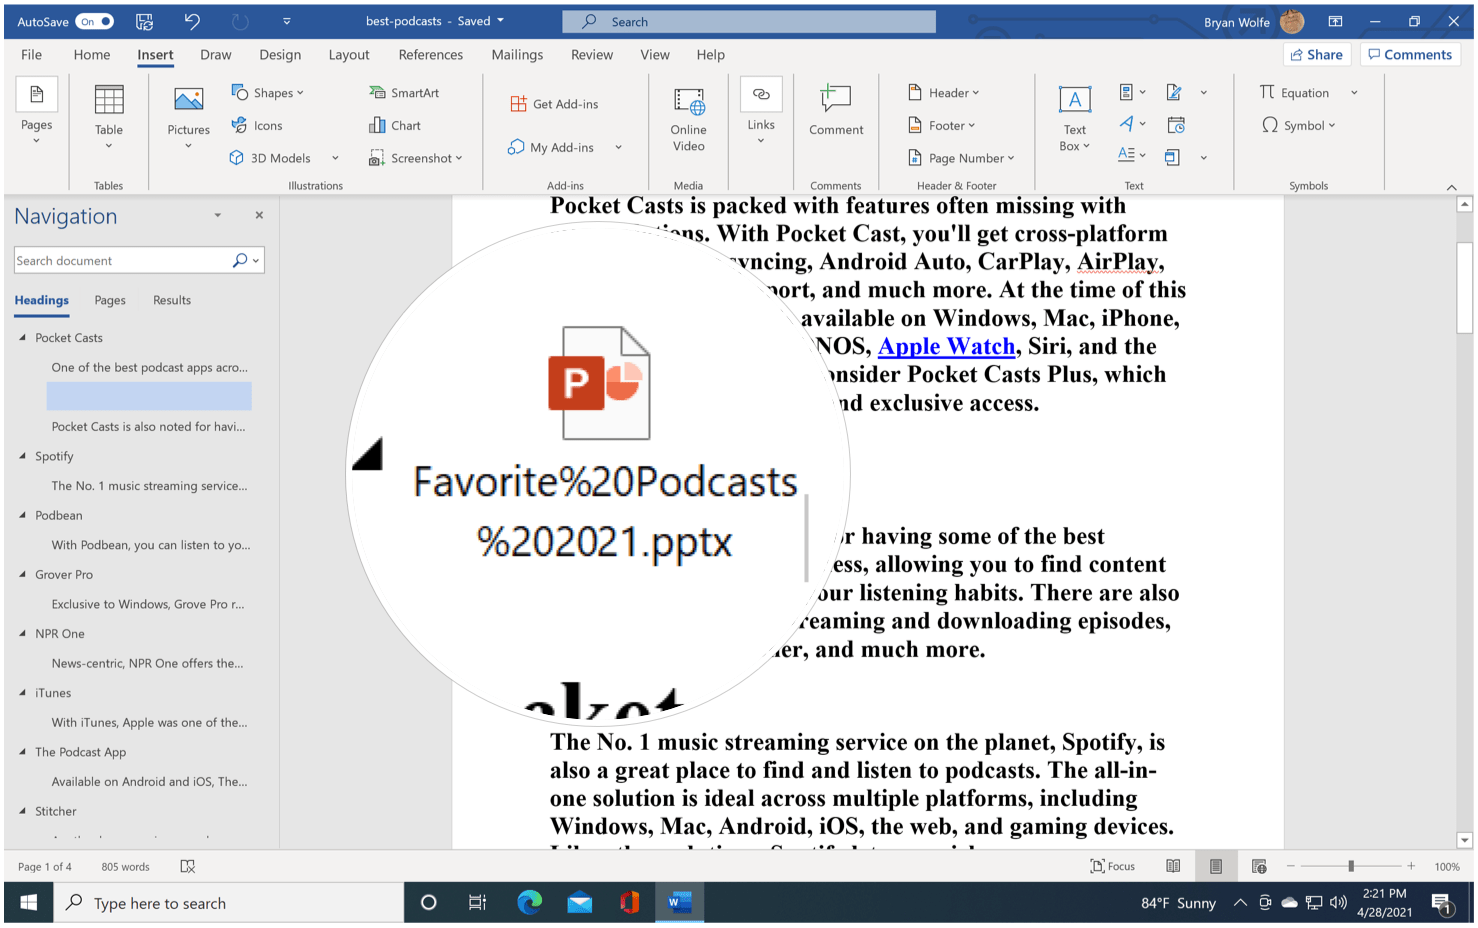
- Выбирать Ссылка на файл или же Отобразить как значок, затем щелкните ОК.
В этом случае вы вставили ссылку на всю презентацию PowerPoint.
Об обновлениях
Связанные объекты обновляются автоматически. По этой причине Word обновляет связанную информацию каждый раз, когда файл Word открывается или когда исходный файл PowerPoint изменяется, пока файл Word открыт. Однако вы можете изменить настройки для отдельных связанных объектов, чтобы связанный объект не обновлялся или чтобы он обновлялся только тогда, когда читатель вашего документа решает обновить его вручную.
Кроме того, вы можете запретить Word обновлять ссылки во всех открываемых вами документах. Вы можете сделать это в качестве меры безопасности, тем самым предотвратив обновление документов файлами, которые могут быть получены из ненадежного источника.
Вы также можете навсегда разорвать связь между связанным объектом и его исходным файлом PowerPoint. Когда соединение разрывается, вы больше не можете редактировать объект в документе, и он становится изображением содержимого PowerPoint.
Обновить ссылки вручную
Чтобы вручную обновить ссылки в Word:
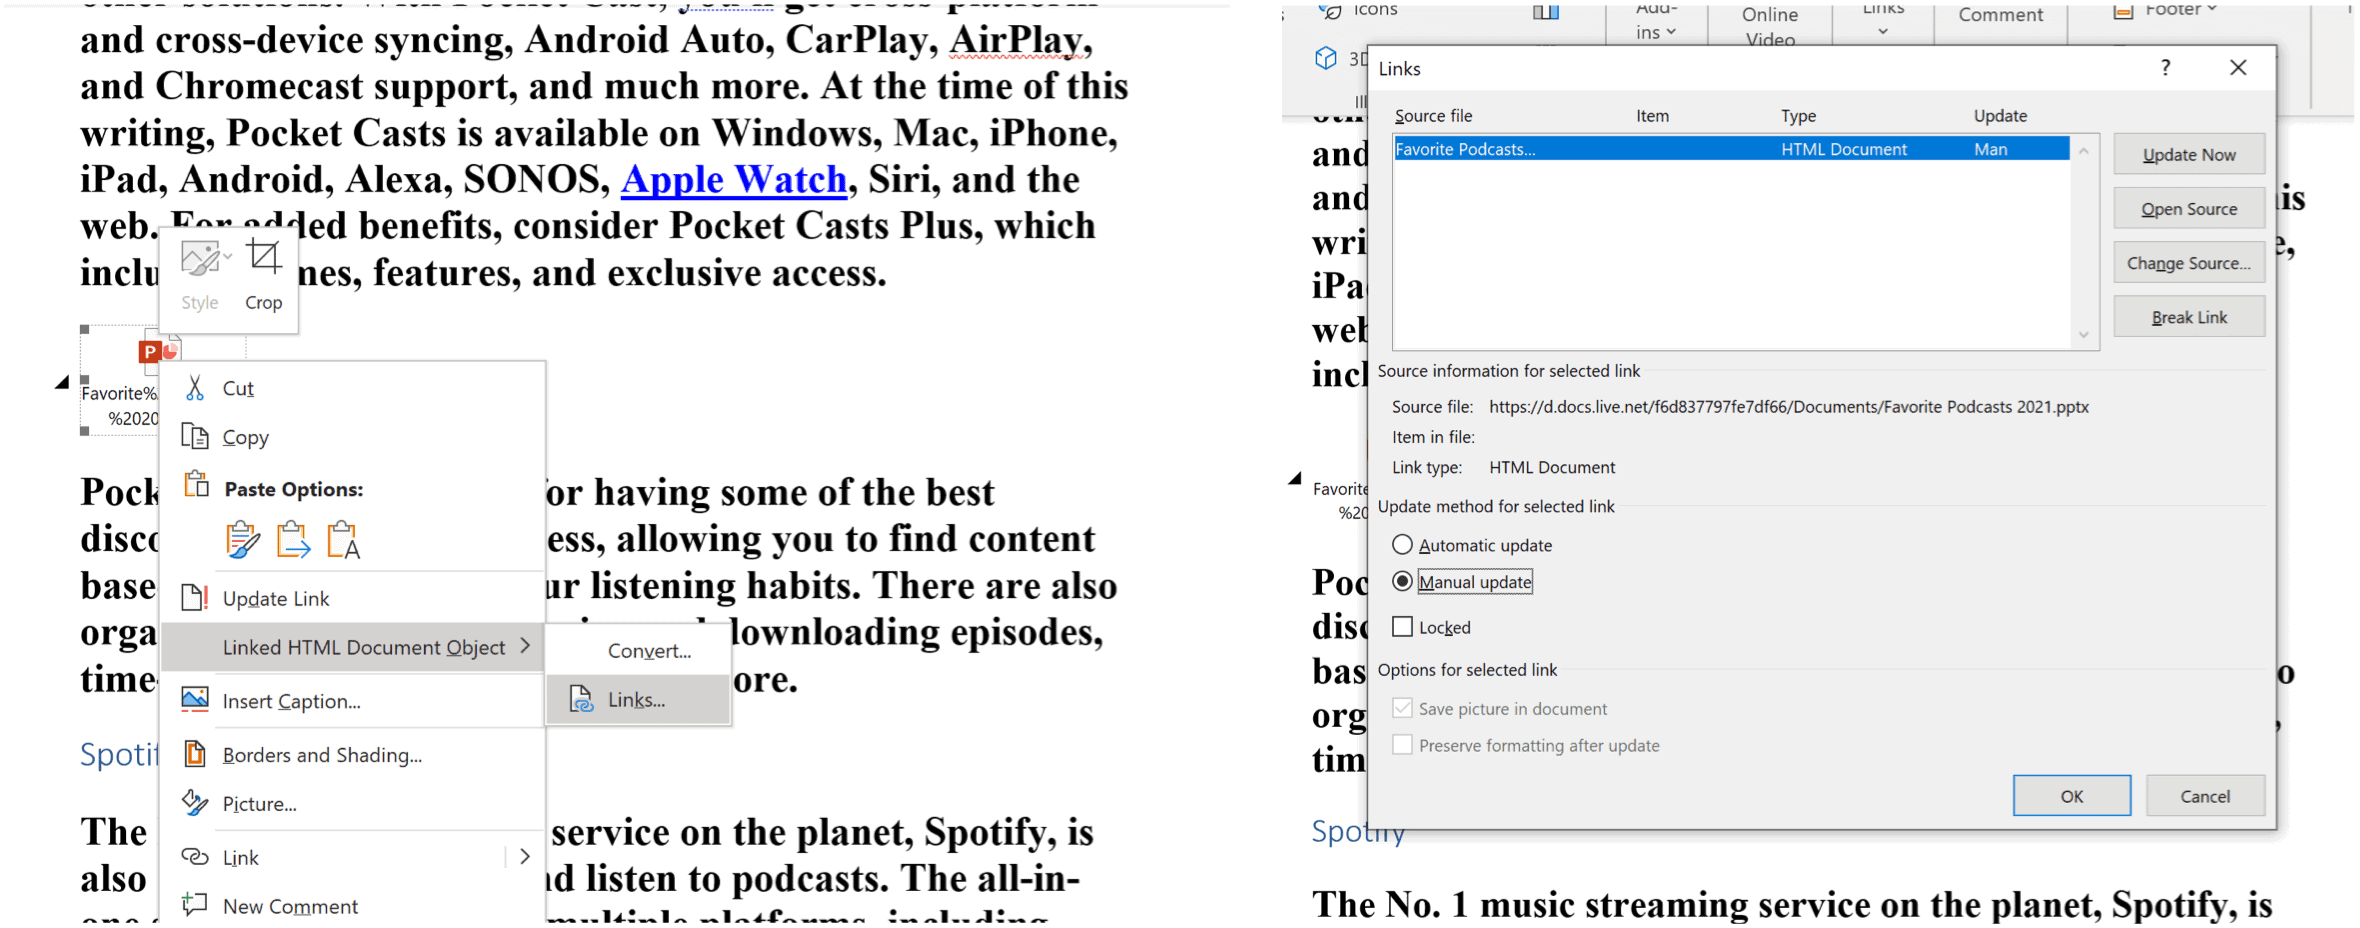
- Щелкните связанный объект правой кнопкой мыши, затем щелкните Связанный объект слайда или же Связанный объект презентации а затем щелкните Ссылки.
- Щелкните ссылку, которую вы хотите обновить вручную, а затем под Метод обновления для выбранной ссылкинажмите Ручное обновление.
Запретить обновление связанных объектов
Если вы не хотите, чтобы связанный объект обновлялся:
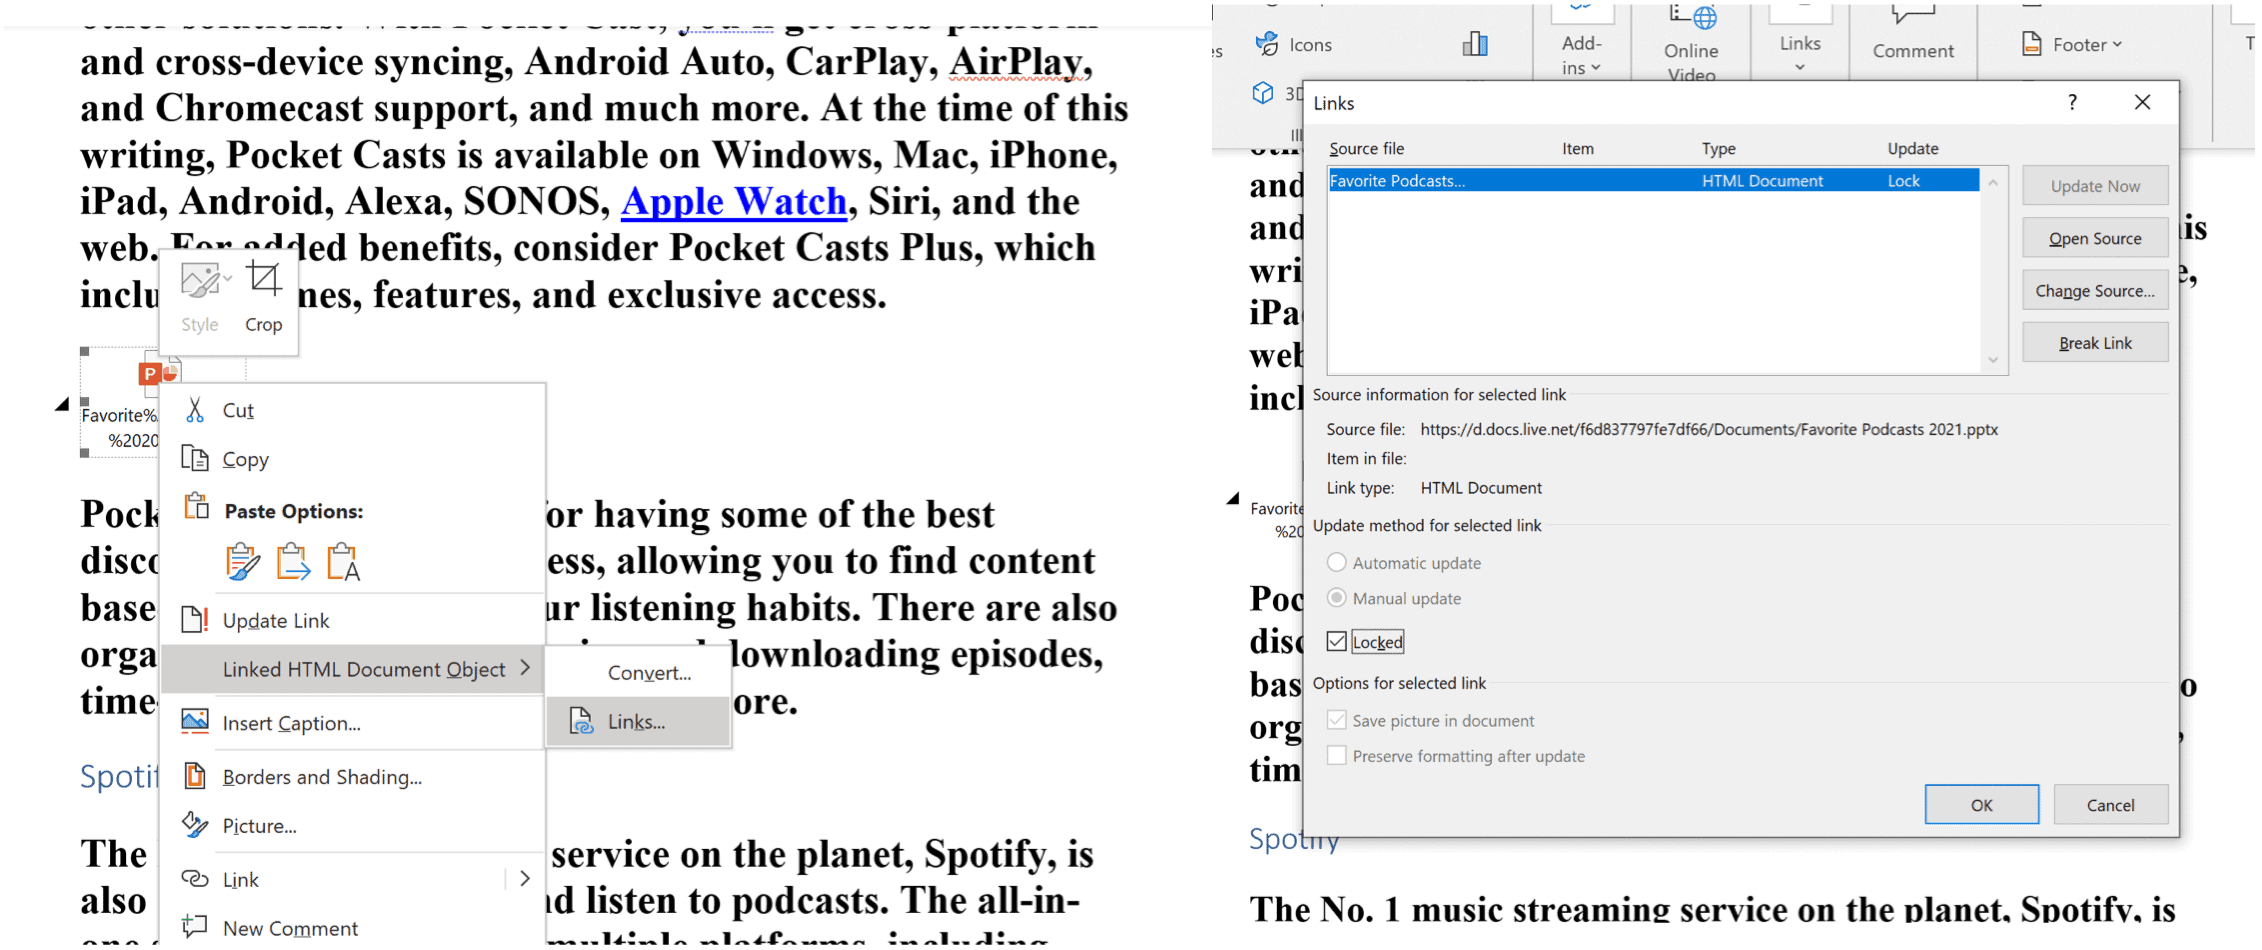
- Щелкните связанный объект правой кнопкой мыши, затем щелкните Связанный объект слайда или же Связанный объект презентации а затем щелкните Ссылки.
- Щелкните ссылку, которую вы хотите предотвратить от обновления, а затем в разделе Метод обновления для выбранной ссылки, выберите Заблокировано флажок.
С PowerPoint и Word вы можете сделать многое, о чем вы, возможно, даже не задумывались. Например, знаете ли вы, что можете сделать презентацию PowerPoint доступной только для чтения или что вы можете преобразовать документ Word в презентацию PowerPoint? Кроме того, не забывайте, что вы можете получить все офисные приложения как часть пакета программного обеспечения с подпиской на Microsoft 365.
Содержание
- Способ 1: Конвертация в PDF
- Способ 2: Ручное копирование
- Способ 3: Экспортирование средствами Microsoft Office
- Вопросы и ответы
Способ 1: Конвертация в PDF
Чтобы открыть и редактировать презентацию PPTX или PPT, созданную в Microsoft PowerPoint, в Word, можно сохранить ее в формате, который поддерживает текстовый редактор. Это могут быть картинки JPEG, но лучше воспользоваться конвертацией в PDF, что даст возможность редактирования слайдов в Word. Действовать нужно следующим образом:
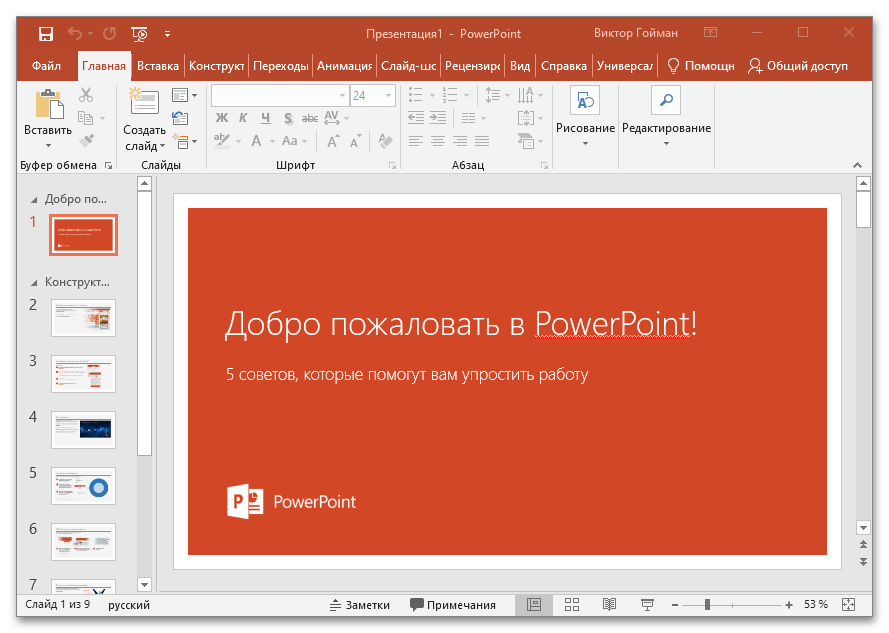
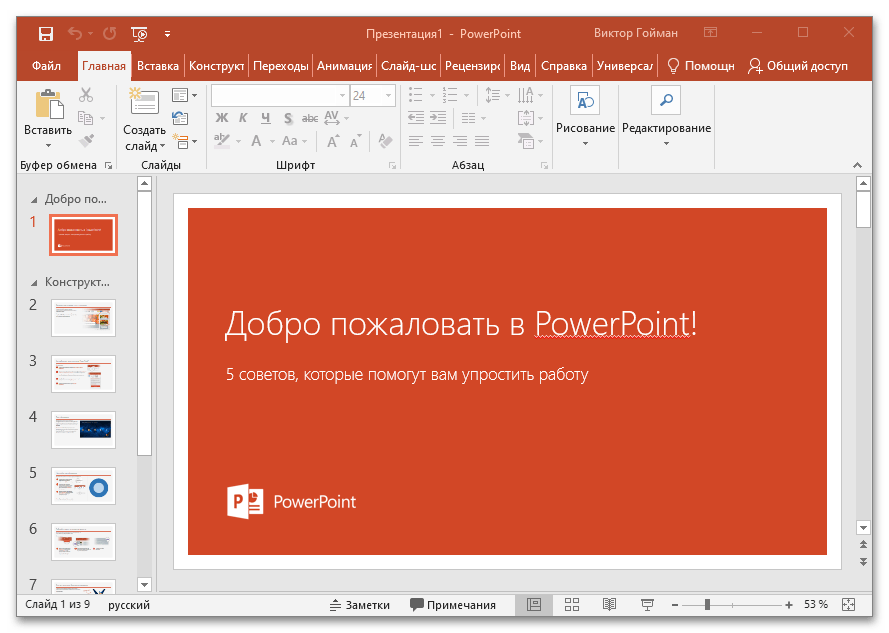
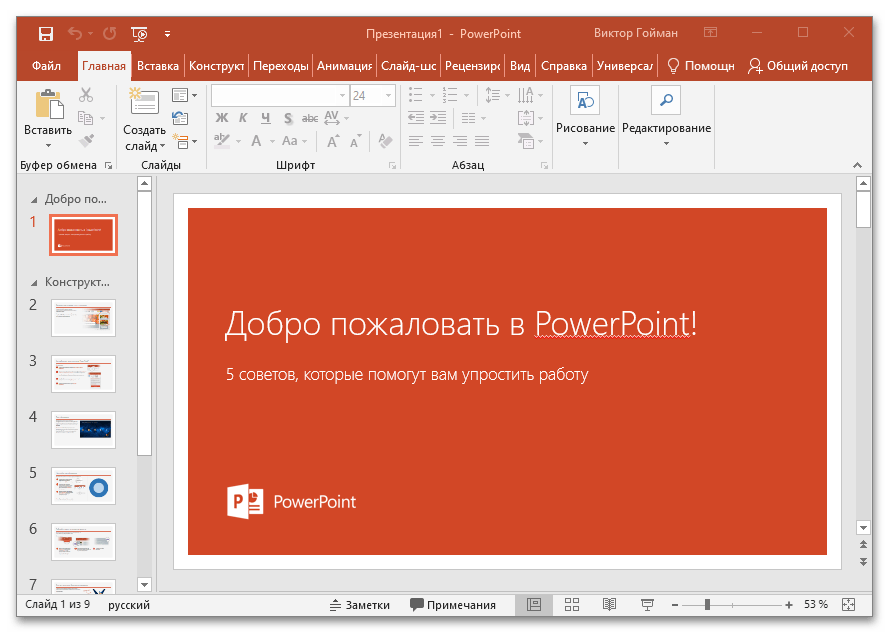
- Откройте презентацию в Microsoft PowerPoint. Для примера взят стандартный шаблон, демонстрирующий возможности программы.
Читайте также: Как установить Microsoft PowerPoint
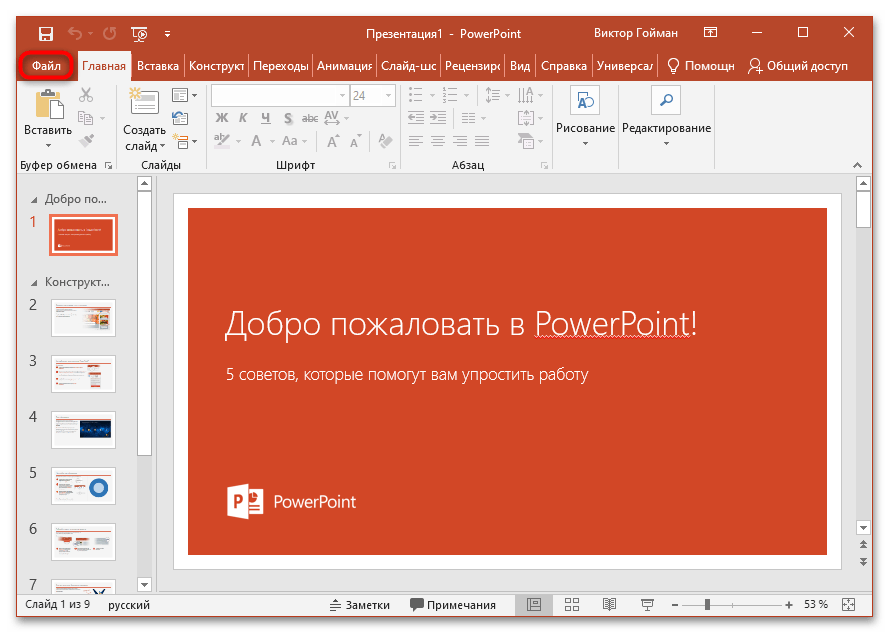
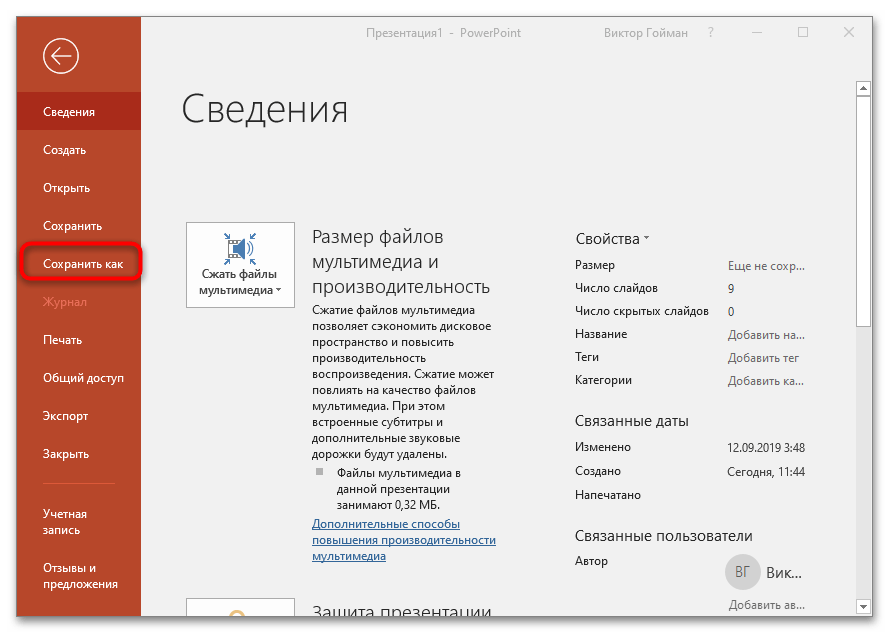
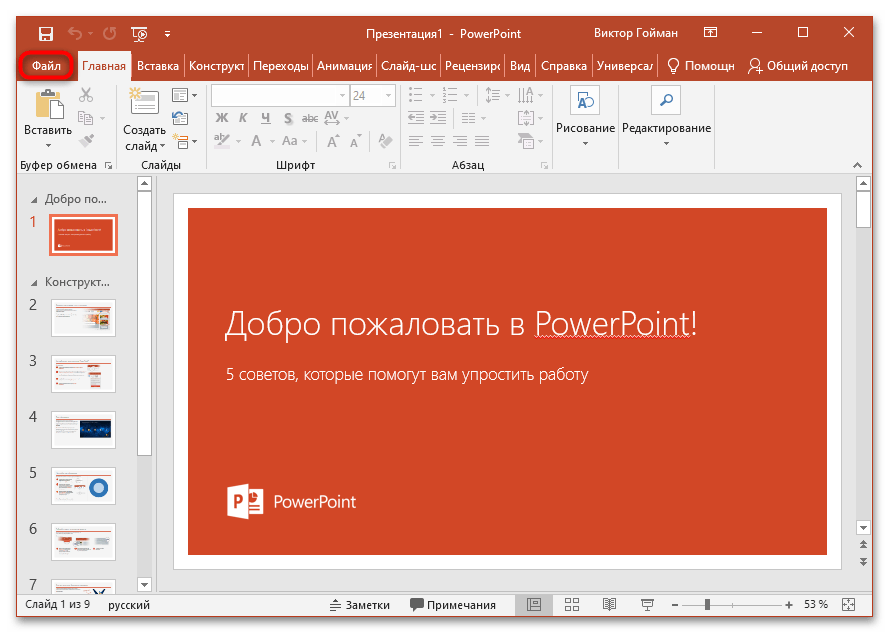
- Переключитесь на вкладку «Файл».
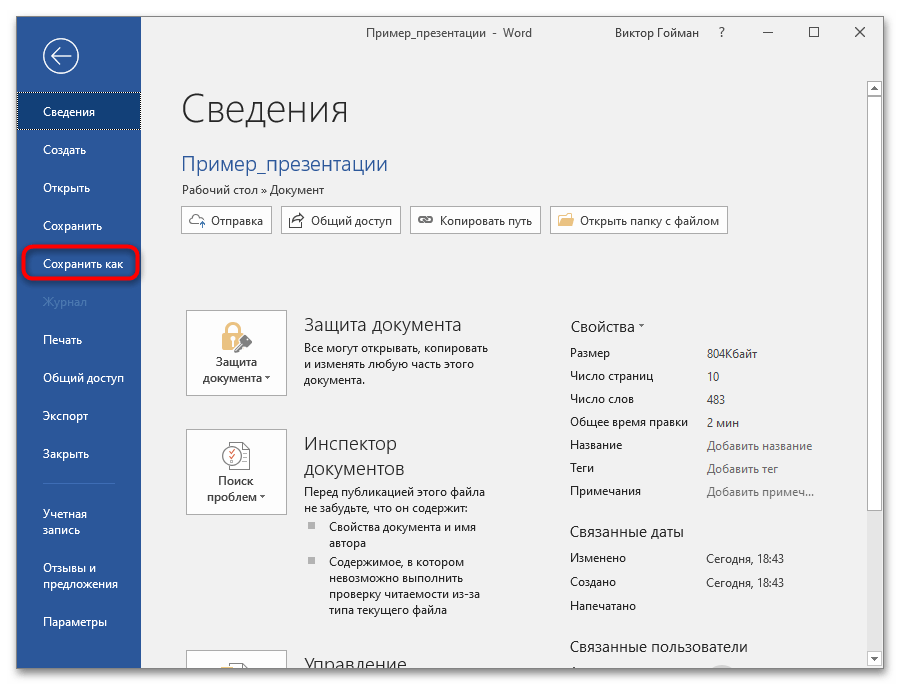
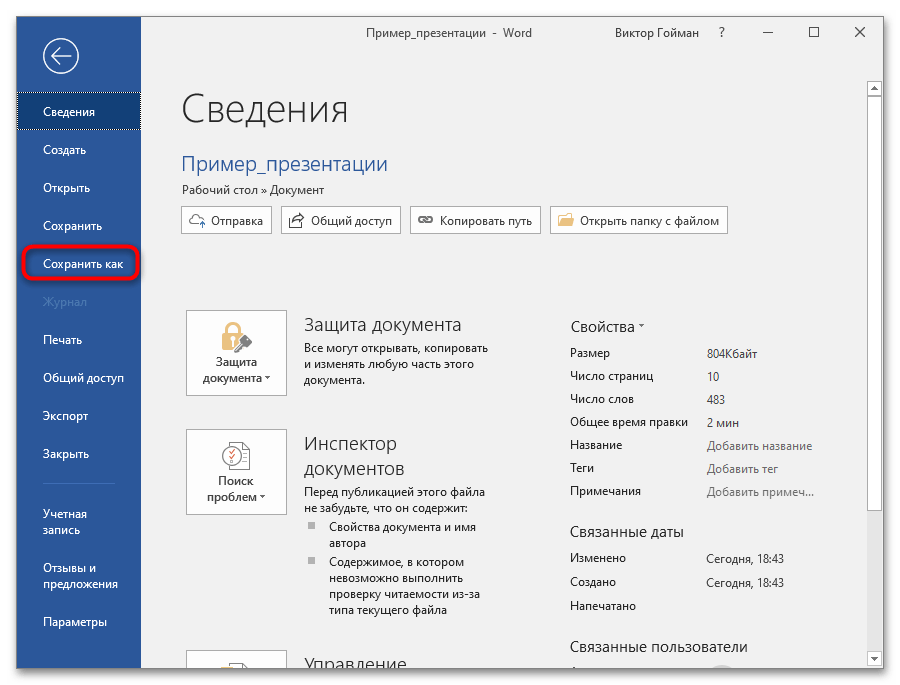
- Выберите пункт «Сохранить как».
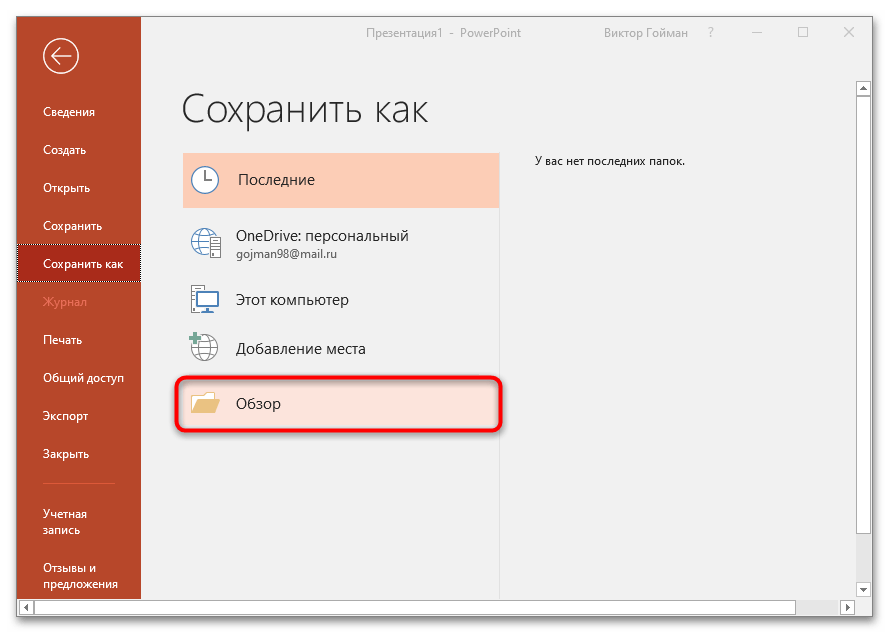
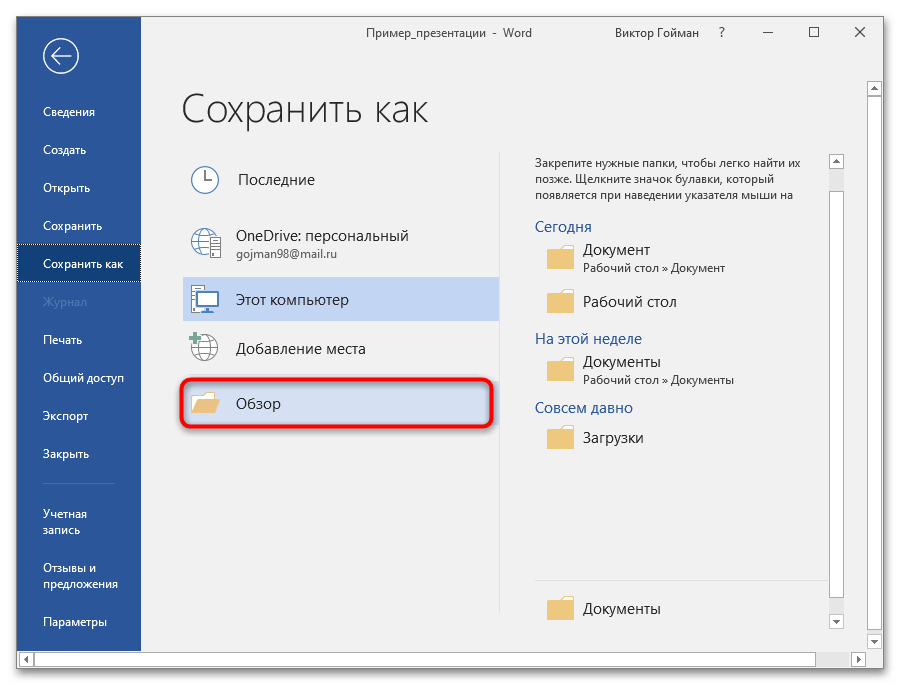
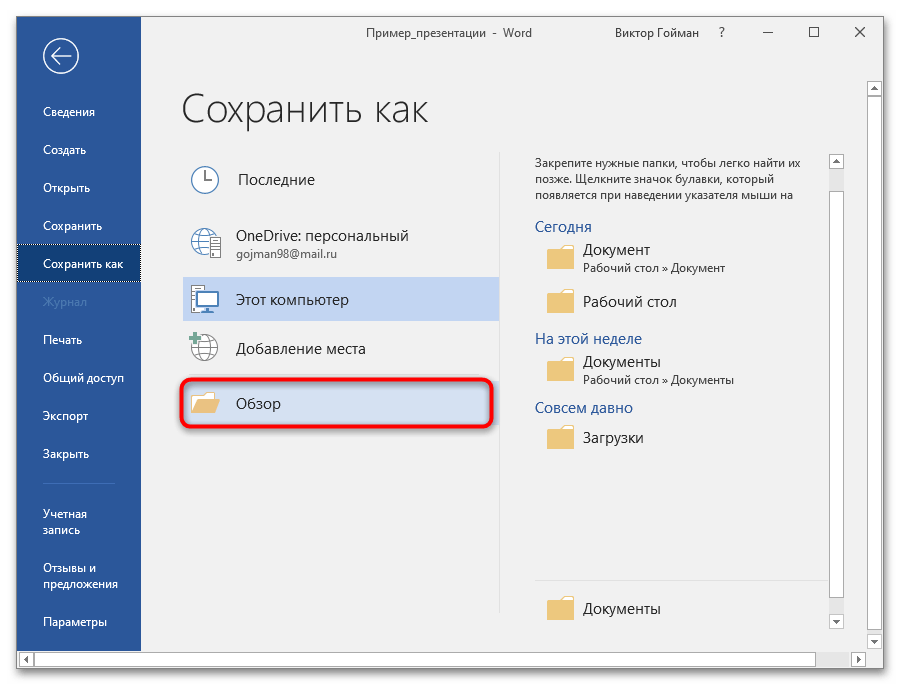
- Кликните на кнопку «Обзор», чтобы получить возможность выбрать место сохранения презентации и ее формат.
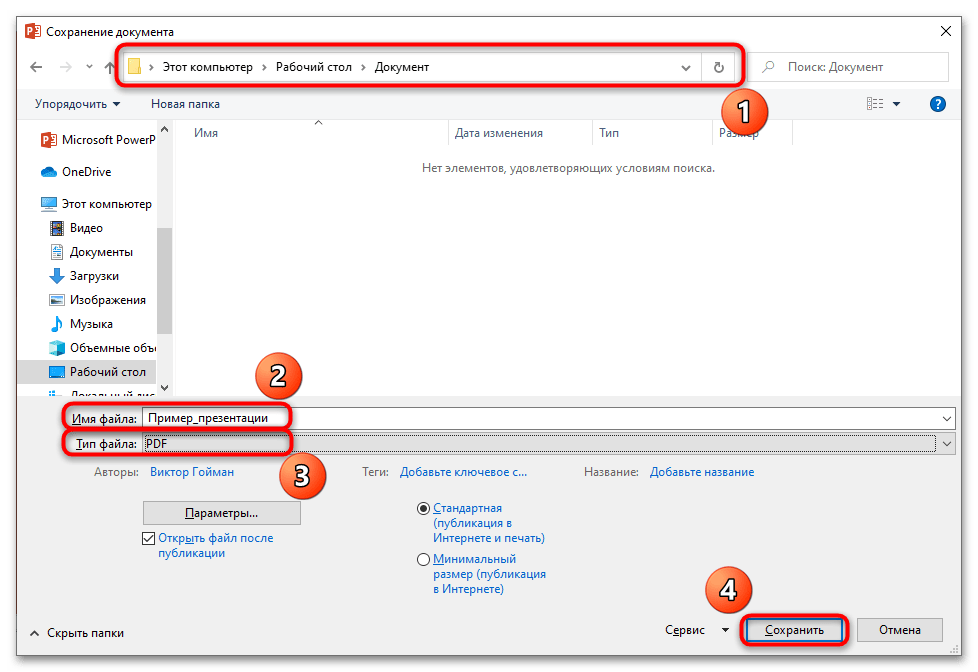
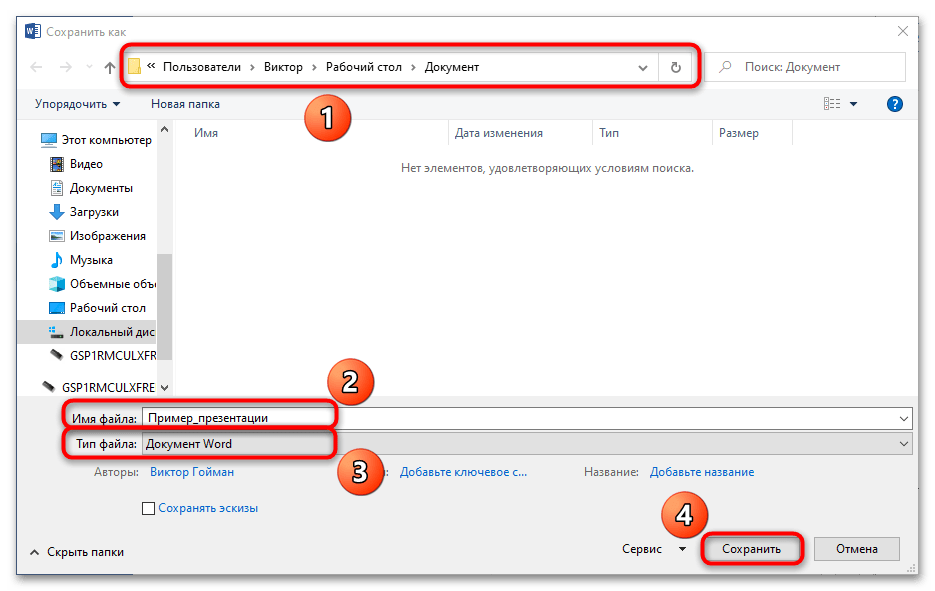
- Укажите каталог для хранения файла, название и формат PDF. Нажмите на кнопку «Сохранить». Никаких других настроек не меняйте.
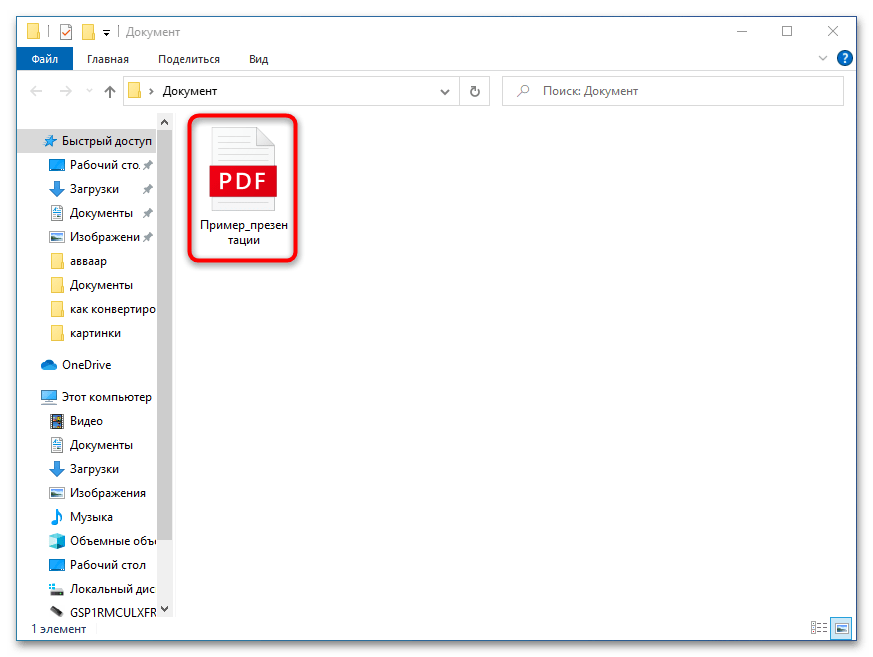
- Перейдите в папку, где сохранилась презентация.
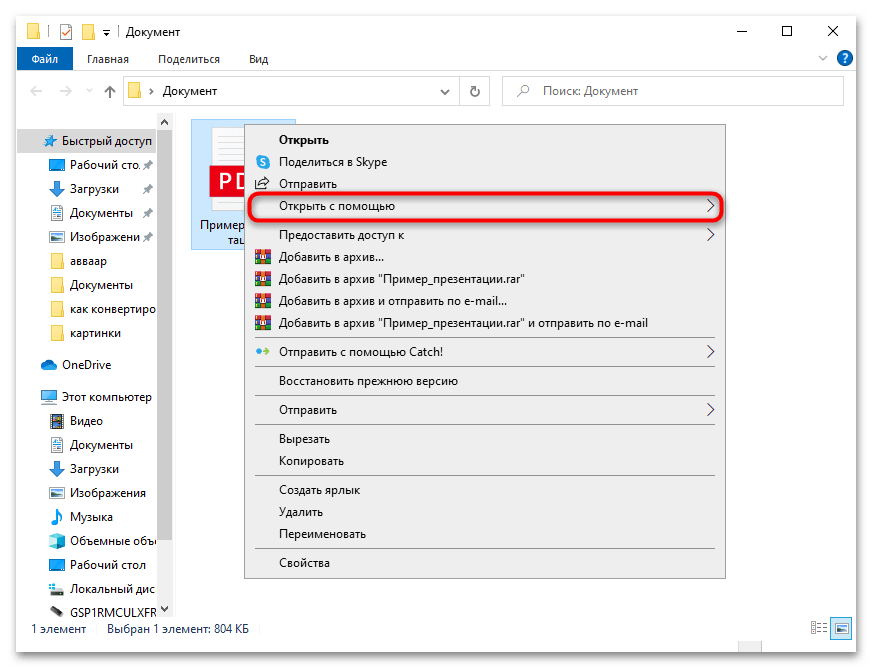
- Щелкните по файлу правой кнопкой мыши — здесь вам нужен пункт «Открыть с помощью».
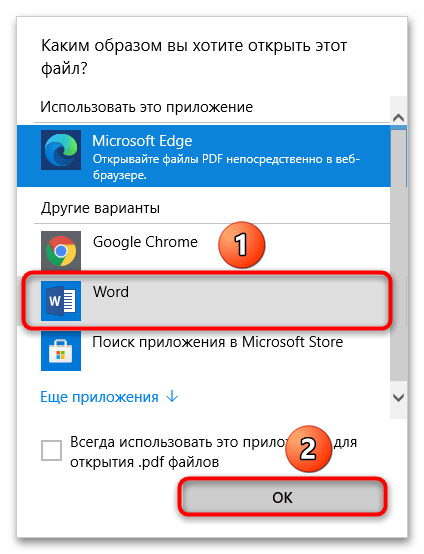
- В следующем окне выберите программу «Word» и нажмите кнопку «ОК»
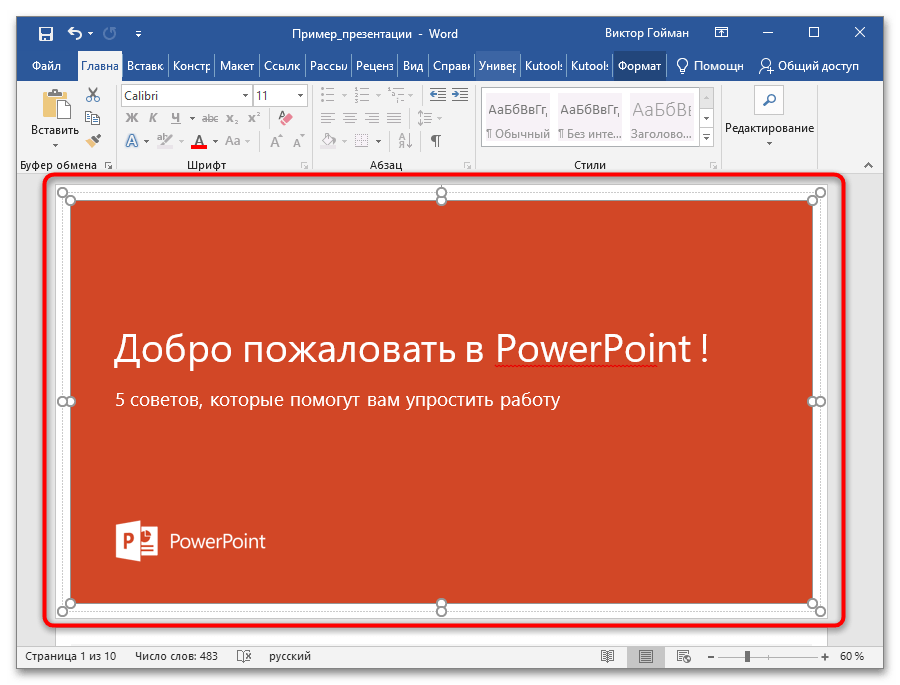
- Дождитесь открытия презентации в текстовом редакторе. Некоторые текстовые данные и изображения могут съехать, так как все они после конвертирования преображаются в графику и фигуры из набора Microsoft Word.
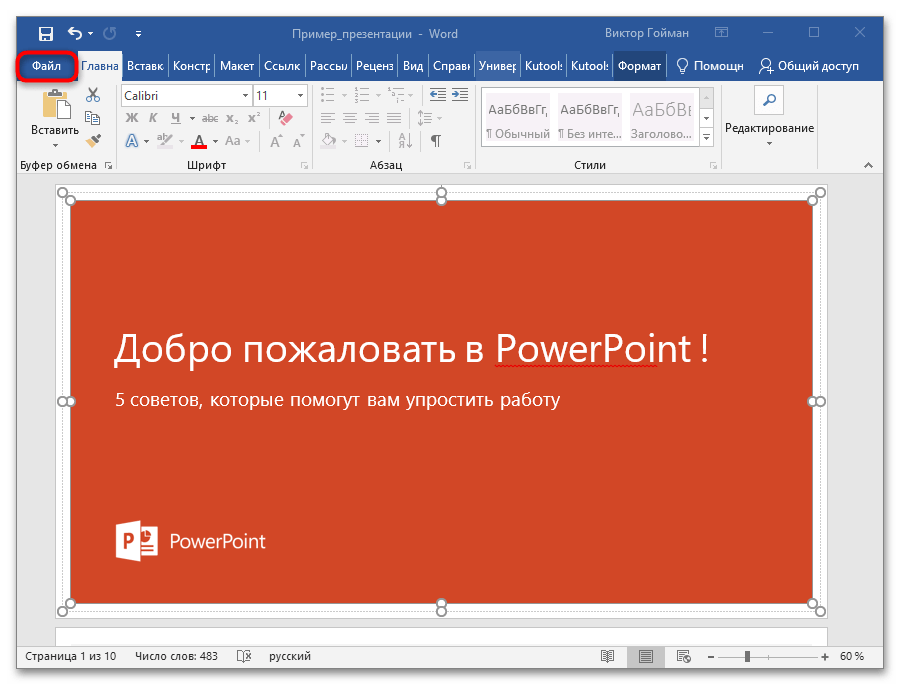
- Отредактируйте файл по желанию и сохраните его. Если нужно произвести преобразование в формат DOCX, зайдите на вкладку «Файл».
- Выберите пункт «Сохранить как».
- Кликните на «Обзор» для указания места сохранения документа.
- Выберите в окне «Проводника» папку, название файла и формат DOCX, затем сохраните результат.
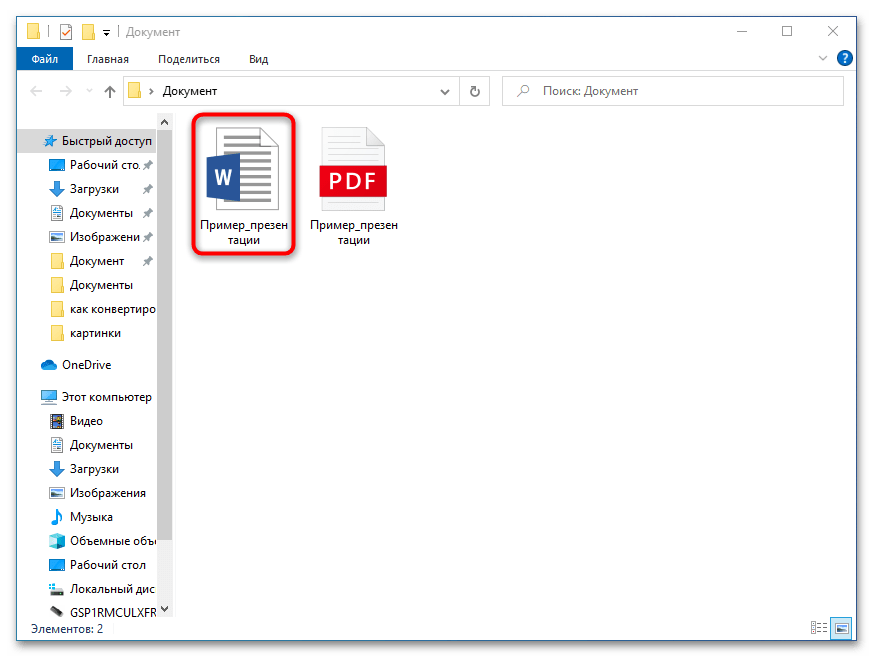
- По указанному пути будет создан документ Microsoft Word.
Не самый удобный и предпочтительный способ конвертации презентаций PowerPoint в формат документов Word, но все можно сделать с помощью встроенных средств и инструментов программ из пакета Microsoft Office. Недостаток метода в том, что иногда после преобразования в PDF элементы слайдов съезжают вбок, а это увеличивает время редактирования документа.
Способ 2: Ручное копирование
Чтобы избежать недостатков предыдущего способа, можно воспользоваться способом в виде ручного копирования слайдов презентации в документ Word. Для этого:
- Откройте презентацию в PowerPoint.
- Создайте документ Word, в который будет производиться копирование.
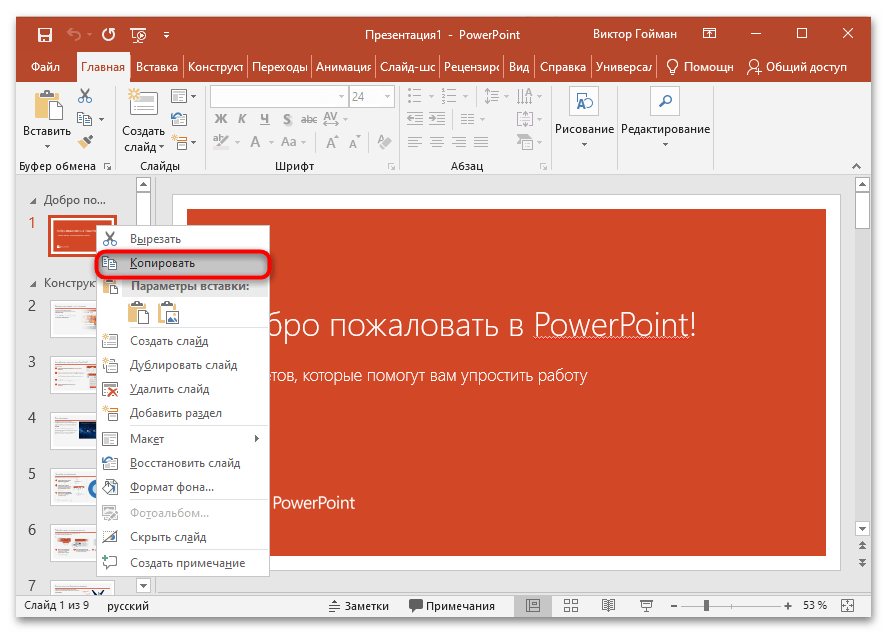
- Вернитесь в PowerPoint и в окне предпросмотра нажмите левой кнопкой мыши на слайд для его выделения. Кликните по нему ПКМ и в контекстном меню выберите пункт «Копировать» или просто воспользуйтесь сочетанием клавиш «Ctrl + C».
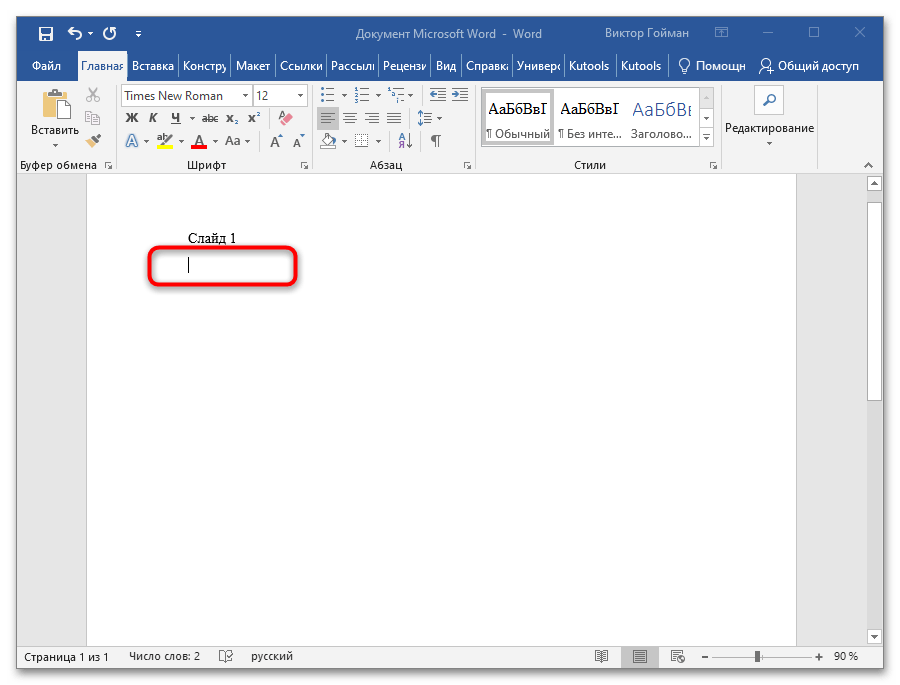
- Перейдите в Word и в месте, где должен располагаться слайд, установите курсор путем клика ЛКМ по рабочей области текстового редактора.
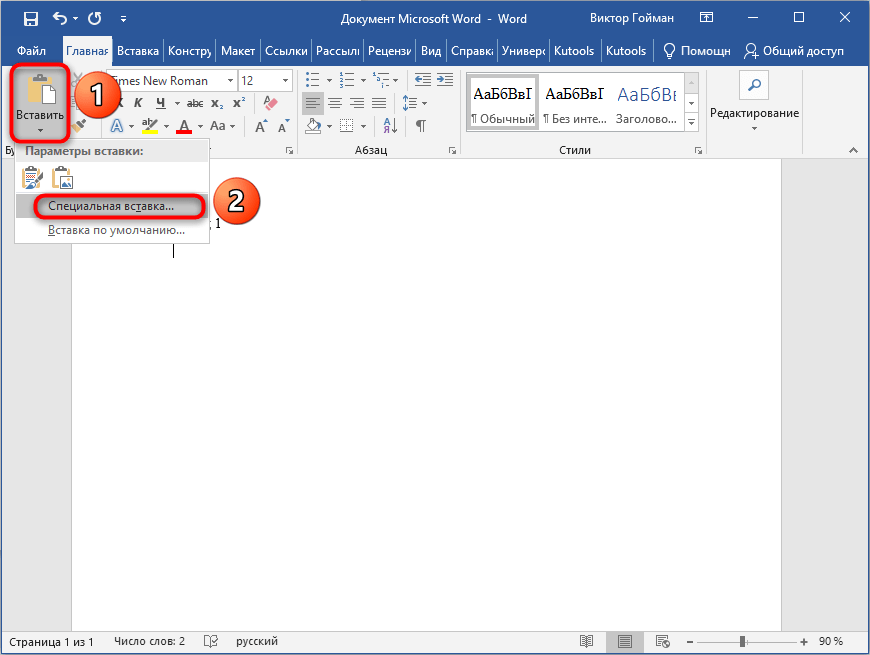
- Выберите в пункте «Вставить» подпункт «Специальная вставка…».
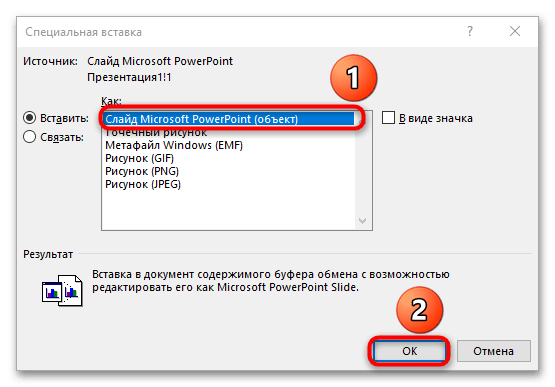
- Укажите параметр вставки «Слайд Microsoft PowerPoint (объект)» и нажмите на кнопку «ОК».
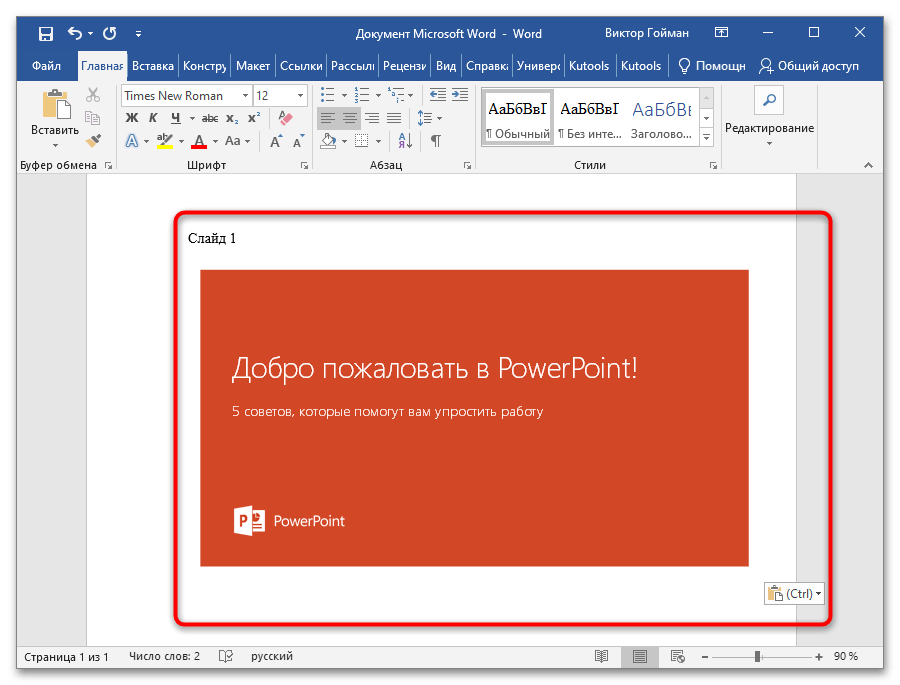
- В рабочую область будет вставлен выбранный слайд в виде изображения.
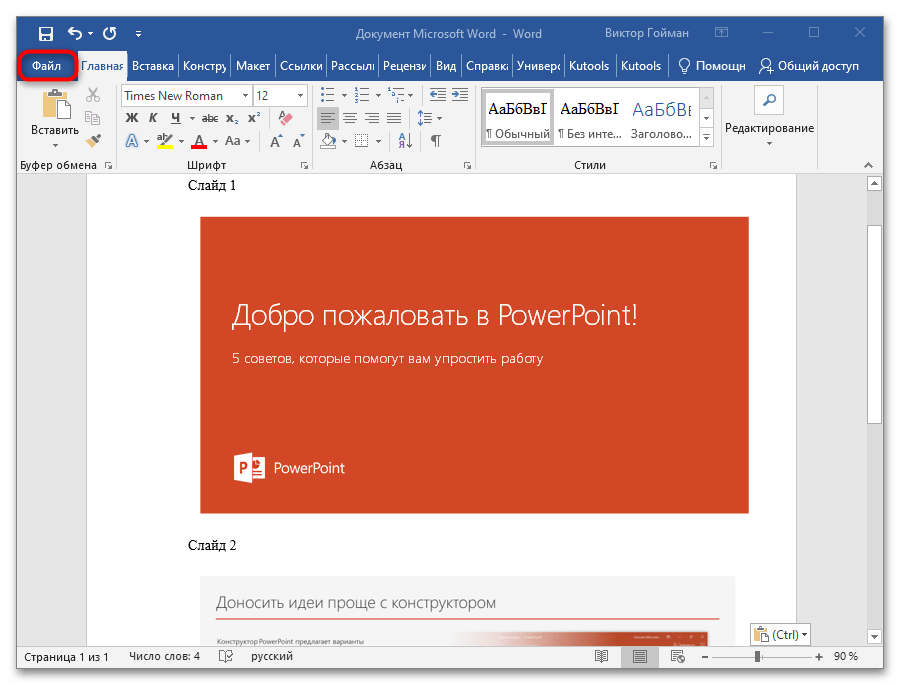
- Произведите поочередное копирование всех слайдов и перейдите на вкладку «Файл».
- Щелкните по кнопке «Обзор».
- Выберите пункт «Сохранить как».
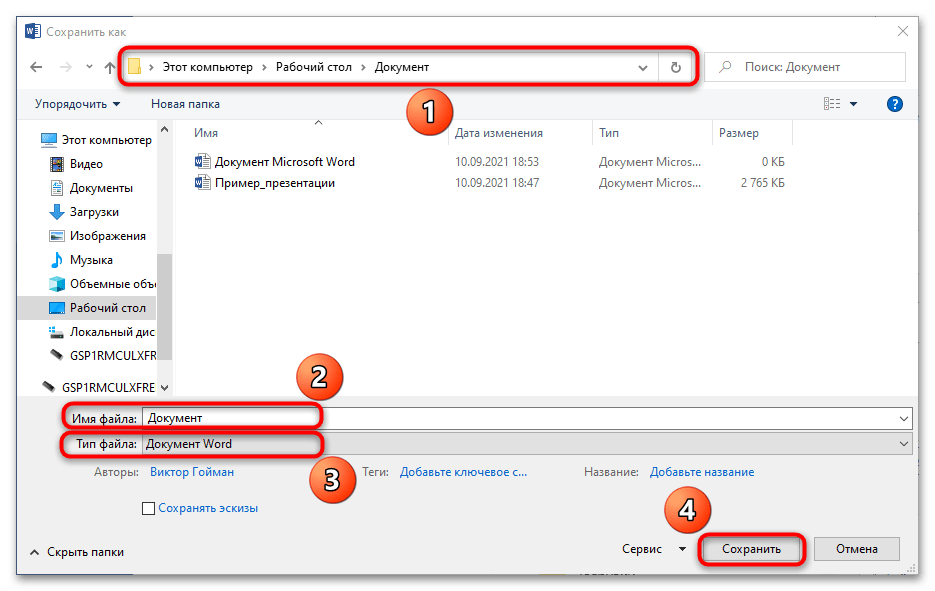
- Укажите название документа, его формат по желанию и папку для создания. Нажмите на кнопку «Сохранить».
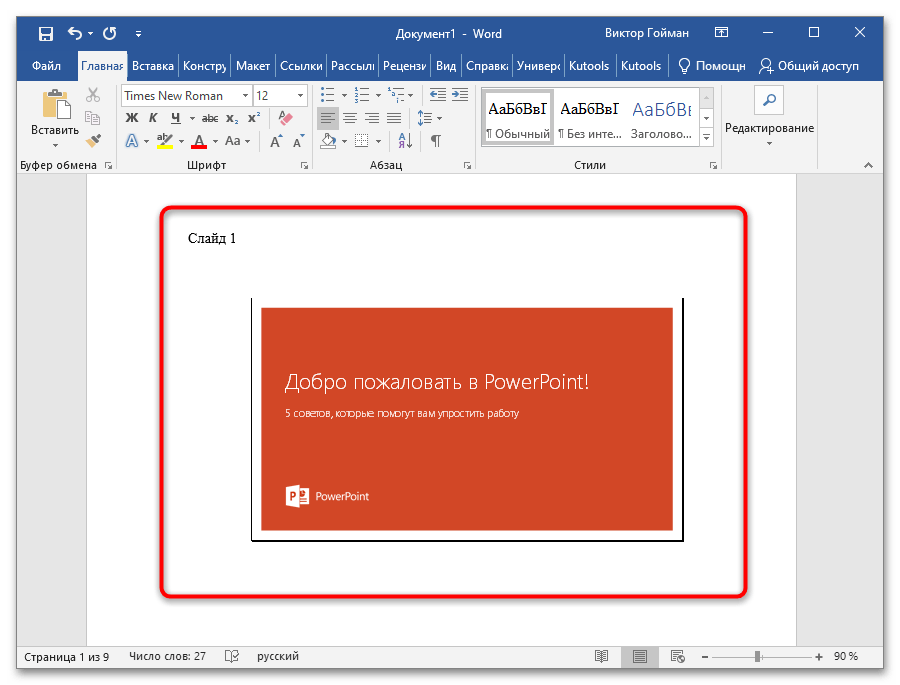
Важно! Если вставлять слайды простым нажатием сочетания клавиш «Ctrl + V», то картинки будут вставляться после предварительного сжатия и их качество существенно снизится. Всегда используйте для этого функцию «Специальная вставка…».
Способ лишен недостатков предыдущего, но требует больше времени и подходит, если презентация содержит не так много слайдов, чтобы утомить в процессе копирования.
Способ 3: Экспортирование средствами Microsoft Office
Современные версии программ из пакета Microsoft Office обладают функциями экспортирования данных из одних приложений и редакторов в другие. Данными функциями можно пользоваться, например, для конвертации документов Word и таблиц Excel в графические файлы и так далее. Для решения рассматриваемой задачи необходимо действовать по нижеприведенной инструкции:
- Откройте презентацию, которую нужно конвертировать в формат DOCX. Для примера опять воспользуемся стандартным шаблоном PowerPoint, демонстрирующим возможности программы.
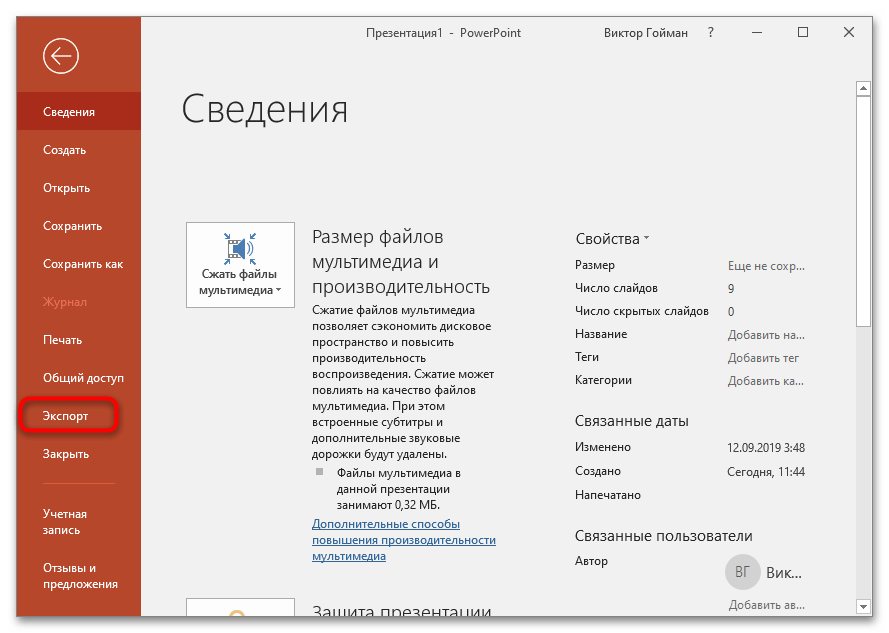
- Перейдите на вкладку «Файл».
- Щелкните по кнопке «Экспорт».
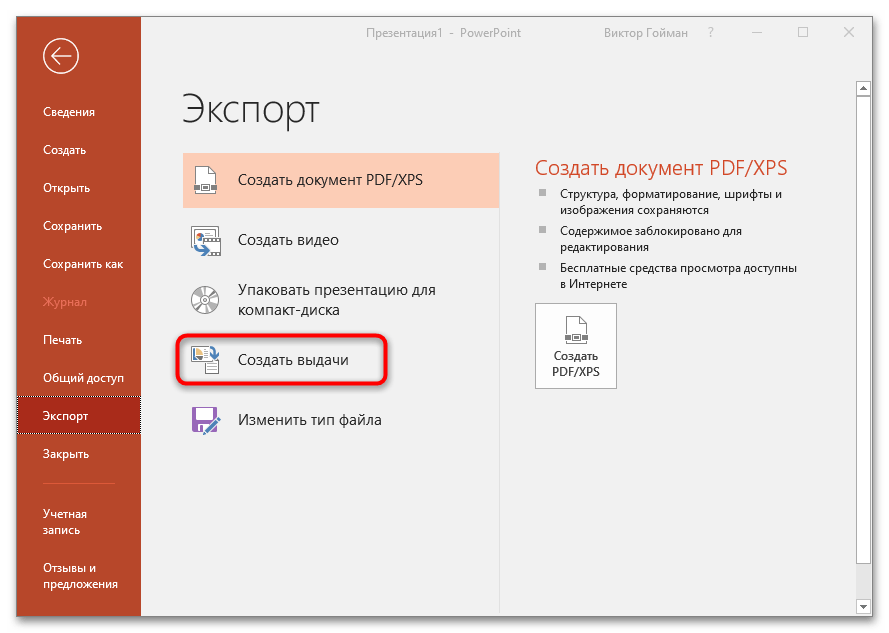
- Выберите режим экспорта «Создать выдачи».
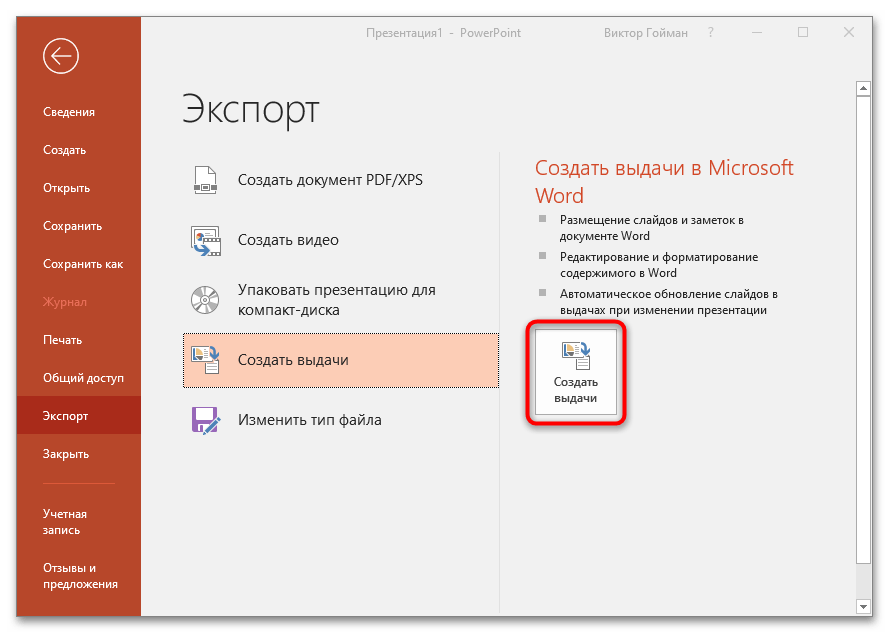
- Ознакомьтесь с возможностями инструмента и нажмите на кнопку с аналогичным названием.
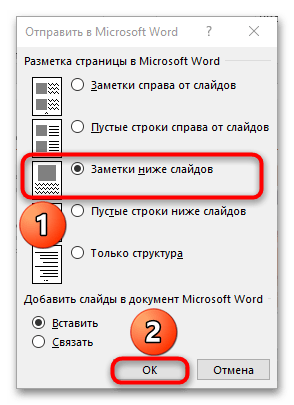
- Укажите, какой режим отображения будет сгенерирован для сконвертированной презентации, и подтвердите действие кнопкой «ОК».
- Будет автоматически создан документ Word. В данном случае выбрана настройка «Заметки ниже слайдов». Поэкспериментируйте с режимами представления презентации в формате DOCX и выберите тот, который подходит вам больше всего.
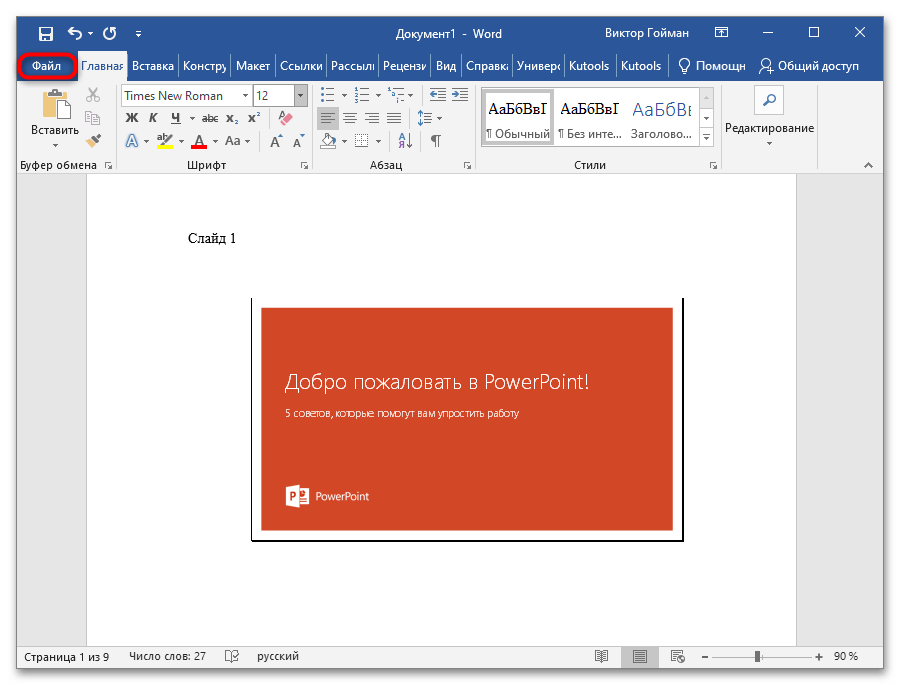
- Снова перейдите на вкладку «Файл».
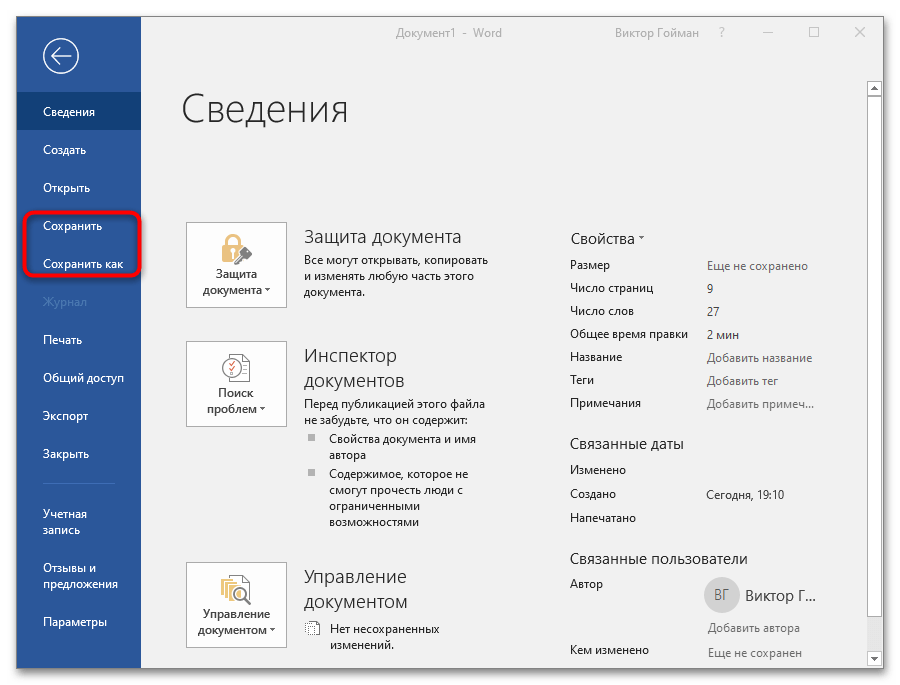
- Нажмите на кнопку «Сохранить» или «Сохранить как».
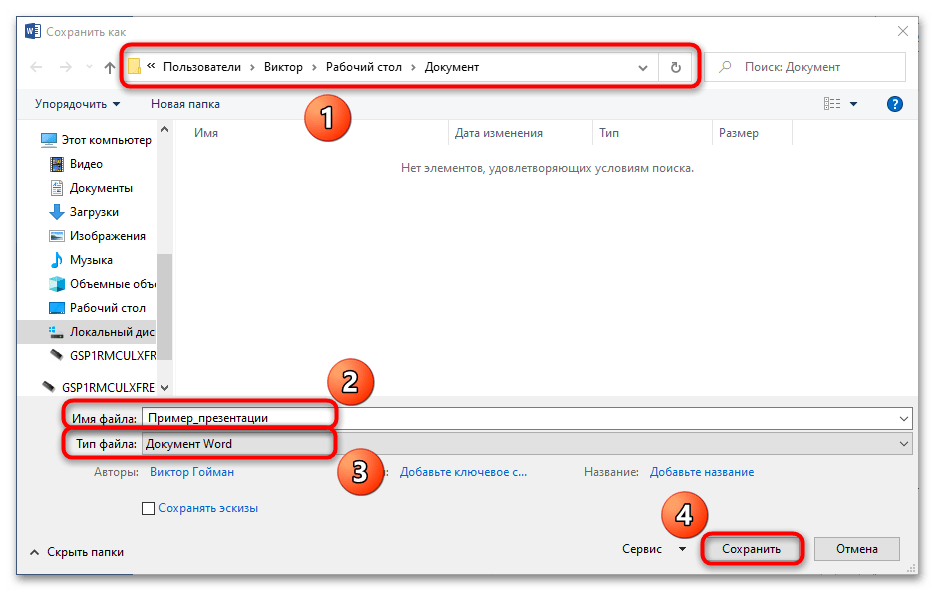
- После выбора инструмента «Обзор» укажите название документа и папку, куда он будет перемещен (расширение менять не нужно). Кликните на кнопку «Сохранить». Файл создастся по указанному пути.
Как видно, этот способ куда более простой и функциональный, ведь экспорт данных между программами новой версии пакета Microsoft Office предлагает вам куда больше настроек и режимов конвертирования. Более того, ничего не придется редактировать, ведь слайды копируются в графическом формате, а не в виде фигур и отдельных элементов.
Еще статьи по данной теме:

 , point to Publish, and then click Create Handouts in Microsoft Office Word.


.jpg)
.jpg)
.jpg)
.jpg)
.jpg)
.jpg)
.jpg)
.jpg)
.jpg)


