
![]()
Download Article
![]()
Download Article
Postcards have a variety of uses from staying in touch with friends to effectively marketing your business. Microsoft Word allows you to make your own custom postcards quickly and easily. There are many different methods for making postcards in Word, but the two most straightforward options are by making them as «Labels» or through starting from a premade «Template.»
-

1
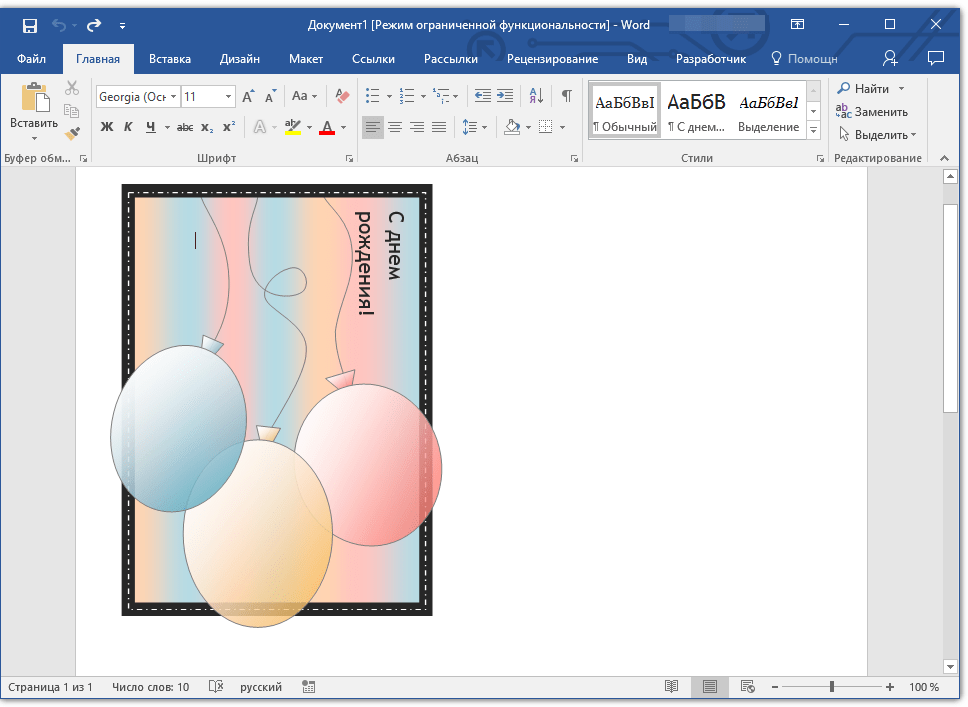
Create a blank Word Document and paste in the picture you’d like to use. Simply right click anywhere on the blank space and select «Paste.» Click on the picture to select it. Your picture doesn’t have to have typical postcard dimensions (six inches long and four inches high) to work.
-
2
Navigate to the «Mailings» tab. Mailings will be between «References» and «Review» in all recent versions of Word (2007, 2010, 2013).[1]
[2]
Select the «Labels» icon. This icon will appear on the leftmost section of the toolbar next to «Envelopes.»Advertisement
-
3
Click on «Options.» Selecting Labels will bring you to the «Envelopes and Labels» window. From there, click the button labeled «Options…» towards the bottom right of the window. This will bring up the «Label Options» window.
-
4
Select the «Postcards» label. Make sure the «Label vendors:» is set to «Microsoft.» If not, click the arrow and find Microsoft in the vendor drop down menu. Scroll through the «Product number:» menu until you find «Postcard.» Click «Postcard» to highlight it before pressing «OK» at the bottom right.
- If you’ve purchased blank postcards, check to see if their manufacturer has a special template to use instead. Look for the manufacturer under «Label vendors:» and the template labeled with the correct product number.
-
5
Click «New Document.» A new page should now display with four copies of your picture in a grid. Each of the four sections is the front of its own postcard. You can resize and move the picture within its section or add text Save this document when you’re finished.


Advertisement
-
1
Create a new Word Document. Instead of creating a blank document, you will be working from a template.
- In Word 2007, click the Office icon at the top left of the screen and select «New.»
- In Word 2010 and 2013, click «File» and then «New.»
-
2
Find the postcard template you’d like to use. You will have dozens of different ready-made postcards to choose from. Select the one that’s closest to what you want.
- In Word 2007, the easiest method will be to type «postcards» into the search bar at the top of the new document window. This will pull up templates for you to download.
- In Word 2010 and 2013, there are special sections for postcard templates. Click «Cards» and then select «Postcards.»
- If you purchased blank postcards, search for their manufacturer. If you cannot locate a pre-installed template, check the manufacturer’s website for available downloads.
-
3
Edit the postcard. Many postcard templates will be easy to edit with each picture and textbox as its own discrete object. Move objects to different areas of your postcard or delete them entirely. If you want to use a custom picture, right click a picture on the template and replace it. Change the text by clicking the textbox. The text’s font, size, and color can also be altered using the Font toolbox, just like in a normal Word document. Save your document once you’re finished to avoid losing your work.


Advertisement
-
1
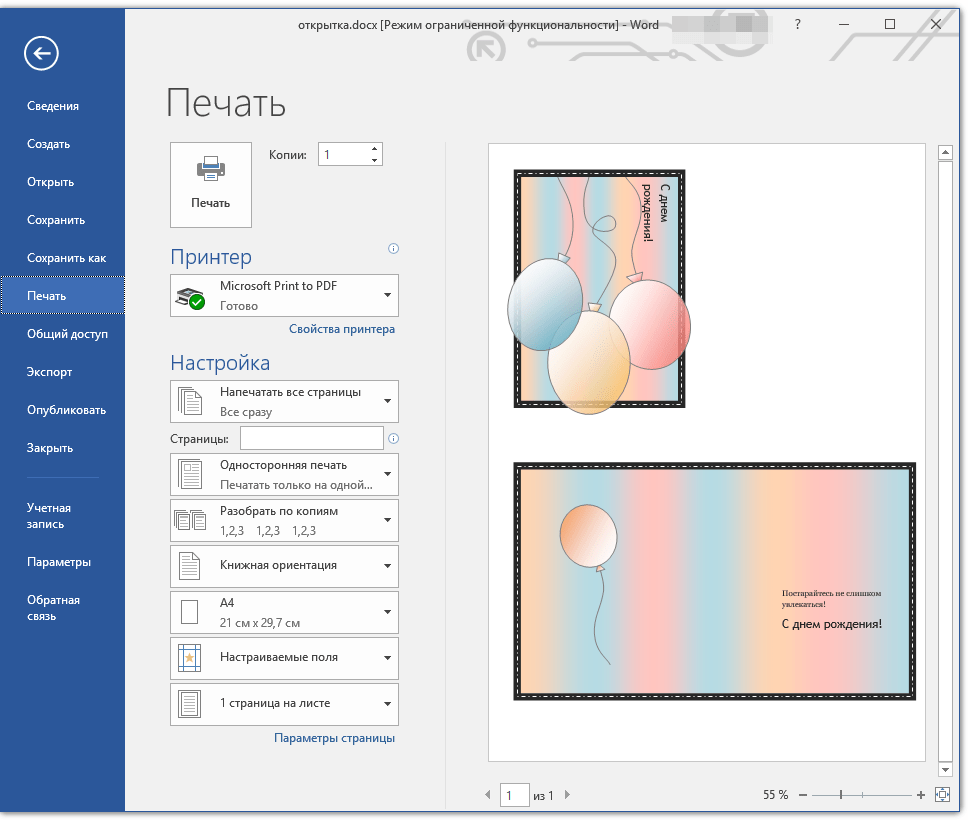
Print out your cards. Make sure your home printer can print on cardstock. Load a sheet of cardstock (or blank postcards) into your printer’s paper tray. Print out however many copies of your postcard that you want.
- If you are printing both the front and back of your postcards, print a page of «fronts» first. Then, load the cardstock back into your printer’s paper tray before printing the «backs.» If you’re unsure which side your printer prints to, try doing this using a test page on normal printer paper first.
-
2
Cut out each card. Unless your postcard takes up the entire sheet of paper, you will need to cut your printout into separate cards. If you have a paper cutter, use that to quickly make consistent cuts into multiple copies at once. Otherwise, hand cut them one at a time with a pair of scissors. Some blank postcards are perforated so that all you will need to do is tear where necessary.
-
3
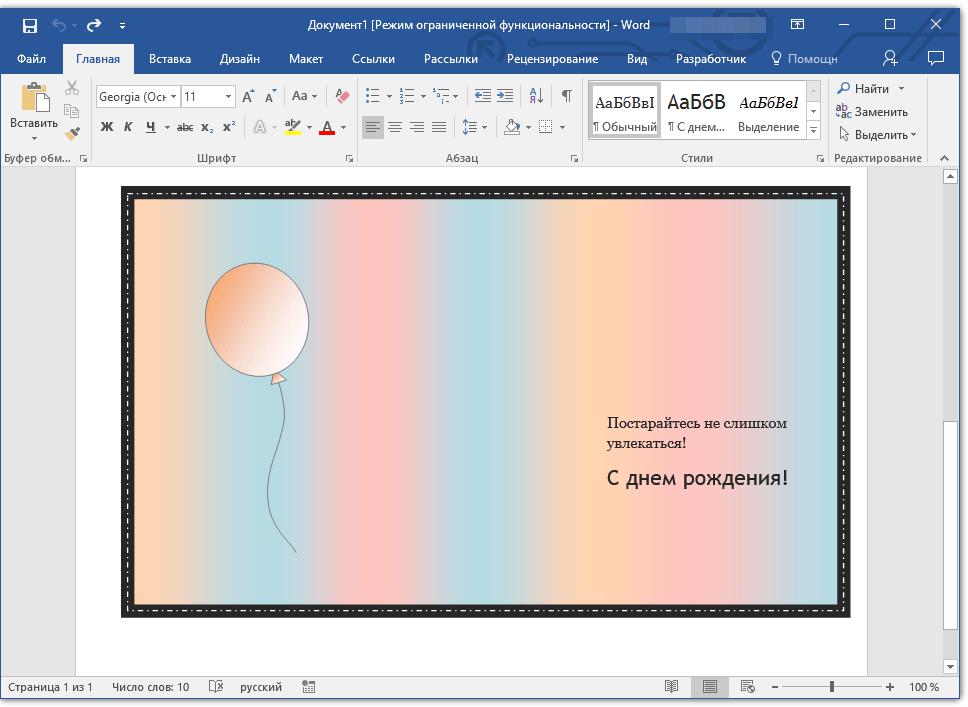
Ready your cards for mailing. If your Word document didn’t include addresses, write them in. You can also add a handwritten message to any available blank space. Affix a stamp to the top right corner of the addressed side, and your card is ready to post.


Advertisement
Add New Question
-
Question
How can I print on US postcards?

Scan the back of the postcard onto your computer then paste it into Word. Make a text box and write in it. Print out the page then cut and glue/tape/adhere it to the back of the card. Also, you could just print out what you want to say and stick it on.
Ask a Question
200 characters left
Include your email address to get a message when this question is answered.
Submit
Advertisement
Video
-
If you don’t own a printer or yours can’t print on cardstock, save your project as a PDF and print it at a copy shop. Such shops usually have paper cutters on hand that will make large batches of cards even easier to make.[3]
-
You can make a postcard bigger than the standard 4″ x 6″. Just keep in mind that larger cards may be heavier and require more postage.
Thanks for submitting a tip for review!
Advertisement
References
About This Article
Article SummaryX
To make a postcard in Microsoft Word, all you need to do is use a postcard template when you create a new document. Word has dozens of different postcards to choose from. Then, you’re free to change the images and text to anything you want. Alternatively, you can create a postcard using Word’s label feature. To do this, first open a blank document and paste the image you want on your postcard. After that, click on the “Mailings” tab, then “Label,” then “Options.” Select the “Postcards” label, then “New document.” This will create 4 copies of your picture on the page. For more tips, including how to print your postcard out, read on!
Did this summary help you?
Thanks to all authors for creating a page that has been read 166,848 times.
Did this article help you?
Postcards are an alternative way to communicate a message attractively. They are fun to make, and creating them in MS Word is easy.
- Using templates
- Using labels
We will show you both methods in simple, step-by-step instructions.
Let us begin.
Method #1: Postcards Using Templates
Step #1: Start MS Word
Start MS Word.
You should see two panes.
Step #2: Get card templates
In the right pane, click on the words ‘More templates’.

You will now see many templates in the right pane.
Click on Cards.

You can see various templates for cards.

Step #3: Select a template
Scroll up and down to see all the cards.
Click on the card template suitable for your purpose.
Word will display the details of the card.
To change the card, click on the left or right arrow.
Click on the Create button to download the card you prefer.

Word will open a new document with the image of the card.
Notice the card has front and back images.
Depending on the template, there may be multiple images.

Step #4: Edit the messages
The image will have instructions for editing the messages on the postcard.

Edit the messages as you like.
Step #5: Save the postcard
Click on the File tab in the top menu bar to change the ribbon.

In the left pane of the file menu, click on Save As.
In the right pane, choose where you want to save the document.
We will click on This PC to open the File Explorer.

In the File Explorer, select the folder to save your card.
Give the card a suitable name.
Click on the Save tab at the bottom to save the card.

Step #6: Print the postcard
Click on the File tab in the top menu bar to change the ribbon.

In the left pane of the file menu, click on Print.
In the center pane, choose your Printer and its Settings.
Change the number of Copies if you want more than one.
Click on the Print icon to start printing.

Method #2: Postcards Using Labels
Step #1: Start MS Word
Start MS Word.
You should see two panes.
Step #2: Open a blank document
Click on the Blank document icon.

Word will open a blank document.
Step #3: Create a Label
Click on the Mailings tab in the top menu bar to change the ribbon.

In the Create section, click on the Labels icon.

This will open the Envelopes and Labels dialog box.
Click on the Labels tab in this dialog box.
Click on the Options… button tab at the bottom.

The Label Options dialog box will open.
Under Label Information, select Microsoft as the Label vendors:.
Under Product number:, click on Index Card, with page size 6” x 4”.
Click on the OK button to close the Label Options dialog box.

Word will return you to the Envelopes and Labels dialog box.
In the Envelopes and Labels dialog box, click on New Document.

This will close the dialog box and open a new postcard.
Step #4: Insert a picture
Click on the Insert tab in the top menu bar to change the ribbon.

In the section Illustrations, click on Pictures.

A menu will open to allow you to Insert Picture From.
If you have the picture on your device, click on This Device…

The File Explorer will open.
Navigate to the picture folder and click on the picture you want.
Word will insert the picture into the postcard.
Use the handles (shown in red below) to resize and reposition the picture as necessary.

Step #5: Insert a text box
Click on the Insert tab in the top menu bar to change the ribbon.

In the section Text, click on the Text Box icon.

This will open the Built-in text box menu.
Select the text box type you want and click on it.
In our example, we have selected the Simple Text Box.

The text box will appear in the postcard.
Use the handles (shown in red below) to reposition and resize the text box.

Step #6: Change the text
Click within the text box and change the text to suit your purpose.
Change the font, its color, and its size as you wish.

Step #7: Save the postcard
Click on the File tab in the top menu bar to open the files menu.

In the left pane of the file menu, click on Save As.
In the right pane, choose where you want to save.
We will click on This PC to open the File Explorer.

In the File Explorer, select the folder to save your card.
Give the card a suitable name.
Click on the Save button at the bottom to save the card.

Step #8: Print the postcard
Click on the File tab in the top menu bar to open the files menu.

In the left pane of the file menu, click on Print.
In the center pane, choose your Printer and its Settings.
Change the number of Copies if you want more than one.
Click on the Print icon to start printing.

Conclusion
We have shown you two simple methods of creating postcards in MS Word. In addition, we have also shown you how to print your cards. Use the method most suitable for your requirements.
How to Print Postcards in Word
- Open Word.
- Click the “Insert” tab.
- Type the text for the postcard, such as “Wish you were here” or “Just moved!” Highlight the text.
- Click the “Page Layout” tab, then click “Page Color” to give the postcard a colored background.
- Turn on your printer and load in postcard paper.
Contents
- 1 Is there a postcard template on Microsoft Word?
- 2 How do I make 4 postcards per page in Word?
- 3 How do you create a 4 up document in Word?
- 4 How do I print 4 postcards on one page PDF?
- 5 How do I create multiple cards in Word?
- 6 How do I print double sided postcards in Word?
- 7 How do I print 4×6 photos in Word?
- 8 How do I print 5×8 index cards in Word?
- 9 How do you make postcards for mailing?
- 10 Can you make postcards?
- 11 What paper is used for postcards?
- 12 How do I print 4 pages in Word?
- 13 How do I Print small flyers in Word?
- 14 How do I Print several photos on one page?
- 15 How can you convert a PDF to Word document?
- 16 Can I print on a 3×5 index card?
- 17 How do you make a 3×5 print?
- 18 Can you print on index cards from word?
- 19 How do I make a card template in Word?
- 20 How do I print folded cards in Word?
Is there a postcard template on Microsoft Word?
Find the Right Template
Inside Word, click the File menu followed by New. In the search box at the top of the window, type postcard as the search term. You’ll see a series of thumbnails for postcard templates appear in the middle of the screen.
How do I make 4 postcards per page in Word?
Print multiple postcards on a single sheet in Publisher
- Click File > Print.
- In the Printer list, select the printer you want to use.
- Under Settings, in the Pages drop-down list, select Multiple pages per sheet and the number in Copies of each page.
- Click Print. Tips:
How do you create a 4 up document in Word?
Split page to 4 quarters with a table
- Place the cursor at left-top of the page, then click Insert > Table, select 2×2 Table.
- The table has been inserted, then drag right-corner of the table to resize it as you need.
- Insert texts into the columns and rows separately.
How do I print 4 postcards on one page PDF?
Choose File > Print. From the Page Scaling pop-up menu, select Multiple Pages Per Sheet. From the Pages Per Sheet pop-up menu, select a value. Click OK or Print.
How do I create multiple cards in Word?
Under Pages, make sure to choose Multiple pages per sheet, and then click Print.
- Click File > New.
- Click Business Cards.
- Click to select a template, and then click Create.
- Click Insert > Page.
- In the Insert Page dialog box, enter the number of pages that you want to add.
How do I print double sided postcards in Word?
Select “Settings,” and then click the “Print One Sided” button. A drop-down menu showing a list of available print modes appears. If your printer supports automatic double-sided printing, select “Print On Both Sides.” If it does not, this option does not appear, so select “Manually Print On Both Sides” instead.
How do I print 4×6 photos in Word?
Click the picture you want to print. To select more than one picture, hold down the CTRL key while you click the pictures that you want to select. 3. On the toolbar, click Print, and then click Print.
How do I print 5×8 index cards in Word?
print 8 X 5 Cards.
- Go to Page Page set up (make sure you printer is set as your default printer).
- go down to page size and 5 x 8 index cards.
- Go to button just below setting og number of copies.
- Scroll down to bottom and give a name.
- From now on you can just select that preset.
How do you make postcards for mailing?
Postcard design: How to do it well
- Keep it simple.
- Craft a great headline.
- Use high-quality imagery.
- Personalize with data.
- Promote a compelling offer.
- Have a single, clear call to action.
- Track and attribute the results.
Can you make postcards?
Making your own postcard can be as simple or complex as you choose to make it. You can start with plain, store-bought cardstock and print a lovely picture on the front and leave things at that.Nothing is worse than having your homemade postcard shredded in a postal machine.
What paper is used for postcards?
Historically, postcards are generally printed on a standard 16 pt “ultra thick” semi-gloss paper stock because of the luxurious feel, quality, and durability. Printivity also offers a 14 pt “extra thick” cardstock for postcards when you want a thick card, but want to be keep the price down.
How do I print 4 pages in Word?
To print four pages to a sheet, follow these steps:
- Go to File | Print.
- In the Zoom section, select 4 Pages from the Pages Per Sheet drop-down list.
- Make any other print selections, and click OK.
How do I Print small flyers in Word?
How to Make 4 Party Flyers on 1 Page
- Click on the “New” icon in your word processing program, such as Microsoft Office.
- Double-click “Flyers” and then “Event Flyers.” Select the event flyer template you would like to customize.
- Personalize your event flyer.
- Save your flyer.
How do I Print several photos on one page?
Tip: In order to select multiple images press and hold CTRL key and keep clicking on desired images to select them. Select multiple images and take right click on one of the selected pictures. Once selection is done, now take right click on any of the selected images and choose Print option from the popup menu.
How can you convert a PDF to Word document?
Open a PDF file in Acrobat DC.
Click on the “Export PDF” tool in the right pane. Choose Microsoft Word as your export format, and then choose “Word Document.” Click “Export.” If your PDF contains scanned text, the Acrobat Word converter will run text recognition automatically.
Can I print on a 3×5 index card?
This is always how I print all my recipes to keep them neat. I believe you can print on the 3X5 inch cards though it does appear you will have to create a Custom paper size form to do so. Hint: Start with an “Index” card of similar size to create your custom paper form.
How do you make a 3×5 print?
When the photo looks right, choose “Print” from the File menu. Click on “Print Size” in the Printer window to choose a size for your photo. You can choose both 3×5 and 4×6 in addition to other sizes. Choose your layout on the left side of the Print menu.
Can you print on index cards from word?
Start with a blank document in Word and go to the Mailings tab. Select the Labels option in the top left of the Mailings tab. A window will open up, click the Labels tab, and select the Options button. Now select Index Cards from the menu.
How do I make a card template in Word?
How to Create a Card Template in Microsoft Word
- Launch the Microsoft Word application and create a new document.
- Click inside the opened document and create or edit the content as you prefer.
- Add images to your card template.
- Click “Save As” when you are ready to save your page as a template.
How do I print folded cards in Word?
Select the Office Button and click “Print.” Press “OK” to print your work. The contents of your card will display on the bottom half of the card. Fold the card in half, so the outside is blank and the contents appear inside the card when opened.
Postcards have a variety of uses ranging from staying in touch with friends to effectively marketing a business. Microsoft Word grants you the ability to make your own custom postcards quickly and concisely. There are different methods you can make postcards in Word; however, this article will show you the two most straightforward options. They are by making them as “Labels” or by starting from a premade “Template.”

How to create Postcards Using Labels in Microsoft Word?
- First, create a blank Word Document and paste the picture you wish to use, to do so right-click anywhere on the blank space and select “Paste.” Click on the picture to select it, if your picture does not need to meet the typical postcard dimensions (six inches long and four inches high) to work.
- Now, navigate to the “Mailings” tab, which can be found between “References” and “Review” in all recent versions of Word (2007, 2010, 2013). Click on the “Labels” icon, this icon will appear on the leftmost section of the toolbar, this is beside “Envelopes.”
- Click on “Options.” When you click on Labels it will bring you to the “Envelopes and Labels” window, from there, click on the button labeled “Options…” this is towards the bottom right of the window. After you press the button, it will bring up the “Label Options” window.
- Click on the “Postcards” label. make sure the “Label vendors:” is set to “Microsoft.” If it is not, click on the arrow, then locate Microsoft in the drop-down menu. Scroll through till you locate “Postcard” in the “Product number:” menu. Click on “Postcard” to highlight it before pressing “OK.”
- If you have purchased blank postcards, check if their manufacturer has a special template that can be used instead. Search for the manufacturer under “Label vendors:” and the template that is labeled with the correct product number.
- Click on “New Document.” A new page will be displayed with four copies of the picture you selected in a grid. Each of the four sections is the front of the postcard. You have the ability to resize and move the picture within its section. You can also add text, and save the document after you’re done.
How to create Postcards Using Templates in Microsoft Word?
- First, create a new Word Document. Unlike the previous method instead of creating a blank document, you will be working from a template.
- If you are using Word 2007, click the Office icon, then click on “New.”
- If you are using Word 2010 and 2013, click on “File” and then click on “New.”
- Find the postcard template you want to use, there are dozens of different ready-made postcards to choose from. Select the one that resembles the one you want.
- In Word 2007, the easiest method is to type “postcards” into the search bar, this will reveal all the templates for you to download.
- If you are using Word 2010 and 2013, there are special sections for postcard templates to reach them, click on “Cards” and then select “Postcards.”
- If you have purchased blank postcards, search for the manufacturer, if you are not able to locate a pre-installed template, check the manufacturer’s website for available downloads.
- Edit the postcard as you like.
A lot of postcard templates will be easy to edit with each picture as well as the textbox as its own discrete object. You can move objects to different areas of your postcard or you can just delete them entirely. If you wish to use a custom picture, right-click a picture on the template to replace it. You can change the text by clicking the textbox. The text’s font, size, along with color can be altered using the Font toolbox. Save the document after you are finished.
If you liked this article (or if it helped), leave a comment below or share it with friends so they can also know How do I create postcards in Microsoft Word?
Microsoft Word allows you to quickly and easily create custom postcards. There are different ways of creating postcards in Word. But the two best methods are making them as “Labels” or choosing an available “Template.“
Postcards are an attractive way to communicate a message.

You can use postcards to notify customers about special events or offer a coupon to attract new customers to your business. The best thing is you can easily make your postcards using Microsoft Word.
You don’t need to hire a professional designer to create postcards in Microsoft Word. You can use Microsoft Office postcard templates in Word to create and customize a postcard for free.
Note: Instructions in this article apply to Word 2021, Word 2019, Word 2016, Word 365, and Word for Mac. For this guide, we are using Word for Microsoft 365 as an example.
How to Create Postcards in Word
- Using templates
- Using labels
In this article, you will learn both methods to create postcards in Word by following our step-by-step instructions. We’ll also guide you on how to print postcards using Word.
Let’s get started.
Method 1: Create Postcards Using Templates
1. Open Word
Open Microsoft Word, and click New.
You’ll see a list of available templates.
2. Get a postcard template
Inside Word, type postcards in the search box and hit enter.
You’ll see a list of available postcard templates appear on the screen.
3. Choose a template
Go through the available postcard templates.
Click on the template you like and want to use.
Word will display the larger image of the template with some information about the card.
If you need to change the template, use the right or left arrow.
Select Create, and Word will download the template for you.
Your postcard template will open in a new document.
4. Customize the postcard
Highlight the title and text, and start typing to edit the card as you like.
You can change fonts, text color, size, and much more.
5. Save the Postcard
Click the File tab in the ribbon menu.
Select Save As from the left pane.
In the “Save As” screen on the right, click Browse to open File Explorer.
Then, choose the folder or drive to save your postcard.
In the File name box, type a unique name.
In the Save as type box, make sure it says Word Document (*.docx).
Click the Save button to save the card.
6. Print the postcard
Select the File tab in the ribbon menu.
From the left pane, select Print.
Click the drop-down arrow and select your Printer.
Change the Printer Properties, Settings, and Page Setup if required.
In the “Copies” box, enter the number of copies you want to print.
When ready, click the Print button to start printing.
Shortcut: Press Ctrl + P on the keyboard to open the Print screen.
RELATED: How to Use Microsoft Word (A Step-by-Step Guide)
Method 2: Create Postcards Using Labels
1. Open Word
Double-click on the Word icon to open it.
Select New from the home screen.
2. Open a new blank document
Click on Blank document.
Microsoft Word will open a new document.
3. Create a Label
Select the Mailings tab in the ribbon menu.
In the Create group on the far left, click the Labels option.
An Envelopes and Labels dialog box will appear.
Make sure the Labels tab is selected. If not, click on it.
Then, at the bottom, select the Options button.
It will open the Label Options dialog box.
Under Label Information, click the Label vendors drop-down and select Microsoft.
Under Product number, use arrow keys to scroll, and select Index Card with a page size of 4″x6″ or 15.24 cm x 10.16 cm.
Click OK to confirm.
Word will take you back to the Envelopes and Labels dialog box.
From there, select New Document.
It will open a new postcard document.
4. Add a picture
Select Insert from the ribbon menu.
From the Illustrations group, click the Pictures option.
It will open the “Insert Picture From” drop-down.
Click This Device if you have the picture on your computer.
The Insert Picture dialog box will open.
Find and select the picture you want to use.
Then, click the Insert button.
Word will add the picture to the postcard document.
To resize and reposition the picture use the handles (as seen in the image below).
5. Add a text box
Select the Insert tab in the ribbon menu.
In the Text group, click the Text Box option.
It opens a list of Built-in text boxes.
Choose the text box type you want to use.
In our case, we selected the Austin Quote text box.
Word will add the text box on the postcard document.
To resize and reposition the text box use the handles (as seen in the image below).
6. Change the text
Click inside the text box and start typing to change the text as you like.
Change fonts, text color, and size as you wish.
7. Save the postcard
Click the File tab at the top left.
From the left pane, select Save As.
On the right, select Browse.
It will open the Save As dialog box.
From the left, select the folder or drive where you to save your postcard.
In the File name box, type a unique name.
Click Save to confirm.
8. Print the postcard
Click File in the top left.
Select the Print option.
Choose your Printer.
If you want to print more than one copy, change the number of Copies.
When ready, click on the Print button.
RELATED: How to Print Postcards in MS Word
Conclusion
We explained two straightforward methods for creating postcards in Word. In addition, we also demonstrated how to print your cards. Choose the method that best meets your needs.
Reference:
- https://templates.office.com/en-us/event-postcards-tm02901267
Among all of the potential methods small business owners have available to contact customers, postcards definitely belong on the list. Although social media and e-mail work for direct contact, postcards represent a tried and true method of contacting customers too.
 |
| © CreditDonkey |
You can use postcards to alert customers to special events, to reward loyal customers, or to provide a coupon to draw new visitors to your business. Best of all, you can cheaply create business postcards yourself, using Microsoft Word.
You don’t need to hire a professional designer to do this type of work.
Preparing a Business Postcard
Spend a bit of time before starting the project thinking about the message you want to create. Think about what you want the postcard to accomplish. If you’re trying to reward loyal customers, create a message that clearly shows them how much you appreciate them.
Collect any photographs or graphics you want to use with the postcard.
Finally, think about how you would like to print the postcards. You can print them on your own printer, but if you’re using a full-color postcard design, printing them yourself may end up being more expensive than taking them to a print shop.
1. Find the Right Template
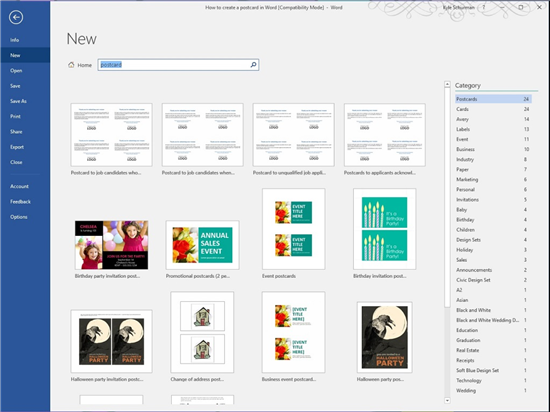
Inside Word, click the File menu followed by New. In the search box at the top of the window, type postcard as the search term. You’ll see a series of thumbnails for postcard templates appear in the middle of the screen.
2. Select a Template
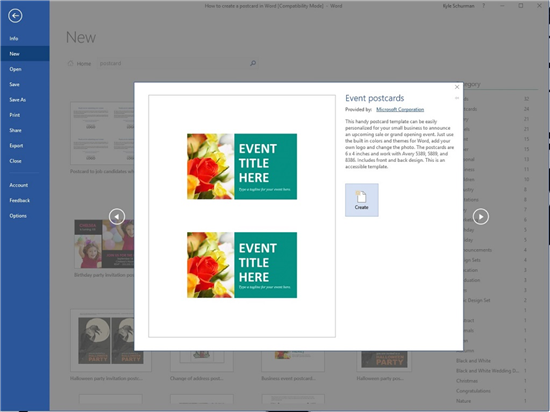
Look through the available template thumbnails to find one that can meet your needs. We picked the Event Postcard template.
After clicking on the thumbnail, you’ll see a larger image of the template, allowing you to inspect it more clearly. If this is the template you want to use, click the Create button.
Word will download the template from the Microsoft web site, so you need an Internet connection available to use the template function.
3. Save the Postcard
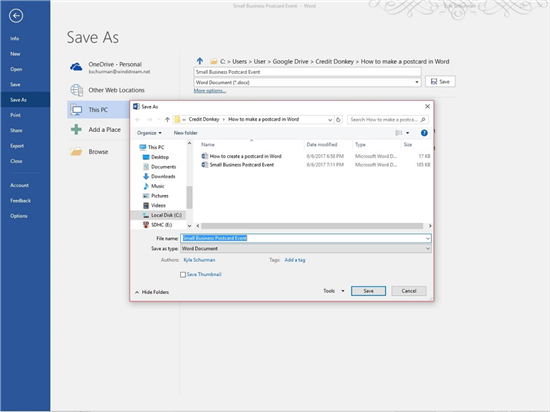
Before going any farther, save the document. Click the File menu and Save As. Then give it a unique name and pick a folder where you’re sure you can find it again later.
One other setting we recommend using with postcard templates is the Print View. This will ensure the copy you’re working with on the screen will match what it will look like when printed. Click the View menu and Print View to activate this feature. Using any other view may cause the image to appear stretched.
4. Work on the Title
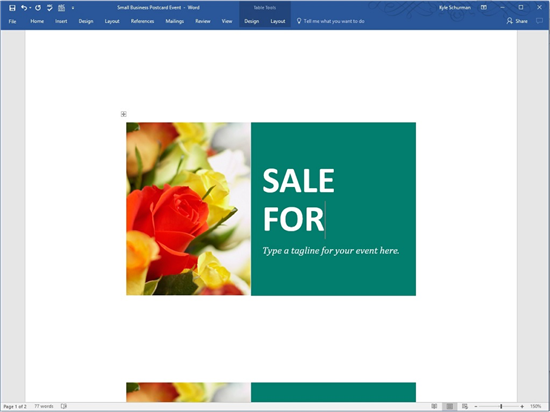
With the template we selected, we see two copies of the postcard template in the Word window. This just indicates that you can print two postcards per standard 8.5-inch by 11-inch piece of paper.
If the template you select also shows two copies, just work on one of the copies. Later, we’ll copy and paste the copy we’ve edited into the lower part of the screen.
To edit the title, triple left-click on the title on the template. Word will fully highlight the entire title, using a gray background. Just begin typing to edit the title.
We changed the title to «Customer Loyalty Reward Sale,» something that can grab the attention of the recipient.
5. Adjust the Text Size
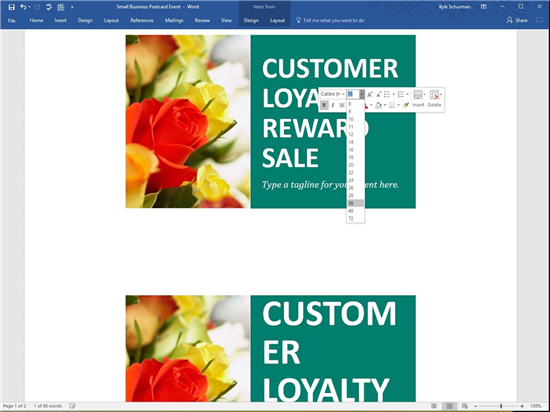
When we created our new title, it didn’t fit well at the default text size. The word «Customer» bled over onto two lines, which is a bad look. (You can see this in the lower copy of the postcard in our screen shot.)
Rather than re-wording the title, we decided to shrink the size of the text a little bit, just to ensure all words would fit on one line. We once again triple left-clicked on the title text block, highlighting it.
We then right-clicked on the highlighted text, causing a popup menu to appear.
Near the top of the popup menu, you’ll see a text size menu button. Click on it and select the new text size. You can do this multiple times to test different text sizes. We settled on 36-point text.
6. Edit Second Line of Text
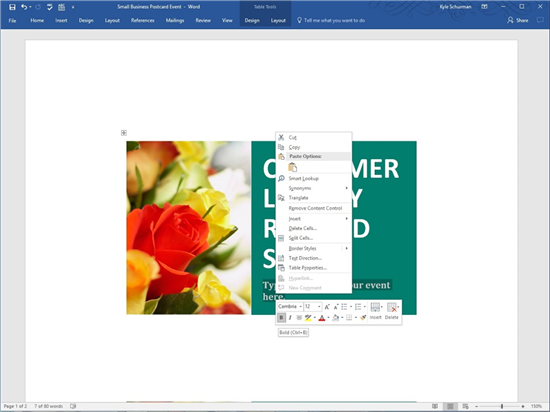
You can change quite a few aspects of the text on the template. On the lower line of text, we decided to change the font and italic emphasis.
Highlight the line of text you want to edit and right-click on it. In the popup menu, you can change the italic emphasis to bold by clicking on the I button to turn italics off and by then clicking on the B button to turn on bold emphasis. Make any other changes you’d like too.
Pressing CTRL + I or CTRL + B will give you the same results.
Then, with the text block highlighted, go ahead and type the phrase you want for that area.
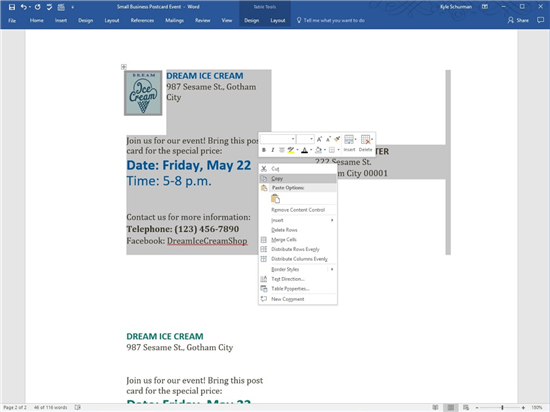
7. Edit the Photograph
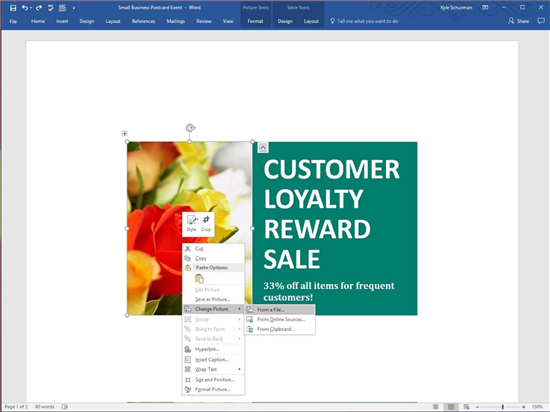
Our sample postcard is for an ice cream store, not for a flower store. So we’re replacing the photo of flowers in the postcard template with our store’s logo.
Left-click on the photo to highlight it. You should see a border with dots appear around it. Then right-click on the photo and left click on Change Picture, followed by From a File. Select the file you want to use as the photo and click Insert. Once the photo or logo is in place, you can stretch or shrink it a little bit by clicking and dragging the dots on the borders.
When changing a photograph on this postcard template, you’ll notice that the photograph is vertically aligned. This means you’ll want a vertically-aligned logo or photo to replace the template’s photograph. For the best results, pick a photo or logo that is similar in size and aspect ratio to the template’s default photo.
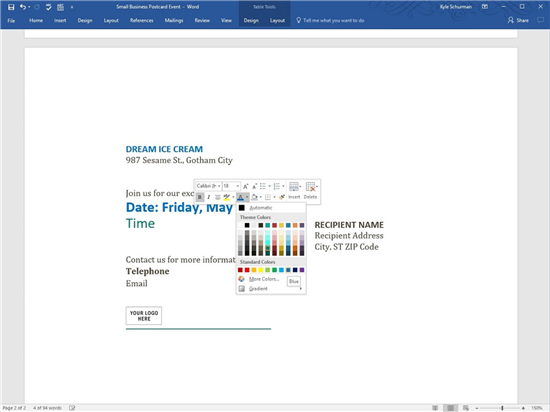
8. Edit the Background Color

Blue is the base color for our «Dream Ice Cream» business for this postcard, so we want to change the green background on the right two-thirds of the postcard (where the text is) to blue. This process is a little tricky, so it may take you a couple of tries.
Left-click in the blank space to the right of the postcard and continue to hold down the left mouse button. Slowly drag the cursor to the left until you’re over the postcard. You’ll now see a gray highlight around most of the green box area, with a slight overhang on the right side.
If you only see a gray highlight around the text, the background was not highlighted, and you’ll have to try again. Look for the slight overhang of gray on the right of the postcard to ensure that you did it correctly.
Now right-click anywhere on the background where there is no text. In the top part of the popup menu, look for the «paint can» icon (labeled Shading when you hover your cursor over it). Left-click on the arrowhead to the right of the «paint can» icon, and you then can pick a new background color by clicking on a color square. If none of the preview colors are right, click on More Colors and you’ll have the ability to select any color.
As a nice feature, when you hover your cursor over the color squares, the background will temporarily change, so you can see how that color looks.
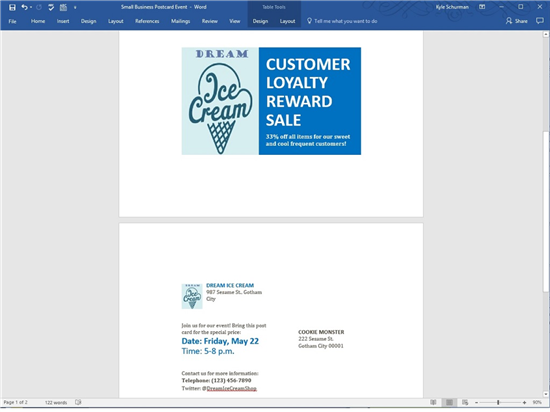
9. Editing the Back of the Postcard
If you scroll down the Word postcard template, you’ll see a second page. This represents the back of the postcard. Again, there are two identical copies at the top and bottom of the page, matching what was on the previous page.
Most of the text on the back is easy to understand. You can add your company name, location, date and time of the event, and contact information along the left side of the postcard template. To edit the text, highlight it by double-clicking on it and then type the new information.
To change the size, color, or font for any text on the back, just highlight it by double-clicking on it. Then right-click on the highlighted text and make changes by left-clicking in the popup menu.
Keep in mind that if you use color on the front and back of the postcard, the printing job will cost a lot more, whether you do it yourself or send the job to a printer. To save some money, consider leaving the back of the card in black text only. To maintain black text on the black, delete the «Your Logo Here» box by left-clicking on it to highlight it and pressing the Delete key.
If you want to remove the line at the bottom of the information area, left-click anywhere on the postcard. Then left-click on the «plus» icon in the tiny box in the upper left corner of the postcard. In the popup menu, find the Borders menu (middle of the lower row of icons). Left-click on the arrowhead for Borders and left-click on No Border.
10. Creating the Addresses

You have three options for creating addresses yourself. (This is not an easy process and will take a bit of time.)
The best way to create addresses is to print peel-and-stick labels with each name and address on them and then stick them onto the postcards after they’re printed. If you have your customers listed in a spreadsheet or database, you can use this information to print the labels too. Just delete the text in the Recipient Name area if you’re going to use stickers.
If you don’t have a database of your customer information and you’re working off a handwritten list, you can type the name and address onto the postcards one by one.
After typing two names onto each postcard template on this page, print the two postcards (as described below), and then repeat the process of entering new names.
Finally, you can address the postcards by hand after printing them, perhaps adding a personal note, if appropriate. Again, to do this, delete the text in the Recipient Name area before printing.
If you plan to send postcards like this on a regular basis, we suggest creating a database of your customer list and printing peel-and-stick address labels each time.
You can set up a customer list in Word and use it to print labels, but that process is beyond the scope of this article; click on the link to see some advice from Microsoft for Creating Address Labels.
11. Mirroring the Postcards
Once you’ve finished your editing on the postcards, highlight and copy the upper postcard on both pages. Then paste the edited copy over the lower postcard on both pages. To highlight the area, click on the lower right portion of the postcard and drag your cursor to the left and upward.
If you’re having trouble making this work properly, remember that the CTRL-Z keystroke combination is a shortcut for Undo.
It’s important when pasting that you don’t change the spacing on the postcard template, or the postcards won’t print properly. It may take a few tries to highlight, copy, and paste the data properly.
If this copy and paste process just isn’t working for you, you always can make editing changes to the lower postcard to match the upper postcard.
12. Print Time!
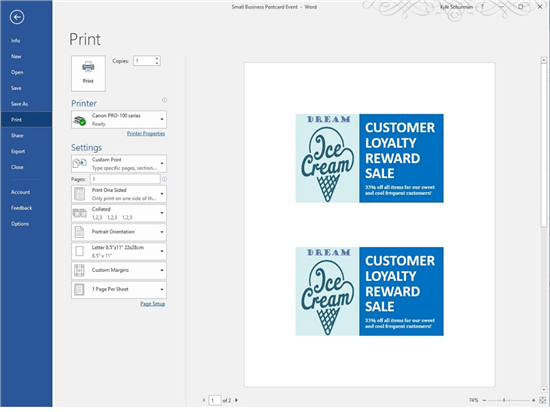
When you’re ready to print the postcards, you’ll have to decide whether to print them yourself or send them to a professional printer.
If your printer can handle thicker paper (called cardstock), you can print the postcards yourself using a two-sided print method. But if you have a simple printer, it may only handle thin paper, meaning you’ll have to take the print job to a printer.
If printing yourself, click the File menu and Print. In the Print window, select your printer. Scroll down and change the Print One Sided box to Manually Print on Both Sides, and Word will prompt you when to reinsert the paper.
Because it’s important that the front and back of each postcard line up exactly, we suggest testing your printer’s two-sided print option first. Use plain paper for the test. In the Copies box, enter «1.» Then click the Print button.
When prompted by Word, reinsert the plain paper back into the printer (and write down exactly how you inserted it so you don’t forget). Most printers will perform two-sided printing by having you insert the previously printed page facing upward and the top of the page toward the interior of the printer.
Make sure one copy is selected and click Print again. You should end up with the postcard front and back lined up properly on opposite sides of the paper. If not, try again, reinserting the paper a different way.
Once you have the test page figured out, insert the card stock into the paper tray. Open the Print window and enter the number of pages you want to print in the Copies box (keeping in mind that each page contains two postcards). Make sure Manually Print on Both Sides is selected. Then click the Print button.
When prompted, reinsert the cardstock into the printer, using the technique you figured out during the test phase. Then enter the same number of pages you want to print in the Copies box.
As the print job is occurring, stay nearby. Inspect a few pages as they exit the printer, ensuring the print job is working correctly and the back and front of the postcards are lined up properly.
If this seems like too much to handle, you always can take the postcards to a professional printer. Depending on how much you pay for ink for your printer, it may be cheaper to have them printed elsewhere.
Final Steps
Once the printing is done, cut the postcards apart, trimming the edges of the paper if necessary to achieve the correct size. Take care as you’re cutting on one side that you’re not ruining the text on the other side. Add your address labels and stamps, and you’re ready to send them out!
Любой праздник невозможно представить без подарков, всеобщего веселья, музыки, воздушных шаров и прочих радостных элементов. Еще один неотъемлемый компонент любого торжества — поздравительные открытки. Последние можно купить в специализированном магазине, а можно создать самостоятельно, используя для этого один из шаблонов Microsoft Word.
Урок: Как в Ворд создать шаблон
Не зря ведь говорят, что лучший подарок — это тот, что вы сделали собственными руками. Поэтому в данной статье мы расскажем, как самостоятельно сделать открытку в Word.
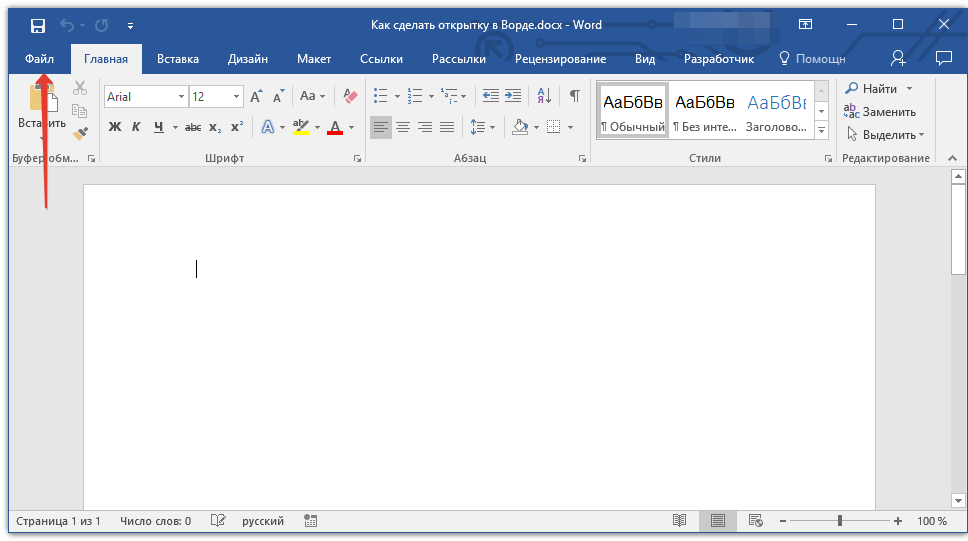
1. Откройте программу MS Word и перейдите в меню «Файл».
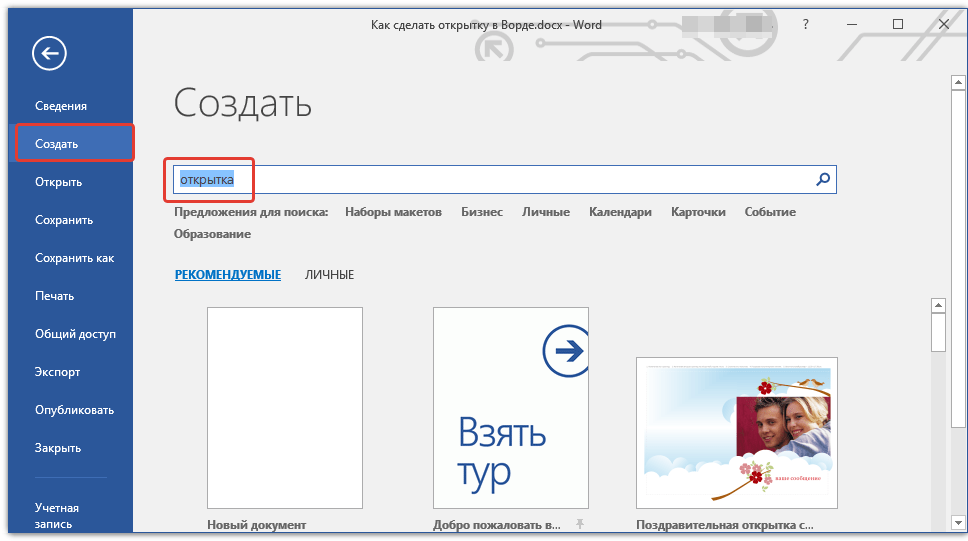
2. Выберите пункт «Создать» и в строке поиска напишите «Открытка» и нажмите «ENTER».
3. В появившемся перечне шаблонов открыток найдите ту, которая вам понравится.
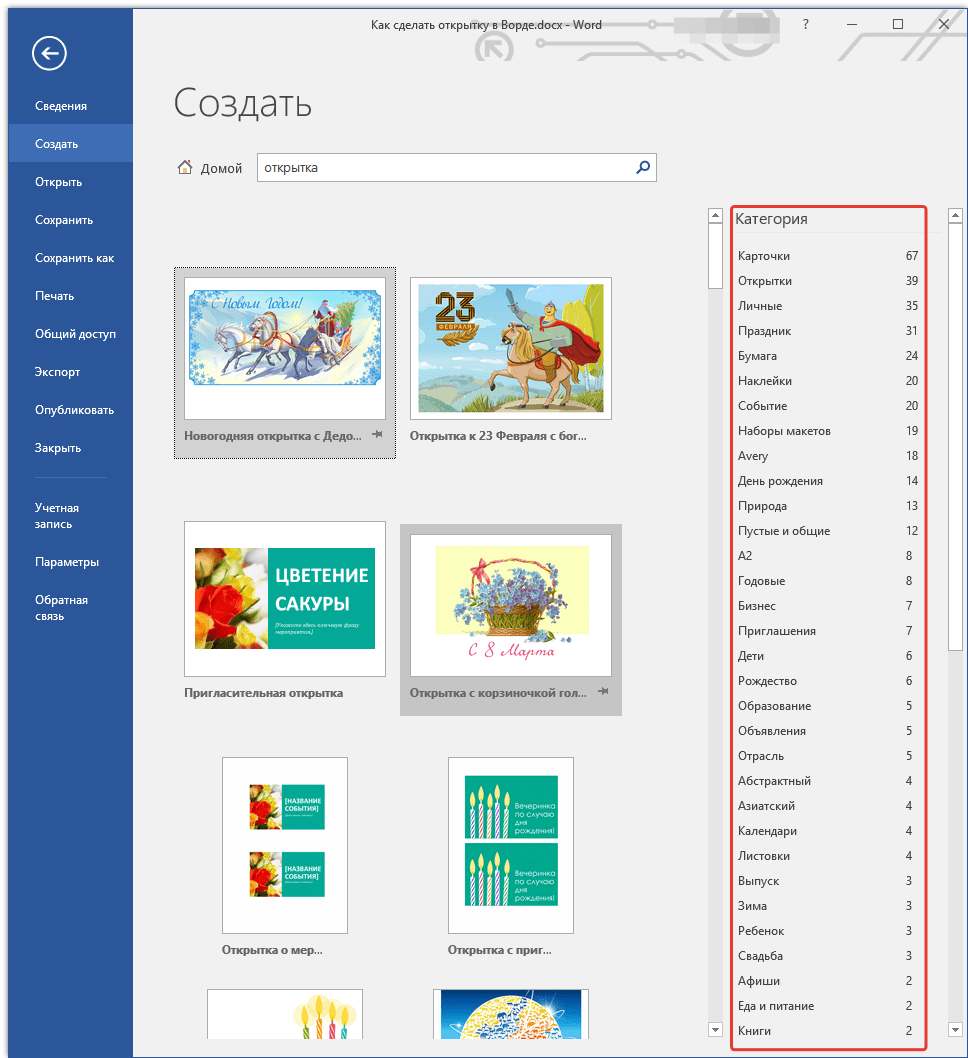
Примечание: В правом боковом списке вы можете выбрать категорию, к которой относится создаваемая вами открытка — годовщина, день рождения, новый год, рождество и т.д..
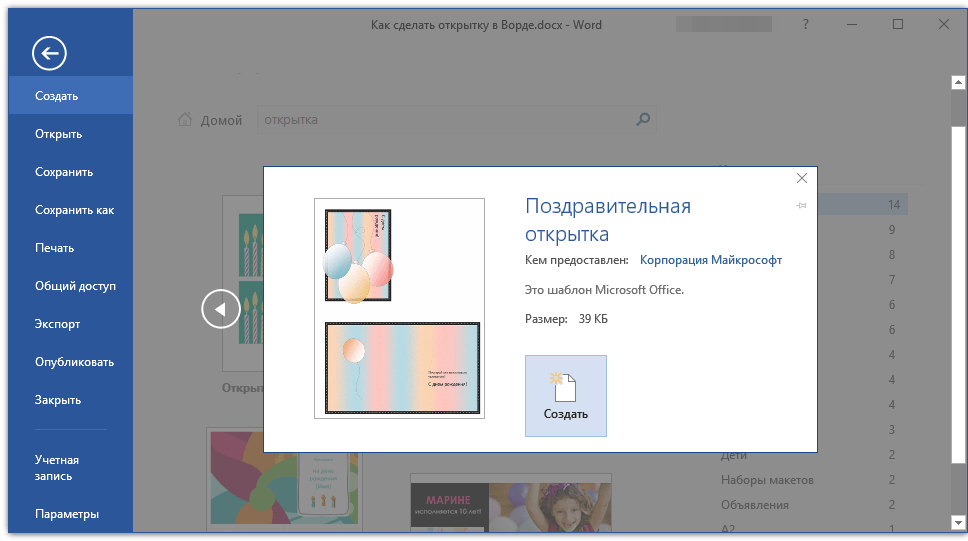
4. Выбрав подходящий шаблон, кликните по нему и нажмите «Создать». Дождитесь, пока этот шаблон будет скачан из интернета и открыт в новом файле.
5. Заполните пустые поля, вписав поздравление, оставив подпись, а также любую другую информацию, которую сами посчитаете нужной. При необходимости, воспользуйтесь нашей инструкцией по форматированию текста.

Урок: Форматирование текста в Ворде
6. Закончив с оформлением поздравительной открытки, сохраните ее и распечатайте.

Урок: Печать документа в MS Word
Примечание: На многих открытках на полях указана пошаговая инструкция с описанием того, как распечатать, вырезать и сложить ту или иную открытку. Не игнорируйте эту информацию, на печать она не выводится, а в деле очень даже поможет.
Поздравляем, вы самостоятельно сделали открытку в Ворде. Теперь осталось только подарить ее виновнику торжества. Используя встроенные в программу шаблоны, вы можете создать много других интересных вещей, например, календарь.
Урок: Как сделать календарь в Word
Еще статьи по данной теме:
Помогла ли Вам статья?
В нашей жизни не так уж и часто случаются праздники, поэтому хорошим дополнением к основному подарку будет открытка, сделанная самостоятельно. Тем более, вручную ее рисовать не придется, для этого можно использовать всем известную программу «Ворд». В этой статье мы расскажем, как сделать открытку в «Ворде». Вся инструкция будет поделена на этапы, выполняя которые в завершение вы сможете достичь желаемого результата.
Пошаговая инструкция, как сделать открытку в «Ворде»
«Ворд» — это многофункциональный текстовый процессор, с помощью которого без проблем удастся сделать открытку на праздник. В статье мы будем рассматривать способ, подразумевающий использование шаблонов. Это не только облегчит и ускорит ее создание, но и позволит выбрать самый красивый дизайн из огромного количества предложенных. Итак, переходим непосредственно к инструкции, как сделать открытку в «Ворде».
Шаг 1: Создание документа
Первым делом, естественно, необходимо создать новый документ. Проще всего это будет выполнить, открыв саму программу, а не создав отдельный документ на жестком диске. Сейчас подробно это будет описано:
- Нажмите по кнопке «Пуск».
- Откройте все приложения, установленные на компьютере. Например, в Windows 7 для этого нужно нажать по кнопке «Все программы».
- В перечне приложений отыщите программу MS Word и нажмите по ней.
- Запустится приложение. В нем первым делом нажмите по кнопке «Файл», находящейся в верхнем левом углу.
- В появившемся меню перейдите в раздел «Создать».
На этом, так сказать, можно завершить создание нового документа, хоть это и не совсем так. Следующим шагом в инструкции о том, как создать открытку в «Ворде», будет выбор подходящего шаблона.
Шаг 2: Выбор шаблона
Как было заявлено, сейчас мы будем выбирать подходящий шаблон, но для начала необходимо отсортировать ненужные, не подходящие по теме.
- Чтобы облегчить поиск, введите в поисковую строку слово «открытка», после чего нажмите клавишу Enter.
- Перед вами появится список шаблонов открыток. Обратите внимание также на категории в правой области окна. Там вы можете выбрать тематику открытки.
- Все, что вам остается сделать, — это выбрать понравившийся вариант и кликнуть по его картинке.
- Появится превью открытки. Если вы уверены, что он вам подходит, нажмите кнопку «Создать».
- Теперь надо подождать, пока файл загрузится из Интернета и откроется в новом документе.

Итак, вы уже знаете, как выбрать шаблон, но это еще не вся инструкция, как сделать открытку в «Ворде». Ее еще необходимо отформатировать, вписав нужный текст и, возможно, исправив некоторые элементы.
Шаг 3: Форматирование открытки
Перед вами находится полноценная открытка, но в ней чего-то не хватает. Конечно же, поздравительного текста! В шаблонах зачастую уже есть какие-либо пожелания, но нет не имени человека, которому адресуется открытка, нет индивидуального поздравления. А что самое главное — не написано, от кого эта открытка.
Чтобы ввести всю необходимую информацию, вам нужно дважды кликнуть по области, где вы хотите ее вписать, и набрать текст с клавиатуры.
Шаг 4: Сохранение и печать

Итак, с открыткой мы закончили, так что теперь смело можно говорить, что вы знаете, как сделать открытку в «Ворде». Но есть еще кое-что — ее необходимо сохранить и распечатать:
- Нажмите на кнопку «Файл».
- Перейдите в раздел «Сохранить как».
- Укажите имя и место, куда хотите ее сохранить.
- После этого перейдите в раздел «Печать» и распечатайте открытку на принтере.
Если у вас нет этого устройства, то вы можете сбросить сохраненный файл на флешку и распечатать на другом компьютере.
Заключение
Теперь вы знаете, как сделать открытку в «Ворде» и вставить текст в нее, а это означает, что вы всему научились. Теперь вам не составит труда порадовать родственников и друзей красивыми открытками собственного производства.
Here are 12 steps you can follow to create postcards in Microsoft Word:
- Find the Right Template.
- Select a Template.
- Save the Postcard.
- Work on the Title.
- Adjust the Text Size.
- Edit Second Line of Text.
- Edit the Photograph.
- Edit the Background Color.
Can I send a homemade postcard?
If you’re creating a postcard, you probably want to send it through the postal service. Shape – Postcards must be an even, rectangular shape. At a minimum, they must be 105 mm high and 148 mm long. At a maximum, they may be 235 mm long and 120 mm high.
What is standard postcard size?
You may think that your mailpiece is a “postcard,” because it is a single sheet of paper. But to qualify for mailing at the First-Class Mail postcard price, it must be: Rectangular. At least 3-1/2 inches high x 5 inches long x 0.007 inch thick.
How can I turn a photo into a postcard?
MyPostcard has a desktop, Android, and iPhone app that lets us create and send the perfect postcard anywhere in the world in a matter of minutes. Once you open the app, all you have to do is snap a picture, write a message, enter the address, and pay, then that memory will be on its way within 24 hours.
Can I use a 4×6 photo as a postcard?
Step 2: DIY Photo Postcards Meet USPS Regulations According to the USPS , to qualify for mailing at the First-Class Mail postcard price (currently 35 cents) , it must be: Rectangular. At least 3-1/2 inches high x 5 inches long x 0.007 inch thick. No more than 4-1/4 inches high x 6 inches long x 0.016 inches thick.
Can you send an index card as a postcard?
Index cards make great postcard bases, because they’re already cut to a size the Post Office will accept. Other companies sell postcard-sized art papers, but they’re often insanely expensive.
How much is a postcard stamp 2021?
Try us out for 4 weeks!
| Post Office/Retail Rates | Stamps.com Rates | |
|---|---|---|
| Letters | 2021 Postage Rates | 2020 Postage Rates* |
| First-Class Mail Flat/Large Envelope (1 oz.) | $1.00 | $1.00 |
| First-Class Mail Flat/Large Envelope – each additional ounce | $0.20 | $0.20 |
| Postcard | $0.36 | $0.35 |
Are seashell postcard stamps still good?
The nondenominated (34¢) stamps are each inscribed with the word “Postcard” and will fulfill the postcard rate regardless of future rate increases, much like a forever stamp is always valid for the current 1-ounce letter rate.
Do postcards need stamps?
A stamp is a proof of payment for your postcard: without a stamp, no letter or postcard will be handled by the post office. Depending on the destination, the price of the stamp will vary. Depending on where you are sending the postcard, you may need two, three, or even more stamps.
Can I use old postcard stamps?
You can use them any time. Any combination of stamps may be used in meeting the postage requirements. You may think it looks “tacky” to have a variety of stamps on your envelope, but the Post Office encourages you to utilize all the stamps you have.
Which postcard stamps are forever?
to Mailing Postcards and Letters Needing Additional Postage. WASHINGTON — The Forever Stamp — good for mailing 1-ounce First-Class letters anytime into the future — regardless of price changes — has been well received by customers.
Can I use 2 postcard stamps on a letter?
Yes. At long as the stamps have a value equal to or greater than the actual postage for a letter. Since the price of a postcard stamp is . 35 cents, two of those stamps would be more than enough to mail a letter.
How many postcard stamps equals a regular stamp?
with 2 postcard
Is there a difference between postcard stamps and regular stamps?
USA Answer: They are the same size. Postcard stamps have “POSTCARD” printed in a 4-point font all caps along the bottom edge. Stamps for first class mail, under an ounce, just say “United States” and “Forever”. It sounds like the ones you have are for letters.
How many postcard stamps do I need for a letter?
How Many Stamps Do I Need To Send A Letter In The U.S?
| New Rate* | Total Cost | Stamps Required |
|---|---|---|
| Postcard | $0.35 | 1 x Postcard stamp |
| 1 oz. First Class Letter | $0.55 | 1 x 1 oz. Forever stamp |
| 2 oz. First Class Letter | $0.70 | 1 x 2 oz. Forever stamp |
| 3 oz. First Class Letter | $0.85 | 1 x 3 oz. Forever stamp |
Are postcard stamps cheaper than regular stamps?
You’ll save money on postage since postcard stamps cost 1/3rd less than stamps for one-ounce letters. The current postal rate for sending a postcard is 36 cents ($0.36). The USPS does not have any wedding-themed postcard stamps like the wedding-themed forever stamps they have for one-ounce letters.
Can you send a letter without a stamp?
If there is no stamp on your envelope, a special scanner will detect it, and the letter will be attributed to a separate category of mail. In case it is confirmed that your letter is unstamped, it will either be sent back to you or delivered to its addressee subject to postage fees.
How do you calculate postage?
Divide the postage price by the price of a Forever stamp. The number you get is how many stamps you’ll need. If your postage cost comes to $2.32, for example, you would divide 2.32 by 0.50 to get 4.64.
What is the minimum stamp on postage?
Currently, a postage stamp for a standard one ounce letter costs $0.55. This means one First Class Mail Letter sent domestically requires either a forever stamp or $0.55 worth of postage stamps.
Is it cheaper to use a flat rate box or your own box?
When to Use USPS Flat Rate Envelopes USPS Flat Rate Envelopes are almost ALWAYS the cheapest option. However, use your own envelope for packages weighing exactly 1 lb. and traveling locally. And if your package weighs less than 1 lb., use your own envelope and ship via USPS First-Class Package Service.
Postcards are used for a variety of purposes, such as congratulating friends or promoting a product. You can quickly make your own postcards in Microsoft Word. There are many ways to make postcards in Word, but the easiest is to use the Stickers feature or a template.
Steps
Method 1 of 3: Using the Stickers feature

Step 1. Create a new text document and insert the desired picture into it
To do this, right-click on a blank sheet and select «Paste» from the menu. Click on the picture to select it. The size of the picture does not have to match the size of a standard postcard (148×105 mm).

Step 2. Go to the Mailings tab
It sits between the References and Review tabs in all recent versions of Word (2007, 2010, 2013). Click «Sticker». This button is located on the left side of the toolbar (next to the Envelopes button).

Step 3. Click «Options»
In the «Envelopes and Labels» window that opens, click «Options» (in the lower right part of the window). The Label Options window opens.

Step 4. From the «Type» menu, select «Postcard»
Select Microsoft from the Label Provider menu. Click «OK» (in the lower right corner).
If you bought blank cards, check to see if the manufacturer suggests using a custom template. The manufacturer’s name is listed in the Label Supplier menu and the template is labeled with the corresponding product number

Step 5. Click «Create»
The page displays four copies of the selected image. Each of the four sections is the front of a separate postcard. You can resize and move the image within the section, and add text. After making the necessary changes, save the document.
Method 2 of 3: Using templates

Step 1. Create a new Word document
Instead of a blank document, you will be working with a ready-made template.
- In Word 2007, click on the Office button (in the upper left corner of the screen) and select New.
- In Word 2010 and 2013, click File -> New.

Step 2. Find the postcard template you want
There are dozens of ready-made postcard templates. Choose a template that suits your requirements.
- In Word 2007, in the New Document search box, type postcard, postcard, or postcard (without the quotes); the search bar is at the top of the window. Postcard templates will be loaded.
- Word 2010 and 2013 have a dedicated section for postcard templates. Click «Cards» -> «Postcards».
- If you bought blank cards, find the manufacturer of them. If you can’t find a pre-installed template, download it from the postcard maker’s website.

Step 3. Edit the postcard
Many templates can be edited because each image and text box is a separate object. Objects can be moved and deleted. To insert another picture, right-click on the template image and replace it. Change the text by clicking on the text box. You can change the style, size, and color of the font using the Font toolbar (just like in a regular Word document). After making the necessary changes, save the document.
Method 3 of 3: Preparing Postcards for Submission

Step 1. Print the postcards
Make sure the printer supports printing on thick paper. Place heavyweight paper (or blank postcards) in the printer tray. Print the required number of postcards.
If you are going to print on both sides of a postcard, print the front side first. Then place the printed postcards in the printer tray and print the back side. If you are not sure how to lay the paper correctly to print the back side, take a regular sheet of paper and print a test page

Step 2. Cut out each postcard
Do this if there are white margins around the card. To cut several postcards at once, use a paper guillotine (if you have one, of course). If you don’t have a guillotine, use scissors to cut each card out. Some blank cards are sold perforated, so in this case, just tear off the margins you don’t need.

Step 3. Prepare postcards for shipping
If your Word document did not include recipient addresses, write them down. You can also write a message on any empty space. In the upper right corner, stick a postage stamp (above the recipient’s address). The card is now ready to be sent.
Advice
- The postcard can be made larger than the standard 148 x 105 mm). The Russian Post considers acceptable postcard sizes from 140 x 90 mm to 235 x 120 mm. The maximum weight of the postcard is 20 g; for more weight you will have to pay extra.
- If you do not have a printer or it does not support printing on thick paper, save your Word document in PDF format and print it in a mini printer. These printers have paper cutters, which will make things easier if you need a lot of postcards.