

-
Select Insert > Page Number, and then choose the location and style you want.
-
If you don’t want a page number to appear on the first page, select Different First Page.
-
If you want numbering to start with 1 on the second page, go to Page Number > Format Page Numbers, and set Start at to 0.
-
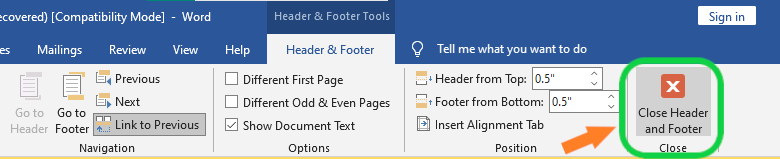
When you’re done, select Close Header and Footer or press Esc.
Tip: To get back to a header or footer to make changes, double-click in the header or footer area.
-
On the Insert tab, click the Page Number icon, and then click Page Number.
-
Select a location, and then pick an alignment style. Word automatically numbers every page, except designated title pages.
-
To change the numbering style, select Format and then choose the formatting you want to use.
-
Select OK twice to close both dialog boxes.
![]()
Download Article
Easily add page numbers to the header or footer in your Microsoft Word document
![]()
Download Article
- Inserting (PC & Mac)
- Formatting (PC & Mac)
- Inserting (Mobile)
- Video
- Expert Q&A
- Tips
|
|
|
|
|
Adding page numbers in Microsoft Word is easy! Whether you’re writing a 10-page essay or a thesis paper, there are a variety of ways to customize the page numbers. Use the Insert tab to quickly add page numbers. From there, you can change the formatting and numbering options. This wikiHow guide will show you how to add page numbers to your Microsoft Word document on Windows and macOS, as well as in the Word mobile app on your Android, iPhone, or iPad.
Things You Should Know
- On desktop or mobile, go to the Insert tab, then select «Page Number» to add page numbers.
- Double-click the page number to make changes to the font, color, or style.
- Double-click the header or footer, then go to Page Number > Format Page Numbers for additional options.
-

1
Click Insert. This is in the tab menu bar at the top of Word. Alternatively, double-click the top or bottom of the page to open the Header or Footer editing menu.
- Don’t forget to save your work as you go!
-
2
Click Page Number. This opens a pop-up menu for choosing where to place the page numbers.[1]
- In the Insert menu, Page Number is near the center.
- In the Header & Footer design tab, Page Number is on the left.
Advertisement
-
3
Choose a page number position. This can be in the header or footer, and located left, center, or right.
- You can also toggle the option to include the page count in the page numbering (e.g. 1 of 3).
- Selecting a page number position will open the “Header & Footer” tab.


Advertisement
-
1
Double-click a page number. This will select it and show a pop-up menu with options for changing the font, color, and style. This change will edit every page number automatically.
- You could even cross out the page numbers if that’s your style.
-
2
Start numbering on the second page. If you want the first page to have no numbering, and start at 1 on the second page, follow these steps:
- Double-click the header or footer to open the Header & Footer design tab.
- Check the “Different First Page” checkbox.
- Click Page Number then Format Page Numbers.
- Select “Start at” and change it to 0.
-
3
Restart page numbers by using page breaks. If you want to start a new numbering later in the document, you’ll need to use a page break.
- Place your cursor at the beginning of the page you want to restart the numbering on.
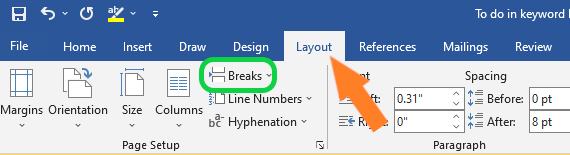
- Go to the Layout tab, then click Breaks.
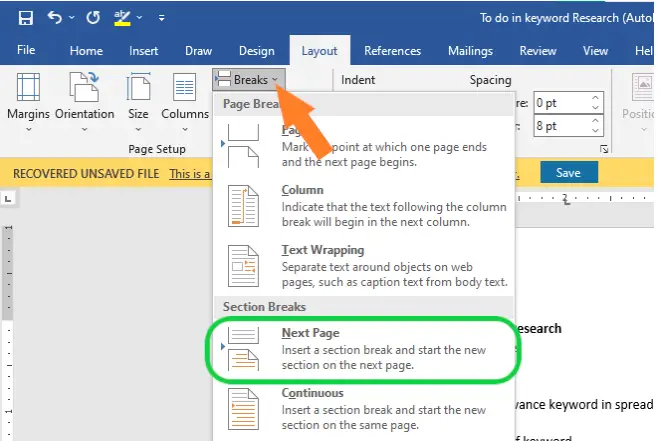
- Select Next Page in the Breaks options menu.
- Double-click the header or footer in the second section. This will open the Header & Footer design tab.
- Click Page Number then Format Page Numbers.
- Select the radio button labeled «Start At,» then select «1» to restart the page count at 1.
-
4
Use «Format Page Numbers» for additional changes. This can be located by going to Insert > Page Number > Format Page Numbers. You can change:
- The number format. You can change this to Roman numerals, letters, or another style.
- The chapter number.
- The starting number.
-
5
Click Close Header and Footer. This will return you to editing the body of the document. Alternatively, press Esc to close the header and footer editor.


Advertisement
-
1
Open your Word document on your Android, iPhone, or iPad. It’s easy to use Word on your phone or tablet to insert page numbers into your document.
-
2
Tap the more button. While in Edit mode in the Word mobile app, tap the more button (three horizontal dots).
-
3
Tap Home. Then, select Insert to switch to the Insert menu.
-
4
Choose Page Numbers. Then, select the placement location for the numbers.
-
5
Format the page number. After selecting the placement, double-click the page number. Then, tap the text edit button (the icon with the letter A and a pen). You can change the font, size, color, and more!
-
6
Go to Headers and Footers. This is in the Insert menu. You can set a different first page, change how odd and even pages look, or remove the page numbers entirely.
- When working in Online mode, any changes made in the app will appear on your desktop version of Word.


Advertisement
Add New Question
-
Question
In the insert box, the page number icon is grayed out and not available for use. How do I activate it?

Kyle Smith is a wikiHow Technology Writer, learning and sharing information about the latest technology. He has presented his research at multiple engineering conferences and is the writer and editor of hundreds of online electronics repair guides. Kyle received a BS in Industrial Engineering from Cal Poly, San Luis Obispo.
wikiHow Technology Writer
Expert Answer
The page numbering feature isn’t available in certain layouts. Go to View and select Print Layout. If this doesn’t resolve the issue, try restarting and/or updating Microsoft Word.

Ask a Question
200 characters left
Include your email address to get a message when this question is answered.
Submit
Advertisement
Video
-
If you plan on creating a complex header or footer (like your name, or a title), try and add the page numbers first. They will be much easier to work with.
-
Looking for money-saving deals on Microsoft Office products? Check out our coupon site for tons of coupons and promo codes on your next subscription.
Thanks for submitting a tip for review!
Advertisement
About This Article
Article SummaryX
1. Click Insert.
2. Click Page Number.
3. Select a position.
4. Choose a style.
Did this summary help you?
Thanks to all authors for creating a page that has been read 423,281 times.
Is this article up to date?
This tutorial shows how to add page numbers in Microsoft Word. Then, we will format page numbers, remove page numbers from the first page, and start the second page with page number 1.
Table of Contents
- How to add page numbers
- How to format page numbers
- How to remove the page number from the first page
- How to start the second page with page number 1
Do you want to start your page numbers on a specific page? Please see “How to Start Page Numbers on a Specific Page in Microsoft Word (PC & Mac).”
This tutorial is available as a YouTube video showing all the steps in real time.
Watch more than 200 other writing-related software tutorials on my YouTube channel.
The images below are from Word for Microsoft 365. These steps will also work in Word 2021, Word 2019, Word 2016, Word 2013, and Word 2010. However, your interface may look slightly different in those older versions of the software.
Are you on a Mac? Please see “How to Add Page Numbers in Word for Mac.”
Important Note: Page numbers added to the top of the page or the bottom of the page will be inserted into the header or footer. The page numbers will replace any existing text placed in the same location within the header or footer. Therefore, you should add page numbers before adding other elements to the header or footer.
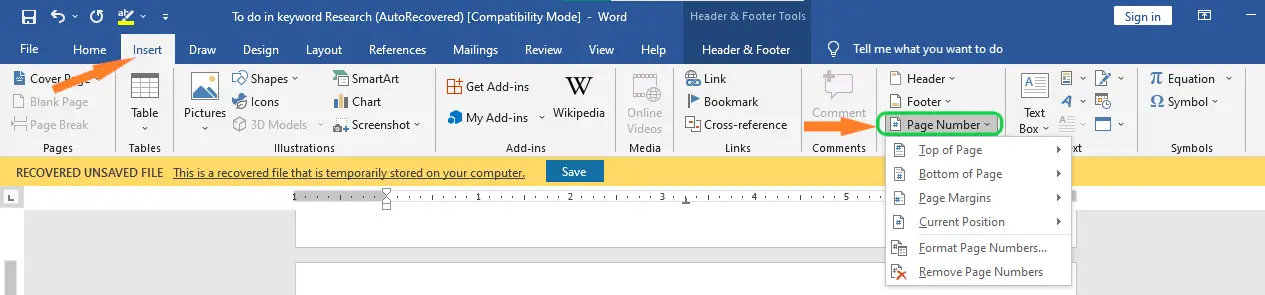
- Select the Insert tab in the ribbon.

- Select the Page Number button in the Header & Footer group.

- Select a location to insert the page numbers from the drop-down menu:
-
- Top of Page (in the header)
- Bottom of Page (in the footer)
- Page Margins
- Current Position
The Current Position option is the current location of your cursor in the header, footer, or body of the text. If the current position is in the body of the text, the page number will only appear on the current page. It won’t appear in the same location on other pages.

- Select additional location and style options from the submenu. (The options will depend on the selection made in step 3.)

Your page numbers should appear immediately.
How to Format Page Numbers in Microsoft Word
This section shows how to change the number format, include chapter numbers, and start on a specific page.
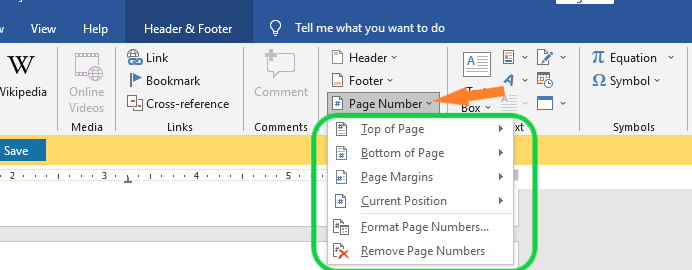
- Select the Insert tab in the ribbon (see figure 1).
- Select the Page Number button in the Header & Footer group (see figure 2).
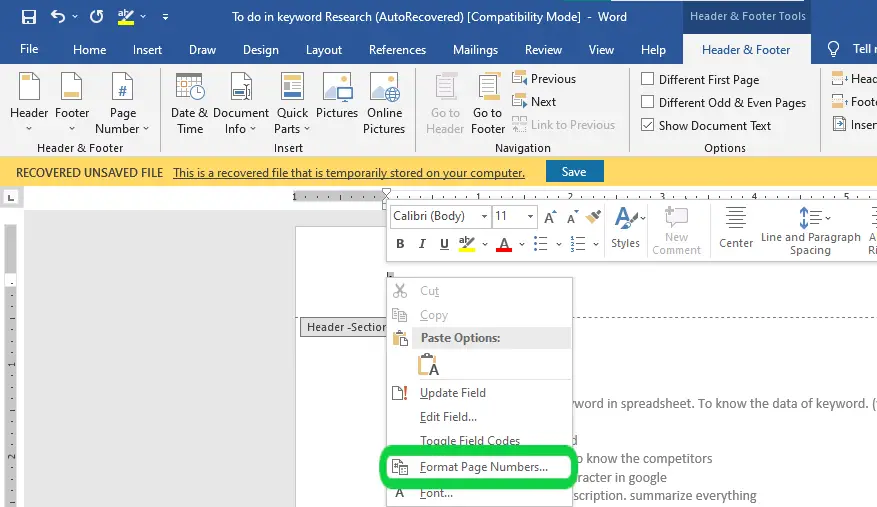
- Select Format Page Numbers from the drop-down menu.

- Select the options you want from the Page Number Format dialog box.
-
- Number format (e.g., numerals, letters, Roman numerals)
- Include chapter number (This option only works if you already established heading numbers.)
- Continue from previous section (When this option is selected, your sections will be number continuously. If you do not want the page numbers to continue from the previous section, select Start at.)
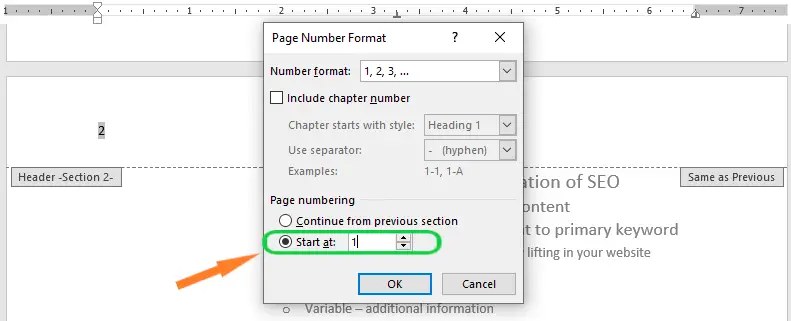
- Start at (This option will default to page 1. However, if you enter another number, such as 5, the page number 5 will appear on the first page of the document or first page of the section.)

- Select the OK button.

Your page number formatting should be applied immediately.
How to Remove the Page Number from the First Page in Microsoft Word
You may want to remove the page number from the first page because it is a title page or a cover page.
- Select the Insert tab in the ribbon (see figure 1).
- Select the Header or Footer button in the Header & Footer group. (Choose the location where your page numbers are located.)

- Select Edit Header or Edit Footer from the drop-down menu.

- Select Different First Page in the Options group in the Header & Footer tab.
Pro Tip: The Header & Footer tab only appears while you are working in headers or footers.

The page number on the first page should disappear. If the page number does not disappear, select it and press the Delete key to remove it manually.
How to Start the Second Page with Page Number 1 in Microsoft Word
After removing the page number from the first page, as shown in the previous section, you can force the second page to start with page number 1.
- Select the Page Number button in the Header & Footer group.

- Select Format Page Numbers from the drop-down menu (see figure 5).
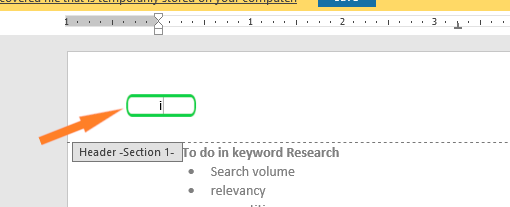
- Enter the number 0 into the Start at menu in the Page Number Format dialog box.

- Select the OK button (see figure 7).
The page number on the second page should be changed to number 1.
- Select the Close Header and Footer button.

Related Resources
How to Adjust Page Margins in Microsoft Word
How to Adjust Line Spacing in Microsoft Word
How to Insert Page Breaks in Microsoft Word
How to Use the Editor in Word for Microsoft 365 (Spelling & Grammar Check)
Updated April 05, 2023
In this guide, you’ll learn everything you need to know about adding page numbers in Word.
When adding page numbers into your Word document, several methods are available.
However, this guide focuses only on the best approaches that give the most ease and flexibility.
I’ll show you all the secrets.
Let’s dive right in.
Introduction.
Page numbering in Word is very easy. In fact, I know a shortcut with which you can insert page numbers in under five seconds (will be discussed soon).
At the same time, numbering pages in Word can be very complicated, depending on what document you are working on.
- Are you starting the page numbering from page one, page two or page three?
- Do you want the page numbers to be Roman numerals, alphabets or ordinary numbers?
- Where do you want to insert the page numbers? – Is it in the footer? In the Header? Or in the side margin?
All these factors count when it comes to inserting page numbers into Word.
So, in order to not confuse you, I’ll begin from the basics with examples and screenshots on every step.
Without wasting much time, let’s get started.
The quickest way to add page numbers in Word – Shortcut
This is so far the quickest way you can use to number your pages in Word.
NOTE: With this method, I assume that you just want your pages to be numbered starting from the first page to the last page.
Below are the steps you can use to perform quick page numbering in Word:
- Identify where on the page you want to insert the page numbers. Whether in the footer (bottom of page) or in the header (top of page). In this example, we’ll insert the page numbers in the footer section.

- Now, go to any page of your choice. It could be page one or page 10, it doesn’t really matter.
- Double-click on the page’s Footer area to make it editable. Alternatively, right-click in the Footer area, then click on Edit Footer. The same thing applies if you are inserting the page number into the header section.
- Whilst in the Footer editing mode, press Shift+Alt+P on your keyboard.
- Now press the Escape (Esc) key to exit the Header & Footer.
After performing the above simple steps, Word will insert page numbers on all the pages in the document.
Below is a very short video illustration of the steps outlined above:
Option 2: Using the insert page numbers button
This is yet another way you can insert page numbers into your Word document.
It involved using the Page Number commands in the Insert tab, or Header & Footer tab when active.
Following the steps below, you can also add page numbers into your Word document.
- Go to the Insert tab, in the ‘Header & Footer’ group, click on ‘Page Number’ to display the page numbering options.

You can also find the ‘Page Number’ command in the Header & Footer tab. However, the Header & Footer tab shows only when you are editing headers or footers. So you can double click either in the Footer or Header section to make it editable.
- From the ‘Page Number’ drop-down menu, choose your page numbering style to automatically insert the page numbers into your document.

Use the ‘Top of Page’ option if you want to insert page numbers on top of the pages. Or use ‘Bottom of Page’ option to add page numbers to the bottom of the pages.
This is how you can add page numbers to your word document.
The two approaches explained above are the basis for learning how to insert complex page numbers in Word.
Now let’s look at more advanced ways you can insert or tweak page numbers to suit your needs.
Numbering your pages with Roman numerals or alphabets
Word gives you the flexibility of choosing the page numbering style that works well for you.
You are not only limited to using the standard ordinary numbers when numbering your pages in Word. You can number pages with Roman numerals. You can also use alphabets.
Therefore, without further ado, below are the steps you can follow to change your page numbers to Roman numerals or other numbering styles.
- First, insert the page numbers.
To insert roman numerals as page numbers, you first have to insert the page numbers with the default ordinary numbers, and then format it to display the roman numerals.
In case you forget, to insert page numbers, go to the Insert tab, under the Header & Footer group, click Page Number and then specify the location and style you want for your page numbers.
- After successfully adding the page numbers, go to Page Number > Format Page Numbers in the Insert tab.

- From the ‘Page Number Format’ dialog, click the ‘Number format’ options and select the numbering style you want. You can select alphabets or roman numerals.

- Click on the OK button.
This few steps will change your page numbers to roman numerals.
NOTE: You can also include different page numbers in the same document. For instance, you can use Roman numerals for the introduction pages, and start page 1 on the main part of the content. This technique is discussed later in this article.
Removing page number from the first page
Perhaps you want to remove the first-page numbering since it serves as your cover page.
Or for any other reason, you can remove the page number from the first page of your Word document using the following editing steps:
- Double-click the Footer/Header section to activate the ‘Header & Footer’ tab. Alternatively, right-click the footer area and Click on Edit Footer.
- From the ‘Header & Footer’tab, select ‘Different First Page’.

As soon as you check the ‘Different First Page’ checkbox, the page number on the first page disappears.
NOTE: Even though there’s no page number on the first page anymore, it is still counted. This means that the second page will still display page number 2 instead of page number 1. To start numbering page 1 on the second page, keep reading below.
Numbering pages starting on page 2
After removing the page number on the first page, you realized that the second page still has page number 2 instead of 1.
This is because the first page is still counted, it’s just that the page number is not visible.
There are two ways you can number pages in Word starting on page 2:
- Start the page numbering at 0 (zero). This way, the first page will be page 0 (which is hidden anyway), and the second page will be numbered page 1.
- Use Section Breaks to separate the first page from the rest of the pages. This way, you can delete the page number on the first page and it will not affect the other page numbers on the rest of the pages.
In this section, I’ll show you how to number pages in Word starting at 0 (zero) instead of 1 (one).
- First, insert the page numbers into your document. If you don’t know how to insert page numbers, refer to the previous sections. If you already have your pages numbered, move to the next step.
- In the Insert tab, go to Page Number > Format Page Numbers.
- The ‘Page Number Format’ dialog appears. Under the page numbering section, type 0 (zero) in the Start at box.

- Click OK.
At this point, the page numbering will start with 0 (zero) on the first page which is not visible. Then the second page will be numbered N1, and so on.
TIP: Not every page needs to be on page 1. Therefore, just like starting to number at zero, you can also start your numbering at any number (except negatives) depending on the layout of your content.
As mentioned already, the second method to perform this task involve using section breaks to separate the first page from the rest of the pages. I’ll cover this approach in the next sections where you’ll learn how to insert page number in Word starting from a specific page.
Insert page number in word from specific page
Yes, it is possible to start page numbering from any page in your word document.
In the previous section, we already talked about how you can start numbering your pages from page two using the ‘Different First Page’ option.
With the ‘Different First Page’ method, you can only start numbering your pages on page 2. You cannot really insert the page numbers on other specific pages like page 3, page 4 or page 5.
To skirt this limitation, you need to use what is called Page Breaks to break your pages into sections. This way, each section can have independent headers and footers, which means that they can also be numbered independently.
To understand how this works, let’s demonstrate how to start page numbers on page 3.
Starting page numbers on page 3 or any other page
NOTE: The following steps will show you how to start numbering your pages from page 3. However, you can apply the same idea to add page numbers from any specific page you want, like page 5.
The diagram below illustrates the goal of this section:

In the diagram above, the first section (first and second pages), is the introduction – with no page numbers. And the second section (starting from the third page), is the main content – which contains page numbers, starting with number 1.
If you follow the steps below carefully, you will achieve awesome results.
Without further ado, let’s dive right into the action:
- Identify the page from where you want to start the numbering. In this example, it’s page 3.
- Place the insertion pointer at the start of the third page (main content page).

- Go to the Page Layout tab, in the page setup group, click on Breaks and then select Next Page from the extended list of commands.

At this point, the section break is inserted. It separates the document’s first two pages from the rest of the pages. Thus, starting from page 3 is a new section.
- Confirm the section break
After inserting the section break, Word doesn’t actually make the effects visible. Everything happens in the backend.
So, to be sure that the section break is really inserted, Press Ctrl+Shift+8 on PC or ⌘+8 on Mac. This will make all the paragraph marks visible including section breaks.

If you see the section break line just before the third page, it means that inserting the section break was successful. It tells Word that the next page (page 3) begins a different section which may have different header/footer.
- Unlink the header/footer for the second section from that of the previous.
To unlink these two sections:
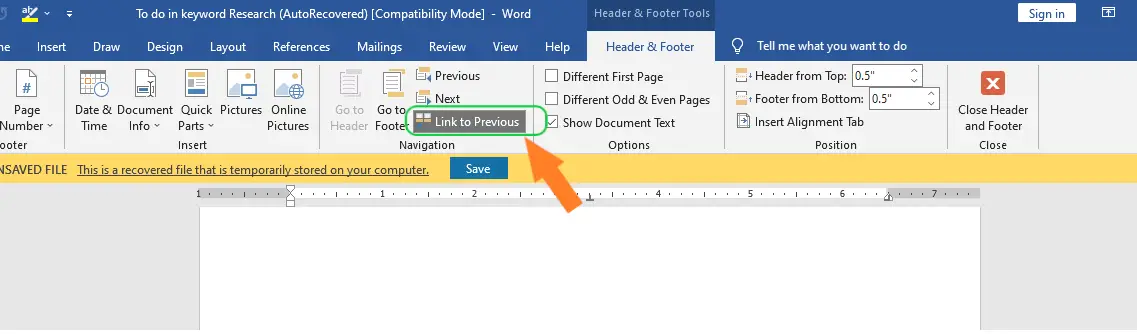
Double-click to activate the Footer section on page three. This displays the Header & Footer tab, in the Navigation group, click on Link to Previous to deselect that command. Do the same for the Header.

When the “Link to Previous” item is selected for any given header or footer, it means that the header or footer is the same as that for the previous section. If you want to fix page numbers on specific pages, you don’t want that setting active.
Now follow the rest of the steps to insert the page numbers on page 3.
- Go to the Insert tab, in the ‘Header & Footer’ group, click on ‘Page Number’ to display the page numbering options.
- From the ‘Page Number’ drop-down menu, choose your page numbering style you want.
Use the ‘Top of Page’ option if you want to insert page numbers on top of the pages. Or use ‘Bottom of Page’ option to add page numbers to the bottom of the pages.
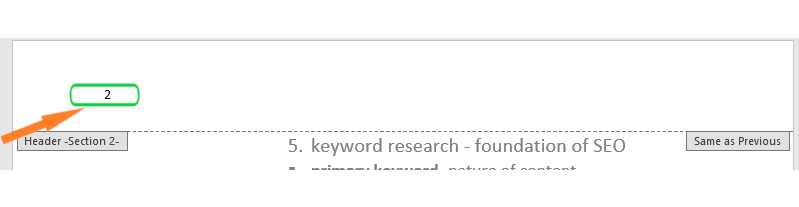
After adding the page numbers, you’ll notice that each section has its pages numbered separately. Section one, which has only two pages will be numbered from page 1 to 2. Then section two, which begins with page three will also be numbered starting from 1.
You can change the numbering styles of the introduction pages to say roman numerals.
We’ll talk about how to do that in the last section below.
How to insert different page numbers in word
You can use different page numbering styles within the same document.
Perhaps you want to use Roman numerals for numbering the introduction and then start over with page number 1 for the main content.
For instance, consider a document with two separate sections, as shown below:

Section 1 is the introduction which uses Roman numerals to number the pages. Section 2 contains the main content – which uses the standard ordinary numbers to number the pages, starting with page number 1.
This is entirely possible if you following the steps below very carefully.
- Open your document. If you haven’t written the content yet, you can finish writing it before you make the settings.
- Using the steps in the preceding section, insert a page break to separate the first section from the second.
- After dividing the document into sections, insert page numbers using the steps I showed you from the beginning.
- Change the page numbers in section one to Roman numerals. This is already covered in the previous sections.
- Format the page numbering in the new section too.
You can use the techniques discussed on this page to solve many page numbering problems in Word.
This is enough information to help you fix page numbers in Word.
Now it’s your turn to take action.
If you have any questions, suggestions or corrections, let me know in the comments section.
How to Add Page Numbers in Word
Create page numbers in Word 2013, 2016, 2019 and Microsoft 365
Updated on October 16, 2020
What to Know
- Go to the Insert tab > Page Number > Page Number > Top of Page (Header) or Bottom of Page (Footer).
- Under Alignment, select Left, Right, or Center > OK.
- To format the page numbering, click Header or Footer > Format > choose format. Double-click anywhere in the document.
This article explains how to add pages numbers to documents in Word 2019, 2016, 2013, and Word for Microsoft 365.
If your Microsoft Word document is long (or book-length), you might want to add page numbers to the header or footer. When you print a document, the headers and footers can be printed as well.
The steps for adding pages numbers is basically the same for Word 2019, 2016, 2013, and Word for Microsoft 365.
-
Place your cursor at the first page of your document or where you want page numbers to begin.
-
Select the Insert tab.
-
Select Page Number in the Header & Footer group.
-
Select Page Number again from a drop-down menu.
-
Under Position, select Top of Page (Header) or Bottom of Page (Footer) to indicate where to place the numbers on the page.
Under Alignment, select Left, Right, or Center.
Select OK to save the selections and exit the menu.
-
Select Header or Footer on the toolbar to format the page numbering.
-
Select a format from the menu options.
-
Double-click anywhere in the document to hide the header and footer areas.
Customize Headers and Footers
You can also customize the headers and footers in all versions of Microsoft Word. You do that from the same area where you added page numbers.
To begin, select Header or Footer to see your options.
In recent editions of Word, you can also get additional header and footer styles online from Office.com.
Thanks for letting us know!
Get the Latest Tech News Delivered Every Day
Subscribe

Contents
- 1 How to Add Page Numbers in Word
- 2 How to Format Page Numbers in Word
- 3 How to Start Page Numbers over in Word (Restart Numbering)
- 4 How to Skip the First Page Number in Word
- 5 How to Change Types of Page Numbering in Word
- 6 How to Leave the Header and Footer or Design Bar
- 7 Extra: How to Add Line Numbers in Word
- 8 Extra: How to Add a Page Border in Microsoft Word
Microsoft Word page numbering
Page numbers in Word are a valuable tool to help you order pages after printing or quickly reference information for other readers. Today, we’re going to show you how to add page numbers in Word, format them, and skip the first page number if necessary.
Inserting page numbers in Word is easy, modifying them not so much
Though inserting page numbers in Word in the base form is quite easy, it gets more complex once you start to modify them to suit your exact needs. Microsoft Word has a variety of styles, placement, and formatting choices that can make things feel a little overwhelming.
Not to worry, though – we’ll be breaking down all the major options so you can quickly get your page numbering in Word looking exactly how you want. Let’s get started:
If you’re wondering how to insert page numbers in Word, the first place you might think to look is the “Page Number” tool. Thankfully, you’d be right. This makes the entire process very simple:
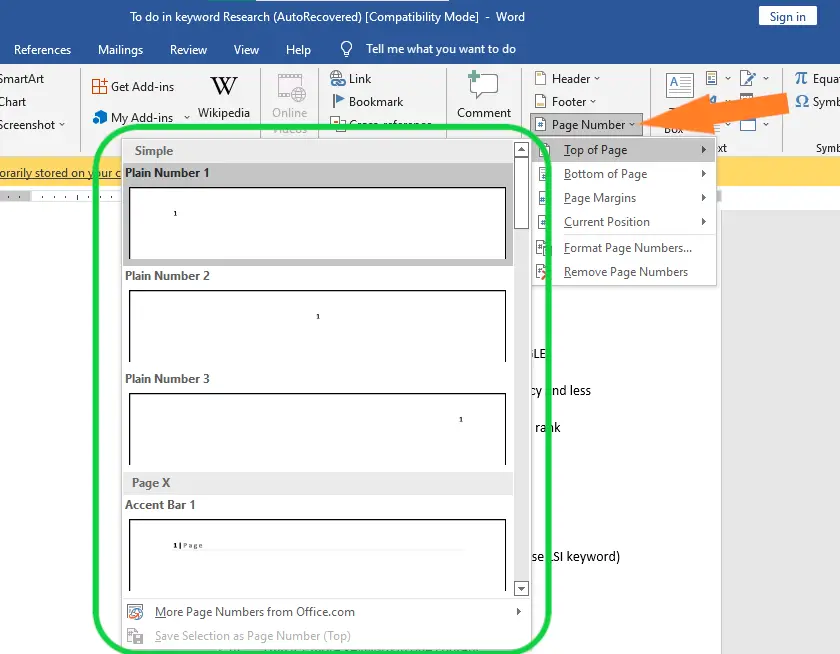
- Open the “Insert” tab of the ribbon and press “Page Number > Bottom of Page > Plan Number 2”
Naturally, you can choose a different style for the page number if you like, such as the accent bar. You can also choose to have the number at the top of the page if you wish.


How to Format Page Numbers in Word
After inserting page numbers in Word, you may want to format them to match the styling of the rest of your document. You can quickly change aspects such as font, text color, size, center/right/left justification, and more. Here’s how:
- Double-click your page number and adjust the formatting options in the fly-out
You should already be familiar with the options here – they’re the same as they are for any other text. Once you’ve finished modifying the number, you can double-click anywhere that’s not in the footer to return to your document.


How to Start Page Numbers over in Word (Restart Numbering)
If you want your page numbers restart at a certain point, you need to make use of Word’s section breaks feature. This is a useful tool in many situations, so it’s worth familiarizing yourself with:
- Place your cursor at the start of the page you want to restart page numbers on and insert a “Next Page” break
To do so, open the “Layout” tab of your ribbon, click on “Breaks” below it, then press “Next Page” under the “Section Breaks” heading.

- Double-click the page number, then press “Page Number > Format Page Numbers…” in the ribbon
To clarify, you should double-click the page number of the page you’re planning to restart the page numbers on.

- Tick “Start at” under the page numbering heading select “1”, and press “OK”


How to Skip the First Page Number in Word
In many cases when adding page numbers in Word, you’ll want to skip the first page number. This happens most commonly when you have a cover page or title page. Here’s how to make page numbers start on page 2:
- Double-click the first page number and tick “Different First Page” in the ribbon
The “Different First Page” option can be found in the “Header & Footer” section of the ribbon, which should automatically appear once you double-click your page number.

- Delete the first page number
Due to the “Different First Page” option, deleting the first page number now won’t remove page numbers from the rest of your document.


How to Change Types of Page Numbering in Word
As well as the style, position and starting position of page numbers, you can change the type of page number. For example, whether the numbers take the form of numbers, letters, or Roman numerals, and whether they use dots or dashes:
- Double-click your number and press “Page Number > Format Page Numbers…” in the ribbon
- Press the dropdown arrow next to “Number format”, choose an option, and press “OK”
The changes will automatically apply to all of the page numbers in your Word document.


How to Leave the Header and Footer or Design Bar
If you find yourself stuck in the Header and Footer or design bar with no way to edit the rest of your document, you can use the following trick:
Press the “Esc” button on your keyboard
This will instantly exit the header and footer bar and bring you back to your normal document view.

As well as page numbers, you can add individual line numbers to your document so that you can reference part of it even more easily. Just follow our linked tutorial to do so.

While you’re at it, you can add a page border to your Word document to ensure a clear margin for annotations once it has been printed. You can read our dedicated guide here to learn how to do so.

In this chapter, we will discuss how to add page numbers in MS Word. Microsoft Word automatically assigns page numbers on the pages of your document.
Typically, page numbers are printed either in the header or footer, but you have the option of displaying the page number in the left or right margin at the top or bottom of a page. To learn more about header and footer, see our previous tutorial.
Table of contents
- What is Page Number in MS Word?
- What is the purpose of page number?
- How to Simply Insert Page Number
- How to Add Different Page Number
- Steps to Hide the Page number on the first Page
- How To Add Page Number to an Existing Header or Footer
- How to Insert page number from Current Position
- Summary
A page number is the particular page number within a document, often abbreviated as page no. The document may be printed or electronic, such as a Microsoft Word document or an e-book.
Furthermore, they came in many different ways to show numbers and changed them to fit your needs. Page numbering lets you start over with page numbering if you need to number some pages differently.
In addition, you can automatically number each page of your document using page numbers. They are available in a variety of numerical formats, and they could be done to your specifications.
Page numbers typically appear in the header, footer, or side margin. Read our article to learn more about header and footer and how to adjust the page margin.
What is the purpose of page number?
The purpose of page numbers is it helps you keep your document organized, makes it easy to refer back to specific parts of your paper, and make things look more professional and well-done.
So, if you want your table of contents and introduction to be numbered differently than the main body of your document, you would have to put them in a separate section at the beginning.
Moreover, most documents use Arabic numerals in the main body, but some use Roman numerals for different parts like the table of contents, introduction, and glossary. Word also lets you set up your document this way.
How to Simply Insert Page Number
Here is the simple way How to Insert Page Numbers in an MS Word document.
- Start by Clicking the “Page Number” button in the “Header & Footer” section of the “Insert” tab on the Ribbon.

- A drop-down menu displays various possibilities for where you would like the page numbers to appear, such as at the top, bottom, etc.
The final two options allow you to format page numbers more accurately.

- When you hover over one of the first four options, a gallery of page numbers appears.
Each choice in the gallery provides a broad representation of how your page’s page numbers will appear.

- Click the desired option to have Word automatically number all of your document’s pages in that format.
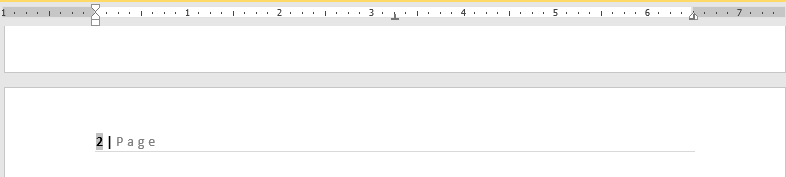
In this example, the “Accent Bar” style has been applied to the “Page X” format.

- Tap the “Close Header & Footer” button on the Ribbon or double-click outside the header or footer section to return to your document.
If you place page numbers at the top or bottom of the page, the header or footer of your document opens so you can add whatever around them.

That’s the easy way to add page numbers, and it works fine if you have a simple document in which you want all the pages to be numbered and numbered in the same way.
How to Add Different Page Number
In adding Different Page Number in MS Word, you will need to divide your document into distinct sections for each component.
To do this, put your insertion point at the very beginning of your document or right before the first page of your main content if you haven’t already made that preliminary content.
- Start on the Ribbon, click the “Breaks” button on the “Layout” tab.

- Then, click “Next Page” in the drops down menu. This makes a new section start on the next page.

- Break the link between your new introduction and the main body of your work. To do so, open your document’s header or footer where page numbers reside.
- On the Ribbon’s “Header and Footer” tab, Click “Link to Previous” to break the link to the previous section’s header and footer.

- Now that you’ve broken the link, you can change the page numbers to how you want them.
- Next, open the header and footer area of any page in that first section. You’ll see the same page numbers before you made the new section break.
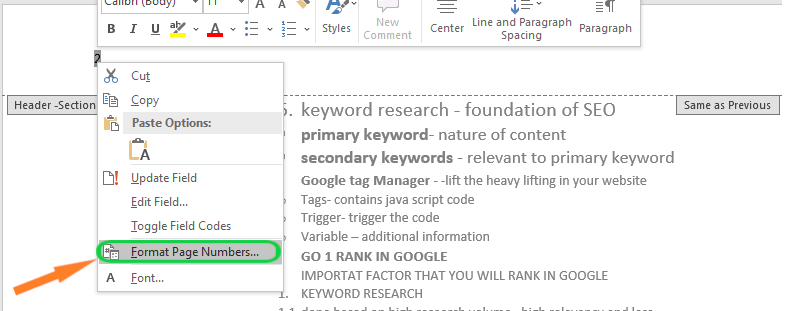
- Right-click on the page number and select “Format Page Numbers” from the menu that appears.

- In the Page Number Format window, use the “Number Format” drop-down menu to choose the type of numbers you want to use for the section.
- Here, we’ve used standard Roman numerals with lowercase letters. When you’re done, click “OK.”

- As you can see that the Roman numerals have been used to number the pages in that section.

- Next page below you’ll notice that page numbering doesn’t start at 1. It kept the same numbering before you added the section.

- But it’s easy to fix. Right-click on the page number and select “Format Page Numbers” from the menu.

- Select “Start At” in the Page Number Format window and type “1” in the box to the right to start the section on page one.


That concludes the discussion. You should now have two parts with distinct numbering and formatting.
Steps to Hide the Page number on the first Page
In some documents, you may not want the first page to show the page number. You can hide the first page number without affecting the rest of the pages. Here are the steps to do it.
- Double-click the header or footer to unlock it.
- From the header and footer tab, place a checkmark next to Different First Page. The header and footer will disappear from the first page. If you want, you can type something new in the header or footer, which will only affect the first page.
If you’re unable to select Different First Page, it may be because an object within the header or footer is selected. Click an empty area within the header or footer.
If you already have a header or footer and you want to add a page number to it, Word has an option to automatically insert the page number into the existing header or footer. In our example, we’ll add page numbering to our document’s header.
- Double-click anywhere on the header or footer to unlock it.
- On the Header and Footer tab, click the Page Number command. In the menu that appears, hover the mouse over Current Position and select the desired page numbering style.
- Page numbering will appear.
- When you’re finished, press the Esc key.
How to Insert page number from Current Position
Step-by-Step Instructions:
- Go to the first page for which you want to have numbered pages.
- At the top of the page, before the first line/word, click on the document to place your curser.
- Then choose Layout from the top menu. Next select Breaks – Next Page.
- Now choose Insert from the top menu and then select Page Numbers and then choose how you want them to appear in the document.
- Now highlight the page number at which you want to start the numbering. From the Header & Footer Tools menu, unclick Link to Previous.
- With the number still highlighted, choose Page Number from the top menu, then select Format Page Numbers. Under Page Numbering, choose Start At and then select a starting number.
- The last step is to go to the top of the document and click on the first page number, and then hit delete. This will remove the beginning numbering sequence, and you will be left with the numbering sequence you created later in the document.
Summary
In summary, we’ve learned how to add page numbers in a word document as well as what those terms mean. In addition, we know why we need a page number in our document to look presentable and creative. Furthermore, we have many options to apply for page numbers in different ways.
Meanwhile, if you want to learn more about formatting text, see the previous tutorial on how to add header and footer and how to adjust page margin in Microsoft Word, which are still part of formatting your documents. You can browse those guides if you are having a hard time exploring your documents.
We hope this tutorial helps you as you format your documents in MS Word.
PREVIOUS

NEXT


- You can add page numbers in Word to the header or footer sections of your document.
- Once you enable page numbers in the Insert menu, Word can automatically number all your pages.
- Page numbers can come in a variety of styles, sizes, and fonts.
Adding page numbers to long Microsoft Word documents takes just a few clicks. The pages are numbered automatically, so you don’t need to add them in one by one.
You can have page numbers at the top or bottom of the page, and there are a variety of styles to choose from (top-right corner, bottom-center, et cetera).
Here’s how to add page numbers in Word, using either a Mac or PC.
How to add page numbers in Word on macOS
1. In the Insert tab of an open document, click the Page Number icon.
Abbey White/Insider
2. Select Page Number.
Abbey White/Insider
3. Choose where you want the page numbers to appear, as well as an alignment style.
Abbey White/Insider
4. Uncheck the «Show number on first page» box if you don’t want the first page of your document to be numbered.
5. If you want to choose a different numbering style, click Format and choose from the list of options.
Abbey White/Insider
6. Once you’re finished, click OK. They’ll appear immediately. If you want to edit them, you can double-click them in the header or footer.
How to add page numbers in Word on Windows
1. In an open document, click Insert.
2. Choose Page Number.
Abigail Abesamis Demarest/Insider
3. Select a location — either header or footer — for page numbers from the drop-down menu, then scroll through the style options and click the one you like best.
Abigail Abesamis Demarest/Insider
4. If you don’t want the first page or title page of your document numbered, go to the Design tab and choose Different First Page.
5. Select Page Number followed by Format Page Numbers.
Abigail Abesamis Demarest/Insider
6. Click the circle next to «Start at:» and set the number to zero.
Abigail Abesamis Demarest/Insider
7. Select OK before choosing Close Header and Footer to finish editing.
Abigail Abesamis Demarest is a contributing writer for Insider based in New York. She loves a good glazed donut and nerdy deep dives into the science of food and how it’s made.
Read more
Read less
Add Page Numbers in Word Documents using Headers or Footers
by Avantix Learning Team | Updated November 15, 2022
Applies to: Microsoft® Word® 2010, 2013, 2016, 2019, 2021 and 365 (Windows)
You can add page numbers in Word documents at the top or bottom of pages using headers or footers. When you insert page numbers in headers and footers, they should be inserted as fields so that they will automatically update as the document is edited. In this article, we’ll review page numbering in simple and more complex Word documents.
Recommended article: How to Add or Remove Page Breaks in Microsoft Word
Note: Some Ribbon tabs may appear with slightly different names if you are working on Word 365 and have a smaller screen or different display settings. Buttons on the Ribbon may appear as icons only and are also affected by screen size and display settings. The Header & Footer tab may appear as Header & Footer Tools Design if you are working on an older version of Word.
Add page numbers in a one section document
By default, Microsoft Word documents contain one section.
To insert page numbers in a one section document:
- Click the Insert tab in the Ribbon.
- In the Header & Footer group, click Header or Footer. A drop-down menu appears.
- Click Edit Header or Edit Footer (although you can select one of the building blocks that appear, you will have more control over your header or footer if you edit it yourself). Word displays the document in Header / Footer mode. A Header & Footer or Header & Footer Tools Design tab appears in the Ribbon.
- Click in the header or footer.
- If you would like text to appear (such as the word Page), type it.
- In the Header & Footer or Header & Footer Tools Design tab, click Page Number. A drop-down menu appears.
- Select Current Position and then Plain Number. A page number field is added to the header or footer.
- You can select the page number field by dragging over it and then apply formatting such as font size or alignment (on the Home tab in the Ribbon).
- To return to the document, double-click anywhere in the document area. You can also click Close in the Header & Footer Tools Design tab. To easily return to Header / Footer mode, double-click in the header or footer area.
The following Header & Footer Tools Design tab appears in the Ribbon when you are in Header / Footer mode:

You can also press Alt + Shift + P to insert the page number field.
Turn off the display of page numbers on the first page in a one section document
Some users may want to turn off the display of page numbers on the first page of a document.
To turn off the display of page numbers on the first page in a one section Word document:
- Click the Insert tab in the Ribbon.
- In the Header & Footer group, click Header or Footer. A drop-down menu appears.
- Select Edit Header or Edit Footer. Alternatively, you can double-click in the header or footer area.
- In the Header & Footer or Header & Footer Tools Design tab, check Different First Page in the Options group. Word creates a different header and footer for the first page of the document and a regular header and footer for all other pages. You can now enter page numbers, text or images in the First Page Header and / or First Page Footer if you’d like.
- To return to the document, double-click anywhere in the document area. You can also click Close in the Header & Footer or Header & Footer Tools Design tab. To return to Header / Footer mode, double-click in the header or footer area.
Below is the Different First Page check box in the Header & Footer Tools Design tab:

Understand page numbers and sections
You can add different page numbers in sections in a Word document. Each section can have a different starting page number, a different numbering style (such as roman numeral) or no numbering at all. For example, you could create a document with three sections with a section for a title page with no numbering, a section for a table of contents page with roman numeral numbering that starts with (i) and another section for the main document that starts with Page 1.
Add different types of page numbers using sections
If you want to have different numbering in parts of a document (such as restarting numbering after a table of contents or using roman numeral numbering), you’ll first need to create sections.
To create a section in a Word document:
- Click in the document where you want to insert a section break.
- Click the Layout or Page Layout tab in the Ribbon and click Breaks. A drop-down menu appears.
- Select a type of section break (normally Next Page under Section Breaks).
Breaks appears in the Page Setup group:

View section breaks
It’s a good idea to click Show/Hide ¶ in the Paragraph group on the Home tab in the Ribbon so you will be able to see where section breaks have been inserted in your document:

With Show/Hide ¶ on, section breaks normally appear as follows:
 You can also view section breaks by clicking the View tab in the Ribbon and selecting Draft in the Views group. To return to the default view, click the View tab in the Ribbon and select Print Layout in the Views group:

Insert page numbers in a section and change numbering
If you want to change numbering in different parts of a Word document, you will need to separate your document into sections and create different headers and footers in the sections.
Typically, you will want to ensure that the header and footer in the section are not linked to the previous section’s header and footer. For example, if you have two sections, one for a table of contents and a second section for the main document, click in the second section and unlink the header and footer with the previous section’s header and footer.
It’s best not to add any text, images or page numbers in the headers or footers before you unlink the headers and footers.
To set up page numbering in a section and then change numbering:
- Add section breaks where necessary.
- Click anywhere in the section in which you want to add page numbers and restart page numbering.
- Double-click in the header or click the Insert tab and the Ribbon, select Header and then Edit Header.
- In the Header & Footer or Header & Footer Tools Design tab in the Ribbon, click Link to Previous to deselect it (to break the link with the header from the previous section).
- Click in the footer.
- In the Header & Footer or Header & Footer Tools Design tab, click Link to Previous to deselect it (to break the link with the footer from the previous section).
- Click in the header or footer and in Header & Footer or Header & Footer Tools Design tab, click Page Number in the Header & Footer group. A drop-down menu appears.
- Choose Current Position and then Plain Number. A page number field is inserted.
- Drag over the page number field to select it.
- To change the page numbering in the section, click Page Number in the Header & Footer or Header & Footer Tools Design tab and click Format Page Numbers. A dialog box appears.
- Enter a number beside Start at if you want to restart numbering (such as 1).
- If you would like a different numbering style (such as roman numerals), select a style from the Number format drop-down menu.
- Click OK.
- To return to the document, double-click in the middle of the document.
The following dialog box appears when you select Page Number and then Format Page Numbers in the Header & Footer or Header & Footer Tools Design tab:

You can also right-click a page number field and select Format Page Numbers from the drop-down menu to access the Page Number Format dialog box:

Similar to a one section document, you can select Different First Page for specific sections if you’d like. Click in the section, double-click in the header or footer and select Different First Page on the Header & Footer or Header & Footer Tools Design tab. You can also select Different Odd & Even Pages.
Be very careful when deleting section breaks. If you delete a section break, the current section takes on the section settings from the following section and your headers, footers, page numbering, orientation and margins could change.
Subscribe to get more articles like this one
Did you find this article helpful? If you would like to receive new articles, JOIN our email list.
More resources
How to Insert a Nonbreaking Space in Word
How to Insert a Watermark in Word (like DRAFT)
How to Superscript or Subscript in Word (with Shortcuts)
3 Strikethrough Shortcuts in Microsoft Word to Cross Out Text
10+ Great Microsoft Word Navigation Shortcuts for Moving Around Quickly in Your Documents
Related courses
Microsoft Word: Intermediate / Advanced
Microsoft Excel: Intermediate / Advanced
Microsoft PowerPoint: Intermediate / Advanced
Microsoft Word: Long Documents Master Class
Microsoft Word: Styles, Templates and Tables of Contents
Microsoft Word: Designing Dynamic Word Documents Using Fields
VIEW MORE COURSES >
Our instructor-led courses are delivered in virtual classroom format or at our downtown Toronto location at 18 King Street East, Suite 1400, Toronto, Ontario, Canada (some in-person classroom courses may also be delivered at an alternate downtown Toronto location). Contact us at info@avantixlearning.ca if you’d like to arrange custom instructor-led virtual classroom or onsite training on a date that’s convenient for you.
Copyright 2023 Avantix® Learning
Microsoft, the Microsoft logo, Microsoft Office and related Microsoft applications and logos are registered trademarks of Microsoft Corporation in Canada, US and other countries. All other trademarks are the property of the registered owners.
Avantix Learning |18 King Street East, Suite 1400, Toronto, Ontario, Canada M5C 1C4 | Contact us at info@avantixlearning.ca

If you’re writing a book or a paper for school, you’ll likely want to include page numbers. They’ll help readers keep track of how far along they are, and allow them to reference specific spots in the text.
And if you’re writing in Microsoft Word, there’s an easy way to add page numbers to your work. Let’s see what it is.
When you have a Word document open, you’ll see the main Word menu along the top of your screen, like this:
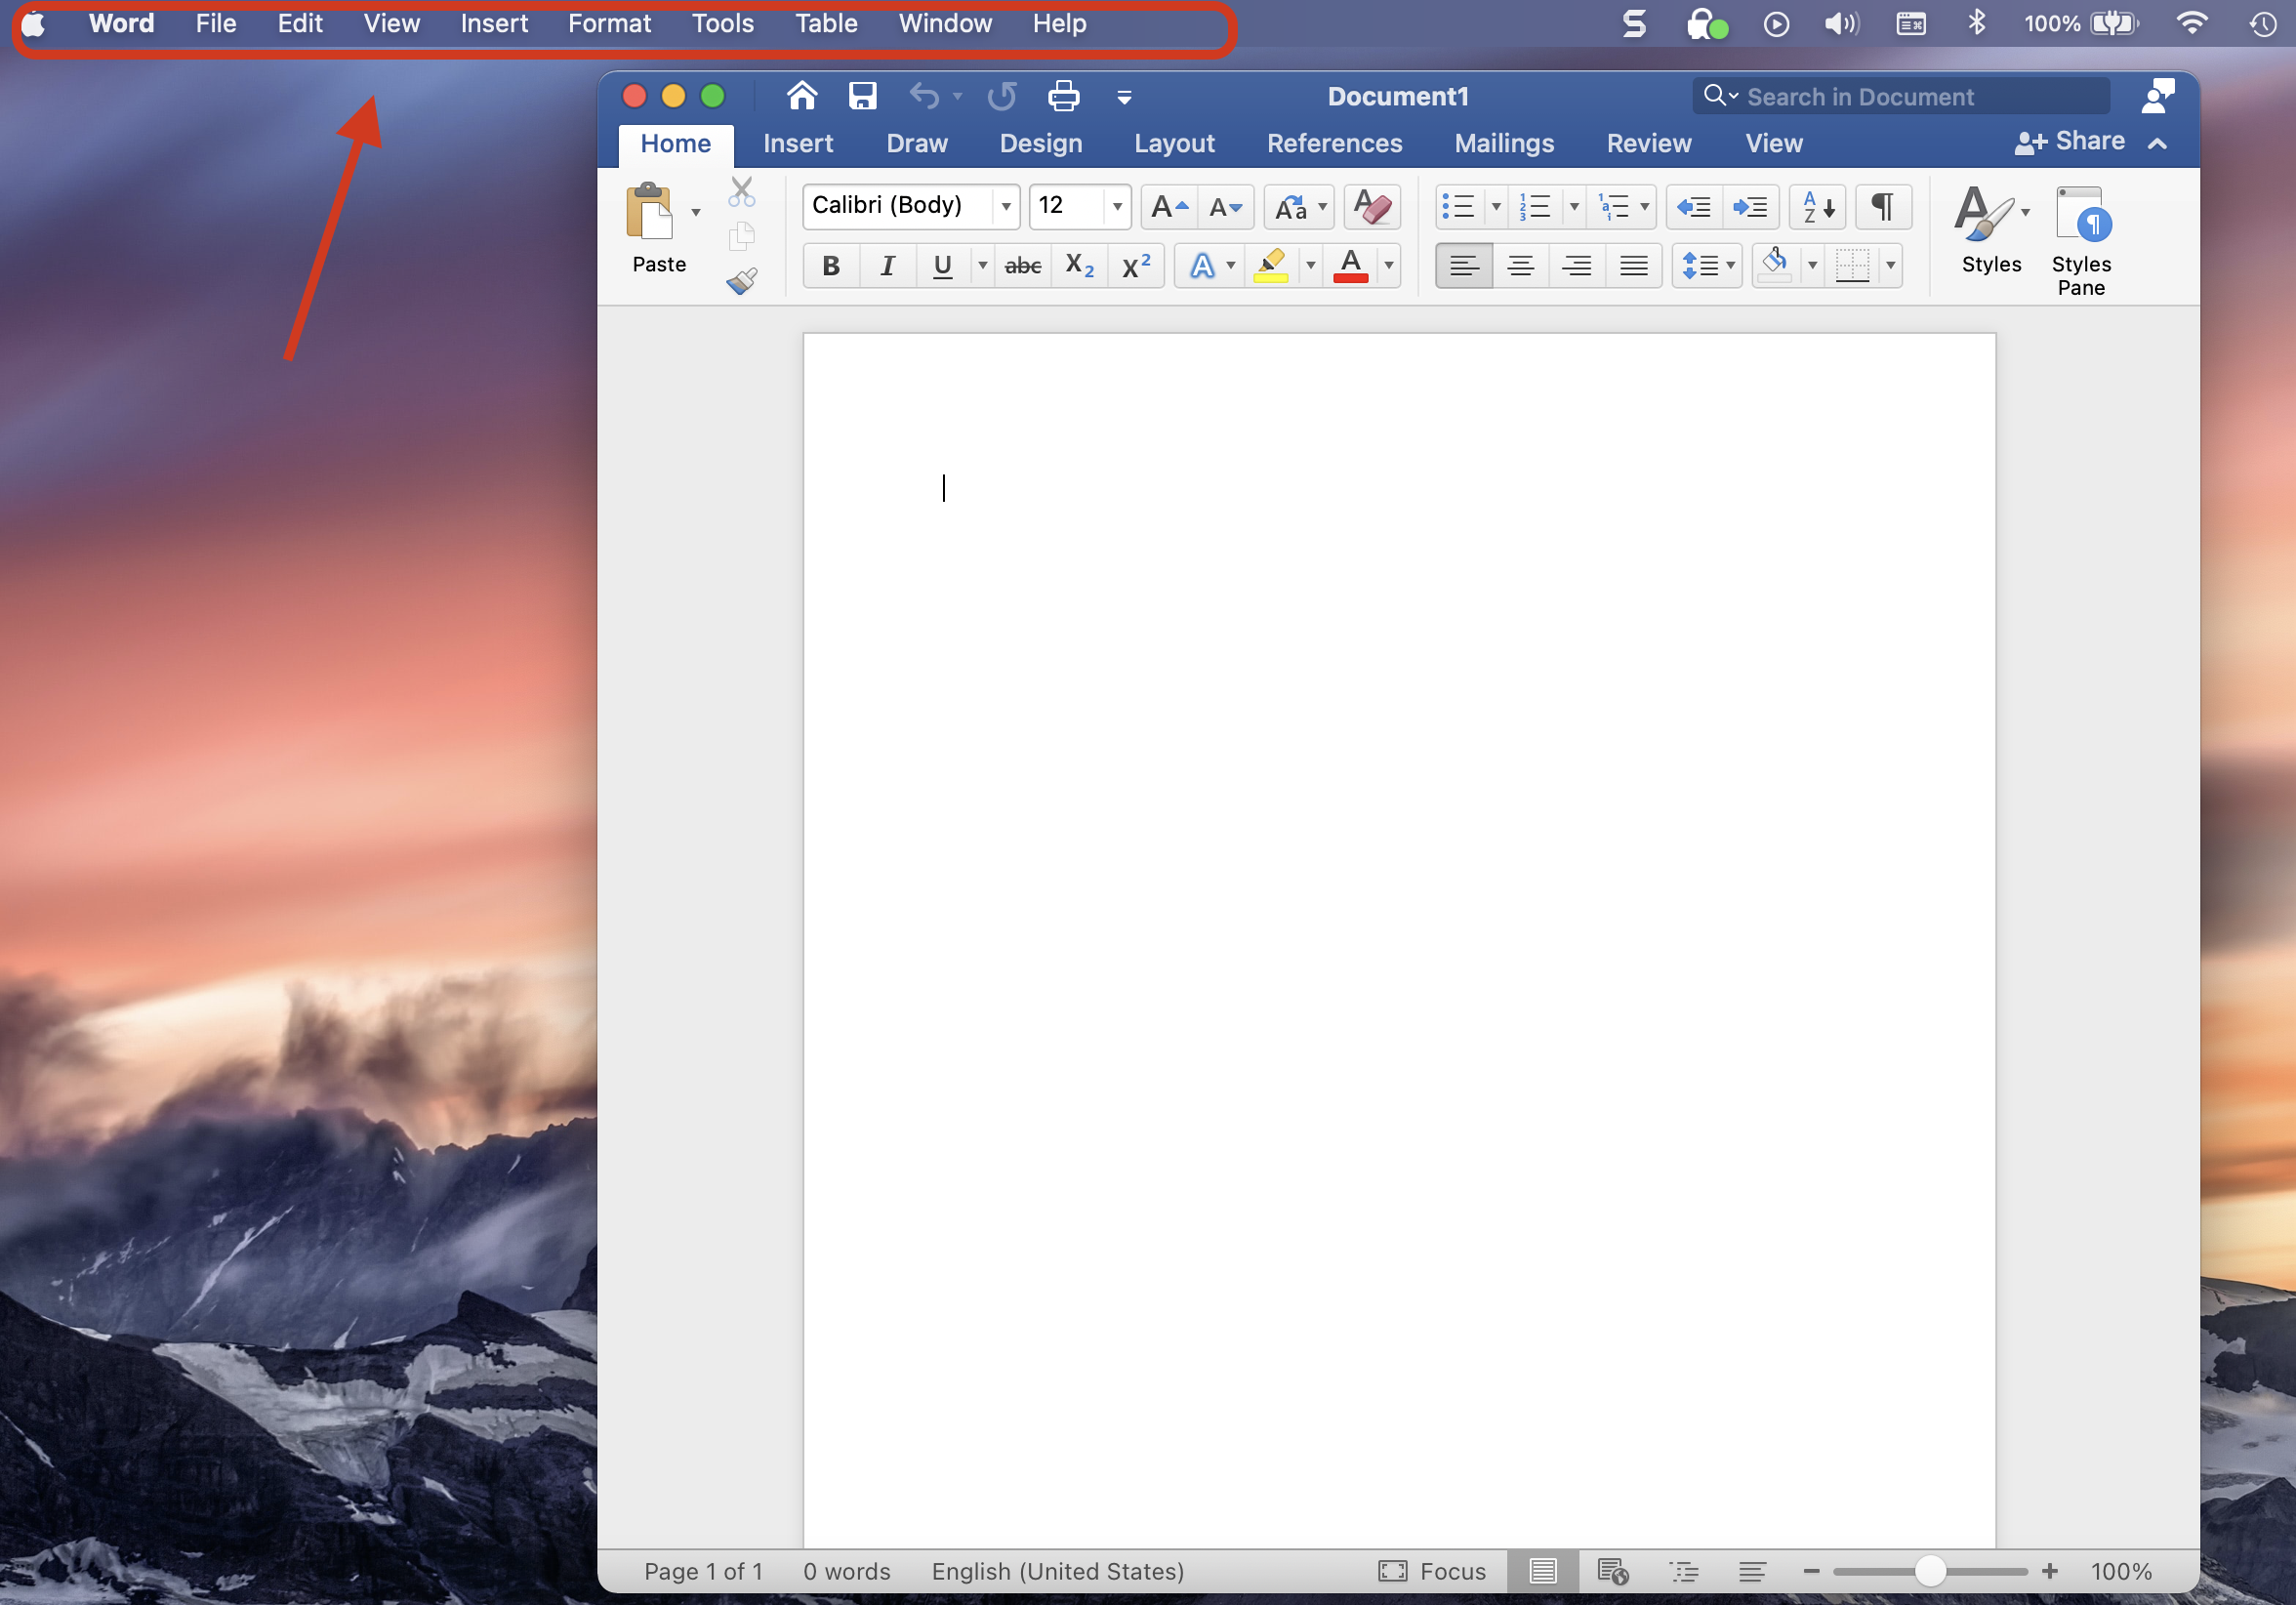
Step 1: Click the «Insert» Tab in the Main Word Menu
Just click on the «Insert» tab, and you’ll get a dropdown menu with lots of options. About two thirds of the way down, you’ll see a «Page Numbers» option, like this:
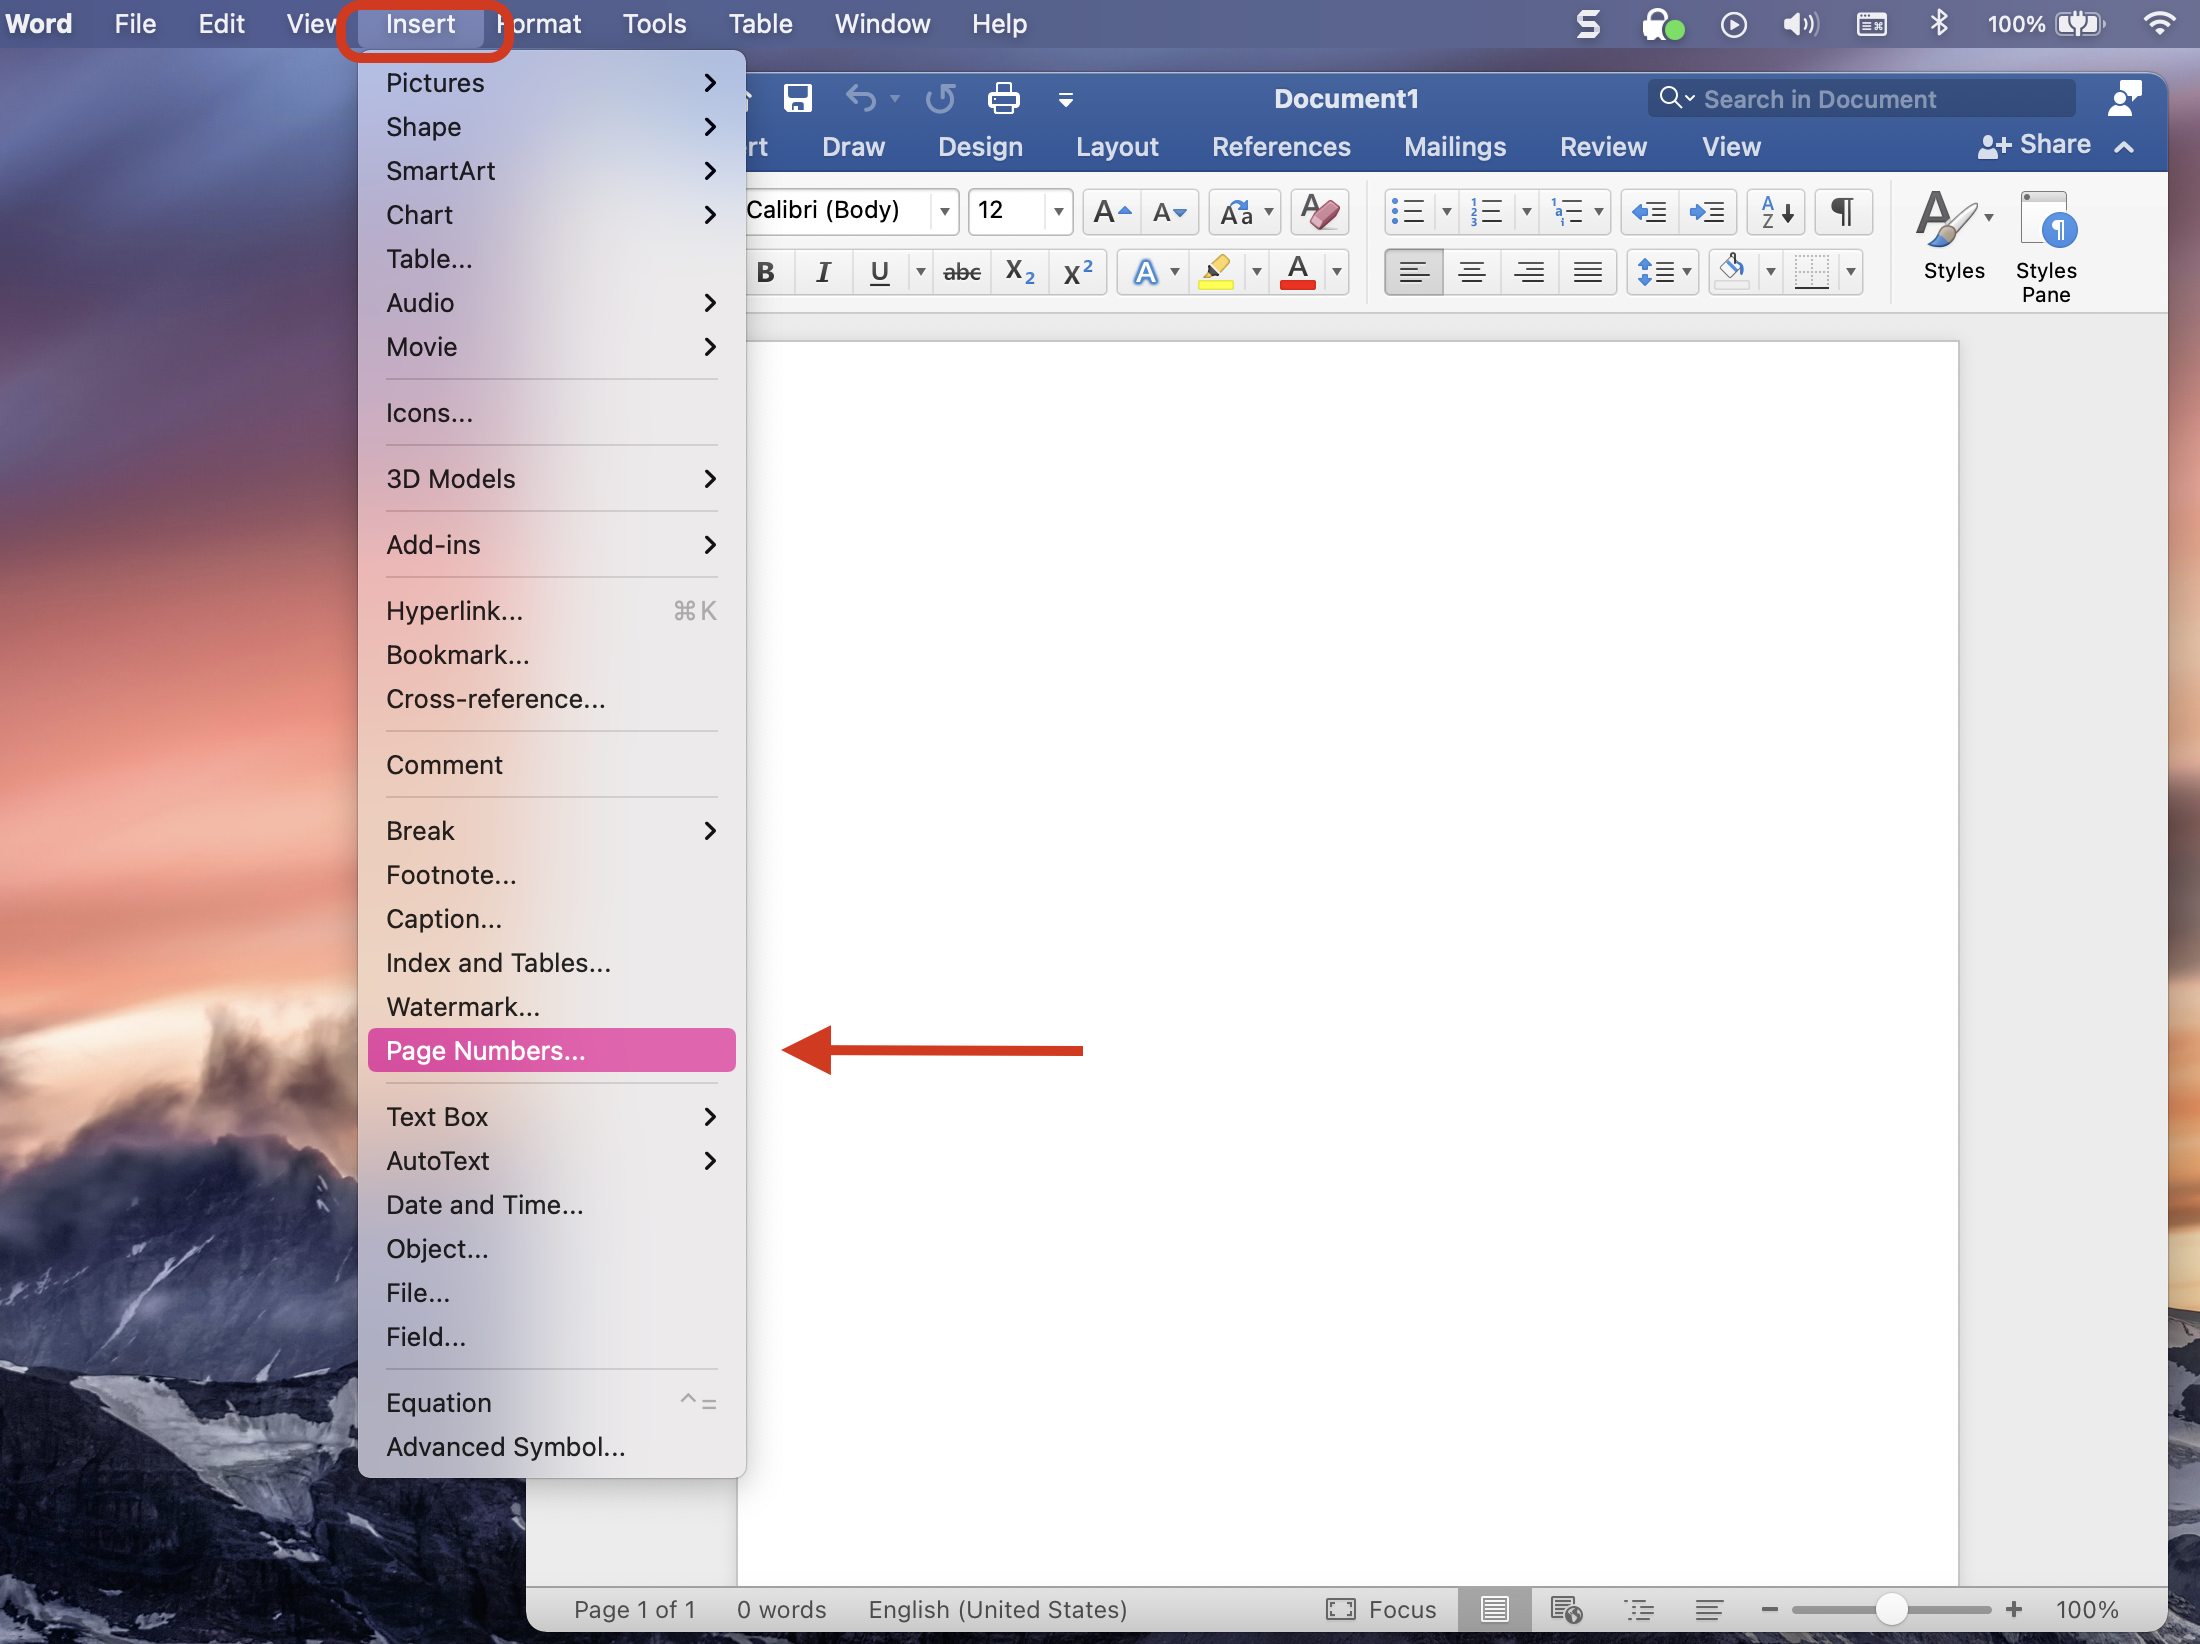
Step 2: Scroll Down and Select the «Page Numbers» Option
When you click on «Page Numbers» a little box will pop up asking you how you want to format your page numbers.
Step 3: Format Your Page Numbers
You’ll have options for where you want to place the numbers («Position»), how you want them aligned on the page («Alignment»), and other formatting options. It’ll look like this:
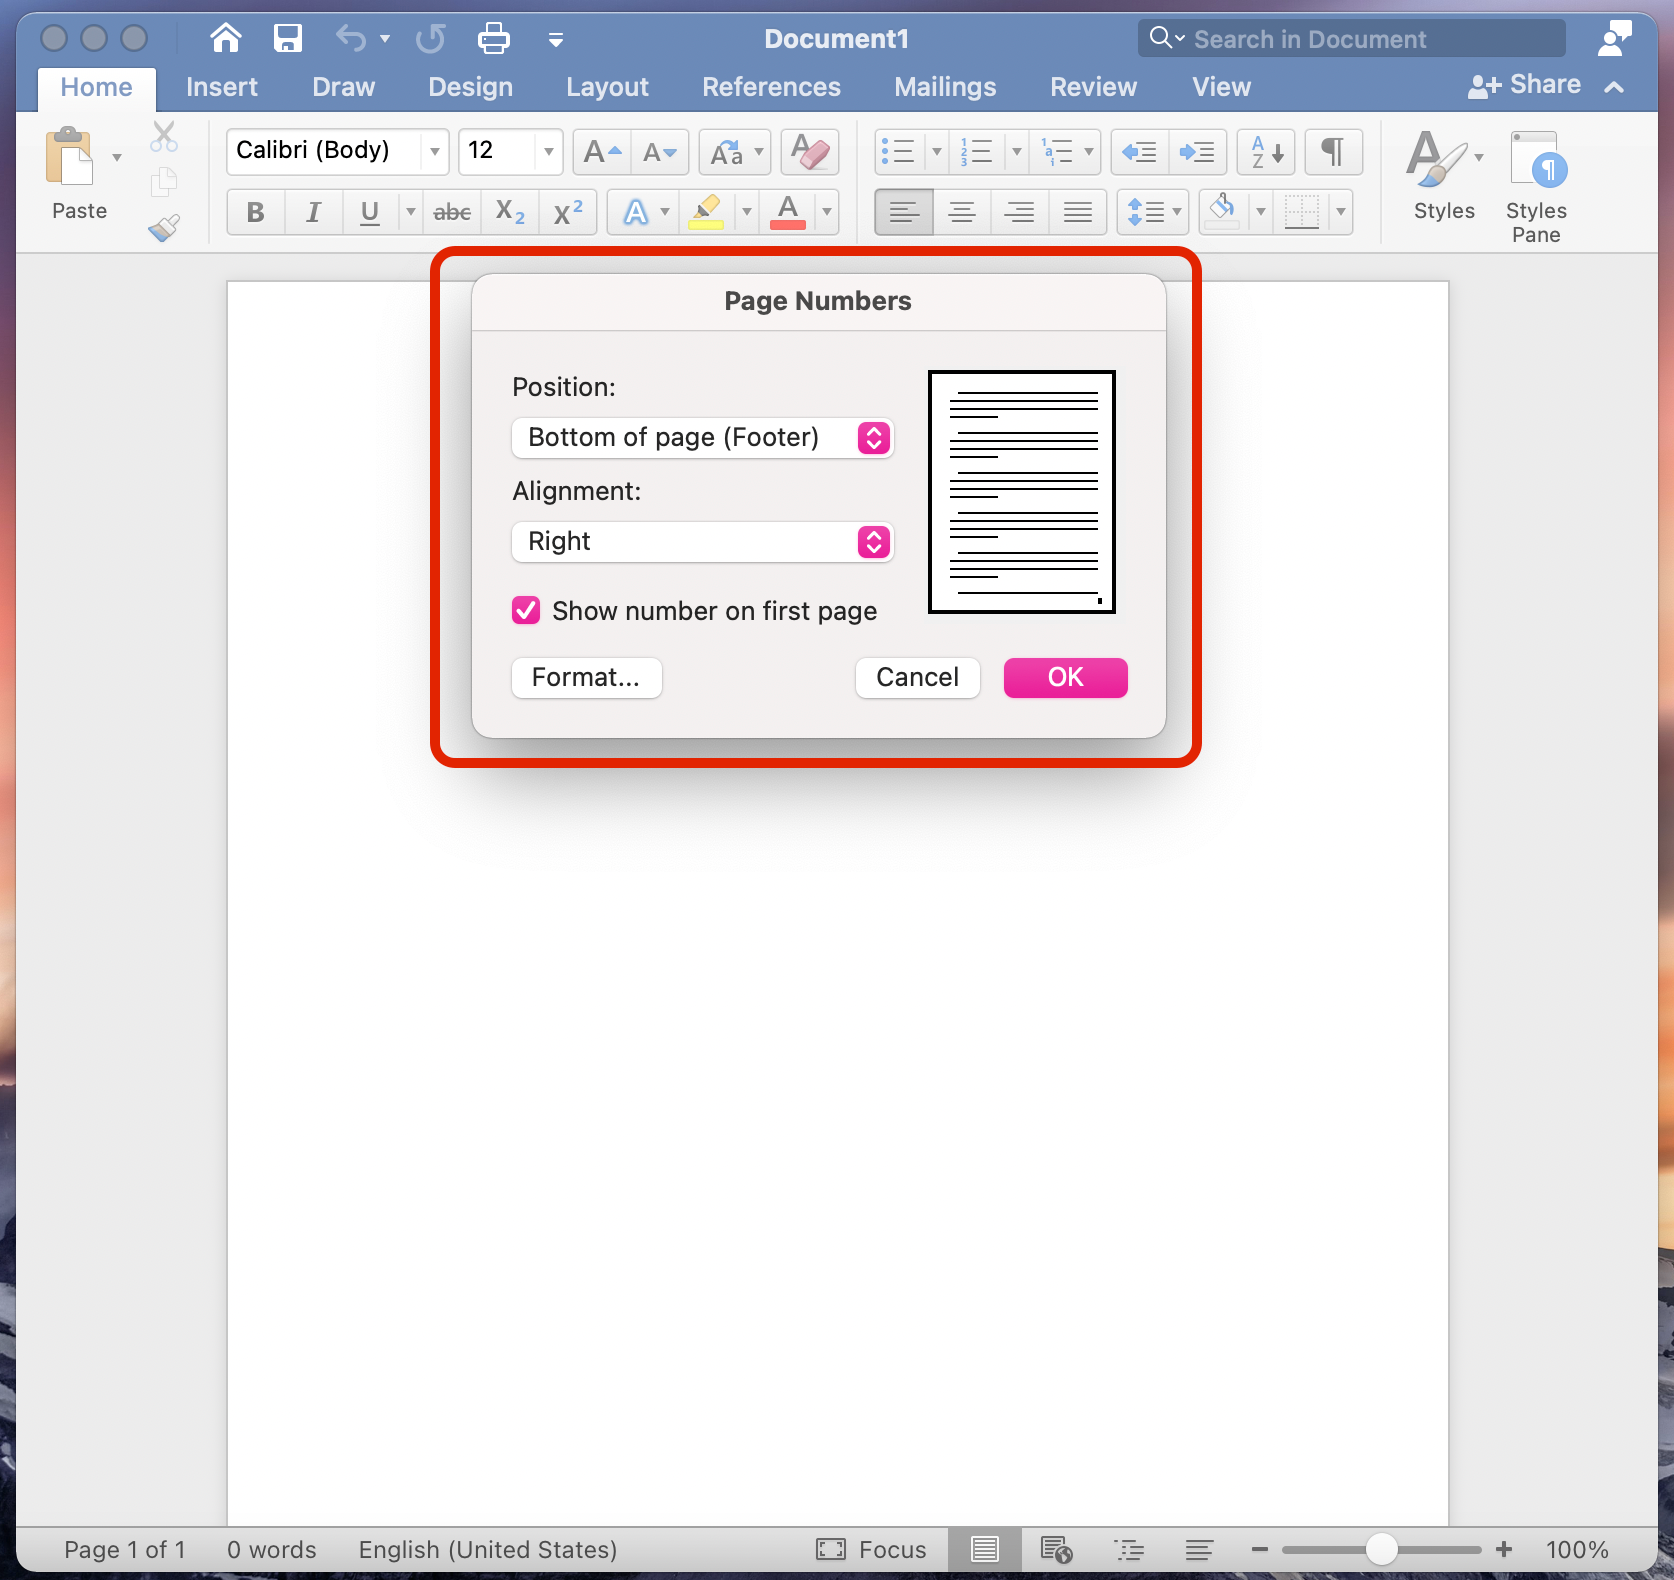
Step 4 (Optional): Customize Your Page Numbers
If you just click on the dropdowns by each option, you’ll be able to choose exactly where and how you want your numbers to appear.
For example, if I want my numbers to appear at the bottom right, I’ll just leave those options at the default. But if I want them, say, at the top and insides of each page, I can make the following adjustments:
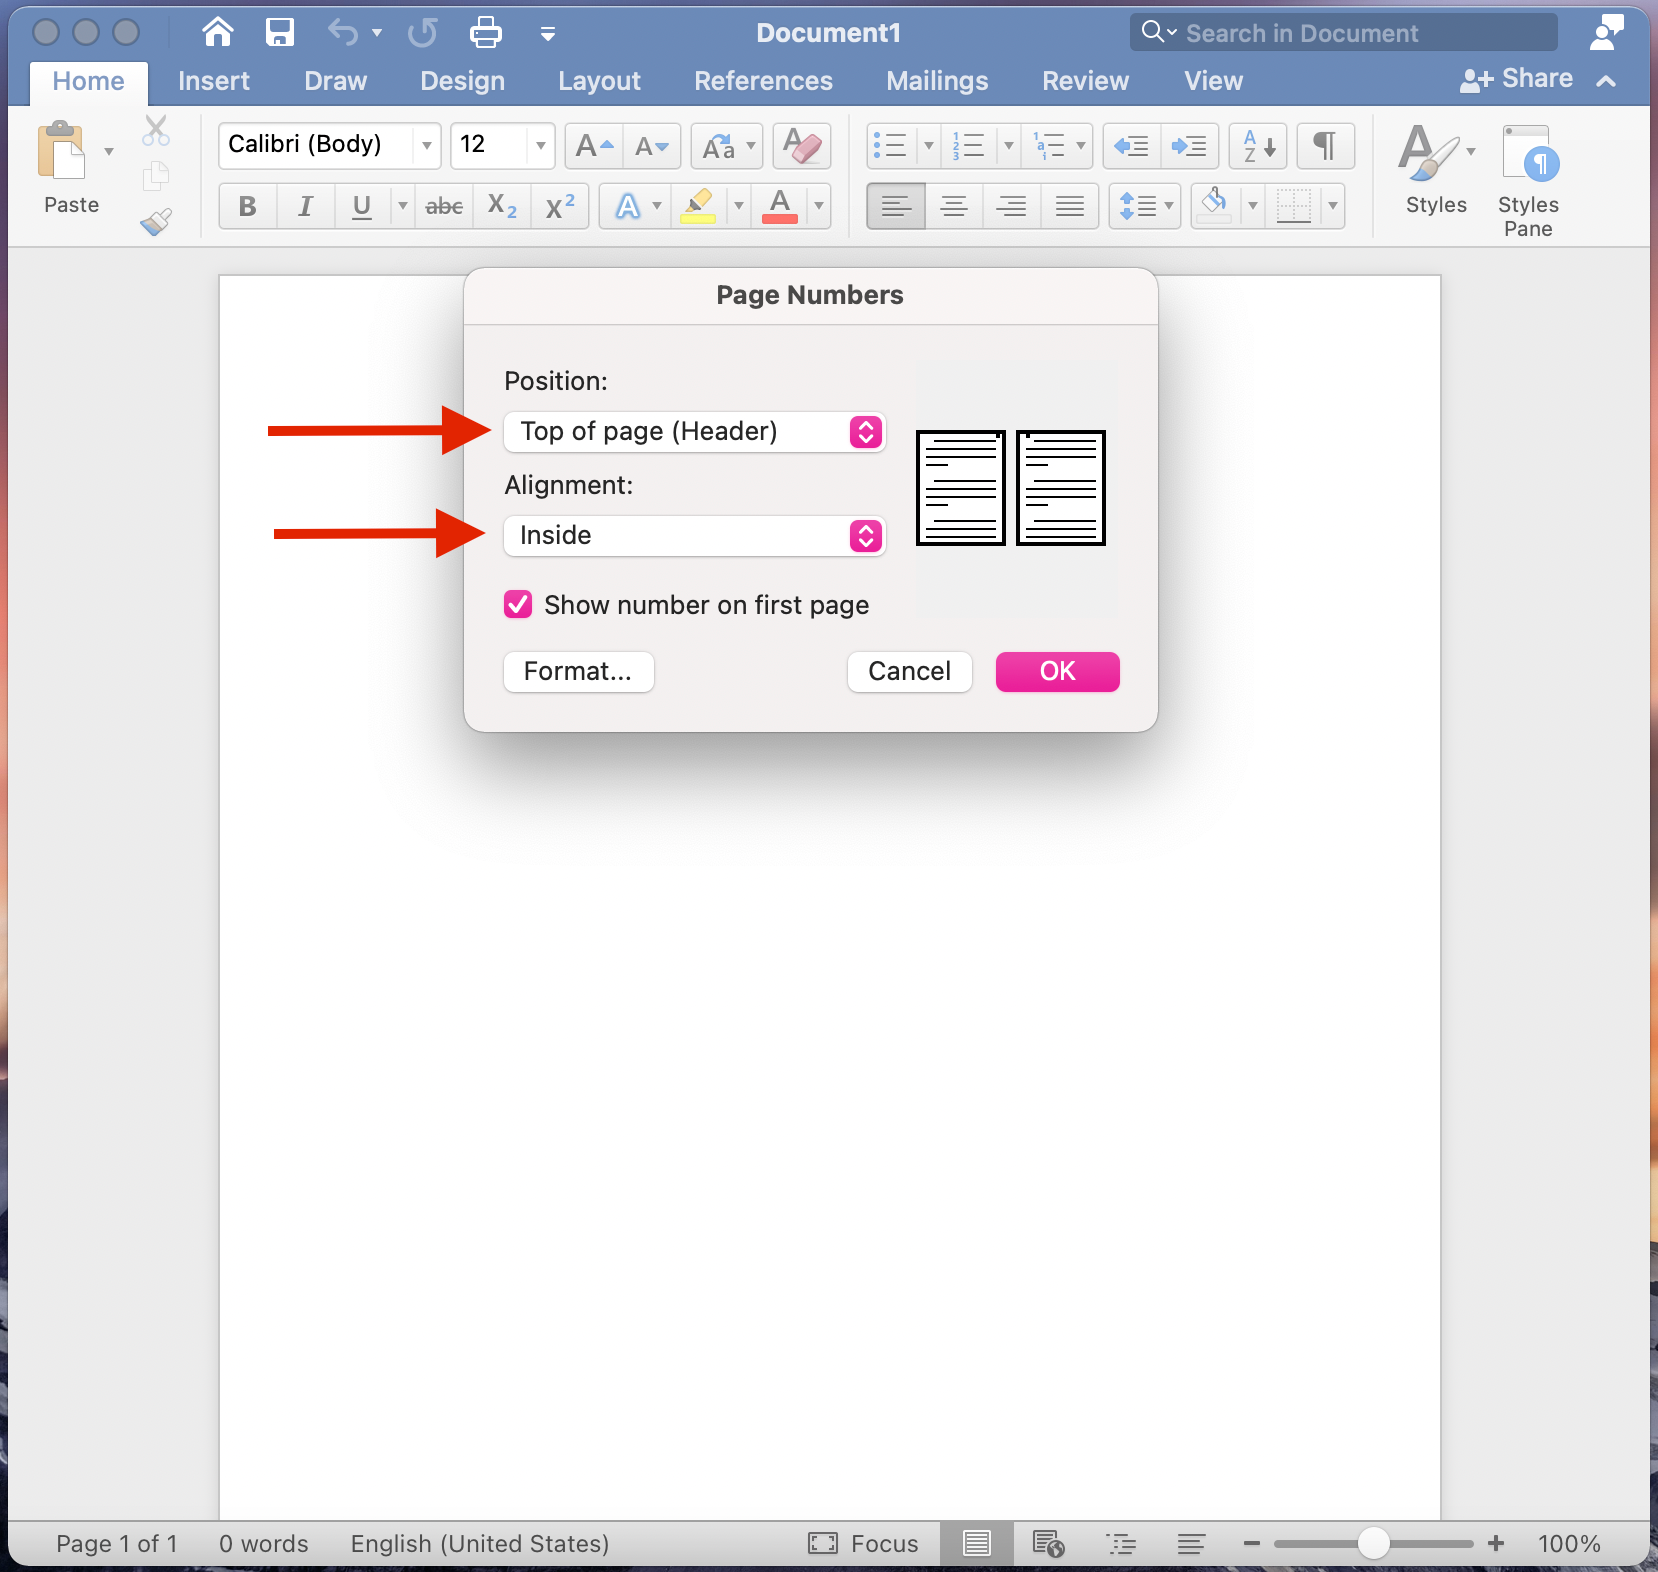
You can also choose whether you want a number to show on the first page (perhaps not if it’s a title page, and so on).
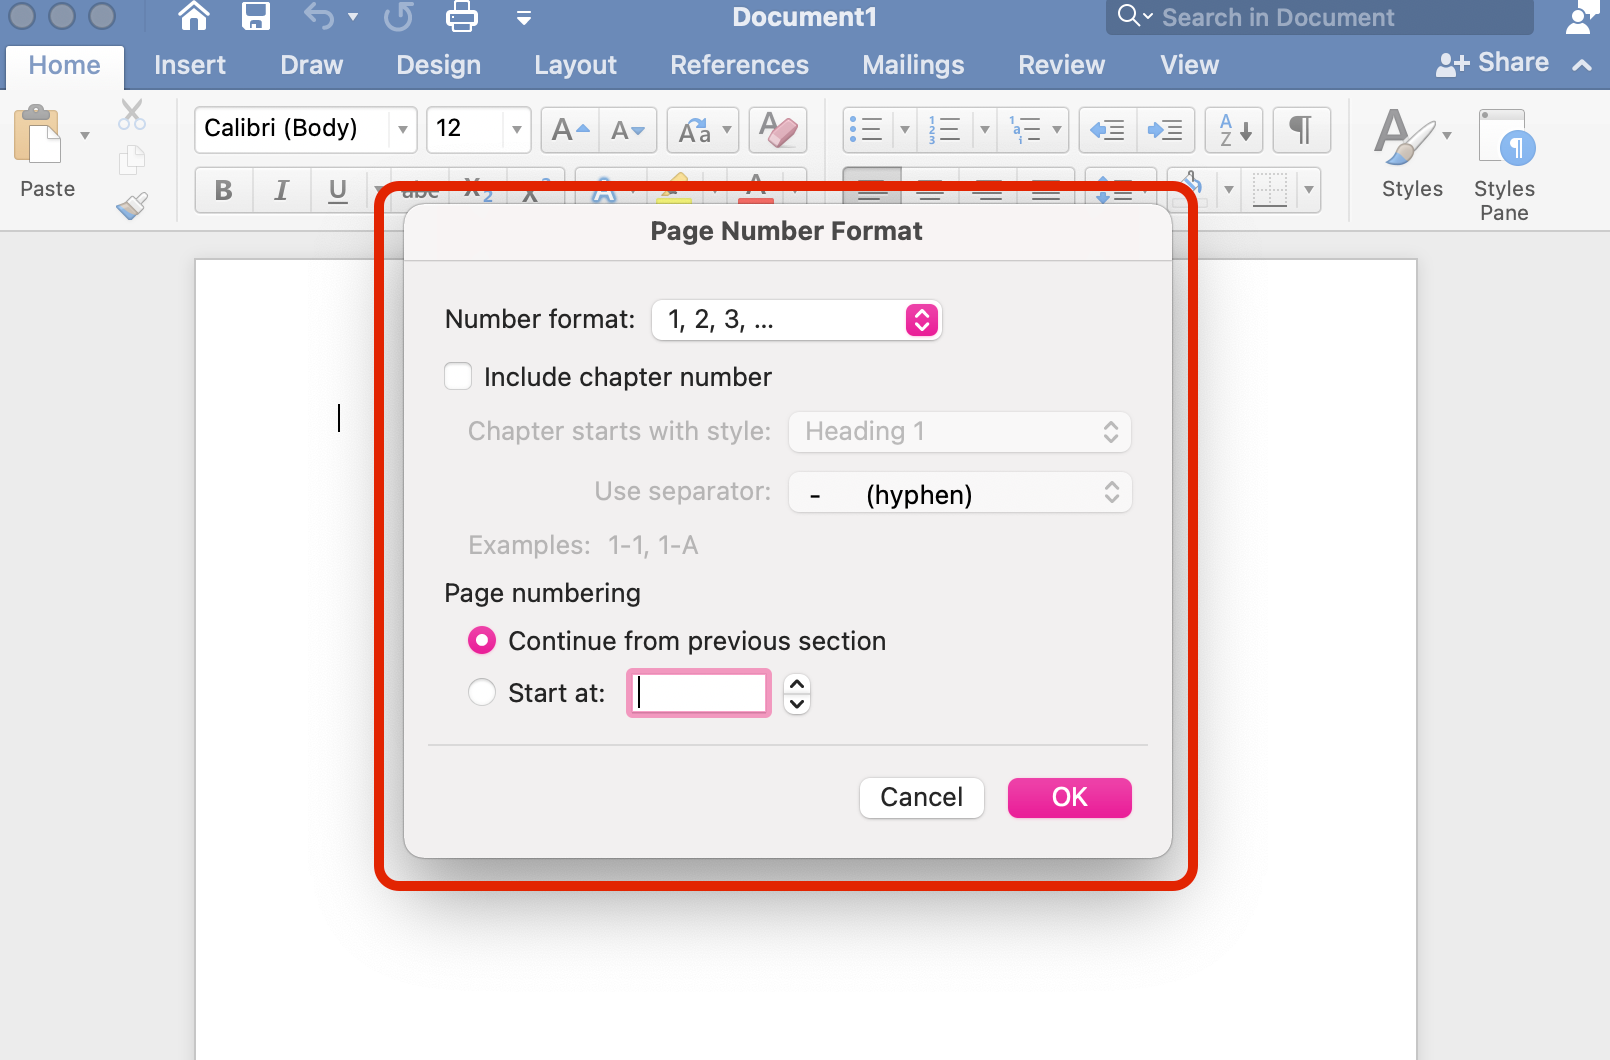
If you really want to get into the details of your page numbers, you can click the «Format…» button. There you can choose how your numbers look (you can have Roman numerals if you want!), whether you want to include chapter numbers, and how your numbers should start.
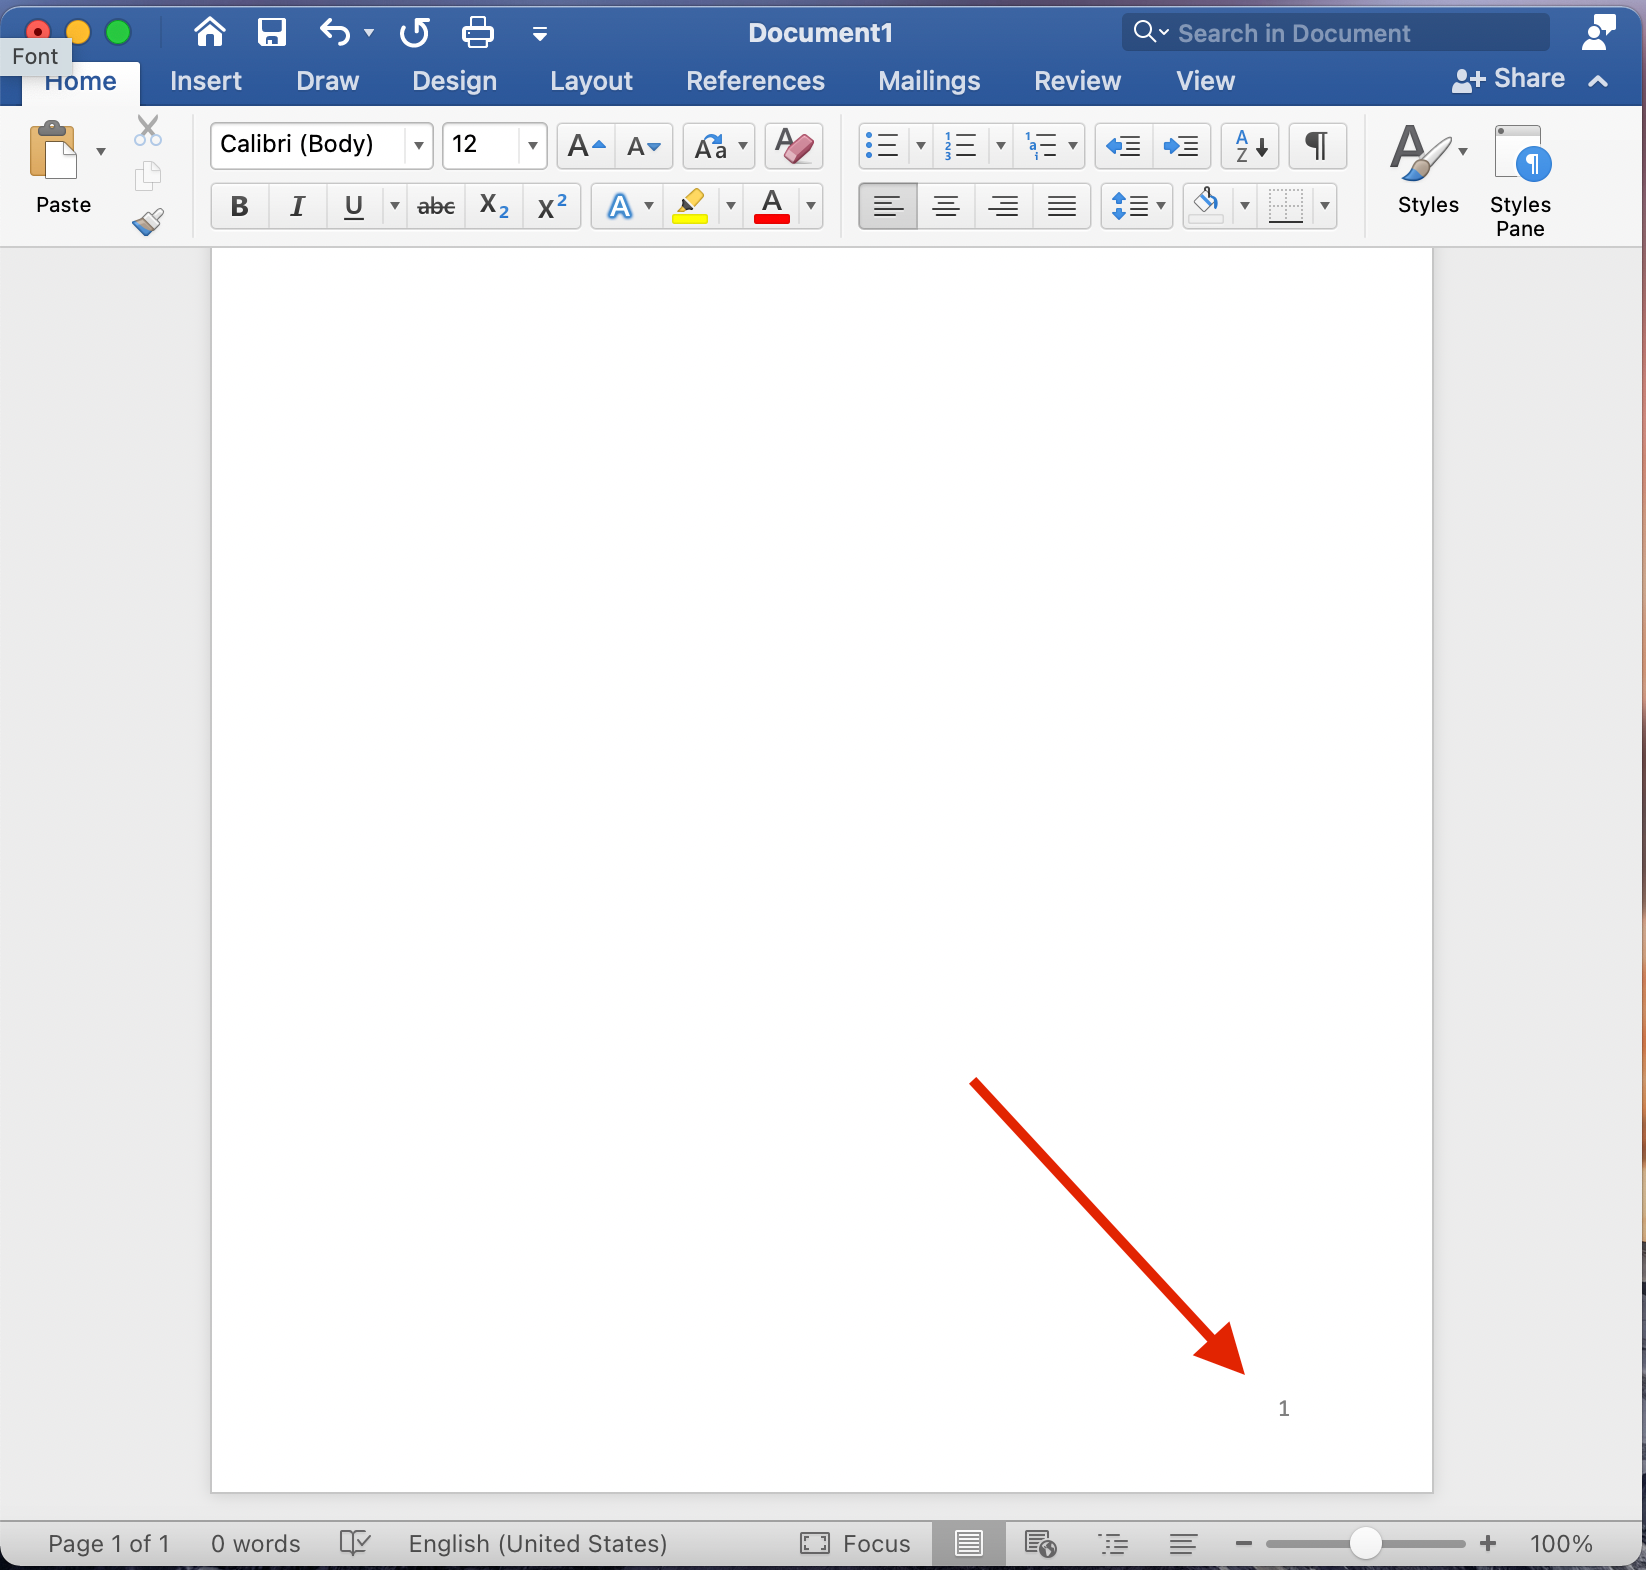
And voilà – now your pages are numbered!
How to Find the Page Numbers Tab in Word
Here’s something cool about Word: if you go to the «Help» tab to search for some functionality, it’ll show you where to find it in the main menu.
Here’s what I mean:
Say I want to find where to add page numbers (and didn’t have this handy tutorial). I could just click on the «Help» tab in the main menu and type in «Page numbers».
But that’s not the cool part – as you’re typing, you’ll see a match pop up (highlighted in pink below). When you hover over that option (don’t click yet), Word displays where to find that tool or feature (in the red box below) and points to your query with a pulsing blue arrow! Like this:

Then if you actually click on your page numbers query in the Help tool, it’ll just take you straight there and you’ll see the «Page Numbers» box pop up.
Now you know how to add page numbers in Microsoft Word and you can customize those numbers to your heart’s content. Happy writing!
Learn to code for free. freeCodeCamp’s open source curriculum has helped more than 40,000 people get jobs as developers. Get started