
Word for Microsoft 365 Word for Microsoft 365 for Mac Word for the web Word 2021 Word 2021 for Mac Word 2019 Word 2019 for Mac Word 2016 Word 2016 for Mac Word 2013 Word 2010 Word for Mac 2011 More…Less
You can control the vertical space between the lines of text in your document by setting the line spacing. Or, you can change the vertical space between paragraphs in your document by setting the spacing before or spacing after paragraphs. You can also choose to keep lines of text together or keep paragraphs together on a page.
Change the line spacing in an entire document
-
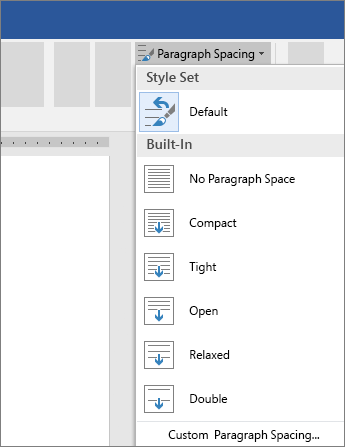
Go to Design > Paragraph Spacing.
-
Choose an option. To single space your document, select No Paragraph Space.
To return to the original settings later, go to Design > Paragraph Spacing and choose the option under Style Set. This may be Default or the name of style you’re currently using.
Change the line spacing in a portion of the document
-
Select one or more paragraphs to update. Press Ctrl + A to select all.
-
Go to Home > Line and Paragraph Spacing

-
Select Line Spacing Options and choose an option in the Line spacing box.
-
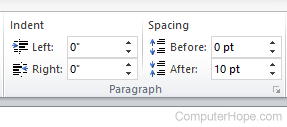
Adjust the Before and After settings to change spacing between paragraphs.
-
Select OK.

For more info, see Adjust indents and spacing.
Change the line spacing in an entire document
-
Go to Design > Paragraph Spacing.
-
Choose the option you want. If you want to single space your document, choose No Paragraph Space.

This overrides the settings of the style you’re currently using. If you decide later to return to the original settings, go to Design > Paragraph Spacing and choose the option under Style Set. The option might be Default, as shown above, or it will show the name of style you’re currently using.
Change the line spacing in a portion of the document
-
Select the paragraphs you want to change.
-
Go to Home > Line and Paragraph Spacing.
-
Choose the number of line spaces you want or select Line Spacing Options, and then select the options you want under Spacing.
-
To change the spacing before or after each of the paragraphs in the text you selected, click the arrow next to Before or After and enter the amount of space that you want.
-
Select OK.

-
Select the paragraph whose lines you want to keep together.
-
Go to Format > Paragraph >Line and Page Breaks.
-
Select Keep lines together.
-
Select the first of the two paragraphs that you want to keep together.
Tip: If you want to keep more than two paragraphs together, select all but the last paragraph.
-
Go to Format > Paragraph.
-
Go to Line and Page Breaks.
-
Select Keep with next.
-
Select OK.
-
Select the paragraphs you want to change, or press Ctrl+A to select everything.
-
Go to Home > Line Spacing.
-
Choose the number of line spaces you want, or select Line Spacing Options and then select the options you want in the Paragraph dialog box under Spacing:
Tip: If you want to change the spacing before or after the selected paragraphs, select the arrows in the Before or After boxes, or type a number directly.
Need more help?
Change the line spacing in Word

-
Select Design > Paragraph Spacing.
-
Hover the cursor over each option to see a preview, and then select the option you want.
For single spacing, select No Paragraph Space.
Change line spacing for part of your document
-
Select the paragraphs you want to change.
-
Select Home > Line and Paragraph Spacing, and choose the spacing you want.
-
To customize spacing, select Line Spacing Options. You can adjust several areas including spacing before and after paragraphs.

See Also
Add and format text
Create a bulleted or numbered list
Apply styles
Apply themes
Change the default line spacing
Need more help?
Updated: 05/03/2022 by

When typing in Microsoft Word, you might need to change the line spacing, depending on the document’s style. The steps to enable double spacing differ slightly between versions. Consequently, you may need to use intuition to adapt them for older versions.
Tip
Use the keyboard shortcuts Ctrl+1 to single space, Ctrl+2 to double space, or Ctrl+5 to set the spacing to 1.5 line spacing on any line, paragraph, or all highlighted text.
Note
When pressing Enter, it starts a new paragraph with extra space between the two paragraphs. If you want to go to the next line without starting a new paragraph, press Ctrl+Enter.
To increase or decrease line spacing or enable double spacing, select a link below and follow the steps.
Enable double spacing for the whole document
Microsoft Word 2016 and 2019 (Office 365)
- Open Microsoft Word.
- On the Home tab, in the Paragraph group, click the Line and Paragraph Spacing (
 ) icon.
 - Select the desired spacing option from the available list.
- For additional spacing options, select Line Spacing Options in the list.
Microsoft Word 2007, 2010, and 2013
- Open Microsoft Word.
- On the Home tab, in the Styles group, right-click Normal.
- Select Modify from the drop-down menu.
- Under Formatting, click the Double Space button (shown below).
![]()
- Click OK.
or
- Open Microsoft Word.
- Click the Page Layout tab.
- Click the down arrow in the bottom right corner next to Paragraph to bring up the Paragraph window.
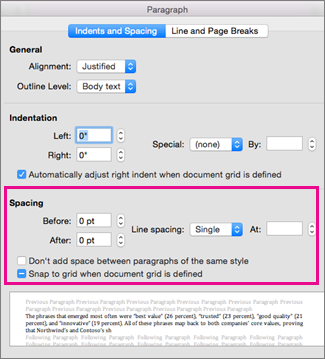
- In the Paragraph window, make sure you are on the Indents and Spacing tab.
- Click the down arrow next to the Line spacing box.
- Select Double and click the OK button.
Modify line spacing for all or part of an existing document
Microsoft Word 2007 and later
- Open Microsoft Word and the document you want to modify.
- Highlight the text where you want to change the line spacing or select all.
- Right-click the highlighted text, and select Format and then Paragraph, or only Paragraph depending on your version of Word.
- In the Paragraph window, make sure you are on the Indents and Spacing tab.
- Click the down arrow in the Line spacing drop-down box.
- Select Double and click the OK button.

There are several ways to adjust line spacing in Microsoft Word. Today’s tutorial explains the basic method using the ribbon and a more advanced method using the Paragraph dialog box.
See the Quick Tip at the bottom of this tutorial to learn how to single-space an entire document from the Paragraph dialog box.
This tutorial is available as a YouTube video showing all the steps in real time.
Watch more than 150 other document software tutorials on my YouTube channel.
The images below are from Word for Microsoft 365.The steps are the same in Word 2021, Word 2019, and Word 2016, and similar for Word 2013 and Word 2010. However, your interface may look slightly different in those older versions of the software.
Basic Method: Adjust Line Spacing from the Ribbon
- Select the Home tab in the ribbon.

- (Optional Step) Select the Show/Hide button in the Paragraph group to show paragraph break symbols and other formatting that may affect line spacing.

- Select the text with the line spacing that needs to be changed.

- Select the Line and Paragraph Spacing button in the Paragraph group.

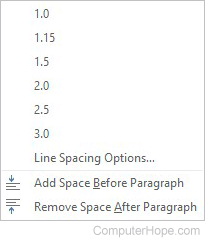
- Select an option from the drop-down menu:
A. Numbers 1.0 through 3.0 add space between lines.
B. Add Space Before Paragraph adds space before paragraphs but not before the lines within them.
C. Remove Space After Paragraph removes space after paragraphs but not after the lines within them.
These three options are based on your current font size with 1.0 being the equivalent of single-spacing.

Your changes will be applied immediately.

Note that you can apply the individual line spacing (the numbers 1.0 through 3.0) and the paragraph spacing to the same text to further customize your results.
- (Optional Step) Select the Show/Hide button again to hide paragraph symbols and other formatting (see figure 2).
Now, let’s move on to an advanced method offering additional spacing options.
Advanced Method: Adjust Line Spacing from the Paragraph Dialog Box
- Select the Home tab in the ribbon (see figure 1).
- (Optional Step) Select the Show/Hide button in the Paragraph group to show paragraph break symbols and other formatting that may affect line spacing (see figure 2).
- Select the text with the line spacing that needs to be changed (see figure 3).
Pro Tip: PC users can press Ctrl + A to select the entire document if all the line spacing needs to be changed. However, this includes items you may not want to alter, including headings, tables, table titles, figure captions, tables of contents, footnotes, endnotes, and reference lists.
- Select the dialog box launcher in the Paragraph group.

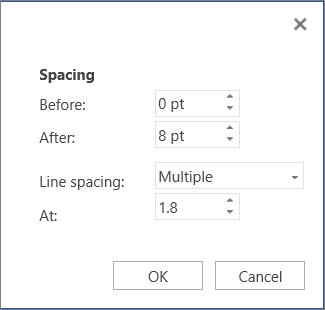
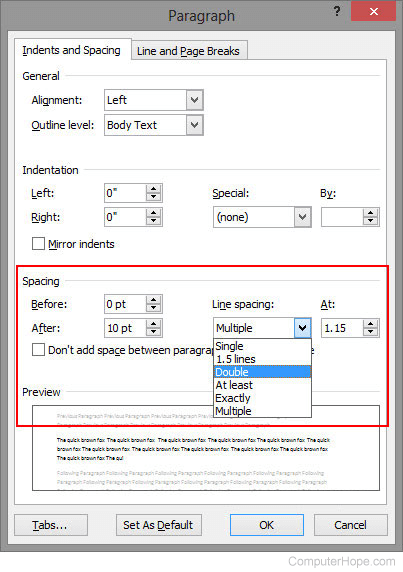
- Make changes in the Spacing section of the Paragraph dialog box:
A. The Before and After boxes represent the spaces before and after paragraphs measured in points with one point being 1/72 of an inch tall. Use the increment arrows to choose a whole number or enter a number with a decimal (e.g., 2.75) directly into the box.
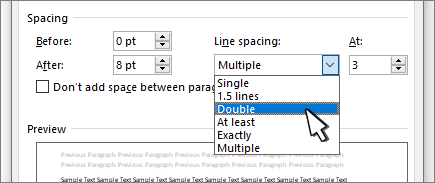
B. The Line spacing drop-down menu offers six options:
1. Single—Creates single-spacing based on your current font size.
2. 1.5 Lines—Creates a space and a half as large as your current font size.
3. Double—Creates double-spacing based on your current font size.
4. At Least—Determines the minimum amount of space between lines based on the number of points entered in the At box.
5. Exactly—Creates space between lines based on the number of points entered in the At box.
6. Multiple—Creates spacing multiplied by the number entered in the At box. For example, if you enter four in the At box, your spacing will be four times as large as your current single-spacing.
C. Don’t add space between paragraphs of the same style—For many users, this will remove spaces between all paragraphs because general documents commonly have only one paragraph style.

Note that the Preview box updates as you make adjustments in the Spacing section.
- Select the OK button to close the Paragraph dialog box.

- (Optional Step) Select the Show/Hide button again to hide paragraph symbols and other formatting (see figure 2).
Quick Tip: Single-Space an Entire Document from the Paragraph Dialog Box
- Select the Home tab in the ribbon (see figure 1).
- Select the entire document. (PC users can press Ctrl + A.)
- Select the dialog box launcher in the Paragraph group (see figure 7).
- Enter 0 in the Before box in the Paragraph dialog box (see figure 8).
- Enter 0 in the After box in the Paragraph dialog box (see figure 8).
- Select Single in the Line spacing drop-down menu (see figure 8).
- Select the OK button (see figure 9).
Related Resources
How to Adjust Letter Spacing in Microsoft Word (PC & Mac)
How to Adjust the Space between Words in Microsoft Word
How to Adjust Page Margins in Microsoft Word
Updated June 25, 2022
Change the line spacing in a portion of the document
- Select one or more paragraphs to update.
- Go to Home > Line and Paragraph Spacing.
- Select Line Spacing Options and choose an option in the Line spacing box.
- Adjust the Before and After settings to change spacing between paragraphs.
- Select OK.
Contents
- 1 How do you do 1.5 line spacing in Word?
- 2 How do I change line spacing to 1.0 in Word?
- 3 How do I change the spacing between lines in Word 2010?
- 4 What is 1.5 spacing word?
- 5 How do I change line spacing in Word 2016?
- 6 How do you change line spacing in Word 2007?
- 7 Is 1.0 single spacing?
- 8 What is a line spacing in Word?
- 9 How do you change line spacing in docs?
- 10 Which line spacing is invalid?
- 11 How do I change the spacing between lines in Word 2013?
- 12 How do I make the space between paragraphs smaller in Word?
- 13 How do I change the spacing in Word for Mac?
- 14 How do I change the line spacing in Word 2008?
- 15 How do I change the line spacing in Word 2003?
- 16 What is line spacing in MS Word 2007?
- 17 Why is line spacing not working in Word?
- 18 How do I change line spacing to 1.2 in Word?
- 19 What is the shortcut key for 1.5 line spacing?
- 20 Why is my Line spacing off in docs?
How do you do 1.5 line spacing in Word?
To format line spacing:
- Click Format on the menu bar.
- Select Paragraph. The Paragraph dialog box appears.
- Click the Indents and Spacing tab.
- In the line spacing drop-down menu, you can select single, 1.5, or double spacing. The default is single spacing.
- Click OK.
How do I change line spacing to 1.0 in Word?
Choose 1.0
- Select the paragraphs you want to change.
- Go to Home > Line and Paragraph Spacing .
- Choose 1.0.
How do I change the spacing between lines in Word 2010?
To format line spacing:
- Select the text you want to format.
- Click the Line and Paragraph Spacing command in the Paragraph group on the Home tab.
- Select the desired spacing option from the drop-down menu.
- From the drop-down menu, you can also select Line Spacing Options to open the Paragraph dialog box.
What is 1.5 spacing word?
Press Ctrl+1 for single-spacing, Ctrl+5 for 1.5 spacing, or Ctrl+2 for double-spacing. Click to view larger image.
How do I change line spacing in Word 2016?
Go to Home > Line and Paragraph Spacing. Select Line Spacing Options, and then choose the options you want under Spacing. To change the spacing before or after the selected paragraphs, select the arrow next to Before or After and enter the amount of space that you want. Select Set as Default.
How do you change line spacing in Word 2007?
Select the text you want to format. Click the Line spacing command in the Paragraph group on the Home tab. Select a spacing option.
The Paragraph dialog box appears.
- Use the Line spacing drop-down menu to select a spacing option.
- Modify the before and after points to adjust line spacing as needed.
- Click OK.
Is 1.0 single spacing?
Line spacing is the distance between lines. In earlier versions of Word, the default line spacing distance is “1.0,” or single-spacing, which stacks lines closely together with minimal space between. The amount of that space varies depending on the font used.
What is a line spacing in Word?
Line spacing is the distance between lines of text.To change the line spacing, select the lines you want to change. Then go to the Home tab and find the line spacing button in the Paragraph section.
How do you change line spacing in docs?
Change line & paragraph spacing
- On your computer, open a document in Google Docs.
- Select the lines you want to change.
- Click Format. Line & paragraph spacing.
- Select a line spacing option: To change your paragraph spacing, click Single, 1.15, 1.5, or Double.
Which line spacing is invalid?
The correct answer is Triple. Line spacing feature in MS word or any other word processing tool gives us the flexibility to adjust the space between two lines of text. To set the line spacing, we need to select the lines of text and go to the spacing option on the ribbon.
How do I change the spacing between lines in Word 2013?
To format line spacing:
- Select the text you want to format. Selecting text to format.
- On the Home tab, click the Line and Paragraph Spacing command. A drop-down menu will appear.
- Move the mouse over the various options.
- The line spacing will change in the document.
How do I make the space between paragraphs smaller in Word?
Change spacing between paragraphs
- Click anywhere in the paragraph you want to change.
- Go to Layout, and under Spacing, click the up or down arrows to adjust the distance before or after the paragraph. You can also type a number directly.
How do I change the spacing in Word for Mac?
Change the line spacing in Word for Mac
- Click Design > Paragraph Spacing.
- Click the option you want. If you want to single space your document, choose No Paragraph Space.
How do I change the line spacing in Word 2008?
Word 2011 and 2008
- Select the document text for which you want to change the line spacing.
- From the Format menu, select Paragraph…. The Paragraph dialog box will open.
- Select the Indents and Spacing tab.
- Click OK to apply your changes.
How do I change the line spacing in Word 2003?
Adjusting Line Spacing
- Place the insertion point in the desired paragraph.
- From the Format menu, select Paragraph… The Paragraph dialog box appears.
- Select the Indents and Spacing tab.
- In the Spacing section, from the Line spacing pull-down list, select the desired spacing option.
- Click OK.
What is line spacing in MS Word 2007?
By Dan Gookin. Word 2007 enables you to change the line spacing within your paragraphs using the Line Spacing command. Changing the line spacing inserts extra space between all lines of text in a paragraph. Word adds the space, or extra blank lines, below each line of text in the paragraph.
Why is line spacing not working in Word?
A couple of things to check: For the style in question, look at the paragraph formatting and make sure that “Don’t add space between paragraphs of the same style” is not checked. At Tools | Options | Compatibility, make sure that “Don’t use HTML paragraph auto spacing” is checked.
How do I change line spacing to 1.2 in Word?
Change the line spacing in a portion of the document
- Select one or more paragraphs to update.
- Go to Home > Line and Paragraph Spacing.
- Select Line Spacing Options and choose an option in the Line spacing box.
- Adjust the Before and After settings to change spacing between paragraphs.
- Select OK.
What is the shortcut key for 1.5 line spacing?
Ctrl+5
Pressing Ctrl+5 changes to 1.5 line spacing.
Why is my Line spacing off in docs?
You will need to change that on the computer/desktop app (not the mobile app). When you’re on a computer, drag your cursor through the problem lines or press Ctrl + A to select your entire document. Then go to the line-spacing tool in the action bar and select Add/remove space before paragraph.
![]()
Download Article
![]()
Download Article
This wikiHow teaches you how to customize a Word document’s layout design by changing line spacing and character spacing, using a computer.
-
1
Open a Word document on your computer. Find the Word document you want to edit on your computer, and open it.
-
2
Select the entire text in the document. You can click and drag your mouse from the beginning to the end, or use a keyboard combination to select all.
- The keyboard shortcut to select all is ⌘ Command+A on Mac, and Control+A on Windows.
- Alternatively, you can select a paragraph or only a few lines. In this case, you will be editing line spacing only for the selected part of your document.
Advertisement
-
3
Click the Home tab. This button is in the upper-left corner of the app window. It will open your Home toolbar at the top of the document.
-
4
Click the line spacing icon. This button looks like three horizontal lines with two blue arrows pointing up and down. You can find it at the middle of the Home toolbar. Clicking will open your line spacing options on a drop-down menu.
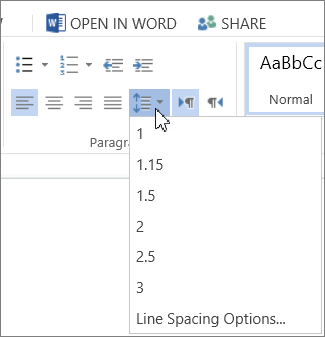
-
5
Select a line spacing value. Your options here include 1.0, 1.15, 1.5, 2.0, 2.5, and 3.0. Selecting a value here will change your line spacing, and apply it to the selected text.
- If you want to manually put in a number, you can select Line Spacing Options at the bottom of the drop-down menu. This will open advanced spacing options in a new pop-up window.


Advertisement
-
1
Open a Word document on your computer. Find the Word document you want to edit on your computer, and open it.
-
2
Select the entire text in the document. You can click and drag your mouse from the beginning to the end, or use a keyboard combination to select all.
- The keyboard shortcut to select all is ⌘ Command+A on Mac, and Control+A on Windows.
- Alternatively, you can select a paragraph or only a few lines. In this case, you will be editing character spacing only for the selected part of your document.
-
3
Press ⌘ Command+D on Mac or Control+D on Windows. This will open your Font options in a new pop-up window.
-
4
Click the Advanced tab. It’s next to Font at the top of the pop-up window.
-
5
Click the selector bar next to Spacing. This option is located under the Character Spacing heading. It will allow you to select one of Normal, Expanded or Condensed for character spacing.
-
6
Adjust the spacing value in the box next to the selector bar. You can click the up and down arrow buttons here to adjust character spacing to the precise amount.
-
7
Click the OK button. This will apply your new character spacing settings to the selected text.


Advertisement
Ask a Question
200 characters left
Include your email address to get a message when this question is answered.
Submit
Advertisement
Thanks for submitting a tip for review!
About This Article
Thanks to all authors for creating a page that has been read 12,291 times.
Is this article up to date?
In the old days, getting a document written up neatly involved having a medieval monk painstakingly copy everything out by hand in elaborate illuminated script.
Thankfully, now we have word processors, which makes life much simpler. As well as eliminating the need to hire a scribe, programs like Microsoft Word provide a range of formatting options to make sure your work is easy to read.
In this post, for example, we take a look at how to set line spacing in Microsoft Word.
What is Line Spacing? Why Does it Matter?
Line spacing is the gap between lines of text in your document. College students are often told to use double spacing (i.e., a gap twice the height of the font) to enhance the clarity of their written work and so markers have space to leave feedback on a paper.
How to Set Line Spacing
Adjusting the spacing in a document is reassuringly easy thanks to the pre-defined settings in Microsoft Word (instructions apply to Word 2007 onwards):
- Select the text you want to adjust
- Find the “Paragraph” section on the “Home” tab
- Click on the line and paragraph spacing button to open the dropdown menu
- Select the desired line spacing (standard options range from 1.0 to 3.0)
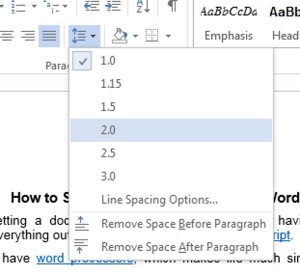 To double-space your document, simply click “2.0.” If you pick “Line Spacing Options” from the dropdown menu, you can also customize the spacing to suit your requirements.
Taking Shortcuts
If you find yourself regularly adjusting the spacing in your work, you could save time by using the keyboard shortcuts in Microsoft Word. For line spacing, these are:
|
Line Spacing |
PC |
Mac |
|
1.0 |
Ctrl + 1 |
Command + 1 |
|
1.5 |
Ctrl + 5 |
Command + 5 |
|
2.0 |
Ctrl + 2 |
Command + 2 |
To set the spacing in your document this way, simply select the passage(s) you want to modify and use the shortcut for the spacing desired. To select all text in the document, use “Ctrl + A” on PC or “Command + A” on Mac.
Find this useful?
Subscribe to our newsletter and get writing tips from our editors straight to your inbox.
Line Spacing refers to the amount of space between any two lines in the Word Document. The default size of Line Spacing is 1.08 in MS Word. However, we can add custom line spaces to different lines, paragraphs in our Word Document according to our requirements and ensure quite good readability of our content to others.
In MS Word there are multiple ways to adjust Line Spacing which are as follows:
Method 1: Using the Line Spacing button
One way of setting the Line Spacing is using directly the Line and Paragraph Spacing feature in MS Word, which comes under the Home menu.
There are multiple Line Spaces like: 1.0, 1.15, 1.5, 2.0, 2.5, 3.0, etc.
Steps to Apply:
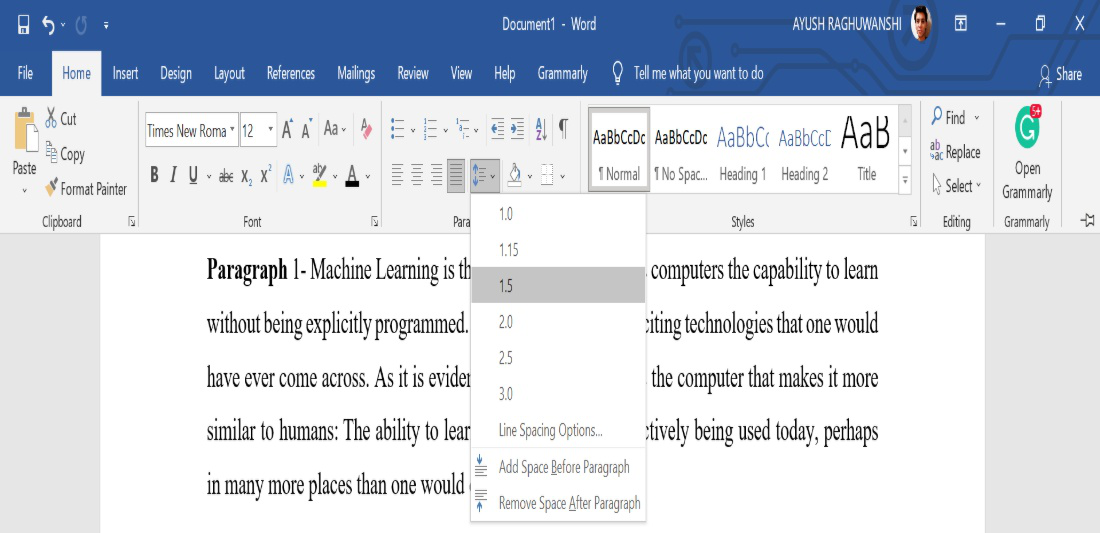
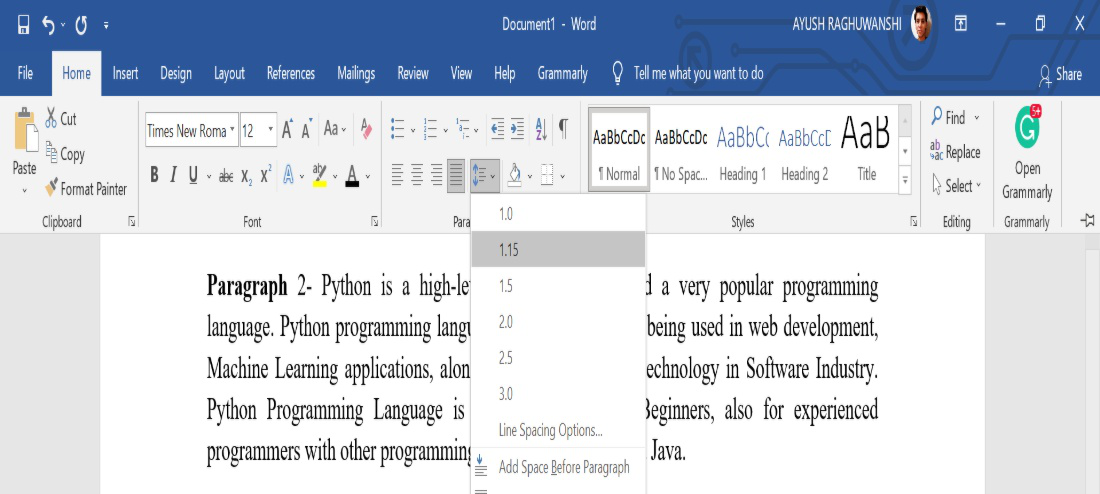
Step 1: Select the text/line/Paragraph you want to change the spacing.

Step 2: Now, select the Line and Paragraph Spacing tab from the Paragraph menu under the Home tab and select the line spacing of your choice.
Perform the same steps for different line spacing:
- Select the text/line/Paragraph you want to change the spacing.

- Now, select the Line and Paragraph Spacing tab from the Paragraph menu under the Home tab and select the line spacing of your choice.
- Select the text/line/Paragraph you want to change the spacing.

- Now, select the Line and Paragraph Spacing tab from the Paragraph menu under the Home tab and select the line spacing of your choice.

Results:
Final Result of the Complete Word Document.

Method 2: Using Paragraph Dialog Box
Another way of setting the Line Spaces is using the Paragraph dialog box feature in MS Word. The Paragraph dialog box provides a wide variety of features along with Line Spacing that we can use in our Word Document to modify beautifully and accurately.
There are multiple Line Spaces in the Paragraph dialog box like- Single, 1.5 lines, Double, At least, Exactly, Multiple, etc,
Steps to Apply:
Step 1: Select the text/line/Paragraph you want to change the spacing.

Step 2: Now, select the Show/Hide Paragraph tab from the Paragraph menu under the Home tab.

Step 3: Now, Select the dialog box launcher-Paragraph Setting from the Paragraph menu under the Home tab.
Step 4: Then select the Line Spacing from the dialog box under the Indents and Spacing tab- Single, 1.5 lines, Double, At least, Exactly, Multiple, etc, and then press the OK button.

Result:
As the whole Document was selected initially, so the Complete Word Document’s line spacing is changed to 1.5 lines.


There are lots of reasons you might want to change the amount of space between lines in a paragraph, or between paragraphs themselves. Word offers some handy preset values to use, but you can also take full control by specifying exact spacing. Here’s how.
Changing the line or paragraph spacing in a document is not something you might need to do very often. But as anyone who’s had to turn in a paper with mandatory double spacing knows, it can be the difference between passing and failing. Outside of college, you still might be faced with line spacing guidelines by employers, clients, or publishers. And even in your own documents, the right spacing can make your document more readable or highlight parts of the documents on which you want your readers to focus . If the default spacing in Word doesn’t quite hit the spot for you, Word makes it easy to change.

They are both pretty much what they sound like. Line spacing is the amount of white space between two lines of text. Paragraph spacing is the amount of white space between two paragraphs. And like using the right font or proper margins, controlling spacing is an important part of document formatting.
RELATED: How to Embed Fonts in a Microsoft Word Document
And weird as it might sound at first, both line and paragraph spacing are applied at the paragraph level. Line spacing controls how all lines of a paragraph are spaced. Paragraph spacing controls how much space comes before and after the paragraph.
In Word, line spacing is most commonly measured in multiples of whatever font size the paragraph is using. For example, say you’re using a 12 point font for the text in your paragraph. If you choose single line spacing, the space between lines will be 12 points. If you choose double spacing, that space between lines will be 24 points. However, if you want to fine tune things, you can also specify an exact point size to use.
Paragraphs work a bit differently. By default, Word adds eight points of space after a paragraph and no additional space before the paragraph, and you can change both of those values however you like.
Let’s take a closer look at how to do all this.
Use Quick Presets for Easy Changes
Word has some common preset options for you to choose from. Remember that line and paragraph spacing are both applied at the paragraph level. If you place your insertion point in a paragraph, you’ll change things for that paragraph. If you select text from multiple paragraphs, you’ll change things for all those paragraphs.
Select all of the paragraphs you want to change (or place your insertion point anywhere in a single paragraph you want to change). On the Home tab, click the “Line and Paragraph Spacing” button.
This opens a dropdown menu with presets for line spacing (at the top) and paragraph spacing (at the bottom).
The line spacing is shown in multiples. “2.0” is double spacing, “3.0” is triple spacing, and so on. Select the multiple you want, and Word applies it to the selected paragraphs. If you want to choose another spacing, or revert to the original spacing, click the “Line and Paragraph Spacing” option again and select a different multiple.
The paragraph spacing only lets you add or remove a preset spacing before the paragraph or after the paragraph. And it’s kind of weird the way it works. If you currently have no spacing before or after a paragraph, the menu shows commands for adding spacing in both locations (as shown in the previous image). If you add a space in one location, that command changes to let you remove that spacing.
So, you can only ever add or remove one level of preset spacing with the menu commands. And what are those presets? 12 points for the spacing before the paragraph and 8 points for the spacing after.
These presets work well enough for simple changes to a few paragraphs. But what if you want to change the spacing on the whole document? You could select everything (Ctrl+A) and then use these same commands, but there are some better presets available if you want to change the whole document.
Use Additional Spacing Presets for Your Whole Document
Switch over to the “Design” tab, and then click the “Paragraph Spacing” button.
Now, even though that button is labeled “Paragraph Spacing,” the changes here can apply to both paragraph and line spacing for your document. As you hover your pointer over each preset, you can see the changes reflected in your document. You’ll also see a little text bubble pop up that lets you know exactly what line and paragraph spacing options that preset will apply.
This is an “all or nothing” option, so it’ll only work for the whole document, or not at all. Here’s what the Compact, Open, and Double presets look like on identical text.
At the bottom of that “Paragraph Spacing” dropdown menu, you can also click the “Custom Paragraph Spacing” command to open the Manage Styles window.
On the “Set Defaults” tab, the tools in the “Paragraph Spacing” section let you fine tune spacing for your document. You can also choose at the bottom whether to apply your changes only in the current document, or to all new documents based on the same template.
Apply Finer Control to Paragraph and Line Spacing
If you want a little more finesse than any of these presets we’ve covered offer, you do have another option (this is Word, after all).
First, place your insertion point in the paragraph you want to change (or select multiple paragraphs, or the whole document with Ctrl+A). On the “Home” tab, click the small arrow at the bottom right of the Paragraph group.
This opens the Paragraph window. On the “Indents and Spacing” tab, in the “Spacing” section, you can apply specific adjustments to both paragraph and line spacing.
On the left, you can use the “Before” and “After” controls to specify how much space you want before and after paragraphs. You’ve also got the option to keep your paragraph spacing from affecting blocks of text that are in different styles by switching on the “Don’t add space between paragraphs of the same style” checkbox. (If you’re not sure whether you’re using different styles then you probably aren’t.)
On the right in that section, the “Line Spacing” dropdown lets you choose all those same line spacing presets we looked at before, along with some other options.
These additional options include:
- At least: This option lets you specify a minimum point size to use for line spacing and is only useful in very specific circumstances. For example, say you had one line in a paragraph that for whatever reason used a smaller font size than the other lines. Regular spacing options might make it look weird. Choose a minimum spacing can help.
- Exactly: This option lets you specify an exact point size to use between lines of the selected paragraphs.
- Multiple: This options lets you dial in a specific multiple to use for spacing. For example, if 1.5 spacing seems too tight and 2.0 seems too wide, you could try something like 1.75.
Between these three options you’ve got complete control of all your document spacing, so now you can confidently double space that term paper or wow your colleagues with a perfectly formatted report.
READ NEXT
- › 8 Microsoft Word Tips for Professional Looking Documents
- › How to Find and Replace Formatting in Microsoft Word
- › How to Remove Section and Page Breaks in Microsoft Word
- › What Does Shift+Enter Do in Word?
- › How to Change Kerning in Microsoft Word
- › How to Add, Edit, and Remove Tab Stops in Microsoft Word
- › How to Number Paragraphs in Microsoft Word
- › The New NVIDIA GeForce RTX 4070 Is Like an RTX 3080 for $599