
Go to the Mailings tab. Choose Start Mail Merge > Labels. Choose the brand in the Label Vendors box and then choose the product number, which is listed on the label package. You can also select New Label if you want to enter custom label dimensions.
Contents
- 1 Can you print labels directly from Excel?
- 2 How do I make mailing labels?
- 3 How do I create a mailing list from Excel?
- 4 How do I create a mail merge from Excel?
- 5 How do you do a mail merge from Excel to Word?
- 6 How are rows labeled in Excel?
- 7 Where is preferences in Excel?
- 8 How do I print labels from an Excel spreadsheet without Word?
- 9 How do I create a mail merge label template?
- 10 How can I create labels in Word?
- 11 How do I print a sheet of labels with different names?
- 12 Can an Excel spreadsheet be used as the data source for a Word mail merge?
- 13 How do I import data from Excel to Word?
- 14 How is a row labeled?
- 15 Why is Excel showing numbers instead of letters?
- 16 How do I change rows and column names in Excel?
- 17 Where is Tools menu Excel?
- 18 What is the Excel Options dialog box?
- 19 Where is the Office button in Excel?
Can you print labels directly from Excel?
The mail merge process creates a sheet of mailing labels that you can print, and each label on the sheet contains an address from the list. To create and print the mailing labels, you must first prepare the worksheet data in Excel, and then use Word to configure, organize, review, and print the mailing labels.
How do I make mailing labels?
Create and print labels
- Go to Mailings > Labels.
- Select Options and choose a label vendor and product to use.
- Type an address or other information in the Address box (text only).
- To change the formatting, select the text, right-click, and make changes with Font or Paragraph.
- Select OK.
How do I create a mailing list from Excel?
Here are some simple steps for building and printing your mailing list in Excel:
- Step 1: Open Excel.
- Step 3: Type or paste in your customer or lead list directly into Excel.
- Step 4: Save your mailing list.
- Step 5: Open a MS Word document.
- Step 6:Go to the Mailings Menu > Start Mail Merge >Step by Step Mail Merge Wizard.
How do I create a mail merge from Excel?
You can insert one or more mail merge fields that pull the information from your spreadsheet into your document.
- Go to Mailings > Insert Merge Field.
- Add the field you want.
- Repeat steps 1 and 2 as needed.
- Choose File > Save.
How do you do a mail merge from Excel to Word?
On your Word document, highlight the field you want to populate with the data from Excel. On the Mailings tab, choose the ‘Insert Merge Field’ button, a list of the column headers on your saved excel document will drop down (i.e. Company Name, etc.). Choose the appropriate field you want to merge and choose Insert.
How are rows labeled in Excel?
By default, Excel uses the A1 reference style, which refers to columns as letters (A through IV, for a total of 256 columns), and refers to rows as numbers (1 through 65,536). These letters and numbers are called row and column headings. To refer to a cell, type the column letter followed by the row number.
Where is preferences in Excel?
To open the preferences dialog box, you can either go to the menu system at the top and then click Excel and then preferences. Or you can press command comma in this case, I’m on already on the menu. So I will click preferences. Doing so displays the Excel preferences, dialogue box.
How do I print labels from an Excel spreadsheet without Word?
How to: How to Print labels from Excel without Word
- Step 1: Download Excel spread sheet and enable Macros.
- Step 2: Paste your single column data into 1A.
- Step 3: Press CTRL + e to activate the macro.
- Step 4: Choose “3” for number of columns.
- Step 5: Set margins to “custom margin”
How do I create a mail merge label template?
How to Create a Label-Based Mail Merge Template in Microsoft Word
- Open a blank document in Microsoft Word.
- Select the “Mailings” Tab.
- Once on the tab, please select “Start Mail Merge > Labels”. Then select the size appropriate for your labels and click “OK”
- Click on the “Select Recipients > Type New List”
How can I create labels in Word?
Create a Label
- Click the Mailings tab.
- Click the Labels button.
- Enter an address.
- Click Options.
- Select your label options.
- Click OK.
- Click Print to print the labels, or New Document if you want to do any formatting or editing of individual labels.
How do I print a sheet of labels with different names?
Create and print a page of different labels
- Go to Mailings > Labels.
- Select Options.
- Select the type of printer you’re using.
- Select your label brand in Label products.
- Select the label type in Product number.
- Select OK.
- Select OK in the Labels dialog box.
- Type the information you want in each label.
Can an Excel spreadsheet be used as the data source for a Word mail merge?
An essential step in a Word mail merge process is setting up and preparing a data source. You can use an existing Excel data source or build a new one by importing a tab-delimited (.txt) or comma-separated value (.csv) file.
How do I import data from Excel to Word?
Inserting linked Excel data into a Word table
- Open the Excel source workbook.
- Select the data you want to place in the Word file.
- Press Ctrl + C or right-click and choose Copy from the drop-down menu.
- Open the Word destination document.
- Position the insertion point where you want the linked Excel data to appear.
How is a row labeled?
How are rows and columns labeled? In all spreadsheet programs including Microsoft Excel, rows are labeled using numbers (e.g., 1 to 1,048,576).When working with a cell, you combine the column with the row. For example, the very first cell is in column A and on row 1, so the cell is labeled as A1.
Why is Excel showing numbers instead of letters?
Cause: The default cell reference style (A1), which refers to columns as letters and refers to rows as numbers, was changed. Solution: Clear the R1C1 reference style selection in Excel preferences. On the Excel menu, click Preferences.The column headings now show A, B, and C, instead of 1, 2, 3, and so on.
How do I change rows and column names in Excel?
Rename columns and rows in a worksheet
- Click the row or column header you want to rename.
- Edit the column or row name between the last set of quotation marks. In the example above, you would overwrite the column name Gold Collection.
- Press Enter. The header updates.
Click the Menus tab to experience the classic style interface and find the Tools menu easily. Click the arrow next to the Tools to access the familiar functions from the dropdown menu.
What is the Excel Options dialog box?
Excel Options Dialog Box Window is used to configure global system settings of Excel program.General : General Panel in Excel Options Dialog Box Window contains commonly used settings like user interface options, options for new workbooks (like font, font size, number of sheets) etc.
Where is the Office button in Excel?
top-left corner
The Microsoft Office button is in the top-left corner of the Excel 2007 window. Click the button, and a menu appears. You can use the menu to create a new file, open an existing file, save a file, and perform many other tasks. The Quick Access toolbar is next to the Microsoft Office button.
Excel for Microsoft 365 Excel 2021 Excel 2019 Excel 2016 Excel 2013 Excel 2010 More…Less
If someone’s entering data inaccurately, or you think a coworker may be confused about how to enter data, add a label. A simple name, such as «Phone,» lets others know what to put in a cell, and your labels can also provide more complex instructions.
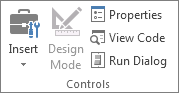
You can add labels to forms and ActiveX controls.
Add a label (Form control)
-
Click Developer, click Insert, and then click Label
 .
.
-
Click the worksheet location where you want the upper-left corner of the label to appear.
-
To specify the control properties, right-click the control, and then click Format Control.
 .
.
-
Click Developer and then click Insert, and under ActiveX Controls, click Label
.
-
Click the worksheet location where you want the upper-left corner of the label to appear.
-
Click Design Mode
. -
Click the worksheet location where you want the upper-left corner of the label to appear.
-
To specify the control properties, click Properties
.Tip: You can also right-click the label, and then click Properties.
The Properties dialog box appears. For detailed information about each property, select the property, and then press F1 to display a Visual Basic Help topic. You can also type the property name in the Visual Basic Help Search box. This table summarizes the properties.
Summary of label properties by functional category
 .
. .
. .
.|
If you want to specify |
Use this property |
|
General: |
|
|
Whether the control is loaded when the workbook is opened. (Ignored for ActiveX controls.) |
AutoLoad (Excel) |
|
Whether the control can receive the focus and respond to user-generated events. |
Enabled (Form) |
|
Whether the control can be edited. |
Locked (Form) |
|
The name of the control. |
Name (Form) |
|
The way the control is attached to the cells below it (free floating, move but do not size, or move and size). |
Placement (Excel) |
|
Whether the control can be printed. |
PrintObject (Excel) |
|
Whether the control is visible or hidden. |
Visible (Form) |
|
Text: |
|
|
Font attributes (bold, italic, size, strikethrough, underline, and weight). |
Bold, Italic, Size, StrikeThrough, Underline, Weight (Form) |
|
Descriptive text on the control that identifies or describes it. |
Caption (Form) |
|
How text is aligned in the control (left, center, or right). |
TextAlign (Form) |
|
Whether the contents of the control automatically wrap at the end of a line. |
WordWrap (Form) |
|
Size and position: |
|
|
Whether the size of the control automatically adjusts to display all contents. |
AutoSize (Form) |
|
The height or width in points. |
Height, Width (Form) |
|
The distance between the control and the left or top edge of the worksheet. |
Left, Top (Form) |
|
Formatting: |
|
|
The background color. |
BackColor (Form) |
|
The background style (transparent or opaque). |
BackStyle (Form) |
|
The color of the border. |
BorderColor (Form) |
|
The type of border (none or single-line). |
BorderStyle (Form) |
|
The foreground color. |
ForeColor (Form) |
|
Whether the control has a shadow. |
Shadow (Excel) |
|
The visual appearance of the border (flat, raised, sunken, etched, or bump). |
SpecialEffect (Form) |
|
Image: |
|
|
The bitmap to display in the control. |
Picture (Form) |
|
The location of the picture relative to its caption (left, top, right, and so on). |
PicturePosition (Form) |
|
Keyboard and mouse: |
|
|
The shortcut key for the control. |
Accelerator (Form) |
|
A custom mouse icon. |
MouseIcon (Form) |
|
The type of pointer that is displayed when the user positions the mouse over a particular object (for example, standard, arrow, or I-beam). |
MousePointer (Form) |
-
Click Developer and then click Insert, and under ActiveX Controls, click Text Box
.
-
Click the worksheet location where you want the upper-left corner of the text box to appear.
-
To edit the ActiveX control, click Design Mode
. -
To specify the control properties, click Properties
.Tip: You can also right-click the text box, and then click Properties.
The Properties dialog box appears. For detailed information about each property, select the property, and then press F1 to display a Visual Basic Help topic. You can also type the property name in the Visual Basic Help Search box. The following section summarizes the properties that are available.
Summary of text box properties by functional category
 .
.|
If you want to specify |
Use this property |
|
General: |
|
|
Whether the control is loaded when the workbook is opened. (Ignored for ActiveX controls.) |
AutoLoad (Excel) |
|
Whether the control can receive the focus and respond to user-generated events. |
Enabled (Form) |
|
Whether the control can be edited. |
Locked (Form) |
|
The name of the control. |
Name (Form) |
|
The way the control is attached to the cells below it (free floating, move but do not size, or move and size). |
Placement (Excel) |
|
Whether the control can be printed. |
PrintObject (Excel) |
|
Whether the control is visible or hidden. |
Visible (Form) |
|
Text: |
|
|
Whether a word or a character is the basic unit used to extend a selection. |
AutoWordSelect (Form) |
|
Font attributes (bold, italic, size, strikethrough, underline, and weight). |
Bold, Italic, Size, StrikeThrough, Underline, Weight (Form) |
|
Whether selected text remains highlighted when the control does not have the focus. |
HideSelection (Form) |
|
The default run time mode of the Input Method Editor (IME). |
IMEMode (Form) |
|
Whether the size of the control adjusts to display full or partial lines of text. |
IntegralHeight (Form) |
|
The maximum number of characters a user can enter. |
MaxLength (Form) |
|
Whether the control supports multiple lines of text. |
MultiLine (Form) |
|
Placeholder characters, such as an asterisk (*), to be displayed instead of actual characters. |
PasswordChar (Form) |
|
Whether the user can select a line of text by clicking to the left of the text. |
SelectionMargin (Form) |
|
The text in the control. |
Text (Form) |
|
How text is aligned in the control (left, center, or right). |
TextAlign (Form) |
|
Whether the contents of the control automatically wrap at the end of a line. |
WordWrap (Form) |
|
Data and binding: |
|
|
The range that is linked to the control’s value. |
LinkedCell (Excel) |
|
The content or state of the control. |
Value (Form) |
|
Size and position: |
|
|
Whether the size of the control automatically adjusts to display all the contents. |
AutoSize (Form) |
|
The height or width in points. |
Height, Width (Form) |
|
The distance between the control and the left or top edge of the worksheet. |
Left, Top (Form) |
|
Formatting: |
|
|
The background color. |
BackColor (Form) |
|
The background style (transparent or opaque). |
BackStyle (Form) |
|
The color of the border. |
BorderColor (Form) |
|
The type of border (none or a single-line). |
BorderStyle (Form) |
|
The foreground color. |
ForeColor (Form) |
|
Whether the control has a shadow. |
Shadow (Excel) |
|
The visual appearance of the border (flat, raised, sunken, etched, or bump). |
SpecialEffect (Form) |
|
Whether an automatic tab occurs when a user enters the maximum allowable characters into the control. |
AutoTab (Form) |
|
Keyboard and mouse: |
|
|
Whether drag-and-drop is enabled. |
DragBehavior (Form) |
|
The selection behavior when entering the control (select all or do not select). |
EnterFieldBehavior (Form) |
|
The effect of pressing ENTER (create a new line or move focus). |
EnterKeyBehavior (Form) |
|
A custom mouse icon. |
MouseIcon (Form) |
|
The type of pointer that is displayed when the user positions the mouse over a particular object (for example, standard, arrow, or I-beam). |
MousePointer (Form) |
|
Whether tabs are allowed in the edit region. |
TabKeyBehavior (Form) |
|
Specific to Text Box: |
|
|
Whether the control has vertical scroll bars, horizontal scroll bars, or both. |
ScrollBars (Form) |
-
Click File, click Options, and then click Customize Ribbon.
-
Under Main Tabs , select the Developer check box, and then click OK.
A label identifies the purpose of a cell or text box, displays brief instructions, or provides a title or caption. A label can also display a descriptive picture. Use a label for flexible placement of instructions, to emphasize text, and when merged cells or a specific cell location is not a practical solution.
A text box is a rectangular box in which you can view, enter, or edit text or data in a cell. A text box can also be a static, and display data users can only read. Use a text box as an alternative to entering text in a cell, when you want to display an object that floats freely. You can also use a text box to display or view text that is independent of row and column boundaries, preserving the layout of a grid or table of data on the worksheet.
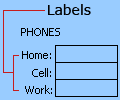
Label on a form control:
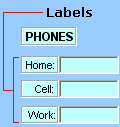
An ActiveX control label:
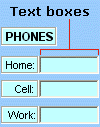
An ActiveX text box control:
Notes:
-
To create a text box with a set of placeholder characters that accepts a password, use the PasswordChar property. Make sure that you protect the linked cell or other location in which the text is stored. Use strong passwords that combine uppercase and lowercase letters, numbers, and symbols, such as Y6dh!et5, not House27. Passwords should be 8 or more characters;14 is better.
And don’t forget your password. If you do, we can’t help you retrieve it. Office doesn’t have a master key to unlock anything. Store passwords in a secure place away from the information they help protect.
-
To create a scrolling, multiple-line text box with horizontal and vertical scroll bars, set MultiLine to True, AutoSize and WordWrap to False, ScrollBars to 3, and LinkedCell to the cell address (such as D1) that you want to contain the text. To enter a new line, the user must press either CTRL+ENTER or SHIFT+ENTER, which generates a special character that is stored in the linked cell.
Need more help?
Want more options?
Explore subscription benefits, browse training courses, learn how to secure your device, and more.
Communities help you ask and answer questions, give feedback, and hear from experts with rich knowledge.
708
708 people found this article helpful
How to Print Labels From Excel
Make labels in Excel in a snap
What to Know
- Prepare your worksheet, set up labels in Microsoft Word, then connect the worksheet to the labels.
- Open a blank Word document > go to Mailings > Start Mail Merge > Labels. Choose brand and product number.
- Add mail merge fields: In Word, go to Mailings > in Write & Insert Fields, go to Address Block and add fields.
This guide explains how to create and print labels from Excel using the mail merge feature in Microsoft Word. Instructions apply to Excel and Word 2019, 2016, and 2013 and Excel and Word for Microsoft 365.
How to Print Labels From Excel
You can print mailing labels from Excel in a matter of minutes using the mail merge feature in Word. With neat columns and rows, sorting abilities, and data entry features, Excel might be the perfect application for entering and storing information like contact lists. Once you have created a detailed list, you can use it with other Microsoft 365 applications for numerous tasks.
Prepare the Worksheet and Enter the Data
To make mailing labels from Excel, you need to add descriptive column headings so everything prints out correctly. For example, you might have the following column headings:
- Title (Mr./Ms./Dr.)
- First Name
- Last Name
- Street Address
- City
- State
- ZIP Code
-
Type in a heading in the first cell of each column describing the data. Make a column for each element you want to include on the labels.
Lifewire
-
Type the names and addresses or other data you’re planning to print on labels.
Make sure each item is in the correct column.
Avoid leaving blank columns or rows within the list.
Lifewire
-
Save the worksheet when you have finished.
Set Up Labels in Word
Next, you need to choose the size and type of the labels you’re printing.
-
Open a blank Word document.
-
Go to the Mailings tab.
-
Choose Start Mail Merge > Labels.
-
Choose the brand in the Label Vendors box and then choose the product number, which is listed on the label package. You can also select New Label if you want to enter custom label dimensions.
-
Click OK when you are ready to proceed.
Connect the Worksheet to the Labels
Before performing the merge to print address labels from Excel, you must connect the Word document to the worksheet containing your list. The first time you connect to an Excel worksheet from Word, you must enable a setting that allows you to convert files between the two programs.
-
In Word, click File.
-
Scroll down, and select Options at the bottom of the left pane.
-
Click Advanced in the left pane of the Word Options window and then scroll down to the General section.
-
Make sure the Confirm file format conversion on open is selected and click OK.
-
From Mailings, in the Start Mail Merge group, choose Select Recipients > Use an Existing List.
-
Navigate to the Excel worksheet containing your list in the Select Data Source window that opens and click Open.
-
Click OK to confirm that you want to use the list and click OK again to select the table containing your list. The page will now be filled with labels that say «Next Record».
Add Mail Merge Fields and Perform the Merge
After you’ve organized the data, you need to add mail merge fields before you can complete the merge. This is where those headings you added to your Excel worksheet will come in handy.
-
Click on the first label on the page and then select Address Block in the Write & Insert Fields section of the Mailings tab.
-
Click the Match Fields button on the Insert Address Block dialog box that appears.
Make sure your headings correspond with the required fields. If any of them are incorrect, use the drop-down arrow beside it to match up to the correct field.
-
Click OK. Click OK again to close the dialog box.
-
Select Mailings > Write & Insert Fields > Update Labels.
-
Once you have the Excel spreadsheet and the Word document set up, you can merge the information and print your labels. Click Finish & Merge in the Finish group on the Mailings tab.
-
Click Edit Individual Documents to preview how your printed labels will appear. Select All > OK.
-
A new document opens with the mailing labels from your Excel worksheet. You can edit, print, and save the labels just as you would any other Word document.
FAQ
-
How do I label an axis in Excel?
To label chart axes in Excel, select a blank area of the chart, then select the Plus (+) in the upper-right. Check the Axis title box, select the right arrow beside it, then choose an axis to label.
-
How do I label a legend in Excel?
To label legends in Excel, select a blank area of the chart. In the upper-right, select the Plus (+) > check the Legend checkbox. Then, select the cell containing the legend and enter a new name.
-
How do I label a series in Excel?
To label a series in Excel, right-click the chart with data series > Select Data. Under Legend Entries (Series), select the data series, then select Edit. In the Series name field, enter a name.
-
How do I apply label filters in Excel?
To apply filters to a pivot table in Excel, select the Column Labels down-arrow to open the filter’s drop-down list, uncheck Select All, then choose your desired filters.
Thanks for letting us know!
Get the Latest Tech News Delivered Every Day
Subscribe
Содержание
- How to Print Labels From Excel
- What to Know
- How to Print Labels From Excel
- Prepare the Worksheet and Enter the Data
- Set Up Labels in Word
- Connect the Worksheet to the Labels
- Add Mail Merge Fields and Perform the Merge
- How to mail merge and print address labels from Excel to Word
- How to mail merge address labels from Excel
- Step 1. Prepare Excel spreadsheet for mail merge
- Step 2. Set up mail merge document in Word
- Step 3. Connect to Excel mailing list
- Step 4. Select recipients for mail merge
- Step 5. Arrange layout of address labels
- Step 6. Preview mailing labels
- Step 7. Print address labels
- Step 8. Save labels for later use (optional)
- How to make a custom layout of mailing labels
- How to add missing address elements
How to Print Labels From Excel
Make labels in Excel in a snap
:max_bytes(150000):strip_icc()/TriciaGoss-c6bcd4d050f744c2b13efbf760819c9d.jpg)
What to Know
- Prepare your worksheet, set up labels in Microsoft Word, then connect the worksheet to the labels.
- Open a blank Word document > go to Mailings >Start Mail Merge >Labels. Choose brand and product number.
- Add mail merge fields: In Word, go to Mailings > in Write & Insert Fields, go to Address Block and add fields.
This guide explains how to create and print labels from Excel using the mail merge feature in Microsoft Word. Instructions apply to Excel and Word 2019, 2016, and 2013 and Excel and Word for Microsoft 365.
How to Print Labels From Excel
You can print mailing labels from Excel in a matter of minutes using the mail merge feature in Word. With neat columns and rows, sorting abilities, and data entry features, Excel might be the perfect application for entering and storing information like contact lists. Once you have created a detailed list, you can use it with other Microsoft 365 applications for numerous tasks.
:max_bytes(150000):strip_icc()/make-labels-with-excel-4157653-2dc7206a7e8d4bab87552c8ae2ab8f28.png)
Prepare the Worksheet and Enter the Data
To make mailing labels from Excel, you need to add descriptive column headings so everything prints out correctly. For example, you might have the following column headings:
- Title (Mr./Ms./Dr.)
- First Name
- Last Name
- Street Address
- City
- State
- ZIP Code
Type in a heading in the first cell of each column describing the data. Make a column for each element you want to include on the labels.
:max_bytes(150000):strip_icc()/PrepareWorksheetinExcelHeadings-5a5a9b984e46ba0037b886ec.jpg)
Type the names and addresses or other data you’re planning to print on labels.
Make sure each item is in the correct column.
Avoid leaving blank columns or rows within the list.
:max_bytes(150000):strip_icc()/PreparetheWorksheet2-5a5a9b290c1a82003713146b.jpg)
Save the worksheet when you have finished.
Set Up Labels in Word
Next, you need to choose the size and type of the labels you’re printing.
Open a blank Word document.
Go to the Mailings tab.
:max_bytes(150000):strip_icc()/mailmergeinword-34245491e1934201bed7ac4658c48bb5.jpg)
Choose Start Mail Merge > Labels.
Choose the brand in the Label Vendors box and then choose the product number, which is listed on the label package. You can also select New Label if you want to enter custom label dimensions.
Click OK when you are ready to proceed.
:max_bytes(150000):strip_icc()/excellabeloptions-8f158ccf1f6e4441bc537935f70a2d46.jpg)
Connect the Worksheet to the Labels
Before performing the merge to print address labels from Excel, you must connect the Word document to the worksheet containing your list. The first time you connect to an Excel worksheet from Word, you must enable a setting that allows you to convert files between the two programs.
In Word, click File.
:max_bytes(150000):strip_icc()/LabelsExcel4-0f0345eb0cd14b6da7728e98c839b7ed.jpg)
Scroll down, and select Options at the bottom of the left pane.
:max_bytes(150000):strip_icc()/Wordoptions-a6682db48abc42cdb8b42b830971276b-d976d9b55fd14db0916a948a94a7868f.jpg)
Click Advanced in the left pane of the Word Options window and then scroll down to the General section.
:max_bytes(150000):strip_icc()/LabelsExcel6-8a737b08ae0c4344b5e4f42249434dc9-c6d45a8fd8a04ac0b87dfad2590b96de.jpg)
Make sure the Confirm file format conversion on open is selected and click OK.
:max_bytes(150000):strip_icc()/confirmfileformatconversion-7944392fc2a644138d89881607aadc25.jpg)
From Mailings, in the Start Mail Merge group, choose Select Recipients > Use an Existing List.
:max_bytes(150000):strip_icc()/LabelsExcel8-f197e761243f4002ad501fdfca3470a7-f22eb76e503f4b2580916cfd7902d95b.jpg)
Navigate to the Excel worksheet containing your list in the Select Data Source window that opens and click Open.
Click OK to confirm that you want to use the list and click OK again to select the table containing your list. The page will now be filled with labels that say «Next Record».
Add Mail Merge Fields and Perform the Merge
After you’ve organized the data, you need to add mail merge fields before you can complete the merge. This is where those headings you added to your Excel worksheet will come in handy.
Click on the first label on the page and then select Address Block in the Write & Insert Fields section of the Mailings tab.
Click the Match Fields button on the Insert Address Block dialog box that appears.
:max_bytes(150000):strip_icc()/AddressblockinWordmailmerge-5a5a9fa5beba33003625c32c-364cbcc6909b405ab2afa88fd58489f9.jpg)
Make sure your headings correspond with the required fields. If any of them are incorrect, use the drop-down arrow beside it to match up to the correct field.
Click OK. Click OK again to close the dialog box.
Select Mailings > Write & Insert Fields > Update Labels.
Once you have the Excel spreadsheet and the Word document set up, you can merge the information and print your labels. Click Finish & Merge in the Finish group on the Mailings tab.
Click Edit Individual Documents to preview how your printed labels will appear. Select All > OK.
:max_bytes(150000):strip_icc()/FinishmergetomakelabelsfromExcel-5a5aa0ce22fa3a003631208a-f9c289e615d3412db515c2b1b8f39f9b.jpg)
A new document opens with the mailing labels from your Excel worksheet. You can edit, print, and save the labels just as you would any other Word document.
To label chart axes in Excel, select a blank area of the chart, then select the Plus (+) in the upper-right. Check the Axis title box, select the right arrow beside it, then choose an axis to label.
To label legends in Excel, select a blank area of the chart. In the upper-right, select the Plus (+) > check the Legend checkbox. Then, select the cell containing the legend and enter a new name.
To label a series in Excel, right-click the chart with data series > Select Data. Under Legend Entries (Series), select the data series, then select Edit. In the Series name field, enter a name.
To apply filters to a pivot table in Excel, select the Column Labels down-arrow to open the filter’s drop-down list, uncheck Select All, then choose your desired filters.
Источник
How to mail merge and print address labels from Excel to Word
 by Svetlana Cheusheva, updated on February 7, 2023
The tutorial explains how to do a mail merge from an Excel spreadsheet for labels. You will learn how to prepare your Excel address list, set up a Word document, make custom labels, print them and save for later use.
Last week we started to look into the capabilities of Word Mail Merge. Today let’s see how you can leverage this feature to make and print labels from an Excel spreadsheet.
How to mail merge address labels from Excel
If you’ve had a chance to read our Mail Merge tutorial, a larger part of the process will be familiar to you because making labels or envelopes from Excel is yet another variation of the Word Mail Merge feature. Whatever intricate and intimidating the task may sound, it boils down to 7 basic steps. 
Below, we’ll take a closer look at each step using Microsoft 365 for Excel. The steps are essentially the same in Excel 365, Excel 2021, Excel 2019, Excel 2016, Excel 2010, and very similar in Excel 2007.
Step 1. Prepare Excel spreadsheet for mail merge
In essence, when you mail merge labels or envelopes from Excel to Word, the column headers of your Excel sheet are transformed into mail merge fields in a Word document. A merge field can correspond to one entry such as first name, last name, city, zip code, etc. Or, it can combine several entries, for example the В«AddressBlockВ» field.
Microsoft Word will be pulling out the information from your Excel columns and placing it into the corresponding merge fields in this way: 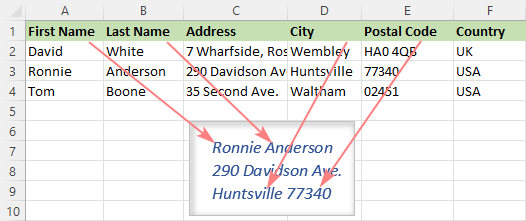
Before starting a mail merge, invest some time in setting up your Excel spreadsheet to ensure it is properly structured. This will make it easier for you to arrange, review and print your mailing labels in Word and save more time in the long run.
Here are a few important things to check:
- Create one row for each recipient.
- Give clear and unambiguous names to your Excel columns such as First Name, Middle Name, Last name, etc. For address fields, use the full words such as Address, City, State, Postal or Zip code, Country or Region.
The screenshot below shows a list of the Address block fields used by Word. Giving identical names to your Excel column will help Mail Merge to automatically match the fields and save you the trouble of mapping the columns manually. 
Step 2. Set up mail merge document in Word
With the Excel mailing list ready, the next step is to configure the main mail merge document in Word. The good news is that it’s a one-time setup — all labels will be created in one go.
There are two ways to do a mail merge in Word:
- Mail Merge Wizard. It provides step-by-step guidance which may be helpful for beginners.
- Mailings tab. If you are pretty comfortable with the mail merge feature, you can use the individual options on the ribbon.
To show you an end-to-end process, we are going to mail merge address labels using the step-by-step wizard. Also, we’ll point out where to find the equivalent options on the ribbon. Not to mislead you, this information will be provided in (brackets).
- Create a Word document. In Microsoft Word, create a new document or open an existing one.
Note. If your company already has a package of label sheets from a certain manufacturer, e.g. Avery, then you need to match the dimensions of your Word mail merge document with the dimensions of the label sheets you are going to use.
Select document type. The Mail Merge pane will open in the right part of the screen. In the first step of the wizard, you select Labels and click Next: Starting document near the bottom.
(Or you can go to the Mailings tab > Start Mail Merge group and click Start Mail Merge > Labels.) 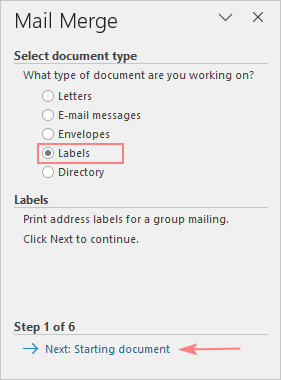
- Use the current document — start from the currently open document.
- Change document layout — start from a ready-to-use mail merge template that can be further customized for your needs.
- Start from existing document — start from an existing mail merge document; you will be able to make change to its content or recipients later.
As we are going to set up a mail merge document from scratch, we select the first option and click Next. 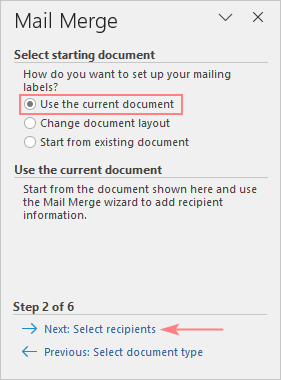
Tip. If the Use the current document option is inactive, then select Change document layout, click the Label options… link, and then specify the label information. 
If you are going to print Avery labels, your settings may look something like this: 
Tip. For more information about the selected label package, click the Details… button in the lower left corner.
When done, click the OK button.
Step 3. Connect to Excel mailing list
Now, it’s time to link the Word mail merge document to your Excel address list. On the Mail Merge pane, choose the Use an existing list option under Select recipients, click Browse… and navigate to the Excel worksheet that you’ve prepared.
(Those of you who prefer working with the ribbon can connect to an Excel sheet by clicking Select Recipients > Use an Existing List… on the Mailings tab.) 
The Select Table dialog box will pop up. If you have given a name to your mailing list, select it and click OK. Otherwise, select the entire sheet — you will be able to remove, sort or filter recipients later. 
Step 4. Select recipients for mail merge
The Mail Merge Recipients window will open with all the recipients from your Excel mailing list selected by default. 
Here are some of the actions you can perform to refine your address list:
- To exclude a particular contact(s), clear a check box next to their name.
- To sort the recipients by a certain column, click the column’s heading, and then choose to sort either ascending or descending.
- To filter the recipient list, click the arrow next to the column heading and pick the desired option, e.g. blanks or non-blanks.
- For advanced sorting or filtering, click the arrow next to the column name, and then select (Advanced…) from the drop-down list.
- A few more options are available in the Refine recipient list section near the bottom.
When the recipient list is all set, click Next: Arrange your labels on the pane.
Step 5. Arrange layout of address labels
Now, you need to determine what information to include in your mailing labels and decide on their layout. For this, you add placeholders to the Word document, which are called mail merge fields. When the merge is finished, the placeholders will be replaced with the data from your Excel’s address list.
To arrange your address labels, follow these steps:
- In your Word document, click where you want to insert a field, and then click the corresponding link on the pane. For mailing labels, you’d normally need only the Address block.
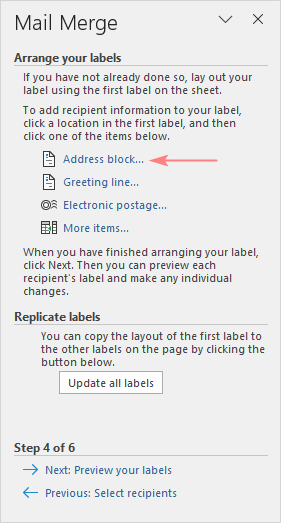
In the Insert Address Block dialog box, select the desired options, check the result under the Preview section and click OK. 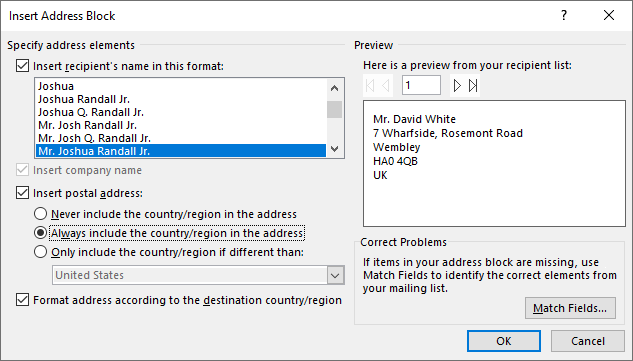
When you are finished with the Address Block, click OK.
The В«AddressBlockВ» merge field will appear in your Word document. Note that it’s just a placeholder. When the labels are printed out, it will be replaced with the actual information from your Excel source file.
When you are ready for the next step, click Next: Preview your labels on the pane.
Step 6. Preview mailing labels
Well, we are very close to the finish line 🙂 To see how your labels will look like when printed, click the left or right arrow on the Mail Merge pane (or the arrows on the Mailings tab, in the Preview Results group). 
- To change label formatting such as font type, font size, font color, switch to the Home tab and design the currently previewed label to your liking. The edits will be automatically applied to all other labels. If they are not, click the Update all labels button on the Mailings tab, in the Write & Insert Fields group.
- To preview a certain label, click Find a recipient… link and type your search criteria in the Find Entry box.
- To make changes to the address list, click the Edit recipient list… link and refine your mailing list.
When you are satisfied with the appearance of your address labels, click Next: Complete the merge.
Step 7. Print address labels
You are now ready to print mailing labels from your Excel spreadsheet. Simply click Print… on the pane (or Finish & Merge > Print documents on the Mailings tab). 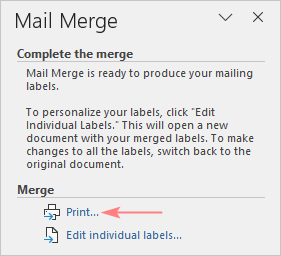
And then, indicate whether to print all of your mailing labels, the current record or specified ones. 
Step 8. Save labels for later use (optional)
If you may want to print the same labels at some point in the future, you have two options:
- Save the Word mail merge document connected to the Excel sheet
Save the Word document in the usual way by clicking the Save button or pressing the Ctrl + S shortcut. The mail merge document will be saved «as-is» retaining the connection to your Excel file. If you make any changes to the Excel mailing list, the labels in Word with be updated automatically.
The next time you open the document, Word will ask you whether you want to pull the information from the Excel sheet. Click Yes to mail merge labels from Excel to Word. 
If you click No, Word will break the connection with the Excel database and replace the mail merge fields with the information from the first record.
Save merged labels as text
In case you wish to save the merged labels as usual text, click the Edit individual labels… on the Mail Merge pane. (Alternatively, you can go to the Mailings tab > Finish group and click Finish & Merge > Edit individual documents.) 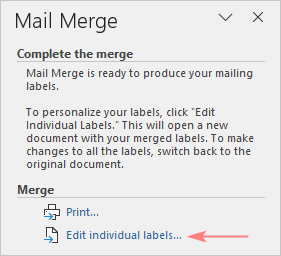
In the dialog box that pops up, specify which labels you want to edit. When you click OK, Word will open the merged labels in a separate document. You can make any edits there, and then save the file as a usual Word document.
How to make a custom layout of mailing labels
If none of the predefined options in the Address Block is suitable for your needs, you can create a custom layout of your address labels. Here’s how:
- When arranging the labels layout, place the cursor where you want to add a merge field.
- On the Mail Merge pane, click the More items… link. (Or click the Insert Merge Field button on the Mailings tab, in the Write & Insert Fields group).
- In the Insert Merge Field dialog, select the desired field and click Insert.
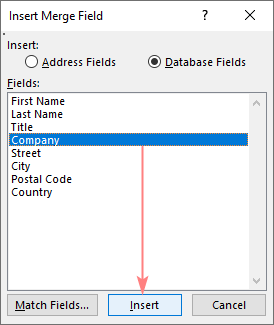
Here’s an example of how your custom labels may eventually look like: 
- To copy the layout of the first label to all other labels, click Update all labels on the pane (or the same button on the Mailings tab, in the Write & Insert Fields group).
- In addition to the mail merge fields, you can add some text or graphics to be printed on each label, e.g. your company logo or return address.
- You can change the format of a particular field directly in the Word document, e.g. display dates or numbers in a different way. For this, select the needed field, press Shift + F9 to display the field coding, and then add a picture switch as explained in How to format mail merge fields.
How to add missing address elements
It may happen that the address elements you see under in the Preview section do not match the selected address pattern. Typically, this is the case when the column headings in your Excel sheet differ from the default Word Mail Merge fields.
For example, you have chosen the Salutation, First name, Last name, Suffix format, but the preview shows only the First name and Last name.
In this case, first verify whether your Excel source file contains all the required data. If it does, click the Match Fields… button in the lower right corner of the Insert Address Block dialog box, and then match the fields manually. 
For the detailed instructions, please see How to get mail merge to match fields.
Hurray! We finally did it 🙂 Thanks a lot to everyone who has read our Mail Merge Labels tutorial to the end!
Источник
Contents
- 1 How do I make labels from an Excel spreadsheet?
- 2 Can you print labels directly from Excel?
- 3 How do I create a mail merge from an Excel spreadsheet?
- 4 Is Mail Merge possible in Excel?
- 5 How do I do a mail merge in Word from Excel?
- 6 How do I merge Excel data into Word document?
- 7 Can you mail merge in Excel without word?
- 8 Can you export Excel to Word?
- 9 How do you copy from Excel to Word and keep formatting?
- 10 How do I make my Excel sheet print on one page?
- 11 How do I open an Excel file in Word 2010?
- 12 How do I insert an Excel table into Word 2010?
- 13 How do I save an Excel table as an image?
- 14 How do I convert an image to text in Excel?
- 15 How do I save an Excel table?
- 16 How do I save an Excel file as an image?
- 17 How do I save an Excel file as a PNG?
- 18 How do I save an Excel chart as 300 DPI?
How do I make labels from an Excel spreadsheet?
Can you print labels directly from Excel?
To create and print the mailing labels, you must first prepare the worksheet data in Excel, and then use Word to configure, organize, review, and print the mailing labels. Here are some tips to prepare your data for a mail merge. Column names in your spreadsheet match the field names you want to insert in your labels.
How do I create a mail merge from an Excel spreadsheet?
You can insert one or more mail merge fields that pull the information from your spreadsheet into your document.
- Go to Mailings > Insert Merge Field.
- Add the field you want.
- Repeat steps 1 and 2 as needed.
- Choose File > Save.
Is Mail Merge possible in Excel?
You can use the mail merge feature in Word and Excel to create and print personalized mass letters quickly. the mail merge template is a form letter in Microsoft Word.
How do I do a mail merge in Word from Excel?
On your Word document, highlight the field you want to populate with the data from Excel. On the Mailings tab, choose the ‘Insert Merge Field’ button, a list of the column headers on your saved excel document will drop down (i.e. Company Name, etc.). Choose the appropriate field you want to merge and choose Insert.
How do I merge Excel data into Word document?
On your Word document, highlight the field you want to populate with the data from Excel. On the Mailings tab, choose the ‘Insert Merge Field’ button, a list of the column headers on your saved excel document will drop down (i.e. Company Name, etc.). Choose the appropriate field you want to merge and choose Insert.
Can you mail merge in Excel without word?
Send bulk personalized emails directly from Excel interface (mail merge without Word) Connect to your email account via SMTP: Gmail, Outlook, SendGrid, etc. Add attachments of any file format from your computer. Use TXT or HTML email templates with any personalized fields.
Can you export Excel to Word?
Do you want to convert an Excel document into a Microsoft Word document? Excel does not contain a feature for converting an Excel file into a Word file, and Word cannot directly open Excel files. However, an Excel table can be copied and pasted into Word and then saved as a Word document.
How do you copy from Excel to Word and keep formatting?
In Excel, select the data you want to copy, and then press Ctrl+C. Open the other Office program, click where you want to paste the data, and then press Ctrl+V. Click Paste Options next to the data, and choose how you want to paste it. Keep Source Formatting This keeps the data formatting exactly as is.
How do I make my Excel sheet print on one page?
Shrink a worksheet to fit on one page
- Click Page Layout.
- Select the Page tab in the Page Setup dialog box.
- Select Fit to under Scaling.
- To fit your document to print on one page, choose 1 page(s) wide by 1 tall in the Fit to boxes.
- Press OK at the bottom of the Page Setup dialog box.
How do I open an Excel file in Word 2010?
In your word document, select the “Insert” tab and select “Object”. From there, a new window will appear, and you’ll select the “Create from File” tab which will let you select the file you have already created in Excel.
How do I insert an Excel table into Word 2010?
How do I save an Excel table as an image?
Copy data as a picture in Excel
Select the cells, or click the chart or object that you want to copy as a picture. On the Home tab, in the Clipboard group, click the arrow next to Copy, then click Copy as Picture.
How do I convert an image to text in Excel?
How to convert Image to Text, Word, or Excel free online:
- Upload your image to our free online OCR tool.
- Choose an option to convert your Image to Text, Word, or Excel.
- Click on the “Convert Image” button in order to start the conversion.
- Wait for the conversion to finish & then download your file.
How do I save an Excel table?
Save a single worksheet
- Right-click the worksheet name tab.
- Click select Move or Copy.
- Click on the Move selected sheets to Book drop-down menu. Select (new book).
- Click OK. Your new workbook opens with your moved worksheet.
- Click File > Save in your new workbook.
How do I save an Excel file as an image?
How to Convert Excel to JPG Online for Free
- Drag and drop your Excel file into the Excel Converter.
- Wait for the first conversion to finish, then click ‘to JPG. ‘
- Wait for the second conversion to finish.
- Download your data sheet in JPG format.
How do I save an Excel file as a PNG?
How to convert a XLS to a PNG file?
- Choose the XLS file that you want to convert.
- Select PNG as the the format you want to convert your XLS file to.
- Click “Convert” to convert your XLS file.
How do I save an Excel chart as 300 DPI?
Copy the graph in Excel (CMD+C), open a new file in Preview (CMD+N), and save as a PNG image (changing the resolution to 300 DPI). This ensures consistent image size and the image quality in Preview can be set to 300 pixels/inch.
Go to the Mailings tab. Choose Start Mail Merge > Labels. Choose the brand in the Label Vendors box and then choose the product number, which is listed on the label package. You can also select New Label if you want to enter custom label dimensions.
Just so, How do I make Labels in Photoshop?
Besides, How do I convert Excel to Word labels?
Templates: from Excel to Word in a Mail Merge
- Select Document Type. Select “Labels”!
- Select Starting Document. If you have a compatible template code select “Change document layout”, then click “Label options”. …
- Select Recipients. …
- Arrange Your Labels. …
- Preview Your Labels. …
- Print Your Labels.
Can you print labels directly from Excel without Word? Follow the below steps to print single address label from excel without word. Use the excel sheet, which has a tiny macro to rearrange the column data to the printable address labels. Enter data into column A. Press CTRL+E to start the excel macro.
Subsequently, How do I make labels in Microsoft Word?
Create and print labels
- Go to Mailings > Labels.
- Select Options and choose a label vendor and product to use. …
- Type an address or other information in the Address box (text only). …
- To change the formatting, select the text, right-click, and make changes with Font or Paragraph.
- Select OK.
Does Photoshop have label templates?
If you’re setting up files in a format supported by Adobe Photoshop, you can download our free Adobe Photoshop label templates. By just entering your email address and password, you can our templates online. If you’re a first-time user, you have to register first before downloading.
Can you create labels in Adobe?
Design your custom label using the templates and tools from Adobe Express. The editable and resizeable label templates empower you to create contemporary, visually-appealing labels to print or share online. Take your label from ordinary to extraordinary with a professional label template.
What is Adobe DN?
Adobe Dimension (formerly Project Felix) is a 3D rendering and design software developed and published by Adobe Systems for macOS and Windows operating systems.
Can I print labels from Excel?
The mail merge process creates a sheet of mailing labels that you can print, and each label on the sheet contains an address from the list. To create and print the mailing labels, you must first prepare the worksheet data in Excel, and then use Word to configure, organize, review, and print the mailing labels.
Can you make Avery labels from an Excel spreadsheet?
You can import addresses or other data from an Excel spreadsheet and add them on Avery labels, cards, and tags. Then you can print using Avery Labels, Microsoft, and a standard printer.
How do I create mailing labels and envelopes in Word?
1) Start Microsoft Word. 2) Click the New Document button. 3) From the Tools menu, select Letters and Mailings, then select Envelopes and Labels. 4) Select the Labels tab, click Options, select the type of labels you want to create and then click OK.
How do I print labels without Word?
How do I print labels from Google Sheets?
In Google Sheets, click on the “Extensions” menu (previously named “Add-ons”), then select “Create & Print Labels”. If you don’t have the add-on yet, make sure to install it first. After the installation, reload your spreadsheet by closing it and reopening it.
Does Microsoft Word have a label template?
Open a blank document in Word, click on the “Mailings” tab at the top of the page, and click on “Labels”. This will open a box titled “Envelopes and Labels”. Click on the “Options” button to create a new label template.
How do you create Labels in Outlook?
Here’s how to create a label that you can add to any of your messages:
- On the left side of the page, click More at the bottom of your labels list. …
- Click Create new label.
- Type the name of your new label and click Create.
How do I create mailing Labels and Envelopes in Word?
1) Start Microsoft Word. 2) Click the New Document button. 3) From the Tools menu, select Letters and Mailings, then select Envelopes and Labels. 4) Select the Labels tab, click Options, select the type of labels you want to create and then click OK.
Which Adobe program is used for labels?
This is why you should always use Adobe Illustrator when designing labels. Adobe Illustrator allows you to create (and work with) high-quality vector imagery that won’t pixelate when resized. This will ensure that your labels will turn out crystal clear when printed.
How do I create labels in PDF?
How do you set label for PDF pages in toolbar?
- Click “Add File” to list your PDF file;
- Set label information in “Advanced->Label”, check “Add Lables” and input “Label Prefix” such as “Chapter” or “Section”;
- Click “Number and save as…”
How do I create a label template in InDesign?
Select the Rectangle Frame tool from the InDesign toolbox. Click at the intersection of your top and left margins, bringing up the Rectangle dialog box. Enter the width and height of an individual label in the corresponding fields. Click on the “OK” button to create your frame.
Can I create labels from PDF?
When you’re printing mailing labels from a PDF file, you need to change the Scale to ‘Actual Size’. After you change the print Scale to ‘Actual Size’, your mailing labels will align properly and print out perfectly.
How do I create a label template?
To create a template:
- Step 1: Click on Options; this opens a dialogue box called Label Options.
- Step 2: Click on New Label; this opens a dialogue box called Label Details.
- Step 3: Enter your required measurements. …
- Step 4: Give your template a name, and click OK.
How do I create a PDF label?
- Reference 1
- Reference 2
- Reference 3
- Reference 4
- Reference 5

According to a study by Epsilon, 77% of consumers sort through their physical mail as soon as they get it. Whereas, think about all those unread emails that you receive every day.
Direct mail marketing still plays a big part in marketing campaigns and the way people do business. It adds an additional personal touch and can build trust with your customers and clients.
Keep reading to discover 2 easy ways to start creating labels in Excel.
How to Create Labels in Excel
Did you know that 66% of people have bought something because of direct mail? If you want to connect with your customers, then try sending them a physical letter.
There are many different ways you can go about creating labels in Excel. These are just 2 ways in which you can do so in a matter of minutes:
1. Using Excel and Word
One way to go about creating labels from excel is by using your contact lists. Excel is great at organizing your contact details and then from there you can export those details and create labels to print.
Step 1: Input Data
The first thing you need to do is ensure that your Excel spreadsheet is set up correctly. You need to make sure that you have a column for each element you want to include in your label.
For example, put the title, first name, last name, street address, city, state, and ZIP code in individual columns.
Then you need to input the relevant data, that you want to print on the labels from excel. To ensure that your labels look professional, ensure you don’t leave any columns blank. Once you’ve inputted the data, save the worksheet.
Step 2: Setting Up Excel and Word
After you’re happy with your worksheet, you need to connect Excel to Word. This will enable you to convert files between the two programs.
To do this, open Word and click on File. Then choose Options, click Advanced and scroll down to General. Ensure that you select Confirm File Format Conversion on Open and then press OK.
Then you need to go to the Mailings tab in Word and select Start Mail Merge. Click on Labels and choose the brand in the Label Vendors box.
Then select the product number which is the right size for your labels (this is listed on the label package). Alternatively, you can create your own label by selecting New Label and customizing the dimensions to suit. Once you’re happy, click OK.
Step 3: Connecting Excel and Word
Before you can print the address labels from Word you need to connect the Word document to your worksheet.
To do this, you need to click on the Mailings tab, click Select Recipients in the Mail Merge group. Then select Use an Existing List.
Find the Excel worksheet that has your list and click Open. Confirm the list you want by clicking OK.
The page should now be filled with labels that read «Next Record».
Next, you want to add the mail merge fields. To do this, you need to click on the first label on the page and choose Address Block, which should be in the Write & Insert Fields section.
Press the Match Fields button on the box that pops up. Then ensure that your headings are all right and in the right fields. If any of them are incorrect you can use the drop-down arrow to match it to the right field.
Once you’re happy with your fields click OK and then select Update Labels.
Step 4: Finishing Up
Now your Excel worksheet and your Word document should all be set up. To finish up, all you need to do is click Finish & Merge in the Finish group (which can be found on the Mailings tab).
To preview how your printed labels will appear, you can select Edit Individual Documents and select All, then press OK.
After this, a new document will open with the mailing labels that you inputted into the Excel worksheet. From here you can edit, print, or save the labels for a later date.
2. Using Excel 2003
If you’re using an older version of Excel, for example, Excel 2003, then the process is a little different.
To make labels from Excel in older versions, you need to input your data (the way you did in step 1 above).
After that, you need to open a new Word document and go to the Tools menu. Then click Letter and Mailings and select Mail Merge.
Once Mail Merge has opened, select Labels and choose Next: Starting Document. Click Label Options and then choose the right size for your label. Again this is the same as the above steps, so you can also create your own customizable label too. Then click OK.
Under Select Recipients, click Use an Existing List and then Browse. Find your Excel worksheet with your mailing list on it and then click Open. If the data that pops up is right, select OK.
Click Next: Arrange Your Labels and choose Address Block. Select Match Fields (which is on the Insert Address Block dialog box). If your headings are correct, click OK, then Update All Labels.
You can then preview your labels, by using the arrows under Preview Your Labels. Once you’re happy with them, click Next: Complete the Merge. You can edit your labels by clicking Edit Individual Labels.
When you are happy with your labels, you can then print them.
Address labels can be tricky to print, so if you’re struggling to get your label to the right size, then check out our Print Certified Mail Labels services.
Now you’ve followed our guide on five easy ways of creating labels in excel in minutes, you can go about sending out all your mail quicker, easier, and cheaper. Implement one of the ways above and see how much time your business can save.
Contact us now to find out how we can help your business save time and money on postage.
Download PC Repair Tool to quickly find & fix Windows errors automatically
When it comes down to creating print or mail labels, the best tools to use are Microsoft Word and Microsoft Excel. Many have decided to go with Word exclusively, but did you know it is possible to store the label data in Excel and then use Word to fetch the data in order to print the labels? If not, well, you should not worry because this article will explain everything you need to know. Now, if you are an amateur, we suggest using the latest version of Microsoft Office because that’s what this article is based on.
The ability to create labels in Microsoft Word from an Excel list is easier than you might think. Still, it will take some effort on your part and the steps involved are as follows:
- Use Microsoft Excel to enter data for your labels
- Put together the labels in Microsoft Word
- Import the Excel data into your Word document
- Add the labels from Excel to Microsoft Word
- Create the labels from Excel in Word
- Save the document as PDF
1] Use Microsoft Excel to enter data for your labels

To begin, we must first create an Excel spreadsheet and then inject the relevant data. An applicable header must then be assigned to each data field as this is important for retrieving the headers in Microsoft Word
- Launch Excel: Open Microsoft Excel on your computer, whether it be Windows or the Mac variety. From there, create a new spreadsheet.
- Add a name: When the spreadsheet screen appears, click within the first cell via the first row and type First Name.
- Add a last name among other things: From the B column, you will want to select the first cell and type, Last Name. Now, in terms of the C, D, E, and F columns, add Street Address, City, State, and ZIP Code to the first rows respectively.
- Populate the headers with data: It is now time to add the relevant data under each teacher you’ve just created.
- Save your spreadsheet: After you’ve added all the required data, click on File at the top of the document and from there, save your spreadsheet.
2] Put together the labels in Microsoft Word
OK, so the next thing to accomplish here is to set up the dimensions of your labels from within Microsoft Word. You do not have to do a lot here since there are quite a few predefined label layouts available. However, if you want to go the custom route, well, we will leave that up to you.
- Launch Microsoft Word: Open the Microsoft Word app on your Windows or Mac device, and once you’ve done that, go on ahead and create a new document.
- Navigate to the Mailings tab: Look to the tabbed section from within the document area and select Mailings.

- Select Start Mail Merge: If you’ve done all things correctly, you should now come across several options. Please avoid all and only choose Start Mail Merge, and from the dropdown menu, click on Labels.
- Choose a Label Vendor: From the newly opened Label Options window, you must choose a Label Vendor from the list. The default vendor is Microsoft so you can stick with that if you want.

- Select a Label Type: Look to the Product Number list and choose a label type that fits your requirement, then complete it by hitting the OK button. Your label layout is now created, but ensure not to close the document.
3] Import the Excel data into your Word document
With your labels created and ready to be used, it is now time to import the Excel spreadsheet information. There is no need to launch Excel to get this done, so for now, focus your time on Word.
- Go to the Mailings tab: Return to the Word document and select the Mailings tab.
- Use Existing List: Click on Select Recipients via the Ribbon where a dropdown menu will be revealed. From this menu, please click on Use an Existing List.
- Import Excel spreadsheet into Word: From the File Explorer window, search for the Excel spreadsheet we’ve created earlier, select it, then import the document into Word.
- Select the spreadsheet from a list: A window with the name, Select Table should now appear. From there, choose the spreadsheet that holds the label data, and then tick First row of data containing column headers.
- Select OK: Click the OK button right away.
4] Add the labels from Excel to Microsoft Word
It is now time to specify the fields you’d prefer to use in your labels when added to the Word document.
- Go to Address Block: From the same Word document, click on the Mailings tab again then select Address Block from the Write & Insert Fields section on the Ribbon.
- Select Match Fields: When the Insert Address Block window appears, please click on the Match Fields button promptly.
- All fields must match Excel data: From the newly opened window, ensure that all fields match the heading data from the Excel document.
- Hit OK: Once the information is confirmed as legit, click the OK button.
- View preview of your work: You should now be looking at a preview of the labels. If you’re satisfied with the possible outcome, hit the OK button located below the window.
- Go over to Update Labels: Again, click the Mailings tab and then promptly select Update Labels.
- View your label: Every label in your document should now read, <<AddressBlock>>.
5] Create the labels from Excel in Word

At this point, Microsoft Word should have all the data needed to generate labels. With all this information, Word will showcase the data for each label inside.
- Edit Documents: Via the Mailings tab, click on Finish & Merge, then select Edit Individual Documents.
- Choose the All option: From the Merge to New Document window, select All > OK.
6] Save the document as a PDF
Finally, we suggest saving the entire Word document with the labels as a PDF.
Read: Convert JSON to Excel using free online converter tools
Is there a label template in Word?
There are multiple label templates in Microsoft Word that are available to use for free. Simply open Word, then click on More templates. Finally, search for the word, Label, and you’ll see several show up in the results.
How to print labels in Word?
That is super easy. Once you’ve accomplished the task of creating your labels, go ahead and select File > Print. Choose your printer, then hit the Print button to complete the job.

Shantel has studied Data Operations, Records Management, and Computer Information Systems. She is quite proficient in using Office software. Her goal is to become a Database Administrator or a System Administrator.