
Word for Microsoft 365 Word 2021 Word 2019 Word 2016 Word 2013 Word 2010 Word 2007 More…Less
An index lists the terms and topics that are discussed in a document, along with the pages that they appear on. To create an index, you mark the index entries by providing the name of the main entry and the cross-reference in your document, and then you build the index.
You can create an index entry for an individual word, phrase, or symbol, for a topic that spans a range of pages, or that refers to another entry, such as «Transportation. See Bicycles.» When you select text and mark it as an index entry, Word adds a special XE (Index Entry) field that includes the marked main entry and any cross-reference information that you choose to include.
After you mark all the index entries, you choose an index design and build the finished index. Word collects the index entries, sorts them alphabetically, references their page numbers, finds and removes duplicate entries from the same page, and displays the index in the document.
Mark the entries
These steps show you how to mark words or phrases for your index, but you can also Mark index entries for text that spans a range of pages.
-
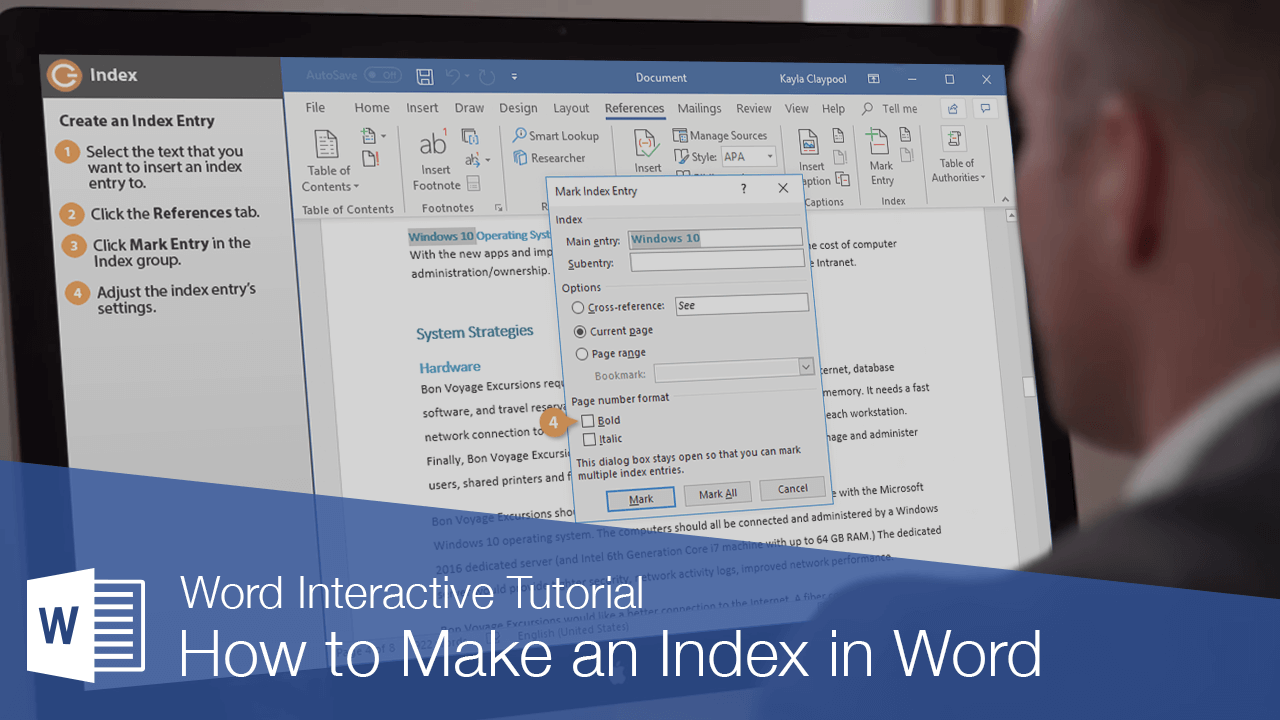
Select the text you’d like to use as an index entry, or just click where you want to insert the entry.
-
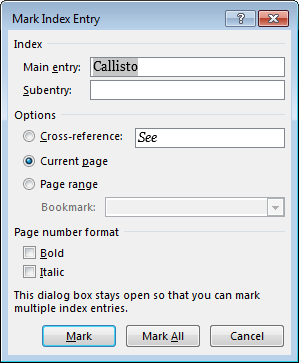
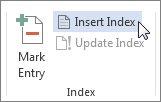
On the References tab, in the Index group, click Mark Entry.

-
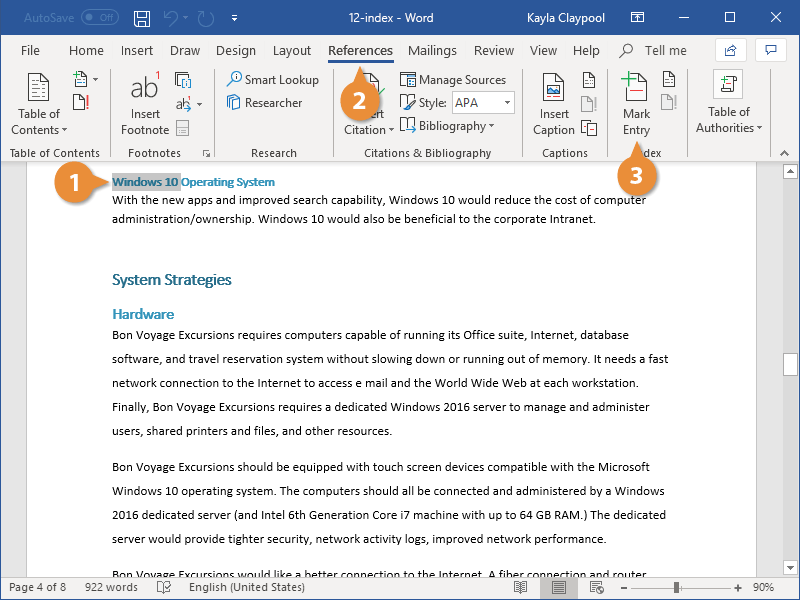
You can edit the text in the Mark Index Entry dialog box.
-
You can add a second-level in the Subentry box. If you need a third level, follow the subentry text with a colon.
-
To create a cross-reference to another entry, click Cross-reference under Options, and then type the text for the other entry in the box.
-
To format the page numbers that will appear in the index, select the Bold check box or Italic check box below Page number format.
-
-
Click Mark to mark the index entry. To mark this text everywhere it shows up in the document, click Mark All.
-
To mark additional index entries, select the text, click in the Mark Index Entry dialog box, and then repeat steps 3 and 4.

Create the index
After you mark the entries, you’re ready to insert the index into your document.
-
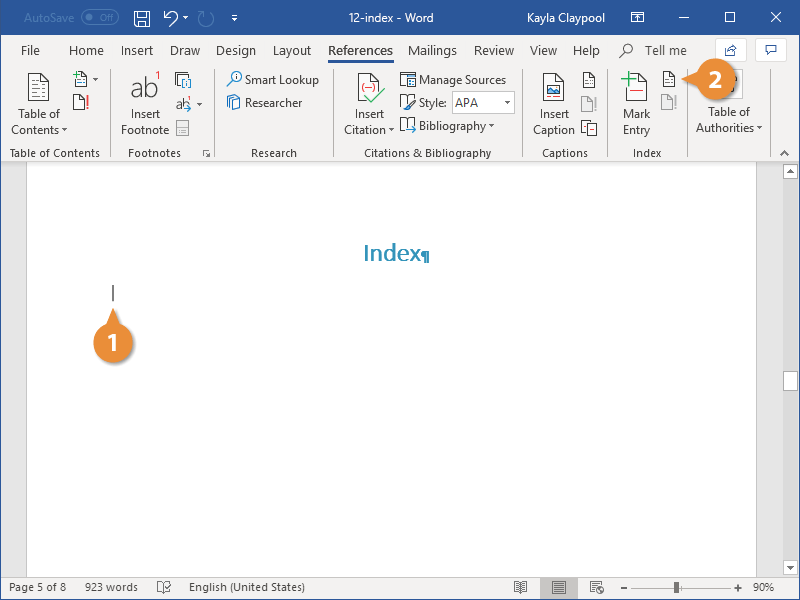
Click where you want to add the index.
-
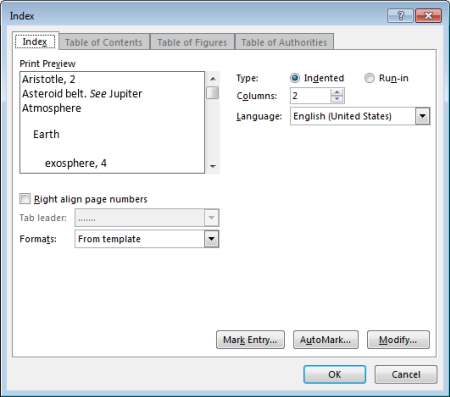
On the References tab, in the Index group, click Insert Index.
-
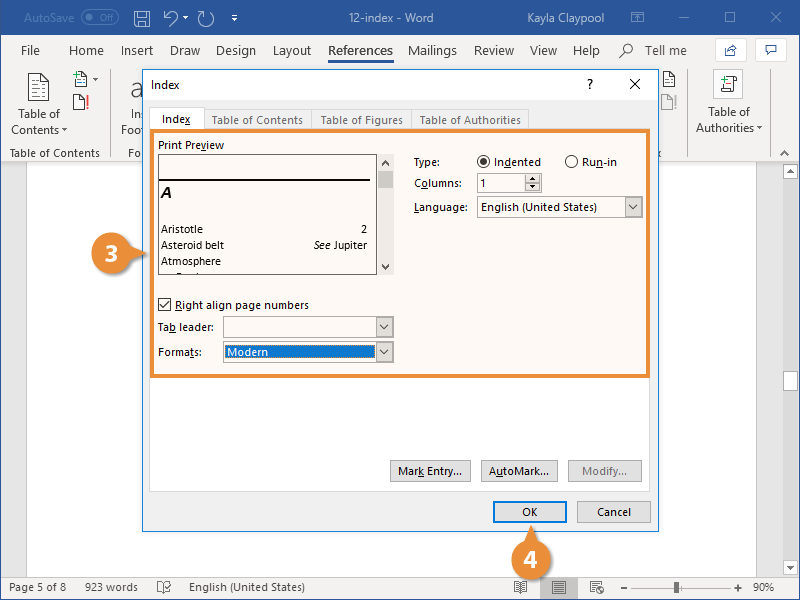
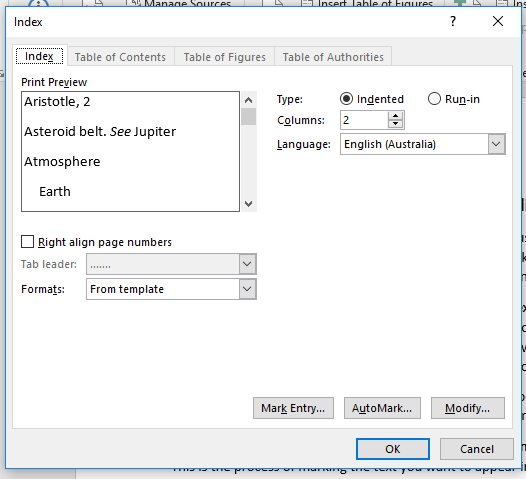
In the Index dialog box, you can choose the format for text entries, page numbers, tabs, and leader characters.
-
You can change the overall look of the index by choosing from the Formats dropdown menu. A preview is displayed in the window to the top left.
-
Click OK.
Edit or format an index entry and update the index
If you mark more entries after creating your index, you’ll need to update the index to see them.
-
If you don’t see the XE fields, click Show/Hide
in the Paragraph group on the Home tab. -
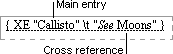
Find the XE field for the entry that you want to change, for example, { XE «Callisto» t «See Moons» }.
-
To edit or format an index entry, change the text inside the quotation marks.
-
To update the index, click the index, and then press F9. Or click Update Index in the Index group on the References tab.
 in the Paragraph group on the Home tab.
If you find an error in the index, locate the index entry that you want to change, make the change, and then update the index.
Delete an index entry and update the index
-
Select the entire index entry field, including the braces ({}), and then press DELETE.
If you don’t see the XE fields, click Show/Hide
in the Paragraph group on the Home tab. -
To update the index, click the index, and then press F9. Or click Update Index in the Index group on the References tab.
Need more help?
Want more options?
Explore subscription benefits, browse training courses, learn how to secure your device, and more.
Communities help you ask and answer questions, give feedback, and hear from experts with rich knowledge.
![]()
Download Article
![]()
Download Article
- Marking Your Entries
- Inserting the Index Page
- Editing Index Entries
- Video
- Q&A
- Tips
|
|
|
|
|
This wikiHow teaches you how to build an index page for your Microsoft Word document. Microsoft Word comes with a built-in indexing tool that can automatically create an index based on the entries you choose. All you’ll need to do is use the Mark Entry tool to mark each word or phrase you want to add to the index. Terms in your index can point to specific pages in the document or cross-reference to other indexed entries.
-
1
Open a Microsoft Word document. MS Word lets you add an index to any document regardless of its length, style, or subject matter. Before you can add an index to your document, you’ll need to go through each page to mark the terms you want to appear in the index.
-
2
Select a word or a group of words for your index. You can select a word or phrase by highlighting it with your mouse.
Advertisement
-
3
Click the References tab. It’s on the toolbar at the top of Word.
-
4
Click the Mark Entry button. Depending on your version of word, this icon will usually appear in a panel on the toolbar labeled «Index.» It’s the icon of a sheet of paper with a minus sign and a plus sign.[1]
-
5
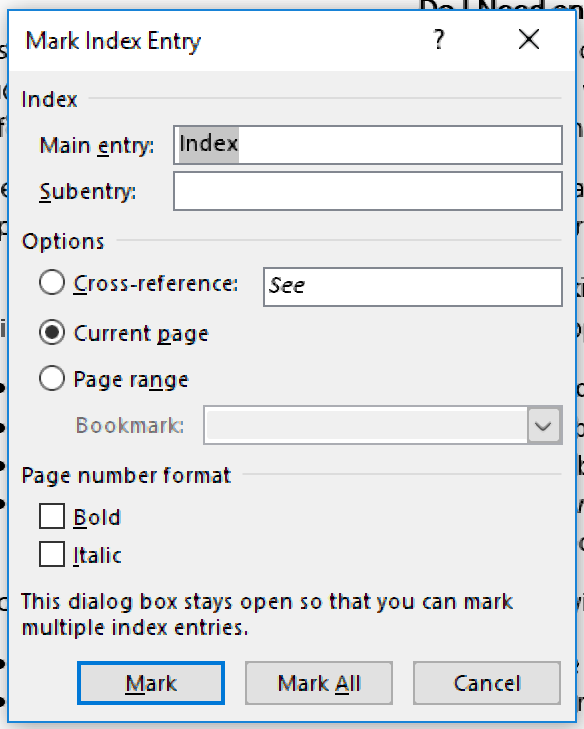
Change how the word or phrase appears in the index. You’ll see the word or phrase you selected in the «Main entry» field at the top of the window. As of now, this is how that word or phrase will appear in the index you’ll be creating. If you want to change the wording, capitalization, or other parameters, you can do so by editing the text in the «Main entry» box.
- If you want to adjust the font face, size, style, or color of this entry in your index, you can do so here. Just highlight the word or phrase in «Main entry,» right-click the highlighted area, and then select Font. Make any changes you want to the font and then click OK.
-
6
Add a subentry (optional). Think about main entries as being their own lines in your index. A subentry would appear below its main entry in the index. It might be helpful to go through your document and create main entries first, and then go back and add subentries.
- For example, if you selected the word surnames and plan to index all surnames in your document, you may want to add mark each surname in the document with the «Surnames» main entry, and then list the surname itself as the subentry.
- You could also add a third-level entry, which would appear below a subentry in the index. To do this, just type a colon after the subentry and then type the third-level entry.
-
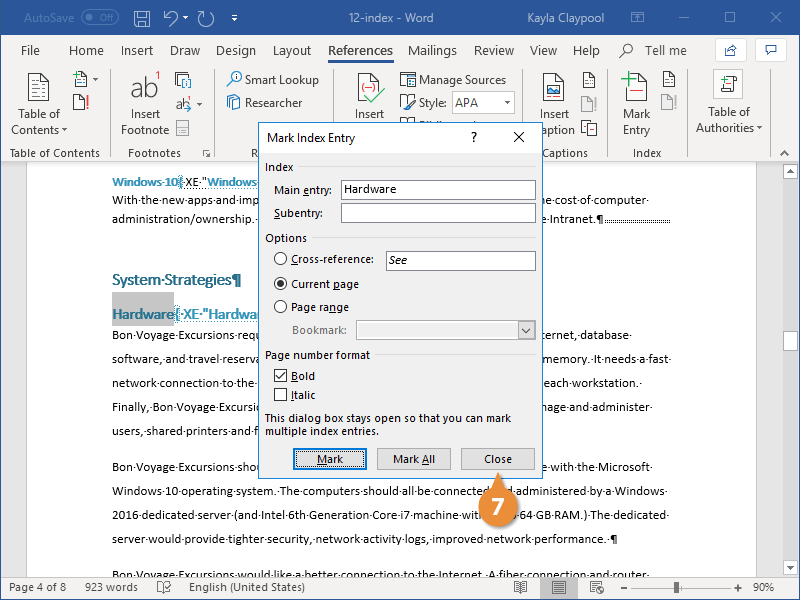
7
Choose the location referenced in the index entry. When Word builds an index based on your marked entries, it will simply list the page number on the entry you selected by default. For example, if you highlighted the word «Surnames» on page 2, the index will list «page 2» as the location of the Surnames entry. This is because «Current page» is the default selection in the «Options» section.
- If you’d rather the selected entry reference a different entry (think of when you see «See also» in an index), select «Cross-reference,» and then type the name of the other entry next to «See.»
- If you want the entry to point to a range of pages rather than a single page, you’ll need to create a bookmark for that page range. If you have a bookmark, select «Page range,» and then select your bookmark from the drop-down menu.
-
8
Format the page numbers in your index. Under the «Page number format»‘ heading, choose whether to display the page numbers in Bold and/or Italics as needed.
-
9
Click Mark to save your new entry. This button will mark the highlighted term and add it to your index with its corresponding page number, range, or cross-reference.
- After marking an entry in the index, paragraph markers will turn on immediately, and you’ll see the selected word or phrase in your document surrounded in curly braces with special formatting, much like this:
{XE "entry"} - If it’s too confusing for you to see your document in this format, you can switch back to the standard view by clicking the Home tab and then clicking the paragraph symbol ¶ in the toolbar.
- If you want to mark all instances of the same word or phrase throughout your document, you can click the Mark all button at the bottom. This would add the page number for all instances of this word or phrase to its entry in the index.
- After marking an entry in the index, paragraph markers will turn on immediately, and you’ll see the selected word or phrase in your document surrounded in curly braces with special formatting, much like this:
-
10
Continue marking entries. The «Mark Index Entry» window stays open after you mark an entry, which makes it easy to move to the next entry you want to mark. To continue, highlight another term in your document, and then click the «Mark Index Entry» window to add it to the «Main entry» field. After customizing this entry to your liking, click Mark to save it and move to the next.
- After marking your main entries, go through and mark any subentries or third-level entries. It’s kind of awkward to do:
- Highlight the word or phrase you want to list as a subentry. Using our surname example, let’s say you created a main entry for Surnames and want to add the surname «Williams» to the list of surnames in the index. Start by highlighting the first instance of «Williams» in your document.
- Next, click the Mark Index Entry window. This adds «Williams» to the «Main entry» field (for now).
- Type or paste the subentry (Williams, in our example) into the subentry field.
- Replace the text in the «Main entry» field with the name of the main entry (Surnames, in our example).
- Edit any details and click Mark (or Mark all).
- After marking your main entries, go through and mark any subentries or third-level entries. It’s kind of awkward to do:


Advertisement
-
1
Click your mouse cursor where you want to place the index. In most cases, you’ll want to place your index at the end of the document—just scroll down and click the first empty line below your existing content.
-
2
Click the Insert tab. It’s at the top of Word.
-
3
Insert a Page Break so the index is on its own page (optional). You’ll usually want your index to appear on its own page at the end of the document. To ensure that this happens, click the Insert tab and select Page Break on the toolbar to add a new page for your index.
-
4
Click the References tab. It’s at the top of Word.
-
5
Click the Insert Index button. This button is located next to the Mark Entry button on the References toolbar. This opens a window titled «Index.»
-
6
Select your index type. You can select Indented or Run-in at the top-right corner of the window. An indented index will be easier to navigate for readers, whereas a run-in index will take up much less space on the page.
- As you make changes to the index, you’ll always see a preview in the «Print Preview» box at the top-left corner of this window.
-
7
Choose the number of columns. Your index will appear in two columns by default, but you can select a different number by clicking the up or down arrows next to the «Columns» field.
- If you click the down arrow enough times, the value will change to «Auto,» which will automatically adjust the column numbers to best fit the amount of content in the index.
-
8
Select an index design from the «Formats» menu. This drop-down menu is below the Print Preview image. Select any of the designs from the drop-down menu to customize your index’s appearance.
- You can also create your own design by selecting From template and clicking the Modify button at the bottom-right. This lets you customize fonts, spacing, and style for all entries and subentries to create your own design format.
- If you want the page numbers to be aligned on the right instead of right after each entry, check the box next to «Right align page numbers.»
-
9
Click OK to save your index. This creates an index that contains all of the entries you’ve marked throughout your document. You can use this index to look up the pages where important terms and concepts are mentioned throughout your writing.


Advertisement
-
1
Click the Home tab. It’s at the top of Word. If you’ve found an error in the index, such as a misspelling or incorrect term, you can correct the errors by hand and then update the index using the Update Index tool.
-
2
Scroll to the error you want to correct. First, if you’re not in paragraph view, click the Home tab and then click the Paragraph icon ¶ to display them.[2]
Then, scroll to the «XE» entry for the entry you want to correct. Remember, all indexed references start with «XE» and are surrounded by those curly braces you saw earlier. -
3
Make your changes.
- Change the text inside the quotation marks: If the text is incorrect, correct it now by editing what’s inside of the quotes.
- Delete an entry: If you want to completely remove an entry from the index, select the entire index entry field (including the curly brackets) with your mouse, and then press your keyboard’s Delete key.
- You can click the Paragraph icon in the Home tab when you’re finished to turn off paragraph markers.
-
4
Scroll down and click your index. Now that you’ve made changes to the index, you’ll need to update it. Clicking the index selects it for updating.
-
5
Press the F9 key on the keyboard. Depending on your keyboard, you may have to press the Fn key as well to use the F9 key. This updates the index to reflect your changes.
- If that doesn’t work, click the References tab, and then click Update Index on the toolbar.


Advertisement
Add New Question
-
Question
How do I create an index which includes the pages that the words show up on?

Create the index. Click where you want to add the index. On the References tab, in the Index group, click Insert Index. In the Index dialog box, you can choose the format for text entries, page numbers, tabs, and leader characters. You can change the overall look of the index by choosing from the Formats dropdown menu.
-
Question
How many entries can I index?
You can create an index entry for an individual word, phrase, or symbol, for a topic, a special XE (Index Entry) field that includes the marked main entry.
-
Question
How do I set up an index page at the beginning of my document?
Position the insertion pointer where you want the index to appear. If you want the index to start on a new page, create a new page in Word. Click the References tab. In the Index group, click the Insert Index button. Click the OK button to insert the index into your document.
See more answers
Ask a Question
200 characters left
Include your email address to get a message when this question is answered.
Submit
Advertisement
Video
-
If you mark more entries in your document after inserting the index and they don’t appear automatically, click the index and press the F9 key on the keyboard.
-
Marking index entries will automatically turn on the Show all nonprinting characters option. You can turn this off anytime by clicking on the paragraph icon on the Home tab.
Thanks for submitting a tip for review!
Advertisement
About This Article
Article SummaryX
1. Click References.
2. Click Mark Entry.
3. Select a word for the index.
4. Click the «Mark Index Entry» box.
5. Format the page numbers.
6. Format the text.
7. Click Mark.
8. Click Mark All.
Did this summary help you?
Thanks to all authors for creating a page that has been read 424,443 times.
Is this article up to date?
An index can usually be found at the end of a document, listing the key words and phrases in a document, along with the page numbers they appear on. There are two steps involved in creating an index: defining which words you want to appear in the index and then inserting the index.
Insert an Index Entry
- Select the text you want to include in the index.
- Click the References tab.
- Click the Mark Entry in the Index group.

- Adjust the index entry’s settings and choose an index entry option:
- Cross-reference: Adds a reference to another index entry, instead of listing the current page number.
- Current page: Lists the current page number for the selected index entry. This is the default option.
- Page range: Lists the range of pages that are included in the bookmark that you click in the Bookmark list. Before using this option, you’ll need to create a bookmark of the selected range.
- Click the Mark or Mark All button.
- Repeat the process for your other index entries.
- Click Close when you’re done.
The Mark Index Entry dialog box opens, where you can set up how the index entry works. The main entry field is filled with the selected text, and you can also add a subentry that will appear below the main entry.
Clicking Mark will create an index entry for the selected instance of the word. Clicking Mark All will instead create an index entry for every instance of the selected word throughout the document.
Once you mark an entry, formatting marks will be displayed so that you can see the hidden text that marks index entries. The window remains open, so you can continue to mark index entries throughout the document.
Index entries are invisible and will not be printed. However, you can see them when the paragraph marks are turned on.
Insert an Index
Once index entries have been marked, you’re ready to insert the index.
- Click in your document where you want to insert an index.
- Click the Insert Index button on the References tab.
- Customize the appearance and behavior of the index.
- Click OK.
Indexes usually appear at the end of a document and can take up a lot of space, so a blank page at the end is ideal.
The Index dialog box opens, where you can set up how the index will appear.
You can choose whether to right align page numbers and select a tab leader that appears between text and page numbers. You can also select whether to use a document’s formatting theme or select another one.
You can choose whether subentries will be indented below the main entry or shown run-in style in a paragraph below the main entry.
Any changes you make to the index appearance will be shown in the Print Preview.
The index is inserted, automatically filling itself out with all the index entries in the document.
Update an Index
When you insert an index, it automatically adds every index entry in the document. If you add or modify index entries after the index is created, you’ll need to update the index.
- Click anywhere in the index.
- Click the Update button.
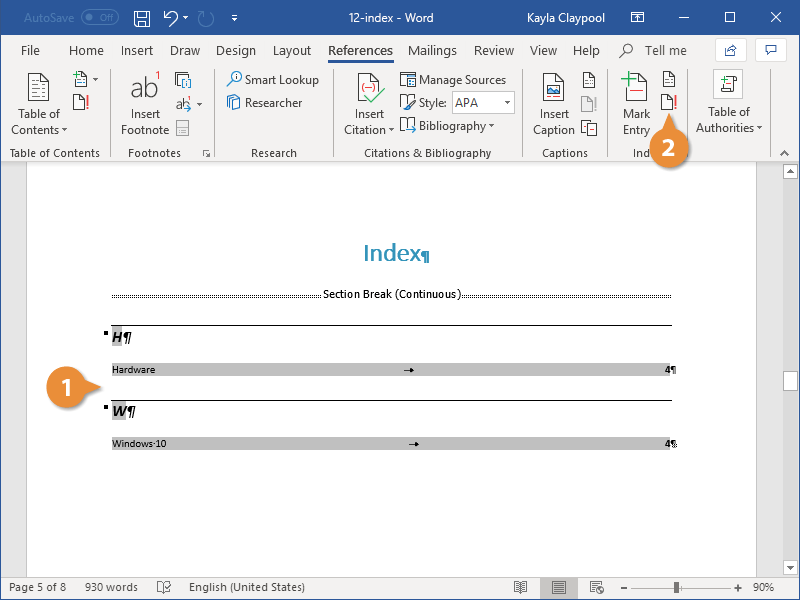
The index is updated, adding any newly created entries while updating the page numbers for any entries that may have moved.

FREE Quick Reference
Click to Download
Free to distribute with our compliments; we hope you will consider our paid training.
Create the index
- Click where you want to add the index.
- On the References tab, in the Index group, click Insert Index.
- In the Index dialog box, you can choose the format for text entries, page numbers, tabs, and leader characters.
- You can change the overall look of the index by choosing from the Formats dropdown menu.
Contents
- 1 How do you create an index?
- 2 Can Word automatically create an index?
- 3 What is an index example?
- 4 Where do we generally create index?
- 5 How do you insert table of contents in Word?
- 6 How do I create an index in Word 2007?
- 7 How do I link an index to a Word document?
- 8 How do I create an index in Word 2019?
- 9 How do you create a table of contents in Word 2016?
- 10 How do I create an index page?
- 11 What does an index looks like?
- 12 Which command will create an index?
- 13 Which of the following is correct create index command?
- 14 What is the type of index?
- 15 How do you create tables in Word?
- 16 How do I create a multi level Table of Contents in Word?
- 17 How do I create a list of tables in Word?
- 18 Where is the index page of a document found?
- 19 How do I create an index in notebook?
- 20 What is a hyperlink index?
There are four steps for constructing an index: 1) selecting the possible items that represent the variable of interest, 2) examining the empirical relationship between the selected items, 3) providing scores to individual items that are then combined to represent the index, and 4) validating the index.
Can Word automatically create an index?
If you want the index to start on a new page, create a new page in Word. Putting the index at the end of your document is what the reader expects. Click the References tab. In the Index group, click the Insert Index button.
What is an index example?
The definition of an index is a guide, list or sign, or a number used to measure change. An example of an index is a list of employee names, addresses and phone numbers.
Where do we generally create index?
Generally, we create an index at the time of table creation in the database. The following statement creates a table with an index that contains two columns col2 and col3. If we want to add index in table, we will use the CREATE INDEX statement as follows: mysql> CREATE INDEX [index_name] ON [table_name] (column names)
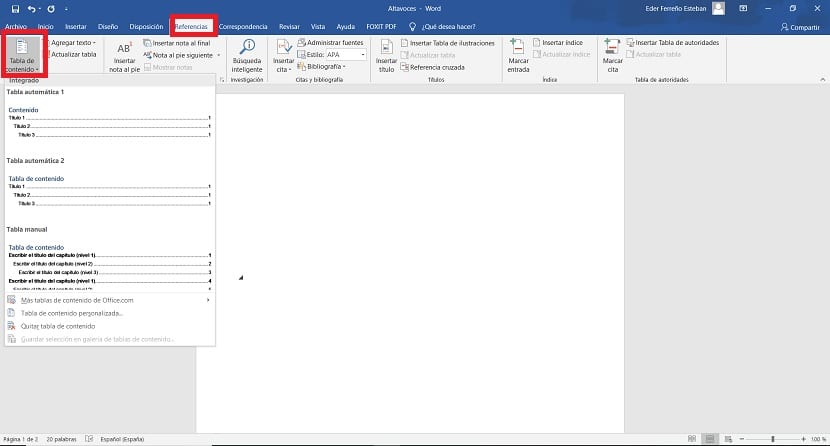
How do you insert table of contents in Word?
On the toolbar ribbon, select References. Near the left end, select Insert Table of Contents. (Or select Table of Contents > Insert Table of Contents. The table of contents is inserted, showing the headings and page numbering in your document.
How do I create an index in Word 2007?
Creating the Index
- Place the insertion point where you want the index to appear.
- From the References command tab, in the Index group, click INSERT INDEX. The Index dialog box appears.
- Click OK. The index appears at the insertion point.
How do I link an index to a Word document?
Add the link
- Select the text or object you want to use as a hyperlink.
- Right-click and then click Hyperlink .
- Under Link to, click Place in This Document.
- In the list, select the heading or bookmark that you want to link to.
How do I create an index in Word 2019?
Create the index
- Click where you want to add the index.
- On the References tab, in the Index group, click Insert Index.
- In the Index dialog box, you can choose the format for text entries, page numbers, tabs, and leader characters.
- You can change the overall look of the index by choosing from the Formats dropdown menu.
How do you create a table of contents in Word 2016?
Click in your document where you want to create the table of contents. If you’d like it to appear on its own page, insert a page break (Ctrl+Enter) before and after inserting the ToC. Click the References tab. In the Table of Contents group, click Table of Contents.
How do I create an index page?
A good index will:
- be arranged in alphabetical order.
- include accurate page references that lead to useful information on a topic.
- avoid listing every use of a word or phrase.
- be consistent across similar topics.
- use sub-categories to break up long blocks of page numbers.
- use italics for publications and Acts.
What does an index looks like?
An index is an alphabetical list of keywords contained in the text of a book or other lengthy writing project. It includes pointers to where those keywords or concepts are mentioned in the book—typically page numbers, but sometimes footnote numbers, chapters, or sections.
Which command will create an index?
The syntax for creating an index is: CREATE INDEX “index_name” ON “table_name” (column_name); Note that an index can only cover one table. We cannot build an index that covers multiple tables.
Which of the following is correct create index command?
Which of the following is correct CREATE INDEX Command? Explanation: The basic syntax of a CREATE INDEX is as follows : CREATE INDEX index_name ON table_name; 4. A ______ index is created based on only one table column.
What is the type of index?
Index architectures are classified as clustered or non-clustered. Clustered indexes are indexes whose order of the rows in the data pages corresponds to the order of the rows in the index. This order is why only one clustered index can exist in any table, whereas, many non-clustered indexes can exist in the table.
How do you create tables in Word?
Answer
- Open a blank Word document.
- In the top ribbon, press Insert.
- Click on the Table button.
- Either use the diagram to select the number of columns and rows you need, or click Insert Table and a dialog box will appear where you can specify the number of columns and rows.
- The blank table will now appear on the page.
How do I create a multi level Table of Contents in Word?
3 Answers
- Click on your top level number/symbol.
- “Define new multi-level list”
- Click “More >>”
- Click on your top level line and click “link level to style”
- Select “heading 1” or your own custom style, I don’t care.
- OK.
- References > Table of contents > Insert table of contents.
- Show levels: 1.
How do I create a list of tables in Word?
To create a combined list of tables and figures
- After the table of contents, click where you want to insert the list.
- In the Insert menu, pull down to Index and Tables.
- Click Table of Figures.
- Check Include label and number, Show page numbers, Right align page numbers.
- Click Options.
- Click OK.
- Click OK.
Where is the index page of a document found?
What Is An Index? An index is an alphabetical and detailed listing of topics in a document, with a corresponding page number displayed alongside (see picture below). An index is typically located at the end of a long document.
How do I create an index in notebook?
Setting up your Index is easy. Simply leave the first couple pages of your notebook blank and give them the topic of “Index.” As you start to use your book, add the topics of your entries and their page numbers to the Index, so you can quickly find your them later.
What is a hyperlink index?
Indices are dictionaries that associate keys (words or phrases) with one or more attributes. Indices maintain these key/attribute bindings over all or part of a document, and are used by browsers to create hyperlinks dynamically. Indices may also include bindings of other indices, in a hierarchical fashion.
We’re going to talk about creating indexes in Microsoft Word. ‘Real’ books often have an index at the back which Word can create for you.
An index is a list of terms or topics that can be found within the document. Microsoft Word has the ‘fixings’ to make an index and automatic options to take some of the drudgery

These days, indexes aren’t as common as they once were. Online documents (in Word format, web pages or PDF) can be easily searched using Ctrl + F, making an index less needed.
Indexes still have a place, especially in printed books. Unfortunately, creating an index in Microsoft Word can be difficult and time-consuming to do on a large scale. This isn’t a slight against Word whose features are mostly adequate, but rather a testament to a conceptually difficult process that needs human judgement. There are professional indexers for a reason.
Hence this series in Office for Mere Mortals, starting this week with the basics; setting up a document to be indexed and then making a simple index.
Word’s Indexing features have barely changed in well over twenty years! Some button positions have moved but the core technology, field codes and shortcut are the same as in Word 6 from 1993.
Indexing in Word – the overview
In short, here’s how indexing works in Word.
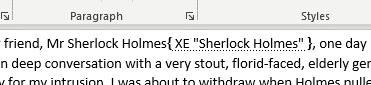
Entries are created by selecting parts of the text and adding an Index Entry. They are hidden from normal views of the document but do show up with the right settings.
This is an Index Entry {XE} for the term ‘Sherlock Holmes’.
The Index itself is made by Word which compiles all the {XE} entries into a list like this:

The {XE} we added above, appears in the Index as a reference to page 1 in the text.
Word has some dialog boxes to make formatting the index easy but underneath that is a field code.

Don’t panic … we’ll explain all this as we go along.
Preparing your first Index
Before jumping in at the deep end, we recommend that you first create a copy of your document (or another smaller document) to practice upon without having to worry about messing up the real thing. A file with a large index can get extremely complicated and confusing if you’re not certain about what you’re doing.
When you have grasped both the fundamental and, perhaps, more complex indexing techniques, come up with a method that suits your needs, then you can transfer your knowledge onto the real document without any problems.
Creating an index for an existing document involves two distinct steps:
- marking index entries
- generating the index
Making or marking a simple Index Entry
An index entry is a Microsoft Word “field code” that marks specific text for inclusion in an index. When you mark text as an index entry, Word inserts an { XE “Index Entry” } field formatted as hidden text.
To use existing document text as an index entry, first select a word or phrase that you wish to include in your index or just place the cursor at the right-place in the document. To enter your own text as an index entry instead, simply click where you want to insert it.
Use the Alt + Shift + X keyboard shortcut to insert index entries.
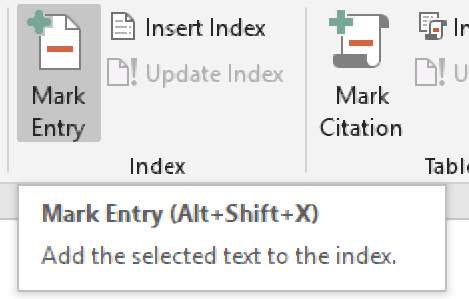
On the ribbon, go to “Reference | Index | Mark Entry” to bring up the “Mark Index Entry” dialog box.

The Mark Index Entry dialog box provides “Main entry” and “Subentry” boxes.
Main Entry
Most terms will fall under the “Main entry” category – a single term with its corresponding page number(s). The selected text is automatically inserted but you can change that, and often will.
Sub-entry
Or use the “Main entry” as a general heading or category for a collection of other terms otherwise known as subentries. For example, the main index entry “Animals” could have subentries “Birds” and “Mammals” – each which would be entered separately.
Here we’ve given Dr Watson a sub-entry for his weapon of choice.

Which appears in the index like this, below and usually indented from the main entry.

Add a few index entries then you’re ready to make your first index.
A short aside for our Mac friends. According to Microsoft’s documentation, Word for Mac doesn’t have ANY in-built shortcut for Mark Index entry. No we could not beleive it either so we dug a little deeper.
There is an in-built Mark Index Entry shortcut Command + Option + Shift + X. It’s listed at Tools | Customize Keyboard.
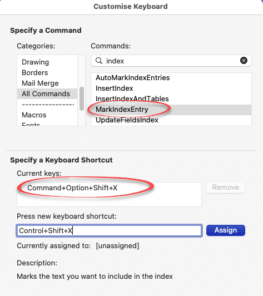
If you think that shortcut is clumsy (we do), try changing it to Control + Shift + X . That’s the closest we could get to the Winword shortcut (Alt+Shift+X isn’t possible in Word for Mac).
Show all
After marking an index entry, you will notice that the show hidden text and show all character options have both been enabled by Word. That’s so you can see and find index entries.

{XE} is the Word field code for Index Entry.
In the double-quotes is the index label. Each sub-level is separated by a colon e.g. “Dr Watson:Revolver” is the Main and Sub entry.
b is the switch to add Bold formatting to that index entry. We’ll look at other switches later.
Create a simple Index in Word
Now there’s a few index entries in the document, let’s make an index from them.
Click the cursor at the end of your document (or wherever you want your index to appear), then navigate to “Reference | Index | Insert Index”
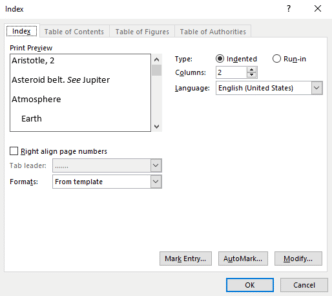
The Index dialog gives you a number of formatting options. The current formatting settings are displayed in the “Preview” pane.
Type: Indented or Run-in
The “Type” radio-button allows you to specify either an “Indented” or “Run-in” type of hierarchical display. You’ve already seen the common Indented index, here’s the run-in alternative:

Run-in takes less vertical space than Indented.
Columns
Another way to save space with an index is adding columns.
The “Columns” box allows you to specify the number of columns that the index will be displayed on per page. It’s much the same as Word’s normal multi-column support but lacks some of the column formatting choices.

The columns can be adjusted from the ruler. If you want better column control (like vertical lines between columns), try inserting multiple columns from the Layout tab then putting a single column index inside the multi-column section.
Right align page numbers
“Right align page numbers” checkbox gives more of a “Table of Contents” look to the index.
Tab leader are the characters between the entry and page number, they guide the eye along the line.

Index Formats
The “Formats” drop down box gives you a number of pre-defined styles to choose from that can be seen in the preview pane. The available styles haven’t changed much over the years, in Word 365 are:
- From template
- Classic
- Fancy
- Modern
- Bulleted
- Formal
- Simple
To design a custom style click the “Modify” button, choose a style and customize as you see fit.
When you are happy with your index layout as it appears in the preview pane, click the “OK” button and your index will be displayed in all its glory.
If you have made any changes to your index entries, always remember to click anywhere on your index and press F9 for those changes to appear in the index itself. Or right-click then Update Field.
That’s enough to get you started. In future articles we’ll look at the many hidden options in Word’s indexing plus some of its shortcomings.
Outlook is stopping Windows Indexing and how to fix it
How to STOP a specific document from being searched / indexed?
Match and Index lookup in Excel

Have you ever wondered who compiles the indexes at the end of books? Traditionally, this has been a specialist profession. However, these days, you can add an index to a document yourself. In this post, for example, we’re looking at how to create an index in Microsoft Word.
When to Add an Index
Most documents don’t need an index. In fact, it is usually only book-length non-fiction that does! And even if you are writing a non-fiction book, indexing is often handled by the publisher.
However, if you want to self-publish a work of non-fiction – or if you are creating another long document such as a company handbook – you may want to add an index yourself. And this is where the indexing options in Microsoft Word become very useful. This process involves two steps:
- Marking terms that you want to appear in the index
- Generating the index itself
We’ll now look at how to create an index in more detail below.
How to Mark Entries
Most of the work of creating an index comes with marking text. This means going through the document to look for terms you want to include in the final index. To mark an entry:
Find this useful?
Subscribe to our newsletter and get writing tips from our editors straight to your inbox.
- Use the cursor to select the word/phrase you want to include in the index
- Go to References > Index on the main ribbon and click Mark Entry
- In the new dialogue box, select the options required
- Click Mark to mark the term selected or Mark All to mark every use of the term throughout the document
The options in the Mark Entry dialogue box mentioned above will let you:
- Link a Subentry (i.e., a similar term) to the main term
- Cross-reference a term with another index entry
- Control the page number format
Make sure to do this for every term that you want to include in the index. If you need to “unmark” a term, you will first need to turn on hidden text in Word. You will then be able to see, and if required remove, the index entry in curly brackets. Make sure to do this for all similar entries.

How to Create an Index
Once you have marked your entries, all that’s left is to create an index:
- Place the cursor where you want to create an index
- Go to References > Index and select Insert Index
- Select any required formatting options from the menu
- Click OK to insert an index in the selected location
Microsoft Word will generate an index based on your marked entries. If you change any of the marked entries, you can then update the index at the click of a button by going to References > Index > Update Index.
Posted on: 07/21/2017

An index lists the terms and topics that are discussed in a document, along with the pages that they appear on. To create an index, you mark the index entries by providing the name of the main entry and the cross-reference in your document, and then you build the index.
Steps to mark words or phrases for the Index
- Select the text you want to include in the index.
- Click the References tab, in the Index group, click Mark Entry.
- Click Mark All.
- Leave the Mark Index Entry open and move it if necessary. Select the next word or phase in your document and click back in the Mark Index Entry box. Select Mark All.
- Continue until all words or phrases are marked.
- When done, click close to close the Mark Index Entry box.
- Go to the end of the document with CTRL + END. Add a page break with CTRL + ENTER on the keyboard.
- On the blank page, click Insert Index.
- Use either 1 or 2 columns, pick a format, and click OK. Finally, turn off Show/Hide with CTRL + SHIFT + 8 on the main keyboard.
YouTube Video on Creating an Index in Word
Transcript for YouTube Video on inserting an Index
Hello this is Chris Menard, let me show you today how to create an index in Microsoft Word and if you’re wondering why do I need an index, if you’re writing a ploy handbook or a technical manual, the first place people often go is to the back of the book to find a certain word or phrase that they’re looking for, and then go look at that page, so if you want to follow along, start Word, then give an equal symbol or and and then we’re going to do 25 7 enter, they’ll give you a random text go back to the top of the document — and if you have at least four pages — I’m happy if your text doesn’t match my text exactly, that’s okay too so to make an index, the first thing you do is double-click, a word go to the references tab up at the top and we’re going to use the index group.
I’m going to select mark entry — it picked up the word video which I double clicked. If I want to mark video on just this page, which is page one, you click the word mark but I want to do it throughout the entire document, so I’ll select mark all.
When you click mark all it may put this code in the back — don’t worry about it — instead of closing this and going to the next word, just move it — highlight another word click back in here and that word will appear in the main entry — mark all.
I’m gonna do Footer, double-click, click in here, mark all.
I’m going to do a couple more Words charts and people wait, may need to know if you need to do two words, I’m gonna select smart art and graphics. Click back in here… perfect!
Right here, mark all, so act like you marked all the words you want. Close if you want to get rid of this right here, go back to the Home tab, the first time you did mark entry — it turned on show/hide. You can turn it off and on all you want to — that will not print, but I’m going to turn it off. I’m gonna go to the end of the document — control end, put a page break, control enter.
You say, Chris I don’t like control enter, I’ll still with the mouse — OK so let’s do undo and then let’s go the long way — layout breaks page — that is Control + Enter, go back to references and here we go — time to put the index in here now, so step one was to mark our entries, step two is to actually put the index in, so let’s go to insert index.
You should be on the index tab. How many columns do you want? I’m gonna leave it at two. You can change the format — there’s classic, fancy, modern — I’m not going to run through all of them. I’m gonna do fancy and I’m gonna hit OK, and there’s an index because I did that equals re and it’s got the same board on all the pages so usually it’ll say charts page 1 3 4 video 1 & 4.
I’m gonna do an undo — Ctrl + Z — go back to insert index. I don’t like the two columns, I’m gonna make it one column. Click OK and there’s my index, so now you know how to create an index in Microsoft Word.
If you need Microsoft Office training please give me a call or an email. Also, my Excel training classes are online thank you

Chris Menard
Chris Menard is a Microsoft Certified Trainer (MCT) and is employed full-time as a Trainer for BakerHostetler, one of the nation’s largest law firms. Menard has a YouTube channel with over 900 technology videos covering Excel, Word, Zoom, Teams, Outlook, Gmail, Google Calendar, and other resources that over 15 million viewers have appreciated. Menard also does public speaking at conferences for CPAs and Administrative Professionals. Connect with Chris on LinkedIn at chrismenardtraining.com/linked or on YouTube at chrismenardtraining.com/youtube
Categories
-
Blog
»
Microsoft
»
Microsoft Word
»
Advanced
There are some programs that we use practically every day on our computer. Microsoft Word is one of them, essential in the daily life of millions of users. Either for work or studies, it is usual that we have to edit a document using this program. Thanks to it we have access to many functions, although there are usually some aspects that often present difficulty for many users when using it.
Creating indexes in Word is something that often presents problems for many users. Although it is something that we can do in a really simple way. Next we will tell you how we can create indexes in the document editor, for any occasion in which we need to use them.
Modify the format of titles
Before starting to create the index in a document in Word, it is important that we are using the correct format in the titles in it. The normal thing is that when we edit a document, we use titles for each of the sections and subsections that are in it. But it is also essential that we use the appropriate format, which we have in said document (Title 1, Title 2, etc). Since the index is based on this at the time of being created.
Therefore, if we already have these formats in use in the document, then the creation of said index will be very simple. Since the index will take these titles to create the levels and will be displayed directly on the screen. So we are not going to have to do anything else in this sense, really comfortable.
So it is good to go to this document in Word and use these formats in the titles that head each of the sections in it. The way to do it is really simple, as you can see in the photo. You just have to choose the title or level to use, for it to apply. Doing this will help us so that the index in question will be perfectly prepared when we create it, so it saves a lot of time in this regard. Once we have modified this we are ready to create said index.
Related article:
How to convert Word to PDF
Create an index in Word
When we have done these steps in the previous section, we are ready to begin with the creation of the index in Word. The steps to follow are very simple in this step. Before you start, it is important place the cursor at the beginning of the document. Since the index is created in the place where the cursor is, so we can make it by mistake entered in the middle of said document. Once we place the cursor at the beginning, we can start.
The first that we have to do is to click on the references section, located at the top of the document in Word. By clicking on it, the options in this section will be displayed. We look below at the left side of the screen, where we see an option called Table of Contents. Click on it, and a contextual menu will appear.
Then we will be able to see that a couple of index models come out, from which we can choose. We are only going to have to choose one of them, so that after a few seconds it will be shown in our Word document. By choosing it, you will see that the titles or sections that we have previously created are already shown in said index. So we don’t have to add anything manually. Very comfortable in this regard. Furthermore, as we add new titles, they will be automatically incorporated into said index.
Therefore, all the changes that we introduce in this document, such as the page number in which a particular chapter begins, this change will be shown in that index. So everything will be fine in this regard. The normal thing in these cases is that this index is inserted in the document in Word at the end, when we’re done editing, to make everything simpler in this sense. It also offers the possibility to edit it at the beginning. Each one must choose the option that seems most comfortable in each case.
Related article:
How to convert PDF to Word
Customize the index
Any index that we have created in a document in Word can be customized. A function is offered for them, so that each user will be able to customize it based on the document they have created. The way to enter this function is very simple, similar to the steps we have used to create it.
Therefore, we have to enter the references section at the top of the screen. Next, we click on the button for the table of contents, so that the contextual menu in that section is then displayed. Then we have to enter in the option called «Custom Table of Contents», which is located towards the end of that contextual menu. A new window then opens on the screen.
In this window we have a series of options with which to customize this index that we are going to use in Word. The options displayed in this window are:
- Show page number: If we want this index to show the page where a chapter begins
- Use of hyperlinks: We can use hyperlinks in the index titles, so that clicking on one takes us to the page in question. It can be very useful, especially in documents that are quite long, it facilitates navigation.
- Formats: We can also choose the format we want to use in the index titles, there are several options from which to choose to be able to customize said index at all times.
- Show levels: It is possible to choose the amount of levels that we want to show in the index in Word. This is something that depends on the levels that we have used in those titles in the document. If we have used Title 1, 2, 3, 4, then we will need to use four levels. It must be adapted to the use of these titles.
Once the changes we want have been introduced, we can give you to accept and the index in question has been as we wanted. We can already print said document or send it by mail, or whatever we need to do with it. As you can see, creating an index in Word is not complicated.
The content of the article adheres to our principles of editorial ethics. To report an error click here!.