All Microsoft Office programs can check spelling, and most can check grammar.
Using Microsoft 365? You may be interested in checking out the powerful new Editor feature in Word! See Editor — your writing assistant for more information.
Run the spelling and grammar checker
To start a check of the spelling and grammar in your document, just press F7.
Click a heading below for more information
Most Office programs automatically check for potential spelling and grammatical errors as you type, so you don’t need to do anything to show errors while you work.
Notes:
-
Automatic spelling and grammar checking is not available in Access, Excel, or Project. You can manually start a spell check by pressing F7.
-
Automatic grammar checking is available only in Outlook, Word, and PowerPoint 2013 (or newer).
Office marks potential spelling errors with a red squiggly line, and potential grammatical errors are marked with a blue squiggly line.
If spelling or grammatical errors aren’t marked, automatic checking might be turned off. You can turn on the automatic spelling and grammar checker.
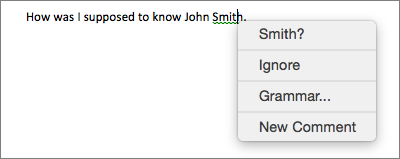
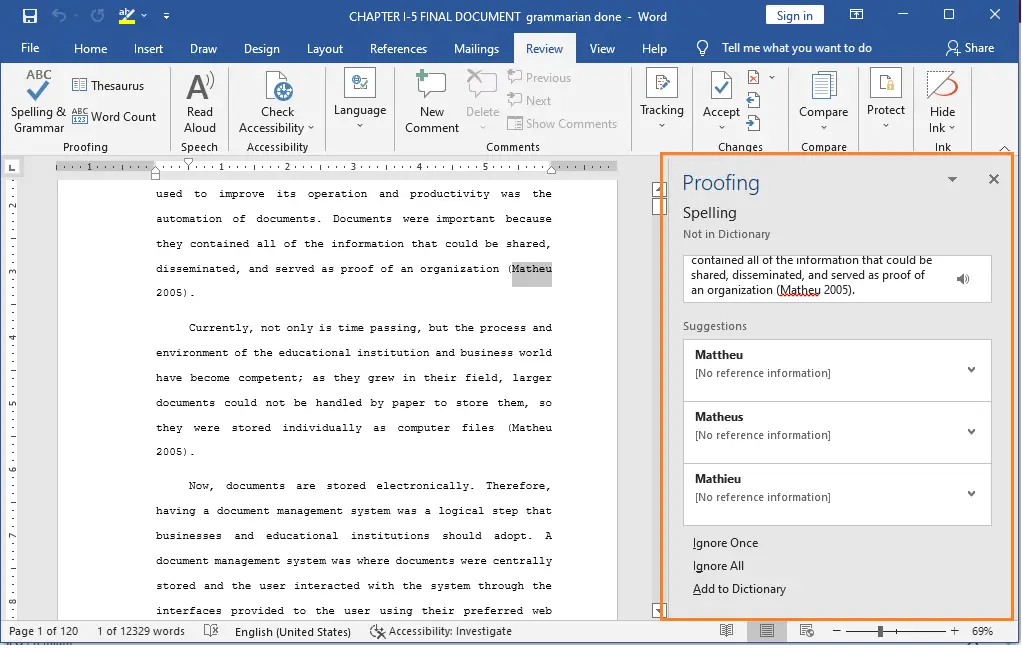
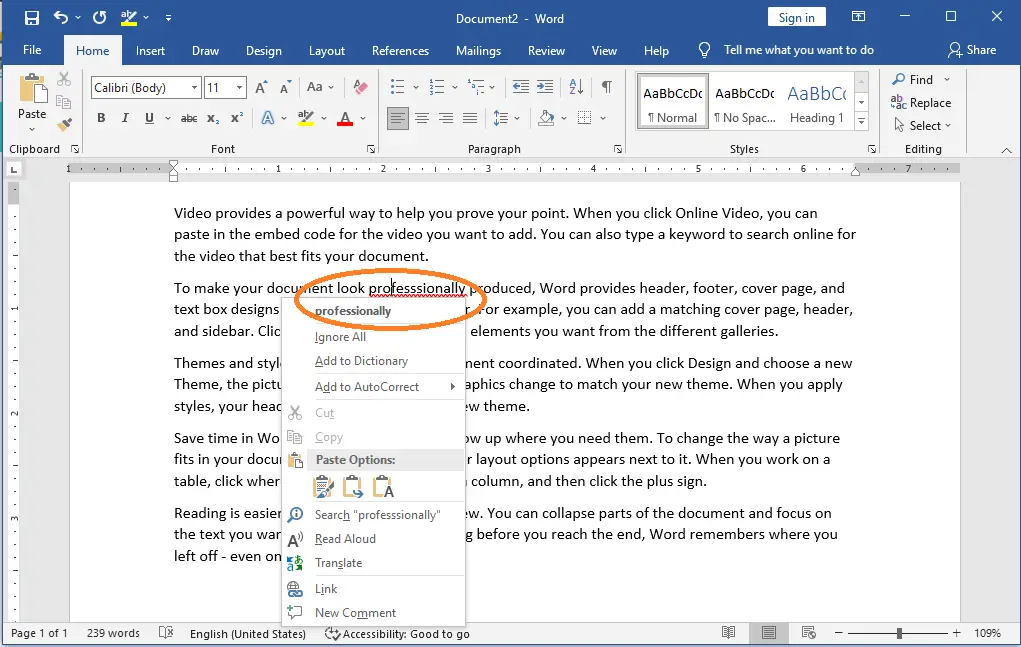
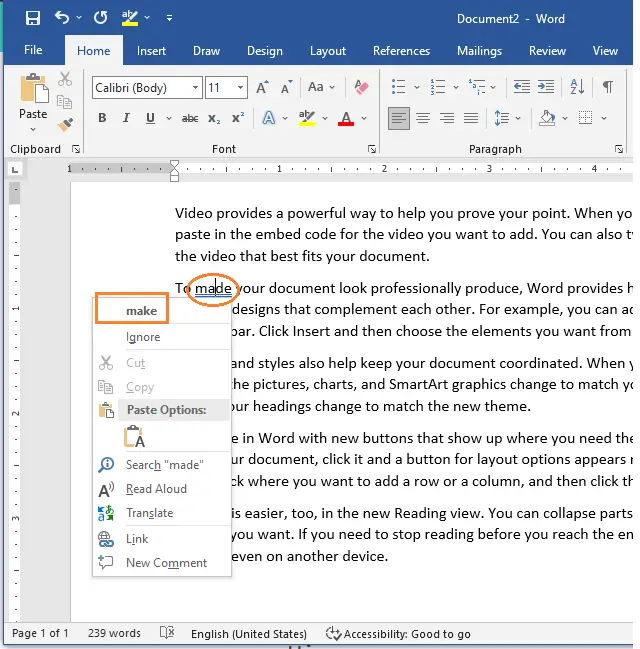
When you see a spelling or grammatical error that you want assistance fixing, right-click on the underlined word or phrase and choose one of the options to fix the error.
If Office is flagging words as misspelled but you have it spelled the way you want it, select Add to Dictionary to teach Office not to flag that word as misspelled in the future. For more information on this see: Add or edit words in a spell check dictionary.
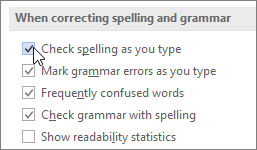
If you don’t want Office to mark potential errors with squiggly lines while you are working, you can turn automatic spelling and grammar checking off:
-
Open the spelling and grammar options:
-
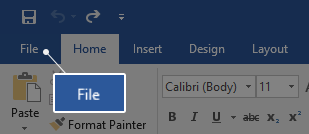
In OneNote, PowerPoint, Publisher, Visio, and Word: On the File menu, click Options, and then click Proofing.
-
In InfoPath: On the Home tab, click the arrow next to or under Spelling, and then click Spelling Options.
-
In Outlook: On the File menu, click Options, and click Mail, and then click Spelling and Autocorrect.
-
-
Select or clear the Check spelling as you type check box. In programs that have automatic grammar checking, you may also select or clear the Mark grammar errors as you type check box.

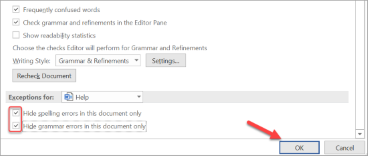
Note: In Word, you can turn the spelling checker on or off for only the document you’re currently working with or for all new documents. Select an option in the Exceptions for list, and then select or clear the Hide spelling errors in this document only and Hide grammar errors in this document only check boxes.
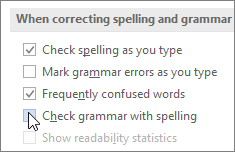
If you don’t want Office to check grammar at all (either when running a spell check or automatically as you type), you can turn it off:
-
Open the spelling and grammar options:
-
In OneNote, PowerPoint, Publisher, Visio, and Word: On the File menu, click Options, and then click Proofing.
-
In InfoPath: On the Home tab, click the arrow next to or under Spelling, and then click Spelling Options.
-
In Outlook: On the File menu, click Options, and click Mail, and then click Spelling and Autocorrect.
-
-
Clear the Mark grammar errors as you type and Check grammar with spelling check boxes.
Note: Not every Office program will have both of these options.
In Word, Outlook, PowerPoint 2013 (or newer), you can force a recheck of the words and grammar that you previously skipped by doing the following:
-
Open the document or item that you want to check.
-
On the File menu, click Options > Proofing> Recheck Document. In Outlook you’ll find this under File > Options > Mail > Spelling and Autocorrect
-
Click Yes when you see the warning message about resetting the spelling and grammar checker.
-
Click OK in the dialog box to get back to the document, and then run the spelling and grammar checker again.
See Also
Check spelling and grammar in a different language.
Test your document’s readability
The spelling and grammar checker isn’t working as expected
Select grammar and writing style options in Office 2013 and earlier
Add words to your spell check dictionary
The spelling or grammar checker isn’t checking words in a different language correctly
Choose AutoCorrect options for capitalization, spelling, and symbols
Check spelling before sending a message in Outlook
Learn how to get more from Editor with Microsoft 365
Office for Mac applications automatically check for potential spelling and grammatical errors as you type. If you’d rather wait to check spelling and grammar until you’re done writing, you can turn off automatic checking, or you can check spelling and grammar all at once.
Word
Check spelling and grammar automatically as you type
Word marks potential spelling errors with a red squiggly line, and potential grammatical errors are marked with a green squiggly line.
Tip: If spelling or grammatical errors aren’t marked, you might need to turn on automatic spelling and grammar checking, which is explained in the next procedure.
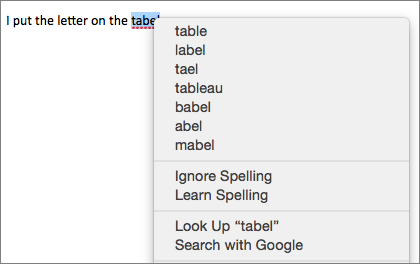
When you see a spelling or grammatical error, Control click the word or phrase and choose one of the options.
If Word has incorrectly flagged a word as misspelled and you want to add that word to your dictionary so that Word will properly recognize it in the future see Add or edit words in a spell check dictionary
-
On the Word menu, click Preferences > Spelling & Grammar.
-
In the Spelling & Grammar dialog box, under Spelling, check or clear the Check spelling as you type box.
-
Under Grammar, check or clear the Check grammar as you type box.
-
Close the dialog box to save your changes.
-
On the Review tab, click Spelling & Grammar.
-
If Word finds a potential error, the Spelling & Grammar dialog box will open, spelling errors will be shown as red text, and grammatical errors will be shown as green text.
-
To fix an error, do one of the following:
-
Type the correction in the box and then click Change.
-
Under Suggestions, click the word you want to use, and then click Change.
To skip the error, do one of the following:
-
Click Ignore to skip only that instance of the error.
-
Click Ignore All to skip all instances of the error.
-
For a grammatical error, click Next Sentence to skip that instance of the error and move to the next error.
To skip a misspelled word in all documents, click Add to add it to the dictionary. This only works for misspelled words. You can’t add custom grammar to the dictionary.
-
-
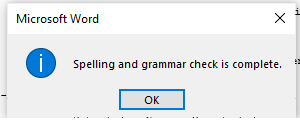
After you correct, ignore, or skip an error, Word moves to the next one. When Word finishes reviewing the document, you’ll see a message that the spelling and grammar check is complete.
-
Click OK to return to your document.
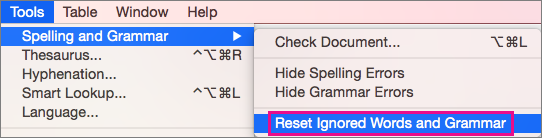
You can clear or reset the list of Ignored Words and Grammar so Word will check for spelling and grammar issues you previously told it to ignore.
Note: When you reset the list of Ignored Words and Grammar, the list is cleared only for the currently open document. Any spelling or grammar issues you told Word to ignore in other documents won’t be affected.
-
Open the document that needs to be checked.
-
On the Tools menu, point to Spelling and Grammar, and then click Reset Ignored Words and Grammar.
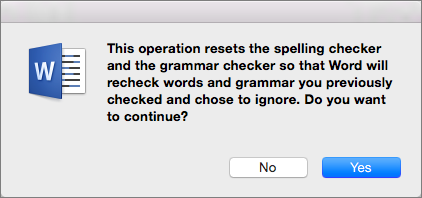
Word displays a warning about the operation resetting the spelling checker and the grammar checker.
-
Click Yes to proceed.
-
Click the Review tab, and then click Spelling & Grammar to check spelling and grammar.
Outlook
Check spelling and grammar automatically as you type
By default, Outlook checks for spelling errors as you type. Outlook uses a dashed red underline to indicate possible spelling errors and a dashed green line to indicate possible grammatical errors.
-
When you see a word with a dashed underline, Control click the word or phrase and choose one of the options.
-
On the shortcut menu, do one of the following:
-
Click one of the guesses at the top of the shortcut menu.
-
Click Ignore Spelling to ignore one instance of the word.
-
Click Learn Spelling to add the word to the spelling dictionary.
-
After opening an email message:
-
To have Outlook correct spelling mistakes automatically, on the Outlook menu, click Preferences. Click on Spelling and Grammar under Personal Settings. Click box next to Checkspelling as you type.
-
To turn automatic grammar checking on or off, on the Outlook menu, click Preferences. Click on Spelling and Grammar under Personal Settings. Click box next to Check grammar as you type.

You can correct all the spelling and grammar issues at the same time after you finish composing a message or other items.
-
On the Edit menu, point to Spelling and Grammar, and then click Spelling and Grammar…
-
Do any of the following:
-
In the list of suggestions, click the word that you want to use, or enter a new spelling in the box at the top, and then click Change.
-
Click Ignore to ignore this word and move on to the next misspelled word.
-
Click Add to add the word to the spelling dictionary.
-
Tip: The keyboard shortcut for skipping to the next spelling or grammar error is  + ; .
+ ; .
PowerPoint
You can check spelling in PowerPoint, but you can’t check grammar.
Check spelling automatically as you type
PowerPoint automatically checks for and marks potential spelling errors with a wavy, red underline.
Tip: If spelling errors aren’t marked, you might need to turn on automatic spell checking, which is explained in the next procedure.
When you see a spelling error, Ctrl+click or right-click the word or phrase and choose one of the suggested options.
-
On the PowerPoint menu, click Preferences > Spelling.
-
In the Spelling dialog box, select or clear the Check spelling as you type box.
-
On the Review tab, click Spelling.
-
If PowerPoint finds a potential error, the Spelling pane opens and spelling errors are shown.
-
To fix an error, do one of the following:
-
Correct the error on your slide.
-
Click one of the suggested words in the Spelling pane, and then click Change.
To skip the error, do one of the following:
-
Click Ignore to skip only that instance of the error.
-
Click Ignore All to skip all instances of the error.
-
click Add to skip a misspelled word in all documents and add it to the dictionary.
-
-
After you correct, ignore, or skip an error, PowerPoint moves to the next one. When PowerPoint finishes reviewing the presentation, you’ll see a message that the spelling check is complete.
-
Click OK to return to your presentation.
Excel
You can check spelling in Excel, but you can’t check grammar.
Check spelling all at once
-
On the Review tab, click Spelling.
Note: The Spelling dialog box will not open if no spelling errors are detected, or if the word you are trying to add already exists in the dictionary.
-
Do any of the following.
To
Do this
Change the word
Under Suggestions, click the word that you want to use, and then click Change.
Change every occurrence of this word in this document
Under Suggestions, click the word that you want to use, and then click Change All.
Ignore this word and move on to the next misspelled word
Click Ignore Once.
Ignore every occurrence of this word in this document and move on to the next misspelled word
Click Ignore All.
See also
Check spelling and grammar in a different language
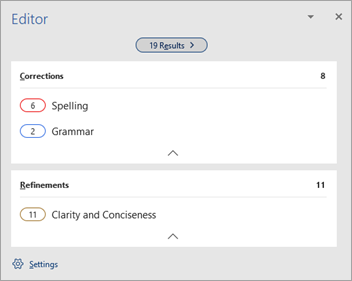
Microsoft Editor runs in Word for Microsoft 365 to analyze your document and offer suggestions for spelling, grammar, and stylistic issues, like making sentences more concise, choosing simpler words, or writing with more formality.
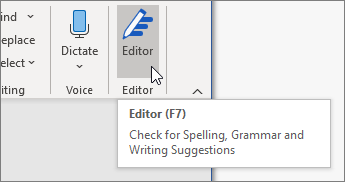
To use Editor, on the Home tab choose Editor.
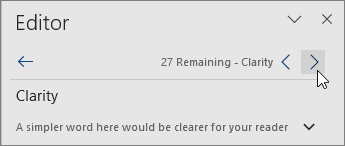
Reviewing suggestions
To focus on the issues you care most about, choose a correction or refinement type, like Grammar or Clarity. Then, use the arrows near the top of the pane to step through each of that type of issue.
Choose a suggestion to incorporate it into your document. If you don’t like the suggestion, choose Ignore Once. Or, if you never want this type of suggestion, choose Don’t check for this issue.

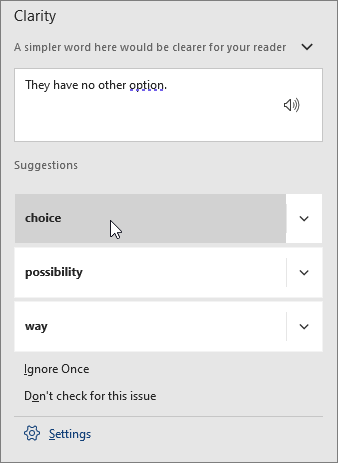
Note: If you change your mind about an issue you ignored, close and reopen the document, and go back to Editor. Editor will find the issue again.
Tailor what Editor checks for
By default, Editor checks for several categories of issues, and the suggestions may or may not suit your writing style. To finely tune Editor for suggestions you want, do the following:
-
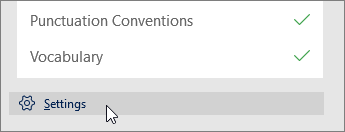
In the Editor pane, choose Settings.
-
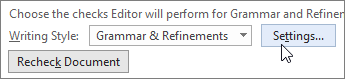
In the Word Options dialog box, next to Grammar & Refinements, choose Settings.
-
Scroll through the list of options. Select issues you want Editor to check, and clear the issues you want Editor to ignore.
Note: Choosing Reset All returns to the default settings.
-
Choose OK.
Tip: Editor is designed to empower you to bring out the best in your writing. We are continually making updates to its suggestions and experimenting to learn which suggestions are most welcome. If you have feedback for us, choose Help Improve Office? at the top of the Word window to open the Feedback pane.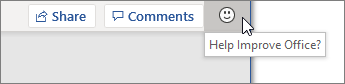
You might notice Editor’s red, blue, and purple underlines in your document even when the Editor pane is closed. That’s because Editor is always running in the background, checking for spelling, grammar, and some style issues.
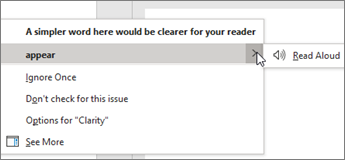
Right-click the underlined text to see the suggestion. Use context menu to:
-
Listen to the suggestion by clicking the arrow next to the suggestion and then choosing Read Aloud.
-
Skip this instance of the issue by choosing Ignore Once.
-
Tell Editor to stop checking for this issue by choosing Don’t check for this issue.
-
Fine tune the settings for this type of issue by choosing the Options link.
-
Get more information about the issue by choosing See More.
Your document might be written in more than one language, or you might want to switch to another language for Editor to check. If you are set up to use multiple authoring languages (File > Options > Language), Word detects the language you’re writing in, and Editor will check for issues in that language.
However, you might be writing in a language that Word doesn’t detect automatically. In that case, you can get Editor to check text in that language by selecting the text and going to Review > Language > Set Proofing Language, and then choose your language.

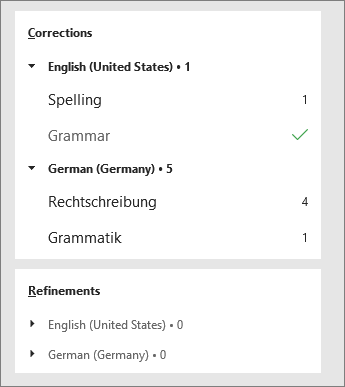
When Editor is checking more than one language, the Editor pane lists corrections and refinements for each language in the document.
For information about the issues that Editor checks in various languages, see Editor’s spelling, grammar, and refinement availability by language.
When you work on documents in Word on the web, Editor provides a rich set of features that are coming soon to Word for Windows. Even when you’re not using Word, the Editor browser extension helps you with writing on websites like LinkedIn, Twitter, Facebook, and Gmail.
Word marks spelling, grammar, and stylistic issues with an underline. Right-click the underlined word, and then choose the suggestion you want, or learn more about the error and how to correct it.
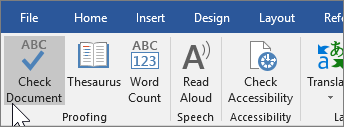
Or, open the Editor pane to address issues by category.
-
On the Review tab, select Check Document.
-
The Editor pane categorizes spelling, grammar, and stylistic issues.
-
Click each category to address the issues.
Note: For keyboard shortcuts in the Editor pane, there’s no need to press Alt. Just use the underlined letter to select the command (like i for Ignore Once, g for Ignore All, etc) .
-
In the Editor pane, click Settings.
-
Under When correcting spelling and grammar in Word, select Settings
-
For Writing Style, select Grammar & Refinements .
-
Scroll down to see all of the options available, and select or clear the rules you want. The settings apply to all the documents that you edit, not just the current one.
Requirements and availability of the Editor pane include the following:
-
Internet connection: Make sure your connection is working.
-
Intelligent Services switched on: Go to File > Options > General and turn on Office Intelligence Services.
-
Language availability: For information about the issues that Word checks for in various languages, see Editor’s spelling, grammar, and refinement availability by language.
Word marks spelling, grammar, and stylistic issues with an underline. Control-click the word or phrase and choose one of the options.
If Word incorrectly underlined a word as misspelled and you want to add that word to your dictionary so that Word will properly recognize it in the future, see Add or edit words in a spell check dictionary.
If spelling or grammatical errors aren’t underlined, you might need to turn on automatic spelling and grammar checking, as follows.
Turn on (or off) automatic spelling and grammar checking
-
On the Word menu, click Preferences > Spelling & Grammar.
-
In the Spelling & Grammar dialog box, under Spelling, check or clear the Check spelling as you type box.
-
Under Grammar, check or clear the Check grammar as you type box.
-
Close the dialog box to save your changes.
-
On the Review tab, click Spelling & Grammar.
-
Word displays the issues it finds in the Spelling & Grammar dialog box.
-
To address an issue, do one of the following:
-
Type the correction in the box and then click Change.
-
Under Suggestions, click the word you want to use, and then click Change.
To skip the error, do one of the following:
-
Click Ignore Once to skip only that instance of the error.
-
Click Ignore All to skip all instances of the error.
-
For a grammatical error, click Next Sentence to skip that instance of the error and move to the next error.
To skip a misspelled word in all documents, click Add to add it to the dictionary. This only works for spelling. You can’t add custom grammar to the dictionary.
-
-
After you correct, ignore, or skip an issue, Word moves to the next one. When Word finishes reviewing the document, you’ll see a message that the spelling and grammar check is complete.
-
Click OK to return to your document.
You can clear or reset the list of Ignored Words and Grammar so Word will check for spelling and grammar issues you previously told it to ignore.
Note: When you reset the list of Ignored Words and Grammar, the list is cleared only for the currently open document. Any spelling or grammar issues you told Word to ignore in other documents won’t be affected.
-
Open the document that needs to be checked.
-
On the Tools menu, point to Spelling and Grammar, and then click Reset Ignored Words and Grammar.
Word displays a warning about the operation resetting the spelling checker and the grammar checker.
-
Click Yes to proceed.
-
Click the Review tab, and then click Spelling & Grammar to check spelling and grammar.
Word marks potential spelling errors with a red squiggly line, and potential grammatical errors are marked with a blue squiggly line.
Right-click on the underlined word or phrase and choose a correction, or ignore the suggestion.
Note: If Word is flagging words as misspelled but you have it spelled the way you want it, select Add to Dictionary to teach Word not to flag that word as misspelled in the future. For more information on this see: Add or edit words in a spell check dictionary.
If you don’t want Office to mark potential errors with squiggly lines while you are working, you can turn automatic spelling and grammar checking off:
-
On the File menu, click Options, and then click Proofing.
-
Select or clear the Check spelling as you type and Mark grammar errors as you type check boxes.
Note: You can turn the spelling checker on or off for the document you’re working with or for all new documents. Select an option in the Exceptions for list, and then select or clear the Hide spelling errors in this document only and Hide grammar errors in this document only check boxes.
If you don’t want Word to check grammar at all (either when running a spell check or automatically as you type), you can turn it off:
-
On the File menu, click Options, and then click Proofing.
-
Clear the Mark grammar errors as you type and Check grammar with spelling check boxes.
-
On the File menu, click Options > Proofing> Recheck Document.
-
Click Yes when you see the warning message about resetting the spelling and grammar checker.
-
Click OK in the dialog box to get back to the document, and then run the spelling and grammar checker again.
See also
For more information about Microsoft Editor, see Microsoft Editor checks grammar and more in documents, mail, and the web.
For more topics on spelling and grammar, see Spelling and grammar in Word.
To try Microsoft Editor for yourself, download the Editor in Word Tutorial.
![]()
Download Article
Proofread and spell check your Microsoft Word documents with this user-friendly guide
![]()
Download Article
- Running a Spelling Check
- Correcting Errors as You Type
- Using the Mobile App
- Video
|
|
|
Microsoft Word has a built-in spellchecker for all your important documents and assignments. To find it, click the «Review» tab, click the down arrow next to «Spelling and Grammar,» and then choose «Spelling.» If you’re ever unsure about a spelling, Word will also point out any errors with a red squiggly line. Grammar is also automatically checked and indicated by a blue or green line. This wikiHow teaches you how to do a spelling and grammar check in Microsoft Word using your Windows, Mac, iPhone, iPad, or Android device.
Things You Should Know
- To run a spell check, click the «Review» tab. Click the down-arrow next to «Spelling and Grammar» and select «Spelling».
- Click a suggestion to apply it, or click «Ignore once», «Ignore all», or «Add to dictionary».
- On mobile, find a word with a red squiggly line underneath it. Tap a suggestion from the pop-up menu.
-
1
-
2
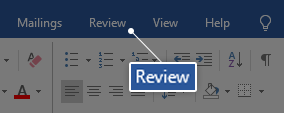
Click Review. This is at the top toolbar, between Mailings and View.
Advertisement
-
3
Click the down-arrow next to «Spelling and Grammar». A pop-up menu will open.
-
4
Select Spelling. The Editor panel will open on the right side.
- If you want to check both spelling and grammar at the same time, skip this step and click the abc icon instead
- You can also press F7 on your keyboard to quickly open the Editor panel. When it’s open, click Spelling.
-
5
View any errors. The Editor panel will show the nearest spelling (or grammar) error.
- Spelling errors will appear in red, while grammatical errors will appear in blue or green, depending on your version.
-
6
Apply an action. Below the error in the Editor panel, you’ll see suggested spellings along with three options: Ignore once, Ignore all, and Add to dictionary.
- To fix a mistake, click a correction in the suggestion list.
- If you don’t see any suggestions, Word’s dictionary was not able to find a similar replacement. You’ll need to delete the word and type it again.
- To skip this instance of the error, click Ignore. To skip all instances of this error in the document, click Ignore All.
- If you don’t want Word to ever report a certain spelling as incorrect, click Add to dictionary.
- To fix a mistake, click a correction in the suggestion list.
-
7
Select actions for the remaining errors. After you choose an option for the first error, Word will automatically take you to the next. When no more errors are found, you’ll see a confirmation message that says the spelling and grammar check is finished.
-
8
Click X to close the tool. Be sure to save your document when you’re finished.
Advertisement
-
1
Open a project in Microsoft Word. This looks like a W on top of a blue square.
-
2
Look for words or phrases underlined in red, green, or blue. Word is set up to check your spelling and grammar automatically as you type.[1]
- Spelling mistakes are underlined with a red squiggly line.
- Grammar issues are underlined with a blue or green line.
-
3
Click an error. A menu will open.
- You can also right-click the error for more options.
-
4
Select an action. You’ll see a few suggestions at the top of the menu.
- To replace an error with one of the suggestions in the menu, click it now.
- To ignore the error and remove its squiggly underline, click the slashed circle icon.
- To add the spelling to your dictionary, click the book icon.

Advertisement
-
1
Open the Microsoft Word app. Word is available for iOS in the App Store and for Android in the Google Play Store.
-
2
Enable spell check. Word should automatically have this enabled, but if it isn’t, do the following:
- Tap the edit icon. This looks like a pencil in front of an A.
- Tap Home.
- Tap Review.
- On Android, tap Spelling. On iOS, tap Proofing Tools and toggle on Spelling.
-
3
Look for words or phrases underlined in red. Word is set up to check your spelling automatically as you type.
-
4
Tap an error. A pop-up menu will open with suggestions and actions.
-
5
Select an action. Tap a suggestion to quickly apply it.
- Tap Learn to add the spelling to your device’s dictionary.
- Tap Cut or Delete to delete the word.
Advertisement
Ask a Question
200 characters left
Include your email address to get a message when this question is answered.
Submit
Advertisement
Video
Thanks for submitting a tip for review!
References
About This Article
Article SummaryX
1. Click Review.
2. Click Spelling & Grammar.
3. Select an action.
4. Repeat for all errors.
5. Click OK when finished.
Did this summary help you?
Thanks to all authors for creating a page that has been read 41,546 times.
Is this article up to date?
Check spelling and grammar all at once On the Review tab, click Spelling & Grammar. If Word finds a potential error, the Spelling & Grammar dialog box will open, spelling errors will be shown as red text, and grammatical errors will be shown as green text.
Contents
- 1 How do you check Grammar errors in Word 2010?
- 2 Does Microsoft Word have a Grammar checker?
- 3 How do you check Grammar and punctuation in Word?
- 4 How do I check grammar in Word 2007?
- 5 How do I check accuracy in Word?
- 6 Does Office 365 have spell check?
- 7 How do I check in a Word document?
- 8 How can I check if my punctuation is correct?
- 9 How do I turn on Track Changes in Word?
- 10 How do I change my grammar settings in Word?
- 11 Why is spell check not working in Word 2007?
- 12 Which key is used for spelling and grammar check?
- 13 Is Word’s spelling and grammar check is always 100 accurate?
- 14 What is proofing in Microsoft Word?
- 15 Why is my Word document not showing spelling errors?
- 16 How do I add grammar check in Outlook 365?
- 17 How do you check grammar in Outlook?
- 18 Is spell check one word?
- 19 How do I check a checkbox in Word?
- 20 How do I insert a checkmark in Word?
How do you check Grammar errors in Word 2010?
More videos on YouTube
- Go to the Review tab.
- Click on the Spelling & Grammar command. The Spelling & Grammar command.
- The Spelling and Grammar dialog box will open. For each error in your document, Word will try to offer one or more suggestions.
- If no suggestions are given, you can manually type the correct spelling.
Does Microsoft Word have a Grammar checker?
Microsoft Word comes with a powerful grammar checker, but many of its advanced grammar detection features are disabled by default. Grammarly is popular, but you don’t need it to add grammar checking to Word. Word itself contains a free alternative to Grammarly.
How do you check Grammar and punctuation in Word?
Use the spell-check tool to check for correct punctuation in Microsoft Word. Find it by pressing F7 (on Windows), clicking the small book icon along the bottom edge of the screen, or clicking on “Spelling & Grammar” under the Review tab.
How do I check grammar in Word 2007?
You can also grammar check a document after you are finished typing. From the Tools menu, select Spelling and Grammar… Press [Option]+[Command]+[L]. The Spelling and Grammar dialog box appears.
How do I check accuracy in Word?
Get your document’s readability and level statistics
- Go to File > Options.
- Select Proofing.
- Under When correcting spelling and grammar in Word, make sure the Check grammar with spelling check box is selected.
- Select Show readability statistics.
- Go to Home > Editor.
Does Office 365 have spell check?
Office 365 (Outlook for Windows) – Check spelling before sending a message. You can check the spelling in your email message at any time by clicking Review > Spelling & Grammar when composing or replying to a message. If you don’t want to do check spelling manually for every message—or you’re worried you might forget
How do I check in a Word document?
If you can’t find the checkmark icon in the Symbol drop-down menu, do the following:
- Click More Symbols…
- Click the “Font” text field.
- Type in wingdings 2 and press ↵ Enter .
- Scroll down until you find the checkmark, then click it.
- Click Insert.
How can I check if my punctuation is correct?
Here’s how to use this tool:
- Type or Copy (CTRL+C) & Paste (CTRL+V) the text in the Editor.
- Click the Lookup button.
- Spelling, Grammar, and Punctuation mistakes will be underlined.
- Hover your mouse cursor on each word for correct Options.
- Use The Deep Lookup button for a thorough check through our partner grammar check.
How do I turn on Track Changes in Word?
Turn tracked changes on or off
- Open the document that you want to edit.
- On the Review tab, under Tracking, select the Track Changes switch to turn on track changes. Tips: Each reviewer’s changes are displayed in a different color. If there are more than eight reviewers, Word will reuses colors.
How do I change my grammar settings in Word?
Follow these steps:
- Open the Spelling & Grammar dialog. Go to Word > Preferences… > Spelling & Grammar.
- Go to Writing Style Settings. On Writing style: Grammar, click Settings…. The Grammar Settings dialog opens.
- Choose Your Grammar and Style Options. Check or uncheck items under Grammar and style options.
Why is spell check not working in Word 2007?
Solution 1: Verify the “check spelling as you type” feature is on.In the Spelling and Grammar: dialog, click the Settings link in the Editor pane. In the Word Options dialog, check the boxes for Check spelling as you type and Mark grammar errors as you type. Click OK.
Which key is used for spelling and grammar check?
F7
Check and correct the spelling and grammar
Open the document you want to check for spelling or grammar mistakes, and then press F7. You can also use the ribbon to start the check. Press Alt+R to open the Review tab, and then press C, 1 to select the Check Document option.
Is Word’s spelling and grammar check is always 100 accurate?
Word’s Spelling and Grammar check is always 100% accurate.You can correct this by inserting the cursor before the first word of the paragraph and pressing the Tab key.
What is proofing in Microsoft Word?
Proofing Options
For example, you can set Word to check for spelling and grammar errors as you type, or customize the dictionaries Word has access to. To access the Proofing Options menu:A menu will open. At the bottom of the menu, click the Word Options button. Select Proofing.
Why is my Word document not showing spelling errors?
Select the File tab, and then select Options. In the Word Options dialog box, select Proofing. Make sure that the Check spelling as you type check box is selected in the When correcting spelling and grammar in Word section. Make sure that all check boxes are cleared in the Exception for section.
How do I add grammar check in Outlook 365?
Check spelling before sending a message
- Click File > Options > Mail.
- Under Compose messages, check the Always check spelling before sending box.
How do you check grammar in Outlook?
How to Check Spelling and Grammar in Microsoft Outlook
- When your message is composed, on the Message Ribbon , select the Review tab.
- In the Proofing group, select Spelling & Grammar .
- The Spelling and Grammar dialog box launches.
- Move through the spelling and grammar issues by selecting the options on the right.
Is spell check one word?
NOTE: Spellcheck may be used as both a noun (performing a spellcheck) and a verb (spellchecking a document). Ironically, there is no official spelling of the term, as “spell-check” and “spell check” are also acceptable. However, “spellcheck” is most common.
How do I check a checkbox in Word?
Place you cursor at the start of the first line. Go to the Developer tab, and then click Check Box. If you want a space after the check box, press Tab or Spacebar. Use a Tab character if you want to format the list item with hanging indentation, like Word applies to bulleted lists.
How do I insert a checkmark in Word?
You can press the Alt key in combination with numbers on the numeric keypad to insert a check mark symbol. To insert a check mark symbol in a Word document using Alt: Position the cursor where you want to insert the check mark symbol. Press Alt + 0252 or Alt + 0254 on the numeric keypad.
This tutorial shows how to use the spelling and grammar check in Microsoft Word 2016. The steps are similar for Word 2013 and Word 2010.
If you use Word for Microsoft 365, Word 2021, or Word 2019, the spelling and grammar check is now called the Editor. Visit “How to Use the Editor in Microsoft Word” for a complete tour of the new interface.
This tutorial is available as a YouTube video showing all the steps in real time.
Watch more than 150 other writing-related software tutorials on my YouTube channel.
Before we run the spelling and grammar check, we’ll look at how to include or exclude grammar from the check.
How to Include or Exclude Grammar
1. Select the File tab.

2. Select Options in the Backstage view.

3. Select Proofing in the Word Options dialog box.

4. Select or deselect Check grammar with spelling.

5. Select the OK button to save your selection and close the Word Options dialog box.

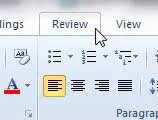
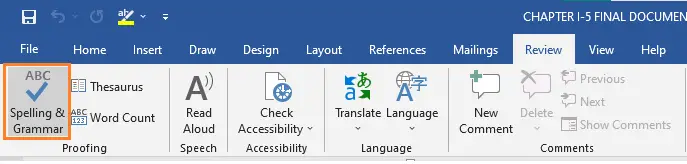
1. Select the Review tab.

2. Select Spelling & Grammar.

3. Choose the appropriate option for each spelling and grammar error detected.
Spelling Errors
Choose an option from the suggestions list to change that instance of the spelling error.

Or, open the drop-down menu for a suggestion and select Change All to change every instance of the spelling error to that suggestion.

You can also choose (a) Add to Dictionary to add the word with its current spelling to your custom dictionary, (b) Ignore Once to ignore that instance of the spelling error, or (c) Ignore All to ignore every instance of the spelling error.

Occasionally, Word will be unable to provide any suggestions; however, when that lapse occurs, the software will still offer the opportunity to add the word to your custom dictionary, ignore the word once, or ignore every instance of the word.
Grammar Errors
Choose an option from the suggestions list to change that instance of the grammar error.

Or, select (a) Ignore Once to ignore that instance of the grammar error, (b) Don’t check for this issue to stop checking for that type of grammar error, or (c) Options for “Clarity and Conciseness” to open the Grammar Settings dialog box where you can customize the grammar check.

If you want to learn about the grammar error and see examples, open the drop-down menu above the text box.

Pro Tip: The spelling and grammar check will automatically pause itself if you edit the text during the check. Select the Resume button when you are ready to restart the check.

If you have chosen to include readability statistics in your proofing options, the Readability Statistics dialog box will appear after you complete the spelling and grammar check.
For more information about using the readability statistics in Word, visit “How to Add Passive Voice to Microsoft Word’s Grammar Check and Readability Statistics” for Word 2013 and “How to Use the Passive Voice Tool in Microsoft Word 2016.”
Updated March 03, 2022
Your grammar can either make or break your documents. However, not everyone is a walking encyclopedia of grammar rules and correct spelling of words, which is why Microsoft Word is able to analyze your documents and notice your mistakes for you. With certain features, you can even have the app automatically correct your spelling errors to the correct one as you type.
Our article aims to teach you how you can take advantage of one of Word’s most famous capabilities. If you’re a beginner and want to know how to enable spell checking or AutoCorrect, this step-by-step guide is the perfect solution. Just follow along with us and learn how you can speed up and increase the quality of your work at the same time!
Things you’ll need
- A device with Microsoft Word installed and activated.
Now, let’s get right to the guides.
Check Spelling and Grammar Manually
- Launch Word, and either open an already existing document or create a new one from the welcome screen.
- From the Ribbon on the top of your screen, select the Review tab.

- In the Proofing section, you can see a button that says Spelling & Grammar. Click on this to start a manual check.

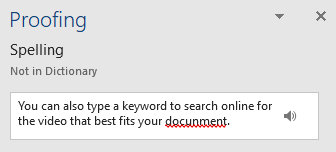
- If Word is able to detect any spelling issues in the language your document is set to, a new pane will open up on the right side of the application. You can see the error underlined with a red line.

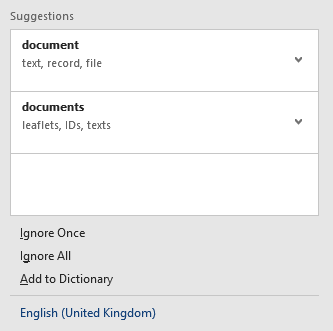
- You’ll see suggested words with definitions that allow you to select the correct spelling of the word you were trying to type. To implement any of these suggestions, simply click on them.

- You also have the option to make Word ignore the presumably misspelled word or words by pressing Ignore Once or Ignore All under the suggestions. You can also Add to Dictionary, meaning that the word in question won’t get detected by as a misspelling in the future.
- After you deal with the first misspelled word, you can move on to the next one if any more have been detected.


Tip: You can use a shortcut to activate the manual spelling and grammar check in Word. Simply press the F7 key on your keyboard, and the application will automatically perform a spelling and grammar check.
How to set Spelling Checker to Show errors while your work
- Launch Word, and either open an already existing document or create a new one from the welcome screen.
- From the Ribbon on top of your screen, select the File menu.

- Near the bottom, you can see a button that says Options. Click on it and direct your attention to the new Word Options window that appears.

- Click on Proofing from the menu on the left.

- To enable automatic spell checking as you type, place a checkmark next to the Check spelling as you type checkbox.

- To enable automatic grammar checking as you type, place a checkmark next to the Mark grammar errors as you type checkbox.
- After you enable automatic spell checking, whenever Word detects a misspelled word, it’ll be highlighted with a red squiggly line under it. You can right-click on the word and see a list of suggested words for replacement, and the option to Ignore or Add to Dictionary.

- After you enable automatic grammar checking, whenever Word detects a potential grammar error, two blue lines will appear. You can get assistance in fixing the error by right-clicking on it. You can also choose the Ignore option if you want to keep it in your document as it is.


We hope that this article was able to help you learn how you can easily check your spelling and grammar in Microsoft Word. Do you know someone who’s starting out with Word and other Microsoft Office products? Don’t forget to share this article with them! Your friends, classmates, colleagues, or employees can all get help in getting started with Word. If you want to learn more about Word or other Microsoft Office suite applications, feel free to browse our section of guides.
If your document in Word is riddled with blue lines, you might have a few grammatical errors. This wikiHow will teach you how to check your grammar in Word on Windows and Mac computers since the feature to check grammar is not available for the mobile app yet.
-
1
Open your document in Word. If you’re in Word, you can open your document by clicking File > Open; if you’re not in Word, you can right-click the file in your file explorer and click Open with > Word.
- If you’re using the web, you can go to https://office.com/launch/word and open a document from your OneDrive.
-
2
Click Review (desktop application) or Home (web). You’ll see this in the menu running across the top of your document with File and Insert.
-
3
Click Check Document (Windows) or Editor (web). You’ll find this in the Proofing grouping all the way on the left side of the menu if you’re using a desktop application. If you’re using the web, you’ll find this on the far right side of the menu next to Voice.[1]
- An editor box will pop up or slide out from the side.
-
4
Click the error Word found. You’ll see suggestions that will fix your sentence or wording. You can either click to change the error, ignore it once, or ignore it throughout the document.


-
1
Open your document in Word. If you’re in Word, you can open your document by clicking File > Open; if you’re not in Word, you can right-click the file in your file explorer and click Open with > Word.
-
2
Click Review. You’ll see this in the menu running across the top of your document with File and Insert.
-
3
Click Spelling & Grammar. You’ll find this in the Proofing grouping all the way on the left side of the menu.
- An editor box will pop up or slide out from the side.
-
4
Click the error Word found. You’ll see suggestions that will fix your sentence or wording. You can either click to change the error, ignore it once, or ignore it throughout the document.[2]


-
1
Open your document in Word. If you’re in Word, you can open your document by clicking File > Open; if you’re not in Word, you can right-click the file in your file explorer and click Open with > Word.
-
2
Click Review. You’ll see this in the menu running across the top of your document with File and Insert.
-
3
Click Spelling & Grammar. You’ll find significantly less functionality with the spelling and grammar checker in Word 2013 than in 2016-2019, but any word or phrase underlined in blue will come with a suggestion to fix it.


Ask a Question
200 characters left
Include your email address to get a message when this question is answered.
Submit
-
You can right-click an underlined word to see suggestions for changing it.
References
About this article
Article SummaryX
1. Open your document in Word.
2. Click Review.
3. Click Check Document (Windows) or Spelling & Grammar (Mac).
4. Click the error Word found.
Did this summary help you?
Thanks to all authors for creating a page that has been read 4,776 times.
Is this article up to date?
Do you often make grammar mistakes when you write, and it’s affecting your grades on papers or your job performance?
One way that you can improve the grammar in your writing is with the help of the spelling and grammar checker tool in Microsoft Word.
Our article below will show you how to check your grammar in Word using the tool built into the application.
How to Do a Grammar Check in Word 2010
- Open the document.
- Click the Review tab.
- Click Spelling & Grammar.
- Accept or ignore changes.
Our guide continues below with more information on checking spelling and grammar in a Microsoft Word document, including pictures of these steps.
Having the ability to scan a document and look for spelling or grammatical mistakes can save you a lot of hassle? But if you are asking the question “how do I do a grammar check on Word?” then it’s very likely that you are having trouble finding that tool within the application.
Word 2010 is a powerful word-processing program not only because of the different ways that you can customize a document but also because of the utilities that you can use to check the contents of that document.
You might be aware of the spell-check feature, which has become a common part of most data-entry programs, but you might not be aware that Word can also check the grammar of the text in your documents.
You can have Word check grammar automatically and check spelling automatically by opening your document, selecting the Review tab, clicking Spelling & Grammar, then choosing what to do with the mistakes it has found.
This can be a particularly helpful tool if you are prone to making common grammatical mistakes or if you are submitting the document to a client or teacher who may be grading the quality of your work.
Continue reading to learn how to do a grammar check in Word 2010.
How to Run the Spelling & Grammar Tool in Word 2010 (Guide with Pictures)
One of the best parts of the spelling and grammar checker in Word 2010 is the level to which it can be customized.
While the tool itself is run directly within the Word 2010 interface, you actually need to open the Word Options menu from the File tab to configure the grammar settings.
After we show you how to perform a grammar check in Word 2010, we will then show you where to go to configure the grammar options as well.
These steps will show you how to do a grammar check in Word using a tool found within the program.
Step 1: Open the document on which you wish to run the grammar check.
Open your document in Microsoft Word.
Step 2: Click the Review tab at the top of the window.
Select the Review tab.
Step 3: Click the Spelling & Grammar button in the Proofing section of the ribbon at the top of the window.
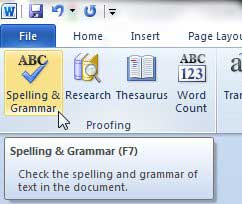
Select the Spelling & Grammar button.
Step 4: Click the button that corresponds with the change that you want to make to the identified mistake.

Choose the fix for the mistake.
You can also elect to ignore the mistake if you so choose.
Now that you know how ot use the spelling and grammar checker in Microsoft Word you will be able to scan the documents that you write and fix any mistakes that you find.
Note the Options button at the bottom of the window. If Word finds a mistake in your document, then you can click this button to set the options for the utility. Otherwise, you will need to follow the directions below to configure the grammar checker.
Changing the Grammar Checker Settings in Word 2010
While the spelling and grammar check in Microsoft Word will be able to find spelling errors and grammatical errors become you make any changes to the settings, it’s likely that you will discover it is either catching or missing some grammar errors.
Fortunately, you can adjust the grammar checking for the application with the following steps.
Step 1: Click the File tab at the top of the window.
Step 2: Click Options in the column at the left side of the window.

Step 3: Click Proofing in the column at the left side of the Word Options window.

Step 4: Locate the When correcting spelling and grammar in Word section.
Step 5: Click the Settings button to the right of Writing Style, then check the items for which you want the grammar utility to check.

Step 6: Click the OK button at the bottom of the Grammar Settings window, then click the OK button at the bottom of the Word Options window.
Our tutorial continues below with more information on how you can change the way that Microsoft Word will find and mark grammar errors in your document.
More Information on Using the Microsoft Word Grammar and Spelling Checker to Find Spelling or Grammar Issues
When you have configured Word to perform automatic spelling and grammar checking, you will start to see an underlined word with a red squiggly line when it has found a spelling error or a grammar error. You can then click on that underlined word and use one of the suggested words to replace the misspelled word or make an adjustment to correct the grammatical error.
If the document is going to be submitted in an official capacity, such as to your school or for work, then you might want to hide spelling errors and hide grammar errors that the automatic spell checking tool has found. This assumes that you have either chosen not to act on the suggestions from the tool, or you are going to be waiting until later to fix them.
You can go to File > Options > Proofing > then go to the Exceptions for section and check the boxes next to Hide grammar errors in this document only and Hide spelling errors in this document only if you don’t want Word to highlight any potential spelling errors or potential grammatical errors when someone is viewing the file.
When you click the Review tab at the top of the window you will see the option to check spelling and turn automatic spelling and automatic grammar checking on, but you will also find ways to work with comments and change tracking. These are other editing options that you can find useful when collaborating on a document with a group, as it can otherwise be difficult to identify the changes that someone makes.
Frequently Asked Questions About How to Check Grammar and Spelling in Word
Is there a way to change the grammar mistakes that Word checks for?
You can modify the settings that Microsoft Word uses when it runs the spelling and grammar checker.
Click the File tab, then select the Options button at the bottom-left of the window.
Select the Proofing tab on the Word Options window, then adjust the settings and options on that menu.
If you click the Settings button next to the Writing Style dropdown menu in the When correcting spelling and grammar in Word section you will find dozens of different options that you can adjust.
This Grammar Settings dialog box can be really useful, especially if there is a particular type of mistake you always make and want to ensure that Word includes it when it checks your documents.
Why is Microsoft Word only checking spelling?
If you would like Word to scan your document for spelling and grammar mistakes, but it’s currently only scanning for spelling mistakes, then you can make a quick adjustment.
Go to the Review tab, then click the down arrow to the right of Spelling and Grammar. You can then click the Spelling and Grammar option to choose that type of scan.
How do I turn on grammar checker in Word?
You can enable or disable this option by going to File > Options > then selecting the Proofing tab.
You can then check the boxes to the left of:
– Check spelling as you type
– Mark grammar errors as you type
In the When correcting spelling and grammar in Word section.
Conclusion
Hopefully, this article has provided you with more information on how you can check spelling and grammar in your documents.
Familiarizing yourself with the grammar dialog box so that you can change how Word detects grammar mistakes and chooses to correct spelling will give you more control over how the program handles potential errors.
Not everyone needs the same thing from the editing tools, and your field or situation could dictate a different set of proofreading rules that you can customize in your Word installation.
Additional Sources

Matthew Burleigh has been writing tech tutorials since 2008. His writing has appeared on dozens of different websites and been read over 50 million times.
After receiving his Bachelor’s and Master’s degrees in Computer Science he spent several years working in IT management for small businesses. However, he now works full time writing content online and creating websites.
His main writing topics include iPhones, Microsoft Office, Google Apps, Android, and Photoshop, but he has also written about many other tech topics as well.
Read his full bio here.
In this chapter, we’ll talk about how to use Spelling and Grammar Checker in MS Word. Microsoft Word has a good spelling and grammar checker that lets you find and fix any spelling or grammar mistakes in a document. This is the continuation of the previous tutorial on how to use find and replace tools in a word document.
Table of contents
- Spelling and Grammar Checker in MS Word
- What is Spelling Checker in MS Word?
- Where is Spell Check and Grammar Option in Word?
- Different Options to Check Spelling Mistakes in Word Document.
- Different Options to Check Grammatical Mistakes
- How to Use Spelling Check and Grammar in Word 2019
- Another Way to Check Spelling and Grammar Check in Word
- To fix a spelling mistake
- To correct grammar mistakes:
- Summary
What is Spelling Checker in MS Word?
The Word’s spell check function is set to automatically check your spelling while you type. Errors in your document will have color-coded underlines reflecting your choices, like red for spelling errors, green for grammar errors, and blue for contextual spelling errors.
Word is smart enough to find misspelled words, words that are used in the wrong way, and grammar mistakes and underlines them as follows.
- A red underlining behind spelling errors.
- A green underlining behind grammar faults.
- A blue line below correctly written but improperly utilized words.
Where is Spell Check and Grammar Option in Word?
The spell check and grammar options in Word can be found in the “Review” tab. To check spelling in a Word document, open up the document, head to the review tab, then click on “Spelling & Grammar,” part of the “Proofing” group of tools. Then a window will appear showing the first word the program believes to be misspelled.
Here’s a quick tip on how to use only the keyboard to run a spell check. Just press Alt + F7 on your keyboard, and it will start with the first misspelled word. If the first highlighted word at the top of the list is right, just hit Enter. You can also point to the right answer, ignore it, or add it to your dictionary.
Different Options to Check Spelling Mistakes in Word Document.
You can now check the spelling mistakes in the following ways.
- Ignore − If you want to ignore a word, click this button, and Word will ignore it throughout the document.
- Ignore All − Like Ignore, but this option ignores all instances of the same misspelled word, not just the first one.
- Add to Dictionary − If you choose “Add to Dictionary,” the word will be added to the Word spelling dictionary.
- Change − This will change the wrong word to the correct word that was suggested.
- Change All − Like Change, but it fixes all instances of the same misspelled word, not just the first one.
- AutoCorrect −If you choose one of the suggestions, Word adds an entry to AutoCorrect that will automatically fix this spelling mistake in the future.
Different Options to Check Grammatical Mistakes
If you have made a grammatical error, the following options are available:
| Options | Description |
| Next Sentence | You can click Next Sentence to direct the grammar checker to skip ahead to the next sentence. |
| Explain | The grammar checker displays a description of the rule that caused the sentence to be flagged as a possible error. |
| Options | This will open the Word Options dialog box to allow you to change the behavior of the grammar checker or spelling options. |
| Undo | This will undo the last grammar changed. |
How to Use Spelling Check and Grammar in Word 2019
Here are the following steps on How to Use Spelling Check and Grammar in Word 2019.
- From the Review tab, click the Spelling & Grammar command.

- On the right, the Spelling and Grammar pane will appear. Word will try to offer one or more suggestions for each error in your document. To correct the error, select a suggestion and click Change.

- Word will proceed through each error until you have reviewed them all. Following the review of the last error, a dialog box will appear confirming that the spelling and grammar check is complete. Click OK.

- If no suggestions are provided, you can type the correct spelling in your document manually.
Another Way to Check Spelling and Grammar Check in Word
To fix a spelling mistake
The following are ways to fix a spelling mistake:
- Right-click the underlined word, then select the correct spelling from the list of suggestions.
- The corrected word will appear in the document.

- You can also choose to Ignore All instances of an underlined word or add it to the dictionary.
To correct grammar mistakes:
The following are ways to fix a grammar mistakes:
- Right-click the underlined word or phrase, then select the correct spelling or phrase from the list of suggestions.

- The corrected phrase will appear in the document.
Summary
In this tutorial, we’ve talked about how to use the spell and grammar checkers in MS Word as well as what those terms mean. We also gain insight into what the tips are for using the spell and grammar checker in an MS Word document. Furthermore, we learned how to check spelling and grammar in Word in a different way.
We hope this tutorial helps you as you plan to create a document in MS Word.
PREVIOUS

NEXT