
You can perform calculations and logical comparisons in a table by using formulas. The Formula command is found on the Table Tools, Layout tab, in the Data group.
A formula in Word automatically updates when you open the document that contains the formula. You can also update a formula result manually. For more information, see the section Update formula results.
Note: Formulas in Word or Outlook tables are a type of field code. For more information about field codes, see the See Also section.
In this article
-
Insert a formula in a table cell
-
Update formula results
-
Update the result of specific formulas
-
Update all the formula results in a table
-
Update all the formulas in a document
-
-
Examples: Sum numbers in a table by using positional arguments
-
Available functions
-
Use bookmarknames or cell references in a formula
-
RnCn references
-
A1 references
-
Insert a formula in a table cell
-
Select the table cell where you want your result. If the cell is not empty, delete its contents.
-
On the Table Tools, Layout tab, in the Data group, click Formula.
-
Use the Formula dialog box to create your formula. You can type in the Formula box, select a number format from the Number Format list, and paste in functions and bookmarks using the Paste Function and Paste Bookmark lists.
Update formula results
In Word, the result of a formula is calculated when it is inserted, and when the document containing the formula opens. In Outlook, the result of a formula is only calculated when it is inserted and won’t be available for the recipient of the email to edit.
You can also manually update:
-
The result of one or more specific formulas
-
The results of all formulas in a specific table
-
All the field codes in a document, including formulas
Update the result of specific formulas
-
Select the formulas that you want to update. You can select multiple formulas by holding down the CTRL key while you make selections.
-
Do one of the following:
-
Right-click the formula, then click Update field.
-
Press F9.
-
Update all the formula results in a table
-
Select the table that contains formula results that you want to update, and then press F9.
Update all the formulas in a document
Important: This procedure updates all the field codes in a document, not just formulas.
-
Press CTRL+A.
-
Press F9.
Examples: Sum numbers in a table by using positional arguments
You can use positional arguments (LEFT, RIGHT, ABOVE, BELOW) with these functions:
-
AVERAGE
-
COUNT
-
MAX
-
MIN
-
PRODUCT
-
SUM
As an example, consider the following procedure for adding numbers by using the SUM function and positional arguments.
Important: To avoid an error while summing in a table by using positional arguments, type a zero (0) in any empty cell that will be included in the calculation.
-
Select the table cell where you want your result. If the cell is not empty, delete its contents.
-
On the Table Tools, Layout tab, in the Data group, click Formula.
-
In the Formula dialog box, do one of the following:
|
To add the numbers… |
Type this in the Formula box |
|---|---|
|
Above the cell |
=SUM(ABOVE) |
|
Below the cell |
=SUM(BELOW) |
|
Above and below the cell |
=SUM(ABOVE,BELOW) |
|
Left of the cell |
=SUM(LEFT) |
|
Right of the cell |
=SUM(RIGHT) |
|
Left and right of the cell |
=SUM(LEFT,RIGHT) |
|
Left of and above the cell |
=SUM(LEFT,ABOVE) |
|
Right of and above the cell |
=SUM(RIGHT,ABOVE) |
|
Left of and below the cell |
=SUM(LEFT,BELOW) |
|
Right of and below the cell |
=SUM(RIGHT,BELOW) |
-
Click OK.
Available functions
Note: Formulas that use positional arguments (e.g., LEFT) do not include values in header rows.
The following functions are available for use in Word and Outlook table formulas:
|
Function |
What it does |
Example |
Returns |
|---|---|---|---|
|
ABS() |
Calculates the absolute value of the value inside the parentheses |
=ABS(-22) |
22 |
|
AND() |
Evaluates whether the arguments inside the parentheses are all TRUE. |
=AND(SUM(LEFT)<10,SUM(ABOVE)>=5) |
1, if the sum of the values to the left of the formula (in the same row) is less than 10 and the sum of the values above the formula (in the same column, excluding any header cell) is greater than or equal to 5; 0 otherwise. |
|
AVERAGE() |
Calculates the average of items identified inside the parentheses. |
=AVERAGE(RIGHT) |
The average of all values to the right of the formula cell, in the same row. |
|
COUNT() |
Calculates the count of items identified inside the parentheses. |
=COUNT(LEFT) |
The number of values to the left of the formula cell, in the same row. |
|
DEFINED() |
Evaluates whether the argument inside the parentheses is defined. Returns 1 if the argument has been defined and evaluates without error, 0 if the argument has not been defined or returns an error. |
=DEFINED(gross_income) |
1, if gross_income has been defined and evaluates without error; 0 otherwise. |
|
FALSE |
Takes no arguments. Always returns 0. |
=FALSE |
0 |
|
IF() |
Evaluates the first argument. Returns the second argument if the first argument is true; returns the third argument if the first argument is false. Note: Requires exactly three arguments. |
=IF(SUM(LEFT)>=10,10,0) |
10, if the sum of values to the left of the formula is at least 10; 0 otherwise. |
|
INT() |
Rounds the value inside the parentheses down to the nearest integer. |
=INT(5.67) |
5 |
|
MAX() |
Returns the maximum value of the items identified inside the parentheses. |
=MAX(ABOVE) |
The maximum value found in the cells above the formula (excluding any header rows). |
|
MIN() |
Returns the minimum value of the items identified inside the parentheses. |
=MIN(ABOVE) |
The minimum value found in the cells above the formula (excluding any header rows). |
|
MOD() |
Takes two arguments (must be numbers or evaluate to numbers). Returns the remainder after the second argument is divided by the first. If the remainder is 0 (zero), returns 0.0 |
=MOD(4,2) |
0.0 |
|
NOT() |
Takes one argument. Evaluates whether the argument is true. Returns 0 if the argument is true, 1 if the argument is false. Mostly used inside an IF formula. |
=NOT(1=1) |
0 |
|
OR() |
Takes two arguments. If either is true, returns 1. If both are false, returns 0. Mostly used inside an IF formula. |
=OR(1=1,1=5) |
1 |
|
PRODUCT() |
Calculates the product of items identified inside the parentheses. |
=PRODUCT(LEFT) |
The product of multiplying all the values found in the cells to the left of the formula. |
|
ROUND() |
Takes two arguments (first argument must be a number or evaluate to a number; second argument must be an integer or evaluate to an integer). Rounds the first argument to the number of digits specified by the second argument. If the second argument is greater than zero (0), first argument is rounded down to the specified number of digits. If second argument is zero (0), first argument is rounded down to the nearest integer. If second argument is negative, first argument is rounded down to the left of the decimal. |
=ROUND(123.456, 2) =ROUND(123.456, 0) =ROUND(123.456, -2) |
123.46 123 100 |
|
SIGN() |
Takes one argument that must either be a number or evaluate to a number. Evaluates whether the item identified inside the parentheses if greater than, equal to, or less than zero (0). Returns 1 if greater than zero, 0 if zero, -1 if less than zero. |
=SIGN(-11) |
-1 |
|
SUM() |
Calculates the sum of items identified inside the parentheses. |
=SUM(RIGHT) |
The sum of the values of the cells to the right of the formula. |
|
TRUE() |
Takes one argument. Evaluates whether the argument is true. Returns 1 if the argument is true, 0 if the argument is false. Mostly used inside an IF formula. |
=TRUE(1=0) |
0 |
Use bookmarknames or cell references in a formula
You can refer to a bookmarked cell by using its bookmarkname in a formula. For example, if you have bookmarked a cell that contains or evaluates to a number with the bookmarkname gross_income, the formula =ROUND(gross_income,0) rounds the value of that cell down to the nearest integer.
You can also use column and row references in a formula. There are two reference styles: RnCn and A1.
Note: The cell that contains the formula is not included in a calculation that uses a reference. If the cell is part of the reference, it is ignored.
RnCn references
You can refer to a table row, column, or cell in a formula by using the RnCn reference convention. In this convention, Rn refers to the nth row, and Cn refers to the nth column. For example, R1C2 refers to the cell that is in first row and the second column. The following table contains examples of this reference style.
|
To refer to… |
…use this reference style |
|---|---|
|
An entire column |
Cn |
|
An entire row |
Rn |
|
A specific cell |
RnCn |
|
The row that contains the formula |
R |
|
The column that contains the formula |
C |
|
All the cells between two specified cells |
RnCn:RnCn |
|
A cell in a bookmarked table |
Bookmarkname RnCn |
|
A range of cells in a bookmarked table |
Bookmarkname RnCn:RnCn |
A1 references
You can refer to a cell, a set of cells, or a range of cells by using the A1 reference convention. In this convention, the letter refers to the cell’s column and the number refers to the cell’s row. The first column in a table is column A; the first row is row 1. The following table contains examples of this reference style.
|
To refer to… |
…use this reference |
|---|---|
|
The cell in the first column and the second row |
A2 |
|
The first two cells in the first row |
A1,B1 |
|
All the cells in the first column and the first two cells in the second column |
A1:B2 |
Last updated 2015-8-29
See Also
Field codes in Word and Outlook
Word provides some simple formulas and functions without need to embed Excel tables. It is easy
to insert and use formulas:
- In a Word table:

- In a document body:

You can use simple formulas in Microsoft Word, such as addition (+), subtraction (-),
multiplication (*), or division (/). Also, you can calculate a power of (^):

See
How to reference a cell of a Word
table
for more details.
All functions you can see in the Paste function drop-down list of the
Formula dialog box:

| Function | Description |
|---|---|
| ABS () | Calculates the absolute value of the value inside the parentheses. |
| AND () | Evaluates whether the arguments inside the parentheses are all TRUE. |
| AVERAGE () | Calculates the average of the elements identified inside the parentheses. |
| COUNT () | Calculates the number of elements identified inside the parentheses. |
| DEFINED () | Evaluates whether the argument inside parentheses is defined. Returns 1 if the argument has been defined and evaluates without error, 0 if the argument has not been defined or returns an error. |
| FALSE | Always returns 0 |
| IF () | Evaluates the first argument. Returns the second argument if the first argument is true; returns the third argument if the first argument is false. Note: Requires exactly three arguments. |
| INT () | Rounds the value inside the parentheses down to the nearest integer. |
| MAX () | Returns the maximum value of the items identified inside the parentheses. |
| MIN () | Returns the minimum value of the items identified inside the parentheses. |
| MOD () | Takes two arguments (must be numbers or evaluate to numbers). Returns the remainder after the second argument is divided by the first. If the remainder is 0 (zero), returns 0.0. |
| NOT | Evaluates whether the argument is true. Returns 0 if the argument is true, 1 if the argument is false. Mostly used inside an IF formula. |
| OR () | Takes two arguments. If both are false, returns 0, else returns 1. Mostly used inside an IF formula. |
| PRODUCT () | Calculates the product of items identified inside the parentheses. |
| ROUND () | Rounds the first argument to the number of digits specified by the second argument. If the second argument is greater than zero (0), first argument is rounded down to the specified number of digits. If second argument is zero (0), first argument is rounded down to the nearest integer. If second argument is negative, first argument is rounded down to the left of the decimal. |
| SIGN () | Takes one argument that must either be a number or evaluate to a number. Evaluates whether the item identified inside the parentheses if greater than, equal to, or less than zero (0). Returns 1 if greater than zero, 0 if zero, -1 if less than zero. |
| SUM () | Calculates the sum of items identified inside the parentheses. |
| TRUE | Always returns 1. |
The arguments can be:
| Argument | Description |
|---|---|
| ABOVE | Cells above the current. For example, =SUM(ABOVE) |
| BELOW | Cells below the current. For example, =SUM(BELOW) |
| LEFT | Cells on left of the current. For example, =SUM(LEFT) |
| RIGHT | Cells on right of the current. For example, =SUM(RIGHT) |
See also this tip in French:
Fonctions et formules dans Word.
Please, disable AdBlock and reload the page to continue
Today, 30% of our visitors use Ad-Block to block ads.We understand your pain with ads, but without ads, we won’t be able to provide you with free content soon. If you need our content for work or study, please support our efforts and disable AdBlock for our site. As you will see, we have a lot of helpful information to share.
Many times we find ourselves creating a Table in Word, which represents values, and at the end of the column or row we want to illustrate the overall value of the corresponding column or row. What most people do is to start the Calculator, perform the math there, and then input the result to the corresponding cell of the table.
What happens though when the values in our table changes? Do we use the Calculator all over again?
In Word we have the advantage of creating a Formula, which will execute all the calculations in the cell of the table.
To create a formula in a table we must be sure that our cursor is in the cell that we want the result to appear.

For example, the cursor is located in the last cell of the second column, and we want to sum the two cells that are located above of my cursor which involve data for Product A and Product B for the First Semester.
Since our cursor is located in the cell of the table, the Table Tools tab activates, where we select the Layout Tab. Then from the area of the ribbon named Data we select the command Formula as we can see in the image below.

The Formula window appears as we can see below. Word knows that our cursor is located in the last cell of the table, knows that there are values in the cells above, and assumes that we want to add the cells and that why it shows the formula =SUM(ABOVE).

If our cursor was located at the end of the row, it would had assumed that we want to add all the values from the left and would had shown the formula =SUM (LEFT), as we can see in the image below.
")
In the area of the Formula window named Number Format, if we expand the drop down menu at the right, we can select the sort of formatting that the result of the formula should have as shown in the image below.

In the area of the Formula window named Paste Function, we can define the sort of the formula that we want to use. The formulas that we can use in a Word Table are a few as we can see in the following images.


Since we have done all the adjustments, we press the OK button of the Formula window and the result appears straight away in the selected cell. Word inserts the field in the cell and executes the formula, in this case the sum and shows the result in the cell.
What happens though we change some values in our table?
Tables in Word may look like spreadsheets, but they don’t re-calculate the formulas when we edit the cells. We must update the fields every time we edit values in our table.
So this is what we must to in order to Update the Fields;
We must have our cursor inside the cell with the field by clicking on it, and then do a right click with our mouse in order for the shortcut menu to appear and from there to select the command Update Field as we can see in the image below. The field will be updated immediately.

We can also put our cursor inside the cell with the field and press the F9 button.
One way or the other the field will be updated according to the changes that have been made.

About Smart Office — philippospan
MVP:
Honored with the MVP (Most Valuable Professional) for OFFICE SYSTEM title for the years 2011, 2012, 2013, 2014 and 2015 by Microsoft, for my contribution and commitment to the technical communities worldwide.
Microsoft Master Specialist:
This certification provides skill-verification tools that not only help assess a person’s skills in using Microsoft Office programs but also the ability to quickly complete on-the-job tasks across multiple programs in the Microsoft Office system
Posted on January 19, 2012, in Microsoft Office 2010 English, Word 2010 English and tagged Autoexec.gr, Data, Edit Field, Formula, Functions in Table of Word, Layout, MVP Office System, Number Format, Office 2010 Greek, Paste Function, SUM(ABOVE), SystemPlus, Table Tools, Update Field, Word 2010. Bookmark the permalink. Comments Off on Functions In A Word Table.
Getty Images / Geri Lavrov
Updated on January 26, 2019
There are many shortcuts for common functions in Microsoft Word. These shortcuts or commands can come in handy when typing a report or term paper, or even a letter. It is a good idea to try some of these functions before you actually begin a project. Once you become familiar with the way they work, you may become hooked on shortcuts.
Executing Shortcuts
Before you can use shortcuts commands, it’s important to understand a few requirements. If the shortcut involves a section of text (words you have typed), you will need to highlight the text before typing the command. For instance, to bold a word or words, you must highlight them first.
For other commands, you may only need to place the cursor at a specific place. For instance, if you want to insert a footnote, place the cursor in the relevant position. The commands below are sectioned into groups by alphabetical order to make it easier to find the ones you need.
Bold Through Italics
Boldfacing a word or group of words is one of the handiest shortcut commands in Microsoft Word. Other commands, such as centering text, creating a hanging indent, or even calling for help can be useful shortcuts to know. The latter command—calling for help by pressing the F1 key—brings up a printed helpfile to the right of your document, which even includes its own search function. (The last section of this article contains instructions for the search command.)
|
Function |
Shortcut |
|
Bold |
CTRL + B |
|
Center a paragraph |
CTRL + E |
|
Copy |
CTRL + C |
|
Create a hanging indent |
CTRL + T |
|
Decrease the font size by 1 point |
CTRL + [ |
|
Double-space lines |
CTRL + 2 |
|
Hanging Indent |
CTRL + T |
|
Help |
F1 |
|
Increase the font size by 1 point |
CTRL + ] |
|
Indent a paragraph from the left |
CTRL + M |
|
Indent |
CTRL + M |
|
Insert a footnote |
ALT + CTRL + F |
|
Insert an endnote |
ALT + CTRL + D |
|
Italic |
CTRL + I |
Justify Through Single-Space Lines
Justifying a paragraph will make it flush left and flush right rather than ragged-right, which is the default in Word. But, you can also left-align a paragraph, create a page break, and even mark a table of contents or index entry, as the shortcut commands in this section show.
|
Function |
Shortcut |
|
Justify a paragraph |
CTRL + J |
|
Left-align a paragraph |
CTRL + L |
|
Mark a table of contents entry |
ALT + SHIFT + O |
|
Mark an index entry |
ALT + SHIFT + X |
|
Page Break |
CTRL + ENTER |
|
|
CTRL + P |
|
Remove a paragraph indent from the left |
CTRL + SHIFT + M |
|
Remove paragraph formatting |
CTRL + Q |
|
Right-align a paragraph |
CTRL + R |
|
Save |
CTRL + S |
|
Search |
CTRL = F |
|
Select All |
CTRL + A |
|
Shrink Font One Point |
CTRL + [ |
|
Single-space lines |
CTRL + 1 |
Subscripts Through Undo
If you’re writing a science paper, you might need to place certain letters or numbers in subscript, such as in H20, the chemical formula for water. The subscript shortcut makes it easy to do this, but you can also create a superscript with a shortcut command. And, if you make a mistake, correcting it is only a CTRL = Z away.
|
Function |
Shortcut |
|
To type a Subscript |
CTRL + = |
|
To type a Superscript |
CTRL + SHIFT + = |
|
Thesaurus |
SHIFT + F7 |
|
Remove Hanging Indent |
CTRL + SHIFT + T |
|
Remove Indent |
CTRL + SHIFT + M |
|
Underline |
CTRL + U |
|
Undo |
CTRL + Z |

Insert Table Formulas in Word: Overview
You can insert table formulas in Word tables to perform simple mathematical functions on data. To insert table formulas in Word that add, subtract, multiply, and divide numbers in the table cells, you insert formulas into cells where you want to show the answers to the mathematical operations performed by the formulas.
The Parts of Table Formulas in Word
When you insert table formulas in Word, you insert a field that performs calculations on values in other table cells. Formulas always start with an equal sign (=). They often refer to the cell addresses from which they gather the data for their calculations. These cell addresses can be linked together with standard mathematical operators. These include the plus sign (+), minus sign (-), multiplication sign (*), and division sign (/), among others. You can also perform functions, like SUM, on a cell range in a table. So, a formula might be expressed “=SUM(Above),” which adds the values of the cells above the cell into which you inserted this formula.
A cell address is a way of referring to a cell. A cell address is the relative location of a cell in a table. Imagine there are letters at the top of each column, starting with “A” at the far left and then continuing to increase one letter at a time to the right. In addition, imagine each row has a number assigned to it. The topmost row is row “1.” The row numbering then continues downward, increasing by one for each row. The cell address is the column letter, followed by the row number. For example, the top left cell is always cell A1. B1 is always to the right of A1. Here is a table with the cell addresses entered into the corresponding cells to help you see the cell address naming convention.
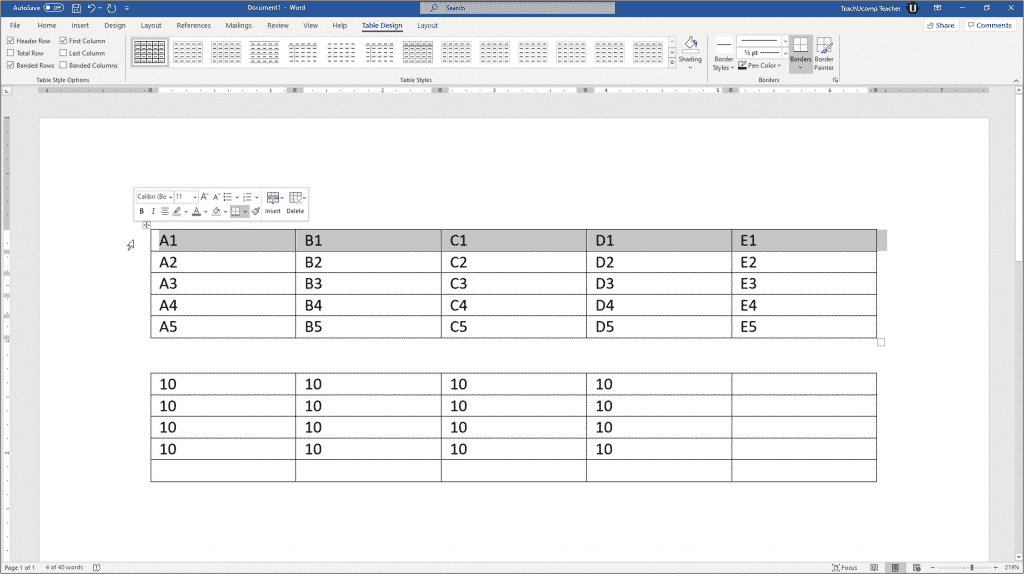
Insert Table Formulas in Word – Instructions: A picture of the cell addresses within a sample table, shown at the top of the Word document.
As stated previously, when you insert table formulas in Word, you are creating a formula field. A cell formula begins with an equal sign (=). It is often followed by the cell addresses of the cells upon which to perform the mathematical operations, joined together by standard mathematical operators. For example, to add the cells above cell A5 and show the formula result in cell A5, click into cell A5. Then insert a formula field that looks like either: =A1+A2+A3+A4 or =SUM(Above).
Instead of showing the formula itself in the cell, the cell shows the answer to the formula. Why? Because when you insert table formulas in Word in a cell, Word knows it should show the answer to the formula, not the formula itself. Formulas display their results by default, not their actual contents.
How to Insert Table Formulas in Word
To insert table formulas in Word into a table cell, click into the table cell where you want to show the answer. This is often the cell at the end of a continuous column or row of numbers. Next, click the table’s “Layout” contextual tab in the Ribbon. In older versions of Word, this appears as the “Layout” tab of the “Table Tools” contextual tab in the Ribbon. For all versions of Word, then click the “Formula” button in the “Data” button group to open the “Formula” dialog box. This dialog box lets you type the formulas used to insert table formulas in Word.
When the “Formula” dialog box first opens, Word tries to guess the formula you want. For example, if you insert table formulas in Word in a cell at the end of a column of continuous numbers, Word assumes you want to add the cell values in the column above the cell. Therefore, Word enters the formula =SUM(Above) as the default formula in the “Formula” dialog box.
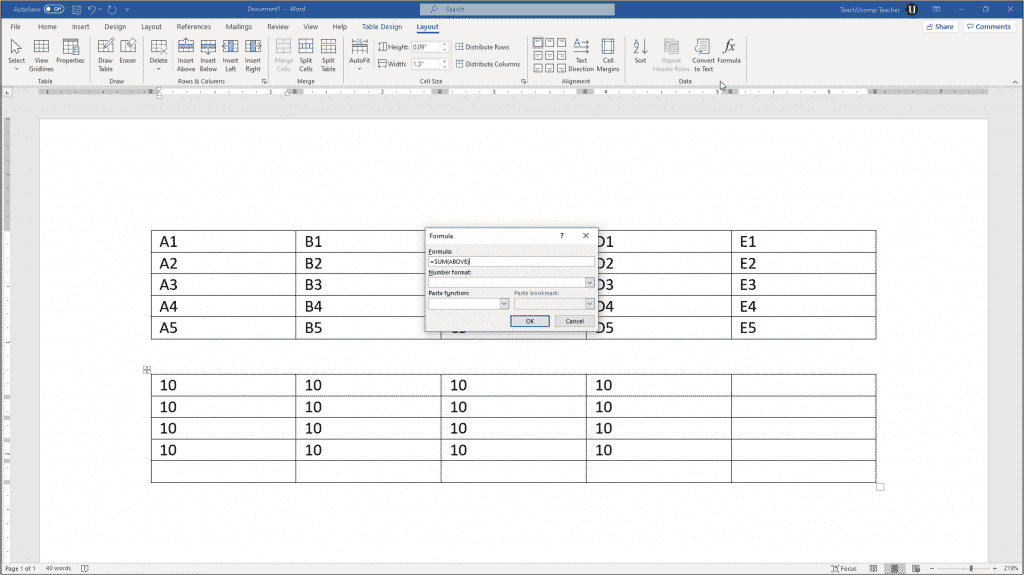
Insert Table Formulas in Word – Instructions: A picture of the default table formula that Word suggests in the “Formula” dialog box.
If Word suggests the correct formula, then click “OK” at the bottom of the “Formula” dialog box to accept it and insert the cell formula. If incorrect, then click into the “Formula:” field and enter the correct formula.
After entering the formula into the “Formula:” field, you can then use the “Number format:” drop-down to select a numeric pattern. This helps show the result in a specific numeric format.
In Word, you can use the terms “LEFT,” “RIGHT,” “ABOVE,” and “BELOW” to refer to adjacent cells in the row or column to the left of, to the right of, above, or below the cell within which you insert table formulas in Word. This is a convenient way of selecting the cell range for the function. You can also enter a cell range by typing the cell address of the upper-left cell in the cell range, followed by a colon symbol (:), then followed by the cell address of the lower-right cell in the range. For example, you could also type =SUM(A1:A4) into the “Formula:” field to add the contents of cells A1 through A4.
The word SUM is a formula function. If want to perform one mathematical operation on a range of cells, you can use functions like SUM, AVERAGE, MAX, and MIN when you insert table formulas in Word, instead of individually writing the cell addresses and mathematical operators. Word provides many standard functions in the “Paste function:” drop-down. Selecting any function from the list of functions in the drop-down menu adds it to the formula in the “Formula:” field.
After creating the Word formula, click the “OK” button to insert the formula field into the selected cell. The results of the formula then appear in the cell.
Insert Table Formulas in Word: Instructions
Instructions on How to Insert Table Formulas in Word
- To insert table formulas in Word, click into the table cell where you want to show the answer to the formula.
- Then click the table’s “Layout” contextual tab in the Ribbon. In older versions of Word, this appears as the “Layout” tab of the “Table Tools” contextual tab in the Ribbon.
- For all versions of Word, then click the “Formula” button in the “Data” button group to open the “Formula” dialog box.
- If necessary, click into the “Formula:” field and enter the desired formula.
- Optionally, to select a function to add to the formula shown in the “Formula:” field, use the “Paste function:” drop-down.
- Optionally, to format the display of the numeric formula’s result, use the “Number format:” drop-down.
- Then click the “OK” button to insert the formula field into the selected cell.
Insert Table Formulas in Word: Video Lesson
The following video lesson, titled “Inserting Table Formulas,” shows how to insert table formulas in Word. It is from our complete Word tutorial, titled “Mastering Word Made Easy v.2019 and 365.”
Tagged under:
cell address, cell addresses, course, create, document, documents, formula, formulas, function, functions, help, how-to, insert, insert table formulas, Insert Table Formulas in Word, inserting, instructions, learn, lesson, make, microsoft word, number format, overview, paste function, table, tables, teach, training, tutorial, video, Word 2013, Word 2016, Word 2019, Word for Microsoft 365, word for Office 365, write

The function keys on keyboards don’t get the love they used to, but depending on the app you’re running, they can still be quite handy. Word, in particular, has some interesting features tucked away behind your function keys. Here’s what they do.
F1
- F1: Get help. How this works depends on what you’re looking at in the Word window. Press F1 in the regular document window, for example, to open Word’s Help pane. Sometimes, though, pressing F1 takes you to Microsoft’s support site and shows you more targeted articles about the feature you’re looking at. This is the case most of the time when you press F1 while a dialog box is open.
- Shift+F1: Open Word’s “Reveal Formatting” pane, where you can see the character and paragraph formatting of whatever text you have selected.
- Alt+F1: Jump to the next field if you’ve got fields in your document.
- Alt+Shift+F1: Jumps to the previous field in your document.
F2
- F2: Move text or objects. Select the text or object you want to move and then hit F2. Place your insertion point where you’d like to move the item and then hit Enter.
- Shift+F2: Copy selected text. It’s just like hitting Ctrl+C.
- Ctrl+F2: Open the Print window, where you can preview and print your document.
- Alt+Shift+F2: Save your document. If you haven’t saved your document previously, it opens the Save As window.
- Alt+Ctrl+F2: Pop up the Open window so you can open a document.
F3
- F3: Expand an AutoText entry. Type at least the first four letters in the name of your AutoText entry and then press F3 to expand it to the full text.
- Alt+F3: Create an AutoText entry from selected text.
- Shift+F3: Change the case of selected text. Pressing this combo repeatedly cycles through the following case styles: Initial Letter Case, ALL CAPS CASE, and lower case.
- Ctrl+F3: Cut selected text to the Spike. You can cut as much text as you want this way and it all accumulates on the Spike.
- Ctrl+Shift+F3: Insert the contents of the Spike. Performing this action also clears any text in the Spike.
F4
- F4: Repeat your last action.
- Shift+F4: Repeat the last “Find” action. This one’s handy because you can use it to browse search results without having the Find and Replace window or Navigation pane open.
- Ctrl+F4: Close the current document. You’ll be asked to save the document if you’ve made any changes.
- Alt+F4: Quit Microsoft Word. This closes all open documents (giving you the chance to save changes first) and exits Word.
F5
- F5: Open “Go To” tab on the Find and Replace window. You can use this to quickly jump to a page, section, bookmark, and so on.
- Shift+F5: Jump the previous edit you made in your document. Press it again go one more edit back. Word remembers your last two edits. This works even after saving and closing a document, letting you return to where you left off when you open the document again.
- Ctrl+Shift+F5: Open the Bookmark window so you can edit bookmarks. If your insertion point is in an existing bookmark, pressing this combo opens the Bookmark window and selects that bookmark.
F6
- F6: Go to the next pane or frame in your Word window. You can use this to navigate the window without using your mouse.
- Shift+F6: Go to the previous pane or frame.
- Ctrl+F6: Go to the next open document window.
- Ctrl+Shift+F6: Go to the previous open document window.
F7
- F7: Open the Editor pane and start a spelling and grammar check.
- Shift+F7: Open the thesaurus. If you have a word selected when you press this combo, Word opens the thesaurus and looks up the selected word.
- Alt+F7: Find the next spelling or grammar error in your document.
- Alt+Shift+F7: Open the Translation pane.
F8
- F8: Enter Word’s selection mode and expand a selection. While in this mode, you can use the arrow keys to extend your selection. You can also press F8 up to five times to extend the selection outward. The first press enters selection mode, the second press selects the word next to the insertion point, the third selects the whole sentence, the fourth all the characters in the paragraph, and the fifth the whole document.
- Shift+F8: Reduce a selection. This works the same way as expanding a selection, but backward.
- Ctrl+Shift+F8: Selects a column. Once the column is selected, you can use the left and right arrow keys to extend the selection to other columns.
F9
- F9: Update a field. This is the same as right-clicking a field and choosing the “Update Field” command.
- Shift+F9: Reveal a field’s code.
- Ctrl+F9: Insert new Empty Field {} braces.
- Ctrl+Shift+F9: Unlink a field.
- Alt+F9: Toggle the display of a field’s code.
F10
- F10: Show key tips. Pressing this combo reveals single letter shortcuts you can use to access Word’s menu commands.
- Shift+F10: Display a context menu. This works just like right-clicking.
- Ctrl+F10: Maximize document window.
- Alt+Shift+F10: Display a menu or window for an available selection.
F11
- F11: Jump to the next field in your document.
- Shift+F11: Jump to the previous field in your document.
- Ctrl+F11: Lock a field so it cannot be edited.
- Ctrl+Shift+F11: Unlock a field.
- Alt+Shift+F11: Start the Microsoft Script Editor.
F12
- F12: Open the Save As window.
- Shift+F12: Save your document.
- Ctrl+F12: Open the Open window.
- Ctrl+Shift+F12: Open the Print window.
Microsoft Word has loads of great keyboard shortcuts, and its support for the function keys on your keyboard is no exception.
RELATED: All of the Best Microsoft Word Keyboard Shortcuts
READ NEXT
- › The New NVIDIA GeForce RTX 4070 Is Like an RTX 3080 for $599
- › How to Adjust and Change Discord Fonts
- › This New Google TV Streaming Device Costs Just $20
- › Google Chrome Is Getting Faster
- › BLUETTI Slashed Hundreds off Its Best Power Stations for Easter Sale
- › HoloLens Now Has Windows 11 and Incredible 3D Ink Features
How-To Geek is where you turn when you want experts to explain technology. Since we launched in 2006, our articles have been read billions of times. Want to know more?
A piecewise function is a special function that is defined using multiple sub-functions where each sub-function applies to a different interval in the domain. Typing it in Microsoft Word document it can become a painful task. This blog covers the trick by which you can type beautifully arranged piecewise function in Ms Word.
Steps to insert piecewise function
1. Place the cursor at the location you need piecewise function.
2. Go to Insert > Equation to get equation editor. You can use shortcut “Alt+=”
3. Type the normal part of equation & to get piece wise function go to Equation > Brackets > Cases and Stacks and insert column of desired size with left curly braces only. You can add or delete rows later on.
Add or delete row: Right click on any of the row & select “Insert equation before / after” to add or click “Delete equation” to remove one.
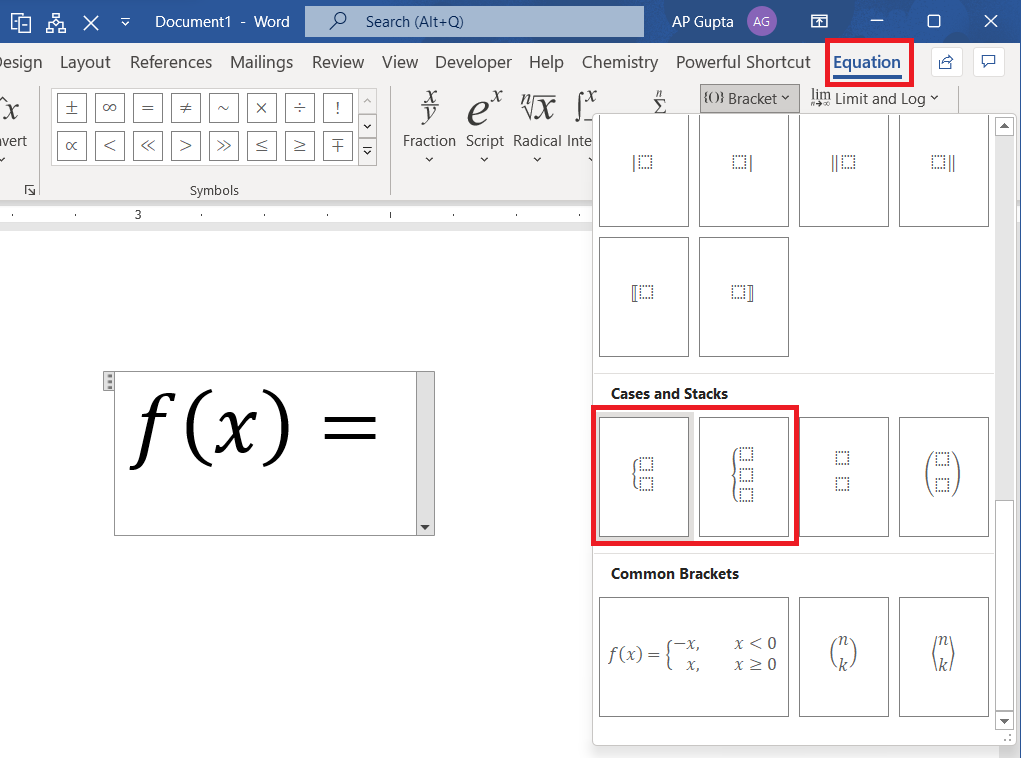
4. To insert an additional column for condition, place the cursor immediately after column and insert empty column by going to Equation > Matrix > Empty Matrices.
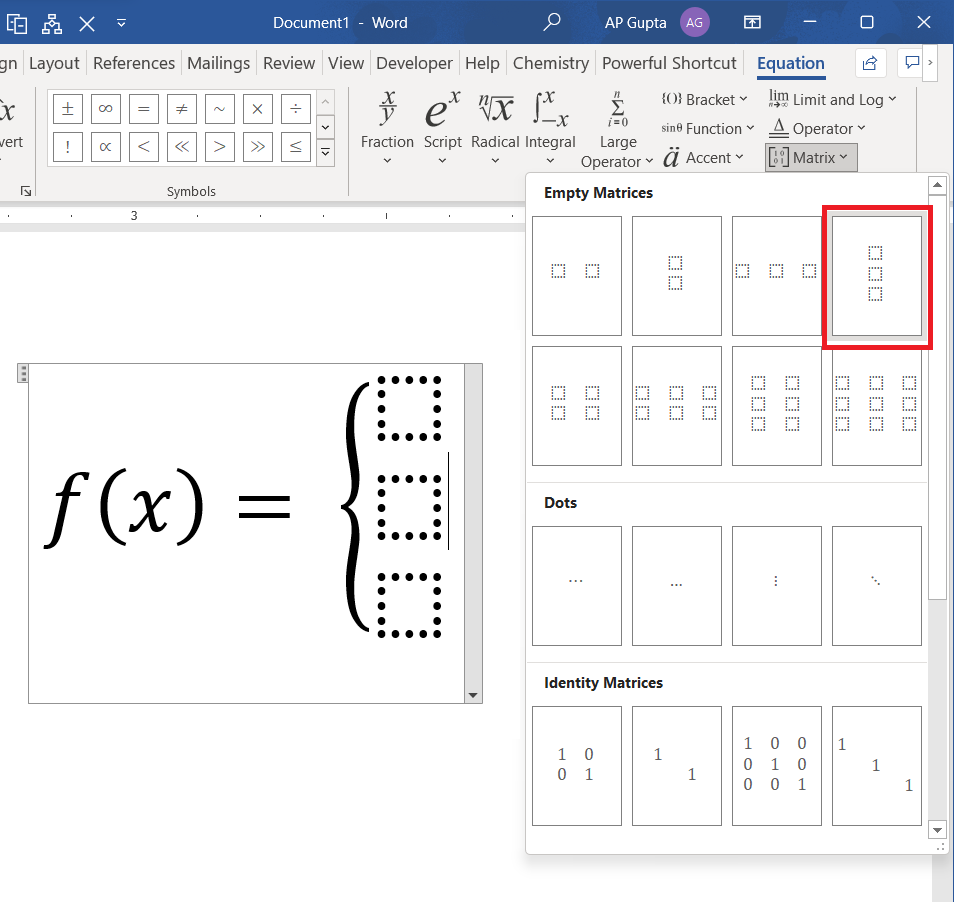
5. Fill the piece wise function as desired.
Related Posts
Excel formulas let you automate your spreadsheets. But how do you use it in a Word document? Here are two ways to do it!

While you can always integrate Excel data into a Word document, it’s often unnecessary when all you need is a small table. It’s quite simple to create a table and use Excel formulas in a Word document. However, there is only a limited number of formulas that can be used.
For instance, if you’re trying to insert sales data in a table, you could add a column for sales, another one for total cost, and a third one for calculating profit using a formula. You can also calculate an average or a maximum for each of these columns.
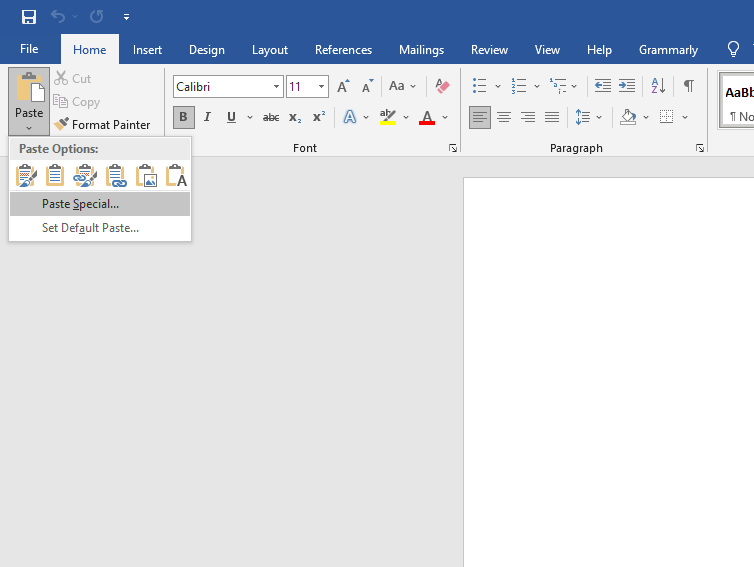
Method 1: Paste Spreadsheet Data Into Word
If you already have data populated into a spreadsheet, you could just copy it into your Microsoft Word document.
- Copy the cells containing the data and open a Word document.
- From the top ribbon, click on the arrow under the Paste button, and click on Paste Special.

- You’ll see a new window pop-up where you’ll need to select what you want to paste the copied content as. Select Microsoft Excel Worksheet Object and select OK.

- Your data should now appear in the Word document, and the cells should contain the formulas as well.
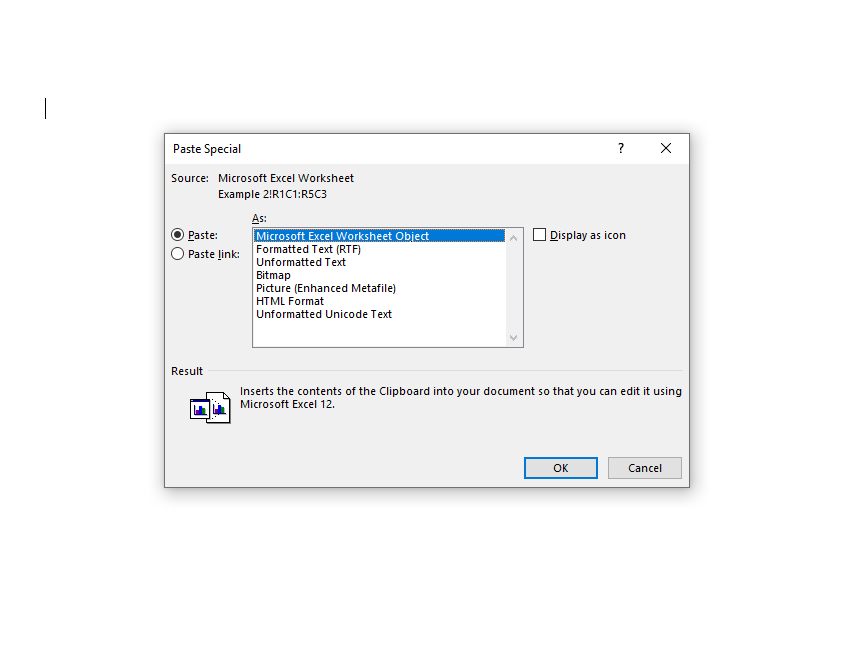
If you want to make any edits, you can double-click on the pasted content, and your Word document will transform into an Excel document, and you’ll be able to do everything you would on a normal spreadsheet.
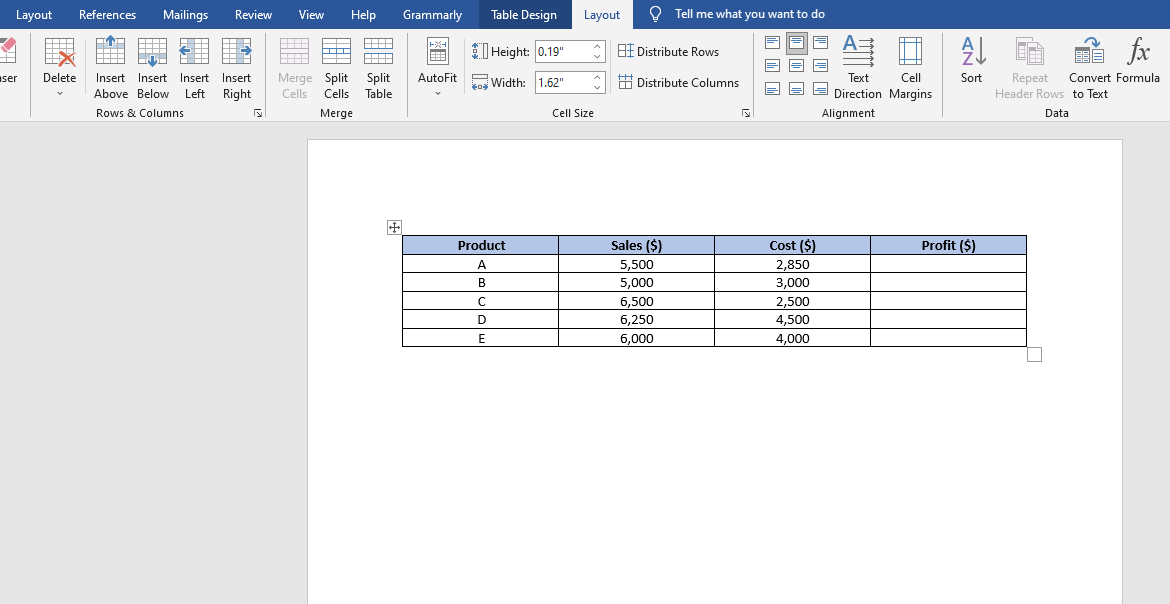
Method 2: Add Formulas in a Table Cell in Word
- Quickly insert a table in your Word document and populate the table with data.
- Navigate to the cell where you want to make your computations using a formula. Once you’ve selected the cell, switch to the Layout tab from the ribbon at the top and select Formula from the Data group.

Notice that there are two tabs called Layout. You need to select the one that appears under Table Tools in the ribbon.
- When you click on Formula, you’ll see a small window pop up.
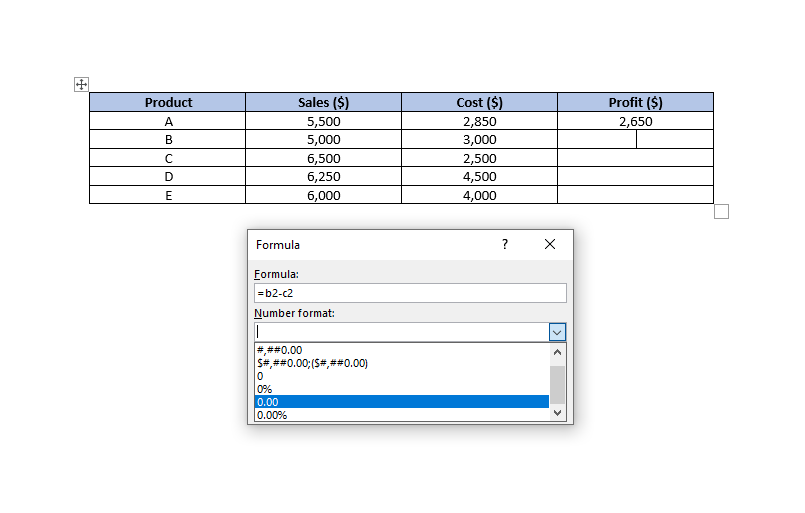
- The first field in the box is where you enter the formula you want to use. In addition to formulas, you can also perform basic arithmetic operations here. For instance, say you want to compute the profit, you could just use the formula:
=B2-C2Here, B2 represents the second cell in the second column, and C2 represents the second cell in the third column.

- The second field allows you to set the Number Format. For instance, if you wanted to calculate profit down to two decimal places, you could select a number format accordingly.

- The Paste Function field lists the formulas you can use in Word. If you can’t remember the name of a function, you could select one from the dropdown list, and it will automatically be added to the Formula field.

- When you’ve entered the function, click OK, and you’ll see the computed figure in the cell.

Positional Arguments
Positional arguments (ABOVE, BELOW, LEFT, RIGHT) can often make things simpler, especially if your table is relatively large. For instance, if you have 20 or more columns in your table, you could use the formula =SUM(ABOVE) instead of referencing each cell inside the parenthesis.
You can use positional arguments with the following functions:
- SUM
- AVERAGE
- MIN
- MAX
- COUNT
- PRODUCT
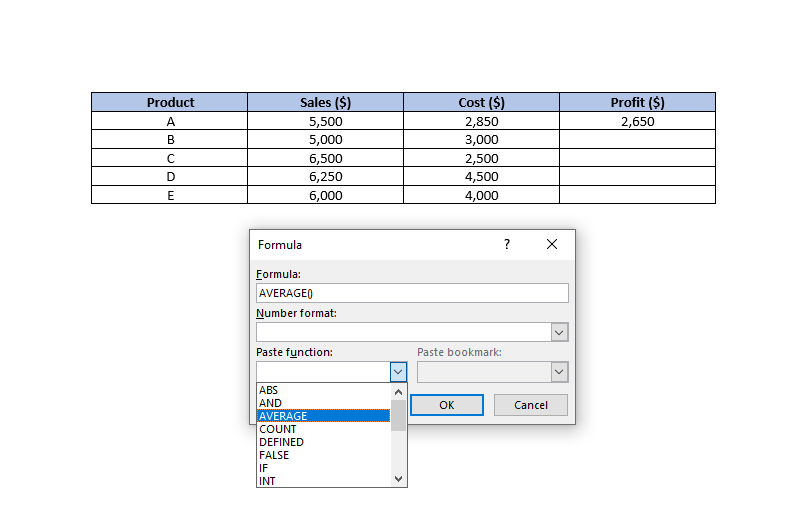
For instance, we could calculate the average sales for the above example using the formula:
=AVERAGE(ABOVE)
If your cell is at the center of the column, you can use a combination of positional arguments. For instance, you could sum up the values above and below a specific cell using the following formula:
=SUM(ABOVE,BELOW)
If you want to sum up the values from both the row and the column in a corner cell, you could use the following formula:
=SUM(LEFT,ABOVE)
Even though Microsoft Word offers only a few functions, they are quite robust in functionality and will easily help you create most tables without running into lack-of-functionality issues.
Updating Data and Results
Unlike Excel, Microsoft Word doesn’t update formula results in real-time. However, it does update the results once you close and re-open the document. If you want to keep things simple, just update the data, close, and re-open the document.
However, if you’d like to update the formula results as you continue to work on the document, you’ll need to select the results (not just the cell), right-click on them, and select Update Field.
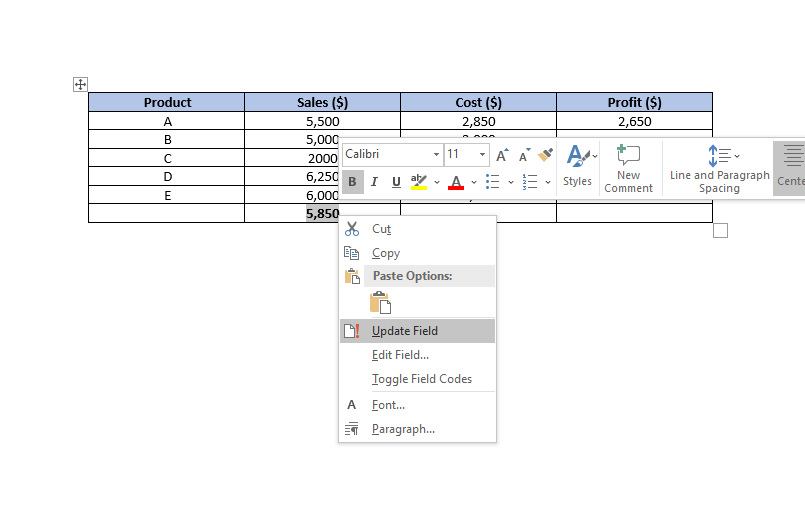
When you click Update Field, the formula’s result should update instantly.
Cell References
There are several ways to reference a cell in a Word document.
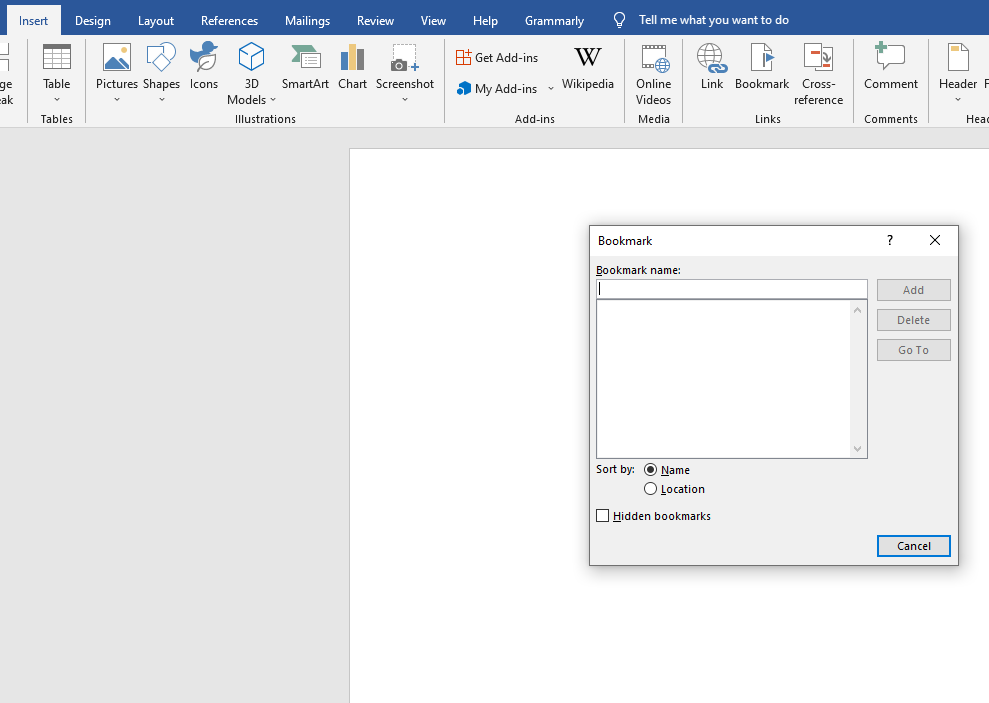
1. Bookmark Names
Let’s say you give your average sales value a bookmark name average_sales. If you don’t know how to give a cell a bookmark name, select the cell and navigate to Insert > Bookmark from the ribbon at the top.
Assume that the average sales value is a decimal value, and you’d like to convert it to an integer. You could reference the average sales value as ROUND(average_sales,0), and this will round the value down to its nearest integer.
2. RnCn References
The RnCn referencing convention allows you to reference a row, column, or a specific cell in a table. The Rn refers to the nth row, while the Cn refers to the nth column. If you wanted to refer to the fifth column and second row, for instance, you’d use R2C5.
You can even select a range of cells using the RnCn reference, much like you would in Excel. For instance, selecting R1C1:R1C6 selects the first six cells of the first row. For selecting the entire row in which you’re using the formula, just use R (or C for a column).
3. A1 References
This is the convention that Excel uses, and we’re all familiar with. The letter represents the columns, while the numbers represent the rows. For instance, A3 refers to the third cell in the first column.
Word Tables Made Easy
Hopefully, the next time you’ll need to use data on a Microsoft Word document, you’ll be able to do things much faster without having to first create a spreadsheet and then import it into your Word document.