
All Microsoft Office programs can check spelling, and most can check grammar.
Using Microsoft 365? You may be interested in checking out the powerful new Editor feature in Word! See Editor — your writing assistant for more information.
Run the spelling and grammar checker
To start a check of the spelling and grammar in your document, just press F7.
Click a heading below for more information
Most Office programs automatically check for potential spelling and grammatical errors as you type, so you don’t need to do anything to show errors while you work.
Notes:
-
Automatic spelling and grammar checking is not available in Access, Excel, or Project. You can manually start a spell check by pressing F7.
-
Automatic grammar checking is available only in Outlook, Word, and PowerPoint 2013 (or newer).
Office marks potential spelling errors with a red squiggly line, and potential grammatical errors are marked with a blue squiggly line.
If spelling or grammatical errors aren’t marked, automatic checking might be turned off. You can turn on the automatic spelling and grammar checker.
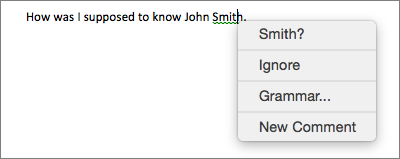
When you see a spelling or grammatical error that you want assistance fixing, right-click on the underlined word or phrase and choose one of the options to fix the error.
If Office is flagging words as misspelled but you have it spelled the way you want it, select Add to Dictionary to teach Office not to flag that word as misspelled in the future. For more information on this see: Add or edit words in a spell check dictionary.
If you don’t want Office to mark potential errors with squiggly lines while you are working, you can turn automatic spelling and grammar checking off:
-
Open the spelling and grammar options:
-
In OneNote, PowerPoint, Publisher, Visio, and Word: On the File menu, click Options, and then click Proofing.
-
In InfoPath: On the Home tab, click the arrow next to or under Spelling, and then click Spelling Options.
-
In Outlook: On the File menu, click Options, and click Mail, and then click Spelling and Autocorrect.
-
-
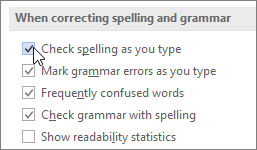
Select or clear the Check spelling as you type check box. In programs that have automatic grammar checking, you may also select or clear the Mark grammar errors as you type check box.

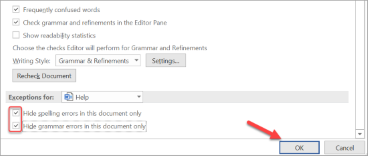
Note: In Word, you can turn the spelling checker on or off for only the document you’re currently working with or for all new documents. Select an option in the Exceptions for list, and then select or clear the Hide spelling errors in this document only and Hide grammar errors in this document only check boxes.
If you don’t want Office to check grammar at all (either when running a spell check or automatically as you type), you can turn it off:
-
Open the spelling and grammar options:
-
In OneNote, PowerPoint, Publisher, Visio, and Word: On the File menu, click Options, and then click Proofing.
-
In InfoPath: On the Home tab, click the arrow next to or under Spelling, and then click Spelling Options.
-
In Outlook: On the File menu, click Options, and click Mail, and then click Spelling and Autocorrect.
-
-
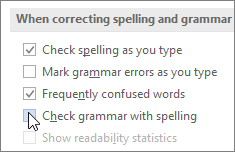
Clear the Mark grammar errors as you type and Check grammar with spelling check boxes.
Note: Not every Office program will have both of these options.
In Word, Outlook, PowerPoint 2013 (or newer), you can force a recheck of the words and grammar that you previously skipped by doing the following:
-
Open the document or item that you want to check.
-
On the File menu, click Options > Proofing> Recheck Document. In Outlook you’ll find this under File > Options > Mail > Spelling and Autocorrect
-
Click Yes when you see the warning message about resetting the spelling and grammar checker.
-
Click OK in the dialog box to get back to the document, and then run the spelling and grammar checker again.
See Also
Check spelling and grammar in a different language.
Test your document’s readability
The spelling and grammar checker isn’t working as expected
Select grammar and writing style options in Office 2013 and earlier
Add words to your spell check dictionary
The spelling or grammar checker isn’t checking words in a different language correctly
Choose AutoCorrect options for capitalization, spelling, and symbols
Check spelling before sending a message in Outlook
Learn how to get more from Editor with Microsoft 365
Office for Mac applications automatically check for potential spelling and grammatical errors as you type. If you’d rather wait to check spelling and grammar until you’re done writing, you can turn off automatic checking, or you can check spelling and grammar all at once.
Word
Check spelling and grammar automatically as you type
Word marks potential spelling errors with a red squiggly line, and potential grammatical errors are marked with a green squiggly line.
Tip: If spelling or grammatical errors aren’t marked, you might need to turn on automatic spelling and grammar checking, which is explained in the next procedure.
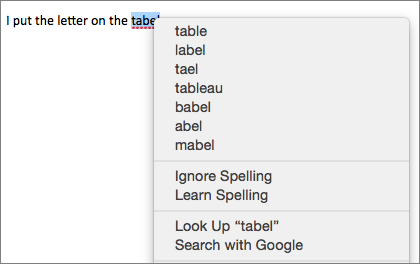
When you see a spelling or grammatical error, Control click the word or phrase and choose one of the options.
If Word has incorrectly flagged a word as misspelled and you want to add that word to your dictionary so that Word will properly recognize it in the future see Add or edit words in a spell check dictionary
-
On the Word menu, click Preferences > Spelling & Grammar.
-
In the Spelling & Grammar dialog box, under Spelling, check or clear the Check spelling as you type box.
-
Under Grammar, check or clear the Check grammar as you type box.
-
Close the dialog box to save your changes.
-
On the Review tab, click Spelling & Grammar.
-
If Word finds a potential error, the Spelling & Grammar dialog box will open, spelling errors will be shown as red text, and grammatical errors will be shown as green text.
-
To fix an error, do one of the following:
-
Type the correction in the box and then click Change.
-
Under Suggestions, click the word you want to use, and then click Change.
To skip the error, do one of the following:
-
Click Ignore to skip only that instance of the error.
-
Click Ignore All to skip all instances of the error.
-
For a grammatical error, click Next Sentence to skip that instance of the error and move to the next error.
To skip a misspelled word in all documents, click Add to add it to the dictionary. This only works for misspelled words. You can’t add custom grammar to the dictionary.
-
-
After you correct, ignore, or skip an error, Word moves to the next one. When Word finishes reviewing the document, you’ll see a message that the spelling and grammar check is complete.
-
Click OK to return to your document.
You can clear or reset the list of Ignored Words and Grammar so Word will check for spelling and grammar issues you previously told it to ignore.
Note: When you reset the list of Ignored Words and Grammar, the list is cleared only for the currently open document. Any spelling or grammar issues you told Word to ignore in other documents won’t be affected.
-
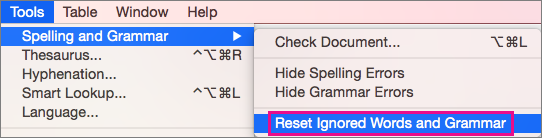
Open the document that needs to be checked.
-
On the Tools menu, point to Spelling and Grammar, and then click Reset Ignored Words and Grammar.
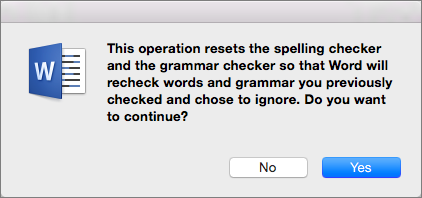
Word displays a warning about the operation resetting the spelling checker and the grammar checker.
-
Click Yes to proceed.
-
Click the Review tab, and then click Spelling & Grammar to check spelling and grammar.
Outlook
Check spelling and grammar automatically as you type
By default, Outlook checks for spelling errors as you type. Outlook uses a dashed red underline to indicate possible spelling errors and a dashed green line to indicate possible grammatical errors.
-
When you see a word with a dashed underline, Control click the word or phrase and choose one of the options.
-
On the shortcut menu, do one of the following:
-
Click one of the guesses at the top of the shortcut menu.
-
Click Ignore Spelling to ignore one instance of the word.
-
Click Learn Spelling to add the word to the spelling dictionary.
-
After opening an email message:
-
To have Outlook correct spelling mistakes automatically, on the Outlook menu, click Preferences. Click on Spelling and Grammar under Personal Settings. Click box next to Checkspelling as you type.
-
To turn automatic grammar checking on or off, on the Outlook menu, click Preferences. Click on Spelling and Grammar under Personal Settings. Click box next to Check grammar as you type.

You can correct all the spelling and grammar issues at the same time after you finish composing a message or other items.
-
On the Edit menu, point to Spelling and Grammar, and then click Spelling and Grammar…
-
Do any of the following:
-
In the list of suggestions, click the word that you want to use, or enter a new spelling in the box at the top, and then click Change.
-
Click Ignore to ignore this word and move on to the next misspelled word.
-
Click Add to add the word to the spelling dictionary.
-
Tip: The keyboard shortcut for skipping to the next spelling or grammar error is  + ; .
+ ; .
PowerPoint
You can check spelling in PowerPoint, but you can’t check grammar.
Check spelling automatically as you type
PowerPoint automatically checks for and marks potential spelling errors with a wavy, red underline.
Tip: If spelling errors aren’t marked, you might need to turn on automatic spell checking, which is explained in the next procedure.
When you see a spelling error, Ctrl+click or right-click the word or phrase and choose one of the suggested options.
-
On the PowerPoint menu, click Preferences > Spelling.
-
In the Spelling dialog box, select or clear the Check spelling as you type box.
-
On the Review tab, click Spelling.
-
If PowerPoint finds a potential error, the Spelling pane opens and spelling errors are shown.
-
To fix an error, do one of the following:
-
Correct the error on your slide.
-
Click one of the suggested words in the Spelling pane, and then click Change.
To skip the error, do one of the following:
-
Click Ignore to skip only that instance of the error.
-
Click Ignore All to skip all instances of the error.
-
click Add to skip a misspelled word in all documents and add it to the dictionary.
-
-
After you correct, ignore, or skip an error, PowerPoint moves to the next one. When PowerPoint finishes reviewing the presentation, you’ll see a message that the spelling check is complete.
-
Click OK to return to your presentation.
Excel
You can check spelling in Excel, but you can’t check grammar.
Check spelling all at once
-
On the Review tab, click Spelling.
Note: The Spelling dialog box will not open if no spelling errors are detected, or if the word you are trying to add already exists in the dictionary.
-
Do any of the following.
To
Do this
Change the word
Under Suggestions, click the word that you want to use, and then click Change.
Change every occurrence of this word in this document
Under Suggestions, click the word that you want to use, and then click Change All.
Ignore this word and move on to the next misspelled word
Click Ignore Once.
Ignore every occurrence of this word in this document and move on to the next misspelled word
Click Ignore All.
See also
Check spelling and grammar in a different language
On the Review tab, click Spelling & Grammar. If Word finds a potential error, the Spelling & Grammar dialog box will open, spelling errors will be shown as red text, and grammatical errors will be shown as green text. To fix an error, do one of the following: Type the correction in the box and then click Change.
Contents
- 1 How do I correct a word document?
- 2 How do you fix a misspelled word?
- 3 How do I AutoCorrect all mistakes in word?
- 4 How do you mark changes in Word?
- 5 How do I edit comments in a Word document?
- 6 How can I check my sentence is correct or not?
- 7 What is used to correct commonly misspelled words in MS word?
- 8 How do you edit someone else’s Word document?
- 9 How do I edit a Word document online?
- 10 Why can’t I accept changes in Word?
- 11 How can we add comments to the changes made?
- 12 How do you correct a sentence with grammatically?
- 13 How do you use the word correctly in a sentence?
- 14 How do you edit a document?
- 15 Can I edit a DOCX file?
- 16 How do I accept corrections in Word?
- 17 How do you accept changes?
- 18 How do I accept all changes in word and remove comments?
How do I correct a word document?
How to Make Corrections on a Word Document
- Open the Word document.
- Click on the “Review” tab and select “Track Changes.”
- Make the corrections you want within the document.
- Accept or reject corrections within the document by clicking the “Accept” or “Reject” button under the “Changes” panel.
How do you fix a misspelled word?
A quick way to correct a misspelled word in Microsoft Word is to right-click on the word that has a red wavy underline. The resulting pop-up menu contains spelling suggestions which you can then select and have the misspelled word replaced.
How do I AutoCorrect all mistakes in word?
1. Press the F7 function key to run the spell checker. 2. When the spell checker comes to a commonly misspelled or mistyped word click on the AutoCorrect button.
How do you mark changes in Word?
Display changes by type of edit or by reviewer
- On the Review tab, go to Tracking and select Show Markup.
- Do one of the following: Select the type of change that you want to display. For example, select Comments, Insertions and Deletions, or Formatting. The check mark next to the item indicates that the item is selected.
How to edit a comment in Microsoft Word documents
- Open the Word document.
- Make all comments visible.
- Click in the comment.
- Edit the text for that comment.
- Click out of the comment to save changes.
How can I check my sentence is correct or not?
Grammarly is more than a grammar check, more than a spell check, and more than a punctuation corrector. It’s a comprehensive writing tool that helps you write clear, flawless text that will impress your readers.
What is used to correct commonly misspelled words in MS word?
AutoCorrect is a great way to correct your spelling, particularly if you misspell the same words over and over. Here’s a quick way to configure AutoCorrect for your commonly misspelled words. When automatically capitalizing the beginning of sentences, Word relies on how you historically have done your typing.
How do you edit someone else’s Word document?
Select Edit Document > Edit in Browser. If anyone else is working on the document, you’ll see their presence and the changes they’re making. We call this coauthoring, or real-time collaboration. From here, if you’d rather work in your Word app, switch from Editing to Open in Desktop App, near the top of the window.
How do I edit a Word document online?
How do I edit a Word document online? To edit, click Edit Document in the top left corner and select Edit in Word Online. The document will then open in the editor and allow you to make changes to the document.
Why can’t I accept changes in Word?
The most common reason is that the document is Protected. Go to Tools> Protect Document in the main menu to see whether the box for Protect document for: is checked. If so you may need a password to remove the protection.
2. How can we add comments to the changes made?
- Select the text or item that you want to comment on, or click to insert the cursor near the text that you want to comment on.
- On the Review tab, under Comments, click New.
- Type the comment text in the comment balloon.
How do you correct a sentence with grammatically?
In order for a sentence to be grammatically correct, the subject and verb must both be singular or plural. In other words, the subject and verb must agree with one another in their tense.
How do you use the word correctly in a sentence?
(1) We have not yet learned to punctuate correctly. (2) Make sure all the components remain correctly orientated. (3) If I recall correctly, he lives in Luton. (4) She was from Henan, if I remember correctly.
How do you edit a document?
- On your Android phone or tablet, open a document in the Google Docs app .
- Tap Edit .
- To select a word, double-tap it. Move the blue markers to select more text.
- Start editing.
- To undo or redo an action, click Undo or Redo .
Can I edit a DOCX file?
A . docx file will open quite happily in Word for Mac, of course, but it can also be edited in Pages, the nearest thing to a first-party Apple equivalent. Simply drag the file on to Pages or Word in your dock and it’ll open in the chosen application. (Alternatively, you can right-click the file and select Open With.
How do I accept corrections in Word?
Accept or reject changes
- Click or tap at the beginning of the document.
- On the Review tab, go to Tracking.
- Select Accept or Reject. As you accept or reject changes, Word will move to the next change.
- Repeat until you’ve reviewed all of the changes in your document.
How do you accept changes?
How to start gracefully accepting this change:
- Admit and surrender to the words: “I don’t know.”
- Avoid asking everyone you know for their help and opinions.
- Stay moving.
- Externalize the change.
- Lean on your practice.
How do I accept all changes in word and remove comments?
To review changes one at a time, click Review then Accept or Reject. To finalize the document all at once, click Accept All Changes or Reject All Changes. On the Review tab, in the Comments group, click the arrow below Delete, then click Delete All Comments in Document.
How to Make Corrections on a Word Document
- Open the Word document. …
- Click on the “Review” tab and select “Track Changes.”
- Make the corrections you want within the document. …
- Accept or reject corrections within the document by clicking the “Accept” or “Reject” button under the “Changes” panel.
moreover, Is it better to submit resume in Word or PDF? Although the PDF is becoming more widely accepted, submitting your resume in a Microsoft Word format is still the safest bet. If there is any doubt at all, send a Word doc that is simple, easy to read, and specifically tailored for your career goals.
How do you edit text in a document?
Edit text – change, replace, or delete text
- Choose Tools > Edit PDF > Edit . The dotted outlines identify the text and images you can edit.
- Select the text you want to edit. …
- Edit the text by doing one of the following: …
- Click outside the selection to deselect it and start over.
How do I convert my resume from PDF to Word?
Open a PDF file in Acrobat DC. Click on the “Export PDF” tool in the right pane. Choose Microsoft Word as your export format, and then choose “Word Document.” Click “Export.” If your PDF contains scanned text, the Acrobat Word converter will run text recognition automatically.
What font should a resume be? Times New Roman Still one of the most popular fonts used today, Times New Roman is traditional, classic and easily recognizable.
What is Word format resume?
Microsoft Word allows you to customize how your resume looks. You can send your resume directly from Word if you have a local email client, such as Outlook, Express or Eudora, installed and set up on your computer.
How do you make text editable in Word?
The following is a summary of the steps involved.
- Step 1: Show Developer tab. …
- Step 2: Open a Word document and you will be able to make the Word document fillable. …
- Step 3: Set or change “Properties” to “Content Control Properties”. …
- Step 4: You can add protection to the form by using the “Restrict Editing”.
How do I edit a Word document without formatting it?
On the Review tab, in the Protect group, click Protect Document, and then click Restrict Formatting and Editing. In the Editing restrictions area, select the Allow only this type of editing in the document check box. In the list of editing restrictions, click No changes (Read only).
What app can I use to edit my resume?
These seven options come with templates and tools to make your CV the best it can be.
- Canva. Canva tastefully brings text and images together. …
- VisualCV. Start off with a template in VisualCV and work from there. …
- CakeResume. CakeResume has a simple drag-and-drop interface. …
- CV Engineer. …
- Resume.com. …
- Google Slides. …
- Microsoft Word.
Where can I upload a resume and edit it?
Resume.com is a completely free resume maker that offers dozens of templates for creating your resume or cover letter, as well as job boards and career advice. You have the option to upload and edit an existing resume, create a new one or edit one of the sample resumes offered on the site.
Where can I edit my resume for free?
With Canva’s free resume builder, applying for your dream job is easy and fast. Choose from hundreds of free, designer-made templates and customize them within a few clicks. Forget spending hours formatting your resume, or choosing complimentary fonts for your cover letter.
What is the best resume editor?
These are the best resume builders in 2022:
- Zety.
- LiveCareer.
- Resume Genius.
- MyPerfectResume.
- ResumeLab.
- ResumeNow.
- EnhanCV.
- ResumeHelp.
How can I edit my PDF resume?
How to edit PDF files:
- Open a file in Acrobat DC.
- Click on the “Edit PDF” tool in the right pane.
- Use Acrobat editing tools: Add new text, edit text, or update fonts using selections from the Format list. …
- Save your edited PDF: Name your file and click the “Save” button.
How can I edit my resume for free?
With Canva’s free resume builder, applying for your dream job is easy and fast. Choose from hundreds of free, designer-made templates and customize them within a few clicks. Forget spending hours formatting your resume, or choosing complimentary fonts for your cover letter.
How do I update my resume in 2022?
10 tips for updating your resume
- Include the appropriate resume sections. …
- Update your resume’s formatting and design. …
- Remove old positions and dates. …
- Refresh your contact information (if necessary) …
- Tailor your resume keywords to the job posting. …
- Include a resume objective. …
- Mention hard numbers and specific details.
How can I edit my resume online?
Go to the editor or click on any of the templates in this article to get started. Choose the template that best suits the job you’re applying for. Customize the template with your information and edit the colors, text, and background to your liking. Save and download it in a few seconds.
Can we make resume in MS Word?
If you need help creating a resume or cover letter, start with one of the dozens of professionally-designed resume and cover letter templates that are available in Word. Go to File > New. In the search box, type Resume or Cover Letter. Double-click the template you want to use.
How can I edit my resume on my laptop?
Edit templates
- Click File > Open.
- Double-click This PC. (In Word 2013, double-click Computer).
- Browse to the Custom Office Templates folder that’s under My Documents.
- Click your template, and click Open.
- Make the changes you want, then save and close the template.
How do I edit a PDF resume?
How to edit PDF files:
- Open a file in Acrobat DC.
- Click on the “Edit PDF” tool in the right pane.
- Use Acrobat editing tools: Add new text, edit text, or update fonts using selections from the Format list. …
- Save your edited PDF: Name your file and click the “Save” button.
How can I edit my resume in PDF for free?
Here’s how to edit a PDF for free, online in 3 easy steps:
- Step 1: Upload PDF file. Drag your PDF file on to the document dropzone above, or click Upload to choose a file from your computer. …
- Step 2: Edit PDF File. Check the box next to your file name, then click the Edit PDF button on the Edit Tab. …
- Step 3: Download file.
Join our Business, Advices & Skills Community and share you ideas today !
by Tobias
November 6, 2021
written by Tobias
November 6, 2021

Word: Activate and Use Correction Mode
Word’s correction mode helps enormously when you are working on a document with several people. With it, the changes and comments of your colleagues are clearly visible to everyone. In this tutorial, we will show you how to activate and use the correction mode.
Activate and use correction mode in Word
Activate and use correction mode in Word
- Once you have finished writing a text and want to have it corrected or critically reviewed by experts, save it in activated correction mode. To do this, proceed as follows:
- In the Word menu, open the “Review” tab and activate the “Track Changes” command in the “Track” button. The symbol and command are now highlighted in blue. Everything that is deleted or added now appears red or crossed out in red in your document by default.
- You can select which changes should be displayed in your text in the submenu “Show Markup”. This becomes visible when you click on the small triangle next to “Show Markup”. Put a tick in front of the entries whose corrections you want to see in the document.
-
You can also change the formatting of the corrections. To do this, go to the submenu “Show Markup” and select the entry “Speech Bubbles”. The default setting is “Show only formatting and comments in balloons”. For example, if you want to see all changes outside the text, put a tick in front of “Show revisions in balloons”.
- When you get back a corrected and commented text, you can decide whether you want to apply all the changes directly or whether you want to check them step by step. Open the submenu to the “Accept” command on the “Review” tab and determine there how you want to proceed.
- Your proofreaders may also have had comments on the content of the text. These can be inserted by clicking on the command “New Comment” in the menu of the “Review” tab. A comment is now inserted at the position of the mouse in the text.
- If you return a commented document, you can jump from comment to comment using the commands “Previous element” and “Next element” in the “Comments” button.
MS OFFICE, MS Word, Correction mode, GUIDE

Related Articles
Leave a Comment
Microsoft’s word processing software is loaded with little-known features. Often ignored by users, who are content to exploit the most basic functions, they can nevertheless be of great service by simplifying tedious tasks. This is the case, for example, with the correction of documents.
Word includes a Review module, which allows you to apply non-destructive corrections to a document. Corrected passages are crossed out, and the suggested correction is displayed alongside, while the corrector can incorporate comments into his correction. Even better, the author of the document can then choose to validate, or not, the suggested corrections.
1. Activate track changes
To start correcting a document, you must first activate the track changes. To do this, in the Word document, go to the Review tab, and click Track Changes.

2. Add corrections
Once change tracking is enabled, remediation can begin. Make mistakes, erase words or entire sentences, and write your corrections directly in the document.
To the left of the line where a correction has been applied, a red line should appear. It allows the corrector to view the location of the corrections applied.

Click on this red line to reveal the details of the corrections made. You should then be able to view the deleted items (they are crossed out), and the added items (visible in red).
3. Add a comment
If you are not sure of the correction to be made on a specific passage, it is possible to add a comment in the file.
Select the passage then, still in the Revision tab, click on New comment.

Highlighted in red, the element selected and directly linked to the comment that takes place in a column to the right of the document. Click on the comment frame to edit it.
4. Validate the corrections
When you open a document that has been corrected with the integrated Review module, there are several possibilities to validate or reject the corrections. Place the cursor at the start of the text, then on the Review tab, click Accept.
The first suggested correction should be selected. Click on Accept again to validate it.

For any comments entered, click on the comment in the right column and, after reading it, click on the Delete button.

Corrections can also be validated one by one, directly from the right click menu. You will then have to choose to Validate or Reject the insertion.
Finally, if you do not want to review all the corrections made in a document, you can perfectly decide to validate them all at once.
To do this, click the drop-down menu of the Accept button from the ribbon, and choose to Accept all changes and stop tracking.

All the corrected elements in the document will then be validated, and the follow-up of corrections, which allows all the modifications made in a document to be displayed in red, will be deactivated. The original document reverts to its classic display and can again be edited by its author.
![]()
Download Audio
Tracking changes and managing edits in Microsoft Word
![]()
Download Audio
This wikiHow teaches you how to use the «Track Changes» tool in Microsoft Word to display any edits you make to a document in red ink.
-
1
Open the document you wish to edit. You can do so by double-clicking the Microsoft Word document directly, or you can open Microsoft Word and select a document from the «Recently Opened» page here.
- Before making any changes to the current document, consider creating a copy and editing it rather than the original document—that way you’ll have a backup document if something goes wrong.
-
2
Click the Review tab. It’s in the blue section at the top of the document’s page. Doing so will open a new set of options related to editing your document.
Advertisement
-
3
Click Track Changes. This option is at the top of the Word page, near the middle of the screen. Clicking it will enable Microsoft Word’s «Track Changes» feature.
-
4
Click the drop-down box next to Track Changes. Doing so will present you with the following editing options:
- Simple Markup — Draws a vertical red line on the far left side of any added or deleted text, but shows no other edits.
- All Markup — Displays all changes you make to your document in red text and comment boxes on the left side of the page.
- No Markup — Displays your changes in addition to the original document, but no red text or comment boxes appear.
- Original — Displays the original document without your changes.
-
5
Click All Markup. This option will show all edits you make to the original document in red ink while leaving the original document’s text in black ink.


Advertisement
-
1
Delete text to remove it from the document. Deleting anything from a single space to a paragraph will cause the writing to disappear from the document. You’ll see a red box appear in the right side of the screen that says «[Name] Deleted: [Writing]» where «Writing» is the text you deleted.
- If you reformat the document at all (e.g., you change the font of the writing), the details of the reformatting will appear in a box on this side of the screen as well.
-
2
Type new text to display red writing. Any text you add to your document will display in red ink.
- If you start a new line of text by pressing ↵ Enter (or ⏎ Return), you’ll see a grey vertical line appear on the left side of the screen where your new line of text begins.
-
3
Click New Comment to add comments to highlighted text. The New Comment button is the speech bubble with a plus sign near the top of the Word document page. Clicking it will open a window on the right side of the screen for your comment.
- You can click anywhere on the screen to save your comment when you’re done typing.
-
4
Accept or reject edits when you’re done. To do so, click Accept or Reject to modify a highlighted edit, or click the ▼ below Accept or Reject and click All Changes to accept or reject every change made to the document. Doing this will remove any Track Changes formatting (e.g., red text and comment boxes).
- You can also save the document with the tracked changes by skipping this step.
-
5
Save your document. To do so, hold down Ctrl (or ⌘ Command on Mac) and tap S. Your document will retain the changes you made.


Advertisement
Add New Question
-
Question
What are the different ways in which one can edit a document?

You can use all mark up to show all your changes, whether they be in deletion, correction, or paraphrasing. In editing, it is important to capture the voice of the original writer, making changes only to bridge the gap between grammar and clear visual images for the reader. It isn’t easy to rewrite other’s work, nor one’s own in my experience.
-
Question
How do I change the name of the editor in comments in documents with multiple editors?
Click Review, click Track Changes, Change User Name, and type in the initials that you want to appear. You can also change the color that changes are typed in.
-
Question
How do I make corrections in color?
To make corrections in color, just highlight the word, then click ‘text color’ at the top of the screen.
See more answers
Ask a Question
200 characters left
Include your email address to get a message when this question is answered.
Submit
Advertisement
Video
-
Some email viewers will show deleted text as black text with a red line through it.
Thanks for submitting a tip for review!
Advertisement
-
Failing to save a copy of the original document before using Track Changes may result in losing the original document’s content.
Advertisement
About This Article
Article SummaryX
1. Click Review.
2. Click Track Changes.
3. Click the «Track Changes» drop-down.
4. Select All Markup.
5. Edit the document.
6. Click Accept.
Did this summary help you?
Thanks to all authors for creating a page that has been read 278,453 times.
Is this article up to date?
You’ll find them under the Tools menu
Updated on February 10, 2023
Microsoft introduced the AutoCorrect feature to correct typos, misspelled words, and grammatical errors. You can also use the AutoCorrect tool to insert symbols, auto-text, and several other forms of text. AutoCorrect is set up by default with a list of typical misspellings and symbols, but you can modify the list that AutoCorrect uses and customize it to boost your productivity.
Today we’ll teach you how to edit the AutoCorrect list and settings to make your word processing experience more fluid. Instructions apply to Word 2003 and later.
What the Tool Can Do
Before we move on to the actual customization and editing of the AutoCorrect tool, you will need to understand how the AutoCorrect list works. There are three main things you can use the AutoCorrect tool to do.
- Corrections
Firstly the tool will automatically detect and correct typos and spelling errors. If, for example, you type «taht,» the AutoCorrect tool will automatically fix it and replace it with «that.» If will also fix typos like «I like tha tcar.» the AutoCorrect tool will also replace it with «I like that car.»
- Symbol Insertion
Symbols are a great feature included in Microsoft products. The easiest example of how the AutoCorrect tool can be used to easily insert symbols is the Copyright symbol. Simply type «(c)» and press the space-bar. You will notice that it is automatically changed to «©.» If the AutoCorrect list doesn’t contain the symbols you want to insert, just add it using the tips outlined below.
- Insert Predefined Text
You can also use the AutoCorrect feature to quickly insert any text based on your predefined AutoCorrect settings. If you use certain phrases often it is useful to add custom entries to the AutoCorrect list. For example, you can create an entry that will automatically replace «eposs» with «electronic point of sale system.»
Understanding the AutoCorrect Tool
When you open the AutoCorrect tool, you will see two lists of words. The pane on the left indicates all the words that will be replaced while the pane on the left is where all the corrections are listed. Note that this list will carry through to all other Microsoft programs that support this feature.
You can add as many entries as you want to boost productivity. You can add things like symbols, words, addresses, sentences, and even complete paragraphs and documents.
Word 2003
The AutoCorrect tool in Word 2003 is great for error correction and with the right customization you can boost your word processing efficiency. In order to access and edit the AutoCorrect list, follow these steps.
- Click on Tools
- Select AutoCorrect Options to open the AutoCorrect Options dialog box
- From this dialog box, you can edit the following options by ticking the check-boxes.
- Show AutoCorrect Options buttons
- Correct two initial capitals
- Capitalize the first letter of the sentence
- Capitalize the first letter of table cells
- Capitalize names of days
- Correct accidental usage of Caps Lock key
- You can also edit the AutoCorrect list by entering your desired corrections in the Replace and With text fields under the list shown above. Replace indicates the text to be replaced and With indicates the text that it will be replaced with. When you are done, just click on Add to add it to the list.
- Click on OK when you are done to implement the changes.
Word 2007
The AutoCorrect tool in Word 2007 is great for error correction and with the right customization you can boost your word processing efficiency. In order to access and edit the AutoCorrect list, follow these steps.
- Click the Office button on the top left of the window
- Click on Word Options on the bottom of the left pane
- Click on Proofing then on AutoCorrect Options to open the dialog box
- Click on the AutoCorrect tab
- From this dialog box, you can edit the following options by ticking the check-boxes.
- Show AutoCorrect Options buttons
- Correct two initial capitals
- Capitalize the first letter of the sentence
- Capitalize the first letter of table cells
- Capitalize names of days
- Correct accidental usage of Caps Lock key
- You can also edit the AutoCorrect list by entering your desired corrections in the Replace and With text fields under the list shown above. Replace indicates the text to be replaced and With indicates the text that it will be replaced with. When you are done, just click on Add to add it to the list.
- Click on OK when you are done to implement the changes.
Word 2013
The AutoCorrect tool in Word 2013 is great for error correction and with the right customization you can boost your word processing efficiency. In order to access and edit the AutoCorrect list, follow these steps.
- Click the File tab on the top left of the window
- Click on Options on the bottom of the left pane
- Click on Proofing then on AutoCorrect Options to open the dialog box
- Click on the AutoCorrect tab
- From this dialog box, you can edit the following options by ticking the check-boxes.
- Show AutoCorrect Options buttons
- Correct two initial capitals
- Capitalize the first letter of the sentence
- Capitalize the first letter of table cells
- Capitalize names of days
- Correct accidental usage of Caps Lock key
- You can also edit the AutoCorrect list by entering your desired corrections in the Replace and With text fields under the list shown above. Replace indicates the text to be replaced and With indicates the text that it will be replaced with. When you are done, just click on Add to add it to the list.
- Click on OK when you are done to implement the changes.
Thanks for letting us know!
Get the Latest Tech News Delivered Every Day
Subscribe
Table of Contents
- Which proofreading mark would you use to identify a correction in this sentence the day Windy was a nice change from the hot weather?
- How do I use proofreading marks in Word?
- How do I mark up a paper in Word?
- How do I enable editing in Word?
- How do I draw on a Word document?
- Can you draw a signature in Word?
- Where is the Draw tool in Word?
- How do I write with pen in Word?
- Can you convert ink to text in Word?
- How do I use the pen in Word 2016?
- How do you use the pen in Word 2010?
- Why is draw disabled in Word?
- How do you draw free in Word?
- How can I type a word document on my phone?
- How do I create a document on my phone?
- Can I type a letter on my phone?
- Can I download Word for free?
- What is best free word processor?
- Is Microsoft Team free?
- Why is Microsoft Word not free?
- Do you have to pay to use Word?
- How can I install Microsoft Office for free?
- What is the cheapest way to get Microsoft Office?
- How do I download Microsoft Office without a product key?
- How can I get Office 365 for free?
- How do you mark a capitalization error?
- What does SC mean on Instagram edits?
- What does IC mean on Instagram?
- What is DTS in text?
- What is DTS short for?
- What is the full form DTS?
- What does DST stand for?
- Is DST on or off now?
- Should DST be on or off?
- What is DST medical term?
- What does LPA stand for in medical terms?
- What is DST in finance?
- What is the purpose of dexamethasone suppression test?
- What is a normal dexamethasone suppression test?
- How long does 1mg of dexamethasone stay in your system?
- What does high cortisol feel like?
- How do you flush cortisol out of your body?
- What happens if your cortisol levels are too high?
- How do you know if your cortisol levels are high?
- What does a pheochromocytoma attack feel like?
- What are the signs of adrenal gland problems?
How to Make Corrections on a Word Document
Which proofreading mark would you use to identify a correction in this sentence the day Windy was a nice change from the hot weather?
Instead of “day windy” the sentence should read “windy day.” Therefore, the proofreading mark I would use would be two arrows.
How do I use proofreading marks in Word?
With Track Changes
- Open Word and open the document to use with proofreader marks.
- Click the “Review” tab.
- Move to the first place in the document, such as where a comma is missing.
- Move to the next place in the document.
- Open Word and open the document to use with proofreader marks.
How do I mark up a paper in Word?
Open Microsoft Word. Choose the Review tab at the top of the document. Either click the Track Changes button (PC) or toggle the Track Changes switch (Mac). Make sure that you change ‘Simple Markup’ to ‘All Markup’ from the drop down bar next to Track Changes.
- Open the Word document.
- Click on the “Review” tab and select “Track Changes.”
- Make the corrections you want within the document.
- Accept or reject corrections within the document by clicking the “Accept” or “Reject” button under the “Changes” panel.
How do I enable editing in Word?
Enable editing in your document
- Go to File > Info.
- Select Protect document.
- Select Enable Editing.
How do I draw on a Word document?
How to draw in Word
- In the ‘Insert tab,’ click the ‘Shapes’ button, and in the drop-down menu select ‘Scribble’
- Click and hold down your mouse to draw the shape you want.
- Release the mouse when you’ve finished drawing.
- Go to the ‘Shape Format’ tab to edit your shape.
Can you draw a signature in Word?
Here are the guidelines to draw electronic signature in word on Android: Download the app and create an account. Edit it and add fields, including a signature field. Set a signing order.
Click the “Draw” tab on the ribbon at the top of Word. 3. You’ll see a list of pens to choose from. Once you’ve clicked on one, click on it again to change the ink color or pen thickness.
How do I write with pen in Word?
Write, draw, or highlight text
- On the Draw tab of the Ribbon, tap a pen to select it.
- Tap again to open the menu of Thickness and Color options for the pen.
- A Pencil texture is also available:
- On the touch screen, begin writing or drawing.
Can you convert ink to text in Word?
Just look for the Draw tab in a Microsoft Word document, choose a pen, and start writing. You can also control the thickness and color of your handwriting. After you’ve written your text, use the Lasso Select button to choose what you want to convert and select Ink to Text on the Draw tab.
How do I use the pen in Word 2016?
To use inking in Word 2016, go to the Review tab and click on the Start inking icon. When you do that, Word will display a Pens tab, similar to the one shown in the previous figure. You can use this tab to choose ink color, pen thickness, etc.
How do you use the pen in Word 2010?
Use the Pens Tab in Word to Quickly “Pen” Your Signature
- The Pens tab can be added to the Word 2010/2013 Ribbon.
- The fist step in adding the Pens tab is to right click the ribbon and select “Customize the Ribbon” Then from the “Choose commands from” drop down choose the Tool Tabs.
- Once you click OK you will have the pens tab to work with.
- Share this:
Why is draw disabled in Word?
In Word, you must be in Print layout to draw with ink. If the Draw tab is grayed out so that you can’t select a pen, go the View tab and select Print Layout. Tap again to open the menu of Thickness and Color options for the pen. Select your preferred size and color.
How do you draw free in Word?
Draw or edit a freeform shape
- On the Insert tab, in the Illustrations group, click Shapes.
- Under Lines, do one of the following: To draw a shape that has both curved and straight segments, click Freeform .
- Click anywhere in the document, and then drag to draw.
- To finish drawing the shape, do one of the following:
How can I type a word document on my phone?
You can create, view, and edit Google documents, as well as Microsoft Word® files, with the Google Docs app for Android.
- Step 1: Download the Google Docs app. On your Android phone or tablet, open the Google Play app .
- Step 2: Get started. Create a document.
- Step 3: Share & work with others.
How do I create a document on my phone?
Create a file
- On your Android phone or tablet, open the Google Docs, Sheets, or Slides app.
- In the bottom right, tap Create .
- Choose whether to use a template or create a new file. The app will open a new file.
Can I type a letter on my phone?
On your Android phone or tablet, open any app that you can type in, like Gmail or Keep. Tap where you can enter text. Your keyboard will appear at the bottom of the screen. With a finger or stylus, handwrite words on the keyboard to enter text.
Can I download Word for free?
The good news is, if you don’t need the full suite of Microsoft 365 tools, you can access a number of its apps online for free — including Word, Excel, PowerPoint, OneDrive, Outlook, Calendar and Skype. Here’s how to get them: Go to Office.com. Login to your Microsoft account (or create one for free).
What is best free word processor?
Don’t pay for what you aren’t going to use–take a look at one of these five free Microsoft Word alternatives instead.
- Google Docs.
- Apache OpenOffice Writer.
- LibreOffice Writer.
- WPS Office Writer.
- Microsoft Office Word Online.
Is Microsoft Team free?
The free version of Teams includes the following: Unlimited chat messages and search. Built-in online meetings and audio and video calling for individuals and groups, with a duration of up to 60 minutes per meeting or call. For a limited time, you can meet for up to 24 hours.
Why is Microsoft Word not free?
Except for the advertising-supported Microsoft Word Starter 2010, Word has never been free except as part of a limited-time trial of Office. When the trial expires, you cannot continue to use Word without buying either Office or a freestanding copy of Word.
Do you have to pay to use Word?
You can download Microsoft’s revamped Office mobile app, available for iPhone or Android devices, for free. Released in 2020, it combines Word, Excel and PowerPoint in one app. While the app itself is free, its premium features are not.
How can I install Microsoft Office for free?
You can use Office for free for one month by downloading the Office 365 trial. This includes the Office 2016 versions of Word, Excel, PowerPoint, Outlook, and other Office programs. Office 365 is the only version of Office with a free trial available.
What is the cheapest way to get Microsoft Office?
Buy Microsoft Office 365 Home for the cheapest price
- Microsoft 365 Personal. Microsoft US. $6.99. View.
- Microsoft 365 Personal | 3… Amazon. $69.99. View.
- Microsoft Office 365 Ultimate… Udemy. $34.99. View.
- Microsoft 365 Family. Origin PC. $119. View.
How do I download Microsoft Office without a product key?
- Step 1: Copy the code into a new text document. Create A New Text Document.
- Step 2: Paste the code into the text file. Then save it as a batch file (named “1click.cmd”).
- Step 3: Run the batch file as administrator.
How can I get Office 365 for free?
On to the ways to get a full free Office 365.
- Get Office 365 through your school. Microsoft offers Office 365 Education for free through many schools and universities.
- Get the free trial of Office 365.
- Get the free trial of Office 365 ProPlus.
- Convince your company to get Office 365.
- Free Office 365 (with purchase of a PC)
How do you mark a capitalization error?
Capitalize: The capitalize mark is three horizontal lines under the letter that should be capitalized. Lowercase: The lowercase mark is a line through the letter that should be lowercased.
What does SC mean on Instagram edits?
Selection Credit
What does IC mean on Instagram?
I See
What is DTS in text?
Meaning. DTS. Don’t Think So.
What is DTS short for?
DTS
| Acronym | Definition |
|---|---|
| DTS | Data Transformation Services (OLAP) |
| DTS | Digital Theater Sound (Digital Theater Systems, Inc.) |
| DTS | Drug Treatment Service (various organizations) |
| DTS | Defense Travel System |
What is the full form DTS?
What does DTS mean? Digital Theater Systems (DTS) is a series of multichannel audio technologies owned by DTS, Inc., formerly known as Digital Theater Systems, Inc., an American company specializing in digital surround sound formats used for both commercial/theatrical and consumer grade applications.
What does DST stand for?
daylight saving time
Is DST on or off now?
Daylight saving time then ends on the first Sunday in November, when clocks are moved back an hour at 2 a.m. local daylight time (so they will then read 1 a.m. local standard time). In 2021, DST begins on March 14 and ends on Nov. 7 in the U.S., when you’ll set the clock back an hour and the cycle will begin again.
Should DST be on or off?
Daylight Saving Time begins on Sunday, March 14, 2021 at 2:00 A.M. On Saturday night, set your clocks forward one hour (i.e., losing one hour) to “spring ahead.” Daylight Saving Time ends on Sunday, November 7, 2021, at 2:00 A.M. On Saturday night, set your clocks back one hour (i.e., gaining one hour) to “fall back.”
What is DST medical term?
DST Stands For : Dexamethasone Suppression Test | drug-susceptibility testing.
What does LPA stand for in medical terms?
Little People of America
What is DST in finance?
A DST stands for Delaware Statutory Trust and is an entity that is used to hold title to investment real estate. The typical minimum investment for a DST 1031 Property is $100,000 allowing an investor to diversify his or her exchange proceeds among multiple properties.
What is the purpose of dexamethasone suppression test?
Test Overview The overnight dexamethasone suppression test checks to see how taking a steroid medicine called dexamethasone changes the levels of the hormone cortisol in the blood. This test checks for a condition in which large amounts of cortisol are produced by the adrenal glands (Cushing’s syndrome).
What is a normal dexamethasone suppression test?
Normal Results Low dose: Overnight — 8 a.m. plasma cortisol lower than 1.8 micrograms per deciliter (mcg/dL) or 50 nanomoles per liter (nmol/L) Standard — Urinary free cortisol on day 3 lower than 10 micrograms per day (mcg/day) or 280 nmol/L.
How long does 1mg of dexamethasone stay in your system?
Dexamethasone is available as a generic product, as a tablet, injection, oral solution, and in ophthalmic products. Dexamethasone is known as a long-acting drug. Its half-life is 36-72 hours.
What does high cortisol feel like?
Cushing’s may occur if the body makes too much cortisol. Symptoms include, excessive weight gain, weak muscles, high blood pressure, a tendency to bruise easily and slow wound healing. A round ‘moon face’ is common.
How do you flush cortisol out of your body?
Natural ways to lower cortisol
- Lowering stress. People trying to lower their cortisol levels should aim to reduce stress.
- Eating a good diet. Share on Pinterest Dark chocolate may help to keep cortisol levels stable.
- Sleeping well.
- Trying relaxation techniques.
- Taking up a hobby.
- Learning to unwind.
- Laughing and having fun.
- Exercising.
What happens if your cortisol levels are too high?
Too much cortisol can produce some of the hallmark signs of Cushing syndrome — a fatty hump between your shoulders, a rounded face, and pink or purple stretch marks on your skin. Cushing syndrome can also result in high blood pressure, bone loss and, on occasion, type 2 diabetes.
How do you know if your cortisol levels are high?
General signs and symptoms of too much cortisol include:
- weight gain, mostly around the midsection and upper back.
- weight gain and rounding of the face.
- acne.
- thinning skin.
- easy bruising.
- flushed face.
- slowed healing.
- muscle weakness.
What does a pheochromocytoma attack feel like?
Most patients with pheochromocytoma have high blood pressure. Many patients have three main symptoms: headache, excess sweating and a hard, fast heartbeat (palpitations).
What are the signs of adrenal gland problems?
What are the symptoms of adrenal gland disorders?
- Upper body obesity, round face and neck, and thinning arms and legs.
- Skin problems, such as acne or reddish-blue streaks on the abdomen or underarm area.
- High blood pressure.
- Muscle and bone weakness.
- Moodiness, irritability, or depression.
- High blood sugars.
- Slow growth rates in children.