
Word for Microsoft 365 Word 2021 Word 2019 Word 2016 Word 2013 More…Less
Change the look of your text or WordArt by changing its fill or outline, or by adding an effect, such as a shadow, reflection, or glow.
-
Select your text or WordArt.
-
On the Home tab, select
 Text Effects.
-
Choose the effect you want.
For more choices, point to Outline, Shadow, Reflection, or Glow, and then select the effect to use.
 Text Effects.
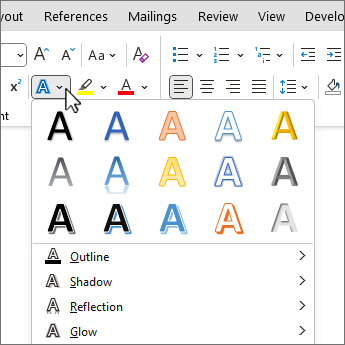
To remove the effect, select the text again, and then go to the Home tab and choose  Clear Formatting.
Need more help?
![]()
Download Article
![]()
Download Article
Want to create an outline around certain letters in your Word document? There are two easy ways you can surround words and phrases with colored outlines in Word—using Text Effects, and using Word Art. We’ll show you how to make any font in your Microsoft Word document stand out by outlining it in color.
-
1
Type the word or phrase you want to outline. The lines around your text will look better on larger characters, so make your font a bit larger than the rest of your text.
- You can make the letters any color you want before creating an outline around them. Just highlight the word or phrase, and then select a color from the «Font» panel at the top of Word.
-
2
Highlight the text you want to outline. Just click and drag the mouse around the text to select it.
Advertisement
-
3
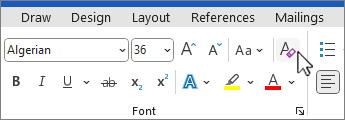
Click the Text Effects and Typography tool. This is the «A» surrounded by a blue glowing outline in the «Font» panel at the top of Word.
- If you don’t see this icon, click the Home tab at the top of Word.
-
4
Select the Outline menu. Now you’ll see all of the options you can use to create an outline around the selected letters.
-
5
Select an outline color. To choose the color of the line that surrounds your text, choose one of the colors displayed on the menu, or select More Outline Colors… to select a custom color.
-
6
Use the Weight menu to select the thickness of the outline. The larger the number, the thicker the outline around the letters.
- If you go too thick, you might make the text unreadable. You can always undo the last action in word by pressing Control + Z (PC) or Command + Z (Mac).
-
7
Use the Dashes menu to stylize the outline. If you’d rather have a dotted, dashed, or otherwise stylized line around your word or phrase instead of a solid line, you can select any of the options in this menu.


Advertisement
-
1
Click the Insert tab at the top of Word. WordArt is a tool that can help you create all types of vibrant text designs, including color outlines. You’ll find it on the Insert tab.
-
2
Click the WordArt menu. It’s the icon of a tiled blue «A» on the Insert tab in Word. A menu with several text styles will appear.[1]
-
3
Select an outline style. Not all WordArt styles have outlines, but several do. Don’t worry about the colors you see in the sample—you’ll be able to change those if you don’t like them. Once you click a style, you’ll see some sample text appear on the page.
-
4
Replace the sample text with your own. The text you type will appear in the selected outline style.
-
5
Select the Shape Format tab. It’ll appear at the top of the screen while you’re editing WordArt. This tab should already be active, but if it’s not, click it now.
-
6
Click the small arrow at the bottom-right corner of the WordArt Styles panel. It’s at the top of Word. This expands the «Format Shape» panel on the right side of Word.
-
7
Click the Text Fill and Outline icon. It’s the «A» with a line under it in the right panel.
-
8
Click Text Fill to select a color. When you choose this option, you’ll be able to choose the color of the actual text—you can choose an outline color separately.
-
9
Click Text Outline to design your outline. On this menu option, you can select a color, width, and even pattern (such as dotted or dashed) for the lines that surround your letters.


Advertisement
Add New Question
-
Question
How do I outline text in Windows 10?

Under WordArt Tools, on the Format tab, in the WordArt Styles group, click Shape Outline, and then do one of the following: To add or change an outline color, click the color that you want. To choose no color, click No Outline.
Ask a Question
200 characters left
Include your email address to get a message when this question is answered.
Submit
Advertisement
Thanks for submitting a tip for review!
About This Article
Article SummaryX
1. Create or Open a Word document.
2. Type the text you want in outline.
3. Highlight the text.
4. Click on the «Text Effects» tool.
5. Click on Outline.
6. Customize the Outline effect.
Did this summary help you?
Thanks to all authors for creating a page that has been read 498,163 times.
Is this article up to date?
When you’re working with a long document, the Outline view helps you arrange your text. It creates an outline based on the styles you use, so it’s easy to see and organize all your headings and subheadings.
Outline View
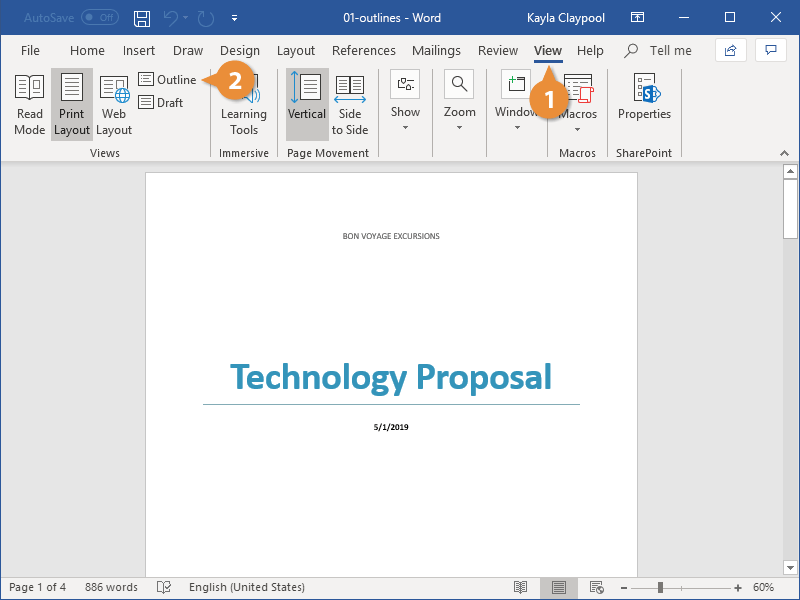
- Click the View tab.
- Click the Outline button in the Views group.

The Outline view breaks the document down so that each heading and paragraph is represented by a single line.
Any text formatted with a Heading style will automatically be set at the specified outline level, but you can adjust a line’s outline level manually using the tools on the Outlining tab that appears in Outline view.
Demote or Promote Items
Outline view makes it very easy to adjust the outline level of a heading.
- Click the item in your document that you want to promote or demote.
- Click a Promote or Demote option from the Outline Tools group.
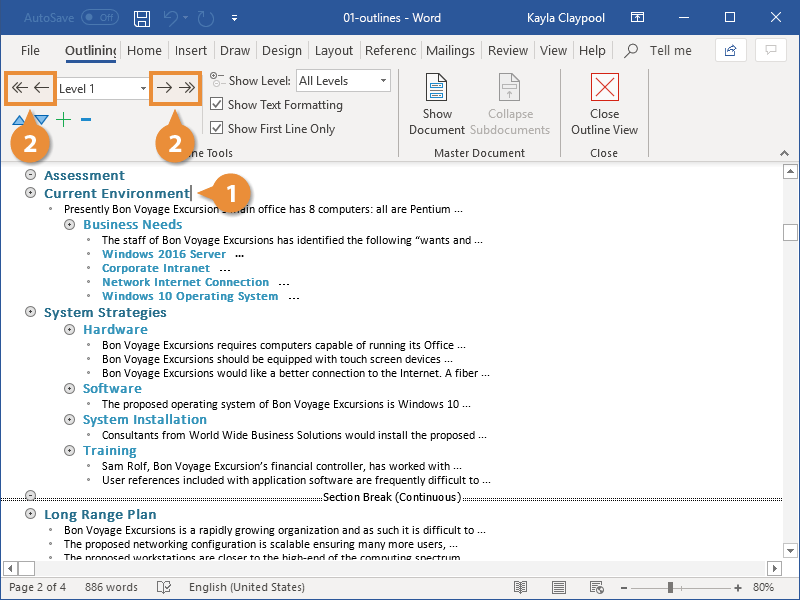
Promoting a topic moves it to a higher outline level, moving it one spot to the left, while demoting a topic moves it to a lower outline level, one spot to the right.
You can also use the double arrow buttons to promote a topic directly to Level 1, the highest outline level, or demote it all the way to body text.
Collapse and Expand Headings
You can collapse the contents of a heading in Outline view to make it easier to see the rest of a document.
- Click the item in your document that you want to minimize.
- To collapse a section, click the Collapse button in the Outline Tools group.
- To expand a section, click the Expand button in the Outline Tools group.
That heading, along with all its subheadings and body text, is collapsed down to a single line.
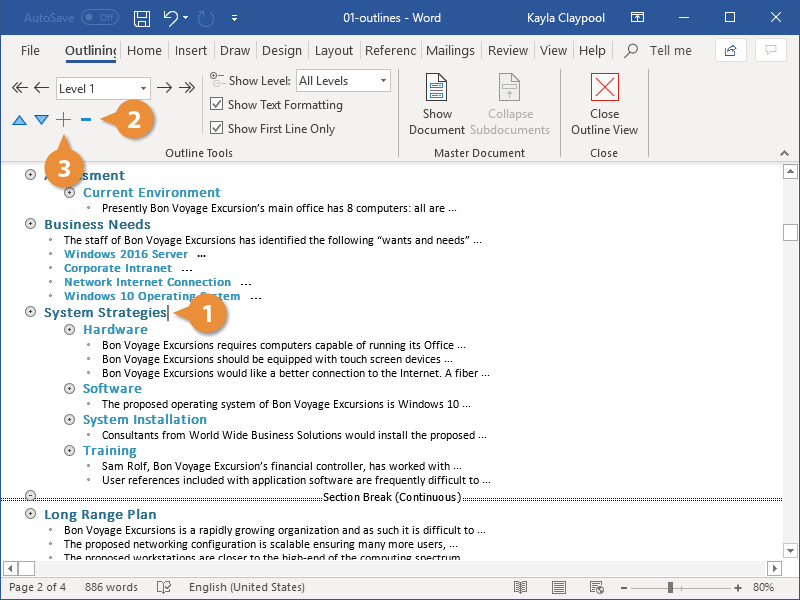
That section is expanded once again, displaying all the subheadings and body text.
You can choose which outline levels are displayed by clicking the Show Level list arrow and selecting a level. Only sections of that outline level and higher will be displayed.

FREE Quick Reference
Click to Download
Free to distribute with our compliments; we hope you will consider our paid training.
From within Word:
Click Home and, in the Paragraph group, click the arrow next to Multilevel List.
Choose an outline style from the List Library. …
Start typing to begin the list. …
To start a new list level, press the Tab key and begin typing.
Press Enter to return to the previous list level.
Hence, How do you outline a text in thesis?
To create an outline:
- Place your thesis statement at the beginning.
- List the major points that support your thesis. Label them in Roman Numerals (I, II, III, etc.).
- List supporting ideas or arguments for each major point. …
- If applicable, continue to sub-divide each supporting idea until your outline is fully developed.
Then, How do I make an outline?
How do I write an outline?
- Identify your topic or thesis statement.
- Decide what points you would like to discuss during your paper.
- Put your points in logical, numerical order so that each point connects back to your main point.
- Write possible transitions between paragraphs.
Does Microsoft Word have an outline template? Beginning on the next page is an outline template (in Microsoft Word format), which is filled in with a sample to show you what a final outline looks like. Here is how to fill in your own outline: Triple click on a sentence to highlight it. (Or swipe across it with a mouse’s left key held down.)
Besides, How do I switch to outline in Word 2016?
Switch to Outline view. (Click the View tab of the ribbon and click the Outline tool or simply click the Outline icon on the Status Bar.) The screen changes and Word displays the Outlining tab on the ribbon. Use the Show Level drop-down list (on the Outlining tab of the ribbon) to choose Level 1.
What are the two types of outlines?
There are two major types of outlines: topic outlines and sentence outlines. A topic outline allows writers to organize the topics of a paper quickly without going into details. It may use noun phrases, infinitive phrases, or gerund phrases instead of sentences.
What is a outline in writing?
An outline is a general plan of the material that is to be presented in a speech or a paper. The outline shows the order of the various topics, the relative importance of each, and the relationship between the various parts. Order in an Outline. There are many ways to arrange the different parts of a subject.
How do you write an outline for a paragraph?
- 1 On a piece of notebook paper. On a piece of notebook paper, write the topic of the paragraph you intend to write. …
- 2 List some supporting ideas. List some supporting ideas that strengthen the claim that you make in your topic sentence. …
- 3 Be followed by a secondary support sentence. …
- 4 Think. …
- 5 On a new sheet of paper.
How do you write a script outline?
How to Write a Script Outline in 6 Steps
- Start with a beat sheet. A beat sheet is a condensed version of your overall screenplay. …
- Move on to index cards. …
- Start writing a document, scene-by-scene. …
- Describe actions and revelations. …
- Insert dialogue as it comes to you. …
- Use your outline as a tool.
How do you outline text in Google Docs?
Google Docs will automatically add headings to an outline, but you can also add them manually.
- Open a document in the Google Docs app.
- Tap Edit .
- Select the text you want to make a heading.
- Tap Format .
- Tap TEXT. Style.
- Tap a heading style.
- Tap Done. . The heading will be added to the outline.
What is the outline in writing?
An outline is a general plan of the material that is to be presented in a speech or a paper. The outline shows the order of the various topics, the relative importance of each, and the relationship between the various parts. There are many ways to arrange the different parts of a subject.
Why is my outline not working in Word?
If the Outlining tab is missing from the ribbon, see if resetting the ribbon fixes the problem. Go to File | Options | Customize Ribbon. Once you have switched to Outline view, the options on the Outlining tab should be available.
Where is the outline tab in Word?
How to Use Outline View in Word
- Click the View tab.
- Click the Outline button in the Views group.
What is the difference between reading outline from a writing outline?
The main difference between outlining a reading and outlining your own paper is the source of the ideas. When you outline something someone else wrote, you are trying to represent their ideas and structure. When outlining your own paper, you will need to focus on your own ideas and how best to organize them.
How do you do an outline for a presentation?
Follow these steps when creating an outline for your presentation:
- Consider the purpose of your presentation. When creating a presentation outline, determine your goal. …
- Create a structure. Next, build your presentation’s structure. …
- Use an attention grabber. …
- Consider visual content. …
- Include a call to action.
What is a good outline look like?
Basic outline form
The main ideas take Roman numerals (I, II, …) and should be in all-caps. Sub-points under each main idea take capital letters (A, B, …) and are indented. Sub-points under the capital letters, if any, take Arabic numerals (1, 2, …) and are further indented.
What is outlining and example?
To outline is to summarize the main points or to draw the outer edge of something. An example of to outline is to write the important details of a planned novel before you write it. An example of to outline is trace the shape of the cat before filling in the details in a painting.
How do you outline a sentence?
In a sentence outline, begin each point with a capital letter and place a period after each division number or letter and at the end of the sentence. 4. In a topic outline, begin each point with a capital letter and place a period after each division number or letter. Do not place periods after ideas.
What is a basic outline?
An outline presents a picture of the main ideas and the subsidiary ideas of a subject. Some typical uses of outlining might be an essay, a term paper, a book review, or a speech. For any of these, an outline will show a basic overview and important details.
How many pages is a script outline?
Write out what happens in each scene and by the end of the movie you should end up with a script outline that’s three to five pages long.
- Reference 1
- Reference 2
- Reference 3
- Reference 4
- Reference 5
Microsoft’s word processor is a leading application worldwide, with a wide range of functions that go far beyond writing documents, so it is always convenient to have a good understanding of all its ins and outs, something that is not easy. Within its characteristics, it has the possibility of making diagrams, in order to keep all the content of a document organized and simplified.

By default, Word takes care of using “Print Layout” when presenting the document. From this option, both the size of the paper and its margins are shown, as well as information about the font. It also has the “Reading Mode”, the “Web Design”, the “Draft” and “Outline”. The latter is the one that we will see in depth in this article.
What is the use of making an outline in Word
The outline is a very useful feature with which to create extensive tutorials, business documents or even books. With this we can summarize the content of a writing to make it more understandable and less extensive, so it is a highly recommended feature for both professionals and students. Outlines are made up of topics and subtopics. The themes are the main ideas; subtopics describe details.
In order to carry it out, it is necessary to have a clear idea of the type we want to carry out, since each idea requires its own design, although the objective will always be the same: to locate the main ideas that will be explained later in the text that we want to present.
The Outline view of Word is capable of presenting a document in a unique way taking advantage of the different heading styles that the word processor has, with which to be able to group and organize different thoughts, sections or ideas in a hierarchical way.
This tool makes it easy for us to randomly reproduce topics, subtopics, and text combinations to help us organize ourselves better. That is why whatever our level of creativity and knowledge we can use them to create lists or work on different projects. This feature works the same in all modern versions of Word : 2010, 2013, 2016, 2019 and is also included in the Microsoft 365 package.
Use Outline view
If we are working with a large document, the so-called Outline view can help us keep our text well organized. Thanks to this function we can create schemes based on different styles with which to keep all titles and subtitles distributed, making them easier to read.
To begin, just click on the “View” tab on the toolbar, where we will find the “Scheme” button within the “Views” group. By clicking on it we will see how the document is divided in an organized way so that each title and paragraph are represented by a single line.

Unlike what happens in other sections of the “Views” group such as “Print Design” or “Web Design”, the “Scheme” comes with its own set of characteristics within the ribbon itself, allowing us to work with different levels and the ability to embed any document. Thus, any text with a title style format will appear automatically at the specified outline level, and can be graduated manually.
Outline tools
When you click on the Scheme button, your own ribbon appears. By default, it begins with Level 1 in the “Schematic tools” section, from where we can always know which level we are using. If we click on the drop-down we can change the current level from 1 to 9. The main topics are formatted in Title 1, the subtopics in Title 2, and so on. On each side of the level we find arrows. The simple arrow on the right allows to decrease a level or with the double date to demote a level as body text.

Just below we have the buttons that will allow us to organize the different elements. With down and up arrows it will be possible to move them in the direction we need so that we can rearrange them without problem. With the plus (+) and minus (-) signs we can expand and group levels so that the scheme is not too long, so that we can expand it when we need them.

On the right we find the “Show level” tool, from which, as its name indicates, we can see the different levels , hiding the rest. For example, if we choose level 5, we will see 1, 2, 3, 4 and 5, with the rest being hidden, from 6 to 9. We also find the option to “Show text format”, which we can uncheck if we prefer to see the scheme with a simpler appearance. Also, we can check the box “Show only the first line”, in case we have long elements within the different levels and we only want to see the first line.

Master documents
From this second section that we find on the right side, we can include subdocuments by clicking on the “Show documents” button so that we can expand the available options ribbon.

If we click on “Create” to obtain a new document or on “Insert” to add a saved file. Once added, all you have to do is press the “Collapse” subdocuments button to group all its content and show only one link to it. Later the name of the button will change to “Expand subdocuments” to carry out the opposite action that allows us to see all the content.
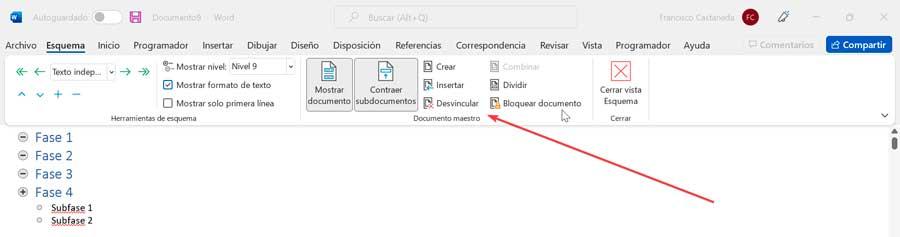
Among the rest of the options we find “Unlink”, which is responsible for removing the link from the subdocument to copy the text in the original document. With “Combine” we can merge the content of each subdocument in the first subdocument. We also find the option to “Divide”, to be able to separate the content of a subdocument in several documents. Finally, the option to “Lock document” will help us to prevent changes from being made.
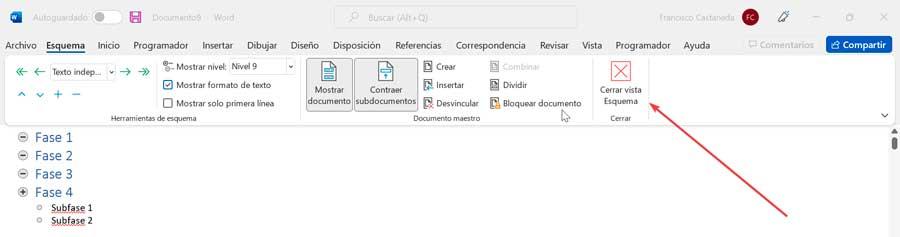
As soon as we want to exit the outline view, we can close it at any time by pressing the Close Outline view button, which we find within the “Close” section in the last block on the right. By doing this we can see the default view of the document at any time.