
Word clouds are used to visualize the most common words in a text. They are ideal for exploring large amounts of text and creating informative visualizations for presentations.

Generating a word cloud
Word clouds can be generated for individual documents, document groups, document sets, or for all the documents in a project. Right-click on the level in the “Document Browser” for which you want to generate the word cloud and select the entry Word Cloud.
Alternatively, you can also open the Word Cloud function via the icon with the same name in the Visual Tools tab. A dialog box will then open in which you can select the relevant documents.

Tip: You can create a word cloud of the words most often used in the displayed retrieved segments. To do so, click on the ![]() -icon in the toolbar of the “Retrieved Segments” window. Only the words listed in the “Retrieved Segments” window will be analyzed.
-icon in the toolbar of the “Retrieved Segments” window. Only the words listed in the “Retrieved Segments” window will be analyzed.
Stop list: Excluding words in the word cloud
So that your word cloud does not consist mainly of insignificant words or words bearing very little meaning, you can create a stop list of these words. The easiest way to do this is to open the Word frequencies function in the Start tab. The table that appears will list all the words in the text in their order of frequency.
Double-clicking on the green icon in front of a specific word will put it in the stop list, which means it won’t be considered for word clouds. You can also select several words in the list (using Ctrl + or cmd + the left mouse button or Shift + the left mouse button for an area in the list) and then right-click and select Add to Stop List to transfer them to the stop list. An icon with the same name is also available in the toolbar.

When you click the Refresh and apply stop list, the word cloud is regenerated excluding words from the stop list.
Tip: You can always right-click a single word in the word cloud and select Add to Stop List to exclude it from the word cloud. To re-create the word cloud without the excluded words, click the Rearrange icon.
Editing the stop list
The option Edit stop list displays the complete stop list used for word clouds in the current project. You can remove words from this list or add new words, although the way of doing this described above, by clicking in the frequency list, is actually much easier. Here you can also save and load already defined stop lists in order to exchange them between projects.
Tip: “MAXQDA Plus” and “MAXQDA Analytics Pro” users can also edit the stop list via MAXDictio > Stop List and easily exchange entries between different lists.
Working with the word frequency list
Via Start > Word frequencies you can open a list of all the words contained in the analyzed texts. This list shows, amongst other things, how often each individual word occurs. It is also possible to combine several words to one. To do this, click and drag one or more words onto another word with your mouse.
Adjusting the display
You can use the numerous options in the Start and Display tabs to customize the appearance of the word cloud, including the number of words displayed, their font, their shape, and color.
The Start tab

Word frequencies – Opens a list of all words contained in the analyzed texts (without the stop words) and shows their frequencies. Words can easily be transferred from the word frequency list to the stop list.
Edit Stop List – Opens the list of all excluded words and lets you import existing stop lists.
Words – Specifies how many words are visualized. You can use the slider to incrementally remove rarer words. If several words occur with the same frequency, words starting with letters earlier in the alphabet are selected first.
Lemmatize words – When this option is activated, words are returned to their respective basic forms, so that words with the same meaning are combined regardless of declination or case.
Minimum Frequency – Defines the minimum number of times a word must occur in order to be displayed.
Characters to be disregarded – Clicking on the button with the three dots opens a small dialog box in which you can enter characters that should be cut off from words and ignored during counting. The selected characters then apply to all word-based functions in MAXQDA and MAXDictio.
Case Sensitivity – If this option is activated, a distinction is made between capitalized and non-capitalized words. For example, the words “earth”, “Earth” and “EARTH” are treated as three different words.
Ignore Numbers – Excludes all “words” consisting only of numbers.
Language Options – Change the language to Japanese to create word clouds from Japanese texts.
Rearrange – Regenerates the word cloud, placing words in different random locations.
Copy to Clipboard – Copies the current view to the clipboard so you can easily paste the word cloud into a report or presentation.
Export – Exports the current view as an image file for further processing.
The Display tab

Shape – Lets you define the outer borders of the word cloud. There are various variations to choose from:
- predefined forms (circle, ellipse, square, triangle)
- most frequent word
- a word you have entered
- a custom-selected image (is converted into a black and white image with the black area filled in, hence black and white images are best)

Please note: For some selected shapes you need to increase the number of words to fill in the shape completely. It is also helpful to use the Smallest Word slider to adjust the size differences of the words (and thus the required space) to fill the shapes evenly.
Alignment – Lets you define the alignment of words. The following options are available:
- Horizontal: All words are displayed horizontally
- Vertical: All words are displayed vertically
- Horizontal and vertical: Words are randomly aligned horizontally and vertically, the most common word is always displayed horizontally
- 30/45 degrees: Some words are additionally displayed at the selected angle diagonally upwards or downwards.
Colors – Lets you choose from a range of different color schemes.
Font / Bold – Lets you specify the font.
Word distance – Defines the minimum distance between words
Smallest word – Defines the size of the smallest word. The smaller this size is, the greater the difference in size compared to the most common words will be.
Size by – Defines the size of the words. Here you can choose from the following:
- Frequency: The more frequently a word occurs, the larger it is.
- Rank: The higher the rank of a word in the word frequency list, the larger the word. If you choose this option, the absolute difference between the word frequencies is irrelevant.
- Number of documents: The larger the word, the more documents it appears in. The number of documents can be seen in the list of word frequencies. This option only makes sense if you are analyzing several documents, as otherwise there will be no size difference between the words.
Scale – Influences the differences in size between common and rare words. The following options are available, which refer to the dimensions set under “Size by”:
- Linear: The font size is linearly proportional to the word frequency.
- Most frequent smaller: The font size is proportional to the root of the word frequencies. As a result, the common words appear smaller in relation to the “Linear” option.
- Most frequent greater: The font size is proportional to the square of the word frequencies. This makes the common words appear larger in relation to the “Linear” option.
Largest word – Lets you set the placement of the largest word: centered, somewhere near the edge, or at random.
Rearrange – Regenerates the word cloud, placing words in different random locations.
Display the occurrence of a word in the texts
The word cloud is interactively linked to the original texts:
- Clicking on a word will list all the occurrences of that word in the analyzed texts.
- If you hover your cursor over a word, the frequency of the word will appears above it (regardless of the selection made in “Size by:…”).
Variety and novelty in English lessons encourage learners to be more engaged. On the contrary, monotonous tasks, no matter how useful they are, cause boredom. How to bring variety without too many changes in the process of learning vocabulary? Use word clouds.
Word clouds are a graphical representation of words and words combinations. They can be used for:
- vocabulary revision
- presenting lexis
- practicing new words
- student’s projects.
It is just a more visually appealing way to teach vocabulary. Instead of using lists, which students are probably fed up with, make clouds. You can utilize them for word searches, making monologues and dialogues, word games, writing tasks, etc.
Here are some examples of the tasks.
Task 1
Make a story about a detective investigating a case using all the words and tell your partner (the teacher).

Task 2
Work in pairs. Ask and answer five questions using the words.
Task 3
Give a definition of one of the words. Can your partner guess the word? Swap roles.
There are some services for creating word clouds:
Word Art
Wordle
Word clouds
I personally prefer to use Word art because it’s possible to create clouds containing collocations. As we know teaching collocations is more effective for learners. Other services just break the word pairs into single words.
Let’s see how to create word clouds using Word art. It’s quick and easy, no registration is required. So click ‘Create’ and make your cloud.
Step 1
Fill in the words or word combinations. You can type as many words as you need, even 30 or even 50. It’s possible to Capitalize letters, use the UPPER or lower case. Click ‘Options’ and opt for repetition of the words as you see in one of the pictures above or choose no repetition.

Step 2
Choose the shape of your cloud: animals, nature, people or some holidays themes. If you want to see the changes, click the red button ‘Visualize’.
For example, this charming ladybird will definitely catch kids’ interest.
 Step 3

Choose a font which you like. There are more than 50 fonts to select.
Step 4
Pick out a layout: horizontal, vertical, crossing words, dancing words, slopes and random. The layout will depend on the task and the learners. Teens prefer something less ordinal and more creative. For adults, I usually make more conservative things like a horizontal layout.
Step 5
Choose a style: colours of the words and the background. If you want to change a colour of the words, click ‘Words colours’ and ‘Custom’ and add more colours to the pallette.

Step 6
To apply all the changes, press ‘Print’ or ‘Download’ your cloud and enjoy it in your lessons.
Is Possible to create word cloud in PowerPoint? Create a Word Cloud in PowerPoint, a PowerPoint word cloud is one of the most simple, visual and effective ways of getting any audience on your side. If you’re looking to turn a disinterested audience into one hanging off your every word, a live word cloud generator that updates with participant responses is one of the easiest ways.
With the steps below, you could set up your PowerPoint Word cloud within 5 minutes…
- How to Make a PowerPoint Word Cloud
- 5 PowerPoint Word Cloud Ideas
- Free Word Cloud Templates
- Benefits of a Live Word Cloud for PowerPoint
Live Word Clouds win the audience
Let your audience in. Ask a word cloud question in your PowerPoint presentation and watch the responses fly!

More Inspiration with AhaSlides
- AhaSlides Word Cloud
- Word cloud examples
- Zoom word cloud
- Powerpoint Memes
- How to add notes to PowerPoint
Below is the free, no-download way to make a live word cloud for PowerPoint. Follow these 5 steps to win some super easy engagement from your audience.
Step 1: Create a Free AhaSlides Account
Sign up to AhaSlides for free in under 1 minute. No card details or downloads are required – just your name and email address!
Step 2: Import your PowerPoint
On the dashboard, click the button labelled ‘Import’. Upload your PowerPoint file (you will have to export it in PowerPoint first). Once your presentation has been uploaded, you will see each slide in the AhaSlides editor.
Step 3: Add your Word Cloud
Click on the ‘New Slide’ button and choose ‘Word Cloud’ from the menu. This will insert a word cloud directly after the slide you had selected. You can move your word cloud slide by dragging and dropping it to any position in your presentation.
Even on AhaSlides’ free plan, there’s no limit to how many word clouds you can have in one presentation!
Step 4: Edit your Word Cloud
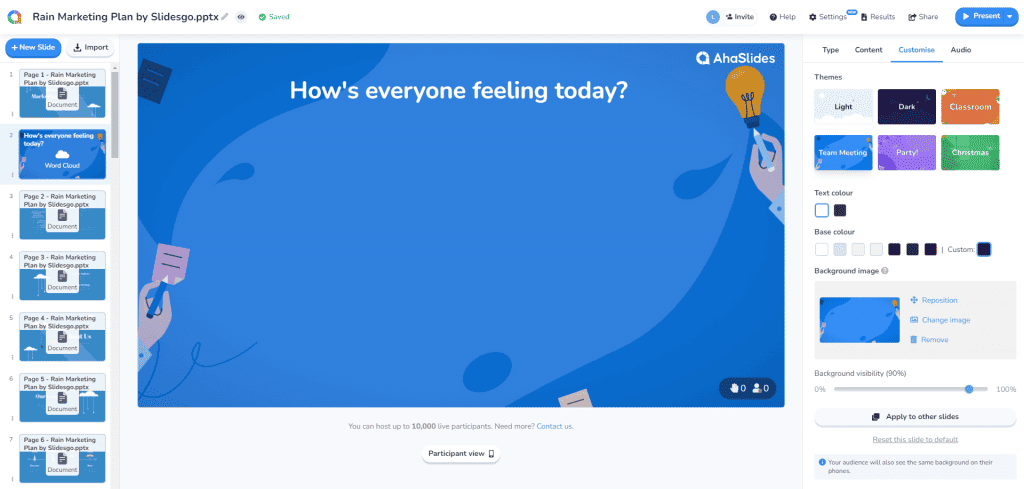
Write the question at the top of your PowerPoint word cloud. After that, choose your setting preferences; you can choose how many entries each participant gets, turn on profanity filter or add a time limit for submission.
Head to the ‘Customise’ tab to change the look of your word cloud. Change the background, theme and colour, and even embed some audio that plays from participants’ phones while they’re responding.
Step 5: Get Responses!

Press the ‘Present’ button to show your presentation’s unique access code. Your participants type this into their phones to interact with your live PowerPoint word cloud.
Present your presentation as normal. When you reach your word cloud slide, participants will be able to answer the question at the top of it by typing their resonses into their phones. Those words will appear on the word cloud, with the most popular answers appearing larger and more centrally in the cloud.
💡 Get so much more with AhaSlides. Insert multiple choice polls, brainstorming activities, Q&A sessions and even live quizzes into your PowerPoint presentation. Check the video below!
5 PowerPoint Word Cloud Ideas
Word clouds are super versatile, so there are a lot of uses for them. Here are 10 ways to get the most out of your word cloud for PowerPoint.
- Breaking ice – Whether virtual or in-person, presentations need icebreakers. Asking how everyone is feeling, what everyone is drinking or what people thought of the game last night never fails to loosen participants up ahead of (or even during) the presentation.
- Gathering opinions – A great way to start a presentation is by setting the scene with an open-ended question. Use a word cloud to ask what words come to mind when they think about the topic you’re going to talk about. This can reveal some interesting insights and give you a great segue into your topic.
- Voting – While you can use a multiple-choice poll on AhaSlides, you can also do open-ended voting by asking for replies in a visually striking word cloud. The largest response is the winner!
- Checking to understand – Make sure everyone’s following along by hosting regular word cloud breaks. After each section, ask a question and get responses in word cloud format. If the right answer looms much larger than the rest, you can safely move on with your presentation!
- Brainstorming – Sometimes, the best ideas come from quantity, not quality. Use a word cloud for a mind dump; get everything your participants can possibly think of down onto the canvas, then refine from there.
Benefits of a Live Word Cloud for PowerPoint
If you’re new to the world of PowerPoint word clouds, you might be wondering what exactly they can offer you. Trust us, once you’ve experienced these benefits, you won’t go back to monologue presentations…
- 64% of presentation participants think that interactive content, like a live word cloud, is more engaging and entertaining than one-way content. A well-timed word cloud or two could be the difference between attentive participants and those bored out of their skulls.
- 68% of presentation participants find interactive presentations to be more memorable. That means that your word cloud won’t just make it a splash when it lands, but your audience will continue to feel the ripple for a long while after.
- 10 minutes is the usual limit that people have when listening to a PowerPoint presentation. An interactive word cloud can increase this massively.
- Word clouds help your audience to have their say, which makes them feel more valued.
- Word clouds are highly visual, which is proven to be more attractive and memorable, especially helpful for online webinar and events. Learn how to Run a Free Zoom Word Cloud effectively with AhaSlides now!
The word cloud is an original solution for many creative, commercial and personal tasks. Create a unique cloud of words with the WordCloud.pro service and you can:
- illustrate the report or presentation,
- make an unusual website design,
- create an exclusive banner,
- add extraordinary images to the blog,
- give a unique card to a friend,
- congratulate your chief on his birthday,
- сonfess your love or ask for forgiveness,
- create a great poster on the wall.
Regardless of the purpose you want to use pictures made of words, the WordCloud.pro will help you implement all of your ideas quickly and easily. Use the detailed instruction to see all the features of the service.
Selecting a sketch
To create a new design, select the «Studio» from the main menu.

First of all, you should decide which design you like. What do you want your word cloud to look like? Select the suited sketch from the represented collection.

To find a suitable design, you can use a filter or search by name. To filter you should select one or more appropriate tags. If you want to exclude a collection with a specific tag from your selection, click on the tag again.

To better view the design, increase the sketch by clicking on it.

Some sketches are presented in several options. Go to the next option by clicking on the image or using the «forward» / «backward» pointers.

Click the «Select» button if you like the sketch. It will become the basis of your picture of the words. If you don’t like this sketch, just close the window to pick up something else. The selected sketch will be highlighted with a green line.

Adding words
After you have selected the design of the sketch, it’s time to adding words from which your cloud will consist. Go to the second stage «Add desired words».

The words you add at this stage will be repeated in the picture in random order, forming a picture with the selected sketch. You can use only one word, then the image will consist only of its repetitions. But the more words you add, the better the picture you will get. Remember that words are the colors of your picture, make it brighter!
You can make a list of your own words and phrases, add selected text or use prepared collections.
Your list of words or prepared text
If you want to use your own words, enter them into the field «Your own words» and add to the list by clicking the mouse button or the «Enter» key. Each line should contain just one word or phrase.

If you have a ready list of words, you can add it entirely to the field «Prepared text».

Click the «Import» button and paste the previously copied text into the appeared window. The words in the text can be separated by spaces or commas, the editor will automatically break the text into words that will become the basis for your word cloud.

You can create a picture using any text from a book or an article the same way.
You can also add text by simply copying the link and pasting it into a special editor field. Please, note that all words on the page by this link will be used.

Prepared collections
You can use the collections, which we have prepared specially for you. To do this, choose one or more collections to add to your word cloud.

If you know exactly what collection you need — use the search. Also you can use filters by types, tags and language for selection of collections.
All prepared collections are divided into two types — icons and words. You can make your picture more informal if you add several collections of icon-emoji.

To select collections by tags, select one or more suitable topics. You can add a collection of words to the cloud of words in different languages. Switching the language is at the bottom of the filter panel.

Tick off all suitable collections to add them to your word cloud.

You can add any words and phrases that are not included in the collection. All words will be placed randomly in the picture, but the words from your list have priority over the words from the collections.

Final view, change and save the picture
It’s time to see what picture you created. To do this, go to the third stage «Evaluate the result».

Click on the button «Update design», and you will see your word cloud.

To change the random order of words in the picture — update the design once more. All words will be arranged in a different order, and the cloud will be different.
To add or remove some words, go back to the stage of adding words, make the necessary changes, then re-evaluate the result. You can also change the design of the sketch by returning to the first stage, the selected words will be saved.
If you like finished picture you should save the changes. You can also undo changes and return to the previous version, create a copy or delete the design.

Save the changes to download the finished word cloud. Also you should select the license format based on your usage goals. A personal license allows you to download a low-resolution image for free and allows to use the picture only for personal non-commercial purposes. Standard and advanced licenses allow you to download high-resolution images and use pictures for any purpose, including commercial. More information about licenses and prices you can find on the «Pricing» page.
After selecting the license format, click «Download». If you choose a paid license, you will see information about image payment. The download will begin after your payment confirmation. If the credits on the current balance are not enough, you will be offered options for buying a credits.

If you choose a free license, download will start automatically.

After you have downloaded the image, you can use it according to the purchased license. We hope that you liked the WordCloud.pro service and you come for new ideas and beautiful word clouds again!
Will I be charged to use the website?
Our website is absolutely free and you can use it as many times as you want. There are no free trial uses, after which you will have to pay for using our services. We won’t charge you anything.
What does the line spacing option do?
Line spacing allows you to select the spaces between your words in the word cloud. The more the number the larger is the gap between the words. It is recommended that if there are fewer words you use more line spacing to make the word cloud look better.
Can I skip some words that I don’t want in my word cloud?
Yes, we provide you an option called Ignoring words, where you can ignore the words that you don’t want to get included in the word cloud.
Which Windows versions does make wordcloudmaker support?
Our website is completely web-based and therefore provides cross-platform support. This means that our tool supports all versions of Windows. It not only works on Windows operating system, but can work on any other operating system, that supports a browser.
Does it support both Android and iOS platforms?
Yes, our website works on browser, and therefore supports both iOS and Android platforms
Will I have to create an account to use wordcloudmaker?
Our website does not require you to sign up or create an account. The platform is absolutely free and you can check as many files as you want.
Can I choose the colors for my wordle?
Yes, Wordle maker provides you with 9 color options which you can choose depending on your need. You get various options like Autumn, Citrus, Breeze, with various color options, making it easier for you to customize your word cloud.
Is there a limit for words in word cloud maker?
No, there is no limit for words in word cloud maker. You can enter as many words as you want on word cloud maker. Once you enter the words, you can select the color, line spacing, mode and shape of the output.
Will my files get uploaded?
Our website does not send any files to server. You only have to select your file from your laptop/PC/mobile and the results will be displayed instantly.
Is it safe to use?
Wordcloudmaker is 100% safe to use and does not save your files. No data is uploaded and hence all your files are safe with you. In case you refresh the browser, you will have to reupload the folders, for the process to take place since, files are not saved on our website.
What will the results display?
Once you type in the words or select your file, Makewordcloud will process the file and generate the word cloud. You can enter as many words as you want on word cloud maker. Once you enter the words, you can select the color, line spacing, mode and shape of the output.
How long will it take to upload my file?
Since our website does not upload any files, it will not take any time. You only have to select your file from your laptop/PC/mobile and the results will be displayed instantly.
I refreshed the browser by mistake. What do I do?
Since our website does not use any servers, and does not store your data, the file that you have uploaded, will not be saved. You need to reupload the file to crop it.
Will my uploaded files be saved on the server?
All processing is done on your browser, and no files are transferred to the server. Hence your files are 100% safe.
Can I download the output after generation?
Yes, you can dowload the output after generating your word cloud. Just click on the download option on the top right corner of your screen, and the result will be downloaded.
In which file format will the output get downloaded?
The output will be downloaded in PNG format, i.e., image format, which you can use in your designs, documents or to just share with friends.