Summary
This article explains how to use the Mail Merge feature in Microsoft Word to create and to print form letters by using data from a Microsoft Excel worksheet.
When you use the Word Mail Merge feature, Word merges a main document with a recipient list to generate a set of output documents:
-
The main document contains the basic text that is the same in all of the output documents. It may contain a letterhead, text, and instructions in merge fields for inserting text (such as recipient names and addresses) that vary from one output document to another.
-
The recipient list is a database that contains the data that is to be merged into the output documents. For example, the recipient list is a Microsoft Access database file or an Excel worksheet.
This database is typically a list of names, addresses, phone numbers, and other categories of personal information.
-
The output documents are the result of the mail merge. The text in an output document can be the same in all output documents, but you can apply formatting to specific documents.
Step 1: Set Up the Excel Data File
Before you proceed with the Mail Merge Wizard, make sure that your Excel worksheet is well structured for this purpose. Note the following requirements for the data table:
-
The first row should contain field names for each column — for example, Title, Salutation, First Name, Middle Name, Last Name, Address1, and Address2.
-
Each field name should be unique.
-
Each row should provide information about a particular item. For example, in a mailing list, each row might include information about a particular recipient.
-
The table should contain no blank rows.
Create your Excel data file, and then arrange it by using the fields that you want to use for your letter, as shown in the following sample data file.
After you create your Excel data file, save it, and then close the data file.
For more information about how to create a mail-merge address list, click the following article number to view the article in the Microsoft Knowledge Base:
294688 How to design and set up a mail merge address list in Word 2002 and in later versions of Word
Step 2: Set Up the Main Document
-
In Microsoft Office Word 2003 and in earlier versions of Word, point to Letters and Mailings on the Tools menu, and then click Mail Merge Wizard.
In Microsoft Office Word 2007, click Start Mail Merge in the Start Mail Merge group on the Mailings tab, and then click Step by Step by Mail Merge Wizard.
-
Under Select document type, click Letters.
The active document becomes the main document. The main document contains the text and graphics that are the same for each version of the merged document. For example, the return address and the salutation in a form letter are the same for each version.
-
Click Next: Starting document.
-
Use one of the following methods:
-
Start with the document that is currently shown in the document window. To do this, click Use the current document.
You can then either type the letter in the document window or wait until the wizard prompts you to do so in a later step.
-
Start with a template. To do this, follow these steps:
-
Click Start from a template.
-
Click Select template.
-
On the Mail Merge tab, select the template that you want in the Select Template dialog box, and then click OK.
-
-
Start with an existing document. To do this, follow these steps:
-
Click Start from existing document.
-
In the Start from existing box, select the document that you want, and then click Open.
-
If you do not see the document, click More files, and then click Open. In the Open dialog box, locate the document that you want, and then click Open.
-
-
-
Click Next: Select recipients.
Step 3: Specify the Excel Data Source
-
Under Select recipients, click Use an existing list.
-
Click Browse.
-
In the Select Data Source dialog box, locate and then click the Excel worksheet that you want to use.
By default, Word opens the «My Data Sources» folder.
-
Click Open.
-
If your Excel worksheet contains information about multiple tabs, select the tab that contains the information that you want, and then click OK.
-
All entries in the data source appear in the Mail Merge Recipients dialog box. Here, you can refine the list of recipients to include in the merge.
Step 4: Select the Recipients
-
In the Mail Merge Recipients dialog box, select the recipients that you want to include. To do this, use one of the following methods:
-
Use the check boxes to designate recipients.
This method is most useful if the list is short. Click to select the check boxes next to the recipients that you want to include, and then click to clear the check boxes next to the recipients that you want to exclude.
Note If you know that you want to include most of the list in your merge, click Select All, and then click to clear particular records. Similarly, if you want to include only a few records in the list, click Clear All, and then select the records that you want.
-
Sort items in the list.
This method is useful if you want to see items in alphabetical or numeric order. Click the column heading of the element by which you want to sort. For example, if you want to display the list alphabetically by last name, click the Last Name column heading.
-
Filter items in the list.
This method is useful if the list contains records that you know you do not want to see or include in the merge. After you have filtered the list, you can use the check boxes to include and exclude records, as described earlier. To filter the list, follow these steps:
-
Click the arrow next to the column heading of the element that you want to filter by.
-
Click any of the following:
-
(Blanks): This option displays all the records in which the corresponding field is blank.
-
(Nonblanks): This option displays all the records in which the corresponding field contains information.
-
If the data source contains records that share the same information, and if there are 10 or fewer unique values in the column, you can filter by specific information. For example, if there are multiple addresses that list Australia as the country, you can filter by Australia.
-
-
-
The Mail Merge Recipients dialog box displays only the designated records. To display all the records again, click (All).
Notes
-
For advanced sorting and filtering, click the arrow next to any column name, and then click (Advanced). Use the Filter Records and Sort Records tabs to set up the sorting or filtering query that you want.
-
If you have installed address validation software, click Validate in the Mail Merge Recipients dialog box to validate your recipients’ addresses.
-
-
Click OK to return to the Mail Merge Wizard.
Word uses the recipients that you designated for the merge.
-
Click Next: Write your letter.
Step 5: Complete the Letter and Add Merge Fields
If you have not already done this, type the text that you want to appear in every form letter in the main document.
Insert Merge Fields
Insert merge fields where you want to merge names, addresses, and other information from the data source. To insert merge fields, follow these steps:
-
In the main document, click where you want to insert the field.
-
Insert any of the following:
-
Address block with name, address, and other information:
-
Click Address block.
-
In the Insert Address Block dialog box, select the address elements that you want to include and the formats that you want, and then click OK. For help on an option, click the question mark, and then click the option.
-
For help on an option, click the question mark, and then click the option. If the Match Fields dialog box appears, Word may be unable to find some of the information it needs for the address block. Click the arrow next to
(not available), and then select the field from your data source that corresponds to the field required for the mail merge.
-
-
Greeting line:
-
Click Greeting line.
-
Select the greeting line format that includes the salutation, name format, and following punctuation.
-
Select the text that you want to appear in the cases in which Word cannot interpret the recipient’s name. For example, Word cannot interpret the name when the data source contains no first or last name for a recipient, but only a company name.
-
Click OK.
-
If the Match Fields dialog box appears, Word may be unable to find some of the information it needs for the greeting line. Click the arrow next to (not available), and then select the field from your data source that corresponds to the field required for the mail merge.
-
-
Other fields of information:
-
Click More items.
-
Use one of the following methods:
-
Click Address Fields to select from address fields that will automatically map to corresponding fields in your data source, even if the data source’s fields do not have the same name as your fields.
-
Click Database Fields to select from fields that always take data directly from a column in a database.
-
-
In the Fields box, click the field that you want.
-
Click Insert, and then click Close.
-
If the Match Fields dialog box appears, Word may not be able to find some of the information it needs to insert the field. Click the arrow next to (not available), and then select the field from your data source that corresponds to the field required for the mail merge.
Note If you insert a field from the Database Fields list, and if you later switch to a data source that does not have a column with the same name, Word cannot insert that field information into the merged document.
-
-
Electronic postage:
To add electronic postage, you must first install an electronic postage program, such as one that you can purchase from a third-party provider on the Web. To use electronic postage, follow these steps:
-
Click Electronic postage.
If you do not have an electronic postage program installed, Word prompts you to install one, and offers to connect to the following Microsoft Office Web site:
Print Online Postage
http://office.microsoft.com/services/service.aspx?sid=2.4 -
Insert the postage according to the program’s instructions.
-
-
To add electronic postage, you must first install an electronic postage program, such as one that you can purchase from a third-party provider on the Web. To use electronic postage, follow these steps:Postal bar code: You must select a letter or envelope type that supports the POSTNET bar code. To use the Postal bar code, follow these steps:
-
Click Postal Bar Code.
-
In the Insert Postal Bar Code dialog box, select the appropriate address fields.
Note The Postal Bar Code option appears only if you are using the U.S. language version of Word.
-
Repeat steps a and b for all the fields that you want to insert. NOTES:
-
You cannot type merge field characters (» «) or insert them by using the Symbol command on the Insert menu.
-
If the merge fields appear inside braces, such as { MERGEFIELD City }, Word is displaying field codes instead of field results. This does not affect the merge, but if you want to display the results instead, right-click the field code, and then click Toggle Field Codes on the shortcut menu.
-
For example, by using the sample database shown earlier, your letter might contain the AddressBlock and GreetingLine fields, and therefore your first page appears similar to the following:
February 26, 2002
AddressBlock
GreetingLine
Type your letter here.
Sincerely,
Type your name here
-
Note You can also use the Mail Merge toolbar to insert merge fields, work with your mail-merge main document, or run a mail merge. To display the Mail Merge toolbar, point to Letters and Mailings on the Tools menu, and then click Show Mail Merge Toolbar.
The Mail Merge toolbar provides additional commands that are not included in the Mail Merge Wizard task panes. For example, you can use the Insert Word Field menu on the Mail Merge toolbar to insert Word fields for controlling the merge process. For example, you can insert an IF field that inserts text only if a particular merge field has a specified value.
Alternatively, you can click Check For Errors to make Word run the mail merge and report any errors that are contained in the main document.
-
Change the Format of the Merged Data
To format merged data, you must format the merge fields in the main document. Do not format the data in the data source, because its formatting is not retained when you merge the data into the document. To change the format of the merged data, follow these steps:
-
In the main document, select the field that contains the information that you want to format, including the enclosing merge field characters (<< >>).
-
In Word 2003 and in earlier versions of Word, click Font on the Format menu, and then select the options that you want.
In Word 2007, click the option that you want in the Theme Fonts box in the Font group on the Home tab.
Format by Using Field Codes
To control other aspects of formatting, press ALT+F9 to display field codes, and then add switches to the merge fields. When you work with fields, a switch is a special instruction that causes a specific action to occur. Generally, a switch is added to a field to modify a result.
Examples of how to use switches are as follows:
-
To display the number 34987.89 as $34,987.89, add the Numeric Picture switch (#).
-
To print client names in uppercase letters, add the Format switch (*).
-
To make sure that the merged information has the same font and point size that you apply to the merge field, add the Charformat switch (*).
Step 6: Save the Document
After you have completed the main document and inserted all the merge fields, make sure that you save the document before proceeding. To do this, follow these steps:
-
In Word 2003 and in earlier versions of Word, click Save As on the File menu.
In Word 2007, click the Microsoft Office Button, and then click Save As.
-
Name the document, and then click Save.
-
Click Next: Preview your letters.
Step 7: Preview the Letters and Fine-Tune the Recipient List
When the wizard displays the «Step 5 Mail Merge» task pane, the wizard replaces each of the merge fields in the main document that has the actual text from the first entry of the recipient list.Therefore, you can see how your first output document will look.
For example, if you were to continue to use the sample database shown earlier, the first page should resemble the following page after you click Next: Preview your letters:
February 26, 2002
Andrew Fuller
908 W. Capital Way
Tacoma 98401
Dear Andrew Fuller,
Type your letter here.
Sincerely,
Type your name here To preview additional entries, use one of the following methods:
-
To preview the items in order, click the left or right arrow buttons.
-
To locate and preview a specific item, click Find a recipient, and then enter the search criteria in the Find Entry dialog box.
Fine-tune the recipient list if you want. To do this, use one of the following methods:
-
To exclude a particular recipient from the merge operation, click Exclude this recipient.
-
To change the list of recipients, click Edit recipient list, and then make your changes in the Mail Merge Recipients dialog box.
Step 8: Complete the Merge
To complete the merge, use any of the following methods.
Personalize Individual Letters
To personalize individual items, you actually complete the merge, and then edit the information that you want in the resulting merged document. To do this, follow these steps:
-
Click Edit individual letters.
-
In the Merge to New Document dialog box, select the records that you want to merge.
-
Click OK.
Word creates and opens a new merged document. Your main document also remains open, and you can switch back to it if you want to change all the documents.
-
Scroll to the information that you want to edit, and then make your changes.
-
Print or save the document just as you would any regular document.
Print the Letters
To print the letters, use one of the following methods:
-
If you personalized the items and if the merged document is active, follow these steps:
-
In Word 2003 and in earlier versions of Word, click Print on the File menu.
In Word 2007, click the Microsoft Office Button, and then click Print.
-
Select the options that you want.
-
-
If you want to print directly from the Mail Merge Wizard, follow these steps:
-
In Step 6 of the Mail Merge Wizard (Complete the merge), click Print.
-
In the Merge to Printer dialog box, use one of the following methods, and then click OK:
-
To print all the documents, click All.
-
To print the document that you see in the document window, click Current record.
-
To print a range of documents, click From, and then type the record numbers in the From and To boxes.
-
-
In the Print dialog box, select the options that you want.
-
Save the Merged Letters for Later Use
If you want to edit merged letters or to save them for later use, you can collect them into a single document. To do this, follow these steps:
-
Click Edit individual letters.
-
In the Merge to a New Document dialog box, use one of the following methods, and then click OK:
-
To merge all the documents, click All.
-
To merge only the document that you see in the document window, click Current record.
-
To merge a range of documents, click From, and then type the record numbers in the From and To boxes.
-
-
Word opens a single new document that contains all the individual letters. You can then save the document for later use, just as you would any regular document.
References
For more information, click the following article numbers to view the articles in the Microsoft Knowledge Base:
318117 How to use addresses from an Excel worksheet to create labels in Word
318115 How to create a form letter by using information from an Access database in Word 2002
318112 How to use addresses from an Access 2002 database to create labels in Word 2002
294686 How to use mail merge to create a list sorted by category in Word 2002 and in later versions of Word
290408 Frequently asked questions about mail merge in Word 2002
294688 How to design and set up a mail merge address list in Word 2002 and in later versions of Word
294693 How to use mail merge to create a directory in Word 2002 and in later versions of Word
294683 How to use mail merge to create form letters in Word 2002 and in later versions of Word
Download Article
Download Article
This wikiHow teaches you how to use the «Mail Merge» feature in Microsoft Word. Mail Merge allows you to use a spreadsheet of contact information to assign automatically a different address, name, or other piece of information to each copy of a document. This is useful when personalizing newsletters or statements, as you don’t have to write by hand each person’s name or address at the top of each document.
Things You Should Know
- Create your contact sheet in Microsoft Excel. Add your headers beginning in column «A1» and moving right. Save your file and remember your save location.
- Open Word and go to Blank document > Mailings > Select Recipients > Use an Existing List…. Choose your Excel sheet.
- Go to the spot you want to insert contact information and click Insert Merge Field. Select the desired headers from your Excel document. Click Finish & Merge.
-
1
Open Microsoft Excel. Microsoft Excel’s app icon resembles a white «X» on a dark-green background. The Excel «New» page will open.
- If you already have a contact sheet in Excel, skip ahead to importing the Excel contacts instead.
-
2
Click Blank workbook. It’s in the upper-left side of the «New» page. This will open a new, blank Excel document.
Advertisement
-
3
Add your contact headers. Starting in cell A1 and moving right from there, enter the following headers:[1]
- FirstName — Your contacts’ first names will go in this column (cell A1).
- LastName — Your contacts’ last names will go in this column (cell B1).
- Tel — Your contacts’ phone numbers will go in this column (cell C1).
- StreetAddress — Your contacts’ street addresses will go in this column (cell D1).
- City — Your contacts’ cities of residence will go in this column (cell E1).
- State — Your contacts’ states of residence will go in this column (cell F1).
- ZIP — Your contacts’ ZIP codes will go in this column (cell G1).
- Email — Your contacts’ email addresses will go in this column (cell H1).
-
4
Enter your contacts’ information. Starting in column A, cell 2, begin entering the contact information for each of the people for whom you want to generate a mail merge.
- Make sure that this information is accurate before proceeding.
-
5
Save your document. To do so:
- Windows — Click File, click Save As, double-click This PC, click a save location on the left side of the window, type the document’s name into the «File name» text box, and click Save.
- Mac — Click File, click Save As…, enter the document’s name in the «Save As» field, select a save location by clicking the «Where» box and clicking a folder, and click Save.
- Keep in mind your selected save location—you’ll need to find the Excel spreadsheet later.
-
6
Close Excel. Click the X in the upper-right corner of Excel (Windows) or the red circle in the upper-left corner (Mac). You can now proceed to creating the mail merge in Microsoft Word.
Advertisement
-
1
Open Microsoft Word. The Word app icon looks like a white «W» on a dark-blue background. As with Excel, the «New» page will open.
- If you have an existing Microsoft Word document into which you want to import the Excel contacts, you’ll instead double-click it to open it and skip the next step.
-
2
Click Blank document. It’s a white box in the upper-left side of the page. A blank Microsoft Word document will open.
-
3
Click the Mailings tab. This tab is at the top of the Microsoft Word window. A toolbar will appear just below the row of tabs here.
-
4
Click Select Recipients. It’s in the «Start Mail Merge» section of the Mailings toolbar. Doing so prompts a drop-down menu.
-
5
Click Use an Existing List…. You’ll find this option in the drop-down menu. A new window will open.
- If you ever want to use Outlook contacts instead, you can select the Choose from Outlook Contacts option in the drop-down menu.
- You can also type a temporary list of contact information into Word by selecting the Type a New List option. This is useful when you only need to create a handful of contacts’ information.
-
6
Select your Microsoft Excel contact sheet. On the left side of the window, click the folder in which you saved the Excel sheet, then click the Excel sheet to select it.
-
7
Click Open. It’s in the bottom-right corner of the window.
-
8
Confirm the decision. Click the Excel sheet’s name in the pop-up window, then click OK at the bottom of the window. Your Excel sheet will be selected as the location from which your contacts will load.
- Make sure that the «First row of data contains column headers» checkbox at the bottom of this window is checked.
Advertisement
-
1
Go to the place in which you want to insert contact information. Find the place where you want to insert contact information (e.g., the top of the document) and click it to place the cursor there.
-
2
Click Insert Merge Field. It’s an option in the «Write & Insert Fields» section of the Mailings tab. A drop-down menu will appear.
- You may have to click the Mailings tab again before doing this.
-
3
Select a type of information. In the drop-down menu, click the name of one of the headers from your Excel document to insert it.
- For example, you would click FirstName in the drop-down menu if you wanted to insert a tag for contacts’ first names.
-
4
Add other information where necessary. This might include contacts’ addresses, last names, phone numbers, and so on.
-
5
Click Finish & Merge. It’s in the far-right side of the Mailings tab’s toolbar. This prompts a drop-down menu.
-
6
Select a merge option. Click one of the following:
- Edit Individual Documents — Opens each recipient’s document, allowing you to personalize further the documents.
- Print Documents… — Allows you to print out a copy of your document for each individual listed in your contact sheet.
- Send Email Messages… — Allows you to send out the documents as emails. The contacts’ email addresses will be selected as the destination email addresses.
-
7
Follow the on-screen instructions. Depending on your selected option, you will have an additional form to review (for example, if you selected Email, you’ll have to enter a subject and then click OK). Doing so will complete the mail merge process.
Advertisement
Add New Question
-
Question
How can I perform a mail merge on MS word?
Go to the Mailings tab and click on the tab «Start Mail Merge;» it should be on the left side of the Mailings panel. Then select recipients and either make a list, or find a file if you already made one by choosing «Use existing list.» Type your letter, and press «Add merge field» whenever you need to use something from your list. Make any additional changes needed, and press «Finish and merge,» and then print if you need to.
-
Question
If I don’t use Outlook can I still send a mail merge?
Yes. You can either copy and paste, print, or click finish and merge and then go to settings regarding where you want to send your documents, and choose your destination. Also you can save to somewhere else in your computer and send it from there.
-
Question
What are the features of Microsoft Excel?
There are hundreds of formulas available to use, as well as a tool for copying data entries, continuing data patterns (1,2,3, or Monday, Tuesday, Wednesday, etc.). Also you can convert data into charts or import and edit files from other programs.
See more answers
Ask a Question
200 characters left
Include your email address to get a message when this question is answered.
Submit
Advertisement
-
Mail Merge is especially useful when creating invoices, statements, reports, or any other form of mass-produced documentation for which you have to include personal names, addresses, or so on.
Thanks for submitting a tip for review!
Advertisement
-
Always double-check your contact information before importing it to Word. Failing to do so could result in anything from using the wrong name to sending documents to the wrong email addresses.
Advertisement
About This Article
Article SummaryX
1. Open a blank document in Microsoft Word.
2. Click the Mailings tab.
3. Click Select Recipients, then click Use an Existing List….
4. Select your Mail Merge file, then click Open.
5. Click OK when prompted.
Did this summary help you?
Thanks to all authors for creating a page that has been read 1,393,031 times.
Is this article up to date?
Mail Merge is most often used to print or email form letters to multiple recipients. Using Mail Merge, you can easily customize form letters for individual recipients. Mail merge is also used to create envelopes or labels in bulk.
This feature works the same in all modern versions of Microsoft Word: 2010, 2013, and 2016.
- In a blank Microsoft Word document, click on the Mailings tab, and in the Start Mail Merge group, click Start Mail Merge.
- Click Step-by-Step Mail Merge Wizard.
- Select your document type. In this demo we will select Letters. Click Next: Starting document.
- Select the starting document. In this demo we will use the current (blank) document. Select Use the current document and then click Next: Select recipients.
- Note that selecting Start from existing document (which we are not doing in this demo) changes the view and gives you the option to choose your document. After you choose it, the Mail Merge Wizard reverts to Use the current document.
- Select recipients. In this demo we will create a new list, so select Type a new list and then click Create.
- Write the letter and add custom fields.
- Press Enter on your keyboard and click Greeting line… to enter a greeting.
- In the Insert Greeting Line dialog box, choose the greeting line format by clicking the drop-down arrows and selecting the options of your choice, and then click OK.
- Note that the address block and greeting line are surrounded by chevrons (« »). Write a short letter and click Next: Preview your letters.
Using the mail merge feature in Microsoft Word is the best way to send bulk emails or letters with a personal touch to anyone.
Using mail merge, you can personalize bulk emails and letters by using placeholders. All you need is a database of contacts and a template for emails or letters to them.
In this article, we will show you how to create a Microsoft Word mail merge using an Excel database. The steps are taken from Microsoft Word and Excel 2016, but the process is the same for all editions.
How to Do a Mail Merge From Excel
The mail merge uses data sources from a database and places them in respective placeholders to personalize your bulk emails. These databases could be anything from the below-mentioned list:
1. Open your Microsoft Excel spreadsheet.
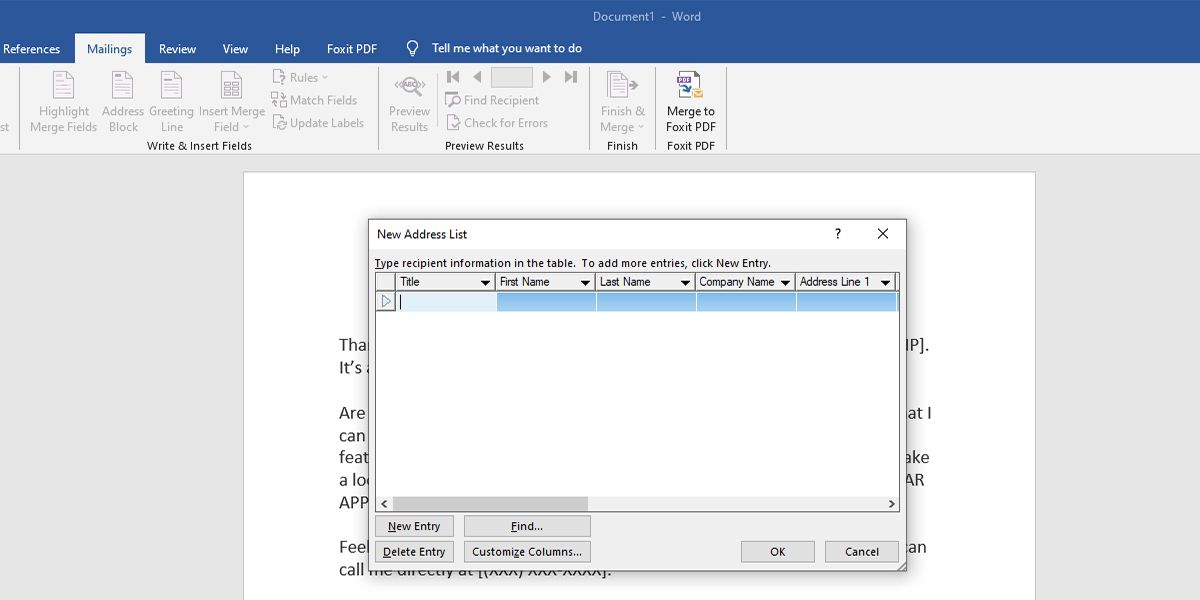
2. Create a manual contact list in Word when using mail merge.
3. Choose contacts data from the Microsoft Outlook app.
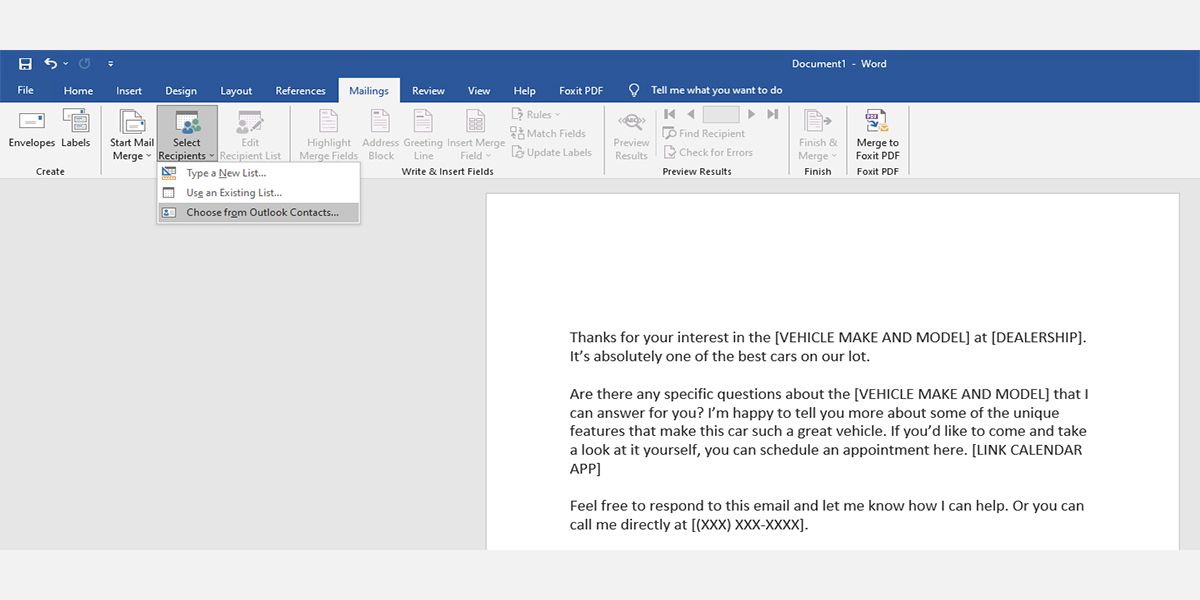
You have two sets of options to choose from:
- Gmail contacts in a compatible file.
- Microsoft SQL Server.
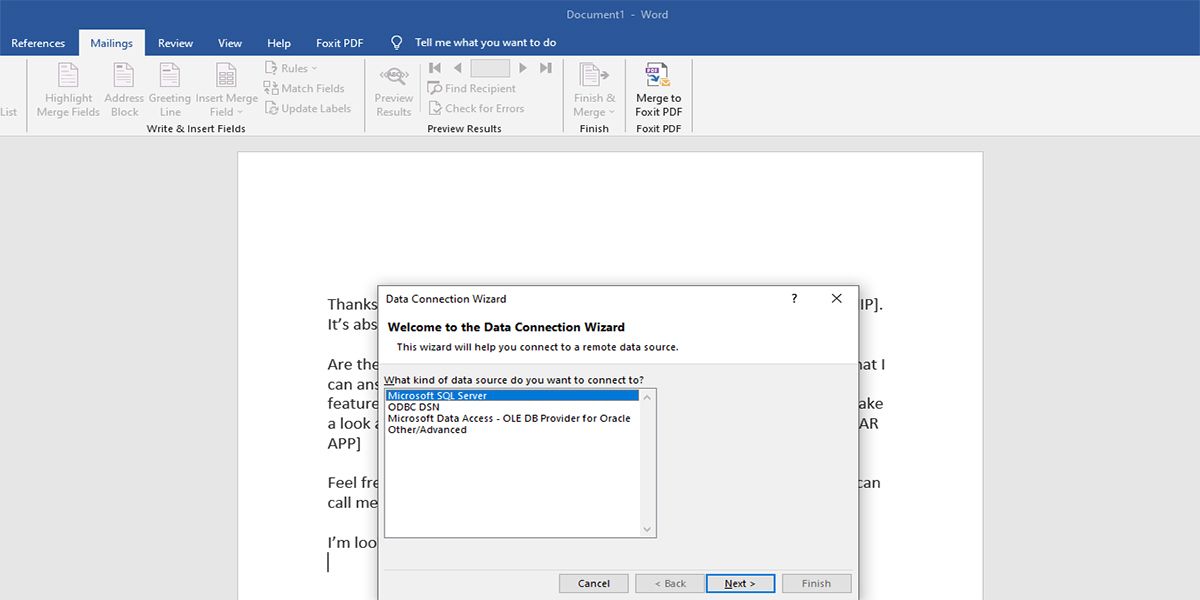
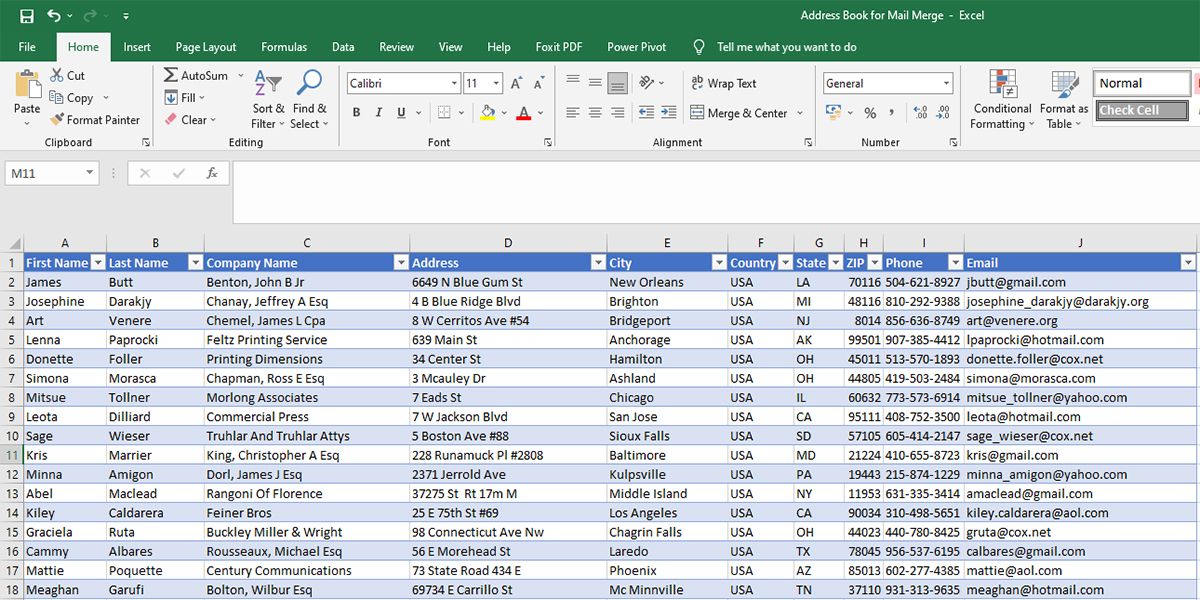
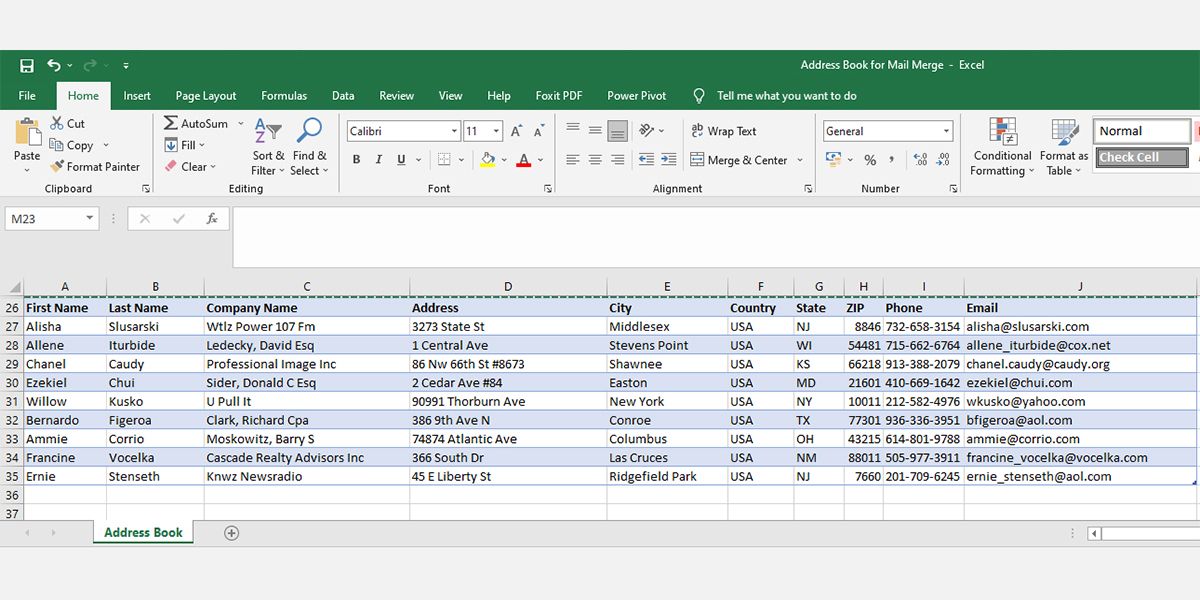
Microsoft Excel workbook database is most preferred when you need to use mail merge in Word. For mail merge, you’ll use Excel to create a database that Word will use later on.
If you don’t have an Excel file with contact details, you may use this sample Excel file for trial purposes.
To avoid any inconsistencies in your bulk emails or letters, you need to tweak your Excel file as mentioned below:
- The first row should only have column headers starting from cell A1. Word will use these column headers as Merge Fields when you use Microsoft Word mail merge.
- You should edit the column headers to match the placeholder names that you’ll be using in the email or letter template document.
- You need to ensure that the spreadsheet file contains contact data as one record per row pattern. For example, in the current tutorial, every available contact detail of the customer James Butt is accessible between cells A2 and J2.
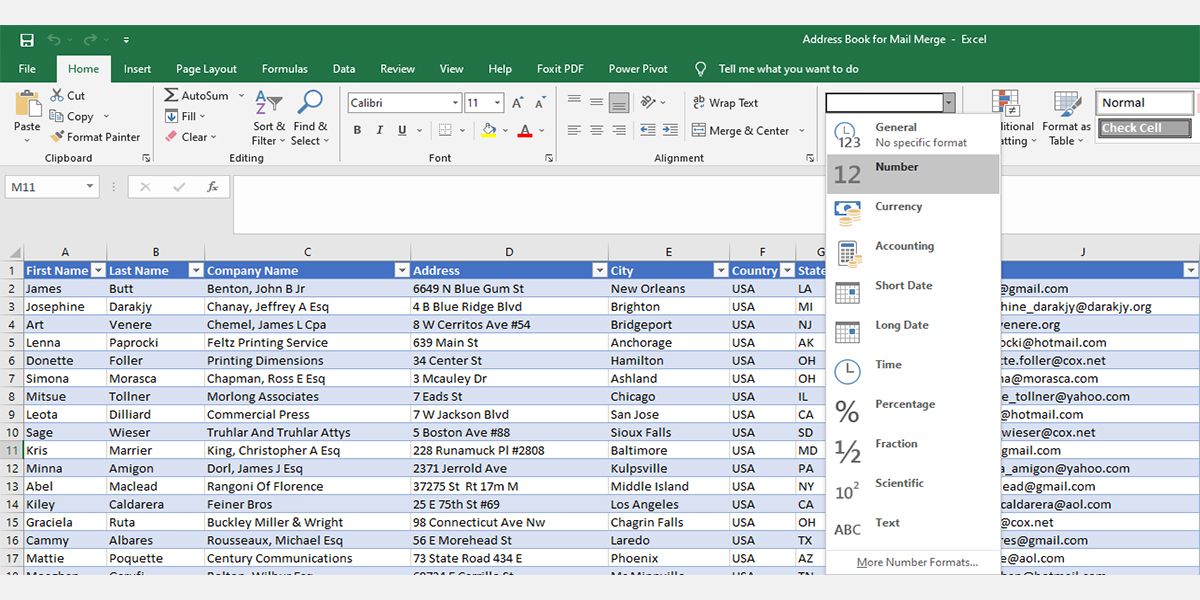
- Numeric data for any contact, like ZIP codes, discount percentages, mileages, currencies, etc., should be in the appropriate number format.
- To make any changes, select the cell or a range of cells that contains the numerics.
- In the Home tab, within the Ribbon, click the dropdown arrow besides General.
-
Make all additions before linking the mail merge Word document to the Excel database file. Once you make all the changes, save the Excel file.
- The Excel database file of your contacts should be present in the local storage of your computer.
- Ensure that all data are in the first sheet of the Excel workbook.
How to Do a Mail Merge in Word
After creating the database in Excel, you need to open the email or letter template that you want to send to many recipients. Follow the steps as outlined below:
1. On the Ribbon, click on the Mailings tab.
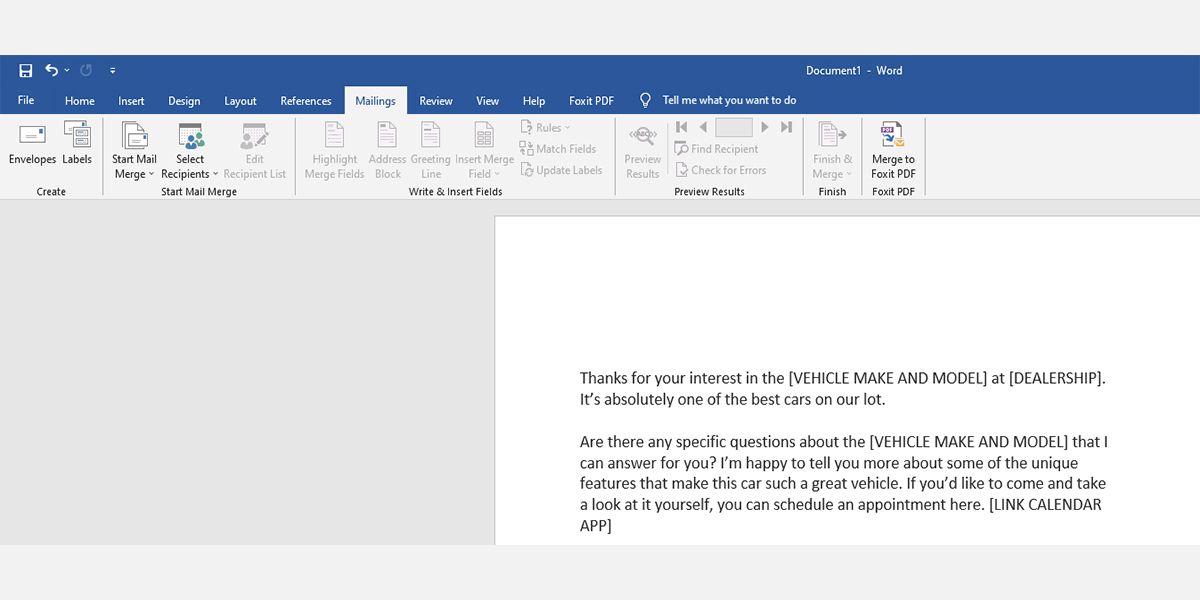
2. In the Start Mail Merge group, you’ll need to click on Start Mail Merge.
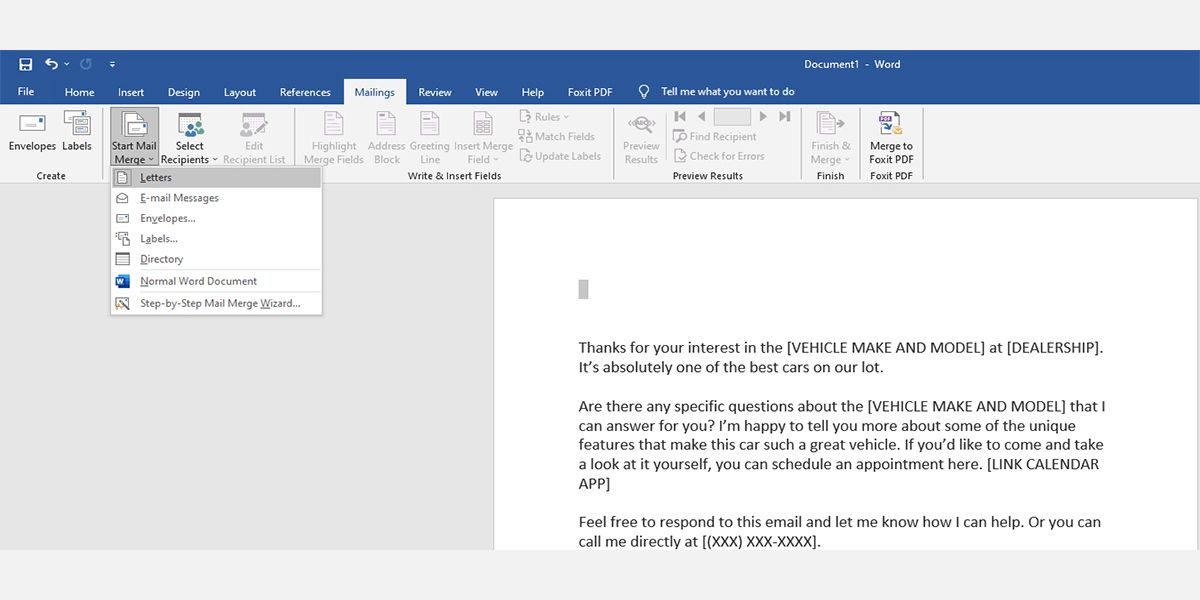
3. You’ll see six mail merge document types. Click on Letters or E-mail Messages.
4. On the Start Mail Merge group, click on Select Recipients. You’ll see options such as Type a New List, Use an Existing List, and Choose from Outlook Contacts.
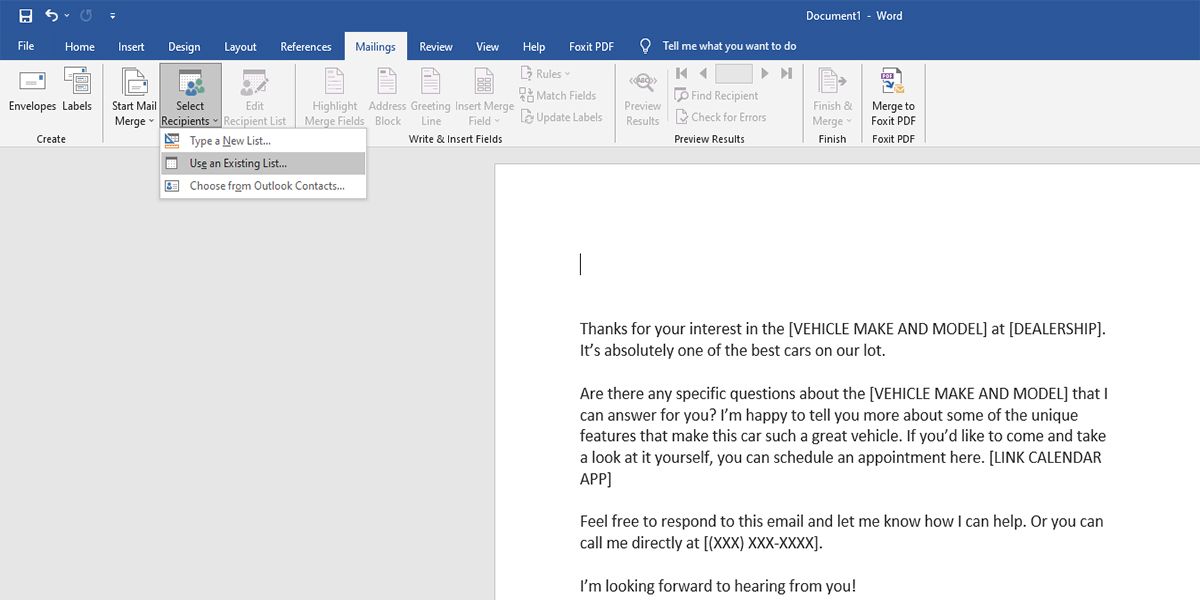
5. You can choose any of the above three options depending on how you want to link the contacts list to the template letter. In this tutorial, let’s select Use an Existing List to utilize the Excel database that you created or downloaded earlier.
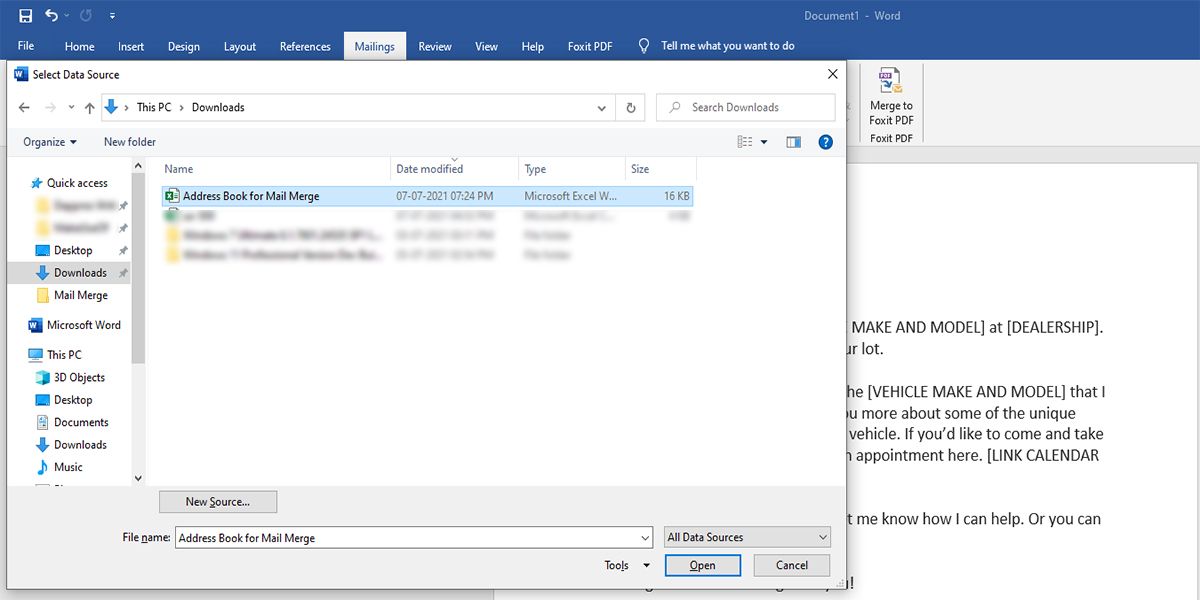
6. On the Select Data Source dialogue box, locate the folder where the Excel database file is available. Once you find the file, select it and then click on Open to load the database into Word’s mail merge.
7. You’ll see the Select Table dialogue box. Exit the box by clicking OK without making any changes in the dialogue box.
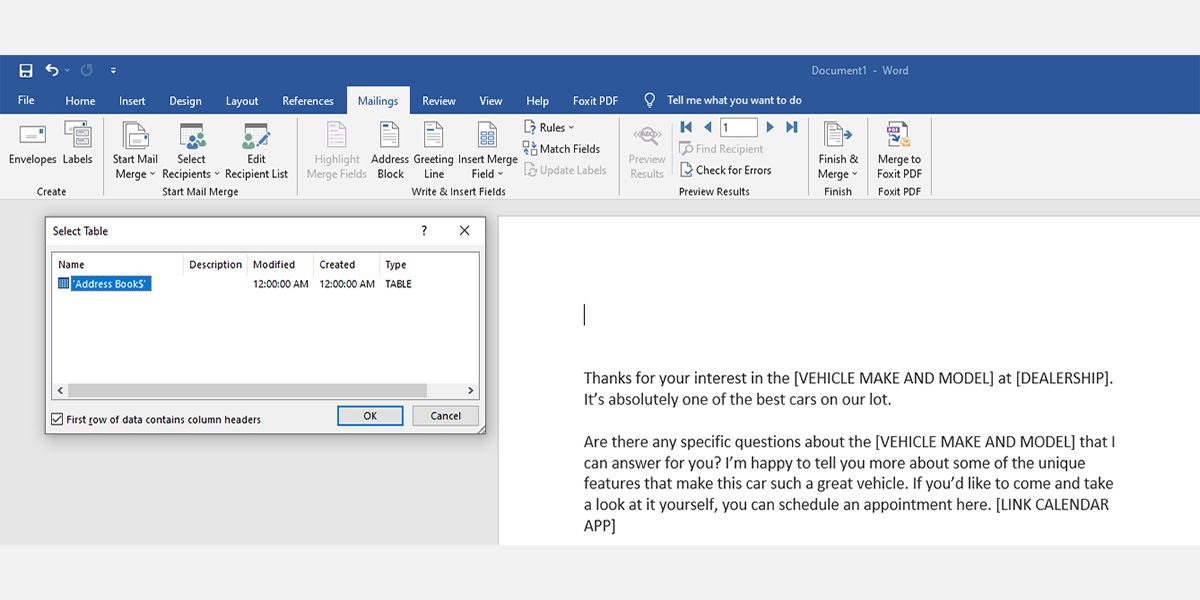
8. That’s Great! You’ve successfully linked the source data with the Word mail merge program.
9. Word will automatically match database column headers with merge field items. To ensure appropriate matching, go to Write & Insert Fields group on the Mailings tab of the Ribbon and then click on Match Fields.
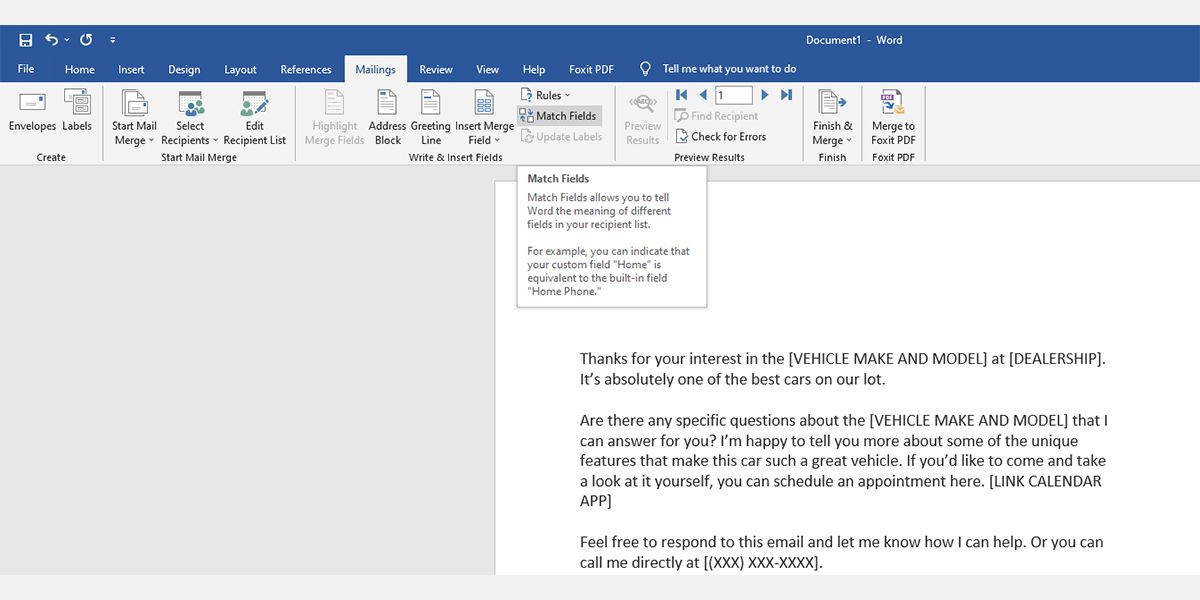
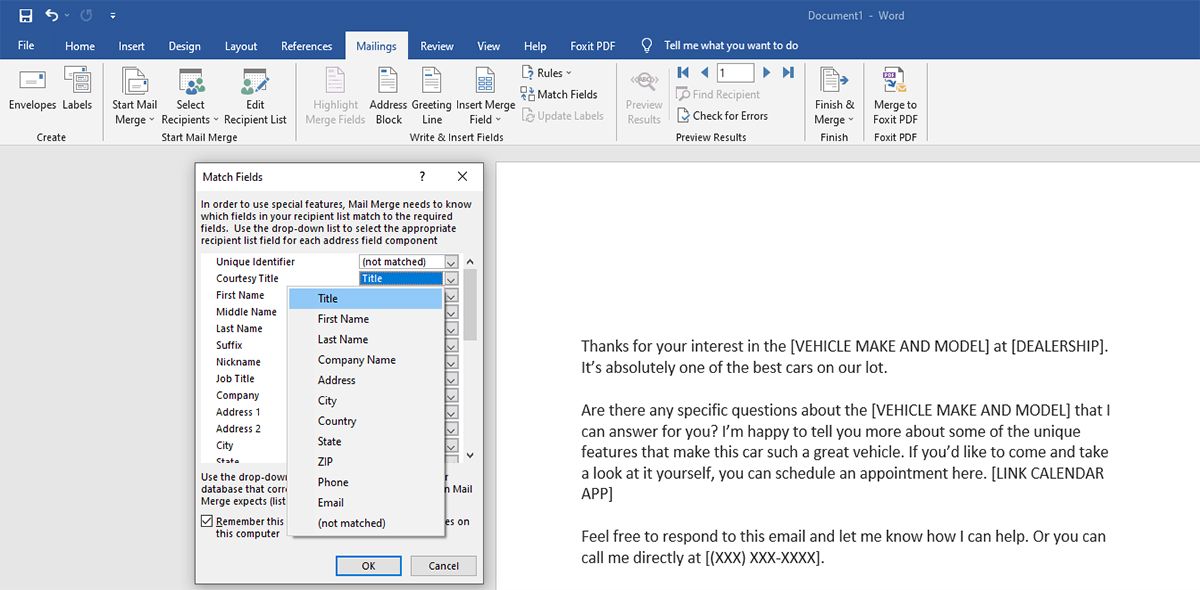
10. Match Fields dialogue box will show up. On the left side column, you’ll see the merge field items. On the right side, you’ll find matching data from the linked Excel database.
11. It’ll be the same if you use other source data like Outlook contacts or exported contacts from Gmail. Ensure that there are no mismatches by scrolling through the list. Click on OK to close.
12. On your template letter, put the cursor ahead of the first letter and press Enter a few times to make some space above the letter body.
13. Place the cursor on the top of the document and then click on Address Block in the Write & Insert Fields group on the Mailings tab of the Ribbon.
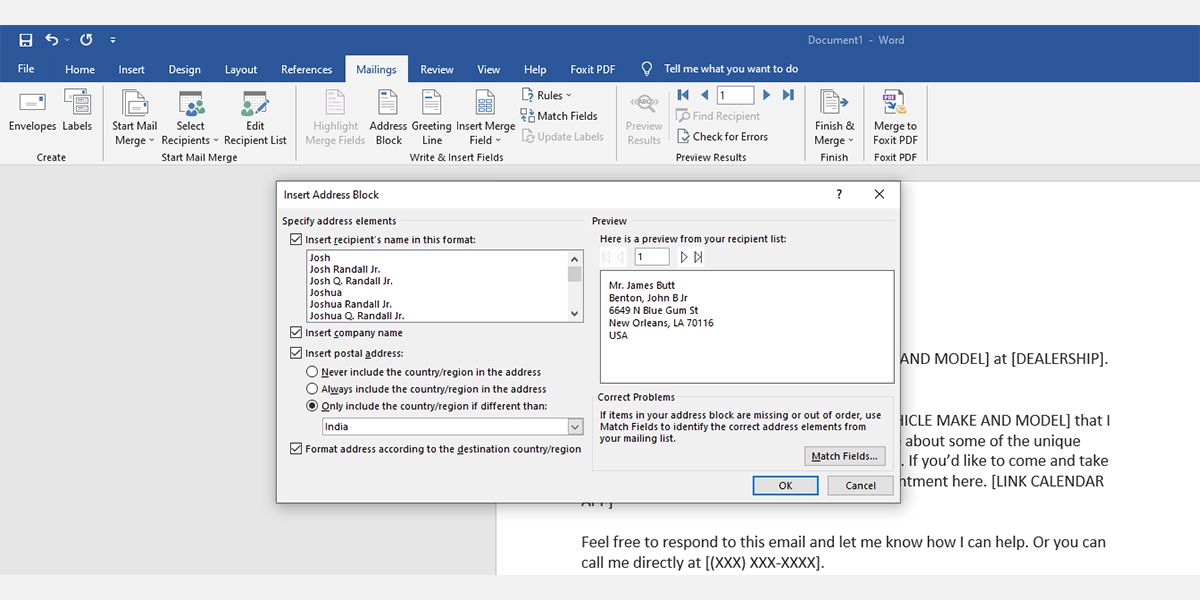
14. On the left side of the Insert Address Block dialogue box, you can choose the name, company name, address, country, etc., formatting options. On the right side, you’ll see a preview of the address block.
15. You can use the Match Fields options to rectify any input data mismatch. Click OK to add AddressBlock within chevrons.
16. Next, click the Greeting Line in the Write & Insert Fields group after AddressBlock, giving it a line spacing.
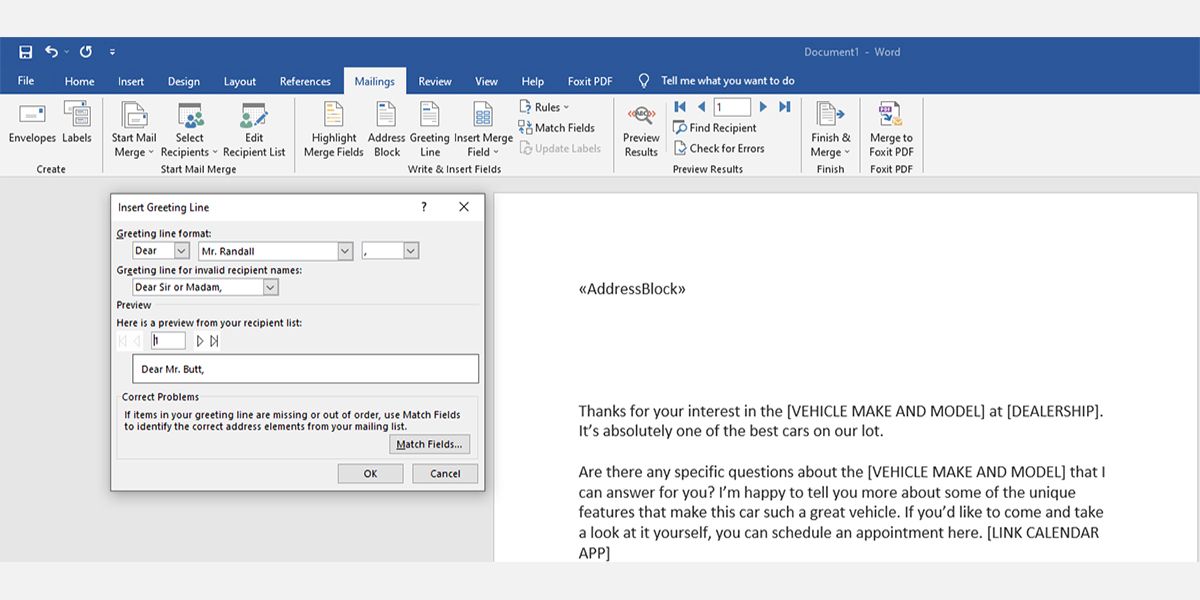
17. The Insert Greeting Line dialogue box will appear. You may make the changes as you desire and then click OK. The GreetingLine within chevrons will show up in the letter.
18. You may click on the Preview Results command on the Ribbon to see how the letter looks.
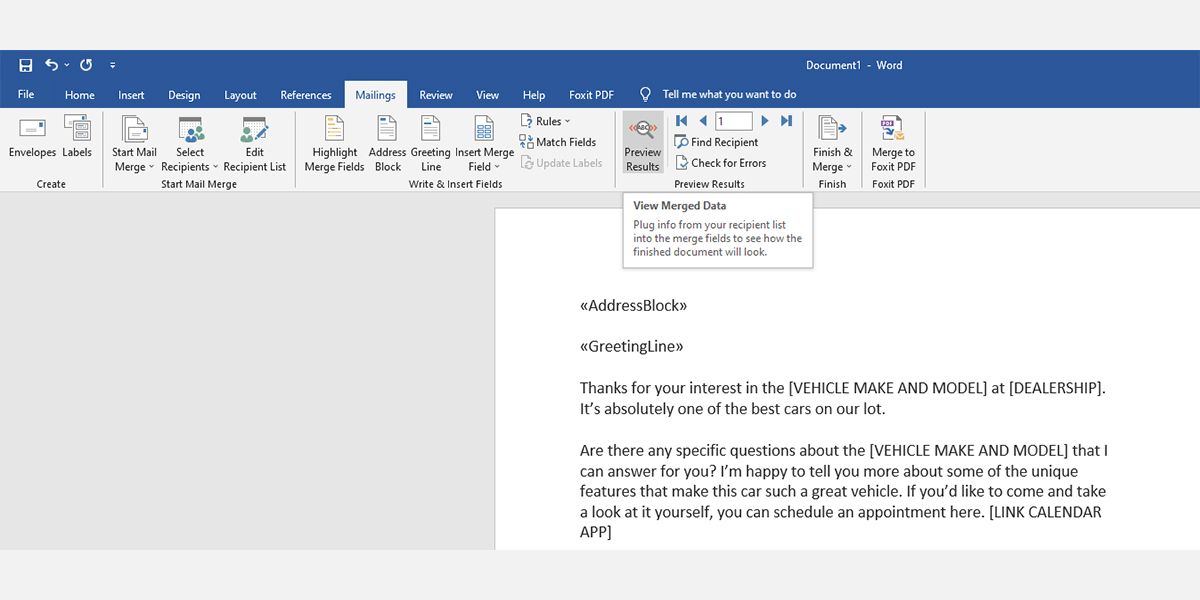
19. You can also add custom merge fields apart from AddressBlock and GreetingLine. Let’s say you want to add Vehicle Make and Model within the letter body.
20. To do that, open the Excel database file linked to mail merge and add the Vehicle Make and Model column header. Enter vehicle details and save the Excel file.
21. Now, go to the mail merge Word document and repeat steps four, five, and six.
22. Now, select any word or a few words within the letter body and then click on Insert Merge Field on the Write & Insert Fields group.
23. On the Insert Merge Field box, choose Database Fields, and then select Vehicle Make and Model. Click on Insert to add the custom merge field.
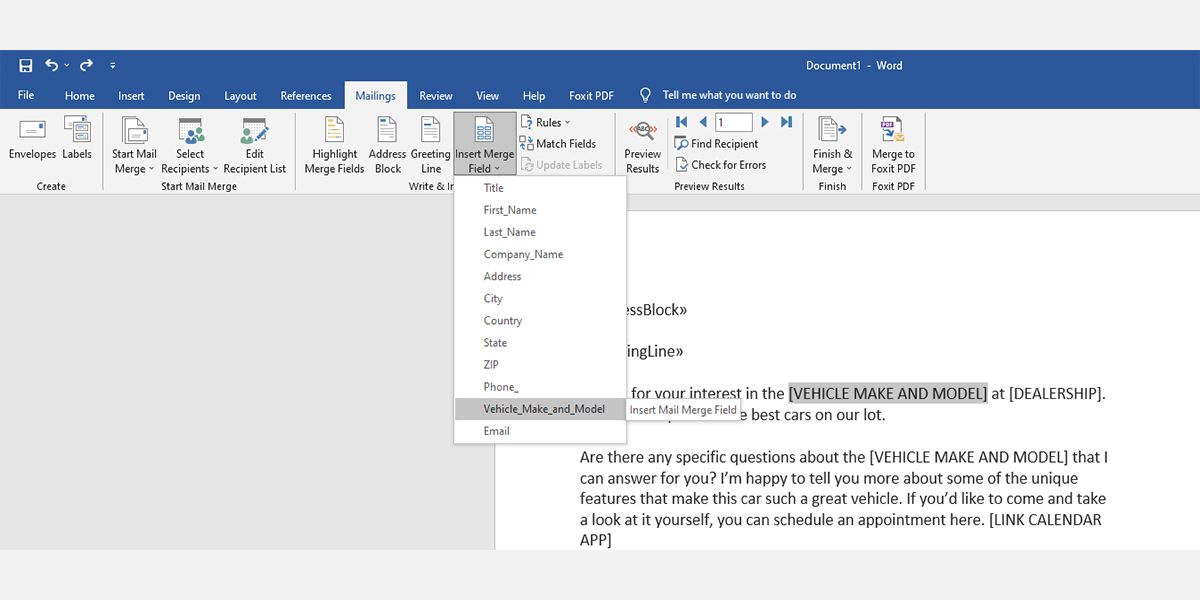
24. This is how you can add as many variable placeholders as you want to customize each letter or email that you send. Microsoft Word mail merge will automatically match data to the name of the recipients.
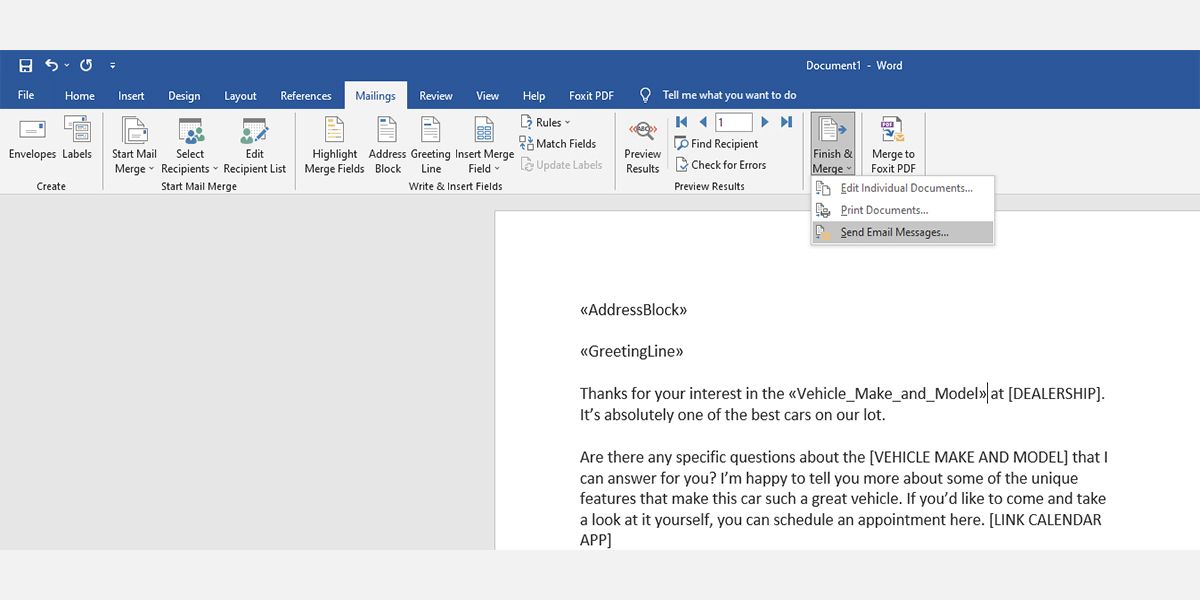
25. On the Ribbon, click on Finish & Merge command and then choose Print Documents or Send Email Messages. You may also click on Edit Individual Documents to proofread your emails or letters before sending them.
Use Mail Merge to Boost Email Productivity
Now you know how to do a mail merge using Microsoft Word and Excel. Use mail merge to send tailored emails faster and set up a good rapport with your professional or personal contacts. Keep using Word to make your professional and personal life easier than before.
Do you have a long list of names and addresses that you need to send letters to? The Mail Merge process combines a Word document with a data source to quickly create letters that feel personal.
| Mail Merge Definitions | |
|---|---|
| Starting Document | (Main Document) A document that contains the information that is the same for each merged document. The starting document contains the field names for the variable information, like the names and addresses that will be inserted. |
| Data Source or Recipients List | A file that contains the information to be inserted into the main document during a mail merge. For example, it has records containing the names and addresses of the people a mail merge letter is sent to. Excel spreadsheets, Access databases, or Word document tables are good examples of data sources. |
| Field | A data category that stores a specific piece of information. For example, the field «LastName» would only contain people’s last names. |
| Record | A record is an entire set of data fields that relate to a single thing or person. For example, a single record would include a person’s first and last names, address, phone number, and date of birth. |
| Merge Field | A merge field is where you want to insert the information from a data source into a main document. Merge fields appear with chevrons (« ») around them. An example would be: Dear «FirstName». |
| Address Block | A group of merge fields that make up an address in a mail merge document. For example, a single address is made up of a name, street address, city, state, and zip code. Word can automatically insert all the appropriate address fields at once, so you don’t have to insert the five or six merge fields yourself. |
| Greeting Line | A group of merge fields that make up the greeting line of a mail merge document, such as “Dear Mr. McDonald”. Word can automatically insert all the appropriate greeting text, title, and name fields at once, so you don’t have to insert the text and required merge fields yourself. |
| Header Row | Data source information is stored in a table. The first row of the table is the header row and contains the field names for the data source. For example, FirstName, LastName, and Address are header rows. |
Set up and Choose Document Type
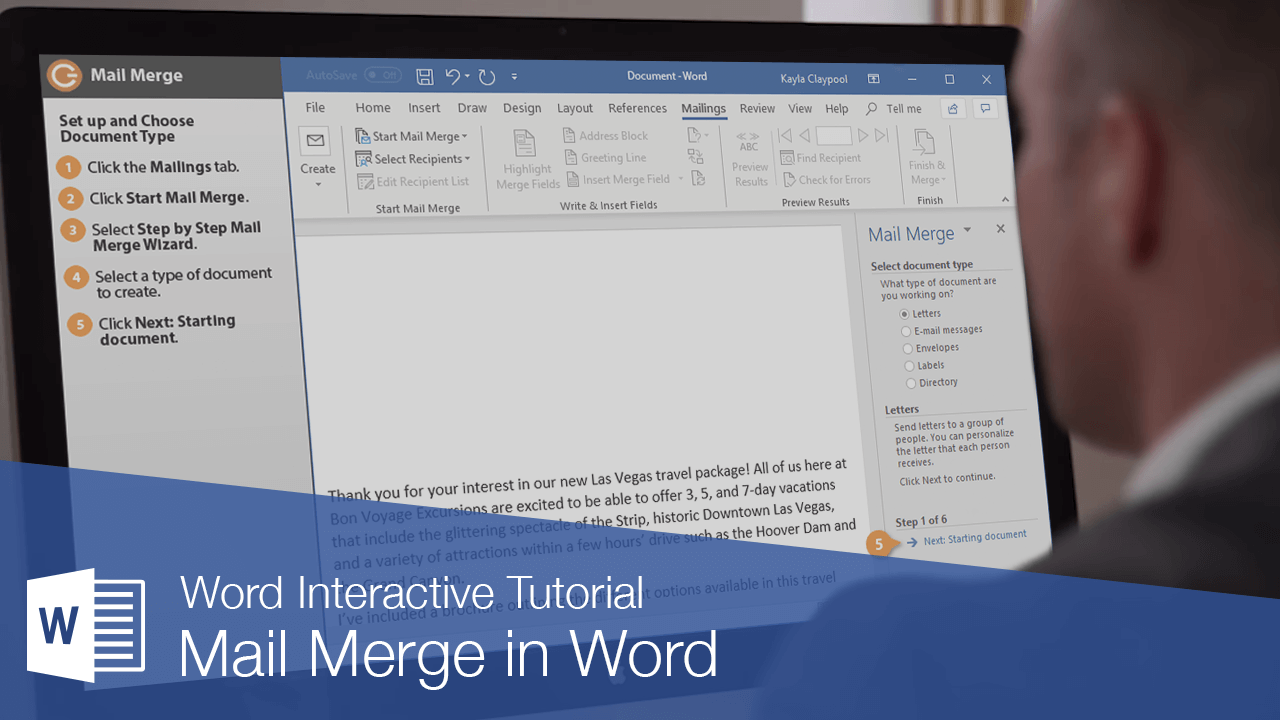
To begin the mail merge process, you first need to choose what sort of document you want to create.
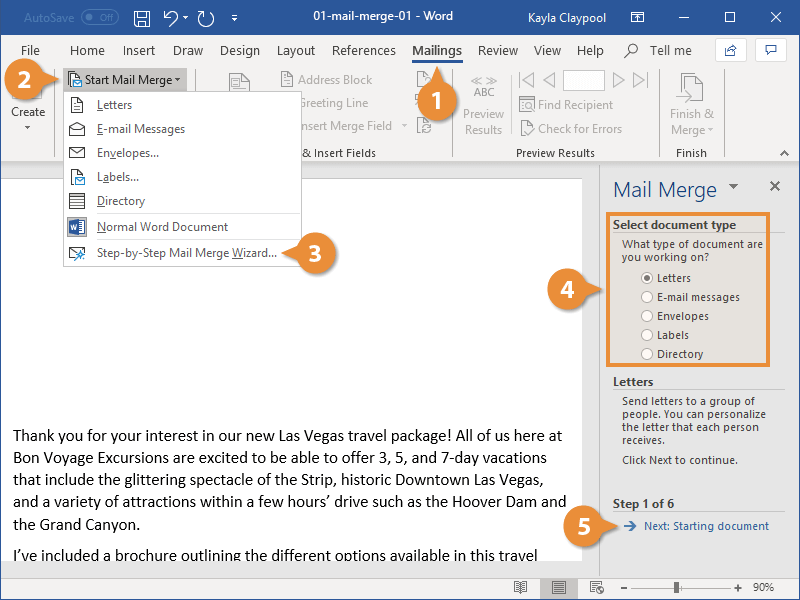
- Click the Mailings tab.
- Click the Start Mail Merge button.
- Select Step-by-Step Mail Merge Wizard.
The Mail Merge pane appears on the right, ready to walk you through the mail merge.
- Select a type of document to create.
- Click Next: Starting document.
The Mail Merge wizard advances to the next step.
Select a Document
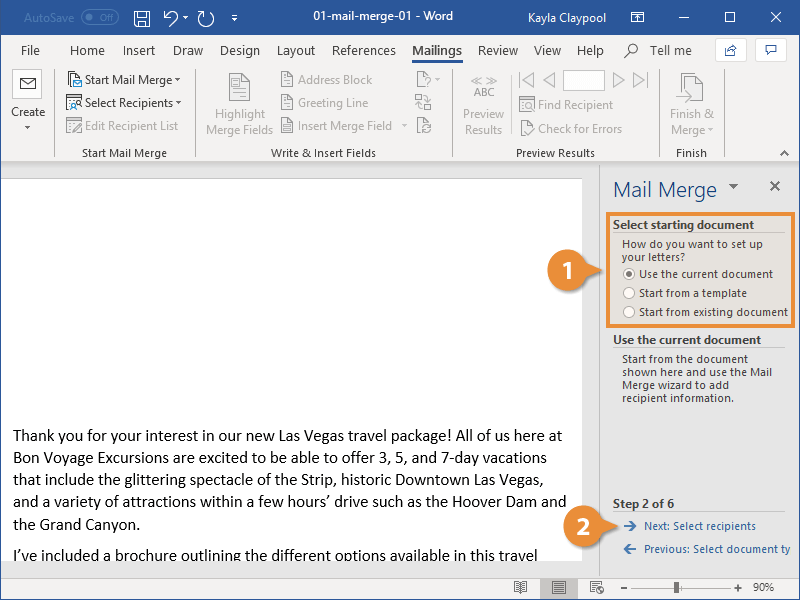
This next step is to select a starting document.
- Select a starting document.
You can use the current document as the basis for the mail merge, or you can select a template or existing document instead.
- Click Next: Select recipients.
The Mail Merge wizard moves on to step 3.
Select Recipients
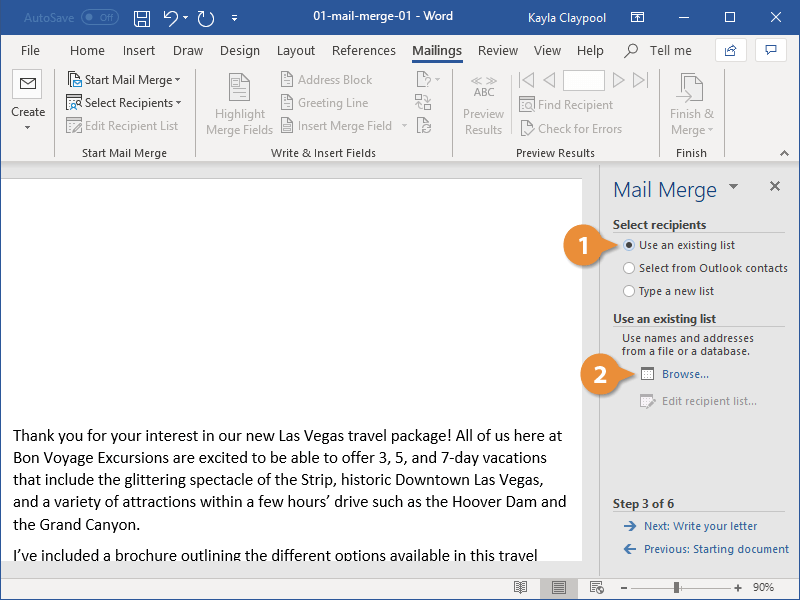
Now, you will need to choose where you’ll get your list of addresses from. This example uses an existing list from a database, but you can also select Outlook contacts or manually create your own list.
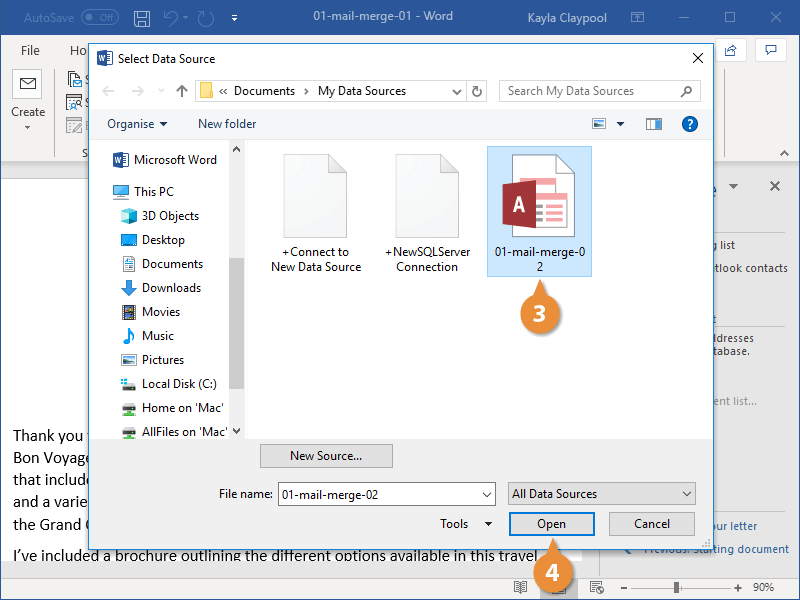
- Select Use an existing list.
- Click Browse.
- Select your data file.
A data file of mail merge recipients can be in a database file, an Excel spreadsheet, another Word document, or other types of data files.
- Click Open.
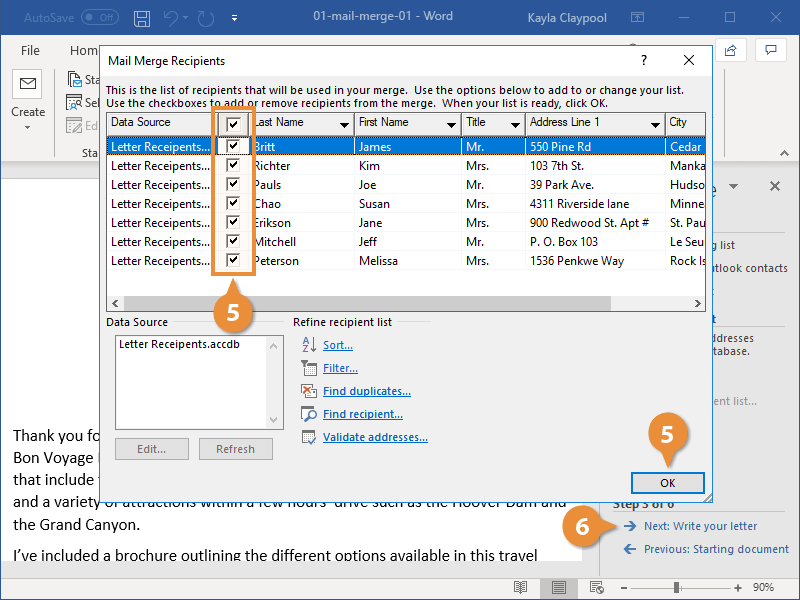
The Mail Merge Recipients dialog box displays the addresses that will be used. If you’re using an Excel spreadsheet as a data source, you may also be prompted to select a worksheet containing the addresses.
If there’s an address you don’t want to use, you can uncheck it.
- Make sure the right recipients are selected and click OK.
- Click Next: Write your letter.
The Mail Merge wizard moves on to step 4.
Write Your Letter
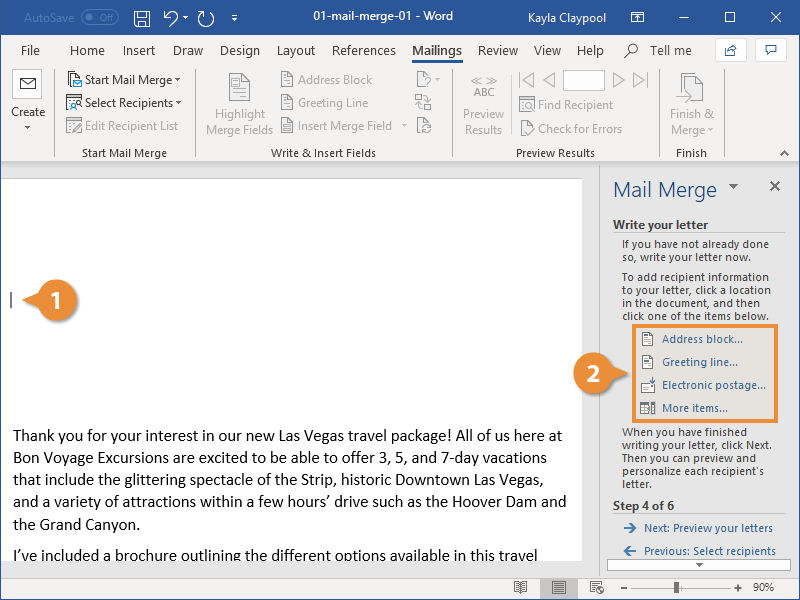
After the main document is set and the recipient list is connected and edited, you are ready to insert the merge fields in the document. The merge fields are placeholders in the document for unique information from the recipients list.
When you put a merge field in the main document, information from that field will appear for the document that is unique to that recipient.
- Click where you want the information.
- Select one of the placeholder options.
You can add merge fields from the wizard, or from the Write & Insert Fields group on the ribbon:
- Address Block: This is a combination of fields to insert the names and addresses of recipients.
- Greeting Line: This is a combination of fields to insert the recipient’s name in the greeting line.
- Insert Merge Field: When you click this button, a list of additional merge fields you can insert appears.
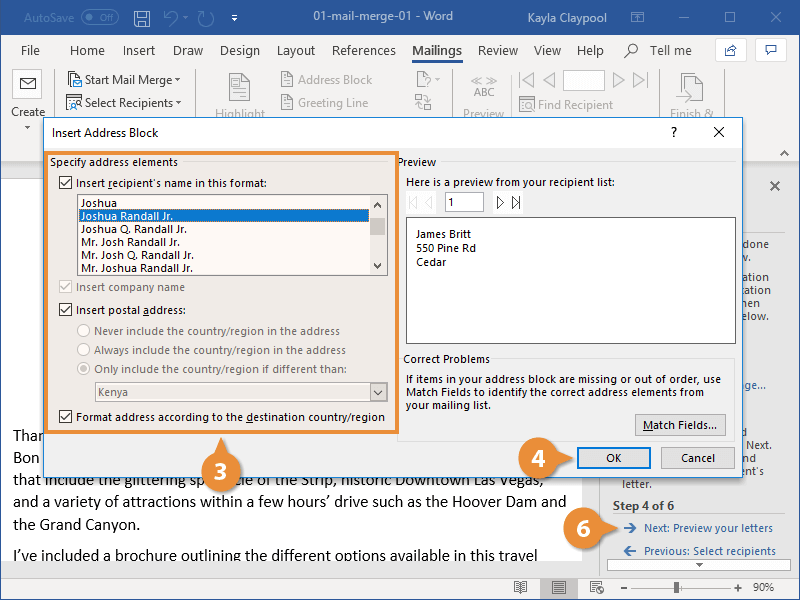
- Customize the placeholder.
- Click OK.
- (Optional) Repeat steps to add each merge field you want to include.
- Click Next: Preview your letters.
The Mail Merge wizard moves on to step 5.
Preview Your Mail Merge
Sometimes, it is helpful to see what the data will look like once it has been inserted into a document, instead of only viewing the merge field names.
You can easily preview how the mail merge will appear before finishing the mail merge. This is encouraged to make sure the results appear as you want them to.
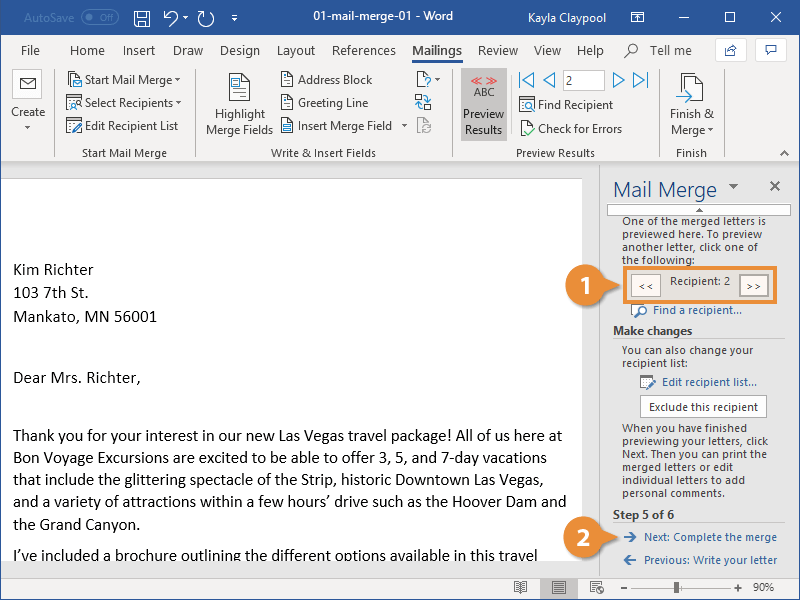
- Use the arrow buttons in the Mail Merge pane to preview each merged document.
You can also use the arrow buttons in the Preview Results group on the ribbon.
Click the Find Recipient button in the Preview Results group or in the Mail Merge pane to search for a specific recipient.
- Click Next: Complete the merge.
The Mail Merge wizard moves on to the final step.
Complete the Merge
Once you’ve added the list of recipients and filled out a document with merge fields, the last step is to finish the merge by making a separate version of the document for each recipient.
There are a couple of different ways you can finish the mail merge:
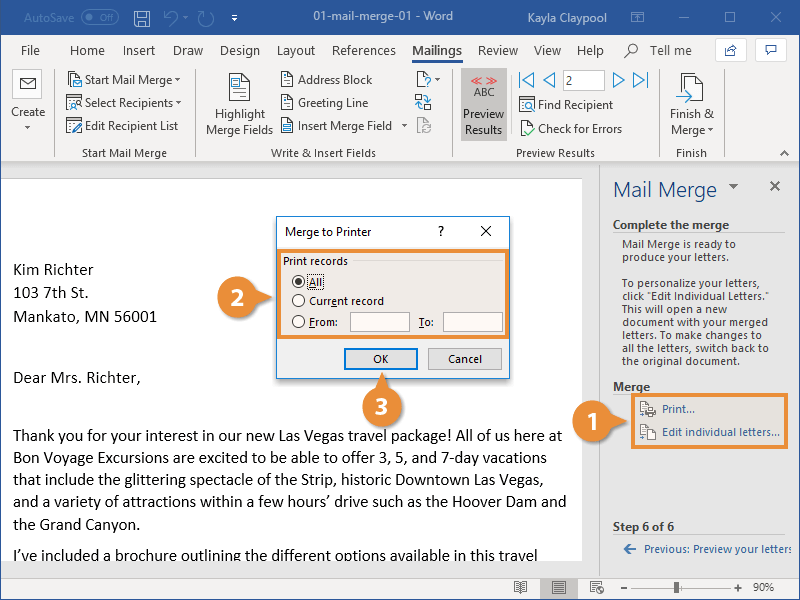
- Edit Individual Documents: Puts the results of the mail merge in a new document. You are free to edit the results of the mail merge and save and print them, just like any other document.
- Print Documents: Merges records and sends them directly to the printer.
- Select the option you want to use to finish the mail merge.
You can also click the Finish & Merge button on the ribbon and select a merge option there.
You’re also given the option to choose which records to merge. You can merge all the records in the list, only the currently displayed record, or specify a range.
- Select the records you want to merge.
- Click OK.
Word merges the main document and the information from the data source into a new Word document, or merges it and sends it to the printer, based on the option you chose.
FREE Quick Reference
Click to Download
Free to distribute with our compliments; we hope you will consider our paid training.


