
To delete a page that contains text, graphics, or empty paragraphs, select the content to delete, and press Delete. You can also do this:
-
Click or tap anywhere in the page you want to delete, press Ctrl+G.
-
In the Enter page number box, type page.
-
Press Enter on your keyboard, and then select Close.
-
Verify that a page of content is selected, and then press Delete on your keyboard.
-
Click or tap anywhere in the page you want to delete, press Option+⌘+G.
-
In the Enter page number box, type page.
-
Press Enter on your keyboard, and then select Close.
-
Verify that a page of content is selected, and then press Delete on your keyboard.
To remove blank pages in the middle or at the end of your document, see Delete a blank page.
Word includes a non-deleteable end-paragraph that sometimes gets pushed out to a new, blank page at the end of a document. The way to delete the page is to make the end-paragraph fit onto the preceding page. The most sure-fire way is to make the end-paragraph very small (1 point):
-
Press Ctrl+Shift+8 (⌘+8 on a Mac) to show paragraph marks.
-
Select the paragraph mark.
-
Select inside the Font size box, type 01, and then press Enter .

The paragraph now fits on the preceding page, removing the unwanted blank page.
-
Press Ctrl+Shift+8 again to hide the paragraph marks (⌘+8 on a Mac).
If that paragraph still doesn’t fit on the preceding page, you can make the bottom margin smaller (Layout tab > Margins > Custom Margins, and set the bottom margin to something small, like 0.3 inches).
Tip: If the paragraph mark has a square bullet next to it, the paragraph might have the Page break before option turned on. To turn it off, right-select the empty paragraph, select Paragraph Settings (Home tab), and on the Lines and Page Breaks tab of thedialog box, uncheck Page break before.
Convert to PDF
You can get rid of a trailing blank page by saving the document as a PDF, leaving out the last page.
-
Go to File > Save As, pick a place to save the file, and then choose PDF for the Save as type.
-
Select Options in the Save As dialog box.
-
Under Page range, choose Page(s), and then specify your non-blank pages. For example, if page 5 of your document is the blank page you can’t get rid of, specify pages from 1 to 4.
-
Select OK, and then select Save.

Page breaks tell Word where to start a new page. A manual page break might be making an unwanted blank page in your document.
-
To see manual page breaks, switch to showing paragraph marks:
Press Ctrl+Shift+8 (⌘+8 on a Mac).
-
Now you can select the page break and delete it.
Section break problems
In the middle of a document, deleting section breaks can cause formatting problems. In these cases, try changing the section break to one that doesn’t generate a new page. Here’s how:
-
Double select the section break.
-
On the Layout tab of the Page Setup dialog box, select the Section start drop down and select Continuous.
-
Select OK.
Odd, Even, and Next cause blank pages
Next Page, Odd Page, and Even Page section breaks may create a blank page in your document. If the blank page occurs at the end of your document and you have a section break there, place your cursor directly before the section break and press Delete.
Tip: To more easily find section breaks, try switching to Draft on the View tab.
If you’re using Microsoft Word, you don’t want blank pages appearing in the middle of your document, or extra pages at the end.
These extra pages could be caused by tables, hitting the ENTER key too many times, unnecessary section breaks, unintentional page breaks, extra paragraph markers, and more.
You don’t want your Word document to look unprofessional because of this quirk, so in this article I’ll show you how to delete blank and extra pages in Word.
I will be using Microsoft Office 2016 in this tutorial, but you can follow along with any version, as pretty much the same thing applies to all versions.
How to Delete a Blank Page in the Middle of a Word Document
If you are working with a large word document and you are about to present it or print it, it’s a good idea to check for blank pages and an extra final page.
To do this, press CTRL + SHIFT + 8, or go to the Home tab and click the paragraph icon.

This key combination displays paragraph markers (¶) at the end of every paragraph and each blank line – basically, whenever you hit the ENTER key, and at the beginning of the extra blank page.
To remove these extra pages, highlight the paragraph markers with your mouse or trackpad and hit the DELETE button. If one of the markers remains there, remove it with the BACKSPACE key.
If you have the patience, you can also remove the blank page(s) by going to the blank pages and hitting the BACKSPACE key until the paragraph markers disappear.
Step 1: To delete an extra blank page that might get added at the end of your document, click the View tab:

Step 2: Go to the Navigation Pane. This will display a sidebar containing 3 tabs – Headings, Pages, and Results. Click on Pages to display all the pages of the document in the sidebar.
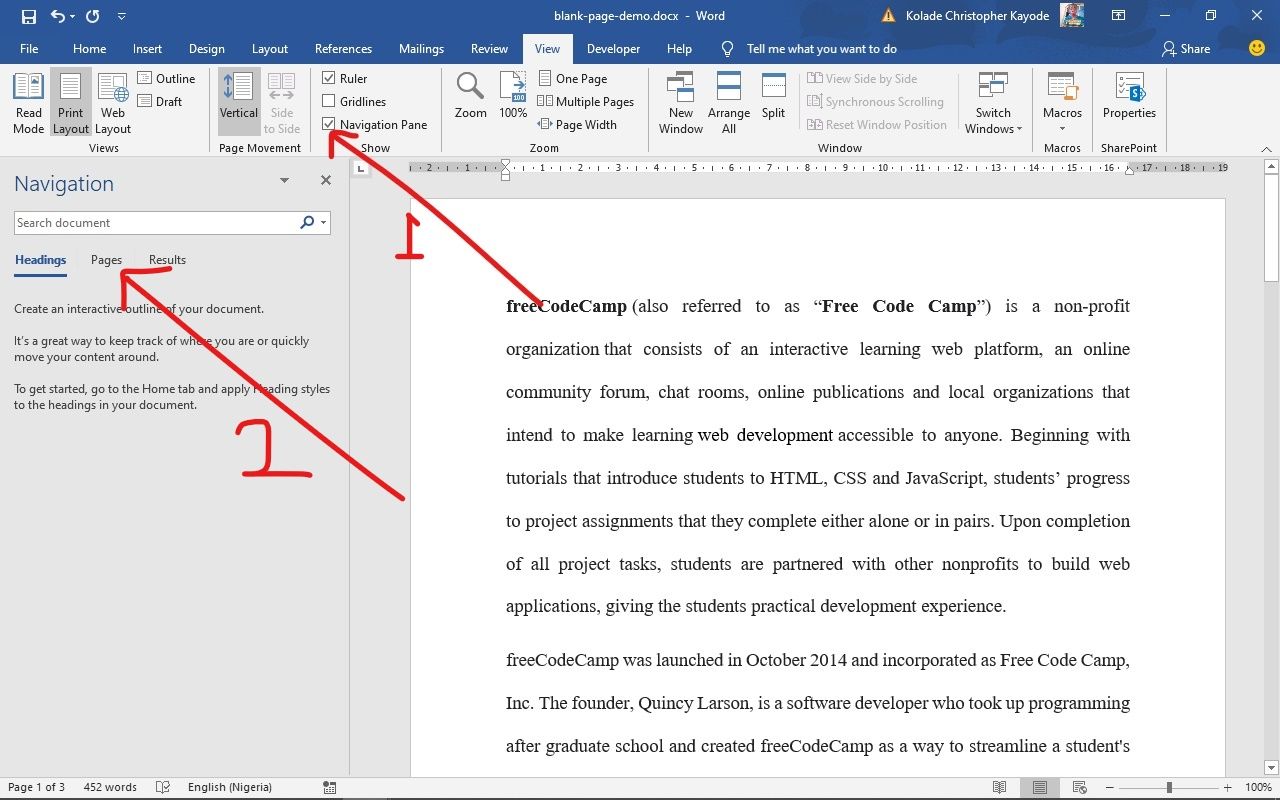
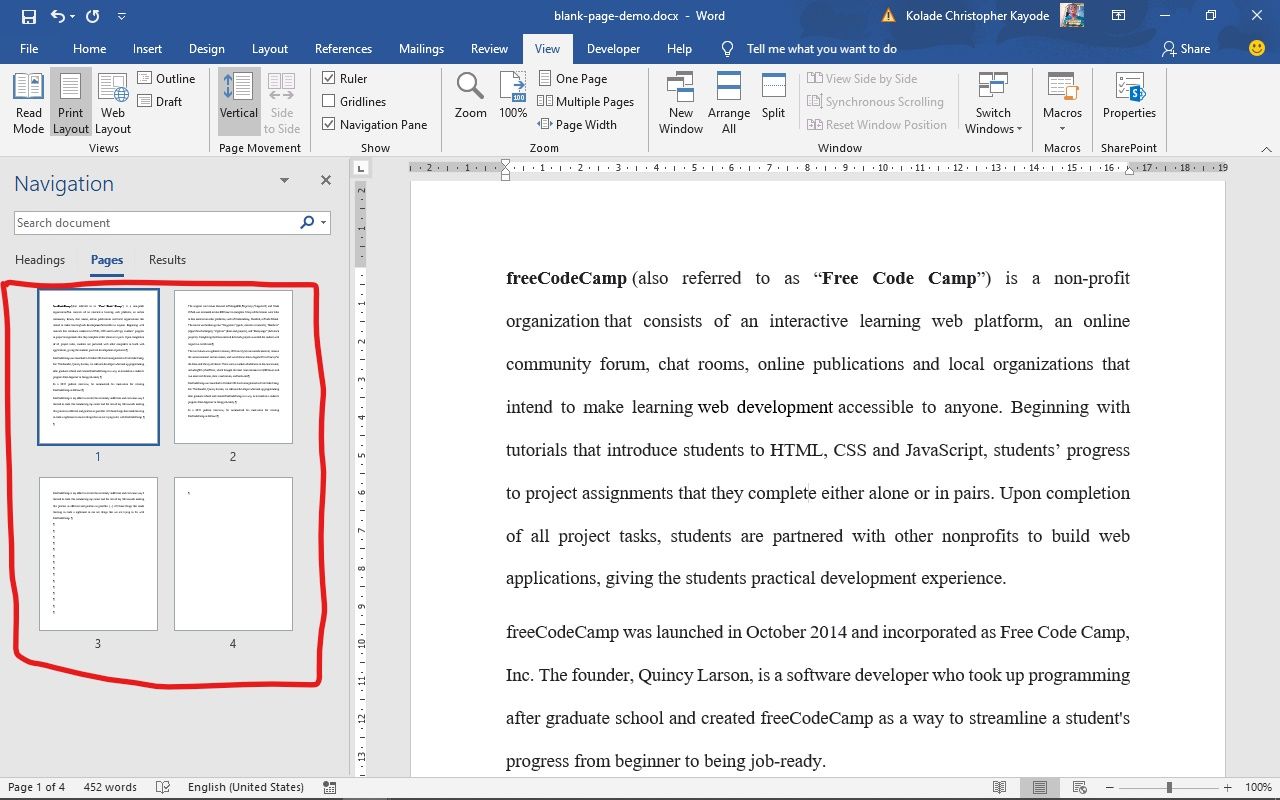
Step 3: The active page will be automatically selected. Click the extra blank page to select it and hit the DELETE button on your keyboard to remove it.
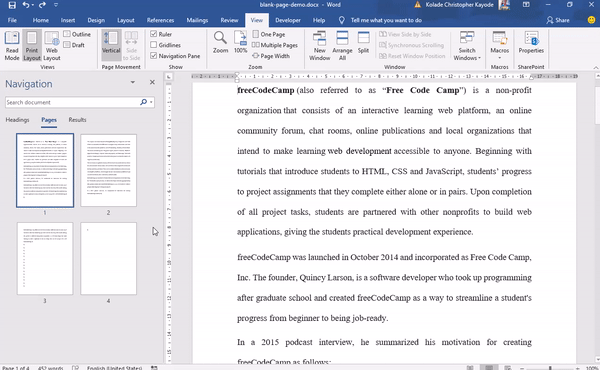
You can also remove this extra blank page by simply pressing the BACKSPACE key.
Conclusion
In this article, you learned how to remove blank pages in Word, so you can make your documents appear more professional.
Thank you for reading. If you find this article helpful, please share it with your friends and family.
Learn to code for free. freeCodeCamp’s open source curriculum has helped more than 40,000 people get jobs as developers. Get started
В процессе работы в текстовом редакторе Microsoft Word, пользователи сталкиваются с пустыми лишними листами внутри документа, поэтому у них возникает вопросы о том, как удалить пустую страницу в Ворде. Необходимо удалить ненужные страницы, чтобы привести готовый документ в надлежащий вид.
Это проблема возникает по нескольким причинам, в основном, из-за особенностей форматирования документа. В тексте появляются пустые дополнительные абзацы, разрывы страниц или другие элементы форматирования.
Содержание:
- Как удалить пустой лист в Ворде — 1 способ
- Как удалить пустую страницу в документе Ворд — 2 способ
- Как удалить пустую страницу в Word — 3 способ
- Как удалить последнюю пустую страницу в Ворде — 4 способ
- Как в документе Ворд убрать пустую страницу, расположенную в середине — 5 способ
- Как в Ворде удалить первую пустую страницу в начале документа — 6 способ
- Выводы статьи
Большинство этих элементов в обычной ситуации скрыто от пользователя, поэтому он их не видит при работе над документом. Пользователю необходимо решить вопрос, как убрать пустую страницу в Ворде, которая может находиться в разных частях документа.
Чаще всего пустые страницы появляются в конце документа Word, довольно часто после таблиц, расположенных в нижней части листа, реже — вначале документа, и очень редко — в середине.
Проблема пустых страниц в версиях MS Word 2007-2019 возникает по нескольким причинам:
- в тексте документа имеются скрытые символы;
- в тексте выполнен перенос таблицы;
- наличие в тексте лишних переносов и пробелов.
В этом руководстве вы найдете инструкции о том, как удалить пустую страницу в документе Ворд, работающие в следующих версиях программы: Word 2019, Word 2016, Word 2013, Word 2010, Word 2007.
Как удалить пустой лист в Ворде — 1 способ
Сначала рассмотрим, как удалить последнюю пустую страницу в Ворде самым легким способом. Для этого, мы используем команду, выполняемую с помощью клавиши клавиатуры.
Выполните следующие действия:
- Щелкните курсором мыши на ненужной пустой странице документа Word.

- Нажмите на клавишу клавиатуры «Backspace» (←) или «Delete» (Del).
Эта команда удаляет лишние абзацы из документа. Если на странице находится несколько невидимых абзацев в виде пустых строк, клавишу «Del» придется нажать несколько раз, пока ненужная страница не исчезнет.
Если этот способ не помог нам прийти к нужному результату, рассмотрим другие альтернативные варианты.
Как удалить пустую страницу в документе Ворд — 2 способ
Частой причиной появления пустых страниц является наличие на листе документа непечатаемых символов: новых абзацев. Чтобы в этом убедиться, нужно включить отображение непечатаемых скрытых символов разметки страницы в Word — знаков абзацев и других элементов.
Сделать это можно следующими способами:
- Нажмите одновременно на клавиши клавиатуры «Ctrl» + «Shift» + «8».
- В программах Word 2019, 2016, 2013, 2010, 2007 войдите в меню «Главная», в группе «Абзац» нажмите на значок «Отобразить все знаки» (¶).
В окне редактора появятся скрытые элементы — знаки абзаца (¶).

Для удаления пустой страницы из документа, проделайте следующие действия:
- Выделите один или все знаки абзаца при помощи мыши.
- Нажмите на клавишу «Delete».
Вместе со знаками абзацев на странице может отображаться знак «Разрыв страницы». Для удаления этого элемента его нужно выделить вместе со знаками абзацев.
Как удалить пустую страницу в Word — 3 способ
Пустая страница в документе Word может появится из-за отдельных элементов «Разрыв страницы» или «Разрыв раздела», которые потребуется удалить.
Выполните следующее:
- Во вкладке «Главная» входим в группу «Абзац», а затем нажимаем на значок непечатаемых символов (¶).
- На пустой странице отобразится элемент «Разрыв страницы».

- Выделяем элемент или щелкаем указателем мыши по элементу «Разрыв страницы», а затем нажимаем на клавишу «Delete».
Как удалить последнюю пустую страницу в Ворде — 4 способ
Если удаление пустого листа из файла Word с помощью предыдущих способов не увенчались успехом, вероятно, что в конце документа имеется таблица.
По умолчанию, в Word после таблицы всегда добавляется пустой абзац, а если таблица расположена в самом низу страницы, то этот пустой абзац переносится на другой лист документа. В результате, появляется дополнительная, ненужная страница.
Решить проблему можно с помощью изменения размера шрифта в данном невидимом абзаце.
Проделайте следующие действия:
- В файле Word войдите в меню «Главная», нажмите на значок «Отобразить все знаки» (¶), расположенный в группе «Абзац».
- На пустой странице, находящейся сразу за таблицей, кликните по значку абзаца (¶).

- В меню «Главная», в группе «Шрифт» напротив поля с именем используемого в документе шрифта, измените размер шрифта для выбранного значка абзаца.
- Если выбрать размер шрифта «1», то пустая страница исчезнет из документа.

- Отключите значок «Отобразить все знаки» (¶).
Теперь, в документе Word после таблицы, расположенной внизу страницы, нет ненужного пустого листа.

Как в документе Ворд убрать пустую страницу, расположенную в середине — 5 способ
Случаются ситуации, когда пустая страница появляется в середине документа Word. Иногда, это происходит при редактировании документа.
На появление пустой страницы влияет функция «Разрыв страницы» или «Разрыв раздела». Понятно, что пустой лист не нужен и его необходимо удалить.

Пройдите шаги:
- Включите отображение всех значков при помощи клавиш «Ctrl» + «Shift» + «8».
- Щелкните курсором мыши перед элементом «Разрывом раздела».

- Нажмите на клавишу «Delete».
Как в Ворде удалить первую пустую страницу в начале документа — 6 способ
Встречаются ситуации, когда необходимо удалить страницу в Ворде, расположенную в самом начале документа, перед оглавлением или основной частью текста.

Для этого, необходимо совершить следующие действия:
- Нажмите на сочетание клавиш «Ctrl» + «G».
- В открывшемся окне «Найти и заменить», войдите во вкладку «Перейти», в поле «Введите номер страницы» вставьте выражение: «page» (без кавычек).
- Нажмите на кнопку «Перейти».

- Первая страница выделится полосой по краю документа.
- Нажмите на клавишу «Delete».
Первый пустой лист удалится из документа Word.
Выводы статьи
Если возникают вопросы о том, как убрать пустые страницы в Word, пользователь может воспользоваться несколькими способами для решения этой проблемы. Лишние пустые страницы часто появляются в самом конце документа, иногда, вначале, и очень редко — в середине. Причиной появления пустых страниц, обычно, служат не отображаемые специальные элементы абзацев или разрывов страницы.
Похожие публикации:
- Как открыть файл DOCX (DOC) онлайн — 7 способов
- Как убрать водяные знаки в Word — 2 способа
- Как убрать фон в Word — 6 способов
- Как открыть DOCX (DOC) на компьютере — 10 программ
- Как убрать режим ограниченной функциональности Word 2019, 2016, 2013, 2010, 2007
![]()
Download Article
![]()
Download Article
This wikiHow article teaches you how to remove stubborn blank pages from anywhere in your Word document. Blank pages in the middle of your document are usually the result of hidden extra paragraphs or page breaks. If the blank page is at the end, it could be the same situation—however, it’s also may be due to Word’s hidden end paragraph feature. You can get rid of blank pages by making paragraph and page breaks markers visible and editing or deleting them manually.
-
1
Go to the blank page in your document. If a strange blank page appears in the middle of your Word document, it’s likely due to an unintentional page break or extra paragraph markers that you can’t see.
-
2
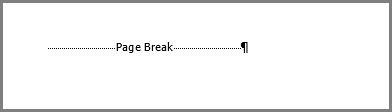
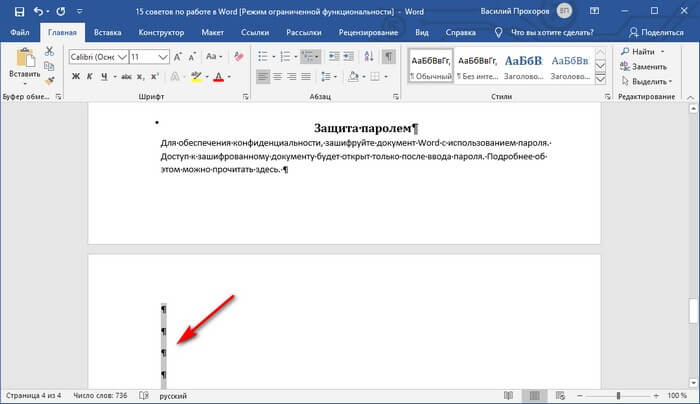
Press Ctrl+⇧ Shift+8 on Windows or ⌘ Cmd+8 on Mac. This displays paragraph markers (¶) at the beginning of each blank line, as well as at the end of every paragraph. If there are any page breaks on this page, you’ll see them marked by dotted lines and the word «Page Break.»
Advertisement
-
3
Look for a small black square next to a paragraph marker. You’ll want to look for this on both the blank page and the page after it. If you see a paragraph marker with a black square beside it, the paragraph has the «Page break before» setting turned on. You’ll want to turn this off. To do so:
- Click the Home tab at the top of Word.
- Right-click the paragraph marker ¶ that has the corresponding black bullet point.
- Select Paragraph… on the menu.
- Click the Lines and Page Breaks tab.
- Remove the check next to «Page break before» (if there is one) and click OK.
-
4
Highlight the ¶ marks and/or Page Break lines with your mouse. If you see both (or more than one of each), highlight it all at once.
- Also check the page right before your blank one for extra page breaks and delete those as well.
- Don’t select paragraph markers that appear on lines that contain actual content.
-
5
Hit the Delete key. This should delete all the ¶ marks and page breaks, which should delete the blank page.
- If the blank page is still there, double-check the pages before for page breaks.
-
6
Press Ctrl+⇧ Shift+8 on Windows or ⌘ Cmd+8 on Mac again. This hides the paragraph markers again.


Advertisement
-
1
Go to the blank last page in your document. If a strange blank page appears at the end of your Word document, it could be due to Word’s hidden undeletable end paragraph.[1]
According to Microsoft, the most reliable way to get rid of that blank page is to make the hidden paragraph very small.- The undeletable hidden paragraph usually occurs when the content of your last real page (not the blank page) goes all the way to the bottom of that page.
-
2
Press Ctrl+⇧ Shift+8 on Windows or ⌘ Cmd+8 on Mac. This displays paragraph markers (¶) at the beginning of each blank line, as well as at the end of every paragraph. Since you have a blank page at the end of your document, you’ll see at least one paragraph marker on that page.
-
3
Delete all of the paragraph markers on the blank page (if there are multiple). If more than one paragraph marker appears on the blank page, deleting all of them will get usually get rid of the blank page. Try that first.
- If there’s only one paragraph marker at the top of the page, deleting it won’t help—continue with this method, if so.
-
4
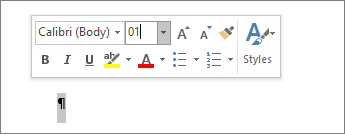
Change the font size of the paragraph marker to 01. Here’s how:
- Click the Home tab if you’re not already there.
- Highlight the paragraph marker.
- Click the font size next to the font’s name.
- Replace it with 01 and press Enter or Return.
-
5
Press Ctrl+⇧ Shift+8 on Windows or ⌘ Cmd+8 on Mac again. This hides the paragraph markers again, which should delete the blank page at the end by fitting the hidden paragraph on the last page that contains content.
- If you still have a blank page after this, you can reduce the size of the bottom margin instead. To do this, click the Layout tab, select Margins, click Custom Margins, and change the bottom margin to 0.3 inches.


Advertisement
-
1
Click the File menu and choose Save as. If you still have a blank page at the end of your document after fixing hidden end paragraphs, you can omit the last page when saving your document as a PDF.
- This only works on the desktop version of Word—the web version doesn’t let you choose which pages to include in a PDF.
- If your file is synced to One Drive, you won’t see Save as. Click Save as copy instead.
- If the document must be in the Word format, you can convert the PDF back to the Word format after you save it as a PDF.
-
2
Select PDF as the file format. Depending on your version of Word, the file type menu may be in the upper-right corner of the page, or in the «Save as type» menu toward the bottom.
-
3
Click Options or More options. You’ll see one of these two options near the menu from which you selected PDF.
-
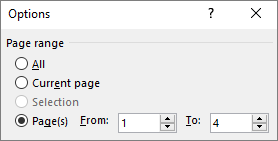
4
Click the radio option next to «Page(s).» This allows you to select a range of include in your PDF.
-
5
Enter the page range, minus the last page. Type «1» in the «From» box, and the last real page (before the blank page) into the «To» box.
-
6
Click Ok and then save the document. This saves your document as a PDF, minus the blank page(s) at the end.


Advertisement
Add New Question
-
Question
How can I delete an Excel page copied to Word?

You can usually highlight the entire pasted table and hit the Delete key. If that doesn’t work, try this: highlight the entire table, then right-click on it and select «Cut.»
-
Question
What if the methods described above still don’t work? What can I do then?
A far better and easier way is to save the doc as a pdf, delete the page from the pdf (which is super easy by clicking on «organize pages»), and then resave as a doc.
-
Question
How can I create a word document I can later fill in blanks such as names or other info in a contract?
If it’s for a printed document, just string underscores together to make the blanks for filling in.
See more answers
Ask a Question
200 characters left
Include your email address to get a message when this question is answered.
Submit
Advertisement
Thanks for submitting a tip for review!
About This Article
Article SummaryX
1. Open your document in Microsoft Word.
2. Press «Ctrl + Shift + 8» on Windows or «Command + 8» on Mac to display line break symbols in the document
3. Scroll down to the blank page.
4. Highlight any Page break or Paragraph symbols (¶) on the page.
5. Press «Delete«.
Did this summary help you?
Thanks to all authors for creating a page that has been read 2,351,071 times.