
Watch Video – Remove Spaces in Excel
Leading and trailing spaces in Excel often leads to a lot of frustration. I can’t think of a situation where you may need these extra spaces, but it often finds its way into the excel spreadsheets.
There are many ways you can end up with these extra spaces – for example, as a part of the data download from a database, while copying data from a text document, or entered manually by mistake.
Leading, trailing, or double space between text could lead to a lot of serious issues.
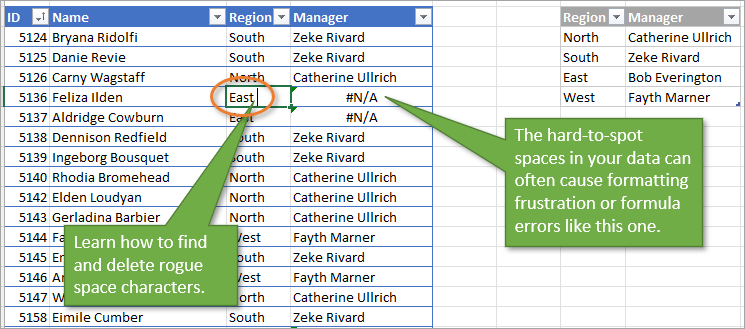
For example, suppose you have a data set as shown below:

Now have a look at what happens when I use a VLOOKUP function to get the last name using the first name.

You might not be able to spot the difference with the naked eye that there is an extra trailing space in the name that is causing this error.

In this example, it was easy to spot the issue in such a small data set, but imagine having to check this for thousands of records.
To be on the safe side, it is always a good idea to clean your data and remove spaces in Excel.
How to Remove Spaces in Excel
In this tutorial, I will show you two ways to remove spaces in Excel.
- Using TRIM function.
- Using Find and Replace.
Using the TRIM Function
Excel TRIM function removes the leading and trailing spaces, and double spaces between text strings.
For example, in the above example, to remove spaces from the entire list if first names (in A2:A7), use the following formula in cell C1 and drag it down for all the first names:
=TRIM(A2)
Excel TRIM function would instantly remove all the leading and trailing spaces in the cell.
Once you have the cleaned data, copy it paste it as values in place of the original data.
This function is also helpful if you have more than one space character between words. It would remove the extra spaces such that the result always have one space character between words.
Excel TRIM function does a good job in removing spaces in Excel, however, it fails when you have non-printing characters (such as line breaks) in your data set. To remove non-printing characters, you can use a combination of TRIM and CLEAN functions.
If you have some text in cell A1 from which you want to remove spaces, use the below formula:
=TRIM(CLEAN(A1))
Non-printing characters can also result from =CHAR(160), which can not be removed by the CLEAN formula. So, if you want to be absolutely sure that you have all the extra spaces and non-printing characters, use the below formula:
=TRIM(CLEAN(SUBSTITUTE(A1,CHAR(160)," ")))
Remove Extra Spaces in Excel using FIND and REPLACE
You can remove spaces in Excel using the Find and Replace functionality.
This is a faster technique and can be useful in the given situations:
- When you want to remove double spaces.
- When you want to remove all the space characters.
Removing Double Spaces
Note that this technique cannot be used to remove leading or trailing spaces. It will find and replace double spaces irrespective of its position.
Here are the steps to do this:
This will replace all the double spaces with a single space character.

Note that this will only remove double spaces. If you have three space characters in between 2 words, it would result in 2 space characters (would remove one). In such cases, you can do this again to remove and any double spaces that might have been left.
Removing Single Spaces
To remove all the space characters in a data set, follow the below steps:
This will remove all the space characters in the selected data set.

Note that in this case, even if there are more than one space characters between two text strings or numbers, all of it would be removed.
Remove Line Breaks
You can also use Find and Replace to quickly remove line breaks.
Here are the steps to do this:
- Select the data.
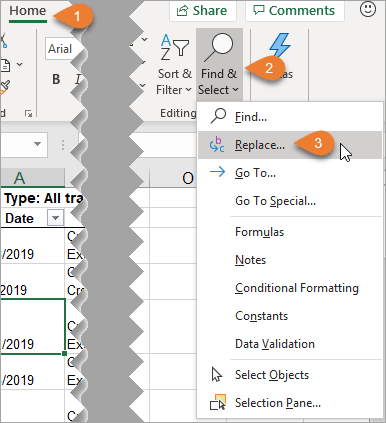
- Go to Home –> Find and Select –> Replace (Keyboard Shortcut – Control + H).
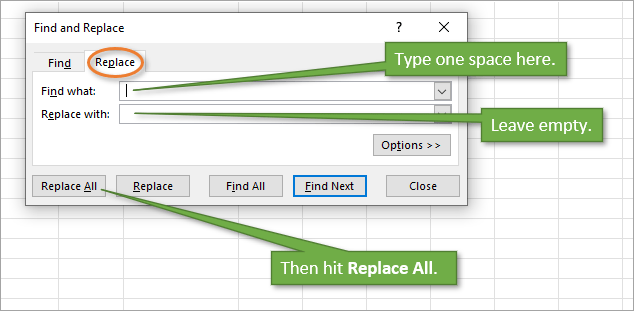
- In the Find and Replace Dialogue Box:
- Find What: Press Control + J (you may not see anything except for a blinking dot).
- Replace With: Leave it empty.

- Replace All.

This will instantly remove all the line breaks from the data set that you selected.
Based on your situation, you can choose either method (formula or find and replace) to remove spaces in Excel.
You may also like the following Excel tutorials:
- Find and Remove Duplicates in Excel.
- 10 Super Neat Ways to Clean Data in Excel.
- MS Help – Remove Space and Non-printing characters.
- How to Remove the First Character from a String in Excel
- How to Remove Time from Date in Excel
Bottom Line: Learn 5 different techniques to find and remove spaces in Excel. Spaces can cause formula errors and frustration with data preparation and analysis.
Skill Level: Intermediate
Watch the Tutorial
Download the Excel File
You can download the workbook that I use in the video, including the macro I wrote to remove blank spaces.
Space Hunting
Blank spaces can be a headache for data analysts and formula writers. That’s because they are not easy to spot, yet can cause frustrating calculation errors.
After many years of working with Excel, I’ve become a Space Hunter. That sounds like a sci-fi movie title, but it’s just someone who can quickly locate and delete superfluous spaces in cell values.
Based on my space hunting experience, here are five techniques I use frequently to clean up data.
1. Find & Replace
The first method for space hunting is to use the Find & Replace feature.
After highlighting the cells that you want to search through, go to the Home tab. Then open the Find & Select dropdown menu. Select the Replace option. The keyboard shortcut for this is Ctrl + H.
That will bring up the Find and Replace window. On the Replace tab, place one blank space in the Find what field. Make sure there is nothing in the Replace with field. Hitting Replace All (keyboard shortcut: Alt+A) will remove any instances of a space in the data set that you selected.
Although this method is really quick and easy, it’s only useful for data where you want ALL spaces removed. However, there are times when you want to keep spaces between words. For example, if your cells contain both first and last names, you will probably want to keep the space in between those names.
That scenario leads us to our second method for space hunting.
2. The TRIM Function
The TRIM function removes all spaces in a text string, except for single spaces between words.
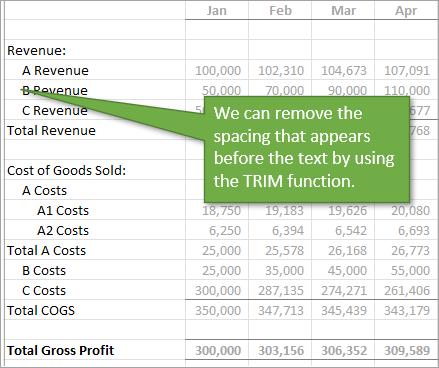
Below is an example of a report where some of the cells look like they are indented but the indentation is actually just extra spaces. Let’s say we want to remove those spaces for uniformity’s sake. We can use the TRIM function to do that.
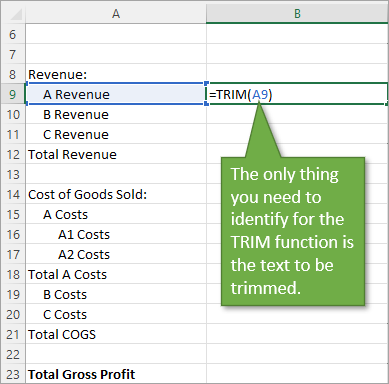
In a blank column, start by typing the equals sign (=) and the word TRIM, then tab into the TRIM function.
The only thing you need to identify for the TRIM function to work is the text that needs trimming. So either type the name of the cell or click on the cell that you want to trim and hit Enter. This will return the result you’re looking for: text with no spaces before or after it.
When you copy the formula down for the whole column, the result looks like this.
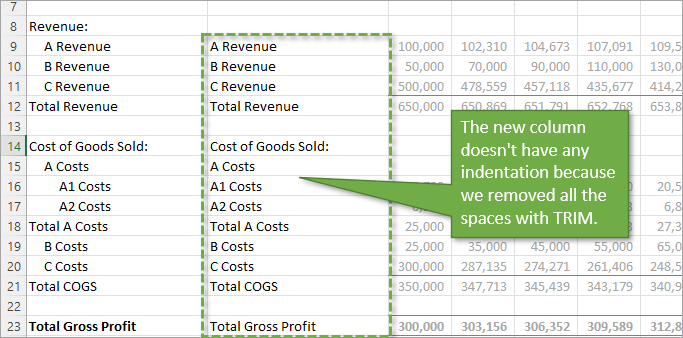
As you can see, the spacing between the words remains in place, but any spacing before or after the text is removed.
With this method, we had to create a whole new column, so you would have to add the additional step of replacing the original column with the new one using Copy and Paste Values. You can then delete the column with the formulas.
3. Power Query
Like functions and formulas, queries can also be tripped up by the inclusion of a stray blank space.
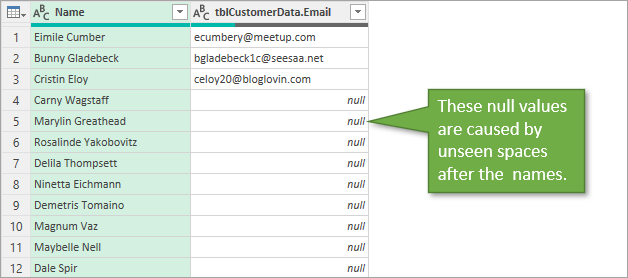
If you are unsure if blank spaces are what’s causing the problem, you can click into the Editor’s preview to see if there is a space or not.

To remove the spaces, Power Query has a Trim feature found in the right-click menu. With the column that you want to fix selected, just right-click and choose Transform, and Trim.

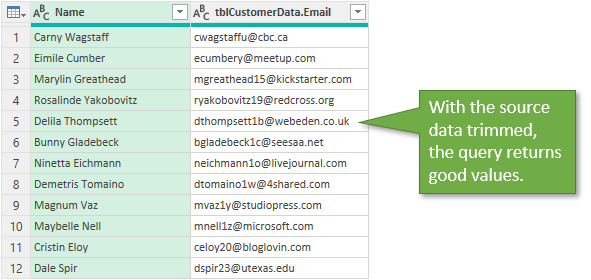
This trims all the blank space before/after the text string so that the query will return the correct values.
If you are relatively new to Power Query, or could use a refresher, I recommend checking out my free webinar: The Modern Excel Blueprint.

4. Macros and VBA
Let’s look at the same example we used for the TRIM function, but this time we will use a macro to trim extra spaces from text.
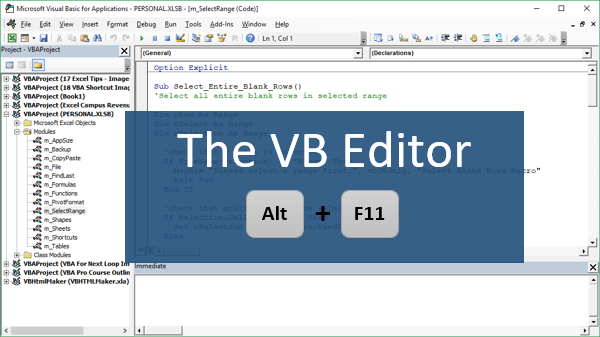
Start by opening the VB Editor. Go to the Developer tab and select the Visual Basic Button. The keyboard shortcut is Alt + F11.
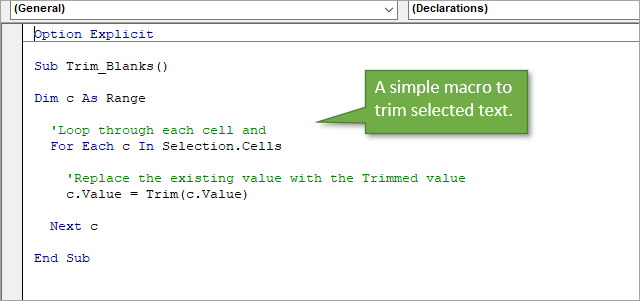
I’ve written a simple macro that loops through each cell and replaces the value of the cell with the trimmed value. If you’d like to copy this macro, you can find it in the download file at the top of this post.
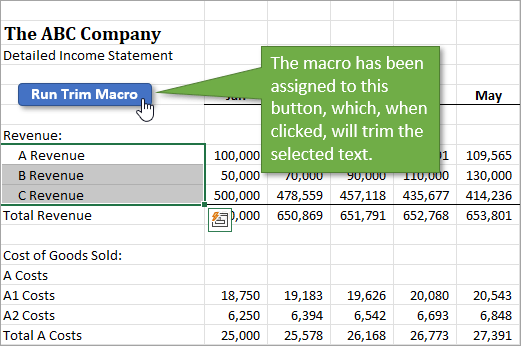
One of the benefits of using a macro is that you can assign it to a button. Here I’ve assigned it to a button on the actual worksheet.
And here, I’ve added it to the ribbon by including this macro in my Personal Macro Workbook and assigning a button to it.
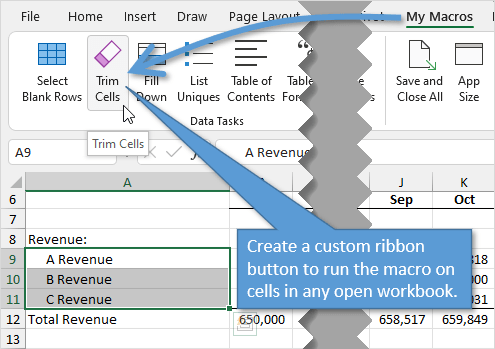
That way, I can use this macro on any workbook.
One downside to using the macro method for removing blank spaces is that you cannot undo the action once the macro has been run. In that case, it might be a good idea to save the file before running the macro, if you think you might need to un-trim the data for some reason.
It’s also important to note that the VBA Trim function does NOT trim extra blank spaces between words. Excel’s TRIM function will remove additional spaces between words. So if there are two spaces between the first and last name, TRIM will remove the additional space. VBA’s Trim will not do this. It only removes spaces from the beginning or end of the string. Thanks to Marvin (an Excel Campus Community Member) for bringing this to our attention!
Here are tutorials for how to create a Personal Macro Workbook as well as how to make Macro buttons, whether on the worksheet or in the ribbon.
How to Create a Personal Macro Workbook (Video Series)
How to Create Macro Buttons in Excel Worksheets
5. Trimming Other Characters
Sometimes after you have trimmed the spaces from your text, you might still get calculation errors. One reason for this could be that another hard-to-detect character might be in play. One such character is the non-breaking space. This is often used in HTML coding ( ) and is similar to a regular space, but would not be deleted by the TRIM function or our macro.
To determine which character might be gumming up the works, you can use the CODE function. By copying and pasting the invisible character into a blank cell, and then identifying that cell’s text in the CODE function (“text” is the only argument that needs to be identified for the CODE function), you will return a code number for that character. A quick Google search of that code number will reveal what type of character you are dealing with.
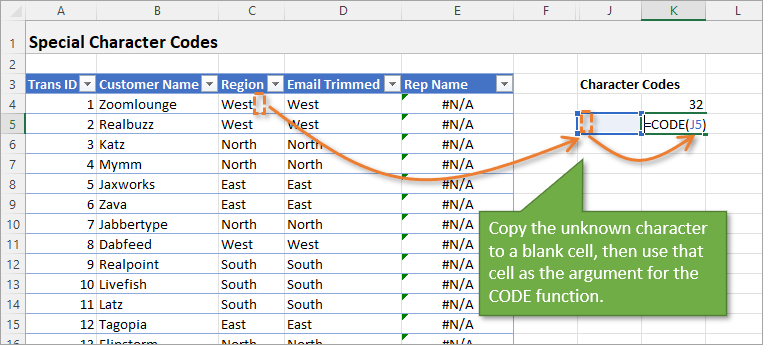
In this case, the non-breaking space character is code 160.
One way to remove that character from your text would be to use Find & Replace. You can simply copy the character and paste it into the Find what field.
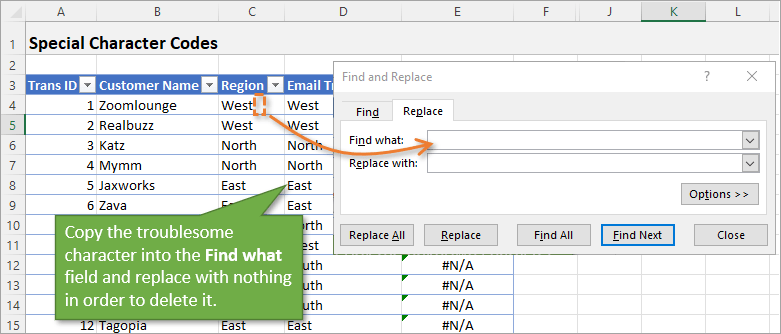
You could also use the REPLACE function to do the same thing.
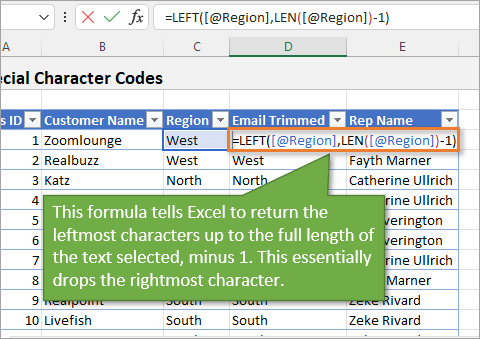
One other option, since we know we want to remove the last character in the text, would be to use the LEFT and LEN functions to essentially create a customized trim feature.
LEFT returns the leftmost characters in a cell, up to a designated amount. LEN (short for Length) returns the number of characters in a cell.
So combining those two functions and subtracting 1 from the LEN to remove that unwanted character would leave just the text without the additional character.
Conclusion
I hope this has been helpful for you. I also explain how spaces can cause errors in formulas in my video on an Introduction to VLOOKUP.
There are actually more than just five ways to go about this task, and if you’d like to add to the list, please leave a comment below. As always, you can ask questions there as well.
Thanks for following along. Until next time!
The space character for an Excel user can be a real problem. When exporting data from various IT systems, that export will often include extra spaces around values. Finding a way to remove spaces in Excel is a crucial skill for every user.
We often can’t see the space characters, but Excel sees them. They can be leading or trailing spaces which are at the start or end of the text string, but we can also find multiple spaces between words. These spaces cause values not to match and calculation errors to occur, which for an Excel user is almost the worst thing that can happen.
In this post, we will discover how to find and remove additional spaces in Excel so our data can be clean and usable.
The example data for this post is:
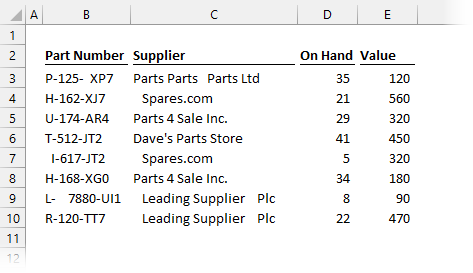
In the example data, we can see a lot of trailing, leading, and multiple spaces.
Watch the video
Watch the video on YouTube
We can use simple Excel functionality to remove additional spaces, such as Find and Replace or Flash Fill. These are fast and quick methods but need to be repeated if data changes. Therefore, they are great for one-off activities.
Find and Replace (#1)
Find and replace may seem obvious, but you would be surprised about the number of people who don’t think about it.
If our data contains leading, trailing, or mid-spaces that all need to be removed, the Find and Replace method is perfect.
In our example data, we have an issue with the Part Number column; it contains lots of rogue spaces.
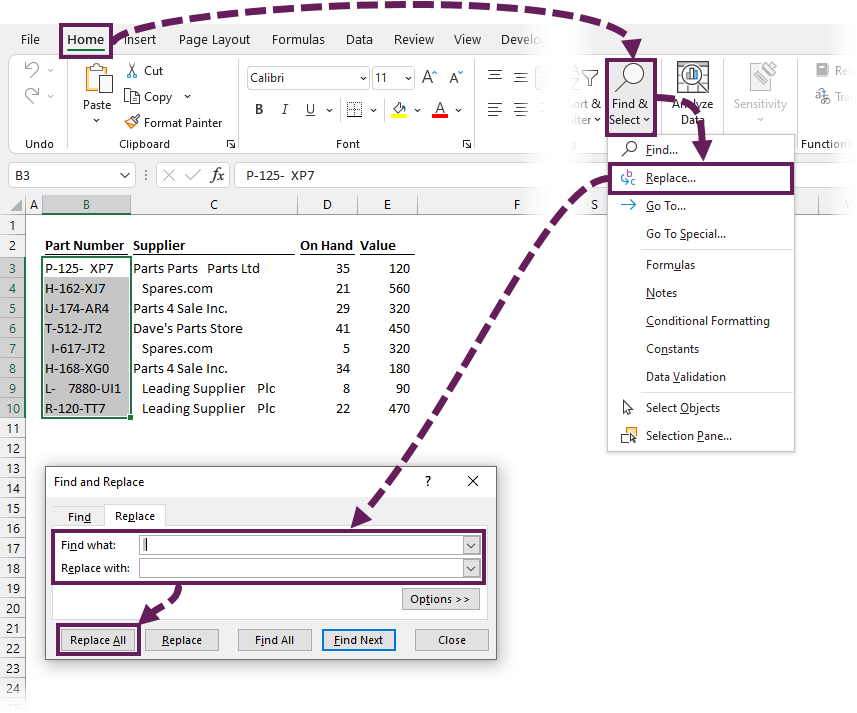
- Select the range of cells to be changed (Cells B3-B10 in our example)
- Click Home > Find & Replace (dropdown) > Replace… (Shortcut: Ctrl + H)
- In the Find and Replace dialog box, enter a space into the find what field, and leave the replace with field blank.
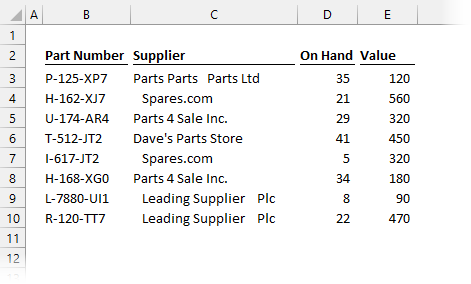
- Click replace all

Ta-dah! Simple.
Obviously, if our data should contain single spaces, such as a supplier name, this approach won’t work.
If our data contains double spaces that need to be removed, in the Find & Replace dialog box enter the following:
- Find what: [enter two spaces]
- Replace with: [enter a single space]
Repeat these steps multiple times until there are no more items to replace.
Flash Fill (#2)
Flash Fill was introduced in Excel 2013. It is easy to use and ideal for finding patterns in text strings. It’s a feature that runs in the background and makes recommendations at suitable points. So, you may have used Flash Fill before without knowing it.
With our data on the left, we can type how the first value should display. Then, when we start typing a second value, hopefully, Flash Fill will spring into action and make suggestions.
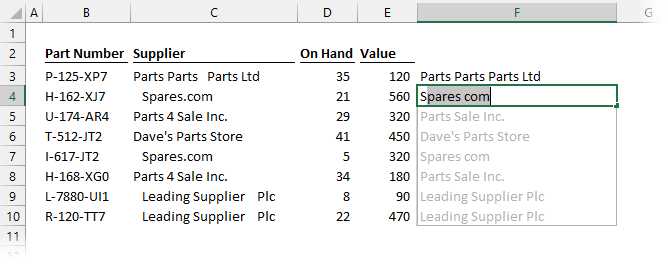
If you are happy with the recommendations, press the Tab key to accept them. However, in our example, you will notice the period between Spares and com has been removed. We need to keep adding more examples for Flash Fill to use.
Once we have entered more values:
- Select the range of cells to be filled
- Click Data > Flash Fill

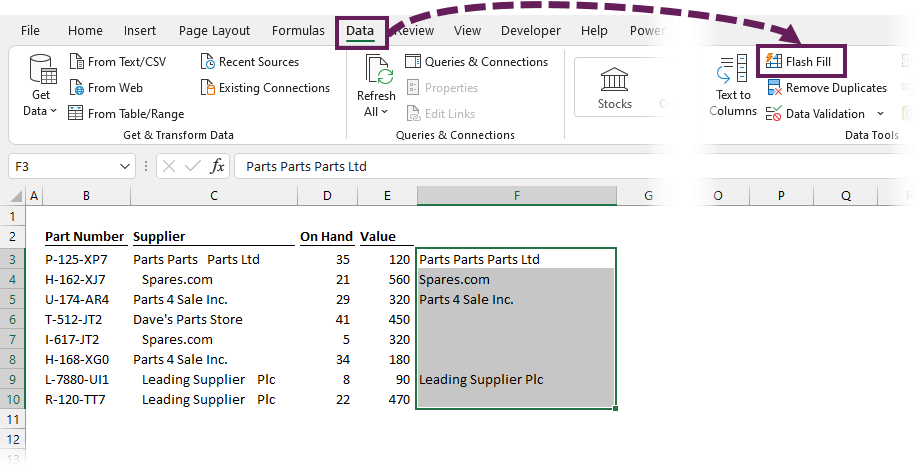
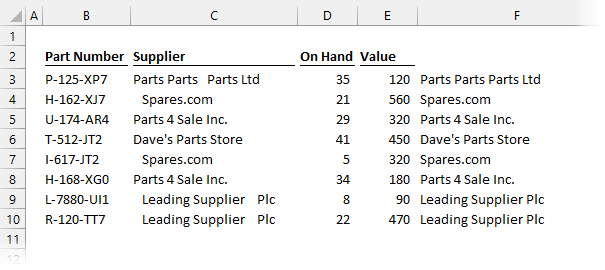
Done! Because we rely on Excel’s algorithm, we should check the other values to ensure they are right. In the screenshot below, column F shows the clean data.
Flash Fill is a pretty nice feature.
Note: If Excel cannot find a matching pattern, it will return an error message.

Functions
If we are looking for a more dynamic method of removing unnecessary spaces, then functions such as TRIM or SUBSTITUTE may be a better solution.
Formulas are useful if we are likely to get new data and have to perform the space removal process again. We simply apply the formula to the new data and it recalculates automatically.
TRIM Function to remove excess spaces (#3)
The TRIM function performs two tasks:
- Removes leading and trailing spaces
- Reduces multiple spaces to a single space
The TRIM function has a single argument, which is the text from which to remove spaces.
Let’s head back and see how we can use this with our Supplier name column.
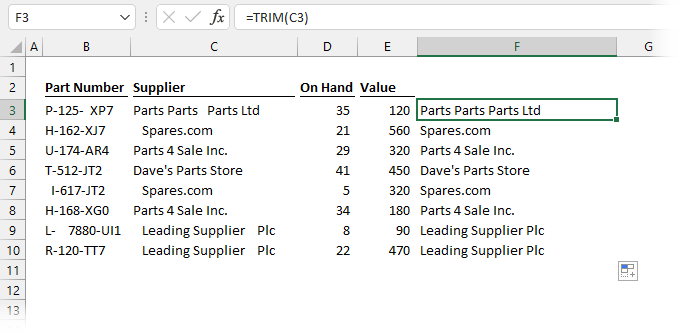
The formula in Cell F3 is
=TRIM(C3)The result is that the spaces have been removed. It’s a simple and powerful function.
Once calculated, if we want, can copy the values in cells F3:F10 and paste the values into cells C3:C10. Alternatively, we could retain the calculation to handle any future data changes.
NOTE: The VBA and Power Query versions of trim are different. They do not remove additional spaces from the middle of strings.
SUBSTITUTE Function to replace spaces (#4)
If you want to combine the result of Find & Replace with the benefit of a function, then SUBSTITUTE is the way to go for you.
The SUBSTITUTE function replaces specific characters in a text string.
Syntax:
SUBSTITUTE(text, old_text, new_text, [instance_num])Arguments:
- Text: The text containing the characters to be substituted
- Old_text: The text to replace
- New_text: The text to replace the old_text with
- Instance_num: Optional. Specifies which occurrence of old_text should be replaced. e.g. if 2 then only the second instance of old_text is substituted. If excluded, all instances of old_text are replaced.
Let’s apply SUBSTITUTE to our example data:
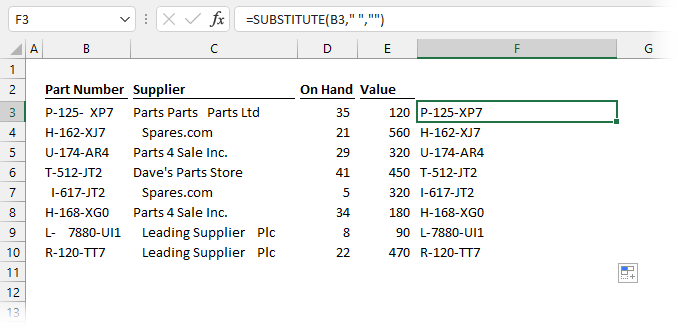
The formula in Cell F3 is:
=SUBSTITUTE(B3," ","")SUBSTITUTE is using Cell B3 and replacing all spaces with an empty text string.
Advanced methods
Depending on your specific scenario and experience, you may be using more advanced Excel features, such as Power Query, VBA Macros, or Office Scripts.
As these are more advanced features, we will not go through these step-by-step. If you’re using these already, you can apply your existing knowledge to apply the techniques.
Power Query (#5)
Power Query is Excel’s tool for cleaning dirty data. However, it is as easy as using the methods above.
Trim the leading and trailing spaces
To remove the leading and trailing spaces, select the column to be cleaned and click Transform > Format (dropdown) > Trim from the Ribbon.
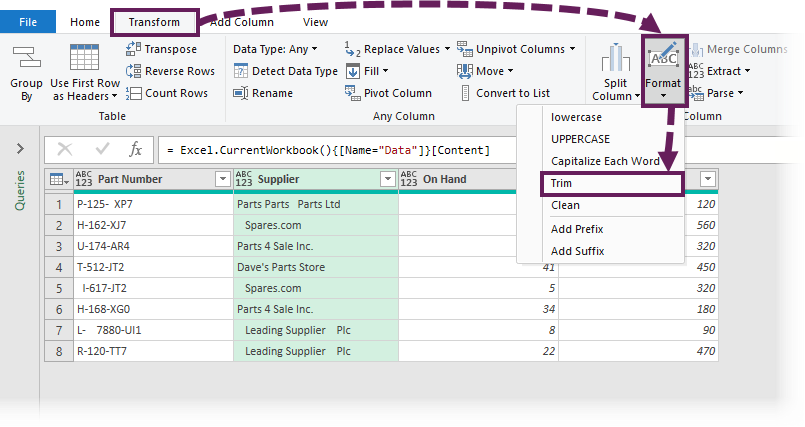
The leading and trailing spaces are removed instantly.
Remove double spaces within text
Unfortunately, the Power Query version of trim does not remove double spaces inside a text string. So, if this is your scenario, we need to turn to a more advanced technique.
The following custom function can be used to remove spaces. Enter the function into a blank query using the Advanced Editor.
(textValue as text)=>

let
    SplitText = Text.Split(textValue," "),
    ListNonBlankValues = List.Select(SplitText, each _<> ""),
    TextJoinList = Text.Combine(ListNonBlankValues," ")
in
    TextJoinList
I have named this query fxTrim.
To apply this function, click Add Column > Custom Column
In the Custom Column window, we can use the custom function.
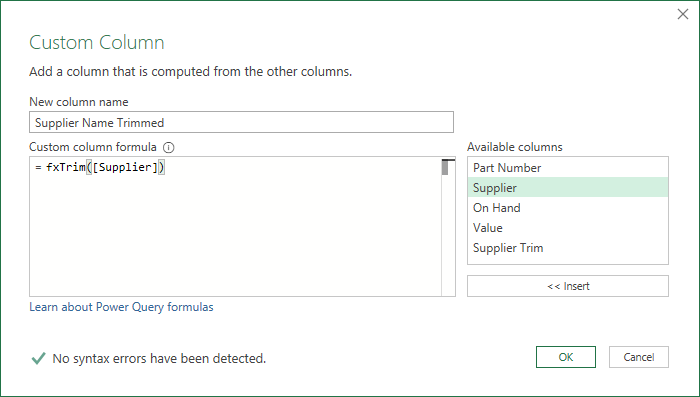
The formula used above is:
=fxTrim([Supplier])
After using the function, double spaces are removed. Once the data is clean, load it back into Excel.
NOTE: For a more advanced method to remove spaces in Power Query, check out this post: Remove excess spaces in Power Query
VBA Macro (#6)
If we remove spaces regularly, having a macro saved within our Personal Macro Workbook may be a quick and easy method.
VBA Trim: remove leading & trailing spaces
The following code removes leading & trailing spaces, but not double spaces from within a text string.
Sub RemoveLeadingTrailingSpaces()

Dim c As Range

'Loop through each cell in selection
For Each c In Selection

    'Apply VBA Trim function to each cell
    c = Trim(c)

Next c

End Sub
Excel Trim: remove leading, trailing, and double spaces
The following code will replicate Excel’s TRIM function.
Sub RemoveAdditionalSpaces()

Dim c As Range

'Loop through each cell in selection
For Each c In Selection

    'Apply Excel TRIM function to each cell
    c = Application.WorksheetFunction.Trim(c)

Next c

End Sub
VBA Replace: Remove all spaces
The following code removes all spaces.
Sub RemoveAllSpaces()

Dim c As Range

'Loop through each cell in selection
For Each c In Selection

    'Apply VBA Replace function to remove spaces
    c = Replace(c, " ", "")

Next c

End Sub
Office Scripts (#7)
If you are using Excel Online and have Office Scripts available, then you can use the following scripts:
Trim leading & trailing spaces
The following script removes leading & trailing spaces.
function main(workbook: ExcelScript.Workbook) {

//Declare and assign variable for the selected cells
let rng = workbook.getSelectedRange();

//Create array for the values in the range
let arr = rng.getValues();

//Loop through each item in the 2D array
for (let i = 0; i < arr.length; i++) {
  for (let j = 0; j < arr[0].length; j++) {

    //Apply JavaScript Trim function to each cell
    arr[i][j] = arr[i][j].toString().trim();

  }
}

//Push array back to cells using the setValues method
rng.setValues(arr);

};
Trim leading, trailing, and double spaces
The following script replicates the outcome of Excel’s TRIM function.
function main(workbook: ExcelScript.Workbook) {

//Declare and assign variable for the selected cells
let rng = workbook.getSelectedRange();

//Create array for the values in the range
let arr = rng.getValues();

//Loop through each item in the 2D array
for (let i = 0; i < arr.length; i++) {
  for (let j = 0; j < arr[0].length; j++) {

    //Apply RegEx to remove additional spaces function to each cell
    arr[i][j] = arr[i][j].toString().replace(/s+/g, ' ').trim();

  }
}

//Push array back to cells using the setValues method
rng.setValues(arr);

};
Remove all spaces
The following script removes all spaces.
function main(workbook: ExcelScript.Workbook) {

//Declare and assign variable for the selected cells
let rng = workbook.getSelectedRange();

//Create array for the values in the range
let arr = rng.getValues();

//Loop through each item in the 2D array
for (let i = 0; i < arr.length; i++) {
  for (let j = 0; j < arr[0].length; j++) {

    //Apply JavaScript Replace function to remove all spaces
    arr[i][j] = arr[i][j].toString().replace(/s/g,'');

  }
}

//Push array back to cells using the setValues method
rng.setValues(arr);

};
Conclusion
So, there you go, 7 ways to remove spaces in excel.
Many would say that we only need one way to achieve this; however, context is everything. Why use a Power Query method if Find and Replace will work? But if you’re using Power Query to extract data, then the Find and Replace method would be useless. So, the choice is entirely dependent on your situation.
Hopefully, this post has provided you with enough ways to remove spaces in Excel, no matter your scenario.

About the author
Hey, I’m Mark, and I run Excel Off The Grid.
My parents tell me that at the age of 7 I declared I was going to become a qualified accountant. I was either psychic or had no imagination, as that is exactly what happened. However, it wasn’t until I was 35 that my journey really began.
In 2015, I started a new job, for which I was regularly working after 10pm. As a result, I rarely saw my children during the week. So, I started searching for the secrets to automating Excel. I discovered that by building a small number of simple tools, I could combine them together in different ways to automate nearly all my regular tasks. This meant I could work less hours (and I got pay raises!). Today, I teach these techniques to other professionals in our training program so they too can spend less time at work (and more time with their children and doing the things they love).
Do you need help adapting this post to your needs?
I’m guessing the examples in this post don’t exactly match your situation. We all use Excel differently, so it’s impossible to write a post that will meet everybody’s needs. By taking the time to understand the techniques and principles in this post (and elsewhere on this site), you should be able to adapt it to your needs.
But, if you’re still struggling you should:
- Read other blogs, or watch YouTube videos on the same topic. You will benefit much more by discovering your own solutions.
- Ask the ‘Excel Ninja’ in your office. It’s amazing what things other people know.
- Ask a question in a forum like Mr Excel, or the Microsoft Answers Community. Remember, the people on these forums are generally giving their time for free. So take care to craft your question, make sure it’s clear and concise. List all the things you’ve tried, and provide screenshots, code segments and example workbooks.
- Use Excel Rescue, who are my consultancy partner. They help by providing solutions to smaller Excel problems.
What next?
Don’t go yet, there is plenty more to learn on Excel Off The Grid. Check out the latest posts:
Remove Spaces in Excel
While importing or copy-pasting the data from an external source, extra spaces are also copied in Excel. This makes the data disorganized and difficult to be used. The purpose of removing unwanted spaces from the excel data is to make it more presentable and readable for the user.
For example, if a cell contains “ rose,” the leading spaces may be visible to the reader. However, if “rose ” is written in a cell, the two trailing spaces may not be easily caught by the user.
Since extra spaces may render the Excel formulas incorrect, it is essential to eliminate them.
Table of contents
- Remove Spaces in Excel
- Top 5 Methods to Remove Spaces in Excel
- #1 – TRIM Function
- #2 – “Delimited” Option of Text to Columns Wizard
- #3 – “Fixed Width” Option of Text to Columns Wizard
- #4 – Find and Replace Option
- #5 – SUBSTITUTE Function
- Frequently Asked Questions
- Recommended Articles
Top 5 Methods to Remove Spaces in Excel
The five methods to remove extra spaces in Excel are listed as follows:
- TRIM function
- “Delimited” option of text to columns wizard
- “Fixed width” option of text to columns wizard
- Find and replace option
- SUBSTITUTE function
The user can select any of the techniques depending on the requirement. Let us discuss all the methods one by one, along with examples.
You can download this Remove Spaces Excel Template here – Remove Spaces Excel Template
#1 – TRIM Function
The TRIM functionThe Trim function in Excel does exactly what its name implies: it trims some part of any string. The function of this formula is to remove any space in a given string. It does not remove a single space between two words, but it does remove any other unwanted spaces.read more removes all spaces from a text string except for the single space between the words.
The following data contains extra spaces in column A. We want to rewrite the data without these spaces in column B with the help of the TRIM function.

Step 1: In cell B1, enter the TRIM function.

Step 2: Select the cell A1.

Step 3: Press the “Enter” key. The extra spaces from the name are removed in cell B1, as shown in the following image.

Step 4: Copy or drag the formula to the remaining cells, as shown in the following image.

#2 – “Delimited” Option of Text to Columns Wizard
The text to columnsText to columns in excel is used to separate text in different columns based on some delimited or fixed width. This is done either by using a delimiter such as a comma, space or hyphen, or using fixed defined width to separate a text in the adjacent columns.read more wizard helps remove spaces in excel by splitting the data strings into separate columns. It works on cells containing numerical and textual values.
The following data contains spaces in column A. We want to split the words of column A into separate cells in such a way that the space between the strings is eliminated.
Use the “delimited” option of the text to columns wizard.

Step 1: Select column A. In the Data tab, click “text to columns” from the “data tools” group. The same is shown in the following image.

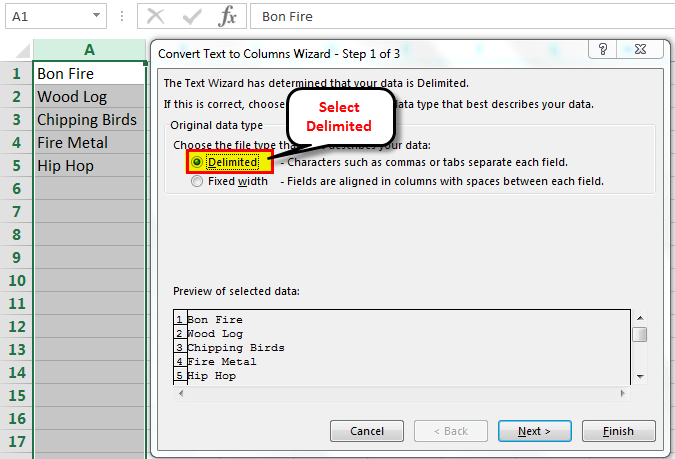
Step 2: The “convert text to columns wizard” appears, as shown in the following image. Select the option “delimited” in “choose the file type that best describes your data.” Click “next.”
Step 3: Select “space” as the delimiter and click “finish.”

Step 4: The text strings of column A are split into two columns. The second half of the strings is placed in column B. The spaces between the strings have also been removed.

#3 – “Fixed Width” Option of Text to Columns Wizard
The “fixed width” option of the text to columns wizard helps remove extra spaces from numerical and textual data in Excel. For this, all the strings before the space should contain the same number of characters.
The following data contains random text and numbers with spaces in column A. We want to remove the spaces and split the strings into two separate columns.
Use the “fixed width” option of the text to columns wizard.

Step 1: Select column A. In the Data tab, click “text to columns” from the “data tools” group. The same is shown in the following image.

Step 2: The “convert text to columns wizard” appears, as shown in the following image. Select the option “fixed width” in “choose the file type that best describes your data.” Click “next.”

Step 3: Place the cursor at the position of the space. Click “finish.”

Step 4: The strings of column A are split into two columns. The second half of the strings is placed in column B. The spaces between the strings have also been removed.

Note: The text to columns wizard (methods #2 and #3) splits the data into different columns.
#4 – Find and Replace Option
The find and replaceFind and Replace is an Excel feature that allows you to search for any text, numerical symbol, or special character not just in the current sheet but in the entire workbook. Ctrl+F is the shortcut for find, and Ctrl+H is the shortcut for find and replace.read more option helps remove spaces from numerical and textual data in Excel.
Working on the excel data under the heading “TRIM function” (method #1), we want to remove spaces with the find and replace option.

Step 1: Press “Ctrl+H” and the “find and replace” dialog box is displayed, as shown in the following image.

Step 2: Enter a space in the “find what” box. Leave the “replace with” box blank. Click “replace all.”

Step 3: Excel displays a message stating the number of replacements. Click “Ok.”

Step 4: All the spaces in column A have been removed, as shown in the following image.

#5 – SUBSTITUTE Function
The SUBSTITUTE functionSubstitute function in excel is a very useful function which is used to replace or substitute a given text with another text in a given cell, this function is widely used when we send massive emails or messages in a bulk, instead of creating separate text for every user we use substitute function to replace the information.read more helps remove the spaces by replacing them with the existing data string.
Working on the data under the heading “TRIM function” (method #1), we want to remove spaces in excel with the SUBSTITUTE function.

Step 1: In cell B1, enter the SUBSTITUTE function. Click “insert function” in the Formulas tab. The “function arguments” dialog box appears, as shown in the following image.
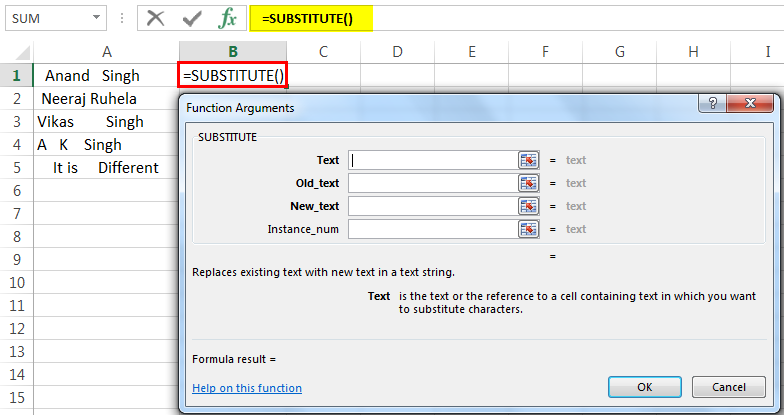
Step 2: Since the text in which characters are to be substituted is present in cell A1, enter the same in the “text” box.

Step 3: Since extra spaces are to be removed, enter “ ” in the “old_text” box. The blank between a pair of double quotation marks refers to a space.

Step 4: Since the space character is to be replaced with the existing text, enter “” in the “new_text” box. The pair of double quotation marks with no character in-between implies no spaces. Click “Ok.”

Step 5: The extra spaces from the name are removed in cell B1, as shown in the following image.

Step 6: Copy or drag the formula to the remaining cells, as shown in the following image.

Note: The find and replace option and the SUBSTITUTE function (methods #4 and #5) display the entire text string together without spaces.
Frequently Asked Questions
What does it mean to remove spaces in excel and why is it important?
While working with Excel, there might be extra spaces that are not easily visible to the user. It is important to eliminate them for the following reasons:
• The spaces at inappropriate places can make the data look untidy and disordered.
• The extra spaces have a negative impact on the quality of data presentation.
• The unwanted spaces can mess up with the formulas of Excel.
• Two cells with and without spaces are considered different entries even though the data in both may be identical.
Since it is difficult to remove the extra spaces manually, there are various techniques available in Excel for such deletions.
How to remove the leading and trailing spaces in Excel with the TRIM function?
Leading spaces are the extra space characters entered at the beginning of a data string. In contrast, the trailing spaces are found at the end of a string without any character following them.
The TRIM function helps remove all the unwanted spaces of the database. The exception to this rule is the single space character inserted between the words.
The syntax of the TRIM function is stated as follows:
“TRIM(text)”
The “text” represents the cell from which excess spaces are to be removed.
For example, the text string “ Chicago, United States ” in cell C2 is changed to “Chicago, United States” by the formula “=TRIM(C2).”
How to remove all the spaces in Excel?
To remove all the spaces in Excel, use the following formula:
“=SUBSTITUTE(C2,“ ”,“”)”
The space (“ ”) is replaced by the existing data (“”) in the cell C2.
For example, the text string “Chicago, United States” in cell C2 is changed to “Chicago,United States” by the given formula.
Note: Alternatively, the find and replace option can be used to remove all the spaces of a data string.
Recommended Articles
This has been a guide to removing spaces in excel cells. We discuss how to remove Leading, Trailing, Blank, Extra Spaces along with step by step examples. You may download an Excel template from the website. For more on Excel, take a look at the following articles –
- Randomize List ExcelRandomizing a list in excel means selecting a random value from the data, to randomize a whole list in excel. There are two excel formulae for this: the =RAND() function, which returns any random value to the cell and then allows us to sort the list, and the =RANDBETWEEN() function, which returns random values to the cell from a number range specified by the user.read more
- Hiding an Excel ColumnThe methods to hide columns in excel are — hide columns using right-click option, hide columns using shortcut cut key, hide columns using column width, hide columns using VBA code.read more
- Hide Formula in ExcelHiding formula in excel is used when we do not want the formula to be displayed in the formula bar when we click on a cell with formulas. We can format the cells, check the hidden checkbox, and protect the worksheet.read more
- Copy Sheet in ExcelThere are various ways to Copy or Move Sheets in Excel 1- By using the dragging method. 2 — By using the right-click method. 3 — Copy a sheet by using Excel Ribbon. 4- Copy Sheet from Another Workbook. and 5- Copy Multiple Sheets in Excel.read more
The TRIM function in Excel removes leading spaces, extra spaces and trailing spaces. Use the SUBSTITUTE function to remove all spaces or non-breaking spaces.
1. The TRIM function below removes 2 leading spaces, 3 extra spaces and 2 trailing spaces.

Note: the TRIM function does not remove single spaces between words.
2. To get the length of a string, use the LEN function.

Explanation: the LEN function counts 2 spaces, 2 characters, 4 spaces, 3 characters and 2 spaces.
3. You can use the SUBSTITUTE function to remove all spaces.

Note: the SUBSTITUTE function substitutes spaces (second argument) with empty strings (third argument).
Text imported from other applications may contain ASCII characters. The CLEAN function removes the first 32 non-printable ASCII characters (codes 0 through 31).
4. The CLEAN function below removes a non-printable character, CHAR(7).

5. Simply combine CLEAN and TRIM to remove non-printable characters and spaces.

6. The CLEAN function removes line breaks. To enter a line break, press ALT + ENTER.

7. You can also use the SUBSTITUTE function to remove a line break, CHAR(10), and replace it with something else. For example, a comma and a space.

The CLEAN function doesn’t remove all ASCII characters. Simply use the SUBSTITUTE function to remove other ASCII characters.
8. First, find out the code number of the character.

9. Next, use SUBSTITUTE and CHAR to return the text string without this character.

10. If your text contains non-breaking spaces, CHAR(160), the TRIM function doesn’t work.

11. You can use the SUBSTITUTE function to substitute non-breaking spaces, CHAR(160) with normal spaces, CHAR(32). Don’t forget to add a TRIM function to remove the extra spaces.
