
Содержание
- Немного об XML
- Способ 1: Visual Studio
- Способ 2: Microsoft Excel
- Способ 3: Блокнот
- Вопросы и ответы

XML-формат предназначен для хранения данных, которые могут пригодиться в работе некоторых программ, сайтов и поддержки определённых языков разметки. Создать и открыть файл с таким форматом не сложно. Это вполне можно сделать, даже если на компьютере не установлено какое-либо специализированное программное обеспечение.
Сам по себе XML — это язык разметки, чем-то похожий на HTML, который используется на веб-страницах. Но если последний применяется только для вывода информации и её правильной разметки, то XML позволяет её структурировать определённым образом, что делает этот язык чем-то похожим на аналог базы данных, который не требует наличия СУБД.
Создавать XML-файлы можно как при помощи специализированных программ, так и встроенным в Windows текстовым редактором. От вида используемого ПО зависит удобство написания кода и уровень его функциональности.
Способ 1: Visual Studio
Вместо этого редактора кода от Microsoft можно использовать любой его аналог от других разработчиков. По факту Visual Studio является более расширенной версией обычного «Блокнота». Код теперь имеет специальную подсветку, ошибки выделяются или исправляются автоматически, также в программу уже загружены специальные шаблоны, которые позволяют упростить создание XML-файлов больших объёмов.
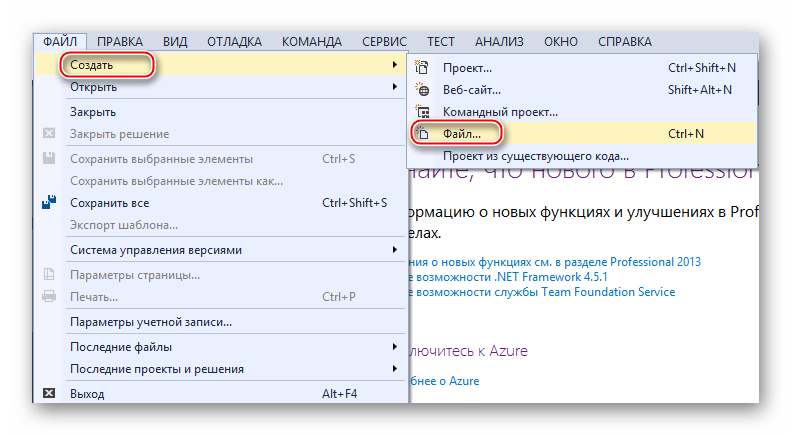
Для начала работы вам нужно создать файл. Нажмите по пункту «Файл» в верхней панели и из выпадающего меню выберите «Создать…». Откроется список, где указывается пункт «Файл».
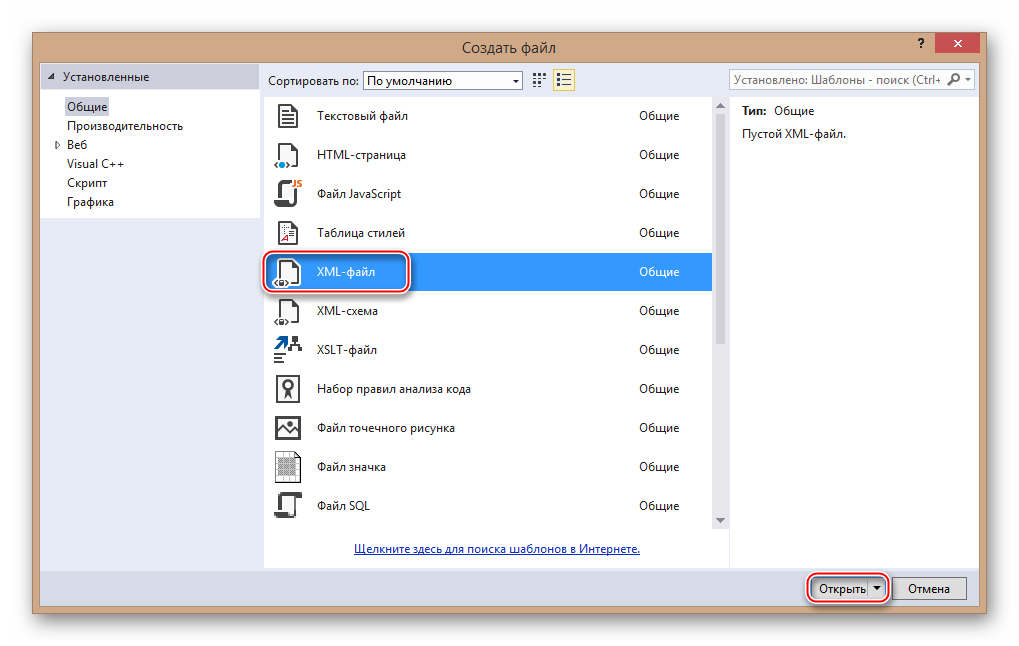
В только что созданном файле уже будет первая строка с кодировкой и версией. По умолчанию прописана первая версия и кодировка UTF-8, которые вы можете поменять в любое время. Дальше для создания полноценного XML-файла вам нужно прописать всё то, что было в предыдущей инструкции.
По завершении работы снова выберите в верхней панели «Файл», а там из выпадающего меню пункт «Сохранить всё».
Способ 2: Microsoft Excel
Можно создать XML-файл и не прописывая код, например, при помощи современных версий Microsoft Excel, который позволяет сохранять таблицы с данным расширением. Однако нужно понимать, что в этом случае создать что-то более функциональное обычной таблицы не получится.
Такой способ больше подойдёт тем, кто не хочет или не умеет работать с кодом. Однако в этом случае пользователь может столкнуться с определёнными проблемами при перезаписи файла в XML-формат. К сожалению, проделать операцию преобразования обычной таблицы в XML можно только на самых новых версиях MS Excel. Чтобы это сделать, используйте следующую пошаговую инструкцию:
- Заполните таблицу каким-либо контентом.
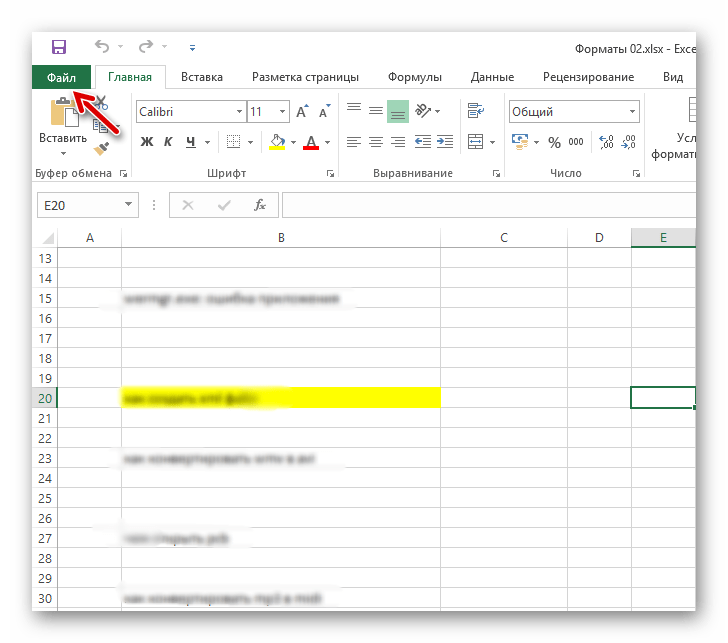
- Нажмите на кнопку «Файл», что в верхнем меню.
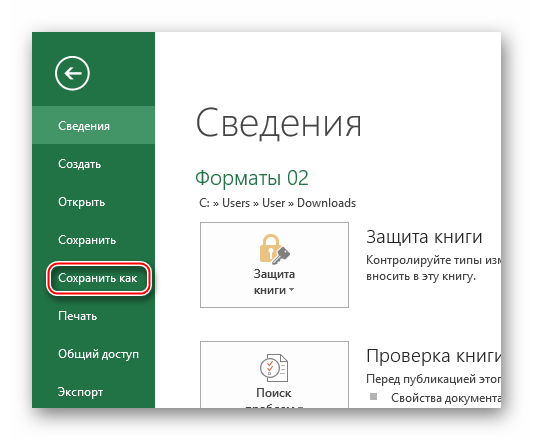
- Откроется специальное окно, где нужно нажать на «Сохранить как…». Этот пункт можно найти в левом меню.
- Укажите папку, куда необходимо сохранить файл. Папка указывается в центральной части экрана.
- Теперь вам нужно указать название файла, а в разделе «Тип файла» из выпадающего меню выбрать
«XML-данные». - Нажмите на кнопку «Сохранить».


Способ 3: Блокнот
Для работы с XML вполне подойдёт даже обычный «Блокнот», однако пользователю, который не знаком с синтаксисом языка, придётся трудно, так как в нём нужно прописывать различные команды и теги. Несколько проще и значительно продуктивнее процесс будет идти в специализированных программах для редактирования кода, например, в Microsoft Visual Studio. В них есть специальная подсветка тегов и всплывающие подсказки, что значительно упрощает работу человеку, плохо знакомому с синтаксисом этого языка.
Для этого способа не потребуется что-либо скачивать, так как в операционную систему уже встроен «Блокнот». Давайте попробуем сделать в нём простую XML-таблицу по данной инструкции:
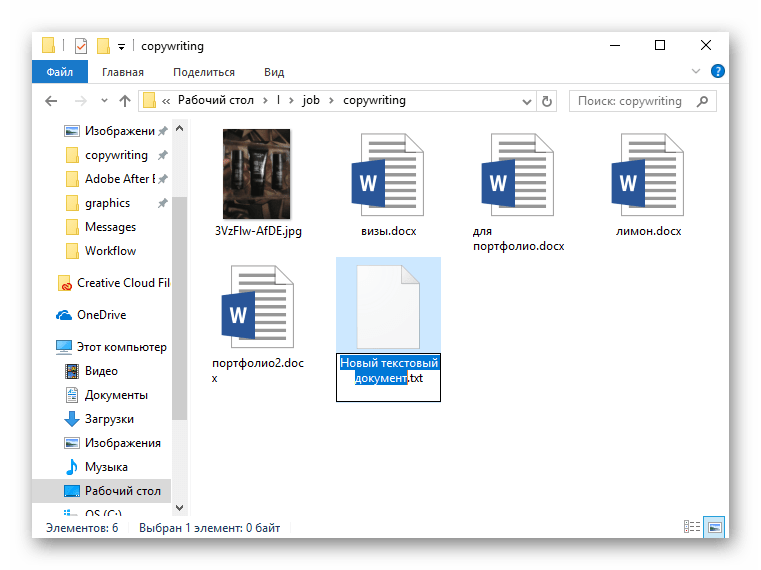
- Создайте обычный текстовый документ с расширением TXT. Разместить его можно где угодно. Откройте его.
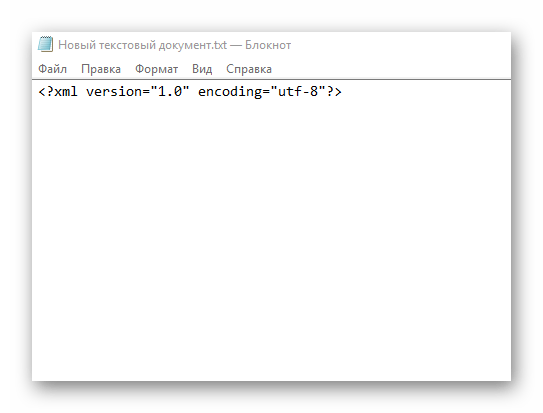
- Начните прописывать в нём первые команды. Для начала нужно задать всему файлу кодировку и указать версию XML, делается это следующей командой:
<?xml version="1.0" encoding="utf-8"?>Первое значение — это версия, её менять не обязательно, а второе значение — это кодировка. Рекомендуется использовать кодировку UTF-8, так как большинство программ и обработчиков работают с ней корректно. Однако её можно изменить на любую другую, просто прописав нужное название.
- Создайте первый каталог в вашем файле, прописав тег
<root>и закрыв его таким образом</root>. - Внутри этого тега теперь можно написать какой-нибудь контент. Создадим тег
<Employee>и присвоим ему любое имя, например, «Иван Иванов». Готовая структура должна быть такой:<Employee name="Иван Иванов"> - Внутри тега
<Employee>теперь можно прописать более подробные параметры, в данном случае это информация о неком Иване Иванове. Пропишем ему возраст и должность. Выглядеть это будет так:<Age>25</Age>
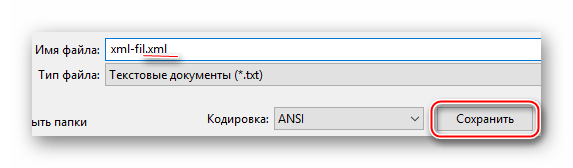
<Programmer>True</Programmer> - Если вы следовали инструкции, то у вас должен получиться такой же код, как ниже. По завершении работы в верхнем меню найдите «Файл» и из выпадающего меню выберите «Сохранить как…». При сохранении в поле «Имя файла» после точки должно стоять расширение не TXT, а XML.
Примерно так у вас должен выглядеть готовый результат:
<?xml version="1.0" encoding="utf-8"?>
<root>
<Employee name="Иван Иванов">
<Age>25</Age>

<Programmer>True</Programmer>
</Employee>
</root>

XML-компиляторы должны обработать этот код в виде таблицы с одной колонкой, где указаны данные о неком Иване Иванове.
В «Блокноте» вполне можно сделать несложные таблицы наподобие этой, но при создании более объёмных массивов данных могут возникнуть сложности, так как в обычном «Блокноте» нет функций исправления ошибок в коде или их подсветки.
Как видите в создании XML-файла нет ничего сложного. При желании его может создать любой пользователь, который более-менее умеет работать на компьютере. Однако для создания полноценного XML-файла рекомендуется изучить данный язык разметки, хотя бы на примитивном уровне.
Microsoft Excel makes it easy to import Extensible Markup Language (XML) data that is created from other databases and applications, to map XML elements from an XML schema to worksheet cells, and to export revised XML data for interaction with other databases and applications. Think of these XML features as turning Office Excel into an XML data file generator with a familiar user interface.
In this article
-
Why use XML in Excel?
-
XML data and schema files
-
Key XML and Excel scenarios
-
-
The basic process of using XML data in Excel
-
Working with XML maps
-
Using the XML Source task pane
-
Element types and their icons
-
Working with single-mapped cells
-
Working with repeating cells in XML tables
-
XML map security considerations
-
Importing XML data
-
Working with an inferred schema
-
Exporting XML data
-
Using the Excel macro-enabled Office Open XML Format file
-
Why use XML in Excel?
XML is a technology that is designed for managing and sharing structured data in a human-readable text file. XML follows industry-standard guidelines and can be processed by a variety of databases and applications. Using XML, application designers can create their own customized tags, data structures, and schemas. In short, XML greatly eases the definition, transmission, validation, and interpretation of data between databases, applications, and organizations.
XML data and schema files
Excel works primarily with two types of XML files:
-
XML data files (.xml), which contain the custom tags and structured data.
-
Schema files (.xsd), which contain schema tags that enforce rules, such as data type and validation.
The XML standard also defines Extensible Stylesheet Language Transformation (XSLT) (.xslt) files, which are used to apply styles and transform XML data into different presentation formats. You can apply these transforms before you import XML files into Excel and after you export XML files from Excel. If XSLT files are linked to XML data files that you import into Excel, you do have the option to apply or not apply the formatting before the data is added to the worksheet, but only when you open an XML file by using the Open command from within Excel. Choose the XML Files (*.xml) file type before you click the Open button to see the XML files in the folder.
Key XML and Excel scenarios
By using XML and Excel, you can manage workbooks and data in ways that were previously impossible or very difficult. By using XML maps, you can easily add, identify, and extract specific pieces of business data from Excel documents. For example, an invoice that contains the name and address of a customer or a report that contains last quarter’s financial results are no longer just static reports. You can easily import this information from databases and applications, revise it, and export it to the same or other databases and applications.
The following are key scenarios that the XML features are designed to address:
-
Extend the functionality of existing Excel templates by mapping XML elements onto existing cells. This makes it easier to get XML data into and out of your templates without having to redesign them.
-
Use XML data as input to your existing calculation models by mapping XML elements onto existing worksheets.
-
Import XML data files into a new workbook.
-
Import XML data from a Web service into your Excel worksheet.
-
Export data in mapped cells to XML data files independent from other data in the workbook.
Top of Page
The basic process of using XML data in Excel
The following diagram shows how the different files and operations work together when you use XML with Excel. Essentially, there are five phases to the process:
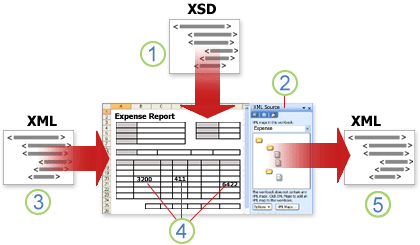
 Adding an XML schema file (.xsd) to a workbook
 Mapping XML schema elements to individual cells or XML tables
 Importing an XML data file (.xml) and binding the XML elements to mapped cells
 Entering data, moving mapped cells, and leveraging Excel functionality, while preserving XML structure and definitions
 Exporting revised data from mapped cells to an XML data file
Working with XML maps
You can create or open a workbook in Excel, attach an XML schema file (.xsd) to the workbook, and then use the XML Source task pane to map XML elements of the schema to individual cells or tables. After you map the XML elements to your worksheet, you can import and export XML data into and out of the mapped cells.
When you add an XML schema file (.xsd) to your workbook, you create an XML map. In general, XML maps are used to create mapped cells and to manage the relationship between mapped cells and individual elements in the XML schema. In addition, these XML maps are used to bind the contents of mapped cells to elements in the schema when you import or export XML data files (.xml).
There are two kinds of mapped cells that you can create: single-mapped cells and repeating cells (which appear as XML tables). To make designing your worksheet more flexible, you can drag the mapped cells anywhere on a worksheet and into any order — even one different from the XML schema. You can also choose which elements to map and not map.
The following rules about using XML maps are important to know:
-
A workbook can contain one or more XML maps.
-
You can only map one element to one location in a workbook at a time.
-
Each XML map is an independent entity, even if multiple XML maps in the same workbook refer to the same schema.
-
An XML map can only contain one root element. If you add a schema that defines more than one root element, you are prompted to choose the root element to use for the new XML map.
Using the XML Source task pane
You use the XML Source task pane to manage XML maps. To open it, on the Developer tab, in the XML group, click Source. The following diagram shows the main features of this task pane.
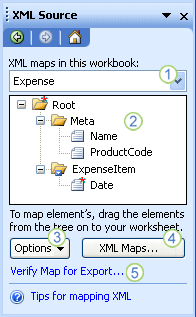
1. Lists XML maps that were added to the workbook
2. Displays a hierarchical list of XML elements in the currently listed XML map
3. Sets options when working with the XML Source task pane and the XML data, such as how to preview the data and control headings
4. Opens the XML Maps dialog box, which you can use to add, delete, or rename XML maps
5. Verifies whether you can export XML data through the current XML map
Top of Page
Element types and their icons
The following table summarizes each type of XML element that Excel can work with and the icon that is used to represent each type of element.
|
Element type |
Icon |
|---|---|
|
Parent element |
|
|
Required parent element |
|
|
Repeating parent element |
|
|
Required repeating parent element |
|
|
Child element |
|
|
Required child element |
|
|
Repeating child element |
|
|
Required repeating child element |
|
|
Attribute |
|
|
Required attribute |
|
|
Simple content in a complex structure |
|
|
Required simple content in a complex structure |
|


Top of Page
Working with single-mapped cells
A single-mapped cell is a cell that has been mapped to a nonrepeating XML element. You create a single-mapped cell by dragging a nonrepeating XML element from the XML Source task pane onto a single cell in your worksheet.
When you drag a nonrepeating XML element onto the worksheet, you can use a smart tag to choose to include the XML element name as a heading above or just to the left of the single-mapped cell, or you can use an existing cell value as a heading.
You can also use a formula in a single-mapped cell, if the cell is mapped to an XML element with an XML Schema Definition (XSD) data type that Excel interprets as a number, date, or time.
Top of Page
Working with repeating cells in XML tables
XML tables are similar in appearance and functionality to Excel tables. An XML table is an Excel table that has been mapped to one or more XML repeating elements. Each column in the XML table represents an XML element.
An XML table is created when you:
-
Use the Import command (in the XML group on the Developer tab) to import an XML data file.
-
Use the Open command from within Excel to open an XML data file — and then select As an XML table in the Open XML dialog box.
-
Use the From XML Data Import command (from the From Other Sources command button, in the Get External Data group, on the Data tab) to import an XML data file — and then select XML table in existing worksheet or New worksheet in the Import Data dialog box.
-
Drag one or more repeating elements from the XML Source task pane to a worksheet.
When you create an XML table, the XML element names are automatically used as column headings. You can change these to any column headings that you want. However, the original XML element names are always used when you export data from the mapped cells.
Two options under the Options button in the XML Source task pane are useful when you work with XML tables:
-
Automatically Merge Elements When Mapping
When selected, Excel creates one XML table from multiple fields as they are dropped onto the worksheet. This option works as long as the multiple fields are dropped on the same row, one adjacent to the other. When this option is cleared, each element appears as its own XML table. -
My Data Has Headings
When selected, existing heading data is used as column headings for repeating elements that you map to your worksheet. When this option is cleared, the XML element names are used as column headings.
Using XML tables, you can easily import, export, sort, filter, and print data based on an XML data source. However, XML tables do have some limitations regarding how they can be arranged on the worksheet.
-
XML tables are row-based, meaning that they grow from the header row down. You cannot add new entries above existing rows.
-
You cannot transpose an XML table so that new entries will be added to the right.
You can use formulas in columns that are mapped to XML elements with an XML Schema Definition (XSD) data type that Excel interprets as a number, date, or time. Just as in an Excel table, formulas in an XML table are filled down the column when new rows are added to the table.
XML map security considerations
An XML map and its data source information are saved with the Excel workbook, not a specific worksheet. A malicious user can view this map information by using a Microsoft Visual Basic for Applications (VBA) macro. Furthermore, if you save your workbook as a macro-enabled Excel Office Open XML Format File, this map information can be viewed through Microsoft Notepad or through another text-editing program.
If you want to keep using the map information but remove the potentially sensitive data source information, you can delete the data source definition of the XML schema from the workbook, but still export the XML data, by clearing the Save data source definition in workbook check box in the XML Map Properties dialog box, which is available from the Map Properties command in the XML group on the Developer tab.
If you delete a worksheet before you delete a map, the map information about the data sources, and possibly other sensitive information, is still saved in the workbook. If you are updating the workbook to remove sensitive information, make sure that you delete the XML map before you delete the worksheet, so that the map information is permanently removed from the workbook.
Top of Page
Importing XML data
You can import XML data into an existing XML map in your workbook. When you import data, you bind the data from the file to an XML map that is stored in your workbook. This means that each data element in the XML data file has a corresponding element, in the XML schema, that you mapped from an XML Schema file or inferred schema. Each XML map can only have one XML data binding, and an XML data binding is bound to all of the mappings that were created from a single XML map.
You can display the XML Map Properties dialog box (Click Map Properties in the XML group on the Developer tab.), which has three options, all selected by default, that you can set or clear to control the behavior of an XML data binding:
-
Validate data against schema for import and export Specifies whether Excel validates data against the XML map when importing data. Click this option when you want to ensure that the XML data that you import conforms to the XML schema.
-
Overwrite existing data with new data Specifies whether data is overwritten when you import data. Click this option when you want to replace the current data with new data, for example, when up-to-date data is contained in the new XML data file.
-
Append new data to existing XML tables Specifies whether the contents of the data source are appended to the existing data on the worksheet. Click this option, for example, when you are consolidating data from several similar XML data files into an XML table, or you do not want to overwrite the contents of a cell that contains a function.
When you import XML data, you may want to overwrite some mapped cells but not others. For example, some mapped cells may contain formulas and you don’t want to overwrite the formula when you import an XML file. There are two approaches that you can take:
-
Unmap the elements that you don’t want overwritten, before you import the XML data. After you import the XML data, you can remap the XML element to the cells containing the formulas, so that you can export the results of the formulas to the XML data file.
-
Create two XML maps from the same XML schema. Use one XML map for importing the XML data. In this «Import» XML map, don’t map elements to the cells that contain formulas or other data that you don’t want overwritten. Use another XML map for exporting the data. In this «Export» XML map, map the elements that you want to export to an XML file.
Note: The ability to import XML data from a Web service by using a Data Retrieval Service Connection (.uxdc) file to connect to a data source is no longer supported in versions later than Excel 2003 through the user interface. If you open a workbook that was created in Excel 2003, you can still view the data, but you cannot edit or refresh the source data.
Working with an inferred schema
If you import XML data without first adding a corresponding XML schema to create an XML map, Excel tries to infer a schema for you based on the tags that are defined in the XML data file. The inferred schema is stored with the workbook, and the inferred schema allows you to work with XML data if an XML schema file isn’t associated with the workbook.
When you work with imported XML data that has an inferred schema, you can also customize the XML Source task pane. Select the Preview Data in Task Pane option from the Options button to display the first row of data as sample data in the element list, if you imported XML data associated with the XML map in the current session of Excel.
You cannot export the Excel inferred schema as a separate XML schema data file (.xsd). Although there are XML schema editors and other methods for creating an XML schema file, you may not have convenient access to them or know how to use them. As an alternative, you can use the Excel 2003 XML Tools Add-in Version 1.1, which can create a schema file from an XML map. For more information, see Using the Excel 2003 XML Tools Add-in Version 1.1.
Exporting XML data
You export XML data by exporting the contents of mapped cells on the worksheet. When you export data, Excel applies the following rules to determine what data to save and how to save it:
-
Empty items are not created when blank cells exist for an optional element, but empty items are created when blank cells exist for a required element.
-
Unicode Transformation Format-8 (UTF-8) encoding is used to write the data.
-
All namespaces are defined in the Root XML element.
-
Excel overwrites existing namespace prefixes. The default namespace is assigned a prefix of ns0. Successive namespaces are designated ns1, ns2 to ns<count> where <count> is the number of namespaces written to the XML file.
-
Comment nodes are not preserved.
You can display the XML Map Properties dialog box (Click Map Properties in the XML group on the Developer tab.) and then use the Validate data against schema for import and export option (active by default) to specify whether Excel validates data against the XML map when exporting data. Click this option when you want to ensure that the XML data you export conforms to the XML schema.
Using the Excel Macro-enabled Office Open XML Format File
You can save an Excel workbook in a variety of file formats, including the Excel macro-enabled Office Open XML Format File (.xlsm). Excel has a defined XML schema that defines the contents of an Excel workbook, including XML tags that store all workbook information, such as data and properties, and define the overall structure of the workbook. Custom applications can use this Excel macro-enabled Office XML Format File. For example, developers may want to create a custom application to search for data in multiple workbooks that are saved in the this format and create a reporting system based on the data found.
Top of Page
Need more help?
You can always ask an expert in the Excel Tech Community or get support in the Answers community.
See Also
Import XML data
Map XML elements to cells in an XML Map
Export XML data
Append or overwrite mapped XML data
How To Convert Data in Excel to XML in 7 Easy Steps
- Step 1: Create your Excel spreadsheet.
- Step 2: Create your XML schema.
- Step 3: Enable the Developer tab.
- Step 4: Open the XML Source pane.
- Step 5: Add an XML Map.
- Step 6: Drag and drop the XML elements into your spreadsheet.
- Step 7: Export your XML data.
Contents
- 1 Can you convert XLSX to XML?
- 2 How do I convert CSV to XML in Excel?
- 3 How convert Excel to tally XML?
- 4 How do you convert Excel file to XML file free download?
- 5 What is the difference between XML and XLSX?
- 6 What is XML in Excel?
- 7 How do I convert XLSX to CSV?
- 8 Can you convert a CSV to XML?
- 9 Is XML similar to CSV?
- 10 How do I create an XML file?
- 11 How do I convert a file to XML?
- 12 Can we transfer data from Excel to tally?
- 13 How can I import Excel data into Tally?
- 14 How do I create an XML file in Notepad?
- 15 What is XML used for?
- 16 Is XML like Excel?
- 17 How is XML different from Excel?
- 18 Should I use XLS or XLSX?
- 19 How do I edit XML in Excel?
- 20 Can Excel Open XML files?
Can you convert XLSX to XML?
How to convert a XLSX to a XML file? Choose the XLSX file that you want to convert. Select XML as the the format you want to convert your XLSX file to. Click “Convert” to convert your XLSX file.
How do I convert CSV to XML in Excel?
Convert CSV to XML
- Step 1: Select your input. Enter Data.
- Step 2: Choose input options (optional) Input Options First row is column names.
- Step 3: Choose output options (optional) Output Options.
- Step 4: Create Custom Output via Template (optional)
- Step 5: Generate output.
Comparing to the manual accounting tasks, converting excel information to Tally is far better. Here are the steps. Step 1: Configure your TDL file by going to Gateway of Tally → F12: Configuration → Product & Features → F4. Step 2: After configuring the add-on file, Go to Gateway of Tally and click on the “1.
How do you convert Excel file to XML file free download?
How to convert xls to xml?
- Upload xls-file. Select xls file, which you want to convert, from your computer, Google Drive, Dropbox or drag and drop it on the page.
- Convert xls to xml. Select xml or any other format, which you want to convert.
- Download your xml-file.
What is the difference between XML and XLSX?
the latest versions of microsoft excel files (. xlsx) are just collections of xml files, all grouped in what amounts to a zip file (change the extension of an .where as xml is an open source format, xlsx is a proprietary Microsoft format. There is no ‘sheet’ in an xml file, as it’s one single datafile.
What is XML in Excel?
Excel has a defined XML schema that defines the contents of an Excel workbook, including XML tags that store all workbook information, such as data and properties, and define the overall structure of the workbook. Custom applications can use this Excel macro-enabled Office XML Format File.
How do I convert XLSX to CSV?
Using Microsoft Excel to convert . xls, . xlsx file into a . csv format
- Open your excel file.
- Click on File and Save as.
- In the “File Name” field type in the name of your document.
- In the “Save as” field select CSV(Comma Delimited) from the drop down menu.
- Click Save.
Can you convert a CSV to XML?
How to convert a CSV to a XML file? Choose the CSV file that you want to convert. Select XML as the the format you want to convert your CSV file to. Click “Convert” to convert your CSV file.
Is XML similar to CSV?
Answer: The CSV output format is simply a text file with each record from the crawl per line, with the columns separated by commas.The XML sitemap is a more complex file that conforms to the sitemap standard published on sitemaps.org.
How do I create an XML file?
Create an XML schema file to model your XML format data.
Procedure
- Click File > New > Other. A window opens in which you can select a wizard.
- Expand XML, select XML Schema File, click Next. The Create XML Schema wizard opens.
- Select a parent folder and enter a file name for your XML schema file.
- Click Finish.
How do I convert a file to XML?
You can convert data in an extract file into XML format.
Converting to XML format
- Expand a folder in the Directory Explorer that contains the convert service, expand the Convert Services node, and double-click the convert service to edit.
- Select the Target File Options tab.
- In the Target file format list, select XML.
Can we transfer data from Excel to tally?
With our add-on “Import Masters from Excel”, users can import Party/Supplier masters, Item masters as well as Cost Centre masters from Excel to Tally. ERP 9. Note: The excel sheet has to be in the prescribed format.
How can I import Excel data into Tally?
Import Vouchers
- Go to Gateway of Tally > Import Data > Vouchers .
- Enter the name of the .xml file to be imported, in the Import Vouchers screen, as shown below: Note : By default, the export location is the Tally.ERP 9 installation folder, which is also the default import location.
- Press Enter to import.
How do I create an XML file in Notepad?
To create a well-formed XML document with XML Notepad, follow these steps:
- To open XML Notepad, click Start, point to Programs, point to XML Notepad, and then click Microsoft XML Notepad.
- Change Root_Element to Catalog and Child_Element to Book, and add an attribute and three child elements to the Book child element.
What is XML used for?
The Extensible Markup Language (XML) is a simple text-based format for representing structured information: documents, data, configuration, books, transactions, invoices, and much more. It was derived from an older standard format called SGML (ISO 8879), in order to be more suitable for Web use.
Is XML like Excel?
XML is text based while XLS is a binary format that cannot be opened with text editors.But you can easily open it with any archiving application like WinZip and WinRar to get to the actual XML files and open them with a text editor. XML is also an open standard compared to XLS, which is not.
How is XML different from Excel?
The main difference between XML and XLS is what they actually are. While XLS is a file format, as already mentioned, XML is actually a markup language that is prominently used in web pages.To complement this point, XML is also text based and can be read on any text editor.
Should I use XLS or XLSX?
The underlying file format is what makes the main difference between the XLS and XLSX files.Data is arranged in an XLS file as binary streams in the form of a compound file as described in [MS-XLS]. In contrast, an XLSX file is based on Office Open XML format that stores data in compressed XML files in ZIP format.
How do I edit XML in Excel?
This can be accomplished a number of ways.
- Right click on the XML file and select Open with Microsoft Office Excel.
- Open Excel and drag and drop the XML file onto an empty workbook.
- Open Excel and use the File Open dialog box to select the XML File. You will need to change the file type to XML Files (*. xml).
Can Excel Open XML files?
The XML data is opened as read-only in Excel so that you don’t accidentally save your original source file in the Excel Macro-Enabled Workbook file format (. xlsm).
Содержание
- How to collect and export data from XML-files in Excel
- How to create XML-file in Excel
- How to save an Excel file in XML format
- How to open an XML file in Excel
- How to convert XML file to Excel
- How to collect data from XML-files to Excel
- 5 способов для быстрой конвертации XML в таблицу Excel
- Что такое форматы XML, XLS, XLSX, XLSM: какой выбрать для сохранения
- Microsoft Excel
- Обычное сохранение в xlsx
- Импорт данных через меню разработчика
- Онлайн-сервисы для конвертации
- Convertio
- Aconvert
- Aspose
How to collect and export data from XML-files in Excel
Microsoft Excel is a useful instrument for organizing and structuring very different data. It can be used to process information by various methods and edit data arrays.
Let us see its tools for generation and processing web applications files. Using a particular example, we will learn the basics of work with XML in Excel.
How to create XML-file in Excel
XML is a file standard for transferring files over the Internet. Excel supports its export and import.
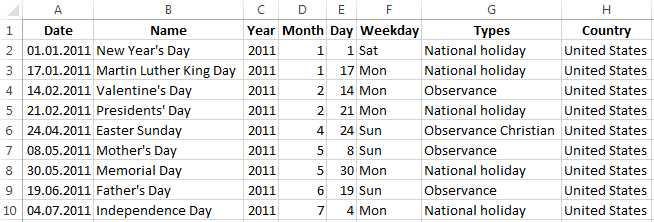
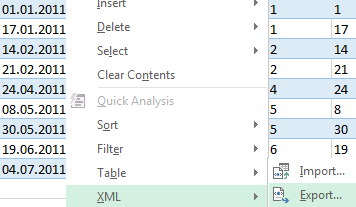
We are going to look through the process of creation an XML-file using factory calendar as a particular example.
- Create a table on which you want to create an XML file in Excel and fill it with data.
- Create and insert a map with the required XML document structure.
- Export the table data in XML format.
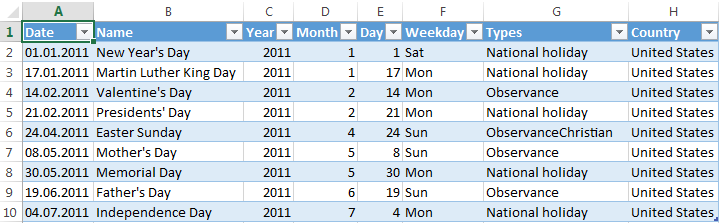
- Our table is a Holiday calendar.

- Create any text editor (such as «Notepad») the desired XML structure to generate a map file is saved. In this example, use the map structure:
How to save an Excel file in XML format
One of the options:
- Press CTRL+S, choose «Save as» — «Other formats».
- Set the name. Choose the file destination and type – XML.
Press «Save» button.
If you get any errors, try to save the workbook as XML 2003 table or web page. Usually, there are no problems with these formats.
- Download XLC to XML converter, or find a service, which exports files online.
- Download XML Tools Add-in from the official Microsoft web site. It is available free of charge.
- Open a new workbook. Press CTRL+O «Open».
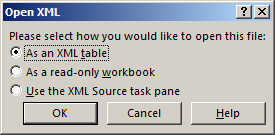
How to open an XML file in Excel
- Change the format to XML file. Choose the desired file. Press CTRL+O.
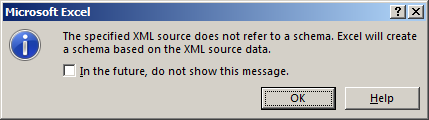
- Open it as an XML-table. Press OK.
- Similar notification will appear.
- Press OK. You can work with this table the same way as with any Excel file.
How to convert XML file to Excel
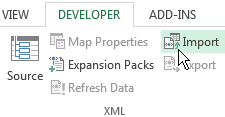
- Open the tool «DEVELOPER». Choose the dialog box «Import».
- Choose a file in the dialog box, that you want to convert.
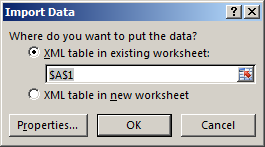
- Press «Import». Excel will offer to create a scheme automatically based on the data received. Press OK. A window will open, where you will need to choose a destination for the importing file.
- Set the range for import. It is better to add extra cells for future entries. Press «OK».
From now on, the created table is being edited and saved in Excel format.
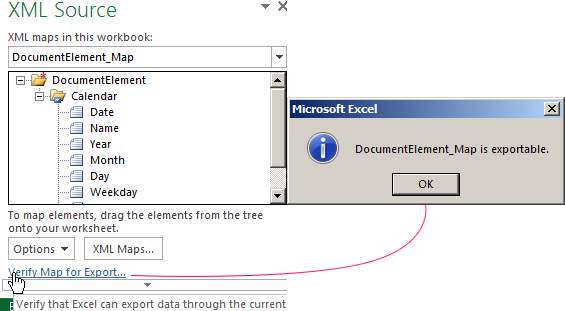
How to collect data from XML-files to Excel
The principle of collecting data from several XML-files is the same as the principle of conversion. When we import data to Excel, the XML map transfers at the same time. You can also transfer other data in this schema.
Each new file will be linked to the existing map. Every element of the table structure binds to an element from XML map. Only one data link is allowed.
In order to configure binding settings, in the «DEVELOPER» menu choose the «Map Proparties» instrument.
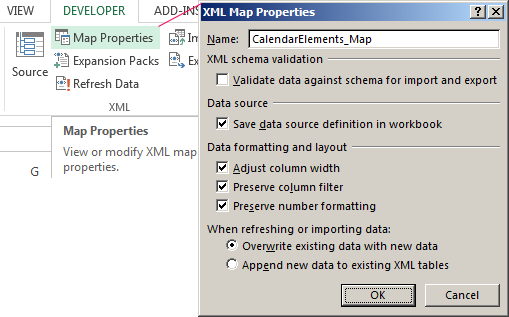
- Excel will check every new file for compliance with the existing map (if you check the box next to this line).
- The data can be update. Also, new information can be added to the existing table (it makes sense, if you need to collect data from similar files).
Other ways to get structure data (schema):
- Download it from a database of a specialized business application. Commercial sites and services may provide schemas. Simple options are in the public domain.
- Use prepared examples in order to validate the maps. Examples contain the basic elements and structure data. Copy and paste it into the program «Notepad» – and save it with the desired extension.
These are all manual methods of import and export files structure data.
Источник
5 способов для быстрой конвертации XML в таблицу Excel

XML-файл содержит в себе данные, из которых можно автоматически создать удобную таблицу. Сегодня покажу, как превратить xml в Excel: в самой программе Майкрософт Эксель и онлайн-конвертерах, на случай если у вас нет приложения для управления таблицами.
Что такое форматы XML, XLS, XLSX, XLSM: какой выбрать для сохранения
XML – это язык разметки, используется на веб-страницах и является базовым форматом офисного инструмента Excel. Если открыть файл с расширением xml в Ворде или другом редакторе, появится текст-структура, чем-то похожая на html. Она будет непонятна обычным пользователям, но информативна для разработчиков.
Если говорить простым языком, XML – это структурированный набор данных, из которых можно автоматически сделать удобную таблицу с ячейками, столбцами и строками.
XLS и XLSX – это основные форматы таблиц Excel. Первый – более устаревший, второй – более новый, основан на формате XML.
У XLSX больше преимуществ, чем у простого XLS. Именно в нем рекомендуется сохранять таблицы. Почему: файлы XLSX легче переносить в другие приложения, они менее подвержены повреждению и имеют меньший вес. Недостатков у нового расширения два: файлы могут дольше сохраняться и запускаться, их нельзя открыть в старых Excel 2003 года (XLSX стал форматом по умолчанию в версиях Эксель 2007 и выше).
У файлов Excel есть и другие, менее популярные расширения:
- XLSM – поддерживает макросы. Если в вашей таблице они есть, выбирайте этот формат.
- XLSTX – таблица, сохраненная в виде шаблона, который можно использовать как отправную точку для других ваших книг Эксель.
- XLSTM – тот же файл-шаблон, только с поддержкой макросов.
- XLSB – формат, который тоже работает с макросами. Подходит для больших таблиц с десятками тысяч строк. Размер файла уменьшается чуть ли не в два раза, а работа с ним при этом ускоряется. Недостаток – открывается только в Excel. Большинство альтернативных программ не запустят этот файл.
Microsoft Excel
Excel спокойно запустит файл xml, превратив структурированные данные в удобную пользовательскую таблицу. А уже открытую книгу с заполненными ячейками можно сохранить в формате xlsx – в самом интерфейсе Excel.
Обычное сохранение в xlsx
Способ подойдет для простых таблиц. Для сложных лучше использовать следующий метод с импортом данных в меню разработчика.
Инструкцию сделала на примере Excel 2016. В зависимости от версии программы названия разделов и последовательность шагов могут отличаться, но в целом ход действий будет одинаковым.
Что нужно сделать для перевода xml в Эксель:
- Запустите Microsoft Excel через ярлык на рабочем столе или в меню «Пуск».
- Также можно открыть панель поиска по системе и отыскать иконку приложения там.
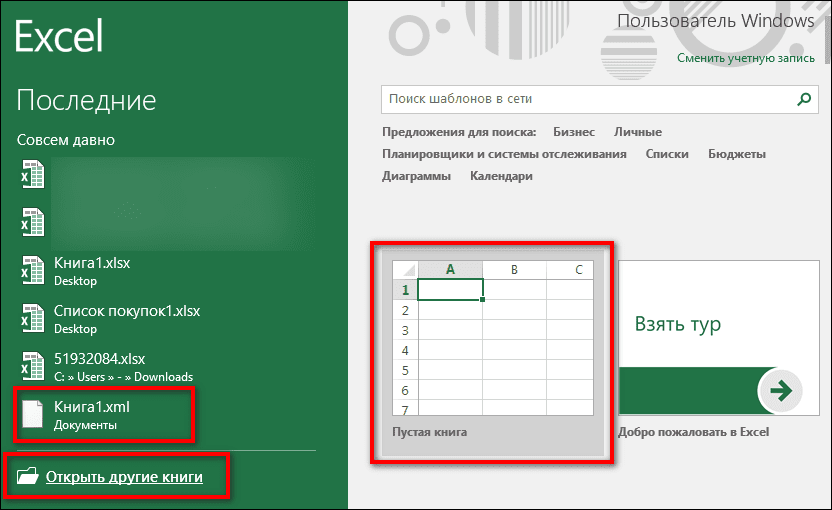
- Попробуйте найти ваш файл xml в списке последних документов. Если там его нет, нажмите «Открыть другие книги», чтобы сразу запустить поиск файла в «Проводнике Windows». Либо нажмите «Пустая книга» – на экране появится пока что пустая таблица.


Импорт данных через меню разработчика
Если конвертация таблицы прошла некорректно в предыдущем способе, тогда используйте полноценный импорт данных. Эта функция находится в меню разработчика, которое по умолчанию отключено.
Как его включить и запустить импорт:
- Откройте Excel с помощью ярлыка на рабочем столе или в «Пуске». Создайте пустую книгу. Также можно запустить любую таблицу, хранящуюся на ПК, если вдруг не нашли ярлык пустого окна программы. Раскройте меню «Файл». Перейдите в «Параметры».
- Зайдите в раздел «Настроить ленту». Поставьте галочку «Разработчик». Нажмите «ОК».
- Теперь перейдите в саму вкладку «Разработчик», которая появилась вверху рядом с другими привычными разделами. Щелкните «Импорт».
- Найдите и выделите файл xml. Кликните «Импорт».
- Нажмите «ОК».
- Если вы ранее запустили пустой лист с помощью ярлыка Excel, оставьте отмеченным пункт «В XML-таблицу в существующей книге» и выберите левую верхнюю ячейку, с которой должна начинаться ваша таблица. Можно вручную прописать адрес ячейки в поле или выбрать ее в самой книге. Если вы ранее открыли существующую таблицу, выберите пункт «В XML-таблицу в новой книге». Нажмите «ОК».
- На экране появится содержимое документа xml. При необходимости внесите какие-либо изменения. Далее для сохранения кликните по дискете либо по меню «Файл» – «Сохранить как».


Онлайн-сервисы для конвертации
Если конвертация с помощью Excel не сработала должным образом, попробуйте преобразовать файл на специальных сайтах. Сервисы также пригодятся, если у вас на ПК нет программы Эксель, а сконвертировать документ нужно срочно.
Регистрироваться на сайтах необязательно. Просто загружаете один или несколько файлов, выбираете формат таблицы и скачиваете готовый документ Excel.
Convertio
Convertio преобразует самые разные виды файлов: картинки, видео, текстовые документы, таблицы, шрифты, презентации, электронные книги, архивы. Всего на счету у сервиса более 300 форматов.
Три способа загрузки файлов: с жесткого диска ПК, из облачных хранилищ Dropbox и Google Drive.
Есть лимиты бесплатной версии. Общий вес загружаемых файлов не должен превышать 100 Мб за один раз. Стоимость подписки: от 10$ до 26$ в месяц в зависимости от тарифа.
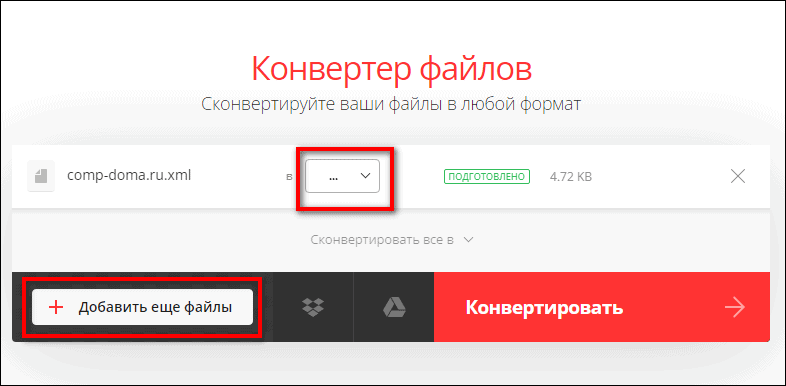
- Перейдите на сайт Convertio и выберите способ загрузки файла: с жесткого диска ПК (папка с лупой), из «облака» Dropbox или Google Drive. В первом случае найдите xml-документы в «Проводнике Windows». В последних двух – сначала предоставьте доступ к хранилищу, написав логин и пароль от него.
- Подождите, пока файл загрузится на сайт. Далее раскройте меню «в». Либо добавьте еще файлов с помощью специальной кнопки, если про какие-то забыли в предыдущем шаге.
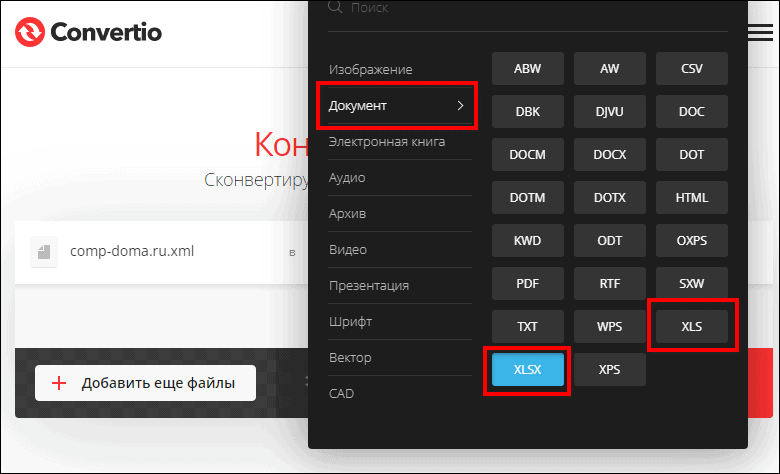
- Укажите один из форматов Excel: xlsx, xls. Они расположены в разделе «Документ». Нажмите на красную кнопку «Конвертировать», чтобы запустить преобразование.

Aconvert
Сервис Aconvert предлагает на выбор два способа загрузки. Первый – классический, с жесткого диска ПК (кнопка «File»).

Второй – по ссылке в интернете. Если ваш xml-документ опубликован в сети, вы можете просто вставить ссылку на него в меню «URL».

Послужной список форматов тоже внушительный. Базу данных xml можно сконвертировать не только в xls и xlsx, но и в другие виды: pdf, doc, ppt, rtf, odt, xps и т. д. Сервис полностью бесплатный. Купить подписку никто не предлагает.

Обработать за раз можно только один файл. Конечный документ будет в таблице «Результаты конверсий». Чтобы перейти к скачиванию, кликните по стрелке.

На открывшейся странице появится QR-код. Вы можете отсканировать его смартфоном – тогда эта же страница откроется в мобильном браузере, сможете скачать документ на телефон. Файл можно отправить в ваше облачное хранилище: Dropbox, Google Drive, One Drive. Также разрешается сжать файл перед загрузкой, если есть требования к его весу. Вверху будет отображаться обратный отсчет – через сколько времени обработанный файл автоматически удалится с сервера Aconvert.
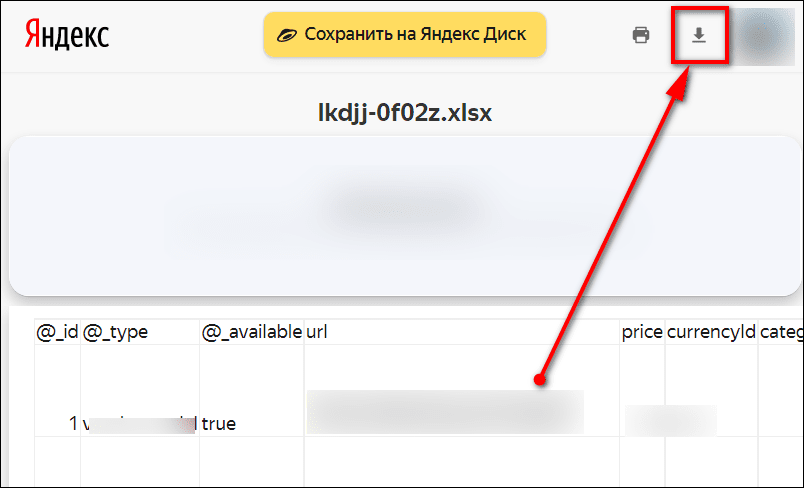
Чтобы скачать xls-таблицу на ПК, кликните по ссылке «URL-адрес файла». 
Откроется страница Яндекса с предпросмотром таблицы. Щелкните по стрелке, чтобы запустить загрузку либо сохраните документ на Яндекс Диске.
Aspose
У Aspose еще больше способов загрузки. Можно добавить файл с ПК, вставить ссылку на него в интернете или выбрать документ из «облака» (Dropbox, Google Drive).

XML можно перевести в xls, xlsx, xlsm, xlsb, xlt, xltx, xltm, pdf, png, jpg, html и многие другие форматы. Одновременно можно обработать до 10 файлов.

Готовые таблицы скачиваются на ПК либо помещаются в те же облачные хранилища Dropbox, Google Drive. Также разрешается отправить ссылку на скачивание файлов по электронной почте. Обработанные документы хранятся на сервере Aspose в течение 24 часов. Сервис бесплатный. Подписку оформить никто не предлагает.

Если на вашем ПК установлена программа Excel, используйте ее как конвертер xml. Заодно можете внести какие-либо изменения в документ. Если таблица относительно простая, используйте обычное сохранение. Если сложная и большая – лучше запустить импорт данных в меню разработчика.
За неимением Эксель можно всегда использовать онлайн-конвертеры. Они работают без регистрации. Для одновременной обработки нескольких файлов возьмите Convertio или Aspose. Aconvert позволит открыть предпросмотр таблицы перед скачиванием.
Источник
Excel spreadsheets are great for storing large amounts of data that would be unmanageable elsewhere. But what happens when you need to transfer that data somewhere else? What if you have hundreds or thousands of cells crammed with information? That would be a lot of data to manually re-type, especially if you need it in another format.
Extensible Markup Language, or XML, is an easy-to-use, read, and format document markup language. It can be used to store data in Excel files and help transfer them to other applications. It is a widely used format on the internet and in other applications.
In this guide, you’ll learn a quick and easy way to convert Excel to XML. All you need is an Excel spreadsheet, an XML schema, and a rudimentary understanding of Excel, which you can learn in this Excel training course for beginners.
Step 1: Create your Excel spreadsheet
The first thing you need is an Excel spreadsheet. Below is an example spreadsheet with six columns and seven rows of data. The columns separate the last names, first names, ages, majors (subject), GPAs (Grade Point Average), and school year of each student listed in the spreadsheet.

Step 2: Create your XML schema
After you have your Excel document set up, you need an XML schema. An XML schema is the document that defines an XML file’s structure. You can create an XML schema in Notepad, as it is a text file format. Here is a basic structure:
<?xml version="1.0" encoding="UTF-8" standalone="yes"?>
<student-data xmlns:xsi="http://www.w3.org/2001/XMLSchema-instance">
    <record>
       <TAGNAME>data</TAGNAME>
       <TAGNAME2>data</TAGNAME2>
       <TAGNAME3>data</TAGNAME3>
    </record>
</student-data>
The first line is a standard line. It identifies that it is an XML file, using the encoding UTF-8 and the XML version 1.0.
The second line identifies that the data is about “student-data”. If you simplify this line and the last line, you have:
<student-data>
</student-data>
The first line above opens the element, and the last line, which includes a “/”, ends this element. It is important that you have a closing tag for every opening tag, and that they are in the right order. Everything in between these lines is part of this element. In other words, it is “student-data”. Because this is the first element, it is also called the “root element”.
The “student-data” above includes a “record” element, which has three data elements, TAGNAME, TAGNAME2, and TAGNAME3.
You can change the name of the <TAGNAME> tags into the names of your columns. They do not have to be the exact name of the columns, as long as they’re in the correct order. You only need to fill out a few examples manually, but we can get Excel to do the rest for us later.
Here’s an example XML schema for our Excel spreadsheet:
<?xml version="1.0" encoding="UTF-8" standalone="yes"?>
<student-data xmlns:xsi="http://www.w3.org/2001/XMLSchema-instance">
    <record>
       <LastName>Takahashi</LastName>
       <FirstName>Jesse</FirstName>
       <Age>19</Age>
       <Major>Literature</Major>
       <GPA>3.8</GPA>
       <Year>Freshman</Year>
    </record>
    <record>
       <LastName>Nguyen</LastName>
       <FirstName>May</FirstName>
       <Age>23</Age>
       <Major>Chemistry</Major>
       <GPA>3.5</GPA>
       <Year>Senior</Year>
    </record>
</student-data>
As you can see, data elements have become <LastName> and <FirstName>, in line with the columns in our data set. You do not need to have the lines indented, but that aids readability.
Also take note of the <student-data> tags that hold the contents of each <record> tag. It should be renamed according to the name of your Excel spreadsheet. In this example, our Excel workbook is called student-data.xlsx, and so our root element tag is called <student-data>.
Don’t forget to name your XML schema with a .xml at the end. In this example, our schema is simply called schema.xml, if you’d like to follow along.
If you want to know more about XML documents, how they work, and what they’re useful for, check out this introduction to XML course. You can also get started with this beginners XML tutorial class.
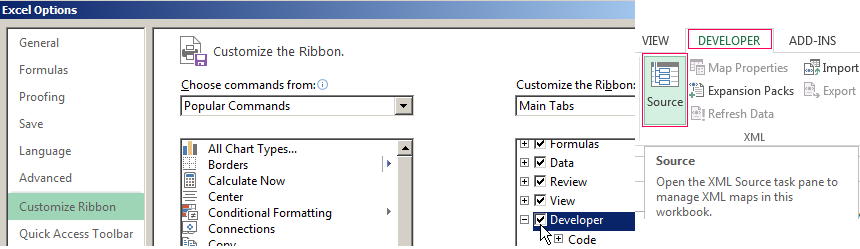
Step 3: Enable the Developer tab
If the Developer tab is not available, you need to enable it. Click on File – Options, and then the “Customize Ribbon” page. In the column on the right is a list of tabs called Main Tabs with check marks.

Make sure that the check box next to the Developer tab is checked, then click OK. The Developer tab should now be visible in the main Excel window.
If you’re having trouble navigating Excel and its various options, it would be beneficial to take a basic Microsoft Office course for beginners and learn your way around the application.
If you want more advanced skills, then why not take advanced Excel training courses if you need experience with the more complicated elements of Excel.
Step 4: Open the XML Source pane
Now that you’ve brought up the Developer tab and clicked on it, you should see a number of sections called Code, Add-Ins, Controls, and XML.

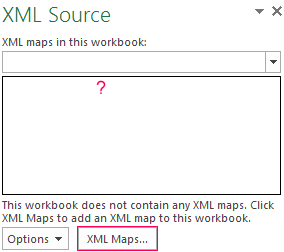
In the XML section, click on the large button that reads Source. This will bring up the XML Source task pane to the right of the screen, where you’ll have the option to manage XML maps. That’s what we want to do next.
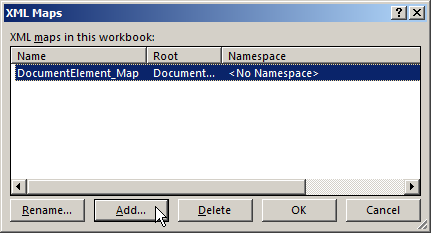
Step 5: Add an XML Map
In the XML Source task pane, click the XML Maps option at the very bottom right. A dialog box will appear. Click Add to add a new XML schema, find your schema.xml file in the browser, and click OK.

Now that your XML file is added, click OK again.
The computer may give you a warning – that’s fine.

Click OK and return to the XML Source task pane.
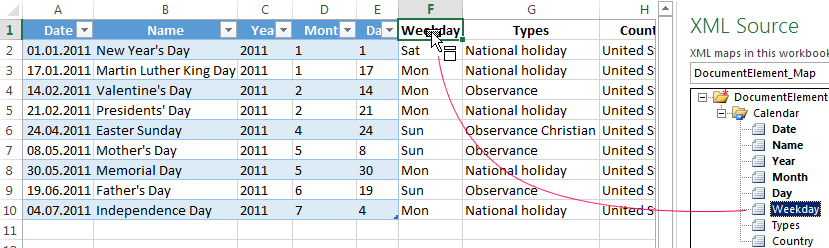
Step 6: Drag and drop the XML elements into your spreadsheet
Each of your columns should appear as a new element in the record tree created by the XML Source task pane. Drag each element individually into its appropriate column, starting at Row 1.

Converted columns become part of a table and should turn blue. Do this until all of your columns have been mapped to the XML elements.
Step 7: Export your XML data
Once you’ve finished converting each column into an XML element, you can either click on Developer – Export, or go to File – Save As, and change the File Type to “XML Data (*.xml).”

Save your XML file, and Excel will export it to XML. It may warn you that it will result in the loss of non-XML features, such as formatting, pictures, and objects. Again, that’s fine.

You can then open it in Notepad to see your results. Go to File – Open, and change the file type from “Text Files (*.txt)” to “All Files”:
<?xml version="1.0" encoding="UTF-8" standalone="yes"?>
<student-data xmlns:xsi="http://www.w3.org/2001/XMLSchema-instance">
	<record>
		<LastName>Takahashi</LastName>
		<FirstName>Jesse</FirstName>
		<Age>19</Age>
		<Major>Literature</Major>
		<GPA>3.8</GPA>
		<Year>Freshman</Year>
	</record>
	<record>
		<LastName>Nguyen</LastName>
		<FirstName>May</FirstName>
		<Age>23</Age>
		<Major>Chemistry</Major>
		<GPA>3.5</GPA>
		<Year>Senior</Year>
	</record>
	<record>
		<LastName>Johnson</LastName>
		<FirstName>Ori</FirstName>
		<Age>20</Age>
		<Major>Business</Major>
		<GPA>3.2</GPA>
		<Year>Junior</Year>
	</record>
	<record>
		<LastName>Kang</LastName>
		<FirstName>Han</FirstName>
		<Age>18</Age>
		<Major>Biology</Major>
		<GPA>3.9</GPA>
		<Year>Freshman</Year>
	</record>
	<record>
		<LastName>Jones</LastName>
		<FirstName>Raymond</FirstName>
		<Age>19</Age>
		<Major>Engineering</Major>
		<GPA>3.3</GPA>
		<Year>Sophomore</Year>
	</record>
	<record>
		<LastName>Akhtar</LastName>
		<FirstName>Ali</FirstName>
		<Age>19</Age>
		<Major>Literature</Major>
		<GPA>4.0</GPA>
		<Year>Freshman</Year>
	</record>
</student-data>
Excel was able to format all of this information automatically, so you didn’t have to.
This trick can come in handy with large data sets of over thousands of cells, so you can create multiple XML data files quickly. However, you can still save time and export XML more reliably with any amount of data.
This was a very simple example, though, and in the future, you might find yourself facing some tougher scenarios. If this happens, it will help if you have advanced Excel skills. If you want to learn how to handle these scenarios, take a look at this course about Pivot Tables, Power Query, Power Pivot, and DAX.
I hope that you have enjoyed this article. You’ve now successfully converted Excel to XML. Hopefully when you need to do it in your work, you will find it easy to do.
If you’re interested in learning more advanced Excel skills, let’s move on to learning how to use SQL in Excel.
Frequently Asked Questions
What is Excel XML format?
Excel can export data into XML (or Extensible Markup Language). It is based on an XML schema, which defines the structure of the file. You can create it in NotePad. To convert the data, go to the Developer tab – Source. You can then load your XML schema and match it to the data. You can then go to Developer – Export, or File – Save as – XML file.
How do I open an XML file in Excel?
To open an XML file in Excel, you should go to File – Open. On the PC, you should change the File Type from “All Excel Files (*.xl*)” to “XML file (*.xml).” You should then navigate to where the file is stored, click on it, and click OK. Your file will then be opened in Excel.
How do I view an XML file?
You can view an XML file in either Notepad or Excel. To view it in NotePad, go to File – Open, and change the File Type from “Text Documents (*.txt)” to “All Files (*.*)”. To view it in Excel, go to File – Open, and change the File Type to “XML Files (*.xml).”