
WordArt is a quick way to make text stand out with special effects. You begin by picking a WordArt style from the WordArt gallery on the Insert tab, and then customize the text as you wish.


Try it!
-
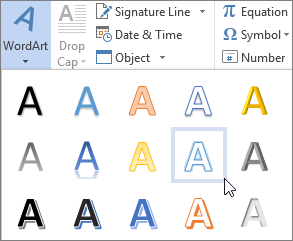
Click Insert > WordArt, and pick the WordArt style you want.

In the WordArt gallery, the letter A represents the different designs that are applied to all text you type.
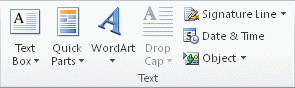
Note: The WordArt icon is located in the Text group, and it may appear different depending on the program you’re using and the size of your screen. Look for one of these icons:
-
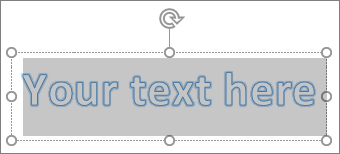
The placeholder text «Your text here» appears, with the text highlighted.
Enter your own text to replace the placeholder text.


Tips:
-
You can enter entire sentences, and even paragraphs, as WordArt. (You may have to change the font size for longer text.) And in Word, you can also convert existing text to WordArt in Word.
-
You can include symbols as WordArt text. Click the location for the symbol, and on the Insert tab, click Symbol, and pick the symbol you want.
Do more things with WordArt
Select a heading below to open it and see the detailed instructions.
You might have tried using shape styles to change the shape of WordArt and then were puzzled that the text didn’t change. Use the text options in the WordArt Styles group instead. Shape styles and effects apply to the box and background surrounding your WordArt, not to the WordArt text. So, to add effects to your WordArt, such as shadows, rotation, curves, and fill and outline colors, you use the options in the WordArt Styles group, including Text Fill, Text Outline, and Text Effects.
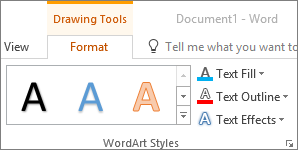
Note: Depending on your screen size, you might only see the icons for WordArt Styles.

-
Select the WordArt text or letters to change.
The Drawing Tools Format tab appears.
-
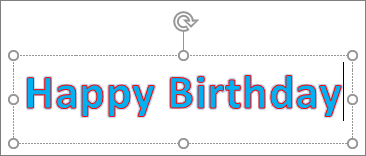
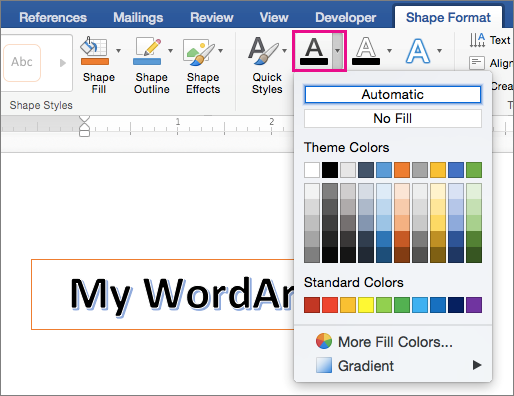
On the Drawing Tools Format tab, click Text Fill or Text Outline, and pick the color you want.
-
Click outside of your text box to see the effect.
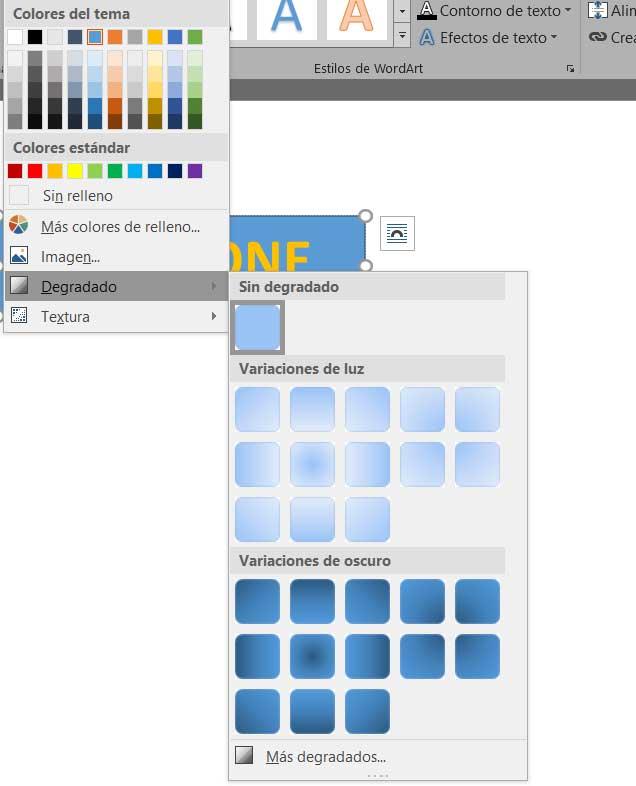
In this example, a light blue text fill and a red text outline were applied.

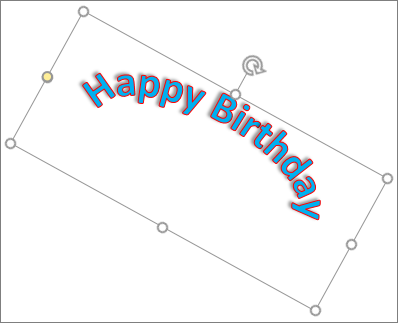
You can curve text around a circular object.
90 seconds
-
Select the WordArt text or letters to change.
The Drawing Tools Format tab appears.
-
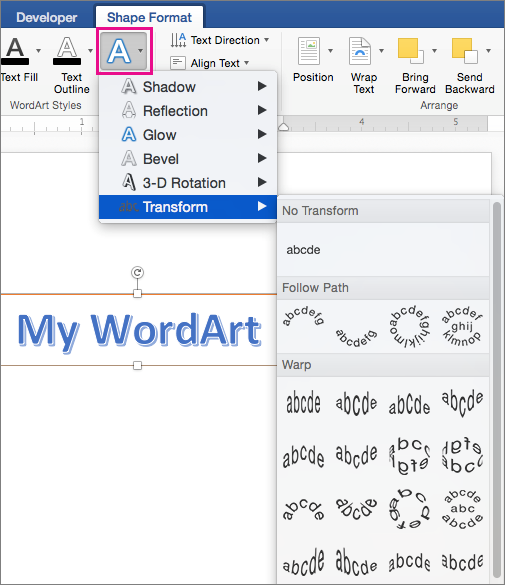
To create a curved effect, on the Drawing Tools Format tab, click Text Effects >Transform and pick the one you want.
Important: The Text Effects
menu is not the same as the Shape Effects menu. If you don’t see Transform at the bottom of the menu, make sure you’ve clicked the Text Effects menu.In this example, the first curved transform effect is selected.
-
Click outside of your text box to see the effect.
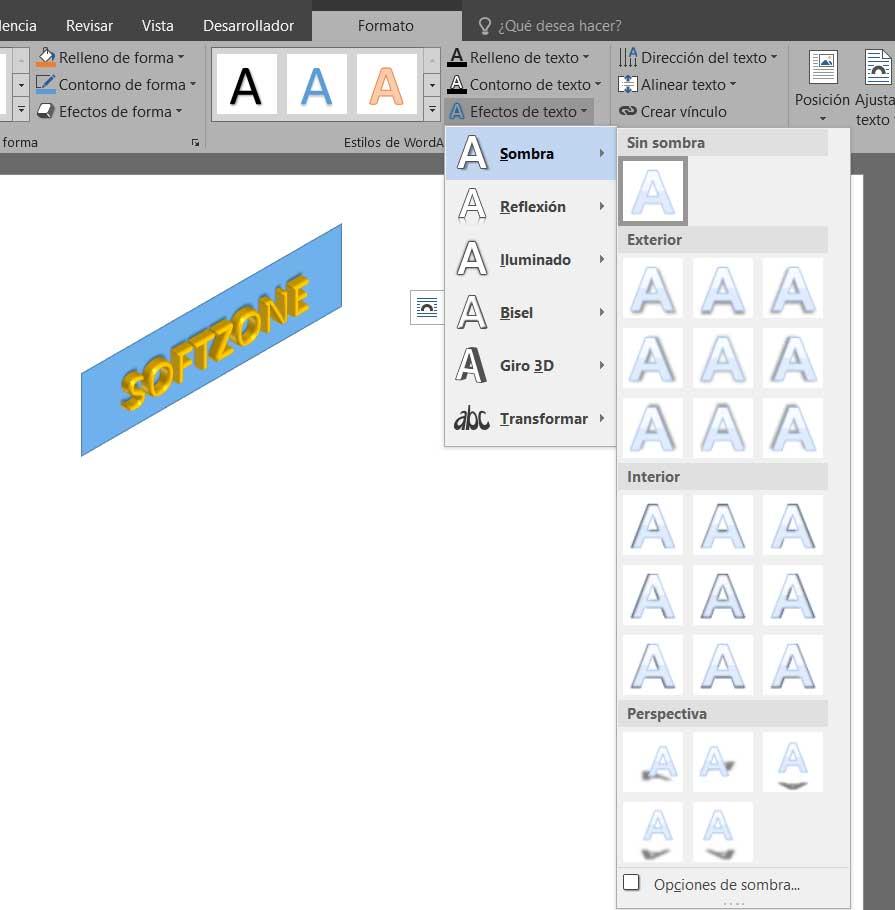
Use the Text Effects menu to create other effects, such as shadow, reflection, glow, bevels, and 3-D rotation. This example shows WordArt with a curved transform effect and a shadow applied.
 menu is not the same as the Shape Effects
  menu. If you don’t see Transform at the bottom of the menu, make sure you’ve clicked the Text Effects menu.

-
To rotate WordArt text to any angle, select it, and then drag the circular rotation handle at the top of the box.
-
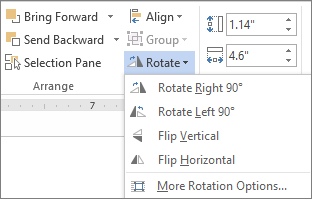
To flip WordArt or rotate it 90 degrees, click the Drawing Tools Format tab, click Rotate in the Arrange group, and then select an option.
To change the font size or style of your WordArt text:
-
Select the WordArt text or letters to change.
-
On the Home tab, select options in the Font group, such as font style, font size, or underline.
-
In your Word document, select the text to convert to WordArt.
-
On the Insert tab, click WordArt, and then pick the WordArt you want.
Double-click the WordArt that you want to remove, and then press Delete.
Insert WordArt
-
Click where you want to insert decorative text in a document.
-
On the Insert tab, in the Text group, click WordArt.
-
Click any WordArt style, and start to type.
Do more things with WordArt
Select a heading below to open it and see the detailed instructions.
-
Click anywhere in the WordArt text that you want to change.
-
Under Drawing Tools, on the Format tab, click any option.
For example, you can change the direction of the WordArt text by clicking Text Direction in the Text group and choosing a new direction for the text.
Double-click the WordArt that you want to remove, and then press Delete.
Add WordArt
Excel
-
On the Insert tab, in the Text group, click WordArt, and then click the WordArt style that you want.
-
Enter your text.
-
You can add a fill or effect to a shape or text box as well as the text in the WordArt.
-
If you have a chart in your 2007 Office release document, you can replace the chart title with WordArt to give the title additional emphasis.
-
Outlook
-
On the Insert tab, in the Text group, click WordArt, and then click the WordArt style that you want.
-
Type your text in the Text box.
You can add a fill or effect to a shape or text box as well as the text in the WordArt.
PowerPoint
-
On the Insert tab, in the Text group, click WordArt, and then click the WordArt style that you want.
-
Enter your text.
-
You can add a fill or effect to a shape or text box as well as the text in the WordArt.
-
If you have a chart in your 2007 Office release document, you can replace the chart title with WordArt to give the title additional emphasis.
-
Publisher
-
On the Objectstoolbar, click Insert WordArt
. -
In the WordArt Gallery, click the WordArt that you want, and then click OK.
-
Type your text in the Text box.
If you want to change the text in the WordArt, double-click the WordArt that you want to change, and then type the new text in the Text box.
 .
.Word
-
On the Insert tab, in the Text group, click WordArt, and then click the WordArt style that you want.
-
Type your text in the Text box.
You can add a fill or effect to a shape or text boxas well as the text in the WordArt.
Do more things with WordArt
Select a heading below to open it and see the detailed instructions.
Excel
Do one or more of the following:
-
To change the text, select it, and then make the changes that you want.
-
To change the font, see Change the font or font size in Excel or Change the color of text in a worksheet.
-
To add an effect to WordArt, see Add or delete a fill, outline, or effect for text or WordArt.
-
To rotate the WordArt, see Rotate or flip a picture, shape, text box, or WordArt in Excel 2007.
-
To resize the WordArt, see Change the size of a picture, shape, text box, or WordArt.
-
To align the WordArt, see Align or arrange a picture, shape, text box, or WordArt.
-
To move the WordArt, see Move a picture, shape, text box, or WordArt.
For more information about selecting WordArt, see Select a shape or other object.
Outlook
Do one or more of the following:
-
To change the text, select it, and then make the changes that you want.
-
To change the font, see Change the size or formatting of text.
-
To add an effect to WordArt, see Add or delete a fill, outline, or effect for text or WordArt.
-
To rotate the WordArt, see Rotate or flip a picture, shape, text box, or WordArt in Outlook 2007.
-
To resize the WordArt, see Change the size of a picture, shape, text box, or WordArt.
-
To align the WordArt, see Align or arrange a picture, shape, text box, or WordArt.
-
To move the WordArt, see Move a picture, shape, text box, or WordArt.
For more information about selecting WordArt, see Select a shape or other object.
PowerPoint
Do one or more of the following:
-
To change the text, select it, and then make the changes that you want.
-
To add an effect to WordArt, see Add or delete a fill, outline, or effect for text or WordArt.
-
To rotate the WordArt, see Rotate or flip a picture, shape, text box, or WordArt in PowerPoint 2007.
-
To resize the WordArt, see Change the size of a picture, shape, text box, or WordArt.
-
To align the WordArt, see Align or arrange a picture, shape, text box, or WordArt.
-
To move the WordArt, see Move a picture, shape, text box, or WordArt.
For more information about selecting WordArt, see Select a shape or other object.
Publisher
Do one or more of the following:
-
To change the text, select it, and then make the changes that you want.
-
To change the font, see Change the font size or Change the color of text.
-
To add an effect to WordArt, see Add or delete a fill, outline, or effect for text or WordArt.
-
To resize the WordArt, see Change the size of a picture, shape, text box, or WordArt.
-
To align the WordArt, see Align or arrange a picture, shape, text box, or WordArt.
-
To move the WordArt, see Move a picture, shape, text box, or WordArt.
For more information about selecting WordArt, see Select a shape or other object.
Word
Do one or more of the following:
-
To change the text, select it, and then make the changes that you want.
-
To change the font, see Change the font size.
-
To add an effect to WordArt, see Add or delete a fill, outline, or effect for text or WordArt.
-
To rotate the WordArt, see Rotate or flip a picture, shape, or WordArt.
-
To resize the WordArt, see Change the size of a picture, shape, text box, or WordArt.
-
To align the WordArt, see Align or arrange a picture, shape, text box, or WordArt.
-
To move the WordArt, see Move a picture, shape, text box, or WordArt.
For more information about selecting WordArt, see Select a shape or other object.
Excel
When you remove the WordArt style from your text, the text remains and changes to plain text.
-
Select the WordArt text that you want to remove the WordArt style from.
-
Under Drawing Tools, on the Format tab, in the WordArt Styles group, click the More button
, and then click Clear WordArt.To remove the WordArt style from part of your text, select the text that you want to remove the WordArt style from, and then follow the steps above.
 , and then click Clear WordArt.
PowerPoint
When you remove the WordArt style from your text, the text remains and changes to plain text.
-
Select the WordArt text that you want to remove the WordArt style from.
-
Under Drawing Tools, on the Format tab, in the WordArt Styles group, click the More button
, and then click Clear WordArt.To remove the WordArt style from part of your text, select the text that you want to remove the WordArt style from, and then follow the steps above.
Do the following for all programs listed in the Applies To at the top of the article.
-
Double-click the WordArt that you want to remove to select it, and then press Delete.
-
In Office for Mac 2016 or later, select the Insert tab on the Ribbon.
or
In Office for Mac 2011, select Insert on the toolbar.
-
Select WordArt, and pick the WordArt style you want.
In the WordArt gallery, the letter A represents the different designs that are applied to all text you type.
-
Enter your text.

Tip: You can also include symbols as WordArt text. To do so, click the location in your document for the symbol, and on the Insert tab, click Advanced Symbol, and pick the symbol you want.
Do more things with WordArt
Select a heading below to open it and see the detailed instructions.
To create curved or circular WordArt text, you add a Transform text effect.
-
Select the WordArt.
When you do that, the Shape Format tab appears.
-
Click Text Effects > Transform and pick the effect you want.

To change the color of the WordArt text, you change the Text Fill.
-
Select the WordArt text or letters to change.
When you do that, the Shape Format tab appears.
-
Click Text Fill, and pick the color you want.
Tip: To change the outline of the WordArt text, on the Shape Format tab, click Text Outline.
-
Select the text to convert to WordArt.
-
On the Insert tab, click WordArt, and then pick the WordArt style you want.
In Microsoft 365 for the web you can see WordArt that’s already in your document, presentation, or worksheet, but to add more WordArt you need to open or edit the doc in the desktop version of Word, PowerPoint, or Excel.
In Microsoft 365 for the web, you can use the Font features on the Home tab to change the font color and size, and apply bolding, italics, or underlines to your text.
If you don’t have the desktop version of Word or PowerPoint, you can try it or buy it in the latest version of Office now.
Excel for Microsoft 365 Word for Microsoft 365 Outlook for Microsoft 365 PowerPoint for Microsoft 365 Excel 2021 Word 2021 Outlook 2021 PowerPoint 2021 Excel 2019 Word 2019 Outlook 2019 PowerPoint 2019 Excel 2016 Word 2016 Outlook 2016 PowerPoint 2016 Office 2016 More…Less
Try it!
When you want text to really stand out on a page, use WordArt to add outlines, shading, and other effects to your words.
Add WordArt
-
Select Insert > WordArt and select the option you want.
-
Enter your text.
Convert existing text to WordArt
-
Select the text.
-
Select WordArt and select the option you want.
Customize your WordArt
-
Select the WordArt.
-
Select Text Fill and select an option.
-
Select Text Outline and select an option.
Add Text Effects
-
Select the WordArt.
-
Select Text Effects and select an option:
Rotate your WordArt
-
Select the WordArt.
-
Select the rotation handle and drag it to rotate the text.
Want more?
Insert WordArt
Word training
Excel training
PowerPoint training
Outlook training
Need more help?
Want more options?
Explore subscription benefits, browse training courses, learn how to secure your device, and more.
Communities help you ask and answer questions, give feedback, and hear from experts with rich knowledge.
Add WordArt
- On the Insert tab, in the Text group, click WordArt, and then click the WordArt style that you want.
- Type your text in the Text box. You can add a fill or effect to a shape or text box as well as the text in the WordArt.
Contents
- 1 How do you get word art on word?
- 2 What is word art examples?
- 3 What is considered word art?
- 4 What are the two ways to create WordArt?
- 5 Is WordArt free?
- 6 What is art with text called?
- 7 Who invented word art?
- 8 What is contemporary word art?
- 9 What is use of WordArt?
- 10 How do you make rainbow WordArt?
- 11 How do you make WordArt Classic?
- 12 How do you make word art curve?
- 13 How do I convert WordArt to Word?
- 14 Does Google Docs have word art?
- 15 How do I make a Word picture?
- 16 How do I make words into a shape?
- 17 What artists use words?
- 18 How would you describe graffiti?
- 19 How do you make text art?
- 20 What are the 7 elements of art?
How do you get word art on word?
Find WordArt Tools in Word
- Click or tap where you want WordArt.
- Select Insert > WordArt.
- Pick a style, and type your text.
What is word art examples?
Word Art: Text-based Painting, Prints, Sculpture. Word Art. Painting, Sculpture or Photolithography Using Words and Phrases.
What is considered word art?
1. WordArt is a program that allows you to treat text as a graphic. You can use the program to add special effects and flourishes to text, and then insert the text in your document. It is useful for creating special text elements such as logos, mastheads, or titles.
What are the two ways to create WordArt?
What are the two ways to create WordArt? From new or by convert existing text.
Is WordArt free?
WordArt offers a freemium model but you’ll need to upgrade to the paid version of the word cloud generator if you want to download high-quality word art, which might be useful if you are planning to print your word cloud.
What is art with text called?
Text art, also called ASCII art or keyboard art is a copy-pasteable digital age art form. It’s about making text pictures with text symbols.
Who invented word art?
Etymology. The term “art” is related to the Latin word “ars” meaning, art, skill, or craft. The first known use of the word comes from 13th-century manuscripts. However, the word art and its many variants (artem, eart, etc.) have probably existed since the founding of Rome.
What is contemporary word art?
A reference to Contemporary Art meaning “the art of today,” more broadly includes artwork produced during the late 20th and early 21st centuries. It generally defines art produced after the Modern Art movement to the present day.
What is use of WordArt?
You can use WordArt to add special text effects to your document. For example, you can stretch a title, skew text, make text fit a preset shape, or apply a gradient fill. This WordArt becomes an object that you can move or position in your document to add decoration or emphasis.
How do you make rainbow WordArt?
To get the rainbow effect, do the following:
- Select the font you want changed.
- Using the other mouse button, choose Font from menu.
- Click the Text Effects button at the bottom of the window.
- Choose Text Fill.
- Choose Gradient Fill.
- Now you need to fiddle with Gradient Stops and Colour to get the effect you want.
How do you make WordArt Classic?
If you have not installed Classic Menu for Office on your computer, you can access the WordArt command in Ribbon with following steps:
- Click the Insert Tab;
- Go to Text group;
- Then you will see the WordArt button. See screen shot (Figure 2):
How do you make word art curve?
Create curved or circular WordArt
- Go to Insert > WordArt.
- Pick the WordArt style you want.
- Type your text.
- Select the WordArt.
- Go to Shape Format > Text Effects > Transform and pick the effect you want.
How do I convert WordArt to Word?
To convert regular text into WordArt:
Select the text you want to convert, then click the Insert tab. Click the WordArt drop-down arrow in the Text group. A drop-down menu of WordArt styles will appear. Select the style you want to use.
Does Google Docs have word art?
To insert word art into a Docs document, open your document and go to Insert > Drawing > New. When the drawing panel opens, go to Actions > Word art and create what you need. When you are done, press the blue Save and Close button to put the word art in your document.
How do I make a Word picture?
Open up a new image in a picture editor such as Paint or Photoshop. Press Ctrl and V at the same time, or click edit and then select paste from the drop-down menu to insert the screen capture of your Word document from your clipboard into the new image file [source: Microsoft Windows].
How do I make words into a shape?
Use WordArt to shape text
- On the Insert tab, in the Text group, click WordArt, and then click the WordArt style that you want.
- Type the text that you want.
- Change the font size, if needed, and then click OK.
What artists use words?
In honour of Word Week on AnOthermag.com, we take a look at some of the 20th century’s most influential word artists
- Marcel Duchamp.
- Lawrence Weiner.
- Hamish Fulton.
- Barbara Kruger.
- Jenny Holzer.
- The Guerrilla Girls.
- Ed Ruscha.
- Martin Creed.
How would you describe graffiti?
graffiti, form of visual communication, usually illegal, involving the unauthorized marking of public space by an individual or group. Although the common image of graffiti is a stylistic symbol or phrase spray-painted on a wall by a member of a street gang, some graffiti is not gang-related.
How do you make text art?
ASCII-Art
- Step 1: Choose a Picture. Choose any image from the internet or from your desktop.
- Step 2: Copy the Picture Into Word. Open a new Word-document and paste the picture into it.
- Step 3: Set the Image Properties.
- Step 4: Set the Font and Begin to ‘paint’
- Step 5: Finish.
What are the 7 elements of art?
ELEMENTS OF ART: The visual components of color, form, line, shape, space, texture, and value.
Of course, although we are talking about text editors, the truth is that Word is an application that goes much further in terms of available functions. How could it be otherwise, from here we can carry out a multitude of tasks of all kinds, not just write texts as such. It must be taken into account that the program also allows us to work with a multitude of additional elements that will be very useful in our day-to-day office automation program .

In this way, from the Insert menu we have the possibility to add to the documents all kinds of content such as photos, tables, graphics, screenshots, etc.
But along these lines we are going to focus on a specific element that will probably be very familiar to many of you. Specifically, we refer to WordArt , something that some veterans will surely remember from a few years ago. Well, it is worth mentioning that we can continue to use these design texts in Word , which surely makes many happy.
What is and how to access WordArt in Microsoft Word
First of all, the first thing we will tell you is that when we talk about WordArt, we are specifically referring to a feature that we can find included in the text editor . It allows us to work with the characters, numbers and words to assign them a more original and striking appearance and design. This is something that we used long ago independently to create original and striking texts, and that we now see in the Redmond editor.
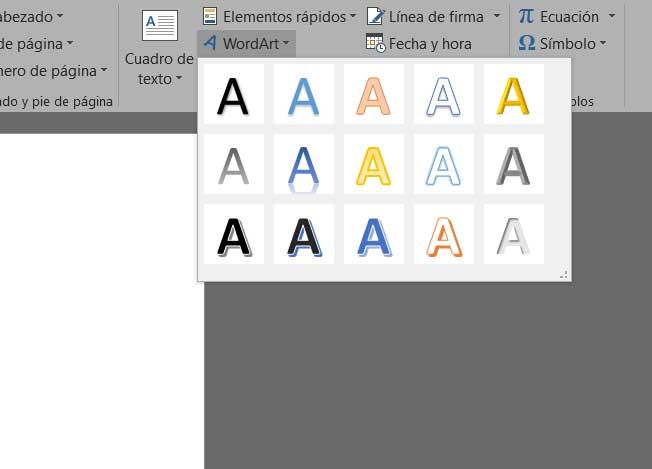
For all this, what the functionality does is offer us the possibility of creating texts using various special effects. Among these we can opt for the use of special contours and textures among many other things. In the same way, we can create shadows in the texts, as well as bend, rotate or deform them to our liking. To give us an idea, here we are going to find up to 15 different predefined styles . Then we will only have to put a little ingenuity to customize them, so the possibilities are enormous.
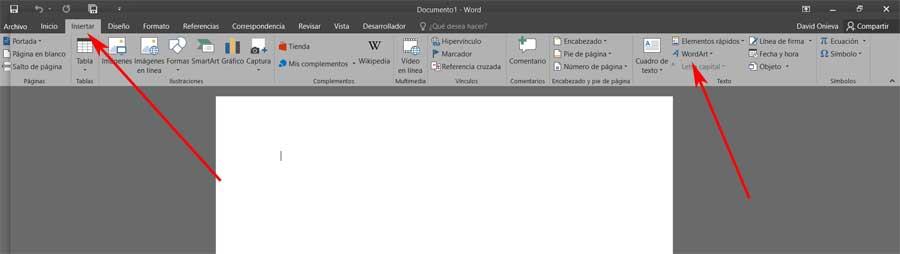
For those of you who do not know, say that to take advantage of all this, the first thing we have to do is open Word in a conventional way. Once in its main interface, we go to the tab called Insert, and on the right side of the options that we are offered we find Insert WordArt.
How to start using WordArt in the text editor
Once we know how to access the functionality as such, as soon as we go to that menu option we will immediately see all the possibilities that it presents us. Therefore, here we are going to find 15 samples in the form of icons with the letter A so that we can choose the one that best suits our needs.
It is worth mentioning, something that we are going to verify first-hand, that the texts that we create with this function are not treated as conventional Word texts . Specifically, we are going to have to work with them more as an image than as a text, at least in view of Word and the way to configure it. Thus, once we have selected the sample we want to use, a series of new options will appear in the main menu of Word. Specifically, we find a tab that appears and from which we will have the possibility to customize this element that we are going to create.
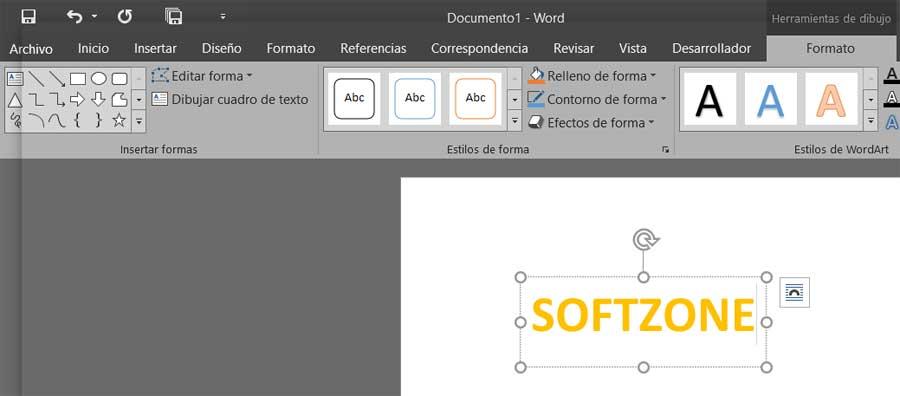
As we can see, the first thing that is created is a box that houses the text that we want to add, with the style selected before. In addition, this is a box that, as with images, we can move, stretch or resize from its corners. This will help us to make the area larger to continue adding more characters.
Available functions for customizing WordArt
As we mentioned before, we have a wide variety of functions that will allow us to fully customize the texts we create here. Therefore, we are going to describe each of them so that you can get an idea of the possibilities that this useful functionality presents us.
Frames and padding
Starting from the left of the new Format menu that we find when marking the WordArt box, we find the possibility of framing or filling the designed text. Although at first we only see three samples, we must move with the small arrows that appear to the right of this section. This way we will see all the colors that we can choose from to fill or frame the work with WordArt. We also have an arrow to see them all at the same time.
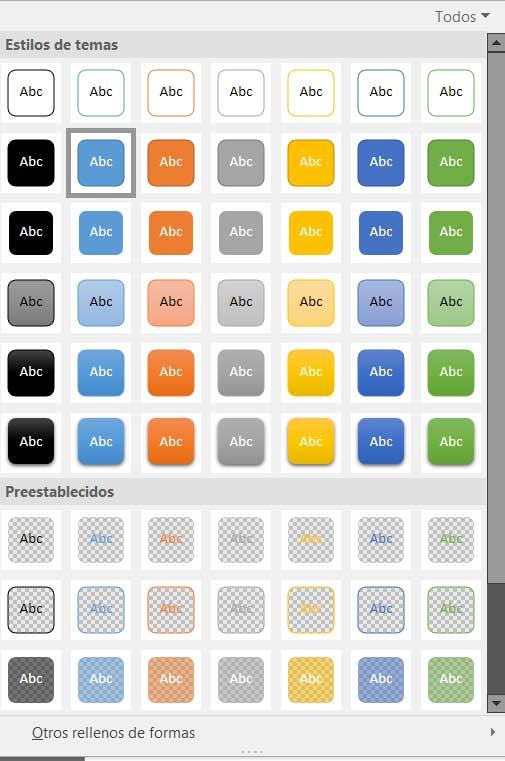
Shape fill and outline
As its name suggests, in the Shape Fill parameter, we can specify a specific tonality for the box that houses the WordArt text. It should be noted that from here we will also have the possibility of adding gradients or even textures to the color we have chosen.
Say that in the Contour section of shape we can also customize the tonality, but in this case of the frame that surrounds the text if we choose one previously.
Shape effects
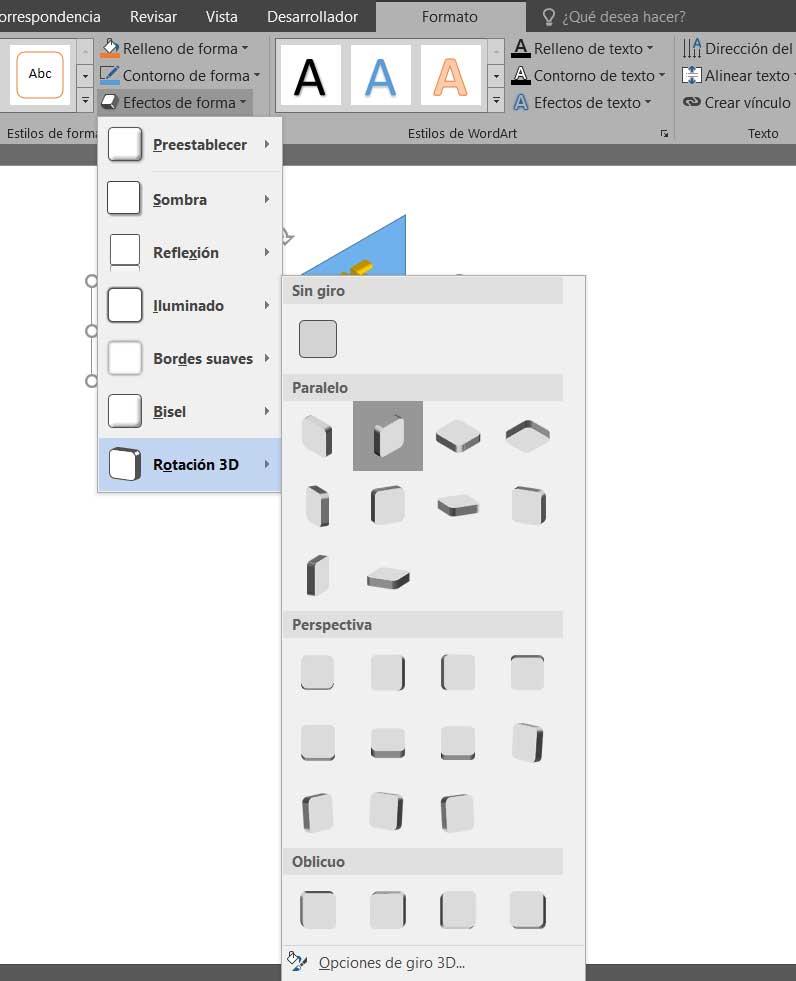
On the other hand we find the section called Shape Effects, which may be one of the most striking for this design. We tell you this because from this section we will have the possibility of integrating a series of attractive effects to the WordArt design that we are creating at this time. For all this we have a multitude of effects related to shading, lighting, edge smoothing, adding a bevel , even a 3D look.
Fill, outline, and text effects
As we have seen in the parameters described above, Word presents us with a good number of elements to customize the box that houses the text. But of course, just as important in this case, or more, is the text as such. That is why in the same way the Microsoft program presents us with three other customizable options that will allow us to adapt the characters of our WordArt to what we need.
We will find all this in the section called WordArt Styles, where we can change the style chosen at the beginning, and much more. Thus, as in the previous case with the shape parameters, here we can modify the fill of the text, its outline or add an effect. For this we will have three other drop-down lists that, in a simple way, will allow us to modify these visual aspects of the design .
Adapt the WorArt to the Word document
As it may happen to you on many occasions, when integrating a new element of this type in Word, we will do it while working on a normal text document. Therefore we might think that it will be a bit complicated to adapt this table added with WordArt, to the whole document . But in reality it is not like that, since we found some other functions that will be very helpful in this.

In this way we can place the new design in the foreground, or place it behind the original text of the document itself. We can also rotate or adjust it to the page. All these options are found in the Organize section. In this way and being a bit creative, we will ensure that the WordArt does not clash at all with the rest of the work we are carrying out.
![]()
Download Article
![]()
Download Article
Word Art is a fun way to make text stand out with special effects. With Word Art, you can add color, shape, and style to text for a birthday card, a presentation, or a display. To create word art, you can use an online word art generator or a computer program. Word art can add variety and interest to any text in just a few short clicks.
-
1
Search for an online word art generator. Online word art generators are easy to find by searching “word art generator” in a search engine. Word art generators are often free and offer a variety of word art styles that you can apply to any text.
- Some word art generators offer more elaborate styles for a small fee. You can decide if you are happy to use the free styles offered or want to pay a little more for a particular style.
-
2
Choose a word art style. Most online word art generators will have a gallery of word art styles that you can choose from to create your word art. Look through the gallery and click on different styles so you can see which one you like.
- You may be given a variety of word art styles, from text that flashes to text in an elaborate font or a bright color.
- Some generators require you to type in the text you want to make into word art. For example, you may type in “Happy Birthday” into the text field. You can then click on a style to see how the style looks on the text.
Advertisement
-
3
Make your own custom word art. Some online word art generators let you make your own custom word art. You may be given the option of selecting the color, font, and animation of the text. You can choose to make the text a certain size and color as well as determine the shape of the text.[1]
- Click through the custom options for the text to select the ones you like. Have fun with the custom options and play around with different styles until you create a style that you like.
-
4
Apply the word art style to the text. Once you have a word art style that you like, type out the text and apply the style. Most online word art generators will have a text box where you can type the text and then click on a word art style to apply it.
- Look over the text once you have applied the word art. Make sure you are happy with it. If not, you can always switch to a different word art style in the gallery or adjust the custom word art style as you see fit.
-
5
Make a word art cloud. Many online word art generators allow you to create a word art cloud, where you cluster or arrange text together in a shape. Look for the word art cloud option on the generator. Often, the generator will create the cloud for you once you put in your preferences.
- You may choose a shape that reflects the intent of the word art. For example, if you are creating word art as a gift for a friend’s baby shower, you may choose a shape like a stork or a baby rattle for the word art cloud.
- You can also choose a shape that you like or that looks appealing to you. For example, you may choose a heart shape or an oval shape for the word art cloud.
-
6
Put the word art on an object or item, if desired. Some online word art generators give you the option of putting your word art on an object or item, such as a t-shirt or a mug. You can also make the word art into a print that you can give as a gift or frame in your home.[2]
- This option will likely cost you, as you will be paying for the cost of printing the word art on the object or item plus shipping.


Advertisement
-
1
Locate the Insert tab and then the word art section. Making word art with a computer program like Microsoft Word, Excel, and PowerPoint can be done in a few easy steps. Start by locating the Insert tab in the computer program. The Insert tab should appear on the main toolbar in the computer program. Once you open the Insert tab, you should see the word art section.[3]
- If you are using a newer version of a computer program like Microsoft Word, you can find the word art option in the Document Elements tab.
- Depending on the version you are using, word art may be called «Smartart» in Microsoft Word.
-
2
Look through the word art styles. Click on the word art section and scroll through the styles. There should be a gallery of different word art styles, from different font colors to different font styles like bold, outline, or highlight. Look through them until you find a style you like for the text.[4]
-
3
Make a custom word art style. If you do not see any word art styles that you like in the gallery or want to adjust an existing style, you can make your own word art style. Use the text options in the word art styles section to customize the text as you see fit. You can also add elements like Text Fill, Text Outline, and Text Effects to the text. This will allow you to add shadows, curves, outline, and fill in the text with specific colors.[5]
- To add a color to fill in the text, use the Text Fill option.
- To add a colored outline to the text, use the Text Outline option.
- To add a curve or shadow to the text, use the Text Effects option.
-
4
Choose a style and enter in your text. Click on a word art style and then start typing your desired text to see how it looks on the page. A placeholder text box may appear on the page where you can then type in your text to apply the word art style.[6]
- You can also type out the text first, such as “Congratulations!”, then choose a word art style and highlight the text to apply the style.
- You can include symbols in the word art as well by clicking the Insert tab and then choosing a symbol to include in the word art.
-
5
Rotate the word art, if desired. If you’d like to rotate the word art so it appears slanted across the page, select it by clicking on it. Then, drag the circular rotation handle at the top of the box to rotate the text as desired.[7]
- You can also flip the word art or rotate it 90 degrees by clicking on the Drawing Tools Format tab. Then, click Rotate in the Arrange group and select an option. You can rotate the text right 90 degrees, rotate the text left 90 degrees, flip it vertically, flip is horizontally, as well as other options.


Advertisement
Ask a Question
200 characters left
Include your email address to get a message when this question is answered.
Submit
Advertisement
Thanks for submitting a tip for review!
About This Article
Thanks to all authors for creating a page that has been read 31,564 times.