
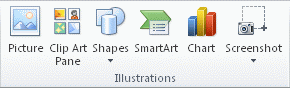
Click in your document where you want to create the drawing. On the Insert tab, in the Illustrations group, click Shapes.
Add a drawing to a document
- Insert a shape.
- Change a shape.
- Add text to a shape.
- Group selected shapes.
- Draw in the document.
- Adjust the size of the shapes.
Contents
- 1 How do I make a diagram in Word?
- 2 Is there a way to draw on Microsoft Word?
- 3 How do you draw a diagram on the computer?
- 4 How do you draw shapes in Word?
- 5 How do you draw a straight line in Word?
- 6 How can I draw a graph?
- 7 How do I draw a pen in Word?
- 8 How do I insert a pen in Word?
- 9 How do I label a diagram in Word?
- 10 Can you draw freehand in Word?
- 11 How do I make a block diagram in Word?
- 12 How do I make a graph in Word 2016?
- 13 How do you insert a draw tab in Word 2016?
- 14 How do you draw in Word 2020?
- 15 Why can’t I draw a straight line in Word?
- 16 How do you draw a straight vertical line in Word?
- 17 How do you make an XY graph in Word?
- 18 Where is the Drawing toolbar in Word 2016?
- 19 How do you draw in docs?
- 20 Where is the pen tool in Microsoft Word 2010?
How do I make a diagram in Word?
To create a diagram in a document
- Position the cursor in the document where you want to insert the diagram.
- Do either of the following to open the Choose a SmartArt Graphic dialog box:
- In the left pane, select a type of diagram.
- Click OK to insert the selected diagram at the cursor.
Is there a way to draw on Microsoft Word?
You can draw freely in Microsoft Word using the “Draw” feature whether you have Word for Mac or Windows. You can also insert customizable shapes into your document, or draw using the “Scribble” feature.
How do you draw a diagram on the computer?
8 Online Tools to Draw Diagrams and Flowcharts
- Lucidchart. Lucidchart allows you to create diagrams and flowcharts without installing any software easily.
- Draw.io. Draw.io is a completely free online tool for creating diagrams of all types.
- Cacoo.
- Gliffy.
- Sketchboard.
- Creately.
- DrawAnywhere.
- Google Drawings.
How do you draw shapes in Word?
Click in your document where you want to create the drawing. On the Insert tab, in the Illustrations group, click Shapes.
Add a drawing to a document
- Insert a shape.
- Change a shape.
- Add text to a shape.
- Group selected shapes.
- Draw in the document.
- Adjust the size of the shapes.
How do you draw a straight line in Word?
How to create a straight line in Microsoft Word
- Go to the Insert menu.
- Click on Shapes, and select which type of line you want to draw.
- Press the Shift button on the keyboard while dragging the pointer to form a straight line (horizontal or vertical).
- The straight line has created!
How can I draw a graph?
- Step 1: Identify the variables.
- Step 2: Determine the variable range.
- Step 3: Determine the scale of the graph.
- Step 4: Number and label each axis and title the graph.
- Step 5: Determine the data points and plot on the graph.
- Step 6: Draw the graph.
How do I draw a pen in Word?
On the Draw tab of the Ribbon, tap a pen to select it. In Word, you must be in Print layout to draw with ink. If the Draw tab is grayed out so that you can’t select a pen, go the View tab and select Print Layout. ; then you can select a pen to draw with.
How do I insert a pen in Word?
Click on File tab and select Options from the menu Page 2 3. Select All Tabs under Choose Commands from: 4. Select Pens under the Ink Tools and click the Add button to add the Pens tab as a main tab on the ribbon.
How do I label a diagram in Word?
Select the object (table, equation, figure, or another object) that you want to add a caption to. On the References tab, in the Captions group, click Insert Caption. In the Label list, select the label that best describes the object, such as a figure or equation.
Can you draw freehand in Word?
Creating Freehand Drawings in Word
To start, press the Draw tab on the ribbon bar. This will display the pen drawing tool options for you to use. Three drawing options are available under the Tools section.
How do I make a block diagram in Word?
Create a block diagram
- Click the File tab.
- Click New, under templates, or categories, click General, and then double-click Block Diagram.
- From the Blocks and Blocks Raised stencils, drag shapes onto the drawing page.
- To add text to a shape, select the shape and then type.
How do I make a graph in Word 2016?
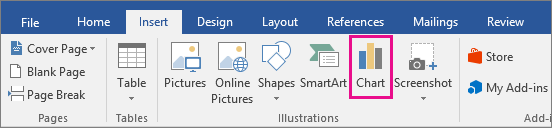
To create a simple chart from scratch in Word, click Insert > Chart, and pick the chart you want.
- Click Insert > Chart.
- Click the chart type and then double-click the chart you want.
- In the spreadsheet that appears, replace the default data with your own information.
- When you’ve finished, close the spreadsheet.
How do you insert a draw tab in Word 2016?
Adding the Draw tab to the Ribbon
- Right-click the Ribbon and select Customize the Ribbon.
- Check the box next to Draw, then click OK.
- The Draw tab will now be available in the Ribbon.
How do you draw in Word 2020?
How to draw in Word
- Click the ‘Shapes’ button and select ‘Scribble’ Open up your Microsoft Word document.
- Hold down your mouse to draw. Click and hold down your mouse to draw.
- Release the mouse. As soon as you release your mouse, the drawing will be finished.
- Edit your drawing. Double-click your drawing.
Why can’t I draw a straight line in Word?
To work around this problem and make the straight line horizontal, set the height to zero in the Size tab of the Layout dialog box. Similarly, to make the straight line vertical, set the width to zero. To display the Layout dialog box, right-click the line and choose More Layout Options.
How do you draw a straight vertical line in Word?
To add a vertical line using the shape tool, go to Insert | Shapes and select the Line tool. Place the cursor where you want the line to start, and drag to where you want the other end of the line to be. Holding the Shift key while you drag will ensure that the line is straight.
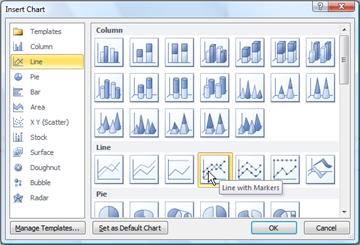
How do you make an XY graph in Word?
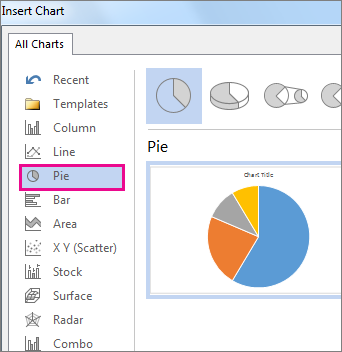
Step 1: Open the Word document. Step 2: Go to the Insert tab on the ribbon and click on the Chart option under the Illustrations group. Step 3: An Insert Charts dialog box will appear on the screen. Select the XY (Scatter) option from the left pane and pick a line graph that you want to insert.
Where is the Drawing toolbar in Word 2016?
Click View > Toolbars > Drawing. The Drawing toolbar is displayed or hidden. The Drawing toolbar contains a collection of icon buttons that allows the user to draw shapes and images in the document.
How do you draw in docs?
What to Know
- Open a document in Google Docs. Place the cursor where you want the drawing to appear.
- Select Insert > Drawing. Choose New to open the Drawing window.
- Choose a drawing type from the Actions menu. Options include word art, shapes, arrows, callouts, and equations.
Where is the pen tool in Microsoft Word 2010?
Click “File” > “Options” > “Customize Ribbon” > “Main Tabs” box > Review. The improved inking feature in Word 2010 lets you make ink annotations on your document on your Tablet PC and save those ink annotations together with the document.
Word for Microsoft 365 Word 2021 Word 2019 Word 2016 Word 2013 Word 2010 Word Starter 2010 More…Less
You can make a chart in Word. If you have lots of data to chart, create your chart in Excel, and then copy from Excel to another Office program. This is also the best way if your data changes regularly and you want your chart to always reflect the latest numbers. In that case, when you copy the chart, keep it linked to the original Excel file.
To create a simple chart from scratch in Word, click Insert > Chart, and pick the chart you want.
-
Click Insert > Chart.

-
Click the chart type and then double-click the chart you want.
-
In the spreadsheet that appears, replace the default data with your own information.
-
When you’ve finished, close the spreadsheet.
-
If you want, use the Layout Options button
to arrange the chart and text in your document.
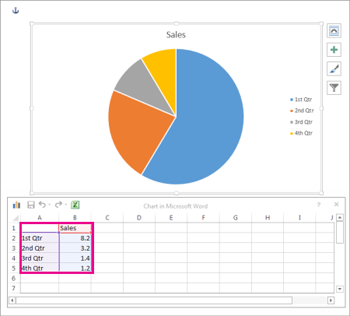
 to arrange the chart and text in your document.
You can make a chart in Word or Excel. If you have lots of data to chart, create your chart in Excel, and then copy from Excel to another Office program. This is also the best way if your data changes regularly and you want your chart to always reflect the latest numbers. In that case, when you copy the chart, keep it linked to the original Excel file.
To create a simple chart from scratch in Word, click Insert > Chart and pick the chart you want.
-
Click Insert > Chart.
-
Click the chart type and then double-click the chart you want.
-
In the spreadsheet that appears, replace the default data with your own information.
-
When you’ve finished, close the spreadsheet.
-
If you want, use the Layout Options button
to arrange the chart and text in your document.
Important:
Office 2010 is no longer supported. Upgrade to Microsoft 365 to work anywhere from any device and continue to receive support.
Upgrade now
In Microsoft Word 2010, you can insert many kinds of data charts and graphs, such as column charts, line graphs, pie charts, bar charts, area graphs, scatter graphs, stock charts, surface charts, doughnut charts, bubble graphs, and radar graphs.
Notes:
-
Don’t see the chart that you want in this article? For more information about the variety of graphs and charts you can use, see Available chart types.
-
Want to create an organization chart? For more information about how to create organization charts, see Create an organization chart.
-
If Microsoft Excel 2010 isn’t installed on your computer, you will not be able to take advantage of the advanced data charting capabilities in the Microsoft Office 2010. Instead, when you create a new data chart in Word 2010, Microsoft Graph opens.
How?
|
|
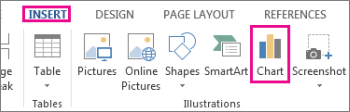
On the Insert tab, in the Illustrations group, click Chart.
|

|
|
In the Insert Chart dialog box, click the arrows to scroll through the chart types. Select the type of chart that you want and then click OK.
When you rest the mouse pointer over any chart type, a ScreenTip displays its name. |

|
|
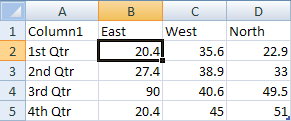
Edit the data in Excel 2010. When you are finished editing your data, you can close Excel.
Sample data in an Excel worksheet |

Tips
-
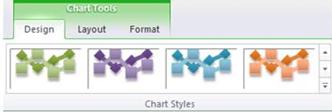
To get a good idea of what you can add to or change in your chart, under Chart Tools, click the Design, Layout, and Format tabs, and then explore the groups and options that are provided on each tab.
Note: If you don’t see the Chart Tools, make sure that you click anywhere inside the chart to activate it.
-
You can also access design, layout, and formatting features that are available for specific chart elements (such as chart axes or the legend) by right-clicking those chart elements.
More information
-
To learn about the available chart types, see Available chart types.
-
To edit data in your chart, see Change the data in an existing chart.
Top of Page
See also
Present data in a chart
Need more help?
Want more options?
Explore subscription benefits, browse training courses, learn how to secure your device, and more.
Communities help you ask and answer questions, give feedback, and hear from experts with rich knowledge.
A flowchart or flow chart usually shows steps of the task, process, or workflow.
Word for Microsoft 365 provides many predefined SmartArt templates that you can use to make a flowchart,
including visually appealing basic flowchart templates with pictures. However, if you have a
process with a tangled flow or you need a custom layout, you can build a complex flowchart
in Word using rectangular, diamond, round, and other box types.

Managers, system analysts, programmers, and engineers adopted flowcharts as a mean of
communication for describing:
- Document workflows
- Data flows
- System operation flows
- Algorithms
No wonder that building blocks and rules of flow charts were standardized by the American
National Standards Institute (ANSI) and International Organization for Standards (ISO)
more than 50 years ago. The current standard defines the drawing direction from top to
bottom and left to right and specific symbols for different types of entities, actions,
etc. E.g.:
You can find all these shapes and other useful visual elements in the Shapes
dropdown list on the Insert tab of Microsoft Word.
The flowchart above is «cross-functional» and defines the responsibility zones of
different business units.
To create a diagram like the one above, follow the next steps (we recommend to check the
tip how to easily organize shapes in
Word,
which demonstrates easy tricks to simplify the drawing routine):
Add the drawing canvas
The drawing canvas is an essential element for the flow chart that you need to add before
adding the flow shapes because of flowchart connectors. You can add flowcharts connectors
only between the shapes within the drawing canvas:
1. On the Insert tab, in the Illustrations group, click
Shapes:

2. On the Shapes list, in the bottom, choose New Drawing
Canvas:

Word adds the new drawing canvas to your flow chart:

Draw the flowchart blocks
3. On the Shapes list, in the Flowchart group,
select the block you want to add:

4. To add text to the selected shape, just double-click in it and enter
the text.
Connect the flowchart blocks by connectors
5. To connect shapes, do the following:
- On the Insert tab, in the Illustrations group, click in the Shapes list and
then select one of the connectors in the Lines group:
- Select the beginning point on the border of the first shape (source) and the ending
point on the edge of the second shape (target):


For more customizations of shapes and connectors, see
how to change format of
diagram shapes in Word
and
how to change flowchart shapes
or
how to change connector
type for flowchart.
Top-to-down flowcharts are perfect for the Portrait page orientation in Microsoft word. For
the Landscape page orientation or the PowerPoint presentation, the preferred layout is
left-to-right. Sometimes left-to-right flow diagrams with delimited borders of organization unit
activities are called Swimlane diagrams or Swimlane flowcharts.
See also this tip in French:
Comment créer un organigramme des opérations dans Word.
A diagram is worth a thousand words, especially if you’re trying to explain a process. And if you know how to make a flowchart in Word, you don’t need a different diagram-creation tool. You can make the flowchart right inside Microsoft Word, no programming or design skills required.


A flowchart is a graphical representation of a series of steps or actions. It’s most effective for depicting a process, data flow, workflow, or decision steps. In a flowchart, each shape holds a meaning. The most basic ones are:
- Oval (or pill shape). Start or end of the process.
- Rectangle. Action or sub-process.
- Diamond. Decision point.
- Parallelogram. Either an input needed for the process, or an output that goes into the next step.
Other shapes are used in flowcharts for very specific applications like data flow diagrams. But the above basic flowchart symbols should be enough for the most common charts. Whether you need just the basics or specialized shapes, you can find them in Word.
In this tutorial, I walk you step-by-step through how to make a flowchart in Microsoft Word using basic shapes. Word offers two ways to create a flowchart. Use the method that lets you make the flowchart you envision.
Note: For this tutorial, I used Microsoft Word for Mac version 16. If you’re using a different version of the application, the interface and steps may be different.
Method One: Create a Flowchart in Word With Shapes
The first way to create a flowchart in Word is by inserting shapes in your document. Here’s what to do:
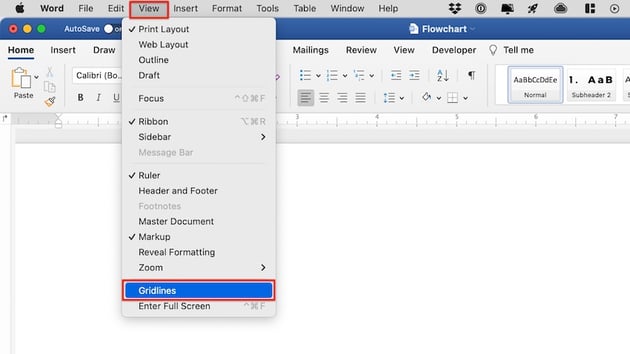
1. Display Gridlines
Before getting started, make sure to switch on gridlines. This will make it much easier for you to create a nice-looking flowchart. Aside from showing you guide lines, when gridlines are on, shapes and lines snap to regular spaces, making it easy to align elements.
To switch on the gridlines, go to View > Gridlines.


2. Create the Flowchart Shapes
Now you’re ready to start inserting shapes. Go to Insert > Shapes. The shapes menu appears. Scroll down to the Flowchart shapes. If you hover over any shape, a tip-tool appears, letting you know what the shape means. Click on the shape you wish to use.
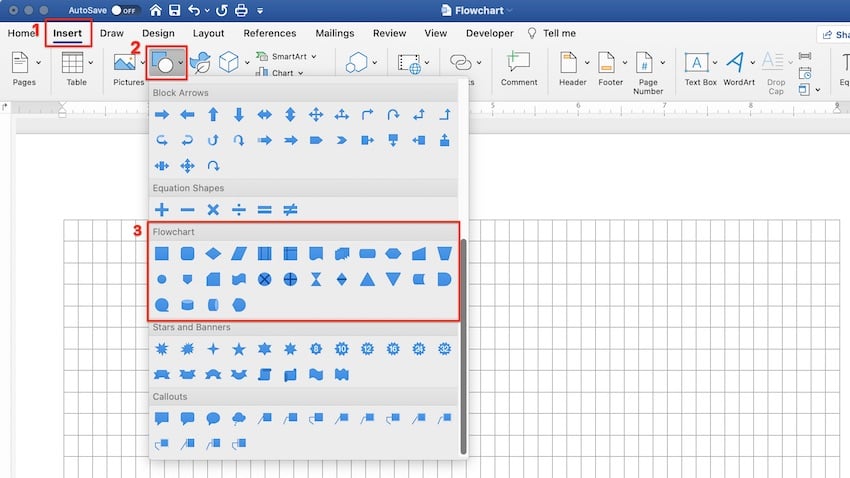


The cursor turns into a crosshair. Click and drag the crosshair to create the shape to the size you want.


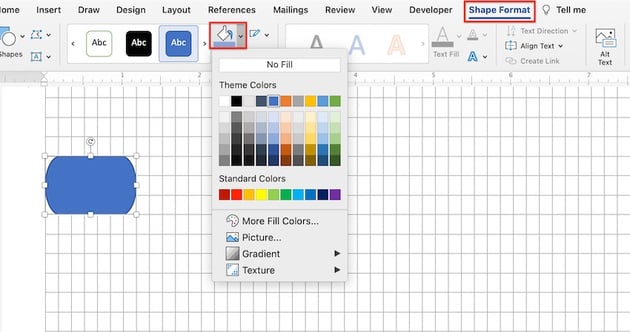
3. Format the Flowchart Shapes
Use the options on the Shape Format ribbon to format the shape’s fill color, border, and other attributes.


4. Add text inside the flowchart shapes.
To add text inside a flowchart shape, first select the shape. Then, start typing. The text will appear inside the selected shape.


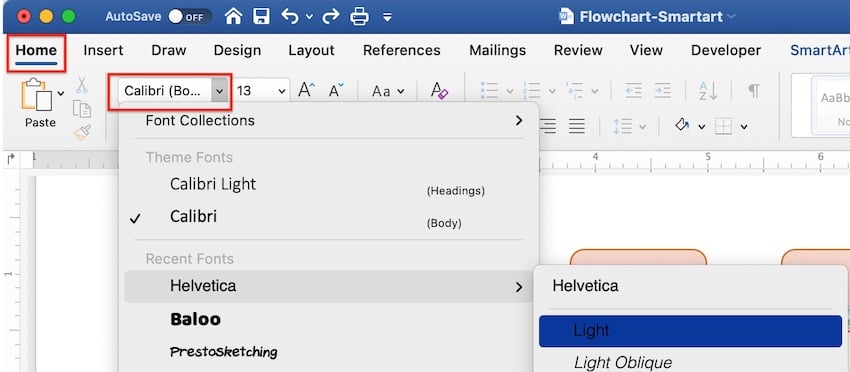
5. Format the Text
If you wish to format the text inside a shape, select the shape. Under the Home tab, use the formatting options to select the font, font size, and other attributes.


Repeat the previous steps to create all the shapes you need for your flowchart. Use the gridlines to arrange them on your document.


6. Add the Flowchart Connectors
Next, you’re going to want to connect the shapes with lines or arrows.
To insert an arrow, go to Insert > Lines. The lines menu opens. Click on the line you wish to use.


Under the Shape Format tab, use the options to format the connector.
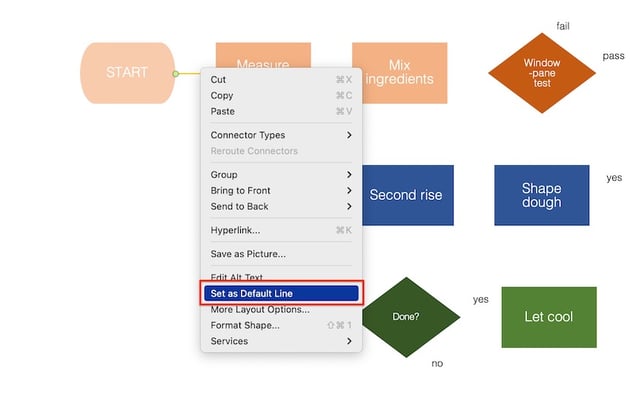
![]()
![]()
![]()
When the line is formatted as you like, set it as a default line. That way Word will use the same formatting settings for the next lines you create, and you won’t have to keep formatting each one.
To set a line as the default line, right-click on it, then select Set as Default Line.


Repeat until you’ve inserted, formatted, and arranged all the connectors you need.
4. Insert More Text
You may find that you need text outside of the shapes in your flowchart.
To add text, go to Insert > Text Box. Click and drag the cursor where you wish to place the text box. Type the text inside the box.


Next, format the text. With the text box selected, click on the Home tab. Use the formatting options on the ribbon to format the text.


When your flowchart is complete, switch off the Gridlines, and enjoy your creation!


Method Two: Create a Flowchart in Word With SmartArt
Another way to create flowcharts in MS Word is by using SmartArt. It’s a pre-designed visual template in Word that lets you quickly make charts and diagrams. You can format SmartArt—up to a certain extent—and personalize them with your own information.
To create a Microsoft SmartArt flowchart, follow these steps:
1. Insert a New SmartArt
Go to Insert > SmartArt > Process. The Process menu pops up.


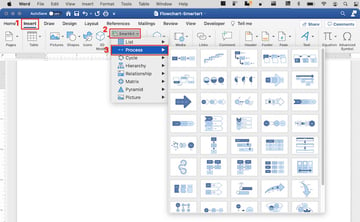
Choose the SmartArt that’s most suitable for the flowchart you wish to create and click on it.
2. Format the SmartArt Flowchart
Under the SmartArt Design tab, use the tools on the ribbon to format the various elements of the SmartArt.
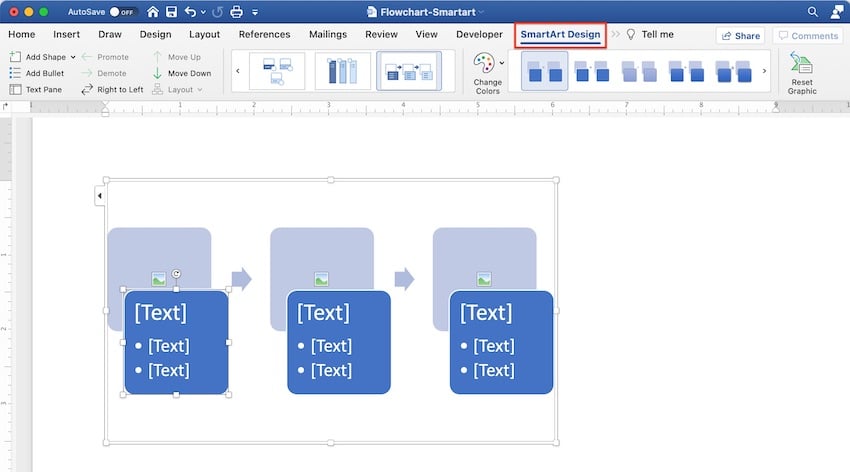


Explore the special effects menu to see ways you can spice up your chart.

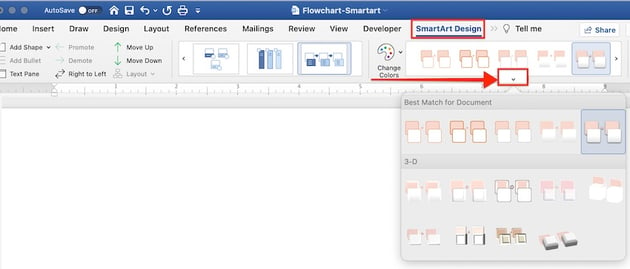

At any point, you can also change the style of your Microsoft SmartArt flowchart. First, select the SmartArt. Under the SmartArt Design tab, open the styles menu. Click on a different style you wish to apply.


3. Add Steps
You’ll probably need to add steps to your process SmartArt. To do this, make sure you’re on the SmartArt Design tab. Click on the Add Shape dropdown menu and choose from one of two options:
- Add Shape After. Adds a step at the end of the current SmartArt.
- Add Shape Before. Adds a step at the beginning.


Tip: You can add steps at any point in your workflow. But I suggest you add all the steps you think you’ll need before you add your text.
4. Add Your Text
To add your text, click on a text box—it’ll have a placeholder that says “Text”—and type your own text. Under the SmartArt Design tab, you can also click on the Text Pane button to add and edit text through the Text Pane.


You can also format the text inside the SmartArt. First, select the text box, then click on the Home tab. Use the formatting options to change the font, font size, and etc.


5. Add Images
If the SmartArt flowchart style you created includes pictures, now’s the time to add your custom images.
Click on the image icon. This launches your document finder. Click on the image file you want to add, then click Insert.

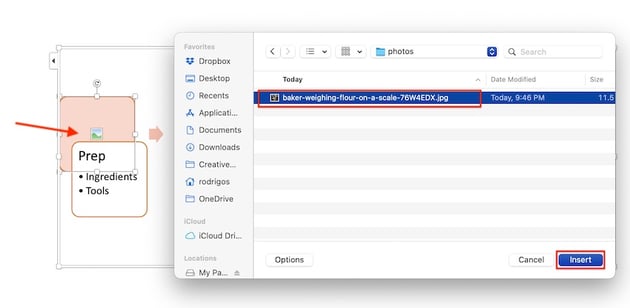

Tip: Make sure your image has the correct proportions for the image placeholder in the SmartArt. If the placeholder is square, edit your image to be a square before inserting it. Otherwise, it may get cropped awkwardly.
Repeat the steps above to complete your Microsoft SmartArt flowchart.


Shapes vs. SmartArt: What’s the Best Way to Create a Flowchart in Word?
Now that know how to create a flowchart in Word using two methods, you may be wondering, which is the better way: shapes or SmartArt?
Each has its advantages and disadvantages.
Use shapes to create a flowchart if:
-
You want complete control over how your flowchart looks. It’s simply easier to control the different elements of a flowchart that’s built from scratch using shapes and lines or arrows as connectors.
-
You want to use symbolic flowchart shapes. Word shapes include both the basic shapes and special flowchart shapes.
-
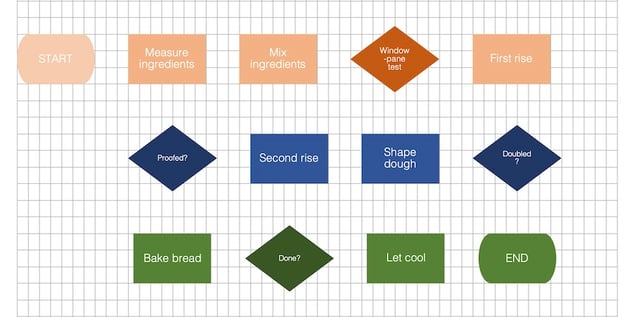
You’ve got a complicated flowchart. If you’re trying to create a flowchart with split steps (like the bread making flowchart I made with charts), then you’re better off using shapes.
Consider using SmartArt to make a flowchart if:
-
You want a creatively designed chart quickly. SmartArt process diagrams are pre-made by designers to look great with minimal fuss.
-
You don’t need traditional flowchart shapes. Most Microsoft SmartArt flowcharts use only basic shapes and other elements that are chosen more for aesthetic purposes.
-
Your flowchart has only a few and simple steps. SmartArt charts lend themselves best to straightforward processes.
5 Flowchart Making Tips
Microsoft Word gives you two convenient ways to make MS Word flowchart diagrams. To get the best results, keep these tips in mind:
1. Plan It Out
Have a clear vision for what you want your flowchart you look like. Sketch it out with pen and paper and know exactly what text and images you’re going to use.
2. Make the Design Elements Consistent
Use a consistent style among the shapes and connectors in your flowchart. For example, use the same one or two fonts for the text.
3. Fit the Entire Chart on One Page
For the greatest legibility, make sure your chart fits all on one page. You may have to change the document’s orientation from portrait to landscape to accommodate a long or wide flowchart.
4. Don’t Count on People Knowing What Flowchart Shapes Mean
As mentioned above, shapes have specific meanings when used in flowcharts. But your readers may not know what those are. Make sure your flowchart makes sense even if this is the case. It’s also a good idea to include a legend or symbol key to let your readers know what the various shapes stand for.
5. Follow the Conventional Reading Direction
In the English language, readers read from left to right and top to bottom. If your flowchart is more than one level long, continue the second level on the left side of the page. (Of course, if your document is in a language that’s read from right to left, bottom to top, then you’d follow that direction for your flowchart as well.)
Streamline Your Workflow With Microsoft Word Templates
Another way to streamline your workflow is with a Word template.
Templates may include a Microsoft Word flowchart or other diagrams. Even if that’s not the case, starting with a Microsoft Word flowchart template is still an easy way to create a professionally-designed document.


With a template for Word, all the major design decisions have already been made for you by a professional. All you’ve got to do is to customize it with your branding colors, images, and text.


One excellent source of Word templates is Envato Elements. In this creative marketplace you’ll find templates for various kinds of documents such as this resume/CV template, which includes infographics.


An Elements subscription gives you access to much more than high-quality Word templates. For one low, fixed price per month, you get unlimited downloads of the creative components you need to make your document look its best, such as fonts, photos, graphics, and icons.
And if you create other types of materials, like videos and websites, then you’ll also benefit from unlimited downloads of stock videos, music, sound effects, and presentation templates.
Create Your Own Flowcharts in Microsoft Word
Now you know how to make an easy flowchart in Microsoft Word. For complete control, build your flowchart with shapes and lines. For a fast and artistic look, use SmartArt. Either way, a well-constructed flowchart will make your document more effective at showing a process, workflow, or data flow.
You can also use Word templates to streamline your workflow. For the best quality and value, get Word templates and other creative resources from Envato Elements. Your subscription brings to your fingertips millions of creative assets to help you communicate effectively.
On a recent consulting job, I had a client asked me if I
could recommend a good, easy-to-use, and affordable diagramming software
application other than Microsoft Visio.
He then went on to say that he only needed the basics for his project and
couldn’t justify the cost of a copy of Visio nor could he afford the amount of
time that it would take to get up and running with Visio.
After giving it a bit of thought, I recommended that he just
use Microsoft Word. His puzzled stare immediately clued me in
that he had no idea that Word could do basic diagramming.
After I spent some time acquainting him with Word’s
diagramming features, which include the ability to create Cycle, Radial,
Pyramid, Venn, and Target diagrams as well as the more standard flow and
organizational charts, he was quickly creating the diagrams that he needed for
his project. The fact that my client wasn’t aware of Word’s diagramming
features reminded me that most of the folks who use Word only take advantage of
a small fraction of all the features that are packed into Word and that Visio,
while it is the most recognizable, isn’t the only diagramming tool you have at
your disposal.
In this document, I’ll introduce you to Word’s basic
diagramming features and explain how to use them to create great diagrams.
Along the way, I’ll create an example.
Prerequisites
The diagramming
features that I’ll describe in this article are only available in Word XP and
Word 2003. Keep in mind, that the other applications in both the Office XP and
Office 2003 suites also provide the same diagramming features. However, since
Word is probably the most commonly used application, and in this case, the more
appropriate application, I’ll use Word to demonstrate the diagramming features.
More specifically, I’ll be using Word 2003 for my examples and screen shots.
Getting started
To get started, launch Word and create a new document. Then,
pull down the Insert menu and select the Diagram command. When you do so,
you’ll see the Diagram Gallery dialog box, as shown in Figure A.
|
Figure A: |
 |
| The Diagram Gallery displays the six basic diagrams that you can create with Word’s diagramming feature. |
As you can see, the Diagram Gallery contains six diagram
types. Each of these diagram types is described in Table A.
Table A: The Diagram Gallery contains six diagram types
|
Diagram Type |
Description |
|
Organizational Chart |
Use this to illustrate |
|
Cycle Diagram |
Use this to illustrate a |
|
Radial Diagram |
Use this to illustrate |
|
Pyramid Diagram |
Use this to illustrate |
|
Venn Diagram |
Use this to illustrate |
|
Target Diagram |
Use this to illustrate |
Looking over the diagram work area
Once you select a diagram type, a template will appear in
your document, as shown in Figure B,
which is ready for you to begin customizing to your specific needs. However,
before we actually create a diagram, let’s take a few moments to look around
the work area.
|
Figure B: |
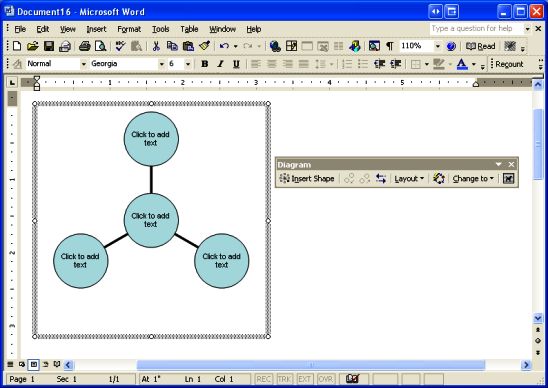 |
| Once you insert a diagram into your document, you’ll see the work area and the Diagram toolbar. |
Looking at the diagram itself, you’ll see that it has a
border around it that defines the work area. This border will disappear once
you select anything outside the work and it will not print. You’ll notice that
there are eight sizing handles, represented by circles, around the border that
you can use, via a click and drag operation, to resize the entire diagram.
The Diagram toolbar, which only appears when the work area
is selected, provides you with a host of configuration and design tools. As you
can see in Figure B, the first item
on the toolbar is the Insert Shape
button, which when clicked automatically places an appropriate element type to
the diagram. For example, if you’re creating a Radial diagram, the Insert Shape
button will add an additional circle to the diagram. (While I’m on the topic,
to delete a shape, simply select the element and press [Delete].)
The next two buttons on the toolbar, Move Shape Backward and Move
Shape Forward, allows you to move individual elements around within the
diagram. For example, if you’re creating a Pyramid diagram, you can use these
buttons to move individual elements up and down the pyramid.
The Reverse Diagram
button allows you to reorient the entire diagram at once. For example, if
you’re creating a Cycle diagram, in which the arrows point to the right by
default, clicking the Reverse Diagram button will reorient the diagram so that
the arrows point to the left.
Next up we have the Layout
drop-down menu, as shown in Figure C.
The Fit Diagram to Contents command
automatically tightens the border around the diagram without resizing the
diagram itself while the Expand Diagram
command automatically add space, at preset intervals, between the border and
the diagram without resizing the diagram. The Resize Diagram command adds resizing handles to the border that
allow you to manually change the border spacing, via a click and drag
operation, without resizing the diagram. The fourth command on the Layout menu
is actually a toggle switch labeled AutoLayout,
which is a setting that must be enabled in order to use the Insert Shape, AutoFormat and Change To
features. However, if the AutoLayout
setting is disabled when you select any of these three features, a dialog box
will prompt you to enable it.
|
Figure C: |
 |
| The Layout drop-down menu allows you to alter the spacing between the diagram and the border. |
When you click the AutoFormat
button, you’ll see the Diagram Style Gallery dialog box, as shown in Figure D, and can select from a variety
of theme-like styles. Typically, you’ll use feature once you’ve completed your
diagram and want to spice it up.
|
Figure D: |
 |
| Word provides a variety of theme-like styles that you can use to change the appearance of your diagram. |
The Change To
drop-down menu allows you to reformat a diagram using one of four other diagram
types—Organization Chart isn’t included. For example, if you’ve created a
Radial diagram and then want to see how it would look as a Target diagram,
you’d just click the Change To
drop-down menu, as shown in Figure E,
and select Target. When you do, your diagram, along with all its text, is
instantly converted.
|
Figure E: |
 |
| Using the selections on the Change To drop-down menu allows you to easily experiment with the various diagrams. |
Like elsewhere in Word, the Text Wrapping drop-down menu provides you with eight ways to
configure how you want to wrap text around your diagram. This comes in handy if
you’re planning on embedding your diagram in the middle of a report.
Note: Organizational charts
As I mentioned, the Change
To drop-down dialog box doesn’t contain an option for converting a diagram
to an Organizational Chart. The reason is being that an
Organizational Chart is a completely different type of diagram. In fact, when
you select Organizational Chart from the Diagram Gallery dialog box, you’ll see
the same work area, but a different toolbar titled Organizational Chart. This
toolbar contains options that are similar to those on the Diagram toolbar, but
the controls are specific to an organization chart. In order to stay focused on
Word’s new diagramming features, I won’t cover Organizational Charts in this
article.
Creating a Diagram
Now that you have a good idea of how to use Word’s
diagramming features, let’s take a look at the process of creating an example
diagram. As I work through this example, I’ll describe a set of techniques that
you can use in Word as you go about creating your own diagrams.
Let’s suppose that you’ve been asked to create a document
detailing all the brands associated with the parent company. In order to instantly
convey the number of brands associated with the parent company you decide to
use a Radial diagram. For the sake of a real world example, let’s use CNET
Networks as our example parent company and create a Radial diagram that shows
the company’s 18 brands.
To begin, launch Word and open a new document. In order to
get the most out of the available document space when you create such a large
diagram, you’ll need to first prepare the page. To do so, pull down the File
menu and select the Page Setup command. On the Margins tab of the Page Setup
dialog box, select the Landscape orientation, set the Top, Bottom, Left, and
Right Margins to 0.25 and click OK
When you return to the document, click the Center alignment
button on the toolbar. Now, access the Diagram Gallery dialog box as described
earlier, select the Radial diagram type, and click OK.
By default, the Radial diagram template displays a central
element surrounded by three nodes. Since you need to have a total of 18 nodes,
you’ll need to click the Insert Shape button 15 times. As you do, you’ll notice
that Word automatically scales the size of the diagram work area to fit the
page. In order to better work with the diagram as a whole at this stage in the
process, click the Zoom box on the Standard toolbar and set the factor to 40%.
Now, use the sizing handles to resize the diagram to fit the entire page, as
shown in Figure F.
|
Figure F: |
 |
| By zooming in, you’ll be able see the entire image as you resize and format diagram. |
Then next thing that you’ll want to do while you have the
diagram in this configuration is set the font and font size in each of the
nodes. To do so, hold down [Shift] as you successively click each node. Then,
set the font and font size on the Formatting toolbar. In this particular
diagram, I’ll use Arial Narrow and 12 pt. You can then Zoom back out to 100%
and begin entering text in the nodes.
As you begin entering text, you can alter positioning and
size as you see fit. In the case of my example, there were so many nodes and
some of the names were quite long, so I went to the Diagram Style Gallery and
selected the Square Shadows style, which provides a bit more room for text. I
then centered the text in each of the squares. The end result is a very nice
diagram that clearly illustrates the number of brands in the CNET stable, as
shown in Figure G.
|
Figure G: |
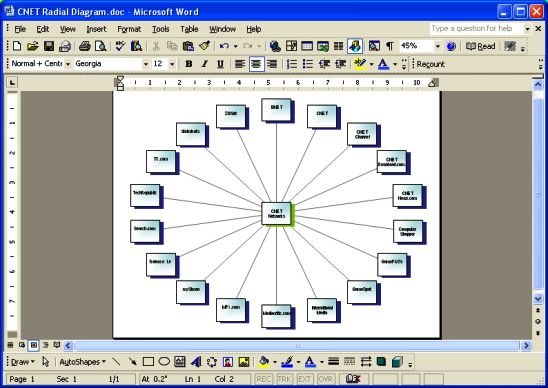 |
| By switching to the Square Shadows style and tweaking the text layout a bit, I’ve created a very nice looking diagram. |
Conclusion
The next time you need to create a basic diagram, remember
that Word XP and Word 2003 provide excellent diagramming features. Keep in mind
that it may take a little bit of time to get used to creating diagrams in Word,
but it’s actually very easy once you get a handle on the process. To help you
get started, you can look at the CNET Radial Diagram.doc file which includes
the Radial diagram that I created for this article’s example.