
Those who regularly work in Microsoft Excel often wonder how to copy the table data properly, retaining the format, formulas or their values.
How to paste a formula in an Excel table retaining the format? It’s possible to save a truckload of time solving this task. For this, we will use the function «Paste Special». It’s a simple tool that allows for solving complicated tasks quickly and mastering the basics of its usage. This unsophisticated tool is employed to quickly apply the same format to all tables and achieve the necessary result.
How to copy a table retaining column width and row height
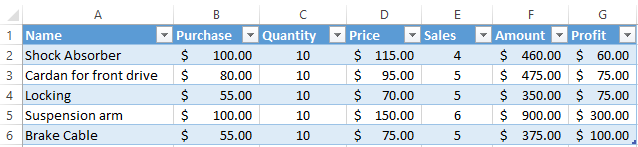
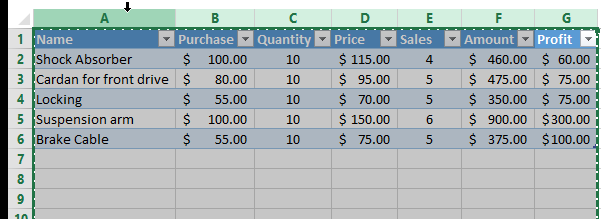
Let’s assume we have a table, the format of which needs to be preserved when you copy it:
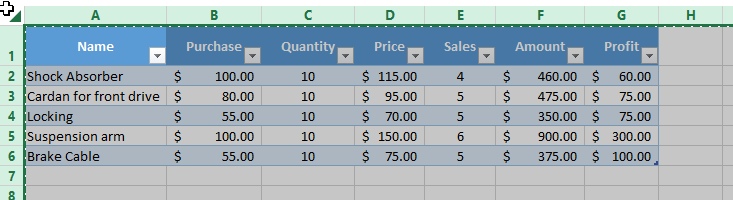
When you copy it to a different spreadsheet using the usual Ctrl+C – Ctrl+V method, the result is far from desired:
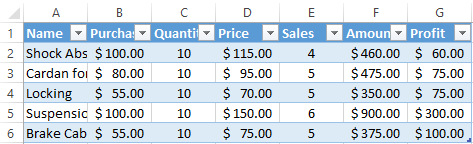
You will have to adjust the column width manually, whipping it into the convenient shape. If the table is large, you will be fiddling around for quite a while. However, there is a way to significantly reduce your loss of time.
Method 1. Using paste special
- Select the initial table that needs to be copied, and press Ctrl+C.
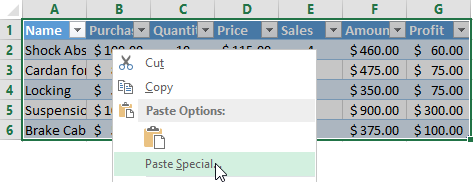
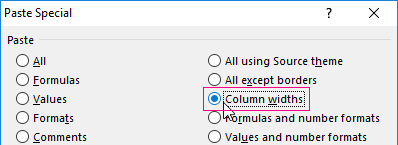
- Select the new (already copied) table, where you need to apply the column width format, and right-click on a cell. Find the line «Paste Special» (CTRL+ALT+V) in the drop-down menu.
- In the dialog window, select the option «Column widths», and click «ОК».
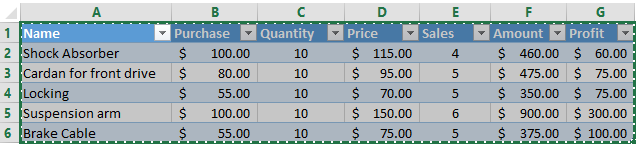
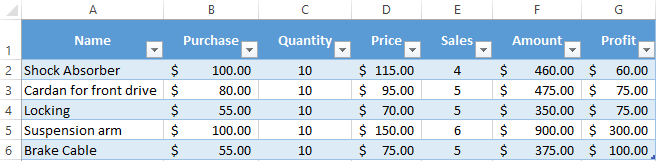
The table now features the initial parameters and looks perfect.
Method 2. Selecting the columns before copying
This method has a secret: if you select the columns together with their headings before copying the table, the width of every column will also be copied when you paste it.
- Select the columns containing the initial data.
- Copy and paste to quickly obtain the desired result.
It’s rational to use each of the methods depending on the task. However, the second method allows to both quickly carry the table over together with the format, and copy the row height. Note that the paste special menu lacks the option “row height.” Thus, you will need to take the following steps to fulfill such a task:
- Select the all rows and column on sheet (CTRL+A).
- Paste its copy below.
Helpful hint! The quickest way to copy a large and complicated table retaining its column width and row height is to copy it as an entire sheet.
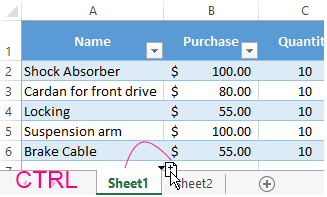
While holding the CTRL key, drag the tab of the sheet.
How to paste formula values retaining table format
Although the paste special tool is not perfect, you should not underestimate its capabilities. For example, let’s view how to copy the value of a formula into an Excel table retaining the cell format.
Step 1:
- Select the initial table containing the formulas and copy it.
- In the spot where you need to paste the range of values (without the formulas), select the «Values» option. Click OK.

Step 2:
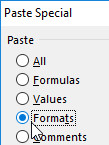
Since the copied range is still in the clipboard after you copied it, proceed to open the paste special dialog again and select the option «Formats». Click OK.
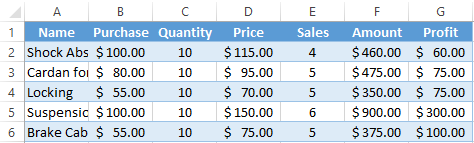
We have pasted the values of the formulas in the table retaining the cell format. As you might have guessed, you can also take a third step and copy the column width as described above.
Microsoft Excel offers users virtually limitless possibilities for calculating the simplest functions and fulfilling a number of other tasks. The program allows you to set formats, save cell values, work with formulas, transfer and change them in a convenient way.
When working with data in Excel, you would often have a need to copy some tables from Excel into an MS Word document.
While there is no built-in option in Excel to convert an entire Excel file to Word, you can easily copy and paste the data from an Excel document to Word.
In this tutorial, I will show you multiple ways to copy data from an Excel Worksheet into a Word document.
Copy Paste Excel Table as Plain Text in MS Word
If all you want is to copy and paste a table from Excel to Word, you can do that with a simple copy paste.
It allows you to get the static table in Word, where you can then format it (and change it if you want).
The downside of this method is that in case there are any formulas in the data, that won’t work. And since this is static table, any changes you make in Excel will not get reflected in the table you copied to Word.
But in most cases, this is exactly what you want.
Let’s see how to do this.
Suppose you have a dataset as shown below and you want to copy this data from Excel and insert it into Word.

Below are the steps to do this:
- Select the data in Excel that you want to copy to Word
- Right-click and then click on Copy (or use the keyboard shortcut Control + C in Windows or Command + C in Mac)

- Open the Word document where you want to insert this data
- Place the cursor where you want this data in the Word document
- Go to the Home tab in Word and click on Paste (or use the keyboard shortcut Control + V)

The above steps would copy the data from Excel and paste it as a static table in the Word document.

Once you have the table in Word, you can format and work with it just like any other table that you insert in Word.
A couple of things to note when using this method:
- If there are any formulas in the table in Excel, they won’t be copied. In my example, I have the formulas in the Total row, but when copied to Word, these are static values. If you make any changes to any data, you will have to manually adjust the formula values as well
- If you don’t want to get copy the formatting from Excel and would rather want to use the formatting of the Word document, you can use the option Use Destination Style option. It shows up when you click on the Paste Options icon after you have pasted the table in Word.
Embed Excel Table into Word (as a Linked Object)
In the above method, we copied the data from Excel and inserted it as a static table into Word.
Another option that you can use is to copy and paste the table into a Word document and keep the two tables linked.
This way, if you make any changes in the Excel table that you copied, you will see that these are reflected in real-time in the table in Word as well.
This is quite useful when there is a possibility that you may have to update the data in Excel and it would also need to be updated in Word. By having the linked table, you only need to make changes in Excel data and these would automatically get reflected in the table you copied to Word.
Let me show you how this works.
Suppose you have a table as shown below and you want to copy it from Excel to MS Word and keep this linked.
Below are the steps to do this:
- Select the data in Excel that you want to copy to Word
- Right-click and then click on Copy (or use the keyboard shortcut Control + C)
- Open the Word document where you want to insert this data
- Place the cursor where you want this data in the Word document
- Go to the Home tab in Word and click on Paste drop-down (click on the small inverted arrow below the Paste Special icon)

- In the options that show up, click on Paste Special

- In the Paste Special dialog box, select the ‘Paste link’ option

- Select Microsoft Excel Worksheet Object from the listed options

- Click OK
The above steps would insert the copied table in Word, where it’s still linked to the original table in Excel.
Now, if you go and make any changes in the table in Excel, you will see that the same is reflected in the table in Word (in real-time).
If for some reason your data doesn’t update in real-time, right-click on the table and click on the ‘Update Link’ option
Here are some things you need to know about this method:
- Since the two files are linked to each other, you will have to keep these together. If you’re sending the Word file to someone, you will also have to send them the Excel file, or the link would be broken and the data in Word would not update.
- Whenever the Word file opens, it will check for any updates in the Excel table. This works even if the Excel file is closed.
This method is best suited for situations where you have a large Excel file that has a lot of calculations/data/dashboards. By using this method, you can only copy a small part of the Excel file, while still being able to update the table when values change in Excel.
Embed Excel Table into Word
This is a really useful feature that MS Word offers. It allows you to embed an Excel document as a part of the Word document.
In the above method, I showed you how to keep the Excel and Word files together and keep them linked.
In this section, I will show you how to embed the Excel file within the Word document, so you won’t have to keep both the files (and only keep the Word file).
In layman terms, it’s as if you can open and work on an Excel worksheet from within the Word Document.
Let me show you what I mean.
Suppose you have a table in Excel as shown below that you want to copy to Word.
Below are the steps to insert this as an Embedded Excel object in Word:
- Select the data in Excel that you want to copy to Word
- Right-click and then click on Copy (or use the keyboard shortcut Control + C)
- Open the Word document where you want to insert this data
- Place the cursor where you want this data in the Word document
- Go to the Home tab in Word and click on Paste drop-down (click on the small inverted arrow below the Paste Special icon)
- In the options that show up, click on Paste Special
- In the Paste Special dialog box, make sure the ‘Paste’ option is selected

- Select Microsoft Excel Worksheet Object from the listed options

- Click OK
The above steps would insert the copied data from Excel to MS Word.
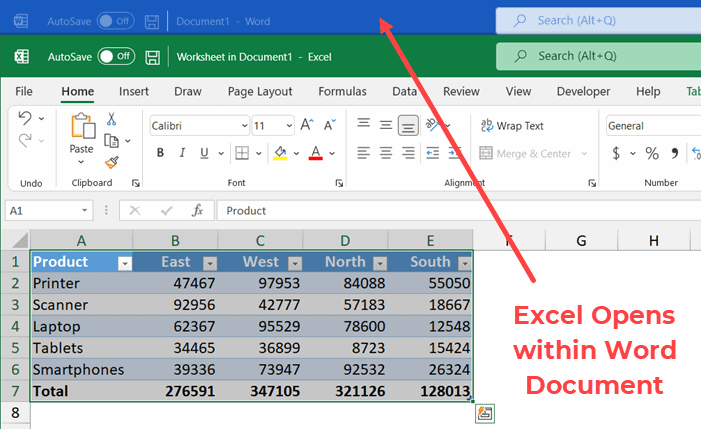
But what actually happnes in the backend in MS Word is that it creates a new Excel file (which is a part of the Word document itself) and shows you the table from that file.
If you double click on the table, you will notice that it opens the Excel file (from within the Word document). You get to see the familiar Excel interface while still being in the Word document.
You can make any change and also use functionality such as conditional formatting, and that would be reflected in the table. Also, any formulas you have in place would continue to work.
The biggest benefit of using this method is that you don’t have to worry about two separate files. Unlike the previous method, in this method, the Excel file is a part of the Word document.
So, if you save the Word file or share it with someone else, the Excel file would remain with it and the data would remain intact.
On the downside, if you use multiple such tables or if the data is large, it will lead to a heavy Word document (as it has to also bear the weight of the embedded Excel file).
Copy Excel Table as a Satic Image
If you’re preparing a report and all you want is a really easy way to show some table (without any need to change the data), you can insert that data as an image.
Doing this is really easy and images are also easier to manage in Word (such as placement and resizing).
With copying an images, you also have an option to link the image to the table in Excel. This way, if you make any changes in Excel table, it would be reflected in the table image in Word.
Inserting Copied Table as a Static Image in Word
Suppose you have a table as shown below in Excel:
Below are the steps to copy this table and insert it as an image in MS Word:
- Select the data in Excel that you want to copy to Word
- Right-click and then click on Copy (or use the keyboard shortcut Control + C)
- Open the Word document where you want to insert this data
- Place the cursor where you want this data in the Word document
- Go to the Home tab in Word and click on Paste drop-down (click on the small inverted arrow below the Paste Special icon)
- In the options that show up, click on Paste Special
- In the Paste Special dialog box, make sure the ‘Paste’ option is selected

- Select ‘Picture’ from the listed options

- Click OK
The above steps would insert an image of the table in the Word document.
This is just like any other image and you can resize and format it.
Inserting Copied Table as a Linked Image in Word
If you like the flexibility of managing images in Word, and still want the table to be connected to the original Excel file, you can do that as well.
Suppose you have a table as shown below in Excel:
Below are the steps to copy this table and insert it as a linked image in MS Word:
- Select the table in Excel
- Right-click and then click on Copy (or use the keyboard shortcut Control + C)
- Open the Word document where you want to insert this data
- Place the cursor where you want this data in the Word document
- Go to the Home tab in Word and click on Paste Special
- In the Paste Special dialog box, select the ‘Paste Link’ option

- Select ‘Picture’ from the listed options

- Click OK
The above steps would again give you an image that you can easily resize and format.
But since this is linked to the original table in Excel, if you make any changes in the original table, these would also be reflected in the image.
Also, remember that since this image is linked to the original data, if you plan to share this Word document with someone else, you should also share the Excel File (in case you want the link to remain as is)
In case the excel file is not available or the name is changed, the image would be just like any other regular image.
So these are some of the ways you can use to copy a table for Excel and insert it into Word. In most cases, I prefer copying and pasting Excel tables as images, as these are easier to manage. In some cases, I also prefer the embed method which allows me to open the Excel file from within Word itself.
I hope you found this tutorial useful!
Other Excel tutorials you may also like:
- How to Save Excel Charts as Images (save as PNG, JPG, BMP)
- Microsoft Excel Won’t Open – How to Fix it! (6 Possible Solutions)
- How to Quickly Copy Chart (Graph) Format in Excel
- How to Copy Conditional Formatting to Another Cell in Excel
- How to Copy and Paste Formulas in Excel without Changing Cell References
- Copy and Paste Multiple Cells in Excel (Adjacent & Non-Adjacent)
Move or copy worksheets or worksheet data
You can move or copy a worksheet in the same workbook to organize your workbook exactly how you want.

You can use the Move or Copy Sheet command to move or copy entire worksheets (also known as sheets), to other locations in the same or a different workbook. You can use the Cut and Copy commands to move or copy a portion of the data to other worksheets or workbooks.
Move a worksheet within a workbook
-
Select the worksheet tab, and drag it to where you want it.
Caution: When you move a sheet to another workbook, check any formulas or charts that refer to data on the sheet because moving the sheet might cause errors or produce unintended results in your data. Similarly, if you move a sheet that is referred to by 3-D references, the calculation might include or leave out data on the sheet.
Copy a worksheet in the same workbook
-
Press CTRL and drag the worksheet tab to the tab location you want.
OR
-
Right click on the worksheet tab and select Move or Copy.
-
Select the Create a copy checkbox.
-
Under Before sheet, select where you want to place the copy.
-
Select OK.
When you need to reorganize your data, you can easily change the order of sheets in a workbook, or move or copy a sheet to another workbook. But be aware that calculations or charts that are based on sheet data may become inaccurate if you move the sheet.
Move a sheet
-
Drag the sheet tab to the location that you want along the row of sheet tabs.
Copy a sheet
-
Hold down OPTION.
-
Drag the sheet tab to the location that you want the copied sheet to appear along the row of sheet tabs.
Important: Release the mouse button before you release the OPTION key.
Move a sheet to another workbook
Caution: When you move a sheet to another workbook, check any formulas or charts that refer to data on the sheet because moving the sheet might cause errors or produce unintended results in your data. Similarly, if you move a sheet that is referred to by 3-D references, the calculation might include or leave out data on the sheet.
-
Open the workbook that you want to move the sheet to.
-
On the Window menu, click the workbook that contains the sheet that you want to move.
Click the sheet that you want to copy to the other workbook.
-
On the Edit menu, click Sheet > Move or Copy Sheet.
-
On the To book menu, click the workbook that you want to move the sheet to.
Tip: To create a new workbook that contains the moved sheet, click new book.
-
In the Before sheet box, click the sheet that you want to insert the moved sheet before, or click move to end.
-
Click OK.
Copy a sheet to another workbook
-
Open the workbook that you want to copy the sheet to.
-
On the Window menu, click the workbook that contains the sheet that you want to copy.
Click the sheet that you want to copy.
-
On the Edit menu, click Sheet > Move or Copy Sheet.
-
On the To book menu, click the workbook that you want to copy the sheet to.
Tip: To create a new workbook that contains the moved sheet, click new book.
-
In the Before sheet box, click the sheet that you want to insert the copied sheet before, or click move to end.
-
Select the Create a copy check box.
-
Click OK.
Change the color of a sheet tab
Coloring the sheet tabs can help you keep track of your information in a large workbook.
-
Hold down CONTROL and click the sheet tab.
-
Click Tab Color, and then click the color that you want to use.
In Excel for the web, you can duplicate (or copy) worksheets within the current workbook. Simply right-click the tab name at the bottom of the sheet and click Duplicate.
Note: You may receive an error when you are trying to duplicate a worksheet that contains a chart, picture, or shape. If you get an error, you can duplicate the sheet manually.
If you have elements in your worksheet that interfere with duplicating it, you can still create a copy of the worksheet manually by copying all the data and pasting it into a new sheet. Here’s how:
-
Select all the data in the worksheet.
Keyboard shortcut: Press CTRL+Spacebar, on the keyboard, and then press Shift+Spacebar.
-
Copy all the data on the sheet by pressing CTRL+C.
-
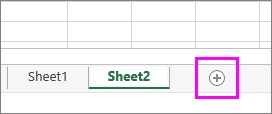
Click the plus sign to add a new blank worksheet.

-
Click the first cell in the new sheet and press CTRL+V to paste the data.
Note: You will lose any conditional formatting applied to the cells when you paste them into the new worksheet.
In Excel for the web, the option to move or copy a sheet isn’t available when you right-click a sheet tab, as it is in the Excel desktop application. In Excel for the web, you can achieve the same result by copying all of the data in the worksheet and pasting it into a blank worksheet in the other workbook.
Follow these steps to move or copy a worksheet to another workbook in Excel for the web:
-
Select all the data in the worksheet.
Keyboard shortcut: Press CTRL+Spacebar and then press Shift+Spacebar.
-
Copy all the data on the sheet by pressing CTRL+C.
-
Open the workbook in which you want to paste the data, then click the + in the status bar to add a new blank worksheet.
-
Click the first cell in the new worksheet, then press CTRL+V to paste the data into that worksheet.
Note: You will lose any conditional formatting applied to the cells when you paste them into the other workbook.
Need more help?
You can always ask an expert in the Excel Tech Community or get support in the Answers community.
Need more help?
Содержание
- Копирование в Экселе
- Способ 1: копирование по умолчанию
- Способ 2: копирование значений
- Способ 3: создание копии с сохранением ширины столбцов
- Способ 4: вставка в виде изображения
- Способ 5: копирование листа
- Вопросы и ответы

Для большинства пользователей Excel процесс копирования таблиц не представляет большой сложности. Но, далеко не все знают некоторые нюансы, которые позволяют сделать эту процедуру максимально эффективной для различного типа данных и разноплановых целей. Давайте подробно рассмотрим некоторые особенности копирования данных в программе Эксель.
Копирование в Экселе
Копирование таблицы в Excel представляет собой создание её дубликата. В самой процедуре практически нет отличий в зависимости от того, куда вы собираетесь вставить данные: в другую область того же листа, на новый лист или в другую книгу (файл). Главное отличие между способами копирования заключается в том, как вы хотите скопировать информацию: вместе с формулами или только с отображаемыми данными.
Урок: Копирование таблиц в Mirosoft Word
Способ 1: копирование по умолчанию
Простое копирование по умолчанию в Эксель предусматривает создание копии таблицы вместе со всеми размещенными в ней формулами и форматированием.
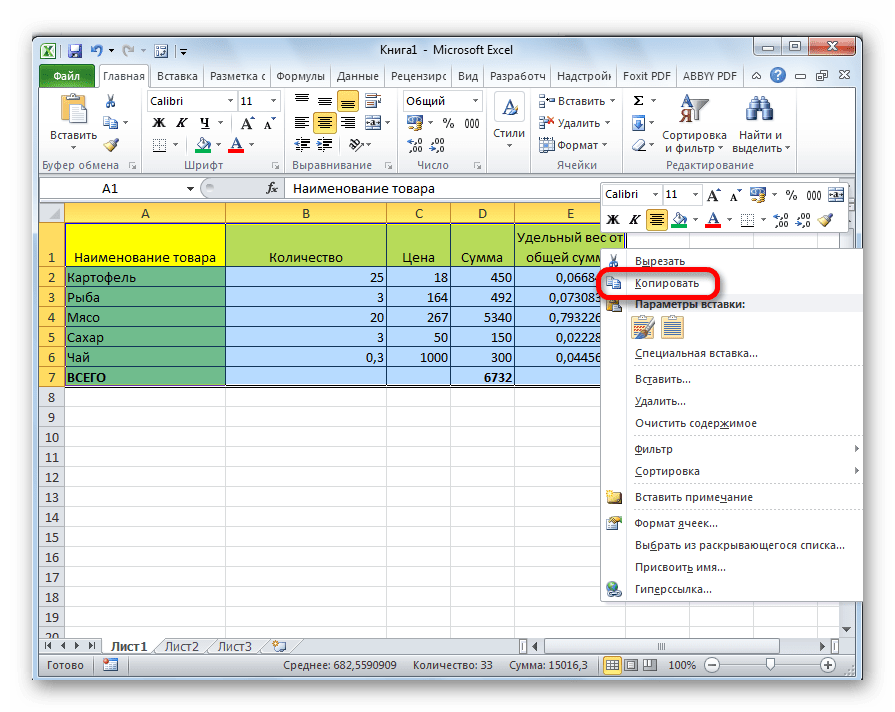
- Выделяем область, которую хотим скопировать. Кликаем по выделенной области правой кнопкой мыши. Появляется контекстное меню. Выбираем в нём пункт «Копировать».

Есть и альтернативные варианты выполнение данного шага. Первый из них состоит в нажатии на клавиатуре сочетания клавиш Ctrl+C после выделения области. Второй вариант подразумевает нажатие кнопки «Копировать», которая располагается на ленте во вкладке «Главная» в группе инструментов «Буфер обмена».
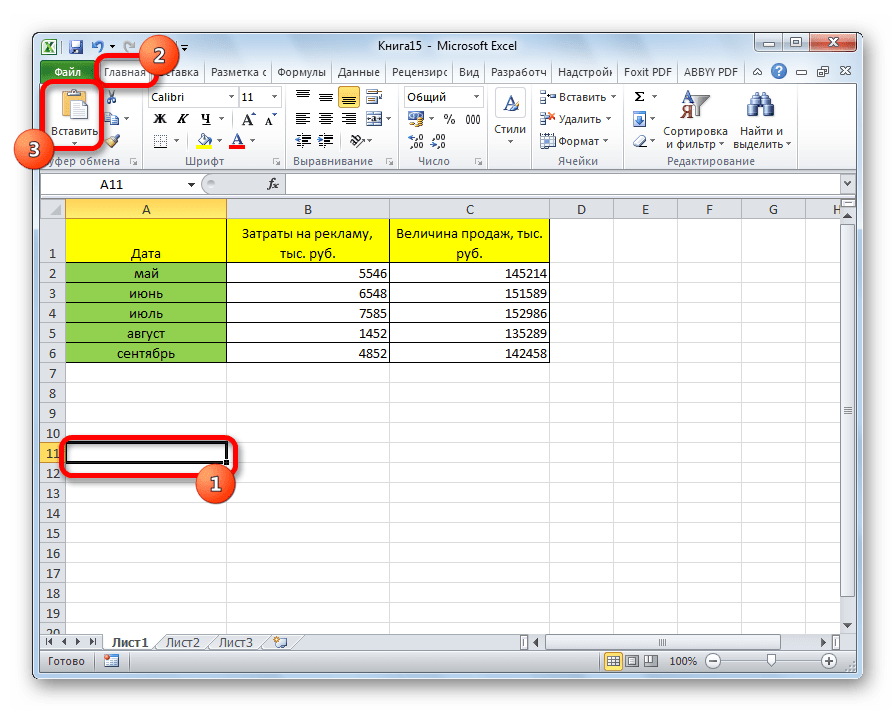
- Открываем область, в которую хотим вставить данные. Это может быть новый лист, другой файл Excel или другая область ячеек на этом же листе. Кликаем по ячейке, которая должна стать верхней левой ячейкой вставленной таблицы. В контекстном меню в параметрах вставки выбираем пункт «Вставить».

Тут также существуют альтернативные варианты действий. Можно выделив ячейку нажать на клавиатуре сочетание клавиш Ctrl+V. Кроме того, можно нажать на кнопку «Вставить», которая размещена на самом левом краю ленты рядом с кнопкой «Копировать».


После этого, будет выполнена вставка данных с сохранением форматирования и формул.

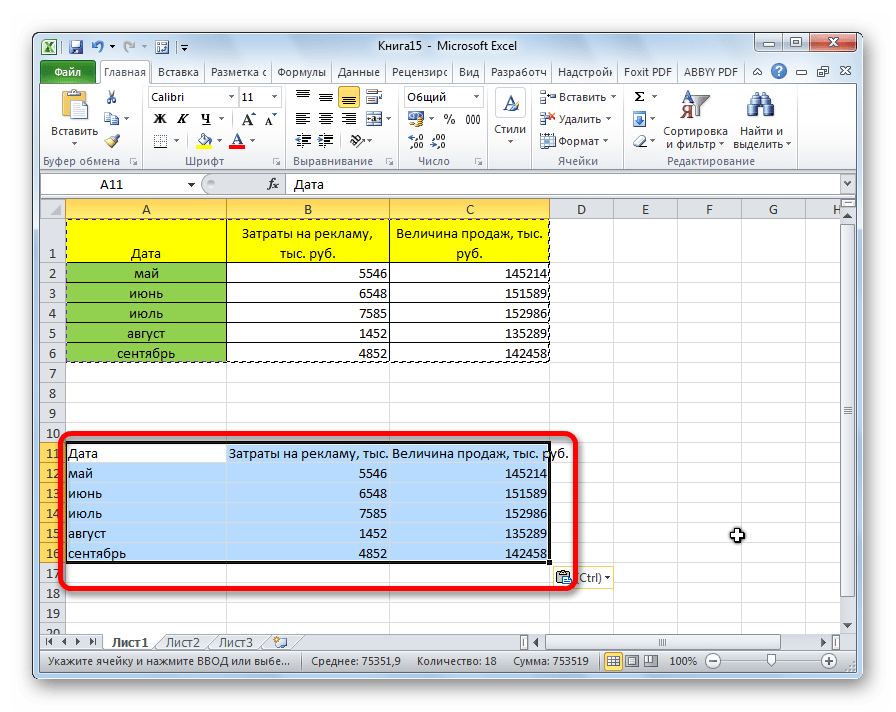
Способ 2: копирование значений
Второй способ предусматривает копирование исключительно значений таблицы, которые отображаются на экране, а не формул.
- Копируем данные одним из способов, которые описывались выше.
- Кликаем правой кнопкой мыши в том месте, куда нужно вставить данные. В контекстном меню в параметрах вставки выбираем пункт «Значения».
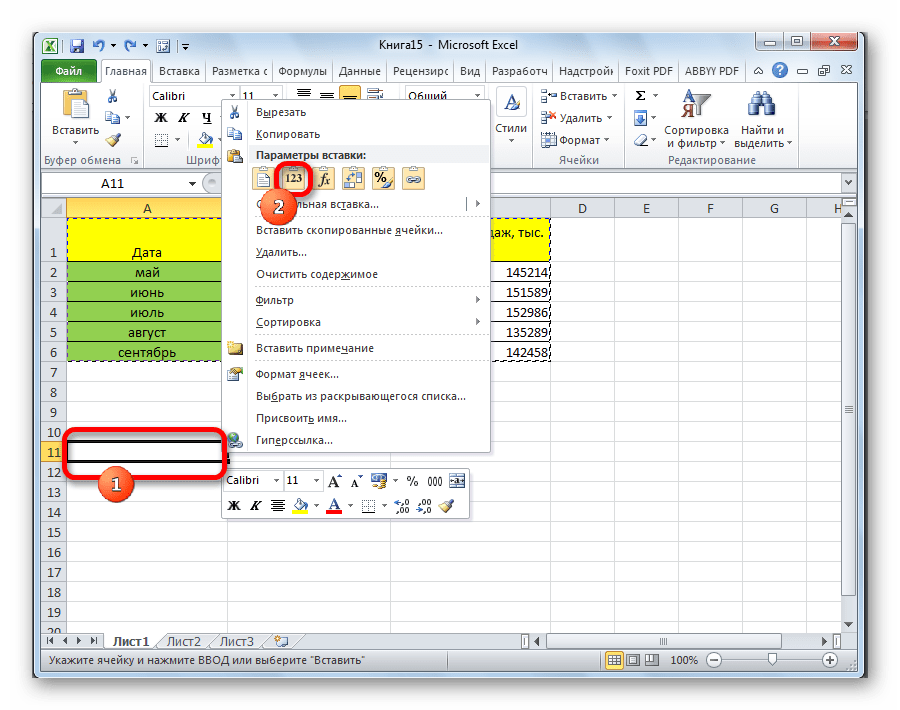
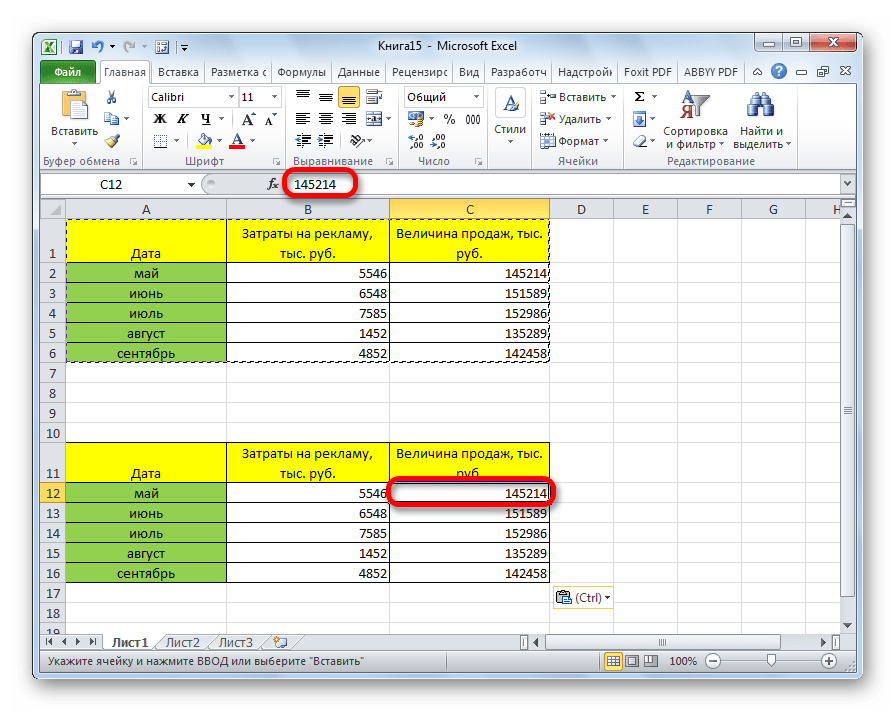
После этого таблица будет добавлена на лист без сохранения форматирования и формул. То есть, фактически будут скопированы только отображаемые на экране данные.

Если вы хотите скопировать значения, но при этом сохранить исходное форматирование, то нужно во время вставки перейти в пункт меню «Специальная вставка». Там в блоке «Вставить значения» нужно выбрать пункт «Значения и исходное форматирование».
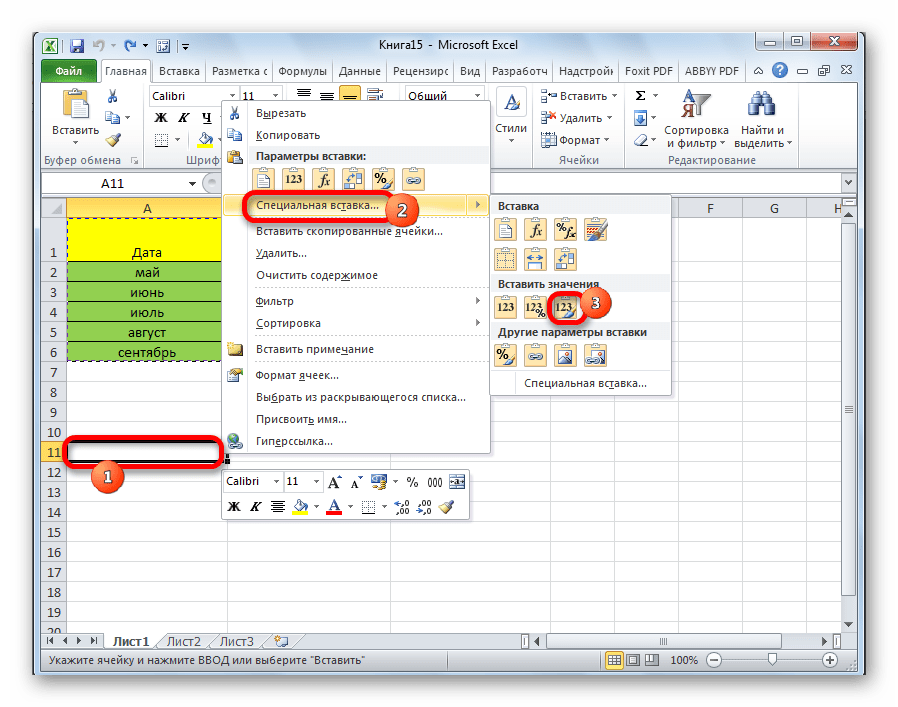
После этого, таблица будет представлена в первоначальном своем виде, но только вместо формул ячейки будут заполнять постоянные значения.
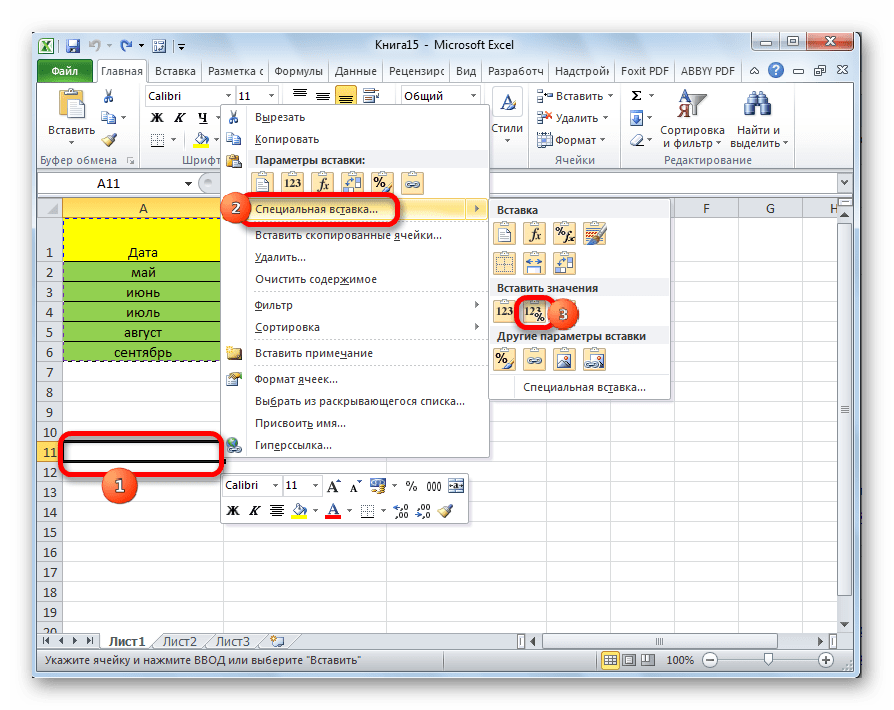
Если вы хотите произвести данную операцию только с сохранением форматирования чисел, а не всей таблицы, то в специальной вставке нужно выбрать пункт «Значения и форматы чисел».
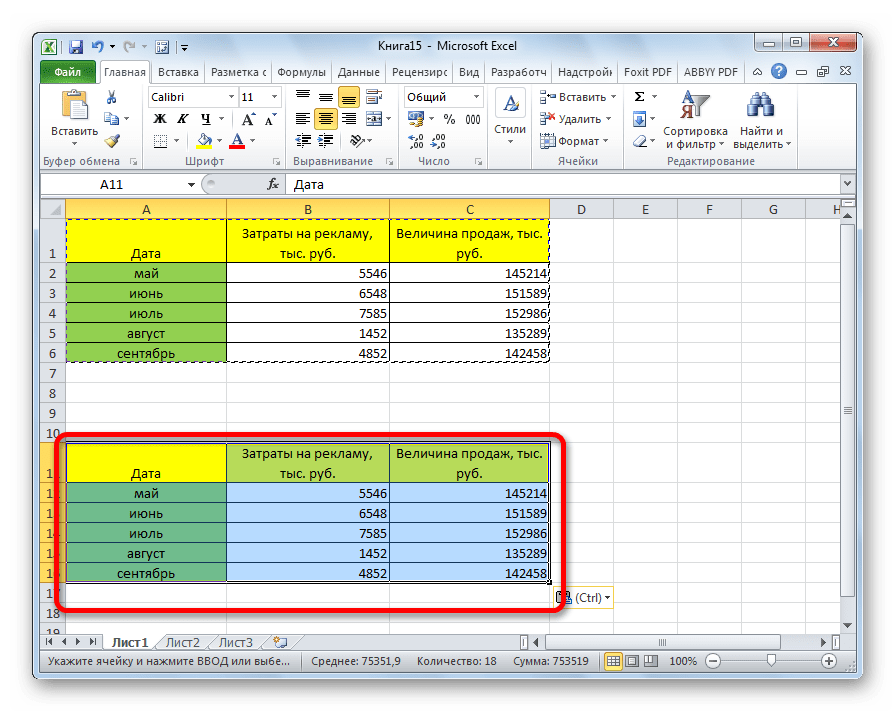
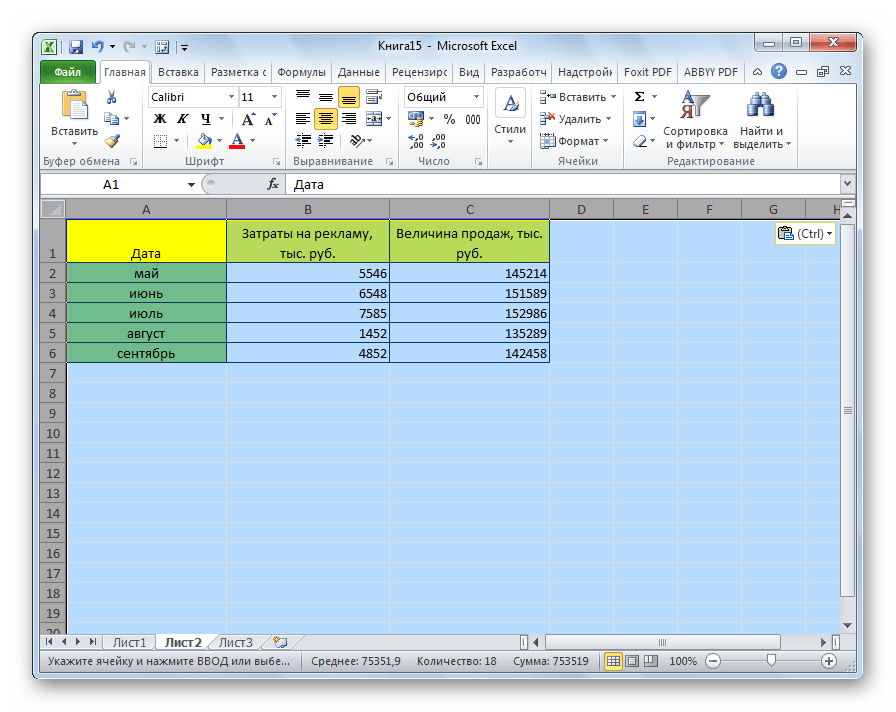
Способ 3: создание копии с сохранением ширины столбцов
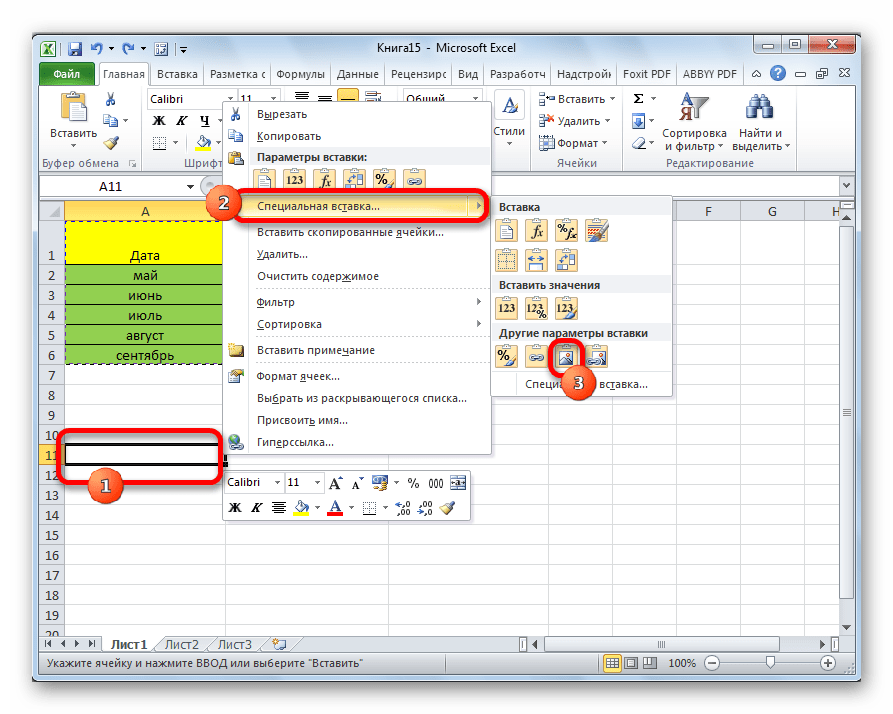
Но, к сожалению, даже использование исходного форматирования не позволяет сделать копию таблицы с первоначальной шириной столбцов. То есть, довольно часто бывают случаи, когда после вставки данные не помещаются в ячейки. Но в Экселе существует возможность с помощью определенных действий сохранить исходную ширину столбцов.
- Копируем таблицу любым из обычных способов.
- В месте, где нужно вставить данные, вызываем контекстное меню. Последовательно переходим по пунктам «Специальная вставка» и «Сохранить ширину столбцов оригинала».

Можно поступить и другим способом. Из контекстного меню дважды переходим в пункт с одинаковым наименованием «Специальная вставка…».

Открывается окно. В блоке инструментов «Вставить» переставляем переключатель в позицию «Ширины столбцов». Жмем на кнопку «OK».
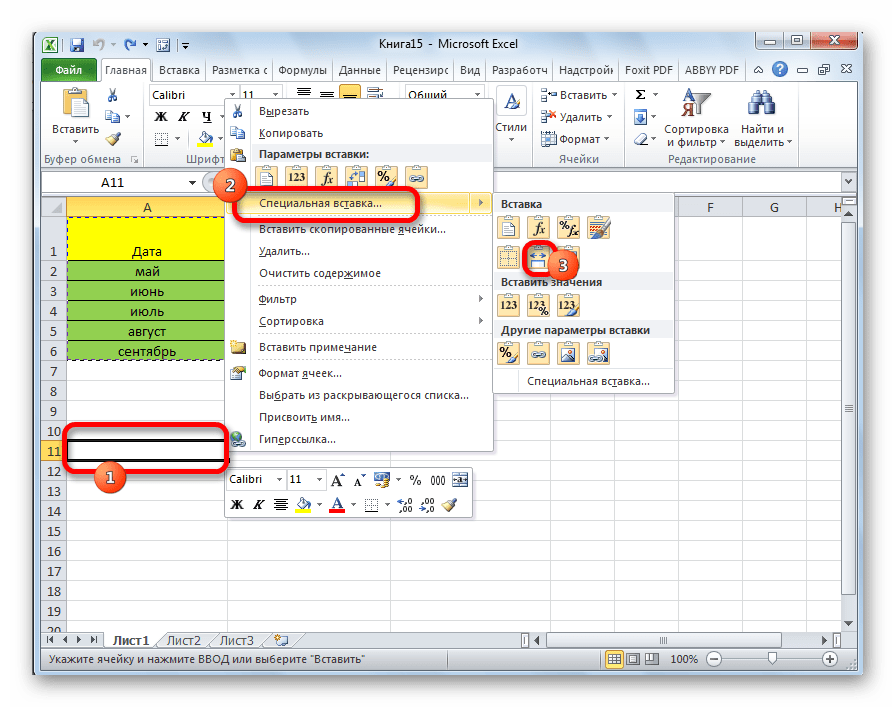

Какой бы вы путь не выбрали из перечисленных выше двух вариантов, в любом случае, скопированная таблица будет иметь ту же ширину столбцов, что и исходник.
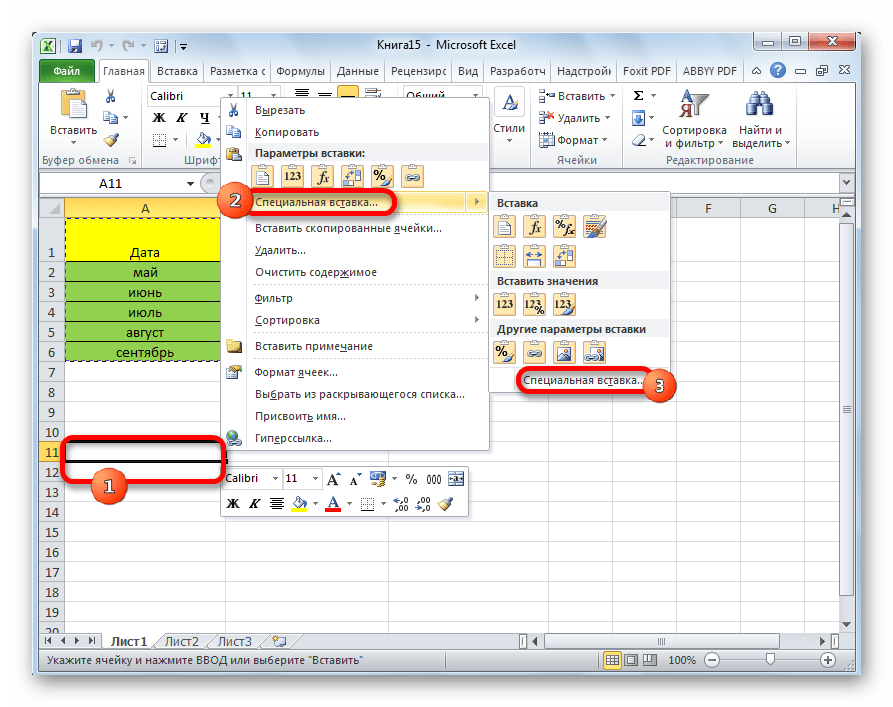
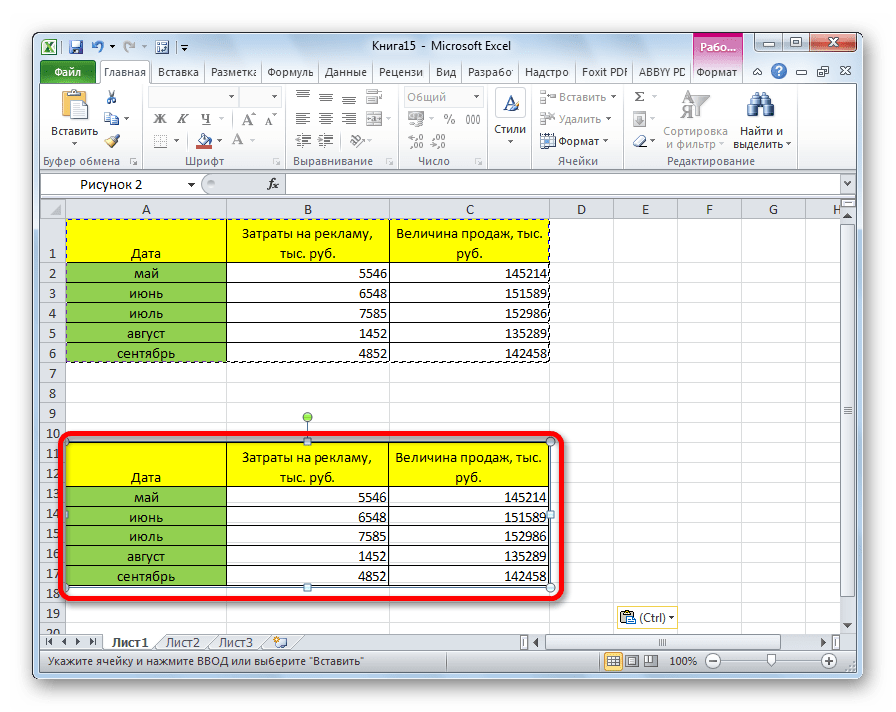
Способ 4: вставка в виде изображения
Бывают случаи, когда таблицу нужно вставить не в обычном формате, а в виде изображения. Эта задача также решается при помощи специальной вставки.
- Выполняем копирование нужного диапазона.
- Выбираем место для вставки и вызываем контекстное меню. Переходим в пункт «Специальная вставка». В блоке «Другие параметры вставки» выбираем пункт «Рисунок».
После этого, данные будут вставлены на лист в виде изображения. Естественно, редактировать такую таблицу уже будет нельзя.
Способ 5: копирование листа
Если вы хотите скопировать полностью всю таблицу на другой лист, но при этом сохранить её абсолютно идентичной исходнику, то в этом случае, лучше всего, выполнить копирование листа целиком. В этом случае важно определить, что вы действительно желаете перенести все, что находится на исходном листе, в ином случае данный способ не подойдет.
- Чтобы вручную не выделять все ячейки листа, а это заняло бы большое количество времени, кликаем по прямоугольнику, расположенному между горизонтальной и вертикальной панелью координат. После этого весь лист будет выделен. Чтобы скопировать содержимое, набираем на клавиатуре комбинацию Ctrl+C.
- Для вставки данных открываем новый лист или новую книгу (файл). Точно так же кликаем по прямоугольнику, размещенному на пересечении панелей. Для того, чтобы вставить данные, набираем комбинацию кнопок Ctrl+V.


Как видим, после выполнения данных действий нам удалось скопировать лист вместе с таблицей и остальным его содержимым. При этом получилось сохранить не только исходное форматирование, но и размер ячеек.
Табличный редактор Эксель располагает обширным инструментарием для копирования таблиц именно в том виде, какой требуется пользователю. К сожалению, далеко не все знают о нюансах работы со специальной вставкой и другими инструментами копирования, которые позволяют значительно расширить возможности по переносу данных, а также автоматизировать действия пользователя.
![]()
Загрузить PDF
![]()
Загрузить PDF
Если у вас есть готовая таблица Excel, которая нужна вам для других целей, просто скопируйте ее, а не создавайте заново. Скопировать таблицу очень просто.
Шаги
-
1
Откройте таблицу Excel, которую вы хотите скопировать (для этого дважды щелкните по файлу Excel).
-
2
Нажмите и удерживайте вкладку таблицы (вкладки расположены в левом нижнем углу окна). Отобразится значок пустого документа (в правой части вкладки) и маленький треугольник (в левой части вкладки).
- На вкладке отображено имя таблицы.
- Если вы не присвоили таблице имя, то на вкладке отображается «Лист 1» (или «Лист 2», «Лист 3» и так далее).
-
3
Нажмите и удерживайте Ctrl, не отпуская кнопку мыши. Отобразится значок «+» (посередине значка пустого документа).
-
4
Переместите мышь вправо (не отпуская кнопку мыши и клавишу Ctrl). Вкладка переместится в новое положение.
-
5
Отпустите кнопку мыши, но клавишу Ctrl держите нажатой. Будет создана копия таблицы. Она будет обозначена как «[Название таблицы] [2]».
-
6
Переименуйте копию таблицы. Для этого дважды щелкните по вкладке копии и введите новое имя. Затем нажмите на любую ячейку в таблице.
Реклама


Об этой статье
Эту страницу просматривали 11 956 раз.